Embed Size (px)
Citation preview
>> assembly instructions
5 shelf bookcaseebonystyle # BK5SHLFXEB dpci # 249-14-0021
espressostyle # BK5SHLFXES dpci # 249-14-0022
midtone/cherrystyle # BK5SHLFXMTdpci # 249-14-0023
chestnut style # BK5SHLFXCHdpci # 249-14-0367
whitestyle # BK5SHLFXWHdpci # 249-14-0048
rusticstyle # BK5SHLFXBRdpci # 249-14-1412

2
Congratulations on your latest Target purchase.Now what? Don’t start sweating over this box of parts. This will be easy. We did the hard work for you. All you need to do is follow our simple instructions and you’ll be on your way to transforming your room in no time. Good luck—though we’re confident you won’t need it.
tools required
before you begin1. Check for damaged or missing parts. Call 1-855-MYTGTHOME (855-698-4846) for parts and service. 2. Use the carton as a working surface to prevent product damage during assembly.3. Gather all tools prior to assembly.
3QUESTIONS? Just call 1-855-MYTGTHOME (855-698-4846) for parts and service. For faster service, have the style number and DPCI number ready when calling.
table of contents
introductionhardwareparts listhow to use the cam lock systemassembly
2456
7-16
4
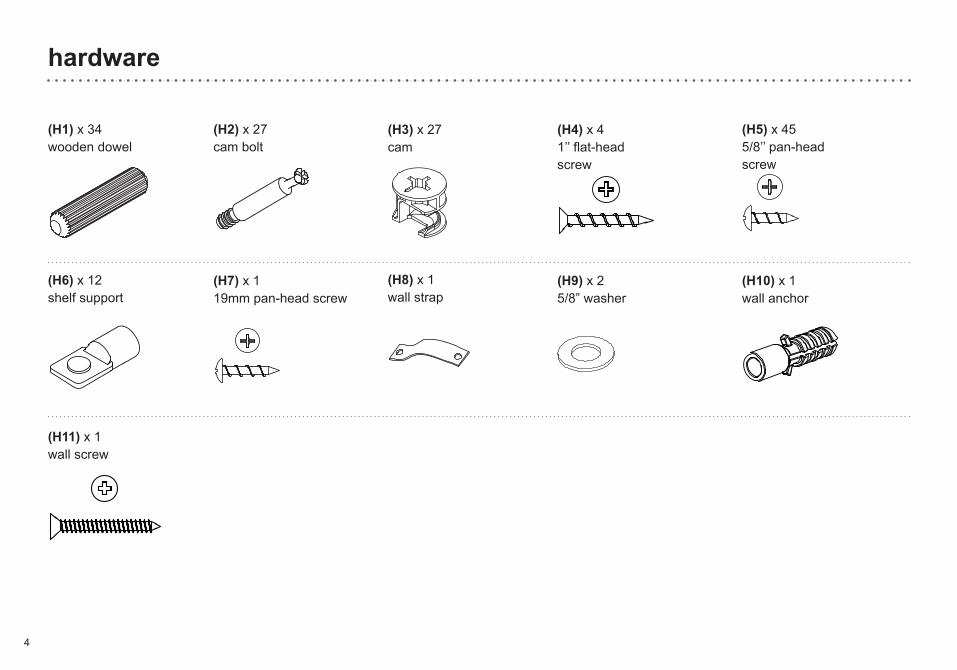
hardware
(H1) x 34 wooden dowel
(H2) x 27cam bolt
(H3) x 27cam
(H5) x 455/8’’ pan-headscrew
(H7) x 119mm pan-head screw
(H6) x 12shelf support
(H9) x 25/8” washer
(H4) x 41’’ flat-head screw
(H10) x 1wall anchor
(H11) x 1wall screw
(H8) x 1wall strap
5
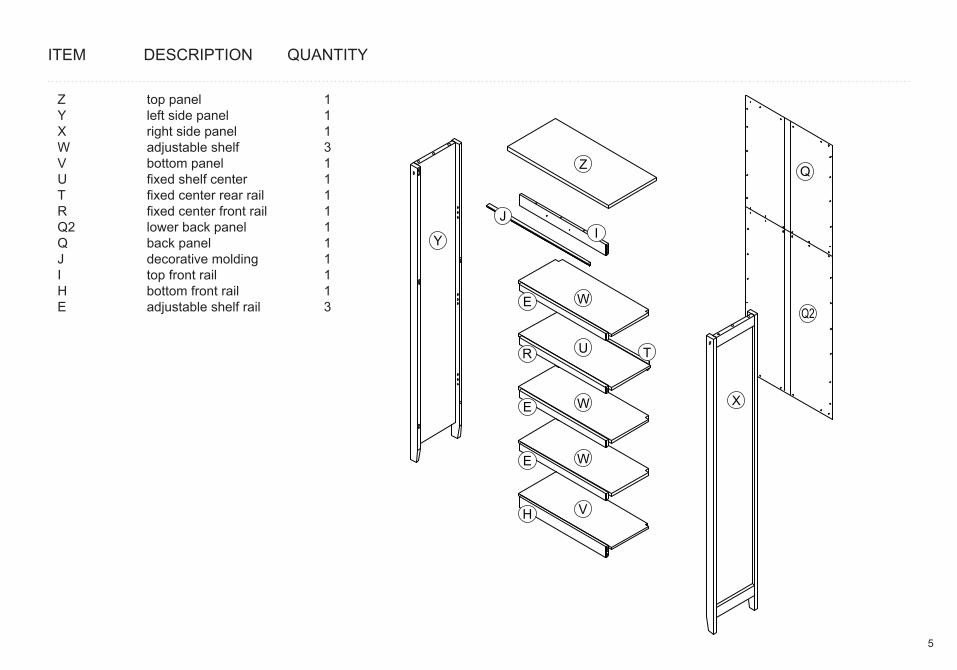
ITEM DESCRIPTION QUANTITY
top panelleft side panelright side paneladjustable shelfbottom panelfixed shelf centerfixed center rear railfixed center front rail lower back panelback paneldecorative moldingtop front railbottom front railadjustable shelf rail
ZYXWVUTRQ2QJIHE
11131111111113
U
Q2
Z
Y
W
W
W
H V
X
Q
E
E
R
E
JI
T
6
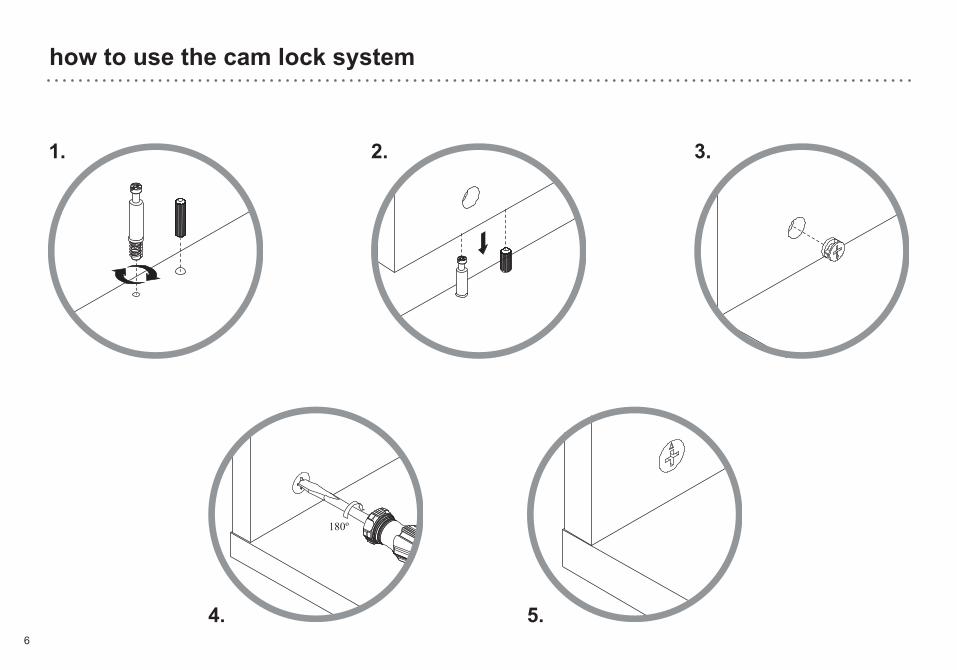
how to use the cam lock system
1. 2. 3.
4. 5.
180º
7
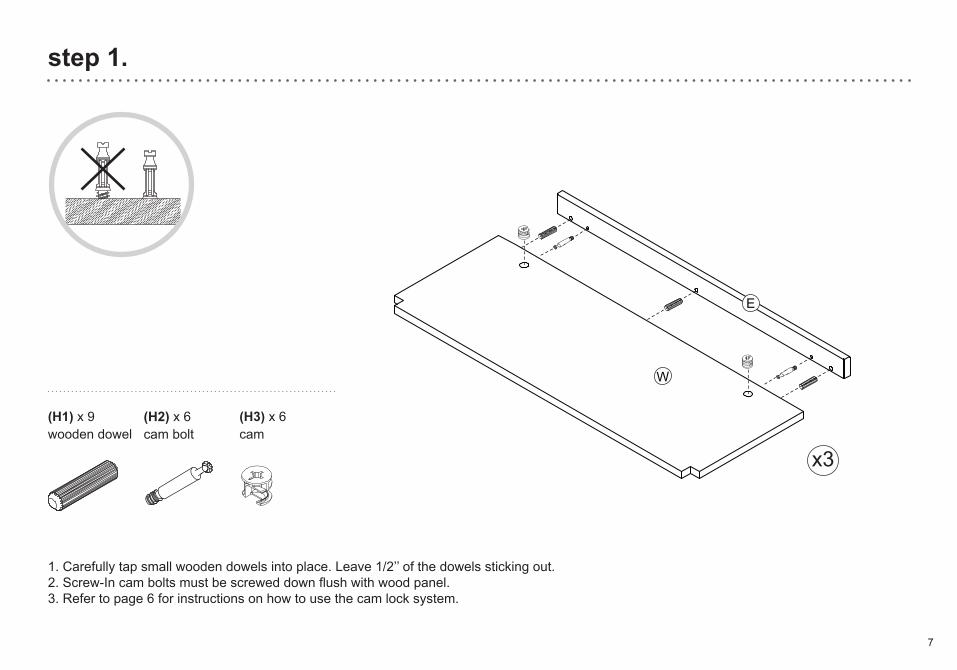
1. Carefully tap small wooden dowels into place. Leave 1/2’’ of the dowels sticking out. 2. Screw-In cam bolts must be screwed down flush with wood panel.3. Refer to page 6 for instructions on how to use the cam lock system.
step 1.
(H1) x 9wooden dowel
(H2) x 6cam bolt
(H3) x 6cam
E
W
x3
8
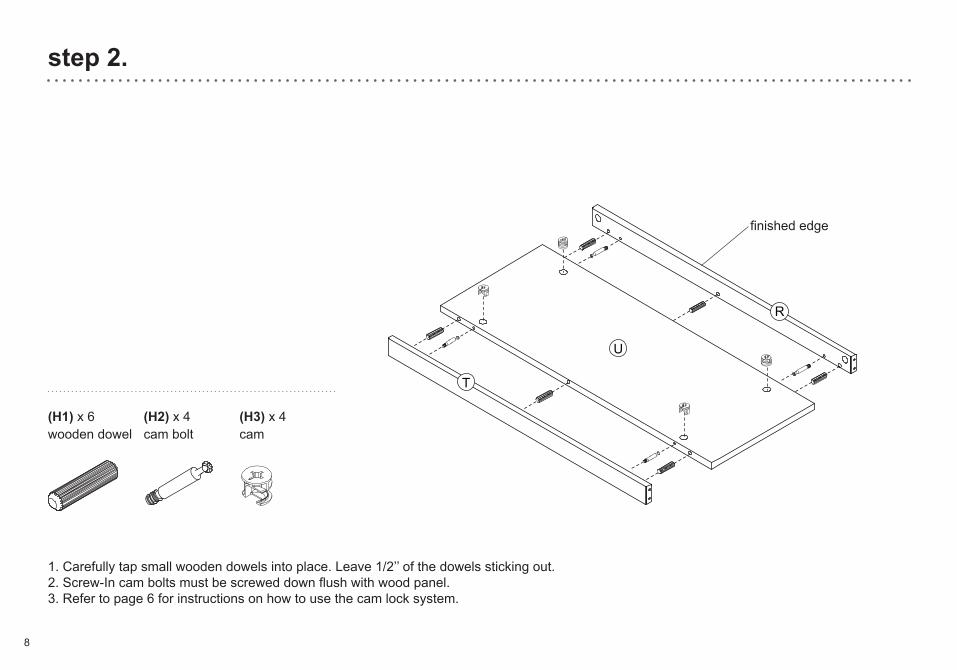
1. Carefully tap small wooden dowels into place. Leave 1/2’’ of the dowels sticking out. 2. Screw-In cam bolts must be screwed down flush with wood panel.3. Refer to page 6 for instructions on how to use the cam lock system.
step 2.
(H1) x 6wooden dowel
(H2) x 4cam bolt
(H3) x 4cam
R
T
U
finished edge

9
1. Carefully tap small wooden dowels into place. Leave 1/2’’ of the dowels sticking out. 2. Screw-In cam bolts must be screwed down flush with wood panel.3. Refer to page 6 for instructions on how to use the cam lock system.
step 3.
(H1) x 3wooden dowel
(H2) x 2cam bolt
(H3) x 2cam
H
V
10
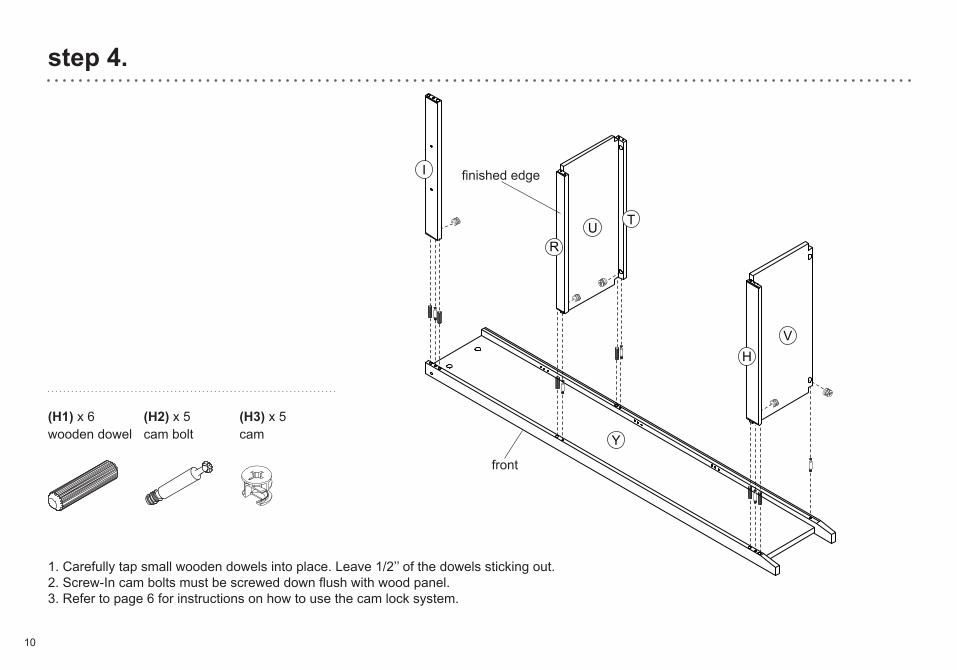
1. Carefully tap small wooden dowels into place. Leave 1/2’’ of the dowels sticking out. 2. Screw-In cam bolts must be screwed down flush with wood panel.3. Refer to page 6 for instructions on how to use the cam lock system.
step 4.
(H1) x 6wooden dowel
(H2) x 5cam bolt
(H3) x 5cam Y
TUR
HV
I
front
finished edge

11
1. Carefully tap small wooden dowels into place. Leave 1/2’’ of the dowels sticking out. 2. Screw-In cam bolts must be screwed down flush with wood panel.3. Refer to page 6 for instructions on how to use the cam lock system.
step 5.
(H1) x 6wooden dowel
(H2) x 5cam bolt
(H3) x 5cam
X
12
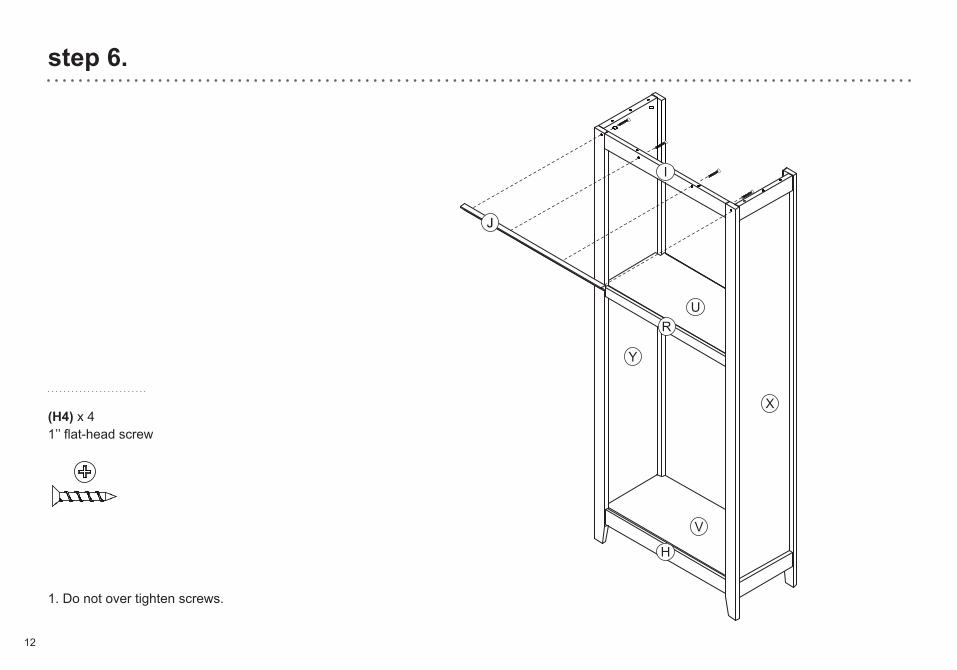
1. Do not over tighten screws.
step 6.
J
(H4) x 41’’ flat-head screw
13
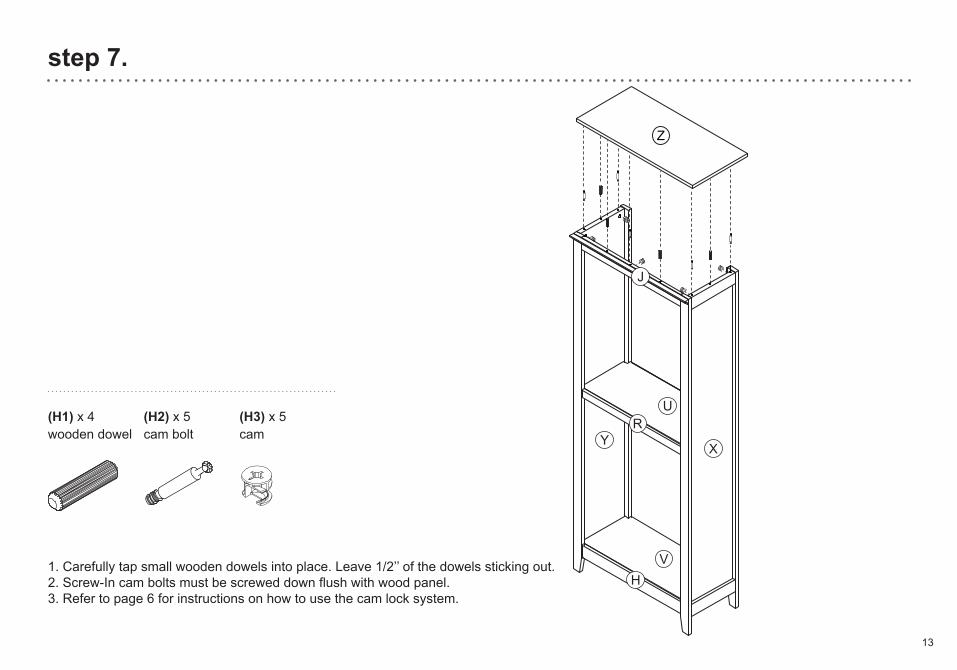
1. Carefully tap small wooden dowels into place. Leave 1/2’’ of the dowels sticking out. 2. Screw-In cam bolts must be screwed down flush with wood panel.3. Refer to page 6 for instructions on how to use the cam lock system.
step 7.
(H1) x 4wooden dowel
(H2) x 5cam bolt
(H3) x 5cam
Z
14
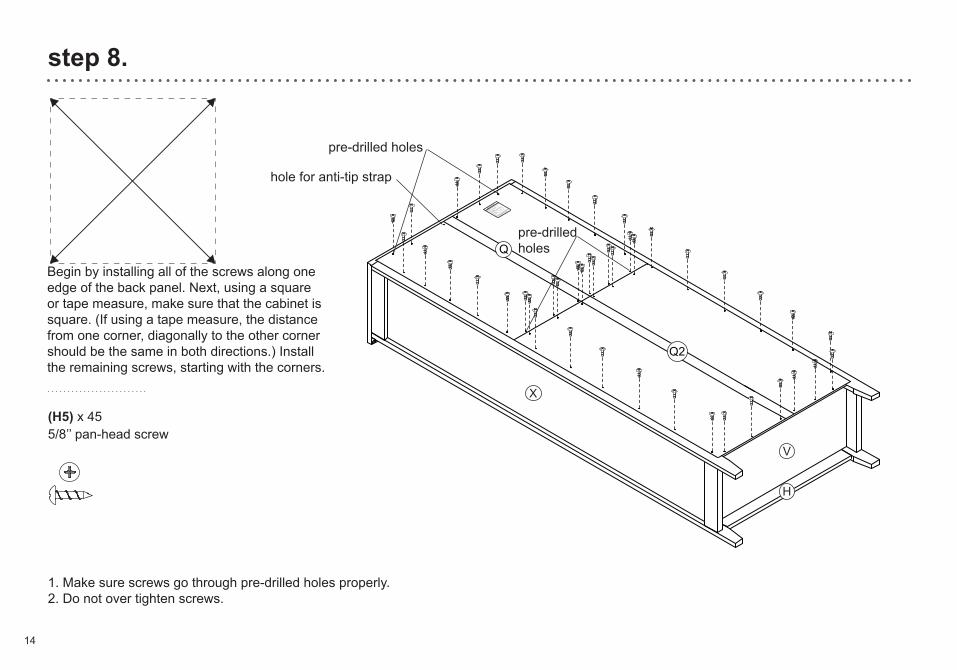
1. Make sure screws go through pre-drilled holes properly. 2. Do not over tighten screws.
step 8.
(H5) x 455/8’’ pan-head screw
Q
Q2
! WARNING
Serious or fa
tal crushing injuries can occur
from fu
rniture tip
-over. To help prevent ti
p-
over:- In
stall tip-over re
straint provided.
- Place heavy ite
ms on lower shelves and as
far b
ack as possible.
- Place heaviest ite
ms in the lowest drawers.
- Unless specific
ally designed to accommodate,
do not set TVs or o
ther heavy objects on top of
this product.
- Never a
llow children to climb or h
ang on drawers,
doors, or shelves.
- Never o
pen more than one drawer at a tim
e.
(OR)
- Do not defeat or re
move the drawer interlock system.
Use of tip-over re
straints may only re
duce,
but not elim
inate, the ris
k of tip-over.
This is a permanent la
bel. Do not re
move.
hole for anti-tip strap
pre-drilled holes
pre-drilledholes
Begin by installing all of the screws along one edge of the back panel. Next, using a square or tape measure, make sure that the cabinet is square. (If using a tape measure, the distance from one corner, diagonally to the other corner should be the same in both directions.) Install the remaining screws, starting with the corners.
15
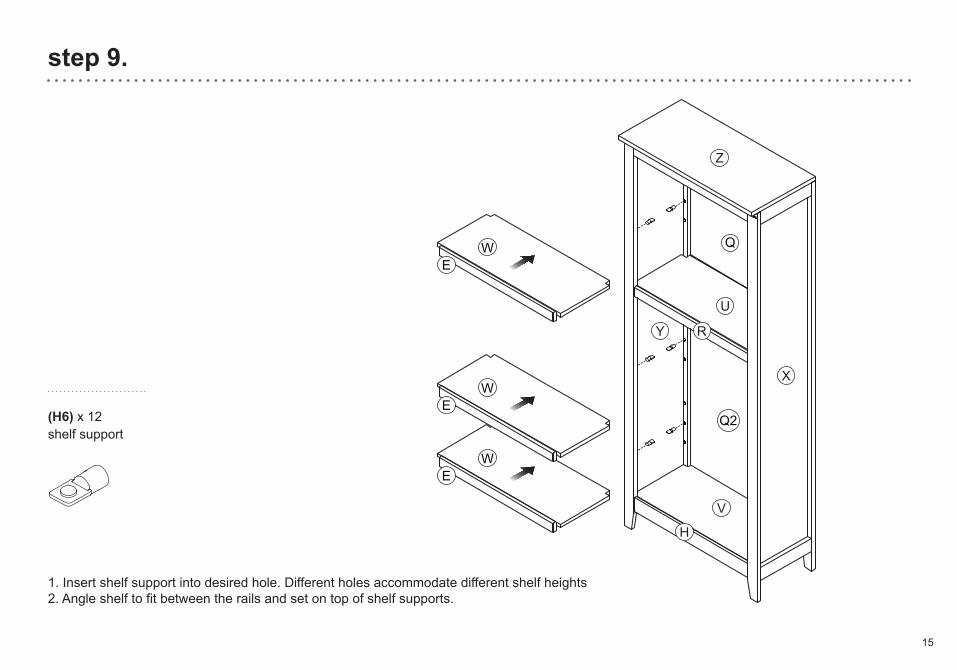
1. Insert shelf support into desired hole. Different holes accommodate different shelf heights 2. Angle shelf to fit between the rails and set on top of shelf supports.
step 9.
(H6) x 12shelf support
WE
WE
WE
Q
Q2
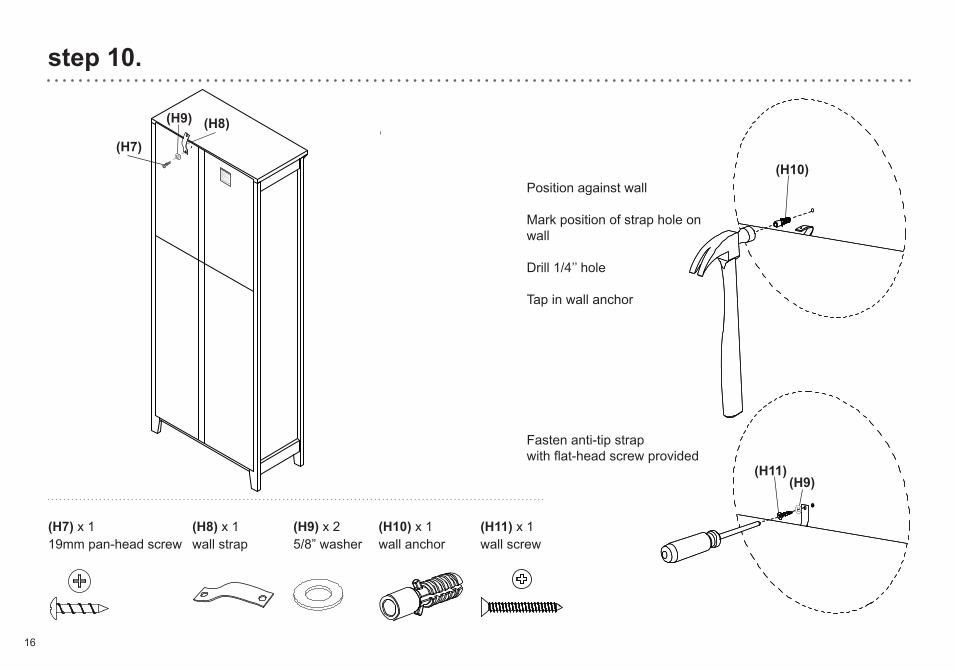
step 10.
Fasten anti-tip strapwith flat-head screw provided
(H10) x 1wall anchor
(H11) x 1wall screw
(H8) x 1wall strap
(H9) x 25/8” washer
(H7) x 119mm pan-head screw
(H11)(H9)
Position against wall
Mark position of strap hole on wall
Drill 1/4’’ hole
Tap in wall anchor
(H10)! WARNING
Serious or fatal crushing injuries can occur
from furniture tip-over. To help prevent tip-
over:- Install tip-over restraint provided.
- Place heavy items on lower shelves and as
far back as possible.
- Place heaviest items in the lowest drawers.
- Unless specifically designed to accommodate,
do not set TVs or other heavy objects on top of
this product.
- Never allow children to climb or hang on drawers,
doors, or shelves.
- Never open more than one drawer at a time.
(OR)- Do not defeat or remove the drawer interlock system.
Use of tip-over restraints may only reduce,
but not eliminate, the risk of tip-over.
This is a permanent label. Do not remove.
(H7)
(H9) (H8)
16
17
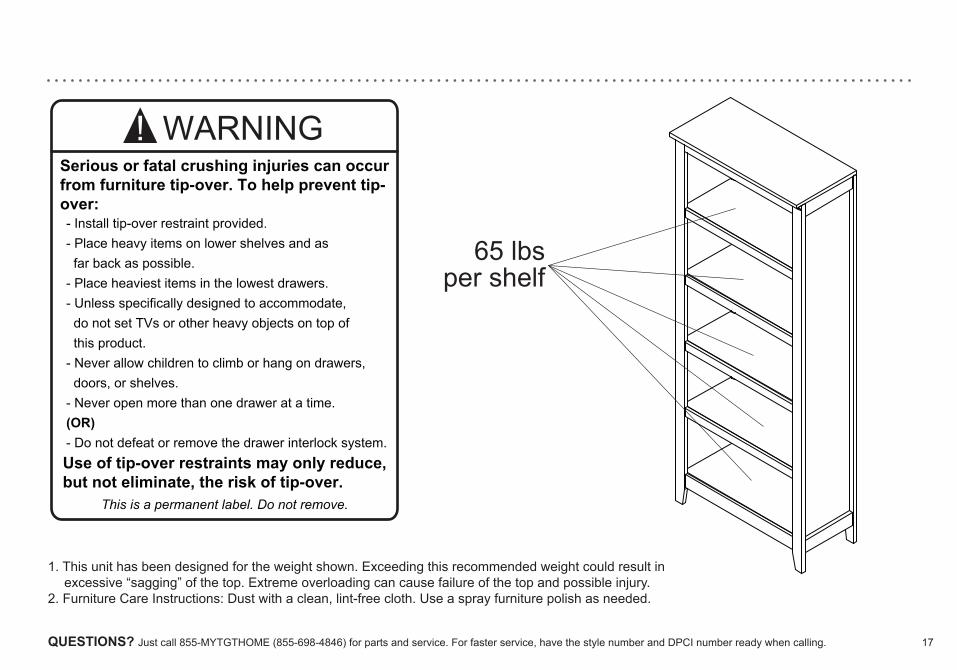
1. This unit has been designed for the weight shown. Exceeding this recommended weight could result in excessive “sagging” of the top. Extreme overloading can cause failure of the top and possible injury.2. Furniture Care Instructions: Dust with a clean, lint-free cloth. Use a spray furniture polish as needed.
QUESTIONS? Just call 855-MYTGTHOME (855-698-4846) for parts and service. For faster service, have the style number and DPCI number ready when calling.
! WARNINGSerious or fatal crushing injuries can occurfrom furniture tip-over. To help prevent tip-over:- Install tip-over restraint provided.- Place heavy items on lower shelves and as far back as possible.- Place heaviest items in the lowest drawers.- Unless specifically designed to accommodate, do not set TVs or other heavy objects on top of this product.- Never allow children to climb or hang on drawers, doors, or shelves.- Never open more than one drawer at a time.(OR)- Do not defeat or remove the drawer interlock system.Use of tip-over restraints may only reduce,but not eliminate, the risk of tip-over.
This is a permanent label. Do not remove.
65 lbsper shelf

© 2014 Target. The Bullseye Design is a trademark of Target Brands, Inc. All rights reserved.


![METO Befestigungen & Zubehör für Electronic Shelf Labels [ESL] · 2019-05-20 · 4 Adapterplatte, groß Anwendung: Adapterplatte für PRICER Electronic Shelf Label DM/HD 110 und](https://img.pdfslide.org/doc/110x75/5e5633e60c3b392f84122ea7/meto-befestigungen-zubehr-fr-electronic-shelf-labels-esl-2019-05-20.jpg)