Embed Size (px)
Citation preview
Lampenbausatz
77502
2
Sicherheitshinweise• 18 V DC• Verbaute LED`s entsprechen der Laserklasse 1 nach
Norm EN 60825-1.• Vorsicht: Widerstand und Diode an den Enden der An-
schlussdrähte sind für die Funktion erforderlich. Keines-falls entfernen! Widerstände nicht mit Isolationsmaterial umhüllen, da sonst keine ausreichende Kühlung möglich ist!
• ACHTUNG! Funktionsbedingte scharfe Kanten und Spitzen.
• Das Produkt darf nur in geschlossenen Räumen verwen-det werden.
Wichtige Hinweise• Die Bedienungsanleitung ist Bestandteil des Produktes
und muss deshalb aufbewahrt, sowie bei Weitergabe des Produktes mitgegeben werden.
• Entsorgung: www.maerklin.com/en/imprint.html
Safety Notes• 18 V DC• The LEDs in this item correspond to Laser Class 1 accor-
ding to Standard EN 60825-1.• Caution: The resistor and diode at the ends of the
connection wires are required for the function of the model. Do not remove them under any circumstances! Do not encase the resistors in insulation material, since otherwise sufficient cooling is not possible!
• WARNING! Sharp edges and points required for operati-on.
• This product may only be used indoors.
Important Notes• The operating instructions are a component part of the
product and must therefore be kept in a safe place as well as included with the product, if the latter is given to someone else.
• Disposing: www.maerklin.com/en/imprint.html
3
Remarques sur la sécurité• 18 V DC• Les DEL installées correspondent à la classe laser 1
selon la norme EN 60825-1.• Attention : La fonction requiert la présence d’une
résistance et d’une diode aux extrémités des fils de raccordement. Ne jamais les enlever ! Ne pas enrouler les résistances dans du matériel isolant, cela empêcher-ait le refroidissement correct !
• ATTENTION! Pointes et bords coupants lors du fonction-nement du produit.
• Le produit doit être utilisé uniquement dans des pièces fermées.
Information importante• La notice d‘utilisation fait partie intégrante du produit ;
elle doit donc être conservée et, le cas échéant, trans-mise avec le produit.
• Elimination : www.maerklin.com/en/imprint.html
Veiligheidsvoorschriften• 18 V DC• Ingebouwde LED’s komen overeen met de laserklasse 1
volgens de norm EN 60825-1.• Voorzichtig: weerstand en diode aan het einde van de
aansluitdraden zijn noodzakelijk voor de werking. In geen geval verwijderen! Weerstand niet omhullen met isolatiemateriaal, aangezien dat de koeling belemmert.
• OPGEPAST! Functionele scherpe kanten en punten.• Het product mag uitsluitend in gesloten ruimtes worden
gebruikt.
Belangrijke aanwijzing• De gebruiksaanwijzing is een essentieel onderdeel van
het product en dient daarom bewaard te worden en bij het overdragen van het product meegegeven te worden.
• Afdanken: www.maerklin.com/en/imprint.html
4
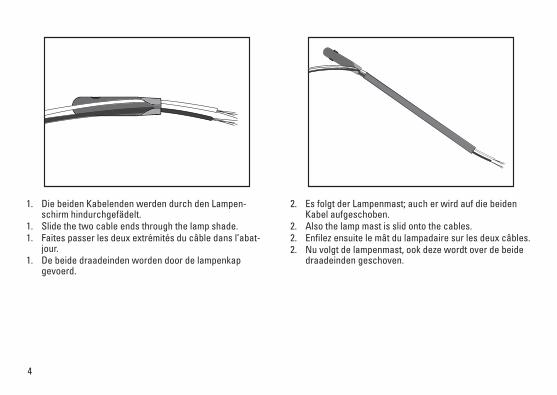
1. Die beiden Kabelenden werden durch den Lampen-schirm hindurchgefädelt.
1. Slide the two cable ends through the lamp shade.1. Faites passer les deux extrémités du câble dans l’abat-
jour.1. De beide draadeinden worden door de lampenkap
gevoerd.
2. Es folgt der Lampenmast; auch er wird auf die beiden Kabel aufgeschoben.
2. Also the lamp mast is slid onto the cables.2. Enfilez ensuite le mât du lampadaire sur les deux câbles.2. Nu volgt de lampenmast, ook deze wordt over de beide
draadeinden geschoven.
5
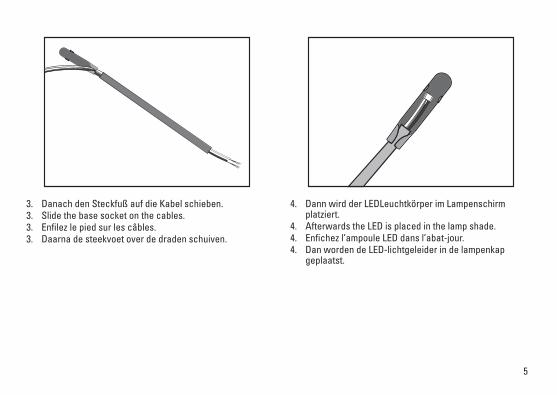
3. Danach den Steckfuß auf die Kabel schieben.3. Slide the base socket on the cables.3. Enfilez le pied sur les câbles.3. Daarna de steekvoet over de draden schuiven.
4. Dann wird der LEDLeuchtkörper im Lampenschirm platziert.
4. Afterwards the LED is placed in the lamp shade.4. Enfichez l’ampoule LED dans l’abat-jour.4. Dan worden de LED-lichtgeleider in de lampenkap
geplaatst.
6
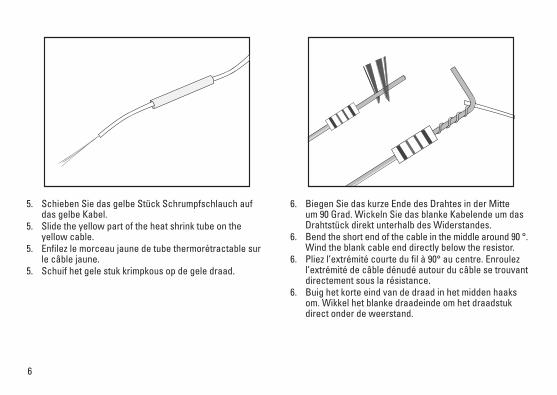
5. Schieben Sie das gelbe Stück Schrumpfschlauch auf das gelbe Kabel.
5. Slide the yellow part of the heat shrink tube on the yellow cable.
5. Enfilez le morceau jaune de tube thermorétractable sur le câble jaune.
5. Schuif het gele stuk krimpkous op de gele draad.
6. Biegen Sie das kurze Ende des Drahtes in der Mitte um 90 Grad. Wickeln Sie das blanke Kabelende um das Drahtstück direkt unterhalb des Widerstandes.
6. Bend the short end of the cable in the middle around 90 °. Wind the blank cable end directly below the resistor.
6. Pliez l’extrémité courte du fil à 90° au centre. Enroulez l’extrémité de câble dénudé autour du câble se trouvant directement sous la résistance.
6. Buig het korte eind van de draad in het midden haaks om. Wikkel het blanke draadeinde om het draadstuk direct onder de weerstand.
7
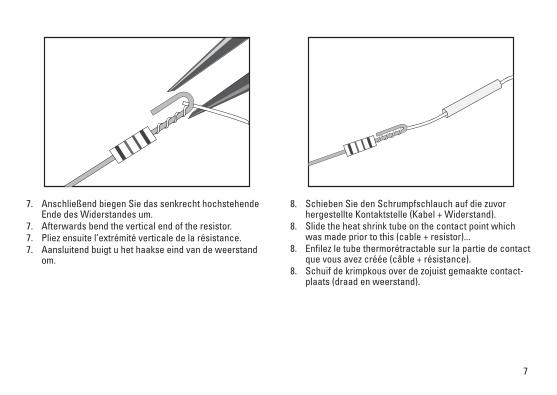
7. Anschließend biegen Sie das senkrecht hochstehende Ende des Widerstandes um.
7. Afterwards bend the vertical end of the resistor.7. Pliez ensuite l’extrémité verticale de la résistance.7. Aansluitend buigt u het haakse eind van de weerstand
om.
8. Schieben Sie den Schrumpfschlauch auf die zuvor hergestellte Kontaktstelle (Kabel + Widerstand).
8. Slide the heat shrink tube on the contact point which was made prior to this (cable + resistor)...
8. Enfilez le tube thermorétractable sur la partie de contact que vous avez créée (câble + résistance).
8. Schuif de krimpkous over de zojuist gemaakte contact-plaats (draad en weerstand).
8
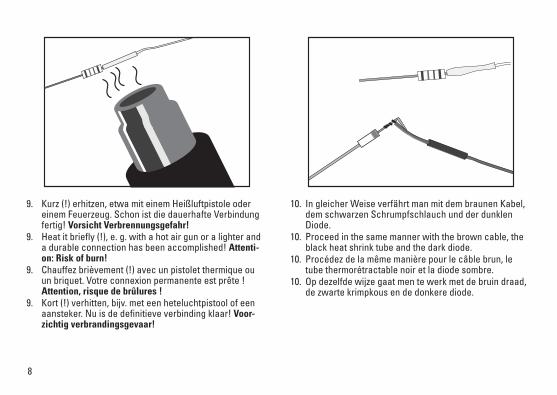
9. Kurz (!) erhitzen, etwa mit einem Heißluftpistole oder einem Feuerzeug. Schon ist die dauerhafte Verbindung fertig! Vorsicht Verbrennungsgefahr!
9. Heat it briefly (!), e. g. with a hot air gun or a lighter and a durable connection has been accomplished! Attenti-on: Risk of burn!
9. Chauffez brièvement (!) avec un pistolet thermique ou un briquet. Votre connexion permanente est prête ! Attention, risque de brûlures !
9. Kort (!) verhitten, bijv. met een heteluchtpistool of een aansteker. Nu is de definitieve verbinding klaar! Voor-zichtig verbrandingsgevaar!
10. In gleicher Weise verfährt man mit dem braunen Kabel, dem schwarzen Schrumpfschlauch und der dunklen Diode.
10. Proceed in the same manner with the brown cable, the black heat shrink tube and the dark diode.
10. Procédez de la même manière pour le câble brun, le tube thermorétractable noir et la diode sombre.
10. Op dezelfde wijze gaat men te werk met de bruin draad, de zwarte krimpkous en de donkere diode.
9
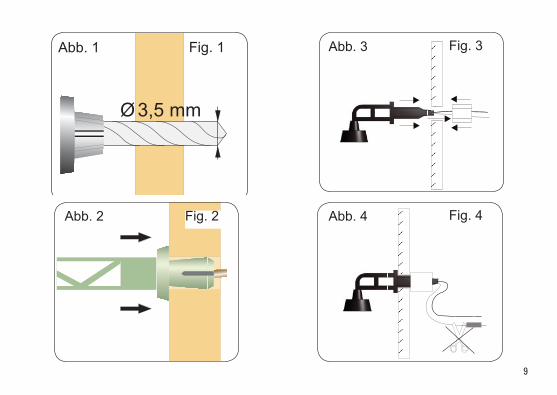
Abb. 1
Ø 3,5 mm
Fig. 1
Abb. 2 Fig. 2 Abb. 4 Fig. 4
Abb. 3 Fig. 3
10
AC DC
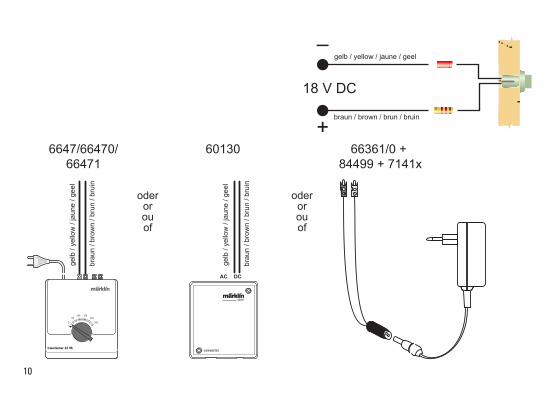
18 V DC
+
–
66361/0 + 84499 + 7141x
6647/66470/66471
60130
oderorouof
gelb / yellow / jaune / geel
braun / brown / brun / bruin
gelb
/ ye
llow
/ ja
une
/ gee
l
brau
n / b
row
n / b
run
/ bru
in
gelb
/ ye
llow
/ ja
une
/ gee
l
brau
n / b
row
n / b
run
/ bru
in
oderorouof

11

12
www.maerklin.com/en/imprint.html
Gebr. Märklin & Cie. GmbH Stuttgarter Str. 55 - 57 73033 Göppingen Germanywww.maerklin.com
284145/0217/Sm1ViÄnderungen vorbehalten
© Gebr. Märklin & Cie. GmbH
Due to different legal requirements regarding electro-magnetic compatibility, this item may be used in the USA only after separate certification for FCC com-pliance and an adjustment if necessary. Use in the USA without this certification is not permitted and absolves us of any liability. If you should want such certification to be done, please contact us – also due to the additional costs incurred for this.