Embed Size (px)
Citation preview
Kommunikations-, Informations- und Medienzentrum (KIM)
CalDavSync Installation und Einrichtung unter Outlook 2010/2013/2016 Installation and configuration for Outlook 2010/2013/2016 17.11.2021 kim.uni-hohenheim.de | [email protected]
Diese Anleitung beschreibt die Installation und Einrichtung von CalDavSync unter Microsoft Outlook 2010/2013/2016. Hierbei wird vorausgesetzt, dass bereits ein POP3/IMAP-Konto in
Outlook eingerichtet ist. CalDavSync ist mit Konten, die über Microsoft ActiveSync synchronisiert werden nicht kompatibel. Diese müssen vorher auf IMAP umgestellt werden.
This guide describes how to install and configure CalDavSync for Microsoft Outlook
2010/2013/2016. It assumes that a POP3/IMAP account is already set up in Outlook. CalDavSync is not compatible with accounts which are synchronised through Microsoft ActiveSync. They need
to be changed to IMAP first.
Inhalt Download und Installation von CalDavSync ..................................................................................................... 1
Einrichtung von CalDavSync in Microsoft Outlook ........................................................................................... 4
Ein einzelnes „Synchronization Profile“ einrichten (Adressbuch, Aufgabenliste, Kalender) ............................ 6
Synchronisation mehrerer Adressbücher, Aufgaben-listen oder Kalender auf einmal einrichten. ................. 12
Synchronisationsprofile exportieren/importieren ............................................................................................ 15
Contents Downloading and installing CalDavSync ........................................................................................................ 17
Configuring CalDavSync in Microsoft Outlook ............................................................................................... 20
Configuring a single “Synchronization Profile” (address book, task list, calendar) ........................................ 22
Configuring synchronisation for multiple address books, task lists or calendars in one go. .......................... 28
Exporting/Importing Synchronization Profiles ................................................................................................. 31
1
Kommunikations-, Informations- und Medienzentrum (KIM)
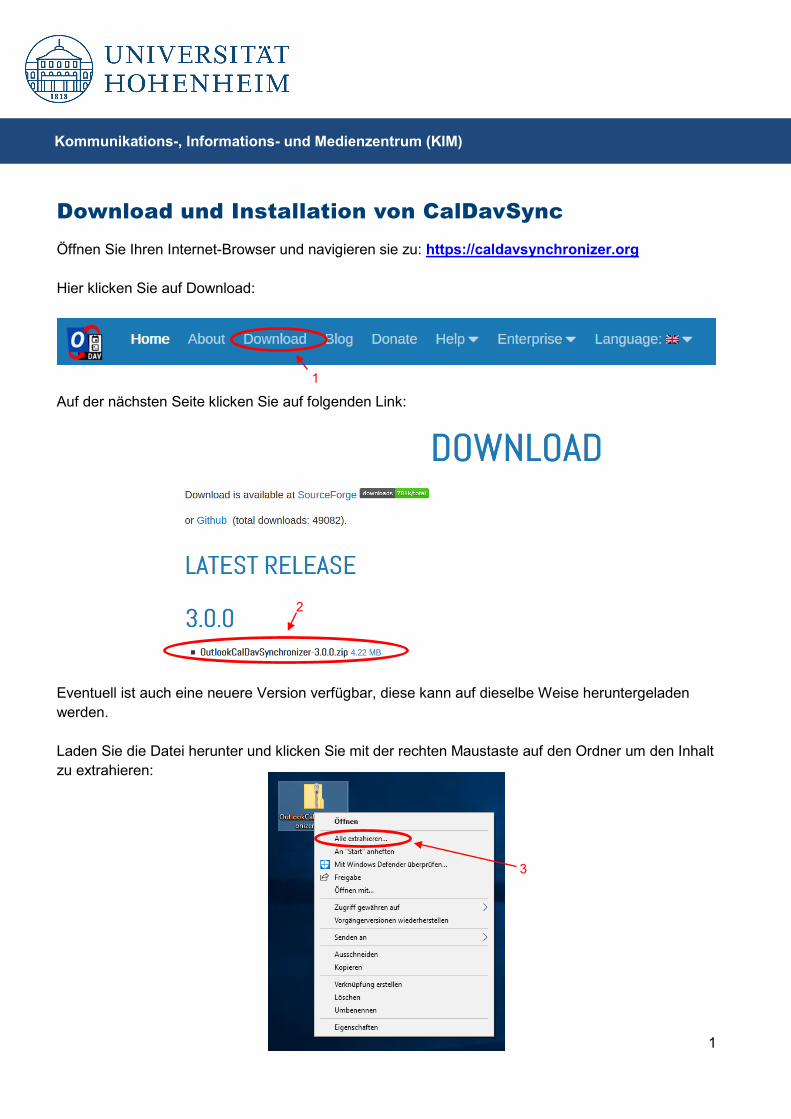
Download und Installation von CalDavSync Öffnen Sie Ihren Internet-Browser und navigieren sie zu: https://caldavsynchronizer.org Hier klicken Sie auf Download:
Auf der nächsten Seite klicken Sie auf folgenden Link:
Eventuell ist auch eine neuere Version verfügbar, diese kann auf dieselbe Weise heruntergeladen werden. Laden Sie die Datei herunter und klicken Sie mit der rechten Maustaste auf den Ordner um den Inhalt zu extrahieren:
1
2
3
2
Kommunikations-, Informations- und Medienzentrum (KIM)
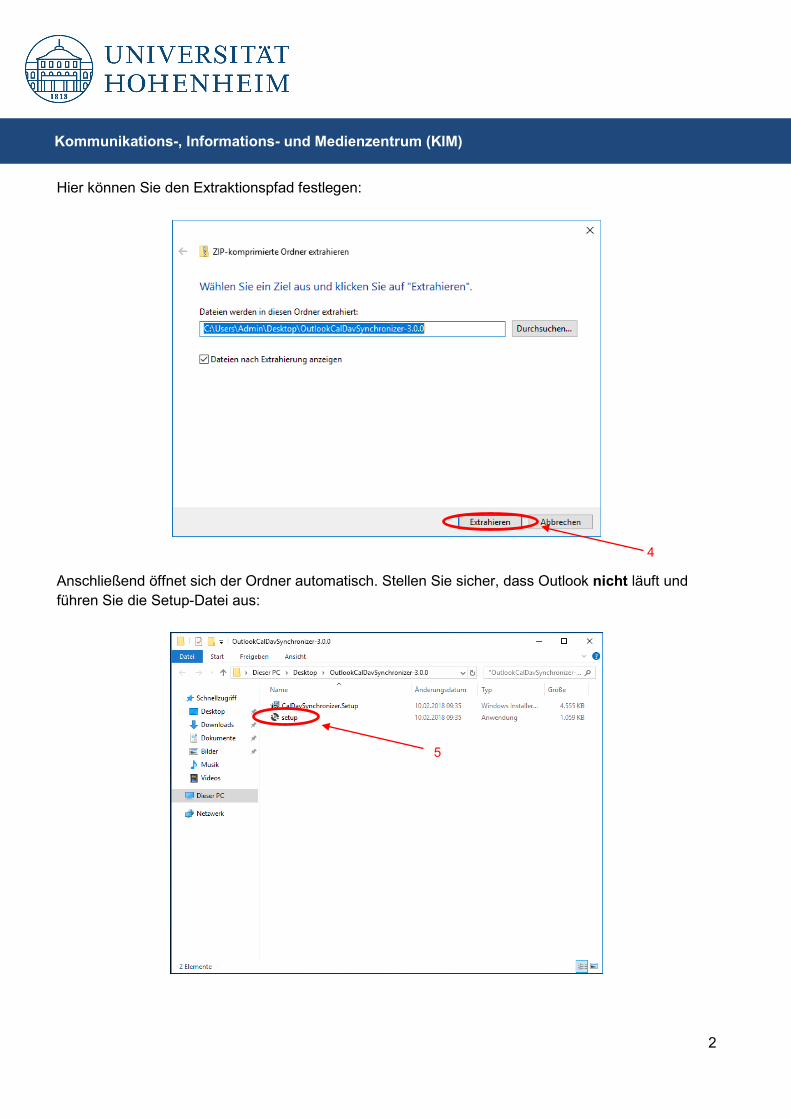
Hier können Sie den Extraktionspfad festlegen:
Anschließend öffnet sich der Ordner automatisch. Stellen Sie sicher, dass Outlook nicht läuft und führen Sie die Setup-Datei aus:
4
5
3
Kommunikations-, Informations- und Medienzentrum (KIM)
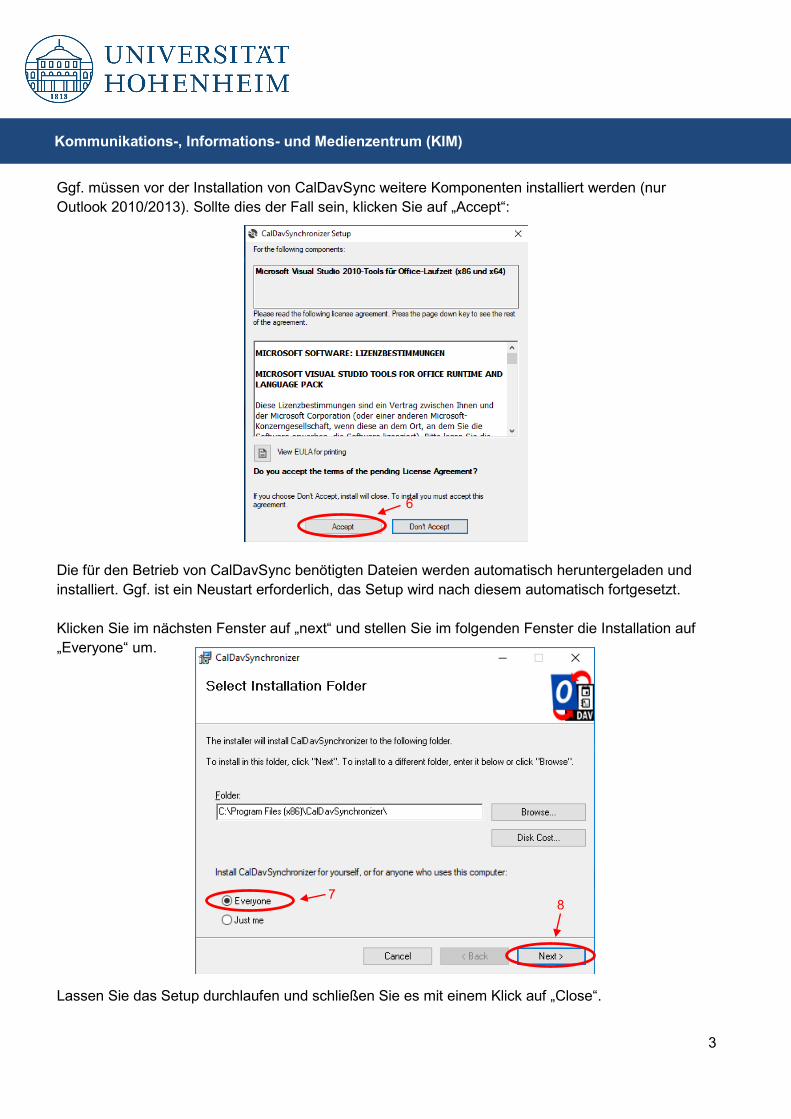
Ggf. müssen vor der Installation von CalDavSync weitere Komponenten installiert werden (nur Outlook 2010/2013). Sollte dies der Fall sein, klicken Sie auf „Accept“:
Die für den Betrieb von CalDavSync benötigten Dateien werden automatisch heruntergeladen und installiert. Ggf. ist ein Neustart erforderlich, das Setup wird nach diesem automatisch fortgesetzt. Klicken Sie im nächsten Fenster auf „next“ und stellen Sie im folgenden Fenster die Installation auf „Everyone“ um. Lassen Sie das Setup durchlaufen und schließen Sie es mit einem Klick auf „Close“.
6
7 8
4
Kommunikations-, Informations- und Medienzentrum (KIM)
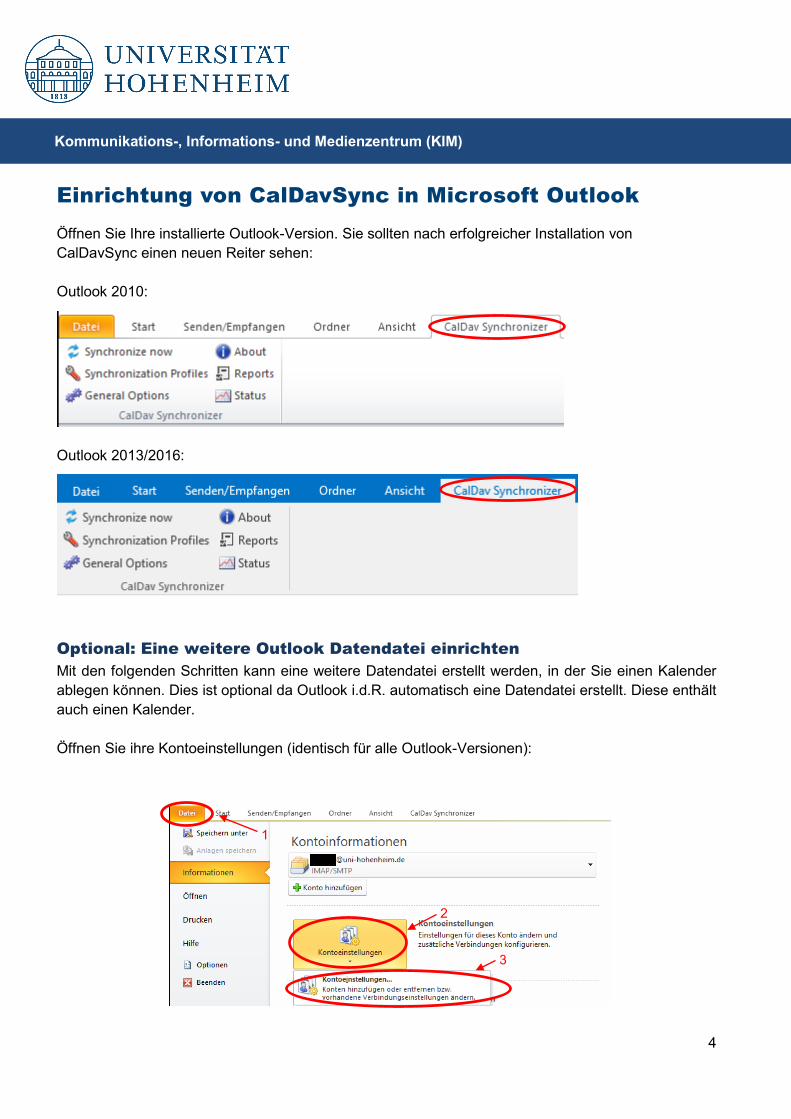
Einrichtung von CalDavSync in Microsoft Outlook Öffnen Sie Ihre installierte Outlook-Version. Sie sollten nach erfolgreicher Installation von CalDavSync einen neuen Reiter sehen: Outlook 2010:
Outlook 2013/2016:
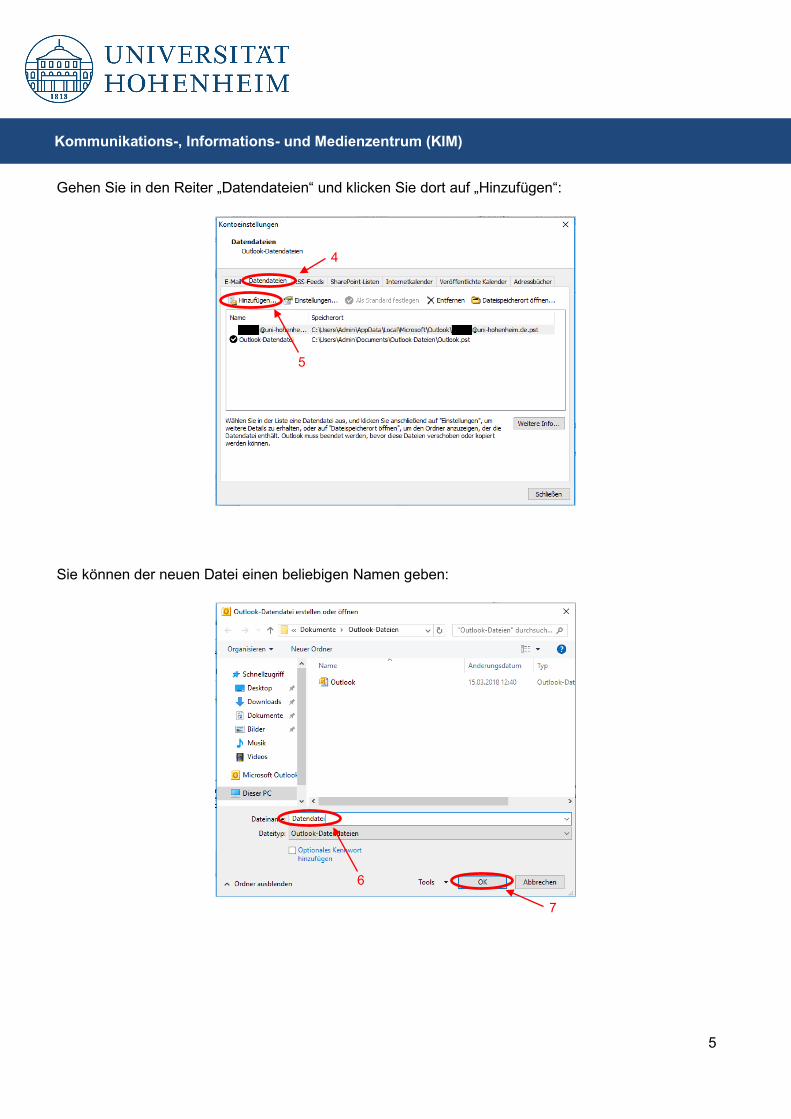
Optional: Eine weitere Outlook Datendatei einrichten Mit den folgenden Schritten kann eine weitere Datendatei erstellt werden, in der Sie einen Kalender ablegen können. Dies ist optional da Outlook i.d.R. automatisch eine Datendatei erstellt. Diese enthält auch einen Kalender. Öffnen Sie ihre Kontoeinstellungen (identisch für alle Outlook-Versionen):
1
2
3
5
Kommunikations-, Informations- und Medienzentrum (KIM)
Gehen Sie in den Reiter „Datendateien“ und klicken Sie dort auf „Hinzufügen“: Sie können der neuen Datei einen beliebigen Namen geben:
4
5
6
7
6
Kommunikations-, Informations- und Medienzentrum (KIM)
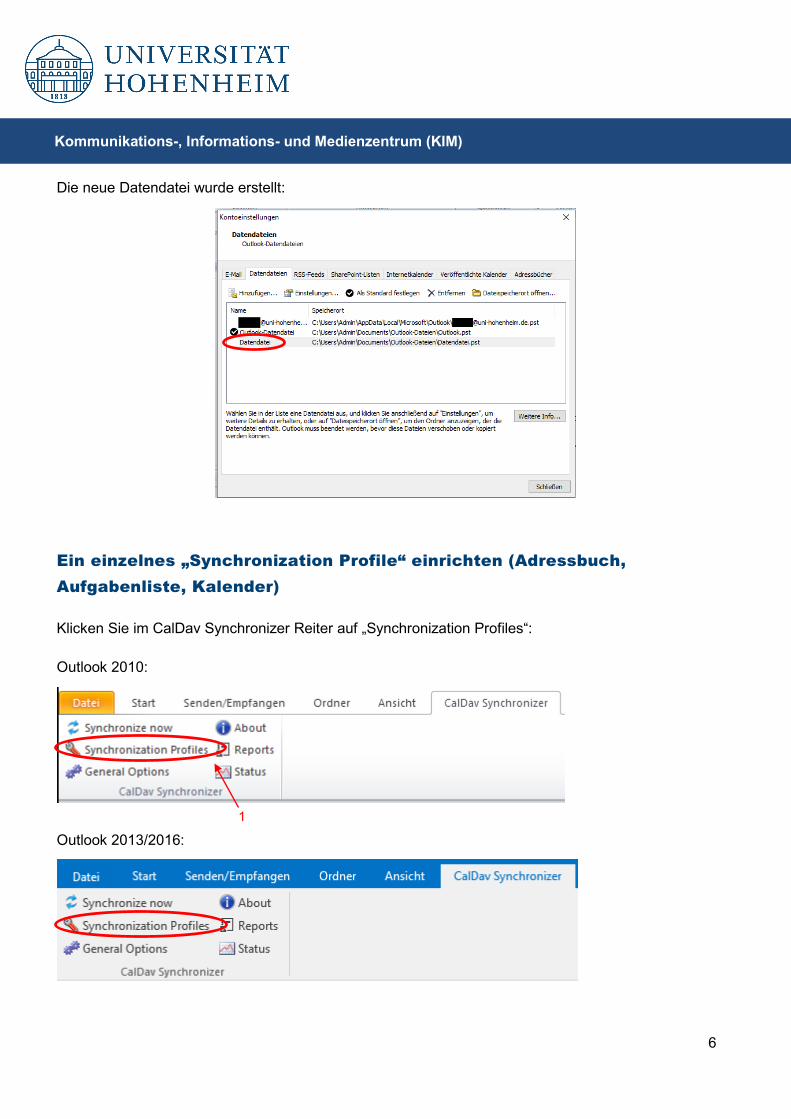
Die neue Datendatei wurde erstellt:
Ein einzelnes „Synchronization Profile“ einrichten (Adressbuch, Aufgabenliste, Kalender) Klicken Sie im CalDav Synchronizer Reiter auf „Synchronization Profiles“: Outlook 2010:
Outlook 2013/2016:
1
7
Kommunikations-, Informations- und Medienzentrum (KIM)
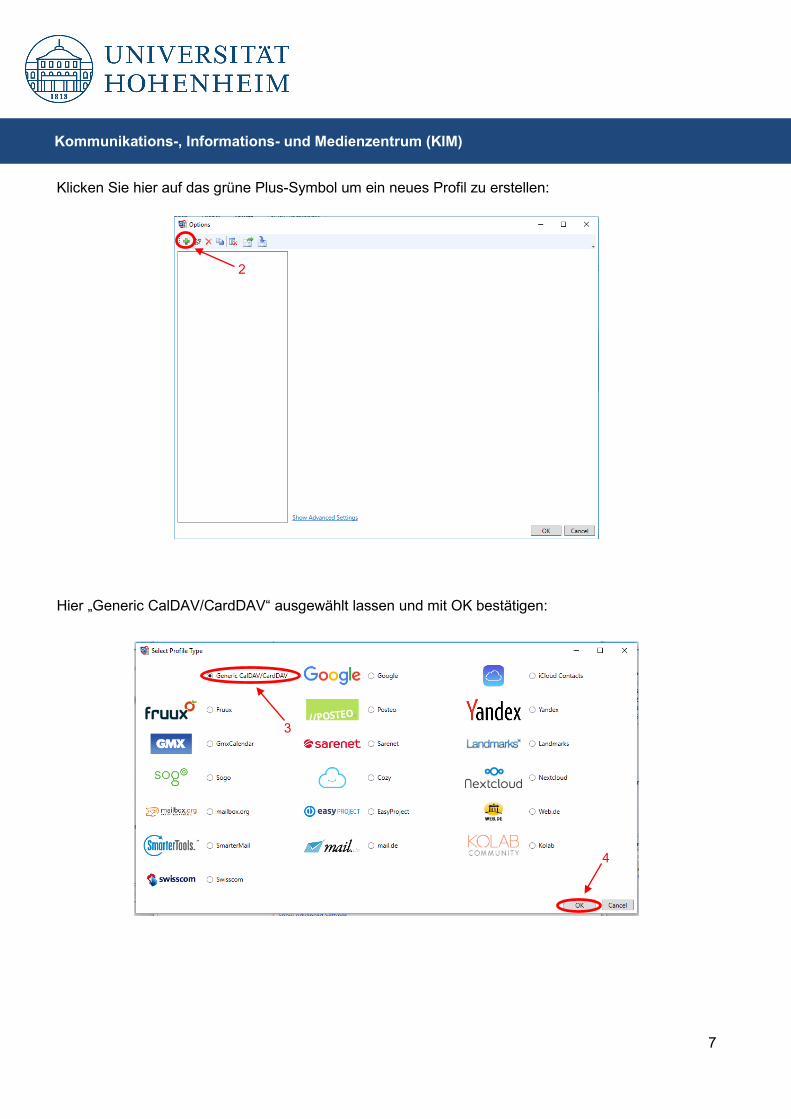
Klicken Sie hier auf das grüne Plus-Symbol um ein neues Profil zu erstellen:
Hier „Generic CalDAV/CardDAV“ ausgewählt lassen und mit OK bestätigen:
2
3
4
8
Kommunikations-, Informations- und Medienzentrum (KIM)
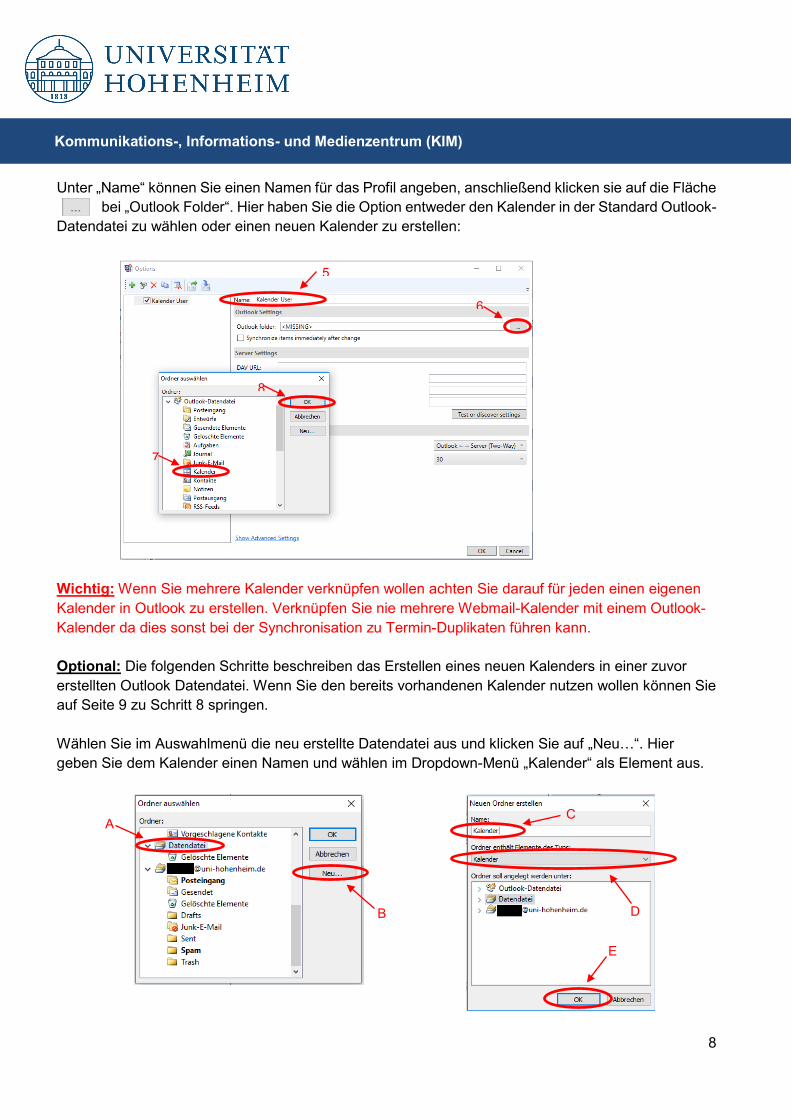
Unter „Name“ können Sie einen Namen für das Profil angeben, anschließend klicken sie auf die Fläche bei „Outlook Folder“. Hier haben Sie die Option entweder den Kalender in der Standard Outlook-Datendatei zu wählen oder einen neuen Kalender zu erstellen:
Wichtig: Wenn Sie mehrere Kalender verknüpfen wollen achten Sie darauf für jeden einen eigenen Kalender in Outlook zu erstellen. Verknüpfen Sie nie mehrere Webmail-Kalender mit einem Outlook-Kalender da dies sonst bei der Synchronisation zu Termin-Duplikaten führen kann. Optional: Die folgenden Schritte beschreiben das Erstellen eines neuen Kalenders in einer zuvor erstellten Outlook Datendatei. Wenn Sie den bereits vorhandenen Kalender nutzen wollen können Sie auf Seite 9 zu Schritt 8 springen. Wählen Sie im Auswahlmenü die neu erstellte Datendatei aus und klicken Sie auf „Neu…“. Hier geben Sie dem Kalender einen Namen und wählen im Dropdown-Menü „Kalender“ als Element aus.
5
6
7
8
A
B
C
D
E
9
Kommunikations-, Informations- und Medienzentrum (KIM)
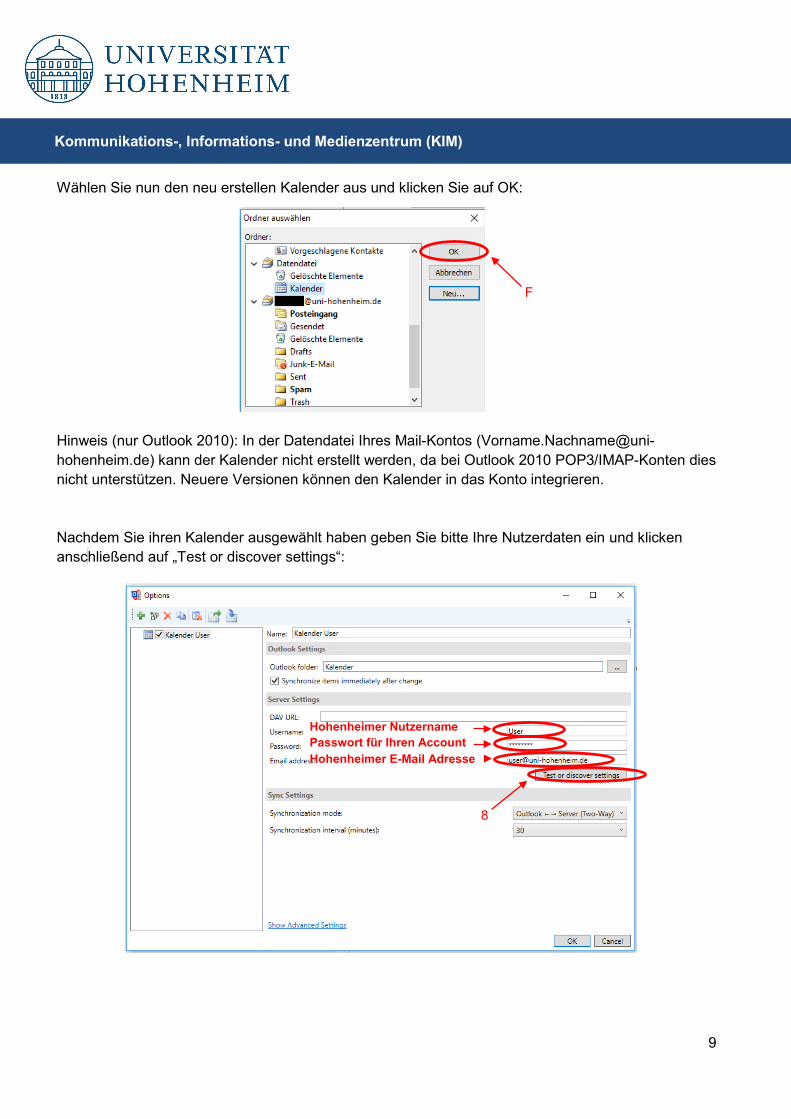
Wählen Sie nun den neu erstellen Kalender aus und klicken Sie auf OK:
Hinweis (nur Outlook 2010): In der Datendatei Ihres Mail-Kontos ([email protected]) kann der Kalender nicht erstellt werden, da bei Outlook 2010 POP3/IMAP-Konten dies nicht unterstützen. Neuere Versionen können den Kalender in das Konto integrieren. Nachdem Sie ihren Kalender ausgewählt haben geben Sie bitte Ihre Nutzerdaten ein und klicken ansc hließend auf „Test or discover settings“:
F
8
Hohenheimer Nutzername Passwort für Ihren Account Hohenheimer E-Mail Adresse

10
Kommunikations-, Informations- und Medienzentrum (KIM)
Bei korrekter Eingabe Ihrer Daten sollte ein Menü erscheinen, in dem Sie Ihre Kalender auswählen können. Diesen können Sie mit ihrem Outlook-Konto synchronisieren:
Eine weitere Meldung bestätigt die korrekte Verbindung zu Ihrem Webmail-Konto:
9
10
11
11
Kommunikations-, Informations- und Medienzentrum (KIM)
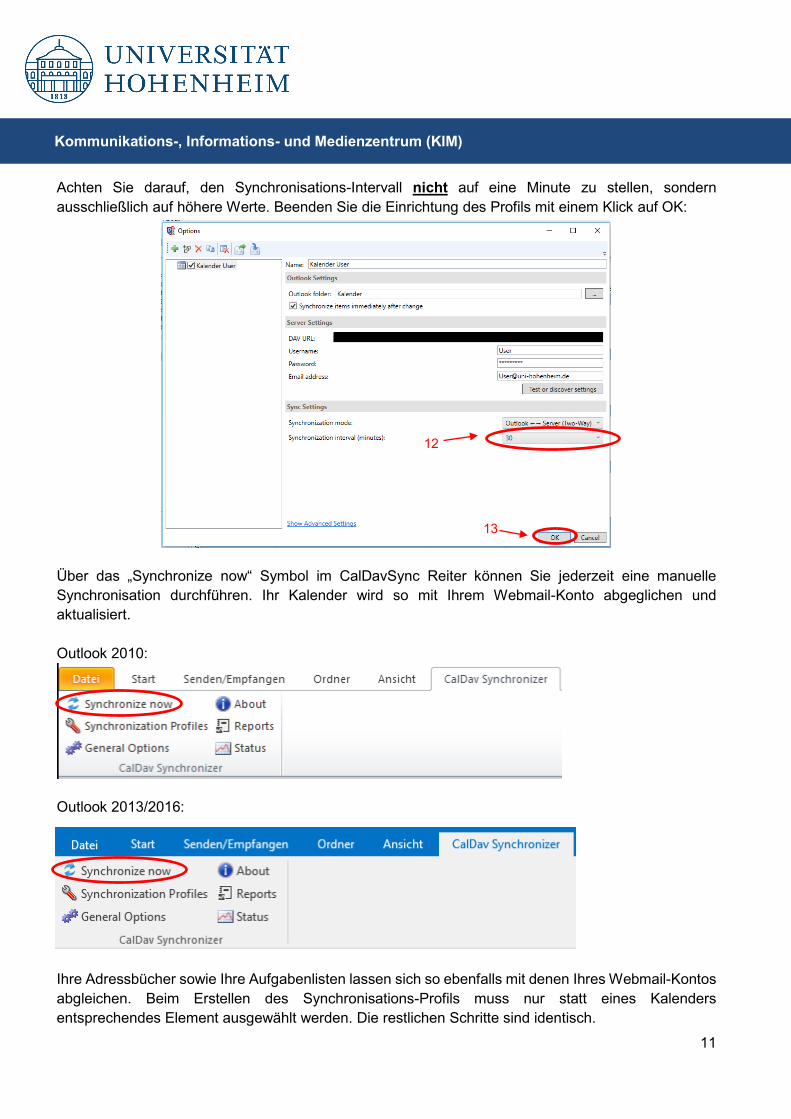
Achten Sie darauf, den Synchronisations-Intervall nicht auf eine Minute zu stellen, sondern ausschließlich auf höhere Werte. Beenden Sie die Einrichtung des Profils mit einem Klick auf OK:
Über das „Synchronize now“ Symbol im CalDavSync Reiter können Sie jederzeit eine manuelle Synchronisation durchführen. Ihr Kalender wird so mit Ihrem Webmail-Konto abgeglichen und aktualisiert. Outlook 2010:
Outlook 2013/2016:
Ihre Adressbücher sowie Ihre Aufgabenlisten lassen sich so ebenfalls mit denen Ihres Webmail-Kontos abgleichen. Beim Erstellen des Synchronisations-Profils muss nur statt eines Kalenders entsprechendes Element ausgewählt werden. Die restlichen Schritte sind identisch.
12
13
12
Kommunikations-, Informations- und Medienzentrum (KIM)
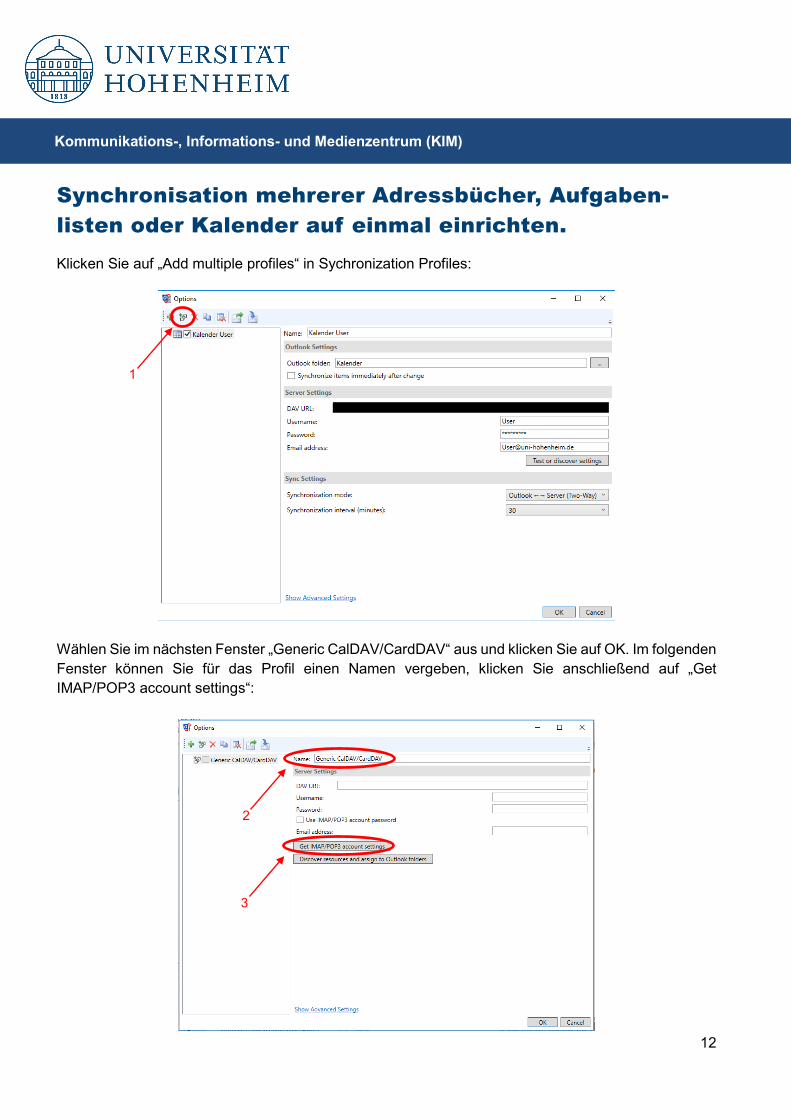
Synchronisation mehrerer Adressbücher, Aufgaben-listen oder Kalender auf einmal einrichten. Klicken Sie auf „Add multiple profiles“ in Sychronization Profiles:
Wählen Sie im nächsten Fenster „Generic CalDAV/CardDAV“ aus und klicken Sie auf OK. Im folgenden Fenster können Sie für das Profil einen Namen vergeben, klicken Sie anschließend auf „Get IMAP/POP3 account settings“:
1
2
3
13
Kommunikations-, Informations- und Medienzentrum (KIM)
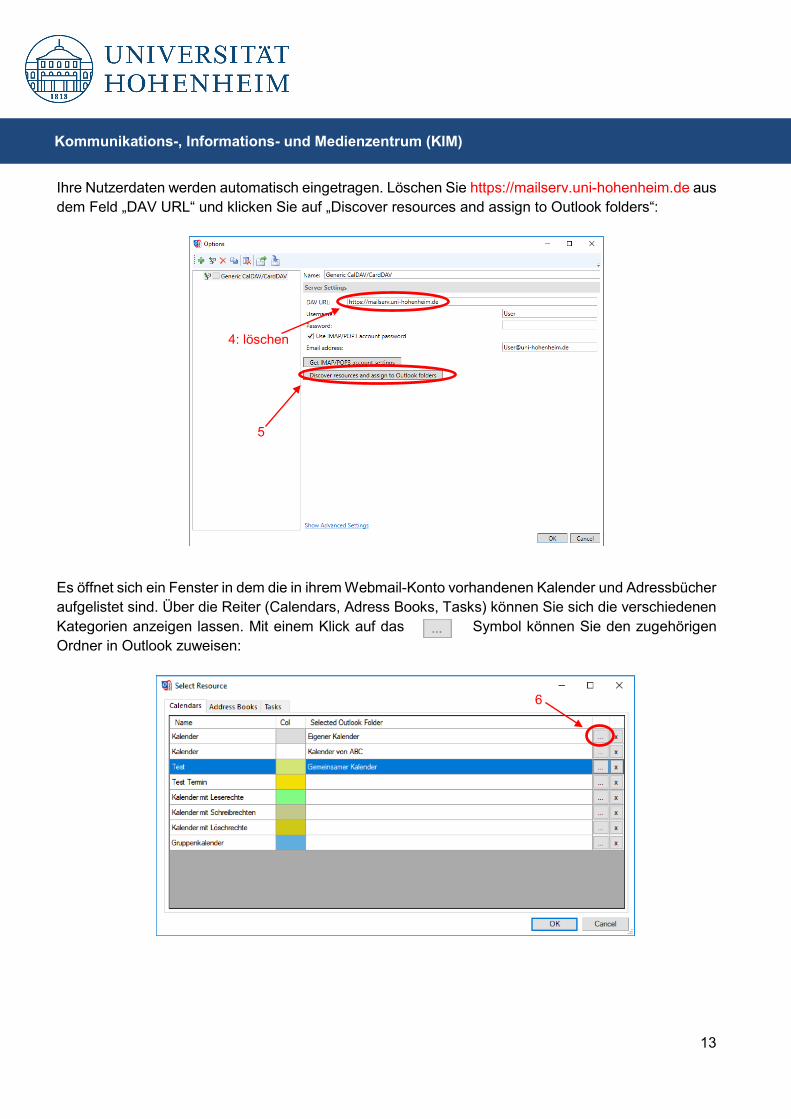
Ihre Nutzerdaten werden automatisch eingetragen. Löschen Sie https://mailserv.uni-hohenheim.de aus dem Feld „DAV URL“ und klicken Sie auf „Discover resources and assign to Outlook folders“:
Es öffnet sich ein Fenster in dem die in ihrem Webmail-Konto vorhandenen Kalender und Adressbücher aufgelistet sind. Über die Reiter (Calendars, Adress Books, Tasks) können Sie sich die verschiedenen Kategorien anzeigen lassen. Mit einem Klick auf das Symbol können Sie den zugehörigen Ordner in Outlook zuweisen:
4: löschen
5
6
14
Kommunikations-, Informations- und Medienzentrum (KIM)
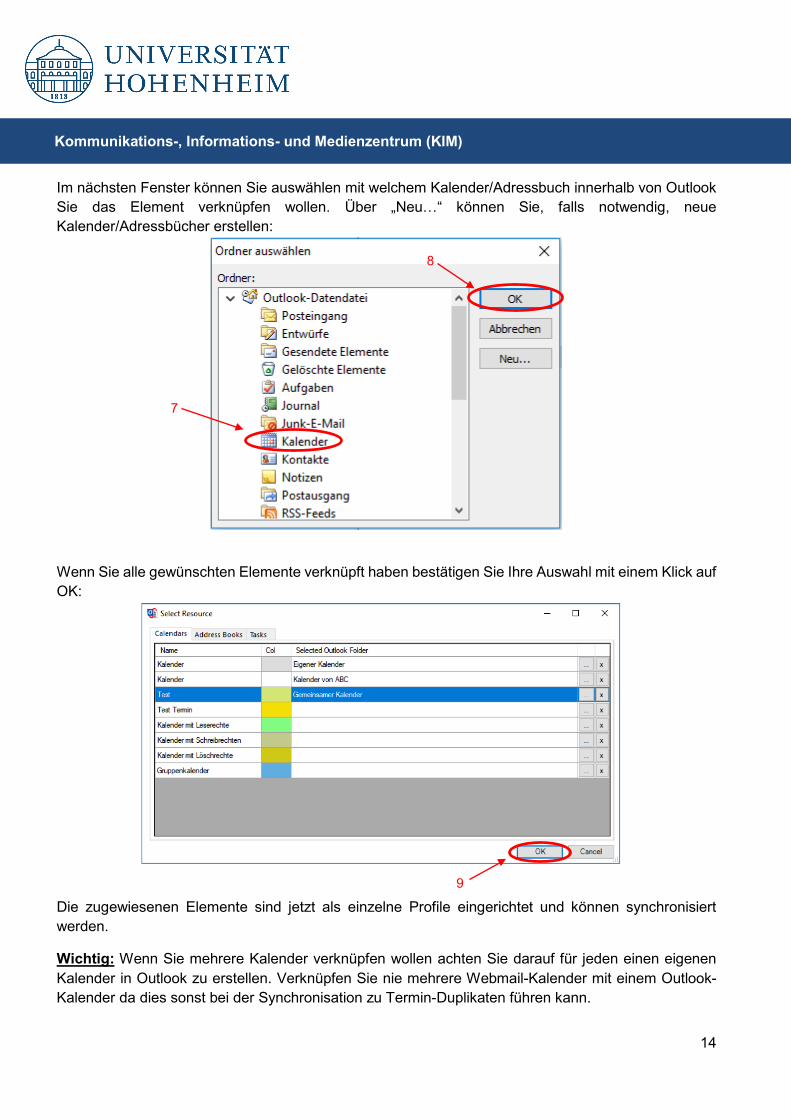
Im nächsten Fenster können Sie auswählen mit welchem Kalender/Adressbuch innerhalb von Outlook Sie das Element verknüpfen wollen. Über „Neu…“ können Sie, falls notwendig, neue Kalender/Adressbücher erstellen:
Wenn Sie alle gewünschten Elemente verknüpft haben bestätigen Sie Ihre Auswahl mit einem Klick auf OK:
Die zugewiesenen Elemente sind jetzt als einzelne Profile eingerichtet und können synchronisiert werden.
Wichtig: Wenn Sie mehrere Kalender verknüpfen wollen achten Sie darauf für jeden einen eigenen Kalender in Outlook zu erstellen. Verknüpfen Sie nie mehrere Webmail-Kalender mit einem Outlook-Kalender da dies sonst bei der Synchronisation zu Termin-Duplikaten führen kann.
8
7
9
15
Kommunikations-, Informations- und Medienzentrum (KIM)
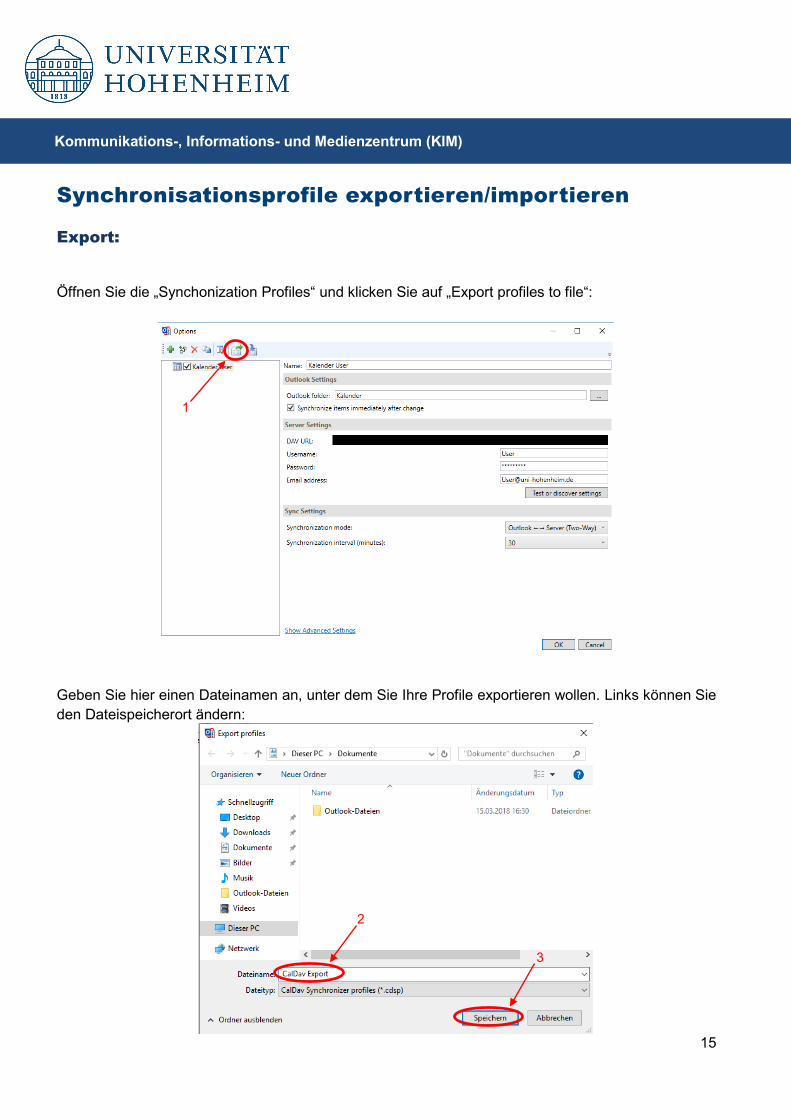
Synchronisationsprofile exportieren/importieren
Export:
Öffnen Sie die „Synchonization Profiles“ und klicken Sie auf „Export profiles to file“:
Geben Sie hier einen Dateinamen an, unter dem Sie Ihre Profile exportieren wollen. Links können Sie den Dateispeicherort ändern:
2
3
1
16
Kommunikations-, Informations- und Medienzentrum (KIM)
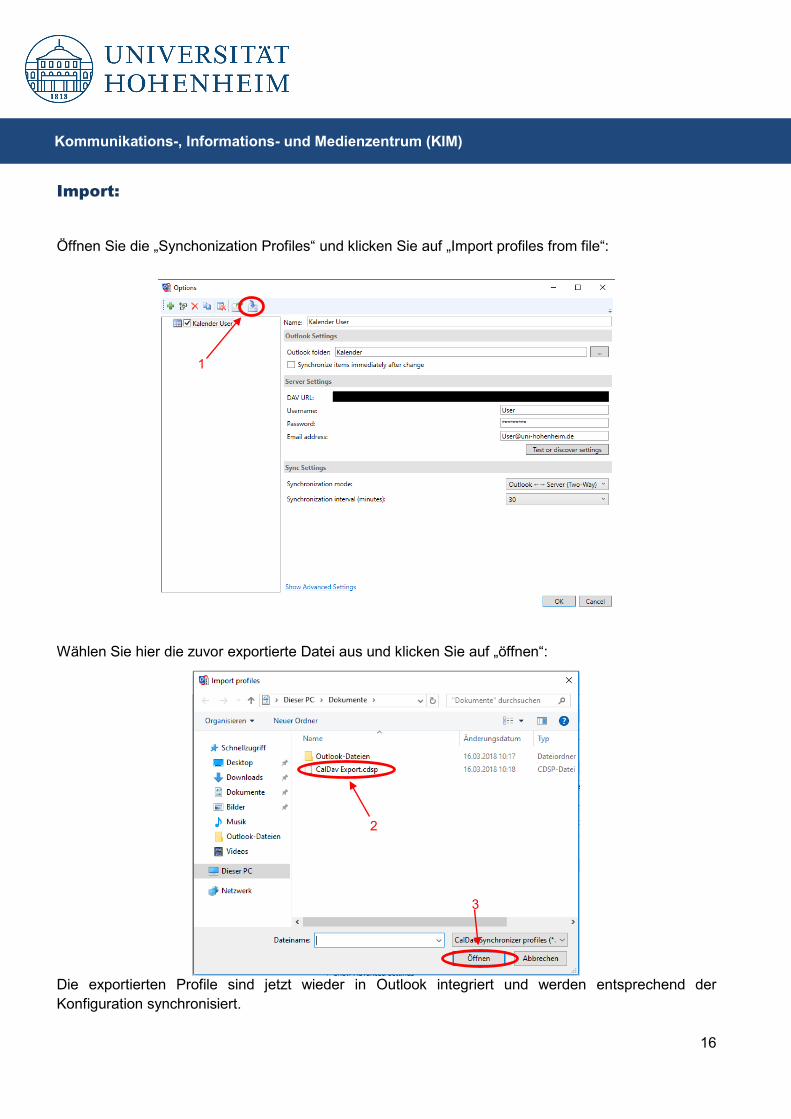
Import:
Öffnen Sie die „Synchonization Profiles“ und klicken Sie auf „Import profiles from file“:
Wählen Sie hier die zuvor exportierte Datei aus und klicken Sie auf „öffnen“:
Die exportierten Profile sind jetzt wieder in Outlook integriert und werden entsprechend der Konfiguration synchronisiert.
1
2
3
17
Kommunikations-, Informations- und Medienzentrum (KIM)
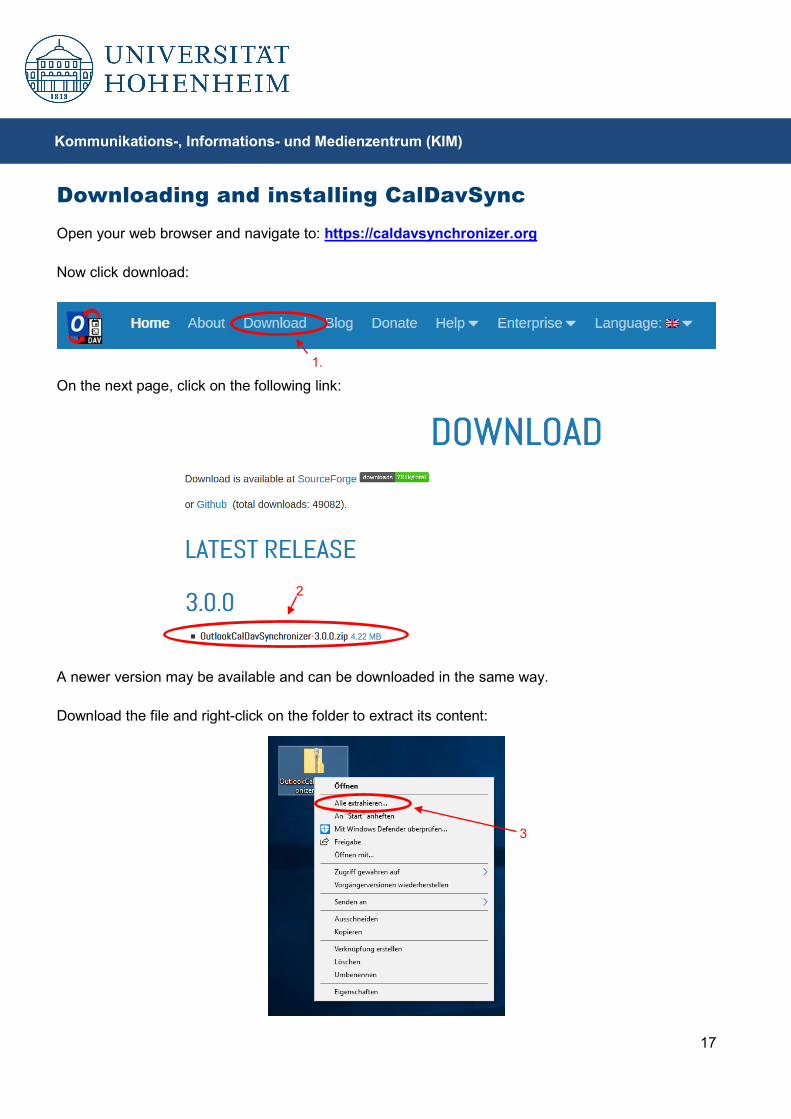
Downloading and installing CalDavSync Open your web browser and navigate to: https://caldavsynchronizer.org Now click download:
On the next page, click on the following link:
A newer version may be available and can be downloaded in the same way. Download the file and right-click on the folder to extract its content:
1.
2
3
18
Kommunikations-, Informations- und Medienzentrum (KIM)
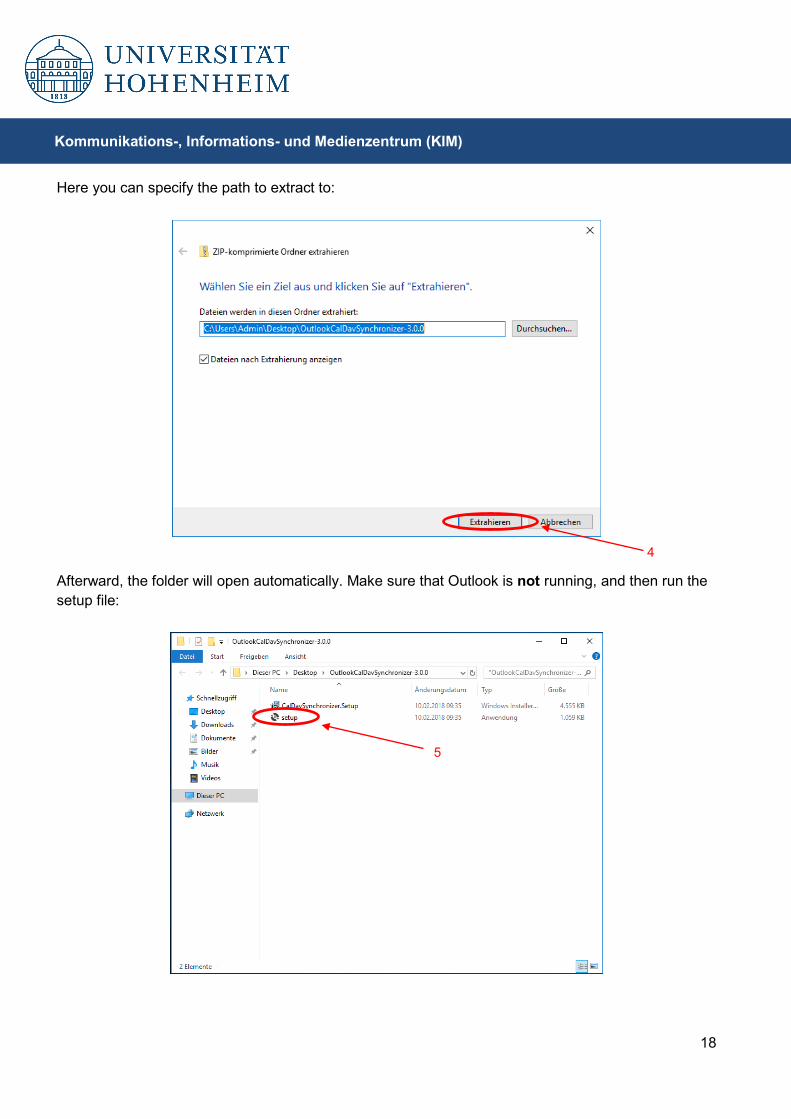
Here you can specify the path to extract to:
Afterward, the folder will open automatically. Make sure that Outlook is not running, and then run the setup file:
4
5
19
Kommunikations-, Informations- und Medienzentrum (KIM)
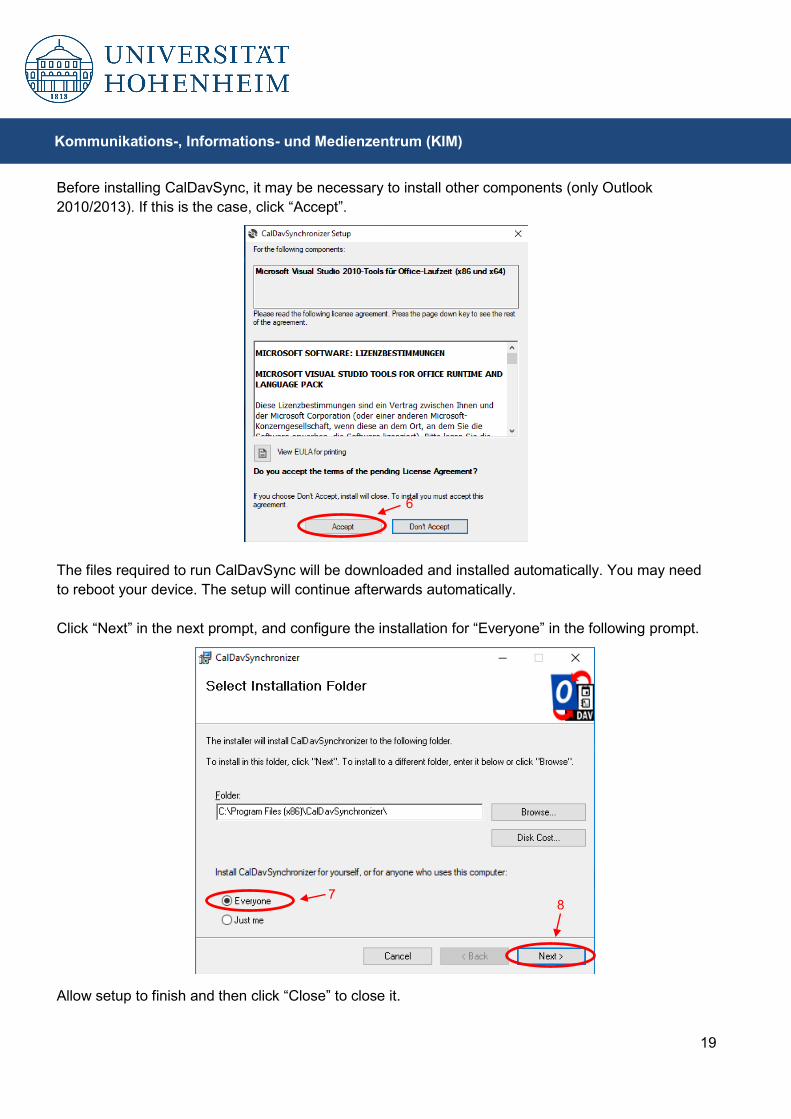
Before installing CalDavSync, it may be necessary to install other components (only Outlook 2010/2013). If this is the case, click “Accept”.
The files required to run CalDavSync will be downloaded and installed automatically. You may need to reboot your device. The setup will continue afterwards automatically. Click “Next” in the next prompt, and configure the installation for “Everyone” in the following prompt. Allow setup to finish and then click “Close” to close it.
6
7 8
20
Kommunikations-, Informations- und Medienzentrum (KIM)
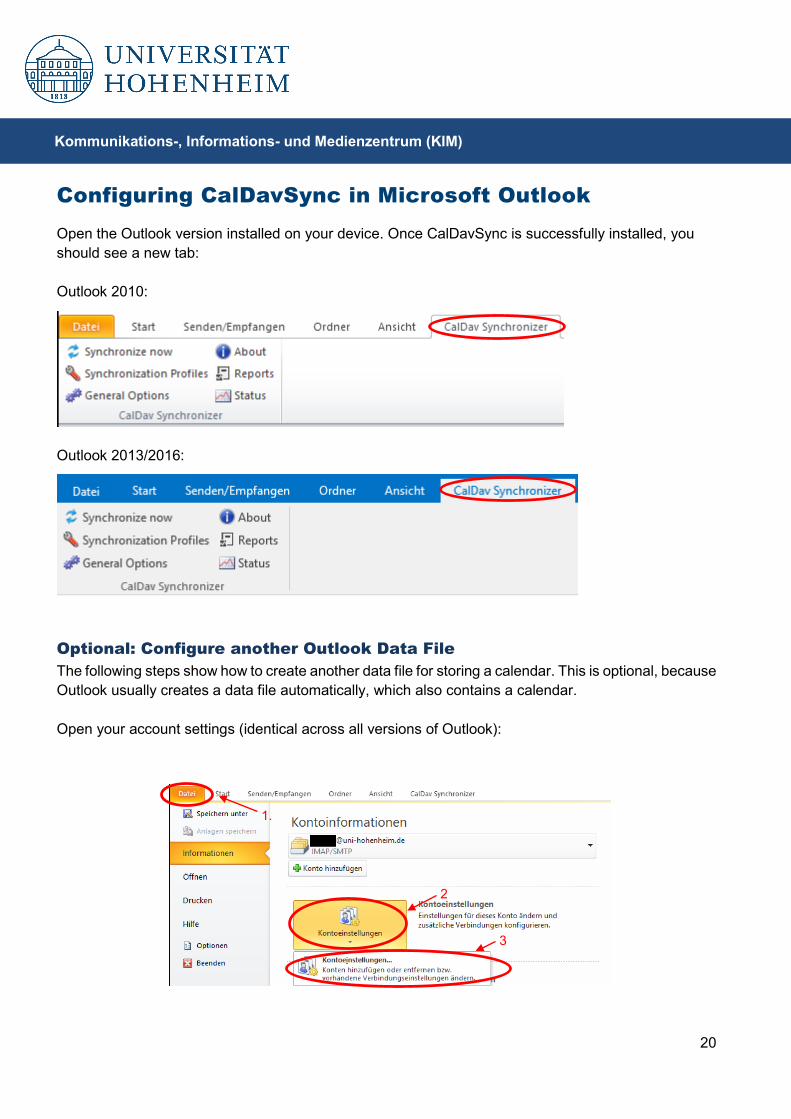
Configuring CalDavSync in Microsoft Outlook Open the Outlook version installed on your device. Once CalDavSync is successfully installed, you should see a new tab: Outlook 2010:
Outlook 2013/2016:
Optional: Configure another Outlook Data File The following steps show how to create another data file for storing a calendar. This is optional, because Outlook usually creates a data file automatically, which also contains a calendar. Open your account settings (identical across all versions of Outlook):
1.
2
3
21
Kommunikations-, Informations- und Medienzentrum (KIM)
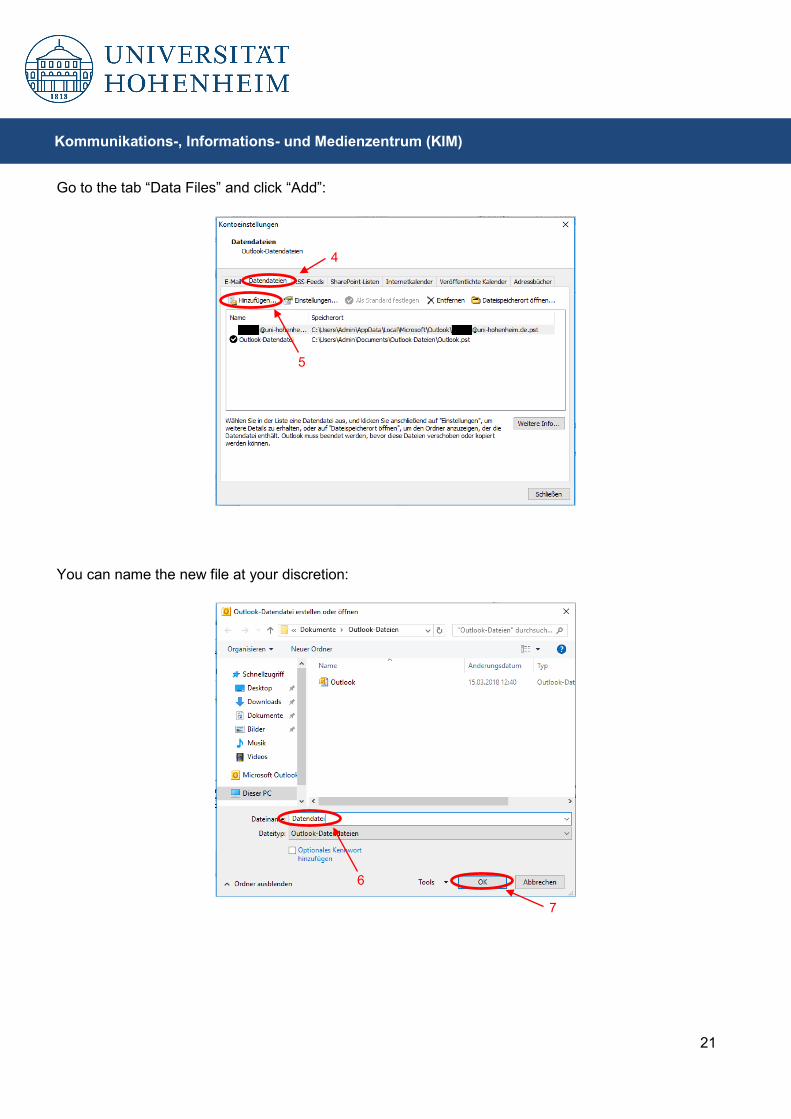
Go to the tab “Data Files” and click “Add”: You can name the new file at your discretion:
4
5
6
7
22
Kommunikations-, Informations- und Medienzentrum (KIM)
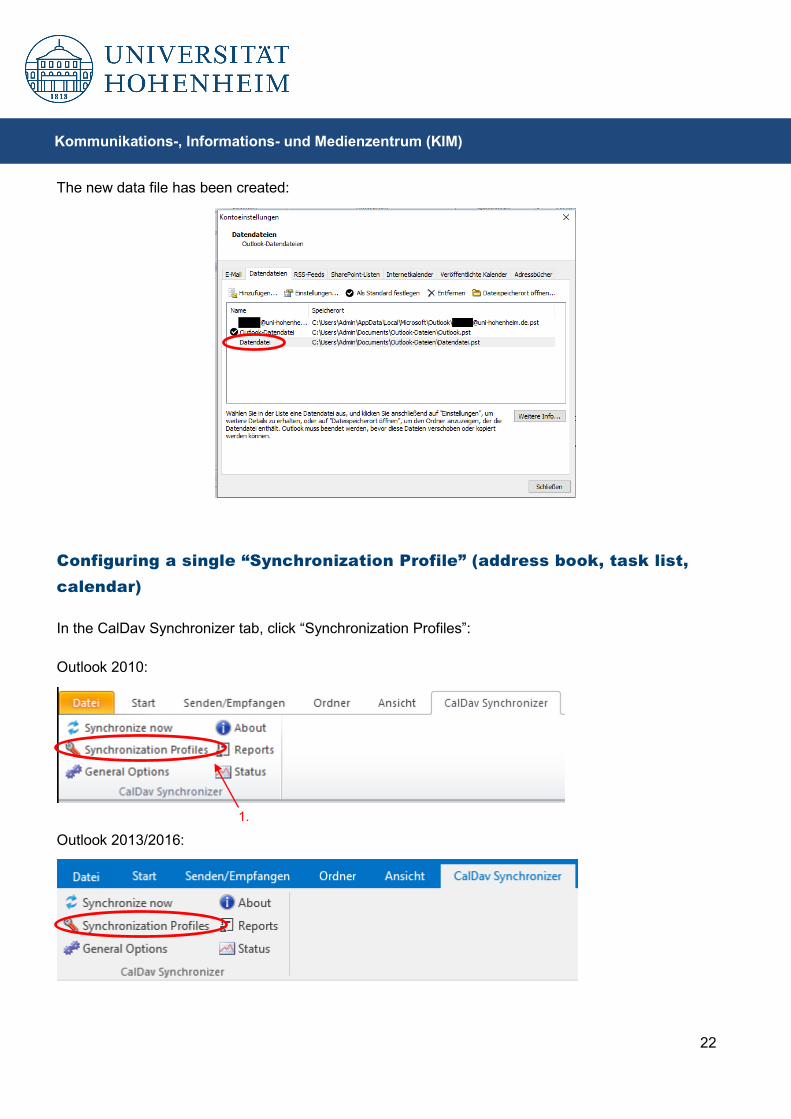
The new data file has been created:
Configuring a single “Synchronization Profile” (address book, task list, calendar) In the CalDav Synchronizer tab, click “Synchronization Profiles”: Outlook 2010:
Outlook 2013/2016:
1.
23
Kommunikations-, Informations- und Medienzentrum (KIM)
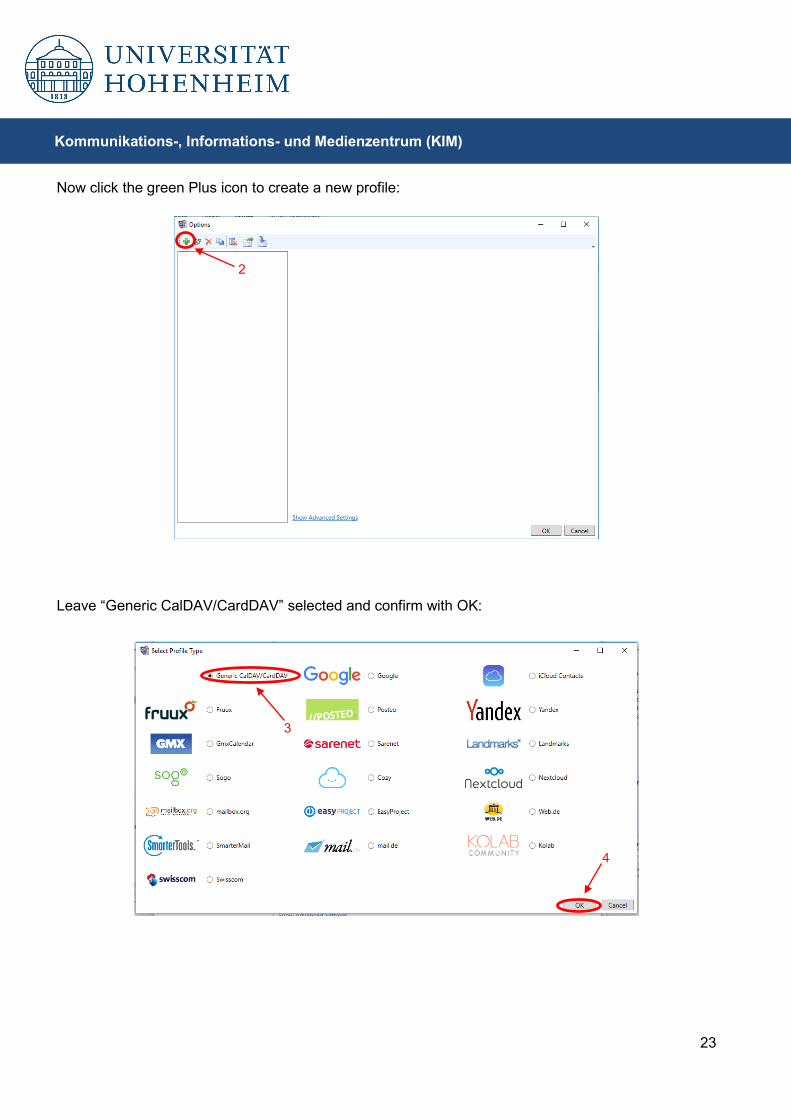
Now click the green Plus icon to create a new profile:
Leave “Generic CalDAV/CardDAV” selected and confirm with OK:
2
3
4
24
Kommunikations-, Informations- und Medienzentrum (KIM)
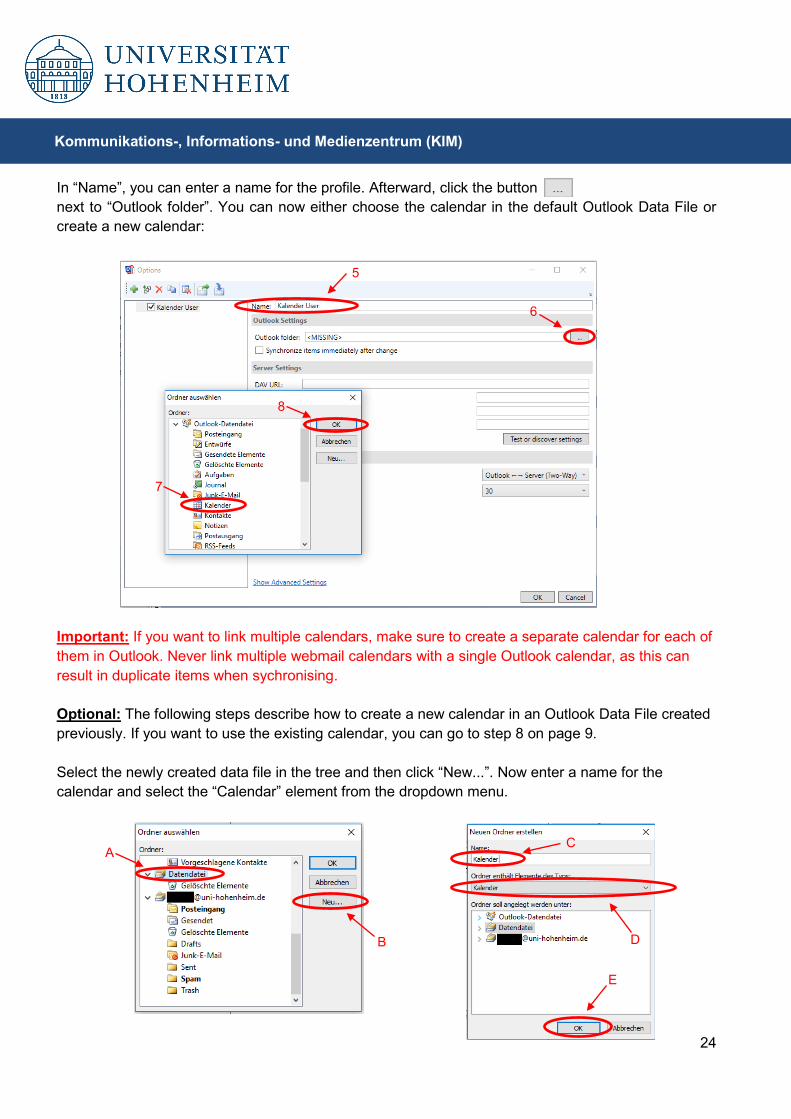
In “Name”, you can enter a name for the profile. Afterward, click the button next to “Outlook folder”. You can now either choose the calendar in the default Outlook Data File or create a new calendar:
Important: If you want to link multiple calendars, make sure to create a separate calendar for each of them in Outlook. Never link multiple webmail calendars with a single Outlook calendar, as this can result in duplicate items when sychronising. Optional: The following steps describe how to create a new calendar in an Outlook Data File created previously. If you want to use the existing calendar, you can go to step 8 on page 9. Select the newly created data file in the tree and then click “New...”. Now enter a name for the calendar and select the “Calendar” element from the dropdown menu.
5
6
7
8
A
B
C
D
E
25
Kommunikations-, Informations- und Medienzentrum (KIM)
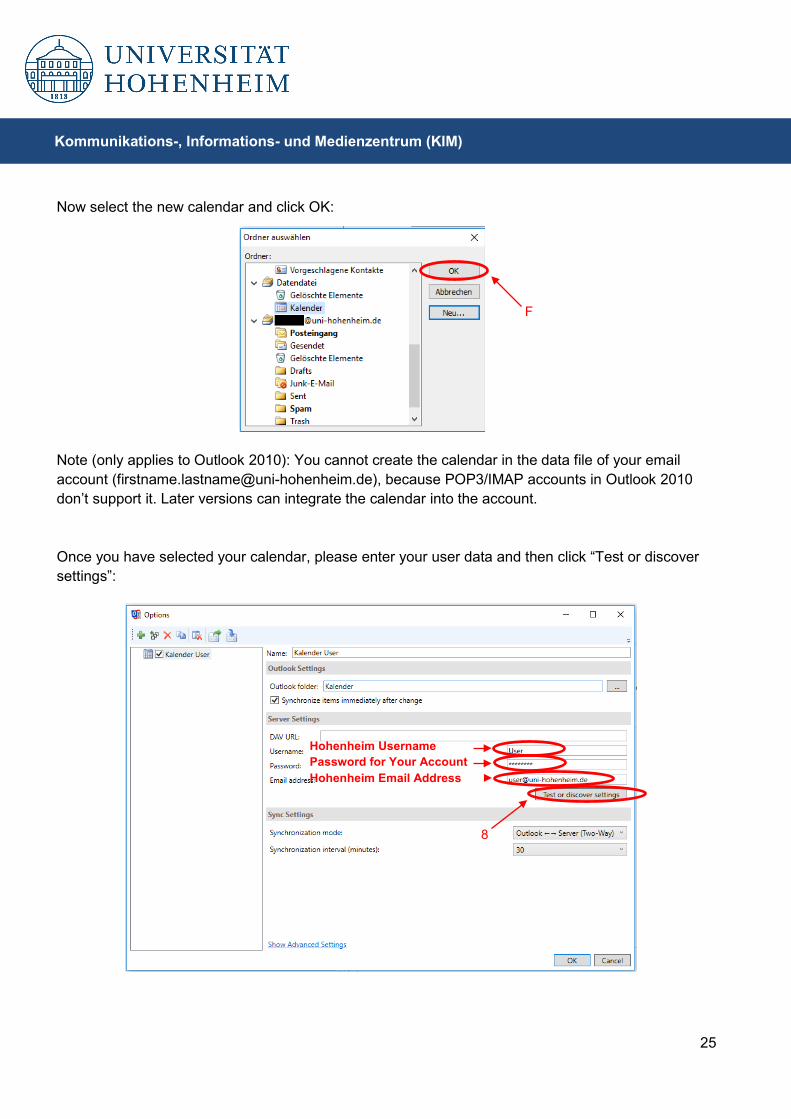
Now select the new calendar and click OK:
Note (only applies to Outlook 2010): You cannot create the calendar in the data file of your email account ([email protected]), because POP3/IMAP accounts in Outlook 2010 don’t support it. Later versions can integrate the calendar into the account. Once you have selected your calendar, please enter your user data and then click “Test or discover settings”:
F
8
Hohenheim Username Password for Your Account Hohenheim Email Address
26
Kommunikations-, Informations- und Medienzentrum (KIM)
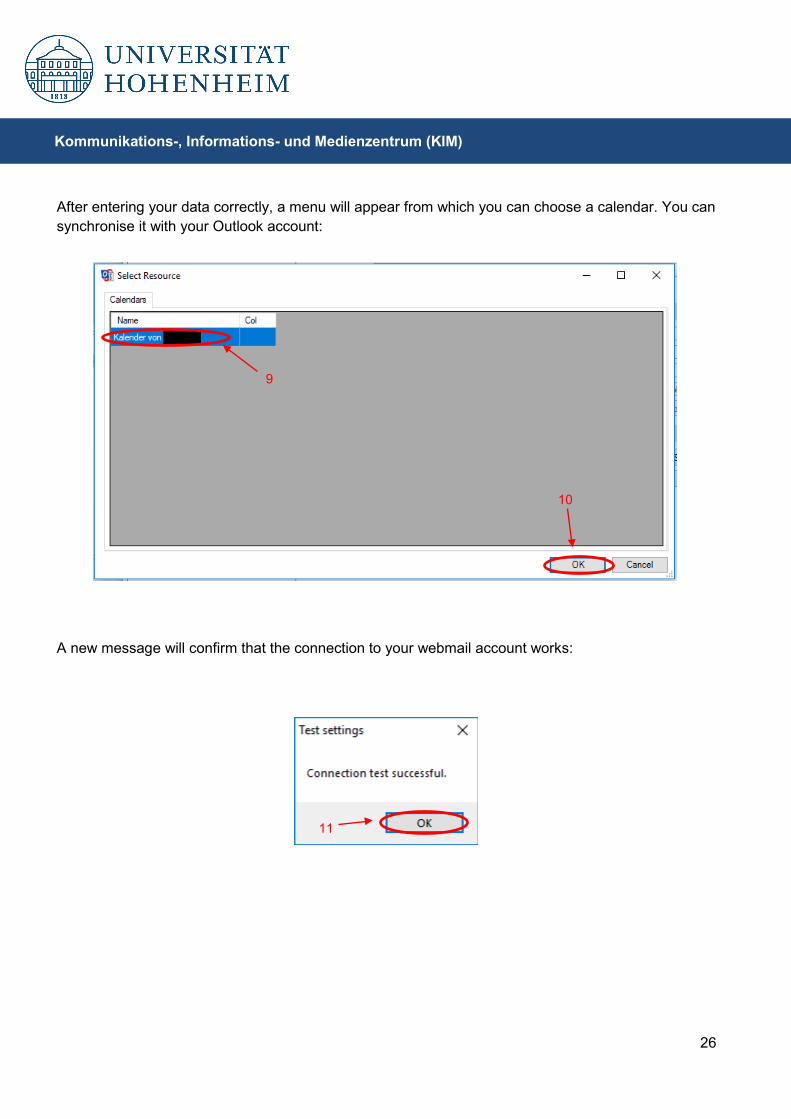
After entering your data correctly, a menu will appear from which you can choose a calendar. You can synchronise it with your Outlook account:
A new message will confirm that the connection to your webmail account works:
9
10
11
27
Kommunikations-, Informations- und Medienzentrum (KIM)
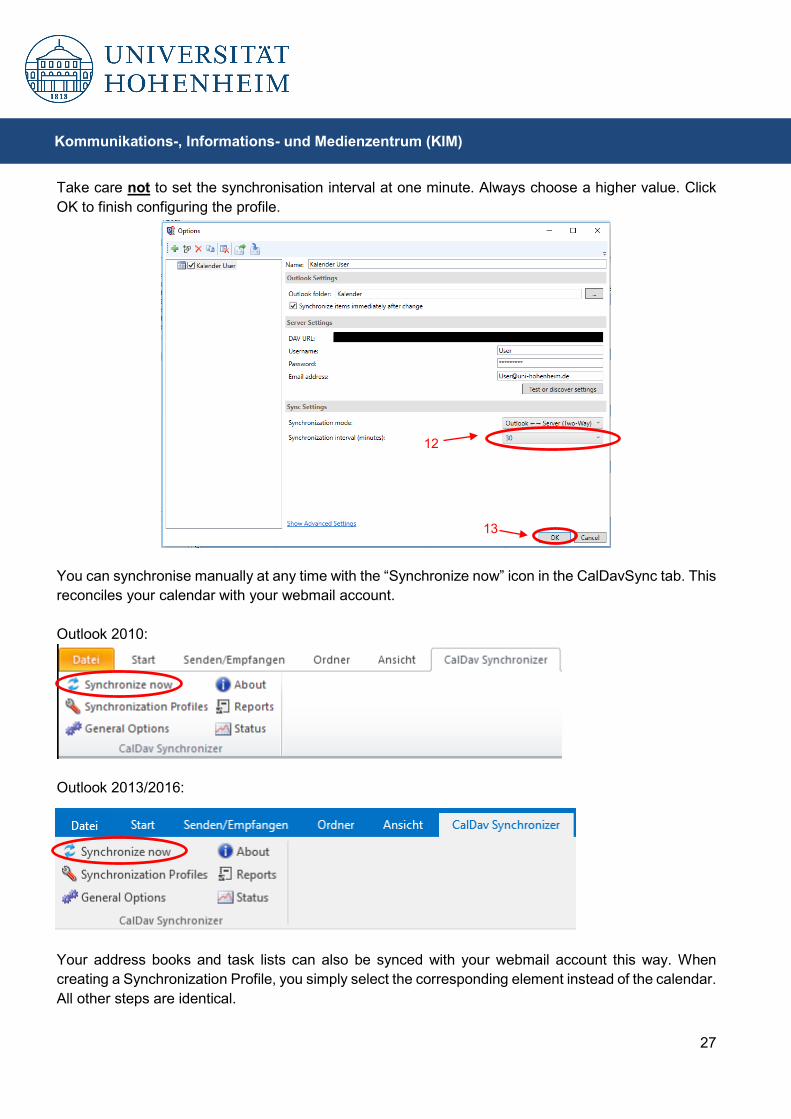
Take care not to set the synchronisation interval at one minute. Always choose a higher value. Click OK to finish configuring the profile.
You can synchronise manually at any time with the “Synchronize now” icon in the CalDavSync tab. This reconciles your calendar with your webmail account. Outlook 2010:
Outlook 2013/2016:
Your address books and task lists can also be synced with your webmail account this way. When creating a Synchronization Profile, you simply select the corresponding element instead of the calendar. All other steps are identical.
12
13
28
Kommunikations-, Informations- und Medienzentrum (KIM)
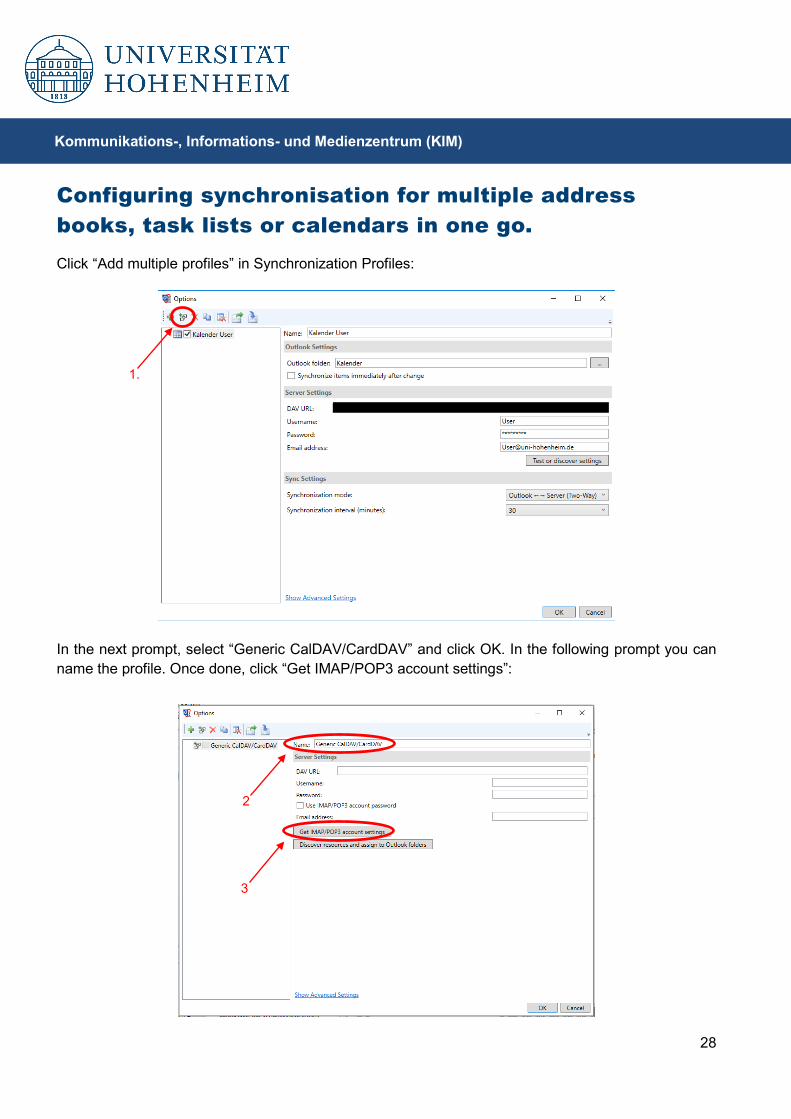
Configuring synchronisation for multiple address books, task lists or calendars in one go. Click “Add multiple profiles” in Synchronization Profiles:
In the next prompt, select “Generic CalDAV/CardDAV” and click OK. In the following prompt you can name the profile. Once done, click “Get IMAP/POP3 account settings”:
1.
2
3
29
Kommunikations-, Informations- und Medienzentrum (KIM)
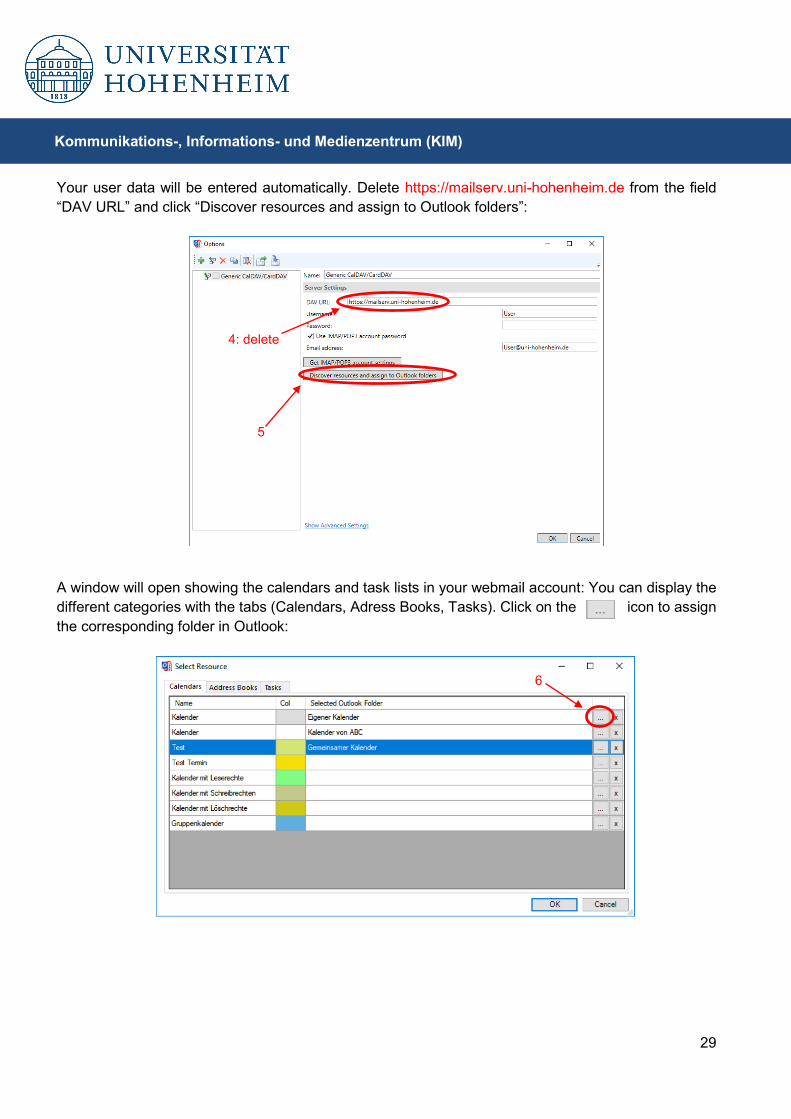
Your user data will be entered automatically. Delete https://mailserv.uni-hohenheim.de from the field “DAV URL” and click “Discover resources and assign to Outlook folders”:
A window will open showing the calendars and task lists in your webmail account: You can display the different categories with the tabs (Calendars, Adress Books, Tasks). Click on the icon to assign the corresponding folder in Outlook:
4: delete
5
6
30
Kommunikations-, Informations- und Medienzentrum (KIM)
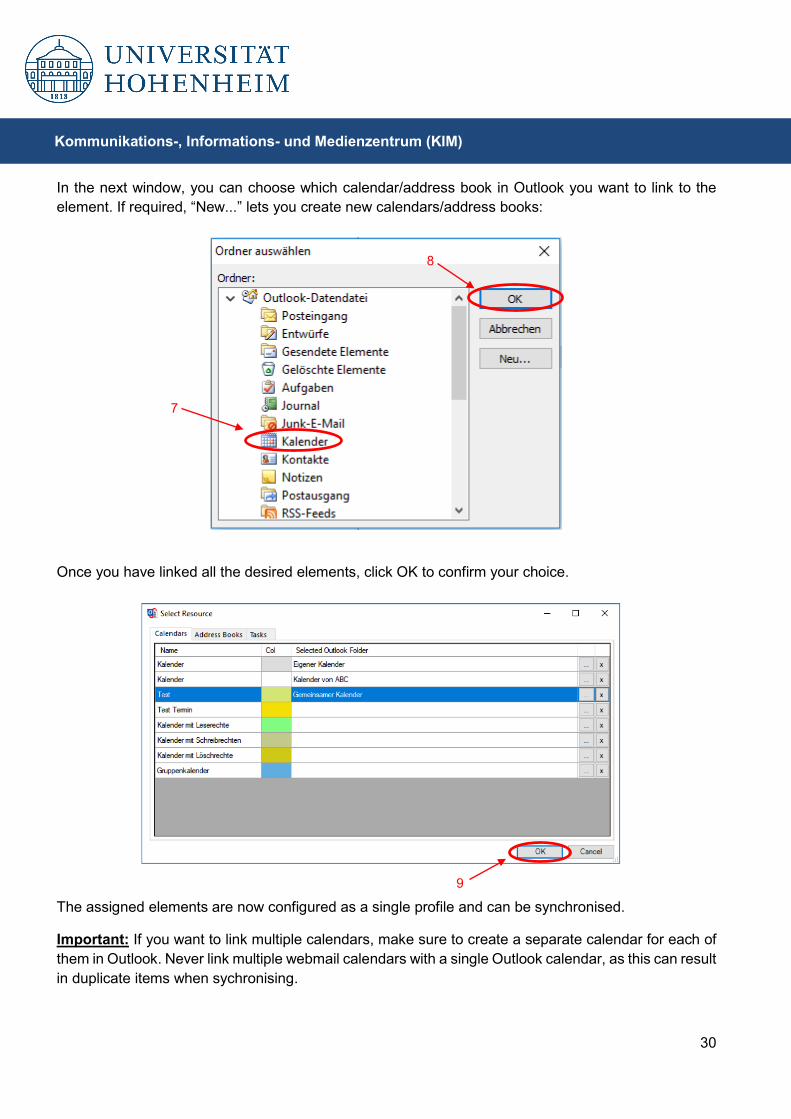
In the next window, you can choose which calendar/address book in Outlook you want to link to the element. If required, “New...” lets you create new calendars/address books:
Once you have linked all the desired elements, click OK to confirm your choice.
The assigned elements are now configured as a single profile and can be synchronised.
Important: If you want to link multiple calendars, make sure to create a separate calendar for each of them in Outlook. Never link multiple webmail calendars with a single Outlook calendar, as this can result in duplicate items when sychronising.
8
7
9
31
Kommunikations-, Informations- und Medienzentrum (KIM)
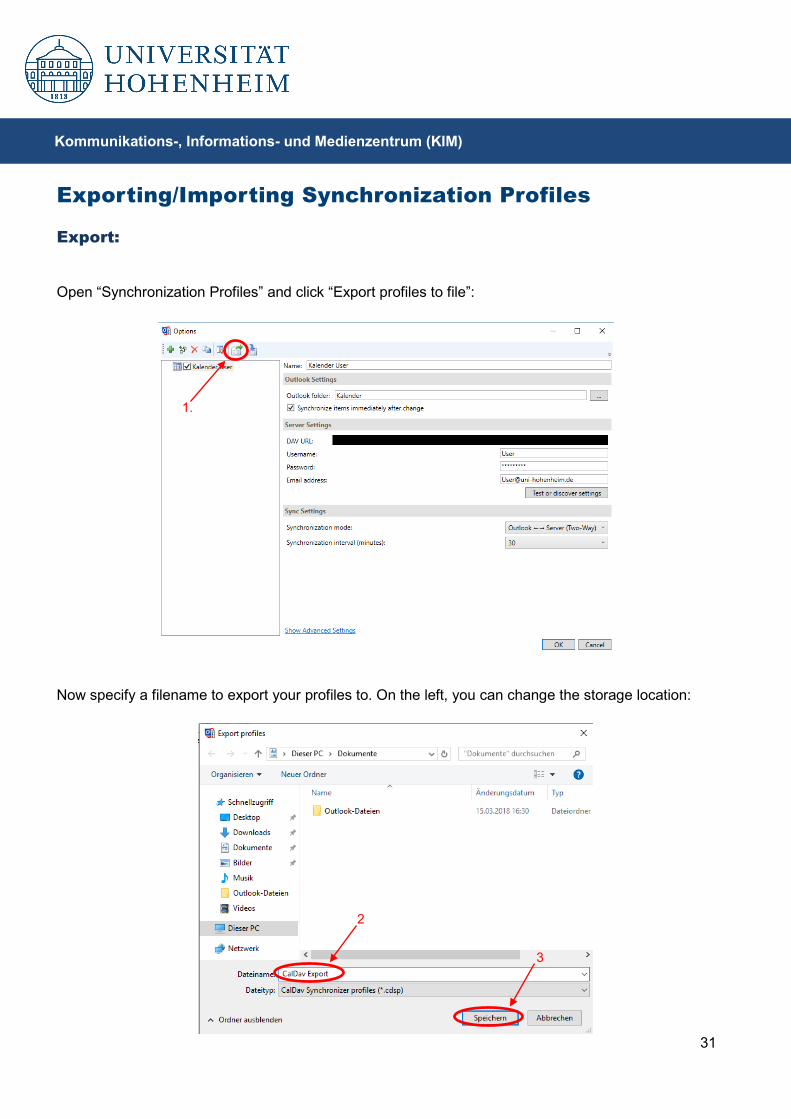
Exporting/Importing Synchronization Profiles
Export:
Open “Synchronization Profiles” and click “Export profiles to file”:
Now specify a filename to export your profiles to. On the left, you can change the storage location:
2
3
1.
32
Kommunikations-, Informations- und Medienzentrum (KIM)
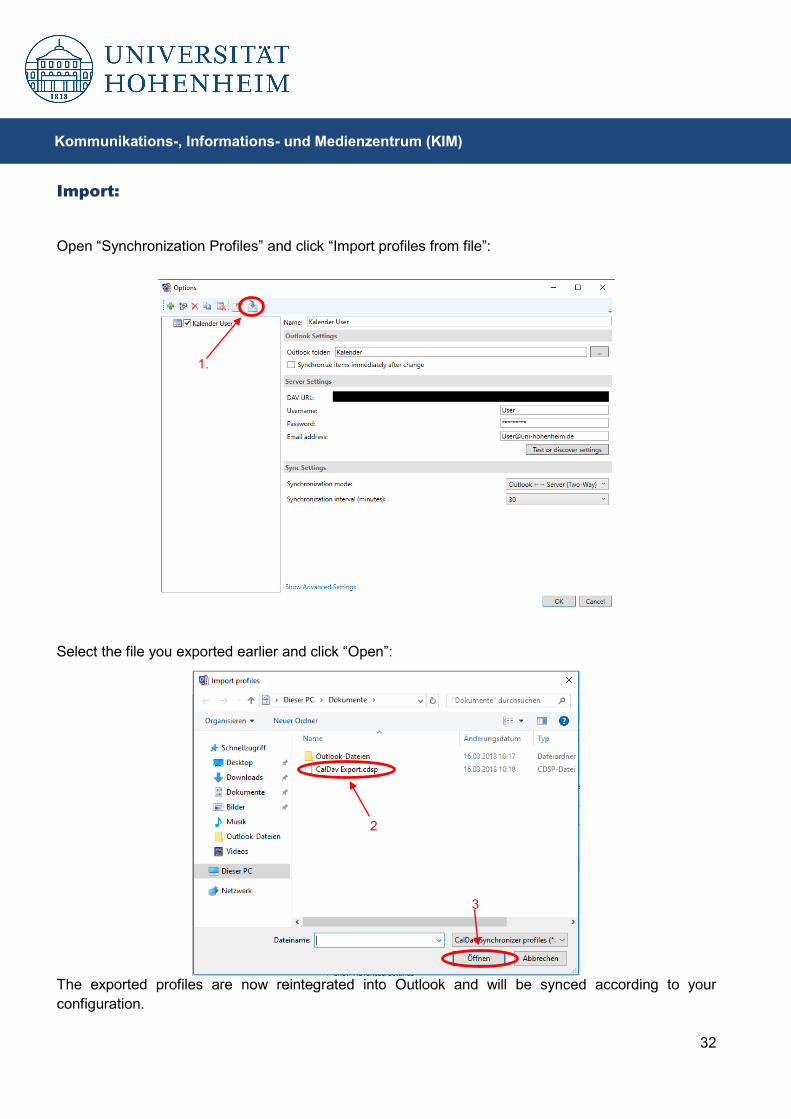
Import:
Open “Synchronization Profiles” and click “Import profiles from file”:
Select the file you exported earlier and click “Open”:
The exported profiles are now reintegrated into Outlook and will be synced according to your configuration.
1.
2
3
33
Kommunikations-, Informations- und Medienzentrum (KIM)
Sollten unerwartete Probleme auftreten stehen wir Ihnen gerne am
KIM-IT-Service-Desk
Biogebäude 1, Garbenstraße 30, 1. UG
per E-Mail unter
zur Verfügung
Should unexpected problems arise, we’d be pleased to help at
KIM-IT-Service-Desk
Biogebäude 1, Garbenstraße 30, 1. Basement
email us at