Embed Size (px)
Citation preview

DE
EN
ITFR
NL
PLH
UC
ZSK
ESP
T
ATON 5USER GUIDE
ECE R-44/04 Gr. 0+ / 0-13kg (ca. 0-18M)
1
DE – WARNUNG! Die folgende Kurzanleitung dient nur der Übersicht. Um maximale Sicherheit und maximalen Komfort für Ihr Kind zu erreichen, ist es unbedingt notwendig, die gesamte Gebrauchsanleitung aufmerksam zu lesen. Reihenfolge: Schale einrichten - Kind anschnallen - Sitz ins Fahrzeug einbauen.
FR – AVERTISSEMENT! Ce manuel résumé sert de synthèse seulement! Pour un maximum de protection et de confort, il est essentiel de lire et de suivre correctement le manuel d‘instructions dans son intégralité. Ordre de lecture: Installation du siège auto - attacher l‘enfant - attacher le siège auto dans la voiture.
HU – FIGYELMEZTETÉS! Ez a rövid tájékoztató csak áttekintésül szolgál. Gyermeke maximális védelme és kényelme érdekében elengedhetetlen, hogy a teljes tájékoztatótalaposan elolvassa. A helyes sorrend: Gyermek ülés
EN – WARNING! This short manual serves as an overview only. For maximum protection and best comfort for your child it is essential to read and follow the entire instruction manual carefully. Correct Order: Baby seat initial setup - fasten child - fasten baby seat in the car.
NL – WAARSCHUWING! De volgende korte handleiding dient enkel als overzicht! Voor een maximale bescherming en een optimaal komfort voor uw kind, is het essentieel de volledige handleiding zorgvuldig te lezen en te volgen.
CZ – VAROVÁNÍ!
IT – ATTENZIONE! Queste istruzioni sono solo un sommario. Per garantire la massima sicurezza e comfort al Vostro bambino è molto importante leggere attentamente ed interamente il manuale e seguirne scrupolosamente le
sedile dell’auto.
SK – VAROVANIE!
ES – ATENCIÓN! Este breve manual es sólo un resumen. Para obtener la máxima protección y mejor confort para su hijo es esencial leer y seguir el manual de instrucciones. Orden Correcto: Instalación inicial de la silla de auto.- sentar al niño - Fijar la silla al coche.PT – ATENÇÃO! Este manual serve apenas como resumo. Para máxima proteção e conforto das crianças é essencial ler e consultar o manual completo. Ordem de leitura deverá ser: Preparação e instalação da cadeira, Acomodar a criança, Instalação da cadeira no automóvel.
2
5 | INHALT
6 | CONTENT
6 | ARGOMENTI
98
5
7
64
3
CLICK
21
DE
EN
IT
131 | CONTENIDO
132 | CONTEÚDO
ESP
T
Kur
zanl
eitu
ngSh
ort i
nstr
uctio
nSo
mm
ario
Inst
ruct
ions
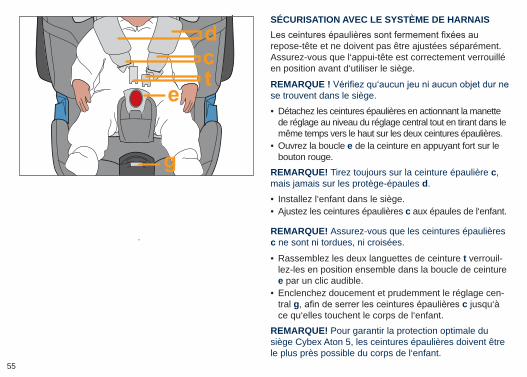
résu
mée
s
Kor
te h
andl
eidi
ngIn
stru
kcja
skr
ócon
aR
övid
tájé
kozt
ató
Zkrá
cený
náv
od
Resu
men
de
inst
rucc
ione
sM
anua
l red
uzid
o
47 | CONTENU
48 | INHOUD
89 | TARTALOM
90 | OBSAH
90 | OBSAH
FRN
LPL
HU
CZ
SK
3
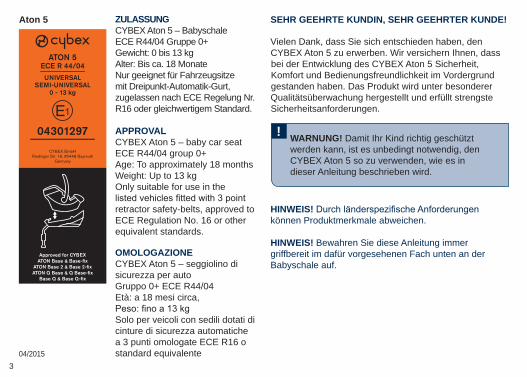
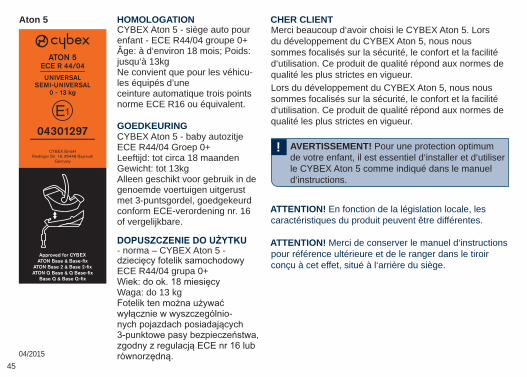
ZULASSUNGCYBEX Aton 5 – Babyschale ECE R44/04 Gruppe 0+ Gewicht: 0 bis 13 kg Alter: Bis ca. 18 Monate Nur geeignet für Fahrzeugsitze mit Dreipunkt-Automatik-Gurt, zugelassen nach ECE Regelung Nr. R16 oder gleichwertigem Standard.
APPROVALCYBEX Aton 5 – baby car seat ECE R44/04 group 0+ Age: To approximately 18 months Weight: Up to 13 kg Only suitable for use in the
retractor safety-belts, approved to ECE Regulation No. 16 or other equivalent standards.
OMOLOGAZIONECYBEX Aton 5 – seggiolino di sicurezza per auto Gruppo 0+ ECE R44/04 Età: a 18 mesi circa,
Solo per veicoli con sedili dotati di cinture di sicurezza automatiche a 3 punti omologate ECE R16 o standard equivalente04/2015
Vielen Dank, dass Sie sich entschieden haben, den CYBEX Aton 5 zu erwerben. Wir versichern Ihnen, dass bei der Entwicklung des CYBEX Aton 5 Sicherheit, Komfort und Bedienungsfreundlichkeit im Vordergrund gestanden haben. Das Produkt wird unter besonderer Qualitätsüberwachung hergestellt und erfüllt strengste Sicherheitsanforderungen.
WARNUNG! Damit Ihr Kind richtig geschütztwerden kann, ist es unbedingt notwendig, denCYBEX Aton 5 so zu verwenden, wie es indieser Anleitung beschrieben wird.
!
HINWEIS! Bewahren Sie diese Anleitung immer griffbereit im dafür vorgesehenen Fach unten an der Babyschale auf.
HINWEIS!können Produktmerkmale abweichen.
SEHR GEEHRTE KUNDIN, SEHR GEEHRTER KUNDE!Aton 5
ATON 5ECE R 44/04 ____________
UNIVERSAL SEMI-UNIVERSAL
0 - 13 kg
04301297 ____________
CYBEX GmbHRiedinger Str. 18, 95448 Bayreuth
Germany
Approved for CYBEX
ATON Base & Base-fix
ATON Base 2 & Base 2-fix
ATON Q Base & Q Base-fix
Base Q & Base Q-fix

4
Thank you very much for purchasing the CYBEX Aton 5. We assure you that in the development process of the CYBEX Aton 5 we focused on safety, comfort and user friendliness. The product is manufactured under special quality surveillance and complies with the strictest safety requirements.
Ci congratuliamo con Lei per avere acquistato CYBEX Aton 5. Le assicuriamo che nel progettare CYBEX Aton 5 i nostri principali obiettivi sono stati la sicurezza, il comfort e la facilità di utilizzo. Il prodotto è stato elaborato sotto uno stretto controllo qualitativo e risponde ai più severi standard di sicurezza.
WARNING! For proper protection of your child, it is essential to use and install the CYBEX Aton 5 accor-ding to the instructions given in this manual.
ATTENZIONE! Per garantire un’adeguata sicureza del Vostro bambino è molto importante che l’uso e l’installazione di CYBEX Aton 5 siano effettuati seguendo scrupolosamente le istruzioni fornite in questo manuale.
! !
NOTE! According to local codes the product characteristic can be different.
NOTE! Please always have the instruction manual at hand and store it in the dedicated slot under the seat.
NOTA BENE! Raccomandiamo di tenere il manuale d’istruzioni sempre a portata di mano e di conservarlo nell’apposito alloggiamento sotto il seggiolino.
NOTA BENE! In base alle normative locali alcune caratteristiche del prodotto potrebbero differire.
DEAR CUSTOMER GENTILE CLIENTE
DE
EN
IT
5
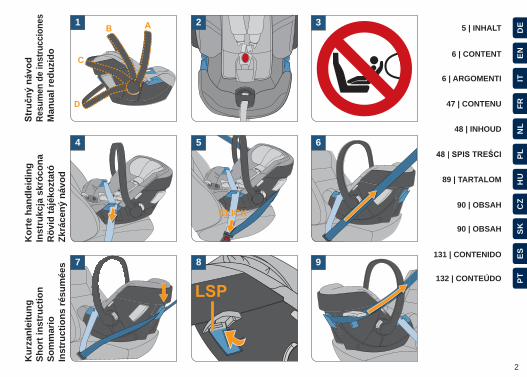
INHALTDEKURZANLEITUNG .........................................................................................2ZULASSUNG ...................................................................................................3VERWENDUNG IM FAHRZEUG .................................................................7ZUM SCHUTZ IHRES FAHRZEUGES! ......................................................7EINSTELLEN DES TRAGEBÜGELS ..........................................................9ANPASSEN DER KOPFSTÜTZE ..............................................................11ANSCHNALLEN MITTELS GURTSYSTEM ............................................11SICHERHEIT FÜR IHR BABY ....................................................................15SICHERHEIT BEIM EINBAU INS FAHRZEUG ........................................17DER EINBAU INS FAHRZEUG ..................................................................19AUSBAU AUS DEM FAHRZEUG ..............................................................23SO IST IHR BABY RICHTIG GESICHERT ...............................................25SO IST DIE BABYSCHALE RICHTIG EINGEBAUT ...............................25ENTFERNEN DER HERAUSNEHMBAREN EINLAGE .........................27ÖFFNEN DES SONNENVERDECKES ....................................................29CYBEX TRAVEL-SYSTEM .........................................................................29DEMONTAGE ................................................................................................29PFLEGE..........................................................................................................31VERHALTEN NACH EINEM UNFALL .......................................................31REINIGUNG ...................................................................................................33ENTFERNEN DES BEZUGES ...................................................................35ANBRINGEN DES BEZUGES ....................................................................35PRODUKTLEBENSDAUER .......................................................................37ABFALLTRENNUNG ....................................................................................39INFORMATIONEN ZUM PRODUKT .........................................................39GARANTIEBEDINGUNGEN .......................................................................41
6
CONTENT ARGOMENTI DE
EN
IT
ENSHORT INSTRUCTION .................................................................................2APPROVAL ......................................................................................................3THE BEST POSITION IN THE CAR ............................................................8FOR THE PROTECTION OF YOUR CAR! ................................................8CARRYING HANDLE ADJUSTMENT .......................................................10ADJUSTING THE HEADREST...................................................................12SECURING BY MEANS OF HARNESS SYSTEM .................................12SAFETY FOR YOUR BABY ........................................................................16SAFETY IN THE CAR ..................................................................................18INSTALLING THE SEAT ..............................................................................20REMOVING THE CAR SEAT ......................................................................24SECURING YOUR CHILD CORRECTLY .................................................26INSTALLING THE BABY SEAT CORRECTLY .........................................26REMOVING THE INSERT ...........................................................................28OPENING THE CANOPY ............................................................................30CYBEX TRAVEL-SYSTEM .........................................................................30DEMOUNTING ..............................................................................................30PRODUCT CARE .........................................................................................32WHAT TO DO AFTER AN ACCIDENT ......................................................32CLEANING .....................................................................................................34REMOVING THE COVER ...........................................................................36ATTACHING THE SEAT COVERS ............................................................36DURABILITY OF PRODUCT ......................................................................38DISPOSAL......................................................................................................40PRODUCT INFORMATION.........................................................................40WARRANTY ..................................................................................................42
ITSOMMARIO .....................................................................................................2OMOLOGAZIONE ..........................................................................................3LA POSIZIONE MIGLIORE ALL’INTERNO DELL’AUTO ..........................8PER LA SALVAGUARDIA DELL’AUTO .......................................................8REGOLAZIONE DEL MANICO PER IL TRASPORTO ...........................10REGOLAZIONE DEL POGGIATESTA ......................................................12PROTEZIONE MEDIANTE SISTEMA CON CINTURE ..........................12SICUREZZA DEL BAMBINO ......................................................................16SICUREZZA NELL’AUTO ............................................................................18INSTALLAZIONE DEL SEGGIOLINO........................................................20TOGLIERE IL SEGGIOLINO .......................................................................24FISSARE CORRETTAMENTE IL BAMBINO ...........................................26INSTALLARE CORRETTAMENTE IL SEGGIOLINO..............................26TOGLIERE IL RIDUTTORE .........................................................................28APERTURA DELLA CAPOTTINA ..............................................................30CYBEX TRAVEL-SYSTEM .........................................................................30SMONTAGGIO ..............................................................................................30MANUTENZIONE .........................................................................................32IN CASO DI INCIDENTE .............................................................................32PULIZIA ...........................................................................................................34RIMOZIONE DEL RIVESTIMENTO ...........................................................36FISSARE IL RIVESTIMENTO .....................................................................36DUREVOLEZZA PRODOTTO ....................................................................38SMALTIMENTO .............................................................................................40INFORMAZIONI TECNICHE .......................................................................40GARANZIA .....................................................................................................42
7
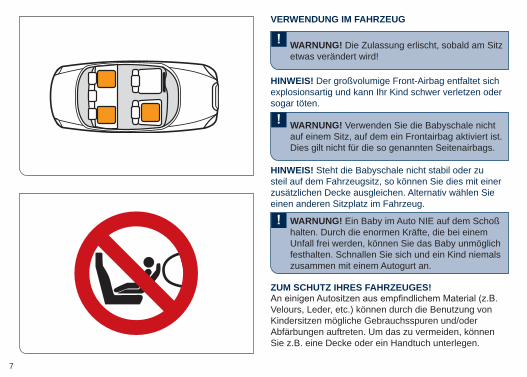
WARNUNG! Die Zulassung erlischt, sobald am Sitz etwas verändert wird!
WARNUNG! Verwenden Sie die Babyschale nicht auf einem Sitz, auf dem ein Frontairbag aktiviert ist. Dies gilt nicht für die so genannten Seitenairbags.
WARNUNG! Ein Baby im Auto NIE auf dem Schoß halten. Durch die enormen Kräfte, die bei einem Unfall frei werden, können Sie das Baby unmöglich festhalten. Schnallen Sie sich und ein Kind niemals zusammen mit einem Autogurt an.
VERWENDUNG IM FAHRZEUG
ZUM SCHUTZ IHRES FAHRZEUGES!
HINWEIS! Der großvolumige Front-Airbag entfaltet sich explosionsartig und kann Ihr Kind schwer verletzen oder sogar töten.
HINWEIS! Steht die Babyschale nicht stabil oder zu steil auf dem Fahrzeugsitz, so können Sie dies mit einer zusätzlichen Decke ausgleichen. Alternativ wählen Sie einen anderen Sitzplatz im Fahrzeug.
Velours, Leder, etc.) können durch die Benutzung von Kindersitzen mögliche Gebrauchsspuren und/oder Abfärbungen auftreten. Um das zu vermeiden, können Sie z.B. eine Decke oder ein Handtuch unterlegen.
8
FOR THE PROTECTION OF YOUR CAR! PER LA SALVAGUARDIA DELL’AUTO
WARNING! Approval of the seat expires immediately
WARNING! Do not use the Aton 5 in front seats equipped with activated front-airbag. This does not apply to so-called side-airbags.
WARNING! Never hold a baby on your lap while driving. Due to the enormous forces released in an accident, it will be impossible to hold onto the baby. Never use the same seat belt to secure yourself and the child.
THE BEST POSITION IN THE CAR
NOTE! High volume front-airbags expand explosively. This can result in the death or injury of the child.
NOTE! If the baby seat is not stable or sits too steeply in the car, you can use a blanket or a towel to compensate. Alternatively, you should choose another place in the car.
It is possible that some car seats that are made of soft
usage and/or discolouration. In order to avoid this, you could, for example, place a cover or towel underneath it.
ATTENZIONE! La validità del prodotto decade -
sioni!
ATTENZIONE! Non utilizzare CYBEX Aton 5 sui sedili anteriori di veicoli dotati di airbag non disin-seribile. L‘avvertimento non riguarda i cosiddetti airbag-laterali.
ATTENZIONE! Non tenere mai in braccio il bambino se alla guida. A causa delle notevoli forze in caso di impatto, sarebbe impossibile riuscire a proteggerlo. Non utilizzare mai la stessa cintura di sicurezza per allacciare il vostro corpo e quello del bambino.
LA POSIZIONE MIGLIORE ALL’INTERNO DELL’AUTO
NOTA BENE! Gli airbag anteriori hanno apertura automatica esplosiva e possono provocare gravi ferite o la morte del bambino.
NOTA BENE! Se il seggiolino è in una posizione instabile o troppo rialzata consigliamo di utilizzare un telo o un asciugamano per compensare. Oppure, di scegliere un‘altra collocazione nell’auto.
esempio velluto, pelle, ecc.) per evitare danneggiamenti consigliamo di di stendere un telo protettivo sotto il seggiolino.
DE
EN
IT
9
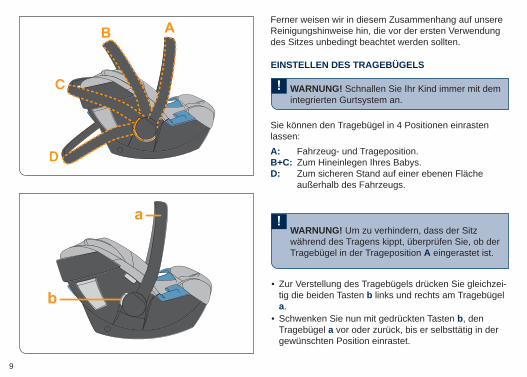
WARNUNG! Schnallen Sie Ihr Kind immer mit dem integrierten Gurtsystem an.
WARNUNG! Um zu verhindern, dass der Sitz während des Tragens kippt, überprüfen Sie, ob der Tragebügel in der Trageposition A eingerastet ist.
EINSTELLEN DES TRAGEBÜGELS
Sie können den Tragebügel in 4 Positionen einrasten lassen:A: Fahrzeug- und Trageposition.B+C: Zum Hineinlegen Ihres Babys.D: Zum sicheren Stand auf einer ebenen Fläche
außerhalb des Fahrzeugs.
• Zur Verstellung des Tragebügels drücken Sie gleichzei-tig die beiden Tasten b links und rechts am Tragebügel a.
• Schwenken Sie nun mit gedrückten Tasten b, den Tragebügel a vor oder zurück, bis er selbsttätig in der gewünschten Position einrastet.
Ferner weisen wir in diesem Zusammenhang auf unsere Reinigungshinweise hin, die vor der ersten Verwendung des Sitzes unbedingt beachtet werden sollten.
10
WARNING! Always secure the baby with the integra-ted harness system.
WARNING! In order to avoid unwanted tilting of the seat whilst carrying, make sure that the handle is locked in the carrying position A.
CARRYING HANDLE ADJUSTMENT
The carrying handle can be adjusted into 4 different positions:A: Carrying/Driving-Position.B+C: For placing the baby in the seat.D: Safe sitting position outside the car.
• In order to adjust the handle press buttons b on left and right side on the handle a.
• Adjust the carrying handle a to the desired position by pressing the buttons b.
ATTENZIONE! Allacciare sempre il bambino con il sistema di cinture integrato.
ATTENZIONE! Per evitare il rischio di capovolgi-mento durante il trasporto, assicuratevi sempre che
A.
REGOLAZIONE DEL MANICO PER IL TRASPORTO
Il manico per il trasporto può essere regolato in 4 diverse posizioni:A: Posizione di trasporto/di viaggioB+C: Posizione per l‘inserimento del bambino nel
seggiolinoD: Posizione di seduta in sicurezza al di fuori
dell’auto.
• Per regolare la posizione del manico premere i pulsanti b su ambo i lati del manico a.
• Regolare il manico a per il trasporto nella posizione desiderata premendo i pulsanti b.
DE
EN
IT
In this context, we would also like to refer to you to our cleaning instructions, which must absolutely be followed
Con l‘occasione ricordiamo di fare riferimento anche alle istruzioni per il lavaggio, che devono essere seguite scrupolosamente prima dell‘utilizzo.
11
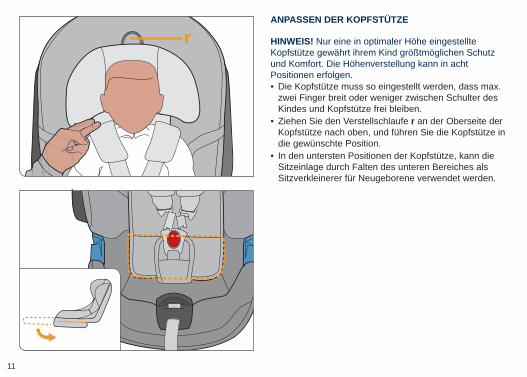
• Die Kopfstütze muss so eingestellt werden, dass max. zwei Finger breit oder weniger zwischen Schulter des Kindes und Kopfstütze frei bleiben.
• Ziehen Sie den Verstellschlaufe r an der Oberseite der Kopfstütze nach oben, und führen Sie die Kopfstütze in die gewünschte Position.
• In den untersten Positionen der Kopfstütze, kann die Sitzeinlage durch Falten des unteren Bereiches als Sitzverkleinerer für Neugeborene verwendet werden.
ANPASSEN DER KOPFSTÜTZE
HINWEIS! Nur eine in optimaler Höhe eingestellte Kopfstütze gewährt ihrem Kind größtmöglichen Schutz und Komfort. Die Höhenverstellung kann in acht Positionen erfolgen.
r
12
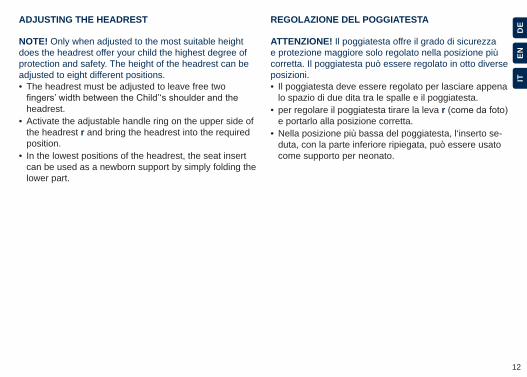
• The headrest must be adjusted to leave free two
headrest. • Activate the adjustable handle ring on the upper side of the headrest r and bring the headrest into the required position.
• In the lowest positions of the headrest, the seat insert can be used as a newborn support by simply folding the lower part.
• Il poggiatesta deve essere regolato per lasciare appena lo spazio di due dita tra le spalle e il poggiatesta.
• per regolare il poggiatesta tirare la leva re portarlo alla posizione corretta.
• Nella posizione più bassa del poggiatesta, l‘inserto se-duta, con la parte inferiore ripiegata, può essere usato come supporto per neonato.
ADJUSTING THE HEADREST REGOLAZIONE DEL POGGIATESTA
NOTE! Only when adjusted to the most suitable height does the headrest offer your child the highest degree of protection and safety. The height of the headrest can be adjusted to eight different positions.
ATTENZIONE! Il poggiatesta offre il grado di sicurezza e protezione maggiore solo regolato nella posizione più corretta. Il poggiatesta può essere regolato in otto diverse posizioni.
DE
EN
IT
13
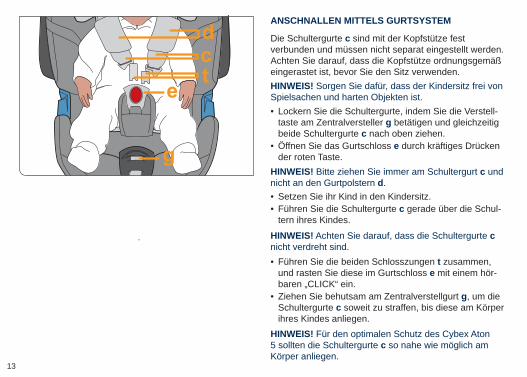
HINWEIS! Bitte ziehen Sie immer am Schultergurt c und nicht an den Gurtpolstern d.
HINWEIS! Achten Sie darauf, dass die Schultergurte c nicht verdreht sind.
• Setzen Sie ihr Kind in den Kindersitz. • Führen Sie die Schultergurte c gerade über die Schul-tern ihres Kindes.
• Führen Sie die beiden Schlosszungen t zusammen, und rasten Sie diese im Gurtschloss e mit einem hör-baren „CLICK“ ein.
• Ziehen Sie behutsam am Zentralverstellgurt g, um die Schultergurte c soweit zu straffen, bis diese am Körper ihres Kindes anliegen.
HINWEIS! Für den optimalen Schutz des Cybex Aton 5 sollten die Schultergurte c so nahe wie möglich am Körper anliegen.
• Lockern Sie die Schultergurte, indem Sie die Verstell-taste am Zentralversteller g betätigen und gleichzeitig beide Schultergurte c nach oben ziehen.
• Öffnen Sie das Gurtschloss e durch kräftiges Drücken der roten Taste.
ANSCHNALLEN MITTELS GURTSYSTEM
HINWEIS! Sorgen Sie dafür, dass der Kindersitz frei von Spielsachen und harten Objekten ist.
Die Schultergurte c sind mit der Kopfstütze fest verbunden und müssen nicht separat eingestellt werden. Achten Sie darauf, dass die Kopfstütze ordnungsgemäß eingerastet ist, bevor Sie den Sitz verwenden.
14
NOTE! Always pull on the shoulder belt c never pull on the shoulder pads d.
ATTENZIONE! Tirare sempre le cinture alla posizione c; mai tirare la parte delle spalline di protezione d.
NOTE! Make sure that the shoulder belts c are not twisted or crossed over.
ATTENZIONE! Assicuratevi che le cinture c non siano attorcigliate prima di legare il bambino.
• Put the child in the child seat. • Adjust the shoulder belts cchild‘s shoulders.
• Sedere il bambino nel seggiolino auto. • Regolare le cinture di sicurezza c per portarle sempre nella posizione più corretta .
• Bring both belt tongues t together and lock them into place in the belt buckle e with an audible “CLICK”.
• Gently and cautiously pull on the central adjuster belt g, in order to tighten the shoulder belts c until they lie against the body of your child.
• Congiungete entrambi gli agganci delle cinture t e allacciateli al blocco centrale e. Sentirete un “CLICK” quando saranno correttamente agganciate.
• Premere leggermente sul pulsante di regolazione centrale g per correggere la lunghezza delle cinture c in modo che restino sempre vicine al corpo del bambino.
NOTE! In order to gain optimum protection from the Cybex Aton 5, the shoulder belts c should lie as close as possible to the body.
ATTENZIONE! Per avere sempre una protezione ottimele trammite Aton 5, le cinture di sicurezza c devono rimanere sempre il più possibile vicine al corpo del bambino
DE
EN
IT
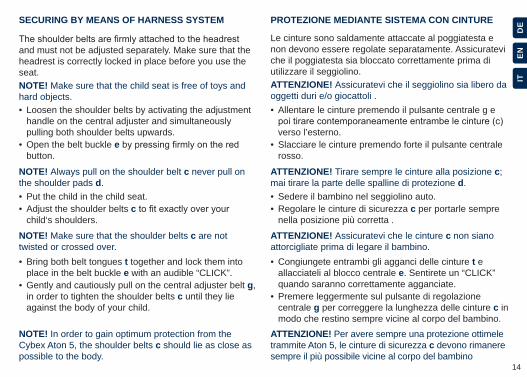
• Loosen the shoulder belts by activating the adjustment handle on the central adjuster and simultaneously pulling both shoulder belts upwards.
• Open the belt buckle e button.
• Allentare le cinture premendo il pulsante centrale g e
verso l’esterno. • Slacciare le cinture premendo forte il pulsante centrale rosso.
SECURING BY MEANS OF HARNESS SYSTEM PROTEZIONE MEDIANTE SISTEMA CON CINTURE
NOTE! Make sure that the child seat is free of toys and hard objects.
ATTENZIONE! Assicuratevi che il seggiolino sia libero da oggetti duri e/o giocattoli .
and must not be adjusted separately. Make sure that the headrest is correctly locked in place before you use the seat.
Le cinture sono saldamente attaccate al poggiatesta e non devono essere regolate separatamente. Assicuratevi che il poggiatesta sia bloccato correttamente prima di utilizzare il seggiolino.
15
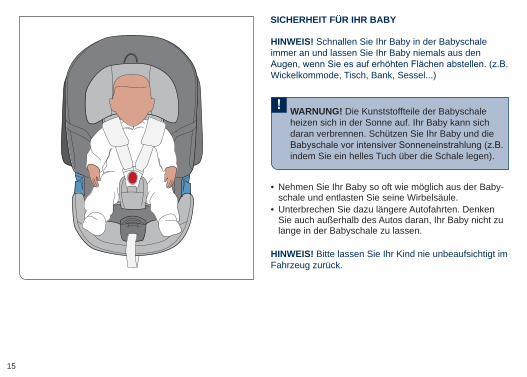
WARNUNG! Die Kunststoffteile der Babyschale heizen sich in der Sonne auf. Ihr Baby kann sich daran verbrennen. Schützen Sie Ihr Baby und die
indem Sie ein helles Tuch über die Schale legen).
HINWEIS! Schnallen Sie Ihr Baby in der Babyschale immer an und lassen Sie Ihr Baby niemals aus den
Wickelkommode, Tisch, Bank, Sessel...)
• Nehmen Sie Ihr Baby so oft wie möglich aus der Baby-schale und entlasten Sie seine Wirbelsäule.
• Unterbrechen Sie dazu längere Autofahrten. Denken Sie auch außerhalb des Autos daran, Ihr Baby nicht zu lange in der Babyschale zu lassen.
HINWEIS! Bitte lassen Sie Ihr Kind nie unbeaufsichtigt im Fahrzeug zurück.
SICHERHEIT FÜR IHR BABY
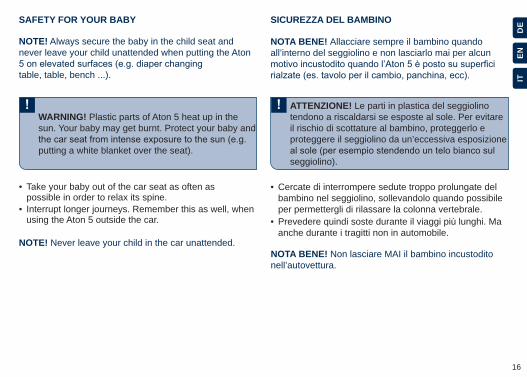
16
NOTE! Never leave your child in the car unattended.NOTA BENE! Non lasciare MAI il bambino incustodito nell’autovettura.
WARNING! Plastic parts of Aton 5 heat up in the sun. Your baby may get burnt. Protect your baby and
putting a white blanket over the seat).
NOTE! Always secure the baby in the child seat and never leave your child unattended when putting the Aton
table, table, bench ...).
• Take your baby out of the car seat as often as possible in order to relax its spine.
• Interrupt longer journeys. Remember this as well, when using the Aton 5 outside the car.
ATTENZIONE! Le parti in plastica del seggiolino tendono a riscaldarsi se esposte al sole. Per evitare il rischio di scottature al bambino, proteggerlo e proteggere il seggiolino da un’eccessiva esposizione
seggiolino).
NOTA BENE! Allacciare sempre il bambino quando all’interno del seggiolino e non lasciarlo mai per alcun
• Cercate di interrompere sedute troppo prolungate del bambino nel seggiolino, sollevandolo quando possibile per permettergli di rilassare la colonna vertebrale.
• Prevedere quindi soste durante il viaggi più lunghi. Ma anche durante i tragitti non in automobile.
SAFETY FOR YOUR BABY SICUREZZA DEL BAMBINO
DE
EN
IT
17
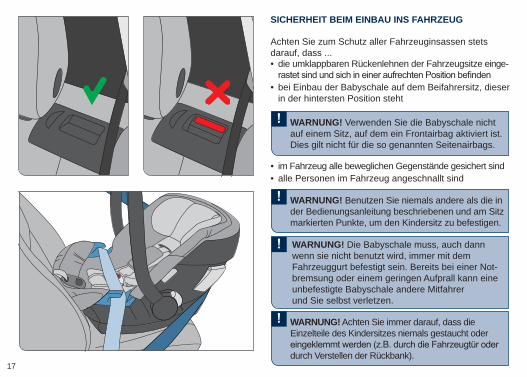
WARNUNG! Verwenden Sie die Babyschale nicht auf einem Sitz, auf dem ein Frontairbag aktiviert ist. Dies gilt nicht für die so genannten Seitenairbags.
WARNUNG! Benutzen Sie niemals andere als die in der Bedienungsanleitung beschriebenen und am Sitz markierten Punkte, um den Kindersitz zu befestigen.
WARNUNG! Achten Sie immer darauf, dass die Einzelteile des Kindersitzes niemals gestaucht oder
durch Verstellen der Rückbank).
WARNUNG! Die Babyschale muss, auch dann wenn sie nicht benutzt wird, immer mit dem Fahrzeuggurt befestigt sein. Bereits bei einer Not-bremsung oder einem geringen Aufprall kann eine unbefestigte Babyschale andere Mitfahrer und Sie selbst verletzen.
Achten Sie zum Schutz aller Fahrzeuginsassen stets darauf, dass ... • die umklappbaren Rückenlehnen der Fahrzeugsitze einge-
• bei Einbau der Babyschale auf dem Beifahrersitz, dieser in der hintersten Position steht
• im Fahrzeug alle beweglichen Gegenstände gesichert sind • alle Personen im Fahrzeug angeschnallt sind
SICHERHEIT BEIM EINBAU INS FAHRZEUG
18
ATTENZIONE! parti del seggiolino non siano mai bloccatie o
durante la regolazione del sedile).
WARNING! Always ensure that the individual com-ponents of the child seat are never compressed or
back seat.)
WARNING! Never use the Aton 5 on a car seat equipped with a front-airbag. This does not apply to so-called side airbags.
WARNING! The child seat must always be secured with the seat belt even if not in use. In case of an emergency brake or accident, an unsecured child seat may injure other passengers or yourself.
WARNING! Do not use any load bearing contact points other than those described in the instructions and marked in the child restraint.
In order to guarantee the best possible safety for all passengers make sure that ... • foldable backrests in the car are locked in their upright position
• when installing the Aton 5 on the front passenger seat, adjust the car seat in rearmost position
• you properly secure all objects likely to cause injury in the case of an accident
• all passengers in the car are buckled up
ATTENZIONE! Non posizionare MAI l’Aton 5 sul sedile anteriore passeggero in auto dotate di airbag. L’avvertenza vale soltanto per airbag frontale, non per quelli laterali.
ATTENZIONE! Il seggiolino deve sempre essere
quando non utilizzato. In caso di frenata brusca o di
altri passeggeri o il guidatore.
ATTENZIONE! Non utilizzare punti di contatto portanti diversi da quelli descritti nelle istruzioni e contrassegnati sul sistema di ritenuta.
Per garantire la massima sicurezza di tutti i passeggeri nell’auto è necessario … •
• nel caso l‘Aton 5 sia installato sul sedile passeggero anteri-
• assicurare in modo appropriato tutti gli oggetti che potreb-bero costituire pericolo di ferite in caso di incidente.
• che tutti i passeggeri nel veicolo abbiano le cinture allacciate.
SAFETY IN THE CAR SICUREZZA NELL’AUTO
DE
EN
IT
19
WARNUNG! Der Sitz ist nicht für die Verwendung mit einem 2-Punkt- oder Beckengurt geeignet. Bei Sicherung mit einem 2-Punkt-Gurt kann es bei einem Unfall zu schweren oder tödlichen Verlet-zungen des Kindes kommen.
• Vergewissern Sie sich, dass der Tragebügel a in der Fahrzeugpostion A
• Stellen Sie die Babyschale entgegen der Fahrtrichtung
Richtung Fahrzeugsitzlehne.) • Der CYBEX Aton 5 ist auf allen Plätzen mit Dreipunkt-Automatikgurt verwendbar. Wir empfehlen generell, den Sitz hinten im Fahrzeug zu verwenden. Vorne ist Ihr Kind bei einem Unfall in den meisten Fällen höheren Gefahren ausgesetzt.
DER EINBAU INS FAHRZEUG
• Stellen Sie sicher, dass die Einbaumarkierung seitlich am Warnaufkleber p des Sitzes parallel zum Fahrzeug-boden steht.
• Ziehen Sie den Fahrzeuggurt heraus und führen Sie ihn über die Babyschale.
• Rasten Sie die Schlosszunge im Fahrzeug-Gurtschloss q ein.
20
WARNING! The seat must not be used with a two-point belt or a lap belt. When securing your child with a two-point belt, this may result in injuries or death of the child.
• Make sure that the carrying handle a is in the upper position A
• Place the seat against driving position on the car
backrest of the car seat). • CYBEX Aton 5 can be used on all seats with a three-point automatic retractor belt. We generally recommend to use the seat in the back of the vehicle. In the front, your child is usually exposed to higher risks in case of an accident.
INSTALLING THE SEAT
• Make sure that the horizontal marking on the safety sticker p
• Pull the three-point belt over the child seat. • Insert the belt tongue into the car belt buckle q.
ATTENZIONE! Il seggiolino NON può essere utilizzato su sedili con cinture a due punti o soltanto quella ventrale. Fissando il bambino con cinture a due punti soltanto lo si espone a grave rischio di ferite o di morte in caso di incidente.
• Assicurarsi che il manico per il trasporto a sia nella posizione più rialzata A
• Collocare il seggiolino sul sedile in direzione opposta a
del sedile) • CYBEX Aton 5 può essere utilizzato in tutti i sedili con cinture di sicurezza automatiche a tre punti. General-mente raccomandiamo di utilizzare il seggiolino nei sedili posteriori dei veicoli. Se utilizzato nel sedile anteriore, il bambino è generalmente esposto a rischi maggiori in caso di incidente.
INSTALLAZIONE DEL SEGGIOLINO
•sicurezza p risulti parallela al pavimento.
• Tirare la cintura a tre punti e farla passare attorno al seggiolino.
• q.
DE
EN
IT
21
• Legen Sie den Beckengurt k in die blauen Gurtfüh-rungen m an beiden Seiten des Babyschalen-Randes ein.
• Straffen Sie den Beckengurt k, indem Sie am Dia-gonalgurt l in Fahrtrichtung ziehen.
• Ziehen Sie den Diagonalgurt l hinter das Kopfende der Babyschale.
• Führen Sie den Diagonalgurt l durch die hintere blaue Gurtführung n.
• Straffen Sie den Diagonalgurt l.
HINWEIS! Fahrzeuggurt dabei nicht verdrehen.
HINWEIS! Der Gurt muss durch die blaue Gurtführung und unterhalb des ausgeklappten Seitenaufprallschutzes geführt werden.
22
• Insert the lap belt k into the blue belt guides m on both sides of the car seat.
• Pull the diagonal belt l in driving direction to tighten the lap belt k.
• Pull the diagonal belt l behind the top end of the baby seat.
• Bring the diagonal belt l into the blue belt slot n on the back.
• Tighten the diagonal belt l.
NOTE! Do not twist the car belt.
NOTE! The seat belt must run through the blue belt routing and below the unfolded Linear Side-impact Protection.
• Inserire la parte di cintura ventrale k nelle guide m su ambo i lati del seggiolino.
• Tirare la parte diagonale della cintura l per stringere la parte ventrale k.
• Posizionare quindi la parte diagonale della cintura l sull’estremità anteriore del seggiolino.
• Posizionare la cintura diagonale l nell’apposita fessura n di colore blu sul retro.
• Stringere la cintura diagonale l.
NOTA BENE! Non attorcigliare la cintura!
NOTA BENE! La cintura di sicurezza deve passare all’interno degli appositi spazi blu e dietro alla protezione LSP aperta
DE
EN
IT
23
f
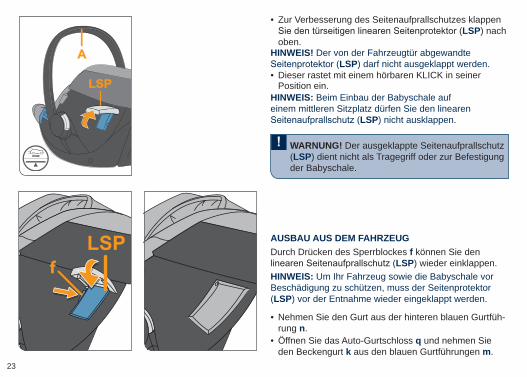
WARNUNG! Der ausgeklappte Seitenaufprallschutz LSP) dient nicht als Tragegriff oder zur Befestigung
der Babyschale.
• Dieser rastet mit einem hörbaren KLICK in seiner Position ein.
HINWEIS: Beim Einbau der Babyschale auf einem mittleren Sitzplatz dürfen Sie den linearen
LSP) nicht ausklappen.
• Nehmen Sie den Gurt aus der hinteren blauen Gurtfüh-rung n.
• Öffnen Sie das Auto-Gurtschloss q und nehmen Sie den Beckengurt k aus den blauen Gurtführungen m.
• Zur Verbesserung des Seitenaufprallschutzes klappen LSP) nach
oben.HINWEIS! Der von der Fahrzeugtür abgewandte
LSP) darf nicht ausgeklappt werden.
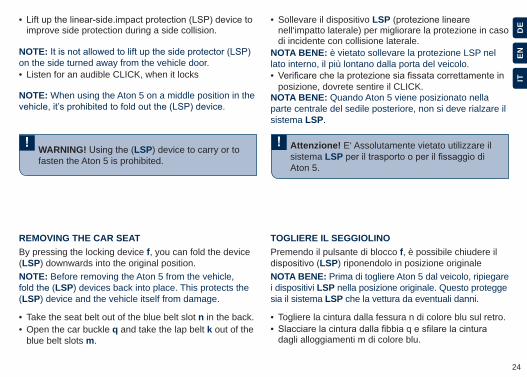
AUSBAU AUS DEM FAHRZEUGDurch Drücken des Sperrblockes f können Sie den
LSP) wieder einklappen.HINWEIS: Um Ihr Fahrzeug sowie die Babyschale vor Beschädigung zu schützen, muss der Seitenprotektor LSP) vor der Entnahme wieder eingeklappt werden.
24
• Listen for an audible CLICK, when it locks
NOTE: When using the Aton 5 on a middle position in the
WARNING! LSP) device to carry or to fasten the Aton 5 is prohibited.
• Take the seat belt out of the blue belt slot n in the back. • Open the car buckle q and take the lap belt k out of the blue belt slots m.
Attenzione! E‘ Assolutamente vietato utilizzare il sistema LSPAton 5.
• Togliere la cintura dalla fessura n di colore blu sul retro. •dagli alloggiamenti m di colore blu.
•improve side protection during a side collision.
• Sollevare il dispositivo LSPnell‘impatto laterale) per migliorare la protezione in caso di incidente con collisione laterale.
•posizione, dovrete sentire il CLICK.
NOTE:on the side turned away from the vehicle door.
NOTA BENE: è vietato sollevare la protezione LSP nel lato interno, il più lontano dalla porta del veicolo.
NOTA BENE: Quando Aton 5 viene posizionato nella parte centrale del sedile posteriore, non si deve rialzare il sistema LSP.
REMOVING THE CAR SEAT TOGLIERE IL SEGGIOLINO
NOTE: Before removing the Aton 5 from the vehicle, LSP) devices back into place. This protects the
LSP) device and the vehicle itself from damage.
NOTA BENE: Prima di togliere Aton 5 dal veicolo, ripiegare i dispositivi LSP nella posizione originale. Questo protegge sia il sistema LSP che la vettura da eventuali danni.
By pressing the locking device f, you can fold the device LSP) downwards into the original position.
Premendo il pulsante di blocco f, è possibile chiudere il LSP) riponendolo in posizione originale
DE
EN
IT
25
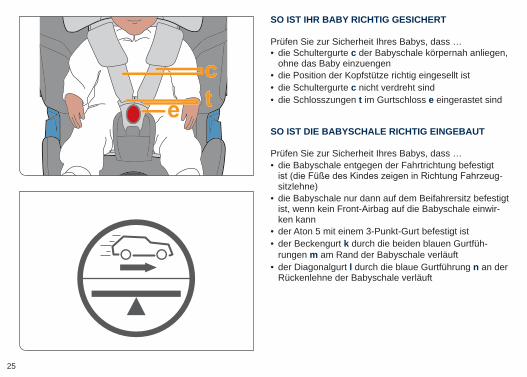
• die Babyschale entgegen der Fahrtrichtung befestigt -
sitzlehne) • die Babyschale nur dann auf dem Beifahrersitz befestigt ist, wenn kein Front-Airbag auf die Babyschale einwir-ken kann
• der Aton 5 mit einem 3-Punkt-Gurt befestigt ist • der Beckengurt k durch die beiden blauen Gurtfüh-rungen m am Rand der Babyschale verläuft
• der Diagonalgurt l durch die blaue Gurtführung n an der Rückenlehne der Babyschale verläuft
SO IST IHR BABY RICHTIG GESICHERT
SO IST DIE BABYSCHALE RICHTIG EINGEBAUT
Prüfen Sie zur Sicherheit Ihres Babys, dass …
Prüfen Sie zur Sicherheit Ihres Babys, dass …
• die Schultergurte c der Babyschale körpernah anliegen, ohne das Baby einzuengen
• die Position der Kopfstütze richtig eingesellt ist • die Schultergurte c nicht verdreht sind • die Schlosszungen t im Gurtschloss e eingerastet sind
26
• that the Aton 5 is positioned against driving direc-
backrest of the car seat) • if the car seat is installed in front, that the front- airbag is deactivated
• that Aton 5 is secured with a 3-point belt • that the lap belt k is running through the belt slots m on each side of the baby seat
• that the diagonal belt l is running through the blue belt hook n on the back of the baby seat
• che il seggiolino Aton 5 sia sempre posizionato in -
no devono trovarsi verso lo schienale del sedile)
• che, nel caso il seggiolino CYBEX Aton 5 sia collocato sul sedile anteriore, l’airbag frontale sia disattivato
• sicurezza a tre punti
• che la parte di cintura ventrale k scorra correttamente attraverso le apposite guide m su ambo i lati del seggiolino
• che la parte di cintura diagonale l scorra attraverso n di colore blu sul retro del
seggiolino
SECURING YOUR CHILD CORRECTLY FISSARE CORRETTAMENTE IL BAMBINO
INSTALLING THE BABY SEAT CORRECTLY
INSTALLARE CORRETTAMENTE IL SEGGIOLINO
For the safety of your child please check … Per la massima sicurezza del bambino raccomandiamo
For the safety of your child please make sure …
• restricting the baby
• that the headrest is adjusted to the correct height • if the shoulder belts c are not twisted • if the buckle tongues t are fastened in the buckle e
• che le cinture di sicurezza per le spalle c siano ben aderenti al suo corpo, senza stringerlo eccessivamente
• che il poggiatesta sia sempre regolato all’altezza giusta • che le cinghie non siano in alcun modo attorcigliate •
e
DE
EN
IT
27
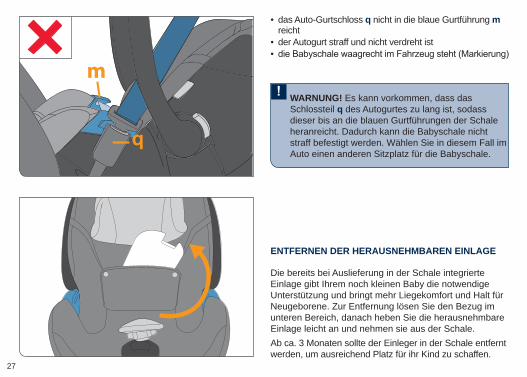
m
• das Auto-Gurtschloss q nicht in die blaue Gurtführung m reicht
• der Autogurt straff und nicht verdreht ist •
ENTFERNEN DER HERAUSNEHMBAREN EINLAGE
Die bereits bei Auslieferung in der Schale integrierte Einlage gibt Ihrem noch kleinen Baby die notwendige Unterstützung und bringt mehr Liegekomfort und Halt für Neugeborene. Zur Entfernung lösen Sie den Bezug im unteren Bereich, danach heben Sie die herausnehmbare Einlage leicht an und nehmen sie aus der Schale.Ab ca. 3 Monaten sollte der Einleger in der Schale entfernt werden, um ausreichend Platz für ihr Kind zu schaffen.
WARNUNG! Es kann vorkommen, dass das Schlossteil q des Autogurtes zu lang ist, sodass dieser bis an die blauen Gurtführungen der Schale heranreicht. Dadurch kann die Babyschale nicht straff befestigt werden. Wählen Sie in diesem Fall im Auto einen anderen Sitzplatz für die Babyschale.
28
• that the car buckle q is not reaching all the way to the blue belt slot m
• that the car belt is tight and not twisted •marking)
• q non raggiunga l’altezza delle guide m del seggiolino
• che la cintura dell’auto sia ben tesa e non attorcigliata • che l’Aton 5 sia installato in posizione verticale sul
DE
EN
IT
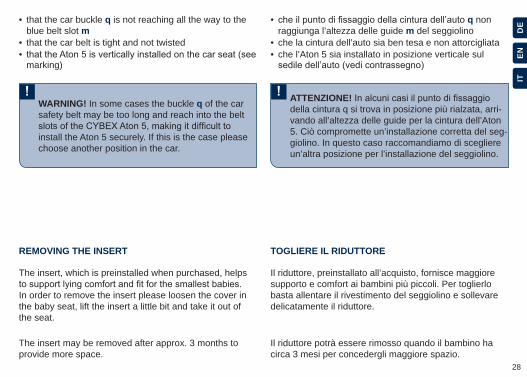
REMOVING THE INSERT TOGLIERE IL RIDUTTORE
The insert, which is preinstalled when purchased, helps
In order to remove the insert please loosen the cover in the baby seat, lift the insert a little bit and take it out of the seat.
Il riduttore, preinstallato all’acquisto, fornisce maggiore supporto e comfort ai bambini più piccoli. Per toglierlo basta allentare il rivestimento del seggiolino e sollevare delicatamente il riduttore.
The insert may be removed after approx. 3 months to provide more space.
Il riduttore potrà essere rimosso quando il bambino ha circa 3 mesi per concedergli maggiore spazio.
WARNING! In some cases the buckle q of the car safety belt may be too long and reach into the belt
install the Aton 5 securely. If this is the case please choose another position in the car.
ATTENZIONE!della cintura q si trova in posizione più rialzata, arri-vando all’altezza delle guide per la cintura dell’Aton 5. Ciò compromette un’installazione corretta del seg-giolino. In questo caso raccomandiamo di scegliere un’altra posizione per l’installazione del seggiolino.
29
Zur Entriegelung halten Sie die beiden Entriegelungstasten r der Babyschale gedrückt und heben Sie die Schale nach oben.
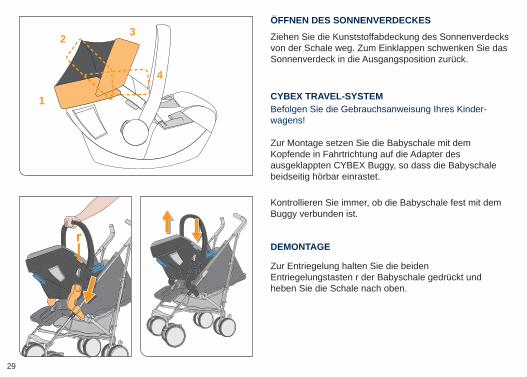
ÖFFNEN DES SONNENVERDECKES
CYBEX TRAVEL-SYSTEM
Ziehen Sie die Kunststoffabdeckung des Sonnenverdecks von der Schale weg. Zum Einklappen schwenken Sie das Sonnenverdeck in die Ausgangsposition zurück.
Befolgen Sie die Gebrauchsanweisung Ihres Kinder-wagens!
Zur Montage setzen Sie die Babyschale mit dem Kopfende in Fahrtrichtung auf die Adapter des ausgeklappten CYBEX Buggy, so dass die Babyschale beidseitig hörbar einrastet.
Kontrollieren Sie immer, ob die Babyschale fest mit dem Buggy verbunden ist.
DEMONTAGE
1
2 3
4
30
To unlock the baby seat keep the release buttons r pressed and then lift the shell up.
Per sganciare il seggiolino tenere premuti i pulsanti r e sollevare la scocca.
OPENING THE CANOPY APERTURA DELLA CAPOTTINA
CYBEX TRAVEL-SYSTEM CYBEX TRAVEL-SYSTEM
Pull the canopy panel away from the seat and turn the canopy up. To fold away the canopy turn it back to its basic position.
Ruotare verso l‘alto il pannello di protezione e aprire la capottina. Per chiudere la capottina, spingere semplicemente il pannello verso la posizione iniziale.
Please follow the instruction manual supplied with your push chair.
Vi preghiamo di seguire le istruzioni contenute nel manuale del passeggino.
In order to attach the CYBEX Aton 5 please place it against driving direction on the adapters of the CYBEX buggy. You will hear an audible CLICK when the baby seat is locked into the adapters.
Always double check if the baby seat is securly fastened to the buggy.
contraria al senso di marcia sugli adattatori del
sentirete chiaramente il CLICK di aggancio negli adattatori.
saldamente al passeggino.
DEMOUNTING SMONTAGGIO
DE
EN
IT

31
Aufgrund eines Unfalles können am Kindersitz Beschädigungen auftreten, die mit bloßem Auge nicht erkennbar sind. Bitte tauschen Sie nach einem Unfall unbedingt den Sitz aus. Im Zweifelsfall wenden Sie sich bitte an den Händler oder Hersteller.
PFLEGE
VERHALTEN NACH EINEM UNFALL
Um die größtmögliche Schutzwirkung Ihrer Babyschale zu gewährleisten, ist es unbedingt notwendig, dass Sie folgendes beachten: • Alle wichtigen Teile der Babyschale sollten regelmäßig auf Beschädigungen kontrolliert werden.
• Die mechanischen Bauteile müssen einwandfrei funk-tionieren.
• Es ist unbedingt darauf zu achten, dass die Babyschale nicht zwischen harten Teilen wie Fahrzeugtür, Sitzschie-ne usw. eingeklemmt wird, da sie dadurch beschädigt werden kann.
• Die Babyschale muss z.B. nach einem Sturz unbedingt vom Hersteller überprüft werden.
HINWEIS! Es ist ratsam, bereits beim Kauf eines CYBEX Aton 5 einen zusätzlichen Bezug zu kaufen, sodass der CYBEX Aton 5 weiter benutzt werden kann, auch während des Waschens und Trocknens des Bezuges.
32
In an accident the seat can sustain damages which are invisible to the eye. Therefore the seat should be replaced immediately in such cases. If in doubt please contact your retailer or the manufacturer.
In caso di incidente il seggiolino può essere soggetto a danni non immediatamente visibili. A seguito di un incidente il seggiolino dovrebbe essere immediatamente sostituito. Per qualsiasi dubbio vi preghiamo di contattare il rivenditore o il produttore.
PRODUCT CARE MANUTENZIONE
WHAT TO DO AFTER AN ACCIDENTIN CASO DI INCIDENTE
In order to guarantee the best possible protection for your child, please take note of the following:
Per garantire la massima protezione del bambino è necessario tenere presente quanto segue:
• All important parts of the child seat should be examined for damages on a regular basis.
• • It is essential that the child seat does not get jammed between hard parts like the door of the car, seat rail etc. which might cause damage to the seat.
• The child seat must be examined by the manufacturer after e.g. having been dropped or similar situations.
• Tutte le parti importanti del seggiolino devono essere
eventuali danni. • Le parti meccaniche devono funzionare correttamente. • E’ essenziale che il seggiolino non venga danneggiato a causa di un eventuale schiacciamento tra il sedile dell’auto e la porta o da altri ostacoli solidi.
• Il seggiolino dovrà essere inviato al produttore per un controllo in caso di caduta o altri eventi similari.
NOTE! When you buy a CYBEX Aton 5 it is recommended to buy a second seat cover. This allows you to clean and dry one whilst using the other one in the seat.
NOTA BENE! Consigliamo sempre l’acquisto di un secondo rivestimento per CYBEX Aton 5. Questo consente di avere sempre il seggiolino completo di rivestimento mentre uno dei due viene lavato e pulito.
DE
EN
IT
33
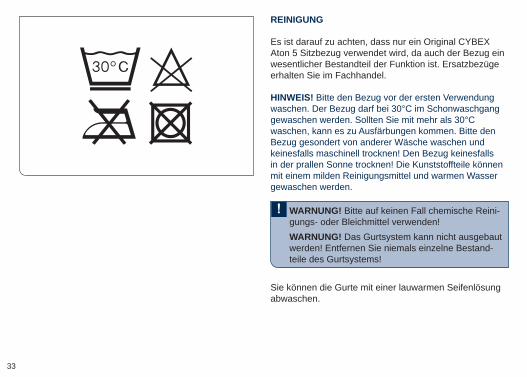
HINWEIS! Bitte den Bezug vor der ersten Verwendung waschen. Der Bezug darf bei 30°C im Schonwaschgang gewaschen werden. Sollten Sie mit mehr als 30°C waschen, kann es zu Ausfärbungen kommen. Bitte den Bezug gesondert von anderer Wäsche waschen und keinesfalls maschinell trocknen! Den Bezug keinesfalls in der prallen Sonne trocknen! Die Kunststoffteile können mit einem milden Reinigungsmittel und warmen Wasser gewaschen werden.
Sie können die Gurte mit einer lauwarmen Seifenlösung abwaschen.
WARNUNG! Bitte auf keinen Fall chemische Reini-gungs- oder Bleichmittel verwenden!WARNUNG! Das Gurtsystem kann nicht ausgebaut werden! Entfernen Sie niemals einzelne Bestand-teile des Gurtsystems!
REINIGUNG
Es ist darauf zu achten, dass nur ein Original CYBEX Aton 5 Sitzbezug verwendet wird, da auch der Bezug ein wesentlicher Bestandteil der Funktion ist. Ersatzbezüge erhalten Sie im Fachhandel.
34
The integrated harness system can be cleaned with a mild detergent and warm water.
Il sistema di imbragatura integrato può essere lavato con un detergente neutro e acqua calda.
NOTE!time. Seat covers are machine washable at max. 30°C on delicate cycle. If you wash it at higher temperature, the cover fabric may lose colour. Please wash the cover separately and never dry it mechanically! Do not dry the cover in direct sunlight! You can clean the plastic parts with a mild detergent and warm water.
NOTA BENE! Consigliamo il lavaggio prima del primo utilizzo. Rivestimenti lavabili in lavatrice, ciclo delicato max 30°. L‘uso di temperature più elevate può scolorire i tessuti. Lavare separatamente e non asciugare mai a macchina. Non asciugare alla luce diretta del sole. Le parti in plastica possono essere pulite con detergente neutro e acqua tiepida.
WARNING! Please do not use chemical detergents or bleaching agents under any circumstances!WARNING! The integrated harness system cannot be removed from the baby seat. Do not remove parts of the harness system.
ATTENZIONE! Non usare MAI detergenti chimici o agenti sbiancanti.ATTENZIONE! Il sistema di imbragatura integrato non può essere rimosso! Non rimuovere alcuna parte del sistema di imbragatura dal seggiolino.
CLEANING PULIZIA
It is important to use only an original CYBEX Aton 5 seat cover since the cover is an essential part of the function. You may obtain spare covers at your retailer.
Il rivestimento è una parte importante per il funzionamento del seggiolino ed è indispensabile utilizzare soltanto rivestimenti originali CYBEX Aton 5. Rivestimenti di ricambio originali sono disponibili presso i rivenditori autorizzati.
DE
EN
IT

35
• Öffnen Sie das Gurtschloss. • Ziehen Sie die beiden Schulterpolster vom Gurt ab. • Ziehen Sie den Kopfstützenbezug über den Kopfstüt-zenrand ab
• Fädeln Sie die Schultergurte mit den Schlosszungen aus dem Kopfstützenbezug aus.
• Ziehen Sie den Kopfstützenbezug ab. • Ziehen Sie den Hauptbezugsteil über den Schalenrand ab.
• Ziehen Sie das Gurtschloss aus dem Bezug. • Nun können Sie den Bezug abnehmen.
HINWEIS! Die Schultergurte dabei nicht verdrehen oder vertauschen.
WARNUNG! Der Kindersitz darf keinesfalls ohne Bezug verwendet werden.
ENTFERNEN DES BEZUGES
ANBRINGEN DES BEZUGES
Der Bezug besteht aus 5 Teilen: 1 Schalenbezug, 1 Kopfstützenbezug, 2 Gurtpolster und 1 Gurtschlosspolster. Zum Entfernen gehen Sie bitte wie folgt vor:
HINWEIS! Es dürfen nur CYBEX Aton 5 original Bezüge verwendet werden.
Führen Sie die zuvor beschriebenen Handgriffe in umgekehrter Reihenfolge aus, um den Bezug wieder zu befestigen.
36
NOTE! Do not twist the shoulder straps. NOTA BENE! Fare molta attenzione a non attorcigliare mai le cinghie per le spalle.
WARNING! The child seat must never be used without the cover.
• Open the buckle. • Remove the shoulder pads from the shoulder belts. • Pull the headrest cover over the headrest rim. • Pull the shoulder belts with the buckle tongues out of the headrest cover.
• Remove the headrest cover. • Pull the seat cover over the seat rim. • Pull the buckle through the seat cover. • Now you can remove the cover part.
• Slacciare le cinture. • Rimuovere le spalline di protezione dalle cinture. • • • Rimuovere la fodera del poggiatesta. •seggiolino.
• • Ora potete rimuovere la fodera della seduta.
ATTENZIONE! Il seggiolino di sicurezza non deve essere MAI utilizzato senza l’apposito rivestimento.
Per riposizionare il rivestimento sul seggiolino ripetere le operazioni sopra descritte nell’ordine inverso.
REMOVING THE COVER RIMOZIONE DEL RIVESTIMENTO
ATTACHING THE SEAT COVERS FISSARE IL RIVESTIMENTO
The cover consists of 5 parts. 1 seat cover, 1 headrest cover, 2 shoulder pads and 1 buckle pad. To remove the cover please follow these steps:
La fodera comprende 5 parti. 1 fodera per la seduta, 1 fodera per il poggiatesta, 2 spalline per le cinture, 1
seguire questi passaggi.
in order to put the covers back onto the seat, proceed in the reverse order as shown above.
NOTE! Use CYBEX Aton 5 covers only! NOTA BENE! Utilizzare solo ed esclusivamente rivestimenti CIBEX Aton 5 originali!
DE
EN
IT
37
Durch den langsamen Verschleiß des Kunststoffs,
sich die Eigenschaften des Produkts geringfügig verschlechtern.
Da in Fahrzeugen sehr große Temperaturschwankungen herrschen und andere unvorhersehbare Belastungen auftreten können, ist es notwendig, folgende Punkte zu beachten: • Wenn das Fahrzeug längere Zeit der prallen Sonne ausgesetzt ist, muss die Babyschale aus dem Fahrzeug entfernt oder mit einem hellen Tuch abgedeckt werden.
• Prüfen Sie jährlich alle Kunststoffteile der Schale auf Beschädigung oder Veränderung von Form oder Farbe.
• Stellen Sie eine Veränderung fest, ist die Schale zu entsorgen. Veränderungen des Stoffes insbesondere das Ausbleichen sind normal und stellen keine Beein-trächtigung dar.
PRODUKTLEBENSDAUER
38
Since plastic materials wear out over time, e.g. from exposure to direct sunlight, the product characteristics may vary slightly.
As the car seat may be exposed to high temperature differences as well as other unforseeable forces please follow the instructions below.
Poiché con il tempo le parti in plastica tendono ad usurarsi, per esempio per esposizione eccessiva alla luce del sole, le caratteristiche del prodotto possono nel tempo subire leggere variazioni.
Poiché il seggiolino può essere esposto a notevoli variazioni di temperatura o a circostanze imprevedibili all’interno del veicolo è in ogni caso importante prendere nota di quanto segue:
• If the car is exposed to direct sunlight for a longer peri-od of time, the child seat must be taken out of the car or covered with a cloth.
• Examine all plastic parts of the seat for any damages or changes to their form or color on a yearly basis.
• If you should notice any changes, you must dispose of the seat. Changes to the fabric - in particular the fading of color - are normal and do not constitute a damage.
• Nel caso l’automobile venga lasciata al sole per un lungo periodo consigliamo di estrarre il seggiolino dall’abitacolo o di ripararlo con un telo di copertura.
• Raccomandiamo di controllare accuratamente almeno
•
di rivestimento, in particolare lo sbiadimento, sono considerate normali e non costituiscono un difetto.
DURABILITY OF PRODUCT DUREVOLEZZA PRODOTTO
DE
EN
IT
39
Aus Umweltschutzgründen bitten wir den Benutzer zu
Lebensdauer der Babyschale, den anfallenden Abfall zu trennen. Die Abfallentsorgung kann kommunal unterschiedlich geregelt sein. Um eine vorschriftsmäßige Entsorgung der Babyschale zu gewährleisten, setzen Sie sich mit Ihrer kommunalen Abfallentsorgung bzw. Verwaltung lhres Wohnortes in Verbindung. Beachten Sie auf jeden Fall die Entsorgungsbestimmungen lhres Landes.
• • Marke und Typ des Autos und die Position des Sitzes, auf dem die Babyschale benutzt wird.
•
auch unter WWW.CYBEX-ONLINE.COM
WARNUNG! Bewahren Sie Verpackungsmaterial aus Kunststoff außer Reichweite Ihres Kindes auf, es besteht Erstickungsgefahr!
ABFALLTRENNUNG
INFORMATIONEN ZUM PRODUKT
Bei Fragen wenden Sie sich zuerst an Ihren Händler. Folgende Angaben sollten Ihnen vorliegen:
40
For further information about our products please visit WWW.CYBEX-ONLINE.COM Per ulteriori informazioni sul prodotto vi invitiamo a
visitare il nostro sito: WWW.CYBEX-ONLINE.COM
WARNING! Keep all packing materials away from children. There is a risk of suffocation!
ATTENZIONE! Tenere tutte le parti dell’imballo lon-tane dalla portata dei bambini. Questo per evitare qualsiasi rischio di soffocamento!
For environmental reasons we kindly ask our customers
parts) of the lifetime of the child seat all incidental waste properly. Waste disposal regulations may vary regionally. In order to guarantee a proper disposal of the child seat, please contact your communal waste management or administration of your place of residence. In any case, please take note of the waste disposal regulations of your country.
• • brand name and type of car and the position where the seat is mounted normally.
•
Per ragioni di natura ambientale chiediamo a tutti i nostri clienti di provvedere allo smaltimento appropriato di ogni
parte). Le norme per lo smaltimento variano localmente.
di residenza per delucidazioni in merito. In ogni caso, seguire sempre le normative dello stato di residenza.
• • Marca e modello dell’auto, posizione in cui il seggiolino viene normalmente installato.
•
DISPOSAL SMALTIMENTO
Please collect the following information before:Per qualsiasi dubbio o informazione rivolgetevi subito al distributore. Prima di contattare il distributore accertatevi di avere questi dati:
PRODUCT INFORMATION INFORMAZIONI TECNICHE
DE
EN
IT
41
Die nachfolgenden Garantiebestimmungen gelten nur in dem Land, in dem dieses Produkt erstmalig über den Einzelhandel an einen Verbraucher verkauft wurde. Die Garantie deckt sämtliche Herstellungs- und Materialfehler ab, die im Zeitpunkt des Kaufs bestanden
Erstverkauf dieses Produkts über den Einzelhandel an einen Verbraucher in Erscheinung getreten sind
Herstellungs- und Materialfehler auf, wird das Produkt kostenlos repariert oder – nach unserem freien Ermessen – gegen ein neues ausgetauscht. Um Leistungen im Rahmen dieser Garantie in Anspruch nehmen zu können, muss das Produkt an den Einzelhändler zurückgegeben werden, der es erstmalig verkauft hat und ein Nachweis
vorgelegt werden, welcher das Kaufdatum, den Namen des Händlers sowie die Produktbezeichnung aufzeigt. Der Anspruch aus diesem Garantieversprechen besteht nicht, wenn das Produkt an den Hersteller oder irgendeine andere Person als den Einzelhändler, der es erstmalig verkauft hat, zum Zweck der Inanspruchnahme der Garantieleistung geschickt wird. Die Garantie gilt nur, wenn das Produkt nach dem Kauf umgehend auf Vollständigkeit, Herstellungs- und Materialfehler überprüft wurde. Wurde das Produkt im Versandhandel gekauft, ist es umgehend nach Erhalt auf Vollständigkeit, Herstellungs- und Materialfehler zu überprüfen. Falls Schäden vorhanden sind, darf das Produkt
GARANTIEBEDINGUNGEN
42
The following warranty applies solely in the country where this product was initially sold by a retailer to a customer. The warranty covers all manufacturing and material defects, existing and appearing, at the date of purchase
of purchase from the retailer who initially sold the product
that a manufacturing or material defect should appear, we will – at our own discretion – either repair the product free of charge or replace it with a new product. To obtain such warranty it is required to take or ship the product to the retailer, who initially sold this product to a customer
or invoice) that contains the date of purchase, the name of the retailer and the type designation of this product. This warranty shall not apply in the event that this product is taken or shipped to the manufacturer or any other person other than the retailer who initially sold this product to a consumer. Please check the product with respect to completeness and manufacturing or material defects immediately at the date of purchase or, in the event that the product was purchased in distance selling, immediately after receipt. In case of a defect stop using the product and take or ship it immediately to the retailer who initially sold it. In a warranty case the product has to be returned in a clean and complete condition. Prior to contacting the retailer, please read this instruction manual carefully. This warranty does not cover any damages
La seguente garanzia vale unicamente nella nazione in cui il prodotto è stato originariamente venduto da un rivenditore al consumatore. La garanzia copre eventuali difetti di fabbricazione e di materiali riscontrati
produttore). Nel caso venga riscontrato o appaia un difetto di fabbricazione o di materiali nel corso di validità della garanzia provvederemo - a nostra discrezione - a riparare il prodotto senza costi o a sostituirlo. Per avere diritto alla garanzia è necessario riportare o spedire il prodotto al rivenditore presso il quale è stato acquistato
dovrà contenere indicati la data di acquisto, il nome del
Nessun intervento in garanzia se il prodotto verrà inviato al produttore o a qualsiasi altra persona diversa dal rivenditore presso il quale si è effettuato l‘acquisto. La garanzia è valida soltanto se il prodotto è stato sottoposto ad un accurato controllo di completezza, funzionalità all‘acquisto e eventuali manchevolezze di produzione o di materiali sono state prontamente segnalate. Per acquisti a distanza, raccomandiamo di effettuare un controllo completo al ricevimento del prodotto. In caso si riscontri qualsiasi danneggiamento invitiamo a NON utilizzare il prodotto e a restituirlo immediatamente al rivenditore da cui è stato acquistato. I diritti di garanzia sono validi soltanto se il prodotto è reso pulito e
WARRANTY GARANZIA
DE
EN
IT
43
nicht mehr benutzt werden und muss umgehend an den Händler, der es erstmalig verkauft hat, zurückgegeben werden. Im Garantiefall muss das Produkt in einem vollständigen und sauberen Zustand zurückgegeben werden. Bitte lesen Sie vor einer Kontaktaufnahme mit dem Händler sorgfältig die Gebrauchsanleitung. Die Garantie deckt keine Schäden ab, die durch
Verkehrsunfälle o.ä.) oder normalen Verschleiß entstanden sind. Die Garantie wird nur gewährt, wenn das Produkt in Übereinstimmung mit der Gebrauchsanweisung behandelt und benutzt wurde, Reparaturen oder Veränderungen ausschließlich durch Personen vorgenommen wurden, die hierzu befugt waren und stets nur Original Bau- und Zubehörteile verwendet wurden. Durch diese Garantie werden weder die auf Grundlage der jeweils anwendbaren Gesetze bestehenden Verbraucherrechte noch Rechte gegen den Verkäufer wegen der Vertragswidrigkeit des Produkts ausgeschlossen, begrenzt oder in anderer Weise eingeschränkt.
CYBEX GmbH, Riedingerstr. 18, 95448 Bayreuth, Germany Tel.: +49 921 78 511-0, Fax.: +49 921 78 511- 999
CYBEX IN EUROPE
44
CYBEX GmbH, Riedingerstr. 18, 95448 Bayreuth, Germany tel. +39 0444 602721, fax +39 0444 1876734 email: [email protected]
road accidents etc.) or normal wear and tear. It does solely apply in the event that the use of the product was always in compliance with the operating instructions, if
by authorized persons and if original components and accessories were used. This warranty does not exclude, limit or otherwise affect any statutory consumer rights, including claims in tort and claims with respect to a breach of contract, which the buyer may have against the seller or the manufacturer of the product.
completo di ogni parte. Prima di contattare il rivenditore Vi preghiamo di leggere con attenzione le istruzioni contenute nel manuale. La garanzia non copre danni provocati da utilizzo improprio o eventi fortuiti e cause
normale deperimento d‘uso. La garanzia è valida soltanto per prodotti usati in conformità a quanto stabilito nel
sono state effettuate da personale autorizzato e se sono state utilizzate solo parti ed accessori originali. Questa garanzia non esclude, limita o comunque pregiudica eventuali diritti legali dei consumatori, comprese istanze in caso di torto e in caso di una violazione del contratto, che l‘acquirente può avere nei confronti del rivenditore o del produttore.
CONTATTO
DE
EN
IT
45
- norma – CYBEX Aton 5 -
ECE R44/04 grupa 0+
Waga: do 13 kg
-
GOEDKEURINGCYBEX Aton 5 - baby autozitje ECE R44/04 Groep 0+ Leeftijd: tot circa 18 maanden Gewicht: tot 13kgAlleen geschikt voor gebruik in de genoemde voertuigen uitgerust met 3-puntsgordel, goedgekeurdconform ECE-verordening nr. 16 of vergelijkbare.
HOMOLOGATIONCYBEX Aton 5 - siège auto pour enfant - ECE R44/04 groupe 0+ Âge: à d‘environ 18 mois; Poids: jusqu‘à 13kgNe convient que pour les véhicu-les équipés d’uneceinture automatique trois points norme ECE R16 ou équivalent.
04/2015
Merci beaucoup d‘avoir choisi le CYBEX Aton 5. Lors du développement du CYBEX Aton 5, nous nous sommes focalisés sur la sécurité, le confort et la facilité d‘utilisation. Ce produit de qualité répond aux normes de qualité les plus strictes en vigueur.Lors du développement du CYBEX Aton 5, nous nous sommes focalisés sur la sécurité, le confort et la facilité d‘utilisation. Ce produit de qualité répond aux normes de qualité les plus strictes en vigueur.
ATTENTION! Merci de conserver le manuel d‘instructions pour référence ultérieure et de le ranger dans le tiroir conçu à cet effet, situé à l‘arrière du siège.
ATTENTION! En fonction de la législation locale, les caractéristiques du produit peuvent être différentes.
AVERTISSEMENT! Pour une protection optimum de votre enfant, il est essentiel d‘installer et d‘utiliser le CYBEX Aton 5 comme indiqué dans le manuel d‘instructions.
!
CHER CLIENTAton 5
ATON 5ECE R 44/04 ____________
UNIVERSAL SEMI-UNIVERSAL
0 - 13 kg
04301297 ____________
CYBEX GmbHRiedinger Str. 18, 95448 Bayreuth
Germany
Approved for CYBEX
ATON Base & Base-fix
ATON Base 2 & Base 2-fix
ATON Q Base & Q Base-fix
Base Q & Base Q-fix
46
Wij danken u voor het aankopen van de CYBEX Aton 5.Wij garanderen u dat bij de ontwikkeling van de CYBEX Aton 5 veiligheid, komfort en gebruiksvriendelijkheid centraal stonden. Dit produkt werd vervaardigd onder een strenge kwaliteitscontrole en beantwoordt aan de strengste veiligheidsnormen.
WAARSCHUWING! Voor de veiligheid van uw kind, is het belangrijk de CYBEX Aton 5 volgens de aanwijzingen in deze handleiding te installeren en te gebruiken.
! !
OPGEPAST! Afhankelijk van lokale gewoonten kunnen de eigenschappen van het produkt verschillen.
OPGELET! Houd de handleiding steeds bij de hand en bewaar ze op de daartoe voorziene plaats onder het zitje.
UWAGA!
fotelikiem.
UWAGA!
GEACHTE KLANT! DRODZY KLIENCI!
FRN
LPL
47
CONTENUFRINSTRUCTIONS RÉSUMÉES .....................................................................2HOMOLOGATION ........................................................................................45AVANT LA PREMIÈRE UTILISATION ........................................................45LA MEILLEURE POSITION DANS LA VOITURE ....................................49POUR LA PROTECTION DE VOTRE VOITURE! ...................................49AJUSTER LA POIGNÉE ..............................................................................51RÉGLAGE DE L‘APPUI-TÊTE ....................................................................53SÉCURISATION AVEC LE SYSTÈME DE HARNAIS ............................53SÉCURITÉ POUR VOTRE BÉBÉ .............................................................57SÉCURITÉ DANS LA VOITURE ................................................................59INSTALLER LE SIÈGE .................................................................................61ÔTER LE SIÈGE AUTO ...............................................................................65SÉCURISER UN ENFANT CORRECTEMENT .......................................67INSTALLER LE SIÈGE AUTO CORRECTEMENT .................................67ÔTER LE RÉDUCTEUR ..............................................................................69OUVERTURE DU CANOPY .......................................................................71CYBEX TRAVEL-SYSTÈME .......................................................................71DÉMONTAGE ................................................................................................71ENTRETIEN DU PRODUIT .........................................................................73EN CAS D‘ACCIDENT .................................................................................73NETTOYAGE .................................................................................................75RETRAIT DE LA HOUSSE ..........................................................................77ATTACHER LES HOUSSES DU SIÈGE...................................................77DURÉE DE VIE DU PRODUIT ...................................................................79RECYCLAGE ................................................................................................81INFORMATION PRODUIT ..........................................................................81GARANTIE .....................................................................................................83
48
INHOUD
FRN
LPL
NLKORTE HANDLEIDING .................................................................................2GOEDKEURING ...........................................................................................45VOOR HET EERSTE GEBRUIK ................................................................46DE BESTE POSITIE IN DE AUTO .............................................................50VOOR DE BESCHERMING VAN UW AUTO! ..........................................50AANPASSING VAN DE DRAAGARM .......................................................52AANPASSEN VAN DE HOOFDSTEUN ....................................................54BEVEILIGEN DOOR MIDDEL VAN HET HARNAS-SYSTEEM............54VEILIGHEID VOOR UW BABY ..................................................................58VEILIGHEID IN DE AUTO............................................................................60HET ZITJE INSTALLEREN ..........................................................................62HET AUTOZITJE VERWIJDEREN ............................................................66UW KIND KORREKT VASTMAKEN ..........................................................68HET BABYZITJE KORREKT INSTALLEREN ..........................................68HET INLEGKUSSEN VERWIJDEREN .....................................................70OPEN DE ZONNEKAP ................................................................................72CYBEX REIS-SYSTEEM .............................................................................72DEMONTEREN.............................................................................................72ONDERHOUD ...............................................................................................74IN GEVAL VAN EEN ONGEVAL .................................................................74REINIGING .....................................................................................................76VERWIJDEREN VAN DE HOES ................................................................78DE BEKLEDING VAN HET ZITJE VASTMAKEN ....................................78DUURZAAMHEID VAN HET PRODUKT ..................................................80AFVALVERWIJDERING ..............................................................................82PRODUKTINFORMATIE .............................................................................82GARANTIE .....................................................................................................84
PLINSTRUKCJA SKRÓCONA ..........................................................................2
.................................................................45 ...............................................................46
NAJLEPSZE MIEJSCE W SAMOCHODZIE ............................................50OCHRONA TWOJEGO SAMOCHODU! ..................................................50REGULACJA UCHWYTU DO NOSZENIA ...............................................52
...............................................54ZAPINANIE SZELEK ....................................................................................54
..................................................................58 ................................................60
....................................................................................62WYJMOWANIE FOTELIKA .........................................................................66
........................................68
SAMOCHODOWEGO .................................................................................68 ........................................................................70
OTWIERANIE BUDKI FOTELIKA ..............................................................72 ..................................................................72
...................................................................................................72KONSERWACJA...........................................................................................74
..................................74CZYSZCZENIE..............................................................................................76ZDEJMOWANIE TAPICERKI ......................................................................78
...........................................................................78 ...........................................................................80
UTYLIZACJA ..................................................................................................82INFORMACJA O PRODUKCIE ..................................................................82GWARANCJA ................................................................................................84
49
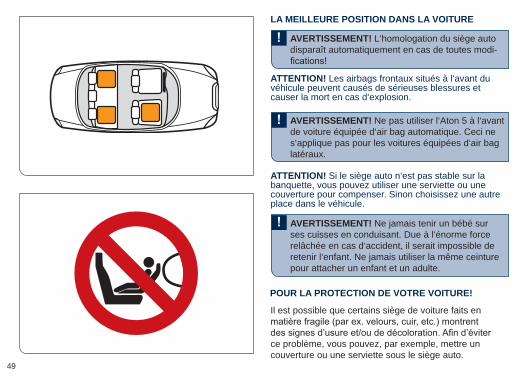
AVERTISSEMENT! L‘homologation du siège auto disparaît automatiquement en cas de toutes modi-
AVERTISSEMENT! Ne pas utiliser l‘Aton 5 à l‘avant de voiture équipée d‘air bag automatique. Ceci ne s‘applique pas pour les voitures équipées d‘air bag latéraux.
AVERTISSEMENT! Ne jamais tenir un bébé sur ses cuisses en conduisant. Due à l‘énorme force relâchée en cas d‘accident, il serait impossible de retenir l‘enfant. Ne jamais utiliser la même ceinture pour attacher un enfant et un adulte.
POUR LA PROTECTION DE VOTRE VOITURE!
LA MEILLEURE POSITION DANS LA VOITURE
ATTENTION! Les airbags frontaux situés à l‘avant du véhicule peuvent causés de sérieuses blessures et causer la mort en cas d‘explosion.
ATTENTION! Si le siège auto n‘est pas stable sur la banquette, vous pouvez utiliser une serviette ou une couverture pour compenser. Sinon choisissez une autre place dans le véhicule.
Il est possible que certains siège de voiture faits en
ce problème, vous pouvez, par exemple, mettre un couverture ou une serviette sous le siège auto.
50
WAARSCHUWING! De conformiteit van het zitje vervalt onmiddellijk wanneer er aanpassingen aan gebeuren.
Gwarancja na produkt natychmiast -
WAARSCHUWING! Gebruik de Aton 5 niet op een autozetel vooraan met een geactiveerde airbag. Dit is niet van toepassing op zogenaamde zijdelingse airbags.
Nie montuj fotelika Aton 5 na
bocznych poduszek.
WAARSCHUWING! Houd uw kind nooit op uw schoot tijdens het rijden. In geval van een ongeluk, zal u het door de enorme inpakt, niet kunnen blijven vasthouden. Gebruik nooit dezelde zetelgordel om zowel uzelf als uw kind vast te zetten.
Nigdy nie trzymaj dziecka na kolanach podczas jazdy samochodem. W razie zder-
VOOR DE BESCHERMING VAN UW AUTO! OCHRONA TWOJEGO SAMOCHODU!
DE BESTE POSITIE IN DE AUTO NAJLEPSZE MIEJSCE W SAMOCHODZIE
OPGELET! Dit kan verwondingen en zelfs de dood van uw kind tot gevolg hebben.
UWAGA! W razie zderzenia przednia poduszka
OPGELET! Indien het babyzitje niet stabiel staat of teveel helt, kan u het door middel van een dekentje of handdoek stabiliseren. Zoniet, moet u een andere plaats in de auto zoeken.
UWAGA!
fotelika w samochodzie.
Het is mogelijk dat sommige autostoelen van zacht
/ of verkleuringen kunnen vertonen. Om dit te voorkomen, kunt u een deken of handdoek eronder plaatsen.
fotelikiem.
FRN
LPL
51
AVERTISSEMENT! Toujours sécuriser l‘enfant avec le système de harnais intégré.
AVERTISSEMENT! De façon à éviter un balance-ment en portant le siège, s‘assurer que la poignée est bien verrouiller en position A.
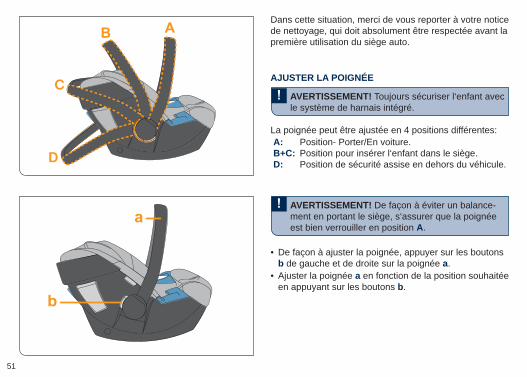
AJUSTER LA POIGNÉE
La poignée peut être ajustée en 4 positions différentes:A: Position- Porter/En voiture.B+C: Position pour insérer l‘enfant dans le siège.D: Position de sécurité assise en dehors du véhicule.
• De façon à ajuster la poignée, appuyer sur les boutons b de gauche et de droite sur la poignée a.
• Ajuster la poignée a en fonction de la position souhaitée en appuyant sur les boutons b.
Dans cette situation, merci de vous reporter à votre notice de nettoyage, qui doit absolument être respectée avant la première utilisation du siège auto.
52
WAARSCHUWING! Maak de baby steeds vast met het geïntegreerde harnassysteem.
Zawsze zabezpieczaj dziecko
WAARSCHUWING! Om te voorkomen dat het zitje bij het dragen te veel voorover zou hellen, dient u de draagarm in de draagpositie A vast te zetten. A.
AANPASSING VAN DE DRAAGARM REGULACJA UCHWYTU DO NOSZENIA
De draagarm kan in 4 verschillende posities versteld worden.A: Dragende/Rijdende positieB+C: Om de baby in het zitje te plaatsenD: Veilige zitpositie buiten de auto
A: Noszenie/Jazda.B+C:D: Zablokowana pozycja do siedzenia poza
samochodem.
• Om de draagarm aan te passen, dient u de knoppen b aan de linker- en rechterzijkant van de draagarm a in te drukken.
• Pas de draagarm a aan naar de gewenste positie door de knoppen b in te drukken.
• b po prawej i lewej stronie uchwytu a.
• Ustaw uchwyt a przyciski b.
FRN
LPL
Graag verwijzen we u ook naar onze schoonmaakinstructies, die absoluut moeten worden gevolgd voor het eerste gebruik van de stoel.
53
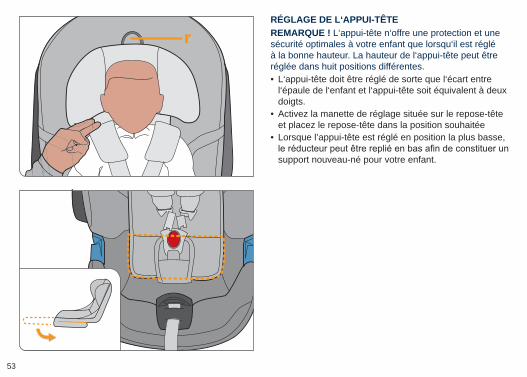
• L‘appui-tête doit être réglé de sorte que l‘écart entre l‘épaule de l‘enfant et l‘appui-tête soit équivalent à deux doigts.
• Activez la manette de réglage située sur le repose-tête et placez le repose-tête dans la position souhaitée
• Lorsque l’appui-tête est réglé en position la plus basse,
support nouveau-né pour votre enfant.
RÉGLAGE DE L‘APPUI-TÊTEREMARQUE ! L‘appui-tête n‘offre une protection et une sécurité optimales à votre enfant que lorsqu‘il est réglé à la bonne hauteur. La hauteur de l‘appui-tête peut être réglée dans huit positions différentes.
r
54
• De hoofdsteun moet zo aangepast worden dat er nog een ruimte is van ongeveer twee vingers breed tussen de schouders van het kind en de hoofdsteun.
• Gebruik de hendel bovenaan de hoofdsteun om de hoofdsteun in de juiste positie in te stellen.
• Indien hoofdsteun in de laagste positie is geplaatst, kan de zitverkleiner gebruikt worden als ondersteuning voor het pasgeboren kindje, door simpelweg het onderste gedeelte om te vouwen.
•
•
•
AANPASSEN VAN DE HOOFDSTEUNOPMERKING! Enkel en alleen indien de hoofdsteun is aangepast aan de meest geschikte hoogte, biedt deze de meeste bescherming en veiligheid aan uw kind. De hoogte van de hoofdsteun kan aangepast worden in acht verschillende posities.
UWAGA!
FRN
LPL
55
REMARQUE! Tirez toujours sur la ceinture épaulière c, mais jamais sur les protège-épaules d.
REMARQUE! Assurez-vous que les ceintures épaulières c ne sont ni tordues, ni croisées.
• Installez l‘enfant dans le siège. • Ajustez les ceintures épaulières c aux épaules de l‘enfant.
• Rassemblez les deux languettes de ceinture t verrouil-lez-les en position ensemble dans la boucle de ceinture e par un clic audible.
• Enclenchez doucement et prudemment le réglage cen-tral g c jusqu‘à ce qu‘elles touchent le corps de l‘enfant.
REMARQUE! Pour garantir la protection optimale du siège Cybex Aton 5, les ceintures épaulières doivent être le plus près possible du corps de l‘enfant.
• Détachez les ceintures épaulières en actionnant la manette de réglage au niveau du réglage central tout en tirant dans le même temps vers le haut sur les deux ceintures épaulières.
• Ouvrez la boucle e de la ceinture en appuyant fort sur le bouton rouge.
SÉCURISATION AVEC LE SYSTÈME DE HARNAIS
REMARQUE ! se trouvent dans le siège.
repose-tête et ne doivent pas être ajustées séparément. Assurez-vous que l‘appui-tête est correctement verrouillé en position avant d‘utiliser le siège.
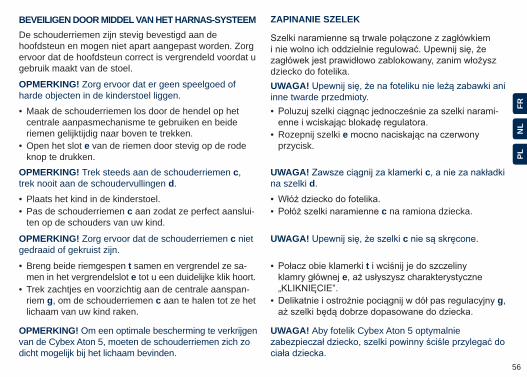
56
OPMERKING! Trek steeds aan de schouderriemen c, trek nooit aan de schoudervullingen d.
UWAGA! cna szelki d.
OPMERKING! Zorg ervoor dat de schouderriemen c niet gedraaid of gekruist zijn.
UWAGA! c
• Plaats het kind in de kinderstoel. • Pas de schouderriemen c aan zodat ze perfect aanslui-ten op de schouders van uw kind.
• • c na ramiona dziecka.
• Breng beide riemgespen t samen en vergrendel ze sa-men in het vergrendelslot e tot u een duidelijke klik hoort.
• Trek zachtjes en voorzichtig aan de centrale aanspan-riem g, om de schouderriemen c aan te halen tot ze het lichaam van uw kind raken.
• t e
• g,
OPMERKING! Om een optimale bescherming te verkrijgen van de Cybex Aton 5, moeten de schouderriemen zich zo dicht mogelijk bij het lichaam bevinden.
UWAGA! Aby fotelik Cybex Aton 5 optymalnie
FRN
LPL
• Maak de schouderriemen los door de hendel op het centrale aanpasmechanisme te gebruiken en beide riemen gelijktijdig naar boven te trekken.
• Open het slot e van de riemen door stevig op de rode knop te drukken.
• -
• Rozepnij szelki e przycisk.
BEVEILIGEN DOOR MIDDEL VAN HET HARNAS-SYSTEEM ZAPINANIE SZELEK
OPMERKING! Zorg ervoor dat er geen speelgoed of harde objecten in de kinderstoel liggen.
UWAGA! inne twarde przedmioty.
De schouderriemen zijn stevig bevestigd aan de hoofdsteun en mogen niet apart aangepast worden. Zorg ervoor dat de hoofdsteun correct is vergrendeld voordat u gebruik maakt van de stoel. dziecko do fotelika.
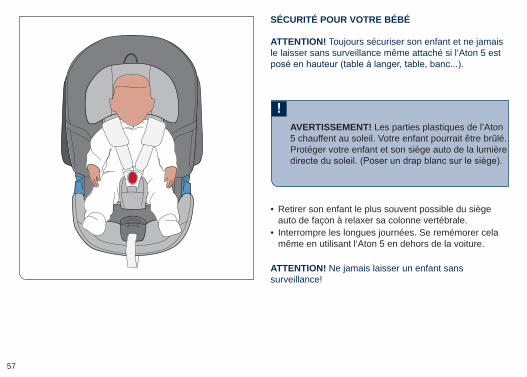
57
AVERTISSEMENT! Les parties plastiques de l’Aton 5 chauffent au soleil. Votre enfant pourrait être brûlé. Protéger votre enfant et son siège auto de la lumière
ATTENTION! Ne jamais laisser un enfant sans surveillance!
SÉCURITÉ POUR VOTRE BÉBÉ
ATTENTION! Toujours sécuriser son enfant et ne jamais le laisser sans surveillance même attaché si l‘Aton 5 est
• Retirer son enfant le plus souvent possible du siège auto de façon à relaxer sa colonne vertébrale.
• Interrompre les longues journées. Se remémorer cela même en utilisant l‘Aton 5 en dehors de la voiture.
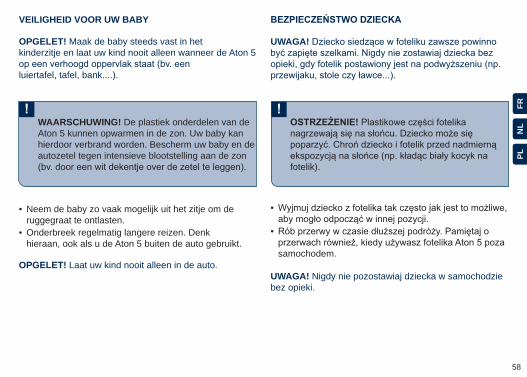
58
WAARSCHUWING! De plastiek onderdelen van de Aton 5 kunnen opwarmen in de zon. Uw baby kan hierdoor verbrand worden. Bescherm uw baby en de autozetel tegen intensieve blootstelling aan de zon
fotelik).
VEILIGHEID VOOR UW BABY
OPGELET! Maak de baby steeds vast in het kinderzitje en laat uw kind nooit alleen wanneer de Aton 5
luiertafel, tafel, bank....).
• Neem de baby zo vaak mogelijk uit het zitje om de ruggegraat te ontlasten.
• Onderbreek regelmatig langere reizen. Denk hieraan, ook als u de Aton 5 buiten de auto gebruikt.
OPGELET! Laat uw kind nooit alleen in de auto.
UWAGA!
•
•
samochodem.
UWAGA! Nigdy nie pozostawiaj dziecka w samochodzie bez opieki.
FRN
LPL
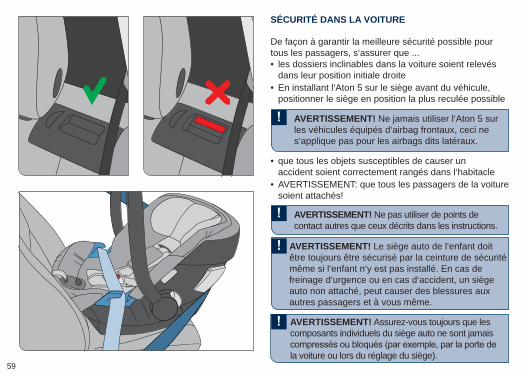
59
SÉCURITÉ DANS LA VOITURE
De façon à garantir la meilleure sécurité possible pour tous les passagers, s‘assurer que ... • les dossiers inclinables dans la voiture soient relevés dans leur position initiale droite
• En installant l‘Aton 5 sur le siège avant du véhicule, positionner le siège en position la plus reculée possible
AVERTISSEMENT! Ne jamais utiliser l‘Aton 5 sur les véhicules équipés d‘airbag frontaux, ceci ne s‘applique pas pour les airbags dits latéraux.
AVERTISSEMENT! Ne pas utiliser de points de contact autres que ceux décrits dans les instructions.
• que tous les objets susceptibles de causer un accident soient correctement rangés dans l‘habitacle
• AVERTISSEMENT: que tous les passagers de la voiture soient attachés!
AVERTISSEMENT! Le siège auto de l‘enfant doit être toujours être sécurisé par la ceinture de sécurité même si l‘enfant n‘y est pas installé. En cas de freinage d‘urgence ou en cas d‘accident, un siège auto non attaché, peut causer des blessures aux autres passagers et à vous même.
AVERTISSEMENT! Assurez-vous toujours que les composants individuels du siège auto ne sont jamais
la voiture ou lors du réglage du siège).
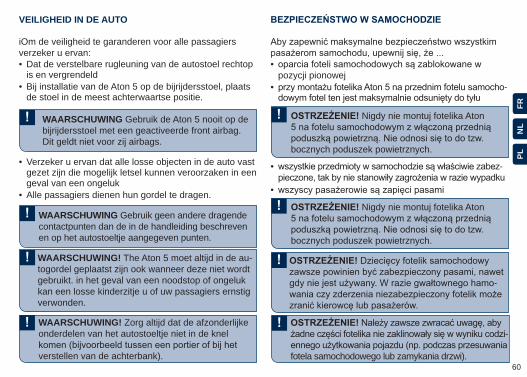
60
VEILIGHEID IN DE AUTO
iOm de veiligheid te garanderen voor alle passagiers verzeker u ervan: • Dat de verstelbare rugleuning van de autostoel rechtop is en vergrendeld
• Bij installatie van de Aton 5 op de bijrijdersstoel, plaats de stoel in de meest achterwaartse positie.
•pozycji pionowej
• -
WAARSCHUWING Gebruik de Aton 5 nooit op de bijrijdersstoel met een geactiveerde front airbag. Dit geldt niet voor zij airbags.
WAARSCHUWING Gebruik geen andere dragende contactpunten dan de in de handleiding beschreven en op het autostoeltje aangegeven punten.
• Verzeker u ervan dat alle losse objecten in de auto vast gezet zijn die mogelijk letsel kunnen veroorzaken in een geval van een ongeluk
• Alle passagiers dienen hun gordel te dragen.
• -
•
WAARSCHUWING! The Aton 5 moet altijd in de au-togordel geplaatst zijn ook wanneer deze niet wordt gebruikt. in het geval van een noodstop of ongeluk kan een losse kinderzitje u of uw passagiers ernstig verwonden.
Nigdy nie montuj fotelika Aton
bocznych poduszek powietrznych.
Nigdy nie montuj fotelika Aton
bocznych poduszek powietrznych.
-
FRN
LPL
WAARSCHUWING! Zorg altijd dat de afzonderlijke onderdelen van het autostoeltje niet in de knel
verstellen van de achterbank).
-
fotela samochodowego lub zamykania drzwi).
61
INSTALLER LE SIÈGE
• Assurez-vous que la poignée a est en position Apages 51).
• -tent le dossier de la banquette).
• CYBEX Aton 5 peut être utilisé dans tous les véhicules équipés d‘une ceinture de sécurité avec un dispositif de rétractation automatique 3 points. a l‘avant du véhicule votre enfant est exposé à plus de risques en cas d‘accident.
AVERTISSEMENT! Ce siège ne doit pas être utili-sé avec une ceinture 2 points dite de ceinture „du milieu“. Ceci pouvant causer de blessures graves voir entraîner la mort de l‘enfant.
• Assurez-vous que les marquages horizontaux sur les autocollants de sécurité p sont parallèles au sol.
• Tirer la ceinture 3 points au dessus du siège auto. • Boucler la ceinture dans l‘encoche de sécurité du véhi-cule prévue à cet effet q.
62
HET ZITJE INSTALLEREN
• Zorg ervoor dat de draagarm a zich in de bovenste positie A
• Plaats het babyzitje tegen de rijrichting in op de auto-
de rugleuning van de autozetel). • De CYBEX Aton 5 kan gebruikt worden op alle autozetels die voorzien zijn van een automatische 3-puntsgordel. In het algemeen raden wij aan om een zetel achterin de auto te gebruiken. Vooraan wordt uw kind in het algemeen meer blootgesteld aan risico‘s in geval van een ongeval.
• a A
•skierowane w kierunku oparcia fotela samochodowe-go).
•
wypadku.
WAARSCHUWING! Het zitje mag niet gebruikt worden met een 2-puntsgordel of een heupgordel. Het gebruik met een 2-puntsgordel kan verwondin-gen of de dood van uw kind tot gevolg hebben.
• Controleer dat de horizontale markering op het veiligheidsetiket p parallel met de bodem staat.
• Trek de 3-puntsgordel over het kinderzitje. • Steek het gordeluiteinde in de gesp q van de auto.
• p
•fotelikiem.
• q.
FRN
LPL
63
• Insérer la ceinture des cuisses k dans les guides bleus m de chaque côtés du siège auto.
• Tirer sur la ceinture diagonale l de façon à serrer fermement la ceinture des cuisses k.
• Tirer la ceinture diagonale l derrière le haut du siège auto.
ATTENTION!
• Amener la ceinture diagonale l dans l‘encoche bleue n à l‘arrière.
• Serrer la ceinture diagonale l.AVERTISSEMENT! La ceinture de sécurité doit passer dans les fentes des pièces bleues prévues à cet effet et sous les systèmes de protection latérale ouverts.
64
• Steek de heupgordel k in de blauwe gordelgeleiders m aan elke van het autozitje.
• Trek de diagonale gordel l in rijrichting om de heupgordel k aan te spannen.
• Trek de diagonale gordel l achter het bovenste uiteinde van het babyzitje.
• k przez niebieskie prowadnice m
• l w kierunku zgodnym z k.
• l od góry za fotelikiem.
OPGELET! Draai de autogordel niet. UWAGA!
• Breng de diagonale gordel l in de blauwe gordelgleuf n aan de achterkant.
• Span de diagonale gordel l aan.
• l n
• l.
FRN
LPLWAARSCHUWING! De autogordel moet door de blauwe
punten en onder de ontvouwde Lineaire Side-Impact Protection. worden aangebracht
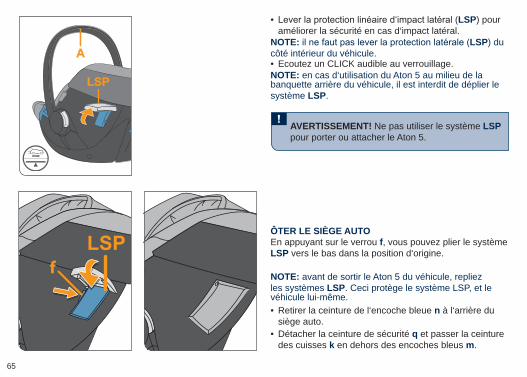
65
AVERTISSEMENT! Ne pas utiliser le système LSP pour porter ou attacher le Aton 5.
• LSP) pour améliorer la sécurité en cas d‘impact latéral.
NOTE: LSP) du côté intérieur du véhicule. • Ecoutez un CLICK audible au verrouillage.
NOTE: en cas d‘utilisation du Aton 5 au milieu de la banquette arrière du véhicule, il est interdit de déplier le système LSP.
ÔTER LE SIÈGE AUTOEn appuyant sur le verrou f, vous pouvez plier le système LSP vers le bas dans la position d‘origine.
NOTE: avant de sortir le Aton 5 du véhicule, repliez les systèmes LSP. Ceci protège le système LSP, et le véhicule lui-même. • Retirer la ceinture de l‘encoche bleue n à l‘arrière du siège auto.
• Détacher la ceinture de sécurité q et passer la ceinture des cuisses k en dehors des encoches bleus m.
f
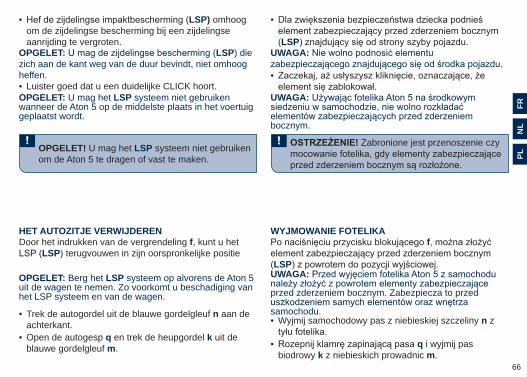
66
OPGELET! U mag het LSP systeem niet gebruiken om de Aton 5 te dragen of vast te maken.
Zabronione jest przenoszenie czy
• LSP) omhoog om de zijdelingse bescherming bij een zijdelingse aanrijding te vergroten.
•
LSPOPGELET: LSP) die zich aan de kant weg van de duur bevindt, niet omhoog heffen.
UWAGA:
• Luister goed dat u een duidelijke CLICK hoort. •
OPGELET: U mag het LSP systeem niet gebruiken wanneer de Aton 5 op de middelste plaats in het voertuig geplaatst wordt.
UWAGA:
bocznym.
HET AUTOZITJE VERWIJDEREN WYJMOWANIE FOTELIKADoor het indrukken van de vergrendeling f, kunt u het
LSP) terugvouwen in zijn oorspronkelijke positief
LSPOPGELET: Berg het LSP systeem op alvorens de Aton 5 uit de wagen te nemen. Zo voorkomt u beschadiging van het LSP systeem en van de wagen.
UWAGA:
przed zderzeniem bocznym. Zabezpiecza to przed
samochodu. • Trek de autogordel uit de blauwe gordelgleuf n aan de achterkant.
• Open de autogesp q en trek de heupgordel k uit de blauwe gordelgleuf m.
• Wyjmij samochodowy pas z niebieskiej szczeliny n z
• q i wyjmij pas biodrowy k z niebieskich prowadnic m.
FRN
LPL
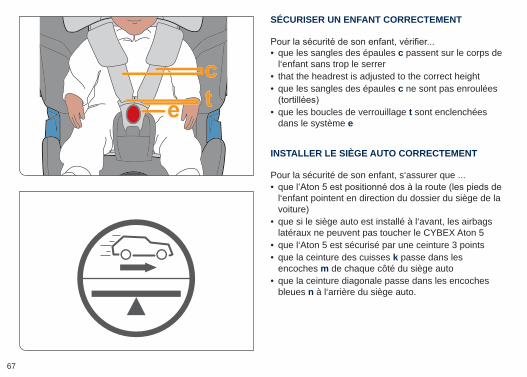
67
SÉCURISER UN ENFANT CORRECTEMENT
• que les sangles des épaules c passent sur le corps de l‘enfant sans trop le serrer
• that the headrest is adjusted to the correct height • que les sangles des épaules c ne sont pas enroulées
• que les boucles de verrouillage t sont enclenchées dans le système e
INSTALLER LE SIÈGE AUTO CORRECTEMENT
Pour la sécurité de son enfant, s‘assurer que ... •l‘enfant pointent en direction du dossier du siège de la voiture)
• que si le siège auto est installé à l‘avant, les airbags latéraux ne peuvent pas toucher le CYBEX Aton 5
• que l‘Aton 5 est sécurisé par une ceinture 3 points • que la ceinture des cuisses k passe dans les encoches m de chaque côté du siège auto
• que la ceinture diagonale passe dans les encoches bleues n à l‘arrière du siège auto.
68
UW KIND KORREKT VASTMAKEN
Voor de veiligheid van uw kind, is het belangrijk te controleren … • dat de schoudergordels c goed tegen het lichaam aansluiten, zonder de baby te beklemmen
• that the headrest is adjusted to the correct height • dat de schoudergordels c niet gedraaid zijn • dat de gespuiteinden t vastzitten in gesp e
• szelki naramienne c
• • szelki naramienne c • plastikowe klamerki szelek t
e
HET BABYZITJE KORREKT INSTALLERENSAMOCHODOWEGO
Voor de veiligheid van het kind, is het belangrijk te controleren … •voeten van de baby wijzen in de richting van de rugleu-ning van de autozetel)
• indien het autozitje vooraan staat, dat de voorste airbag de CYBEX Aton 5 niet kan raken.
• dat de Aton 5 met een 3-puntsgordel vastgemaakt is • dat de heupgordel k door de gordelgleuven m langs elke kant van het babyzitje loopt
• dat de diagonale gordel l door de blauwe gordelhaak n aan de achterkant van het babyzitje loopt
•
oparcia fotela samochodowego) • fotelik CYBEX Aton 5 zamontowany na przednim
poduszki powietrznej • fotelik Aton 5 zabezpieczony jest 3-punktowymi
• biodrowy pas samochodowy k przebiega przez prowadnice m
• ln
FRN
LPL
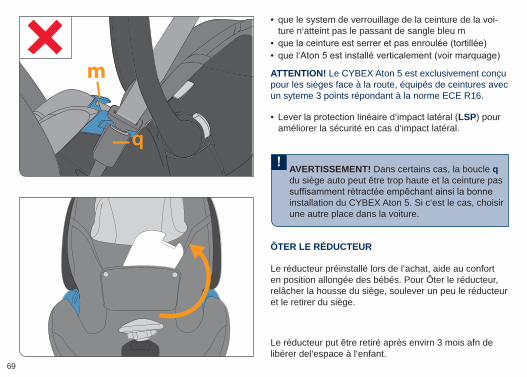
69
• que le system de verrouillage de la ceinture de la voi-ture n‘atteint pas le passant de sangle bleu m
• •
ATTENTION! Le CYBEX Aton 5 est exclusivement conçu pour les sièges face à la route, équipés de ceintures avec un syteme 3 points répondant à la norme ECE R16.
• LSP) pour améliorer la sécurité en cas d‘impact latéral.
m
ÔTER LE RÉDUCTEUR
Le réducteur préinstallé lors de l‘achat, aide au confort en position allongée des bébés. Pour Ôter le réducteur, relâcher la housse du siège, soulever un peu le réducteur et le retirer du siège.
Le réducteur put être retiré après envirn 3 mois afn de libérer del‘espace à l‘enfant.
AVERTISSEMENT! Dans certains cas, la boucle q du siège auto peut être trop haute et la ceinture pas
installation du CYBEX Aton 5. Si c‘est le cas, choisir une autre place dans la voiture.
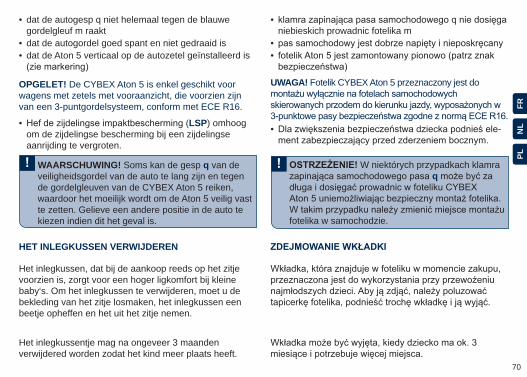
70
• dat de autogesp q niet helemaal tegen de blauwe gordelgleuf m raakt
• dat de autogordel goed spant en niet gedraaid is • dat de Aton 5 verticaal op de autozetel geïnstalleerd is
•niebieskich prowadnic fotelika m
• •
OPGELET! De CYBEX Aton 5 is enkel geschikt voor wagens met zetels met vooraanzicht, die voorzien zijn van een 3-puntgordelsysteem, conform met ECE R16.
UWAGA! Fotelik CYBEX Aton 5 przeznaczony jest do
• LSP) omhoog om de zijdelingse bescherming bij een zijdelingse aanrijding te vergroten.
• -
FRN
LPL
HET INLEGKUSSEN VERWIJDEREN
Het inlegkussen, dat bij de aankoop reeds op het zitje voorzien is, zorgt voor een hoger ligkomfort bij kleine baby‘s. Om het inlegkussen te verwijderen, moet u de bekleding van het zitje losmaken, het inlegkussen een beetje opheffen en het uit het zitje nemen.
Het inlegkussentje mag na ongeveer 3 maanden verwijdered worden zodat het kind meer plaats heeft.
WAARSCHUWING! Soms kan de gesp q van de veiligheidsgordel van de auto te lang zijn en tegen de gordelgleuven van de CYBEX Aton 5 reiken, waardoor het moeilijk wordt om de Aton 5 veilig vast te zetten. Gelieve een andere positie in de auto te kiezen indien dit het geval is.
W niektórych przypadkach klamra q
fotelika w samochodzie.
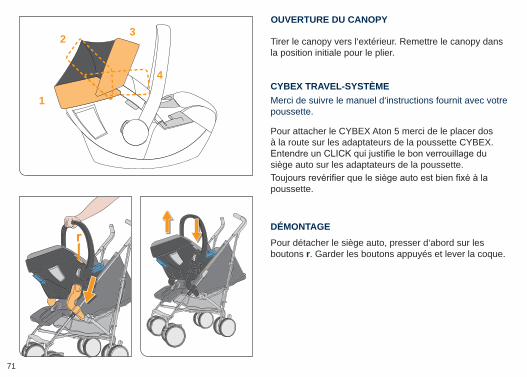
71
OUVERTURE DU CANOPY
Tirer le canopy vers l‘extérieur. Remettre le canopy dans la position initiale pour le plier.
CYBEX TRAVEL-SYSTÈMEMerci de suivre le manuel d‘instructions fournit avec votre poussette.
Pour attacher le CYBEX Aton 5 merci de le placer dos à la route sur les adaptateurs de la poussette CYBEX.
siège auto sur les adaptateurs de la poussette.
poussette.
DÉMONTAGEPour détacher le siège auto, presser d‘abord sur les boutons r. Garder les boutons appuyés et lever la coque.
1
2 3
4
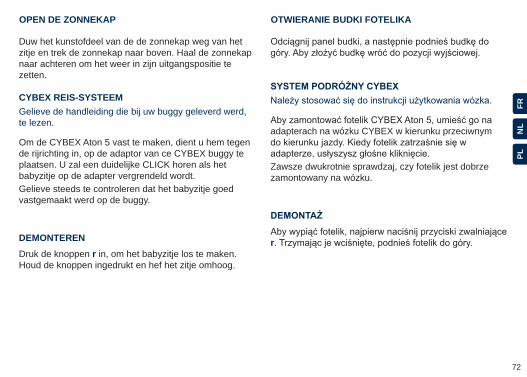
72
OPEN DE ZONNEKAP OTWIERANIE BUDKI FOTELIKA
Duw het kunstofdeel van de de zonnekap weg van het zitje en trek de zonnekap naar boven. Haal de zonnekap naar achteren om het weer in zijn uitgangspositie te zetten.
CYBEX REIS-SYSTEEMGelieve de handleiding die bij uw buggy geleverd werd, te lezen.
Om de CYBEX Aton 5 vast te maken, dient u hem tegen de rijrichting in, op de adaptor van ce CYBEX buggy te plaatsen. U zal een duidelijke CLICK horen als het babyzitje op de adapter vergrendeld wordt.Gelieve steeds te controleren dat het babyzitje goed vastgemaakt werd op de buggy.
adapterach na wózku CYBEX w kierunku przeciwnym
Zawsze dwukrotnie sprawdzaj, czy fotelik jest dobrze zamontowany na wózku.
DEMONTERENDruk de knoppen r in, om het babyzitje los te maken. Houd de knoppen ingedrukt en hef het zitje omhoog.
r
FRN
LPL

73
ENTRETIEN DU PRODUIT
EN CAS D‘ACCIDENT
De façon à garantir la meilleure protection de votre enfant, merci de vous assurer du suivant:
• Toutes les parties du siège auto doivent être examinées régulièrement pour déceler d‘éventuels dégâts.
• Les parties métalliques doivent fonctionner facilement.
• Il est essentiel que le siège auto ne soit pas endomma-gé par des coups de portière ou par le rail des sièges de la voiture.
• Le siège auto doit être examiné par le constructeur en cas de chute ou d‘accident.
ATTENTION! Lorsque vous achetez le CYBEX Aton 5, nous vous recommandons d‘acheter une seconde housse
nettoyez une.
Lors d‘un accident, même mineur, un siège-auto peut subir des dégâts invisibles à l‘oeil nu. Il est donc très important de remplacer immédiatement un siège accidenté. En cas de doute, contactez votre revendeur ou le fabricant.
74
ONDERHOUD KONSERWACJA
IN GEVAL VAN EEN ONGEVAL
Om de veiligheid van uw kind te garanderen, dient u het volgende te noteren:
• Alle belangrijke onderdelen van het kinder- veiligheidszitje moeten regelmatig op beschadiging gecontroleerd worden.
• De mechanische onderdelen moeten perfect functioneren.
• Het is heel belangrijk dat het kinderveiligheidszitje niet geklemd geraakt tussen harde delen, zoals bijvoor-beeld de deur van de auto, enz. Dit kan het het zitje beschadigen.
• Het kinderveiligheidszitje moet door de fabrikant onder-zocht worden wanneer het bijvoorbeeld gevallen is, of iets gelijkaardigs.
• regularnie sprawdzane.
• •
innymi twardymi elementami. • -
OPGELET! Wanneer u een CYBEX Aton 5 koopt, is het aanbevolen om een tweede bekleding te kopen. Zo kan u één bekleding wassen en laten drogen terwijl u de andere in het zitje gebruikt.
UWAGA!
Na een ongeval kan het zitje schade opgelopen hebben, die onzichtbaar is voor het blote oog. Daarom moet het zitje na een ongeval onmiddellijk vervangen worden. Contacteer in geval van twijfel de verdeler of de fabrikant.
FRN
LPL
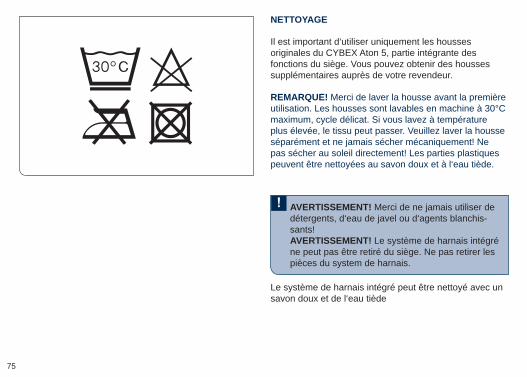
75
AVERTISSEMENT! Merci de ne jamais utiliser de détergents, d‘eau de javel ou d‘agents blanchis-sants!AVERTISSEMENT! Le système de harnais intégré ne peut pas être retiré du siège. Ne pas retirer les pièces du system de harnais.
NETTOYAGE
Il est important d‘utiliser uniquement les housses originales du CYBEX Aton 5, partie intégrante des fonctions du siège. Vous pouvez obtenir des housses supplémentaires auprès de votre revendeur.
REMARQUE! Merci de laver la housse avant la première utilisation. Les housses sont lavables en machine à 30°C maximum, cycle délicat. Si vous lavez à température plus élevée, le tissu peut passer. Veuillez laver la housse séparément et ne jamais sécher mécaniquement! Ne pas sécher au soleil directement! Les parties plastiques peuvent être nettoyées au savon doux et à l‘eau tiède.
Le système de harnais intégré peut être nettoyé avec un savon doux et de l‘eau tiède
76
WAARSCHUWING! Gebruik onder geen beding chemische detergenten of bleekmiddelen!WAARSCHUWING! Het geïntegreerde harnassy-steem mag niet verwijderd worden van het babyzitje. Vewijder ook geen onderdelen van het harnassy-steem.
-czy!
REINIGING CZYSZCZENIE
Het is belangrijk enkel een origineel CYBEX Aton 5 bekleding te gebruiken aangezien deze bekleding een essentiëel onderdeel van het zitje is. U kan reserve-bekledingen bij uw verdeler verkrijgen.
LET OP! Was de bekleding voordat u deze voor de eerste keer gaat gebruiken. De bekleding van het zitje mag in de machine gewassen worden op 30°C, met een voorzichtig programma. Indien u de bekleding op een hogere temperatuur wast, kan ze haar kleur verliezen. Gelieve de bekleding apart te wassen en ze nooit machinaal te drogen! Droog de bekleding niet in direkt zonlicht! U kan de plastieken onderdelen met een milde detergent en warm water afwassen.
UWAGA!
Het geïntegreerde harnassysteem kan met warm water en een milde detergent gewassen worden.
FRN
LPL
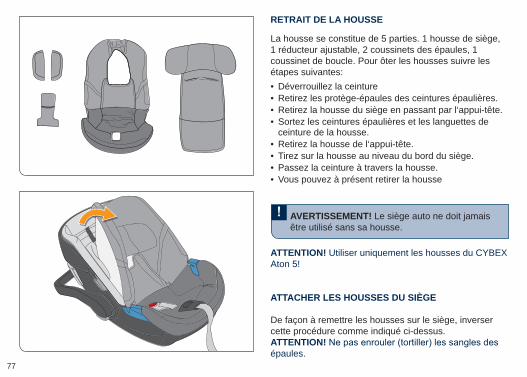
77
AVERTISSEMENT! Le siège auto ne doit jamais être utilisé sans sa housse.
RETRAIT DE LA HOUSSE
ATTENTION! Utiliser uniquement les housses du CYBEX Aton 5!
ATTACHER LES HOUSSES DU SIÈGE
De façon à remettre les housses sur le siège, inverser cette procédure comme indiqué ci-dessus.ATTENTION! épaules.
• Déverrouillez la ceinture • Retirez les protège-épaules des ceintures épaulières. • Retirez la housse du siège en passant par l‘appui-tête. • Sortez les ceintures épaulières et les languettes de ceinture de la housse.
• Retirez la housse de l‘appui-tête. • Tirez sur la housse au niveau du bord du siège. • Passez la ceinture à travers la housse. • Vous pouvez à présent retirer la housse
La housse se constitue de 5 parties. 1 housse de siège, 1 réducteur ajustable, 2 coussinets des épaules, 1 coussinet de boucle. Pour ôter les housses suivre les étapes suivantes:
78
WAARSCHUWING! Het kinderveiligheidzitje mag nooit zonder bekleding gebruikt worden. tapicerki.
VERWIJDEREN VAN DE HOES ZDEJMOWANIE TAPICERKI
OPGELET! Gebruik alleen de CYBEX Aton 5 bekleding! UWAGA! 5!
DE BEKLEDING VAN HET ZITJE VASTMAKEN
Doe het omgekeerde om de bekleding opnieuw op het zitje aan te brengen.OPGELET! Draai de schoudergordels niet. UWAGA!
• • • • • • • •
• Verwijder de gespen uit het slot. • Verwijder de schoudervullingen van de schouderriemen. • Trek de hoes van de hoofdsteun over de hoofdsteun-rand.
• Trek de schouderriemen met de gespen uit de hoofsteunhoes.
• Verwijder de hoofdsteunhoes. • Trek de zetelhoes over de zetelrand. • Trek de gesp door de zetelhoes. • U kunt de hoes nu verwijderen.
De bekleding bestaat uit 5 delen. 1 bekleding van het zitje, 1 aanpasbaar inlegkussen, 2 schouderbeschermers, 1 gespbeschermer. Het verwijderen van de bekleding gebeurt volgens de volgende stappen:
FRN
LPL
79
DURÉE DE VIE DU PRODUITComme les parties plastiques varient légèrement avec le temps par exemple dû à l‘exposition à la lumière du soleil, les caractéristiques peuvent légèrement changer. Comme le siège auto peut être exposé à des différences de température, et d‘autres désagrément, merci de suivre les instructions ci-dessous.
• Si le siège auto est exposé à la lumière directe du soleil pendant un certain temps, le siège auto doit être sorti du véhicule ou couvert par un drap blanc.
• Examiner toutes les parties plastiques de façon
couleurs ou de formes. • En cas de changement de formes ou de couleur, faire
couleurs du tissus sont normales avec le temps et ne constitues pas un défaut.
80
DUURZAAMHEID VAN HET PRODUKTAangezien plastiek onderdelen na verloop van tijd slijtage kunnen ondervinden, bv. bij blootstelling aan direct zonlicht, kunnen de kenmerken van het produkt lichtjes verschillen. Aangezien de autozetel aan hoge temperatuurverschillen alsook aan onvoorzienbare krachten kan blootgesteld worden, is het belangrijk volgende aanwijzingen te volgen.
• Indien de auto langere tijd aan direct zonlicht blootgesteld wordt, moet het autozitje uit de wagen gehaald worden of met een doek afgedekt worden.
• Controleer alle plastiek onderdelen elk jaar op schade of veranderingen aan de vorm of kleur.
• Indien u veranderingen opmerkt, dient u zich van het zitje te ontdoen. Veranderingen aan de stof - vooral het vervagen van de kleur - zijn normaal en worden niet als schade beschouwd.
•
kocem. • Raz do roku sprawdzaj, czy plastikowe elementy • • • Przy stwierdzeniu jakichkolwiek zmian fotelik
wyrobu, ale normalnym efektem eksploatacji.
FRN
LPL
81
AVERTISSEMENT! Ne pas conserver les em-ballages à porté des enfants. Il y a un risque de suffocation!
RECYCLAGE
Pour des raisons environnementales et écologiques, nous vous demandons d‘évacuer emballages et pièce
vigueur de votre pays. De façon à garantir le recyclage des déchets, merci de contacter votre commune de
d‘évacuation.
INFORMATION PRODUIT
Pour toutes informations complémentaires, merci de contacter votre revendeur en priorité et merci de collecter au préalable, les informations suivantes: • • Marque, Type et nom du véhicule ainsi que la position dans l‘habitacle où est installé le siège auto habituellement.
•
Pour plus d‘information sur nos produits, merci de visiter WWW.CYBEX-ONLINE.COM.
82
WAARSCHUWING! Houd alle verpakkingsmate-rialen uit de buurt van kinderen om het risico op verstikking te vermijden!
Wszystkie elementy opakowa-
-
PRODUKTINFORMATIEINFORMACJA O PRODUKCIE
Contacteer eerst uw verdeler in geval van vragen. Gelieve eerst de volgende informatie te verzamelen:
informacje: • • Merknaam en autotype en de positie waar het zitje normaal gemonteerd wordt.
• • • marka i typ samochodu oraz miejsce, na którym zwykle montowany jest fotelik.
• waga, wiek, wzrost dziecka.Voor verdere informatie over onze produkten, gelieve te surfen naar WWW.CYBEX-ONLINE.COM.
WWW.CYBEX-ONLINE.COM.
AFVALVERWIJDERING UTYLIZACJA
Wij vragen onze klanten om alle afval, zowel in het
verwijderen. De richtlijnen voor afvalverwerking kunnen verschillen van regio tot regio. Om de juiste richtlijnen te kennen, neemt u best contact op met de plaatselijke autoriteiten voor afvalverwerking in uw woonplaats. Neem in elk geval steeds de regels voor afvalverwerking van uw land in acht.
swoim kraju.
FRN
LPL
83
GARANTIE
Les conditions de garantie suivantes ne sont valables que dans le pays dans lequel, ce produit a été vendu à l‘origine par un détaillant à un consommateur. La garantie couvre tous les défauts de fabrication et de matériaux, qui existaient au moment de l‘achat ou qui sont devenus
du fabricant). Dans le cas où des défauts de fabrication et de matériel apparaîtraient au cours de la période de garantie, le produit sera réparé ou remplacé, à notre entière discrétion. Pour toute réclamation concernant des services couverts par cette garantie, le produit doit être retourné au détaillant auprès duquel le produit a
caisse ou facture) doit être présenté, mentionnant la date d‘achat, le nom du détaillant, le nom du produit et sa description. Aucune réclamation n‘est possible directement auprès du fabricant ou de toute autre personne autre que le détaillant chez qui le produit a été initialement acheté. La garantie est valable uniquement si
complet et qu‘il ne présentait aucun défaut de fabrication ni aucun défaut matériel. Si le produit a été acheté
réception que le produit est complet et qu‘il ne présente aucun défaut de fabrication ni aucun défaut matériel.

84
GARANTIE GWARANCJA
Deze garantie is alleen van toepassing in het land van aankoop, en verkocht door een retailer direct aan een consument. De garantie dekt alle productie en matreriaal fouten. Bestaande op datum aankoop of verschijnende in de periode van 3 jaar na aankoop bij de retailer.
of een materiaalfout verschijnt zullen wij het product kosteloos repareren of vervangen voor een gelijkwaardig product. Om van dergelijke garantie gebruik te maken dient u het product in de winkel van aankoop aan te bieden voorzien van aankoopsbewijs met datum aankoop en naam retailer. Deze garantie vervalt bij doorverkoop aan derden. Gelieve het product direct na aankoop / ontvangst controleren op eventuele gebreken. In geval van gebreken, gebruik het artikel niet maar breng deze in nette en originele staat naar de winkel van aankoop om zo verzekerd te zijn van de garantie. Voorafgaand aan contact met de retailer, lees deze gebruiksaanwijzing aandachtig door. Deze garantie dekt geen schade
vuur, verkeersongevallen, of normale slijtage.) Het is uitsluitend van toepassing in het geval dat het gebruik van het product altijd in overeenstemming was met de gebruiksaanwijzing, en alle reparaties of wijzigingen aan het product door daar toe aangewezen personen is uitgevoerd, en alleen originele onderdelen zijn gebruikt.
klientowi przez sklep detaliczny. Gwarancja obejmuje
od daty zakupu produktu w sklepie detalicznym przez
producenta lub innego podmiotu, a nie do sklepu, w
czy jakichkolwiek wad w momencie jego zakupu, a
po jego otrzymaniu. W przypadku stwierdzenia wady
Reklamowany w ramach gwarancji produkt powinien
FRN
LPL
85
Si le produit est endommagé, il ne doit pas être utilisé et doit être renvoyé sans délai au détaillant chez qui il a été acheté. Pour toute réclamation dans le cadre de la garantie, le produit doit être retourné complet et propre. Avant de contacter le détaillant, veuillez lire attentivement le manuel de l‘utilisateur. La garantie ne couvre pas les dommages causés par une mauvaise utilisation, des
autres) ou par l‘usure normale. Toute réclamation dans le cadre de la garantie ne sera autorisée que si le produit a été manipulé et utilisé conformément aux instructions d‘utilisation, si des réparations ont été effectuées par des personnes autorisées à le faire et si des pièces détachées et des accessoires d‘origine ont été utilisés. Cette garantie n‘exclut, ne limite et ne restreint en rien les droits actuels des consommateurs conformément à l‘ensemble des lois actuellement en vigueur, ni les droits contre les vendeurs en cas de violation du contrat de produit.
86
Deze garantie sluit niet uit, beperkt of heeft anderszins invloed op enige wettelijke rechten van de consument, waaronder begrepen vorderingen uit onrechtmatige daad en claims met betrekking tot een schending van het contract, welke de koper jegens verkoper of de fabrikant van het product heeft.
FRN
LPLCYBEX GMBH
Riedingerstr. 18, 95448 Bayreuth, Germany Tel.: +49 921 78 511-0, Fax.: +49 921 78 511- 999
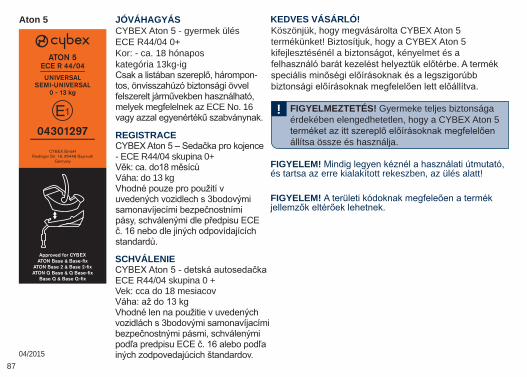
87
JÓVÁHAGYÁSCYBEX Aton 5 - gyermek ülés ECE R44/04 0+ Kor: - ca. 18 hónapos kategória 13kg-ig
-
melyek megfelelnek az ECE No. 16
REGISTRACE
- ECE R44/04 skupina 0+
Váha: do 13 kg
SCHVÁLENIE
ECE R44/04 skupina 0 + Vek: cca do 18 mesiacov
04/2015
Köszönjük, hogy megvásárolta CYBEX Aton 5 termékünket! Biztosítjuk, hogy a CYBEX Aton 5 kifejlesztésénél a biztonságot, kényelmet és a
FIGYELMEZTETÉS! Gyermeke teljes biztonsága érdekében elengedhetetlen, hogy a CYBEX Aton 5
állítsa össze és használja.
!
FIGYELEM!és tartsa az erre kialakított rekeszben, az ülés alatt!
KEDVES VÁSÁRLÓ!
FIGYELEM!
Aton 5
ATON 5ECE R 44/04 ____________
UNIVERSAL SEMI-UNIVERSAL
0 - 13 kg
04301297 ____________
CYBEX GmbHRiedinger Str. 18, 95448 Bayreuth
Germany
Approved for CYBEX
ATON Base & Base-fix
ATON Base 2 & Base 2-fix
ATON Q Base & Q Base-fix
Base Q & Base Q-fix
88
VAROVÁNÍ!
podmínky obsluhy uvedené v tomto návodu.
VAROVANIE! ! !
POZOR!skladujte ho vo vyhradenom mieste pod sedadlom.
HU
CZ
SK
89
TARTALOMHURÖVID TÁJÉKOZTATÓ .................................................................................2JÓVÁHAGYÁS ..............................................................................................87A LEGJOBB POZÍCIÓ A KOCSIBAN .........................................................91AUTÓJA VÉDELMÉBEN! ............................................................................91A HORDOZÓKAR BEÁLLÍTÁSA ................................................................93A FEJTÁMLA BEÁLLÍTÁSA .........................................................................95A BIZTONSÁGI ÖV BEKÖTÉSE ................................................................95GYERMEKE BIZTONSÁGA ÉRDEKÉBEN ..............................................99BIZTONSÁG AZ AUTÓBAN ......................................................................101AZ ÜLÉS RÖGZÍTÉSE ..............................................................................103AZ ÜLÉS ELTÁVOLÍTÁSA .........................................................................107
...........................................109 .109
...........................................................111 ........................................................................113
CYBEX TRAVEL-SYSTEM .......................................................................113SZÉTSZERELÉS ........................................................................................113TERMÉK GONDOSKODÁS .....................................................................115BALESET ESETÉN ....................................................................................115TISZTÍTÁS ....................................................................................................117A HUZAT ELTÁVOLÍTÁSA .........................................................................119A HUZAT RÖGZÍTÉSE ...............................................................................119A TERMÉK TARTÓSSÁGA .......................................................................121RENDELKEZÉS ..........................................................................................123TERMÉK INFORMÁCIÓK! ........................................................................123SZAVATOSSÁG ..........................................................................................125
90
OBSAH OBSAH
HU
CZ
SK
CZZKRÁCENÝ NÁVOD ......................................................................................2REGISTRACE ...............................................................................................87
.................................................................................92.............................................................92
NASTAVENÍ NOSÍCÍ RUKOJETI................................................................94....................................................................96
..........................................................96 ...........................................................100
......................................102 ..........................................................................104
................................................108....................................110
.....................110 ..........................................................112
.......................................................114CYBEX CESTOVNÍ SYSTÉM ..................................................................114
.................................................................................................114 ............................................................................................................116
........................................................116 ........................................................................................................118
SEJMUTÍ POTAHU .....................................................................................120NAVLÉKNUTÍ POTAHU .............................................................................120
..............................................................122 .....................................................................................124
INFORMACE O VÝROBKU ......................................................................124PODMÍNKY ZÁRUKY .................................................................................126
SK ........................................................................................2
SCHVÁLENIE ................................................................................................87 ...................................................................92
................................................................92NASTAVENIE NOSIACI RUKOVÄTE ........................................................94NASTAVENIE OPIERKY HLAVY ................................................................96
...................................................96...........................................................100
.............................................................................102 ............................................................................104
.....................................................................108 ...................................110
...............................110 ...................................................................................112
.................................................114CESTOVNÝ SYSTÉM CYBEX .................................................................114
.................................................................................................114 .............................................................116
V PRÍPADE NEHODY ................................................................................116 .....................................................................................................118
....................................................................................120 ......................................................120
....................................................................122LIKVIDÁCIA ..................................................................................................124INFORMÁCIE O PRODUKTE ..................................................................124ZÁRUKA .......................................................................................................126
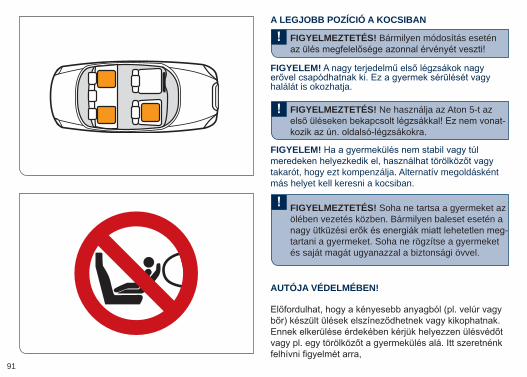
91
FIGYELMEZTETÉS! Bármilyen módosítás esetén
FIGYELMEZTETÉS! Ne használja az Aton 5-t az -
FIGYELMEZTETÉS! Soha ne tartsa a gyermeket az ölében vezetés közben. Bármilyen baleset esetén a
-tartani a gyermeket. Soha ne rögzítse a gyermeket és saját magát ugyanazzal a biztonsági övvel.
A LEGJOBB POZÍCIÓ A KOCSIBAN
FIGYELEM!
takarót, hogy ezt kompenzálja. Alternatív megoldásként más helyet kell keresni a kocsiban.
FIGYELEM!
halálát is okozhatja.
AUTÓJA VÉDELMÉBEN!
92
VAROVÁNÍ! VAROVANIE!
VAROVÁNÍ! VAROVANIE! -
VAROVÁNÍ!
vozidla!
VAROVANIE!
NAJLEPŠIA POLOHA V AUTE
Pokud jsou potahy sedadel ve vozidle vyrobeny z
POZOR!
aute.
POZOR!
PRE OCHRANU VÁŠHO AUTA!
HU
CZ
SK
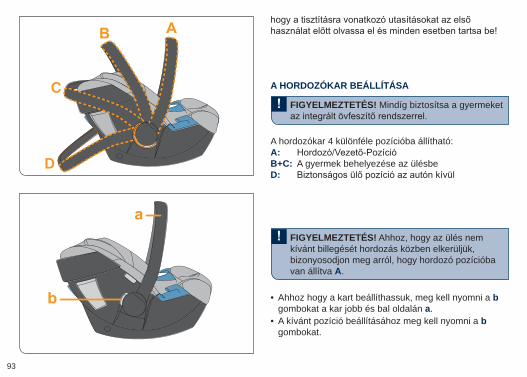
93
FIGYELMEZTETÉS! Mindíg biztosítsa a gyermeket
FIGYELMEZTETÉS! Ahhoz, hogy az ülés nem kívánt billegését hordozás közben elkerüljük, bizonyosodjon meg arról, hogy hordozó pozícióba van állítva A.
A HORDOZÓKAR BEÁLLÍTÁSA
A hordozókar 4 különféle pozícióba állítható:A: B+C: A gyermek behelyezése az ülésbeD:
• Ahhoz hogy a kart beállíthassuk, meg kell nyomni a b gombokat a kar jobb és bal oldalán a.
• A kívánt pozíció beállításához meg kell nyomni a b gombokat.
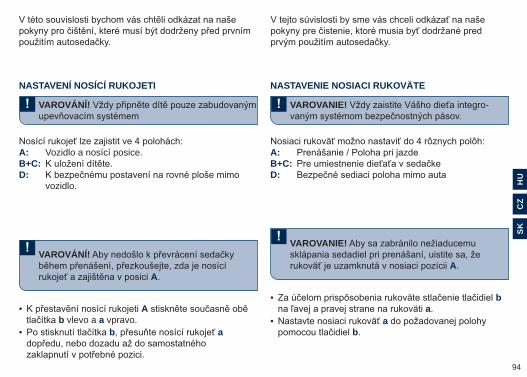
94
VAROVÁNÍ! VAROVANIE! -
VAROVÁNÍ!
A.
VAROVANIE!
A.
NASTAVENÍ NOSÍCÍ RUKOJETI NASTAVENIE NOSIACI RUKOVÄTE
A: Vozidlo a nosící posice.B+C:D:
vozidlo.
A:B+C:D:
• Ab vlevo a a vpravo.
• b a
• b a.
• ab.
HU
CZ
SK
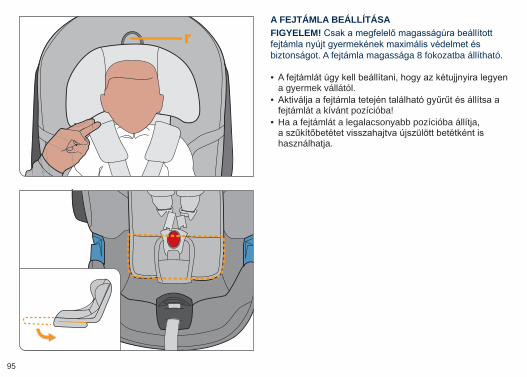
95
•a gyermek vállától.
•fejtámlát a kívánt pozícióba!
• Ha a fejtámlát a legalacsonyabb pozícióba állítja,
használhatja.
A FEJTÁMLA BEÁLLÍTÁSAFIGYELEM!
biztonságot. A fejtámla magassága 8 fokozatba állítható. r
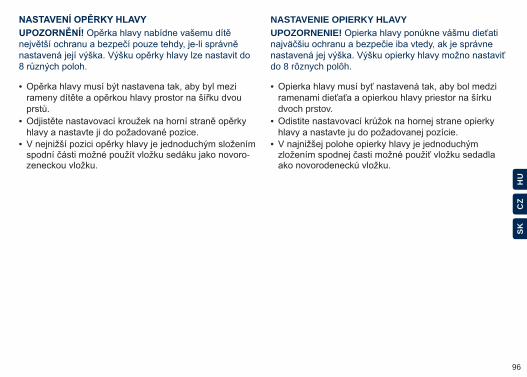
96
•
•
•-
•
dvoch prstov. •
•
NASTAVENIE OPIERKY HLAVYUPOZORNENIE!
do 8 rôznych polôh.
HU
CZ
SK
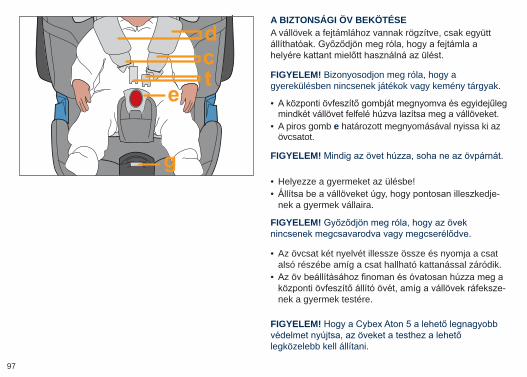
97
FIGYELEM!
FIGYELEM!
• Helyezze a gyermeket az ülésbe! • -nek a gyermek vállaira.
• Az övcsat két nyelvét illessze össze és nyomja a csat alsó részébe amíg a csat hallható kattanással záródik.
•-
nek a gyermek testére.
FIGYELEM!
legközelebb kell állítani.
•
• A piros gomb e határozott megnyomásával nyissa ki az övcsatot.
A BIZTONSÁGI ÖV BEKÖTÉSE
FIGYELEM! Bizonyosodjon meg róla, hogy a gyerekülésben nincsenek játékok vagy kemény tárgyak.
A vállövek a fejtámlához vannak rögzítve, csak együtt
98
ramenní vycpávky.UPOZORNENIE! za ramenné vypchávky.
nebo prohozeny.UPOZORNENIE! alebo prehodené.
• •
• • Nastavte ramenné pásy tak, aby viedli presne cez
•
•
• Spojte oba jazyky pásov k sebe a uzamknite ich do
•
UPOZORNENIE!
HU
CZ
SK
• -
• e
• Odistením nastavovacieho madlá na centrálnom na-
• e otvorte sponu.
UPOZORNENIE!
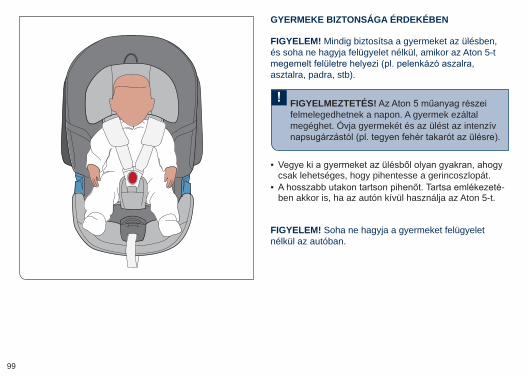
99
FIGYELMEZTETÉS!felmelegedhetnek a napon. A gyermek ezáltal megéghet. Óvja gyermekét és az ülést az intenzív
GYERMEKE BIZTONSÁGA ÉRDEKÉBEN
FIGYELEM! Mindig biztosítsa a gyermeket az ülésben, és soha ne hagyja felügyelet nélkül, amikor az Aton 5-t
asztalra, padra, stb).
•csak lehetséges, hogy pihentesse a gerincoszlopát.
• -ben akkor is, ha az autón kívül használja az Aton 5-t.
FIGYELEM! Soha ne hagyja a gyermeket felügyelet nélkül az autóban.
100
VAROVÁNÍ! VAROVANIE!
-
POZOR!
lavice ...).
•
• -
•
•
dozoru.POZOR!dozoru.
HU
CZ
SK
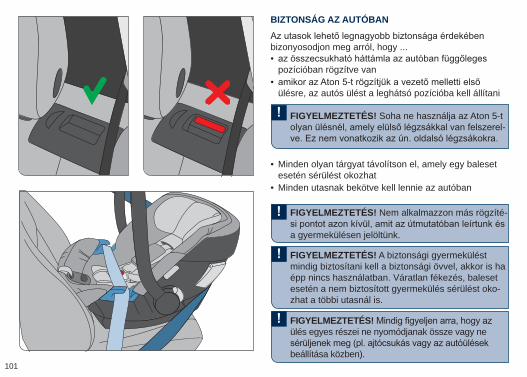
101
FIGYELMEZTETÉS! Soha ne használja az Aton 5-t -
FIGYELMEZTETÉS! Nem alkalmazzon más rögzíté-
a gyermekülésen jelöltünk.
FIGYELMEZTETÉS! A biztonsági gyermekülést mindig biztosítani kell a biztonsági övvel, akkor is ha épp nincs használatban. Váratlan fékezés, baleset esetén a nem biztosított gyermekülés sérülést oko-zhat a többi utasnál is.
BIZTONSÁG AZ AUTÓBAN
bizonyosodjon meg arról, hogy ... •pozícióban rögzítve van
• ülésre, az autós ülést a leghátsó pozícióba kell állítani
• Minden olyan tárgyat távolítson el, amely egy baleset esetén sérülést okozhat
• Minden utasnak bekötve kell lennie az autóban
FIGYELMEZTETÉS!ülés egyes részei ne nyomódjanak össze vagy ne
beállítása közben).
102
VAROVÁNÍ!
VAROVÁNÍ!
VAROVANIE!
neplatí pre takzvané postranné airbagy.
VAROVANIE!
VAROVÁNÍ!
-
VAROVANIE!
• • •pozici.
•vzpriamenej polohe
• -
• •
•
• HU
CZ
SK
VAROVANIE!
nastavovaní zadného sedadla).
VAROVÁNÍ!
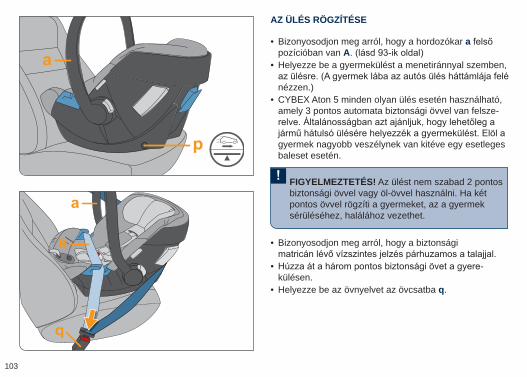
103
FIGYELMEZTETÉS! Az ülést nem szabad 2 pontos biztonsági övvel vagy öl-övvel használni. Ha két pontos övvel rögzíti a gyermeket, az a gyermek sérüléséhez, halálához vezethet.
AZ ÜLÉS RÖGZÍTÉSE
• Bizonyosodjon meg arról, hogy a hordozókar apozícióban van A
• Helyezze be a gyermekülést a menetiránnyal szemben,
nézzen.) • CYBEX Aton 5 minden olyan ülés esetén használható, amely 3 pontos automata biztonsági övvel van felsze-
gyermek nagyobb veszélynek van kitéve egy esetleges baleset esetén.
• Bizonyosodjon meg arról, hogy a biztonsági
• -külésen.
• Helyezze be az övnyelvet az övcsatba q.
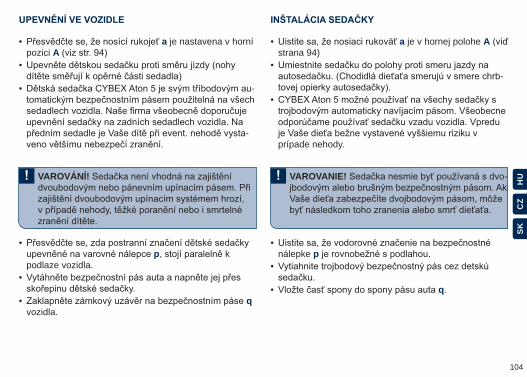
104
VAROVÁNÍ! VAROVANIE! -
• a je nastavena v horní pozici A
•
• -
-
• a je v hornej polohe Astrana 94)
•-
•
prípade nehody.
• p
podlaze vozidla. •
• q vozidla.
•nálepke p
•
• q.
HU
CZ
SK
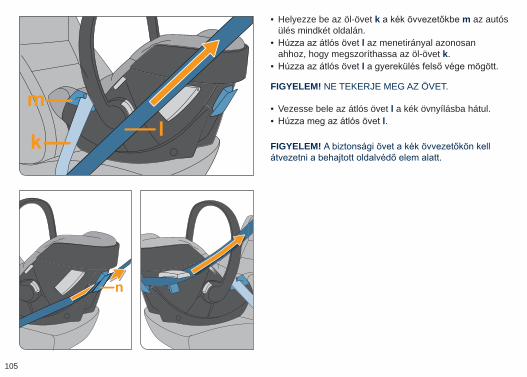
105
• Helyezze be az öl-övet k m az autós ülés mindkét oldalán.
• l az menetirányal azonosan ahhoz, hogy megszoríthassa az öl-övet k.
• l
FIGYELEM! NE TEKERJE MEG AZ ÖVET.
• Vezesse bele az átlós övet l a kék övnyílásba hátul. • l.
FIGYELEM!
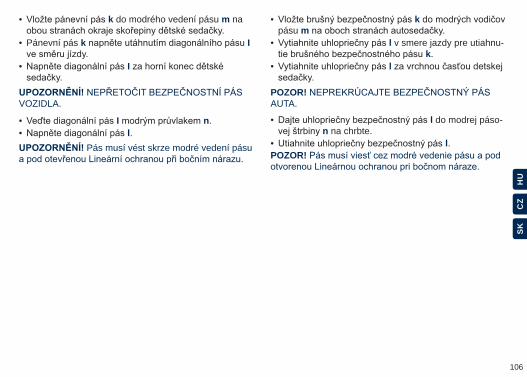
106
• k do modrého vedení pásu m na
• Pánevní pás k I
• I
• k pásu m
• l v smere jazdy pre utiahnu-k.
• l
VOZIDLA.POZOR!AUTA.
• I n. • l.
• l do modrej páso-n na chrbte.
• l.
HU
CZ
SK
Pás musí vést skrze modré vedení pásu POZOR!
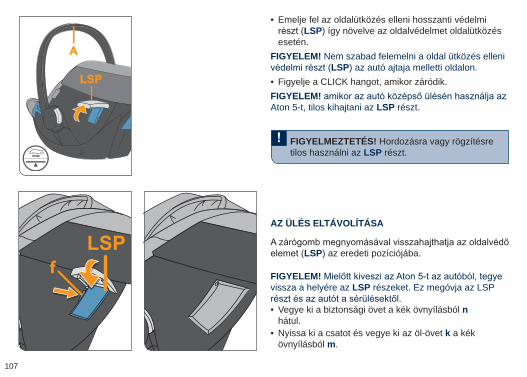
107
FIGYELMEZTETÉS! Hordozásra vagy rögzítésre tilos használni az LSP részt.
• Emelje fel az oldalütközés elleni hosszanti védelmi LSP) így növelve az oldalvédelmet oldalütközés
esetén.FIGYELEM! Nem szabad felemelni a oldal ütközés elleni
LSP) az autó ajtaja melletti oldalon. • Figyelje a CLICK hangot, amikor záródik.
FIGYELEM!Aton 5-t, tilos kihajtani az LSP részt.
AZ ÜLÉS ELTÁVOLÍTÁSA
LSP) az eredeti pozíciójába.
FIGYELEM! vissza a helyére az LSP részeket. Ez megóvja az LSP
• Vegye ki a biztonsági övet a kék övnyílásból n hátul.
• Nyissa ki a csatot és vegye ki az öl-övet k a kék övnyílásból m.
f
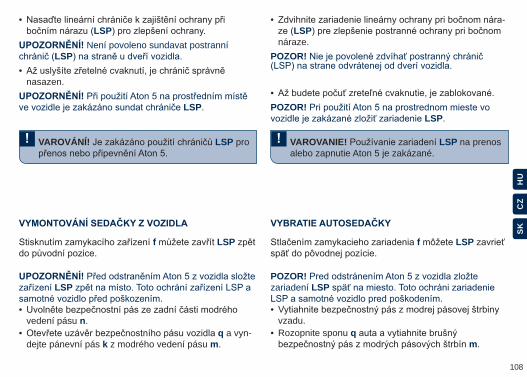
108
VAROVÁNÍ! LSP pro VAROVANIE! LSP na prenos alebo zapnutie Aton 5 je zakázané.
•LSP
• -LSP
náraze.Není povoleno sundavat postranní LSP POZOR!
•nasazen.
•LSP. POZOR!
LSP.
f LSP
f LSP
LSPPOZOR! zariadení LSP
•vedení pásu n.
• q a vyn-dejte pánevní pás k z modrého vedení pásu m.
•vzadu.
• Rozopnite sponu qm.
HU
CZ
SK
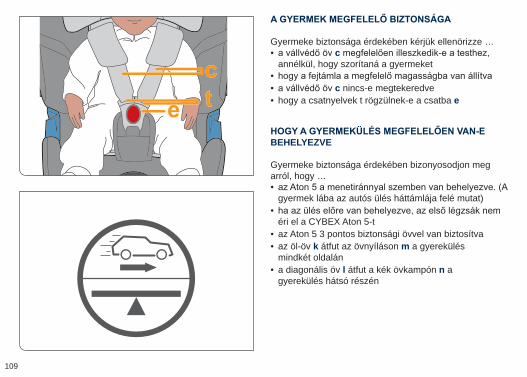
109
Gyermeke biztonsága érdekében kérjük ellenörizze … • cannélkül, hogy szorítaná a gyermeket
• • c nincs-e megtekeredve • hogy a csatnyelvek t rögzülnek-e a csatba e
BEHELYEZVE
Gyermeke biztonsága érdekében bizonyosodjon meg arról, hogy … •gyermek lába az autós ülés háttámlája felé mutat)
•éri el a CYBEX Aton 5-t
• az Aton 5 3 pontos biztonsági övvel van biztosítva • az öl-öv k átfut az övnyíláson m a gyerekülés mindkét oldalán
• a diagonális öv l átfut a kék övkampón n a gyerekülés hátsó részén
110
• Ramenní pásy c
• • Ramenní pásy c • t e zaklapnuty.
• c sedí dobre na telo bez obmedzova-
• • c • t zapnuté do spony e
•
•
• • pokud pánevní pás k je veden skrze oba modré
m • pokud diagonální pás l n na
• -
•
•pásom
• k prechádza cez pásové m
• l
HU
CZ
SK
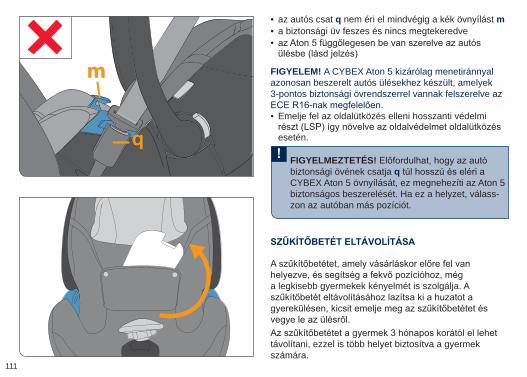
111
• az autós csat q nem éri el mindvégig a kék övnyílást m • a biztonsági üv feszes és nincs megtekeredve •
FIGYELEM! A CYBEX Aton 5 kizárólag menetiránnyal azonosan beszerelt autós ülésekhez készült, amelyek 3-pontos biztonsági övrendszerrel vannak felszerelve az
• Emelje fel az oldalütközés elleni hosszanti védelmi
esetén.
m
a legkisebb gyermekek kényelmét is szolgálja. A
távolítani, ezzel is több helyet biztosítva a gyermek számára.
FIGYELMEZTETÉS!biztonsági övének csatja qCYBEX Aton 5 övnyílását, ez megnehezíti az Aton 5 biztonságos beszerelését. Ha ez a helyzet, válass-zon az autóban más pozíciót.
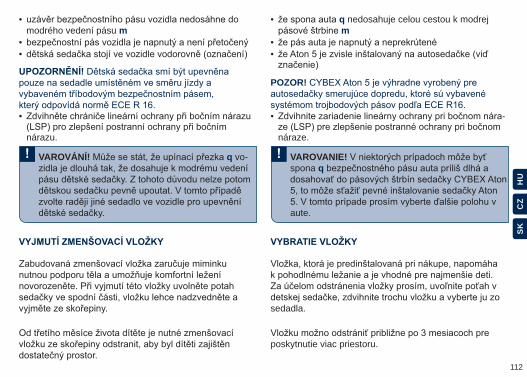
112
•modrého vedení pásu m
• •
• q nedosahuje celou cestou k modrej m
• •
POZOR!
. •
nárazu.
• -
náraze.
HU
CZ
SK
sedadla.
poskytnutie viac priestoru.
VAROVÁNÍ! q vo- VAROVANIE!spona q
aute.
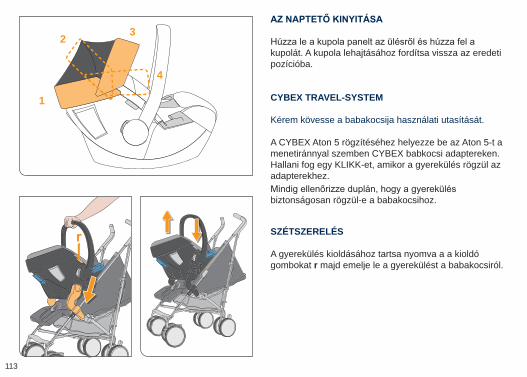
113
kupolát. A kupola lehajtásához fordítsa vissza az eredeti pozícióba.
CYBEX TRAVEL-SYSTEM
Kérem kövesse a babakocsija használati utasítását.
A CYBEX Aton 5 rögzítéséhez helyezze be az Aton 5-t a menetiránnyal szemben CYBEX babkocsi adaptereken. Hallani fog egy KLIKK-et, amikor a gyerekülés rögzül az adapterekhez.
biztonságosan rögzül-e a babakocsihoz.
SZÉTSZERELÉS
A gyerekülés kioldásához tartsa nyomva a a kioldó gombokat r majd emelje le a gyerekülést a babakocsiról.
1
2 3
4
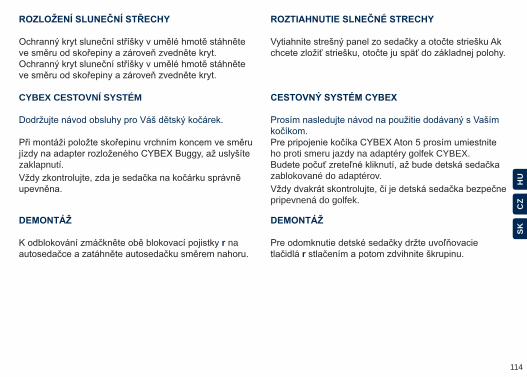
114
CYBEX CESTOVNÍ SYSTÉM
zaklapnutí.ho proti smeru jazdy na adaptéry golfek CYBEX.
zablokované do adaptérov.
pripevnená do golfek.
r na r
HU
CZ
SK

115
TERMÉK GONDOSKODÁS
Ahhoz, hogy gyermeke legnagyobb biztonságát
• A gyermek biztonségi ülés minden fontos részét rends-zeresen meg kell vizsgálni, nem sérültek-e.
• • Fontos, hogy a gyermekülés ne akadjon be kemény
-lyek sérülést okozhatnak az ülésen.
• A biztonsági gyermekülést a gyártónak mindig meg kell vizsgálnia, ha azt leejtették, illetve ehhez hasonló szituációkban.
FIGYELEM! Ha CYBEX Aton 5-t vásárol, ajánlatos egy második huzatot is vásárolni. így miközben tisztítja és szárítja, zavartalanul használhatja az ülést a másik huzattal.
BALESET ESETÉNBaleset esetén a gyermekülés károsodhat, akár oly módon is, hogy ez szabad szemmel nem látható. Ezért ilyen esetben a gyermekülést azonnal ki kell cserélni. További kérdés esetén vegye fel a kapcsolatot a forgalmazóval vagy a gyártóval.
116
•
• •
posouvací kolejnice sedadel, atd. Mohlo by dojít k
•
• -
• •
•po pádu alebo podobnej situácii.
POZOR!
V PRÍPADE NEHODY
HU
CZ
SK
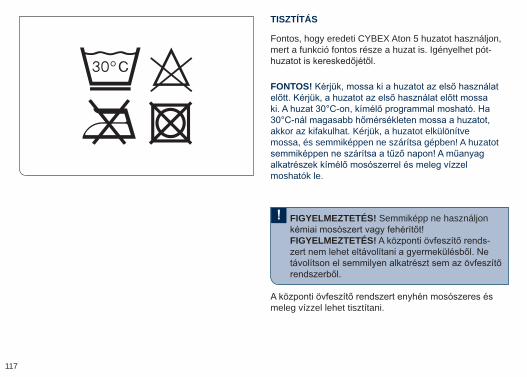
117
FIGYELMEZTETÉS! Semmiképp ne használjon
FIGYELMEZTETÉS! -
TISZTÍTÁS
Fontos, hogy eredeti CYBEX Aton 5 huzatot használjon, mert a funkció fontos része a huzat is. Igényelhet pót-
meleg vízzel lehet tisztítani.
FONTOS!
akkor az kifakulhat. Kérjük, a huzatot elkülönítve mossa, és semmiképpen ne szárítsa gépben! A huzatot
moshatók le.
118
VAROVÁNÍ!
VAROVÁNÍ!
VAROVANIE!
VAROVANIE!
UPOZORNENIE!
prostriedkom a teplou vodou.
HU
CZ
SK
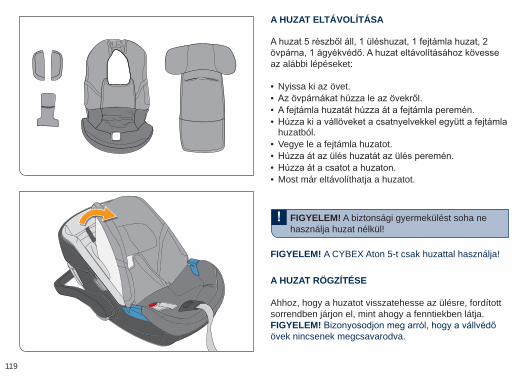
119
FIGYELEM! A biztonsági gyermekülést soha ne használja huzat nélkül!
A HUZAT ELTÁVOLÍTÁSA
FIGYELEM! A CYBEX Aton 5-t csak huzattal használja!
A HUZAT RÖGZÍTÉSE
Ahhoz, hogy a huzatot visszatehesse az ülésre, fordított sorrendben járjon el, mint ahogy a fenntiekben látja.FIGYELEM! övek nincsenek megcsavarodva.
• Nyissa ki az övet. • • •huzatból.
• Vegye le a fejtámla huzatot. • • • Most már eltávolíthatja a huzatot.
az alábbi lépéseket:
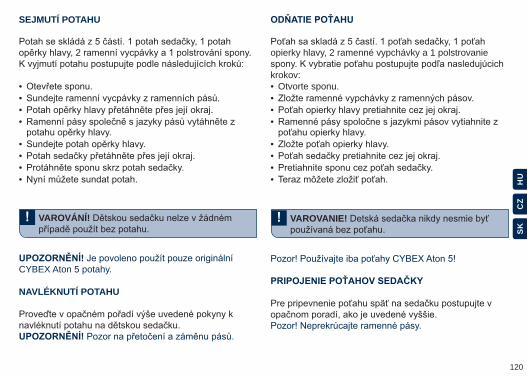
120
VAROVÁNÍ! VAROVANIE!
SEJMUTÍ POTAHU
CYBEX Aton 5 potahy.
NAVLÉKNUTÍ POTAHU
• Otvorte sponu. • • •
• • • •
• • • •
• • • •
opierky hlavy, 2 ramenné vypchávky a 1 polstrovanie
krokov:
HU
CZ
SK
121
A TERMÉK TARTÓSSÁGA
kéjük, hogy kövesse az alábbi instrukciókat.
• Ha az autó közvetlen napfénynek van kitéve
kocsiból vagy le kell takarni valamivel. • alkatrészét a gyerekülésnek, hogy nem sérült-e a formája, színe.
• Ha bármiféle változást tapasztal, nem szabad használnia az ülést. Ha huzat anyagnál van változás, pl. kifakul - az normális, és nem számít sérülésnek.
122
následující body:
•
•
barvy. • -
•
alebo prikrytá handrou. •
•
HU
CZ
SK
123
FIGYELMEZTETÉS! Mindenfajta csomagoló anya-
RENDELKEZÉS
TERMÉK INFORMÁCIÓK!
Környezetvédelmi szempontokból kifolyólag mindig
anyagokkal kapcsoaltos rendelkezések régiónként
fel a kapcsolatot a lakhelye szerinti illetékes hatósággal, akik a kommunális hulladékkal foglalkoznak. Minden esetben vegyék alapul országuk hulladék gazdálkodással kapcsolatos szabályozását.
• • Márkanév és Típus az autónál, valamint a pozíció, ahova általában beszerelik a gyermekülést.
•
meg WWW.CYBEX-ONLINE.COM
124
VAROVÁNÍ! VAROVANIE!od detí. Hrozí riziko udusenia.
LIKVIDÁCIA
INFORMÁCIE O PRODUKTE
prosím, vezmite na vedomie predpisy o odpadoch vo
Ak máte nejaké otázky, prosím kontaktujte svojho
informácie: • •
•
• •namontované.
•
WWW.CYBEX-ONLINE.COM WWW.CYBEX-ONLINE.COM
HU
CZ
SK
125
SZAVATOSSÁG
Az alábbi garancia feltételek kizárólag abban az országban érvényesek, ahol egy forgalmazó egy ügyfél
és anyaghibára kiterjed, amely a vásárláskor már fennállt, illetve a termék a forgalmazó által az ügyfél részére
eseteben, ha gyártási vagy anyaghiba jelentkezik, a gyártó saját megítélése szerint megjavítja vagy kicseréli.
a terméket vissza kell juttatni annak a forgalmazónak,
forgalmazó neve és a termék pontos megnevezése
ha a terméket reklamációs céllal a gyártónak vagy bármely más személynek küldik vissza, és nem annak a forgalmazónak, aki a terméket eredetileg értékesítette.
gyártási vagy anyaghibára utaló jeleket rögtön a vásárlás után illetve rendelés esetén a kézhezvétel után azonnal. Amennyiben a termék megsérül, ne használja tovább, haladéktalanul juttassa vissza annak a forgalmazónak,
a terméket megtisztított és hiánytalan állapotban
126
PODMÍNKY ZÁRUKY ZÁRUKA
Následující záruka platí pouze v zemi, kde byl tento
existují a které se objeví v den nákupu nebo se objevily
HU
CZ
SK
127
az esetleges javításokat kizárólag az arra jogosult személyek végezték, továbbá eredeti alkatrészeket és tartozékokat használtak. Jelen garanciát a hatályban
módon nem zárják ki, korlátozzák vagy kényszerítik.
128
HU
CZ
SK
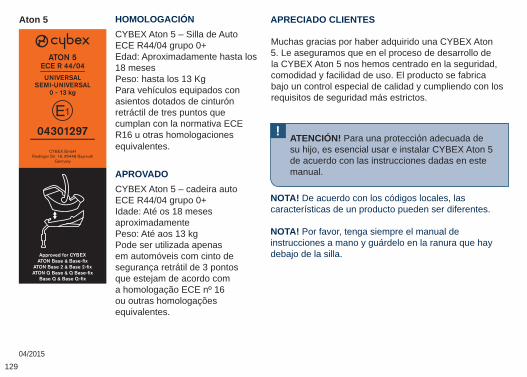
HOMOLOGACIÓNCYBEX Aton 5 – Silla de Auto ECE R44/04 grupo 0+ Edad: Aproximadamente hasta los 18 meses Peso: hasta los 13 Kg Para vehículos equipados con asientos dotados de cinturón retráctil de tres puntos que cumplan con la normativa ECE R16 u otras homologacionesequivalentes.
APROVADOCYBEX Aton 5 – cadeira auto ECE R44/04 grupo 0+ Idade: Até os 18 meses aproximadamente Peso: Até aos 13 kg Pode ser utilizada apenas em automóveis com cinto de segurança retrátil de 3 pontos que estejam de acordo com a homologação ECE nº 16 ou outras homologações equivalentes.
04/2015
Muchas gracias por haber adquirido una CYBEX Aton 5. Le aseguramos que en el proceso de desarrollo de la CYBEX Aton 5 nos hemos centrado en la seguridad, comodidad y facilidad de uso. El producto se fabrica bajo un control especial de calidad y cumpliendo con los requisitos de seguridad más estrictos.
ATENCIÓN! Para una protección adecuada de su hijo, es esencial usar e instalar CYBEX Aton 5 de acuerdo con las instrucciones dadas en este manual.
!
NOTA! De acuerdo con los códigos locales, las características de un producto pueden ser diferentes.
NOTA! Por favor, tenga siempre el manual de instrucciones a mano y guárdelo en la ranura que hay debajo de la silla.
APRECIADO CLIENTESAton 5
ATON 5ECE R 44/04 ____________
UNIVERSAL SEMI-UNIVERSAL
0 - 13 kg
04301297 ____________
CYBEX GmbHRiedinger Str. 18, 95448 Bayreuth
Germany
Approved for CYBEX
ATON Base & Base-fix
ATON Base 2 & Base 2-fix
ATON Q Base & Q Base-fix
Base Q & Base Q-fix
129

ESP
T
Agradecemos a sua preferência na aquisição da CYBEX Aton 5. Asseguramos-lhe de que na elaboração da CYBEX Aton 5 foram consideradas as seguintes referências: segurança, conforto e facíl utilização. Este produto foi produzido sob especial vigilância de qualidade e em conformidade com as mais rigorosas normas de segurança.
ATENÇÃO! Para viajar em máxima segurança é essencial usar e instalar a CYBEX Aton 5 de acordo com as instruções deste manual.
!
NOTA! De acordo com os códigos locais as caraterísticas deste produto podem ser diferentes.
NOTA! Tenha o manual sempre à mão para futuras consultas. Quando acabe de o consultar volte a guardá-lo
CAROS CLIENTES
130
CONTENIDOESRESUMEN DE INSTRUCCIONES ..............................................................2HOMOLOGACIÓN .....................................................................................129LA MEJOR POSICIÓN EN EL COCHE ...................................................133PARA PROTEGER SU COCHE ...............................................................133AJUSTE DEL ASA DE TRANSPORTE ...................................................135AJUSTE DEL RESPOSACABEZAS ........................................................137ASEGURADO MEDIANTE EL SISTEMA DE ARNESES ....................137SEGURIDAD PARA SU BEBÉ .................................................................141SEGURIDAD EN EL COCHE ...................................................................143INSTALACIÓN DE LA SILLA .....................................................................145RETIRAR LA SILLA DE AUTO ..................................................................149ASEGURAR CORRECTAMENTE A SU HIJO .......................................151INSTALAR CORRECTAMENTE LA SILLA ............................................151EXTRAER EL REDUCTOR .......................................................................153ABRIR LA CAPOTA ....................................................................................155SISTEMA DE VIAJE CYBEX.....................................................................155DESMONTAJE ...........................................................................................155CUIDADOS DE LA SILLA ..........................................................................157EN CASO DE ACCIDENTE.......................................................................157LIMPIEZA......................................................................................................159EXTRACCIÓN DE LA VESTIDURA .........................................................161COLOCAR LA VESTIDURA ......................................................................161DURABILIDAD DE LA SILLA.....................................................................163DESECHO ...................................................................................................165INFORMACIÓN DEL PRODUCTO ..........................................................165GARANTÍA ...................................................................................................167
131
ESP
T
CONTEÚDOPTMANUAL REDUZIDO .....................................................................................2APROVADO .................................................................................................129A MELHOR POSIÇÃO DENTRO DO AUTOMÓVEL ............................134PARA A PROTEÇÃO DO SEU AUTOMÓVEL .......................................134REGULAÇÃO DA ASA DE TRANSPORTE ............................................136REGULAÇÃO DO ENCOSTO DE CABEÇA ..........................................138SEGURANÇA AO USAR O SISTEMA DE ARNÊS ...............................138SEGURANÇA PARA O SEU BEBÉ .........................................................142SEGURANÇA NO AUTOMÓVEL .............................................................144INSTALAÇÃO DA CADEIRA .....................................................................146REMOVER A CADEIRA .............................................................................150ACOMODAR A CRIANÇA CORRETAMENTE ......................................152INSTALAR A CADEIRA CORRETAMENTE ...........................................152RETIRAR O REDUTOR.............................................................................154ABRIR A CAPOTA .......................................................................................156CYBEX TRAVEL-SYSTEM .......................................................................156DESMONTAGEM .......................................................................................156CUIDADOS DO PRODUTO ......................................................................158QUE FAZER EM CASO DE ACIDENTE .................................................158LIMPEZA.......................................................................................................160REMOÇÃO DA FORRA .............................................................................162COLOCAR A FORRA .................................................................................162TEMPO DE VIDA DO PRODUTO ............................................................164ELIMINAÇÃO ...............................................................................................166INFORMAÇÃO DE PRODUTO ................................................................166GARANTIA ...................................................................................................168
132
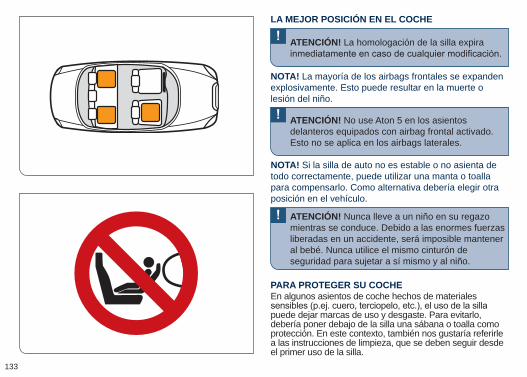
PARA PROTEGER SU COCHE
ATENCIÓN! La homologación de la silla expira
ATENCIÓN! No use Aton 5 en los asientos delanteros equipados con airbag frontal activado. Esto no se aplica en los airbags laterales.
ATENCIÓN! Nunca lleve a un niño en su regazo mientras se conduce. Debido a las enormes fuerzas liberadas en un accidente, será imposible mantener al bebé. Nunca utilice el mismo cinturón de seguridad para sujetar a sí mismo y al niño.
LA MEJOR POSICIÓN EN EL COCHE
NOTA! La mayoría de los airbags frontales se expanden explosivamente. Esto puede resultar en la muerte o lesión del niño.
NOTA! Si la silla de auto no es estable o no asienta de todo correctamente, puede utilizar una manta o toalla para compensarlo. Como alternativa debería elegir otra posición en el vehículo.
En algunos asientos de coche hechos de materiales
puede dejar marcas de uso y desgaste. Para evitarlo, debería poner debajo de la silla una sábana o toalla como protección. En este contexto, también nos gustaría referirle a las instrucciones de limpieza, que se deben seguir desde el primer uso de la silla.
133
ESP
T
PARA A PROTEÇÃO DO SEU AUTOMÓVEL
ATENÇÃO! A aprovação desta cadeira auto expira
posterior.
ATENÇÃO! Não utilize a cadeira Aton 5 no assento
que não se possam desligar). Isto não se aplica para os airbags laterais.
ATENÇÃO! Nunca viaje com a criança ao colo dentro do automóvel. Devido a enormes forças libertados num acidente, é impossível garantir a segurança do bebé. Nunca partilhe o mesmo cinto de segurança com a criança.
A MELHOR POSIÇÃO DENTRO DO AUTOMÓVEL
NOTA! Airbags frontais de grande volume expandem-se de forma explosiva. Isto pode provocar ferimentos ou mesmo a morte à criança.
NOTA! Se a cadeira auto não estiver estável de todo ou não assentar bem no automóvel poderá usar uma toalha ou cobertor para compensar. Alternativamente, pode escolher outra posição no automóvel.
É possível que alguns assentos de automóvel de material
descoloração e desgaste. De forma a evitar este desgaste poderá, por exemplo, colocar uma toalha debaixo da cadeira. Neste contexto referimo-nos também às instruções de limpeza, que deverão ser consideradas antes da primeira utilização.
134
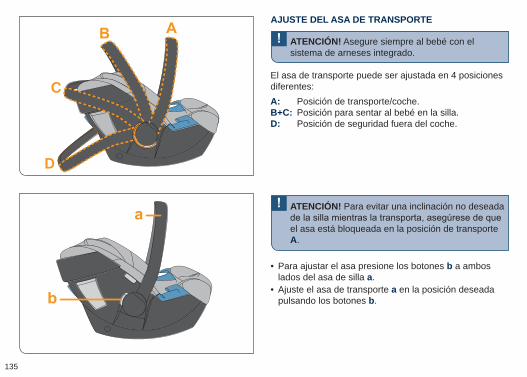
ATENCIÓN! Asegure siempre al bebé con el sistema de arneses integrado.
ATENCIÓN! Para evitar una inclinación no deseada
el asa está bloqueada en la posición de transporte A.
AJUSTE DEL ASA DE TRANSPORTE
El asa de transporte puede ser ajustada en 4 posiciones diferentes:A: Posición de transporte/coche.B+C: Posición para sentar al bebé en la silla.D: Posición de seguridad fuera del coche.
• Para ajustar el asa presione los botones b a ambos lados del asa de silla a.
• Ajuste el asa de transporte a en la posición deseada pulsando los botones b.
135
ESP
T
ATENÇÃO! Sente e acomode o bebé utilizando o sistema de arnês integrado.
ATENÇÃO! De forma a evitar que a cadeira incline ou balance, assegure-se de que a asa está bloquea-da na posição de transporte. A.
REGULAÇÃO DA ASA DE TRANSPORTE
Esta asa de transporte pode ser regulada em 4 posições diferentes.A: Transporte/Posição de ConduçãoB+C: Para colocar o bebé na cadeira.D: Posição segura fora do automóvel.
• Para ajustar el asa presione los botones b a ambos lados del asa de silla a.
• Ajuste el asa de transporte a en la posición deseada pulsando los botones b.
136
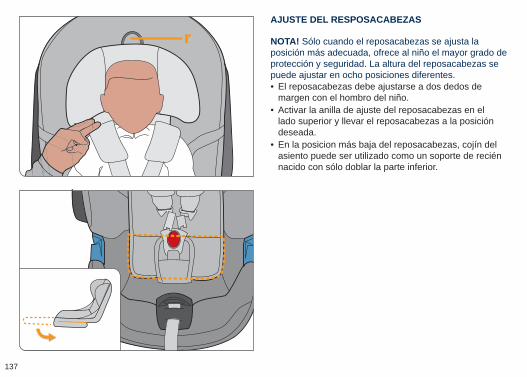
• El reposacabezas debe ajustarse a dos dedos de margen con el hombro del niño.
• Activar la anilla de ajuste del reposacabezas en el lado superior y llevar el reposacabezas a la posición deseada.
• En la posicion más baja del reposacabezas, cojín del asiento puede ser utilizado como un soporte de recién nacido con sólo doblar la parte inferior.
AJUSTE DEL RESPOSACABEZAS
NOTA! Sólo cuando el reposacabezas se ajusta la posición más adecuada, ofrece al niño el mayor grado de protección y seguridad. La altura del reposacabezas se puede ajustar en ocho posiciones diferentes.
r
137
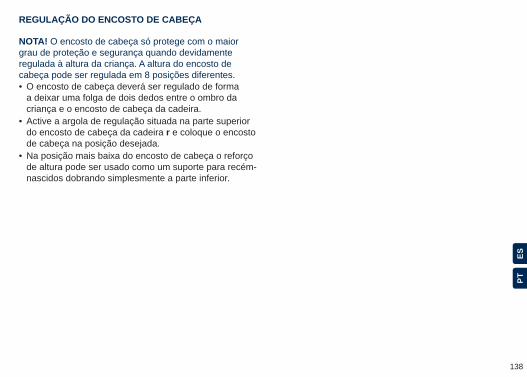
ESP
T
• O encosto de cabeça deverá ser regulado de forma a deixar uma folga de dois dedos entre o ombro da criança e o encosto de cabeça da cadeira.
• Active a argola de regulação situada na parte superior do encosto de cabeça da cadeira r e coloque o encosto de cabeça na posição desejada.
• Na posição mais baixa do encosto de cabeça o reforço de altura pode ser usado como um suporte para recém-nascidos dobrando simplesmente a parte inferior.
REGULAÇÃO DO ENCOSTO DE CABEÇA
NOTA! O encosto de cabeça só protege com o maior grau de proteção e segurança quando devidamente regulada à altura da criança. A altura do encosto de cabeça pode ser regulada em 8 posições diferentes.
138
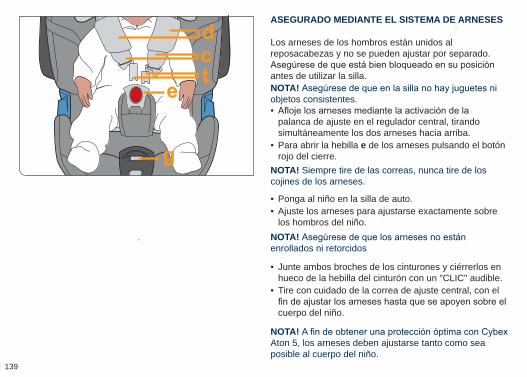
NOTA! Siempre tire de las correas, nunca tire de los cojines de los arneses.
NOTA! enrollados ni retorcidos
• Ponga al niño en la silla de auto. • Ajuste los arneses para ajustarse exactamente sobre los hombros del niño.
• Junte ambos broches de los cinturones y ciérrerlos en hueco de la hebilla del cinturón con un "CLIC" audible.
• Tire con cuidado de la correa de ajuste central, con el
cuerpo del niño.
NOTA! Aton 5, los arneses deben ajustarse tanto como sea posible al cuerpo del niño.
•palanca de ajuste en el regulador central, tirando simultáneamente los dos arneses hacia arriba.
• Para abrir la hebilla e de los arneses pulsando el botón rojo del cierre.
ASEGURADO MEDIANTE EL SISTEMA DE ARNESES
NOTA! objetos consistentes.
Los arneses de los hombros están unidos al reposacabezas y no se pueden ajustar por separado.
antes de utilizar la silla.
139
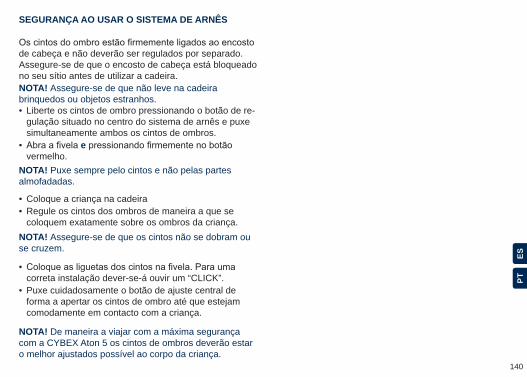
ESP
T
NOTA! Puxe sempre pelo cintos e não pelas partes almofadadas.
NOTA! Assegure-se de que os cintos não se dobram ou se cruzem.
• Coloque a criança na cadeira • Regule os cintos dos ombros de maneira a que se coloquem exatamente sobre os ombros da criança.
•correta instalação dever-se-á ouvir um “CLICK”.
• Puxe cuidadosamente o botão de ajuste central de forma a apertar os cintos de ombro até que estejam comodamente em contacto com a criança.
NOTA! De maneira a viajar com a máxima segurança com a CYBEX Aton 5 os cintos de ombros deverão estar o melhor ajustados possível ao corpo da criança.
• Liberte os cintos de ombro pressionando o botão de re-gulação situado no centro do sistema de arnês e puxe simultaneamente ambos os cintos de ombros.
• evermelho.
SEGURANÇA AO USAR O SISTEMA DE ARNÊS
NOTA! Assegure-se de que não leve na cadeira brinquedos ou objetos estranhos.
de cabeça e não deverão ser regulados por separado. Assegure-se de que o encosto de cabeça está bloqueado no seu sítio antes de utilizar a cadeira.
140
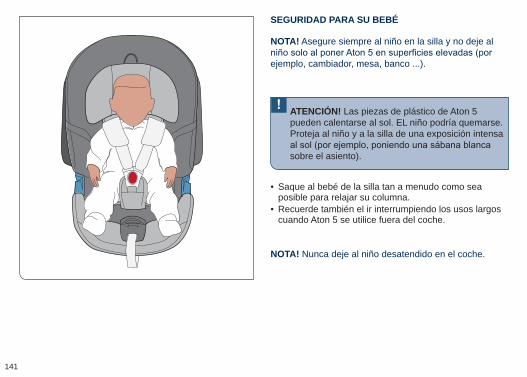
NOTA! Nunca deje al niño desatendido en el coche.
ATENCIÓN! Las piezas de plástico de Aton 5 pueden calentarse al sol. EL niño podría quemarse. Proteja al niño y a la silla de una exposición intensa
sobre el asiento).
NOTA! Asegure siempre al niño en la silla y no deje al
ejemplo, cambiador, mesa, banco ...).
• Saque al bebé de la silla tan a menudo como sea posible para relajar su columna.
• Recuerde también el ir interrumpiendo los usos largos cuando Aton 5 se utilice fuera del coche.
SEGURIDAD PARA SU BEBÉ
141
ESP
T
NOTA!
ATENÇÃO! As parte de plástico da CYBEX Aton 5 poderão aquecer quando expostas ao sol e poderão queimar o bebé. Proteja o seu bebé e a cadeira de
manta branca para cobrir o assento).
NOTA! Coloque sempre a criança corretamente na
mesa, banco...)
• Levante o seu bebé da cadeira sempre que lhe seja possível. Desta maneira o seu bebé poderá relaxar a coluna.
• Faça paragens em viagens mais longas. Este conselho é válido também quando a pé.
SEGURANÇA PARA O SEU BEBÉ
142

ATENCIÓN! Nunca utilice Aton 5 en un asiento equipado con un airbag frontal. Esto no se aplica a los llamados airbags laterales.
ATENCIÓN! No utilice ningun otro punto de contacto excepto los que están descritos en el manual de instrucciones y marcados en la silla de seguridad.
ATENCIÓN! La silla de auto debe ir siempre sujeta con el cinturón de seguridad, incluso si no está en uso. En caso de frenado de emergencia o accidente, una sillita sin sujetar puede dañar a otros pasajeros o a usted mismo.
Para poder garantizar la mayor seguridad posible,
• Los respaldos plegados del coche están bloqueados en posición vertical
• Cuando se instale Aton 5 en el asiento del copiloto, ajustar el asiento del coche a la posición más retrasada posible.
• Asegure adecuadamente todos los objetos susceptibles de causar lesiones en caso de accidente
• Todos los pasajeros del coche van abrochados
SEGURIDAD EN EL COCHE
ATENCIÓN!
ejemplo, por la puerta del coche o mientras se ajusta el asiento de atrás).
143
ESP
T
ATENÇÃO Nunca utilize a Aton 5 num automóvel equipado com airbag frontal. Não aplicável a airbags laterais.
ATENÇÃO Não utilize outros pontos de contacto sem ser os descritos nas instruções e marcados na própria cadeira auto.
ATENÇÃO A cadeira infantil deverá estar sempre
não esteja a criança). Em caso de uma travagem repentina ou acidente o assento poderá deslocar-se e provocar ferimentos aos passageiros.
De forma a garantir a máxima segurança para todos os passageiros assegure-se que: • que os assentos reclináveis do automóvel estão blo-queados na sua posição vertical.
• ao instalar a Aton 5 no assento frontal, coloque a cadei-ra à máxima distância do tabelier.
• Prenda todos os objectos que possivelmente possam cau-sar qualquer tipo de ferimentos em caso de impacto.
• Todos os passageiros deverão levar posto o cinto de segurança.
SEGURANÇA NO AUTOMÓVEL
ATENÇÃO Assegure sempre que os componentes da
da cadeira)144
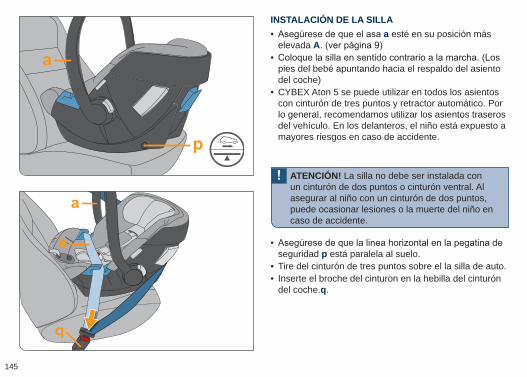
ATENCIÓN! La silla no debe ser instalada con un cinturón de dos puntos o cinturón ventral. Al asegurar al niño con un cinturón de dos puntos, puede ocasionar lesiones o la muerte del niño en caso de accidente.
• a esté en su posición más elevada A
•pies del bebé apuntando hacia el respaldo del asiento del coche)
• CYBEX Aton 5 se puede utilizar en todos los asientos con cinturón de tres puntos y retractor automático. Por lo general, recomendamos utilizar los asientos traseros del vehículo. En los delanteros, el niño está expuesto a mayores riesgos en caso de accidente.
INSTALACIÓN DE LA SILLA
•seguridad p está paralela al suelo.
• Tire del cinturón de tres puntos sobre el la silla de auto. • Inserte el broche del cinturon en la hebilla del cinturón del coche.q.
145
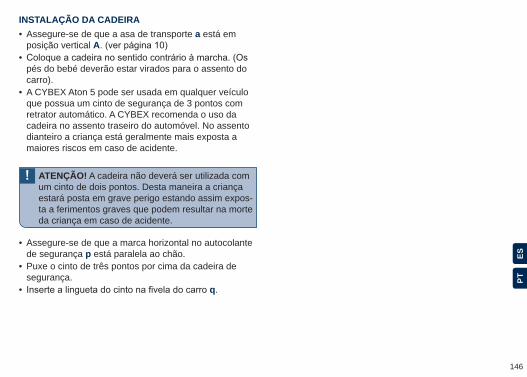
ESP
T
ATENÇÃO! A cadeira não deverá ser utilizada com um cinto de dois pontos. Desta maneira a criança estará posta em grave perigo estando assim expos-ta a ferimentos graves que podem resultar na morte da criança em caso de acidente.
• Assegure-se de que a asa de transporte a está em posição vertical A
•pés do bebé deverão estar virados para o assento do carro).
• A CYBEX Aton 5 pode ser usada em qualquer veículo que possua um cinto de segurança de 3 pontos com retrator automático. A CYBEX recomenda o uso da cadeira no assento traseiro do automóvel. No assento dianteiro a criança está geralmente mais exposta a maiores riscos em caso de acidente.
INSTALAÇÃO DA CADEIRA
• Assegure-se de que a marca horizontal no autocolante de segurança p está paralela ao chão.
• Puxe o cinto de três pontos por cima da cadeira de segurança.
• q.
146
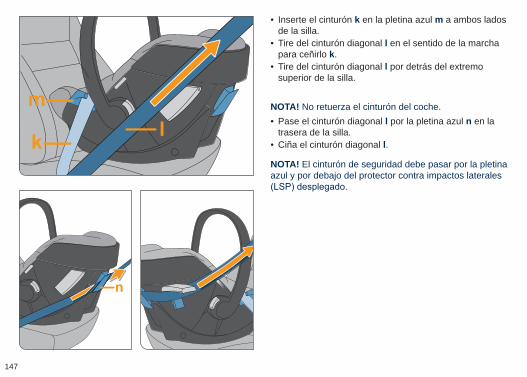
• Inserte el cinturón k en la pletina azul m a ambos lados de la silla.
• Tire del cinturón diagonal l en el sentido de la marcha para ceñirlo k.
• Tire del cinturón diagonal l por detrás del extremo superior de la silla.
• Pase el cinturón diagonal l por la pletina azul n en la trasera de la silla.
• Ciña el cinturón diagonal l.
NOTA! No retuerza el cinturón del coche.
NOTA! El cinturón de seguridad debe pasar por la pletina azul y por debajo del protector contra impactos laterales
147
ESP
T
• Coloque o cinto k nas guias azuis m em ambos os lados da cadeira.
• Coloque o cinto diagonal l na direção da condução para ir mais apertado k.
• Puxe o cinto diagonal l para trás da cadeira.
• Coloque o cinto diagonal l na parte azul n que se situa na parte traseira da cadeira.
• l.
NOTA! Não torça ou gire o cinto de segurança.
NOTA! O cinto de segurança deverá passar pelas partes
148
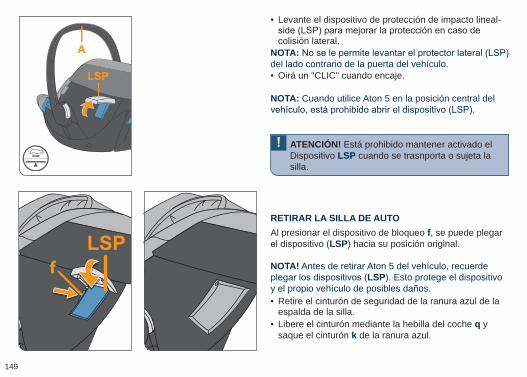
• Oirá un "CLIC" cuando encaje.
NOTA: Cuando utilice Aton 5 en la posición central del
ATENCIÓN! Está prohibido mantener activado el Dispositivo LSP cuando se trasnporta o sujeta la silla.
• Retire el cinturón de seguridad de la ranura azul de la espalda de la silla.
• Libere el cinturón mediante la hebilla del coche q y saque el cinturón k de la ranura azul.
• Levante el dispositivo de protección de impacto lineal-
colisión lateral.NOTA:del lado contrario de la puerta del vehículo.
RETIRAR LA SILLA DE AUTO
NOTA! Antes de retirar Aton 5 del vehículo, recuerde LSP). Esto protege el dispositivo
y el propio vehículo de posibles daños.
Al presionar el dispositivo de bloqueo f, se puede plegar LSP) hacia su posición original.
f
149
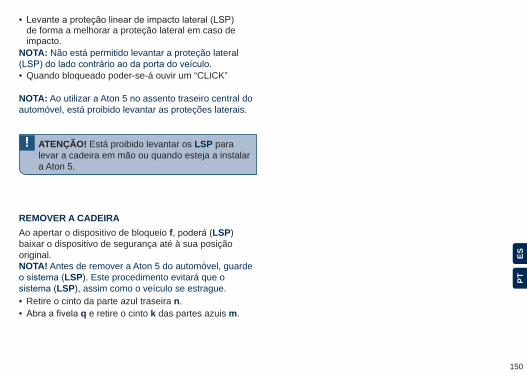
ESP
T
• Quando bloqueado poder-se-á ouvir um “CLICK”
NOTA: Ao utilizar a Aton 5 no assento traseiro central do automóvel, está proibido levantar as proteções laterais.
ATENÇÃO! Está proibido levantar os LSP para levar a cadeira em mão ou quando esteja a instalar a Aton 5.
• Retire o cinto da parte azul traseira n. • q e retire o cinto k das partes azuis m.
•de forma a melhorar a proteção lateral em caso de impacto.
NOTA: Não está permitido levantar a proteção lateral
REMOVER A CADEIRA
NOTA! Antes de remover a Aton 5 do automóvel, guarde LSP). Este procedimento evitará que o
LSP), assim como o veículo se estrague.
Ao apertar o dispositivo de bloqueio f LSP) baixar o dispositivo de segurança até à sua posição original.
150
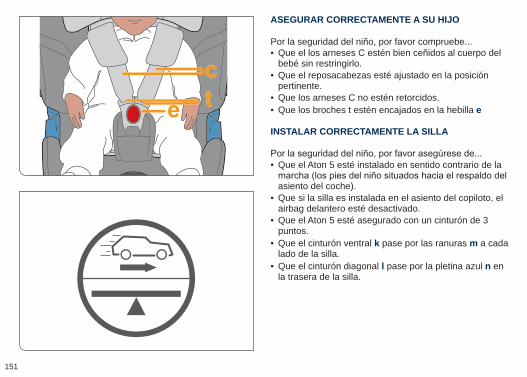
• Que el Aton 5 esté instalado en sentido contrario de la
asiento del coche). • Que si la silla es instalada en el asiento del copiloto, el airbag delantero esté desactivado.
• Que el Aton 5 esté asegurado con un cinturón de 3 puntos.
• Que el cinturón ventral k pase por las ranuras m a cada lado de la silla.
• Que el cinturón diagonal l pase por la pletina azul n en la trasera de la silla.
ASEGURAR CORRECTAMENTE A SU HIJO
INSTALAR CORRECTAMENTE LA SILLA
Por la seguridad del niño, por favor compruebe... • Que el los arneses C estén bien ceñidos al cuerpo del bebé sin restringirlo.
• Que el reposacabezas esté ajustado en la posición pertinente.
• Que los arneses C no estén retorcidos. • Que los broches t estén encajados en la hebilla e
151
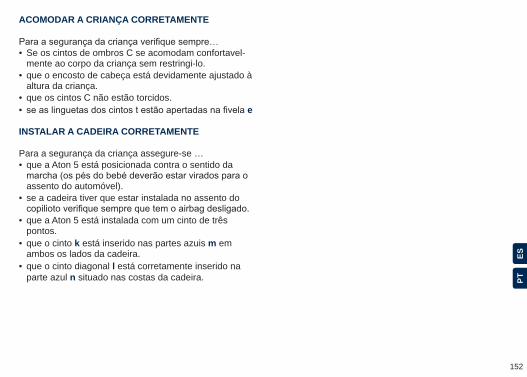
ESP
T
• que a Aton 5 está posicionada contra o sentido da
assento do automóvel). • se a cadeira tiver que estar instalada no assento do
• que a Aton 5 está instalada com um cinto de três pontos.
• que o cinto k está inserido nas partes azuis m em ambos os lados da cadeira.
• que o cinto diagonal l está corretamente inserido na parte azul n situado nas costas da cadeira.
ACOMODAR A CRIANÇA CORRETAMENTE
INSTALAR A CADEIRA CORRETAMENTE
Para a segurança da criança assegure-se …
• Se os cintos de ombros C se acomodam confortavel-mente ao corpo da criança sem restringi-lo.
• que o encosto de cabeça está devidamente ajustado à altura da criança.
• que os cintos C não estão torcidos. • e
152
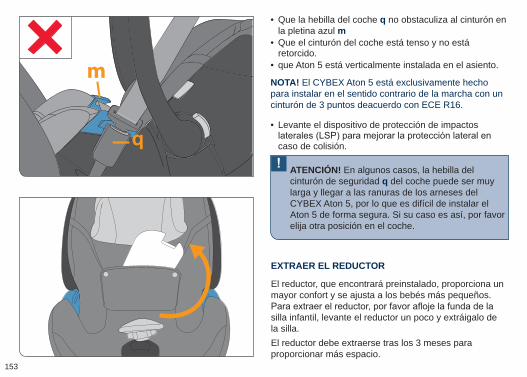
• Levante el dispositivo de protección de impactos
caso de colisión.
m
• Que la hebilla del coche q no obstaculiza al cinturón en la pletina azul m
• Que el cinturón del coche está tenso y no está retorcido.
• que Aton 5 está verticalmente instalada en el asiento.
NOTA! El CYBEX Aton 5 está exclusivamente hecho para instalar en el sentido contrario de la marcha con un cinturón de 3 puntos deacuerdo con ECE R16.
EXTRAER EL REDUCTOR
El reductor, que encontrará preinstalado, proporciona un mayor confort y se ajusta a los bebés más pequeños.
silla infantil, levante el reductor un poco y extráigalo de la silla.El reductor debe extraerse tras los 3 meses para proporcionar más espacio.
ATENCIÓN! En algunos casos, la hebilla del cinturón de seguridad q del coche puede ser muy larga y llegar a las ranuras de los arneses del CYBEX Aton 5, por lo que es difícil de instalar el Aton 5 de forma segura. Si su caso es así, por favor elija otra posición en el coche.
153
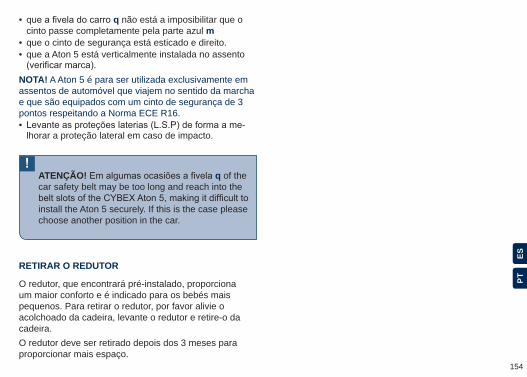
ESP
T
• -lhorar a proteção lateral em caso de impacto.
• q não está a imposibilitar que o cinto passe completamente pela parte azul m
• que o cinto de segurança está esticado e direito. • que a Aton 5 está verticalmente instalada no assento
NOTA! A Aton 5 é para ser utilizada exclusivamente em assentos de automóvel que viajem no sentido da marcha e que são equipados com um cinto de segurança de 3 pontos respeitando a Norma ECE R16.
RETIRAR O REDUTOR
O redutor, que encontrará pré-instalado, proporciona um maior conforto e é indicado para os bebés mais pequenos. Para retirar o redutor, por favor alivie o acolchoado da cadeira, levante o redutor e retire-o da cadeira.O redutor deve ser retirado depois dos 3 meses para proporcionar mais espaço.
ATENÇÃO! q of the car safety belt may be too long and reach into the
install the Aton 5 securely. If this is the case please choose another position in the car.
154
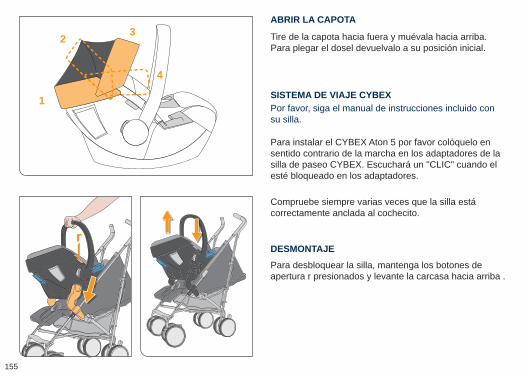
Para desbloquear la silla, mantenga los botones de apertura r presionados y levante la carcasa hacia arriba .
ABRIR LA CAPOTA
SISTEMA DE VIAJE CYBEX
Tire de la capota hacia fuera y muévala hacia arriba. Para plegar el dosel devuelvalo a su posición inicial.
Por favor, siga el manual de instrucciones incluido con su silla.
Para instalar el CYBEX Aton 5 por favor colóquelo en sentido contrario de la marcha en los adaptadores de la silla de paseo CYBEX. Escuchará un "CLIC" cuando el esté bloqueado en los adaptadores.
Compruebe siempre varias veces que la silla está correctamente anclada al cochecito.
DESMONTAJE
1
2 3
4
155
ESP
T
Para desbloquear a cadeira do carrinho pressione os botões r e ao mesmo tempo levante a cadeira.
ABRIR A CAPOTA
CYBEX TRAVEL-SYSTEM
Puxe a capota para fora e coloque-a para cima. Para voltar a guarda a capota volte à posição original.
Siga as instruções do manual que vem incluído com o carrinho de passeio.
Para instalar a CYBEX Aton 5 coloque-a no sentido contrário à marcha nos adaptadores do carrinho CYBEX. Ouvir-se-á um “CLICK” quando a cadeira esteja corretamente instalada e bloqueada nos adaptadores.
Assegure-se que a cadeira está efetivamente instalada e segura no carro.
DESMONTAGEM
156
En un accidente, la silla puede recibir daños invisibles al ojo humano. Por lo tanto, en esa situación, la silla debe ser reemplazada inmediatamente, en caso de duda, por favor contacte con el distribuidor o fabricante.
CUIDADOS DE LA SILLA
EN CASO DE ACCIDENTE
Para garantizar la mejor protección posible para el niño, por favor tome nota de lo siguiente: • Todas las partes impotantes de la silla deben ser examinadas de forma regular.
• Las partes mecanicas deben funcionar impecablemente.
• Es esencial que la silla no quede atascada entre partes duras, como la puerta del coche, etc. que puedan le causar daños.
• La silla debe ser examinada por el fabricante después de, por ejemplo, haber sufrido una caída o situaciones similares.
NOTA! Cuando compra el CYBEX Aton 5 se recomienda comprar una segunda vestidura. Esto le permite limpiar y secar una mientras usa la otra.
157
ESP
T
Em caso de acidente a cadeira poderá ter sofrido estragos internos que não são visíveis ao olho nu. Nestes casos a cadaeira deverá ser imediamente substituída.
com o distribuidor ou fabricante.
CUIDADOS DO PRODUTO
QUE FAZER EM CASO DE ACIDENTE
De maneira a garantir a máxima proteção da criança, tenha atenção a: • Todas as partes importantes da cadeira deverão ser examinadas regularmente.
• As partes mecánicas deverão funcionar perfeitamente. •partes rígidas do automóvel, tais como a porta do carro e que podem causar estragos na cadeira.
• A cadeira infantil deverá ser examinada pelo fabricante em caso de queda ou outras situações semelhantes.
NOTA! Ao comprar a cadeira CYBEX Aton 5 é recomendável adquirir uma segunda forra. Isto permitirá o uso da cadeira enquanto uma das forras está a ser lavada.
158
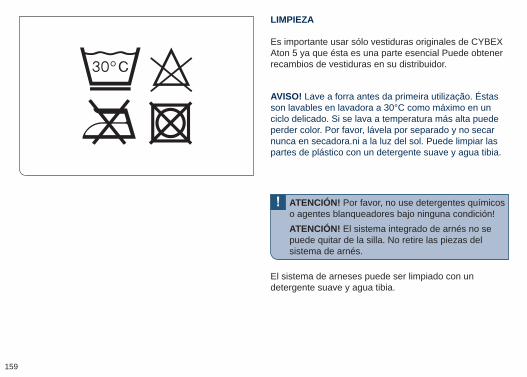
El sistema de arneses puede ser limpiado con un detergente suave y agua tibia.
AVISO! Lave a forra antes da primeira utilização. Éstas son lavables en lavadora a 30°C como máximo en un ciclo delicado. Si se lava a temperatura más alta puede perder color. Por favor, lávela por separado y no secar nunca en secadora.ni a la luz del sol. Puede limpiar las partes de plástico con un detergente suave y agua tibia.
ATENCIÓN! Por favor, no use detergentes químicos o agentes blanqueadores bajo ninguna condición!ATENCIÓN! El sistema integrado de arnés no se puede quitar de la silla. No retire las piezas del sistema de arnés.
LIMPIEZA
Es importante usar sólo vestiduras originales de CYBEX Aton 5 ya que ésta es una parte esencial Puede obtener recambios de vestiduras en su distribuidor.
159
ESP
TO sistema integrado de arneses pode ser lavado utilizando um detergente suave e água quente.
NOTA! Se debe lavar la vestidura antes de usarla por primera vez. As forras são laváveis à máquina a uma temperatura máxima de 30°C e no ciclo de roupa delicada. Se lavar a forra a uma temperatura mais alta, a forra poderá perder cor. Lave a forra por separado e nunca seca na máquina! Não ponha a forra a secar ao sol.As partes de plástico poderão ser lavadas com um detergente suave e água quente.
ATENÇÃO Não use produtos químicos ou lixívia.ATENÇÃO O sistema integrado de arneses não pode ser removido da cadeira. Não tente remover partes do sistema de arnês.
LIMPEZA
É importante utilizar unica e simplesmente as forras originais da CYBEX Aton 5, uma vez que a forra é uma parte importante da funcionalidade da cadeira. É possível obter forras extra no seu distribuidor.
160
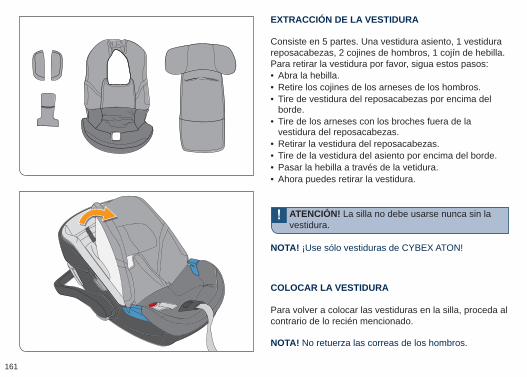
NOTA! No retuerza las correas de los hombros.
ATENCIÓN! La silla no debe usarse nunca sin la vestidura.
• Abra la hebilla. • Retire los cojines de los arneses de los hombros. • Tire de vestidura del reposacabezas por encima del borde.
• Tire de los arneses con los broches fuera de la vestidura del reposacabezas.
• Retirar la vestidura del reposacabezas. • Tire de la vestidura del asiento por encima del borde. • Pasar la hebilla a través de la vetidura. • Ahora puedes retirar la vestidura.
EXTRACCIÓN DE LA VESTIDURA
COLOCAR LA VESTIDURA
Consiste en 5 partes. Una vestidura asiento, 1 vestidura reposacabezas, 2 cojines de hombros, 1 cojín de hebilla. Para retirar la vestidura por favor, sigua estos pasos:
Para volver a colocar las vestiduras en la silla, proceda al contrario de lo recién mencionado.
NOTA! ¡Use sólo vestiduras de CYBEX ATON!
161
ESP
T
NOTA! Não torça nem gire as alças dos cintos de ombros.
ATENÇÃO! A cadeira nunca deverá ser usada sem a forra.
• • Remova as proteções de ombro dos cintos. • Retire a forra do encosto de cabeça, puxando-a, de forma a que passe por cima deste.
•para fora do encosto de cabeça
• Remova a forra do enconto de cabeça. • Retire a forra pela extremidade do assento. • • Pode agora remover a forra por completo.
REMOÇÃO DA FORRA
COLOCAR A FORRA
A forra tem 5 partes. Forra do assento, 1 para o encosto
Para remover a forra proceda da seguinte maneira:
Para voltar a colocar a forra no assento, tenha o mesmo
ordem dos passos.
NOTA! Use simplesmente as forras CYBEX Aton 5!
162
Dado que los materiales de plástico se desgastan con el tiempo, por ejemplo, de la exposición a la luz solar directa, las características de los productos pueden variar ligeramente.
Como la silla puede estar expuesta a grandes diferencias de temperatura, así como otras fuerzas imprevisibles, por favor siga las instrucciones a continuación.
• Si el coche está expuesto a la luz solar directa durante un largo periodo de tiempo, el la silla debe ser sacado del coche o cubierta con un paño.
• Examine las partes de plástico de la silla en busca de cambios de color o forma una vez al año.
•cambios en el tejido - en particular el desvanecimiento del color - son normales y no constituyen un daño.
DURABILIDAD DE LA SILLA
163
ESP
T
Uma vez que os materiais plásticos se desgastam com o pasar do tempo. como por exemplo, com a exposição constante ao sol, as carateristicas do produto podem variar ligeiramente.
A cadeira pode estar exposta a grandes diferenças de temperatura, assim como outras forças imprevisíveis, faça o favor de seguir as seguintes instruções.
• Se o automóvel estiver exposto ao sol durande um longo período de tempo a cadeira deverá ser retirada do carro ou deverá ser tapada por um pano.
• Examine anualmente todas as partes de plástico para
• Em caso de que a cadeira apresente diferenças estruturais deverá desfazer-se dela. A perda de cor dos tecidos é normal e não apresenta problemas.
TEMPO DE VIDA DO PRODUTO
164
Para más información sobre nuestros productos, visite WWW.CYBEX-ONLINE.COM
ATENCIÓN! Mantenga los materiales de embalaje
Por razones medioambientales, le rogamos a nuestros clientes que se deshagan correctamente de todos los
silla) de la vida de la silla. Las normas de eliminación
de garantizar una correcta eliminación de la silla, por favor, póngase en contacto con la gestión de residuos comunitaria o la administración de su lugar de residencia. En cualquier caso, por favor, tome nota de las normas de eliminación de residuos de su país.
• • Marca y modelo de coche y posición de asiento en que se monta normalmente.
• Peso, edad y altura del niño.
Si tiene alguna pregunta, por favor consulte con su vendedor. Por favor, tenga la siguiente información antes:
INFORMACIÓN DEL PRODUCTO
DESECHO
165
ESP
T
Para mais informação sobre os nossos produtos: WWW.CYBEX-ONLINE.COM
ATENÇÃO! Mantenha os materiais da embalagem
Por razões ambientais pedimos que prodedam à correta
de eliminação de resíduos poderá variar segundo o país. De maneira a garantir uma correta eliminação da cadeira contacte com gestão de resíduos urbanos ou administração do seu local de residência. Em qualquer caso, por favor, tome nota dos regulamentos de eliminação de resíduos do seu país.
• • Marca e caraterísticas do automóvel e a posição onde costuma instalar-se a cadeira.
•
distribuidor. Tenha em conta esta informação antes de:
INFORMAÇÃO DE PRODUTO
ELIMINAÇÃO
166
La presente garantía sólo es de aplicación en el país en el que el consumidor adquirió inicialmente el producto a un detallista. En el caso de productos vendidos a consumidores españoles en territorio español, la presente garantía solo será aplicable para los productos adquiridos en un punto de venta CYBEX autorizado por MILLENIUM BABY S.L., distribuidor exclusivo en España de los productos CYBEX. La garantía cubre todos los defectos de materiales y fabricación, existentes o que
caso de que aparezca cualquier defecto de materiales
criterio, reparar el producto sin coste o entregar un producto nuevo. Para obtener esta garantía es preciso entregar o enviar el producto al detallista que vendió inicialmente
factura) que muestre la fecha de compra, el nombre del detallista y el modelo del producto. Esta garantía no es de aplicación en caso de que el producto sea enviado o entregado al fabricante o a cualquier otra persona que no sea el detallista que vendió el producto inicialmente
ni de fabricación en el momento de la compra o, si se ha adquirido a distancia, en el mismo momento de recibirlo. En caso de apreciar cualquier defecto, deje de utilizar el producto y entréguelo o envíelo al detallista.
GARANTÍA
167
ESP
T
A garantia dos produtos Cybex só é aplicada no País em que o consumidor adquiriu inicialmente o produto a um retalhista. A garantia cobre todos os defeitos de materiais e fabricação, existentes ou que possam aparecer, por
defeito de materiais ou de fabricação, a CYBEX decidirá, segundo o nosso critério, reparar o produto sem custo ou entregar um produto novo. Para obter esta garantia é preciso entregar ou enviar o produto ao retalhista que vendeu inicialmente o produto e juntar um comprovativo
compra, o nome do retalhista e o modelo do produto. Esta garantia não é aplicada em caso de que o produto seja enviado por outra pessoa, que não o retalhista que
o produto está completo e que não apresenta nenhum defeito de materiais nem de fabricação na altura da compra, ou se adquiriu o produto num sistema de venda
produto ao retalhista. O produto deverá ser entregue limpo e completo. Antes de contactar com a loja leia este manual detalhadamente. A garantia não cobre nenhum
desgaste normal do produto. Só é aplicada no caso de o produto ser usado de acordo irregularidades do terreno, etc...) ou desgaste normal do produto.
GARANTIA
168
El producto debe entregarse limpio y completo. Antes de contactar con la tienda lea este manual detenidamente.
irregularidades del terreno, etc.) o el desgaste normal del producto. Sólo es de aplicación en caso de que el uso del producto sea acorde al manual de instrucciones y si
por personas autorizadas y se han utilizado piezas y accesorios originales. La garantía no excluye, limita o
establecidos por ley, incluyendo reclamaciones por responsabilidad civil o quejas por incumplimiento de contrato que el comprador quiera interponer contra el vendedor, el fabricante o el producto
169
ESP
T
Só é aplicada no caso de o produto ser usado de acordo
ou reparação tenha sido feita por pessoas autorizadas e se utilizou peças e acessórios originais. A garantia não exclui, imita ou afeta de nenhum modo os direitos do consumidor estabelecidos pela lei, incluindo reclamações por responsabilidade civil ou queixas por incumprimento de contrato que o comprador queira interpor contra o vendedor, o fabricante ou o produto.
CYBEX GmbH, Riedingerstr. 18, 95448 Bayreuth, Germany Tel.: +49 921 78 511-0, Fax.: +49 921 78 511- 999
CONTACT
170

CY
_171
_108
6_B
0716
CYBEX GmbH Riedingerstr. 18 | 95448 Bayreuth | Germany
[email protected] / WWW.CYBEX-ONLINE.COM WWW.FACEBOOK.COM/CYBEX.ONLINE
GO TO WWW.CYBEX-ONLINE.COMTO WATCH AN INSTRUCTIONAL VIDEO