Embed Size (px)
Citation preview

00036018/00036019/00036020
Version 05/2014
DP-50 Digitalpiano
Bedienungsanleitung

Sicherheitshinweise!!Bitte lesen Sie diese Hinweise bevor Sie das Gerät bedienen und verwahren Sie sie an einem sicheren Ort. Befolgen Sie die Sicherheitshinweise um Schäden oder gar Verletzungen durch Strom, Kurzschlüsse oder Brand zu vermeiden. Dazu gehört unter anderem Folgendes:!!Entfernen Sie weder Gehäuse noch Rückwand, es befinden sich keine Teile im Gerät, die von Ihnen gewartet werden könnten. Sollte eine Reparatur nötig sein, wenden Sie sich bitte an eine qualifizierte Werkstatt.!!• Setzen Sie das Gerät weder Regen noch sonstiger Feuchtigkeit aus, vermeiden Sie den Betrieb
unter feuchten oder nassen Bedingungen. Stellen Sie auch keine flüssigkeitsgefüllten Behälter darauf, damit keine Spritzer in das Gerät gelangen können.!
• Sollte das Stromkabel oder der Stecker beschädigt sein, ein Soundverlust während der Benutzung des Pianos auftreten, Sie einen ungewöhnlichen Geruch wahrnehmen oder Rauch austritt, schalten Sie das Gerät bitte unverzüglich aus, trennen Sie es vom Strom und geben Sie es in eine qualifizierte Fachwerkstatt.!
• Benutzen Sie nur Spannungen, für die das Gerät zugelassen ist. Diese ist auf dem Typenschild des Pianos angegeben.!
• Bevor Sie das Gerät reinigen, trennen Sie es bitte immer vom Strom. Berühren Sie niemals den Stecker oder die Steckdose mit feuchten Händen!!
• Überprüfen Sie bitte regelmäßig den Zustand des Steckers und entfernen Sie den Schmutz oder Staub, der sich eventuell darauf angesammelt hat.!!!!
Vorsichtsmaßnahmen!!• Platzieren Sie das Stromkabel nicht in der Nähe von Heizquellen wie Heizkörpern oder
Radiatoren, biegen Sie es nicht übermäßig, stellen Sie keine schweren Gegenstände darauf und geben Sie auch Acht, dass es nicht anderweitig beschädigt wird. Verlegen Sie es so, dass niemand darüber stolpern oder darauf treten kann und keine Gegenstände darüber gerollt werden können.!
• Wenn Sie das Gerät vom Strom trennen möchten, ziehen Sie bitte stets am Stecker und keinesfalls am Kabel.!
• Betreiben Sie das Piano nicht an einer Mehrfachsteckdose, das kann sowohl einen Soundverlust, sowie eine Überlastung oder Überhitzung der Steckdose zur Folge haben.!
• Trennen Sie das Piano von der Steckdose, wenn Sie es längere Zeit nicht benutzen und grundsätzlich während eines Gewitters.!
• Bevor Sie das Piano an andere Geräte anschließen, schalten Sie bitte stets alle Gerät aus, drehen alle Lautstärkeregler auf Minimum und schalten Sie dann erst die Geräte ein.!
• Setzen Sie das Gerät nicht übermäßigem Staub oder Vibrationen aus, weder Hitze noch Kälte, auch nicht direktem Sonnenlicht und lassen Sie es nicht tagsüber im Auto liegen. Sie vermeiden dadurch einerseits Verfärbungen und Schäden an der Oberfläche, andererseits Schäden an der Elektronik.!
• Benutzen Sie das Piano nicht in der Nähe von Fernseh- oder Radiogeräten und Lautsprechern um Interferenzen zu vermeiden, die den Betrieb des Pianos stören könnten.!
• Stellen Sie das Piano nicht auf unebenem Boden auf, da es dadurch nicht stabil steht und eventuell umkippen könnte.!
• Bevor Sie das Piano transportieren, ziehen Sie bitte sämtliche Kabel ab.!• Wenn Sie das Gerät reinigen möchten, benutzen Sie bitte ein trockenes, weiches Tuch.
Benutzen Sie keine Verdünner, Lösungsmittel oder sonstige Reinigungsflüssigkeiten oder chemisch imprägnierte Tücher. Stellen Sie keine vinylhaltigen Produkte auf das Piano, ebenso wenig Plastik- oder Gummi-Objekte. Dadurch könnte sich die Oberfläche des Pianos verfärben.!
�1

• Setzen Sie sich nicht auf das Piano und stellen Sie keine schweren Gegenstände darauf.!• Wenden Sie im Umgang mit Knöpfen, Tasten und Steckern keine Gewalt an.!• Seien Sie vorsichtig, damit die Tastenabdeckung nicht Ihre Finger einklemmt. Stecken Sie
keinesfalls einen Finger in den Spalt zwischen Abdeckung und Tastatur!!• Geben Sie Acht, dass auch sonst keinerlei Gegenstände in den Spalt zwischen Abdeckung und
Tastatur gelangen. Sollte es dennoch passieren, trennen Sie das Gerät vom Strom und geben Sie es zur Inspektion in eine qualifizierte Werkstatt.!
• Halten Sie einen Abstand von 3 cm zwischen Wand und Piano ein. Dieser ist wichtig für die Zirkulation der Luft, die ein Überhitzen des Pianos verhindert.!
• Lesen Sie sorgfältig das Kapitel über Aufbau und Inbetriebnahme, da Sie sich bei unsachgemäßem Aufbau verletzen oder das Gerät beschädigen können.!
• Betreiben Sie das Piano nicht über einen längeren Zeitraum bei hoher Lautstärke, da dies zu einem, unter Umständen dauerhaften, Hörverlust führen kann. Wenn Sie den Verdacht haben, schlechter zu hören oder Geräusche wie Klingeln oder Pfeifen wahrnehmen, konsultieren Sie bitte einen Arzt.!
• Schalten Sie das Gerät während eines Gewitter aus und trennen Sie es von der Steckdose.!!!Willkommen!!Vielen Dank und herzlichen Glückwunsch zum Kauf Ihres neuen Dynatone Digitalpianos! Es befindet sich auf dem neuesten Stand der Technik und verfügt über neueste elektronische Technologie um die Bedienung so einfach wie möglich zu gestalten. Das vielseitige Digitalpiano ist ideal sowohl für Anfänger wie für erfahrene Musiker. Durch seine kompakte Bauweise benötigt es weniger Platz als ein traditionelles oder ein großes digitales Piano. Das schlanke, stylische Design fügt sich in die meisten häuslichen Umgebungen ein. Um alle Möglichkeiten und Funktionen voll ausschöpfen zu können, lesen Sie bitte dieses Handbuch sorgfältig und befolgen Sie die darin enthaltenen Hinweise.!!!Hauptfunktionen!!16 Instrumente!Grand Piano 1/2, Harpsichord, Vibraphon, Elec. Piano 1/2, Organ 1/2, Elec. Organ 1/2, Strings 1/2, Bass 1/2, Drum Set, Sound Effekt, etc.!!50 Demosongs!Das Piano verfügt über 50 Demosongs, die Sie entweder zu Ihrem Vergnügen anhören oder zum Lernen benutzen können.!!2-Spur-Aufnahme und Playback!Sie können mit Hilfe dieser Funktion Ihr eigenes Spiel aufnehmen und wiedergeben.!!USB-Anschluss!Sie können über diesen Anschluss Ihr Piano mit einem PC verbinden und dadurch MIDI- und Audio-Daten austauschen.!!Nützliche Funktionen!Das Piano verfügt über zahlreiche Funktionen wie Metronom, Twin Piano, Audio In/Out, 2 Kopfhöreranschlüsse, Tuning, Transponierung, Layer und Split.!!Auto-Power-Off!Das Piano kann sich selbständig ausschalten, wenn es 30 min lang nicht benutzt wird, und kann dadurch Strom sparen.!
�2

!Inhaltsverzeichnis!!
Sicherheitshinweise! 1! Vorsichtsmaßnahmen! 1! Willkommen! 2! Hauptfunktionen! 2! Inhaltsverzeichnis! 3! Auspacken! 4! Aufbau! 5! Seiten und Pedalkasten! 5! Zusammenbau des Pianostands! 5! Verbindung von Piano und Pianostand! 5! Anschluss von Pedalkabel und Netzteil! 6! Anschlüsse! 6! Inbetriebnahme des Pianos! 6! Kopfhörer! 7! Anschluss von Audio-Geräten! 7! Anschluss eines Computers! 7! Anschluss des Pedals! 8! Bedienelemente! 8! Grundlegende Bedienung! 9! Lautstärke! 9! Sounds! 9! Layer! 10! Split! 11! Reverb! 11! Metronom! 12! Twin Piano! 12! Funktionen! 12! Tuning! 12! Transpose! 13! Touch! 13! MIDI Local! 14! Sound-Einstellungen! 14! Aufnahme und Playback! 15! Demosongs! 16! Übersicht über die Demosongs! 17! Drums und SFX Tabelle! 18! MIDI Implementierung! 19! Hilfe bei Störungen! 20! Spezifikationen! 20! WEEE-Erklärung / Entsorgung! 21! Herstellerangaben! 21
�3
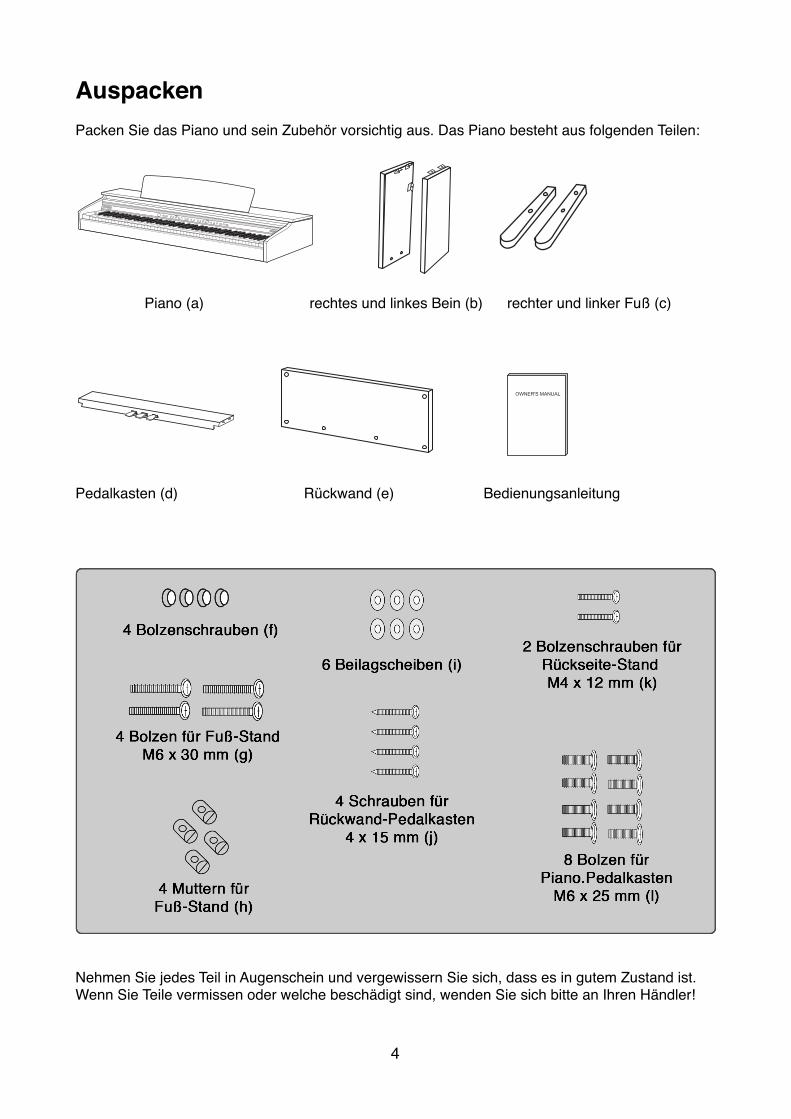
Auspacken!!Packen Sie das Piano und sein Zubehör vorsichtig aus. Das Piano besteht aus folgenden Teilen:!!!!!!!!!! Piano (a) rechtes und linkes Bein (b) rechter und linker Fuß (c)!!! !!!!!!!!Pedalkasten (d) Rückwand (e) Bedienungsanleitung !!!
!Nehmen Sie jedes Teil in Augenschein und vergewissern Sie sich, dass es in gutem Zustand ist. Wenn Sie Teile vermissen oder welche beschädigt sind, wenden Sie sich bitte an Ihren Händler!!!!
�4
UnpackingCarefully remove the digital piano and its accessoriesfrom the packing box. The digital piano set consists ofthe following items.
Unpacking
5
Owner’ s ManualBack Panel (e)
4 Bolt Caps (f)
6 Washers (i)
4 Screws for back panel -pedal board (j)
4 X 15 mm8 Bolts for main unit and
pedal board (l)M6 X 25 mm
2 Bolts for back panel - leg (k)M4 X 12 mm
4 Bolts for foot-leg (g)M6 X 30 mm
4 nuts for foot-leg (h)
Main Unit (a) Right, Left Legs (b)
Pedal Board (d)
☞ Inspect each item carefully to make sure that it is in good condition. If you find any itemmissing or damaged, contact the place of purchase immediately for replacement.
Right, Left Foots (c)
SLP-50 MANUAL Rev1.0(140302) ENGLISH_Dynatone Brand 2014-03-05 5:58 Page 5

Aufbau!!Seiten und Pedalkasten!!Bauen Sie die Beine (b) und Füße (c) mit Hilfe der Bolzen (g) und der Muttern (h) zu den Seitenteilen zusammen, wie in der Abbildung dargestellt.!!Befestigen Sie anschließend die Seitenteile mit Hilfe der 4 Bolzen (l) am Pedalkasten (d).!!!!Zusammenbau des Pianostands!!!!!!!
Befestigen Sie nun die Rückwand (e) an Seitenteilen und Pedalkasten mit 2 Bolzen (k), 4 Schrauben (j) und 6 Beilagscheiben (i).!!!!!!!!
Verbindung von Piano und Pianostand!!Stellen Sie den Unterbau aufrecht und setzen Sie vorsichtig das Piano (a) darauf. Befestigen Sie es mit 4 Bolzen (l) gemäß der Abbildung.!!Stellen Sie den Notenständer auf und befestigen Sie ihn mit den Metallklammern an der Rückseite.!!!
�5
Setting Up Your Piano
6
1 Attaching both legs and pedal board assembly
Assembling the stand
Assemble Leg (b) and Foot (c) usingBolt (g) and Nut (h). And put Bolt Capinto the bolt hole as below illustration.
Securely combine left and right legs to PedalBoard (d) using four Bolts (l) .
2
Attach Back Board(e) into the legs andpedal board using 2 Bolts (k) and 4 Screws (j)with 6 Washers (i).
After fixing the back panel to the legs,set the stand upright and make sure thestand is parallel.
Setting Up Your Piano
SLP-50 MANUAL Rev1.0(140302) ENGLISH_Dynatone Brand 2014-03-05 5:58 Page 6
Setting Up Your Piano
6
1 Attaching both legs and pedal board assembly
Assembling the stand
Assemble Leg (b) and Foot (c) usingBolt (g) and Nut (h). And put Bolt Capinto the bolt hole as below illustration.
Securely combine left and right legs to PedalBoard (d) using four Bolts (l) .
2
Attach Back Board(e) into the legs andpedal board using 2 Bolts (k) and 4 Screws (j)with 6 Washers (i).
After fixing the back panel to the legs,set the stand upright and make sure thestand is parallel.
Setting Up Your Piano
SLP-50 MANUAL Rev1.0(140302) ENGLISH_Dynatone Brand 2014-03-05 5:58 Page 6

Anschluss von Pedalkabel und Netzteil!!Stecken Sie Pedalkabel (-> Pedal) und Netzteil (-> DC 12V) in die entsprechenden Buchsen an der Unterseite des Pianos wie in der Abbildung dargestellt.!!
!!!!Anschlüsse!!Inbetriebnahme des Pianos!!1. Anschließen des Netzteils: Stecken Sie den DC-Stecker in die Buchse des Pianos und den
Stecker des Stromkabels in eine Steckdose.!2. Schalten Sie das Piano ein, indem Sie den Knopf STANDBY/ON drücken. Der Startmeldung
erscheint im Display. Der Sound des Grand Pianos ist automatisch geladen; Sie müssen lediglich die Lautstärke anpassen.!
3. Ausschalten des Geräts: Halten Sie den Knopf STANDBY/ON für 3 Sekunden gedrückt. Alle Leuchten sowie das Display gehen aus. Die Aufnahme eines Songs bleibt trotzdem erhalten.!!
Die automatische Abschaltung erfolgt, wenn Sie das Gerät 30 Minuten nicht benutzen. Möchten Sie diese Funktion nicht nutzen; können Sie beim Einschalten des Pianos die beiden untersten weißen und schwarzen Tasten gedrückt halten. Die automatische Abschaltung wird dadurch deaktiviert.!!!!!!!!!!!!!
�6
Turning ON the Power Controls and Terminals
TurningO
Nthe
Power/ H
eadphone
8
Connect a set of stereo headphones(optional) toHEADPHONE jack (standard 1/4" phone jacks).Insert the headphone plug into the HEADPHONEjack on the bottom panel of the piano.When headphones are connected, the internalspeaker system is automatically shut off.
Since the piano has two HEADPHONE jacks, twosets of headphones can be used simultaneously,allowing two people to enjoy listening to theperformance.
Connect the AC POWER ADAPTER.Insert DC plug of the AC adapter into the piano andAC plug of the AC adapter into a household ACpower outlet.
☞ See 'Connecting the pedal cord and AC adapter' on page 7. Turn on POWERPress the STANDBY/ON switch. The power is turnedon and the initial display appears in the MultiFunction Display.
☞ The voice of Grand Piano is selected automatically.☞ Adjust the volume by using MASTER VOLUME.
Auto Power OffThis digital piano is designed to turn off automatically to savepower without operation for 30 min.
Disable Auto Power Off While holding down both lowest white and black keys, press theSTANDBY/ON button to turn on piano without APO.
Turn off POWERPress and hold the STANDBY/ON switch for 3seconds.All lights and the LED display will turn off.
☞Backing Up the recorded songEven if the power is turned off, the recorded song memory isnot deleted.
Controls and Terminals
Headphone connectors are onthe bottom of the main unit.
Headphone
SLP-50 MANUAL Rev1.0(140302) ENGLISH_Dynatone Brand 2014-03-05 5:58 Page 8

Kopfhörer!!Sie können bei Bedarf ein oder zwei Kopfhörer (1/4“) an ihrem Piano anschließen. Die benötigten Buchsen befinden sich an der Unterseite des Pianos. Durch den Anschluss eines Kopfhörers wird das interne Lautsprechersystem automatisch abgeschaltet.!!!!!!!!!!Anschluss von Audio-Geräten!!1. Line Out-Buchse (Stereo): Verbinden Sie mit Hilfe eines Stereo-Audiokabels die Line Out-
Buchse des Pianos mit den Eingangsbuchsen der Lautsprecher.!2. Line In-Buchse (Stereo): Verbinden Sie mit Hilfe eines Stereo-Audiokabels die Line Out-
Buchse eines externen Synthesizers oder eines Soundgenerators mit der Line In-Buchse des Pianos. Der Stereo-Ausgang eines anderen Geräts kann mit dieser Buchse verbunden werden um den Sound des externen Geräts über die Lautsprecher des Pianos wiederzugeben. Sie können in diesem Fall die Lautstärke über den Regler am Piano einstellen. Schalten Sie bei dieser Verbindung stets das externe Gerät ein und abschließend das Piano. Beim Ausschalten wird die Reihenfolge umgekehrt.! !!!!!!!!!!
Anschluss eines Computers!!Wenn Sie einen Computer an der USB-Buchse des Pianos anschließen, können Sie MIDI- und Audiodaten zwischen Instrument und Computer austauschen und Musikprogramme nutzen. Das Piano kann als Audio Device am Computer betrieben werden.!Wenn Sie das Piano an den Computer anschließen, wird der benötigte Treiber auf dem Computer installiert. Sollte der Computer oder das Piano „einfrieren“, schalten Sie bitte das Piano aus und starten Sie den Computer neu.! !!!!!!!!
�7
Controls and Terminals
Connecting Audio D
evices/ Connecting Other D
evices
9
LINE OUT jack (Stereo Phone jack)
Connect the instrument's LINE OUT jack and the input jacks of a pair of powered speakers usingappropriate stereo audio cable.
LINE IN jack (Stereo Phone jack)
Connect the output jack (LINE OUT etc.) of an external synthesizer or the tone generator module andthe instrument's LINE IN jack using appropriate stereo audio cable.The stereo outputs from another instrument can be connected to this jack, allowing the sound of anexternal instrument to be reproduced via the instrument's speakers.When this is connected, you can use the instrument's MASTER VOLUME control to adjust thevolume of the sound output to the external device.
☞ CAUTIONWhen the sound of an external device is output to the instrument, first turn on the power to the external device, then to theinstrument. Reverse this order when you turn the power off.
By connecting a computer to the USB, you can transfer MIDI and audio data between the instrumentand the computer and take advantage of sophisticated computer music programs. When connecting to a computer, the digital piano can be used as an audio device of your computer.
When you connect the digital piano to a computer, the device driver required to send and receivedata will be installed on the computer.
The below instructions explain how to connect and use the terminals.☞ CAUTION - Precautions when using the USB terminal.When connecting the computer to the USB terminal, make sure to observe the following points. Failing to do so risks freezingthe computer and corrupting or losing data. If the computer or the instrument freezes, turn the power to the instrument offand restart the computer.
Connectors are on the bottom of the main unit
Connectors are on the bottom of the main unit
Connecting to Audio Devices
Connecting to a Computer
SLP-50 MANUAL Rev1.0(140302) ENGLISH_Dynatone Brand 2014-03-05 5:58 Page 9
Turning ON the Power Controls and Terminals
TurningO
Nthe
Power/ H
eadphone
8
Connect a set of stereo headphones(optional) toHEADPHONE jack (standard 1/4" phone jacks).Insert the headphone plug into the HEADPHONEjack on the bottom panel of the piano.When headphones are connected, the internalspeaker system is automatically shut off.
Since the piano has two HEADPHONE jacks, twosets of headphones can be used simultaneously,allowing two people to enjoy listening to theperformance.
Connect the AC POWER ADAPTER.Insert DC plug of the AC adapter into the piano andAC plug of the AC adapter into a household ACpower outlet.
☞ See 'Connecting the pedal cord and AC adapter' on page 7. Turn on POWERPress the STANDBY/ON switch. The power is turnedon and the initial display appears in the MultiFunction Display.
☞ The voice of Grand Piano is selected automatically.☞ Adjust the volume by using MASTER VOLUME.
Auto Power OffThis digital piano is designed to turn off automatically to savepower without operation for 30 min.
Disable Auto Power Off While holding down both lowest white and black keys, press theSTANDBY/ON button to turn on piano without APO.
Turn off POWERPress and hold the STANDBY/ON switch for 3seconds.All lights and the LED display will turn off.
☞Backing Up the recorded songEven if the power is turned off, the recorded song memory isnot deleted.
Controls and Terminals
Headphone connectors are onthe bottom of the main unit.
Headphone
SLP-50 MANUAL Rev1.0(140302) ENGLISH_Dynatone Brand 2014-03-05 5:58 Page 8
Die Kopfhöreranschlüsse!befinden sich an der Unterseite
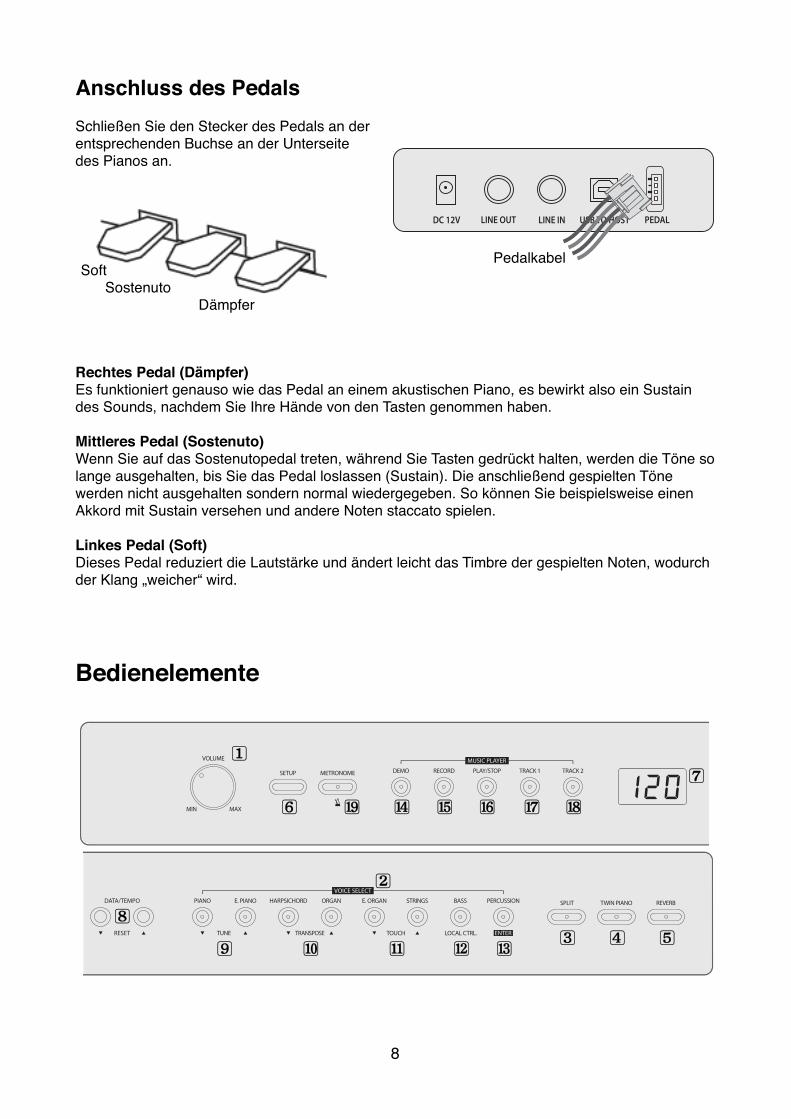
Anschluss des Pedals!!Schließen Sie den Stecker des Pedals an der entsprechenden Buchse an der Unterseite des Pianos an.!!
!!!Rechtes Pedal (Dämpfer)!Es funktioniert genauso wie das Pedal an einem akustischen Piano, es bewirkt also ein Sustain des Sounds, nachdem Sie Ihre Hände von den Tasten genommen haben.!!Mittleres Pedal (Sostenuto)!Wenn Sie auf das Sostenutopedal treten, während Sie Tasten gedrückt halten, werden die Töne so lange ausgehalten, bis Sie das Pedal loslassen (Sustain). Die anschließend gespielten Töne werden nicht ausgehalten sondern normal wiedergegeben. So können Sie beispielsweise einen Akkord mit Sustain versehen und andere Noten staccato spielen.!!Linkes Pedal (Soft)!Dieses Pedal reduziert die Lautstärke und ändert leicht das Timbre der gespielten Noten, wodurch der Klang „weicher“ wird.!!!!!Bedienelemente!
!!�8
Controls and Terminals
Connecting to the Pedal
10
Connecting to the Pedal
☞ RIGHT PEDAL (Damper Pedal )With piano tones, depressing the pedal causes notes to linger, much like a piano's damper pedal.With organ tones, depressing the pedal causes notes to continue to sound until the pedal is released.
☞ CENTER PEDAL (Sostenuto Pedal)As with the sustain pedal function described above, depressing the sostenuto pedal causes notes tobe sustained. This difference between a sostenuto pedal and sustain pedal is the timing. With asostenuto pedal, you press the keys and then depress the pedal before you release the keys.Only the notes that are sounding when the pedal is depressed are sustained.
☞ LEFT PEDAL (Soft Pedal)Depressing the pedal softens the sound of the notes being played.
Damper PedalSostenuto Pedal
Soft Pedal
Pedal Cable
Plug Pedal cord which is protruding from the top of the pedal assembly into the correspondingport on underside of the main unit.
Insert the pedal plug into the pedal connector on bottom of the piano.
SLP-50 MANUAL Rev1.0(140302) ENGLISH_Dynatone Brand 2014-03-05 5:58 Page 10
PedalkabelSoft! Sostenuto! Dämpfer
Controls and Terminals
Control Panel
12
POWER POWER SWITCH DC IN
CONNECTOR HEADPHONE LINE OUT LINE IN USB PEDAL
PEDAL SOFT PEDAL SOSTENUTO PEDAL DAMPER PEDAL
Page 8Page 7
Page 8Page 9Page 9Page 9 Page 10
Page 10Page 10Page 10
PLAYER SECTION DEMO RECORD PLAY/STOP TRACK 1 TRACK 2 METRONOME
Page 21Page 20Page 20, 21Page 20, 21Page 20, 21Page 16
SLP-50 MANUAL Rev1.0(140302) ENGLISH_Dynatone Brand 2014-03-05 5:59 Page 12Control Panel
Controls and Terminals
Control Panel
11
VOLUME SECTION MASTER VOLUME
VOICE SECTION VOICE buttons SPLIT TWIN PIANO REVERB
SETUP SECTION SETUP LED Display DATA UP/DOWN TUNE TRANSPOSE TOUCH LOCAL CONTROL ENTER
Page 13
Page 13Page 14Page 16Page 15
Page 17Page 17Page 18Page 18Page 19
SLP-50 MANUAL Rev1.0(140302) ENGLISH_Dynatone Brand 2014-03-05 5:59 Page 11

1. Volume (Lautstärkeregler)!2. Sound-Knöpfe!3. Split!4. Twin Piano!5. Reverb!6. Setup!7. LED-Display!8. Data Up/Down!9. Tune (Stimmen)!10. Transpose (Transponieren)!11. Touch (Anschlagsempfindlichkeit)!12. Local Control!13. Enter!!14. Demo!15. Record!16. Play/Stop!17. Track 1!18. Track 2!19. Metronome!!A. Power (Einschaltknopf)!B. DC IN (Netzteil-Buchse)!C. Headphone (Kopfhörer)!D. Line Out!E. Line In!F. USB-Buchse!G. Pedal-Buchse!!H. Soft Pedal!I. Sostenuto Pedal!J. Damper Pedal!!!!!Grundlegende Bedienung!!Lautstärke!!Mit dem Regler VOLUME können Sie die Lautstärke des Pianos oder die Lautstärke für die Kopfhörer einstellen.!!!Sounds!!Das Piano verfügt über eine Vielzahl von Sounds (Voices) wie Piano, Orgel, Streicher u.v.a. Es verfügt außerdem über eine Percussion-Funktion, die Ihnen erlaubt, Schlagzeug- und Percussion- Sounds realistisch wiederzugeben.!!• 14 Sounds!• 1 Drum Kit!• 1 Sound Effekt Set!!
�9
Controls and Terminals
Control Panel
12
POWER POWER SWITCH DC IN
CONNECTOR HEADPHONE LINE OUT LINE IN USB PEDAL
PEDAL SOFT PEDAL SOSTENUTO PEDAL DAMPER PEDAL
Page 8Page 7
Page 8Page 9Page 9Page 9 Page 10
Page 10Page 10Page 10
PLAYER SECTION DEMO RECORD PLAY/STOP TRACK 1 TRACK 2 METRONOME
Page 21Page 20Page 20, 21Page 20, 21Page 20, 21Page 16
SLP-50 MANUAL Rev1.0(140302) ENGLISH_Dynatone Brand 2014-03-05 5:59 Page 12
Adjusting the Volume
Basic Operation
Basic Operation
Adjusting the Volum
e /Selecting Voices
13
Selecting Voices
Select a Voice.Select the desired voice by pressing the appropriate VOICE button.
☞ The digital piano has 8 voice buttons and a voice button has two assigned voices. ☞ When pressing a voice button, the assigned voice number is shown on the display.☞ You can change a voice of the selected button pressing the button again.
☞ Backing Up the Selected VoiceThe last selected voice in each button will be retained in memory.
The piano has one volume knob on the panel for adjusting the volume.
MASTER VOLUMEThis determines the entire volume of the piano.
☞ This also determines the volume level of the HEADPHONE(s).
The piano features a wealth of rich, authentic voices, including piano, organ, elec. piano, strings and otherinstruments. It also features a keyboard percussion function that lets you play realistic drum, percussionsounds, and various effect sounds directly from keyboard.Voice Types☞ 14 Sounds ☞ 1 Drum kit☞ 1 Sound Effect set
SLP-50 MANUAL Rev1.0(140302) ENGLISH_Dynatone Brand 2014-03-05 5:59 Page 13
Control Panel
Controls and Terminals
Control Panel
11
VOLUME SECTION MASTER VOLUME
VOICE SECTION VOICE buttons SPLIT TWIN PIANO REVERB
SETUP SECTION SETUP LED Display DATA UP/DOWN TUNE TRANSPOSE TOUCH LOCAL CONTROL ENTER
Page 13
Page 13Page 14Page 16Page 15
Page 17Page 17Page 18Page 18Page 19
SLP-50 MANUAL Rev1.0(140302) ENGLISH_Dynatone Brand 2014-03-05 5:59 Page 11

Auswahl eines Sounds !!Drücken Sie den gewünschten Knopf (Button). Dieses Digitalpiano verfügt über 8 Voice- (Sound-) Knöpfe, denen jeweils 2 Sounds zugewiesen sind. Wenn Sie einen der Knöpfe drücken, erscheint der ausgewählte Sound im Display. Drücken Sie erneut diesen Knopf, erscheint der zweite Sound im Display. Die jeweils zuletzt ausgewählte Sound bleibt im Piano gespeichert. Bitte passen Sie stets die Lautstärke an.! !!!!!!!!!Im Folgenden eine Übersicht über die Sounds:!
!!!!Layer!!Dieser Modus erlaubt das gleichzeitige Spielen mit zwei verschiedenen Sounds. Dadurch können ganz einfach beeindruckende, volle Sounds erzeugt werden. Die Lautstärke kann für beide Sounds getrennt eingestellt werden.!!Halten Sie den Knopf für den ersten Sound gedrückt und wählen Sie einen zweiten Sound aus. Dies funktioniert, wie im letzten Kapitel beschrieben. !Wenn Sie nun eine Taste drücken, hören Sie die beiden Sounds zusammen. !Sie können die Lautstärke für den zweiten Sound separat regeln. Näheres dazu im Kapitel „Setup“.!!Um den Modus wieder abzuschalten, drücken Sie den Knopf für den zweiten Sound erneut.!!!!!!!!!!!!!!
�10
Adjusting the Volume
Basic Operation
Basic Operation
Adjusting the Volum
e /Selecting Voices
13
Selecting Voices
Select a Voice.Select the desired voice by pressing the appropriate VOICE button.
☞ The digital piano has 8 voice buttons and a voice button has two assigned voices. ☞ When pressing a voice button, the assigned voice number is shown on the display.☞ You can change a voice of the selected button pressing the button again.
☞ Backing Up the Selected VoiceThe last selected voice in each button will be retained in memory.
The piano has one volume knob on the panel for adjusting the volume.
MASTER VOLUMEThis determines the entire volume of the piano.
☞ This also determines the volume level of the HEADPHONE(s).
The piano features a wealth of rich, authentic voices, including piano, organ, elec. piano, strings and otherinstruments. It also features a keyboard percussion function that lets you play realistic drum, percussionsounds, and various effect sounds directly from keyboard.Voice Types☞ 14 Sounds ☞ 1 Drum kit☞ 1 Sound Effect set
SLP-50 MANUAL Rev1.0(140302) ENGLISH_Dynatone Brand 2014-03-05 5:59 Page 13
Basic Operation
Layer / Split
14
Voice List
Play the selected voice.Adjust the volume by using MASTER VOLUME and play the piano with the selected voice.
GrandPiano E.Piano Harpsichord Organ E.Organ Strings Bass Percussion
Button 1 Button 2 Button 3 Button 4 Button 5 Button 6 Button 7 Button 8
G. Piano 1G. Piano 2
E.Piano 1E.Piano 2
HarpsichordVibraphone
Organ 1Organ 2
E. Organ 1E. Organ 2
StringsSlow Strings
Acoust. BassE. Bass
Drum SetSound Effects
Layer
The Layer mode of the piano allows you to select and play two different voices simultaneously in alayer. This makes it easy to create exceptionally rich and thick tonal textures. The volume balance canbe set for the two voices.
Press and hold a main voice and press a layered voice.Select a voice in the normal way. (See the SELECTING VOICE section on page 13.)
☞ When you play a key, main voice is played with the layered voice.☞ Volume of the layered voice can be adjusted independently in the setup mode. (See the SETUP section on page 19.)
Split
The Split mode of the piano allows you to select and play two different voices with your left and righthands - For example, play bass with the left and piano with the right .
PLAYING WITH SPLIT VOICE Select a main voice.Select a voice in the normal way. (See the SELECTING VOICE section on page 13.)
+ Press a voice button to release the layered voice.
SLP-50 MANUAL Rev1.0(140302) ENGLISH_Dynatone Brand 2014-03-05 5:59 Page 14

Split!!Dieser Modus erlaubt das Spielen mit zwei verschiedenen Sounds: einem für die rechte, einem für die linke Hand. Sie können also beispielsweise mit der linken Hand Bass spielen und mit der rechten Piano.!!Wählen Sie, wie üblich einen Sound aus. Drücken Sie den Knopf SPLIT. Das Lämpchen blinkt und im Display erscheint der ausgewählte Split-Sound. Ab Werk ist Nr. 7 (Akustikbass) ausgewählt.!Drücken Sie nun, während das Lämpchen blinkt, einen Sound-Knopf. Die Lautstärke des Split-Sounds kann separat eingestellt werden. Näheres ist im Kapitel „Setup“ beschrieben.! !!!!!!!!!Ändern des Splitpoints!Sie können den Punkt, an dem die Sounds geteilt werden, selbst festlegen. Ab Wer liegt dieser Punkt (Splitpoint) bei Taste 33. Um dies zu ändern, halten Sie den Knopf SPLIT gedrückt und drücken auf die gewünschte Taste, die somit den neuen Splitpoint definiert. Ihre Nummer erscheint im Display. Der niedrigste Splitpoint liegt bei 00.!!
!!Reverb!!Der Reverb ist ein Effekt, der den Hall in verschiedenen Umgebungen simuliert, beispielsweise einer Konzerthalle.!Um den Effekt einzuschalten, drücken Sie bitte den Knopf REVERB. Das Lämpchen leuchtet auf. Drücken Sie abermals diesen Knopf um den Effekt wieder abzuschalten. Das Lämpchen erlischt.!Ab Werk ist der Reverb eingeschaltet. Die Art und Lautstärke des Halls können separat eingestellt werden. Nähere Informationen erhalten Sie im Kapitel „Setup“.!!!!!!!!!!
�11
You can set the point dividing the right and left keyboard ranges at any desired key position.
To assign new split point, hold down the SPLIT button and press a key. The LED display shows split key’s number.
▼ SPLIT (DEFAULT F#3 , KEY 33)
Basic Operation
Changingthe
Split point / Reverb
15
Changing the Split Point
Reverb
Reverb is an effect that recreates the decaying reflections of a sound in a performance space, andreproduces the special ambience of a concert hall.
REVERB ON/OFFTo turn on reverb, press the REVERB button. The lamp lights andthe reverb is set ON.
To turn off reverb, press the REVERB button again. The lamp turns off and the reverb is no longer activated.☞ Default is ON.☞ Reverb type and volume can be adjusted in the setup mode. (See the SETUP section on page 19.)
Call up the Split mode. To call up the split mode, press the SPLIT button. The lamp flashes and the split is set on and the LEDdisplay shows current selected split voice.
Select the split voice.Press a voice button to select a desired split voice during the split button flashes.
☞ Volume of the split voice can be adjusted independently in the setup mode. (See the SETUP section on page 19.)
☞ Key number of the lowest note is ‘ 00.
☞ The default voice is ‘07’ ACOUSTIC BASS in the split mode.
SLP-50 MANUAL Rev1.0(140302) ENGLISH_Dynatone Brand 2014-03-05 5:59 Page 15
Splitpoint (ab Werk F#3, Taste 33)You can set the point dividing the right and left keyboard ranges at any desired key position.
To assign new split point, hold down the SPLIT button and press a key. The LED display shows split key’s number.
▼ SPLIT (DEFAULT F#3 , KEY 33)
Basic Operation
Changingthe
Split point / Reverb
15
Changing the Split Point
Reverb
Reverb is an effect that recreates the decaying reflections of a sound in a performance space, andreproduces the special ambience of a concert hall.
REVERB ON/OFFTo turn on reverb, press the REVERB button. The lamp lights andthe reverb is set ON.
To turn off reverb, press the REVERB button again. The lamp turns off and the reverb is no longer activated.☞ Default is ON.☞ Reverb type and volume can be adjusted in the setup mode. (See the SETUP section on page 19.)
Call up the Split mode. To call up the split mode, press the SPLIT button. The lamp flashes and the split is set on and the LEDdisplay shows current selected split voice.
Select the split voice.Press a voice button to select a desired split voice during the split button flashes.
☞ Volume of the split voice can be adjusted independently in the setup mode. (See the SETUP section on page 19.)
☞ Key number of the lowest note is ‘ 00.
☞ The default voice is ‘07’ ACOUSTIC BASS in the split mode.
SLP-50 MANUAL Rev1.0(140302) ENGLISH_Dynatone Brand 2014-03-05 5:59 Page 15
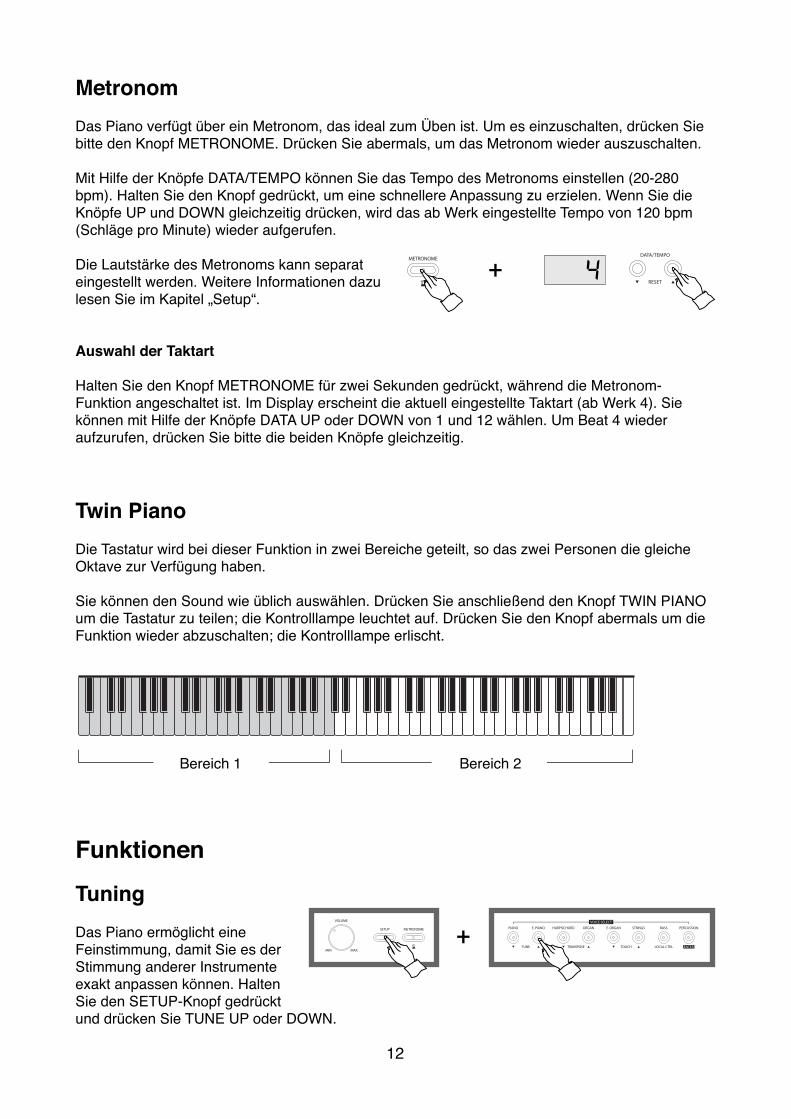
Metronom!!Das Piano verfügt über ein Metronom, das ideal zum Üben ist. Um es einzuschalten, drücken Sie bitte den Knopf METRONOME. Drücken Sie abermals, um das Metronom wieder auszuschalten.!!Mit Hilfe der Knöpfe DATA/TEMPO können Sie das Tempo des Metronoms einstellen (20-280 bpm). Halten Sie den Knopf gedrückt, um eine schnellere Anpassung zu erzielen. Wenn Sie die Knöpfe UP und DOWN gleichzeitig drücken, wird das ab Werk eingestellte Tempo von 120 bpm (Schläge pro Minute) wieder aufgerufen. !!Die Lautstärke des Metronoms kann separat eingestellt werden. Weitere Informationen dazu lesen Sie im Kapitel „Setup“.!!!Auswahl der Taktart!!Halten Sie den Knopf METRONOME für zwei Sekunden gedrückt, während die Metronom-Funktion angeschaltet ist. Im Display erscheint die aktuell eingestellte Taktart (ab Werk 4). Sie können mit Hilfe der Knöpfe DATA UP oder DOWN von 1 und 12 wählen. Um Beat 4 wieder aufzurufen, drücken Sie bitte die beiden Knöpfe gleichzeitig.!!!!Twin Piano!!Die Tastatur wird bei dieser Funktion in zwei Bereiche geteilt, so das zwei Personen die gleiche Oktave zur Verfügung haben.!!Sie können den Sound wie üblich auswählen. Drücken Sie anschließend den Knopf TWIN PIANO um die Tastatur zu teilen; die Kontrolllampe leuchtet auf. Drücken Sie den Knopf abermals um die Funktion wieder abzuschalten; die Kontrolllampe erlischt.! !!!!!!!!!!!Funktionen!!Tuning!!Das Piano ermöglicht eine Feinstimmung, damit Sie es der Stimmung anderer Instrumente exakt anpassen können. Halten Sie den SETUP-Knopf gedrückt und drücken Sie TUNE UP oder DOWN.!
�12
Basic Operation
Using the M
etronome
/ Twin Piano
16
SELECTING THE BEATMetronome sound can be set beat.
While the metronome is on, press and hold the METRONOME button to assign the beat for 2 seconds.The LED display shows current beat and you can change it by DATA UP or DOWN button.
☞ To set default ‘metronome beat 4’ press both DATA UP and DOWN buttons.☞ Metronome Beat Range 1~12
Using the Metronome
START/STOP OF THE METRONOMETo start the metronome, simply press the METRONOME button. Press the METRONOME buttonagain to stop the metronome sound.
The piano features a convenient metronome that is ideal for practicing.
+
Twin Piano
The keyboard can be divided into two separate sections, allowing two people to perform in the sameoctave.
Selecting a Voice.Select a voice in the normal way. (See the SELECTING VOICE section on page 13.)
Press the TWIN PIANO button.The keyboard splits two sections, which have same octave.
2
ADJUSTING THE TEMPO OF THE METRONOMEYou can set the tempo over range 20 ~ 280 beats per minute by using the DATA/TEMPO buttons.
☞ Hold the button for continuous decrementing or incrementing.☞ If you press both UP and DOWN buttons at the same time, it automatically returns to the default tempo 120.☞ Metronome volume can be adjusted in the setup mode. (See the SETUP section on page 19.)
SECTION 1 SECTION 2
To turn off the twin piano performance, press the TWIN PIANO button again.The twin piano performance turns off and the lamp goes out.
SLP-50 MANUAL Rev1.0(140302) ENGLISH_Dynatone Brand 2014-03-05 5:59 Page 16
Bereich 1 Bereich 2
Tune
Function
Transpose
Function Tune / Transpose
17
+
+
The Tune function lets you make fine adjustments to the pitch, allowing you to accurately match thetuning with that of other instruments.
Press and hold down the SETUP button and press the TUNE UP or DOWN button.
☞ The tune pop-up display appears and shows current value.☞ The value can be changed by pressing TUNE UP or DOWN button.☞ If you press both UP and DOWN buttons at the same time, it automatically returns to the default value.☞ Range -64~ default 00 ~ 64☞ Hz(Hertz)
The pitch is measured in units of Hertz (abbreviated Hz), which represents the number of times the sound wave vibratesin a second.
☞ The cent is unit of pitch, equal to 1/100 of a semitone.☞ Backing Up adjusted value
The last adjusted value of each function can be retained in memory.
The TRANSPOSE function makes it possible to shift the pitch of the keyboard in semitone units,allowing you to match the pitch of the keyboard to the range of other instruments or singers, orletting you easily play in a different key without having to change your fingering. For example, if theTRANSPOSE is set F key, playing C results in a pitch of F, or in other words, you can play in the key of Cmajor on the keyboard and automatically have the pitch transposed to F major.
Press and hold down the SETUP button and press the TRANSPOSE UP or DOWN button.
☞ The Transpose pop-up display appears and shows current value.☞ The value can be changed by pressing TRANSPOSE UP or DOWN button.☞ If you press both UP and DOWN buttons at the same time, it automatically returns to the default value.☞ Range: -12 semitone ~ 0 ~ 12 semitone (default 00)☞ Backing Up adjusted value
The last adjusted value of each function can be retained in memory.
SLP-50 MANUAL Rev1.0(140302) ENGLISH_Dynatone Brand 2014-03-05 5:59 Page 17
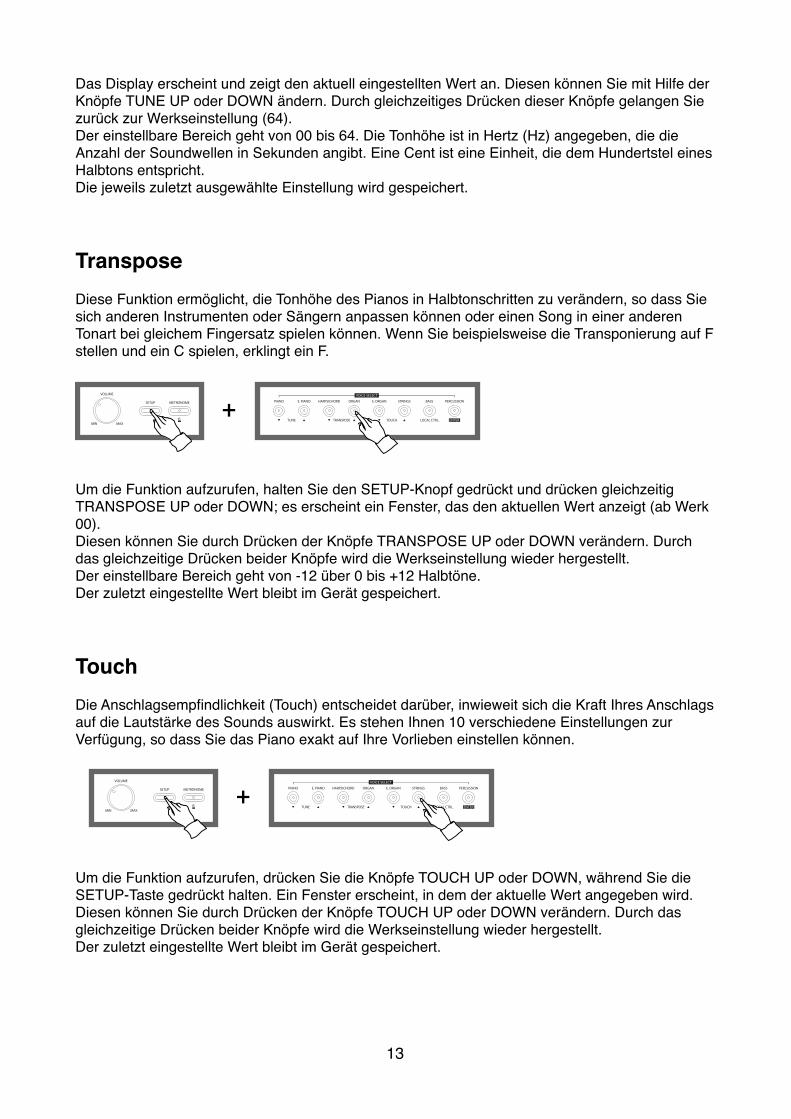
Das Display erscheint und zeigt den aktuell eingestellten Wert an. Diesen können Sie mit Hilfe der Knöpfe TUNE UP oder DOWN ändern. Durch gleichzeitiges Drücken dieser Knöpfe gelangen Sie zurück zur Werkseinstellung (64).!Der einstellbare Bereich geht von 00 bis 64. Die Tonhöhe ist in Hertz (Hz) angegeben, die die Anzahl der Soundwellen in Sekunden angibt. Eine Cent ist eine Einheit, die dem Hundertstel eines Halbtons entspricht.!Die jeweils zuletzt ausgewählte Einstellung wird gespeichert.!!!!Transpose!!Diese Funktion ermöglicht, die Tonhöhe des Pianos in Halbtonschritten zu verändern, so dass Sie sich anderen Instrumenten oder Sängern anpassen können oder einen Song in einer anderen Tonart bei gleichem Fingersatz spielen können. Wenn Sie beispielsweise die Transponierung auf F stellen und ein C spielen, erklingt ein F. ! !!!!!!!Um die Funktion aufzurufen, halten Sie den SETUP-Knopf gedrückt und drücken gleichzeitig TRANSPOSE UP oder DOWN; es erscheint ein Fenster, das den aktuellen Wert anzeigt (ab Werk 00). !Diesen können Sie durch Drücken der Knöpfe TRANSPOSE UP oder DOWN verändern. Durch das gleichzeitige Drücken beider Knöpfe wird die Werkseinstellung wieder hergestellt. !Der einstellbare Bereich geht von -12 über 0 bis +12 Halbtöne. !Der zuletzt eingestellte Wert bleibt im Gerät gespeichert.!!!!Touch!!Die Anschlagsempfindlichkeit (Touch) entscheidet darüber, inwieweit sich die Kraft Ihres Anschlags auf die Lautstärke des Sounds auswirkt. Es stehen Ihnen 10 verschiedene Einstellungen zur Verfügung, so dass Sie das Piano exakt auf Ihre Vorlieben einstellen können.!!!!!!!!Um die Funktion aufzurufen, drücken Sie die Knöpfe TOUCH UP oder DOWN, während Sie die SETUP-Taste gedrückt halten. Ein Fenster erscheint, in dem der aktuelle Wert angegeben wird. Diesen können Sie durch Drücken der Knöpfe TOUCH UP oder DOWN verändern. Durch das gleichzeitige Drücken beider Knöpfe wird die Werkseinstellung wieder hergestellt. !Der zuletzt eingestellte Wert bleibt im Gerät gespeichert.!!!!!!
�13
Tune
Function
Transpose
Function Tune / Transpose
17
+
+
The Tune function lets you make fine adjustments to the pitch, allowing you to accurately match thetuning with that of other instruments.
Press and hold down the SETUP button and press the TUNE UP or DOWN button.
☞ The tune pop-up display appears and shows current value.☞ The value can be changed by pressing TUNE UP or DOWN button.☞ If you press both UP and DOWN buttons at the same time, it automatically returns to the default value.☞ Range -64~ default 00 ~ 64☞ Hz(Hertz)
The pitch is measured in units of Hertz (abbreviated Hz), which represents the number of times the sound wave vibratesin a second.
☞ The cent is unit of pitch, equal to 1/100 of a semitone.☞ Backing Up adjusted value
The last adjusted value of each function can be retained in memory.
The TRANSPOSE function makes it possible to shift the pitch of the keyboard in semitone units,allowing you to match the pitch of the keyboard to the range of other instruments or singers, orletting you easily play in a different key without having to change your fingering. For example, if theTRANSPOSE is set F key, playing C results in a pitch of F, or in other words, you can play in the key of Cmajor on the keyboard and automatically have the pitch transposed to F major.
Press and hold down the SETUP button and press the TRANSPOSE UP or DOWN button.
☞ The Transpose pop-up display appears and shows current value.☞ The value can be changed by pressing TRANSPOSE UP or DOWN button.☞ If you press both UP and DOWN buttons at the same time, it automatically returns to the default value.☞ Range: -12 semitone ~ 0 ~ 12 semitone (default 00)☞ Backing Up adjusted value
The last adjusted value of each function can be retained in memory.
SLP-50 MANUAL Rev1.0(140302) ENGLISH_Dynatone Brand 2014-03-05 5:59 Page 17
+
+
FunctionTouch
/ MID
I Local Control
18
Touch
☞ The Touch pop-up display appears and shows current value.☞ The value can be changed by pressing TOUCH UP or DOWN button.☞ If you press both UP and DOWN buttons at the same time, it automatically returns to the default value.☞ Backing Up adjusted value
The last adjusted value of each Function can be retained in memory.
DISPLAY TOUCH DESCRIPTION
SoF SoftThese settings let you produce a relatively loud sound even when playing the keysoftly.
nor NormalThese settings are standard keyboard response and the NORMAL is used as thebasic setting. (Default)
hrd HardThese settings require you to play the keys quite strongly to produce maximumloudness.
oFF Off These settings produce the same degree of loudness, no matter how strongly orsoftly you play the keys.
Local control refers to the fact that, normally, the piano keyboard controls its internal tone generator,allowing the internal voices to be played directly from the keyboard. This situation is called Local Control ON. When the local control is set to off, the keyboard and soundsource are separated and no sound is heard through the piano when playing the keyboard.However, the data of the keyboard performance is output through MIDI. By setting local control to off,you can play an external MIDI tone generator from the keyboard of the piano without sounding theinternal voices.To turn off the MIDI local control, press and hold the SETUP button and press the LOCAL CTRLbutton. The LED display shows ‘oFF’ and the piano goes to the MIDI control off mode.
MIDI Local control
Touch determines how your playing strength (velocity) affects the volume of the voices. 10 types are available for tailoring the keyboard response to the selected voice, type of song, or yourown playing preference.
Press and hold down the SETUP button and press the TOUCH UP or DOWN button.
SLP-50 MANUAL Rev1.0(140302) ENGLISH_Dynatone Brand 2014-03-05 5:59 Page 18

!!!!MIDI Local!!„Local Control“ bezieht sich auf die Tatsache, dass normalerweise die Tastatur des Pianos seine interne Sounderzeugung regelt, d.h., dass die internen Sounds direkt über die Tastatur wiedergegeben werden. Diese Situation wird „Local Control On“ genannt. Wenn diese Funktion abgeschaltet ist (Local Off), werden Tastatur und Sounderzeugung getrennt. Das bedeutet, Sie hören nichts, wenn Sie spielen. Auf diese Weise können Sie Ihre Tastatur als Keyboard benutzen, den Sound aber von der externen Quelle beziehen.!!Um MIDI Control auszuschalten, halten Sie den SETUP-Knopf gedrückt und drücken Sie währenddessen den Knopf LOCAL CTRL. Im Display erscheint „oFF“.!!!!!!!!!!Sound-Einstellungen!!Um folgende elf Einstellungen vorzunehmen, drücken Sie bitte den Knopf SETUP um den entsprechenden Modus aufzurufen. Im Display erscheint „- - -„. !!Drücken Sie nun entweder DATA/TEMPO UP oder DOWN, während Sie den SETUP-Knopf gedrückt halten um zwischen den Funktionen zu wählen. Die aktuell ausgewählte Funktion wird im Display angezeigt.!!Um den Wert der angezeigten Funktion zu ändern, drücken Sie bitte den Knopf ENTER/PERCUSSION, während Sie den SETUP-Knopf gedrückt halten. Nun können Sie den Wert mit den Knöpfen DATA/TEMPO UP und DOWN ändern. !!Sie können die Knöpfe gedrückt halten, um den Wert schneller zu ändern. !Wenn Sie die beiden Knöpfe gleichzeitig drücken, wird der Wert auf die Werkseinstellung zurückgesetzt.!!
Anzeige Anschlag Beschreibung
SoF Weich Bei dieser Einstellung produzieren Sie einen lauten Sound, selbst bei zartem Anschlag.
nor Normal Das ist der Standard-Anschlag und dient als Grundeinstellung ab Werk.
hrd Hart Bei dieser Einstellung müssen Sie kraftvoll anschlagen, um einen lauten Sound zu erzeugen.
oFF Aus Ist die Funktion deaktiviert, erklingen alle Töne gleich laut, unabhängig von der Kraft Ihres Anschlags.
�14
+
+
FunctionTouch
/ MID
I Local Control
18
Touch
☞ The Touch pop-up display appears and shows current value.☞ The value can be changed by pressing TOUCH UP or DOWN button.☞ If you press both UP and DOWN buttons at the same time, it automatically returns to the default value.☞ Backing Up adjusted value
The last adjusted value of each Function can be retained in memory.
DISPLAY TOUCH DESCRIPTION
SoF SoftThese settings let you produce a relatively loud sound even when playing the keysoftly.
nor NormalThese settings are standard keyboard response and the NORMAL is used as thebasic setting. (Default)
hrd HardThese settings require you to play the keys quite strongly to produce maximumloudness.
oFF Off These settings produce the same degree of loudness, no matter how strongly orsoftly you play the keys.
Local control refers to the fact that, normally, the piano keyboard controls its internal tone generator,allowing the internal voices to be played directly from the keyboard. This situation is called Local Control ON. When the local control is set to off, the keyboard and soundsource are separated and no sound is heard through the piano when playing the keyboard.However, the data of the keyboard performance is output through MIDI. By setting local control to off,you can play an external MIDI tone generator from the keyboard of the piano without sounding theinternal voices.To turn off the MIDI local control, press and hold the SETUP button and press the LOCAL CTRLbutton. The LED display shows ‘oFF’ and the piano goes to the MIDI control off mode.
MIDI Local control
Touch determines how your playing strength (velocity) affects the volume of the voices. 10 types are available for tailoring the keyboard response to the selected voice, type of song, or yourown playing preference.
Press and hold down the SETUP button and press the TOUCH UP or DOWN button.
SLP-50 MANUAL Rev1.0(140302) ENGLISH_Dynatone Brand 2014-03-05 5:59 Page 18
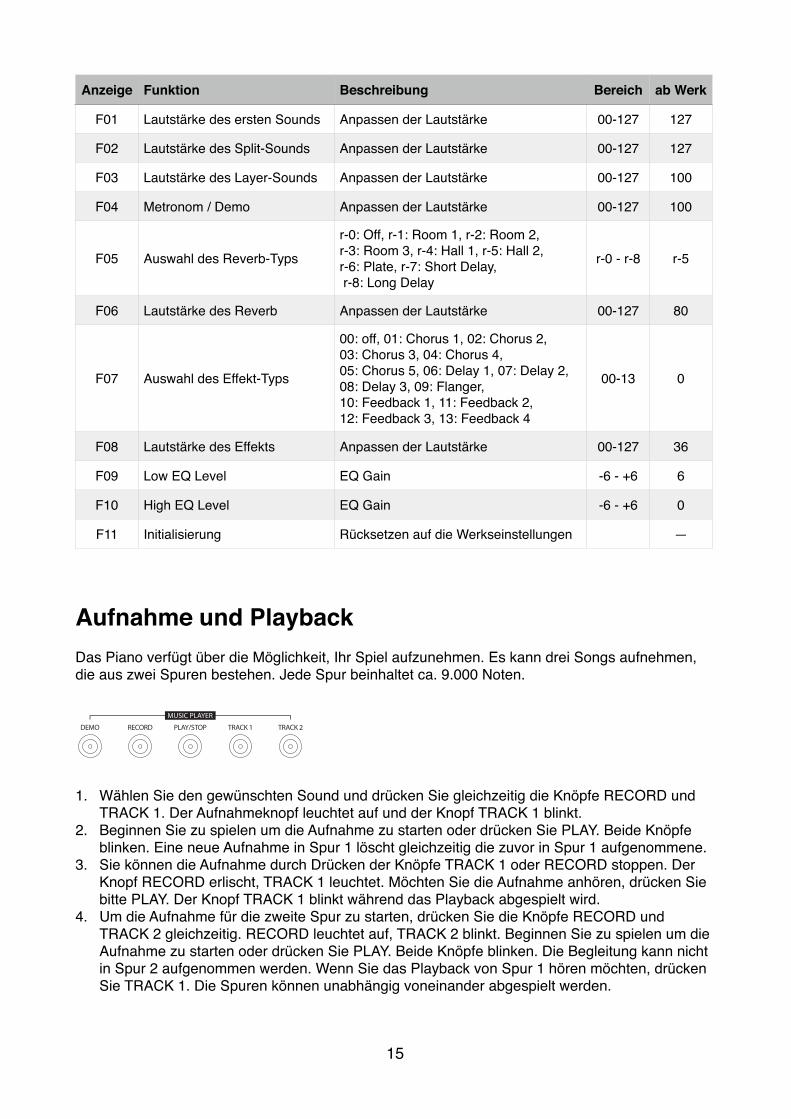
!!!Aufnahme und Playback!!Das Piano verfügt über die Möglichkeit, Ihr Spiel aufzunehmen. Es kann drei Songs aufnehmen, die aus zwei Spuren bestehen. Jede Spur beinhaltet ca. 9.000 Noten.!!!!!!!1. Wählen Sie den gewünschten Sound und drücken Sie gleichzeitig die Knöpfe RECORD und
TRACK 1. Der Aufnahmeknopf leuchtet auf und der Knopf TRACK 1 blinkt.!2. Beginnen Sie zu spielen um die Aufnahme zu starten oder drücken Sie PLAY. Beide Knöpfe
blinken. Eine neue Aufnahme in Spur 1 löscht gleichzeitig die zuvor in Spur 1 aufgenommene.!3. Sie können die Aufnahme durch Drücken der Knöpfe TRACK 1 oder RECORD stoppen. Der
Knopf RECORD erlischt, TRACK 1 leuchtet. Möchten Sie die Aufnahme anhören, drücken Sie bitte PLAY. Der Knopf TRACK 1 blinkt während das Playback abgespielt wird.!
4. Um die Aufnahme für die zweite Spur zu starten, drücken Sie die Knöpfe RECORD und TRACK 2 gleichzeitig. RECORD leuchtet auf, TRACK 2 blinkt. Beginnen Sie zu spielen um die Aufnahme zu starten oder drücken Sie PLAY. Beide Knöpfe blinken. Die Begleitung kann nicht in Spur 2 aufgenommen werden. Wenn Sie das Playback von Spur 1 hören möchten, drücken Sie TRACK 1. Die Spuren können unabhängig voneinander abgespielt werden.!
Anzeige Funktion Beschreibung Bereich ab Werk
F01 Lautstärke des ersten Sounds Anpassen der Lautstärke 00-127 127
F02 Lautstärke des Split-Sounds Anpassen der Lautstärke 00-127 127
F03 Lautstärke des Layer-Sounds Anpassen der Lautstärke 00-127 100
F04 Metronom / Demo Anpassen der Lautstärke 00-127 100
F05 Auswahl des Reverb-Typs
r-0: Off, r-1: Room 1, r-2: Room 2, !r-3: Room 3, r-4: Hall 1, r-5: Hall 2, !r-6: Plate, r-7: Short Delay,! r-8: Long Delay
r-0 - r-8 r-5
F06 Lautstärke des Reverb Anpassen der Lautstärke 00-127 80
F07 Auswahl des Effekt-Typs
00: off, 01: Chorus 1, 02: Chorus 2, !03: Chorus 3, 04: Chorus 4, !05: Chorus 5, 06: Delay 1, 07: Delay 2, 08: Delay 3, 09: Flanger, !10: Feedback 1, 11: Feedback 2, !12: Feedback 3, 13: Feedback 4
00-13 0
F08 Lautstärke des Effekts Anpassen der Lautstärke 00-127 36
F09 Low EQ Level EQ Gain -6 - +6 6
F10 High EQ Level EQ Gain -6 - +6 0
F11 Initialisierung Rücksetzen auf die Werkseinstellungen —
�15
RecordingRecoding and Playback
20
Recording and Playback
RecordingThe piano features comprehensive song recordingfunctions that allow you to record your own performance.A song records 2 tracks and approx. 9,000 notes can berecorded into one track.You can record total 3 songs in the piano.
Start recording to the Track1.Recording starts when playing the keyboard or pressing the PLAY button. Both buttons flash.
☞ When record of the tack1 starts, old data of the track 1 is deleted.
Stop recording to the Track1.Recording stops when pressing the TRACK1 button or RECORD button. The record button turns offand the track 1 button turns on. If you want to hear the recorded song in the Track1, press the PLAY button. Playback of the track1starts with flashing the play button.
Prepare recording to the Track 1Select the desired voice and press both the RECORD and the TRACK 1 buttons. The record buttonturns on and the track1 button flashes.
Start recording to the Track2.Press both the RECORD and TRACK 2 button. The record button turns on and the track2 button flashes. Recording starts when playing the keyboard or pressing the PLAY button. Accompaniment cannot be recorded into the track2.
☞ If you want to hear playback of the track1, turn on the track1 by pressing the TRACK1 button. If not, turns off the track1. ☞ Each track independently can be played.
Playback the recorded song.Press the PLAY button. Playback of the recorded song starts.
☞ If there is a recorded song in the track memory, the track lamp lights.☞ If you turn off a track, piano does not play the track.
Stop playback of the recorded song.Press the PLAY button again. Playback of the recorded song stops.
CLEARING RECORDED MEMORY
Press both RECORD and PLAY buttons. The recorded data is deleted in the tracks.☞ When you recorded a new song into a track, old data is deleted in the track.☞ Backing Up the recorded song
Even if the power is turned off, the recorded song memory is not deleted.
Stop recording to the Track2.Recording stops when pressing the TRACK2 button or RECORD button. The record button turns offand the track 2 button turns on.If you want to hear the recorded song in the track2, press the PLAY button. Playback of the track2starts with flashing the play button.
SLP-50 MANUAL Rev1.0(140302) ENGLISH_Dynatone Brand 2014-03-05 5:59 Page 20

5. Um die Aufnahme in Spur 2 zu beenden, drücken Sie die Knöpfe TRACK 2 oder RECORD. Der Knopf RECORD erlischt, TRACK 2 leuchtet. Möchten Sie die Aufnahme anhören, drücken Sie bitte PLAY. Der Knopf TRACK 2 blinkt während das Playback abgespielt wird.!
6. Abspielen des aufgenommenen Songs: Drücken Sie den Knopf PLAY. Befindet sich eine Aufnahme in einer Spur, blinkt das Kontrolllämpchen. Sie können einzelne Spuren abschalten, die dann nicht abgespielt werden.!
7. Stoppen des Playbacks: Drücken Sie abermals PLAY.!8. Löschen der Aufnahme: Sie können die Knöpfe RECORD und PLAY gleichzeitig drücken um
Spuren zu löschen. Sie können Sie auch einfach durch eine neue Aufnahme ersetzen. Die letzte Aufnahme bleibt permanent gespeichert, auch wenn Sie das Gerät abschalten.!!!!
Demosongs!!Im Ihrem Piano sind 50 Demosongs gespeichert, die Sie einfach zu Ihrem Vergnügen anhören oder zum Üben benutzen können.! !!!!!!!1. Drücken Sie DEMO MUSIC um den entsprechenden Modus aufzurufen. Im Display erscheint
„d01“, der erste Demosong.!2. Um einen anderen Song auszuwählen, benutzen Sie die Knöpfe DATA UP oder DOWN. EIne
Übersicht über die Demosongs finden Sie im Anhang.!3. Drücken Sie PLAY/STOP um den ausgewählten Demosong abzuspielen.!4. Um den Demosong zu beenden, drücken Sie erneut PLAY/STOP.!!!!!!!!!
�16
Playback of the Music
Your piano comes with 50 piano music. You canplayback the demo music for your own listeningpleasure, or you can use them for practice.
Dem
oM
usicPlayback
ofthe music
21
Demo Music
Enter the demo music mode.Press the DEMO MUSIC button. The LED display shows ‘d01’ that is first number of the music.
Select a desired music.Change the number of the music by using DATA UP or DOWN button.
Stop music.Press the PLAY/STOP again. The music stops.
Playback of the selected music.Press the PLAY/STOP button. The selected music starts.
☞ There are 50 tunes in the music demo.☞ Refer to the MUSIC LIST.
SLP-50 MANUAL Rev1.0(140302) ENGLISH_Dynatone Brand 2014-03-05 5:59 Page 21
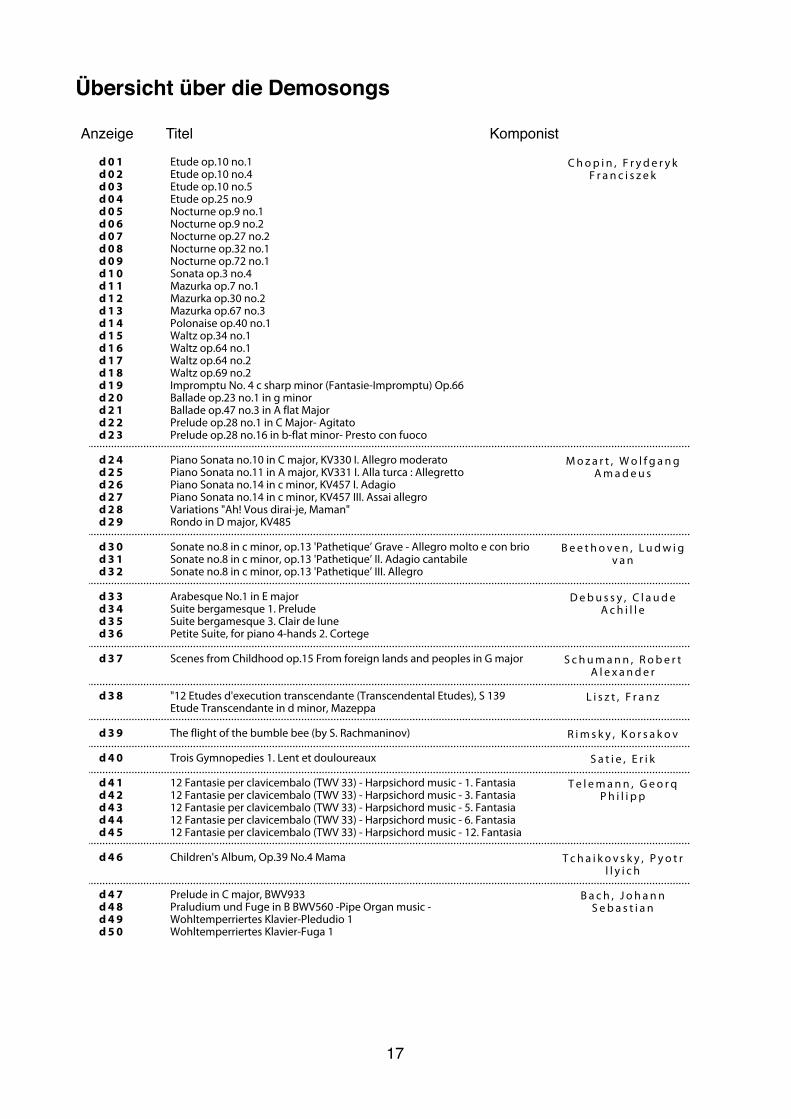
Übersicht über die Demosongs!
!!!!�17
Dem
oM
usicD
emo M
usic List
22
Demo Music List
C h o p i n , F r y d e r y kF r a n c i s z e k
M o z a r t , W o l f g a n gA m a d e u s
B e e t h o v e n , L u d w i gv a n
D e b u s s y , C l a u d eA c h i l l e
S c h u m a n n , R o b e r tA l e x a n d e r
L i s z t , F r a n z
R i m s k y , K o r s a k o v
S a t i e , E r i k
T e l e m a n n , G e o r qP h i l i p p
T c h a i k o v s k y , P y o t rl l y i c h
B a c h , J o h a n nS e b a s t i a n
Display Title Composer
d 0 1d 0 2d 0 3d 0 4d 0 5d 0 6d 0 7d 0 8d 0 9d 1 0d 1 1d 1 2d 1 3d 1 4d 1 5d 1 6d 1 7d 1 8d 1 9d 2 0d 2 1d 2 2d 2 3
d 2 4d 2 5d 2 6d 2 7d 2 8d 2 9
d 3 0d 3 1d 3 2
d 3 3d 3 4d 3 5d 3 6
d 3 7
d 3 8
d 3 9
d 4 0
d 4 1d 4 2d 4 3d 4 4d 4 5
d 4 6
d 4 7d 4 8d 4 9d 5 0
Etude op.10 no.1Etude op.10 no.4Etude op.10 no.5Etude op.25 no.9Nocturne op.9 no.1Nocturne op.9 no.2Nocturne op.27 no.2Nocturne op.32 no.1Nocturne op.72 no.1Sonata op.3 no.4Mazurka op.7 no.1Mazurka op.30 no.2Mazurka op.67 no.3Polonaise op.40 no.1Waltz op.34 no.1Waltz op.64 no.1Waltz op.64 no.2Waltz op.69 no.2Impromptu No. 4 c sharp minor (Fantasie-Impromptu) Op.66Ballade op.23 no.1 in g minorBallade op.47 no.3 in A flat MajorPrelude op.28 no.1 in C Major- AgitatoPrelude op.28 no.16 in b-flat minor- Presto con fuoco
Piano Sonata no.10 in C major, KV330 I. Allegro moderatoPiano Sonata no.11 in A major, KV331 I. Alla turca : Allegretto Piano Sonata no.14 in c minor, KV457 I. AdagioPiano Sonata no.14 in c minor, KV457 III. Assai allegroVariations "Ah! Vous dirai-je, Maman"Rondo in D major, KV485
Sonate no.8 in c minor, op.13 'Pathetique’ Grave - Allegro molto e con brioSonate no.8 in c minor, op.13 'Pathetique’ II. Adagio cantabile Sonate no.8 in c minor, op.13 'Pathetique’ III. Allegro
Arabesque No.1 in E majorSuite bergamesque 1. PreludeSuite bergamesque 3. Clair de lunePetite Suite, for piano 4-hands 2. Cortege
Scenes from Childhood op.15 From foreign lands and peoples in G major
"12 Etudes d'execution transcendante (Transcendental Etudes), S 139Etude Transcendante in d minor, Mazeppa
The flight of the bumble bee (by S. Rachmaninov)
Trois Gymnopedies 1. Lent et douloureaux
12 Fantasie per clavicembalo (TWV 33) - Harpsichord music - 1. Fantasia12 Fantasie per clavicembalo (TWV 33) - Harpsichord music - 3. Fantasia12 Fantasie per clavicembalo (TWV 33) - Harpsichord music - 5. Fantasia12 Fantasie per clavicembalo (TWV 33) - Harpsichord music - 6. Fantasia12 Fantasie per clavicembalo (TWV 33) - Harpsichord music - 12. Fantasia
Children's Album, Op.39 No.4 Mama
Prelude in C major, BWV933Praludium und Fuge in B BWV560 -Pipe Organ music -Wohltemperriertes Klavier-Pledudio 1Wohltemperriertes Klavier-Fuga 1
SLP-50 MANUAL Rev1.0(140302) ENGLISH_Dynatone Brand 2014-03-05 5:59 Page 22
Anzeige Titel Komponist
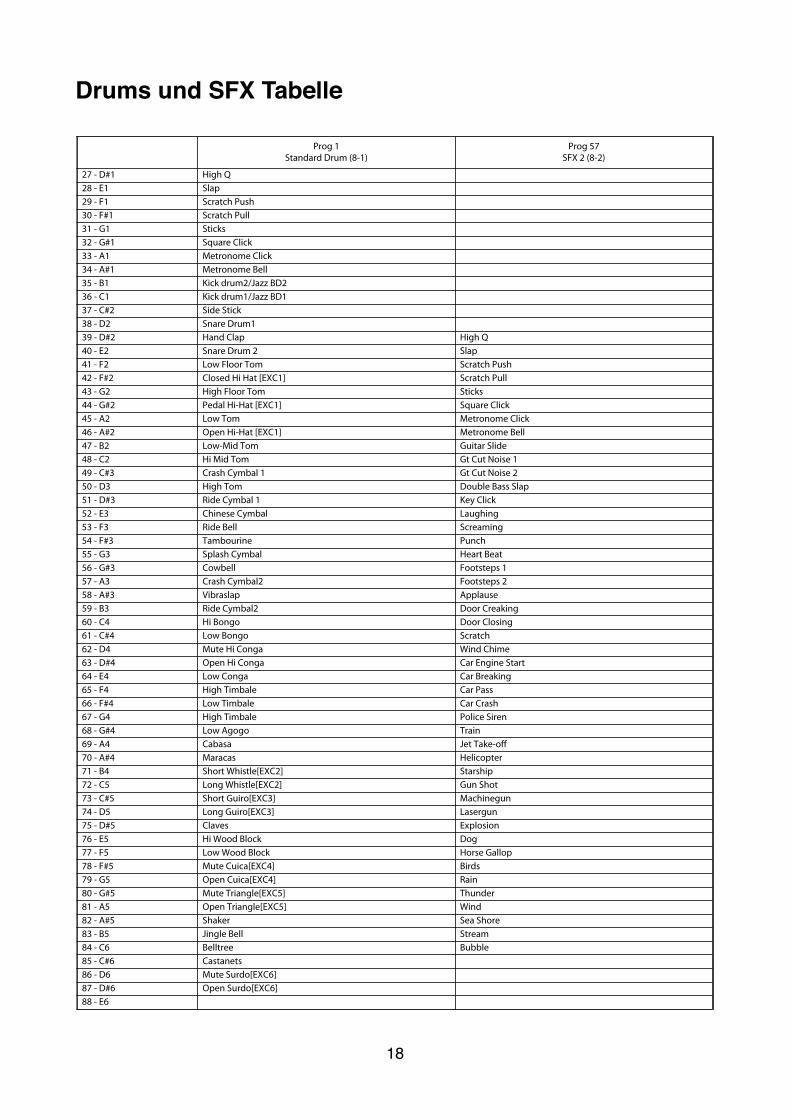
Drums und SFX Tabelle!
�18
Drum
andSFX
Table
23
Prog 1Standard Drum (8-1)
Prog 57SFX 2 (8-2)
27 - D#1 High Q28 - E1 Slap29 - F1 Scratch Push30 - F#1 Scratch Pull31 - G1 Sticks32 - G#1 Square Click33 - A1 Metronome Click34 - A#1 Metronome Bell35 - B1 Kick drum2/Jazz BD236 - C1 Kick drum1/Jazz BD137 - C#2 Side Stick38 - D2 Snare Drum139 - D#2 Hand Clap High Q40 - E2 Snare Drum 2 Slap41 - F2 Low Floor Tom Scratch Push42 - F#2 Closed Hi Hat [EXC1] Scratch Pull43 - G2 High Floor Tom Sticks44 - G#2 Pedal Hi-Hat [EXC1] Square Click45 - A2 Low Tom Metronome Click46 - A#2 Open Hi-Hat [EXC1] Metronome Bell47 - B2 Low-Mid Tom Guitar Slide48 - C2 Hi Mid Tom Gt Cut Noise 149 - C#3 Crash Cymbal 1 Gt Cut Noise 250 - D3 High Tom Double Bass Slap51 - D#3 Ride Cymbal 1 Key Click 52 - E3 Chinese Cymbal Laughing 53 - F3 Ride Bell Screaming54 - F#3 Tambourine Punch55 - G3 Splash Cymbal Heart Beat56 - G#3 Cowbell Footsteps 157 - A3 Crash Cymbal2 Footsteps 258 - A#3 Vibraslap Applause 59 - B3 Ride Cymbal2 Door Creaking60 - C4 Hi Bongo Door Closing61 - C#4 Low Bongo Scratch 62 - D4 Mute Hi Conga Wind Chime 63 - D#4 Open Hi Conga Car Engine Start64 - E4 Low Conga Car Breaking 65 - F4 High Timbale Car Pass66 - F#4 Low Timbale Car Crash67 - G4 High Timbale Police Siren68 - G#4 Low Agogo Train69 - A4 Cabasa Jet Take-off70 - A#4 Maracas Helicopter 71 - B4 Short Whistle[EXC2] Starship 72 - C5 Long Whistle[EXC2] Gun Shot73 - C#5 Short Guiro[EXC3] Machinegun 74 - D5 Long Guiro[EXC3] Lasergun 75 - D#5 Claves Explosion76 - E5 Hi Wood Block Dog77 - F5 Low Wood Block Horse Gallop78 - F#5 Mute Cuica[EXC4] Birds79 - G5 Open Cuica[EXC4] Rain80 - G#5 Mute Triangle[EXC5] Thunder81 - A5 Open Triangle[EXC5] Wind82 - A#5 Shaker Sea Shore83 - B5 Jingle Bell Stream84 - C6 Belltree Bubble 85 - C#6 Castanets86 - D6 Mute Surdo[EXC6]87 - D#6 Open Surdo[EXC6]88 - E6
Drum and SFX Table
SLP-50 MANUAL Rev1.0(140302) ENGLISH_Dynatone Brand 2014-03-05 5:59 Page 23
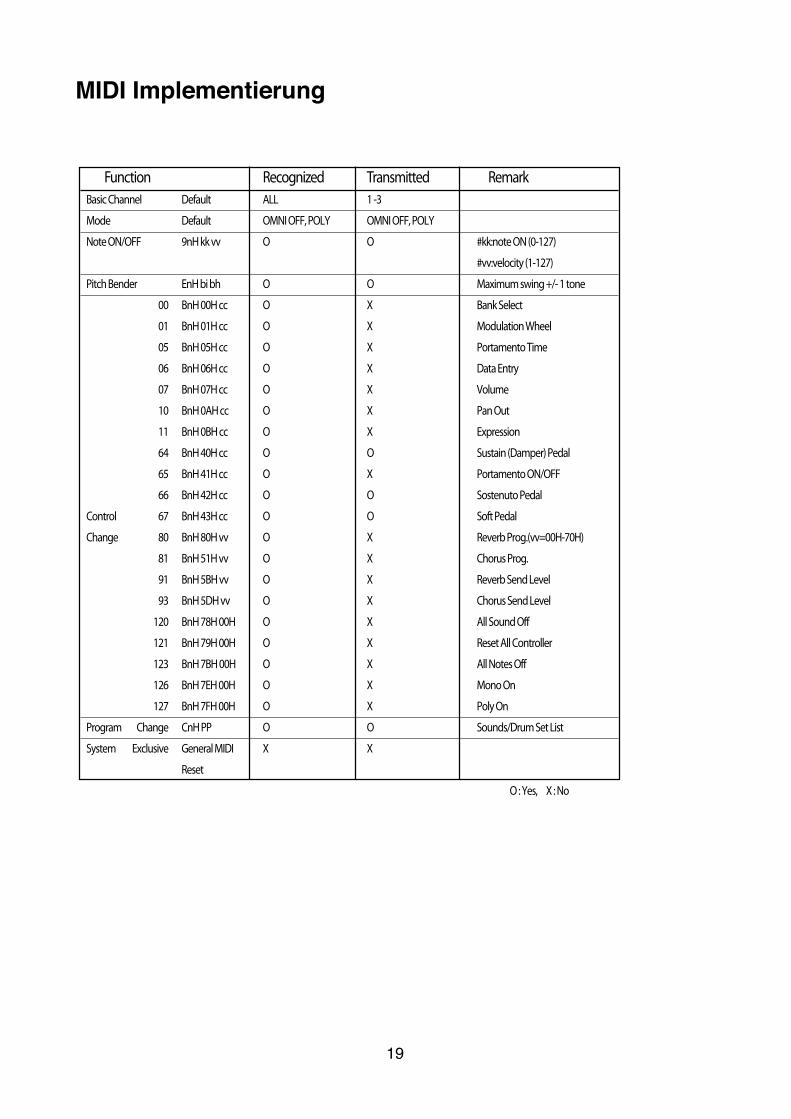
MIDI Implementierung!!! !!!!!!!!!!!!!!!!!!!!!!!!!!!!!!!!!!!!!!!!!!!!!!!!!!!!
�19
MID
I Implem
entation
24
MIDI Implementation
Function Recognized Transmitted RemarkBasic Channel Default ALL 1 -3
Mode Default OMNI OFF, POLY OMNI OFF, POLY
Note ON/OFF 9nH kk vv O O #kk:note ON (0-127)
#vv:velocity (1-127)
Pitch Bender EnH bi bh O O Maximum swing +/- 1 tone
00 BnH 00H cc O X Bank Select
01 BnH 01H cc O X Modulation Wheel
05 BnH 05H cc O X Portamento Time
06 BnH 06H cc O X Data Entry
07 BnH 07H cc O X Volume
10 BnH 0AH cc O X Pan Out
11 BnH 0BH cc O X Expression
64 BnH 40H cc O O Sustain (Damper) Pedal
65 BnH 41H cc O X Portamento ON/OFF
66 BnH 42H cc O O Sostenuto Pedal
Control 67 BnH 43H cc O O Soft Pedal
Change 80 BnH 80H vv O X Reverb Prog.(vv=00H-70H)
81 BnH 51H vv O X Chorus Prog.
91 BnH 5BH vv O X Reverb Send Level
93 BnH 5DH vv O X Chorus Send Level
120 BnH 78H 00H O X All Sound Off
121 BnH 79H 00H O X Reset All Controller
123 BnH 7BH 00H O X All Notes Off
126 BnH 7EH 00H O X Mono On
127 BnH 7FH 00H O X Poly On
Program Change CnH PP O O Sounds/Drum Set List
System Exclusive General MIDI X X
Reset
O : Yes, X : No
SLP-50 MANUAL Rev1.0(140302) ENGLISH_Dynatone Brand 2014-03-05 5:59 Page 24
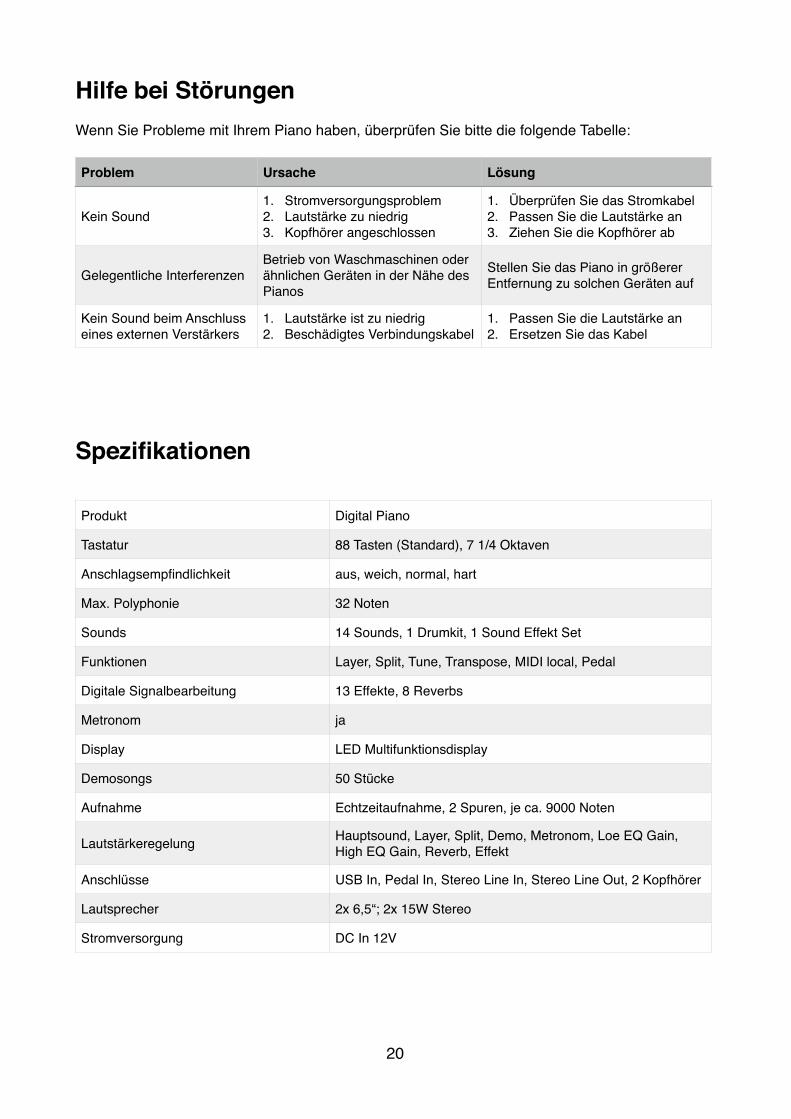
Hilfe bei Störungen!!Wenn Sie Probleme mit Ihrem Piano haben, überprüfen Sie bitte die folgende Tabelle:!!
!!!!!Spezifikationen!!!
!!
Problem Ursache Lösung
Kein Sound1. Stromversorgungsproblem!2. Lautstärke zu niedrig!3. Kopfhörer angeschlossen
1. Überprüfen Sie das Stromkabel!2. Passen Sie die Lautstärke an!3. Ziehen Sie die Kopfhörer ab
Gelegentliche InterferenzenBetrieb von Waschmaschinen oder ähnlichen Geräten in der Nähe des Pianos
Stellen Sie das Piano in größerer Entfernung zu solchen Geräten auf
Kein Sound beim Anschluss eines externen Verstärkers
1. Lautstärke ist zu niedrig!2. Beschädigtes Verbindungskabel
1. Passen Sie die Lautstärke an!2. Ersetzen Sie das Kabel
Produkt Digital Piano
Tastatur 88 Tasten (Standard), 7 1/4 Oktaven
Anschlagsempfindlichkeit aus, weich, normal, hart
Max. Polyphonie 32 Noten
Sounds 14 Sounds, 1 Drumkit, 1 Sound Effekt Set
Funktionen Layer, Split, Tune, Transpose, MIDI local, Pedal
Digitale Signalbearbeitung 13 Effekte, 8 Reverbs
Metronom ja
Display LED Multifunktionsdisplay
Demosongs 50 Stücke
Aufnahme Echtzeitaufnahme, 2 Spuren, je ca. 9000 Noten
Lautstärkeregelung Hauptsound, Layer, Split, Demo, Metronom, Loe EQ Gain, High EQ Gain, Reverb, Effekt
Anschlüsse USB In, Pedal In, Stereo Line In, Stereo Line Out, 2 Kopfhörer
Lautsprecher 2x 6,5“; 2x 15W Stereo
Stromversorgung DC In 12V
�20

WEEE-Erklärung / Entsorgung!!!Ihr Produkt wurde mit hochwertigen Materialien und Komponenten entworfen und hergestellt, die recyclebar sind und wieder verwendet werden können. Dieses Symbol bedeutet, dass elektrische und elektronische Geräte am Ende ihrer Nutzungsdauer vom Hausmüll getrennt entsorgt werden müssen. Bitte entsorgen Sie dieses Gerät bei Ihrer örtlichen kommunalen Sammelstelle oder im Recycling Center. Bitte helfen Sie mit, die Umwelt, in der wir leben, zu erhalten.!!!
Technische Änderungen und Änderungen im Erscheinungsbild vorbehalten. Alle Angaben entsprechen dem Stand bei Drucklegung. Für die Richtigkeit und Vollständigkeit der enthaltenen Beschreibungen, Abbildungen und Angaben übernimmt Musikhaus Kirstein GmbH keinerlei Gewähr. Abgebildete Farben und Spezifikationen können geringfügig vom Produkt abweichen. Musikhaus Kirstein GmbH - Produkte sind nur über autorisierte Händler erhältlich. Distributoren und Händler sind keine Handlungsbevollmächtigten von Musikhaus Kirstein GmbH und haben keinerlei Befugnis, die Musikhaus Kirstein GmbH in irgendeiner Weise, sei es ausdrücklich oder durch schlüssiges Handeln, rechtlich zu binden. Diese Bedienungsanleitung ist urheberrechtlich geschützt. Jede Vervielfältigung, bzw. jeder Nachdruck, auch auszugsweise, und jede Wiedergabe der Abbildungen, auch in verändertem Zustand, ist nur mit schriftlicher Zustimmung der Firma Musikhaus Kirstein GmbH gestattet.!!!!!!!!!!!!!!Herstellerangaben!!Musikhaus Kirstein GmbH!Bernbeurener Strasse 11!86956 Schongau!Telefon: 0049-909494-0!Telefax: 0049-909494-19!www.kirstein.de! !!!
�21
!
!
!