Embed Size (px)
DESCRIPTION
Eclipse Plug in s Tutorial
Citation preview
A Quick-Start Tutorial to EclipsePlug-in Development
Anleitung zur wissenschaftlichen Arbeitder Philosophisch-naturwissenschaftlichen Fakultat
der Universitat Bern
vorgelegt von
Markus BalsigerDezember 2010
Leiter der Arbeit:
Prof. Dr. Oscar Nierstrasz
Dr. David Rothlisberger
Institut fur Informatik und angewandte Mathematik

Further information about this work and the tools used as well as an online version of thisdocument can be found under the following addresses:
Markus [email protected]://scg.unibe.ch
Software Composition GroupUniversity of BernInstitute of Computer Science and Applied MathematicsNeubruckstrasse 10CH-3012 Bernhttp://scg.unibe.ch/

Abstract
This document is a quick-start guide to developers which are about to create a plug-in for theEclipse IDE. We discuss the basic project setup of the plug-in as well as the so-called extensionpoints of Eclipse. As a quick tutorial, we create a sample plug-in with a few simple features onthe fly.
iii

iv
Contents
Contents v
List of Figures vii
1 Introduction 1
2 Preparations and Requirements 3
3 Plug-in Project Creation 5
4 The Most Elementary Extension Points and Services 114.1 Our Tutorial Project . . . . . . . . . . . . . . . . . . . . . . . . . . . . . . . . 124.2 User Interfaces . . . . . . . . . . . . . . . . . . . . . . . . . . . . . . . . . . 124.3 Launch Configurations . . . . . . . . . . . . . . . . . . . . . . . . . . . . . . 154.4 Run Configuration User Interfaces . . . . . . . . . . . . . . . . . . . . . . . . 174.5 Eclipse-Wide Selection Listener . . . . . . . . . . . . . . . . . . . . . . . . . 19
5 Update Site Creation 23
v

vi CONTENTS
List of Figures
3.1 Select the plug-in project type . . . . . . . . . . . . . . . . . . . . . . . . . . 53.2 Settings for the new project . . . . . . . . . . . . . . . . . . . . . . . . . . . 63.3 The project overview . . . . . . . . . . . . . . . . . . . . . . . . . . . . . . . 73.4 Adding our view to the Java perspective . . . . . . . . . . . . . . . . . . . . . 83.5 Selecting our registered view . . . . . . . . . . . . . . . . . . . . . . . . . . . 8
4.1 The registered view extension element of our demo project . . . . . . . . . . . 134.2 Our first GUI . . . . . . . . . . . . . . . . . . . . . . . . . . . . . . . . . . . 154.3 Adding org.eclipse.jdt.launching as required plugin of our project . . . . . . . 164.4 Our own launch configuration . . . . . . . . . . . . . . . . . . . . . . . . . . 194.5 Eclipse’s selection service . . . . . . . . . . . . . . . . . . . . . . . . . . . . 204.6 The Demo plugin in action . . . . . . . . . . . . . . . . . . . . . . . . . . . . 22
vii

viii LIST OF FIGURES
Chapter 1
Introduction
This document is an introduction to Eclipse plug-in development. It is based on Eclipse Classic3.61. We first introduce the basic project creation and the plug-in project structure. After thisshort introduction, we take a closer look at the most common extension points that Eclipseoffers to plug-in developers. Among other extensions, we present the user interface integrationand a run configuration.
Eclipse’s plug-in system is based on Equinox, which is an OSGi framework implementation.Most infrastructure and service modules of Eclipse are therefore available as bundles and can bereused or integrated. Besides the fact that modules can be installed and maintained automaticallyincluding automatic download and update of bundles on which a module depends, Equinoxallows the IDE to be updated without a restart.
Often plug-ins are installed using so-called update sites. An update site typically consists ofa site.xml which contains the basic information about the plug-in like its category, supportedoperating systems or the feature name, the artifacts.xml offering information about every OSGibundle required by a feature, the content.xml containing more information like the licensetext and the jar files required by the plug-in itself. Luckily Eclipse maintains many of theseinformations and jar files automatically when we set up the correct plug-in structure.
1http://download.eclipse.org/eclipse/downloads/
1

2 CHAPTER 1. INTRODUCTION
Chapter 2
Preparations and Requirements
This tutorial should be feasible in under 90 minutes. First, download 1 Eclipse 3.6 Classic. Alsomake sure that you have a Java SDK available which is up-to-date 2.
1http://download.eclipse.org/eclipse/downloads/2http://www.oracle.com/technetwork/java/javase/downloads/index.html
3

4 CHAPTER 2. PREPARATIONS AND REQUIREMENTS
Chapter 3
Plug-in Project Creation
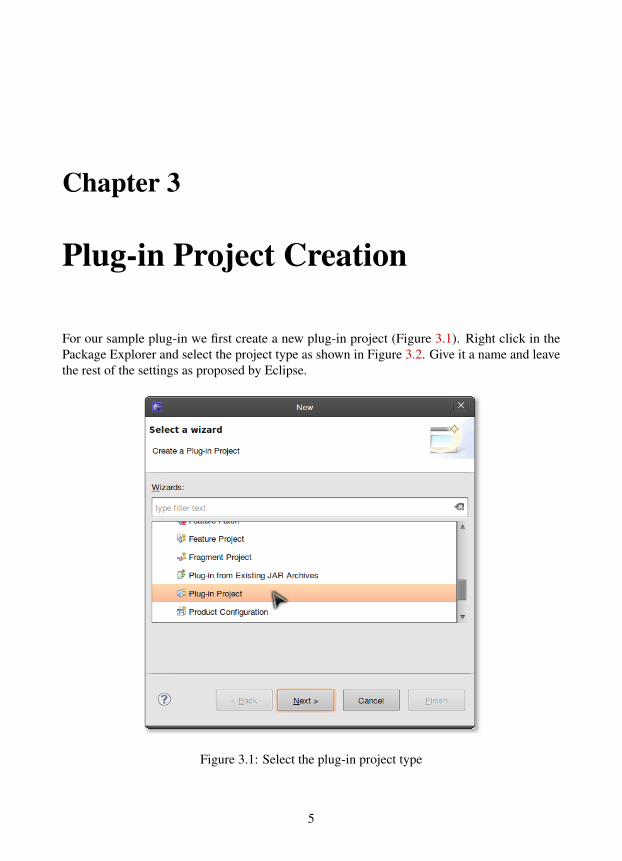
For our sample plug-in we first create a new plug-in project (Figure 3.1). Right click in thePackage Explorer and select the project type as shown in Figure 3.2. Give it a name and leavethe rest of the settings as proposed by Eclipse.
Figure 3.1: Select the plug-in project type
5
6 CHAPTER 3. PLUG-IN PROJECT CREATION
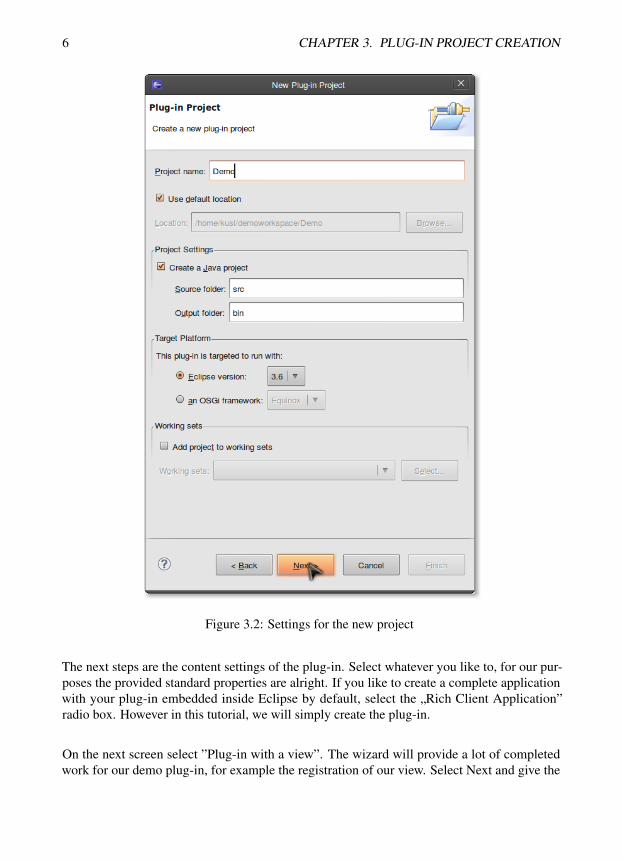
Figure 3.2: Settings for the new project
The next steps are the content settings of the plug-in. Select whatever you like to, for our pur-poses the provided standard properties are alright. If you like to create a complete applicationwith your plug-in embedded inside Eclipse by default, select the ”Rich Client Application”radio box. However in this tutorial, we will simply create the plug-in.
On the next screen select ”Plug-in with a view”. The wizard will provide a lot of completedwork for our demo plug-in, for example the registration of our view. Select Next and give the
7
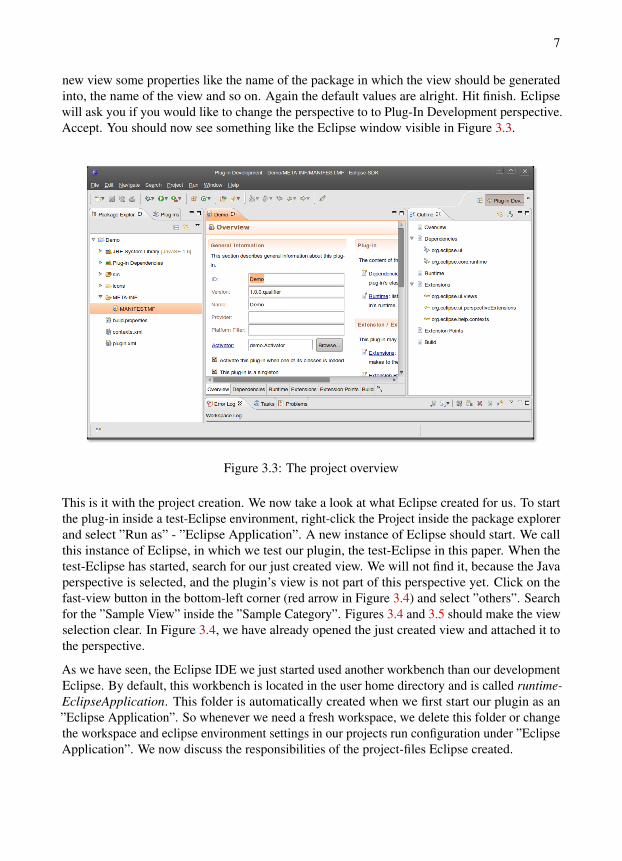
new view some properties like the name of the package in which the view should be generatedinto, the name of the view and so on. Again the default values are alright. Hit finish. Eclipsewill ask you if you would like to change the perspective to to Plug-In Development perspective.Accept. You should now see something like the Eclipse window visible in Figure 3.3.
Figure 3.3: The project overview
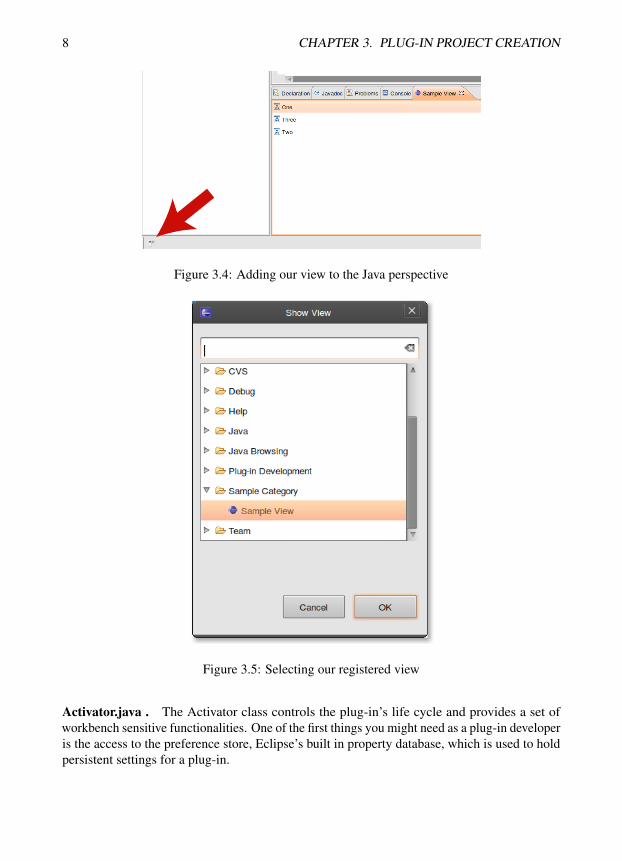
This is it with the project creation. We now take a look at what Eclipse created for us. To startthe plug-in inside a test-Eclipse environment, right-click the Project inside the package explorerand select ”Run as” - ”Eclipse Application”. A new instance of Eclipse should start. We callthis instance of Eclipse, in which we test our plugin, the test-Eclipse in this paper. When thetest-Eclipse has started, search for our just created view. We will not find it, because the Javaperspective is selected, and the plugin’s view is not part of this perspective yet. Click on thefast-view button in the bottom-left corner (red arrow in Figure 3.4) and select ”others”. Searchfor the ”Sample View” inside the ”Sample Category”. Figures 3.4 and 3.5 should make the viewselection clear. In Figure 3.4, we have already opened the just created view and attached it tothe perspective.
As we have seen, the Eclipse IDE we just started used another workbench than our developmentEclipse. By default, this workbench is located in the user home directory and is called runtime-EclipseApplication. This folder is automatically created when we first start our plugin as an”Eclipse Application”. So whenever we need a fresh workspace, we delete this folder or changethe workspace and eclipse environment settings in our projects run configuration under ”EclipseApplication”. We now discuss the responsibilities of the project-files Eclipse created.
8 CHAPTER 3. PLUG-IN PROJECT CREATION
Figure 3.4: Adding our view to the Java perspective
Figure 3.5: Selecting our registered view
Activator.java . The Activator class controls the plug-in’s life cycle and provides a set ofworkbench sensitive functionalities. One of the first things you might need as a plug-in developeris the access to the preference store, Eclipse’s built in property database, which is used to holdpersistent settings for a plug-in.

9
SampleView.java . This is our generated view. As we see in Chapter 4.2 ”User Interfaces”, itis already correctly registered as an extension of Eclipse.
contexts.xml . In the contexts.xml, among other textual information, help contents of a pluginare provided.
plugin.xml . This file is the heart of our plugin. In this XML, we define dependencies toother plug-ins, bundles or packages, we register extensions and define extension points of theplugin.

10 CHAPTER 3. PLUG-IN PROJECT CREATION
Chapter 4
The Most Elementary ExtensionPoints and Services
First things first. What is an extension point and what is a service?
Extension Points and Extensions. Eclipse provides a concept to enable plug-ins to verysimply contribute functionality to other plug-ins with extension points and extensions. Anextension point defines a way to contribute functionality to a plugin, while the definition of anextension inside a plugin contributes functionality. Eclipse itself already ships with a number ofextension points, for example the org.eclipse.ui.views extension point, allowing us to add newviews to the IDE.
Services. The term services is in fact not Eclipse terminiology, but used in this paper todescribe the interfaces and functions Eclipse offers besides the OSGi implementation. Some ofthe services are called services, for example the selection listener service which we use in thispaper, while others are not.
Almost every setting of our plugin.xml can be managed with Eclipse’s built in plugin.xml-editor.We will now discuss the tabs or categories available in this editor.
Overview. In this tab, general information about the plugin is provided by the developer. Youwill see that the name of our plugin is stored here and also the Activator is registered inhere. One of the most interesting settings listed is the execution attribute which enablesthe developer to specify the minimal execution environment for a plugin.
11
12 CHAPTER 4. THE MOST ELEMENTARY EXTENSION POINTS AND SERVICES
Dependencies. The dependencies settings define the bundles and packages a plugin dependson. The difference between the requirement of a plug-in and a package is, that the plug-inrequirement defines a complete plugin including packages needed to run a plugin, whilethe imported packages only defines packages, leaving the Eclipse environment open fromwhich plug-in the package will be imported.
Runtime. In this configuration tab, packages can be exposed for other plug-ins. Exposedpackages can be used by other plug-ins if they, for example, define them as a packagedependency.
Extensions. Inside the extensions tab, implementations that add functionalities to Eclipse orother plug-ins are defined. These extensions contribute functionalities to extension pointsdefined by other plug-ins.
Extension Points. In the extension points tab, new extension points can be defined. Newextension points can then be used by other plug-ins to add functionalities to our plug-inor to use information of our plug-in.
Build. In here we describe the build order of libraries and define the source and binary folders.A developer might already know this from the project settings of a plain Java Project.
MANIFEST.MF. In this tab we are able to view and manipulate the manifest of our plugin.Furthermore a few OSGi hacks are possible in here.
plugin.xml. The plugin.xml is the plain XML editor of the plugin.xml. Sometimes it is morecomfortable to copy and paste attributes of a plugin.xml rather clicking through the editor.
build.properties. The build.properties represent the settings made in the build tab.
4.1 Our Tutorial Project
We will now start developing our Eclipse plugin. The plugin will enable us to start anyapplication with arguments configured in the plugin view. If we have a console applicationwhich we want to test with different arguments, we can simply type in these arguments in ourplugin view instead of inside the launch configuration, which takes many clicks. And to make iteven better, we provide a selection listener which will enable us to use selected text from plaintext files as runtime arguments. That way, we can create some kind of arguments database in atext file and test these arguments again and again without having to type a single word. Theplugin every Java developer was waiting for!
4.2 User Interfaces
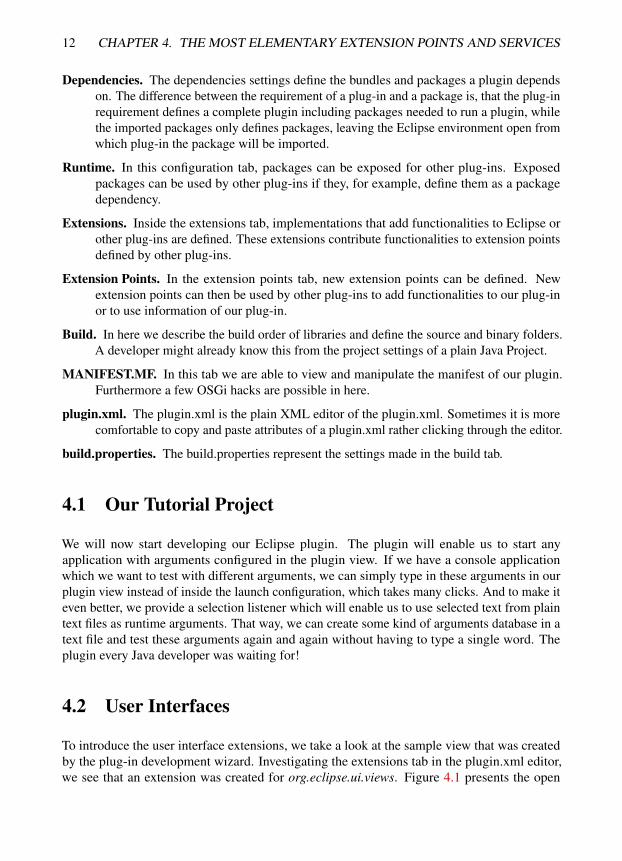
To introduce the user interface extensions, we take a look at the sample view that was createdby the plug-in development wizard. Investigating the extensions tab in the plugin.xml editor,we see that an extension was created for org.eclipse.ui.views. Figure 4.1 presents the open
4.2. USER INTERFACES 13
extension element of our sample view. The important settings are the name, the category andmost of all the class.
Figure 4.1: The registered view extension element of our demo project
Eclipse uses SWT for user interfaces. If you are new to SWT, there are many very nice tutorialsin the Internet. If you are familiar with AWT and Swing, it should not take you too long to getused to SWT. Check out the project’s website1 which really helped us to get started, especiallythe widgets overview page2.
If our class extends org.eclipse.ui.part.ViewPart, as the SampleView already does, we canregister the extension in the plugin.xml. Our sample view is already registered, but let us take alook at how this is done:
<extensionpoint="org.eclipse.ui.views">
<categoryname="Sample Category"id="Demo">
</category><view
name="Sample View"icon="icons/sample.gif"category="Demo"class="demo.views.SampleView"id="demo.views.SampleView">
</view></extension>
The important entries here are the extension points to which we deliver an extension, and theclass that delivers the actual implementation. Other than that, a category, which will be visible
1http://www.eclipse.org/swt/2http://www.eclipse.org/swt/widgets/
14 CHAPTER 4. THE MOST ELEMENTARY EXTENSION POINTS AND SERVICES
e.g. in the ”Show View” dialog of Eclipse, or a name can be set in here. Note that we can addas many extensions to this point as we want to. We are not limited to a single view.
To create our own view, we first remove most of the implementation that was generated byEclipse. Actually, we remove the entire implementation inside the class body. Eclipse will nowtell us that there are some methods that have to be implemented. Select the SampleView classname in the Java file and press ctrl+1 on your keyboard. A context menu showing quick-fixeswill open. Select ”Add unimplemented methods” et voila, here are our dummy methods: cre-atePartControl and setFocus. As good developers, let’s tidy up our class imports by pressingctrl+shift+o. Done, no warnings. Beautiful. Now let us do some simple GUI work.
The following listing shows the code defining an SWT label with the text ”Program arguments:”and a multi-line text-box beneath.
private Text argumentsField;private static String arguments;
@Overridepublic void createPartControl(Composite parent) {
GridLayout gridLayout = new GridLayout(1, false);
parent.setLayout(gridLayout);
GridData gridData = new GridData();gridData.horizontalAlignment = GridData.FILL;gridData.verticalAlignment = GridData.FILL;gridData.grabExcessHorizontalSpace = true;gridData.grabExcessVerticalSpace = true;
Label label = new Label(parent, SWT.NULL);label.setText("Program arguments: ");
argumentsField = new Text(parent, SWT.MULTI | SWT.BORDER | SWT.V_SCROLL);argumentsField.setLayoutData(gridData);argumentsField.setText("");argumentsField.addListener(SWT.CHANGED, new Listener() {
@Overridepublic void handleEvent(Event event) {
arguments = argumentsField.getText();}
});
parent.pack();}
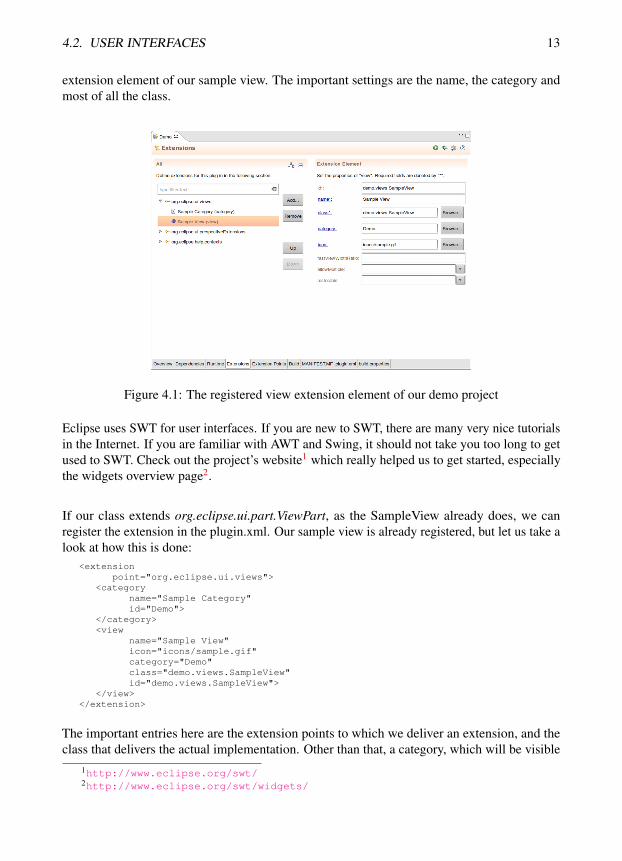
The code produces the GUI shown in Figure 4.2.
Now we need accessors for the text inserted in the view. We will make it dirty, as this is nothingparticularly interesting when focusing on plugin development. We simply create static accessorsto the view’s text inside the argumentsField. The arguments String is used to reduce the threadaccess on SWT’s dispatch thread. Using the change listener we can simply update the Stringand then return it in the getArguments() method instead of invoking asyncExec() and wait forthe result. We could do it without the asyncExec() method for sure, but actually this would beillegal thread access.
4.3. LAUNCH CONFIGURATIONS 15
Figure 4.2: Our first GUI
private static SampleView view;private static String arguments;
public SampleView(){view = this;
}
// ...
public static void setArguments(final String arguments) {Display.getDefault().asyncExec(new Runnable(){
@Overridepublic void run() {
view.argumentsField.setText(arguments);}
});SampleView.arguments = arguments;
}
public static String getArguments() {return arguments;
}
4.3 Launch Configurations
A launch configuration implements a specific launching mechanism. Examples of launchconfigurations are the Java Application run configuration or the JUnit configuration, whichwe have all used already. Other examples can be found in the run configurations window ofEclipse.
To implement our own run configuration, we need the extension point provided by Eclipse thatallows us to define a new run configuration. First we create a class called ”Launcher” inside thedemo.launcher package and let it extend the JavaLaunchDelegate. That way we can reuse a lotof Eclipse’s standard Java launcher. Now we add the extension inside the plugin.xml. We canuse the graphical editor in Eclipse’s plugin.xml editor or add the following lines manually to theDOM of the XML file:<extension point="org.eclipse.debug.core.launchConfigurationTypes">
<launchConfigurationTypedelegate="demo.launcher.Launcher"
16 CHAPTER 4. THE MOST ELEMENTARY EXTENSION POINTS AND SERVICES
delegateDescription="Launches the application with the arguments provided bythe SampleView of the Demo project"
id="Demo.launchConfigurationType1"modes="run"name="DemoLauncher"public="true"sourceLocatorId="org.eclipse.jdt.launching.sourceLocator.
JavaSourceLookupDirector"sourcePathComputerId="org.eclipse.jdt.launching.sourceLookup.
javaSourcePathComputer"></launchConfigurationType>
</extension>
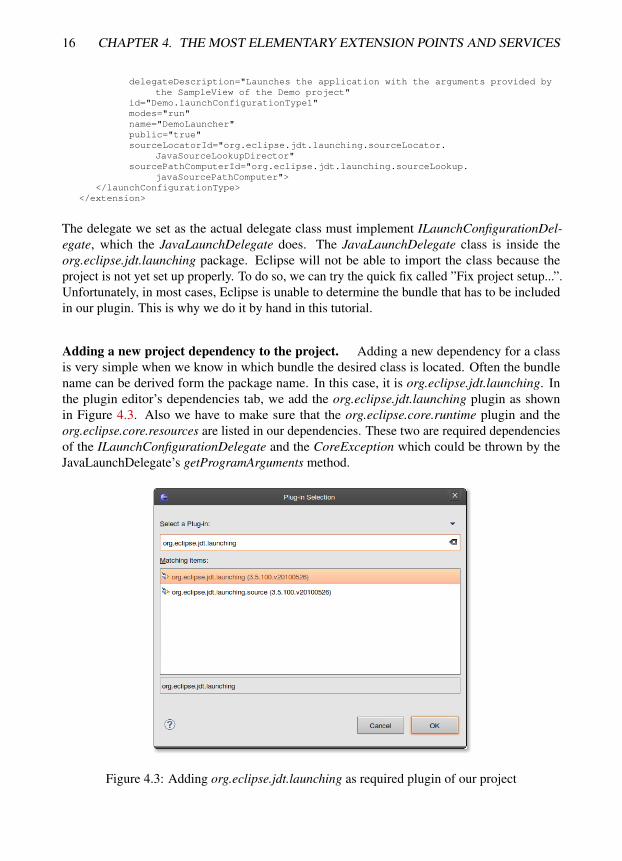
The delegate we set as the actual delegate class must implement ILaunchConfigurationDel-egate, which the JavaLaunchDelegate does. The JavaLaunchDelegate class is inside theorg.eclipse.jdt.launching package. Eclipse will not be able to import the class because theproject is not yet set up properly. To do so, we can try the quick fix called ”Fix project setup...”.Unfortunately, in most cases, Eclipse is unable to determine the bundle that has to be includedin our plugin. This is why we do it by hand in this tutorial.
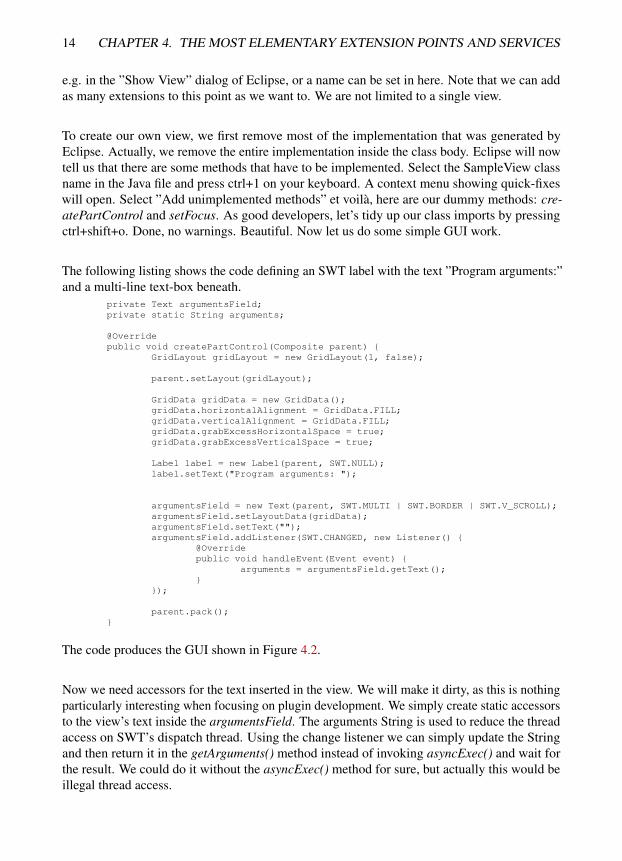
Adding a new project dependency to the project. Adding a new dependency for a classis very simple when we know in which bundle the desired class is located. Often the bundlename can be derived form the package name. In this case, it is org.eclipse.jdt.launching. Inthe plugin editor’s dependencies tab, we add the org.eclipse.jdt.launching plugin as shownin Figure 4.3. Also we have to make sure that the org.eclipse.core.runtime plugin and theorg.eclipse.core.resources are listed in our dependencies. These two are required dependenciesof the ILaunchConfigurationDelegate and the CoreException which could be thrown by theJavaLaunchDelegate’s getProgramArguments method.
Figure 4.3: Adding org.eclipse.jdt.launching as required plugin of our project
4.4. RUN CONFIGURATION USER INTERFACES 17
After this short digression we would like to start implementing our launch configuration. As wewill start the application almost like the standard Java launch config, we first take a look thesource code of the original launch configuration provided by the JavaLaunchDelegate 3. Theimportant part for our project is the following snippet inside the launching method:
String pgmArgs = getProgramArguments(configuration);
If we override this getProgramArguments(ILaunchConfiguration) method, we are able to set thearguments from inside our view. We first implement the following overriding method:
public String getProgramArguments(ILaunchConfiguration configuration) throwsCoreException{
return super.getProgramArguments(configuration);}
Now we add the arguments from our user interface. To make sure that general arguments can bepassed by the run configuration, we will simply concatenate them with the string provided bythe original getProgramArguments(ILaunchConfiguration) method.
As every launch configuration needs some configuration, the next step is to create a LaunchCon-figurationTabGroup. See the next chapter to learn about the GUI setup of a launch configura-tion.
4.4 Run Configuration User Interfaces
Every launch configuration has a user interface defining properties of a specific run. Also theseproperties can be automatically stored inside the workbench. We can reuse already availabletabs or whole groups of tabs if we like. We first create a class called LauncherUI inside thedemo.views package. In this class, we add the following lines of code which we will discussafter the listing:public class LauncherUI implements ILaunchConfigurationTabGroup{
private ILaunchConfigurationTab[] tabs = new ILaunchConfigurationTab[3];
public LauncherUI(){tabs[0] = new org.eclipse.jdt.debug.ui.launchConfigurations.JavaMainTab()
;tabs[1] = new org.eclipse.jdt.debug.ui.launchConfigurations.JavaJRETab();tabs[2] = new org.eclipse.debug.ui.CommonTab();
}
@Overridepublic void createTabs(ILaunchConfigurationDialog dialog, String mode) {
dialog.setActiveTab(tabs[0]);}
@Overridepublic void dispose() {
}
3http://www.java2s.com/Open-Source/Java-Document/IDE-Eclipse/jdt/org/eclipse/jdt/launching/JavaLaunchDelegate.java.htm
18 CHAPTER 4. THE MOST ELEMENTARY EXTENSION POINTS AND SERVICES
@Overridepublic ILaunchConfigurationTab[] getTabs() {
return tabs;}
@Overridepublic void initializeFrom(ILaunchConfiguration configuration) {
tabs[0].initializeFrom(configuration);tabs[1].initializeFrom(configuration);tabs[2].initializeFrom(configuration);
}
@Overridepublic void launched(ILaunch launch) {
}
@Overridepublic void performApply(ILaunchConfigurationWorkingCopy configuration) {
tabs[0].performApply(configuration);tabs[1].performApply(configuration);tabs[2].performApply(configuration);
}
@Overridepublic void setDefaults(ILaunchConfigurationWorkingCopy configuration) {
tabs[0].setDefaults(configuration);tabs[1].setDefaults(configuration);tabs[2].setDefaults(configuration);
}}
The interfaces ILaunchConfigurationTabGroup and ILaunchConfigurationTab are located inthe plugin called org.eclipse.debug.ui. We add it to our project’s dependencies to solve theunresolved dependencies. Specificly for our implementation, we also have to make sure theorg.eclipse.jface plugin is in your dependency list. Otherwise our plugin will not know whereto take the ILaunchConfigurationDialog interface from. Other than those two, we have to addthe org.eclipse.jdt.debug.ui package for the tabs of the JDt launcher we are reusing. These tabsare the following three:
• org.eclipse.jdt.debug.ui.launchConfigurations.JavaMainTab
• org.eclipse.jdt.debug.ui.launchConfigurations.JavaJRETab
• org.eclipse.debug.ui.CommonTab
If we wanted to add a custom tab, it must implement ILaunchConfigurationTab which allows toput configuration attributes on the launch configuration and so on. It is very simple once weknow how the rest of Eclipse works. Also we do not have to register such a tab in the plugin.xml.We just have to instantiate it in our tab group class.
To make our LaunchConfigurationTabGroup usable, we have to register it in the plugin.xml.Read the following listing on how our extension to Eclipse’s org.eclipse.debug.ui.launch-ConfigurationTabGroups extension point looks like:
<extension point="org.eclipse.debug.ui.launchConfigurationTabGroups"><launchConfigurationTabGroup
4.5. ECLIPSE-WIDE SELECTION LISTENER 19
class="demo.views.LauncherUI"description="This is the configuration tab group of the DemoLauncher"id="Demo.launchConfigurationTabGroup1"type="Demo.launchConfigurationType1">
</launchConfigurationTabGroup></extension>
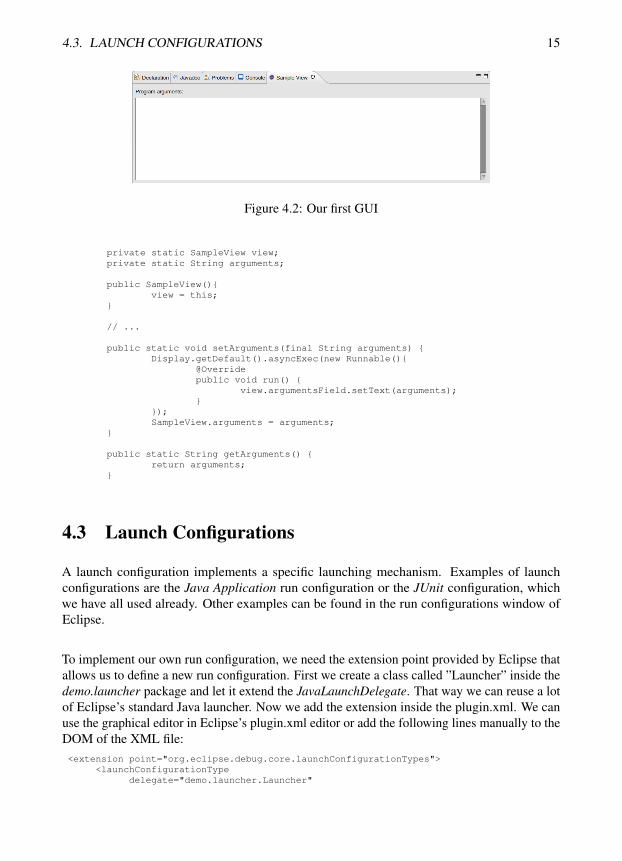
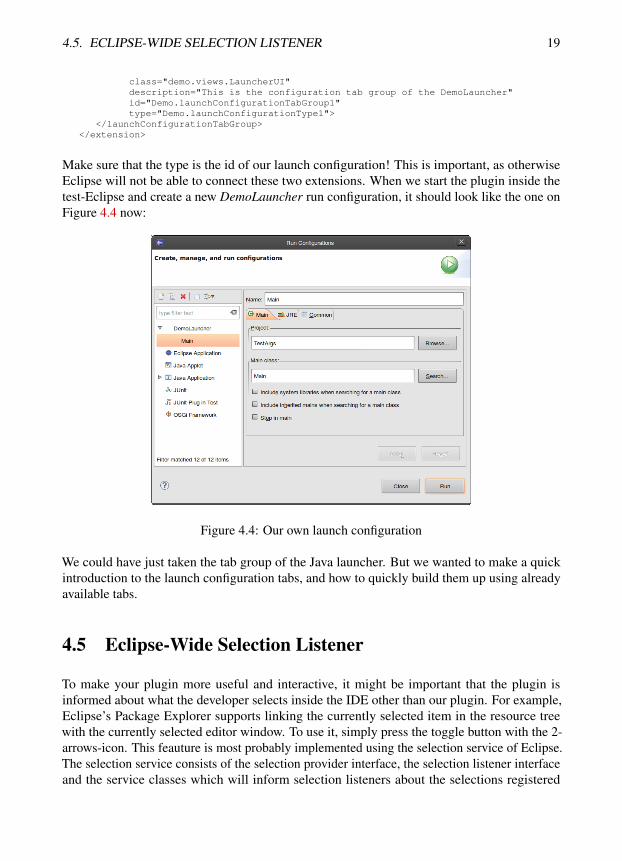
Make sure that the type is the id of our launch configuration! This is important, as otherwiseEclipse will not be able to connect these two extensions. When we start the plugin inside thetest-Eclipse and create a new DemoLauncher run configuration, it should look like the one onFigure 4.4 now:
Figure 4.4: Our own launch configuration
We could have just taken the tab group of the Java launcher. But we wanted to make a quickintroduction to the launch configuration tabs, and how to quickly build them up using alreadyavailable tabs.
4.5 Eclipse-Wide Selection Listener
To make your plugin more useful and interactive, it might be important that the plugin isinformed about what the developer selects inside the IDE other than our plugin. For example,Eclipse’s Package Explorer supports linking the currently selected item in the resource treewith the currently selected editor window. To use it, simply press the toggle button with the 2-arrows-icon. This feauture is most probably implemented using the selection service of Eclipse.The selection service consists of the selection provider interface, the selection listener interfaceand the service classes which will inform selection listeners about the selections registered
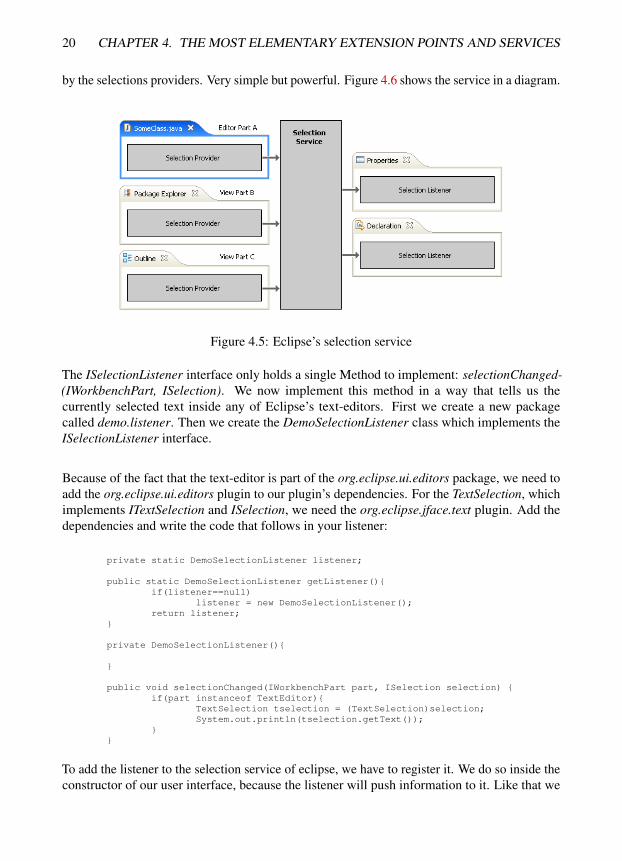
20 CHAPTER 4. THE MOST ELEMENTARY EXTENSION POINTS AND SERVICES
by the selections providers. Very simple but powerful. Figure 4.6 shows the service in a diagram.
Figure 4.5: Eclipse’s selection service
The ISelectionListener interface only holds a single Method to implement: selectionChanged-(IWorkbenchPart, ISelection). We now implement this method in a way that tells us thecurrently selected text inside any of Eclipse’s text-editors. First we create a new packagecalled demo.listener. Then we create the DemoSelectionListener class which implements theISelectionListener interface.
Because of the fact that the text-editor is part of the org.eclipse.ui.editors package, we need toadd the org.eclipse.ui.editors plugin to our plugin’s dependencies. For the TextSelection, whichimplements ITextSelection and ISelection, we need the org.eclipse.jface.text plugin. Add thedependencies and write the code that follows in your listener:
private static DemoSelectionListener listener;
public static DemoSelectionListener getListener(){if(listener==null)
listener = new DemoSelectionListener();return listener;
}
private DemoSelectionListener(){
}
public void selectionChanged(IWorkbenchPart part, ISelection selection) {if(part instanceof TextEditor){
TextSelection tselection = (TextSelection)selection;System.out.println(tselection.getText());
}}
To add the listener to the selection service of eclipse, we have to register it. We do so inside theconstructor of our user interface, because the listener will push information to it. Like that we
4.5. ECLIPSE-WIDE SELECTION LISTENER 21
can make sure that no update is thrown while the user interface is not ready yet. Here’s a littlemethod registering the new listener.
private void registerSelectionListener() {new Thread(new Runnable() {
@Overridepublic void run() {
IWorkbenchPartSite site = null;
while (site == null) {try {
Thread.sleep(50);} catch (InterruptedException e) {
e.printStackTrace();}site = getSite();
}IWorkbenchWindow window = site.getWorkbenchWindow();window.getSelectionService().addSelectionListener(
DemoSelectionListener.getListener());}
}).start();}
We add this registration to the constructor of our SampleView.public SampleView(){
registerSelectionListener();view = this;
}
To make sure the registration of the listener will not block the ui creation, we create a newthread. Also notice that we retry getting the workbench part site again and again until we reallyhave it. When launching Eclipse, getSite() might return null for a few milliseconds. And tomake the whole thing clean when we unload our user interface extension, we unregister thelistener on dispose.
public void dispose(){getSite().getWorkbenchWindow().getSelectionService().
removeSelectionListener(DemoSelectionListener.getListener());super.dispose();
}
Start Eclipse and open any plain text file. You will notice that your current selection is printedout to the console of the Eclipse you just launched your plugin from (Not the console of thetest-Eclipse instance!).
Now to the implementation which adds useful functionality to our plugin. Change the code ofthe selectionChanged(IWorkbenchPart, ISelection) method to the following implementation,updating our view.
@Overridepublic void selectionChanged(IWorkbenchPart part, ISelection selection) {
if(part instanceof TextEditor){TextSelection tselection = (TextSelection)selection;SampleView.setArguments(tselection.getText());
}}
22 CHAPTER 4. THE MOST ELEMENTARY EXTENSION POINTS AND SERVICES
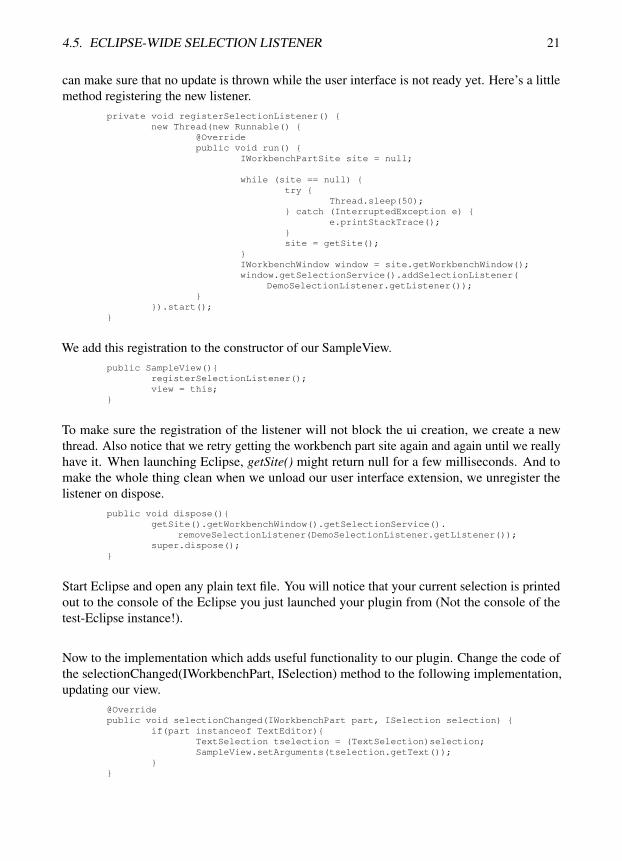
Now run the plugin as ”Eclipse Application” and create a project (e.g. a Java project). Insidethis project create a plain text file, add text to it and select some text: The text selected will betransfered to our plugin.
To make this useful, we have to make one last change: Open the getProgramArguments-(ILaunchConfiguration) method of the Launcher class. Change it in a way that it adds the textof the SampleView’s text box. Do not forget to convert newlines into spaces or whatever youlike. Here is our solution:
public String getProgramArguments(ILaunchConfiguration configuration) throwsCoreException{
return super.getProgramArguments(configuration) + " " + SampleView.getArguments().replace(’\n’, ’ ’).replace(’\r’, ’ ’);
}
We tested the plugin with a very simple Java project containing a single main method doingnothing but printing out all arguments. We created a file called test, and stored a few arguments init. And: when we selected text inside this file, it was inserted in our plugin automatically.
Figure 4.6: The Demo plugin in action
Chapter 5
Update Site Creation
To make our plugin available for developers which are using the Eclipse IDE, we should createan update site. These are the steps needed in order to create an update site using Eclipse:
1. Create a feature project
2. Add some information to the just created feature project
3. Create an update site project
4. Add some information to the just created update site project
Sounds easy, is even easier. Create a new feature project. The feature project is located in thePlug-In development category of the new-wizard. Give it a name, for example Demo Feature.Click next until you are at the ”Referenced Plug-Ins and Fragments” form of the wizard. Select”initialize from a launch configuration” and select the one you were using when starting theplugin inside our test-Eclipse the whole time. In most cases this configuration will have thename ”Eclipse Application”. Click finish. Now fill out the feature.xml information, which is allquite trivial and can be changed later on.
The next step is to create the update site. Create a new project of the type ”Update Site Project”.Select the ”Create a web page listing all available features within the site” check-box. This ishelpful in some cases, because it creates a website with a few informations. Okay, hit finish andopen the site.xml. In the ”Site Map” tab, add a new category first. We will call it demo. Thenadd the Demo feature in this category. Done. Select ”Build All” to build the update site withthe web content. The update site will create a new jar file with a new version number every timeyou hit ”Build All”.
23

24 CHAPTER 5. UPDATE SITE CREATION


![Deutschland SONDERHEFT - andrena.de · Project Usus˛[1] ermöglicht genau das. Usus ist ein Eclipse-Plug-in, das sich über den Eclipse Marketplace sehr einfach installieren lässt](https://img.pdfslide.org/doc/110x75/5e19e897ad5f466e9c00247d/deutschland-sonderheft-project-usus1-ermglicht-genau-das-usus-ist-ein-eclipse-plug-in.jpg)


![Redwood Anwendertage 2015 - Eclipse [Schreibgeschützt] · 2015. 5. 4. · Tipps & Tricks. Was ist Eclipse. Eclipse Eclipse(von englisch eclipse‚Sonnenfinsternis‘, ‚Finsternis‘,](https://img.pdfslide.org/doc/110x75/60e8ab6cf8fa6d37e6282437/redwood-anwendertage-2015-eclipse-schreibgeschtzt-2015-5-4-tipps-.jpg)