Embed Size (px)
Citation preview
Ultra Mirage™ II Nasal MaskUser GuideEnglish
Note: For complete instructions, read the text section in conjunction with the illustrations on this sheet. / Hinweis: Vollständige Anweisungen finden Sie im Textabschnitt und in den Illus-trationen auf diesem Blatt. / Remarque : pour les instructions complètes, veuillez vous référer au texte et aux illustrations de cette fiche. / Nota: Per istruzioni complete, leggere la sezione con il testo insieme alle illustrazioni su questo foglio. / Nota: Para instrucciones detalladas, sírvase leer el texto en conjunto con las ilustraciones de esta hoja. / Nota: Para obter infor-mações completas, leia a secção de texto juntamente com as ilustrações que se encontram neste folheto. / Obs! Läst textavsnittet tillsammans med illustrationerna på det här bladet för fullständiga anvisningar. / Opm: Raadpleeg voor een volledige beschrijving het tekstgedeelte en de bijbehorende illustraties op dit blad.
ILLUSTRATIONS SHEET / ILLUSTRATIONSBLATT / FICHE D’ILLUSTRATIONS / FOGLIO DELLE ILLUSTRAZIONI / HOJA DE FIGURAS / FOLHETO DE ILUSTRAÇÕES / ILLUSTRATIONSBLAD / ILLUSTRATIEBLAD
Component of 168159/4 2017-12
Vent
flow
rat
e / D
urch
fluss
rate
an
den
Lufta
usla
ssöf
fnun
gen
/ Déb
it à
l’orfi
ce d
e ve
ntila
tion
/ C
oeffi
cien
te d
i flu
sso
della
pre
sa p
er l’
esal
azio
ne /
Cau
dal
de fl
ujo
por l
a ve
ntila
ción
/ Ta
xa d
e flu
xo d
e ve
ntila
ção
/ Ve
ntilf
löde
stak
t / U
itlaa
t-ve
ntila
tiest
room
(L
/min
)
Mask Pressure / Maskendruck / Pression dans le masque / Pressione della maschera / Presión en la mascarilla / Pressão na máscara / Masktryck / Maskerdruk (cm H2O)
©2017 R
esMed Ltd.
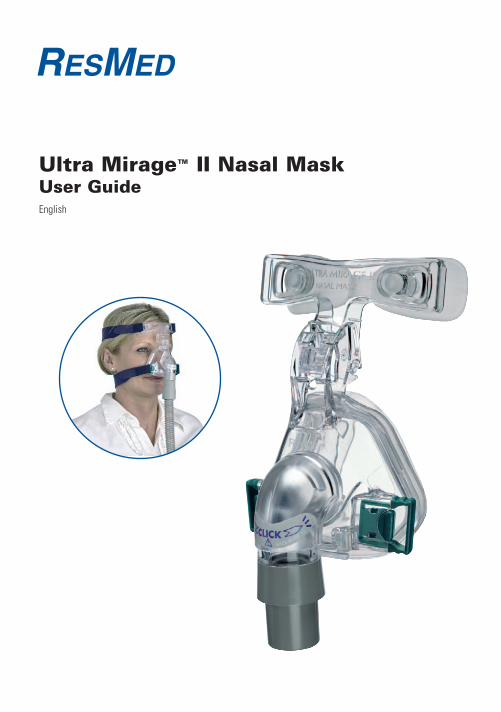
Pressure–Flow Curve / Druck-Durchflusskurve / Courbe Pression-Débit / Curva di pressione e flusso / Curva de Presión-Flujo / Curva de Pressão-Fluxo / Tryck-Flödeskurvan / Druk-flow-curve
A
0
10
20
30
40
50
60
70
4 5 6 7 8 9 10 11 12 13 14 15 16 17 18 19 20
C-1 C-2
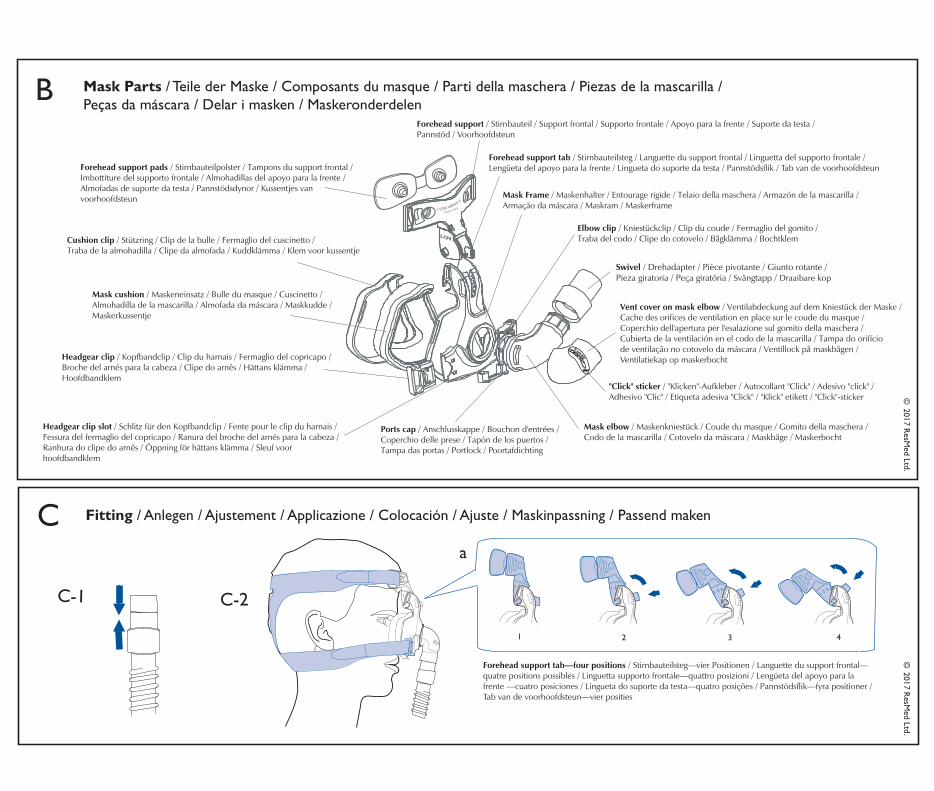
Fitting / Anlegen / Ajustement / Applicazione / Colocación / Ajuste / Maskinpassning / Passend maken
12
34
D-1
D-2
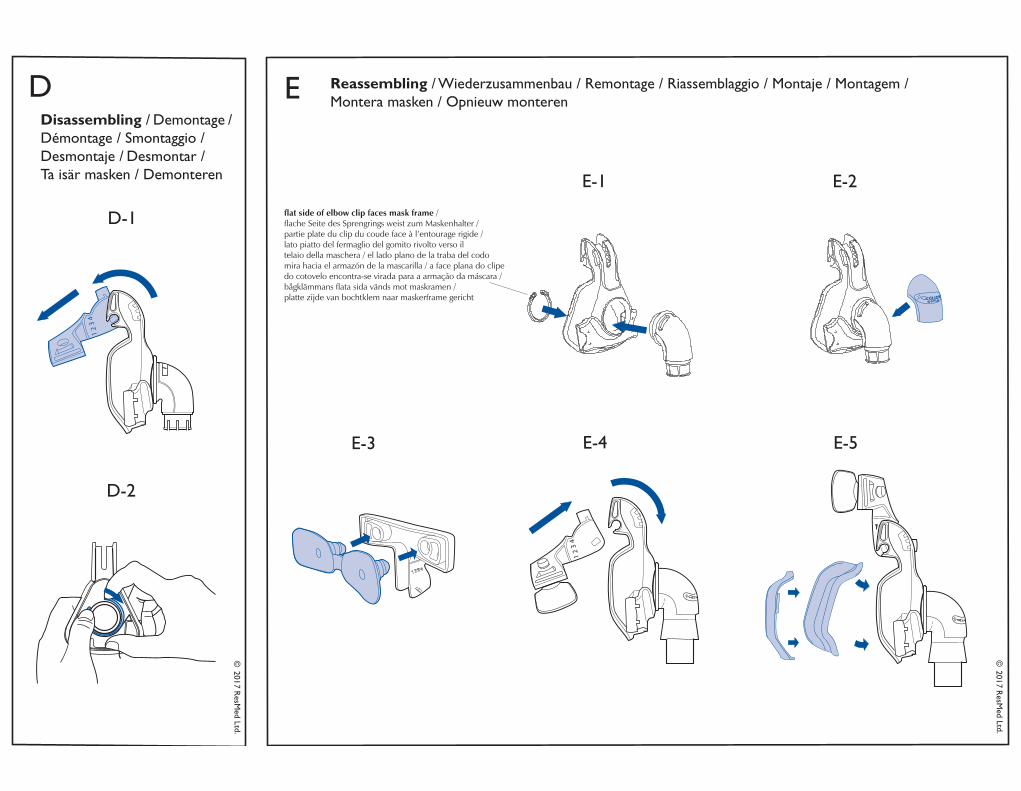
Disassembling / Demontage / Démontage / Smontaggio / Desmontaje / Desmontar / Ta isär masken / Demonteren E-1 E-2
E-3 E-4 E-5
1 2 3 4
12
34
2 3 4
Reassembling / Wiederzusammenbau / Remontage / Riassemblaggio / Montaje / Montagem / Montera masken / Opnieuw monteren
C
D EB
NASAL MASKULTRA MIRAGE II
Forehead support tab / Stirnbauteilsteg / Languette du support frontal / Linguetta del supporto frontale / Lengüeta del apoyo para la frente / Lingueta do suporte da testa / Pannstödsflik / Tab van de voorhoofdsteun
Elbow clip / Kniestückclip / Clip du coude / Fermaglio del gomito / Traba del codo / Clipe do cotovelo / Bågklämma / Bochtklem
Mask Frame / Maskenhalter / Entourage rigide / Telaio della maschera / Armazón de la mascarilla / Armação da máscara / Maskram / Maskerframe
Swivel / Drehadapter / Pièce pivotante / Giunto rotante / Pieza giratoria / Peça giratória / Svängtapp / Draaibare kop
Vent cover on mask elbow / Ventilabdeckung auf dem Kniestück der Maske / Cache des orifices de ventilation en place sur le coude du masque / Coperchio dell'apertura per l'esalazione sul gomito della maschera / Cubierta de la ventilación en el codo de la mascarilla / Tampa do orifício de ventilação no cotovelo da máscara / Ventillock på maskbågen / Ventilatiekap op maskerbocht
"Click" sticker / "Klicken"-Aufkleber / Autocollant "Click" / Adesivo "click" / Adhesivo "Clic" / Etiqueta adesiva "Click" / "Klick" etikett / "Click"-sticker
Mask elbow / Maskenkniestück / Coude du masque / Gomito della maschera / Codo de la mascarilla / Cotovelo da máscara / Maskbåge / Maskerbocht
Ports cap / Anschlusskappe / Bouchon d'entrées / Coperchio delle prese / Tapón de los puertos / Tampa das portas / Portlock / Poortafdichting
Headgear clip slot / Schlitz für den Kopfbandclip / Fente pour le clip du harnais / Fessura del fermaglio del copricapo / Ranura del broche del arnés para la cabeza / Ranhura do clipe do arnês / Öppning för hättans klämma / Sleuf voor hoofdbandklem
Cushion clip / Stützring / Clip de la bulle / Fermaglio del cuscinetto / Traba de la almohadilla / Clipe da almofada / Kuddklämma / Klem voor kussentje
Mask cushion / Maskeneinsatz / Bulle du masque / Cuscinetto / Almohadilla de la mascarilla / Almofada da máscara / Maskkudde / Maskerkussentje
Headgear clip / Kopfbandclip / Clip du harnais / Fermaglio del copricapo / Broche del arnés para la cabeza / Clipe do arnês / Hättans klämma / Hoofdbandklem
Forehead support pads / Stirnbauteilpolster / Tampons du support frontal / Imbottiture del supporto frontale / Almohadillas del apoyo para la frente / Almofadas de suporte da testa / Pannstödsdynor / Kussentjes van voorhoofdsteun
Forehead support / Stirnbauteil / Support frontal / Supporto frontale / Apoyo para la frente / Suporte da testa / Pannstöd / Voorhoofdsteun
Mask Parts / Teile der Maske / Composants du masque / Parti della maschera / Piezas de la mascarilla / Peças da máscara / Delar i masken / Maskeronderdelen
Forehead support tab—four positions / Stirnbauteilsteg—vier Positionen / Languette du support frontal— quatre positions possibles / Linguetta supporto frontale—quattro posizioni / Lengüeta del apoyo para la frente —cuatro posiciones / Lingueta do suporte da testa—quatro posições / Pannstödsflik—fyra positioner / Tab van de voorhoofdsteun—vier posities
flat side of elbow clip faces mask frame / flache Seite des Sprengrings weist zum Maskenhalter / partie plate du clip du coude face à l’entourage rigide / lato piatto del fermaglio del gomito rivolto verso il telaio della maschera / el lado plano de la traba del codo mira hacia el armazón de la mascarilla / a face plana do clipedo cotovelo encontra-se virada para a armação da máscara / bågklämmans flata sida vänds mot maskramen / platte zijde van bochtklem naar maskerframe gericht
1
1 2 3 4 1 2 3 4
1 2 3 4 1
2 3 4
1 3 42
a
© 2017 R
esMed Ltd.
© 2017 R
esMed Ltd.
© 2012 R
esMed Ltd.
© 2012 R
esMed Ltd.
C-1 C-2
Fitting / Anlegen / Ajustement / Applicazione / Colocación / Ajuste / Maskinpassning / Passend maken
12
34
D-1
D-2
Disassembling / Demontage / Démontage / Smontaggio / Desmontaje / Desmontar / Ta isär masken / Demonteren E-1 E-2
E-3 E-4 E-5
1 2 3 4
12
34
2 3 4
Reassembling / Wiederzusammenbau / Remontage / Riassemblaggio / Montaje / Montagem / Montera masken / Opnieuw monteren
C
D EB
NASAL MASKULTRA MIRAGE II
Forehead support tab / Stirnbauteilsteg / Languette du support frontal / Linguetta del supporto frontale / Lengüeta del apoyo para la frente / Lingueta do suporte da testa / Pannstödsflik / Tab van de voorhoofdsteun
Elbow clip / Kniestückclip / Clip du coude / Fermaglio del gomito / Traba del codo / Clipe do cotovelo / Bågklämma / Bochtklem
Mask Frame / Maskenhalter / Entourage rigide / Telaio della maschera / Armazón de la mascarilla / Armação da máscara / Maskram / Maskerframe
Swivel / Drehadapter / Pièce pivotante / Giunto rotante / Pieza giratoria / Peça giratória / Svängtapp / Draaibare kop
Vent cover on mask elbow / Ventilabdeckung auf dem Kniestück der Maske / Cache des orifices de ventilation en place sur le coude du masque / Coperchio dell'apertura per l'esalazione sul gomito della maschera / Cubierta de la ventilación en el codo de la mascarilla / Tampa do orifício de ventilação no cotovelo da máscara / Ventillock på maskbågen / Ventilatiekap op maskerbocht
"Click" sticker / "Klicken"-Aufkleber / Autocollant "Click" / Adesivo "click" / Adhesivo "Clic" / Etiqueta adesiva "Click" / "Klick" etikett / "Click"-sticker
Mask elbow / Maskenkniestück / Coude du masque / Gomito della maschera / Codo de la mascarilla / Cotovelo da máscara / Maskbåge / Maskerbocht
Ports cap / Anschlusskappe / Bouchon d'entrées / Coperchio delle prese / Tapón de los puertos / Tampa das portas / Portlock / Poortafdichting
Headgear clip slot / Schlitz für den Kopfbandclip / Fente pour le clip du harnais / Fessura del fermaglio del copricapo / Ranura del broche del arnés para la cabeza / Ranhura do clipe do arnês / Öppning för hättans klämma / Sleuf voor hoofdbandklem
Cushion clip / Stützring / Clip de la bulle / Fermaglio del cuscinetto / Traba de la almohadilla / Clipe da almofada / Kuddklämma / Klem voor kussentje
Mask cushion / Maskeneinsatz / Bulle du masque / Cuscinetto / Almohadilla de la mascarilla / Almofada da máscara / Maskkudde / Maskerkussentje
Headgear clip / Kopfbandclip / Clip du harnais / Fermaglio del copricapo / Broche del arnés para la cabeza / Clipe do arnês / Hättans klämma / Hoofdbandklem
Forehead support pads / Stirnbauteilpolster / Tampons du support frontal / Imbottiture del supporto frontale / Almohadillas del apoyo para la frente / Almofadas de suporte da testa / Pannstödsdynor / Kussentjes van voorhoofdsteun
Forehead support / Stirnbauteil / Support frontal / Supporto frontale / Apoyo para la frente / Suporte da testa / Pannstöd / Voorhoofdsteun
Mask Parts / Teile der Maske / Composants du masque / Parti della maschera / Piezas de la mascarilla / Peças da máscara / Delar i masken / Maskeronderdelen
Forehead support tab—four positions / Stirnbauteilsteg—vier Positionen / Languette du support frontal— quatre positions possibles / Linguetta supporto frontale—quattro posizioni / Lengüeta del apoyo para la frente —cuatro posiciones / Lingueta do suporte da testa—quatro posições / Pannstödsflik—fyra positioner / Tab van de voorhoofdsteun—vier posities
flat side of elbow clip faces mask frame / flache Seite des Sprengrings weist zum Maskenhalter / partie plate du clip du coude face à l’entourage rigide / lato piatto del fermaglio del gomito rivolto verso il telaio della maschera / el lado plano de la traba del codo mira hacia el armazón de la mascarilla / a face plana do clipedo cotovelo encontra-se virada para a armação da máscara / bågklämmans flata sida vänds mot maskramen / platte zijde van bochtklem naar maskerframe gericht
1
1 2 3 41 2 3 4
1 2 3 41
2 3 4
1 3 42
a
© 2012 R
esMed Ltd.
© 2012 R
esMed Ltd.
© 2017 R
esMed Ltd.
© 2017 R
esMed Ltd.
ENGLISH
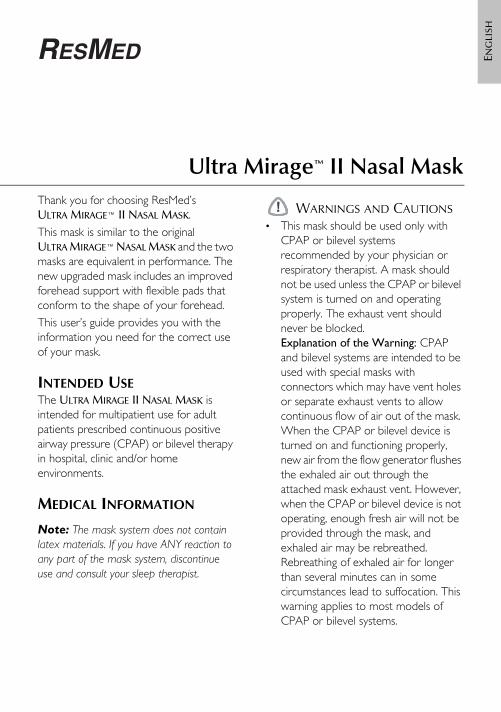
Ultra Mirage™ II Nasal MaskThank you for choosing ResMed’s ULTRA MIRAGE™ II NASAL MASK. This mask is similar to the original ULTRA MIRAGE™ NASAL MASK and the two masks are equivalent in performance. The new upgraded mask includes an improved forehead support with flexible pads that conform to the shape of your forehead. This user’s guide provides you with the information you need for the correct use of your mask.
INTENDED USEThe ULTRA MIRAGE II NASAL MASK is intended for multipatient use for adult patients prescribed continuous positive airway pressure (CPAP) or bilevel therapy in hospital, clinic and/or home environments.
MEDICAL INFORMATION
Note: The mask system does not contain latex materials. If you have ANY reaction to any part of the mask system, discontinue use and consult your sleep therapist.
. WARNINGS AND CAUTIONS• This mask should be used only with
CPAP or bilevel systemsrecommended by your physician orrespiratory therapist. A mask shouldnot be used unless the CPAP or bilevelsystem is turned on and operatingproperly. The exhaust vent shouldnever be blocked.Explanation of the Warning: CPAPand bilevel systems are intended to beused with special masks withconnectors which may have vent holesor separate exhaust vents to allowcontinuous flow of air out of the mask.When the CPAP or bilevel device isturned on and functioning properly,new air from the flow generator flushes the exhaled air out through theattached mask exhaust vent. However,when the CPAP or bilevel device is not operating, enough fresh air will not beprovided through the mask, andexhaled air may be rebreathed.Rebreathing of exhaled air for longerthan several minutes can in somecircumstances lead to suffocation. Thiswarning applies to most models ofCPAP or bilevel systems.
168159.book Page 1 Monday, February 13, 2012 11:13 AM
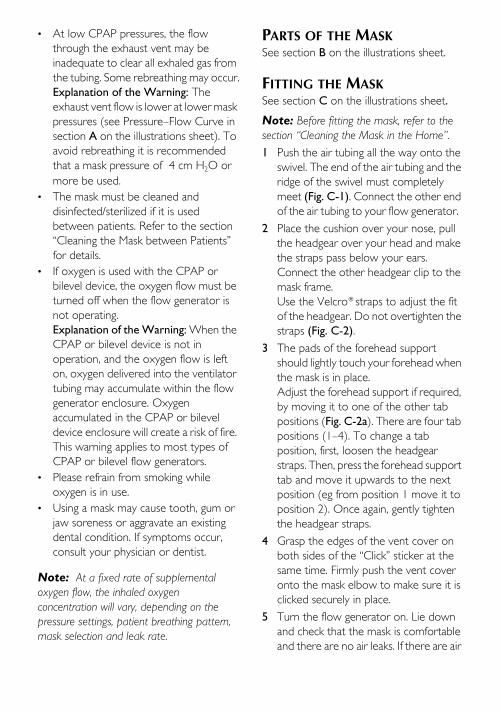
• At low CPAP pressures, the flowthrough the exhaust vent may beinadequate to clear all exhaled gas fromthe tubing. Some rebreathing may occur.Explanation of the Warning: Theexhaust vent flow is lower at lower mask pressures (see Pressure–Flow Curve insection A on the illustrations sheet). Toavoid rebreathing it is recommendedthat a mask pressure of 4 cm H2O ormore be used.
• The mask must be cleaned anddisinfected/sterilized if it is usedbetween patients. Refer to the section“Cleaning the Mask between Patients”for details.
• If oxygen is used with the CPAP orbilevel device, the oxygen flow must beturned off when the flow generator isnot operating.Explanation of the Warning: When the CPAP or bilevel device is not inoperation, and the oxygen flow is lefton, oxygen delivered into the ventilatortubing may accumulate within the flowgenerator enclosure. Oxygenaccumulated in the CPAP or bileveldevice enclosure will create a risk of fire. This warning applies to most types ofCPAP or bilevel flow generators.
• Please refrain from smoking whileoxygen is in use.
• Using a mask may cause tooth, gum orjaw soreness or aggravate an existingdental condition. If symptoms occur,consult your physician or dentist.
Note: At a fixed rate of supplemental oxygen flow, the inhaled oxygen concentration will vary, depending on the pressure settings, patient breathing pattern, mask selection and leak rate.
PARTS OF THE MASKSee section B on the illustrations sheet.
FITTING THE MASKSee section C on the illustrations sheet.
Note: Before fitting the mask, refer to the section “Cleaning the Mask in the Home”.1 Push the air tubing all the way onto the
swivel. The end of the air tubing and the ridge of the swivel must completely meet (Fig. C-1). Connect the other end of the air tubing to your flow generator.
2 Place the cushion over your nose, pull the headgear over your head and make the straps pass below your ears. Connect the other headgear clip to the mask frame. Use the Velcro®straps to adjust the fit of the headgear. Do not overtighten the straps (Fig. C-2).
3 The pads of the forehead support should lightly touch your forehead when the mask is in place. Adjust the forehead support if required, by moving it to one of the other tab positions (Fig. C-2a). There are four tab positions (1–4). To change a tab position, first, loosen the headgear straps. Then, press the forehead support tab and move it upwards to the next position (eg from position 1 move it to position 2). Once again, gently tighten the headgear straps.
4 Grasp the edges of the vent cover on both sides of the “Click” sticker at the same time. Firmly push the vent cover onto the mask elbow to make sure it is clicked securely in place.
5 Turn the flow generator on. Lie down and check that the mask is comfortable and there are no air leaks. If there are air
168159.book Page 2 Monday, February 13, 2012 11:13 AM
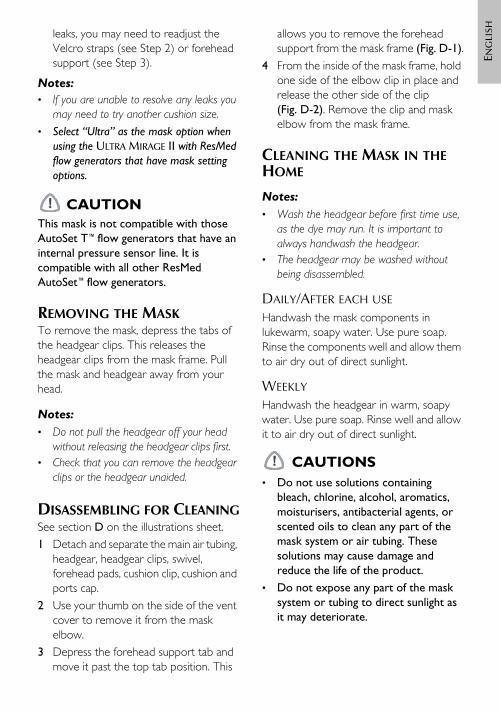
ENGLISHleaks, you may need to readjust the
Velcro straps (see Step 2) or forehead support (see Step 3).
Notes: • If you are unable to resolve any leaks you
may need to try another cushion size.• Select “Ultra” as the mask option when
using the ULTRA MIRAGE II with ResMedflow generators that have mask settingoptions.
CAUTIONThis mask is not compatible with those AutoSet T™flow generators that have an internal pressure sensor line. It is compatible with all other ResMed AutoSet™flow generators.
REMOVING THE MASKTo remove the mask, depress the tabs of the headgear clips. This releases the headgear clips from the mask frame. Pull the mask and headgear away from your head.
Notes: • Do not pull the headgear off your head
without releasing the headgear clips first.• Check that you can remove the headgear
clips or the headgear unaided.
DISASSEMBLING FOR CLEANINGSee section D on the illustrations sheet.1 Detach and separate the main air tubing,
headgear, headgear clips, swivel, forehead pads, cushion clip, cushion and ports cap.
2 Use your thumb on the side of the vent cover to remove it from the mask elbow.
3 Depress the forehead support tab and move it past the top tab position. This
allows you to remove the forehead support from the mask frame (Fig. D-1).
4 From the inside of the mask frame, hold one side of the elbow clip in place and release the other side of the clip (Fig. D-2). Remove the clip and mask elbow from the mask frame.
CLEANING THE MASK IN THE HOME
Notes: • Wash the headgear before first time use,
as the dye may run. It is important toalways handwash the headgear.
• The headgear may be washed withoutbeing disassembled.
DAILY/AFTER EACH USE
Handwash the mask components in lukewarm, soapy water. Use pure soap. Rinse the components well and allow them to air dry out of direct sunlight.
WEEKLY
Handwash the headgear in warm, soapy water. Use pure soap. Rinse well and allow it to air dry out of direct sunlight.
. CAUTIONS• Do not use solutions containing
bleach, chlorine, alcohol, aromatics,moisturisers, antibacterial agents, orscented oils to clean any part of themask system or air tubing. Thesesolutions may cause damage andreduce the life of the product.
• Do not expose any part of the masksystem or tubing to direct sunlight asit may deteriorate.
168159.book Page 3 Monday, February 13, 2012 11:13 AM
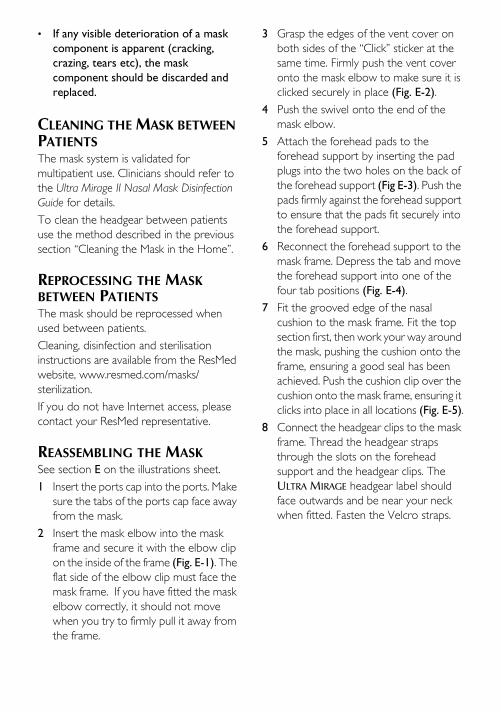
• If any visible deterioration of a maskcomponent is apparent (cracking,crazing, tears etc), the maskcomponent should be discarded andreplaced.
CLEANING THE MASK BETWEEN PATIENTSThe mask system is validated for multipatient use. Clinicians should refer to the Ultra Mirage II Nasal Mask Disinfection Guide for details.To clean the headgear between patients use the method described in the previous section “Cleaning the Mask in the Home”.
REPROCESSING THE MASK BETWEEN PATIENTSThe mask should be reprocessed when used between patients. Cleaning, disinfection and sterilisation instructions are available from the ResMed website, www.resmed.com/masks/sterilization.If you do not have Internet access, please contact your ResMed representative.
REASSEMBLING THE MASKSee section E on the illustrations sheet.1 Insert the ports cap into the ports. Make
sure the tabs of the ports cap face away from the mask.
2 Insert the mask elbow into the mask frame and secure it with the elbow clip on the inside of the frame (Fig. E-1). The flat side of the elbow clip must face the mask frame. If you have fitted the mask elbow correctly, it should not move when you try to firmly pull it away from the frame.
3 Grasp the edges of the vent cover on both sides of the “Click” sticker at the same time. Firmly push the vent cover onto the mask elbow to make sure it is clicked securely in place (Fig. E-2).
4 Push the swivel onto the end of the mask elbow.
5 Attach the forehead pads to the forehead support by inserting the pad plugs into the two holes on the back of the forehead support (Fig E-3). Push the pads firmly against the forehead support to ensure that the pads fit securely into the forehead support.
6 Reconnect the forehead support to the mask frame. Depress the tab and move the forehead support into one of the four tab positions (Fig. E-4).
7 Fit the grooved edge of the nasal cushion to the mask frame. Fit the top section first, then work your way around the mask, pushing the cushion onto the frame, ensuring a good seal has been achieved. Push the cushion clip over the cushion onto the mask frame, ensuring it clicks into place in all locations (Fig. E-5).
8 Connect the headgear clips to the mask frame. Thread the headgear straps through the slots on the forehead support and the headgear clips. The ULTRA MIRAGE headgear label should face outwards and be near your neck when fitted. Fasten the Velcro straps.
168159.book Page 4 Monday, February 13, 2012 11:13 AM
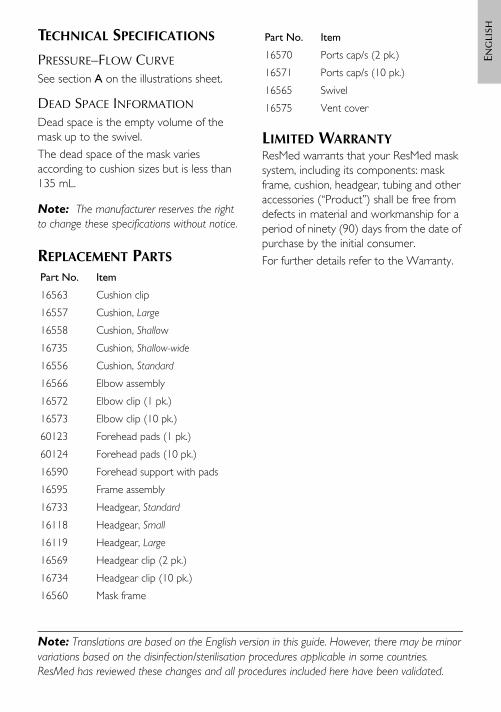
ENGLISHTECHNICAL SPECIFICATIONS
PRESSURE–FLOW CURVE
See section A on the illustrations sheet.
DEAD SPACE INFORMATION
Dead space is the empty volume of the mask up to the swivel.The dead space of the mask varies according to cushion sizes but is less than 135 mL.
Note: The manufacturer reserves the right to change these specifications without notice.
REPLACEMENT PARTS
LIMITED WARRANTYResMed warrants that your ResMed mask system, including its components: mask frame, cushion, headgear, tubing and other accessories (“Product”) shall be free from defects in material and workmanship for a period of ninety (90) days from the date of purchase by the initial consumer.For further details refer to the Warranty.
Part No. Item
16563 Cushion clip
16557 Cushion, Large
16558 Cushion, Shallow
16735 Cushion, Shallow-wide
16556 Cushion, Standard
16566 Elbow assembly
16572 Elbow clip (1 pk.)
16573 Elbow clip (10 pk.)
60123 Forehead pads (1 pk.)
60124 Forehead pads (10 pk.)
16590 Forehead support with pads
16595 Frame assembly
16733 Headgear, Standard
16118 Headgear, Small
16119 Headgear, Large
16569 Headgear clip (2 pk.)
16734 Headgear clip (10 pk.)
16560 Mask frame
16570 Ports cap/s (2 pk.)
16571 Ports cap/s (10 pk.)
16565 Swivel
16575 Vent cover
Note: Translations are based on the English version in this guide. However, there may be minor variations based on the disinfection/sterilisation procedures applicable in some countries. ResMed has reviewed these changes and all procedures included here have been validated.
Part No. Item
168159.book Page 5 Monday, February 13, 2012 11:13 AM

Manufacturer:ResMed Ltd 1 Elizabeth Macarthur Drive Bella Vista NSW 2153 Australia
See www.resmed.com for other ResMed locations worldwide.
For patent information, see www.resmed.com/ip
Ultra Mirage, Mirage and AutoSet T are trademarks of ResMed Ltd and Mirage and AutoSet T are Registered in U.S. Patent and Trademark Office.Velcro is a registered trademark of Velcro Industries B.V.
© 2017 ResMed Ltd. 168159/4 2017-.2
Global leaders in sleep and respiratory medicine www.resmed.com
168159/4 2017-12
Ultra Mirage II Nasal Mask
User Guide
ROW - ENG