Embed Size (px)
Citation preview
How-To-Do –EtherCAT Communication with CPU 300S
Januar 14
page 1 of 19
© by VIPA GmbH, Ohmstraße 4, 91074 Herzogenaurach, Deutschland Angaben ohne Gewähr, Änderungen und Irrtümer vorbehalten.
‘How-To-Do’
EtherCAT Communication with CPU 300S
With the SIMATIC Manager from SIEMENS AG
Content
EtherCAT Communication with CPU 300S ....................................................................................................... 1
1 General ....................................................................................................................................................... 2
1.1 Information ......................................................................................................................................... 2
1.2 Reference .......................................................................................................................................... 2
2 Step by step Hardware Configuration ........................................................................................................ 3
2.1 Hardware configuration of the EtherCAT master systems ................................................................ 3
2.2 Configuration of the EtherCAT Slave .............................................................................................. 13
2.3 Transfer Configuration of the EtherCAT Slave into the VIPA CPU 300S ........................................ 18
3 Revision History ........................................................................................................................................ 19
3.1 Changes:.......................................................................................................................................... 19
How-To-Do –EtherCAT Communication with CPU 300S
Januar 14
page 2 of 19
© by VIPA GmbH, Ohmstraße 4, 91074 Herzogenaurach, Deutschland Angaben ohne Gewähr, Änderungen und Irrtümer vorbehalten.
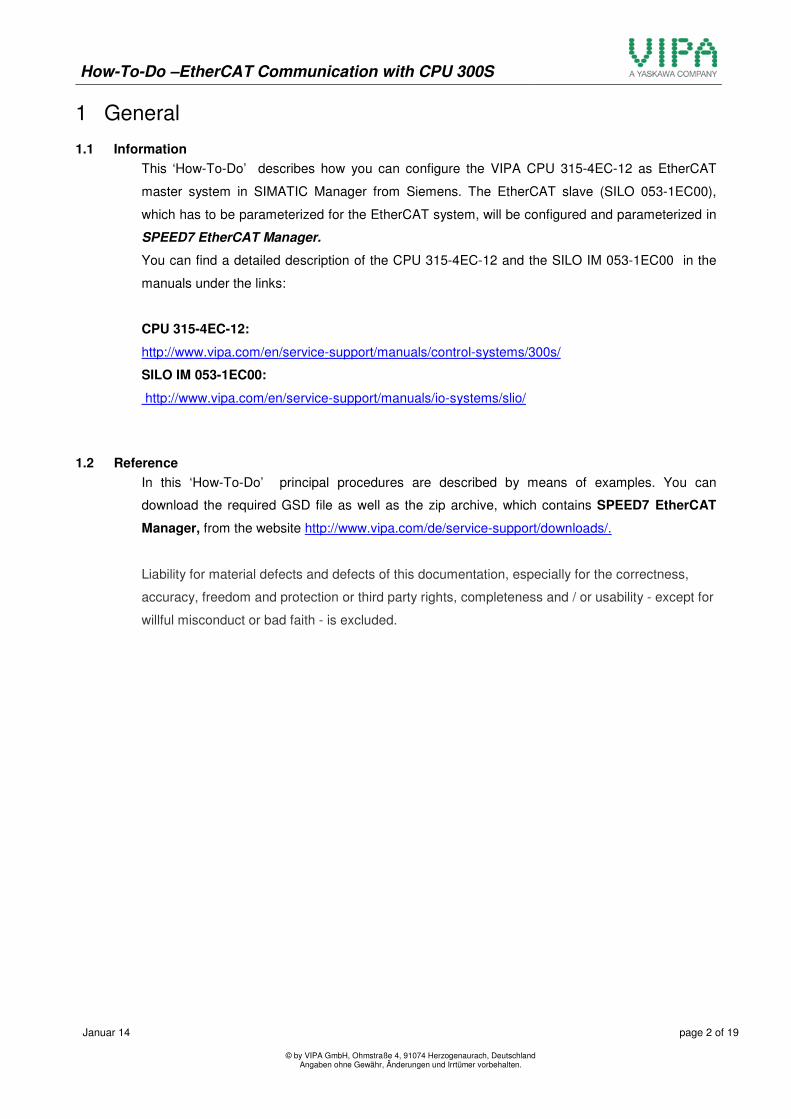
1 General
1.1 Information
This ‘How-To-Do’ describes how you can configure the VIPA CPU 315-4EC-12 as EtherCAT
master system in SIMATIC Manager from Siemens. The EtherCAT slave (SILO 053-1EC00),
which has to be parameterized for the EtherCAT system, will be configured and parameterized in
SPEED7 EtherCAT Manager.
You can find a detailed description of the CPU 315-4EC-12 and the SILO IM 053-1EC00 in the
manuals under the links:
CPU 315-4EC-12:
http://www.vipa.com/en/service-support/manuals/control-systems/300s/
SILO IM 053-1EC00:
http://www.vipa.com/en/service-support/manuals/io-systems/slio/
1.2 Reference
In this ‘How-To-Do’ principal procedures are described by means of examples. You can
download the required GSD file as well as the zip archive, which contains SPEED7 EtherCAT
Manager, from the website http://www.vipa.com/de/service-support/downloads/.
Liability for material defects and defects of this documentation, especially for the correctness,
accuracy, freedom and protection or third party rights, completeness and / or usability - except for
willful misconduct or bad faith - is excluded.
How-To-Do –EtherCAT Communication with CPU 300S
Januar 14
page 3 of 19
© by VIPA GmbH, Ohmstraße 4, 91074 Herzogenaurach, Deutschland Angaben ohne Gewähr, Änderungen und Irrtümer vorbehalten.
2 Step by step Hardware Configuration
2.1 Hardware configuration of EtherCAT master systems
(SIMATIC Manager / SIEMENS AG)
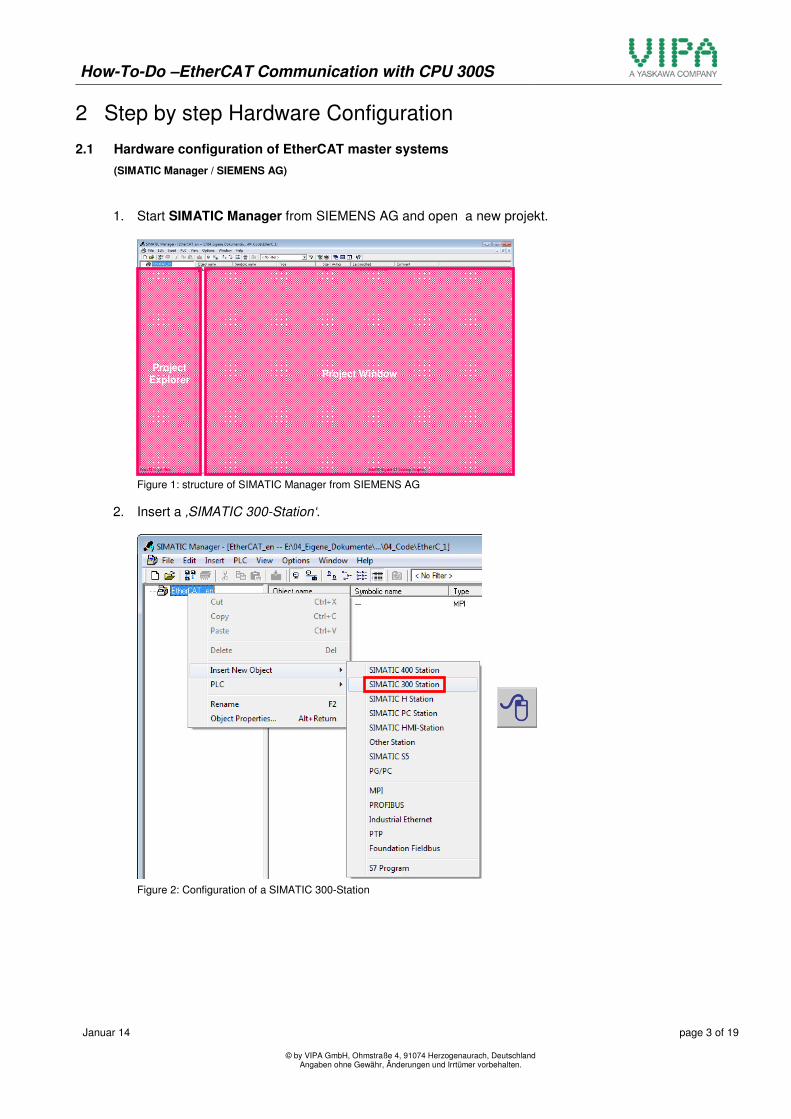
1. Start SIMATIC Manager from SIEMENS AG and open a new projekt.
Figure 1: structure of SIMATIC Manager from SIEMENS AG
2. Insert a ‚SIMATIC 300-Station‘.
Figure 2: Configuration of a SIMATIC 300-Station
Project Explorer
Project Window
How-To-Do –EtherCAT Communication with CPU 300S
Januar 14
page 4 of 19
© by VIPA GmbH, Ohmstraße 4, 91074 Herzogenaurach, Deutschland Angaben ohne Gewähr, Änderungen und Irrtümer vorbehalten.
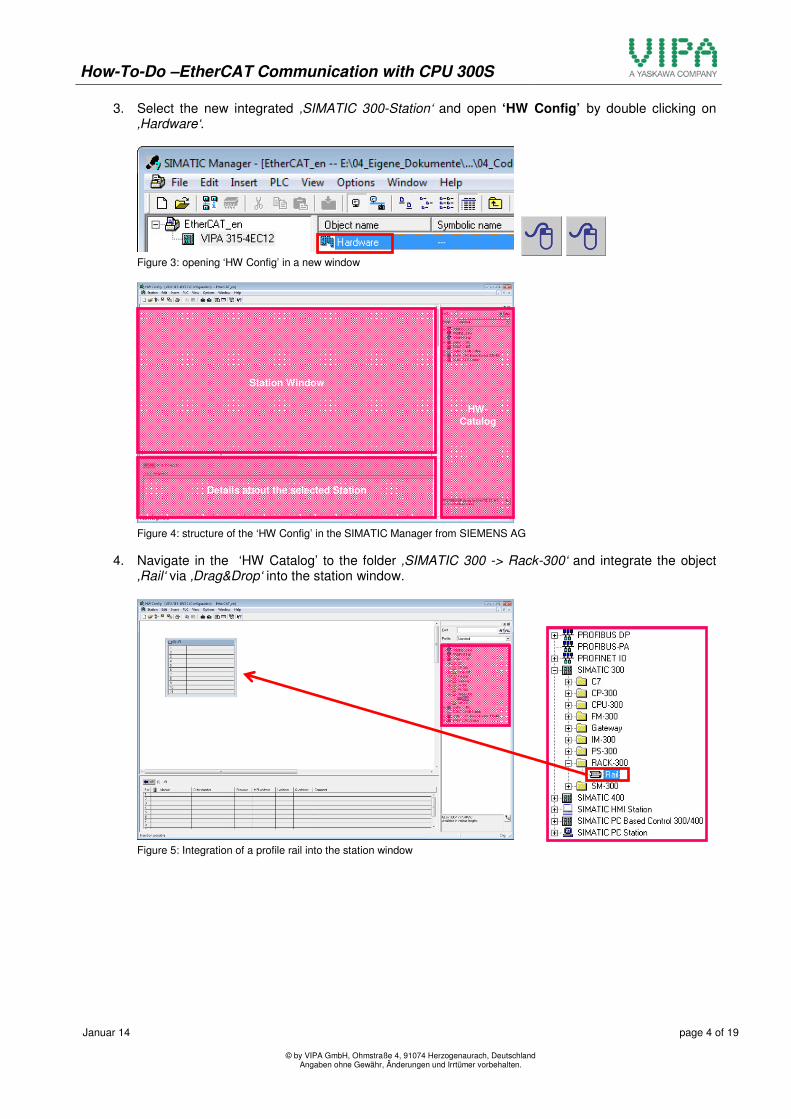
3. Select the new integrated ‚SIMATIC 300-Station‘ and open ‘HW Config’ by double clicking on ‚Hardware‘.
Figure 3: opening ‘HW Config’ in a new window
Figure 4: structure of the ‘HW Config’ in the SIMATIC Manager from SIEMENS AG
4. Navigate in the ‘HW Catalog’ to the folder ‚SIMATIC 300 -> Rack-300‘ and integrate the object ‚Rail‘ via ‚Drag&Drop‘ into the station window.
Figure 5: Integration of a profile rail into the station window
HW-Catalog
Station Window
Details about the selected Station
How-To-Do –EtherCAT Communication with CPU 300S
Januar 14
page 5 of 19
© by VIPA GmbH, Ohmstraße 4, 91074 Herzogenaurach, Deutschland Angaben ohne Gewähr, Änderungen und Irrtümer vorbehalten.
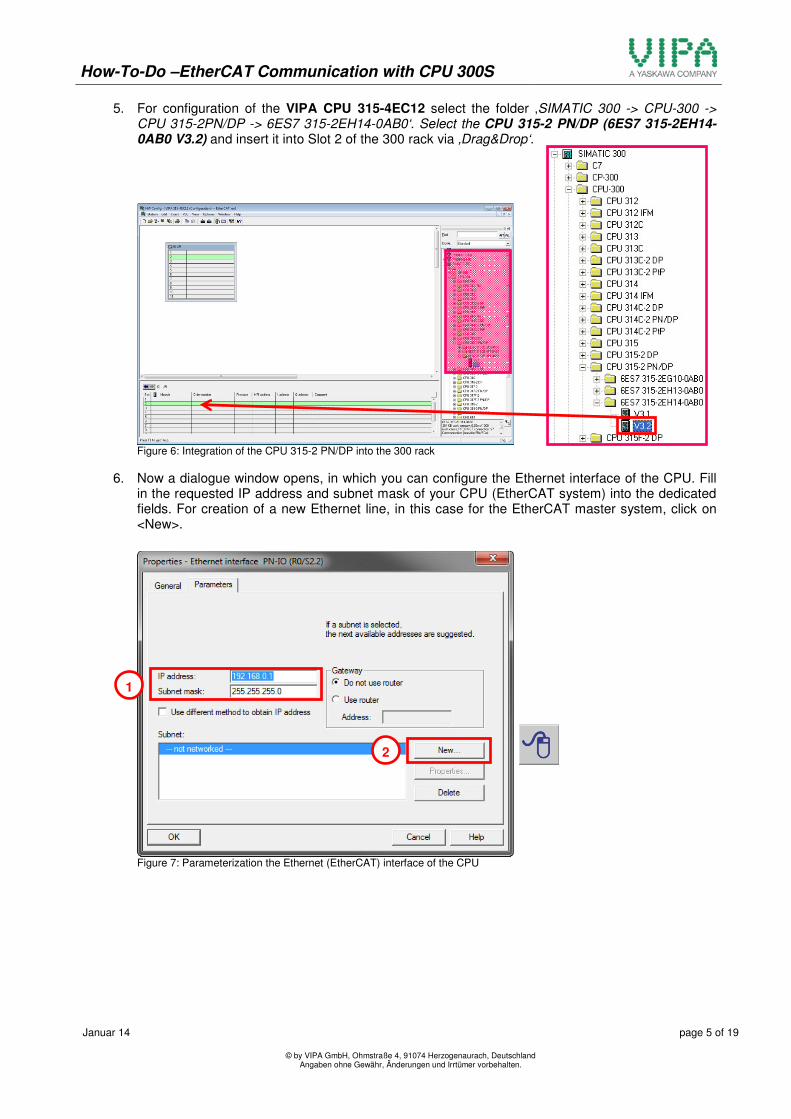
5. For configuration of the VIPA CPU 315-4EC12 select the folder ‚SIMATIC 300 -> CPU-300 -> CPU 315-2PN/DP -> 6ES7 315-2EH14-0AB0‘. Select the CPU 315-2 PN/DP (6ES7 315-2EH14-0AB0 V3.2) and insert it into Slot 2 of the 300 rack via ‚Drag&Drop‘.
Figure 6: Integration of the CPU 315-2 PN/DP into the 300 rack
6. Now a dialogue window opens, in which you can configure the Ethernet interface of the CPU. Fill in the requested IP address and subnet mask of your CPU (EtherCAT system) into the dedicated fields. For creation of a new Ethernet line, in this case for the EtherCAT master system, click on <New>.
Figure 7: Parameterization the Ethernet (EtherCAT) interface of the CPU
! 1
! 2
How-To-Do –EtherCAT Communication with CPU 300S
Januar 14
page 6 of 19
© by VIPA GmbH, Ohmstraße 4, 91074 Herzogenaurach, Deutschland Angaben ohne Gewähr, Änderungen und Irrtümer vorbehalten.
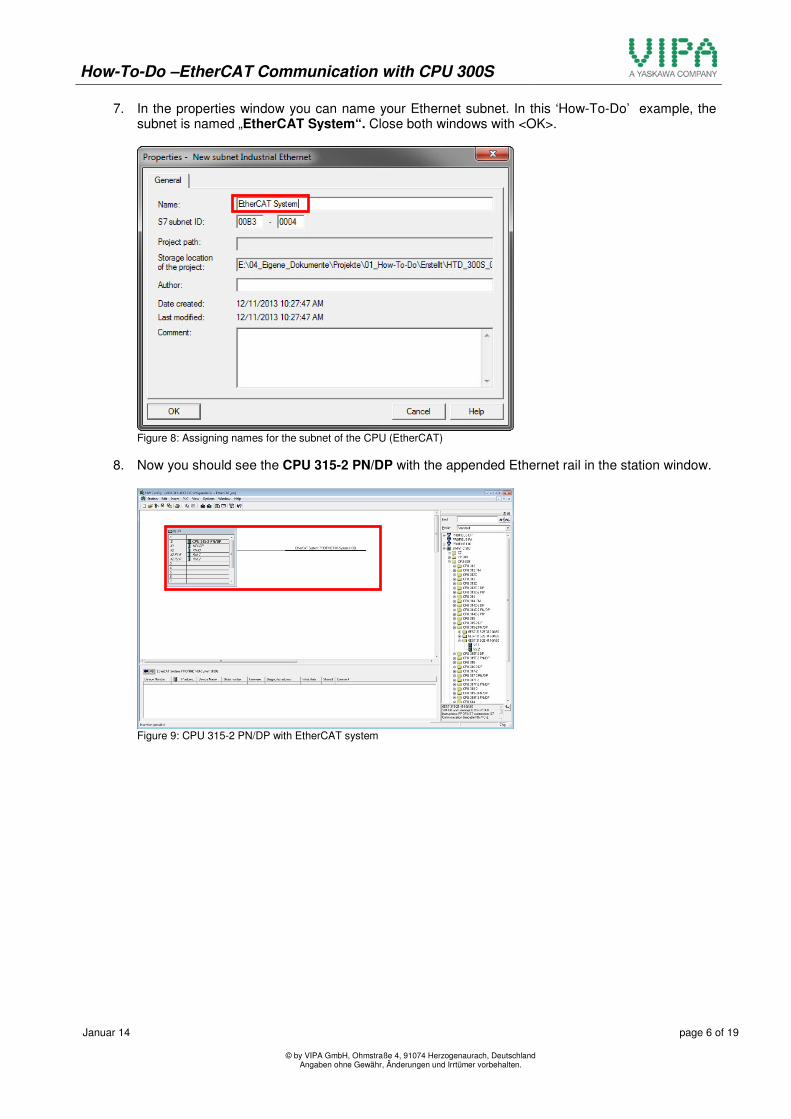
7. In the properties window you can name your Ethernet subnet. In this ‘How-To-Do’ example, the subnet is named „EtherCAT System“. Close both windows with <OK>.
Figure 8: Assigning names for the subnet of the CPU (EtherCAT)
8. Now you should see the CPU 315-2 PN/DP with the appended Ethernet rail in the station window.
Figure 9: CPU 315-2 PN/DP with EtherCAT system
How-To-Do –EtherCAT Communication with CPU 300S
Januar 14
page 7 of 19
© by VIPA GmbH, Ohmstraße 4, 91074 Herzogenaurach, Deutschland Angaben ohne Gewähr, Änderungen und Irrtümer vorbehalten.
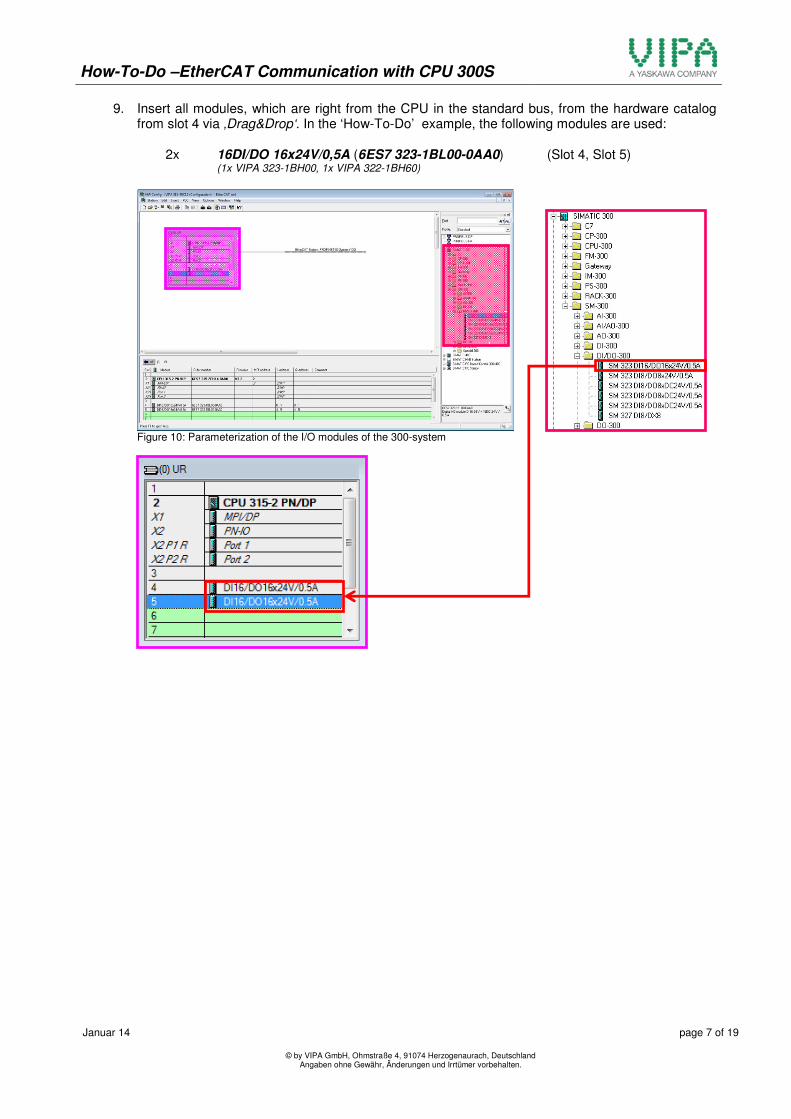
9. Insert all modules, which are right from the CPU in the standard bus, from the hardware catalog from slot 4 via ‚Drag&Drop‘. In the ‘How-To-Do’ example, the following modules are used:
2x 16DI/DO 16x24V/0,5A (6ES7 323-1BL00-0AA0) (Slot 4, Slot 5)
(1x VIPA 323-1BH00, 1x VIPA 322-1BH60)
Figure 10: Parameterization of the I/O modules of the 300-system
How-To-Do –EtherCAT Communication with CPU 300S
Januar 14
page 8 of 19
© by VIPA GmbH, Ohmstraße 4, 91074 Herzogenaurach, Deutschland Angaben ohne Gewähr, Änderungen und Irrtümer vorbehalten.
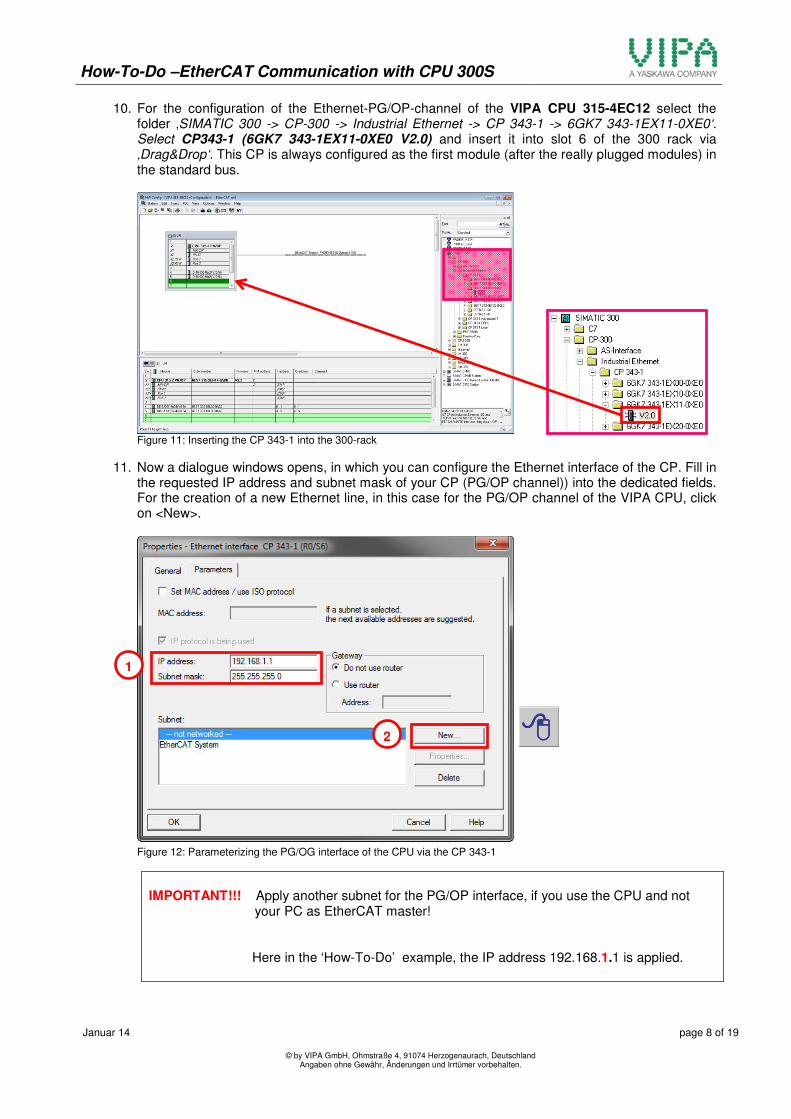
10. For the configuration of the Ethernet-PG/OP-channel of the VIPA CPU 315-4EC12 select the folder ‚SIMATIC 300 -> CP-300 -> Industrial Ethernet -> CP 343-1 -> 6GK7 343-1EX11-0XE0‘. Select CP343-1 (6GK7 343-1EX11-0XE0 V2.0) and insert it into slot 6 of the 300 rack via ‚Drag&Drop‘. This CP is always configured as the first module (after the really plugged modules) in the standard bus.
Figure 11: Inserting the CP 343-1 into the 300-rack
11. Now a dialogue windows opens, in which you can configure the Ethernet interface of the CP. Fill in the requested IP address and subnet mask of your CP (PG/OP channel)) into the dedicated fields. For the creation of a new Ethernet line, in this case for the PG/OP channel of the VIPA CPU, click on <New>.
Figure 12: Parameterizing the PG/OG interface of the CPU via the CP 343-1
IMPORTANT!!! Apply another subnet for the PG/OP interface, if you use the CPU and not your PC as EtherCAT master!
Here in the ‘How-To-Do’ example, the IP address 192.168.1.1 is applied.
! 1
! 2
How-To-Do –EtherCAT Communication with CPU 300S
Januar 14
page 9 of 19
© by VIPA GmbH, Ohmstraße 4, 91074 Herzogenaurach, Deutschland Angaben ohne Gewähr, Änderungen und Irrtümer vorbehalten.
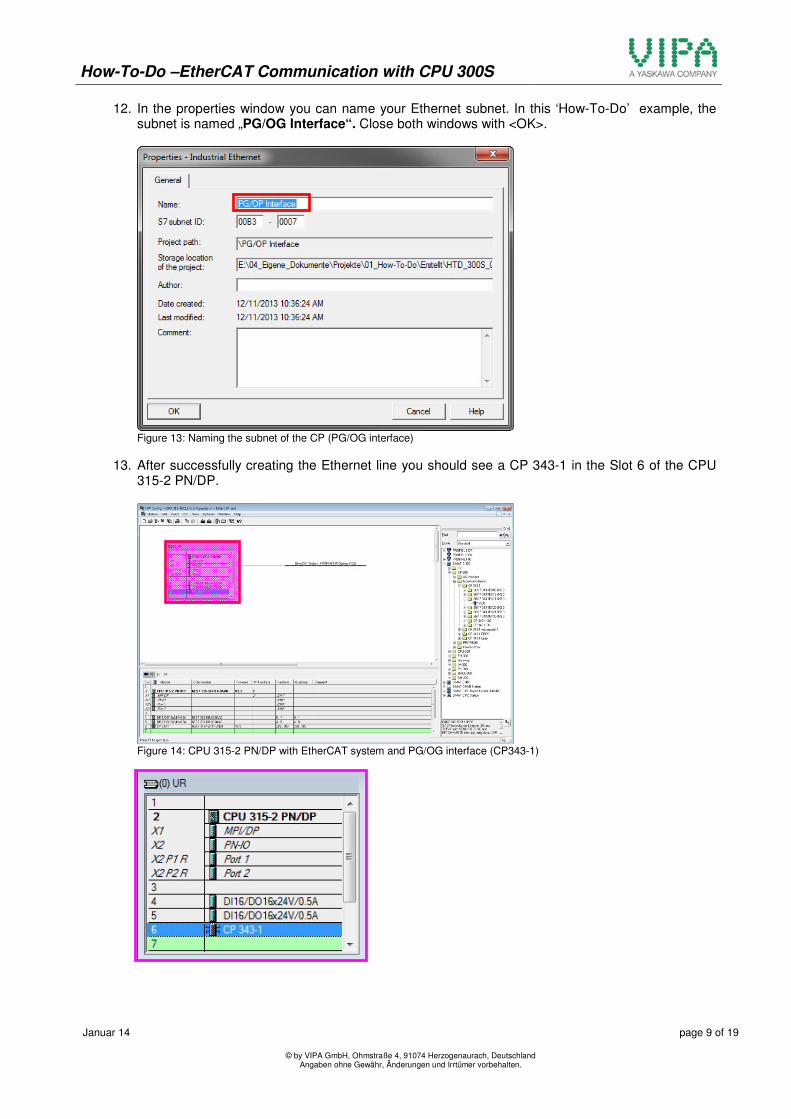
12. In the properties window you can name your Ethernet subnet. In this ‘How-To-Do’ example, the subnet is named „PG/OG Interface“. Close both windows with <OK>.
Figure 13: Naming the subnet of the CP (PG/OG interface)
13. After successfully creating the Ethernet line you should see a CP 343-1 in the Slot 6 of the CPU 315-2 PN/DP.
Figure 14: CPU 315-2 PN/DP with EtherCAT system and PG/OG interface (CP343-1)
How-To-Do –EtherCAT Communication with CPU 300S
Januar 14
page 10 of 19
© by VIPA GmbH, Ohmstraße 4, 91074 Herzogenaurach, Deutschland Angaben ohne Gewähr, Änderungen und Irrtümer vorbehalten.
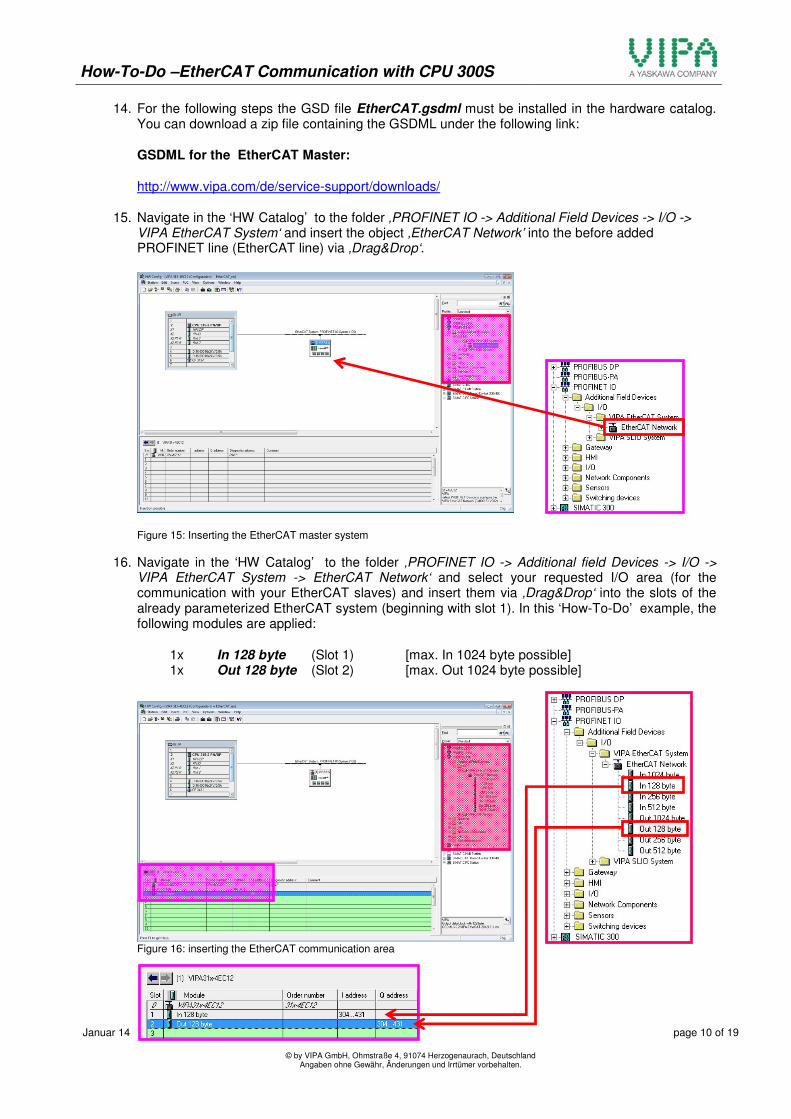
14. For the following steps the GSD file EtherCAT.gsdml must be installed in the hardware catalog. You can download a zip file containing the GSDML under the following link:
GSDML for the EtherCAT Master:
http://www.vipa.com/de/service-support/downloads/
15. Navigate in the ‘HW Catalog’ to the folder ‚PROFINET IO -> Additional Field Devices -> I/O -> VIPA EtherCAT System‘ and insert the object ‚EtherCAT Network’ into the before added PROFINET line (EtherCAT line) via ‚Drag&Drop‘.
Figure 15: Inserting the EtherCAT master system
16. Navigate in the ‘HW Catalog’ to the folder ‚PROFINET IO -> Additional field Devices -> I/O -> VIPA EtherCAT System -> EtherCAT Network‘ and select your requested I/O area (for the communication with your EtherCAT slaves) and insert them via ‚Drag&Drop‘ into the slots of the already parameterized EtherCAT system (beginning with slot 1). In this ‘How-To-Do’ example, the following modules are applied:
1x In 128 byte (Slot 1) [max. In 1024 byte possible] 1x Out 128 byte (Slot 2) [max. Out 1024 byte possible]
Figure 16: inserting the EtherCAT communication area
How-To-Do –EtherCAT Communication with CPU 300S
Januar 14
page 11 of 19
© by VIPA GmbH, Ohmstraße 4, 91074 Herzogenaurach, Deutschland Angaben ohne Gewähr, Änderungen und Irrtümer vorbehalten.
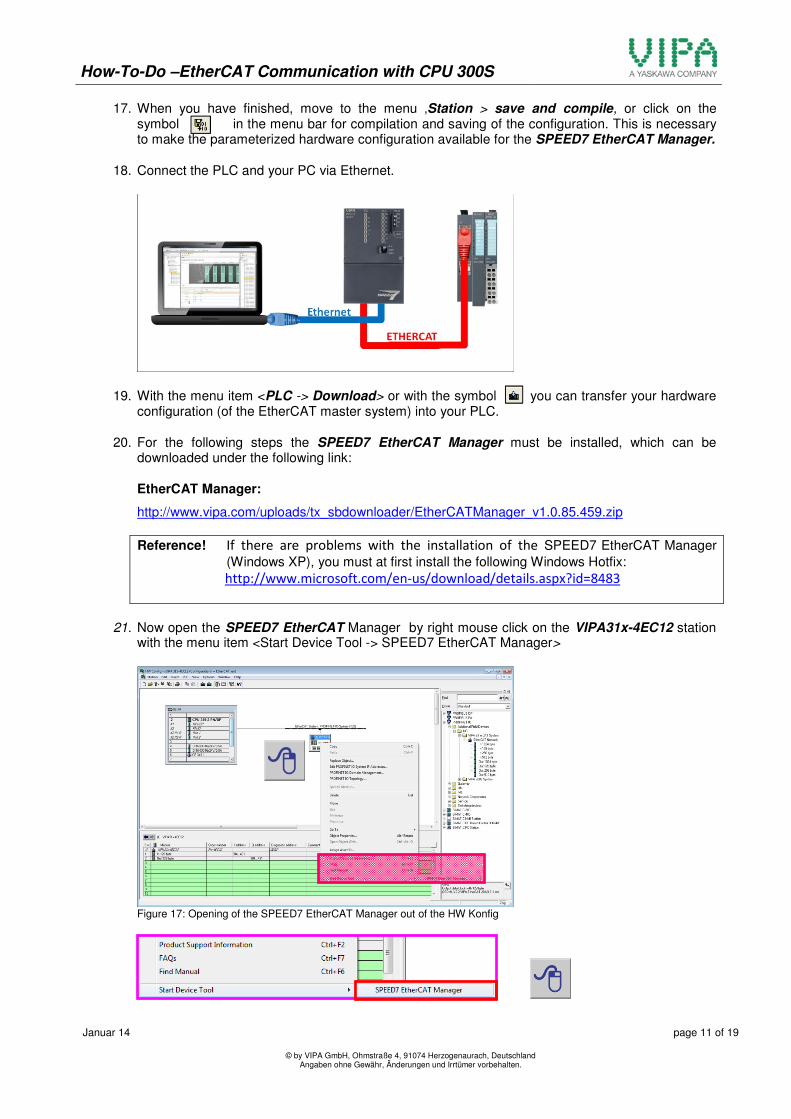
17. When you have finished, move to the menu ‚Station > save and compile, or click on the symbol in the menu bar for compilation and saving of the configuration. This is necessary to make the parameterized hardware configuration available for the SPEED7 EtherCAT Manager.
18. Connect the PLC and your PC via Ethernet.
19. With the menu item <PLC -> Download> or with the symbol you can transfer your hardware configuration (of the EtherCAT master system) into your PLC.
20. For the following steps the SPEED7 EtherCAT Manager must be installed, which can be downloaded under the following link:
EtherCAT Manager:
http://www.vipa.com/uploads/tx_sbdownloader/EtherCATManager_v1.0.85.459.zip
Reference! If there are problems with the installation of the SPEED7 EtherCAT Manager (Windows XP), you must at first install the following Windows Hotfix:
http://www.microsoft.com/en-us/download/details.aspx?id=8483
21. Now open the SPEED7 EtherCAT Manager by right mouse click on the VIPA31x-4EC12 station with the menu item <Start Device Tool -> SPEED7 EtherCAT Manager>
Figure 17: Opening of the SPEED7 EtherCAT Manager out of the HW Konfig

How-To-Do –EtherCAT Communication with CPU 300S
Januar 14
page 12 of 19
© by VIPA GmbH, Ohmstraße 4, 91074 Herzogenaurach, Deutschland Angaben ohne Gewähr, Änderungen und Irrtümer vorbehalten.
22. Please now follow the description from chapter 2.2 Configuration of the EtherCAT slave
How-To-Do –EtherCAT Communication with CPU 300S
Januar 14
page 13 of 19
© by VIPA GmbH, Ohmstraße 4, 91074 Herzogenaurach, Deutschland Angaben ohne Gewähr, Änderungen und Irrtümer vorbehalten.
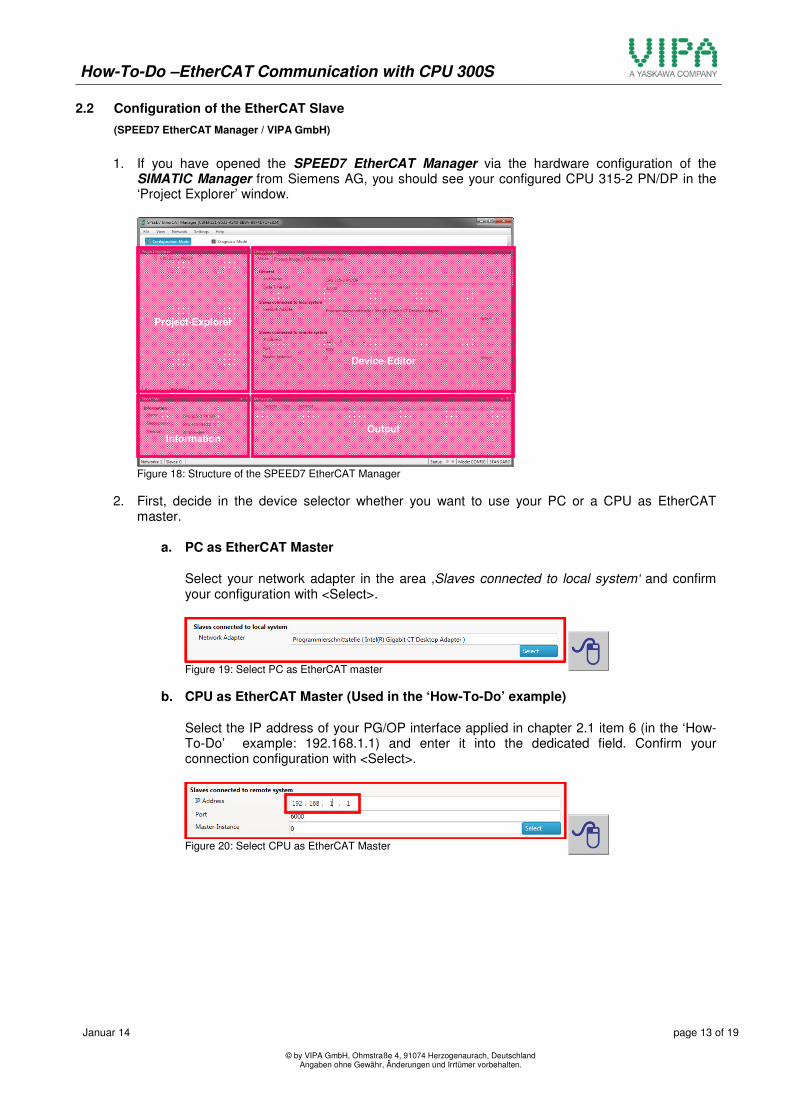
2.2 Configuration of the EtherCAT Slave
(SPEED7 EtherCAT Manager / VIPA GmbH)
1. If you have opened the SPEED7 EtherCAT Manager via the hardware configuration of the
SIMATIC Manager from Siemens AG, you should see your configured CPU 315-2 PN/DP in the ‘Project Explorer’ window.
Figure 18: Structure of the SPEED7 EtherCAT Manager
2. First, decide in the device selector whether you want to use your PC or a CPU as EtherCAT master.
a. PC as EtherCAT Master
Select your network adapter in the area ‚Slaves connected to local system‘ and confirm your configuration with <Select>.
Figure 19: Select PC as EtherCAT master
b. CPU as EtherCAT Master (Used in the ‘How-To-Do’ example)
Select the IP address of your PG/OP interface applied in chapter 2.1 item 6 (in the ‘How-To-Do’ example: 192.168.1.1) and enter it into the dedicated field. Confirm your connection configuration with <Select>.
Figure 20: Select CPU as EtherCAT Master
Project-Explorer
Device-Editor
Information Output
How-To-Do –EtherCAT Communication with CPU 300S
Januar 14
page 14 of 19
© by VIPA GmbH, Ohmstraße 4, 91074 Herzogenaurach, Deutschland Angaben ohne Gewähr, Änderungen und Irrtümer vorbehalten.
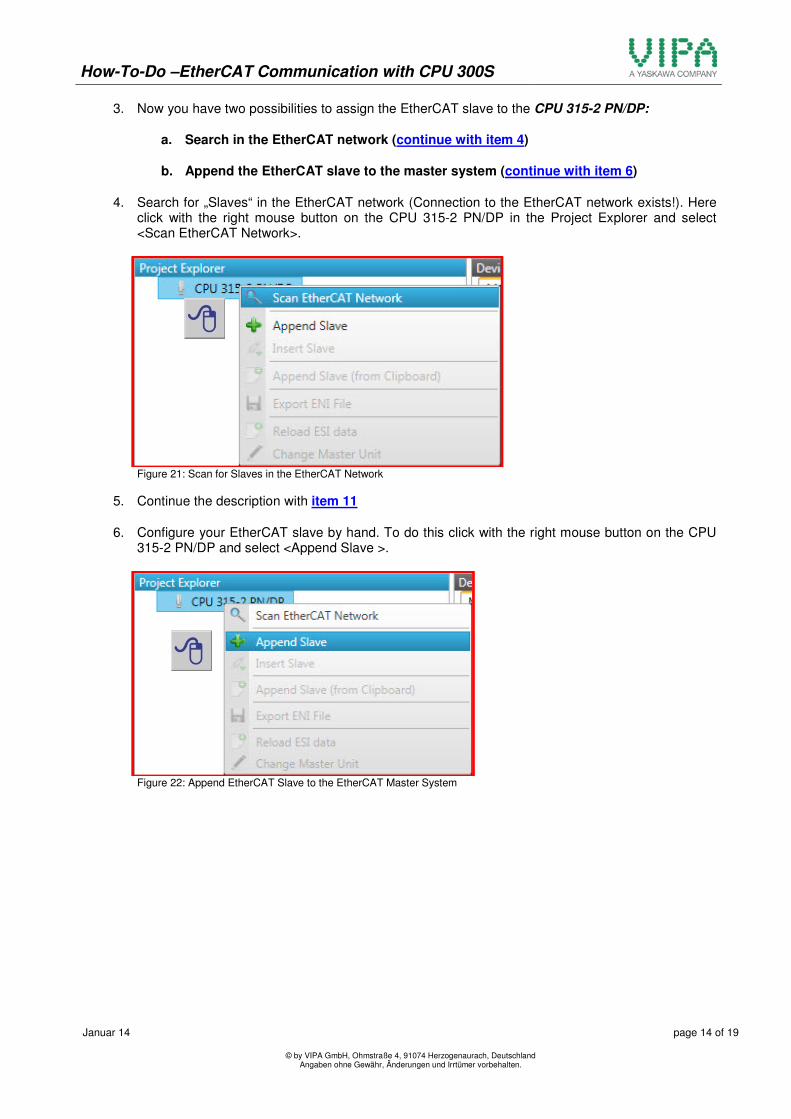
3. Now you have two possibilities to assign the EtherCAT slave to the CPU 315-2 PN/DP:
a. Search in the EtherCAT network (continue with item 4)
b. Append the EtherCAT slave to the master system (continue with item 6)
4. Search for „Slaves“ in the EtherCAT network (Connection to the EtherCAT network exists!). Here click with the right mouse button on the CPU 315-2 PN/DP in the Project Explorer and select <Scan EtherCAT Network>.
Figure 21: Scan for Slaves in the EtherCAT Network
5. Continue the description with item 11
6. Configure your EtherCAT slave by hand. To do this click with the right mouse button on the CPU 315-2 PN/DP and select <Append Slave >.
Figure 22: Append EtherCAT Slave to the EtherCAT Master System
How-To-Do –EtherCAT Communication with CPU 300S
Januar 14
page 15 of 19
© by VIPA GmbH, Ohmstraße 4, 91074 Herzogenaurach, Deutschland Angaben ohne Gewähr, Änderungen und Irrtümer vorbehalten.
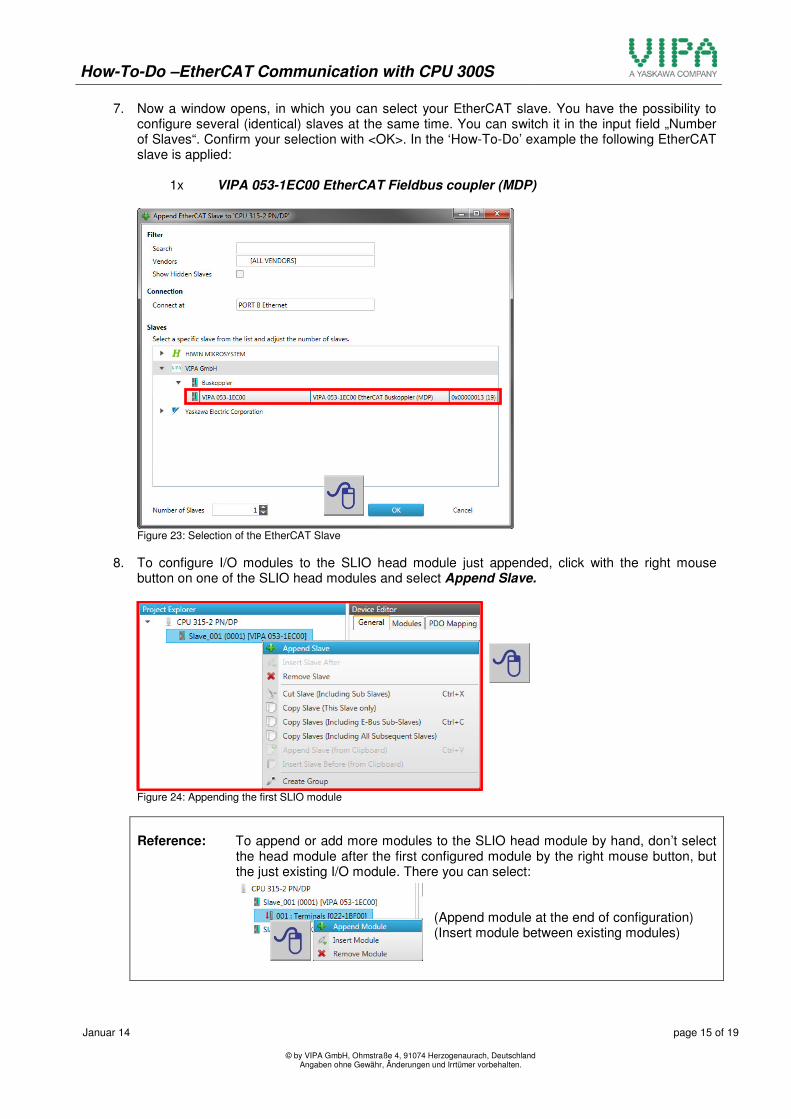
7. Now a window opens, in which you can select your EtherCAT slave. You have the possibility to configure several (identical) slaves at the same time. You can switch it in the input field „Number of Slaves“. Confirm your selection with <OK>. In the ‘How-To-Do’ example the following EtherCAT slave is applied:
1x VIPA 053-1EC00 EtherCAT Fieldbus coupler (MDP)
Figure 23: Selection of the EtherCAT Slave
8. To configure I/O modules to the SLIO head module just appended, click with the right mouse button on one of the SLIO head modules and select Append Slave.
Figure 24: Appending the first SLIO module
Reference: To append or add more modules to the SLIO head module by hand, don’t select the head module after the first configured module by the right mouse button, but the just existing I/O module. There you can select:
(Append module at the end of configuration) (Insert module between existing modules)
How-To-Do –EtherCAT Communication with CPU 300S
Januar 14
page 16 of 19
© by VIPA GmbH, Ohmstraße 4, 91074 Herzogenaurach, Deutschland Angaben ohne Gewähr, Änderungen und Irrtümer vorbehalten.
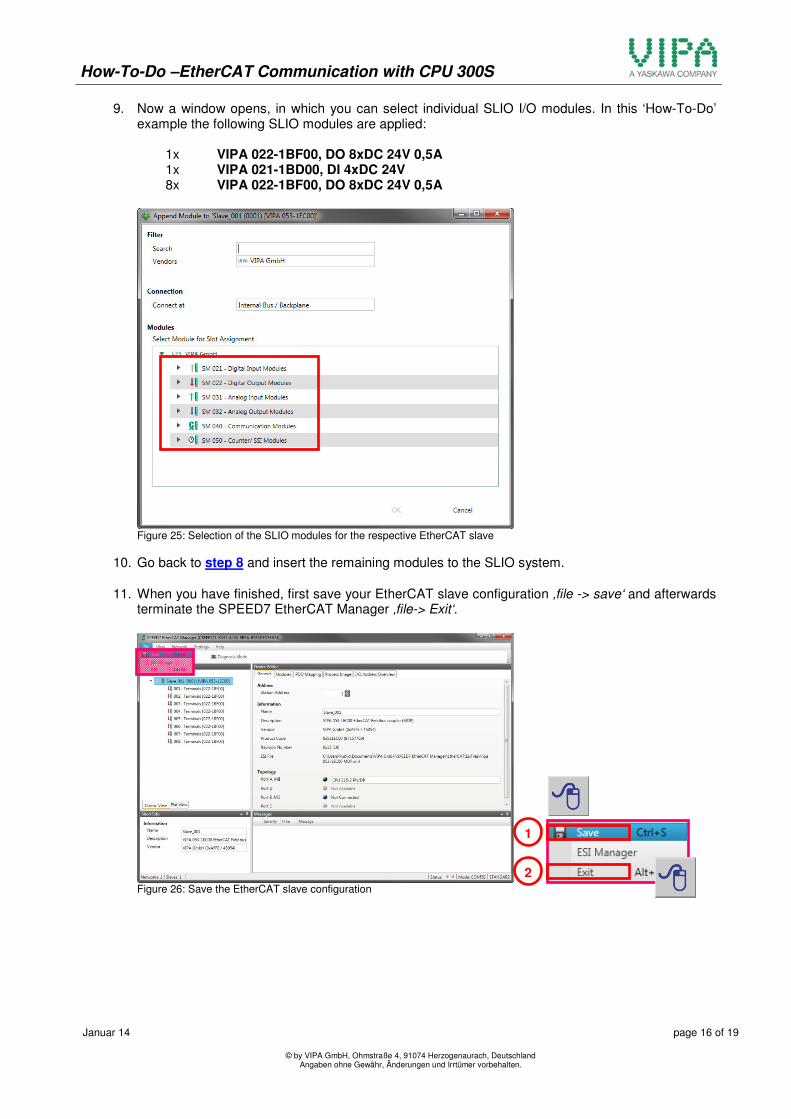
9. Now a window opens, in which you can select individual SLIO I/O modules. In this ‘How-To-Do’ example the following SLIO modules are applied:
1x VIPA 022-1BF00, DO 8xDC 24V 0,5A 1x VIPA 021-1BD00, DI 4xDC 24V 8x VIPA 022-1BF00, DO 8xDC 24V 0,5A
Figure 25: Selection of the SLIO modules for the respective EtherCAT slave
10. Go back to step 8 and insert the remaining modules to the SLIO system.
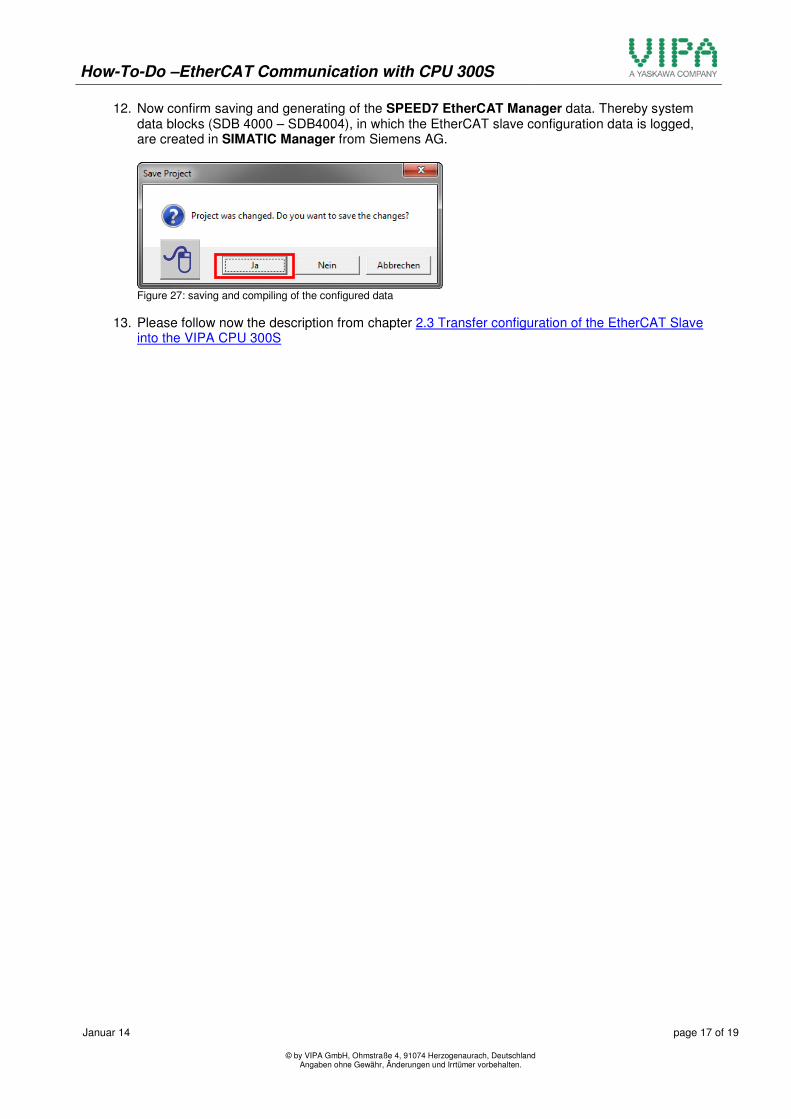
11. When you have finished, first save your EtherCAT slave configuration ‚file -> save‘ and afterwards terminate the SPEED7 EtherCAT Manager ‚file-> Exit‘.
Figure 26: Save the EtherCAT slave configuration
! 1
! 2
How-To-Do –EtherCAT Communication with CPU 300S
Januar 14
page 17 of 19
© by VIPA GmbH, Ohmstraße 4, 91074 Herzogenaurach, Deutschland Angaben ohne Gewähr, Änderungen und Irrtümer vorbehalten.
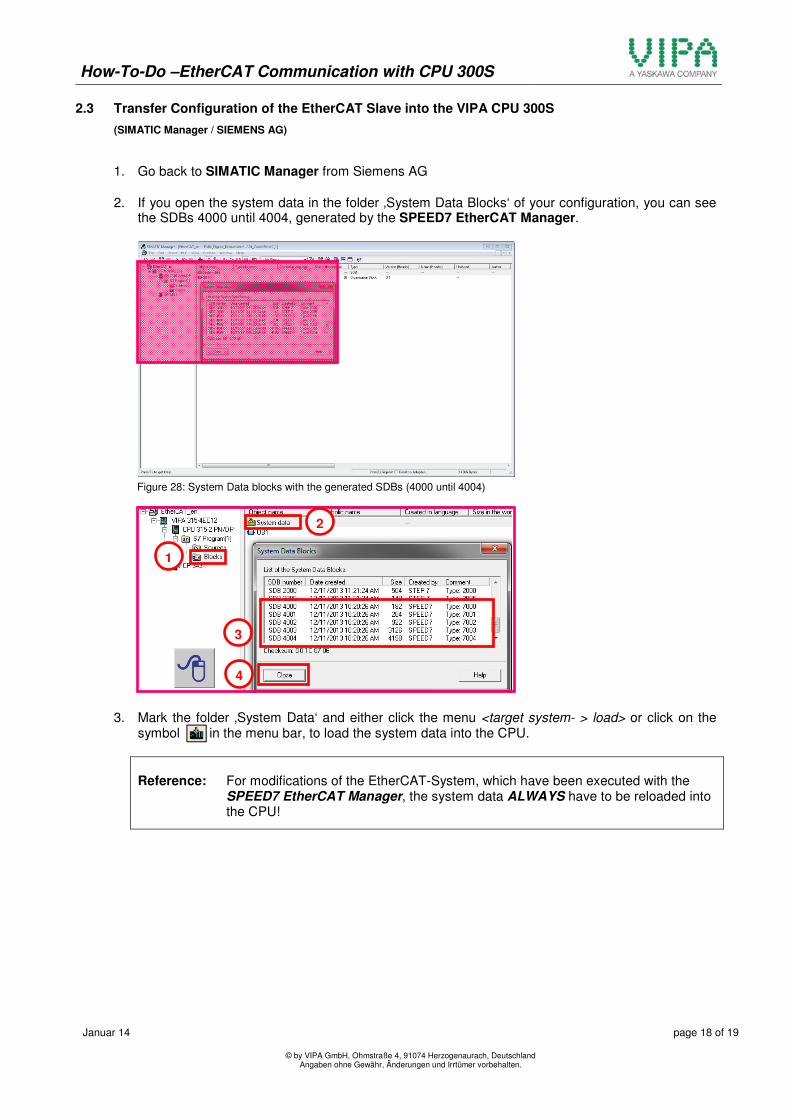
12. Now confirm saving and generating of the SPEED7 EtherCAT Manager data. Thereby system data blocks (SDB 4000 – SDB4004), in which the EtherCAT slave configuration data is logged, are created in SIMATIC Manager from Siemens AG.
Figure 27: saving and compiling of the configured data
13. Please follow now the description from chapter 2.3 Transfer configuration of the EtherCAT Slave into the VIPA CPU 300S
How-To-Do –EtherCAT Communication with CPU 300S
Januar 14
page 18 of 19
© by VIPA GmbH, Ohmstraße 4, 91074 Herzogenaurach, Deutschland Angaben ohne Gewähr, Änderungen und Irrtümer vorbehalten.
2.3 Transfer Configuration of the EtherCAT Slave into the VIPA CPU 300S
(SIMATIC Manager / SIEMENS AG)
1. Go back to SIMATIC Manager from Siemens AG
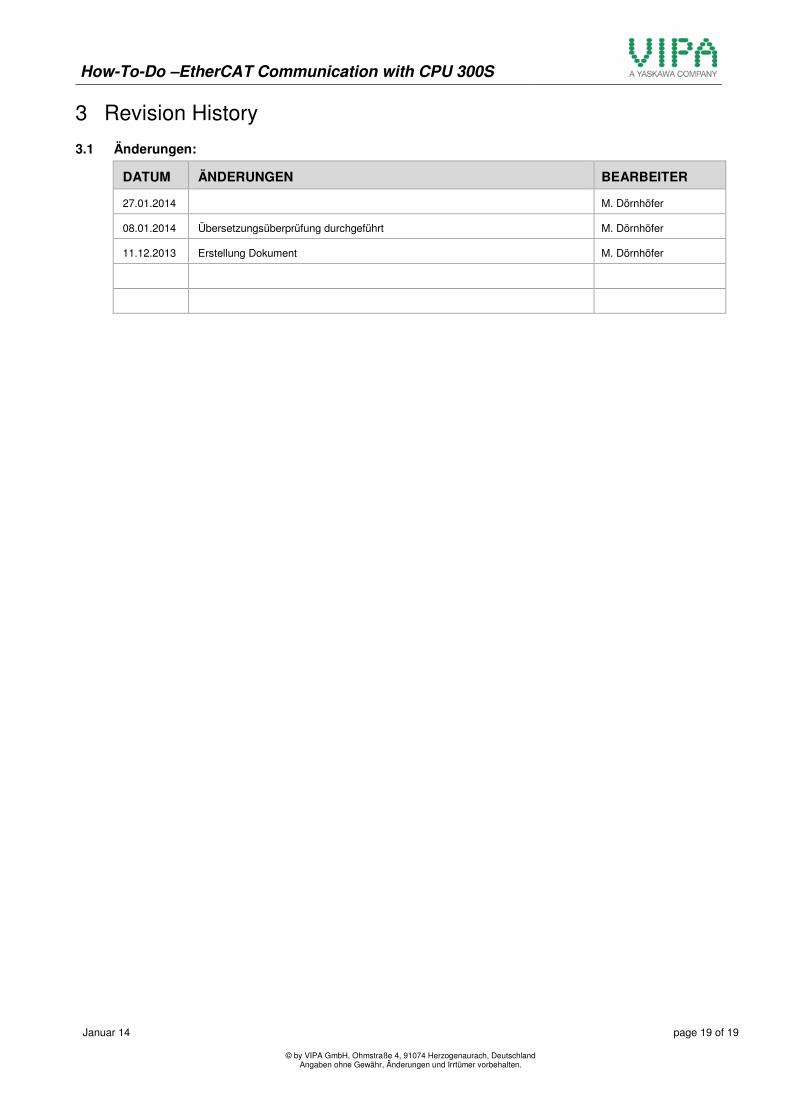
2. If you open the system data in the folder ‚System Data Blocks‘ of your configuration, you can see the SDBs 4000 until 4004, generated by the SPEED7 EtherCAT Manager.
Figure 28: System Data blocks with the generated SDBs (4000 until 4004)
3. Mark the folder ‚System Data‘ and either click the menu <target system- > load> or click on the symbol in the menu bar, to load the system data into the CPU.
Reference: For modifications of the EtherCAT-System, which have been executed with the SPEED7 EtherCAT Manager, the system data ALWAYS have to be reloaded into the CPU!
! 1
! 2
! 3
! 4
How-To-Do –EtherCAT Communication with CPU 300S
Januar 14
page 19 of 19
© by VIPA GmbH, Ohmstraße 4, 91074 Herzogenaurach, Deutschland Angaben ohne Gewähr, Änderungen und Irrtümer vorbehalten.
3 Revision History
3.1 Änderungen:
DATUM ÄNDERUNGEN BEARBEITER
27.01.2014 M. Dörnhöfer
08.01.2014 Übersetzungsüberprüfung durchgeführt M. Dörnhöfer
11.12.2013 Erstellung Dokument M. Dörnhöfer