Embed Size (px)
Citation preview
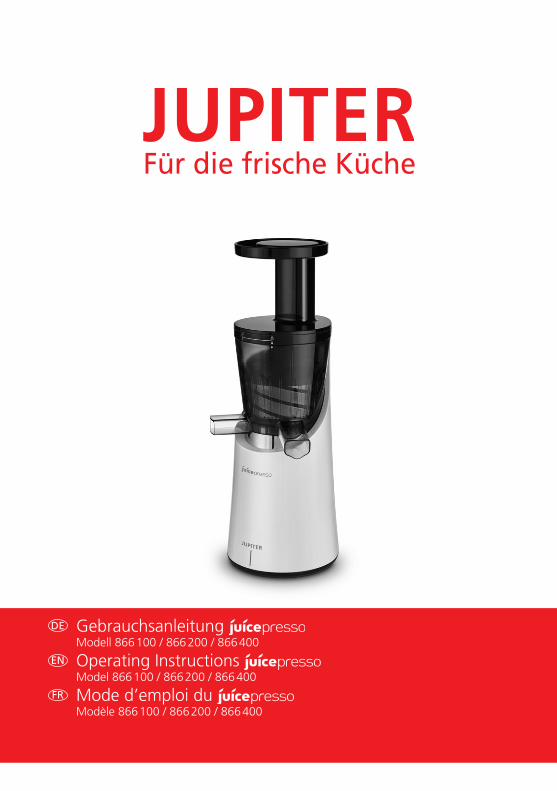
DE Gebrauchsanleitung Modell 866 100 / 866 200 / 866 400
EN Operating Instructions Model 866 100 / 866 200 / 866 400
FR Mode d’emploi du Modèle 866 100 / 866 200 / 866 400
Gebrauchsanleitung
2 Technische Änderungen vorbehalten, alle Angaben ohne Gewähr.
DE Herzlichen Glückwunsch zum Kauf Ihres neuen JUPITER-Küchengeräts. Sie haben sich für ein
hochwertiges und modernes Küchengerät entschieden. Weitere Informationen zu diesem und zu weiteren Pro-dukten finden Sie im Internet auf www.jupiter-gmbh.de.
Dieses Gerät ist zum Pressen von frischem Saft aus Obst oder Gemüse in haushaltsüblichen Mengen im Haushalt oder in haushaltsähnlichen, nichtgewerblichen Anwen-dungen bestimmt. Haushaltsähnliche Anwendungen umfassen z. B. die Verwendung in Mitarbeiterküchen von Läden, Büros, landwirtschaftlichen und anderen gewerblichen Betrie-ben, kleinen Hotels und ähnlichen Wohneinrichtungen. Verwenden Sie das Gerät nur für haushaltübliche Verar-beitungsmengen und nur für den Kurzzeitbetrieb von max. 20 Minuten. Das Gerät ist wartungsfrei.
Lesen Sie vor der Inbetriebnahme des Geräts die Ge-brauchsanleitung und besonders die Sicherheitshin-weise aufmerksam.Bewahren Sie die Gebrauchsanleitung sorgfältig und im-mer mit dem Gerät auf.
Wichtige Hinweise für Ihre Sicherheit
WARNUNG Gefahr eines Stromschlags!• Stecken Sie vor dem Reinigen des Geräts den Netzste-
cker aus.• Tauchen Sie das Gerät und die Anschlussleitung nicht
in Wasser.• Halten Sie das Gerät und die Anschlussleitung nicht un-
ter fließendes Wasser.• Benutzen Sie das Gerät nur, wenn die Anschlussleitung
und das Gerät keine Beschädigungen aufweisen.
VORSICHT Verletzungsgefahr durch rotierende Teile!• Nicht bei laufendem Motor in das Gerät greifen. • Führen Sie das Pressgut niemals von Hand zu. Verwen-
den Sie immer den Stopfer A.
VORSICHT Verletzungsgefahr durch herabfallende Teile! Gerätegewicht ca. 7 kg!
• Halten Sie das Gerät beim Transport immer mit 2 Hän-den an der Antriebseinheit F.
• Die Trommel D ist mit der Antriebseinheit F nicht fest verbunden, sondern nur aufgesetzt!
VORSICHT Unbeabsichtigter Motoranlauf!• Trennen Sie das Gerät vom Stromnetz (Ausstecken des
Netzsteckers): - nach jedem Gebrauch - bei Verlassen des Raumes - bei einem Stromausfall - bei Fehlfunktion.
• Beachten Sie die Angaben auf dem Typenschild und be-treiben Sie das Gerät nur entsprechend diesen Angaben.
• Betreiben Sie das Gerät nur in zusammengebautem Zustand. Nie ohne aufgesetzten und eingerasteten Einfülltrichter B betreiben!
• Kinder dürfen das Gerät nicht benutzen. Auch nicht zum Spielen.
• Dieses Gerät kann von Personen mit eingeschränkten physischen, sensorischen oder geistigen Fähigkeiten oder einem Mangel an Erfahrung und/oder Wissen ver-wendet werden, wenn sie beaufsichtigt werden oder bezüglich des sicheren Gebrauchs des Geräts unter-wiesen wurden und die daraus resultierenden Gefahren verstanden haben.
• Um Beschädigungen zu vermeiden, halten Sie mit dem Gerät und der Anschlussleitung Abstand von scharfen Kanten und heißen Flächen.
• Reparaturen am Gerät dürfen nur durch den JUPITER-Kundendienst ausgeführt werden.
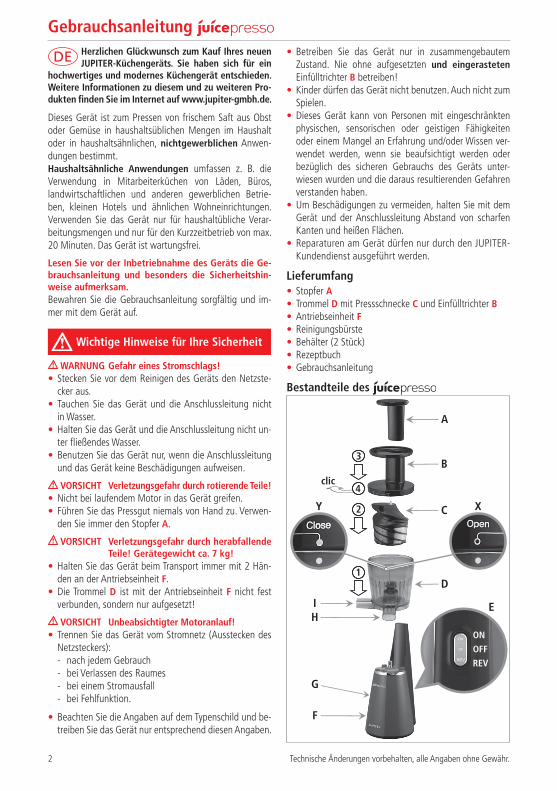
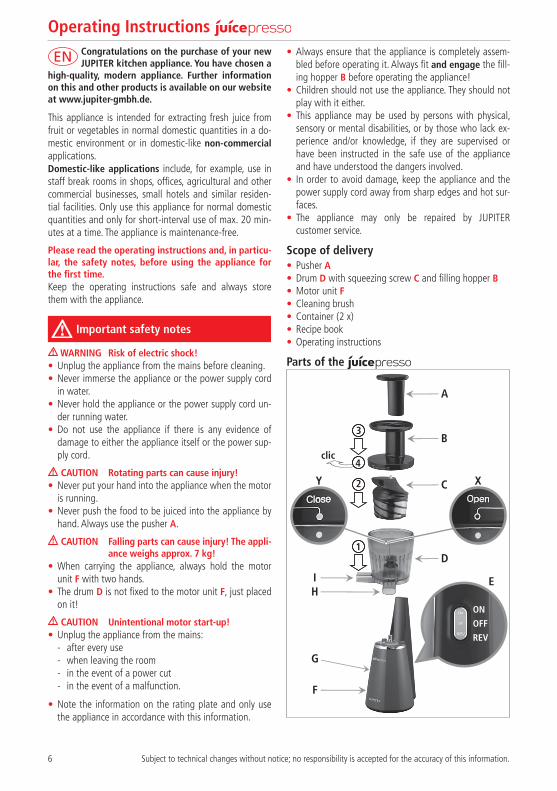
Lieferumfang• Stopfer A• Trommel D mit Pressschnecke C und Einfülltrichter B• Antriebseinheit F• Reinigungsbürste• Behälter (2 Stück)• Rezeptbuch• Gebrauchsanleitung
Bestandteile des
A
B
C
D
I
F
HON
OFF
REV
E
G
2
3
1
4clic
Y X
Technische Änderungen vorbehalten, alle Angaben ohne Gewähr. 3
A StopferB EinfülltrichterC PressschneckeD TrommelE Ein-/Ausschalter (3-stufig)
Inbetriebnahme• Stellen Sie sicher, dass der Netzstecker des Geräts aus-
gesteckt ist und der Ein-/Ausschalter E auf OFF (Mittel-stellung) steht!
• Reinigen Sie vor dem ersten Gebrauch alle Bestandteile des Geräts gründlich (siehe Abschnitt Reinigung).
• Betreiben Sie das Gerät nur in zusammengebautem Zustand. Nie ohne aufgesetzten und eingerasteten Einfülltrichter B betreiben!
• Stellen Sie das Gerät auf einen rutschfesten, ebenen und sauberen Untergrund.
• Stellen Sie je einen Behälter unter die Saftausgabe H und den Tresterauswurf I.
• Stecken Sie den Netzstecker ein.
Gerät einschalten VORSICHT Verletzungsgefahr durch rotierende Teile!
Nicht bei laufendem Motor in das Gerät greifen.
HINWEIS Beschädigung des Geräts!• Keine Gegenständer während des Betriebs in die
Saftausgabe H oder den Tresterauswurf I stecken.• Gerät nie ohne aufgesetzten und eingerasteten Ein-
fülltrichter B betreiben!• Gerät nie mit leerer Trommel betreiben.• Gerät nicht während es Betriebs demontieren.• Gerät nicht während des Betriebs bewegen.
HINWEIS Beschädigung durch zu lange Betriebs-dauer!
Das Gerät ist nur für den Kurzzeitbetrieb von max. 20 Mi-nuten geeignet. Danach muss das Gerät abkühlen.
HINWEIS Überhitzung des Motors!Läuft das Gerät beim Einschalten (E auf ON) nicht an, drü-cken Sie für 2 - 3 Sekunden auf REV. Bringt dies keine Abhilfe, schalten Sie das Gerät sofort aus (siehe Abschnitt Fehlerbehebung).
Das Gerät verfügt über einen 3-stufigen Ein-/Ausschalter.
• ON EIN; Gerät ist eingeschaltet, Motor läuft.• OFF AUS; Gerät ist ausgeschaltet.• REV RÜCKLAUF; Taster; Gerät läuft rückwärts. In der
Pressschnecke verklemmtes Pressgut wird dadurch gelöst (siehe Abschnitt Fehlerbehebung).
F AntriebseinheitG TypenschildH SaftausgabeI Tresterauswurf
Demontage vor der ersten InbetriebnahmeGeliefert wird der mit in der Trommel D eingesetzter Pressschnecke C und aufgesetztem Einfüll-trichter B. Demontieren Sie diese Teile zur Reinigung vor der ersten Inbetriebnahme.
• Halten Sie die Trommel D fest und drehen Sie den Ein-fülltrichter B gegen den Uhrzeigersinn, bis die Markie-rung Open über der Markierung der Trommel steht (Detail X).
• Nehmen Sie den Einfülltrichter B nach oben ab.• Entnehmen Sie die Pressschnecke C nach oben aus der
Trommel D.TIPP: Greifen Sie dazu mit dem Zeigefinger unter die erste Windung der Pressschnecke.
Montage/Demontage• Stellen Sie sicher:
- dass der Netzstecker des Geräts ausgesteckt ist und der Ein-/Ausschalter E auf OFF (Mittelstellung) steht!
- das an der Unterseite der Trommel D die gelbe Sili-kondichtung bis zur Markierungslinie im Schlitz des Tresterauswurfs I sitzt.
1 Setzen Sie die Trommel D bündig auf die Antriebsein-heit F auf. WICHTIG: Positionieren Sie dabei die Saftausgabe H über der runden Vertiefung der Antriebseinheit F und den Tresterauswurf I über der eckigen Vertiefung.
2 Setzen Sie die Pressschnecke C in die Trommel D ein und drücken Sie die Pressschnecke unter leichtem Drehen nach unten.
3 Setzen Sie den Einfülltrichter B so auf die Trommel D, dass die Markierung Open über der Markierung der Trommel steht (Detail X).
4 Drehen Sie den Einfülltrichter B im Uhrzeigersinn, bis die Markierung Close über der Markierung der Trom-mel steht (Detail Y) und hörbar einrastet.
• Die Demontage erfolgt in umgekehrter Reihenfolge.
Gebrauchsanleitung
4 Technische Änderungen vorbehalten, alle Angaben ohne Gewähr.
Saft pressenHINWEIS Beschädigung des Geräts!• Bei Funktionsstörungen während des Pressens schalten
Sie das Gerät sofort aus (siehe Abschnitt Fehlerbehe-bung).
• Entfernen Sie alle harten Stiele, Schalen, Kerne und Stei-ne vor dem Pressen. Diese könnten das Gerät verstopfen oder beschädigen.
• Verwenden Sie ausschließlich den Stopfer A zum Nach-schieben.
• Waschen Sie das zu verarbeitende Pressgut gründlich .• Verarbeiten Sie das Pressgut entsprechend dem mitge-
lieferten Rezeptbuch. • Füllen Sie das Pressgut portionsweise in den Einfülltrich-
ter B. • Schieben Sie mit dem Stopfer A nach.
INFO: Übermäßiges Stopfen beschleunigt nicht die Verar-beitung und führt zum Überlaufen der Trommel.TIPP: Nach der Verarbeitung von ca. 1 kg Pressgut, geben Sie zum Spülen etwas Wasser in den Einfülltrichter und schal-ten das Gerät ein.
Gerät außer Betrieb setzenHINWEIS Beschädigung des Geräts!Lassen Sie das Gerät vor dem Ausschalten komplett leer-laufen.
• Geben Sie zum Spülen etwas Wasser in den Einfülltrichter und schalten das Gerät ein.
• Schalten Sie das Gerät aus (Ein-/Ausschalter E auf OFF).• Stecken Sie den Netzstecker aus.• Reinigen Sie das Gerät gründlich (siehe Abschnitt Rei-
nigung).
Reinigung WARNUNG Gefahr eines Stromschlags!
Stecken Sie vor dem Reinigen des Geräts den Netzstecker aus.
HINWEIS Beschädigung des Geräts!Reinigen Sie das Gerät sofort nach jedem Gebrauch gründlich um Beschädigungen und Fehlfunktionen zu ver-meiden.
HINWEIS Beschädigung durch Spülmaschine!Die Bestandteile des Geräts sind nicht spülmaschinenge-eignet. Reinigen Sie die Bestandteile nur mit lauwarmem Wasser und Spülmittel.
• Demontieren Sie das Gerät vor dem Reinigen (siehe Ab-schnitt Montage/Demontage).
• Die Antriebseinheit niemals in Wasser tauchen und nie unter fließendes Wasser halten.
• Reinigen Sie die Antriebseinheit nur mit einem feuchten Tuch.
• Trocknen Sie die Bestandteile nur mit einem trockenen Tuch. Nicht heiß trocknen!
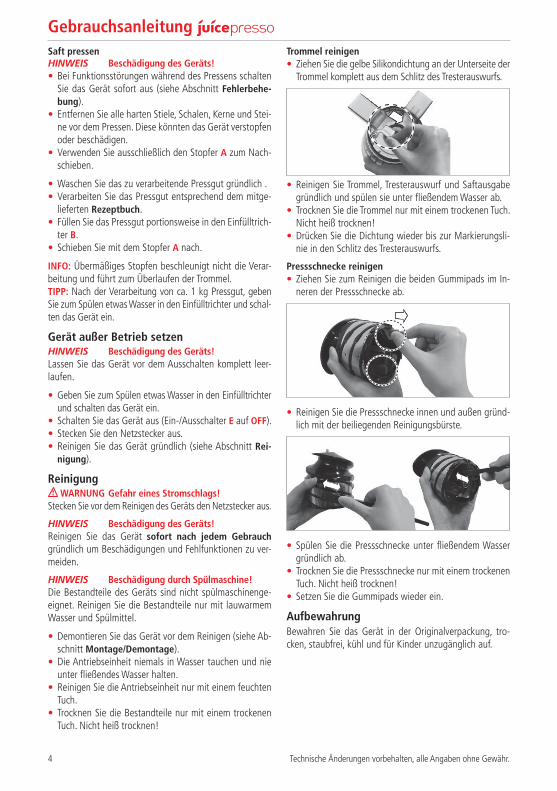
Trommel reinigen• Ziehen Sie die gelbe Silikondichtung an der Unterseite der
Trommel komplett aus dem Schlitz des Tresterauswurfs.
• Reinigen Sie Trommel, Tresterauswurf und Saftausgabe gründlich und spülen sie unter fließendem Wasser ab.
• Trocknen Sie die Trommel nur mit einem trockenen Tuch. Nicht heiß trocknen!
• Drücken Sie die Dichtung wieder bis zur Markierungsli-nie in den Schlitz des Tresterauswurfs.
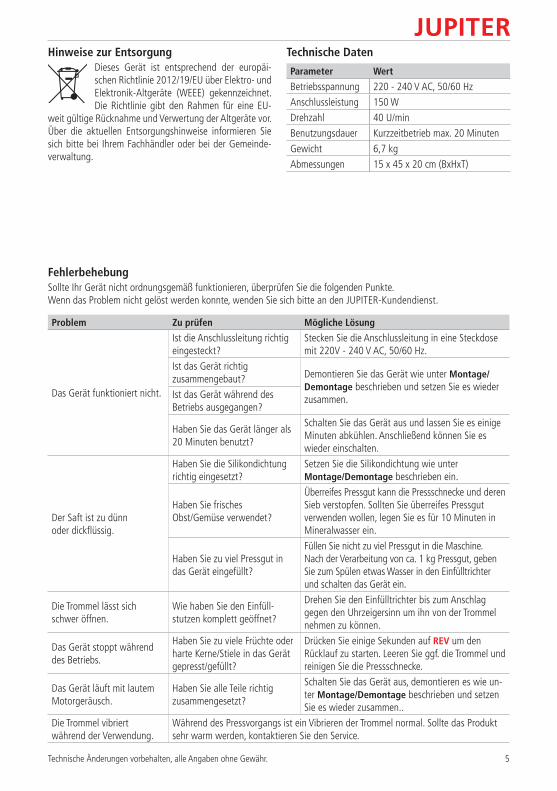
Pressschnecke reinigen• Ziehen Sie zum Reinigen die beiden Gummipads im In-
neren der Pressschnecke ab.
• Reinigen Sie die Pressschnecke innen und außen gründ-lich mit der beiliegenden Reinigungsbürste.
• Spülen Sie die Pressschnecke unter fließendem Wasser gründlich ab.
• Trocknen Sie die Pressschnecke nur mit einem trockenen Tuch. Nicht heiß trocknen!
• Setzen Sie die Gummipads wieder ein.
AufbewahrungBewahren Sie das Gerät in der Originalverpackung, tro-cken, staubfrei, kühl und für Kinder unzugänglich auf.
Technische Änderungen vorbehalten, alle Angaben ohne Gewähr. 5
FehlerbehebungSollte Ihr Gerät nicht ordnungsgemäß funktionieren, überprüfen Sie die folgenden Punkte. Wenn das Problem nicht gelöst werden konnte, wenden Sie sich bitte an den JUPITER-Kundendienst.
Problem Zu prüfen Mögliche Lösung
Das Gerät funktioniert nicht.
Ist die Anschlussleitung richtig eingesteckt?
Stecken Sie die Anschlussleitung in eine Steckdose mit 220V - 240 V AC, 50/60 Hz.
Ist das Gerät richtig zusammengebaut? Demontieren Sie das Gerät wie unter Montage/
Demontage beschrieben und setzen Sie es wieder zusammen.Ist das Gerät während des
Betriebs ausgegangen?
Haben Sie das Gerät länger als 20 Minuten benutzt?
Schalten Sie das Gerät aus und lassen Sie es einige Minuten abkühlen. Anschließend können Sie es wieder einschalten.
Der Saft ist zu dünn oder dickflüssig.
Haben Sie die Silikondichtung richtig eingesetzt?
Setzen Sie die Silikondichtung wie unter Montage/Demontage beschrieben ein.
Haben Sie frisches Obst/Gemüse verwendet?
Überreifes Pressgut kann die Pressschnecke und deren Sieb verstopfen. Sollten Sie überreifes Pressgut verwenden wollen, legen Sie es für 10 Minuten in Mineralwasser ein.
Haben Sie zu viel Pressgut in das Gerät eingefüllt?
Füllen Sie nicht zu viel Pressgut in die Maschine. Nach der Verarbeitung von ca. 1 kg Pressgut, geben Sie zum Spülen etwas Wasser in den Einfülltrichter und schalten das Gerät ein.
Die Trommel lässt sich schwer öffnen.
Wie haben Sie den Einfüll- stutzen komplett geöffnet?
Drehen Sie den Einfülltrichter bis zum Anschlag gegen den Uhrzeigersinn um ihn von der Trommel nehmen zu können.
Das Gerät stoppt während des Betriebs.
Haben Sie zu viele Früchte oder harte Kerne/Stiele in das Gerät gepresst/gefüllt?
Drücken Sie einige Sekunden auf REV um den Rücklauf zu starten. Leeren Sie ggf. die Trommel und reinigen Sie die Pressschnecke.
Das Gerät läuft mit lautem Motorgeräusch.
Haben Sie alle Teile richtig zusammengesetzt?
Schalten Sie das Gerät aus, demontieren es wie un-ter Montage/Demontage beschrieben und setzen Sie es wieder zusammen..
Die Trommel vibriert während der Verwendung.
Während des Pressvorgangs ist ein Vibrieren der Trommel normal. Sollte das Produkt sehr warm werden, kontaktieren Sie den Service.
Hinweise zur EntsorgungDieses Gerät ist entsprechend der europäi-schen Richtlinie 2012/19/EU über Elektro- und Elektronik-Altgeräte (WEEE) gekennzeichnet. Die Richtlinie gibt den Rahmen für eine EU-
weit gültige Rücknahme und Verwertung der Altgeräte vor. Über die aktuellen Entsorgungshinweise informieren Sie sich bitte bei Ihrem Fachhändler oder bei der Gemeinde-verwaltung.
Technische Daten
Parameter Wert
Betriebsspannung 220 - 240 V AC, 50/60 Hz
Anschlussleistung 150 W
Drehzahl 40 U/min
Benutzungsdauer Kurzzeitbetrieb max. 20 Minuten
Gewicht 6,7 kg
Abmessungen 15 x 45 x 20 cm (BxHxT)
Operating Instructions
6 Subject to technical changes without notice; no responsibility is accepted for the accuracy of this information.
EN Congratulations on the purchase of your new JUPITER kitchen appliance. You have chosen a
high-quality, modern appliance. Further information on this and other products is available on our website at www.jupiter-gmbh.de.
This appliance is intended for extracting fresh juice from fruit or vegetables in normal domestic quantities in a do-mestic environment or in domestic-like non-commercial applications. Domestic-like applications include, for example, use in staff break rooms in shops, offices, agricultural and other commercial businesses, small hotels and similar residen-tial facilities. Only use this appliance for normal domestic quantities and only for short-interval use of max. 20 min-utes at a time. The appliance is maintenance-free.
Please read the operating instructions and, in particu-lar, the safety notes, before using the appliance for the first time.Keep the operating instructions safe and always store them with the appliance.
Important safety notes
WARNING Risk of electric shock!• Unplug the appliance from the mains before cleaning.• Never immerse the appliance or the power supply cord
in water.• Never hold the appliance or the power supply cord un-
der running water.• Do not use the appliance if there is any evidence of
damage to either the appliance itself or the power sup-ply cord.
CAUTION Rotating parts can cause injury!• Never put your hand into the appliance when the motor
is running. • Never push the food to be juiced into the appliance by
hand. Always use the pusher A.
CAUTION Falling parts can cause injury! The appli-ance weighs approx. 7 kg!
• When carrying the appliance, always hold the motor unit F with two hands.
• The drum D is not fixed to the motor unit F, just placed on it!
CAUTION Unintentional motor start-up!• Unplug the appliance from the mains:
- after every use - when leaving the room - in the event of a power cut - in the event of a malfunction.
• Note the information on the rating plate and only use the appliance in accordance with this information.
• Always ensure that the appliance is completely assem-bled before operating it. Always fit and engage the fill-ing hopper B before operating the appliance!
• Children should not use the appliance. They should not play with it either.
• This appliance may be used by persons with physical, sensory or mental disabilities, or by those who lack ex-perience and/or knowledge, if they are supervised or have been instructed in the safe use of the appliance and have understood the dangers involved.
• In order to avoid damage, keep the appliance and the power supply cord away from sharp edges and hot sur-faces.
• The appliance may only be repaired by JUPITER customer service.
Scope of delivery• Pusher A• Drum D with squeezing screw C and filling hopper B• Motor unit F• Cleaning brush• Container (2 x)• Recipe book• Operating instructions
Parts of the
A
B
C
D
I
F
HON
OFF
REV
E
G
2
3
1
4clic
Y X
Subject to technical changes without notice; no responsibility is accepted for the accuracy of this information. 7
A PusherB Filling hopper C Squeezing screwD DrumE On/off switch (3 levels)
First use• Make sure that the appliance's plug is disconnected
from the mains and that the on/off switch E is set to OFF (centre position).
• Before using the appliance for the first time, thoroughly clean all parts of the appliance (see section Cleaning).
• Always ensure that the appliance is completely assem-bled before operating it. Always fit and engage the fill-ing hopper B before operating the appliance!
• Place the appliance on a non-slip, even and clean sur-face.
• Place one container under the juice outlet H and the other under the pulp outlet I.
• Plug in the mains plug.
Switching on the appliance CAUTION Rotating parts can cause injury!
Never put your hand into the appliance when the motor is running.
NOTE Risk of damage to the appliance!• Do not insert any objects into the juice outlet H or pulp
outlet I while operating the appliance.• Always fit and engage the filling hopper B before oper-
ating the appliance!• Never operate the appliance when the drum is empty.• Do not disassemble the appliance during operation.• Do not move the appliance during operation.
NOTE Damage due to being operated for too long!
The appliance is only suitable for short-interval operation of max. 20 minutes at a time. After that the appliance must cool down.
NOTE Motor can overheat!If the appliance does not start when you switch it on (E is set to ON), press REV for 2 - 3 seconds. If this does not help, switch the appliance off immediately (see section Troubleshooting).
The appliance has a 3-level on/off switch.
• ON ON; appliance is switched on, motor is running.• OFF OFF; appliance is switched off.• REV REVERSE; button; appliance runs backwards. This
releases any food to be juiced that is jammed in the squeezing screw (see section Troubleshooting).
F Motor unitG Rating plateH Juice outletI Pulp outlet
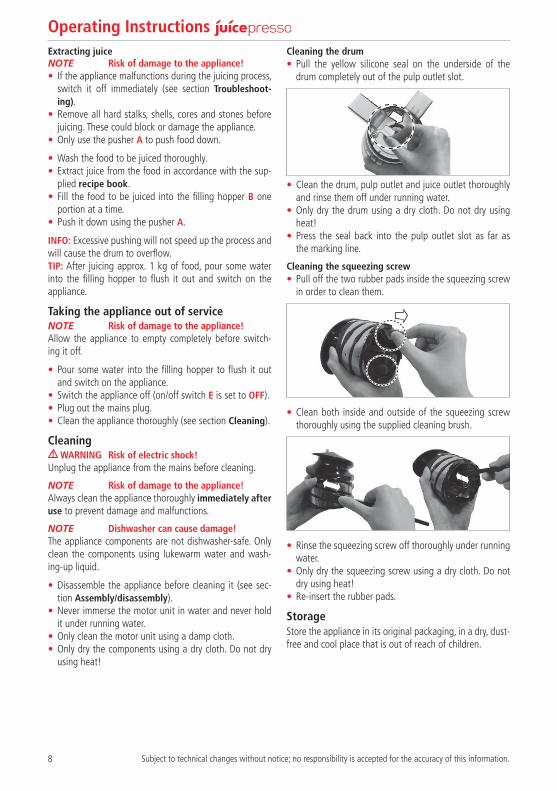
Disassembly before first useThe is supplied with the squeezing screw C inserted in the drum D and the filling hopper B fitted. Dis-assemble and clean these parts before first use.
• Hold the drum D securely and turn the filling hopper B anti-clockwise until the Open marking is above the marking on the drum (detail X).
• Remove the filling hopper B in an upward direction.• Lift the squeezing screw C up out of the drum D.
TIP: To do this, reach your index finger under the first ridge of the squeezing screw.
Assembly/disassembly• Make sure:
- that the appliance's plug is disconnected from the mains and that the on/off switch E is set to OFF (cen-tre position).
- that the yellow silicone seal on the underside of the drum D is fitted as far as the marking line in the slot on the pulp outlet I.
1 Position the drum D flush on the motor unit F. IMPORTANT: Position the juice outlet H over the round recess in the motor unit F and the pulp outlet I over the square recess.
2 Insert the squeezing screw C into the drum D and press the squeezing screw down by turning it slightly.
3 Position the filling hopper B on the drum D so that the Open marking is above the marking on the drum (detail X).
4 Turn the filling hopper B clockwise until the Close marking is above the marking on the drum (detail Y) and engages with an audible click.
• It can be disassembled using the same steps in reverse order.
Operating Instructions
8 Subject to technical changes without notice; no responsibility is accepted for the accuracy of this information.
Extracting juiceNOTE Risk of damage to the appliance!• If the appliance malfunctions during the juicing process,
switch it off immediately (see section Troubleshoot-ing).
• Remove all hard stalks, shells, cores and stones before juicing. These could block or damage the appliance.
• Only use the pusher A to push food down.
• Wash the food to be juiced thoroughly.• Extract juice from the food in accordance with the sup-
plied recipe book. • Fill the food to be juiced into the filling hopper B one
portion at a time. • Push it down using the pusher A.
INFO: Excessive pushing will not speed up the process and will cause the drum to overflow.TIP: After juicing approx. 1 kg of food, pour some water into the filling hopper to flush it out and switch on the appliance.
Taking the appliance out of serviceNOTE Risk of damage to the appliance!Allow the appliance to empty completely before switch-ing it off.
• Pour some water into the filling hopper to flush it out and switch on the appliance.
• Switch the appliance off (on/off switch E is set to OFF).• Plug out the mains plug.• Clean the appliance thoroughly (see section Cleaning).
Cleaning WARNING Risk of electric shock!
Unplug the appliance from the mains before cleaning.
NOTE Risk of damage to the appliance!Always clean the appliance thoroughly immediately after use to prevent damage and malfunctions.
NOTE Dishwasher can cause damage!The appliance components are not dishwasher-safe. Only clean the components using lukewarm water and wash-ing-up liquid.
• Disassemble the appliance before cleaning it (see sec-tion Assembly/disassembly).
• Never immerse the motor unit in water and never hold it under running water.
• Only clean the motor unit using a damp cloth.• Only dry the components using a dry cloth. Do not dry
using heat!
Cleaning the drum• Pull the yellow silicone seal on the underside of the
drum completely out of the pulp outlet slot.
• Clean the drum, pulp outlet and juice outlet thoroughly and rinse them off under running water.
• Only dry the drum using a dry cloth. Do not dry using heat!
• Press the seal back into the pulp outlet slot as far as the marking line.
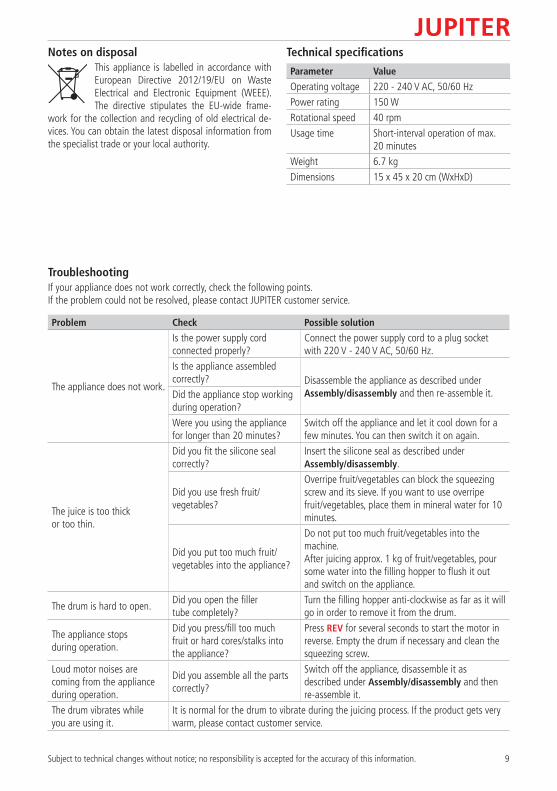
Cleaning the squeezing screw• Pull off the two rubber pads inside the squeezing screw
in order to clean them.
• Clean both inside and outside of the squeezing screw thoroughly using the supplied cleaning brush.
• Rinse the squeezing screw off thoroughly under running water.
• Only dry the squeezing screw using a dry cloth. Do not dry using heat!
• Re-insert the rubber pads.
StorageStore the appliance in its original packaging, in a dry, dust-free and cool place that is out of reach of children.
Subject to technical changes without notice; no responsibility is accepted for the accuracy of this information. 9
TroubleshootingIf your appliance does not work correctly, check the following points. If the problem could not be resolved, please contact JUPITER customer service.
Problem Check Possible solution
The appliance does not work.
Is the power supply cord connected properly?
Connect the power supply cord to a plug socket with 220 V - 240 V AC, 50/60 Hz.
Is the appliance assembled correctly? Disassemble the appliance as described under
Assembly/disassembly and then re-assemble it.Did the appliance stop working during operation?
Were you using the appliance for longer than 20 minutes?
Switch off the appliance and let it cool down for a few minutes. You can then switch it on again.
The juice is too thick or too thin.
Did you fit the silicone seal correctly?
Insert the silicone seal as described under Assembly/disassembly.
Did you use fresh fruit/ vegetables?
Overripe fruit/vegetables can block the squeezing screw and its sieve. If you want to use overripe fruit/vegetables, place them in mineral water for 10 minutes.
Did you put too much fruit/vegetables into the appliance?
Do not put too much fruit/vegetables into the machine. After juicing approx. 1 kg of fruit/vegetables, pour some water into the filling hopper to flush it out and switch on the appliance.
The drum is hard to open.Did you open the filler tube completely?
Turn the filling hopper anti-clockwise as far as it will go in order to remove it from the drum.
The appliance stops during operation.
Did you press/fill too much fruit or hard cores/stalks into the appliance?
Press REV for several seconds to start the motor in reverse. Empty the drum if necessary and clean the squeezing screw.
Loud motor noises are coming from the appliance during operation.
Did you assemble all the parts correctly?
Switch off the appliance, disassemble it as described under Assembly/disassembly and then re-assemble it.
The drum vibrates while you are using it.
It is normal for the drum to vibrate during the juicing process. If the product gets very warm, please contact customer service.
Notes on disposalThis appliance is labelled in accordance with European Directive 2012/19/EU on Waste Electrical and Electronic Equipment (WEEE). The directive stipulates the EU-wide frame-
work for the collection and recycling of old electrical de-vices. You can obtain the latest disposal information from the specialist trade or your local authority.
Technical specifications
Parameter Value
Operating voltage 220 - 240 V AC, 50/60 Hz
Power rating 150 W
Rotational speed 40 rpm
Usage time Short-interval operation of max. 20 minutes
Weight 6.7 kg
Dimensions 15 x 45 x 20 cm (WxHxD)

Mode d’emploi du
10 Toutes les données sont sans garantie et sous réserve de modifications techniques..
FR Félicitations pour votre achat de ce nouvel ap-pareil ménager JUPITER. Avec lui, vous avez
choisi un appareil de qualité et moderne. Vous trouve-rez plus d'informations à son sujet et sur nos autres produits sur Internet à l'adresse www.jupiter-gmbh.de.
Cet appareil sert à presser fruits ou légumes pour les trans-former en jus frais en quantités usuelles d'un usage privé ou d'applications similaires, autres que professionnelles. Les applications d'un usage privé incluent par exemple une utilisation dans les cuisines des employés de bou-tiques, bureaux, exploitations agricoles et autres lieux de travail, les petits hôtels et infrastructures similaires. N'utilisez cet appareil que pour des quantités habituelles à un usage privé et pour une durée de fonctionnement ne dépassant pas 20 minutes. L'appareil est sans entretien.
Avant d'utiliser cet appareil pour la première fois, lisez son mode d'emploi et ses consignes de sécurité avec attention.Conservez le mode d'emploi avec soin et toujours avec l'appareil.
Instructions importantes pour votre sécurité
AVERTISSEMENT Risque d'électrocution !• Débranchez l'appareil avant de le nettoyer.• Ne trempez pas l'appareil et son câble d'alimentation
dans l'eau.• Ne tenez pas l'appareil et son câble d'alimentation sous
l'eau courante.• N'utilisez l'appareil que si lui et son câble ne présentent
pas de dommages.
ATTENTION Risque de blessures sur les pièces en rotation !
• Ne saisissez pas l'appareil quand le moteur est en marche. • Ne guidez jamais l'aliment à presser à la main. Utilisez
toujours le poussoir A.
ATTENTION Risque de blessures occasionné par la chute d'objets ! Poids de l'appareil env. 7 kg !
• Durant son transport, tenez toujours l'appareil à deux mains au niveau de l'unité motrice F.
• Le tambour D n'est pas fixé à l'unité motrice F, il est simplement posé !
ATTENTION Démarrage inopiné du moteur !• Déconnectez l'appareil du secteur (débranchement de
la prise secteur) : - après chaque utilisation - quand vous quittez la pièce - en cas de panne de courant - en cas de dysfonctionnement.
• Respectez les valeurs de la plaque signalétique et n'utili-sez l'appareil que conformément à ces valeurs.
• N'utilisez l'appareil qu'une fois celui-ci assemblé. Ne l'utilisez jamais sans y avoir installé et encliqueté l'entonnoir B !
• Les enfants ne doivent pas utiliser l'appareil. Même pour jouer.
• Cet appareil ne peut être utilisé par des personnes souffrant de capacités physiques, sensorielles ou men-tales déficientes, ou manquant d'expérience et/ou de connaissance que sous surveillance ou après avoir reçu les instructions nécessaires sur l'appareil et compris les risques potentiels de son utilisation.
• Pour éviter tous dégâts, maintenez l'appareil et son câble d'alimentation loin des arêtes tranchantes et des surfaces chaudes.
• Seul le service après-vente de JUPITER est habilité à effectuer des réparations sur l'appareil.
Éléments fournis• Poussoir A• Tambour D avec vis sans fin à presser C et entonnoir B• Unité motrice F• Brosse de nettoyage• 2 récipients• Livre de recettes• Mode d'emploi
Composants du
A
B
C
D
I
F
HON
OFF
REV
E
G
2
3
1
4clic
Y X
Toutes les données sont sans garantie et sous réserve de modifications techniques. 11
A PoussoirB EntonnoirC Vis sans fin à presserD TambourE Interrupteur (3 positions)
Mise en service• Assurez-vous que la prise électrique de l’appareil est
débranchée et que l’interrupteur E est sur OFF (position centrale) !
• Avant leur première utilisation, nettoyez soigneusement tous les éléments de l’appareil (voir la section Net-toyage).
• N’utilisez l’appareil qu’une fois celui-ci assemblé. Ne l’utilisez jamais sans y avoir installé et encliqueté l’entonnoir B !
• Placez l’appareil sur un plan antidérapant, plat et propre.• Placez un récipient sous le bec d’écoulement du jus H et
un autre sous le bec d’écoulement de la pulpe I.• Branchez la prise secteur.
Mise en marche de l’appareil ATTENTION Risque de blessures sur les pièces
en rotation !Ne saisissez pas l’appareil quand le moteur est en marche.
NOTE Détérioration de l’appareil !• N’insérez rien dans le bec d’écoulement du jus H ou dans le
bec d’écoulement de la pulpe I pendant le fonctionnement.• N’utilisez jamais l’appareil sans y avoir installé et encli-
queté l’entonnoir B !• Ne faites jamais fonctionner l’appareil avec un tambour
vide.• Ne démontez pas l’appareil pendant le fonctionnement.• Ne déplacez pas l’appareil pendant le fonctionnement.
NOTE Détérioration due à une trop longue durée de fonctionnement !
L’appareil est conçu pour une durée de fonctionnement ne dépassant pas 20 minutes. Au bout de ce laps de temps, l’appareil doit refroidir.
NOTE Surchauffe du moteur !Si l’appareil ne fonctionne pas lors de sa mise en route (E sur ON), appuyez pendant 2 ou 3 secondes sur REV. Si cela ne règle pas le problème, éteignez immédiatement l’appareil (voir section Dépannage).
L’appareil est équipé d’un interrupteur à 3 positions.
• ON MARCHE ; l’appareil est activé, le moteur tourne.• OFF ARRÊT ; l’appareil est éteint.• REV MARCHE INVERSE ; bouton ; l’appareil fonctionne
en sens inverse. Un aliment à presser coincé dans la vis sans fin à presser peut ainsi être enlevé (voir section Dépannage).
F Unité motriceG Plaque signalétiqueH Bec d'écoulement du jusI Bec d'écoulement de la
pulpe
Démontage avant la première mise en serviceLe est livré avec la vis sans fin à presser C installée ainsi que l’entonnoir B posé dans le tambour D. Démontez ces éléments à des fins de nettoyage avant la première mise en service.
• Maintenez fermement le tambour D et tournez l’enton-noir B dans le sens contraire des aiguilles d’une montre jusqu’à ce que le repère Open se trouve au-dessus du repère du tambour (détail X).
• Retirez l’entonnoir B par le haut.• Enlevez, par le haut, la vis sans fin à presser C du tam-
bour D.ASTUCE : pour ce faire, saisissez avec l’index la pre-mière spire de la vis sans fin à presser.
Montage / Démontage• Assurez-vous...
- que la prise électrique de l’appareil est débranchée et que l’interrupteur E est sur OFF (position centrale) !
- que le joint en silicone jaune logé sous le tambour D est inséré jusqu’à la ligne repère dans la fente du bec d’écoulement de la pulpe I.
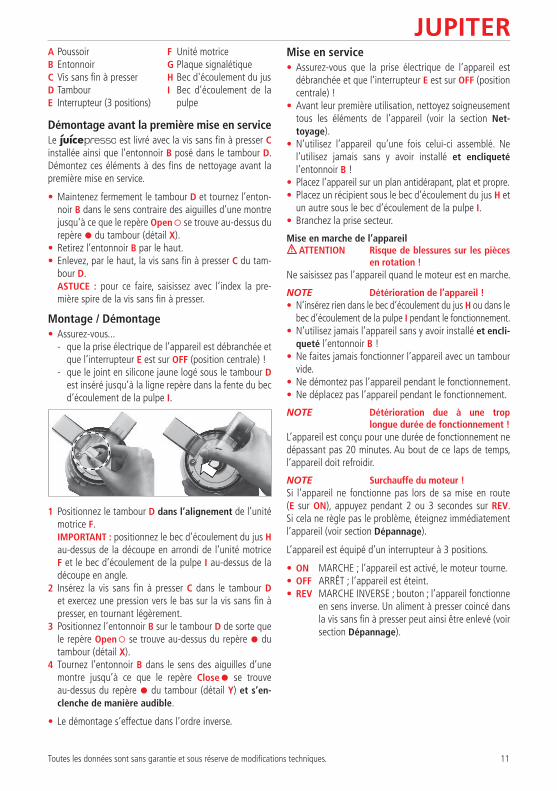
1 Positionnez le tambour D dans l’alignement de l’unité motrice F. IMPORTANT : positionnez le bec d’écoulement du jus H au-dessus de la découpe en arrondi de l’unité motrice F et le bec d’écoulement de la pulpe I au-dessus de la découpe en angle.
2 Insérez la vis sans fin à presser C dans le tambour D et exercez une pression vers le bas sur la vis sans fin à presser, en tournant légèrement.
3 Positionnez l’entonnoir B sur le tambour D de sorte que le repère Open se trouve au-dessus du repère du tambour (détail X).
4 Tournez l’entonnoir B dans le sens des aiguilles d’une montre jusqu’à ce que le repère Close se trouve au-dessus du repère du tambour (détail Y) et s’en-clenche de manière audible.
• Le démontage s’effectue dans l’ordre inverse.
Mode d’emploi du
12 Toutes les données sont sans garantie et sous réserve de modifications techniques..
Obtenir un jus presséNOTE Détérioration de l’appareil !• En cas de défaillance pendant le processus de pressage,
éteignez immédiatement l’appareil (voir section Dépan-nage).
• Retirez tiges, queues, coques, pépins et noyaux trop durs avant de presser. Ceux-ci pourraient boucher ou endom-mager l’appareil.
• Utilisez uniquement le poussoir A pour introduire les aliments.
• Nettoyez soigneusement l’aliment à presser.• Travaillez l’aliment à presser conformément aux indica-
tions figurant dans le livre de recettes fourni. • Introduisez l’aliment à presser dans l’entonnoir B por-
tion par portion. • Poussez les portions avec le poussoir A.
INFO : un remplissage excessif n’accélèrera pas le proces-sus et provoquera un débordement du tambour.ASTUCE : après avoir travaillé env. 1 kg d’aliment à pres-ser, mettez un peu d’eau dans l’entonnoir pour le rincer et mettez l’appareil en route.
Mise hors service de l’appareilNOTE Détérioration de l’appareil !Laissez l’appareil se vider complètement avant de l’éteindre.
• Mettez un peu d’eau dans l’entonnoir pour le rincer et mettez l’appareil en route.
• Éteignez l’appareil (interrupteur E sur OFF).• Débranchez la prise secteur.• Nettoyez soigneusement l’appareil (voir section Net-
toyage).
Nettoyage AVERTISSEMENT Risque d’électrocution !
Débranchez l’appareil avant de le nettoyer.
NOTE Détérioration de l’appareil !Nettoyez soigneusement l’appareil immédiatement après usage afin d’éviter tout endommagement et dys-fonctionnement.
NOTE Détérioration due à un passage au lave-vaisselle !
Les composants de cet appareil ne sont pas adaptés au lave-vaisselle. Nettoyez les composants à l’eau chaude et au produit nettoyant.
• Démontez l’appareil avant de le nettoyer (voir section Montage / Démontage).
• Ne plongez jamais l’unité motrice et ne la passez jamais sous l’eau courante.
• Nettoyez l’unité motrice uniquement avec un chiffon humide.
• Séchez les composants uniquement avec un chiffon sec. Ne les séchez pas à l’air chaud !
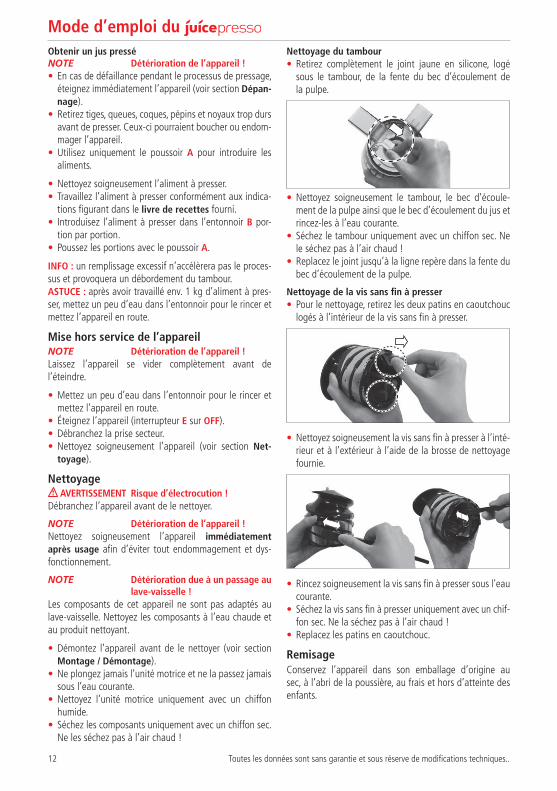
Nettoyage du tambour• Retirez complètement le joint jaune en silicone, logé
sous le tambour, de la fente du bec d’écoulement de la pulpe.
• Nettoyez soigneusement le tambour, le bec d’écoule-ment de la pulpe ainsi que le bec d’écoulement du jus et rincez-les à l’eau courante.
• Séchez le tambour uniquement avec un chiffon sec. Ne le séchez pas à l’air chaud !
• Replacez le joint jusqu’à la ligne repère dans la fente du bec d’écoulement de la pulpe.
Nettoyage de la vis sans fin à presser• Pour le nettoyage, retirez les deux patins en caoutchouc
logés à l’intérieur de la vis sans fin à presser.
• Nettoyez soigneusement la vis sans fin à presser à l’inté-rieur et à l’extérieur à l’aide de la brosse de nettoyage fournie.
• Rincez soigneusement la vis sans fin à presser sous l’eau courante.
• Séchez la vis sans fin à presser uniquement avec un chif-fon sec. Ne la séchez pas à l’air chaud !
• Replacez les patins en caoutchouc.
RemisageConservez l’appareil dans son emballage d’origine au sec, à l’abri de la poussière, au frais et hors d’atteinte des enfants.
Toutes les données sont sans garantie et sous réserve de modifications techniques. 13
Notes pour la mise au rebutCet appareil est identifié conformément à la Directive européenne 2012/19/UE sur les appareils électriques et électroniques (DEEE). Cette Directive définit le cadre de l’UE pour
une reprise et un recyclage adéquats des anciens appa-reils ménagers. Veuillez vous informer sur les instructions actuelles de mise au rebut auprès de votre commerçant spécialisé ou de votre mairie.
Caractéristiques techniques
Paramètre Valeur
Tension de service 220 - 240 V AC, 50/60 Hz
Puissance de raccordement
150 W
Vitesse de rotation 40 tr/min
Durée d'utilisation Fonctionnement momentané 20 minutes maxi
Poids 6,7 kg
Dimensions 15 x 45 x 20 cm (LxHxP)
DépannageSi votre appareil ne fonctionne pas correctement, contrôlez les points suivants. Si le problème ne peut pas être résolu, veuillez vous adresser au service après-vente de JUPITER.
Problème À contrôler Solution possible
L'appareil ne fonctionne pas.
Le câble d'alimentation est-il branché correctement ?
Branchez le câble d'alimentation dans une prise de 220V - 240 V AC, 50/60 Hz.
L'appareil est-il assemblé correctement ? Démontez l'appareil comme expliqué section
Montage / Démontage et assemblez-le à nouveau.L'appareil s'est-il éteint en cours de fonctionnement ?
Avez-vous utilisé l'appareil pendant plus de 20 minutes ?
Éteignez l'appareil et laissez-le refroidir quelques minutes. Vous pourrez ensuite le remettre en route.
Le jus est trop liquide ou trop épais.
Avez-vous inséré le joint en silicone correctement ?
Insérez le joint en silicone comme expliqué section Montage / Démontage .
Avez-vous utilisé des fruits / légumes frais ?
Un aliment à presser trop mûr peut boucher la vis sans fin à presser et son tamis. Si vous voulez utiliser un aliment trop mûr, placez-le pendant 10 minutes dans de l'eau minérale gazeuse.
Avez-vous mis une trop grande quantité d'aliment à presser dans l'appareil ?
Ne mettez pas une trop grande quantité d'aliment à presser dans la machine. Après avoir travaillé env. 1 kg d'aliment à presser, mettez un peu d'eau dans l'entonnoir pour le rincer et mettez l'appareil en route.
Le tambour est difficile à ouvrir.
Avez-vous ouvert l'embout de remplissage complètement ?
Tournez l'entonnoir dans le sens contraire des aiguilles d'une montre, jusqu'en butée, pour pouvoir le désolidariser du tambour.
L'appareil s'arrête pendant le fonctionnement.
Avez-vous mis / pressé une trop grande quantité de fruits ou avez-vous mis des pépins / queues trop dur(e)s dans l'appareil ?
Appuyez quelques secondes sur REV pour lancer la marche inverse. Videz le cas échéant le tambour et nettoyez la vis sans fin à presser.
L'appareil fonctionne en émettant un bruit de moteur important.
Avez-vous assemblé toutes les pièces correctement ?
Éteignez l'appareil, démontez-le comme expliqué section Montage / Démontage et assemblez-le à nouveau.
Le tambour vibre pendant l'utilisation.
Pendant le processus de pressage, une vibration du tambour est normale. Si le produit devient très chaud, contactez le service après-vente.

14
Für die frische Küche

15

Jupiter Küchenmaschinen GmbH- Customer Service Center -Raiffeisenstraße 873249 WernauGermany
Telefon: +49 (0)7153 - 55930 0Fax: +49 (0)7153 - 55930 29
eMail: [email protected]
JUPITER Internetseite: www.jupiter-gmbh.de 866
100-
023
01/2
015