Embed Size (px)
Citation preview
user manual
plugin
2
Melodyne plugin Version 1.0 user manualThis printed documentation refers to Melodyne plugin 1.0. Please check your program folder for updated documentations in pdf format. In addition, the latestdocumentation can always be downloaded from www.celemony.com.
Author: Uwe G.Hoenig, Stefan LindlahrTranslation: Ewan Whyte
Celemony Software GmbHValleystr. 25, 81371 München, Germanywww.celemony.comSupport: [email protected]
The manual and the software described therein are supplied under formal licence.They may be used and copied only under the conditions of this licensing agree-ment. The data contained in the manual only serves for information purposes andmay be changed without prior announcement. The information contained in themanual does not constitute a legal obligation of Celemony Software GmbH.Celemony is not responsible for any eventual faulty or inaccurate informationcontained in the manual. The manual and any parts thereof must not be repro-duced or transmitted without the prior and explicit permission of CelemonySoftware GmbH.Melodyne is a registered trademark of Celemony Software GmbH. All product andcompany names are registered trademarks or brands of their respective holders.Apple, Mac, AudioUnit and Mac OS X are registered trademarks of Apple Compu-ter. Inc. in the United States and/or other countries. Windows XP is a registeredtrademark of Microsoft Corporation in the United States and/or other countries.Pentium and Intel are registered trademarks of Intel Corporation. Rewire is a regi-stered trademark of Propellerhead Software
© Celemony Software GmbH, 2006All rights reserved
Melodyne plugin 1.0 user manual

3Melodyne plugin 1.0 user manual
Dear Melodyne customer,You can find the Melodyne Handbook in pdf format in English, German, Spanish,French and Japanese on our web site: www.celemony.com along with the latestversion of Melodyne and a whole variety of tips and tricks designed to help youmake the best possible use of the program. Check it out. It's well worth a visit.
Lieber Melodyne-Kunde,Das vorliegende Melodyne-Handbuch finden Sie als pdf in den Sprachen Englisch,Deutsch, Spanisch, Französisch und Japanisch auch auf unserer Webseite unterwww.celemony.com. Dort finden Sie auch die jeweils aktuellste Version vonMelodyne und viele Tipps und Trick rund um das Programm. Ein Besuch lohntsich also...
Estimados clientes.En nuestro sitio web www.celemony.com encontrará el manual de Melodyneen formato pdf, disponible en Inglés, Alemán, Español, Francés y Japonés.Además encontrará la última versión del programa y una amplia variadad detrucos y sugerencias diseñados para ayudarle a lograr el mejor uso posiblede Melodyne. Compruébelo; vale la pena una visita.
Cher Client Melodyne,Vous trouverez le Guide d'utilisation de Melodyne au format PDF en Anglais,Allemand, Espagnol, Français et Japonais sur notre site web: www.celemony.com,ainsi que la toute dernière version de Melodyne et toutes sortes de trucs etastuces conçus pour vous permettre de tirer tout le parti possible du logiciel. Ne manquez pas d'y faire une visite, vous n'y perdrez pas votre temps.
4
Content
Melodyne plugin 1.0 user manual
Content
Welcome to Melodyne plugin ...................................................................6
Overview: The surface of Melodyne plugin.................................................8Overview: The tools of Melodyne plugin ..................................................10
1. Installation and Authorization......................................12Are you up-to-date? ..............................................................................16
2. Introduction: How Melodyne plugin functions ..............................17
Melodyne plugin and the host ................................................................18Working strategies ...............................................................................20The peculiarities of hosts ......................................................................22
3. Operation...............................................................................24
4. The Interface and Menu Functions ........................30Overview..............................................................................................30Melodyne plugin's menu........................................................................32The Settings menu ...............................................................................32The Select menu ..................................................................................34The Edit menu .....................................................................................35The Algorithm menu .............................................................................35The View menu.....................................................................................36The Help menu ....................................................................................37Other elements of the interface..............................................................37Select Time Grid...................................................................................37Select Pitch grid ..................................................................................38Show / Hide Stave ................................................................................38Zooming and Scrolling ..........................................................................39
5. Tools and Editing Functions ........................................40Editing the pitch with the Main tool .......................................................41The grid for editing pitch.......................................................................43The Correct Pitch macro........................................................................44Editing timing with the Main tool ...........................................................45Automatic time correction .....................................................................49"Normal" time-stretching .......................................................................50Editing note separators and segments with the Main tool..........................51The tools for editing pitch ....................................................................54The Edit Formants tool..........................................................................58The Amplitude tool ...............................................................................60Tools for editing timing .........................................................................61The Note separation tool .......................................................................63Correcting the automatic detection ........................................................66
Appendix .............................................................................................68Overview of the Functions of Special Keys and Right-clicking ...................68Overview of the double-click functions....................................................68
Index ..................................................................................................69
5
Content
Melodyne plugin 1.0 user manual
6
Welcome to Melodyne plugin
Melodyne plugin 1.0 user manual
Welcome to Melodyne plugin
Melodyne plugin offers you a simple and convenient way of making use ofMelodyne's highly acclaimed technology, which has proved its value in studios allover the world, within your audio/MIDI sequencer or digital audio workstation (the'host') and integrate it into your workflow.
Melodyne plugin's specialty is the editing of vocals: no other solution on themarket offers you greater flexibility, sound quality and musicality when it comes tothis sensitive task. There are few professional productions nowadays in which noMelodyne product is used to optimize the vocals. The listener may not be awarethat any such editing has taken place, but that's precisely what is intended. Thegreat advantage of Melodyne technology is that it sounds outstanding and totallynatural — even when quite major changes have been made to the pitch or timing.
You can take advantage of these special characteristics not only for the editing ofvocals but also for that of almost all single-voice instruments. For example, youcan use Melodyne plugin to correct and optimize – or even radically reshape andcreate something new from – saxophone, flute, violin, bass or even Jew's harprecordings. All that is necessary is for the part to consist of a single line with arecognizable pitch; in other words, a part in which two or more notes never soundsimultaneously and in which there is no overlapping of notes. Since the applica-tion of reverb can result in notes overlapping, 'dry' (i.e. reverberation free) record-ings are more suitable for editing with Melodyne plugin.
You can, however, edit percussive recordings as well as melodic ones withMelodyne plugin. A special algorithm is provided for drum loops, percussion tracksand the like, and it, too, offers highly flexible and high-quality editing possibilitiesthat go far beyond conventional slicing.
Melodyne plugin works somewhat differently to conventional plug-ins, so please doread this manual carefully in order to learn how the software functions – even ifyou're already familiar with other Melodyne products.
7
The manual is divided into the following chapters:
1. Installation and AuthorizationDoubtless you will want to try out Melodyne plugin right away. This chapter coversthe essentials of installing, and authorizing the use of, the plug-in.
2. Introduction: How Melodyne plugin functionsThis deals with the plug-in’s essential functioning principles and basic applica-tions; you should read it before you begin working with Melodyne plugin. Particu-larly important points ('key facts') are displayed in bold type.
3. OperationThis chapter explains how to use Melodyne plugin.
4. The Interface and Menu FunctionsThis chapter takes you on a quick tour of the user interface, describing thefunction of all the controls and menu items.
5. Tools and Editing FunctionsThis chapter introduces you to the tools and functions offered by Melodyne pluginfor the editing of audio material.
Here’s wishing you joy and success with Melodyne plugin,All at Celemony
Welcome to Melodyne plugin
Melodyne plugin 1.0 user manual
8
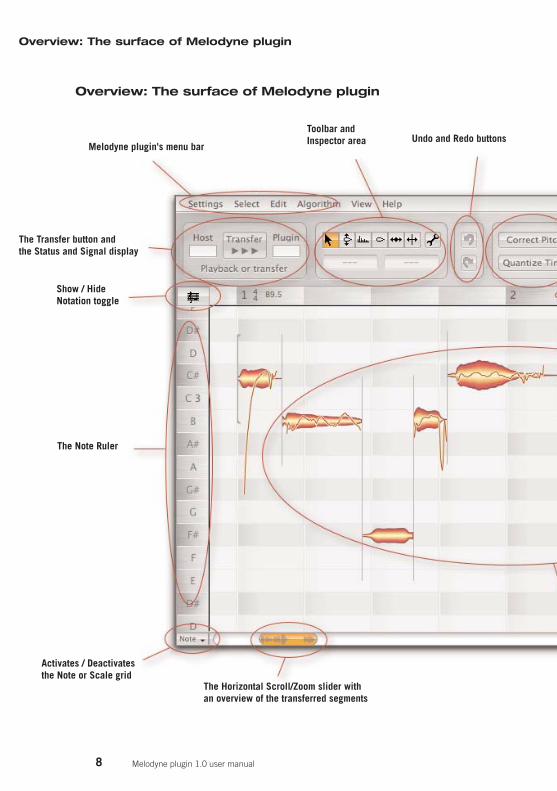
Overview: The surface of Melodyne plugin
Overview: The surface of Melodyne plugin
Melodyne plugin 1.0 user manual
Melodyne plugin's menu bar
Toolbar andInspector area Undo and Redo buttons
The Horizontal Scroll/Zoom slider withan overview of the transferred segments
Activates / Deactivatesthe Note or Scale grid
The Note Ruler
Show / HideNotation toggle
The Transfer button andthe Status and Signal display
9
Overview: The surface of Melodyne plugin
Melodyne plugin 1.0 user manual
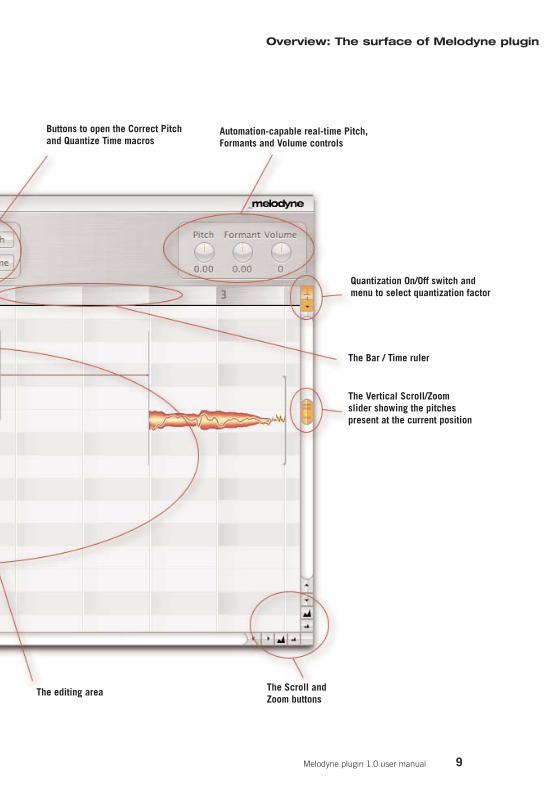
Buttons to open the Correct Pitchand Quantize Time macros
Automation-capable real-time Pitch,Formants and Volume controls
Quantization On/Off switch andmenu to select quantization factor
The Bar / Time ruler
The Vertical Scroll/Zoomslider showing the pitchespresent at the current position
The Scroll andZoom buttons
The editing area
10
Overview: The tools of Melodyne plugin
Melodyne plugin 1.0 user manual
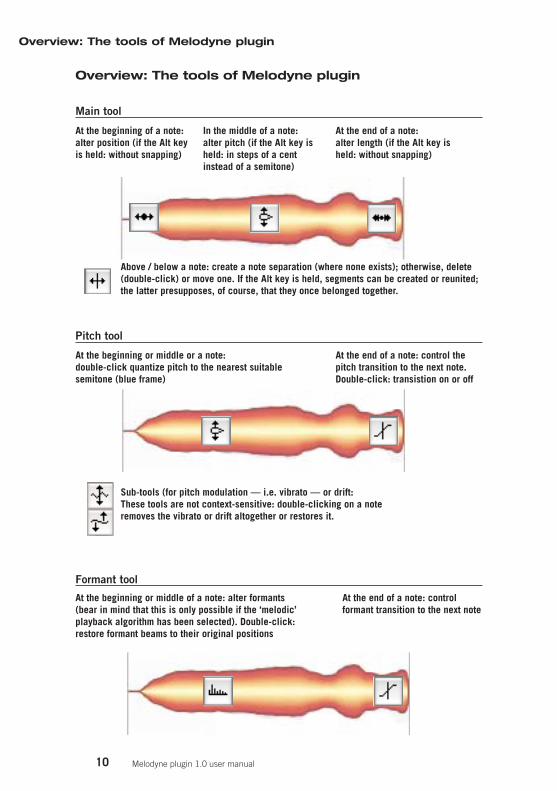
Sub-tools (for pitch modulation — i.e. vibrato — or drift:These tools are not context-sensitive: double-clicking on a noteremoves the vibrato or drift altogether or restores it.
Formant tool
At the beginning of a note:alter position (if the Alt keyis held: without snapping)
At the end of a note:alter length (if the Alt key isheld: without snapping)
Above / below a note: create a note separation (where none exists); otherwise, delete(double-click) or move one. If the Alt key is held, segments can be created or reunited;the latter presupposes, of course, that they once belonged together.
At the beginning or middle or a note:double-click quantize pitch to the nearest suitablesemitone (blue frame)
At the end of a note: controlformant transition to the next note
Main tool
Pitch tool
In the middle of a note:alter pitch (if the Alt key isheld: in steps of a centinstead of a semitone)
At the end of a note: control thepitch transition to the next note.Double-click: transistion on or off
At the beginning or middle of a note: alter formants(bear in mind that this is only possible if the ‘melodic’playback algorithm has been selected). Double-click:restore formant beams to their original positions
Overview: The tools of Melodyne plugin
11
Overview: The tools of Melodyne plugin
Melodyne plugin 1.0 user manual
Time tool
Amplitude tool
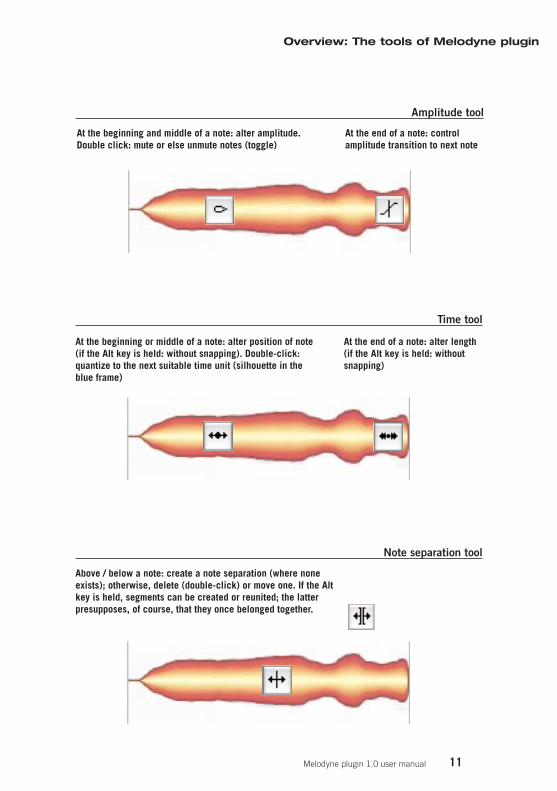
At the beginning and middle of a note: alter amplitude.Double click: mute or else unmute notes (toggle)
At the end of a note: controlamplitude transition to next note
At the beginning or middle of a note: alter position of note(if the Alt key is held: without snapping). Double-click:quantize to the next suitable time unit (silhouette in theblue frame)
At the end of a note: alter length(if the Alt key is held: withoutsnapping)
Note separation tool
Above / below a note: create a note separation (where noneexists); otherwise, delete (double-click) or move one. If the Altkey is held, segments can be created or reunited; the latterpresupposes, of course, that they once belonged together.
12
1. Installation and Authorization
Melodyne plugin 1.0 user manual
1. Installation and Authorization
To begin with, you must install Melodyne plugin on your computer. To do this,start the installation program that you will find on the CD ROM or that you havedownloaded from the Internet. Please note, that the download area and the instal-lation CD contain a number of other items that might interest you besides simplythe installation program itself. These are:
– a folder called 'Movies' containing four films to introduce you to Melodyneplugin and its possibilities
– a folder with small sample arrangements for different hosts that you can use totry out and learn how to use Melodyne plugin
– a demo version of Melodyne studio
Melodyne plugin is constantly being improved. Please check to see whether anewer version is available on the Internet than the one on your installation CD.
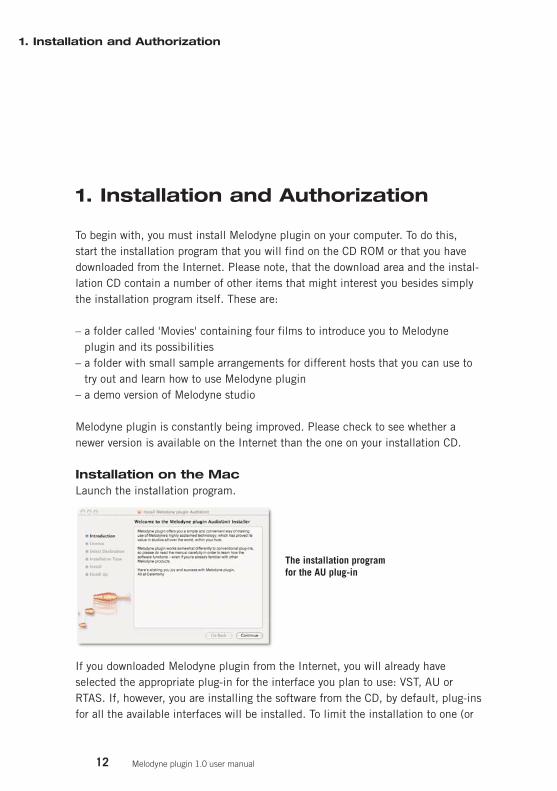
Installation on the MacLaunch the installation program.
The installation program for the AU plug-in
If you downloaded Melodyne plugin from the Internet, you will already haveselected the appropriate plug-in for the interface you plan to use: VST, AU orRTAS. If, however, you are installing the software from the CD, by default, plug-insfor all the available interfaces will be installed. To limit the installation to one (or
13
1. Installation and Authorization
Melodyne plugin 1.0 user manual
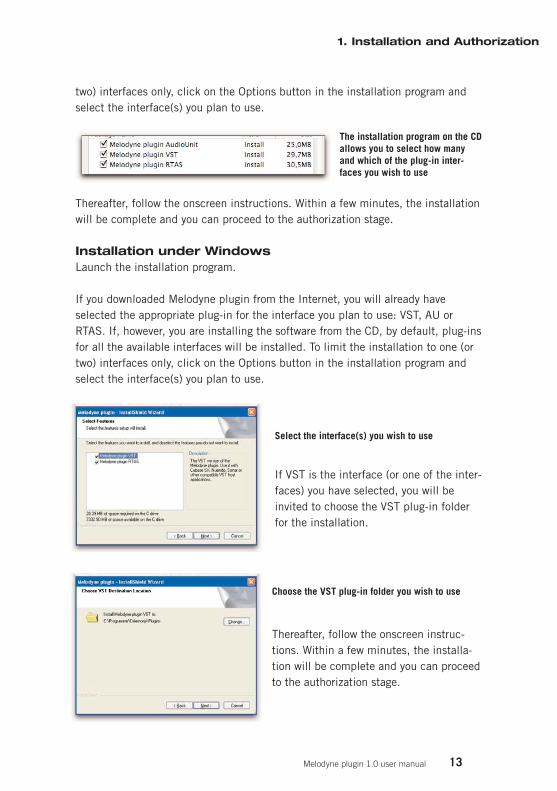
two) interfaces only, click on the Options button in the installation program andselect the interface(s) you plan to use.
The installation program on the CDallows you to select how manyand which of the plug-in inter-faces you wish to use
Thereafter, follow the onscreen instructions. Within a few minutes, the installationwill be complete and you can proceed to the authorization stage.
Installation under WindowsLaunch the installation program.
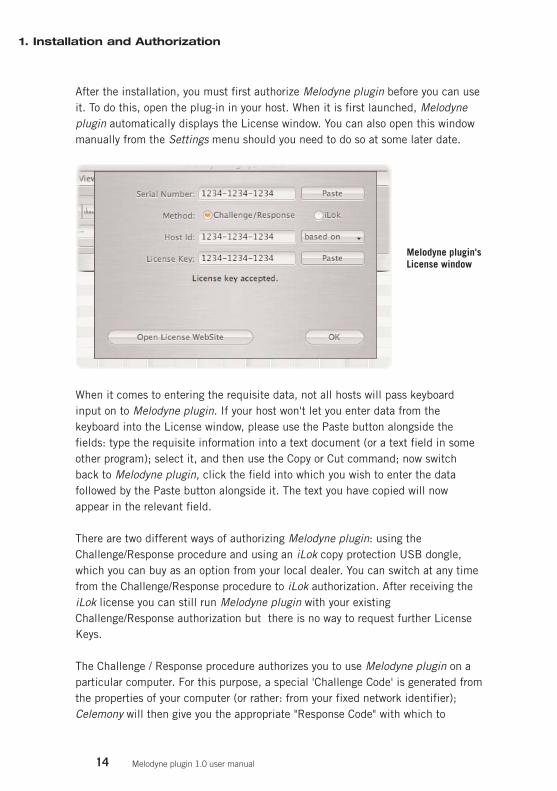
If you downloaded Melodyne plugin from the Internet, you will already haveselected the appropriate plug-in for the interface you plan to use: VST, AU orRTAS. If, however, you are installing the software from the CD, by default, plug-insfor all the available interfaces will be installed. To limit the installation to one (ortwo) interfaces only, click on the Options button in the installation program andselect the interface(s) you plan to use.
Select the interface(s) you wish to use
If VST is the interface (or one of the inter-faces) you have selected, you will beinvited to choose the VST plug-in folderfor the installation.
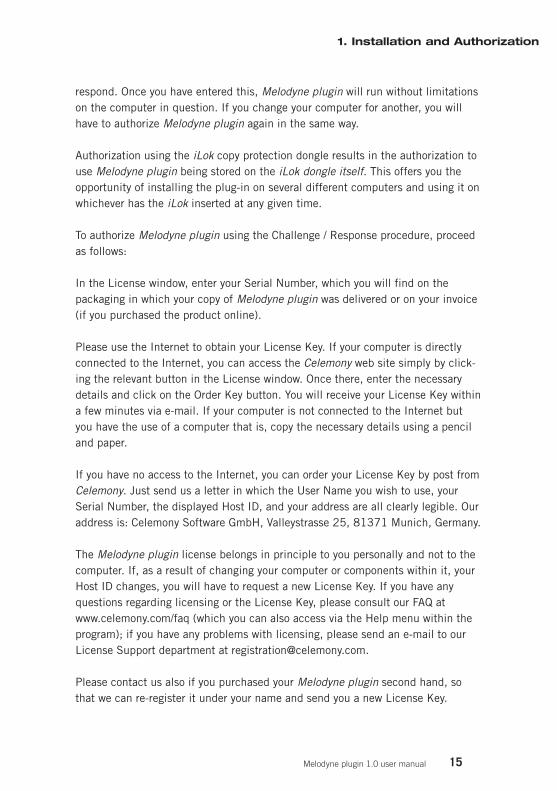
Choose the VST plug-in folder you wish to use
Thereafter, follow the onscreen instruc-tions. Within a few minutes, the installa-tion will be complete and you can proceedto the authorization stage.
14
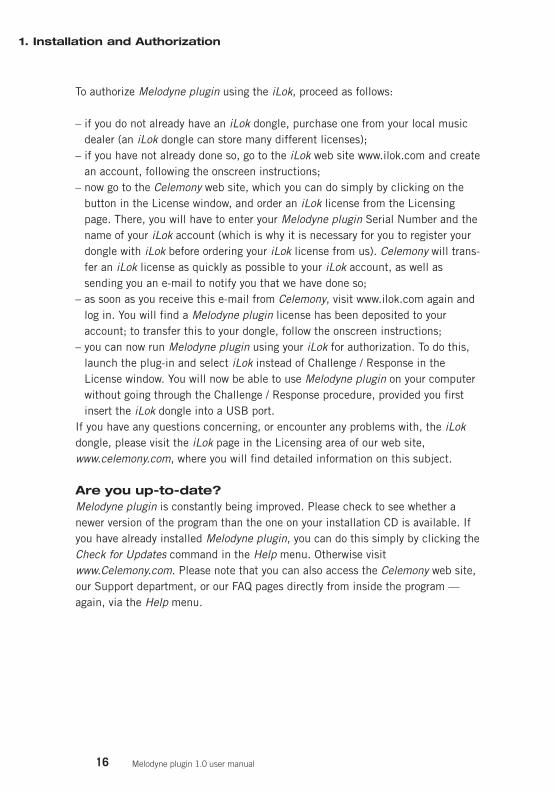
After the installation, you must first authorize Melodyne plugin before you can useit. To do this, open the plug-in in your host. When it is first launched, Melodyneplugin automatically displays the License window. You can also open this windowmanually from the Settings menu should you need to do so at some later date.
Melodyne plugin'sLicense window
When it comes to entering the requisite data, not all hosts will pass keyboardinput on to Melodyne plugin. If your host won't let you enter data from thekeyboard into the License window, please use the Paste button alongside thefields: type the requisite information into a text document (or a text field in someother program); select it, and then use the Copy or Cut command; now switchback to Melodyne plugin, click the field into which you wish to enter the datafollowed by the Paste button alongside it. The text you have copied will nowappear in the relevant field.
There are two different ways of authorizing Melodyne plugin: using theChallenge/Response procedure and using an iLok copy protection USB dongle,which you can buy as an option from your local dealer. You can switch at any timefrom the Challenge/Response procedure to iLok authorization. After receiving theiLok license you can still run Melodyne plugin with your existingChallenge/Response authorization but there is no way to request further LicenseKeys.
The Challenge / Response procedure authorizes you to use Melodyne plugin on aparticular computer. For this purpose, a special 'Challenge Code' is generated fromthe properties of your computer (or rather: from your fixed network identifier);Celemony will then give you the appropriate "Response Code" with which to
1. Installation and Authorization
Melodyne plugin 1.0 user manual
respond. Once you have entered this, Melodyne plugin will run without limitationson the computer in question. If you change your computer for another, you willhave to authorize Melodyne plugin again in the same way.
Authorization using the iLok copy protection dongle results in the authorization touse Melodyne plugin being stored on the iLok dongle itself. This offers you theopportunity of installing the plug-in on several different computers and using it onwhichever has the iLok inserted at any given time.
To authorize Melodyne plugin using the Challenge / Response procedure, proceedas follows:
In the License window, enter your Serial Number, which you will find on thepackaging in which your copy of Melodyne plugin was delivered or on your invoice(if you purchased the product online).
Please use the Internet to obtain your License Key. If your computer is directlyconnected to the Internet, you can access the Celemony web site simply by click-ing the relevant button in the License window. Once there, enter the necessarydetails and click on the Order Key button. You will receive your License Key withina few minutes via e-mail. If your computer is not connected to the Internet butyou have the use of a computer that is, copy the necessary details using a penciland paper.
If you have no access to the Internet, you can order your License Key by post fromCelemony. Just send us a letter in which the User Name you wish to use, yourSerial Number, the displayed Host ID, and your address are all clearly legible. Ouraddress is: Celemony Software GmbH, Valleystrasse 25, 81371 Munich, Germany.
The Melodyne plugin license belongs in principle to you personally and not to thecomputer. If, as a result of changing your computer or components within it, yourHost ID changes, you will have to request a new License Key. If you have anyquestions regarding licensing or the License Key, please consult our FAQ atwww.celemony.com/faq (which you can also access via the Help menu within theprogram); if you have any problems with licensing, please send an e-mail to ourLicense Support department at [email protected].
Please contact us also if you purchased your Melodyne plugin second hand, sothat we can re-register it under your name and send you a new License Key.
15
1. Installation and Authorization
Melodyne plugin 1.0 user manual
16
To authorize Melodyne plugin using the iLok, proceed as follows:
– if you do not already have an iLok dongle, purchase one from your local musicdealer (an iLok dongle can store many different licenses);
– if you have not already done so, go to the iLok web site www.ilok.com and createan account, following the onscreen instructions;
– now go to the Celemony web site, which you can do simply by clicking on thebutton in the License window, and order an iLok license from the Licensingpage. There, you will have to enter your Melodyne plugin Serial Number and thename of your iLok account (which is why it is necessary for you to register yourdongle with iLok before ordering your iLok license from us). Celemony will trans-fer an iLok license as quickly as possible to your iLok account, as well assending you an e-mail to notify you that we have done so;
– as soon as you receive this e-mail from Celemony, visit www.ilok.com again andlog in. You will find a Melodyne plugin license has been deposited to youraccount; to transfer this to your dongle, follow the onscreen instructions;
– you can now run Melodyne plugin using your iLok for authorization. To do this,launch the plug-in and select iLok instead of Challenge / Response in theLicense window. You will now be able to use Melodyne plugin on your computerwithout going through the Challenge / Response procedure, provided you firstinsert the iLok dongle into a USB port.
If you have any questions concerning, or encounter any problems with, the iLokdongle, please visit the iLok page in the Licensing area of our web site,www.celemony.com, where you will find detailed information on this subject.
Are you up-to-date?Melodyne plugin is constantly being improved. Please check to see whether anewer version of the program than the one on your installation CD is available. Ifyou have already installed Melodyne plugin, you can do this simply by clicking theCheck for Updates command in the Help menu. Otherwise visitwww.Celemony.com. Please note that you can also access the Celemony web site,our Support department, or our FAQ pages directly from inside the program —again, via the Help menu.
1. Installation and Authorization
Melodyne plugin 1.0 user manual
2. Introduction: How Melodyne plugin functions
Melodyne plugin does not work in real time like a conventional effects plug-in. Inother words, it does not process the audio signal at the same moment it receivesit, the way an echo or chorus effect does; for it to work in such a way is logicallyimpossible, since Melodyne plugin can also edit the timing of notes (their positionand length), which it can obviously only do once they are all 'there' and it has hada chance to study them; despite its advanced technology, Melodyne plugin cannotlook into the future! We have therefore adopted a different approach that allowsyou to take advantage of Melodyne plugin’s full range of editing possibilities,which go way beyond simple pitch correction, and for this it is necessary for it toanalyze the material in advance and recognize (or 'detect') the individual notes.This brings us to the first of our key facts:
If you want to edit a piece of audio material using Melodyne plugin, you must 'play itthrough to it' first. As you do this, the plug-in will record the passage, analyze it, andthen display it in its own editor so that you can begin work.
Only by playing it through in this way beforehand do you make it possible forMelodyne plugin to shorten, lengthen and quantize notes; modify their volumeindividually; and do other things besides. With a plug-in working entirely in realtime, such things would be impossible (in the absence of a time machine…)without increasing the overall latency of the host to an impracticable level throughthe use of a correspondingly large look-ahead buffer.
Once you've played the material through to the plug-in, or rather, transferred thematerial to the plug-in, thereafter it does work in real time: if you move a note to adifferent pitch in the Editor, alter its length or use the automatic pitch- or timing-correction functions, the changes are displayed, and can be heard, immediately –i.e. without any latency at all – in the context, naturally, of your running arrange-ment.
17
2. Introduction: How Melodyne plugin functions
Melodyne plugin 1.0 user manual
18
You know now that audio material requiring editing using the plug-in must betransferred to it first. Melodyne plugin records these signals and stores them onyour hard disk. It is these files, created by Melodyne plugin – not the audio filescreated by your host – that form the basis for all editing done in the plug-in.
But why doesn't Melodyne plugin simply access the existing audio file used by thehost? Unfortunately, it would serve no useful purpose to reveal to the plug-in thelocation of this file, since the file in question has no idea which parts of it areplayed back when and where, which have been duplicated, nor which have beendeleted or had special playback parameters applied to them; and for Melodyneplugin to make any kind of intelligent use of it, it would need to know all of thesethings and reproduce in its own editor the results of the editing you have alreadydone in the host. There's no alternative, then, but to transfer the material.
Melodyne plugin and the hostThe question that arises now is: how do the audio material on the host track andthe material transferred to Melodyne plugin interact. To this, there is a simpleanswer: our second key fact:
In those parts of the timeline where audio has been transferred to Melodyne plugin andnotes are visible in its editor, you will hear the plug-in and not the host track;conversely, in those parts of the timeline from which nothing has been transferred tothe plug-in or in which no notes are visible in its editor, you will hear the host track notthe plug-in.
You can transfer to the plug-in as many passages from as many different parts ofthe host track as you like; the plug-in retains the overall picture. Wherever thereare notes in its editor, it plays them back and at the same time mutes the hosttrack; in all other places, it is the plug-in that is silent, allowing the host signal topass. You can think of it, if you like, as an automatic railway switch (or ‘point’)that gives priority to the plug-in whenever it has notes to play, but allows the hostsignal to pass at all other times.
2. Introduction: How Melodyne plugin functions
Melodyne plugin 1.0 user manual
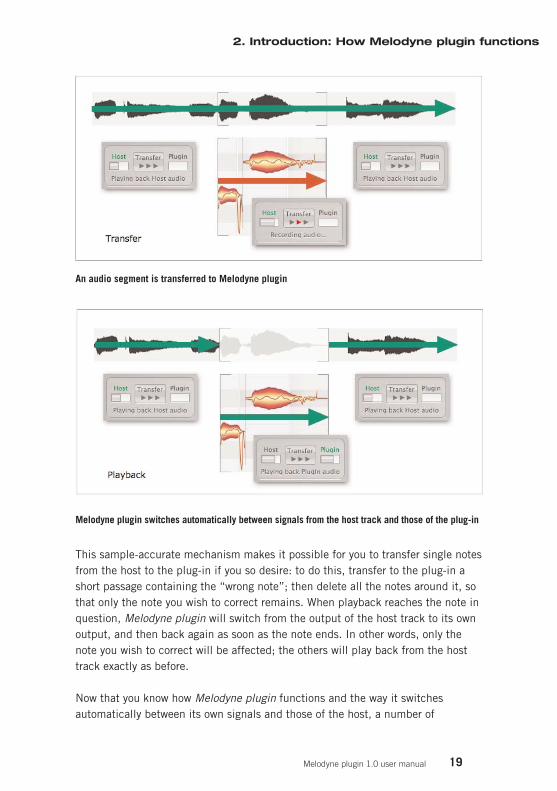
An audio segment is transferred to Melodyne plugin
Melodyne plugin switches automatically between signals from the host track and those of the plug-in
This sample-accurate mechanism makes it possible for you to transfer single notesfrom the host to the plug-in if you so desire: to do this, transfer to the plug-in ashort passage containing the “wrong note”; then delete all the notes around it, sothat only the note you wish to correct remains. When playback reaches the note inquestion, Melodyne plugin will switch from the output of the host track to its ownoutput, and then back again as soon as the note ends. In other words, only thenote you wish to correct will be affected; the others will play back from the hosttrack exactly as before.
Now that you know how Melodyne plugin functions and the way it switchesautomatically between its own signals and those of the host, a number of
19
2. Introduction: How Melodyne plugin functions
Melodyne plugin 1.0 user manual
20
questions arise concerning your own 'working strategy', since there are now two'audio levels': the original signal on the host track and the passages you havetransferred to the plug-in. What happens if, after transferring a passage to theplugin, you modify, delete or re-record it in the host? The answer to that questionconstitutes our third key fact:
Melodyne plugin has no way of knowing when something changes on the host track.
If you rearrange the material on the host track and these changes affect parts ofthe timeline where there are notes in the plug-in, you will have to make correspon-ding changes to the material in the plug-in; otherwise, the plug-in will switch atthe wrong moment from the host’s to the plug-in’s signal, and you will hear thenotes of the 'old' arrangement that are still in the plug-in. The same applies if youdelete the material on the host track or replace it with new material.
Why can't the plug-in register changes made to the host track? The reason is thatthe commonly used plug-in interfaces do not support the type of informationexchange (between plug-in and host) that this would require. The various plug-ininterfaces are simply designed to route audio from the host to the plug-in andback, along with some rudimentary information needed for the purpose of synchro-nization. Melodyne plugin makes skillful use of the various plug-in interfaces toallow for a very advanced type of audio editing that was not envisaged when theywere conceived, but there remain technical and conceptual limitations in thedesign of the plug-in interfaces that create obstacles not even Melodyne plugincan surmount.
Working strategies To work as smoothly as possible and without confusion with the two audio signals(the host track and the material transferred to the plug-in), two basic strategiessuggest themselves immediately; it is not necessary to adopt either of themslavishly, but being aware of them should help you optimize your workflow withMelodyne plugin.
Suppose you have recorded some vocals on one of the tracks of the host and wishto make corrections to certain passages or edit them in some other way. Not allbars, we will assume, are yet in the positions they will eventually occupy: you maywish, for example, later to copy the vocals from the third refrain to the first; inother words, the track is not yet fully arranged but is simply functioning as a kindof container for the various takes, which you have not yet sorted, cleaned up, andmoved to their final destinations.
2. Introduction: How Melodyne plugin functions
Melodyne plugin 1.0 user manual
One approach would be to transfer the audio material on the track in its entirety toMelodyne plugin, where you could remove the mistakes and optimize the material.Once you had done this, you could 'bounce' the results to the hard disk and simplyreplace the old audio file in the host track with the newly created one. You couldthen deactivate Melodyne plugin, as it would by that time have served its purpose,with the changes made ‘fixed’ in a new audio file. If you were working in this way,you could then continuing copying and moving segments of the (now optimized)vocals on the host track until everything was in the desired place.
Note: the 'Bounce', 'Render' or 'Audio Mixdown' function (the name varies fromhost to host) results in a new audio file (or files) being created by the host on yourhard disk from the signals of one or more tracks – after processing (including, inthis case, the changes introduced by Melodyne plugin) has been applied to them.
The second approach involves postponing the use of Melodyne plugin until afteryou have arranged the track: Begin by going through your vocal recordings, remov-ing the bad takes, and copying and moving the good ones to the right places. Onlythen, when the arranging process is complete, do you transfer the track – or ratherthose parts of it that require optimization – to the plug-in. Since the material onthe track has already been arranged, there is not the same danger here of findingyour work with the plug-in being outdated by changes to the arrangement madelater in the host. (Remember; any such changes must be duplicated within theplug-in, by moving the affected notes to the same positions in the plug-in’stimeline as they occupy in that of the host). Whether you now, with this secondapproach, bounce the host track and the plug-in track to create a new audio file,or wait and allow the plug-in to decide which source to use and when, is a matterof personal preference. If you want to transfer the song to another computer onwhich Melodyne plugin is not installed, then, naturally, you do have no choice butto bounce it. The same applies if the burden on your computer’s CPU is reaching acritical level, the reason being that playing back a bounced track requires far lessprocessing than playing back an unbounced one.
A hybrid approach might be to begin by transferring the entire track with all itstakes to Melodyne plugin, where in a single pass you could correct the worst of theerrors using the pitch- and timing-correction macros, before rendering the resultsto the host application. If at a later stage you wished to return individual passagesto Melodyne plugin for ‘microsurgical fine-tuning’, it would simply be a questionof transferring them a second time to the plug-in using the same procedure asbefore.
21
2. Introduction: How Melodyne plugin functions
Melodyne plugin 1.0 user manual
22
The approaches we have outlined serve simply to avoid potential confusion causedby the fact of there being two audio levels: that of the host application and that ofthe plug-in. You are free, of course, to transfer only the passages requiring editingfrom the host track to the plug-in, and work with the combined signals of the hosttrack and the plug-in. If you do so, however, remember that any changes made tothe audio material on the host track must be duplicated in the plug-in; alterna-tively, you could simply delete the passages in question in the plug-in and transferthe new versions from the host to the plug-in for further editing.
The peculiarities of hostsWe have already observed that Melodyne plugin can do nothing about the concep-tual and technical limitations of the plug-in interface; the same goes for thepeculiarities of certain host applications. Since Melodyne plugin runs within thehost environment as a plug-in, it is dependent upon it and subject not only to thelimitations imposed by the interface but also to whatever additional limitationsresult from the peculiarities of the specific host. This brings us to our fourth keyfact:
Melodyne plugin can only do as much as the host will let it. If, for example, the hostonly processes plug-ins only in those places in the timeline where there is actuallyaudio on the host track (as is the case with Logic and DP), these limitations areinevitably reflected in the way they interact with Melodyne plugin.
If your host falls into this category, it can happen at times that you see notes inMelodyne plugin and ought therefore to be able to hear them during playback, butin fact hear nothing, the reason being that there is no audio on the host track atthis point in the timeline, either because you moved the passage in question to adifferent part of the song after transferring it to Melodyne plugin or because yousimply deleted it. In such cases, there’s a simple workaround: copy a piece of‘mute audio’ (for example, a piece of bounced audio containing only silence) tothe relevant part of the host track; this will force the host to process the plug-in.
Depending upon which application you are using as a host, you may encounterother limitations, including some that appear overnight, or rather, when youupdate the host; updating your host software may even have the opposite effect,causing limitations that were there previously to disappear. Celemony testsMelodyne plugin on a large number of host applications, so as to be able to offertips and workarounds for whatever problems are encountered. Since this is anongoing process and the information provided relies upon the assumption that youwill be constantly updating your software to take advantage of the latest improve-
2. Introduction: How Melodyne plugin functions
Melodyne plugin 1.0 user manual

ments, this handbook is obviously not the best place to deal with it. Instead, youwill find in the FAQ section of the Celemony web site (www.celemony.com/faq_plugin) a constantly updated fund of information – sorted by host application.If ever you have the feeling, then, that something isn’t functioning quite as itshould, that’s the first place to look for a solution: the section devoted to your hostapplication in the FAQ.
23
2. Introduction: How Melodyne plugin functions
Melodyne plugin 1.0 user manual
24
3. Operation
You should by now have an understanding of the way Melodyne plugin functionsas well as an idea of how to make the most effective use of it. In the followingchapter, we will look a little more closely at the practical use of Melodyne plugin,before examining the user interface and the functions to which it offers access.
Note: please remember that Melodyne plugin does not respond to keyboardcommands; these always affect the host! If you wish to delete a note from insidethe plug-in, you have to do so using the Delete command in the Edit menu ratherthan the [Delete] key of your keyboard – otherwise, what you will in fact delete isthe currently selected object in the host application. The same goes for the Undoand Redo functions; the conventional keyboard shortcuts for these will cause thehost not the plug-in to Undo or Redo its last action. If you wish to use the Undo orRedo functions within Melodyne plugin, you can only access these commandsthrough the Menu or via the corresponding buttons on the plugin surface. Other-wise the results will not be those you expect.
To use Melodyne plugin to edit the audio material on one of the tracks of your hostapplication, proceed as follows:
1) Load Melodyne plugin into the track as an insert effect. If possible select the firstinsert slot, relegating whatever other effects you wish to use to a later point inthe signal chain. Melodyne plugin works best with cleanly recorded, 'dry'material; for this reason, it is best to avoid placing effects in front of it. Themost problematic effects in this respect are reverb, echo, chorus and the like,since they make it more difficult – or even impossible – to detect the notes inthe audio material. EQ and compression pose less of a problem, but you shouldstill place them after Melodyne plugin in the signal chain, because otherwise,when the results of your editing are transferred, the EQ and/or compression willbe transferred at the same time, which means you will no longer be able tochange them.
3. Operation
Melodyne plugin 1.0 user manual
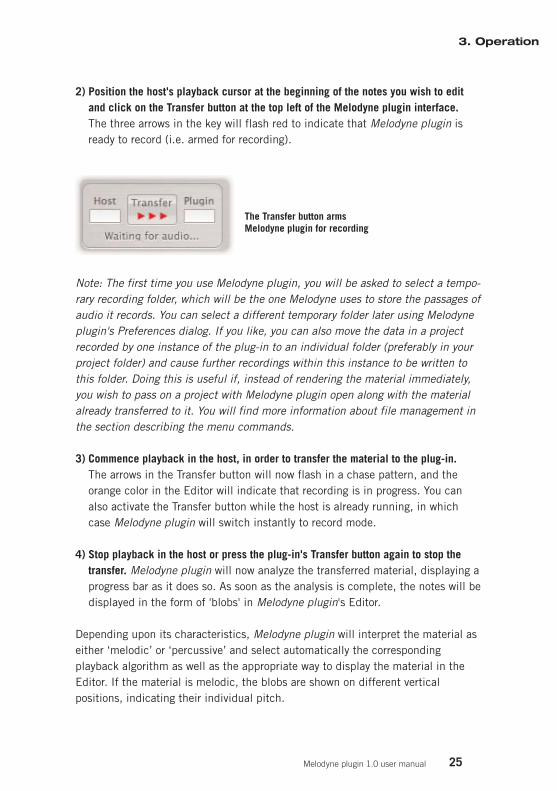
2) Position the host's playback cursor at the beginning of the notes you wish to editand click on the Transfer button at the top left of the Melodyne plugin interface.The three arrows in the key will flash red to indicate that Melodyne plugin isready to record (i.e. armed for recording).
The Transfer button arms Melodyne plugin for recording
Note: The first time you use Melodyne plugin, you will be asked to select a tempo-rary recording folder, which will be the one Melodyne uses to store the passages ofaudio it records. You can select a different temporary folder later using Melodyneplugin's Preferences dialog. If you like, you can also move the data in a projectrecorded by one instance of the plug-in to an individual folder (preferably in yourproject folder) and cause further recordings within this instance to be written tothis folder. Doing this is useful if, instead of rendering the material immediately,you wish to pass on a project with Melodyne plugin open along with the materialalready transferred to it. You will find more information about file management inthe section describing the menu commands.
3) Commence playback in the host, in order to transfer the material to the plug-in.The arrows in the Transfer button will now flash in a chase pattern, and theorange color in the Editor will indicate that recording is in progress. You canalso activate the Transfer button while the host is already running, in whichcase Melodyne plugin will switch instantly to record mode.
4) Stop playback in the host or press the plug-in's Transfer button again to stop thetransfer. Melodyne plugin will now analyze the transferred material, displaying aprogress bar as it does so. As soon as the analysis is complete, the notes will bedisplayed in the form of 'blobs' in Melodyne plugin's Editor.
Depending upon its characteristics, Melodyne plugin will interpret the material aseither ‘melodic’ or ‘percussive’ and select automatically the correspondingplayback algorithm as well as the appropriate way to display the material in theEditor. If the material is melodic, the blobs are shown on different verticalpositions, indicating their individual pitch.
25
3. Operation
Melodyne plugin 1.0 user manual
26
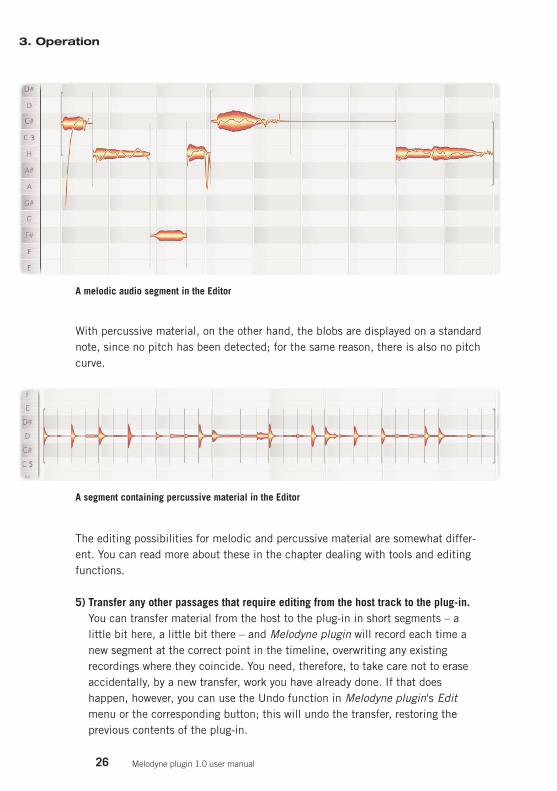
A melodic audio segment in the Editor
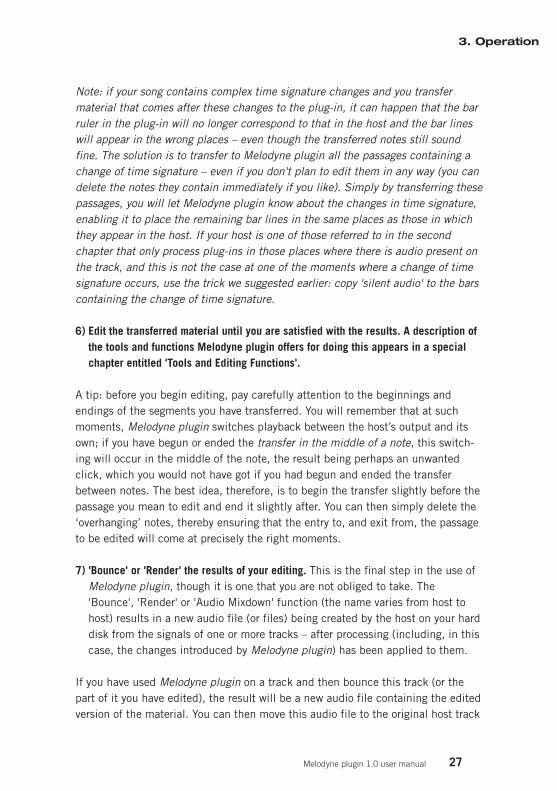
With percussive material, on the other hand, the blobs are displayed on a standardnote, since no pitch has been detected; for the same reason, there is also no pitchcurve.
A segment containing percussive material in the Editor
The editing possibilities for melodic and percussive material are somewhat differ-ent. You can read more about these in the chapter dealing with tools and editingfunctions.
5) Transfer any other passages that require editing from the host track to the plug-in.You can transfer material from the host to the plug-in in short segments – alittle bit here, a little bit there – and Melodyne plugin will record each time anew segment at the correct point in the timeline, overwriting any existingrecordings where they coincide. You need, therefore, to take care not to eraseaccidentally, by a new transfer, work you have already done. If that doeshappen, however, you can use the Undo function in Melodyne plugin's Editmenu or the corresponding button; this will undo the transfer, restoring theprevious contents of the plug-in.
3. Operation
Melodyne plugin 1.0 user manual
Note: if your song contains complex time signature changes and you transfermaterial that comes after these changes to the plug-in, it can happen that the barruler in the plug-in will no longer correspond to that in the host and the bar lineswill appear in the wrong places – even though the transferred notes still soundfine. The solution is to transfer to Melodyne plugin all the passages containing achange of time signature – even if you don't plan to edit them in any way (you candelete the notes they contain immediately if you like). Simply by transferring thesepassages, you will let Melodyne plugin know about the changes in time signature,enabling it to place the remaining bar lines in the same places as those in whichthey appear in the host. If your host is one of those referred to in the secondchapter that only process plug-ins in those places where there is audio present onthe track, and this is not the case at one of the moments where a change of timesignature occurs, use the trick we suggested earlier: copy 'silent audio' to the barscontaining the change of time signature.
6) Edit the transferred material until you are satisfied with the results. A description ofthe tools and functions Melodyne plugin offers for doing this appears in a specialchapter entitled 'Tools and Editing Functions'.
A tip: before you begin editing, pay carefully attention to the beginnings andendings of the segments you have transferred. You will remember that at suchmoments, Melodyne plugin switches playback between the host’s output and itsown; if you have begun or ended the transfer in the middle of a note, this switch-ing will occur in the middle of the note, the result being perhaps an unwantedclick, which you would not have got if you had begun and ended the transferbetween notes. The best idea, therefore, is to begin the transfer slightly before thepassage you mean to edit and end it slightly after. You can then simply delete the‘overhanging’ notes, thereby ensuring that the entry to, and exit from, the passageto be edited will come at precisely the right moments.
7) 'Bounce' or 'Render' the results of your editing. This is the final step in the use ofMelodyne plugin, though it is one that you are not obliged to take. The'Bounce', 'Render' or 'Audio Mixdown' function (the name varies from host tohost) results in a new audio file (or files) being created by the host on your harddisk from the signals of one or more tracks – after processing (including, in thiscase, the changes introduced by Melodyne plugin) has been applied to them.
If you have used Melodyne plugin on a track and then bounce this track (or thepart of it you have edited), the result will be a new audio file containing the editedversion of the material. You can then move this audio file to the original host track
27
3. Operation
Melodyne plugin 1.0 user manual
28
at the same point in the timeline as the bounce occurred. In this way, you willreplace the passage originally transferred to Melodyne plugin by a new file thatreflects the results of your editing. Now you can – and should – deactivateMelodyne plugin in this track, as it has completed its work and is no longerneeded, and continue working as before with the audio regions of your host.
We mentioned above that step 7 is not obligatory: instead of bouncing, you cansimply allow Melodyne plugin to carry on switching wherever necessary betweenthe output of the host track (or tracks) and its own output, right up to the master-ing stage. Of course, if you are planning to pass on the song to someone else or totransfer it to another computer on which Melodyne plugin is not installed, thenyou must bounce the track(s) from which you have transferred material toMelodyne plugin. You may want to do this anyway in order to reduce the load onthe CPU of your computer, or to bring your work with the plug-in to a conclusionand make the results of your editing ‘permanent’.
Tip: trying out different temposMelodyne plugin offers you a simple way of experimenting with different temposduring the composition phase to see which feels best. To do this, insert oneinstance of Melodyne plugin into each of the audio tracks of your production andtransfer the entire contents of the track to it. Now, you can speed up or slow downthe playback at will and your audio tracks will follow every change just as if theywere using MIDI- or software instruments. You need, however, to bear the follow-ing in mind:
It is a good idea to investigate the tempo at a relatively early stage in the produc-tion, when, for example, all you have recorded (apart from the MIDI tracks) are ahandful of audio tracks: the bass, a drum loop, and the lead vocals, for example –the fewer instances of the plug-in you use, the less the load on the CPU of yourcomputer.
The tempo changes will only affect the material transferred to the plug-in, not thematerial on the host tracks, so the two will be out of sync; this can lead to opticalconfusion (what you see will not be what you are hearing) and in pauses betweenthe notes of the transferred material, the host tracks will burst in. To avoid thishappening, replace the original tracks in the host with silent audio. With certainhosts, such as Logic (as explained in Chapter 2), this silent audio must run thelength of the entire song; otherwise, as we have already explained, the absence ofaudio at any point in the host track will mute the playback from the plug-in.
3. Operation
Melodyne plugin 1.0 user manual
Once you have settled on a new tempo, it is a good idea to bounce all the audiotracks individually and replace the silent audio on the host tracks with thebounced files. Once you have done this, the waveforms displayed on screen willonce again match the audio you are hearing; in other words, the display and theplayback will again be in sync.
If you want to make regular and intensive use of Melodyne to experiment withdifferent tempos, we should in all fairness point out that the multi-track editionsof Melodyne (Melodyne cre8 and Melodyne studio), when connected via theMelodyneBridge or ReWire to the host, offer an even faster and more intuitive wayof doing this.
29
3. Operation
Melodyne plugin 1.0 user manual
30
4. The Interface and Menu Functions
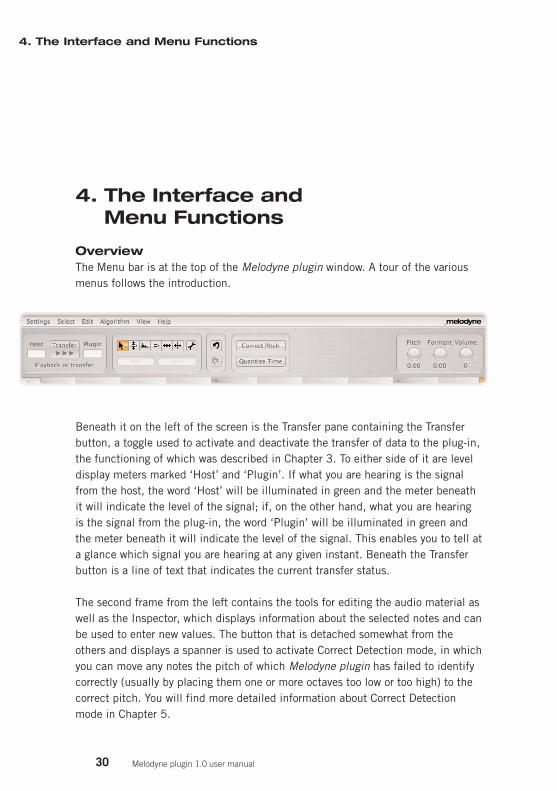
OverviewThe Menu bar is at the top of the Melodyne plugin window. A tour of the variousmenus follows the introduction.
Beneath it on the left of the screen is the Transfer pane containing the Transferbutton, a toggle used to activate and deactivate the transfer of data to the plug-in,the functioning of which was described in Chapter 3. To either side of it are leveldisplay meters marked ‘Host’ and ‘Plugin’. If what you are hearing is the signalfrom the host, the word ‘Host’ will be illuminated in green and the meter beneathit will indicate the level of the signal; if, on the other hand, what you are hearingis the signal from the plug-in, the word ‘Plugin’ will be illuminated in green andthe meter beneath it will indicate the level of the signal. This enables you to tell ata glance which signal you are hearing at any given instant. Beneath the Transferbutton is a line of text that indicates the current transfer status.
The second frame from the left contains the tools for editing the audio material aswell as the Inspector, which displays information about the selected notes and canbe used to enter new values. The button that is detached somewhat from theothers and displays a spanner is used to activate Correct Detection mode, in whichyou can move any notes the pitch of which Melodyne plugin has failed to identifycorrectly (usually by placing them one or more octaves too low or too high) to thecorrect pitch. You will find more detailed information about Correct Detectionmode in Chapter 5.
4. The Interface and Menu Functions
Melodyne plugin 1.0 user manual

The third frame from the left contains the multilevel Undo and Redo buttons,each of which duplicates the functions of the command of the same name in theEdit menu. The Undo and Redo buttons are grayed out when there is nothing toundo or redo.
The next frame contains the buttons used to invoke the automatic Correct Pitchand Quantize Time macros. These open modal windows, which means you can nolonger select notes or use any of the other functions of the plug-in for as long asthey remain open. The effects of any parameter changes made using the windowsare displayed and heard immediately.
You will find more detailed information regarding the use of these macros inChapter 5.
The Correct Pitch panel
The Quantize Time panelused for correcting timingand re-quantizing notes
The pane on the right contains rotary controls for the real-time control of pitch,formants and volume level; these can be automated in the host or assigned to aMIDI fader box (or both). Right-clicking on the Pitch or Formants controls opens acontext menu from which you can select the control range from three options: ±2,±12 or ±24 semitones. These controls offer you swift access to the most impor-tant parameters of the material, but they are not ‘editing controls’: in fact, theyhave no affect upon your work in the Editor or the displayed state of the notes.What they do is add or subtract something in real time to the values set in the
31
4. The Interface and Menu Functions
Melodyne plugin 1.0 user manual
32
Editor, treating all the notes in the plug-in in the same way. Please note that withpercussive material (or to be more precise: when the Percussive playbackalgorithm is selected) the transposition of formants is not possible; the Formantcontroller is therefore deactivated.
Melodyne plugin's menuMelodyne plugin possesses its own small menu bar offering access to varioussettings and editing functions. There are six menus in all: Settings, Select, Edit,Algorithm, View and Help.
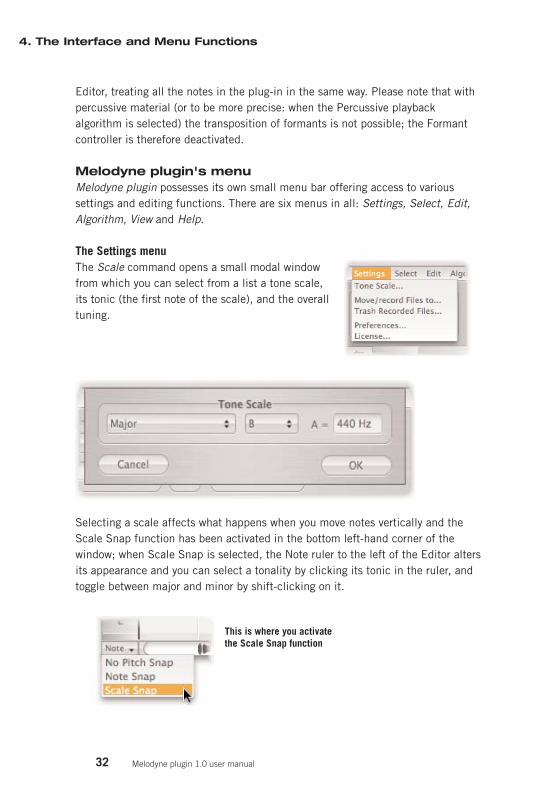
The Settings menuThe Scale command opens a small modal windowfrom which you can select from a list a tone scale, its tonic (the first note of the scale), and the overalltuning.
Selecting a scale affects what happens when you move notes vertically and theScale Snap function has been activated in the bottom left-hand corner of thewindow; when Scale Snap is selected, the Note ruler to the left of the Editor altersits appearance and you can select a tonality by clicking its tonic in the ruler, andtoggle between major and minor by shift-clicking on it.
This is where you activate the Scale Snap function
4. The Interface and Menu Functions
Melodyne plugin 1.0 user manual
The commands Move/record Files to… and Trash Recorded files… help you tomanage the audio files created by Melodyne plugin. The first time you launch theplug-in, you are asked to select a temporary recording folder; this is where(without asking, in future) Melodyne plugin will store all the files containing thetransferred audio. If you wish to save the data recorded by one instance of theplug-in to an individual folder with a view to transferring the whole project (includ-ing this data) to another computer, select the command Move/record Files to…. Afile selection box will appear allowing you to select a storage location. When youconfirm your choice, the recordings already made using that instance of the plug-in will be transferred to the selected folder and all subsequent files created by itwill be stored there as well. After selecting a new recording folder, be sure to saveyour project, in order to fix the altered references to the new storage location forthe files.
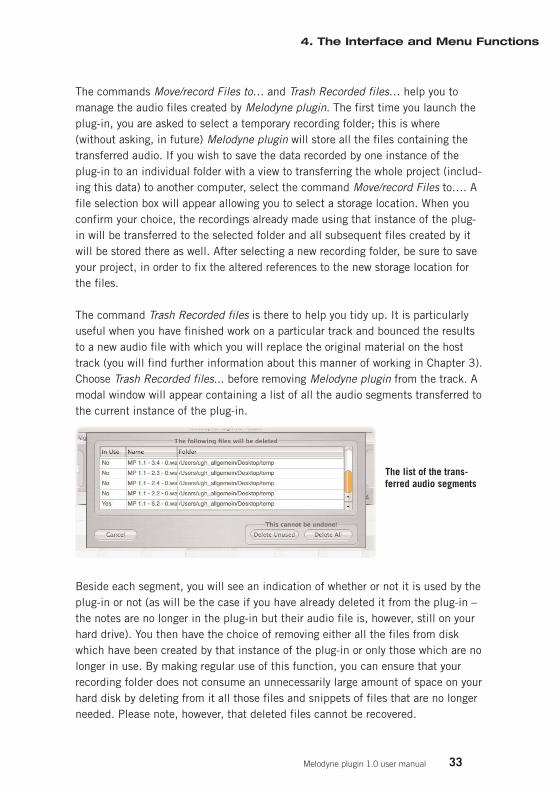
The command Trash Recorded files is there to help you tidy up. It is particularlyuseful when you have finished work on a particular track and bounced the resultsto a new audio file with which you will replace the original material on the hosttrack (you will find further information about this manner of working in Chapter 3).Choose Trash Recorded files... before removing Melodyne plugin from the track. Amodal window will appear containing a list of all the audio segments transferred tothe current instance of the plug-in.
The list of the trans-ferred audio segments
Beside each segment, you will see an indication of whether or not it is used by theplug-in or not (as will be the case if you have already deleted it from the plug-in –the notes are no longer in the plug-in but their audio file is, however, still on yourhard drive). You then have the choice of removing either all the files from diskwhich have been created by that instance of the plug-in or only those which are nolonger in use. By making regular use of this function, you can ensure that yourrecording folder does not consume an unnecessarily large amount of space on yourhard disk by deleting from it all those files and snippets of files that are no longerneeded. Please note, however, that deleted files cannot be recovered.
33
4. The Interface and Menu Functions
Melodyne plugin 1.0 user manual
34
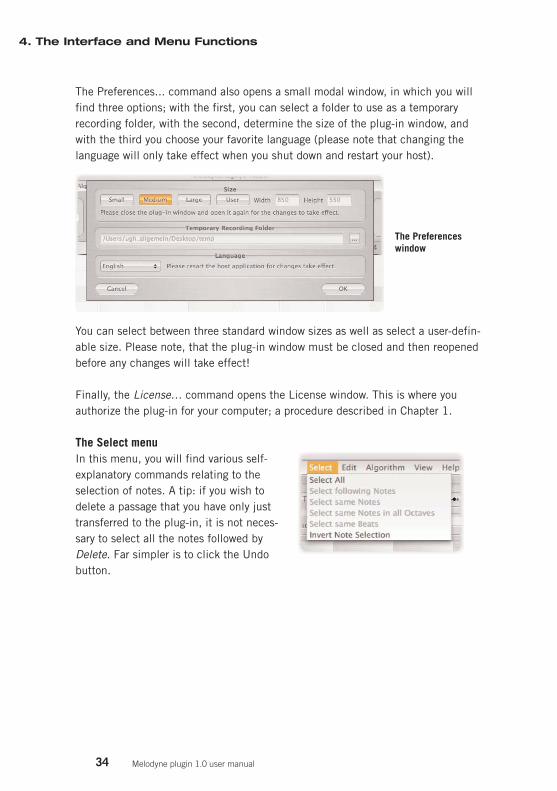
The Preferences... command also opens a small modal window, in which you willfind three options; with the first, you can select a folder to use as a temporaryrecording folder, with the second, determine the size of the plug-in window, andwith the third you choose your favorite language (please note that changing thelanguage will only take effect when you shut down and restart your host).
The Preferenceswindow
You can select between three standard window sizes as well as select a user-defin-able size. Please note, that the plug-in window must be closed and then reopenedbefore any changes will take effect!
Finally, the License… command opens the License window. This is where youauthorize the plug-in for your computer; a procedure described in Chapter 1.
The Select menuIn this menu, you will find various self-explanatory commands relating to theselection of notes. A tip: if you wish todelete a passage that you have only justtransferred to the plug-in, it is not neces-sary to select all the notes followed byDelete. Far simpler is to click the Undobutton.
4. The Interface and Menu Functions
Melodyne plugin 1.0 user manual
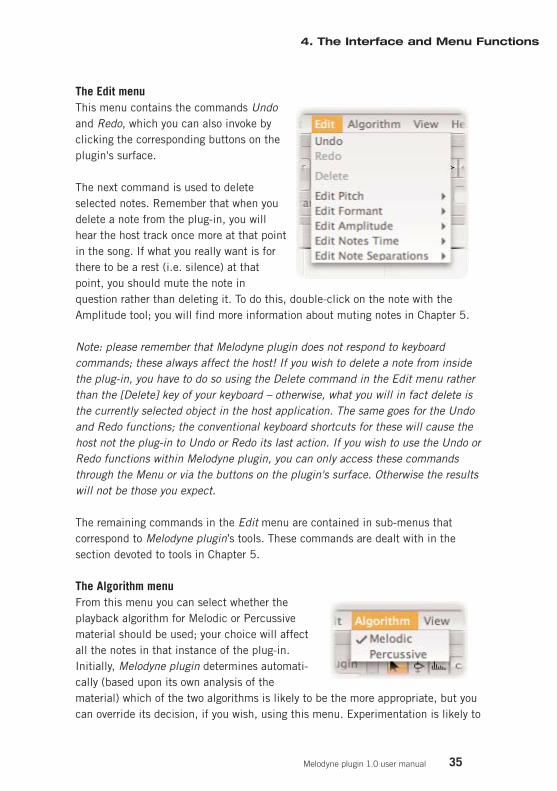
The Edit menuThis menu contains the commands Undoand Redo, which you can also invoke byclicking the corresponding buttons on theplugin's surface.
The next command is used to deleteselected notes. Remember that when youdelete a note from the plug-in, you willhear the host track once more at that pointin the song. If what you really want is forthere to be a rest (i.e. silence) at thatpoint, you should mute the note inquestion rather than deleting it. To do this, double-click on the note with theAmplitude tool; you will find more information about muting notes in Chapter 5.
Note: please remember that Melodyne plugin does not respond to keyboardcommands; these always affect the host! If you wish to delete a note from insidethe plug-in, you have to do so using the Delete command in the Edit menu ratherthan the [Delete] key of your keyboard – otherwise, what you will in fact delete isthe currently selected object in the host application. The same goes for the Undoand Redo functions; the conventional keyboard shortcuts for these will cause thehost not the plug-in to Undo or Redo its last action. If you wish to use the Undo orRedo functions within Melodyne plugin, you can only access these commandsthrough the Menu or via the buttons on the plugin's surface. Otherwise the resultswill not be those you expect.
The remaining commands in the Edit menu are contained in sub-menus thatcorrespond to Melodyne plugin’s tools. These commands are dealt with in thesection devoted to tools in Chapter 5.
The Algorithm menuFrom this menu you can select whether theplayback algorithm for Melodic or Percussivematerial should be used; your choice will affectall the notes in that instance of the plug-in.Initially, Melodyne plugin determines automati-cally (based upon its own analysis of thematerial) which of the two algorithms is likely to be the more appropriate, but youcan override its decision, if you wish, using this menu. Experimentation is likely to
35
4. The Interface and Menu Functions
Melodyne plugin 1.0 user manual
36
prove most fruitful when the material is both percussive and melodic in character,such as a slapped bass line or scat vocals.
The algorithm for melodic material displays the transferred notes in such a way asto permit you to read their pitch from the note ruler; it also displays a pitch curveand allows you to transpose the formants. The algorithm for percussive material,on the other hand, displays all the notes at the same pitch, since with percussivematerial, the sounds generally have no recognizable pitch; for the same reason,this algorithm displays no pitch curve. The Percussive algorithm is designed topreserve the transients of the material and its timing even after quite drasticchanges have been made. Unlike the algorithm for melodic material, the Percus-sive algorithm does not allow you to transpose formants.
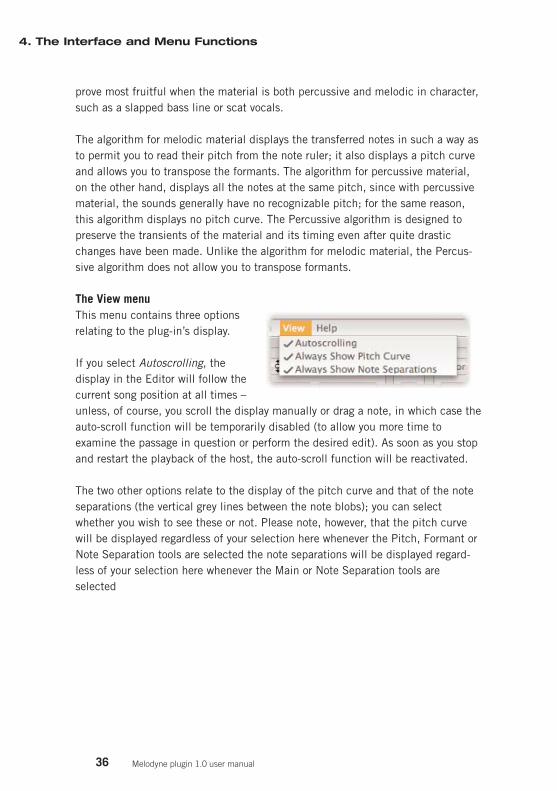
The View menuThis menu contains three optionsrelating to the plug-in’s display.
If you select Autoscrolling, thedisplay in the Editor will follow thecurrent song position at all times –unless, of course, you scroll the display manually or drag a note, in which case theauto-scroll function will be temporarily disabled (to allow you more time toexamine the passage in question or perform the desired edit). As soon as you stopand restart the playback of the host, the auto-scroll function will be reactivated.
The two other options relate to the display of the pitch curve and that of the noteseparations (the vertical grey lines between the note blobs); you can selectwhether you wish to see these or not. Please note, however, that the pitch curvewill be displayed regardless of your selection here whenever the Pitch, Formant orNote Separation tools are selected the note separations will be displayed regard-less of your selection here whenever the Main or Note Separation tools areselected
4. The Interface and Menu Functions
Melodyne plugin 1.0 user manual
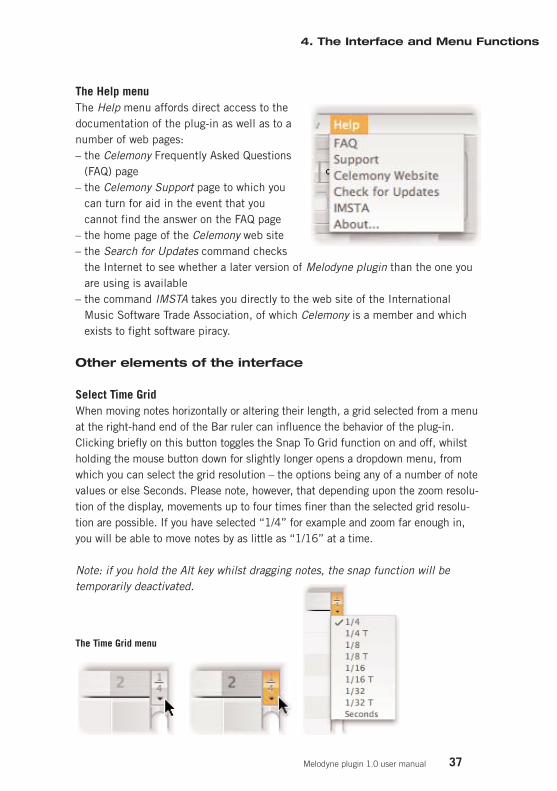
The Help menuThe Help menu affords direct access to thedocumentation of the plug-in as well as to anumber of web pages:– the Celemony Frequently Asked Questions
(FAQ) page– the Celemony Support page to which you
can turn for aid in the event that youcannot find the answer on the FAQ page
– the home page of the Celemony web site– the Search for Updates command checks
the Internet to see whether a later version of Melodyne plugin than the one youare using is available
– the command IMSTA takes you directly to the web site of the InternationalMusic Software Trade Association, of which Celemony is a member and whichexists to fight software piracy.
Other elements of the interface
Select Time GridWhen moving notes horizontally or altering their length, a grid selected from a menuat the right-hand end of the Bar ruler can influence the behavior of the plug-in.Clicking briefly on this button toggles the Snap To Grid function on and off, whilstholding the mouse button down for slightly longer opens a dropdown menu, fromwhich you can select the grid resolution – the options being any of a number of notevalues or else Seconds. Please note, however, that depending upon the zoom resolu-tion of the display, movements up to four times finer than the selected grid resolu-tion are possible. If you have selected “1/4” for example and zoom far enough in,you will be able to move notes by as little as “1/16” at a time.
Note: if you hold the Alt key whilst dragging notes, the snap function will betemporarily deactivated.
The Time Grid menu
37
4. The Interface and Menu Functions
Melodyne plugin 1.0 user manual
38
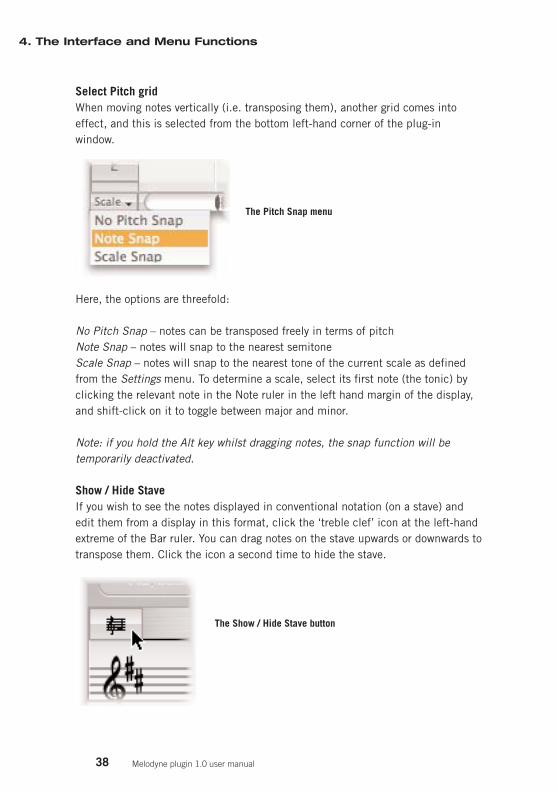
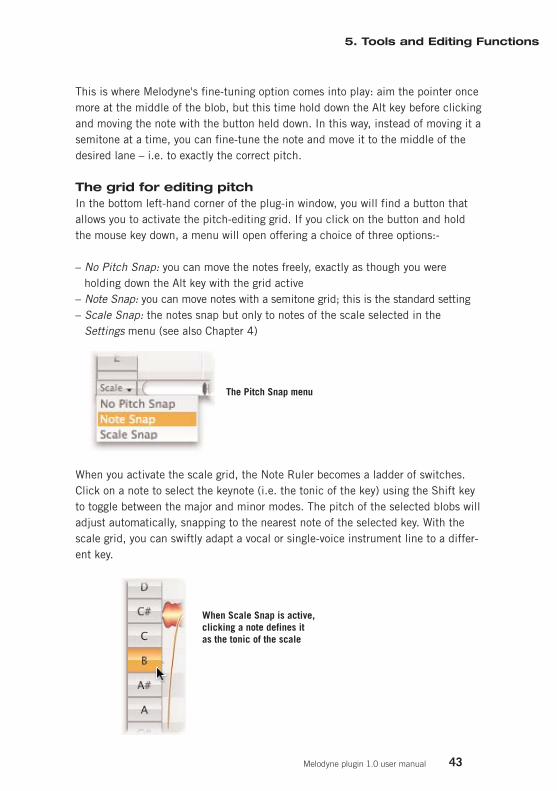
Select Pitch gridWhen moving notes vertically (i.e. transposing them), another grid comes intoeffect, and this is selected from the bottom left-hand corner of the plug-inwindow.
The Pitch Snap menu
Here, the options are threefold:
No Pitch Snap – notes can be transposed freely in terms of pitchNote Snap – notes will snap to the nearest semitoneScale Snap – notes will snap to the nearest tone of the current scale as definedfrom the Settings menu. To determine a scale, select its first note (the tonic) byclicking the relevant note in the Note ruler in the left hand margin of the display,and shift-click on it to toggle between major and minor.
Note: if you hold the Alt key whilst dragging notes, the snap function will betemporarily deactivated.
Show / Hide StaveIf you wish to see the notes displayed in conventional notation (on a stave) andedit them from a display in this format, click the ‘treble clef’ icon at the left-handextreme of the Bar ruler. You can drag notes on the stave upwards or downwards totranspose them. Click the icon a second time to hide the stave.
The Show / Hide Stave button
4. The Interface and Menu Functions
Melodyne plugin 1.0 user manual
Zooming and ScrollingMelodyne plugin offers you a number of different ways of determining what part,and how much, of the material is displayed in the Edit window at any givenmoment.
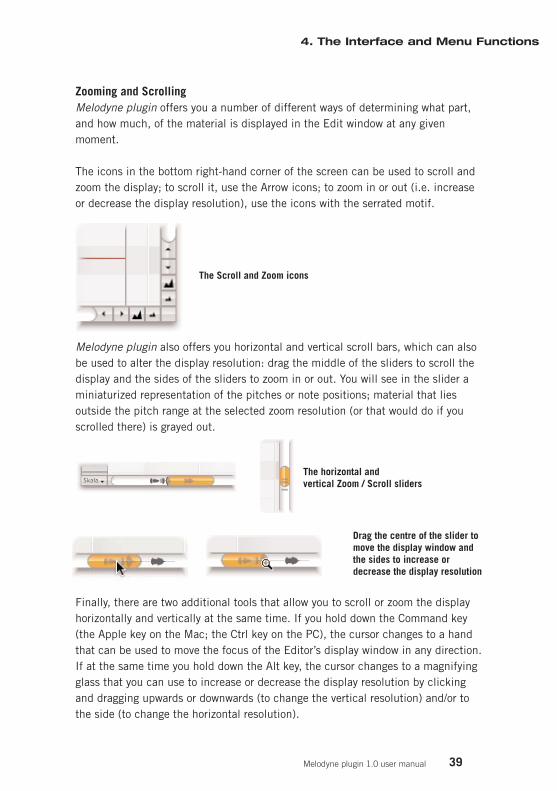
The icons in the bottom right-hand corner of the screen can be used to scroll andzoom the display; to scroll it, use the Arrow icons; to zoom in or out (i.e. increaseor decrease the display resolution), use the icons with the serrated motif.
The Scroll and Zoom icons
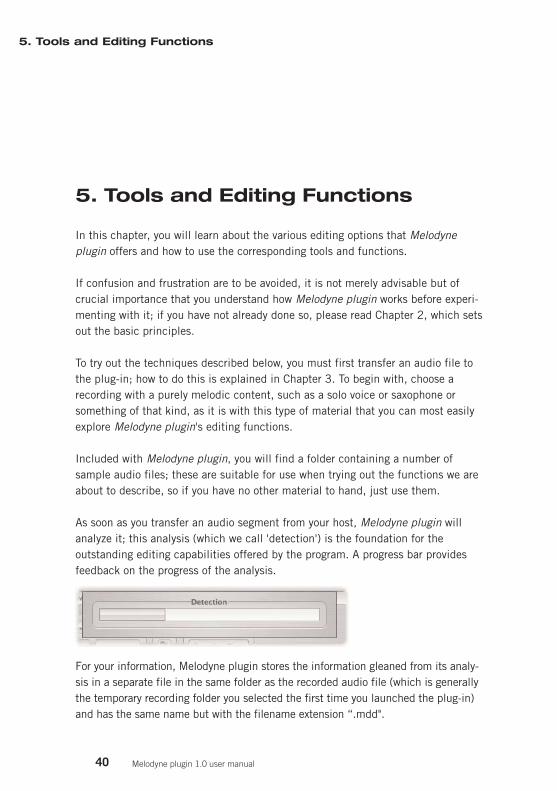
Melodyne plugin also offers you horizontal and vertical scroll bars, which can alsobe used to alter the display resolution: drag the middle of the sliders to scroll thedisplay and the sides of the sliders to zoom in or out. You will see in the slider aminiaturized representation of the pitches or note positions; material that liesoutside the pitch range at the selected zoom resolution (or that would do if youscrolled there) is grayed out.
The horizontal and vertical Zoom / Scroll sliders
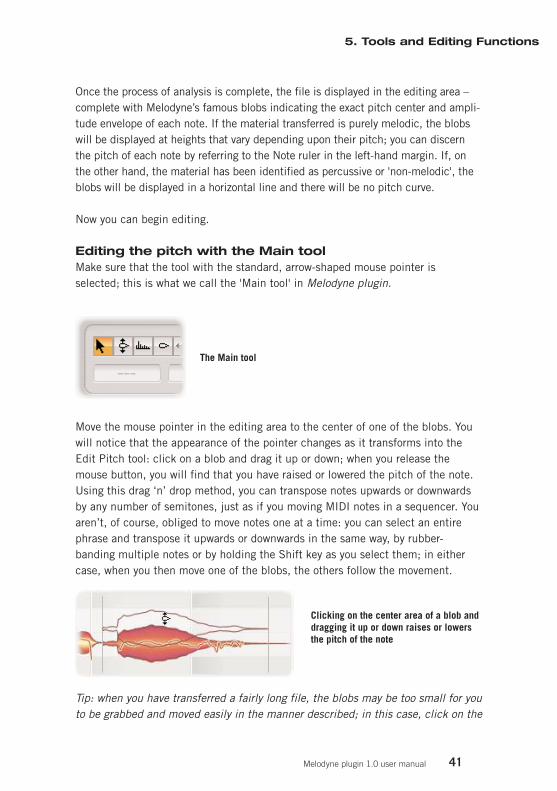
Drag the centre of the slider tomove the display window andthe sides to increase ordecrease the display resolution
Finally, there are two additional tools that allow you to scroll or zoom the displayhorizontally and vertically at the same time. If you hold down the Command key(the Apple key on the Mac; the Ctrl key on the PC), the cursor changes to a handthat can be used to move the focus of the Editor’s display window in any direction.If at the same time you hold down the Alt key, the cursor changes to a magnifyingglass that you can use to increase or decrease the display resolution by clickingand dragging upwards or downwards (to change the vertical resolution) and/or tothe side (to change the horizontal resolution).
39
4. The Interface and Menu Functions
Melodyne plugin 1.0 user manual
40
5. Tools and Editing Functions
In this chapter, you will learn about the various editing options that Melodyneplugin offers and how to use the corresponding tools and functions.
If confusion and frustration are to be avoided, it is not merely advisable but ofcrucial importance that you understand how Melodyne plugin works before experi-menting with it; if you have not already done so, please read Chapter 2, which setsout the basic principles.
To try out the techniques described below, you must first transfer an audio file tothe plug-in; how to do this is explained in Chapter 3. To begin with, choose arecording with a purely melodic content, such as a solo voice or saxophone orsomething of that kind, as it is with this type of material that you can most easilyexplore Melodyne plugin's editing functions.
Included with Melodyne plugin, you will find a folder containing a number ofsample audio files; these are suitable for use when trying out the functions we areabout to describe, so if you have no other material to hand, just use them.
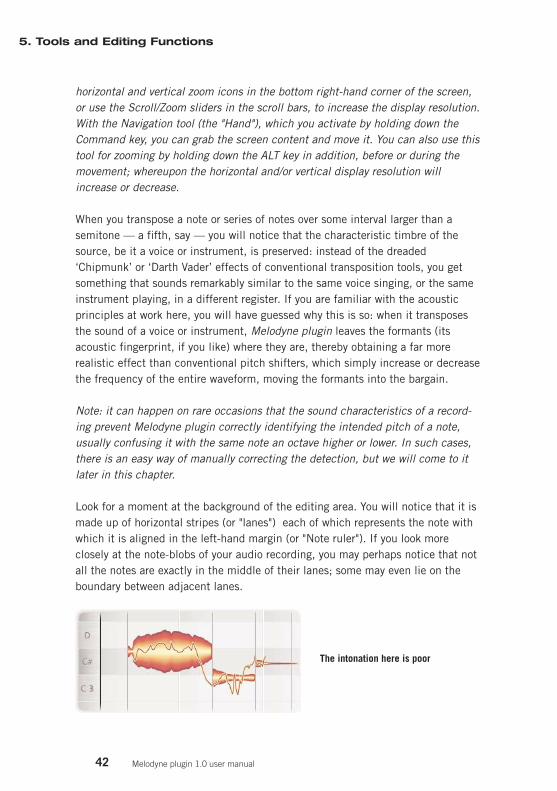
As soon as you transfer an audio segment from your host, Melodyne plugin willanalyze it; this analysis (which we call 'detection') is the foundation for theoutstanding editing capabilities offered by the program. A progress bar providesfeedback on the progress of the analysis.
For your information, Melodyne plugin stores the information gleaned from its analy-sis in a separate file in the same folder as the recorded audio file (which is generallythe temporary recording folder you selected the first time you launched the plug-in)and has the same name but with the filename extension “.mdd".
5. Tools and Editing Functions
Melodyne plugin 1.0 user manual
Once the process of analysis is complete, the file is displayed in the editing area –complete with Melodyne’s famous blobs indicating the exact pitch center and ampli-tude envelope of each note. If the material transferred is purely melodic, the blobswill be displayed at heights that vary depending upon their pitch; you can discernthe pitch of each note by referring to the Note ruler in the left-hand margin. If, onthe other hand, the material has been identified as percussive or 'non-melodic', theblobs will be displayed in a horizontal line and there will be no pitch curve.
Now you can begin editing.
Editing the pitch with the Main toolMake sure that the tool with the standard, arrow-shaped mouse pointer isselected; this is what we call the 'Main tool' in Melodyne plugin.
The Main tool
Move the mouse pointer in the editing area to the center of one of the blobs. Youwill notice that the appearance of the pointer changes as it transforms into theEdit Pitch tool: click on a blob and drag it up or down; when you release themouse button, you will find that you have raised or lowered the pitch of the note.Using this drag ‘n’ drop method, you can transpose notes upwards or downwardsby any number of semitones, just as if you moving MIDI notes in a sequencer. Youaren’t, of course, obliged to move notes one at a time: you can select an entirephrase and transpose it upwards or downwards in the same way, by rubber-banding multiple notes or by holding the Shift key as you select them; in eithercase, when you then move one of the blobs, the others follow the movement.
Clicking on the center area of a blob anddragging it up or down raises or lowersthe pitch of the note
Tip: when you have transferred a fairly long file, the blobs may be too small for youto be grabbed and moved easily in the manner described; in this case, click on the
41
5. Tools and Editing Functions
Melodyne plugin 1.0 user manual
42
horizontal and vertical zoom icons in the bottom right-hand corner of the screen,or use the Scroll/Zoom sliders in the scroll bars, to increase the display resolution.With the Navigation tool (the "Hand"), which you activate by holding down theCommand key, you can grab the screen content and move it. You can also use thistool for zooming by holding down the ALT key in addition, before or during themovement; whereupon the horizontal and/or vertical display resolution willincrease or decrease.
When you transpose a note or series of notes over some interval larger than asemitone — a fifth, say — you will notice that the characteristic timbre of thesource, be it a voice or instrument, is preserved: instead of the dreaded‘Chipmunk’ or ‘Darth Vader’ effects of conventional transposition tools, you getsomething that sounds remarkably similar to the same voice singing, or the sameinstrument playing, in a different register. If you are familiar with the acousticprinciples at work here, you will have guessed why this is so: when it transposesthe sound of a voice or instrument, Melodyne plugin leaves the formants (itsacoustic fingerprint, if you like) where they are, thereby obtaining a far morerealistic effect than conventional pitch shifters, which simply increase or decreasethe frequency of the entire waveform, moving the formants into the bargain.
Note: it can happen on rare occasions that the sound characteristics of a record-ing prevent Melodyne plugin correctly identifying the intended pitch of a note,usually confusing it with the same note an octave higher or lower. In such cases,there is an easy way of manually correcting the detection, but we will come to itlater in this chapter.
Look for a moment at the background of the editing area. You will notice that it ismade up of horizontal stripes (or "lanes") each of which represents the note withwhich it is aligned in the left-hand margin (or "Note ruler"). If you look moreclosely at the note-blobs of your audio recording, you may perhaps notice that notall the notes are exactly in the middle of their lanes; some may even lie on theboundary between adjacent lanes.
The intonation here is poor
5. Tools and Editing Functions
Melodyne plugin 1.0 user manual
This is where Melodyne's fine-tuning option comes into play: aim the pointer oncemore at the middle of the blob, but this time hold down the Alt key before clickingand moving the note with the button held down. In this way, instead of moving it asemitone at a time, you can fine-tune the note and move it to the middle of thedesired lane – i.e. to exactly the correct pitch.
The grid for editing pitchIn the bottom left-hand corner of the plug-in window, you will find a button thatallows you to activate the pitch-editing grid. If you click on the button and holdthe mouse key down, a menu will open offering a choice of three options:-
– No Pitch Snap: you can move the notes freely, exactly as though you wereholding down the Alt key with the grid active
– Note Snap: you can move notes with a semitone grid; this is the standard setting– Scale Snap: the notes snap but only to notes of the scale selected in the
Settings menu (see also Chapter 4)
The Pitch Snap menu
When you activate the scale grid, the Note Ruler becomes a ladder of switches.Click on a note to select the keynote (i.e. the tonic of the key) using the Shift keyto toggle between the major and minor modes. The pitch of the selected blobs willadjust automatically, snapping to the nearest note of the selected key. With thescale grid, you can swiftly adapt a vocal or single-voice instrument line to a differ-ent key.
When Scale Snap is active, clicking a note defines it as the tonic of the scale
43
5. Tools and Editing Functions
Melodyne plugin 1.0 user manual
44
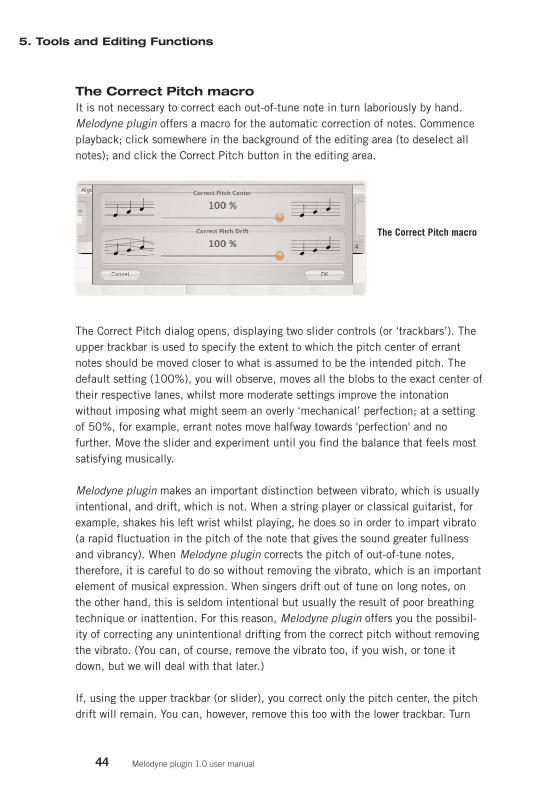
The Correct Pitch macroIt is not necessary to correct each out-of-tune note in turn laboriously by hand.Melodyne plugin offers a macro for the automatic correction of notes. Commenceplayback; click somewhere in the background of the editing area (to deselect allnotes); and click the Correct Pitch button in the editing area.
The Correct Pitch macro
The Correct Pitch dialog opens, displaying two slider controls (or ‘trackbars’). Theupper trackbar is used to specify the extent to which the pitch center of errantnotes should be moved closer to what is assumed to be the intended pitch. Thedefault setting (100%), you will observe, moves all the blobs to the exact center oftheir respective lanes, whilst more moderate settings improve the intonationwithout imposing what might seem an overly ‘mechanical’ perfection; at a settingof 50%, for example, errant notes move halfway towards 'perfection' and nofurther. Move the slider and experiment until you find the balance that feels mostsatisfying musically.
Melodyne plugin makes an important distinction between vibrato, which is usuallyintentional, and drift, which is not. When a string player or classical guitarist, forexample, shakes his left wrist whilst playing, he does so in order to impart vibrato(a rapid fluctuation in the pitch of the note that gives the sound greater fullnessand vibrancy). When Melodyne plugin corrects the pitch of out-of-tune notes,therefore, it is careful to do so without removing the vibrato, which is an importantelement of musical expression. When singers drift out of tune on long notes, onthe other hand, this is seldom intentional but usually the result of poor breathingtechnique or inattention. For this reason, Melodyne plugin offers you the possibil-ity of correcting any unintentional drifting from the correct pitch without removingthe vibrato. (You can, of course, remove the vibrato too, if you wish, or tone itdown, but we will deal with that later.)
If, using the upper trackbar (or slider), you correct only the pitch center, the pitchdrift will remain. You can, however, remove this too with the lower trackbar. Turn
5. Tools and Editing Functions
Melodyne plugin 1.0 user manual
this up to 100% and listen to the results: the fluctuations in intonation disappearbut any vibrato or trill in the signal is retained. This should make clear, if it werenot already apparent, quite how sophisticated Melodyne plugin's analysis of thesignal is and how sensitive the resulting possibilities for intervention are.
The two pitch correction parameters, Correct Pitch Center and Correct Pitch Drift,are completely independent: i.e. you can set a different intensity (from 0-100%)for each parameter. If and when you are satisfied with the results, exit with OK; if,on the other hand, you would prefer to leave things as they were before youopened the Correct Pitch dialog, exit with Cancel. You can at any time use theUndo function to reverse changes made by the macro.
Note: if no notes are selected at the time you open the Correct Pitch dialog,Melodyne plugin understands you to mean ‘correct the pitch of all the notes’; if,on the other hand, one or more notes are selected, they and only they will beaffected by whatever changes you make. In this context, take note of the variousnote selection options offered by the sub-menu of the Edit menu.
Now that you have mastered the basic pitch editing functions of Melodyne plugin,it should be pointed out that these only work as described for monophonic audiomaterial. The problem with polyphonic material is that Melodyne plugin has noway of isolating just one of multiple notes sounding at the same time, so the set offunctions available for editing the pitch are rather more limited. The same appliesto percussive material.
Before we introduce still more functions for the editing of pitch in connection withthe other tools offered by Melodyne plugin, we will deal briefly with a number ofother fundamental and no less fascinating possibilities: those for manipulating thetiming and tempo of audio recordings.
Editing timing with the Main toolMelodyne plugin allows you to alter not only the pitch but also the position andlength of individual notes with the Main tool. It is with these possibilities that wewill concern ourselves in the following paragraphs. Transfer a drum loop from theaudio files supplied with Melodyne plugin and use it to try out the techniques weare about to describe.
Since Melodyne plugin allows you to modify the pitch of individual notes, it mustobviously know where one note ends and the next begins. If the Arrow Tool isselected in Melodyne plugin’s editing area or the option Always Show Note separa-
45
5. Tools and Editing Functions
Melodyne plugin 1.0 user manual
46
tors is checked in the View menu, this information is displayed in the form of thinvertical lines.
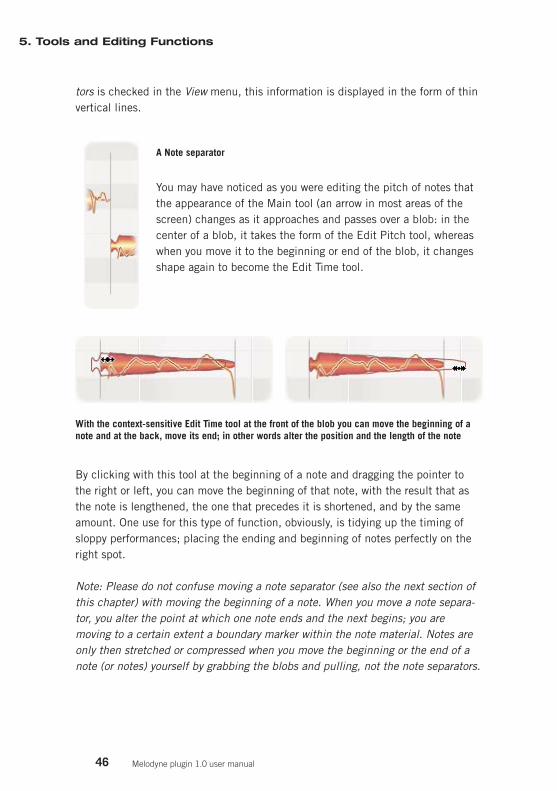
A Note separator
You may have noticed as you were editing the pitch of notes thatthe appearance of the Main tool (an arrow in most areas of thescreen) changes as it approaches and passes over a blob: in thecenter of a blob, it takes the form of the Edit Pitch tool, whereaswhen you move it to the beginning or end of the blob, it changesshape again to become the Edit Time tool.
With the context-sensitive Edit Time tool at the front of the blob you can move the beginning of anote and at the back, move its end; in other words alter the position and the length of the note
By clicking with this tool at the beginning of a note and dragging the pointer tothe right or left, you can move the beginning of that note, with the result that asthe note is lengthened, the one that precedes it is shortened, and by the sameamount. One use for this type of function, obviously, is tidying up the timing ofsloppy performances; placing the ending and beginning of notes perfectly on theright spot.
Note: Please do not confuse moving a note separator (see also the next section ofthis chapter) with moving the beginning of a note. When you move a note separa-tor, you alter the point at which one note ends and the next begins; you aremoving to a certain extent a boundary marker within the note material. Notes areonly then stretched or compressed when you move the beginning or the end of anote (or notes) yourself by grabbing the blobs and pulling, not the note separators.
5. Tools and Editing Functions
Melodyne plugin 1.0 user manual
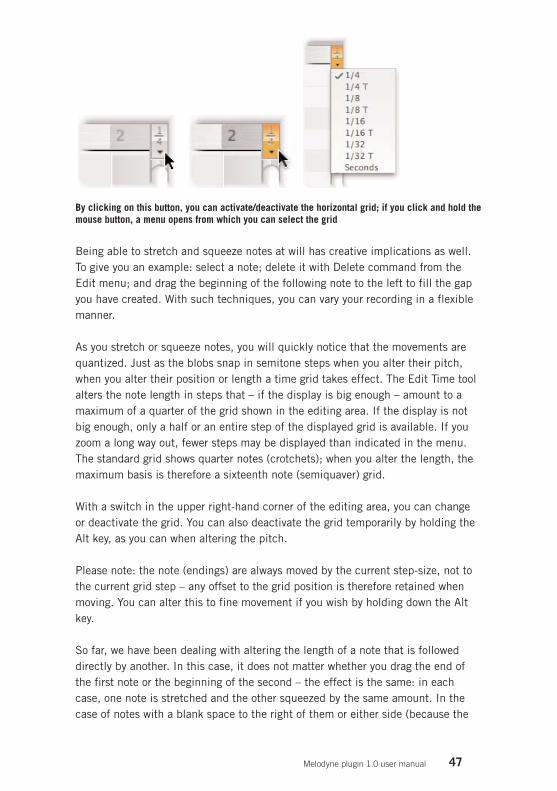
By clicking on this button, you can activate/deactivate the horizontal grid; if you click and hold themouse button, a menu opens from which you can select the grid
Being able to stretch and squeeze notes at will has creative implications as well.To give you an example: select a note; delete it with Delete command from theEdit menu; and drag the beginning of the following note to the left to fill the gapyou have created. With such techniques, you can vary your recording in a flexiblemanner.
As you stretch or squeeze notes, you will quickly notice that the movements arequantized. Just as the blobs snap in semitone steps when you alter their pitch,when you alter their position or length a time grid takes effect. The Edit Time toolalters the note length in steps that – if the display is big enough – amount to amaximum of a quarter of the grid shown in the editing area. If the display is notbig enough, only a half or an entire step of the displayed grid is available. If youzoom a long way out, fewer steps may be displayed than indicated in the menu.The standard grid shows quarter notes (crotchets); when you alter the length, themaximum basis is therefore a sixteenth note (semiquaver) grid.
With a switch in the upper right-hand corner of the editing area, you can changeor deactivate the grid. You can also deactivate the grid temporarily by holding theAlt key, as you can when altering the pitch.
Please note: the note (endings) are always moved by the current step-size, not tothe current grid step – any offset to the grid position is therefore retained whenmoving. You can alter this to fine movement if you wish by holding down the Altkey.
So far, we have been dealing with altering the length of a note that is followeddirectly by another. In this case, it does not matter whether you drag the end ofthe first note or the beginning of the second – the effect is the same: in eachcase, one note is stretched and the other squeezed by the same amount. In thecase of notes with a blank space to the right of them or either side (because the
47Melodyne plugin 1.0 user manual
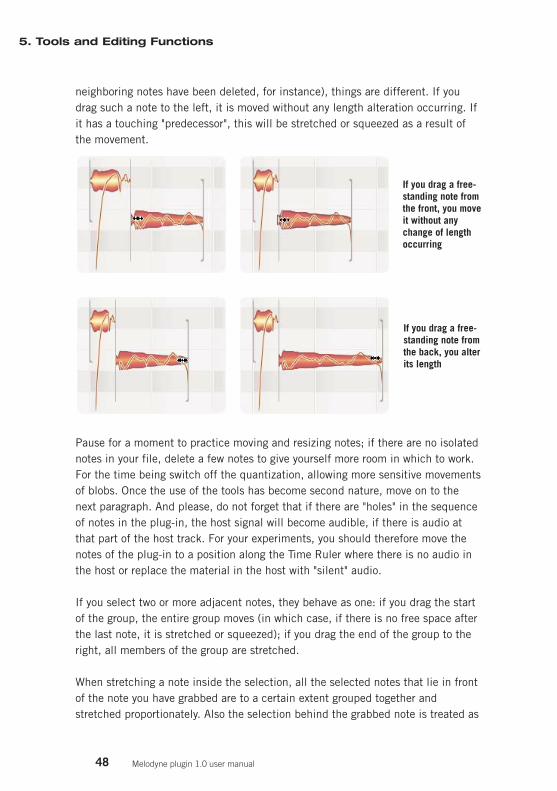
48
neighboring notes have been deleted, for instance), things are different. If youdrag such a note to the left, it is moved without any length alteration occurring. Ifit has a touching "predecessor", this will be stretched or squeezed as a result ofthe movement.
If you drag a free-standing note fromthe front, you moveit without anychange of lengthoccurring
If you drag a free-standing note fromthe back, you alterits length
Pause for a moment to practice moving and resizing notes; if there are no isolatednotes in your file, delete a few notes to give yourself more room in which to work.For the time being switch off the quantization, allowing more sensitive movementsof blobs. Once the use of the tools has become second nature, move on to thenext paragraph. And please, do not forget that if there are "holes" in the sequenceof notes in the plug-in, the host signal will become audible, if there is audio atthat part of the host track. For your experiments, you should therefore move thenotes of the plug-in to a position along the Time Ruler where there is no audio inthe host or replace the material in the host with "silent" audio.
If you select two or more adjacent notes, they behave as one: if you drag the startof the group, the entire group moves (in which case, if there is no free space afterthe last note, it is stretched or squeezed); if you drag the end of the group to theright, all members of the group are stretched.
When stretching a note inside the selection, all the selected notes that lie in frontof the note you have grabbed are to a certain extent grouped together andstretched proportionately. Also the selection behind the grabbed note is treated as
5. Tools and Editing Functions
Melodyne plugin 1.0 user manual
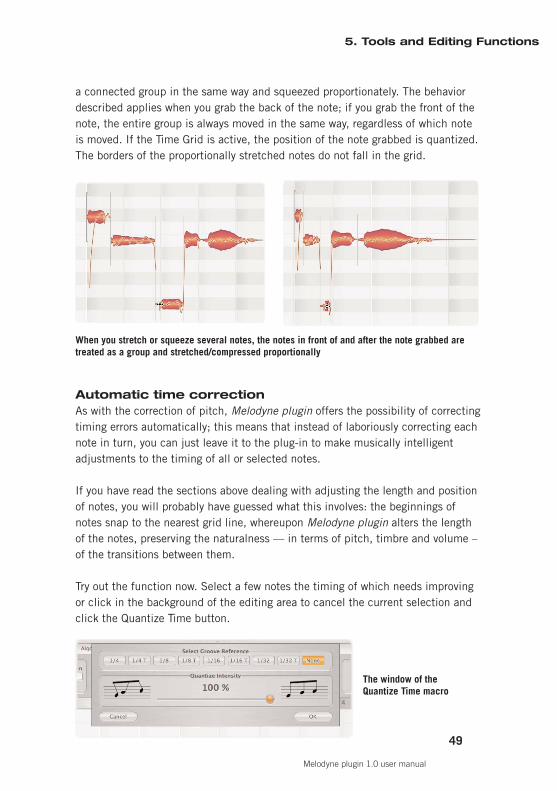
a connected group in the same way and squeezed proportionately. The behaviordescribed applies when you grab the back of the note; if you grab the front of thenote, the entire group is always moved in the same way, regardless of which noteis moved. If the Time Grid is active, the position of the note grabbed is quantized.The borders of the proportionally stretched notes do not fall in the grid.
When you stretch or squeeze several notes, the notes in front of and after the note grabbed aretreated as a group and stretched/compressed proportionally
Automatic time correctionAs with the correction of pitch, Melodyne plugin offers the possibility of correctingtiming errors automatically; this means that instead of laboriously correcting eachnote in turn, you can just leave it to the plug-in to make musically intelligentadjustments to the timing of all or selected notes.
If you have read the sections above dealing with adjusting the length and positionof notes, you will probably have guessed what this involves: the beginnings ofnotes snap to the nearest grid line, whereupon Melodyne plugin alters the lengthof the notes, preserving the naturalness — in terms of pitch, timbre and volume –of the transitions between them.
Try out the function now. Select a few notes the timing of which needs improvingor click in the background of the editing area to cancel the current selection andclick the Quantize Time button.
The window of the Quantize Time macro
49
5. Tools and Editing Functions
Melodyne plugin 1.0 user manual
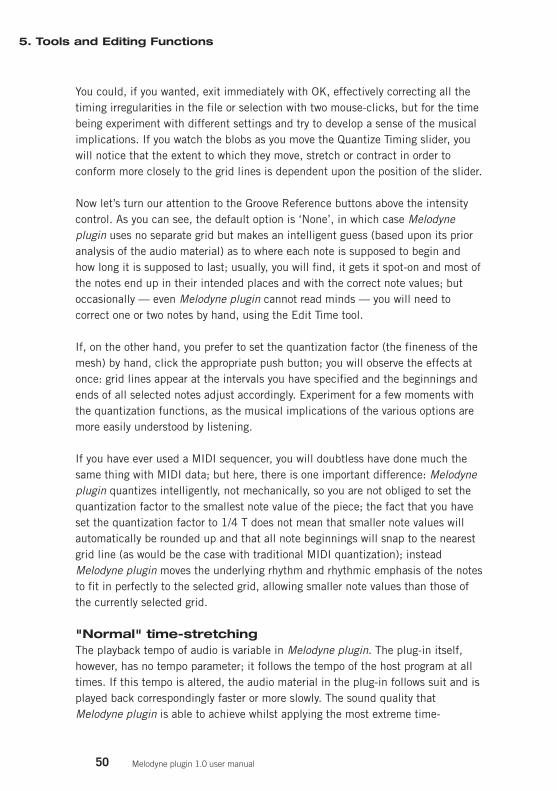
50
You could, if you wanted, exit immediately with OK, effectively correcting all thetiming irregularities in the file or selection with two mouse-clicks, but for the timebeing experiment with different settings and try to develop a sense of the musicalimplications. If you watch the blobs as you move the Quantize Timing slider, youwill notice that the extent to which they move, stretch or contract in order toconform more closely to the grid lines is dependent upon the position of the slider.
Now let’s turn our attention to the Groove Reference buttons above the intensitycontrol. As you can see, the default option is ‘None’, in which case Melodyneplugin uses no separate grid but makes an intelligent guess (based upon its prioranalysis of the audio material) as to where each note is supposed to begin andhow long it is supposed to last; usually, you will find, it gets it spot-on and most ofthe notes end up in their intended places and with the correct note values; butoccasionally — even Melodyne plugin cannot read minds — you will need tocorrect one or two notes by hand, using the Edit Time tool.
If, on the other hand, you prefer to set the quantization factor (the fineness of themesh) by hand, click the appropriate push button; you will observe the effects atonce: grid lines appear at the intervals you have specified and the beginnings andends of all selected notes adjust accordingly. Experiment for a few moments withthe quantization functions, as the musical implications of the various options aremore easily understood by listening.
If you have ever used a MIDI sequencer, you will doubtless have done much thesame thing with MIDI data; but here, there is one important difference: Melodyneplugin quantizes intelligently, not mechanically, so you are not obliged to set thequantization factor to the smallest note value of the piece; the fact that you haveset the quantization factor to 1/4 T does not mean that smaller note values willautomatically be rounded up and that all note beginnings will snap to the nearestgrid line (as would be the case with traditional MIDI quantization); insteadMelodyne plugin moves the underlying rhythm and rhythmic emphasis of the notesto fit in perfectly to the selected grid, allowing smaller note values than those ofthe currently selected grid.
"Normal" time-stretchingThe playback tempo of audio is variable in Melodyne plugin. The plug-in itself,however, has no tempo parameter; it follows the tempo of the host program at alltimes. If this tempo is altered, the audio material in the plug-in follows suit and isplayed back correspondingly faster or more slowly. The sound quality thatMelodyne plugin is able to achieve whilst applying the most extreme time-
5. Tools and Editing Functions
Melodyne plugin 1.0 user manual
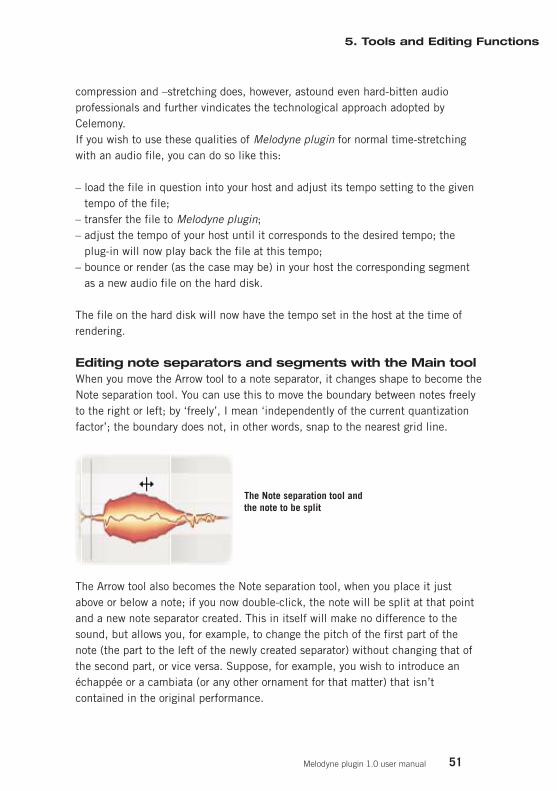
compression and –stretching does, however, astound even hard-bitten audioprofessionals and further vindicates the technological approach adopted byCelemony.If you wish to use these qualities of Melodyne plugin for normal time-stretchingwith an audio file, you can do so like this:
– load the file in question into your host and adjust its tempo setting to the giventempo of the file;
– transfer the file to Melodyne plugin;– adjust the tempo of your host until it corresponds to the desired tempo; the
plug-in will now play back the file at this tempo;– bounce or render (as the case may be) in your host the corresponding segment
as a new audio file on the hard disk.
The file on the hard disk will now have the tempo set in the host at the time ofrendering.
Editing note separators and segments with the Main toolWhen you move the Arrow tool to a note separator, it changes shape to become theNote separation tool. You can use this to move the boundary between notes freelyto the right or left; by ‘freely’, I mean ‘independently of the current quantizationfactor’; the boundary does not, in other words, snap to the nearest grid line.
The Note separation tool and the note to be split
The Arrow tool also becomes the Note separation tool, when you place it justabove or below a note; if you now double-click, the note will be split at that pointand a new note separator created. This in itself will make no difference to thesound, but allows you, for example, to change the pitch of the first part of thenote (the part to the left of the newly created separator) without changing that ofthe second part, or vice versa. Suppose, for example, you wish to introduce anéchappée or a cambiata (or any other ornament for that matter) that isn’tcontained in the original performance.
51
5. Tools and Editing Functions
Melodyne plugin 1.0 user manual
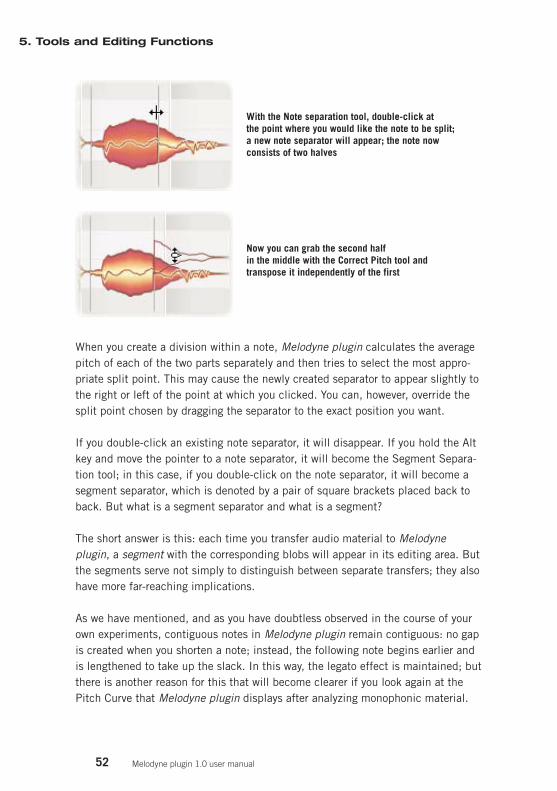
52
With the Note separation tool, double-click at the point where you would like the note to be split;a new note separator will appear; the note now consists of two halves
Now you can grab the second half in the middle with the Correct Pitch tool and transpose it independently of the first
When you create a division within a note, Melodyne plugin calculates the averagepitch of each of the two parts separately and then tries to select the most appro-priate split point. This may cause the newly created separator to appear slightly tothe right or left of the point at which you clicked. You can, however, override thesplit point chosen by dragging the separator to the exact position you want.
If you double-click an existing note separator, it will disappear. If you hold the Altkey and move the pointer to a note separator, it will become the Segment Separa-tion tool; in this case, if you double-click on the note separator, it will become asegment separator, which is denoted by a pair of square brackets placed back toback. But what is a segment separator and what is a segment?
The short answer is this: each time you transfer audio material to Melodyneplugin, a segment with the corresponding blobs will appear in its editing area. Butthe segments serve not simply to distinguish between separate transfers; they alsohave more far-reaching implications.
As we have mentioned, and as you have doubtless observed in the course of yourown experiments, contiguous notes in Melodyne plugin remain contiguous: no gapis created when you shorten a note; instead, the following note begins earlier andis lengthened to take up the slack. In this way, the legato effect is maintained; butthere is another reason for this that will become clearer if you look again at thePitch Curve that Melodyne plugin displays after analyzing monophonic material.
5. Tools and Editing Functions
Melodyne plugin 1.0 user manual
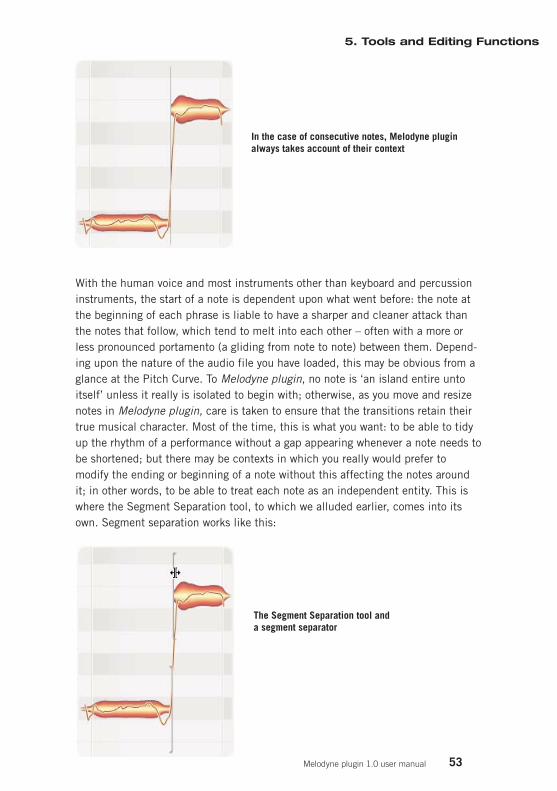
In the case of consecutive notes, Melodyne pluginalways takes account of their context
With the human voice and most instruments other than keyboard and percussioninstruments, the start of a note is dependent upon what went before: the note atthe beginning of each phrase is liable to have a sharper and cleaner attack thanthe notes that follow, which tend to melt into each other – often with a more orless pronounced portamento (a gliding from note to note) between them. Depend-ing upon the nature of the audio file you have loaded, this may be obvious from aglance at the Pitch Curve. To Melodyne plugin, no note is ‘an island entire untoitself’ unless it really is isolated to begin with; otherwise, as you move and resizenotes in Melodyne plugin, care is taken to ensure that the transitions retain theirtrue musical character. Most of the time, this is what you want: to be able to tidyup the rhythm of a performance without a gap appearing whenever a note needs tobe shortened; but there may be contexts in which you really would prefer tomodify the ending or beginning of a note without this affecting the notes aroundit; in other words, to be able to treat each note as an independent entity. This iswhere the Segment Separation tool, to which we alluded earlier, comes into itsown. Segment separation works like this:
The Segment Separation tool and a segment separator
53
5. Tools and Editing Functions
Melodyne plugin 1.0 user manual
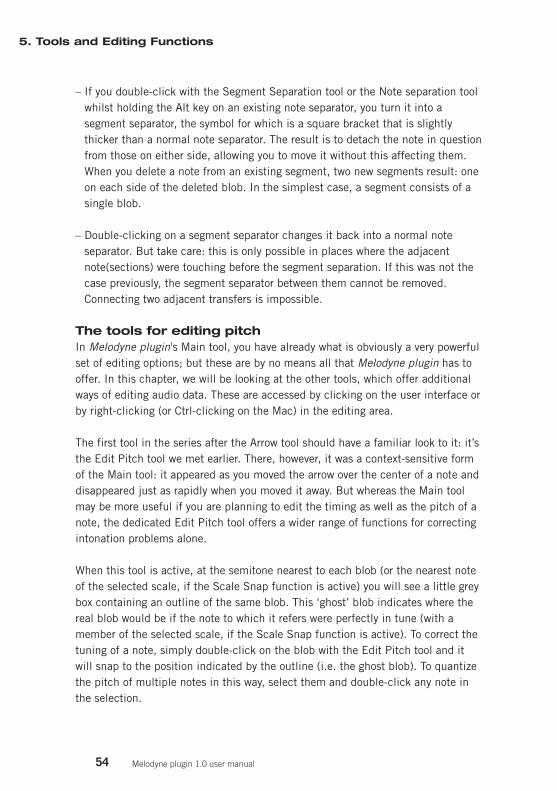
54
– If you double-click with the Segment Separation tool or the Note separation toolwhilst holding the Alt key on an existing note separator, you turn it into asegment separator, the symbol for which is a square bracket that is slightlythicker than a normal note separator. The result is to detach the note in questionfrom those on either side, allowing you to move it without this affecting them.When you delete a note from an existing segment, two new segments result: oneon each side of the deleted blob. In the simplest case, a segment consists of asingle blob.
– Double-clicking on a segment separator changes it back into a normal noteseparator. But take care: this is only possible in places where the adjacentnote(sections) were touching before the segment separation. If this was not thecase previously, the segment separator between them cannot be removed.Connecting two adjacent transfers is impossible.
The tools for editing pitchIn Melodyne plugin's Main tool, you have already what is obviously a very powerfulset of editing options; but these are by no means all that Melodyne plugin has tooffer. In this chapter, we will be looking at the other tools, which offer additionalways of editing audio data. These are accessed by clicking on the user interface orby right-clicking (or Ctrl-clicking on the Mac) in the editing area.
The first tool in the series after the Arrow tool should have a familiar look to it: it’sthe Edit Pitch tool we met earlier. There, however, it was a context-sensitive formof the Main tool: it appeared as you moved the arrow over the center of a note anddisappeared just as rapidly when you moved it away. But whereas the Main toolmay be more useful if you are planning to edit the timing as well as the pitch of anote, the dedicated Edit Pitch tool offers a wider range of functions for correctingintonation problems alone.
When this tool is active, at the semitone nearest to each blob (or the nearest noteof the selected scale, if the Scale Snap function is active) you will see a little greybox containing an outline of the same blob. This ‘ghost’ blob indicates where thereal blob would be if the note to which it refers were perfectly in tune (with amember of the selected scale, if the Scale Snap function is active). To correct thetuning of a note, simply double-click on the blob with the Edit Pitch tool and itwill snap to the position indicated by the outline (i.e. the ghost blob). To quantizethe pitch of multiple notes in this way, select them and double-click any note inthe selection.
5. Tools and Editing Functions
Melodyne plugin 1.0 user manual
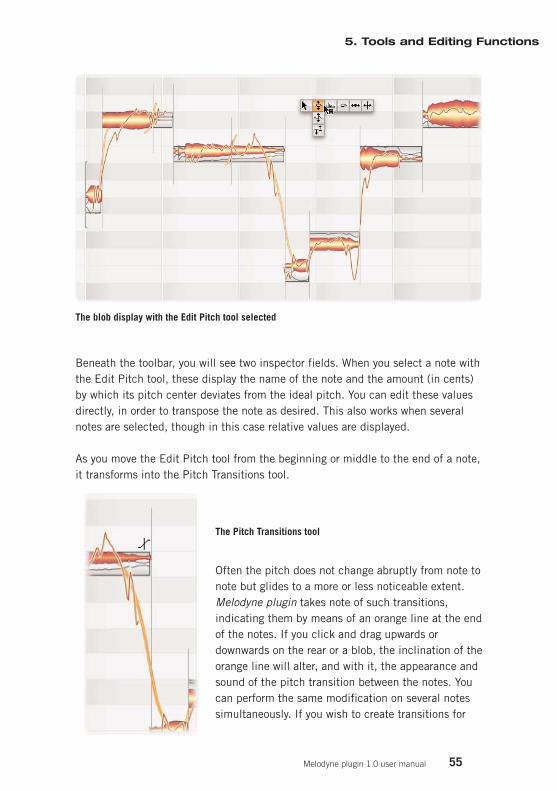
Beneath the toolbar, you will see two inspector fields. When you select a note withthe Edit Pitch tool, these display the name of the note and the amount (in cents)by which its pitch center deviates from the ideal pitch. You can edit these valuesdirectly, in order to transpose the note as desired. This also works when severalnotes are selected, though in this case relative values are displayed.
As you move the Edit Pitch tool from the beginning or middle to the end of a note,it transforms into the Pitch Transitions tool.
The Pitch Transitions tool
Often the pitch does not change abruptly from note tonote but glides to a more or less noticeable extent.Melodyne plugin takes note of such transitions,indicating them by means of an orange line at the endof the notes. If you click and drag upwards ordownwards on the rear or a blob, the inclination of theorange line will alter, and with it, the appearance andsound of the pitch transition between the notes. Youcan perform the same modification on several notessimultaneously. If you wish to create transitions for
55
5. Tools and Editing Functions
Melodyne plugin 1.0 user manual
The blob display with the Edit Pitch tool selected
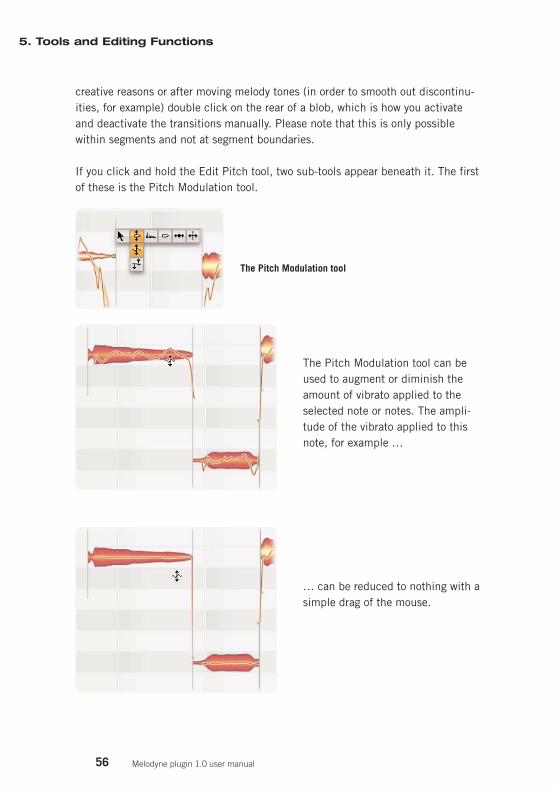
56
creative reasons or after moving melody tones (in order to smooth out discontinu-ities, for example) double click on the rear of a blob, which is how you activateand deactivate the transitions manually. Please note that this is only possiblewithin segments and not at segment boundaries.
If you click and hold the Edit Pitch tool, two sub-tools appear beneath it. The firstof these is the Pitch Modulation tool.
The Pitch Modulation tool
The Pitch Modulation tool can beused to augment or diminish theamount of vibrato applied to theselected note or notes. The ampli-tude of the vibrato applied to thisnote, for example …
… can be reduced to nothing with asimple drag of the mouse.
5. Tools and Editing Functions
Melodyne plugin 1.0 user manual
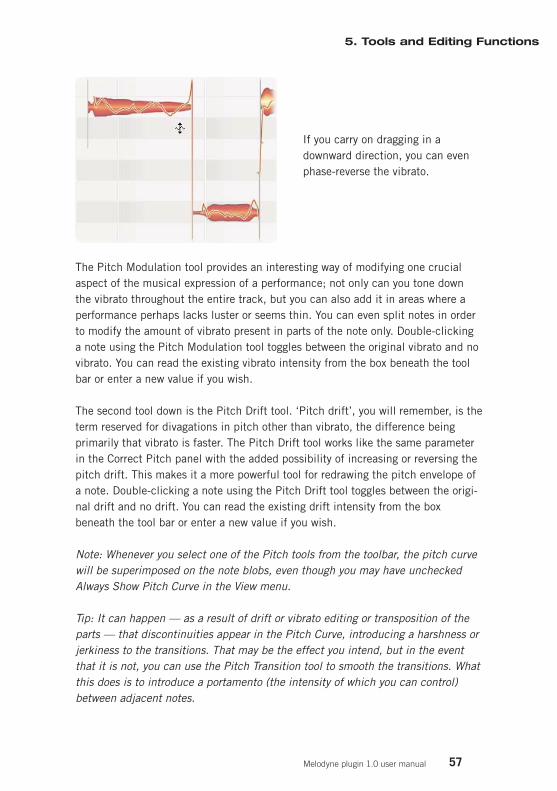
If you carry on dragging in adownward direction, you can evenphase-reverse the vibrato.
The Pitch Modulation tool provides an interesting way of modifying one crucialaspect of the musical expression of a performance; not only can you tone downthe vibrato throughout the entire track, but you can also add it in areas where aperformance perhaps lacks luster or seems thin. You can even split notes in orderto modify the amount of vibrato present in parts of the note only. Double-clickinga note using the Pitch Modulation tool toggles between the original vibrato and novibrato. You can read the existing vibrato intensity from the box beneath the toolbar or enter a new value if you wish.
The second tool down is the Pitch Drift tool. ‘Pitch drift’, you will remember, is theterm reserved for divagations in pitch other than vibrato, the difference beingprimarily that vibrato is faster. The Pitch Drift tool works like the same parameterin the Correct Pitch panel with the added possibility of increasing or reversing thepitch drift. This makes it a more powerful tool for redrawing the pitch envelope ofa note. Double-clicking a note using the Pitch Drift tool toggles between the origi-nal drift and no drift. You can read the existing drift intensity from the boxbeneath the tool bar or enter a new value if you wish.
Note: Whenever you select one of the Pitch tools from the toolbar, the pitch curvewill be superimposed on the note blobs, even though you may have uncheckedAlways Show Pitch Curve in the View menu.
Tip: It can happen — as a result of drift or vibrato editing or transposition of theparts — that discontinuities appear in the Pitch Curve, introducing a harshness orjerkiness to the transitions. That may be the effect you intend, but in the eventthat it is not, you can use the Pitch Transition tool to smooth the transitions. Whatthis does is to introduce a portamento (the intensity of which you can control)between adjacent notes.
57
5. Tools and Editing Functions
Melodyne plugin 1.0 user manual
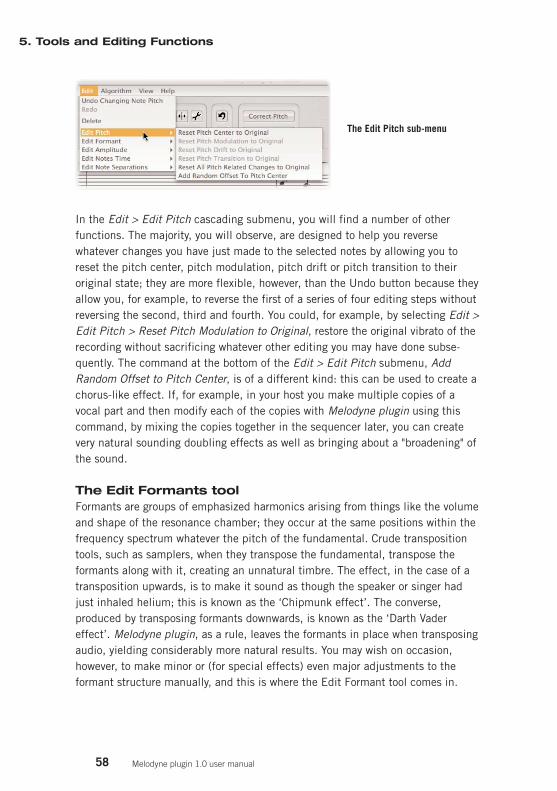
58
The Edit Pitch sub-menu
In the Edit > Edit Pitch cascading submenu, you will find a number of otherfunctions. The majority, you will observe, are designed to help you reversewhatever changes you have just made to the selected notes by allowing you toreset the pitch center, pitch modulation, pitch drift or pitch transition to theiroriginal state; they are more flexible, however, than the Undo button because theyallow you, for example, to reverse the first of a series of four editing steps withoutreversing the second, third and fourth. You could, for example, by selecting Edit >Edit Pitch > Reset Pitch Modulation to Original, restore the original vibrato of therecording without sacrificing whatever other editing you may have done subse-quently. The command at the bottom of the Edit > Edit Pitch submenu, AddRandom Offset to Pitch Center, is of a different kind: this can be used to create achorus-like effect. If, for example, in your host you make multiple copies of avocal part and then modify each of the copies with Melodyne plugin using thiscommand, by mixing the copies together in the sequencer later, you can createvery natural sounding doubling effects as well as bringing about a "broadening" ofthe sound.
The Edit Formants toolFormants are groups of emphasized harmonics arising from things like the volumeand shape of the resonance chamber; they occur at the same positions within thefrequency spectrum whatever the pitch of the fundamental. Crude transpositiontools, such as samplers, when they transpose the fundamental, transpose theformants along with it, creating an unnatural timbre. The effect, in the case of atransposition upwards, is to make it sound as though the speaker or singer hadjust inhaled helium; this is known as the ‘Chipmunk effect’. The converse,produced by transposing formants downwards, is known as the ‘Darth Vadereffect’. Melodyne plugin, as a rule, leaves the formants in place when transposingaudio, yielding considerably more natural results. You may wish on occasion,however, to make minor or (for special effects) even major adjustments to theformant structure manually, and this is where the Edit Formant tool comes in.
5. Tools and Editing Functions
Melodyne plugin 1.0 user manual
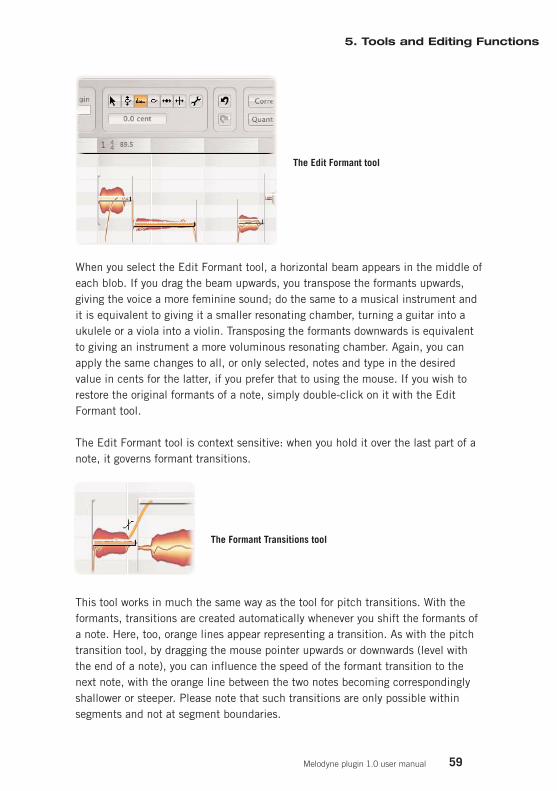
The Edit Formant tool
When you select the Edit Formant tool, a horizontal beam appears in the middle ofeach blob. If you drag the beam upwards, you transpose the formants upwards,giving the voice a more feminine sound; do the same to a musical instrument andit is equivalent to giving it a smaller resonating chamber, turning a guitar into aukulele or a viola into a violin. Transposing the formants downwards is equivalentto giving an instrument a more voluminous resonating chamber. Again, you canapply the same changes to all, or only selected, notes and type in the desiredvalue in cents for the latter, if you prefer that to using the mouse. If you wish torestore the original formants of a note, simply double-click on it with the EditFormant tool.
The Edit Formant tool is context sensitive: when you hold it over the last part of anote, it governs formant transitions.
The Formant Transitions tool
This tool works in much the same way as the tool for pitch transitions. With theformants, transitions are created automatically whenever you shift the formants ofa note. Here, too, orange lines appear representing a transition. As with the pitchtransition tool, by dragging the mouse pointer upwards or downwards (level withthe end of a note), you can influence the speed of the formant transition to thenext note, with the orange line between the two notes becoming correspondinglyshallower or steeper. Please note that such transitions are only possible withinsegments and not at segment boundaries.
59
5. Tools and Editing Functions
Melodyne plugin 1.0 user manual
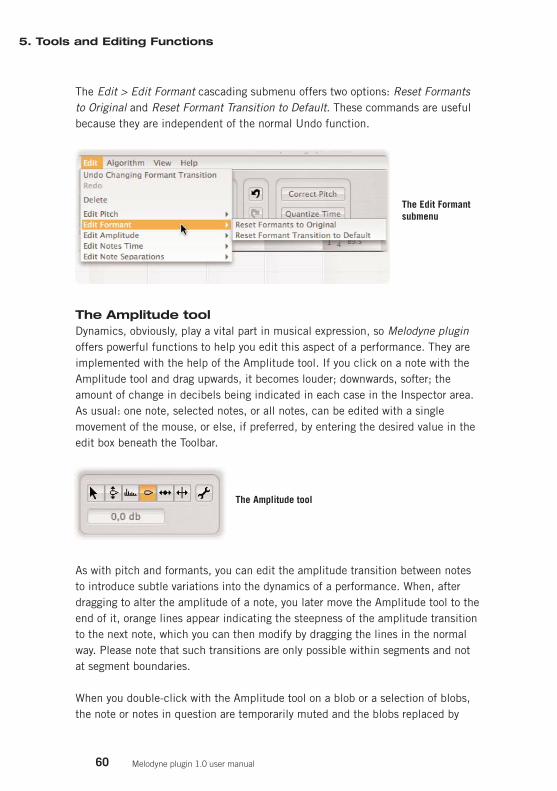
60
The Edit > Edit Formant cascading submenu offers two options: Reset Formantsto Original and Reset Formant Transition to Default. These commands are usefulbecause they are independent of the normal Undo function.
The Edit Formantsubmenu
The Amplitude toolDynamics, obviously, play a vital part in musical expression, so Melodyne pluginoffers powerful functions to help you edit this aspect of a performance. They areimplemented with the help of the Amplitude tool. If you click on a note with theAmplitude tool and drag upwards, it becomes louder; downwards, softer; theamount of change in decibels being indicated in each case in the Inspector area.As usual: one note, selected notes, or all notes, can be edited with a singlemovement of the mouse, or else, if preferred, by entering the desired value in theedit box beneath the Toolbar.
The Amplitude tool
As with pitch and formants, you can edit the amplitude transition between notesto introduce subtle variations into the dynamics of a performance. When, afterdragging to alter the amplitude of a note, you later move the Amplitude tool to theend of it, orange lines appear indicating the steepness of the amplitude transitionto the next note, which you can then modify by dragging the lines in the normalway. Please note that such transitions are only possible within segments and notat segment boundaries.
When you double-click with the Amplitude tool on a blob or a selection of blobs,the note or notes in question are temporarily muted and the blobs replaced by
5. Tools and Editing Functions
Melodyne plugin 1.0 user manual
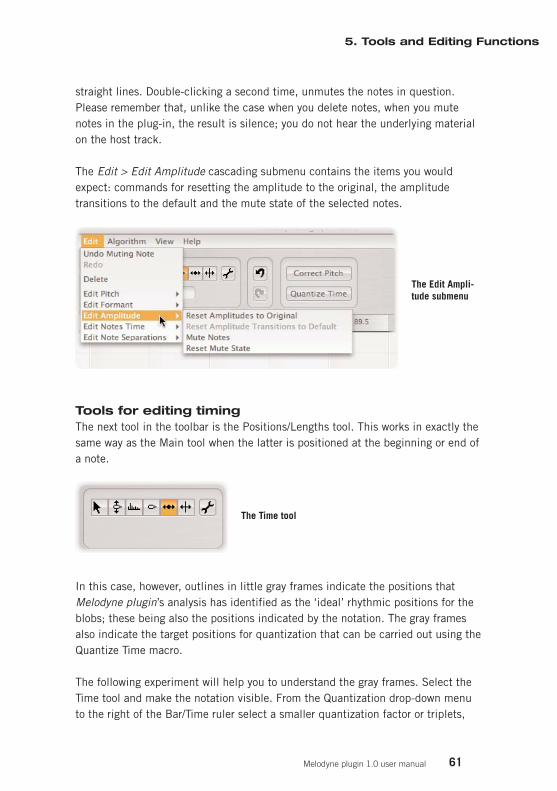
straight lines. Double-clicking a second time, unmutes the notes in question.Please remember that, unlike the case when you delete notes, when you mutenotes in the plug-in, the result is silence; you do not hear the underlying materialon the host track.
The Edit > Edit Amplitude cascading submenu contains the items you wouldexpect: commands for resetting the amplitude to the original, the amplitudetransitions to the default and the mute state of the selected notes.
The Edit Ampli-tude submenu
Tools for editing timingThe next tool in the toolbar is the Positions/Lengths tool. This works in exactly thesame way as the Main tool when the latter is positioned at the beginning or end ofa note.
The Time tool
In this case, however, outlines in little gray frames indicate the positions thatMelodyne plugin’s analysis has identified as the ‘ideal’ rhythmic positions for theblobs; these being also the positions indicated by the notation. The gray framesalso indicate the target positions for quantization that can be carried out using theQuantize Time macro.
The following experiment will help you to understand the gray frames. Select theTime tool and make the notation visible. From the Quantization drop-down menuto the right of the Bar/Time ruler select a smaller quantization factor or triplets,
61
5. Tools and Editing Functions
Melodyne plugin 1.0 user manual
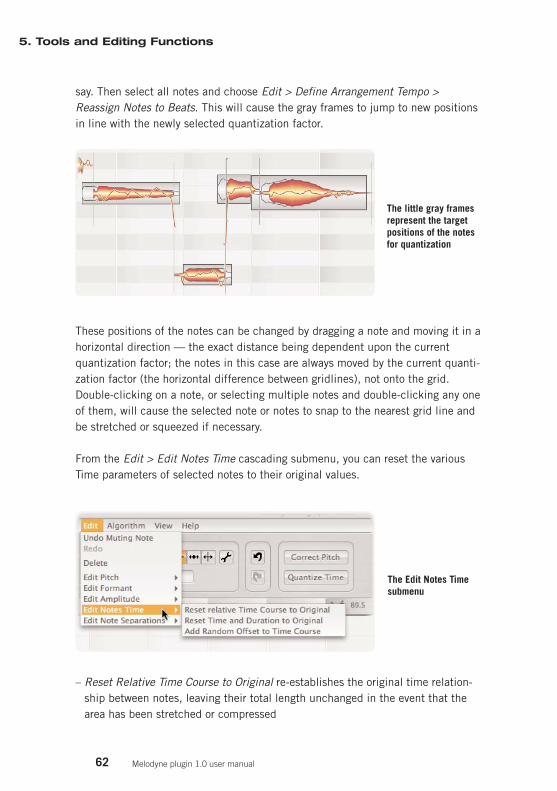
62
say. Then select all notes and choose Edit > Define Arrangement Tempo >Reassign Notes to Beats. This will cause the gray frames to jump to new positionsin line with the newly selected quantization factor.
The little gray framesrepresent the targetpositions of the notesfor quantization
These positions of the notes can be changed by dragging a note and moving it in ahorizontal direction — the exact distance being dependent upon the currentquantization factor; the notes in this case are always moved by the current quanti-zation factor (the horizontal difference between gridlines), not onto the grid.Double-clicking on a note, or selecting multiple notes and double-clicking any oneof them, will cause the selected note or notes to snap to the nearest grid line andbe stretched or squeezed if necessary.
From the Edit > Edit Notes Time cascading submenu, you can reset the variousTime parameters of selected notes to their original values.
The Edit Notes Timesubmenu
– Reset Relative Time Course to Original re-establishes the original time relation-ship between notes, leaving their total length unchanged in the event that thearea has been stretched or compressed
5. Tools and Editing Functions
Melodyne plugin 1.0 user manual
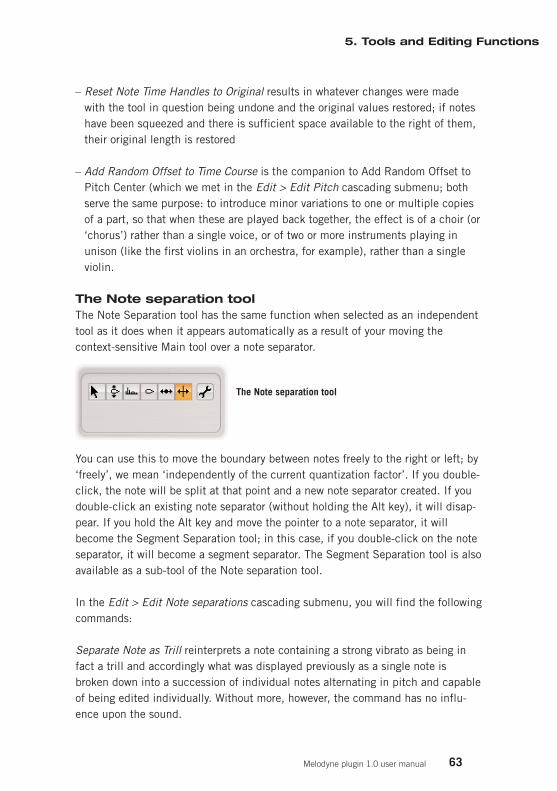
– Reset Note Time Handles to Original results in whatever changes were madewith the tool in question being undone and the original values restored; if noteshave been squeezed and there is sufficient space available to the right of them,their original length is restored
– Add Random Offset to Time Course is the companion to Add Random Offset toPitch Center (which we met in the Edit > Edit Pitch cascading submenu; bothserve the same purpose: to introduce minor variations to one or multiple copiesof a part, so that when these are played back together, the effect is of a choir (or‘chorus’) rather than a single voice, or of two or more instruments playing inunison (like the first violins in an orchestra, for example), rather than a singleviolin.
The Note separation toolThe Note Separation tool has the same function when selected as an independenttool as it does when it appears automatically as a result of your moving thecontext-sensitive Main tool over a note separator.
The Note separation tool
You can use this to move the boundary between notes freely to the right or left; by‘freely’, we mean ‘independently of the current quantization factor’. If you double-click, the note will be split at that point and a new note separator created. If youdouble-click an existing note separator (without holding the Alt key), it will disap-pear. If you hold the Alt key and move the pointer to a note separator, it willbecome the Segment Separation tool; in this case, if you double-click on the noteseparator, it will become a segment separator. The Segment Separation tool is alsoavailable as a sub-tool of the Note separation tool.
In the Edit > Edit Note separations cascading submenu, you will find the followingcommands:
Separate Note as Trill reinterprets a note containing a strong vibrato as being infact a trill and accordingly what was displayed previously as a single note isbroken down into a succession of individual notes alternating in pitch and capableof being edited individually. Without more, however, the command has no influ-ence upon the sound.
63
5. Tools and Editing Functions
Melodyne plugin 1.0 user manual

64
The Edit Note separationssubmenu
A note before and after separation with the Separate Note as Trill command
The command Separate Note as Slide is designed to separate notes created, forexample, when a guitarist or bass player slides the finger stopping the string up ordown the string — in other words, it breaks a rising or descending glissando into aseries of discrete semitone steps. Where the potential for a glissando exists, acontinuous rising or falling pitch curve is displayed which, with fretted instru-ments, may take on a step-like appearance; for it to be recognized and acceptedas such by Melodyne plugin, a slide must cover at least three semitones, with thefirst and last notes defining the range of the slide.
A note before andafter separation withthe Separate Note asSlide command
5. Tools and Editing Functions
Melodyne plugin 1.0 user manual
The note range that you wish to treat and separate as a slide should initially beseparated from any preceding or following ‘main note’ and consist of only onenote. Select this slide note followed by the command Separate Note as Slide. Theslide will then be broken down into its constituent notes.
When you select the Edit Time tool, as described above, little gray frames aredisplayed containing the outlines of the notes. These frames indicate the"presumed" ideal position of the notes, which is that at which they are displayedat the top of the window in the notation display. When quantizing, the framesindicate the target position of the notes. If you wish, you can alter these targetpositions. To do this, select from the Quantization cascading menu to the right ofthe Bar/Time Ruler a different quantization factor (some smaller note value, forexample, or triplets). Then select the desired notes and choose Edit > Edit NoteSeparations > Reassign Notes to Beats. The gray frames and the notation willjump to new positions corresponding to the new target positions for the quantiza-tion. Tip: the notes themselves are not otherwise altered by this command. All youare doing is making preparations for a targeted and effective quantization laterwith the corresponding macro.
With the commands More Separations and Fewer Separations you can influencethe number of note separations Melodyne plugin detects in the transferred audiomaterial. If notes that should be separated from one another are not, you cancause Melodyne plugin to be more sensitive (thereby detecting a greater numberof note separations) with the command More Separations; if there are too manyseparations in the material, you can arrive at the opposite result with the FewerSeparations command. Please note that these two commands can also be usedseveral times is succession to influence the number of separations.
If you check the option Separate According to Pitch, Melodyne plugin will be moreinfluenced by the melodic course of the material (and less by the amplitude) whendeciding whether or not to separate notes. Removing the checkmark will weakenthe influence of the melodic course upon the separations. Try out this option (alsoin connection with the two commands for more/fewer separations), if you are notsatisfied with the separations detected in more complex material.
It is preferable to use the above-mentioned options before you begin editing thenotes, so that your editing is not disturbed by alterations in the note separations.
65
5. Tools and Editing Functions
Melodyne plugin 1.0 user manual
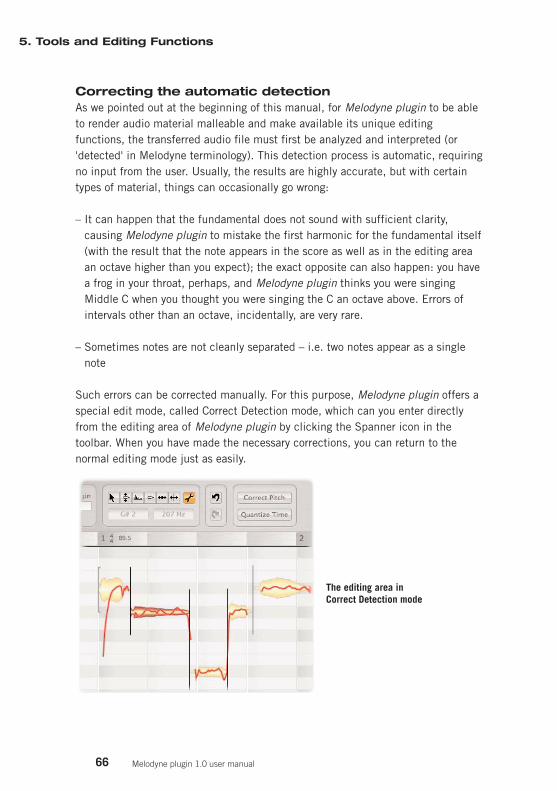
66
Correcting the automatic detection As we pointed out at the beginning of this manual, for Melodyne plugin to be ableto render audio material malleable and make available its unique editingfunctions, the transferred audio file must first be analyzed and interpreted (or'detected' in Melodyne terminology). This detection process is automatic, requiringno input from the user. Usually, the results are highly accurate, but with certaintypes of material, things can occasionally go wrong:
– It can happen that the fundamental does not sound with sufficient clarity,causing Melodyne plugin to mistake the first harmonic for the fundamental itself(with the result that the note appears in the score as well as in the editing areaan octave higher than you expect); the exact opposite can also happen: you havea frog in your throat, perhaps, and Melodyne plugin thinks you were singingMiddle C when you thought you were singing the C an octave above. Errors ofintervals other than an octave, incidentally, are very rare.
– Sometimes notes are not cleanly separated – i.e. two notes appear as a singlenote
Such errors can be corrected manually. For this purpose, Melodyne plugin offers aspecial edit mode, called Correct Detection mode, which can you enter directlyfrom the editing area of Melodyne plugin by clicking the Spanner icon in thetoolbar. When you have made the necessary corrections, you can return to thenormal editing mode just as easily.
The editing area in Correct Detection mode
5. Tools and Editing Functions
Melodyne plugin 1.0 user manual
When you are in Correct Detection mode, the blobs in the editing area are yellowand the pitch curve is displayed in a bolder red.
In Correct Detection mode, the mouse pointer is again context sensitive: when youmove it to the center of a blob, it becomes the Pitch Correction tool, though noteshere do not snap into position in steps of a semitone; and the effect of dragging anote to a new location is not to alter its pitch (as would be the case in the normalediting area) but to trigger a fresh search at the new position; it’s a hint, in otherwords; the equivalent of saying: “try looking here”. If Melodyne plugin is success-ful, the pitch curve will be redrawn to take account of the newly detected note. If,however, the redrawn pitch curve seems implausible, by double-clicking the blob,you can trigger a fresh search at the designated location.
When you move the pointer to a position above or below (or to the beginning orend of) a note, it changes to the Note separation tool, which you can use if needbe to split (or move the boundaries between) notes as in the ordinary editing area.
In addition to the detection errors already described, Melodyne plugin sometimesconfuses tonal material with percussive and vice versa: one could think of certainpassages of scat (jazz singers imitating instruments), where different people couldhave a legitimate difference of opinion as to whether it was tonal or percussive.The significance of the decision is threefold: when material is categorized as‘percussive’, all the notes are displayed at the same pitch; when it is transposed,the formants are also transposed; and no manual editing of formants is possible.
If Melodyne plugin's categorization of your material does not correspond with yourown thoughts on the matter, you can simply select manually the playbackalgorithm you prefer from the Algorithm menu.
67
5. Tools and Editing Functions
Melodyne plugin 1.0 user manual
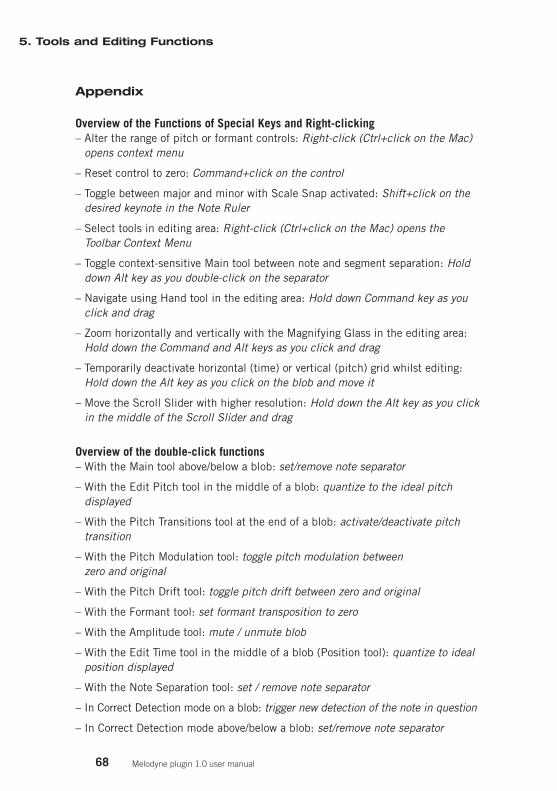
68
Appendix
Overview of the Functions of Special Keys and Right-clicking– Alter the range of pitch or formant controls: Right-click (Ctrl+click on the Mac)
opens context menu
– Reset control to zero: Command+click on the control
– Toggle between major and minor with Scale Snap activated: Shift+click on thedesired keynote in the Note Ruler
– Select tools in editing area: Right-click (Ctrl+click on the Mac) opens theToolbar Context Menu
– Toggle context-sensitive Main tool between note and segment separation: Holddown Alt key as you double-click on the separator
– Navigate using Hand tool in the editing area: Hold down Command key as youclick and drag
– Zoom horizontally and vertically with the Magnifying Glass in the editing area:Hold down the Command and Alt keys as you click and drag
– Temporarily deactivate horizontal (time) or vertical (pitch) grid whilst editing:Hold down the Alt key as you click on the blob and move it
– Move the Scroll Slider with higher resolution: Hold down the Alt key as you clickin the middle of the Scroll Slider and drag
Overview of the double-click functions– With the Main tool above/below a blob: set/remove note separator
– With the Edit Pitch tool in the middle of a blob: quantize to the ideal pitchdisplayed
– With the Pitch Transitions tool at the end of a blob: activate/deactivate pitchtransition
– With the Pitch Modulation tool: toggle pitch modulation between zero and original
– With the Pitch Drift tool: toggle pitch drift between zero and original
– With the Formant tool: set formant transposition to zero
– With the Amplitude tool: mute / unmute blob
– With the Edit Time tool in the middle of a blob (Position tool): quantize to idealposition displayed
– With the Note Separation tool: set / remove note separator
– In Correct Detection mode on a blob: trigger new detection of the note in question
– In Correct Detection mode above/below a blob: set/remove note separator
5. Tools and Editing Functions
Melodyne plugin 1.0 user manual
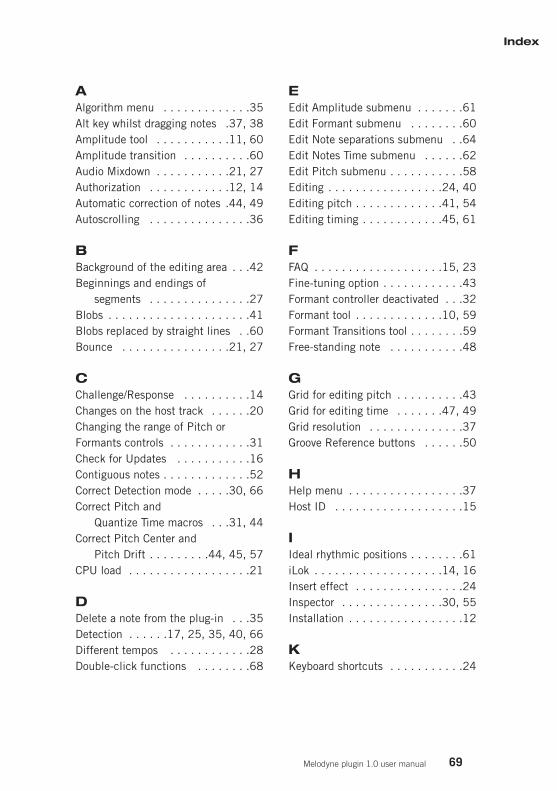
69
Index
Melodyne plugin 1.0 user manual
A Algorithm menu . . . . . . . . . . . . .35 Alt key whilst dragging notes .37, 38 Amplitude tool . . . . . . . . . . .11, 60 Amplitude transition . . . . . . . . . .60 Audio Mixdown . . . . . . . . . . .21, 27 Authorization . . . . . . . . . . . .12, 14 Automatic correction of notes .44, 49Autoscrolling . . . . . . . . . . . . . . .36
B Background of the editing area . . .42 Beginnings and endings of
segments . . . . . . . . . . . . . . .27 Blobs . . . . . . . . . . . . . . . . . . . . .41 Blobs replaced by straight lines . .60 Bounce . . . . . . . . . . . . . . . .21, 27
C Challenge/Response . . . . . . . . . .14 Changes on the host track . . . . . .20Changing the range of Pitch or Formants controls . . . . . . . . . . . .31 Check for Updates . . . . . . . . . . .16 Contiguous notes . . . . . . . . . . . . .52 Correct Detection mode . . . . .30, 66 Correct Pitch and
Quantize Time macros . . .31, 44 Correct Pitch Center and
Pitch Drift . . . . . . . . .44, 45, 57 CPU load . . . . . . . . . . . . . . . . . .21
D Delete a note from the plug-in . . .35 Detection . . . . . .17, 25, 35, 40, 66Different tempos . . . . . . . . . . . .28 Double-click functions . . . . . . . .68
E Edit Amplitude submenu . . . . . . .61 Edit Formant submenu . . . . . . . .60 Edit Note separations submenu . .64 Edit Notes Time submenu . . . . . .62 Edit Pitch submenu . . . . . . . . . . .58 Editing . . . . . . . . . . . . . . . . .24, 40 Editing pitch . . . . . . . . . . . . .41, 54 Editing timing . . . . . . . . . . . .45, 61
F FAQ . . . . . . . . . . . . . . . . . . .15, 23 Fine-tuning option . . . . . . . . . . . .43 Formant controller deactivated . . .32 Formant tool . . . . . . . . . . . . .10, 59Formant Transitions tool . . . . . . . .59 Free-standing note . . . . . . . . . . .48
G Grid for editing pitch . . . . . . . . . .43 Grid for editing time . . . . . . .47, 49Grid resolution . . . . . . . . . . . . . .37 Groove Reference buttons . . . . . .50
H Help menu . . . . . . . . . . . . . . . . .37 Host ID . . . . . . . . . . . . . . . . . . .15
I Ideal rhythmic positions . . . . . . . .61 iLok . . . . . . . . . . . . . . . . . . .14, 16 Insert effect . . . . . . . . . . . . . . . .24 Inspector . . . . . . . . . . . . . . .30, 55 Installation . . . . . . . . . . . . . . . . .12
K Keyboard shortcuts . . . . . . . . . . .24
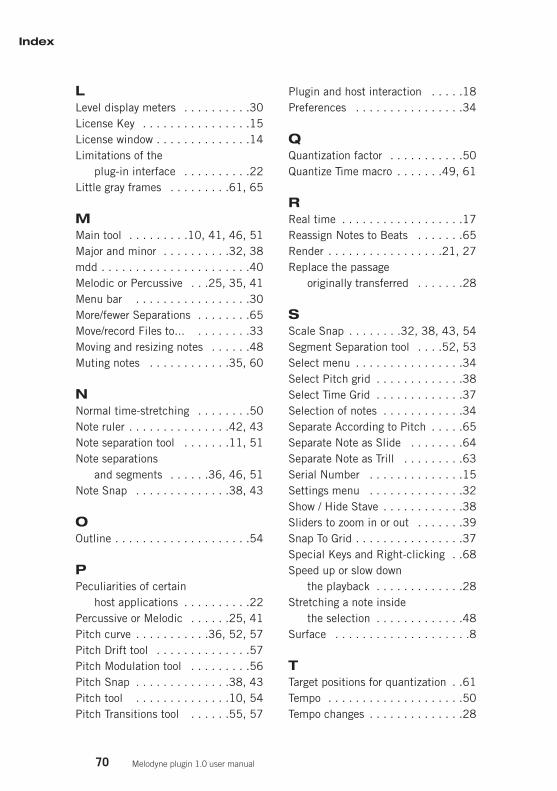
L Level display meters . . . . . . . . . .30 License Key . . . . . . . . . . . . . . . .15 License window . . . . . . . . . . . . . .14 Limitations of the
plug-in interface . . . . . . . . . .22 Little gray frames . . . . . . . . .61, 65
M Main tool . . . . . . . . .10, 41, 46, 51 Major and minor . . . . . . . . . .32, 38mdd . . . . . . . . . . . . . . . . . . . . . .40 Melodic or Percussive . . .25, 35, 41 Menu bar . . . . . . . . . . . . . . . . .30 More/fewer Separations . . . . . . . .65 Move/record Files to... . . . . . . . .33 Moving and resizing notes . . . . . .48 Muting notes . . . . . . . . . . . .35, 60
N Normal time-stretching . . . . . . . .50 Note ruler . . . . . . . . . . . . . . .42, 43 Note separation tool . . . . . . .11, 51 Note separations
and segments . . . . . .36, 46, 51 Note Snap . . . . . . . . . . . . . .38, 43
O Outline . . . . . . . . . . . . . . . . . . . .54
P Peculiarities of certain
host applications . . . . . . . . . .22 Percussive or Melodic . . . . . .25, 41 Pitch curve . . . . . . . . . . .36, 52, 57 Pitch Drift tool . . . . . . . . . . . . . .57 Pitch Modulation tool . . . . . . . . .56 Pitch Snap . . . . . . . . . . . . . .38, 43 Pitch tool . . . . . . . . . . . . . .10, 54 Pitch Transitions tool . . . . . .55, 57
Plugin and host interaction . . . . .18 Preferences . . . . . . . . . . . . . . . .34
Q Quantization factor . . . . . . . . . . .50 Quantize Time macro . . . . . . .49, 61
R Real time . . . . . . . . . . . . . . . . . .17 Reassign Notes to Beats . . . . . . .65 Render . . . . . . . . . . . . . . . . .21, 27 Replace the passage
originally transferred . . . . . . .28
S Scale Snap . . . . . . . .32, 38, 43, 54 Segment Separation tool . . . .52, 53 Select menu . . . . . . . . . . . . . . . .34 Select Pitch grid . . . . . . . . . . . . .38 Select Time Grid . . . . . . . . . . . . .37 Selection of notes . . . . . . . . . . . .34 Separate According to Pitch . . . . .65Separate Note as Slide . . . . . . . .64 Separate Note as Trill . . . . . . . . .63 Serial Number . . . . . . . . . . . . . .15 Settings menu . . . . . . . . . . . . . .32 Show / Hide Stave . . . . . . . . . . . .38 Sliders to zoom in or out . . . . . . .39 Snap To Grid . . . . . . . . . . . . . . . .37 Special Keys and Right-clicking . .68 Speed up or slow down
the playback . . . . . . . . . . . . .28 Stretching a note inside
the selection . . . . . . . . . . . . .48 Surface . . . . . . . . . . . . . . . . . . . .8
T Target positions for quantization . .61 Tempo . . . . . . . . . . . . . . . . . . . .50 Tempo changes . . . . . . . . . . . . . .28
70
Index
Melodyne plugin 1.0 user manual
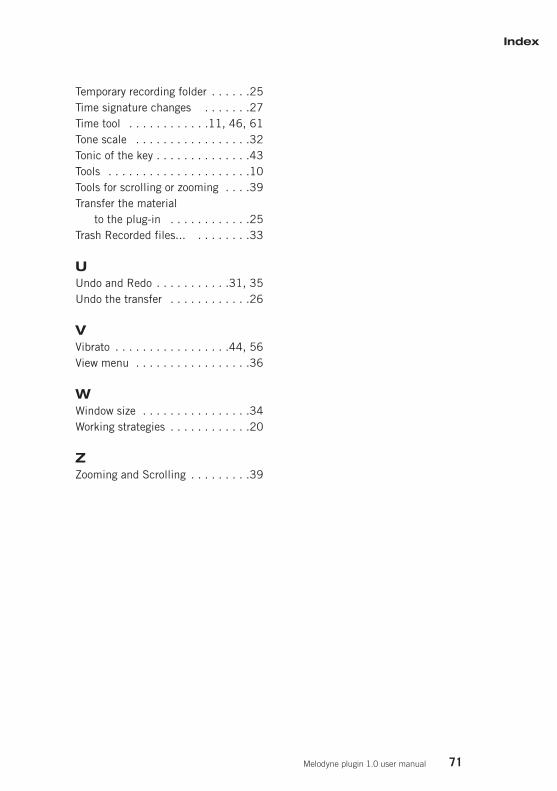
71
Index
Melodyne plugin 1.0 user manual
Temporary recording folder . . . . . .25 Time signature changes . . . . . . .27 Time tool . . . . . . . . . . . .11, 46, 61 Tone scale . . . . . . . . . . . . . . . . .32 Tonic of the key . . . . . . . . . . . . . .43 Tools . . . . . . . . . . . . . . . . . . . . .10Tools for scrolling or zooming . . . .39 Transfer the material
to the plug-in . . . . . . . . . . . .25 Trash Recorded files... . . . . . . . .33
U Undo and Redo . . . . . . . . . . .31, 35 Undo the transfer . . . . . . . . . . . .26
V Vibrato . . . . . . . . . . . . . . . . .44, 56 View menu . . . . . . . . . . . . . . . . .36
W Window size . . . . . . . . . . . . . . . .34 Working strategies . . . . . . . . . . . .20
Z Zooming and Scrolling . . . . . . . . .39


![ACID Pro 10 共通...Celemony Melodyne essential のインストール 1.ダウンロード 後に解凍 してできた フォルダ 内の[ インストール する(.exe)]を](https://img.pdfslide.org/doc/110x75/612880b07722cd723750824b/acid-pro-10-e-celemony-melodyne-essential-ffff-1fffff.jpg)