Embed Size (px)
Citation preview
HY5 .1TTDesigned according tothe highest germansafety standards
0/1, 0 – 18 kgapprox. 0 – 5 years
DE / EN / IT
2
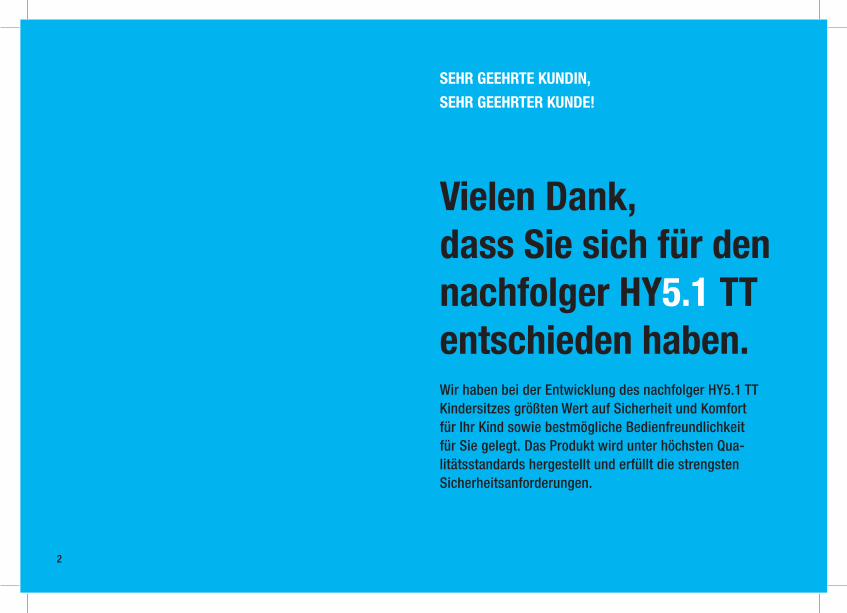
Vielen Dank,dass Sie sich für den nachfolger HY5.1 TTentschieden haben.Wir haben bei der Entwicklung des nachfolger HY5.1 TT Kindersitzes größten Wert auf Sicherheit und Komfort für Ihr Kind sowie bestmögliche Bedienfreundlichkeit für Sie gelegt. Das Produkt wird unter höchsten Qua-litätsstandards hergestellt und erfüllt die strengsten Sicherheitsanforderungen.
SEHR GEEHRTE KUNDIN,SEHR GEEHRTER KUNDE!
3
Grazie per aver acquistato il nachfolger HY5.1 TT.
Thank you for purchasing the nachfolger HY5.1 TT.
Assicuriamo che nel processo di sviluppo del nachfolger HY5.1 TT ci siamo concentrati sulla sicurezza e il comfort per il suo bambino, nonché sulla migliore facilità d‘utilizzo per lei. Il prodotto è fabbricato con un‘alta sorveglianza della qualità e conforme alle più severe norme di sicurezza.
We assure you that in the process of developing the nachfolger HY5.1 TT we have focused on safety and comfort for your child, as well as the best user friendliness for you. The product is ma-nufactured under highest quality surveillance and complies with the strictest safety standards.
CARO CLIENTE!DEAR CUSTOMER!

4
KURZANLEITUNG
ALLGEMEINE HINWEISE
VOR DER ERSTEN VERWENDUNG
VERWENDUNG IM FAHRZEUG
EINBAU DES KINDERSITZES
INSTALLATION DES TOP TETHER
ANPASSEN DER KOPFSTÜTZE
ANSCHNALLEN MITTELS GURTSYSTEM
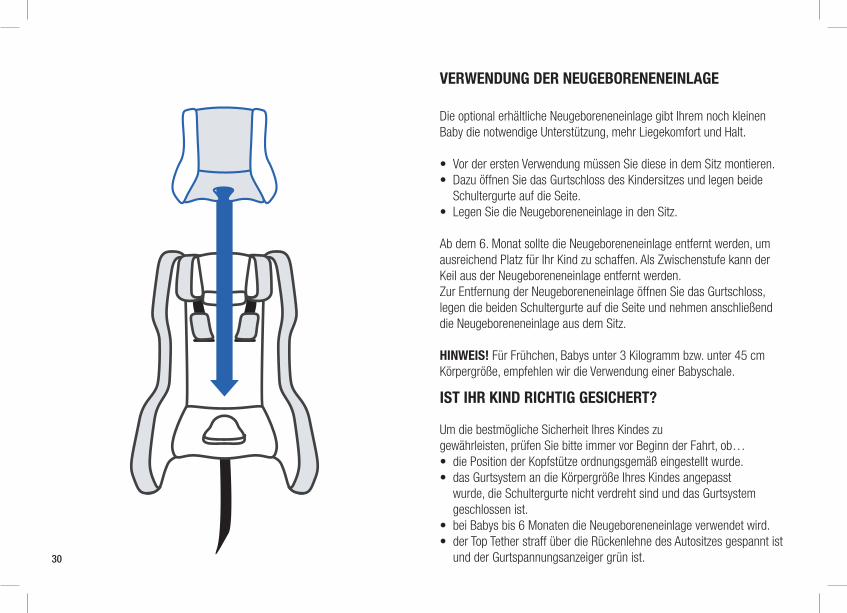
VERWENDUNG DER NEUGEBORENENEINLAGE
IST IHR KIND RICHTIG GESICHERT?
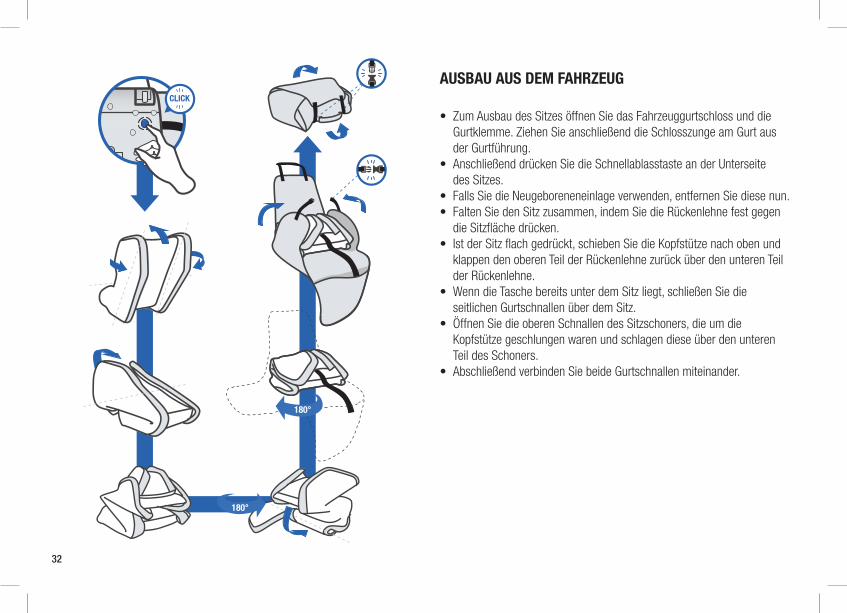
AUSBAU AUS DEM FAHRZEUG
REINIGUNG DES BEZUGES
ENTFERNEN DES BEZUGES
BEDIENUNG DER MOBILEN PUMPE
PFLEGE
VERHALTEN NACH EINEM UNFALL
PRODUKTLEBENSDAUER
ENTSORGUNG
KONTAKT
GARANTIEBEDINGUNGEN
>
>
>
>
>
>
>
>
>
>
>
>
>
>
>
>
>
>
>
>
DE
6-7
8
10
12
14-20
22-24
26
28
30
30
32
34
36
38
40
42
42
44
44
46
5
BREVI ISTRUZIONI
INFORMAZIONI GENERALI
PRIMA DI UTILIZZARE IL SEGGIOLINO PER LA PRIMA VOLTA
USARE IL SEGGIOLINO IN AUTO
INSTALLAZIONE DEL SEGGIOLINO
INSTALLAZIONE DEL TOP TETHER
REGOLARE IL POGGIATESTA
SICUREZZA COL SISTEMA D‘IMBRACATURA
USO DELL‘INSERTO NEONATO
SUO FIGLIO È LEGATO CORRETTAMENTE?
DISINSTALLAZIONE DEL SEGGIOLINO
PULIRE IL RIVESTIMENTO
RIMUOVERE IL RIVESTIMENTO
GESTIONE DELLA POMPA
CURA DEL PRODOTTO
COSA FARE DOPO UN INCIDENTE
DURATA DEL PRODOTTO
SMALTIMENTO
CONTATTI
GARANZIA
BRIEF INSTRUCTION
GENERAL INFORMATION
BEFORE USING THE SEAT THE FIRST TIME
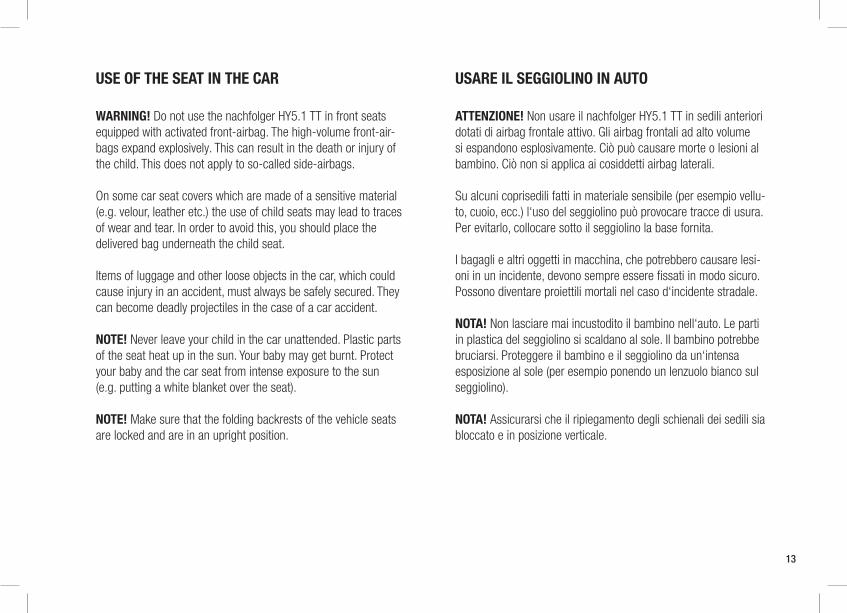
USE OF THE SEAT IN THE CAR
INSTALLATION OF THE CAR SEAT
INSTALLATION OF THE TOP TETHER
ADJUSTING THE HEADREST
SECURING BY MEANS OF HARNESS SYSTEM
USING THE NEWBORN INLAY
IS YOUR CHILD PROPERLY SECURED?
DE-INSTALLATION OF THE CAR SEAT
CLEANING THE COVER
REMOVAL OF THE COVER
OPERATING THE MOBILE PUMP
PRODUCT CARE
WHAT TO DO AFTER AN ACCIDENT
PRODUCT DURABILITY
DISPOSAL
CONTACT
WARRANTY
>
>
>
>
>
>
>
>
>
>
>
>
>
>
>
>
>
>
>
>
>
>
>
>
>
>
>
>
>
>
>
>
>
>
>
>
>
>
>
>
EN IT
6-7
9
11
13
15-21
23-25
27
29
31
31
33
35
37
39
41
43
43
45
45
47
6-7
9
11
13
15-21
23-25
27
29
31
31
33
35
37
39
41
43
43
45
45
47

4
1 2
5 6
3
1 2
4 5 6
3
CLICK
Watch installation videoRead user guide
6
rückwärtsgerichtet (0 - 5 Jahre) rearward-facing (0 - 5 years) rivolto all‘indietro (0 - 5 anni)
KURZANLEITUNG BRIEF INSTRUCTIONS BREVI ISTRUZIONI

4
1 2
5 6
3
1 2
4 5 6
3
CLICK
Watch installation videoRead user guide
7
8
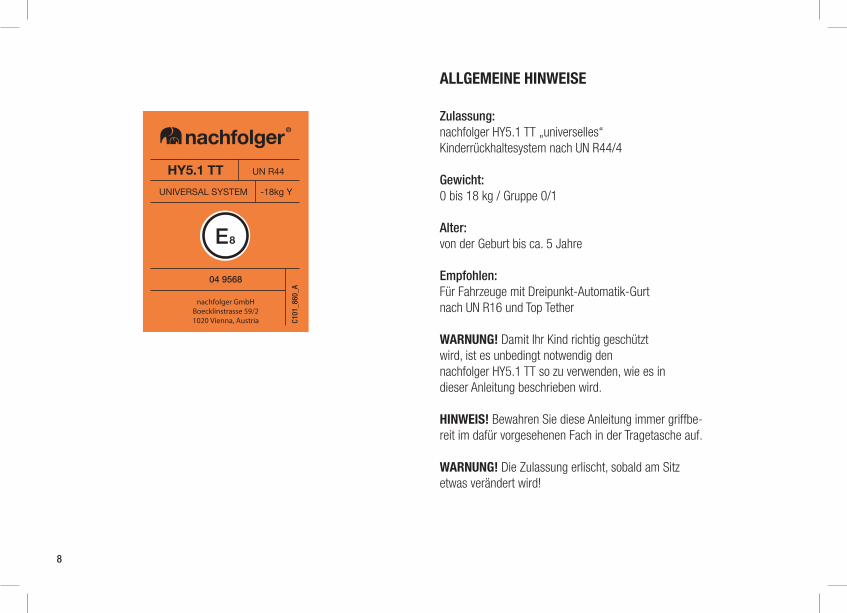
ALLGEMEINE HINWEISE
Zulassung:nachfolger HY5.1 TT „universelles“ Kinderrückhaltesystem nach UN R44/4
Gewicht: 0 bis 18 kg / Gruppe 0/1
Alter: von der Geburt bis ca. 5 Jahre
Empfohlen:Für Fahrzeuge mit Dreipunkt-Automatik-Gurt nach UN R16 und Top Tether
WARNUNG! Damit Ihr Kind richtig geschütztwird, ist es unbedingt notwendig dennachfolger HY5.1 TT so zu verwenden, wie es indieser Anleitung beschrieben wird.
HINWEIS! Bewahren Sie diese Anleitung immer griffbe-reit im dafür vorgesehenen Fach in der Tragetasche auf.
WARNUNG! Die Zulassung erlischt, sobald am Sitz etwas verändert wird!
HY5.1 TT UN R44
UNIVERSAL SYSTEM -18kg Y
04 9568
nachfolger GmbHBoecklinstrasse 59/21020 Vienna, Austria C1
01_860_A
E 8
9
GENERAL INFORMATION INFORMAZIONI GENERALI
Approval:nachfolger HY5.1 TT “universal“ child restraint according to UN R44/4
Weight: 0 to 18 kg / Group 0/1
Age: from birth, up to approximately 5 years
Recommended for: For vehicle seats with three-pointautomatic retractor belt according to UN R16 and Top Tether
WARNING! For proper protection of your child, it is essential to use and install the nachfolger HY5.1 TT according to the instructions given in this manual.
NOTE! Please always have the instruction manual at hand and store it in the dedicated slot in the carrying bag.
WARNING! Approval of the seat expires immediately in case of any modification!
Approvazione:seggiolino „universale“ per bambini nachfolger HY5.1 TT secondo la UN R44/4
Peso: da 0 a 18 kg / Gruppo 0/1
Età: dalla nascita fino a circa 5 anni
Consigliato per:Sedili auto con cinture di sicurezza a tre punti con riavvolgimento automatico secondo la UN R16 e Top Tether
ATTENZIONE! Per la corretta protezione del bambino, è essenziale usare e installare il nachfolger HY5.1 TT secondo le istruzioni fornite in questo manuale.
NOTA! Conservate queste istruzioni sempre a portata di mano nell’apposito scomparto nella custodia.
ATTENZIONE! L‘approvazione del seggiolino scade immediatamente in caso di modifiche!
CLICK
10
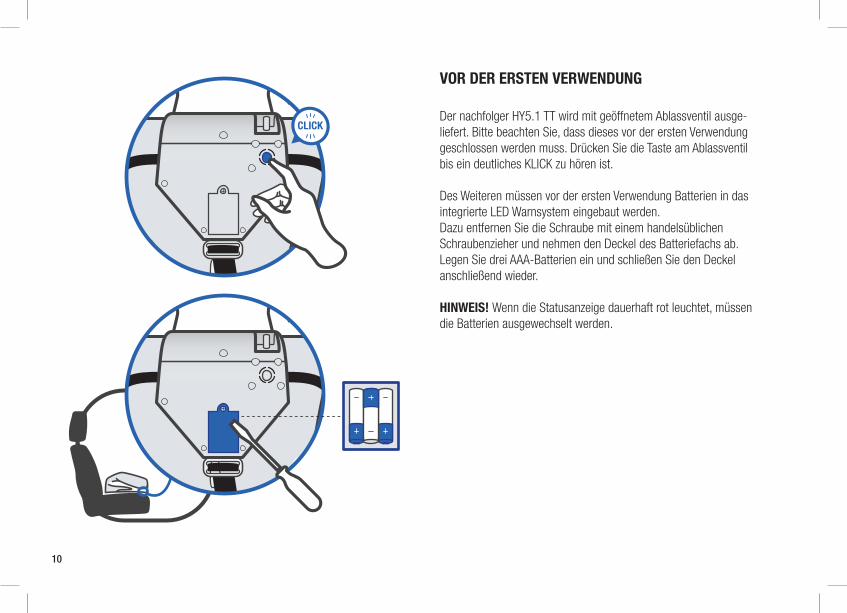
Der nachfolger HY5.1 TT wird mit geöffnetem Ablassventil ausge-liefert. Bitte beachten Sie, dass dieses vor der ersten Verwendung geschlossen werden muss. Drücken Sie die Taste am Ablassventil bis ein deutliches KLICK zu hören ist.
Des Weiteren müssen vor der ersten Verwendung Batterien in das integrierte LED Warnsystem eingebaut werden.Dazu entfernen Sie die Schraube mit einem handelsüblichen Schraubenzieher und nehmen den Deckel des Batteriefachs ab. Legen Sie drei AAA-Batterien ein und schließen Sie den Deckel anschließend wieder.
HINWEIS! Wenn die Statusanzeige dauerhaft rot leuchtet, müssen die Batterien ausgewechselt werden.
VOR DER ERSTEN VERWENDUNG
CLICK
11
The nachfolger HY5.1 TT is delivered with the release valve in open position. Please note that this must be closed prior to first usage. Press the button on the release valve until you hear a clear CLICK.
Furthermore, batteries must be installed in the integrated LED warning system prior to first usage. Remove the screw with a standard screw driver and remove the cover of the battery com-partment. Insert three AAA batteries and close the cover again.
NOTE! If the status light remains solid red, the batteries must be replaced.
Il nachfolger HY5.1 TT viene fornito con la valvola di rilascio in posizione aperta. Si rammenta che questa dev‘essere chiusa prima del primo utilizzo. Premere il pulsante sulla valvola di rilascio finché non sente un chiaro CLICK.
Inoltre, prima del primo utilizzo devono essere installate le batterie nel sistema di allarme LED integrato. Rimuovere le viti con un cac-ciavite standard e rimuovere il coperchio del vano batterie. Inserire tre batterie AAA e chiudere nuovamente il coperchio.
NOTA! Se la spia resta rossa, le batterie devono essere sostituite.
BEFORE USING THE SEAT THE FIRST TIME PRIMA DI UTILIZZARE IL SEGGIOLINO PER LA PRIMA VOLTA
12
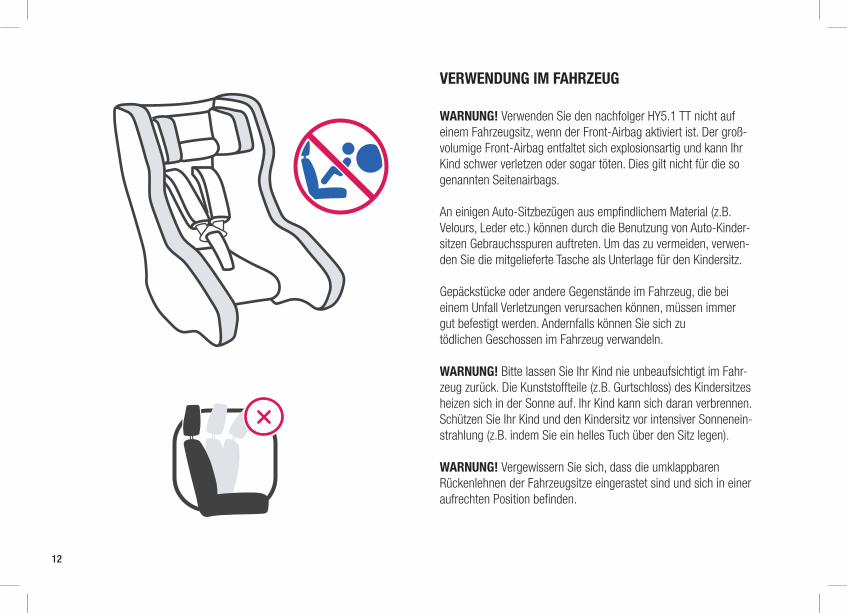
WARNUNG! Verwenden Sie den nachfolger HY5.1 TT nicht auf einem Fahrzeugsitz, wenn der Front-Airbag aktiviert ist. Der groß-volumige Front-Airbag entfaltet sich explosionsartig und kann Ihr Kind schwer verletzen oder sogar töten. Dies gilt nicht für die so genannten Seitenairbags.
An einigen Auto-Sitzbezügen aus empfindlichem Material (z.B. Velours, Leder etc.) können durch die Benutzung von Auto-Kinder-sitzen Gebrauchsspuren auftreten. Um das zu vermeiden, verwen-den Sie die mitgelieferte Tasche als Unterlage für den Kindersitz.
Gepäckstücke oder andere Gegenstände im Fahrzeug, die bei einem Unfall Verletzungen verursachen können, müssen immer gut befestigt werden. Andernfalls können Sie sich zutödlichen Geschossen im Fahrzeug verwandeln.
WARNUNG! Bitte lassen Sie Ihr Kind nie unbeaufsichtigt im Fahr-zeug zurück. Die Kunststoffteile (z.B. Gurtschloss) des Kindersitzes heizen sich in der Sonne auf. Ihr Kind kann sich daran verbrennen. Schützen Sie Ihr Kind und den Kindersitz vor intensiver Sonnenein-strahlung (z.B. indem Sie ein helles Tuch über den Sitz legen).
WARNUNG! Vergewissern Sie sich, dass die umklappbaren Rückenlehnen der Fahrzeugsitze eingerastet sind und sich in einer aufrechten Position befinden.
VERWENDUNG IM FAHRZEUG
13
WARNING! Do not use the nachfolger HY5.1 TT in front seats equipped with activated front-airbag. The high-volume front-air-bags expand explosively. This can result in the death or injury of the child. This does not apply to so-called side-airbags.
On some car seat covers which are made of a sensitive material (e.g. velour, leather etc.) the use of child seats may lead to traces of wear and tear. In order to avoid this, you should place the delivered bag underneath the child seat.
Items of luggage and other loose objects in the car, which could cause injury in an accident, must always be safely secured. They can become deadly projectiles in the case of a car accident.
NOTE! Never leave your child in the car unattended. Plastic parts of the seat heat up in the sun. Your baby may get burnt. Protect your baby and the car seat from intense exposure to the sun (e.g. putting a white blanket over the seat).
NOTE! Make sure that the folding backrests of the vehicle seats are locked and are in an upright position.
ATTENZIONE! Non usare il nachfolger HY5.1 TT in sedili anteriori dotati di airbag frontale attivo. Gli airbag frontali ad alto volume si espandono esplosivamente. Ciò può causare morte o lesioni al bambino. Ciò non si applica ai cosiddetti airbag laterali.
Su alcuni coprisedili fatti in materiale sensibile (per esempio vellu-to, cuoio, ecc.) l‘uso del seggiolino può provocare tracce di usura. Per evitarlo, collocare sotto il seggiolino la base fornita.
I bagagli e altri oggetti in macchina, che potrebbero causare lesi-oni in un incidente, devono sempre essere fissati in modo sicuro. Possono diventare proiettili mortali nel caso d‘incidente stradale.
NOTA! Non lasciare mai incustodito il bambino nell‘auto. Le parti in plastica del seggiolino si scaldano al sole. Il bambino potrebbe bruciarsi. Proteggere il bambino e il seggiolino da un‘intensa esposizione al sole (per esempio ponendo un lenzuolo bianco sul seggiolino).
NOTA! Assicurarsi che il ripiegamento degli schienali dei sedili sia bloccato e in posizione verticale.
USE OF THE SEAT IN THE CAR USARE IL SEGGIOLINO IN AUTO
A
C
B
D
14
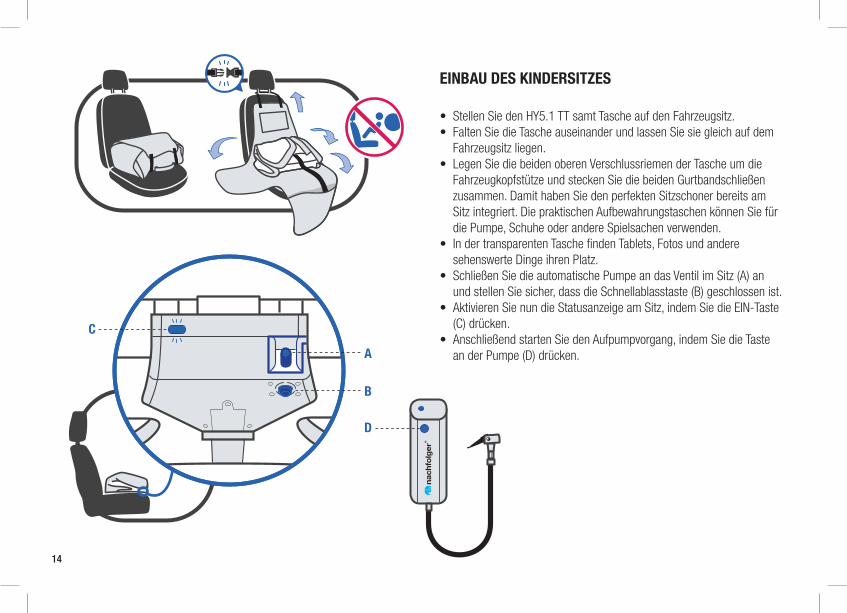
• Stellen Sie den HY5.1 TT samt Tasche auf den Fahrzeugsitz. • Falten Sie die Tasche auseinander und lassen Sie sie gleich auf dem Fahrzeugsitz liegen.• Legen Sie die beiden oberen Verschlussriemen der Tasche um die Fahrzeugkopfstütze und stecken Sie die beiden Gurtbandschließen zusammen. Damit haben Sie den perfekten Sitzschoner bereits am Sitz integriert. Die praktischen Aufbewahrungstaschen können Sie für die Pumpe, Schuhe oder andere Spielsachen verwenden. • In der transparenten Tasche finden Tablets, Fotos und andere sehenswerte Dinge ihren Platz.• Schließen Sie die automatische Pumpe an das Ventil im Sitz (A) an und stellen Sie sicher, dass die Schnellablasstaste (B) geschlossen ist.• Aktivieren Sie nun die Statusanzeige am Sitz, indem Sie die EIN-Taste (C) drücken. • Anschließend starten Sie den Aufpumpvorgang, indem Sie die Taste an der Pumpe (D) drücken.
EINBAU DES KINDERSITZES
A
C
B
D
15
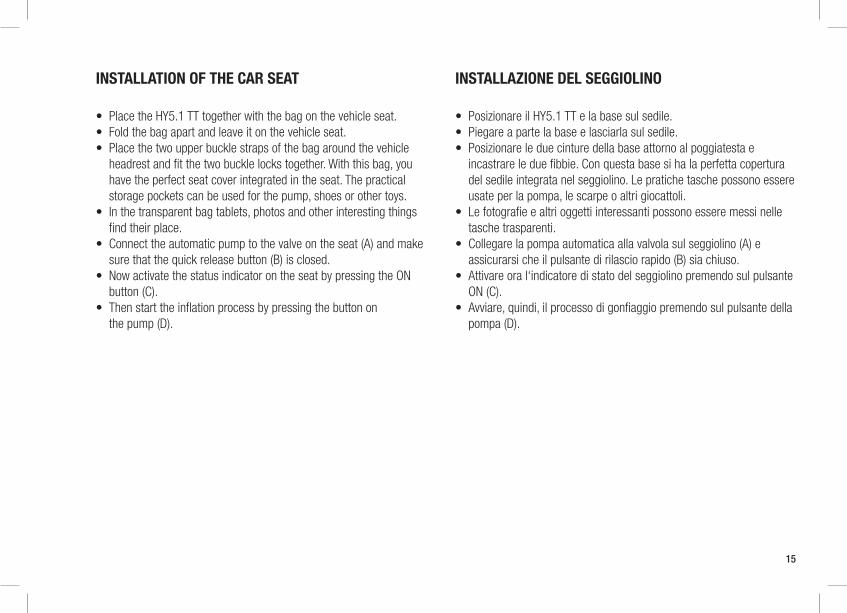
• Place the HY5.1 TT together with the bag on the vehicle seat.• Fold the bag apart and leave it on the vehicle seat.• Place the two upper buckle straps of the bag around the vehicle headrest and fit the two buckle locks together. With this bag, you have the perfect seat cover integrated in the seat. The practical storage pockets can be used for the pump, shoes or other toys.• In the transparent bag tablets, photos and other interesting things find their place.• Connect the automatic pump to the valve on the seat (A) and make sure that the quick release button (B) is closed.• Now activate the status indicator on the seat by pressing the ON button (C).• Then start the inflation process by pressing the button on the pump (D).
• Posizionare il HY5.1 TT e la base sul sedile.• Piegare a parte la base e lasciarla sul sedile.• Posizionare le due cinture della base attorno al poggiatesta e incastrare le due fibbie. Con questa base si ha la perfetta copertura del sedile integrata nel seggiolino. Le pratiche tasche possono essere usate per la pompa, le scarpe o altri giocattoli.• Le fotografie e altri oggetti interessanti possono essere messi nelle tasche trasparenti.• Collegare la pompa automatica alla valvola sul seggiolino (A) e assicurarsi che il pulsante di rilascio rapido (B) sia chiuso.• Attivare ora l‘indicatore di stato del seggiolino premendo sul pulsante ON (C).• Avviare, quindi, il processo di gonfiaggio premendo sul pulsante della pompa (D).
INSTALLATION OF THE CAR SEAT INSTALLAZIONE DEL SEGGIOLINO
A
B
C
D
E
16
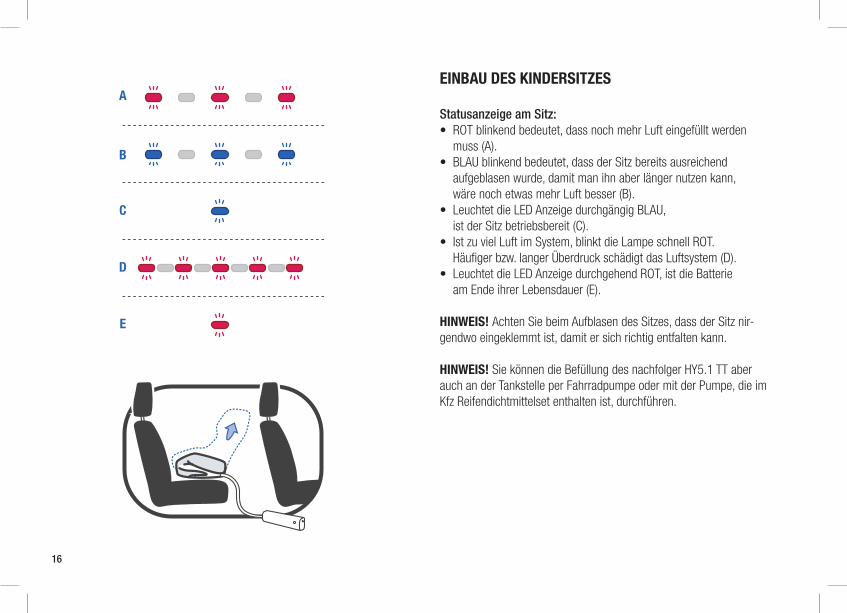
Statusanzeige am Sitz:• ROT blinkend bedeutet, dass noch mehr Luft eingefüllt werden muss (A).• BLAU blinkend bedeutet, dass der Sitz bereits ausreichend aufgeblasen wurde, damit man ihn aber länger nutzen kann, wäre noch etwas mehr Luft besser (B).• Leuchtet die LED Anzeige durchgängig BLAU, ist der Sitz betriebsbereit (C).• Ist zu viel Luft im System, blinkt die Lampe schnell ROT. Häufiger bzw. langer Überdruck schädigt das Luftsystem (D).• Leuchtet die LED Anzeige durchgehend ROT, ist die Batterie am Ende ihrer Lebensdauer (E).
HINWEIS! Achten Sie beim Aufblasen des Sitzes, dass der Sitz nir-gendwo eingeklemmt ist, damit er sich richtig entfalten kann.
HINWEIS! Sie können die Befüllung des nachfolger HY5.1 TT aber auch an der Tankstelle per Fahrradpumpe oder mit der Pumpe, die im Kfz Reifendichtmittelset enthalten ist, durchführen.
EINBAU DES KINDERSITZES
A
B
C
D
E
17
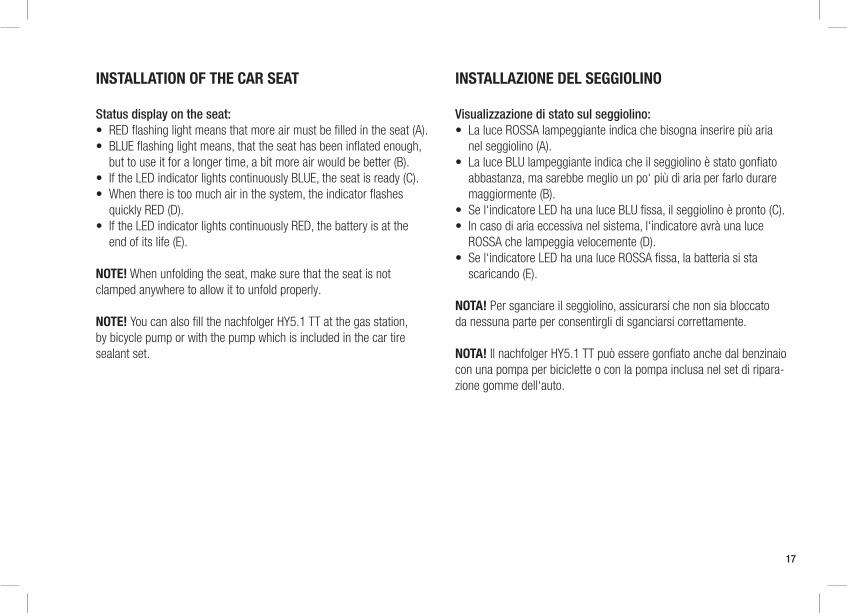
Status display on the seat:• RED flashing light means that more air must be filled in the seat (A).• BLUE flashing light means, that the seat has been inflated enough, but to use it for a longer time, a bit more air would be better (B).• If the LED indicator lights continuously BLUE, the seat is ready (C).• When there is too much air in the system, the indicator flashes quickly RED (D).• If the LED indicator lights continuously RED, the battery is at the end of its life (E).
NOTE! When unfolding the seat, make sure that the seat is not clamped anywhere to allow it to unfold properly.
NOTE! You can also fill the nachfolger HY5.1 TT at the gas station, by bicycle pump or with the pump which is included in the car tire sealant set.
Visualizzazione di stato sul seggiolino:• La luce ROSSA lampeggiante indica che bisogna inserire più aria nel seggiolino (A).• La luce BLU lampeggiante indica che il seggiolino è stato gonfiato abbastanza, ma sarebbe meglio un po‘ più di aria per farlo durare maggiormente (B).• Se l‘indicatore LED ha una luce BLU fissa, il seggiolino è pronto (C).• In caso di aria eccessiva nel sistema, l‘indicatore avrà una luce ROSSA che lampeggia velocemente (D).• Se l‘indicatore LED ha una luce ROSSA fissa, la batteria si sta scaricando (E).
NOTA! Per sganciare il seggiolino, assicurarsi che non sia bloccato da nessuna parte per consentirgli di sganciarsi correttamente.
NOTA! Il nachfolger HY5.1 TT può essere gonfiato anche dal benzinaio con una pompa per biciclette o con la pompa inclusa nel set di ripara-zione gomme dell‘auto.
INSTALLATION OF THE CAR SEAT INSTALLAZIONE DEL SEGGIOLINO
OFF
18
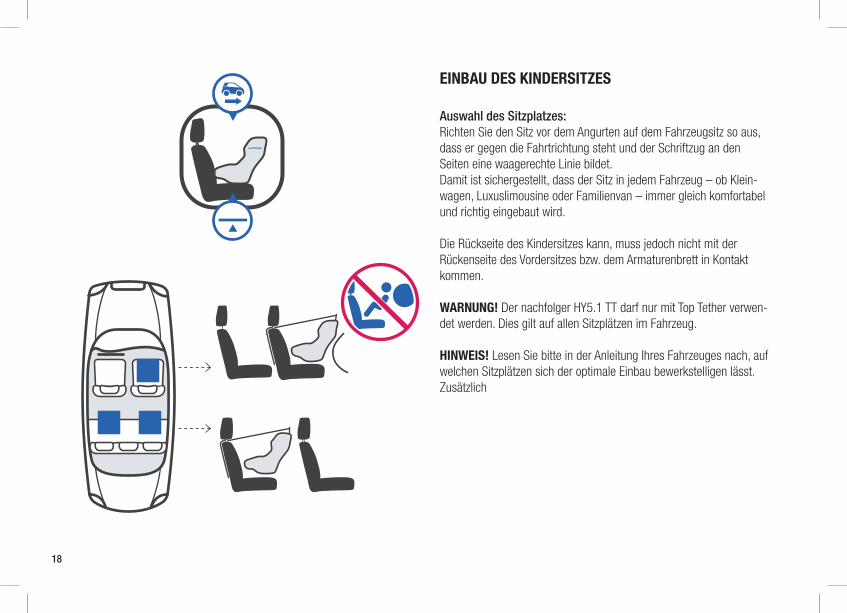
Auswahl des Sitzplatzes:Richten Sie den Sitz vor dem Angurten auf dem Fahrzeugsitz so aus, dass er gegen die Fahrtrichtung steht und der Schriftzug an den Seiten eine waagerechte Linie bildet. Damit ist sichergestellt, dass der Sitz in jedem Fahrzeug – ob Klein-wagen, Luxuslimousine oder Familienvan – immer gleich komfortabel und richtig eingebaut wird.
Die Rückseite des Kindersitzes kann, muss jedoch nicht mit der Rückenseite des Vordersitzes bzw. dem Armaturenbrett in Kontakt kommen.
WARNUNG! Der nachfolger HY5.1 TT darf nur mit Top Tether verwen-det werden. Dies gilt auf allen Sitzplätzen im Fahrzeug.
HINWEIS! Lesen Sie bitte in der Anleitung Ihres Fahrzeuges nach, auf welchen Sitzplätzen sich der optimale Einbau bewerkstelligen lässt. Zusätzlich
EINBAU DES KINDERSITZES
OFF
19
Selection of the seat:Before you belt on the seat in the car, the seat must be positioned against the driving direction and the lettering on the sides forms a horizontal line. This ensures that the seat is always installed in every vehicle - whether it is a small car, a luxury limousine or a family van - in the same comfortable and correct way.
The back of the child restraint may, but does not need to be in contact with the back of the front seat or the dashboard.
WARNING! The HY5.1 TT must be used only in conjunction with the top tether belt! This applies to all seats in the vehicle.
NOTE! Please refer to the instructions manual of your vehicle, to find the best suited seating positions for the installation.
Scelta della posizione:Prima di mettere la cintura al seggiolino, esso dev‘essere posizi-onato in senso contrario alla direzione di guida e la scritta sul lato deve formare una linea orizzontale. Ciò assicura che il seggiolino è installato in ogni vettura - sia che si tratti di una macchina piccola, una lussuosa limousine o una monovolume - in modo confortevole e corretto.
La parte posteriore del sistema di ritenuta per bambini può, ma non deve essere nella parte posteriore del sedile anteriore o del cruscotto.
ATTENZIONE! Questo seggiolino per auto può essere utilizzato soltanto insieme alla cinghia Top Tether!Questo vale per tutti i posti nel veicolo.
NOTA! Fare riferimento al manuale d‘istruzione del veicolo per trovare le posizioni più adatte all‘installazione.
INSTALLATION OF THE CAR SEAT INSTALLAZIONE DEL SEGGIOLINO
C
D E F
BA
CLICK
20
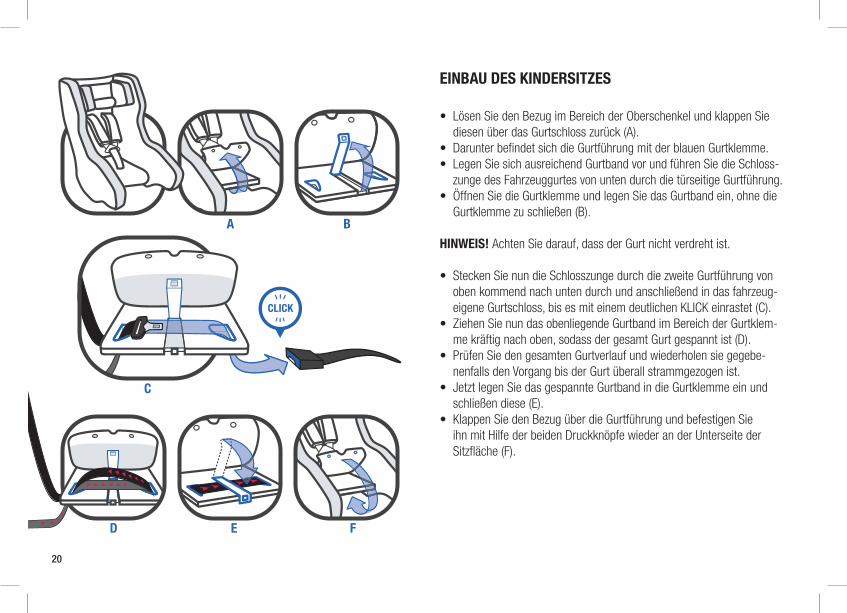
• Lösen Sie den Bezug im Bereich der Oberschenkel und klappen Sie diesen über das Gurtschloss zurück (A).• Darunter befindet sich die Gurtführung mit der blauen Gurtklemme.• Legen Sie sich ausreichend Gurtband vor und führen Sie die Schloss- zunge des Fahrzeuggurtes von unten durch die türseitige Gurtführung.• Öffnen Sie die Gurtklemme und legen Sie das Gurtband ein, ohne die Gurtklemme zu schließen (B).
HINWEIS! Achten Sie darauf, dass der Gurt nicht verdreht ist.
• Stecken Sie nun die Schlosszunge durch die zweite Gurtführung von oben kommend nach unten durch und anschließend in das fahrzeug- eigene Gurtschloss, bis es mit einem deutlichen KLICK einrastet (C).• Ziehen Sie nun das obenliegende Gurtband im Bereich der Gurtklem- me kräftig nach oben, sodass der gesamt Gurt gespannt ist (D).• Prüfen Sie den gesamten Gurtverlauf und wiederholen sie gegebe- nenfalls den Vorgang bis der Gurt überall strammgezogen ist.• Jetzt legen Sie das gespannte Gurtband in die Gurtklemme ein und schließen diese (E).• Klappen Sie den Bezug über die Gurtführung und befestigen Sie ihn mit Hilfe der beiden Druckknöpfe wieder an der Unterseite der Sitzfläche (F).
EINBAU DES KINDERSITZES
C
D E F
BA
CLICK
21
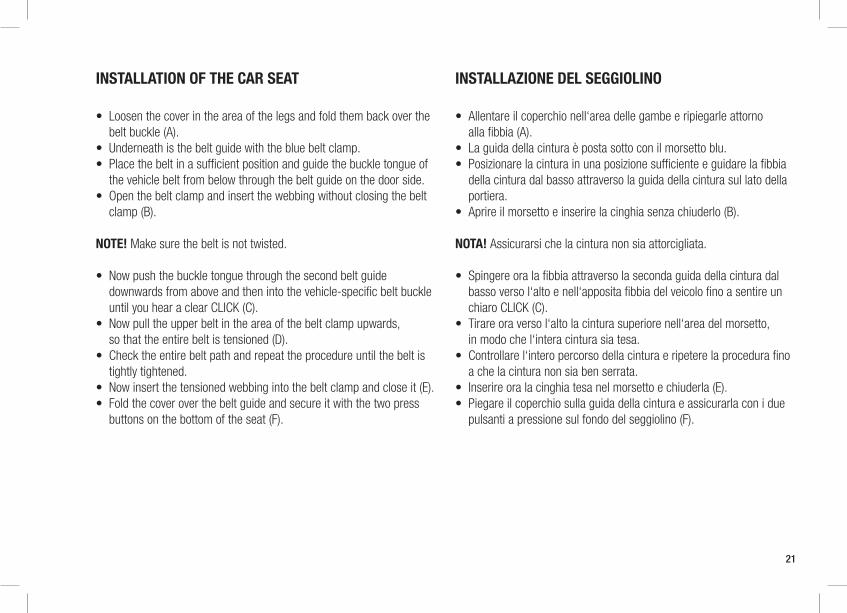
• Loosen the cover in the area of the legs and fold them back over the belt buckle (A).• Underneath is the belt guide with the blue belt clamp.• Place the belt in a sufficient position and guide the buckle tongue of the vehicle belt from below through the belt guide on the door side.• Open the belt clamp and insert the webbing without closing the belt clamp (B).
NOTE! Make sure the belt is not twisted.
• Now push the buckle tongue through the second belt guide downwards from above and then into the vehicle-specific belt buckle until you hear a clear CLICK (C).• Now pull the upper belt in the area of the belt clamp upwards, so that the entire belt is tensioned (D).• Check the entire belt path and repeat the procedure until the belt is tightly tightened.• Now insert the tensioned webbing into the belt clamp and close it (E).• Fold the cover over the belt guide and secure it with the two press buttons on the bottom of the seat (F).
• Allentare il coperchio nell‘area delle gambe e ripiegarle attorno alla fibbia (A).• La guida della cintura è posta sotto con il morsetto blu.• Posizionare la cintura in una posizione sufficiente e guidare la fibbia della cintura dal basso attraverso la guida della cintura sul lato della portiera.• Aprire il morsetto e inserire la cinghia senza chiuderlo (B).
NOTA! Assicurarsi che la cintura non sia attorcigliata.
• Spingere ora la fibbia attraverso la seconda guida della cintura dal basso verso l‘alto e nell‘apposita fibbia del veicolo fino a sentire un chiaro CLICK (C).• Tirare ora verso l‘alto la cintura superiore nell‘area del morsetto, in modo che l‘intera cintura sia tesa.• Controllare l‘intero percorso della cintura e ripetere la procedura fino a che la cintura non sia ben serrata.• Inserire ora la cinghia tesa nel morsetto e chiuderla (E).• Piegare il coperchio sulla guida della cintura e assicurarla con i due pulsanti a pressione sul fondo del seggiolino (F).
INSTALLATION OF THE CAR SEAT INSTALLAZIONE DEL SEGGIOLINO
A B
C
D
12
456
3
CLICK
Watch installation videoRead user guide
22
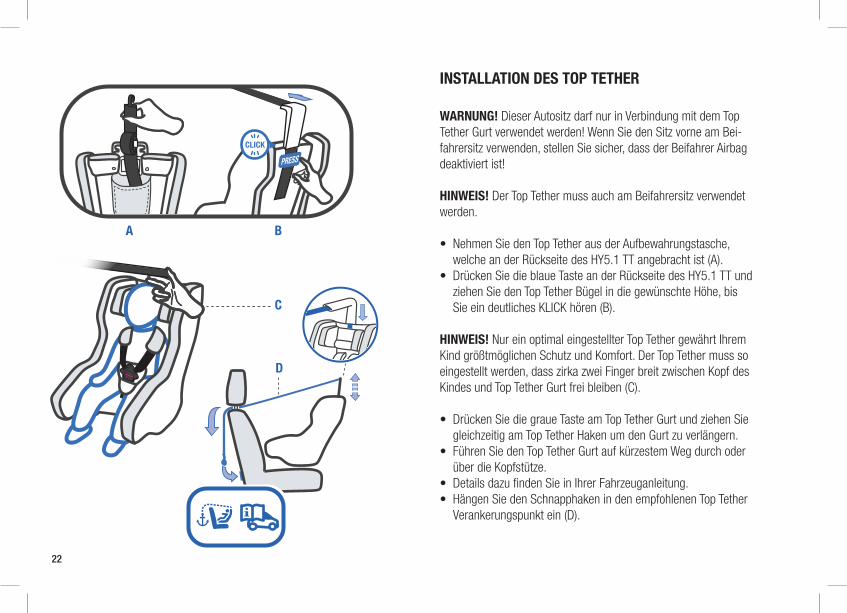
WARNUNG! Dieser Autositz darf nur in Verbindung mit dem Top Tether Gurt verwendet werden! Wenn Sie den Sitz vorne am Bei-fahrersitz verwenden, stellen Sie sicher, dass der Beifahrer Airbag deaktiviert ist!
HINWEIS! Der Top Tether muss auch am Beifahrersitz verwendet werden.
• Nehmen Sie den Top Tether aus der Aufbewahrungstasche, welche an der Rückseite des HY5.1 TT angebracht ist (A).• Drücken Sie die blaue Taste an der Rückseite des HY5.1 TT und ziehen Sie den Top Tether Bügel in die gewünschte Höhe, bis Sie ein deutliches KLICK hören (B).
HINWEIS! Nur ein optimal eingestellter Top Tether gewährt Ihrem Kind größtmöglichen Schutz und Komfort. Der Top Tether muss so eingestellt werden, dass zirka zwei Finger breit zwischen Kopf des Kindes und Top Tether Gurt frei bleiben (C).
• Drücken Sie die graue Taste am Top Tether Gurt und ziehen Sie gleichzeitig am Top Tether Haken um den Gurt zu verlängern.• Führen Sie den Top Tether Gurt auf kürzestem Weg durch oder über die Kopfstütze.• Details dazu finden Sie in Ihrer Fahrzeuganleitung.• Hängen Sie den Schnapphaken in den empfohlenen Top Tether Verankerungspunkt ein (D).
INSTALLATION DES TOP TETHER
A B
C
D
12
456
3
CLICK
Watch installation videoRead user guide
23
WARNING! This car seat must be used only in conjunction with the top tether belt! If you want to use the car seat on the front passenger seat, make sure the front passenger airbag is deactivated!
NOTE! The top tether must also be used on the front passenger seat.
• Take the top tether out of the storage bag, which is attached to the back of the HY5.1 TT (A).• Press the blue button on the back of the HY5.1 TT and pull the top tether frame to the recommended height until you hear a clear CLICK (B).
NOTE! Only when adjusted to the most suitable height does the top tether offer your child the highest degree of protection and safety. The top tether must be adjusted to leavethe space of two fingers between the child’s head and the top tether belt (C).
• Press the gray button of the top tether strap while pulling the top tether hook to extend the belt.• Run the top tether strap the shortest way through or over the head rest. Details can be found in your vehicle manual.• Connect the snap hook into the recommended top tether anchorage point (D).
ATTENZIONE! Questo seggiolino per auto può essere utilizzato soltanto insieme alla cinghia Top Tether! Se utilizzate il sedile davanti nel posto del passeggero, assicuratevi che l’airbag del passeggero sia disattivato!
NOTA! Il Top Tether deve essere utilizzato anche sul sedile del pas-seggero anteriore.
• Estraete il Top Tether dalla custodia montata sul retro del seggioli- no HY5.1 TT (A).• Premete il tasto blu sul retro dell’HY5.1 TT ed estraete la staffa Top Tether all’altezza desiderata fino a udire un CLIC evidente (B).
NOTA! Soltanto un Top Tether regolato perfettamente offre al tuo bambino la massima sicurezza e il migliore comfort. Il Top Tether deve essere regolato in modo che resti uno spazio libero di circa due dita fra la testa del bambino e la cinghia Top Tether (C).
• Premete il tasto grigio sulla cinghia Top Tether e allo stesso tempo tirate il gancio Top Tether per allungare la cinghia.• Fate compiere alla cinghia Top Tether il percorso più corto oppure fatela passare sopra il poggiatesta. Potete trovare i dettagli in merito nel manuale della vostra auto.• Agganciare il gancio a scatto nel punto di ancoraggio Top Tether consigliato (D).
INSTALLATION OF THE TOP TETHER INSTALLAZIONE DEL TOP TETHER
FE
24
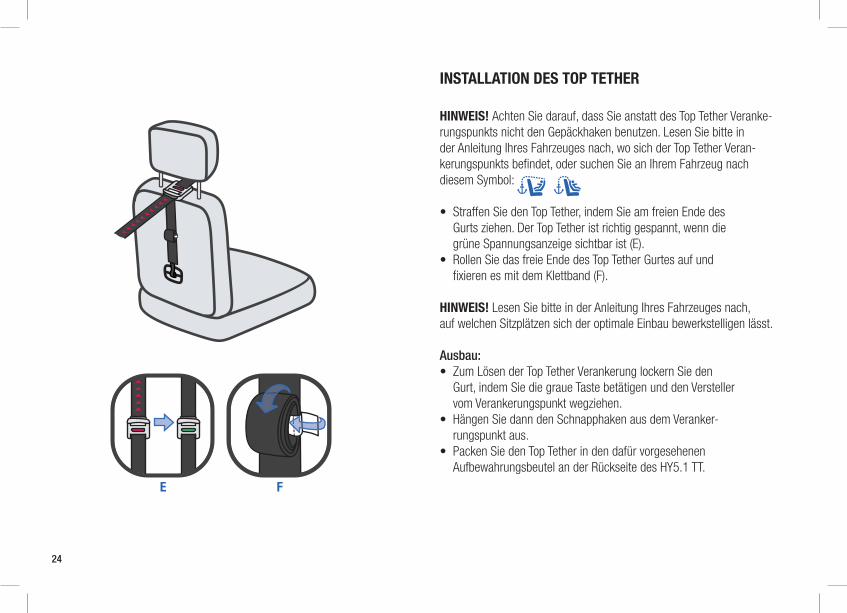
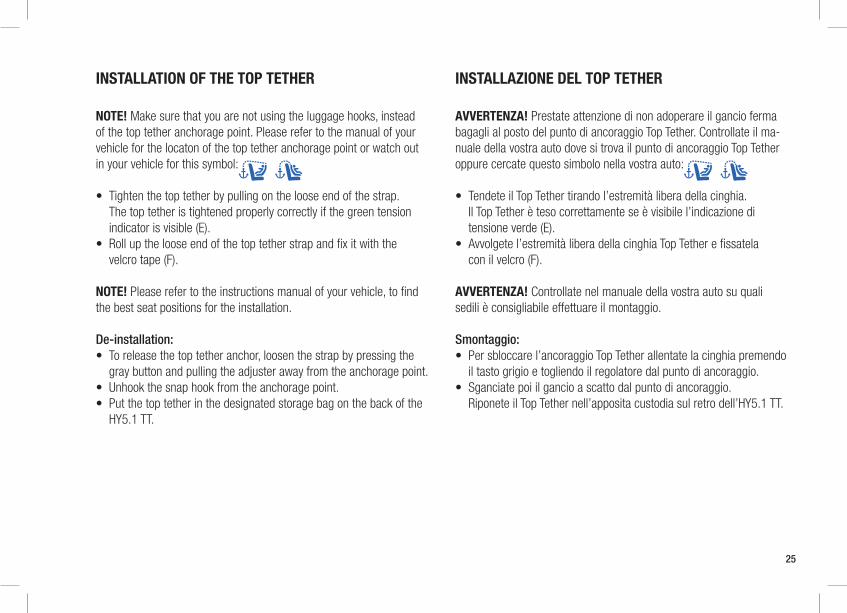
HINWEIS! Achten Sie darauf, dass Sie anstatt des Top Tether Veranke-rungspunkts nicht den Gepäckhaken benutzen. Lesen Sie bitte in der Anleitung Ihres Fahrzeuges nach, wo sich der Top Tether Veran-kerungspunkts befindet, oder suchen Sie an Ihrem Fahrzeug nach diesem Symbol:
• Straffen Sie den Top Tether, indem Sie am freien Ende des Gurts ziehen. Der Top Tether ist richtig gespannt, wenn die grüne Spannungsanzeige sichtbar ist (E).• Rollen Sie das freie Ende des Top Tether Gurtes auf und fixieren es mit dem Klettband (F).
HINWEIS! Lesen Sie bitte in der Anleitung Ihres Fahrzeuges nach, auf welchen Sitzplätzen sich der optimale Einbau bewerkstelligen lässt.
Ausbau:• Zum Lösen der Top Tether Verankerung lockern Sie den Gurt, indem Sie die graue Taste betätigen und den Versteller vom Verankerungspunkt wegziehen. • Hängen Sie dann den Schnapphaken aus dem Veranker- rungspunkt aus.• Packen Sie den Top Tether in den dafür vorgesehenen Aufbewahrungsbeutel an der Rückseite des HY5.1 TT.
INSTALLATION DES TOP TETHER
FE
25
NOTE! Make sure that you are not using the luggage hooks, instead of the top tether anchorage point. Please refer to the manual of your vehicle for the locaton of the top tether anchorage point or watch out in your vehicle for this symbol:
• Tighten the top tether by pulling on the loose end of the strap. The top tether is tightened properly correctly if the green tension indicator is visible (E).• Roll up the loose end of the top tether strap and fix it with the velcro tape (F).
NOTE! Please refer to the instructions manual of your vehicle, to find the best seat positions for the installation.
De-installation:• To release the top tether anchor, loosen the strap by pressing the gray button and pulling the adjuster away from the anchorage point.• Unhook the snap hook from the anchorage point.• Put the top tether in the designated storage bag on the back of the HY5.1 TT.
AVVERTENZA! Prestate attenzione di non adoperare il gancio ferma bagagli al posto del punto di ancoraggio Top Tether. Controllate il ma-nuale della vostra auto dove si trova il punto di ancoraggio Top Tether oppure cercate questo simbolo nella vostra auto:
• Tendete il Top Tether tirando l’estremità libera della cinghia. Il Top Tether è teso correttamente se è visibile l’indicazione di tensione verde (E).• Avvolgete l’estremità libera della cinghia Top Tether e fissatela con il velcro (F).
AVVERTENZA! Controllate nel manuale della vostra auto su quali sedili è consigliabile effettuare il montaggio.
Smontaggio:• Per sbloccare l’ancoraggio Top Tether allentate la cinghia premendo il tasto grigio e togliendo il regolatore dal punto di ancoraggio. • Sganciate poi il gancio a scatto dal punto di ancoraggio. Riponete il Top Tether nell’apposita custodia sul retro dell’HY5.1 TT.
INSTALLATION OF THE TOP TETHER INSTALLAZIONE DEL TOP TETHER
26
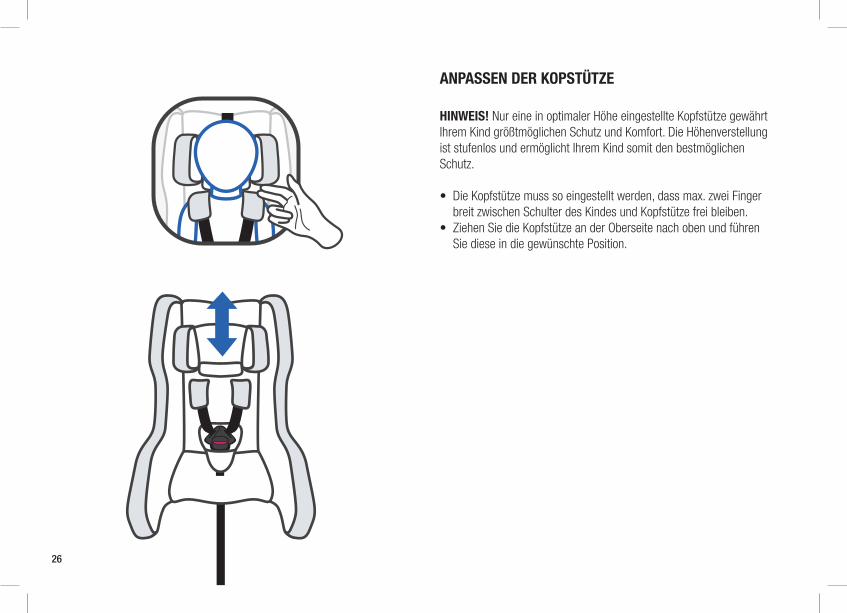
HINWEIS! Nur eine in optimaler Höhe eingestellte Kopfstütze gewährt Ihrem Kind größtmöglichen Schutz und Komfort. Die Höhenverstellung ist stufenlos und ermöglicht Ihrem Kind somit den bestmöglichen Schutz.
• Die Kopfstütze muss so eingestellt werden, dass max. zwei Finger breit zwischen Schulter des Kindes und Kopfstütze frei bleiben.• Ziehen Sie die Kopfstütze an der Oberseite nach oben und führen Sie diese in die gewünschte Position.
ANPASSEN DER KOPSTÜTZE
27
NOTE! Only when adjusted to the most suitable height does the head-rest offer your child the highest degree of protection and safety. The height of the headrest can be adjusted stepless and thus allows your child the best possible protection.
• The headrest must be adjusted to leave free two fingers’ width between the child’s shoulder and the headrest.• Pull the headrest at the top upwards and bring the headrest into the required position.
NOTA! Il poggiatesta offre al bambino il massimo grado di protezione e sicurezza solo se regolato all‘altezza più confortevole. L‘altezza del poggiatesta può essere regolata in modo graduale, consentendo al bambino la migliore protezione possibile.
• Il poggiatesta deve essere regolato per lasciare due dita di larghezza libere tra la spalla del bambino e il poggiatesta.• Tirare il poggiatesta verso l‘alto e portarlo nella posizione desiderata.
ADJUSTING THE HEADREST REGOLARE IL POGGIATESTA
A B C
DCLICK
28
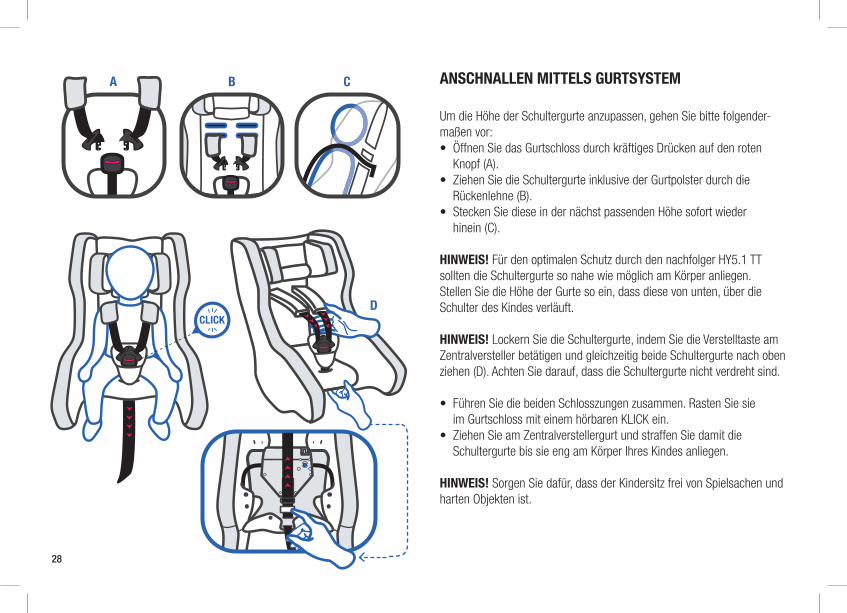
Um die Höhe der Schultergurte anzupassen, gehen Sie bitte folgender-maßen vor:• Öffnen Sie das Gurtschloss durch kräftiges Drücken auf den roten Knopf (A).• Ziehen Sie die Schultergurte inklusive der Gurtpolster durch die Rückenlehne (B).• Stecken Sie diese in der nächst passenden Höhe sofort wieder hinein (C).
HINWEIS! Für den optimalen Schutz durch den nachfolger HY5.1 TT sollten die Schultergurte so nahe wie möglich am Körper anliegen. Stellen Sie die Höhe der Gurte so ein, dass diese von unten, über die Schulter des Kindes verläuft.
HINWEIS! Lockern Sie die Schultergurte, indem Sie die Verstelltaste am Zentralversteller betätigen und gleichzeitig beide Schultergurte nach oben ziehen (D). Achten Sie darauf, dass die Schultergurte nicht verdreht sind.
• Führen Sie die beiden Schlosszungen zusammen. Rasten Sie sie im Gurtschloss mit einem hörbaren KLICK ein. • Ziehen Sie am Zentralverstellergurt und straffen Sie damit die Schultergurte bis sie eng am Körper Ihres Kindes anliegen.
HINWEIS! Sorgen Sie dafür, dass der Kindersitz frei von Spielsachen und harten Objekten ist.
ANSCHNALLEN MITTELS GURTSYSTEM
A B C
DCLICK
29
To adjust the height of the shoulder belts, please follow the next steps:• Press the red button to open the buckle (A).• Pull the shoulder belts including the shoulder pads through the backrest (B).• Now insert it again through the next higher slot (C).
NOTE! For optimum protection by the nachfolger HY5.1 TT, the shoulder straps should be as close as possible to the body. Adjust the height of the straps so that it runs from below, over the child‘s shoulder.
NOTE! Loosen the shoulder belts by activating the adjustment handle on the central adjuster and simultaneouslypulling both shoulder belts upwards (D). Make sure that the shoulder belts are not twisted or crossed over.
• Join the buckle tongue sections together and insert them into the buckle with an audible CLICK. • Pull the central adjuster belt below the shoulder belts to fit your child’s body tightly.
NOTE! Make sure that the child seat is free of toys and hard objects.
Seguire le fasi seguenti per regolare l‘altezza delle cinture• Premere il pulsante rosso per aprire la chiusura (A).• Tirare le cinture, comprese di spalline, attraverso lo schienale (B).• Inserirle nuovamente attraverso la successiva fessura superiore (C).
NOTA! Per una protezione ottimale con il nachfolger HY5.1 TT, le spal-line devono essere il più vicino possibile al corpo. Regolare l‘altezza delle cinghie in modo che scorra da sotto, oltre le spalle del bambino.
NOTA! Allentare le cinture premendo il pulsante centrale e poi tirare contemporaneamente entrambe le cinture verso l’esterno (D). Assicur-arsi che le cinture non siano arrotolate o intrecciate.
• Unire le fibbie e inserirle nella chiusura con un CLICK udibile. • Posizionare la cintura regolabile centrale sotto le cinture per aderire ermeticamente al corpo del bambino.
NOTA! Assicurarsi che il seggiolino del bambino sia libero da giocattoli e oggetti duri.
SECURING BY MEANS OF HARNESS SYSTEM SICUREZZA COL SISTEMA D‘IMBRACATURA
30
Die optional erhältliche Neugeboreneneinlage gibt Ihrem noch kleinen Baby die notwendige Unterstützung, mehr Liegekomfort und Halt.
• Vor der ersten Verwendung müssen Sie diese in dem Sitz montieren. • Dazu öffnen Sie das Gurtschloss des Kindersitzes und legen beide Schultergurte auf die Seite. • Legen Sie die Neugeboreneneinlage in den Sitz.
Ab dem 6. Monat sollte die Neugeboreneneinlage entfernt werden, um ausreichend Platz für Ihr Kind zu schaffen. Als Zwischenstufe kann der Keil aus der Neugeboreneneinlage entfernt werden.Zur Entfernung der Neugeboreneneinlage öffnen Sie das Gurtschloss, legen die beiden Schultergurte auf die Seite und nehmen anschließend die Neugeboreneneinlage aus dem Sitz.
HINWEIS! Für Frühchen, Babys unter 3 Kilogramm bzw. unter 45 cm Körpergröße, empfehlen wir die Verwendung einer Babyschale.
Um die bestmögliche Sicherheit Ihres Kindes zugewährleisten, prüfen Sie bitte immer vor Beginn der Fahrt, ob…• die Position der Kopfstütze ordnungsgemäß eingestellt wurde.• das Gurtsystem an die Körpergröße Ihres Kindes angepasst wurde, die Schultergurte nicht verdreht sind und das Gurtsystem geschlossen ist.• bei Babys bis 6 Monaten die Neugeboreneneinlage verwendet wird.• der Top Tether straff über die Rückenlehne des Autositzes gespannt ist und der Gurtspannungsanzeiger grün ist.
VERWENDUNG DER NEUGEBORENENEINLAGE
IST IHR KIND RICHTIG GESICHERT?
31
The optional available newborn inlay helps to support lying comfort and fit for the smallest babies.
• Before you use it for the first time, you must install it in the seat.• Open the buckle of the child seat and put the two shoulder straps on the side.• Place the newborn inlay into the seat.
From the 6th month, the newborn inlay should be removed to create sufficient space for the child. As an intermediate stage remove the wedge from the newborn inlay. To remove the newborn inlay, open the buckle, place the two shoulder straps on the side and then remove the newborn inlay from the seat.
NOTE! For preemies, babies under 3 kilograms or under 45 cm height, we recommend using an infant carrier.
L‘inserto neonato disponibile in opzione aiuta a supportare il comfort da sdraiato ed è adatto per i bambini più piccoli.
• Installarlo sul sedile prima di utilizzarlo per la prima volta.• Aprire la chiusura del seggiolino e posizionare di lato le due spalline.• Posizionare l‘inserto neonato nel seggiolino.
L‘inserto neonato dovrà essere rimosso al sesto mese, in modo da cre-are lo spazio sufficiente per il bambino. Come intermedio, il cuneo può essere rimosso dall‘inserto neonatale. Per rimuovere l‘inserto neonato, aprire la chiusura, posizionare di lato le spalline e rimuovere l‘inserto dal seggiolino.
NOTA! Raccomandiamo l‘utilizzo di porte-enfant per bambini prematu-ri, sotto i 3 chilogrammi o 45 cm di altezza.
To guarantee the maximum safety for your child, please make sure that:• The headrest is adjusted to the correct height.• The belt system is correctly adjusted to the size of the child, the shoulder belts are not twisted and the belt system is locked.• The vehicle-specific belt is tensioned and the clamp is closed and locked.• The newborn inlay is used for babies up to 6 months.• the top tether tightly stretched over the back of the car seat and the belt tension indicator is green.
Per garantire la massima sicurezza al bambino, assicurarsi che:• Il poggiatesta sia regolato all‘altezza corretta.• Il sistema delle cinture sia regolato correttamente alla dimensione del bambino, le cinture non siano arrotolate e che il sistema cinture sia bloccato.• l‘inserto neonato sia utilizzato per bambini fino a 6 mesi.• il Top Tether è teso sopra lo schienale del sedile e l’indicatore della tensione della cinghia è verde.
USING THE NEWBORN INLAY
IS YOUR CHILD PROPERLY SECURED? SUO FIGLIO È LEGATO CORRETTAMENTE?
USO DELL‘INSERTO NEONATO
180°
CLICK
180°
32
• Zum Ausbau des Sitzes öffnen Sie das Fahrzeuggurtschloss und die Gurtklemme. Ziehen Sie anschließend die Schlosszunge am Gurt aus der Gurtführung.• Anschließend drücken Sie die Schnellablasstaste an der Unterseite des Sitzes.• Falls Sie die Neugeboreneneinlage verwenden, entfernen Sie diese nun.• Falten Sie den Sitz zusammen, indem Sie die Rückenlehne fest gegen die Sitzfläche drücken.• Ist der Sitz flach gedrückt, schieben Sie die Kopfstütze nach oben und klappen den oberen Teil der Rückenlehne zurück über den unteren Teil der Rückenlehne.• Wenn die Tasche bereits unter dem Sitz liegt, schließen Sie die seitlichen Gurtschnallen über dem Sitz.• Öffnen Sie die oberen Schnallen des Sitzschoners, die um die Kopfstütze geschlungen waren und schlagen diese über den unteren Teil des Schoners.• Abschließend verbinden Sie beide Gurtschnallen miteinander.
AUSBAU AUS DEM FAHRZEUG
180°
CLICK
180°
33
• To remove the seat, open the vehicle seat belt buckle and the belt clamp. Then pull the buckle through the belt guide.• Then press the quick release button on the bottom of the seat.• If you are using the newborn inlay, remove it now.• Fold the seat together by pressing the backrest firmly against the seat.• If the seat is flat, move the headrest upwards and fold the upper part of the backrest back over the lower part of the backrest.• If you have the bag already under the seat, close the side buckles above the seat.• Open the top buckles of the seat protector, which are wrapped around the headrest and fold them over the lower part of the protector.• Finally, connect the two buckles together.
• Per rimuovere il seggiolino, aprire l‘apposita chiusura del veicolo e il morsetto. In seguito, tirare la chiusura attraverso la guida della cintura.• Premere il pulsante di rilascio rapido sul fondo del seggiolino. • Se si sta usando l‘inserto neonato, rimuoverlo adesso.• Piegare il seggiolino premendo con fermezza lo schienale contro il sedile.• Se il seggiolino è sgonfio, muovere verso l‘alto il poggiatesta e ripiegare la parte superiore del poggiatesta contro la parte inferiore.• Se la base è ancora sotto il seggiolino, chiudere le chiusure laterali sopra il seggiolino.• Aprire le chiusure superiori della protezione sedile, che sono avvolte al poggiatesta e ripiegarle sulla parte inferiore della protezione.• In fine, collegare le due chiusure.
DE-INSTALLATION OF THE CAR SEAT DISINSTALLAZIONE DEL SEGGIOLINO
34
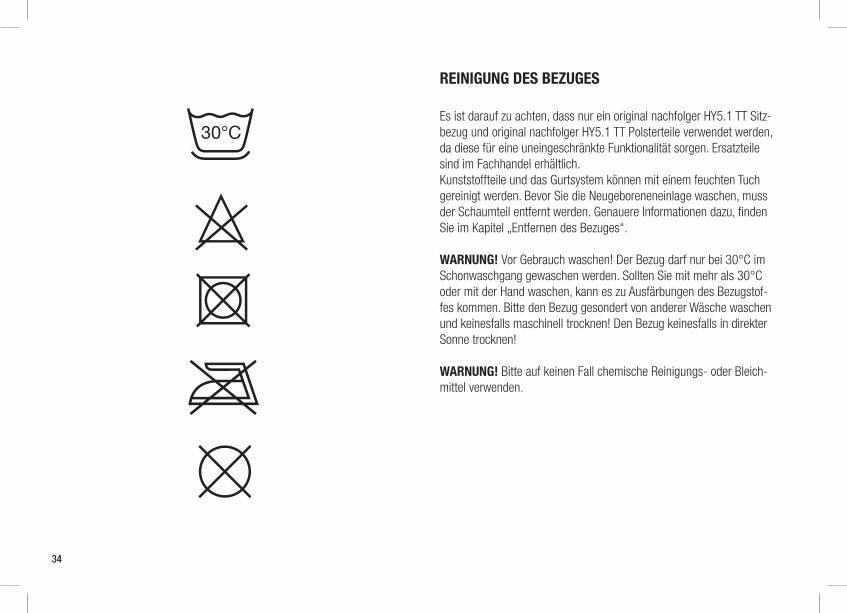
Es ist darauf zu achten, dass nur ein original nachfolger HY5.1 TT Sitz-bezug und original nachfolger HY5.1 TT Polsterteile verwendet werden, da diese für eine uneingeschränkte Funktionalität sorgen. Ersatzteile sind im Fachhandel erhältlich.Kunststoffteile und das Gurtsystem können mit einem feuchten Tuch gereinigt werden. Bevor Sie die Neugeboreneneinlage waschen, muss der Schaumteil entfernt werden. Genauere Informationen dazu, finden Sie im Kapitel „Entfernen des Bezuges“.
WARNUNG! Vor Gebrauch waschen! Der Bezug darf nur bei 30°C im Schonwaschgang gewaschen werden. Sollten Sie mit mehr als 30°C oder mit der Hand waschen, kann es zu Ausfärbungen des Bezugstof-fes kommen. Bitte den Bezug gesondert von anderer Wäsche waschen und keinesfalls maschinell trocknen! Den Bezug keinesfalls in direkter Sonne trocknen!
WARNUNG! Bitte auf keinen Fall chemische Reinigungs- oder Bleich-mittel verwenden.
REINIGUNG DES BEZUGES
35
Make sure that only an original nachfolger HY5.1 TT seat cover is used on the seat because the cover is also a fundamental component of the good functioning of the child seat. Replacement covers may be purchased at authorised dealers.Plastic parts, the harness system as well as the antislidecoating of the shoulder belts can be cleaned with a wet cloth. Before you wash the newborn inlay, the foam part must be removed. For more detailed information, see the section „Removing the cover“.
WARNING! Wash before use! The cover should be washed at 30°C in a delicate wash cycle. Washing at higher temperatures than 30°C or by hand may result in color bleeding. Wash separately from other items and never tumble dry! Never dry in strong sunlight!
WARNING! Never use chemical cleaning or bleaching agents.
Assicurarsi di utilizzare solo coprisedili originali nachfolger HY5.1 TT sul seggiolino, in quanto il rivestimento è anch‘esso una componente fondamentale del buon funzionamento del seggiolino. Rivestimenti di ricambio possono essere acquistati da rivenditori autorizzati.Le parti in plastica, il sistema di cablaggio e il rivestimento anti scivolo delle spalline possono essere puliti con un panno bagnato. Rimuovere la gommapiuma prima di lavare l‘inserto neonato. Per informazioni più dettagliate, consultare la sezione „Rimuovere il rivestimento“.
ATTENZIONE! Lavare prima dell‘uso! Il rivestimento deve essere lavato a 30°C nel ciclo di lavaggio delicati. Il lavaggio a temperature superiori a 30°C o a mano può causare perdita del colore. Non lavare con altri oggetti e non fare la centrifuga! Non fare asciugare a luce solare forte!
ATTENZIONE! Non usare mai detergenti chimici o candeggianti.
CLEANING THE COVER PULIZIA
180°
180°
36
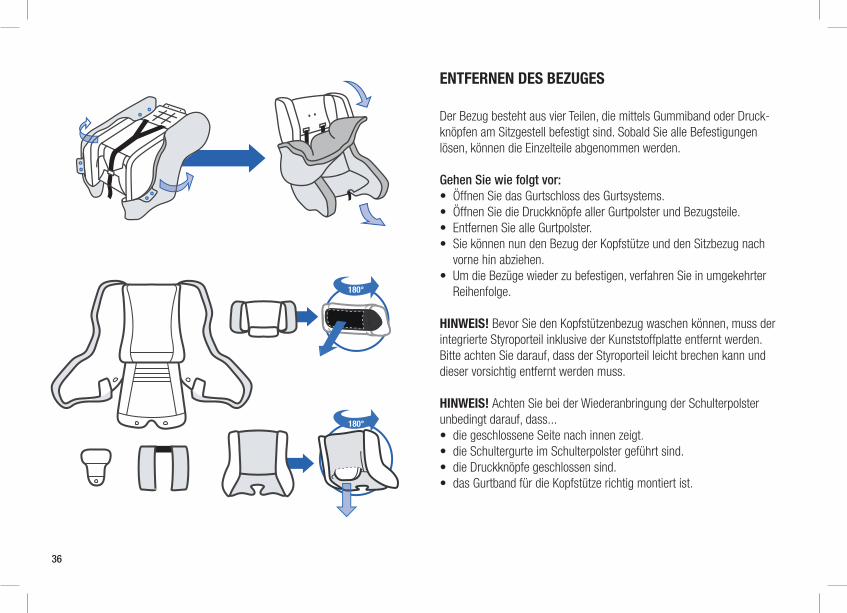
Der Bezug besteht aus vier Teilen, die mittels Gummiband oder Druck-knöpfen am Sitzgestell befestigt sind. Sobald Sie alle Befestigungen lösen, können die Einzelteile abgenommen werden.
Gehen Sie wie folgt vor:• Öffnen Sie das Gurtschloss des Gurtsystems.• Öffnen Sie die Druckknöpfe aller Gurtpolster und Bezugsteile.• Entfernen Sie alle Gurtpolster.• Sie können nun den Bezug der Kopfstütze und den Sitzbezug nach vorne hin abziehen.• Um die Bezüge wieder zu befestigen, verfahren Sie in umgekehrter Reihenfolge.
HINWEIS! Bevor Sie den Kopfstützenbezug waschen können, muss der integrierte Styroporteil inklusive der Kunststoffplatte entfernt werden. Bitte achten Sie darauf, dass der Styroporteil leicht brechen kann und dieser vorsichtig entfernt werden muss.
HINWEIS! Achten Sie bei der Wiederanbringung der Schulterpolster unbedingt darauf, dass...• die geschlossene Seite nach innen zeigt.• die Schultergurte im Schulterpolster geführt sind.• die Druckknöpfe geschlossen sind.• das Gurtband für die Kopfstütze richtig montiert ist.
ENTFERNEN DES BEZUGES
180°
180°
37
The cover consists of four components fixed to the seat shell by elastic piping and snap buttons. Once you have released all the fastenings, you can remove the individual components for washing.
Proceed as follows:• Open the belt buckle of the belt system.• Open all snap buttons of the pads and cover parts.• Remove all belt pads.• Remove the cover of the headrest and the seat by pulling it forwards.• To fix the cover again on the seat carry out the steps in reverse order.
NOTE! Before you can wash the headrest cover, the integrated styro-foam part including the plastic plate must be removed. Please ensure that the styrofoam part is easy to break and must be carefully removed.
NOTE! When remounting the shoulder pads, it is essential to ensure that...• the closed side faces towards the inside.• the shoulder belts are guided inside the shoulder pads.• the press buttons are closed.
Il rivestimento è composto da quattro componenti fissati al guscio del seggiolino da tubi elastici e bottoni automatici. Dopo aver rilasciato tutti i fissanti, è possibile rimuovere le componenti individuali per il lavaggio.
Procedere come segue:• Aprire la chiusura del sistema cinture.• Aprire tutti i bottoni automatici delle imbottiture e del rivestimento.• Rimuovere le spalline.• Rimuovere il rivestimento del poggiatesta e il seggiolino tirandoli via.• Per risistemare il rivestimento sul seggiolino, seguire le indicazioni in ordine inverso.
NOTA! Prima di poter lavare il rivestimento del poggiatesta, devono essere rimosse la parte in polistirolo integrata e la piastra in plastica. Assicurarsi che la parte in polistirolo sia facile da rompere e dev‘essere rimossa con cautela.
NOTA! Nel rimontare le spalline, è essenziale assicurarsi che...• il lato chiuso sia rivolto verso l‘interno.• le cinture siano guidate dentro le spalline.• I pulsanti automatici siano chiusi.
REMOVAL OFT THE COVER RIMUOVERE IL RIVESTIMENTO
C
B
A
38
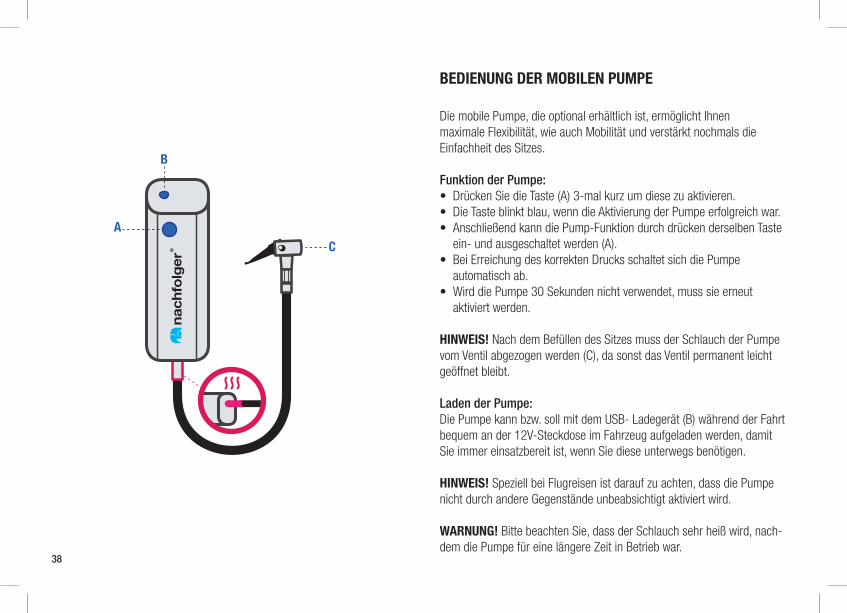
Die mobile Pumpe, die optional erhältlich ist, ermöglicht Ihnen maximale Flexibilität, wie auch Mobilität und verstärkt nochmals die Einfachheit des Sitzes.
Funktion der Pumpe:• Drücken Sie die Taste (A) 3-mal kurz um diese zu aktivieren.• Die Taste blinkt blau, wenn die Aktivierung der Pumpe erfolgreich war.• Anschließend kann die Pump-Funktion durch drücken derselben Taste ein- und ausgeschaltet werden (A).• Bei Erreichung des korrekten Drucks schaltet sich die Pumpe automatisch ab.• Wird die Pumpe 30 Sekunden nicht verwendet, muss sie erneut aktiviert werden.
HINWEIS! Nach dem Befüllen des Sitzes muss der Schlauch der Pumpe vom Ventil abgezogen werden (C), da sonst das Ventil permanent leicht geöffnet bleibt.
Laden der Pumpe:Die Pumpe kann bzw. soll mit dem USB- Ladegerät (B) während der Fahrt bequem an der 12V-Steckdose im Fahrzeug aufgeladen werden, damit Sie immer einsatzbereit ist, wenn Sie diese unterwegs benötigen.
HINWEIS! Speziell bei Flugreisen ist darauf zu achten, dass die Pumpe nicht durch andere Gegenstände unbeabsichtigt aktiviert wird.
WARNUNG! Bitte beachten Sie, dass der Schlauch sehr heiß wird, nach-dem die Pumpe für eine längere Zeit in Betrieb war.
BEDIENUNG DER MOBILEN PUMPE
C
B
A
39
The mobile pump, which is optionally available, ensures maximum flexibility, mobility and enhances the simplicity of the seat.
Function of the pump:• Briefly press the button (A) 3 times to activate it.• The button flashes blue, when the activation of the pump was successful.• Afterwards the pump function can be switched on and off by pressing the same button (A).• When the correct pressure is reached, the pump switches off automatically.• If the pump is not used for 30 seconds, it must be activated again.
NOTE! After filling the seat, the hose of the pump (C) must be removed from the valve, otherwise the valve remains slightly open.
Charging the pump:The pump can or should be easily recharged (B) with the charger while driving on the 12V socket in the car, so it is always ready when you need it while traveling.
NOTE! Especially when traveling by airplane, ensure that the pump will not be activated accidentally by other objects.
WARNING! Please note, that the tube will get hot after the inflator has worked for a long time.
La pompa mobile disponibile come opzione Le permette il massimo livello di flessibilità e di mobilità, rinforzando nuovamente la semplicità del sedile.
Funzionamento della pompa:• Prema il tasto (A) brevemente per 3 volte per attivarlo.• Quando l‘attivazione della pompa sarà riuscita, il pulsante lampeggerà di blu.• Dopo, il funzionamento della pompa potrà essere acceso e spento premendo lo stesso pulsante (A).• Una volta raggiunta la pressione corretta, la pompa si spegnerà automaticamente.• Se la pompa non viene utilizzata per 30 secondi, si dovrà riattivarla.
NOTA! Dopo aver gonfiato il seggiolino, il tubo della pompa (C) dovrà essere rimosso dalla valvola in modo che essa non resti leggermente aperta.
Caricare la pompa:La pompa può essere o deve essere facilmente ricaricata (B) con il caricabatteria durante la guida mediante la presa 12V della macchina, in modo da essere sempre pronta all‘uso durante il viaggio.
NOTA! Assicurarsi che la pompa non possa essere accidentalmente attivata da altri oggetti, soprattutto durante i viaggi aerei.
ATTENZIONE! Si prega di notare che il tubo diventerà incandescente dopo il gonfiaggio prolungato.
OPERATION OF THE PUMP GESTIONE DELLA POMPA
40
Um die größtmögliche Schutzwirkung Ihres Kindersitzes zu gewähr-leisten, ist es unbedingt notwendig, dass Sie Folgendes beachten:
• Alle wichtigen Teile des Kindersitzes sollten regelmäßig auf Beschädigungen kontrolliert werden. Die mechanischen Bauteile müssen einwandfrei funktionieren.• Es ist unbedingt notwendig darauf zu achten, dass der Kindersitz nicht zwischen harten Teilen wie Fahrzeugtür, Sitzschiene usw. eingeklemmt wird und dadurch beschädigt werden könnte.• Achten Sie darauf, dass kein Schmutz in den Spalt zwischen Sitz und Basis gelangt. Dies kann die Funktionalität des Arretierungs mechanismus negativ beeinflussen. Sollte dies dennoch vorkom- men sollte der Schmutz entfernt werden.
Der Kindersitz muss nach einem Sturz, Unfall oder einer anderen Form der direkten Beeinträchtigung unbedingt vom Hersteller überprüft werden.
WARNUNG! Der Bezug ist integraler Bestandteil des nachfolger HY5.1 TT Sicherheitskonzeptes. Der Kindersitz darf aus diesem Grund keinesfalls ohne Bezug verwendet werden.
PFLEGE
41
To guarantee, that your child seat provides the maximum protection, it is essential to comply with the following points:
• All major components of the child seat must be regularly checked for damage. The mechanical parts must work without problems.• Make sure that the child seat is not jammed between hard parts such as the car door, seat rails etc., which can damage it.• Avoid getting any dirt or sand in between the upper seat shell and the base. This can have a negative impact on the performance of the rotation and recline function. Should this happen the dirt should be removed before rotating and reclining the seat any further to avoid any permanent damage of the seat.
After a drop, accident or any other form of direct impact, it must be tested by the manufacturer before being used again.
WARNING! The cover is an integral component of the nachfolger HY5.1 TT safety design. The child seat must therefore never be used without the cover. The seat cover should not be replaced with any other than the one recommended by the manufacturer, because the cover constitutes a integral part of the restraint performance.
Per garantire che il seggiolino offra la massima protezione, è essenziale rispettare i seguenti punti:
• Tutte le maggiori componenti del seggiolino devono essere rego- larmente controllate per danni. Le parti meccaniche devono funzio- nare senza problemi.• Assicurarsi che il seggiolino non sia incastrato tra parti dure come la portiera, i binari, ecc., che potrebbero danneggiarlo.• Evitare che sporcizia o sabbia vada tra la parte superiore del seggio- lino e la base. Ciò potrebbe avere un impatto negativo sulle prestazi- oni della funzione di rotazione e di reclinazione. Se questo avvenisse la sporcizia dovrà essere rimossa prima di ruotare o reclinare il seggiolino in modo da prevenirne danni permanenti.
Dopo una caduta, un incidente o altre forme d‘impatto diretto, dovrà essere testato dal costruttore prima di poter essere riutilizzato.
ATTENZIONE! Il rivestimento è una componente integrale del disegno di sicurezza del nachfolger HY5.1 TT. Il seggiolino non dovrà mai essere usato senza il rivestimento.
PRODUCT CARE CURA DEL PRODOTTO
42
Sollten Sie einen Unfall gehabt haben, können am Kindersitz Beschädi-gungen auftreten, die nicht offensichtlich erkennbar sind. In diesem Fall muss der Kindersitz unbedingt vom Hersteller geprüft und gegebenen-falls ausgetauscht werden.
Der nachfolger HY5.1 TT ist so ausgelegt, dass er für die gesamte Ver-wendungszeit von ca. fünf Jahren seine Eigenschaften erfüllt. Da jedoch in Fahrzeugen sehr große Temperaturschwankungen und unvorherseh-bare Belastungen auftreten können, ist es notwendig folgende Punkte zu beachten:
• Wenn das Fahrzeug längere Zeit der prallen Sonne ausgesetzt ist, muss der Kindersitz aus dem Fahrzeug entfernt oder mit einem hellen Tuch abgedeckt werden.• Prüfen Sie regelmäßig alle Kunststoff- und Metallteile des Sitzes auf Beschädigung oder Veränderung von Form oder Farbe. Stellen Sie eine Veränderung fest, ist der Kindersitz unbedingt zu entsorgen, oder er muss vom Hersteller geprüft und gegebenenfalls ausge- tauscht werden.• Veränderungen des Stoffes, insbesondere das Ausbleichen, sind nach jahrelanger Verwendung in einem Fahrzeug normal und stellen keine Beeinträchtigung dar.
VERHALTEN NACH EINEM UNFALL
PRODUKTLEBENSDAUER
43
If you are involved in an accident, the child seat may sustain damage that is not visible to the naked eye. If this is the case, the child seat must be examined by the manufacturer and replaced if necessary.
In caso di incidente, il seggiolino potrà aver subito danni non visibili ad occhio nudo. In questo caso, il seggiolino dovrà essere esaminato dal costruttore e rimpiazzato se necessario.
The nachfolger HY5.1 TT has been designed to fulfil its intended func-tions for a maximum of five years of total use. However, since vehicles are subject to great fluctuations in temperature and to unpredictable strains, the following points must be observed:
• If the car is exposed to the bright sun, the child seat must be removed from the car or covered with a light-colored cloth.• Check all plastic and metal parts of the seat regularly for damage or alterations in shape or color. If you discover any alteration, the child seat must be disposed or it must be checked by the manufacturer and replaced if necessary.• Alteration in the fabric of the upholstery, in particular fading, are normal after some years of use and do not represent damage.
Il nachfolger HY5.1 TT è stato progettato per adempiere alle funzioni previste per un massimo di 5 anni. Tuttavia, dato che i veicoli sono soggetti a grandi variazioni di temperatura e danni imprevedibili, si dovranno osservare i seguenti punti:
• Se la macchina è esposta alla luce locare, il seggiolino dovrà essere rimosso dal veicolo o coperto con un panno chiaro.• Controllare regolarmente tutte le parti in plastica e in metallo da danni o alterazioni di colore. Se si evidenziano alterazioni, il seggio- lino dovrà essere smaltito o esaminato dal costruttore e rimpiazzato se necessario.• L‘alterazione nel tessuto della tappezzeria, in particolare la dissol- venza, è normale dopo alcuni anni di utilizzo e non rappresenta un danno.
WHAT TO DO AFTER AN ACCIDENT
PRODUCT DURABILITY DURATA DEL PRODOTTO
COSA FARE DOPO UN INCIDENTE
44
Am Ende der Produktlebensdauer des Kindersitzes muss er ord-nungsgemäß entsorgt werden. Die Abfalltrennung kann kommunal unterschiedlich sein. Um eine vorschriftsgemäße Entsorgung des Kindersitzes zu gewährleisten, setzen Sie sich mit Ihrer kommunalen Abfallentsorgung bzw. Verwaltung Ihres Wohnortes in Verbindung. Be-achten Sie auf jeden Fall die Entsorgungsbestimmungen Ihres Landes!
nachfolger GmbHBoecklinstrasse 59 / 21020 ViennaAustria, EU
ENTSORGUNG
KONTAKT
www. nachfolger.com / [email protected]
45
At the end of its product life the child seat must be properly disposed. Waste separation may vary in different localities. In order to make sure that the child seat is disposed in proper way, contact your local waste disposal authority or administration of your place of residence. In all cases you may have a look to your national disposal regulations.
Alla fine del suo ciclo di vita, il seggiolino dovrà essere adeguatamente smaltito. La differenziazione dei rifiuti può variare a seconda del luogo. Per assicurarsi che il seggiolino sia correttamente smaltito, contattare l‘autorità o l‘amministrazione di gestione rifiuti del luogo di residen-za. In ogni caso bisognerà osservare il regolamento nazionale per lo smaltimento.
nachfolger GmbHBoecklinstrasse 59 / 21020 ViennaAustria, EU
nachfolger GmbHBoecklinstrasse 59 / 21020 ViennaAustria, EU
DISPOSAL
CONTACT CONTATTI
SMALTIMENTO
www. nachfolger.com / [email protected] www. nachfolger.com / [email protected]
46
Die nachfolgenden Garantiebestimmungen gelten nur in dem Land, in dem dieses Produkt erstmalig über den Einzelhandel an einen Verbraucher verkauft wurde.
1. Die Garantie deckt sämtliche Herstellungs- und Materialfehler ab, die im Zeitpunkt des Kaufs bestanden haben oder die innerhalb von zwei Jahren nach dem Erstverkauf dieses Produkts über den Einzelhandel an einen Verbraucher in Erscheinung getreten sind (Herstellergarantie). Bitte überprüfen Sie das Produkt nach dem Kauf oder wenn es im Versandhandel gekauft wurde nach Erhalt umgehend auf Vollständigkeit, Herstellungs- und Materialfehler.
2. Falls Schäden vorhanden sind, darf das Produkt nicht mehr benutzt werden. Um Leistungen im Rahmen dieser Garantie in Anspruch nehmen zu können, muss das Produkt in einem vollständigen und sauberen Zustand an den Einzelhändler zurückgegeben werden, der es erstmalig verkauft hat und ein Nachweis über den Kauf (Kaufbeleg oder Rechnung) im Original vorgelegt wer-den. Bitte bringen oder schicken Sie das Produkt nicht direkt zum Hersteller!
3. Die Garantie deckt keine Schäden ab, die durch Fehlgebrauch, äußere Einflüsse (Wasser, Feuer, Unfälle o.ä.), normalen Verschleiß oder durch Behand-lung und Benutzung entstanden sind, die im Gegensatz zu den Instruktionen dieser Gebrauchsanweisung stehen. Die Garantie wird nur gewährt, wenn Reparaturen oder Veränderungen ausschließlich durch Personen vorgenommen wurden, die hierzu befugt waren und stets nur originale Bau- und Zubehörteile verwendet wurden.
4. Durch diese Garantie werden weder bestehende Verbraucherrechte noch Rechte gegen den Verkäufer wegen Vertragswidrigkeit des Produkts beein-flusst.
GARANTIEBEDINGUNGEN
47
The following warranty applies solely in the country where this product was initially sold by a retailer to a customer.
1. The warranty covers all manufacturing and material defects, existing and appearing, at the date of purchase or appearing within a term of two years from the date of purchase from the retailer who initially sold the product to a consumer (manufacturer’s warranty). Please check the product with respect to completeness and manufacturing or material defects immediately at the date of purchase or immediately after receipt. Please always keep your dated proof of purchase.
2. In case of a defect, stop using the product immediately. To obtain the war-ranty please take or ship the product to the original retailer, who initially sold this product to you in a clean and complete condition and submit an originalproof of purchase (sales receipt or invoice). Please do not take or ship the product to the manufacturer directly.
3. This warranty does not cover any damages which result from misuse, en-vironmental influence (water, fire, accidents etc.), normal wear and tear or failu-re to comply with the instructions provided in this user manual. The warranty does not apply if modifications and services were performed by unauthorized persons or if non-original components and accessories were used.
4. This warranty does not affect any statutory consumer rights, including claims in tort and claims with respect to a breach of contract, which the buyer may have against the seller or the manufacturer of the product.
WARRANTY
La seguente garanzia è applicabile solo nel paese di vendita iniziale del prodotto da parte del rivenditore.
1. La garanzia copre tutti i difetti, esistenti e visibili, di fabbricazione e del materiale alla data di acquisto o che appaiano entro due anni dalla data di vendita da parte del rivenditore, che inizialmente ha venduto il prodotto al cliente (garanzia del produttore). Si prega di controllare immediatamente il prodotto facendo attenzione alla completezza e manifattura o a difetti materiali al momento dell‘acquisto o subito dopo la ricezione. Si prega di conservare sempre lo scontrino d‘acquisto.
2. In caso di difetti, smettere immediatamente di utilizzare il prodotto. Per ottenere la garanzia si prega di portare o spedire il prodotto al venditore originale, che le aveva inizialmente venduto il prodotto, in condizioni pulite e complete e allegare una copia d‘acquisto originale (scontrino o fattura). Si prega di non portare o spedire il prodotto direttamente al costruttore.
3. Questa garanzia non copre danni risultanti da uso improprio, influenze ambientali (acqua, fuoco, incidenti, ecc.), normale usura o inadempimento alle istruzioni fornite in questo manuale utente. La garanzia non è applica-bile se sono state eseguite modifiche o servizi da parte di personale non autorizzato o se sono stati usati componenti e accessori non originali.
4. Questa garanzia non pregiudica alcun diritto legale del consumatore, inclusi i reclami extracontrattuali e reclami relativi a una violazione del contratto che l‘acquirente potrebbe esercitare contro il venditore o il costruttore del prodotto.
GARANZIA
C101_851-0_A