Embed Size (px)
Citation preview
Montageanleitung · Owners manual
pure musicIn
Wal
l

Herzlichen Dank für Ihr Vertrauen, daß Sie uns mit dem Kauf dieserLautsprecher entgegenbringen. Sie haben sich für ein hochwertigesInWall System entschieden und damit Ihren hohen Anspruch anKlang- und Verarbeitungsqualität bewiesen. Wir wünschen Ihnenviel Spaß und Freude mit diesen InWall Lautsprechern.
Canton hat diese Systeme speziell für den Einbau in Wände undDecken konzipiert und entwickelt. Durch die konstruktive Trennungvon Einbaurahmen und Lautsprecher-System ist eine einfacheMontage möglich. Die Lautsprecher werden elegant von einerfarblich angepaßten Blende mit feinem Lochblechgitter abgedeckt.Die Canton InWall Systeme eignen sich perfekt für die Beschallungprivater und kommerziell genutzter Räume wie Bars, Restaurants,Fitness-Studios oder Konferenzräumen. Eine weitereEinsatzmöglichkeit ist die Integration in Heimkino-Anlagen, speziellals Surround-Lautsprecher.
Thank you very much for the confidence you have placed in us withyour purchase of Canton loudspeakers. You have chosen a highquality InWall system, thus demonstrating your high standards ofexcellence in acoustics and craftsmanship. We hope you very muchenjoy the performance of your InWall speakers.
Canton has designed and developed these systems especially forinstallation in walls and ceilings. The separate configuration ofinstallation frame and loudspeaker system makes for easy mounting.The speakers are stylishly covered with a color-coordinated grille offinely perforated sheet metal. Canton InWall systems are perfectfor both private homes and commercial premises such as bars,restaurants, fitness studios and conference rooms. The speakers canalso be integrated in Home Theater systems, especially as SurroundSpeakers.
Allgemeine Einbauempfehlungen / General Installation RecommendationsBitte beachten: Der Einbau der Inwall Systeme setzt ein gewisseshandwerkliches Geschick im Umgang mit Werkzeugen voraus.Überzeugen Sie sich vor der Montage, dass die Installation an dervorgesehenen Stelle möglich ist und keine Leitungen für Strom,Wasser, Gas, etc. beschädigt werden können.
Diverses Einbauzubehör erleichtert die Montage. Zum Lieferumfanggehören u.a. eine Schablone für die Einbauöffnung, Dichtungen unddiverse Schrauben zur optimalen Befestigung der Lautsprecher.
Das zum Lieferumfang gehörende Zubehör erlaubt eine Montageder InWall Systeme in Wände oder Decken von 6 mm bis 35 mmStärke. Bei Wänden stärker als 35 mm benötigen Sie entsprechendlängere Schrauben. Für den perfekten Einbau in massive Wändeempfehlen wir die Verwendung eines speziellen zusätzlichenEinbaurahmens, der die Einbauöffnung sauber abschließt. DieserEinbaurahmen ist über den Canton-Kundenservice zu beziehen.
Please note: Installation of InWall systems calls for a certain amountof skill in working with tools. Before installation, make sure thatmounting at the point selected is possible and that no lines forelectricity, water, gas, etc. can be damaged.
Various installation accessories simplify mounting. The factory-supplied items include a template for the installation opening,sealing strips and an assortment of screws for perfect speakermounting.
These items permit installation of the InWall systems in walls orceilings of from 6 mm to 35 mm thickness. In walls thicker than 35mm, you will require longer screws. For clean installation in solidmasonry walls, we recommend the use of a special accessoryinstallation frame which neatly covers the installation opening. Thisinstallation frame may be ordered through Canton CustomerService.

Da die Installation der InWall Lautsprecher von bleibender Dauerist, sollte der Einbauort sorgfältig überlegt werden. Bedenken Siehierbei: Man verschiebt öfter mal die Möbel, der einmal gewählteEinbauplatz der InWall Systeme lässt sich nicht mehr so leichtverändern.
Um zwischen InWall System und Einbauoberfläche eine optimaleDichtigkeit zu gewährleisten, sollte die Montage auf jeden Fall aufeiner ebenen Fläche erfolgen. Wenden Sie bitte keine Gewalt beider Montage der Lautsprecher an. Die Rahmen der InWallLautsprecher müssen verspannungsfrei montiert werden.
Since installation of InWall speakers is permanent, the installationpoint should be carefully considered. Keep in mind that furnituremay be moved at times and that, once selected, the installationpoint of the InWall systems cannot be changed all that easily.
To assure optimum flush-mounting between InWall System andsurface, installation should definitely be on an even surface. Pleasedo not use force when installing the speakers. The frames of InWallspeakers must be mounted torsion-free.
Lautsprecherkabel / Loudspeaker CablesDie Canton InWall Systeme werden über zweiadrigeLautsprecherkabel mit dem Verstärker verbunden. Die erforderlicheKabelstärke hängt von ihrer Länge ab. Alle InWall Lautsprechersind mit vergoldeten Klemmanschlüssen ausgerüstet, die Kabel biszu einer Stärke von 10 mm aufnehmen können. Für kurzeVerbindungen bis 5 m sollten Sie Kabel mit einem Querschnitt von2,5 mm verwenden, bei einer Länge von über 5 m empfehlen wireine Stärke von 4 mm.
Achten Sie beim Anschließen der Lautsprecher unbedingt auf dierichtige Polung: Plus an Plus, Minus an Minus. Eine unterschiedlichePolung etwa des linken und rechten Lautsprechers würde zuKlangverfälschungen, insbesondere im Bassbereich führen. Bei denInWalls wie bei Verstärkern sind die Anschlußklemmen mitentsprechenden Symbolen gekennzeichnet; außerdem sind – in derRegel – die Pluspole rot hervorgehoben.
An den Kennzeichnungen am Verstärker erkennen Sie, welcheLautsprecher der Anlage mit welchem Anschlußpaar zu verbindensind: rechter und linker Lautsprecher in einer einfachenStereoanlage; rechter und linker Frontlautsprecher, Center- undSurround-Lautsprecher in einer Heimkino-Anlage.
Canton InWall systems are connected with the amplifier via two-conductor loudspeaker cable. The gauge of cable required dependson its length. All InWall loudspeakers are equipped with gold-platedscrew clamps which can accept cable of up to 10 mm gauge. Forshort connections of up to 5 meters, cable with a gauge of 2.5 mmshould be used; for greater lengths, over 5 meters, we recommend agauge of 4 mm.
When connecting speakers to the amplifier, be sure to observecorrect polarity: i.e., make sure that „plus“ is linked to „plus“,„minus“ to „minus“. Different polarity of left and right speakerswould cause acoustic distortion, particularly in the bass range.Connecting clamps on both the InWalls and the amplifier areidentified by corresponding symbols: additionally, the plus poles aregenerally emphasized in red.
From the markings on the amplifier, you can tell which loudspeakersin the system are to be linked with which pair of poles: right andleft speakers in a standard stereo system; right and left FrontSpeakers, Center Speaker and Surround Speakers in a HomeTheater system.

Cantons InWall Lautsprecher sind problemlos an jedemhandelsüblichen Verstärker anzuschließen.
Canton InWall speakers can be unhesitatingly operated with anystandard amplifier.
Anschlusswerte / Power Ratings
Anschlußmöglichkeiten / Wiring Possibilities
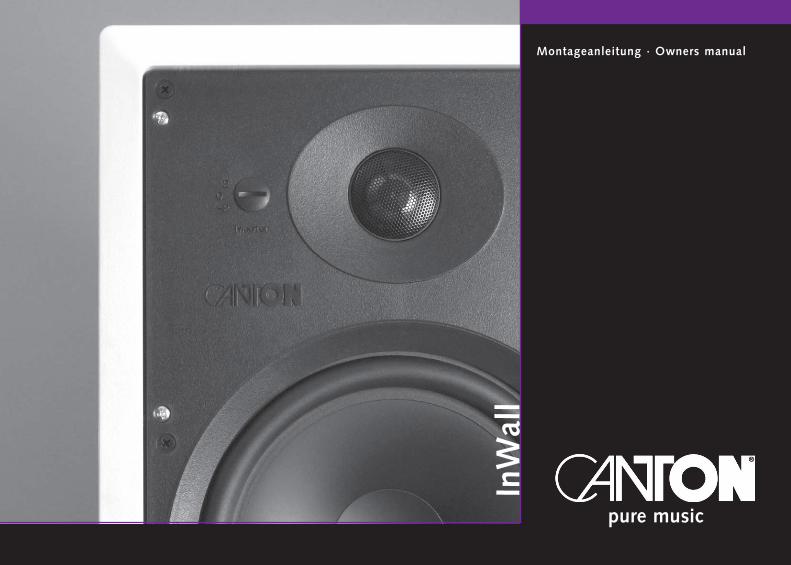
Die minimale Lastimpedanz des Verstärkers sollte zwischen 4-8Ohm liegen.
The minimum load impedance of the amplifier should bebetween 4 and 8 ohms.
As indicated by the Technical Data, the impedance (nominalresistance) of these systems is 8 ohms. Virtually all amplifiers on themarket today can safely be connected with these speakers. If youwish to drive two speakers from one amplifier channel, you canconnect them in parallel. However, make sure that the impedanceof this configuration is not less than the lower impedance limit ofyour amplifier.
Wie die technischen Daten ausweisen, liegt die Impedanz (derScheinwiderstand) dieser Systeme bei 8 Ohm. Nahezu alle heuteangebotenen Verstärker lassen sich problemlos mit diesenLautsprechern verbinden. Möchten Sie zwei Lautsprecher an einemVerstärkerkanal anschließen, können Sie diese parallel schalten.Versichern Sie sich aber, dass die Impedanz dieser Konfigurationnicht unter die untere Impedanz-grenze ihres Verstärkers fällt.
Impedanz / Impedance
8 Ohm 8 Ohm
4/8 Ohm
Durch Kombination einer Reihen- und einer Parallelschaltungdes InWall Systems verändert sich die Impedanz nicht.
Combined series/parallel circuitry of the InWall system does notalter the impedance.
Bei Parallelschaltung des InWall Systems halbiert sich dieImpedanz von 8 Ohm auf 4 Ohm. Die minimale Lastimpedanzdes Verstärkers muß bei 8 Ohm liegen.
The minimum load impedance of the amplifier must be 4 ohms.When the InWall systems are connected in parallel, impedanceis reduced by half – from 8 ohms to 4 ohms.
8 Ohm 8 Ohm8 Ohm 8 Ohm
4 Ohm
8 Ohm 8 Ohm8 Ohm 8 Ohm
8 Ohm 8 Ohm8 Ohm 8 Ohm
16 Ohm 16 Ohm
16 Ohm 16 Ohm
4/8 Ohm

Achten Sie darauf, die Systeme nicht zu überlasten. Am sicherstenist dies gewährleistet, wenn Ausgangsleistung des Verstärkers undBelastbarkeit der Lautsprecher einander entsprechen. Aber auchVerstärker mit größerer Leistung stellen dann keine Gefahr dar,wenn Sie darauf achten, den Lautstärkeregler nicht höher alszuträglich aufzudrehen. Eine Überlastung der Lautsprecher machtsich durch unüberhörbare Verzerrungen bemerkbar.
Be careful not to overload the system. The most reliable way toassure this is to see that the output power of the amplifier and thepower handling rating of the speakers conform with each other.However, even amplifiers with greater power are no danger if youare sure not to turn up the volume higher than tolerable. Speakeroverload quickly makes itself audible as unmistakable distortion.
Belastbarkeit / Power Handling
As a rule, danger to loudspeakers is more likely to be caused by low-powered amplifiers since, when attempting to achieve greatersound pressure by turning up the volume and tone controls, they areoverdriven and go into so-called „clipping“, creating overtoneswhich can destroy speaker tweeters in particular.
To prevent damage to loudspeaker drivers, our InWall speakersfeature overload protection. In event of impending overload, thelevel is audibly lowered. In this case, please turn down the volumecontrol on your amplifier. After cooling off, the speakers will againperform normally.
In der Regel geht eine Gefahr eher von zu leistungsschwachenVerstärkern aus, da sie beim Versuch, durch Aufdrehen vonLautstärke- und Klangreglern mehr Schalldruck zu erzielen,übersteuert werden und durch sogenanntes “Clipping” Obertöneerzeugen, die insbesondere die Hochtöner des Systems zerstörenkönnen.
Um eine Beschädigung der Lautsprecher-Chassis zu verhüten, sindunsere InWall Lautsprecher mit einem Überlastschutz ausgestattet.Bei drohender Überlastung wird – deutlich hörbar – der Pegelabgesenkt. Drehen Sie in diesem Fall bitte den LautstärkereglerIhres Verstärkers zurück. Nach erfolgter Abkühlung arbeiten dieLautsprecher wieder normal.

Benutzen Sie die beigefügte Einbauschablone, um diegenaue Größe des Wandausschnittes festzulegen. DerAußenrand der Schablone gibt die Größe der Blende an. Dermit Pfeilen gekennzeichnete Innenrand gibt die Größe derEinbauöffnung vor.
Use the enclosed installation template to ascertain the exact sizeof the wall cutout. The outer edge of the template indicates thesize of the cover trim. The inner edge, identified by arrows,indicates the size of the installation opening.
Montage 1 / Installation 1
Schaffen Sie nun eine entsprechende Einbauöffnung in IhrerWand bzw. Decke. Beim Verlegen der Lautsprecherkabel vomVerstärker zum Einbauort ist zu beachten, dass die Kabelendenetwa 30 cm über den Wandausschnitt hinausragen. Dieserleichtert Ihnen später die Befestigung an denLautsprecherklemmen der InWall Systeme.
Now hollow out an appropriate installation opening in the wall/ceiling. When laying loudspeaker cable from amplifier toinstallation point, be sure that the cable ends protrude about30 cm beyond the wall cutout. This later simplifies fastening tothe InWall systems’ speaker clamps.

Bevor Sie die Lautsprecher-Kabel an den Klemmanschlüssen desInWall-Systems befestigen, müssen Sie die Kabel spreizen undetwa 1,5 cm der Kabelenden abisolieren. Verbinden Sie nun dasmarkierte Kabel (+) mit dem roten Klemmanschluss an derFrequenzweiche, das zweite Kabel (-) mit dem schwarzenAnschluss.
Before fastening the speaker cable to the screw clamps of theInWall systems, you must first split the two-conductor cableand strip off about 1.5 cm of insulation from the cable ends.Now connect the marked cable (+) with the red screw clamp onthe crossover network, the second cable (-) with the blackscrew clamp.
Achten Sie bitte darauf, dass die roten Befestigungslaschen (6Stück pro Lautsprechersystem) nicht abstehen wie im Foto links,sondern nach innen anliegen (Foto unten), damit das InWallSystem in die Einbauöffnung passt.
Make sure that the red mounting tabs (6 per InWall system)do not stick out (photo above), but are in a position facing theinside (photo underneath) so that the InWall system will fit inthe installation opening.

Nach dem Einsetzten wird das InWall System jeweils an densilbernen Schrauben in der Wand fixiert.Wichtig: Die Schrauben nicht zu fest anziehen damit dieBefestigungslaschen nicht beschädigt werden. Danach könnenSie das Gitter in das InWall System einsetzen.
Now the speaker system can be inserted into the wall cutoutand can be secured using the silver screws.. Important: Toprevent damage to the mounting tabs, do not twist the screwstoo tightly. After that you can insert the grille into the InWallsystem.

Um bei problematischen Verhältnissen den Einbau zuvereinfachen, ist es möglich die InWall Systeme zu zerlegen.Hierzu müssen Sie die sechs schwarzen Schrauben auf derVorderseite herausdrehen. Danach lässt sich die Schallwand ausdem Einbaurahmen nehmen.
In order to make the installation under problematic conditionseasier it is possible to separate the baffle of the InWall systemfrom the frame. Therefore you must loosen the six black screwson the front.
Achten Sie bitte darauf, dass die roten Befestigungslaschen (6Stück pro Lautsprechersystem) nach innen anliegen, damit dasInWall System in die Einbauöffnung passt.Setzen Sie nun denRahmen in die Einbauöffnung und fixieren Sie ihn jeweils anden silbernen Schrauben in der Wand.Wichtig: Die Schrauben nicht zu fest anziehen damit dieBefestigungslasche nicht beschädigt wird.
Make sure that the red mounting tabs (6 per InWall system) arein a position facing the inside (photo underneath) so that theInWall system will fit in the installation opening.After that theframe can be inserted into the wall cutout and can be securedusing the silver screws..Important: To prevent damage to the mounting tabs, do nottwist the screws too tightly.
Montage 2 / Installation 2

Nachdem dieser Kontakt hergestellt ist, kann das LautsprecherSystem mit den sechs schwarzen Schrauben in demEinbaurahmen befestigt werden. Danach können Sie das Gitterin das InWall System einsetzen.
Once this contact is established, the speaker system can bescrewed into the installation frame using the six black screws.After that you can insert the grille in the InWall system.
Bevor Sie die Lautsprecher-Kabel an den Klemmanschlüssen desInWall-Systems befestigen, müssen Sie die Kabel spreizen undetwa 1,5 cm der Kabelenden abisolieren. Verbinden Sie nun dasmarkierte Kabel (+) mit dem roten Klemmanschluss an derFrequenzweiche, das zweite Kabel (-) mit dem schwarzenAnschluss.
Before fastening the speaker cable to the screw clamps of theInWall systems, you must first split the two-conductor cableand strip off about 1.5 cm of insulation from the cable ends.Now connect the marked cable (+) with the red screw clamp onthe crossover network, the second cable (-) with the blackscrew clamp.

Der Rahmen der InWall Systeme besteht aus weißem ABS-Kunststoff und kann ebenso wie das weiß lackierteLochblechgitter ohne weiteres mit handelsüblichen Lackenindividuell überlackiert werden.
Die Frequenzweichen der InWall Systeme bieten eine anHörgeschmack und Einbauort orientierte Anpassung desHochtonpegels um +/- 2 dB. Sie finden auf der Front der InWallSysteme einen Regler. Für eine Wiedergabe mit linearem Pegelbefindet sich der Regler in der einer neutralen Position (O).Drehen Sie den Regler gegen den Uhrzeigersinn, senken Sie denPegel um – 2 dB ab. Wird er nach rechts bewegt, heben Sie denHochtonpegel um + 2 dB an.
Lackierung / Painting
Anpassung des Hochtonpegels / Adjusting the Treble Level
The crossover networks of the InWall systems provide foradjustment of treble level by +/- 2 dB to suit personal listeningpreference and acoustic conditions. On the front of the InWallsystem you will find a control. For sound reproduction with flatfrequency response, the control is set in a neutral position (O). Byturning the control counter-clockwise, the level is reduced by 2 dB.If turned clockwise, the treble level is boosted by 2 dB.
Frames of the InWall systems are made of white ABS plastic and,like the white-painted perforated grille, can be overpainted withstandard paints to suit individual taste.
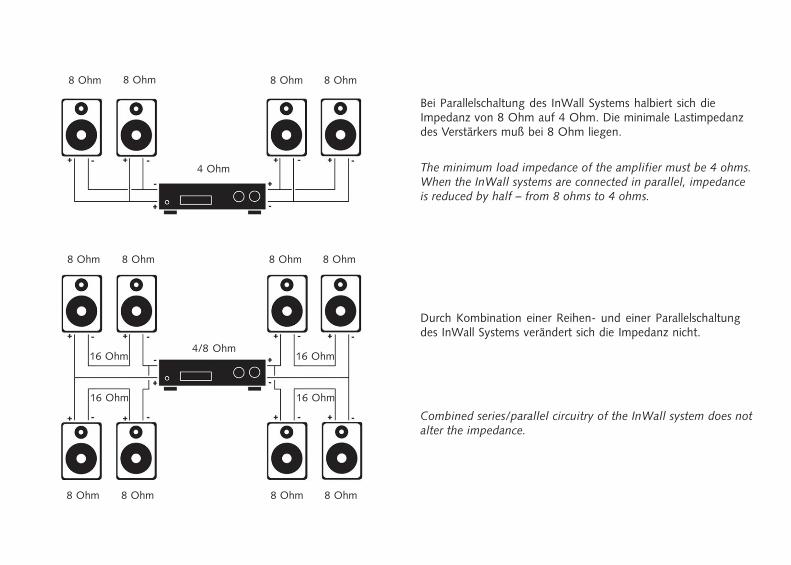
Für die Installation der InWall Systeme bei Häusern inMassivbauweise empfiehlt sich der Einsatz eines speziellenEinbaurahmens. Bei Neubauten bestimmt dieser Rahmen schon imMauerwerk die zukünftige Position der Lautsprecher. Beinachträglich vorgenommenen Einbauten schließt dieser Rahmendie Öffnung in der Mauer sauber ab. Der Einbaurahmen ist überden Canton Kundendienst zu beziehen.
Zubehör / Accessory
For installing the InWall systems in solid masonry buildings, use ofa special installation frame is recommended. In buildings underconstruction, this frame is pre-installed in masonry at the futureposition of the speakers. For retrofitting installations, this frameneatly closes the opening in the wall. The installation frame isavailable through Canton Customer Service.
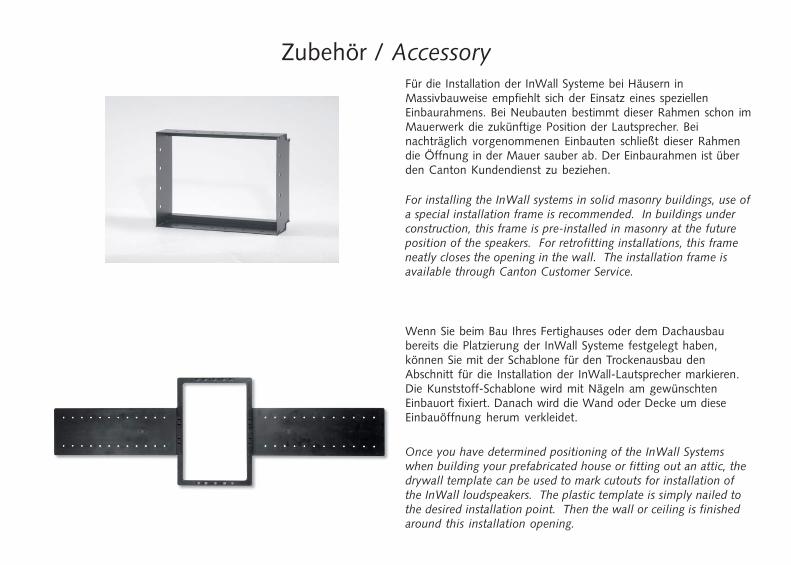
Wenn Sie beim Bau Ihres Fertighauses oder dem Dachausbaubereits die Platzierung der InWall Systeme festgelegt haben,können Sie mit der Schablone für den Trockenausbau denAbschnitt für die Installation der InWall-Lautsprecher markieren.Die Kunststoff-Schablone wird mit Nägeln am gewünschtenEinbauort fixiert. Danach wird die Wand oder Decke um dieseEinbauöffnung herum verkleidet.
Once you have determined positioning of the InWall Systemswhen building your prefabricated house or fitting out an attic, thedrywall template can be used to mark cutouts for installation ofthe InWall loudspeakers. The plastic template is simply nailed tothe desired installation point. Then the wall or ceiling is finishedaround this installation opening.

Wiedergabe im Stereo- bzw. Heimkino-Betrieb / Reproduction in Stereo and Home Theater Operation
When intended for normal stereo operation, Canton InWall speakersare installed by the familiar „stereo triangle“ rule. For best possiblesound quality, the speakers should be set up at a minimum distanceof two meters from each other. The distance from left to rightspeaker (the „base“) should be approximately equal to the listener’sdistance from the speakers.
In a Home Theater system, InWall speakers can be set up as leftand right Front Speakers to reproduce the stereo signal. However,they are also outstanding for reproduction of Surround effects, thusdelivering the spatial atmosphere. Ideal for reproduction of the rearchannels is speaker placement on the side walls of the listeningposition, above head level.
To expand a stereo system into a complete Home Theater system,you will require a special magnetically-shielded Center Speaker.Augmenting speakers for left and right channels, it reproduces thecenter channel. So it is best positioned directly above or below theTV set. You will find a large selection of Center Speakers forexpanding stereo setups into Home Theater systems in the currentCanton loudspeaker range.
Please note: If InWall systems are to be used near a TV set, thespeakers should be positioned at a distance of about 1.5 meters fromthe set. Under certain unfavorable conditions, speaker magnetscould otherwise detract from the quality of the TV picture.
Die Canton InWall Lautsprecher werden, wenn Sie für denkonventionellen Stereobetrieb bestimmt sind, nach der allgemeinbekannten Regel des “Stereodreiecks” eingebaut. Für einebestmögliche Wiedergabequalität sollten die Lautsprecher in einemAbstand von mindestens zwei Meter voneinander plaziert werden.Der Abstand vom linken zum rechtem Lautsprecher (die “Basis”)sollte ungefähr so groß sein, wie die Distanz des Hörers zu denLautsprechern.
In einer Heimkino-Anlage können die InWall Lautsprecher alsFrontlautsprecher links und rechts für die Wiedergabe desStereosignals eingesetzt werden. Sie eignen sich aber auchhervorragend für die Wiedergabe der Surroundeffekte und liefernso die räumliche Atmosphäre. Ideal für die Wiedergabe derrückwärtigen Kanäle ist eine Anordnung an den seitlichen Wändendes Hörplatzes, oberhalb Kopfhöhe.
Zum Ausbau einer kompletten Heimkino-Anlage benötigen Sieeinen speziellen, magnetisch abgeschirmten Center-Speaker. AlsErgänzung zu den Lautsprechern für den linken und rechten Kanalgibt er den Mittenkanal wieder. Deshalb steht oder liegt er ambesten direkt über oder unter dem Fernseher. Im aktuellen CantonLautsprecher Programm finden Sie eine große Auswahl an Center-Speakern zur Heimkino-Erweiterung.
Beachten Sie bitte: Werden die InWall Systeme in der Nähe einesFernsehers eingesetzt, sollten die Lautsprecher in einem Abstandvon etwa 1,5 m zum Gerät positioniert werden. Die Magnete derLautsprecher können unter ungünstigen Bedingungen eineBeeinflussung der Qualität des Fernsehbildes verursachen.

○ ○ ○ ○ ○ ○ ○ ○ ○ ○ ○
Principle
○ ○ ○ ○ ○ ○ ○ ○ ○ ○ ○
Impedance
○ ○ ○ ○ ○ ○ ○ ○ ○ ○ ○
Nom./Music Power Handling
○ ○ ○ ○ ○ ○ ○ ○ ○ ○ ○
Frequency Response
○ ○ ○ ○ ○ ○ ○ ○ ○ ○ ○
SPL (1 W at 1 m)
○ ○ ○ ○ ○ ○ ○ ○ ○ ○ ○
Crossover Frequency
○ ○ ○ ○ ○ ○ ○ ○ ○ ○ ○
Woofer
○ ○ ○ ○ ○ ○ ○ ○ ○ ○ ○
Tweeter
○ ○ ○ ○ ○ ○ ○ ○ ○ ○ ○
Dimensions
○ ○ ○ ○ ○ ○ ○ ○ ○ ○ ○
Installation Opening
Recommended Installation
○ ○ ○ ○ ○ ○ ○ ○ ○ ○ ○
Volume
○ ○ ○ ○ ○ ○ ○ ○ ○ ○ ○ ○ ○ ○ ○ ○ ○ ○ ○ ○ ○ ○ ○ ○ ○ ○ ○ ○ ○ ○ ○ ○ ○ ○ ○ ○ ○ ○ ○ ○ ○ ○ ○ ○ ○ ○ ○ ○
2-way 2-way 2-way 2-way
○ ○ ○ ○ ○ ○ ○ ○ ○ ○ ○ ○ ○ ○ ○ ○ ○ ○ ○ ○ ○ ○ ○ ○ ○ ○ ○ ○ ○ ○ ○ ○ ○ ○ ○ ○ ○ ○ ○ ○ ○ ○ ○ ○ ○ ○ ○ ○
8 ohms 8 ohms 8 ohms 8 ohms
○ ○ ○ ○ ○ ○ ○ ○ ○ ○ ○ ○ ○ ○ ○ ○ ○ ○ ○ ○ ○ ○ ○ ○ ○ ○ ○ ○ ○ ○ ○ ○ ○ ○ ○ ○ ○ ○ ○ ○ ○ ○ ○ ○ ○ ○ ○ ○
50/100 watts 80/130 watts 60/110 watts 90/140 watts
○ ○ ○ ○ ○ ○ ○ ○ ○ ○ ○ ○ ○ ○ ○ ○ ○ ○ ○ ○ ○ ○ ○ ○ ○ ○ ○ ○ ○ ○ ○ ○ ○ ○ ○ ○ ○ ○ ○ ○ ○ ○ ○ ○ ○ ○ ○ ○
50...30,000 Hz 42...30,000 Hz 45...30,000 Hz 42...30,000 Hz
○ ○ ○ ○ ○ ○ ○ ○ ○ ○ ○ ○ ○ ○ ○ ○ ○ ○ ○ ○ ○ ○ ○ ○ ○ ○ ○ ○ ○ ○ ○ ○ ○ ○ ○ ○ ○ ○ ○ ○ ○ ○ ○ ○ ○ ○ ○ ○
86 dB 89 dB 87 dB 88 dB
○ ○ ○ ○ ○ ○ ○ ○ ○ ○ ○ ○ ○ ○ ○ ○ ○ ○ ○ ○ ○ ○ ○ ○ ○ ○ ○ ○ ○ ○ ○ ○ ○ ○ ○ ○ ○ ○ ○ ○ ○ ○ ○ ○ ○ ○ ○ ○
3,300 Hz 3,000 Hz 3,000 Hz 3,300 Hz
○ ○ ○ ○ ○ ○ ○ ○ ○ ○ ○ ○ ○ ○ ○ ○ ○ ○ ○ ○ ○ ○ ○ ○ ○ ○ ○ ○ ○ ○ ○ ○ ○ ○ ○ ○ ○ ○ ○ ○ ○ ○ ○ ○ ○ ○ ○ ○
5.3“, polypropylene 2 x 5.3“, polypropylene 6.5“, polypropylene 8.3“, polypropylene
○ ○ ○ ○ ○ ○ ○ ○ ○ ○ ○ ○ ○ ○ ○ ○ ○ ○ ○ ○ ○ ○ ○ ○ ○ ○ ○ ○ ○ ○ ○ ○ ○ ○ ○ ○ ○ ○ ○ ○ ○ ○ ○ ○ ○ ○ ○ ○
1“, aluminum 1“, aluminum 1“, aluminum 1“, aluminum
○ ○ ○ ○ ○ ○ ○ ○ ○ ○ ○ ○ ○ ○ ○ ○ ○ ○ ○ ○ ○ ○ ○ ○ ○ ○ ○ ○ ○ ○ ○ ○ ○ ○ ○ ○ ○ ○ ○ ○ ○ ○ ○ ○ ○ ○ ○ ○
8“ x 11.6“ 10.6“ x 13.4“ 9“ x 12.8“ 10.6“ x 14.7“
○ ○ ○ ○ ○ ○ ○ ○ ○ ○ ○ ○ ○ ○ ○ ○ ○ ○ ○ ○ ○ ○ ○ ○ ○ ○ ○ ○ ○ ○ ○ ○ ○ ○ ○ ○ ○ ○ ○ ○ ○ ○ ○ ○ ○ ○ ○ ○
6.7“ x 10.2“ 9.3“ x 12“ 7.7“ x 11.4“ 9.2“ x 13.4“
○ ○ ○ ○ ○ ○ ○ ○ ○ ○ ○ ○ ○ ○ ○ ○ ○ ○ ○ ○ ○ ○ ○ ○ ○ ○ ○ ○ ○ ○ ○ ○ ○ ○ ○ ○ ○ ○ ○ ○ ○ ○ ○ ○ ○ ○ ○ ○
min. 4 L min. 5 L min. 6 L min. 7 L
InWall 500 InWall 500 LCR InWall 650 InWall 800
○ ○ ○ ○ ○ ○ ○ ○ ○ ○ ○
Prinzip
○ ○ ○ ○ ○ ○ ○ ○ ○ ○ ○
Impedanz
○ ○ ○ ○ ○ ○ ○ ○ ○ ○ ○
Nenn-/Musikbelastbarkkeit
○ ○ ○ ○ ○ ○ ○ ○ ○ ○ ○
Übertragungsbereich
○ ○ ○ ○ ○ ○ ○ ○ ○ ○ ○
SPL (1 W in 1 m)
○ ○ ○ ○ ○ ○ ○ ○ ○ ○ ○
Übergangsfrequenz
○ ○ ○ ○ ○ ○ ○ ○ ○ ○ ○
Tieftonchassis
○ ○ ○ ○ ○ ○ ○ ○ ○ ○ ○
Hochtonchassis
○ ○ ○ ○ ○ ○ ○ ○ ○ ○ ○
Abmessungen
○ ○ ○ ○ ○ ○ ○ ○ ○ ○ ○
Einbauöffnung
○ ○ ○ ○ ○ ○ ○ ○ ○ ○ ○
Empfohlenes Volumen
○ ○ ○ ○ ○ ○ ○ ○ ○ ○ ○ ○ ○ ○ ○ ○ ○ ○ ○ ○ ○ ○ ○ ○ ○ ○ ○ ○ ○ ○ ○ ○ ○ ○ ○ ○ ○ ○ ○ ○ ○ ○ ○ ○ ○ ○ ○ ○ ○ ○ ○ ○
2-Wege 2-Wege 2-Wege 2-Wege
○ ○ ○ ○ ○ ○ ○ ○ ○ ○ ○ ○ ○ ○ ○ ○ ○ ○ ○ ○ ○ ○ ○ ○ ○ ○ ○ ○ ○ ○ ○ ○ ○ ○ ○ ○ ○ ○ ○ ○ ○ ○ ○ ○ ○ ○ ○ ○ ○ ○ ○ ○
8 Ohm 8 Ohm 8 Ohm 8 Ohm
○ ○ ○ ○ ○ ○ ○ ○ ○ ○ ○ ○ ○ ○ ○ ○ ○ ○ ○ ○ ○ ○ ○ ○ ○ ○ ○ ○ ○ ○ ○ ○ ○ ○ ○ ○ ○ ○ ○ ○ ○ ○ ○ ○ ○ ○ ○ ○ ○ ○ ○ ○
50/ 100 Watt 80/130 Watt 60/110 Watt 90/140 Watt
○ ○ ○ ○ ○ ○ ○ ○ ○ ○ ○ ○ ○ ○ ○ ○ ○ ○ ○ ○ ○ ○ ○ ○ ○ ○ ○ ○ ○ ○ ○ ○ ○ ○ ○ ○ ○ ○ ○ ○ ○ ○ ○ ○ ○ ○ ○ ○ ○ ○ ○ ○
50...30.000 Hz 42...30.000 Hz 45...30.000 Hz 42...30.000 Hz
○ ○ ○ ○ ○ ○ ○ ○ ○ ○ ○ ○ ○ ○ ○ ○ ○ ○ ○ ○ ○ ○ ○ ○ ○ ○ ○ ○ ○ ○ ○ ○ ○ ○ ○ ○ ○ ○ ○ ○ ○ ○ ○ ○ ○ ○ ○ ○ ○ ○ ○ ○
86 dB 89 dB 87 dB 88 dB
○ ○ ○ ○ ○ ○ ○ ○ ○ ○ ○ ○ ○ ○ ○ ○ ○ ○ ○ ○ ○ ○ ○ ○ ○ ○ ○ ○ ○ ○ ○ ○ ○ ○ ○ ○ ○ ○ ○ ○ ○ ○ ○ ○ ○ ○ ○ ○ ○ ○ ○ ○
3.300 Hz 3.000 Hz 3.000 Hz 3.300 Hz
○ ○ ○ ○ ○ ○ ○ ○ ○ ○ ○ ○ ○ ○ ○ ○ ○ ○ ○ ○ ○ ○ ○ ○ ○ ○ ○ ○ ○ ○ ○ ○ ○ ○ ○ ○ ○ ○ ○ ○ ○ ○ ○ ○ ○ ○ ○ ○ ○ ○ ○ ○
135 mm, Polypropylen 2 x 135 mm, Polypropylen 165 mm, Polypropylen 210 mm, Polypropylen
○ ○ ○ ○ ○ ○ ○ ○ ○ ○ ○ ○ ○ ○ ○ ○ ○ ○ ○ ○ ○ ○ ○ ○ ○ ○ ○ ○ ○ ○ ○ ○ ○ ○ ○ ○ ○ ○ ○ ○ ○ ○ ○ ○ ○ ○ ○ ○ ○ ○ ○ ○
25 mm, Aluminium 25 mm, Aluminium 25 mm, Aluminium 25 mm, Aluminium
○ ○ ○ ○ ○ ○ ○ ○ ○ ○ ○ ○ ○ ○ ○ ○ ○ ○ ○ ○ ○ ○ ○ ○ ○ ○ ○ ○ ○ ○ ○ ○ ○ ○ ○ ○ ○ ○ ○ ○ ○ ○ ○ ○ ○ ○ ○ ○ ○ ○ ○ ○
204 mm x 294 mm 270 mm x 340 mm 230 mm x 324 mm 268 mm x 373 mm
○ ○ ○ ○ ○ ○ ○ ○ ○ ○ ○ ○ ○ ○ ○ ○ ○ ○ ○ ○ ○ ○ ○ ○ ○ ○ ○ ○ ○ ○ ○ ○ ○ ○ ○ ○ ○ ○ ○ ○ ○ ○ ○ ○ ○ ○ ○ ○ ○ ○ ○ ○
170 mm x 260 mm 236 mm x 306 mm 196 mm x 290 mm 234 mm x 339 mm
○ ○ ○ ○ ○ ○ ○ ○ ○ ○ ○ ○ ○ ○ ○ ○ ○ ○ ○ ○ ○ ○ ○ ○ ○ ○ ○ ○ ○ ○ ○ ○ ○ ○ ○ ○ ○ ○ ○ ○ ○ ○ ○ ○ ○ ○ ○ ○ ○ ○ ○ ○
min. 4 L min. 5 L min. 6 L min. 7 L
InWall 500 InWall 500 LCR InWall 650 InWall 800

Seriennummer / Serial number
Name d. Käufers / Buyer’s name
Adresse / Address
Händlerstempel / Dealer’s Stamp
Garantie-Urkunde · Warranty-Card
Art. Nr. 12868
Canton gewährt auf alle InWall Syteme fünf Jahre Vollgarantie. Vollgarantie bedeutet,daß im Reparaturfall die Kosten für Material, Arbeitszeit und den Rückversand gedecktsind. Wenden Sie sich bitte im Schadensfall an Ihren Fachhändler oder direkt an denCanton Service. Der Garantieanspruch verlängert sich nicht durch den Austausch vonBauteilen innerhalb der Garantiezeit. Beachten Sie bitte, daß sich die Garantie nur aufLautsprecherboxen erstreckt, die bei einem autorisierten Canton Fachhändler gekauftwurden. Die Adressen der internationalen Vertriebspartner finden Sie unter:www.canton.de
Canton grants a guarantee of 5 years on all InWall systems.During the warranty period any defects in materials or manufacture will be correctedfree of charge. The warranty period is not extended by performance of warranty work,not even for replaced or repaired parts. Repairs under this gurantee will be performedin Germany by an authorized Canton Dealer or by the Canton Customer Service.Responsible for repairs of Canton products in other countries are the local CantonRepresentatives. Their addresses can be found at: www.canton.de
Guarantee-Performance
Garantie-Leistung
www.canton.de
Canton Elektronik GmbH + Co KGNeugasse 21-23D-61276 WeilrodDeutschland / Germany
Tel.: +49(0) 60 83 28 70Fax: +49(0) 60 83 28 113
e-mail: [email protected]
Canton Electronics Corp.504 Malcolm Avenue SE, Suite 400Minneapolis, MN 55414USA
Phone: +1-612-706-9250Fax: +1-612-706-9255
e-mail: [email protected]