Embed Size (px)
Citation preview
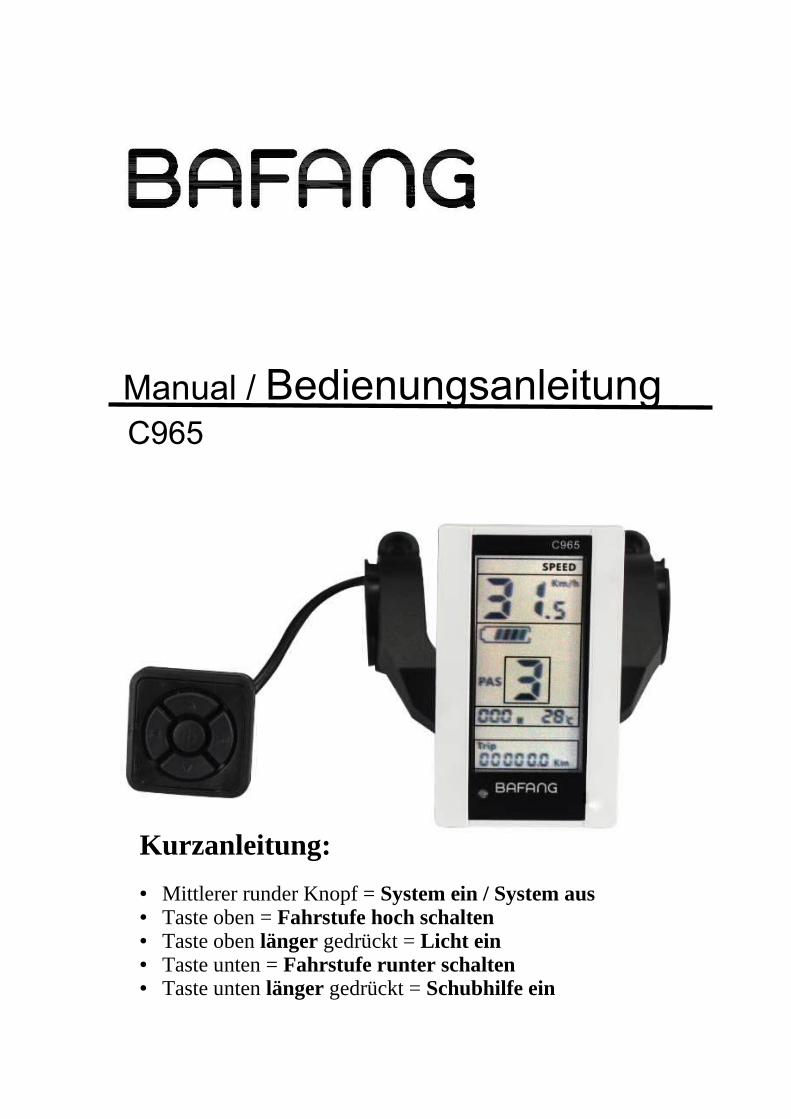
Manual / BedienungsanleitungC965
Kurzanleitung:
● Mittlerer runder Knopf = System ein / System aus● Taste oben = Fahrstufe hoch schalten ● Taste oben länger gedrückt = Licht ein● Taste unten = Fahrstufe runter schalten● Taste unten länger gedrückt = Schubhilfe ein
1 Product Name
1.1 The Middle install intelligent LCD Display
1.2 Model:APT12LCD800U
2 Type
2.1 C965
3 Electrical Parameters
� 24V/36V battery supply
� Rated operating current : 10mA
� Max operating current : 30mA
� Off leakage current < 1uA
� Buzzer tone > 55db ( 20cm )
� Output current to the controller : 50mA
� Operating temperature : -18~60℃
� Storage temperature : -30~70℃
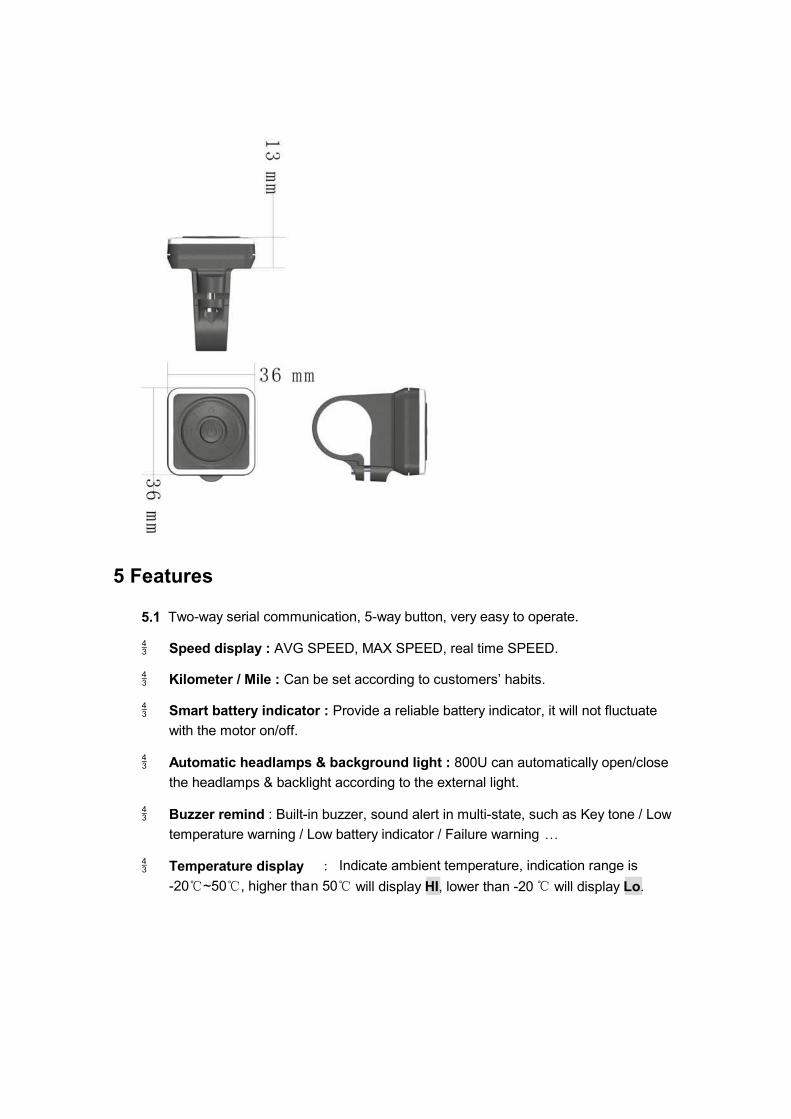
4 Dimensions & Material
4.1 Product shell is ABS, transparent window is made with high strength Acrylic, the
stiffness equals the tempered glass.
4.2 Dimensions : host/L90mm*W54mm*H13.3mm

5 Features
5.1 Two-way serial communication, 5-way button, very easy to operate.
� Speed display : AVG SPEED, MAX SPEED, real time SPEED.
� Kilometer / Mile : Can be set according to customers’ habits.
� Smart battery indicator : Provide a reliable battery indicator, it will not fluctuate
with the motor on/off.
� Automatic headlamps & background light : 800U can automatically open/close
the headlamps & backlight according to the external light.
� Buzzer remind : Built-in buzzer, sound alert in multi-state, such as Key tone / Low
temperature warning / Low battery indicator / Failure warning …
� Temperature display : Indicate ambient temperature, indication range is
-20℃~50℃, higher than 50℃ will display HI, lower than -20 ℃ will display Lo.

b.
a. >50℃ b. <-20℃
� Maintain remind : 800U can indicate the maintain information according to the
battery cycle times and the riding mileage(ODO). 800U can estimated the battery
cycle life .
� Low temperature warning : 800U can alarm the user by LCD&BUZZER when the
temperature is below freezing.
Low temperature warning
� The brightness of the backlight adjust able : 5-sections
� 9-level ASSIST : 3-ASSIST/5-ASSIST/6-ASSIST/9-ASSIST optional
� Power indicator : Real-time battery output power indication
� Mileage indicator : Odometer/Trip distance/ Riding time
� Error code indicator
� Parameter settings : Multiple parameter can be set through computer USB port,
including ASSIST level / Wheel diameter / Voltage / Speed limit / Magnetic steel /
Number of halls…
6 LCD instructions
The figure of LCD display see below:
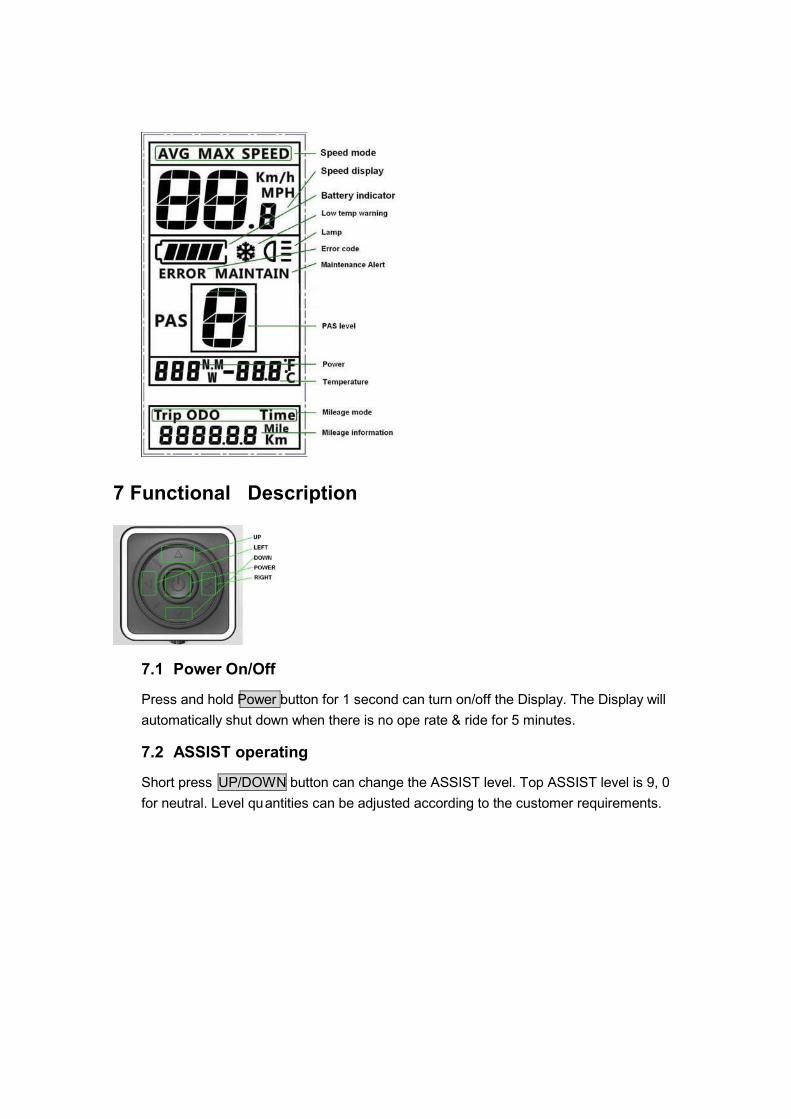
7 Functional Description
7.1 Power On/Off
Press and hold Power button for 1 second can turn on/off the Display. The Display will
automatically shut down when there is no ope rate & ride for 5 minutes.
7.2 ASSIST operating
Short press UP/DOWN button can change the ASSIST level. Top ASSIST level is 9, 0
for neutral. Level quantities can be adjusted according to the customer requirements.
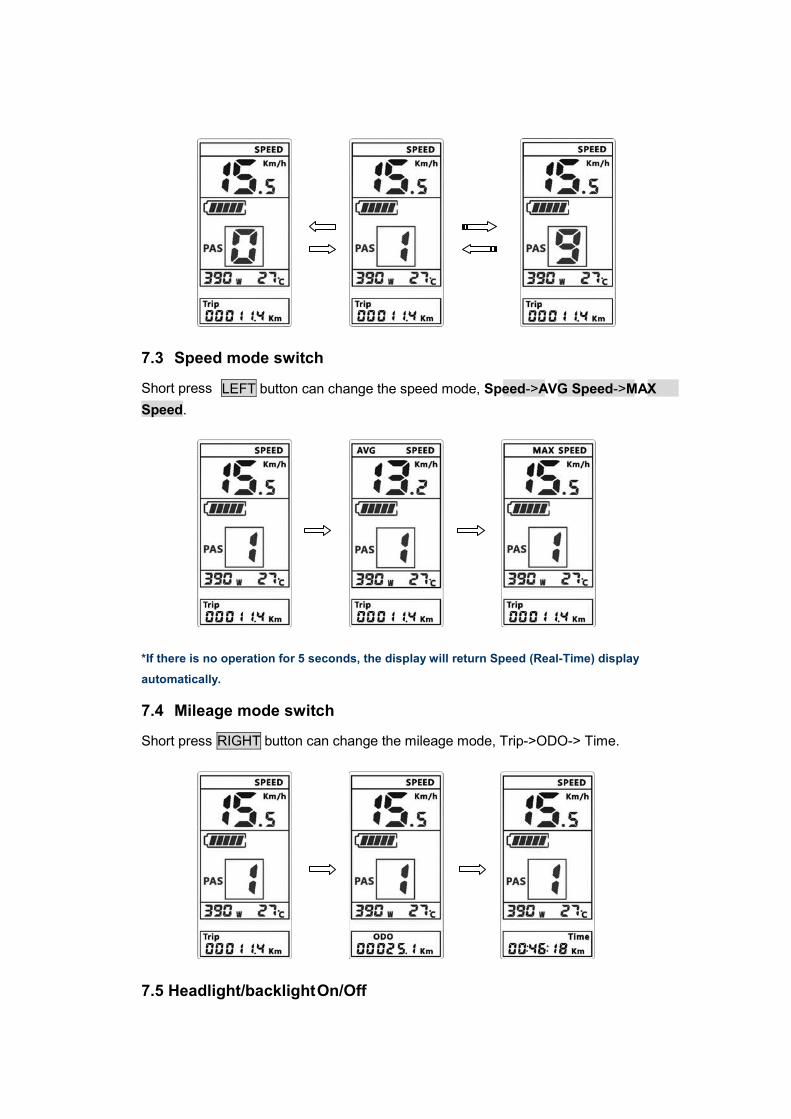
7.3 Speed mode switch
Short press LEFT button can change the speed mode, Speed->AVG Speed->MAX
Speed.
*If there is no operation for 5 seconds, the display will return Speed (Real-Time) display
automatically.
7.4 Mileage mode switch
Short press RIGHT button can change the mileage mode, Trip->ODO-> Time.
7.5 Headlight/backlight On/Off
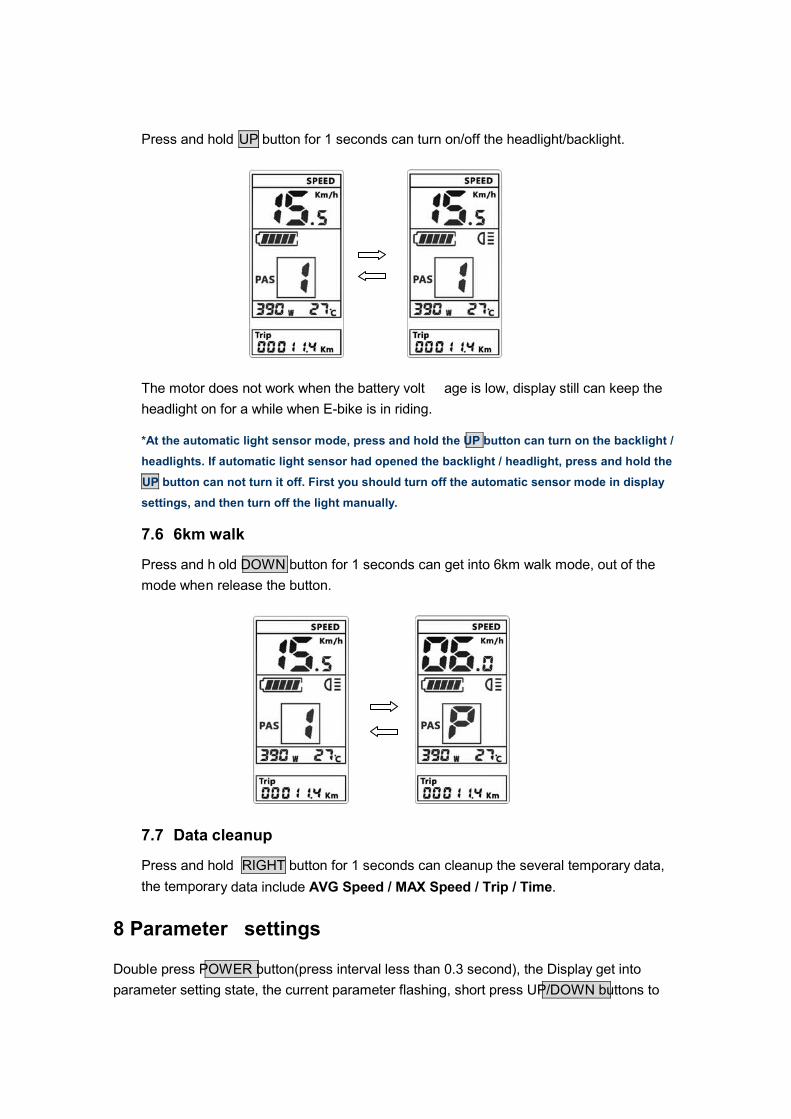
Press and hold UP button for 1 seconds can turn on/off the headlight/backlight.
The motor does not work when the battery volt age is low, display still can keep the
headlight on for a while when E-bike is in riding.
*At the automatic light sensor mode, press and hold the UP button can turn on the backlight /
headlights. If automatic light sensor had opened the backlight / headlight, press and hold the
UP button can not turn it off. First you should turn off the automatic sensor mode in display
settings, and then turn off the light manually.
7.6 6km walk
Press and h old DOWN button for 1 seconds can get into 6km walk mode, out of the
mode when release the button.
7.7 Data cleanup
Press and hold RIGHT button for 1 seconds can cleanup the several temporary data,
the temporary data include AVG Speed / MAX Speed / Trip / Time.
8 Parameter settings
Double press POWER button(press interval less than 0.3 second), the Display get into
parameter setting state, the current parameter flashing, short press UP/DOWN buttons to
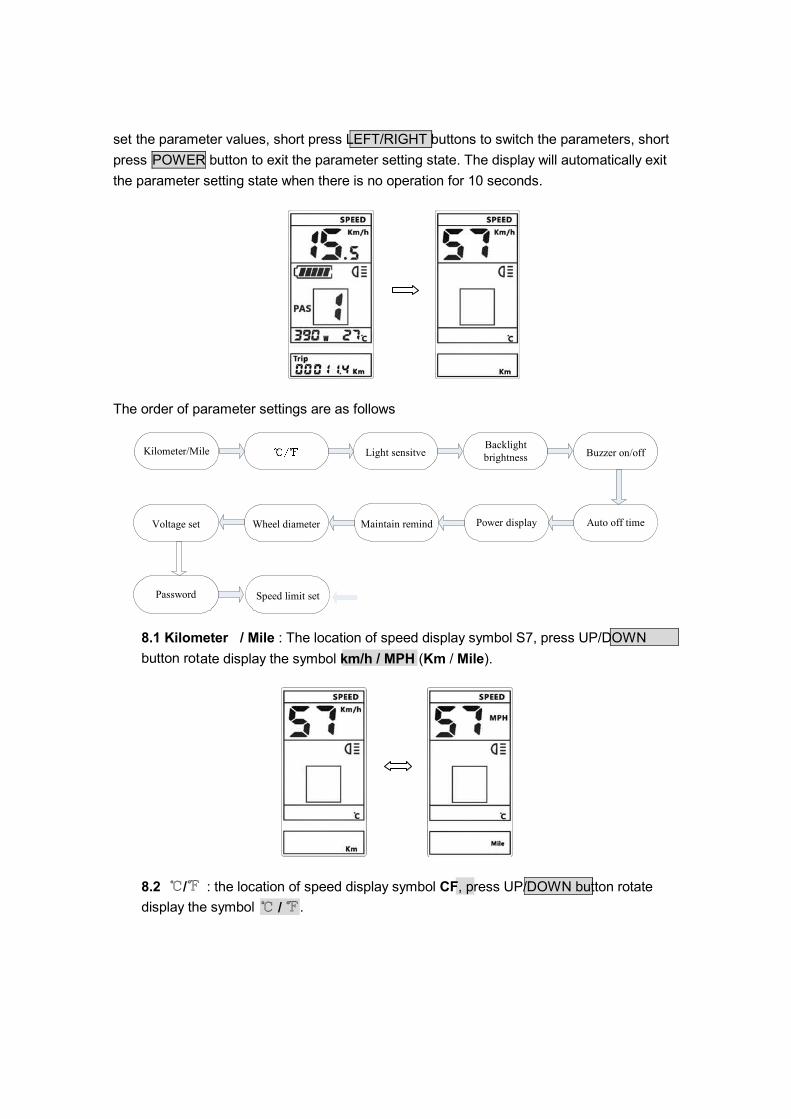
set the parameter values, short press LEFT/RIGHT buttons to switch the parameters, short
press POWER button to exit the parameter setting state. The display will automatically exit
the parameter setting state when there is no operation for 10 seconds.
The order of parameter settings are as follows
Kilometer/Mile Light sensitveBacklight brightness Buzzer on/off
Auto off timeMaintain remindWheel diameterVoltage set
Speed limit set
Power display
Password
8.1 Kilometer / Mile : The location of speed display symbol S7, press UP/DOWN
button rotate display the symbol km/h / MPH (Km / Mile).
8.2 ℃/℉ : the location of speed display symbol CF, press UP/DOWN button rotate
display the symbol ℃ / ℉.
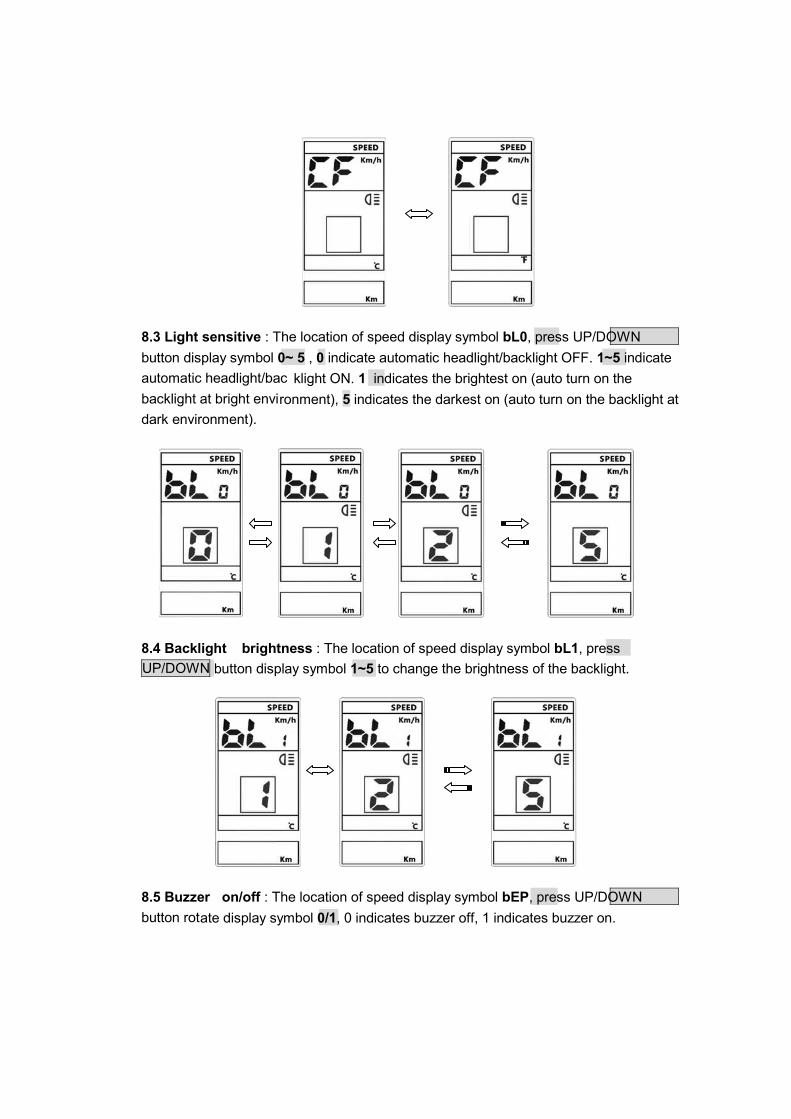
8.3 Light sensitive : The location of speed display symbol bL0, press UP/DOWN
button display symbol 0~ 5 , 0 indicate automatic headlight/backlight OFF. 1~5 indicate
automatic headlight/bac klight ON. 1 indicates the brightest on (auto turn on the
backlight at bright environment), 5 indicates the darkest on (auto turn on the backlight at
dark environment).
8.4 Backlight brightness : The location of speed display symbol bL1, press
UP/DOWN button display symbol 1~5 to change the brightness of the backlight.
8.5 Buzzer on/off : The location of speed display symbol bEP, press UP/DOWN
button rotate display symbol 0/1, 0 indicates buzzer off, 1 indicates buzzer on.
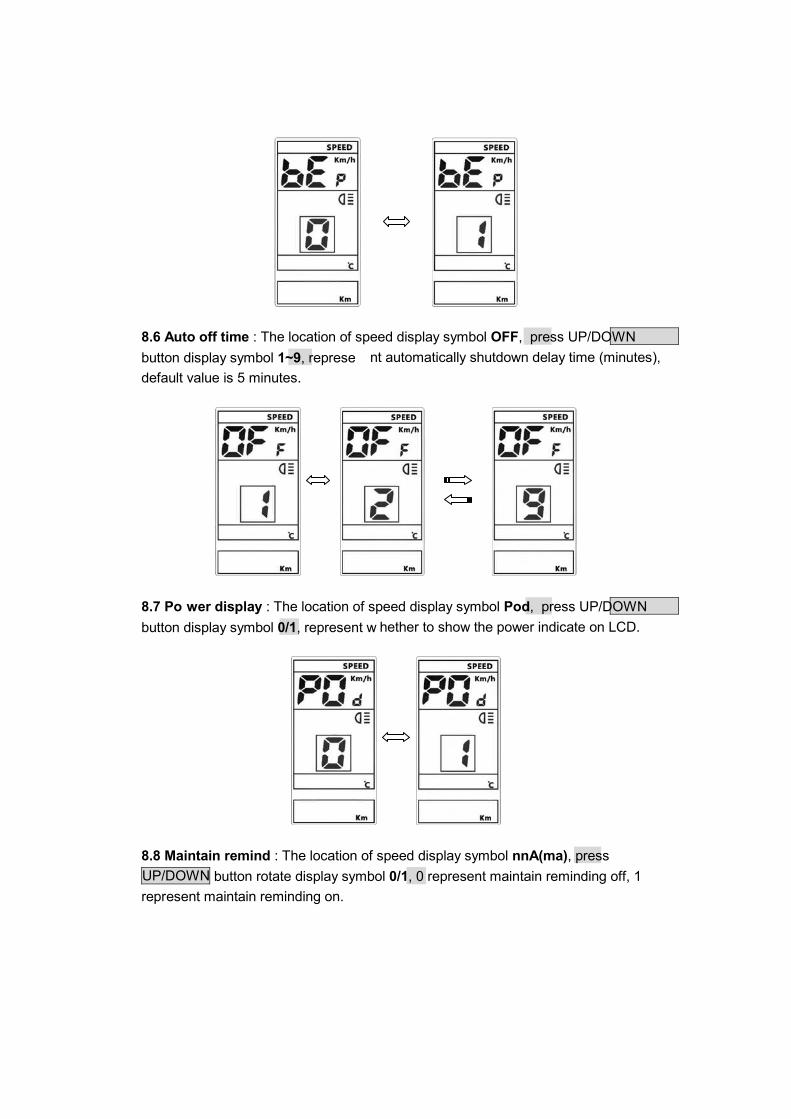
8.6 Auto off time : The location of speed display symbol OFF, press UP/DOWN
button display symbol 1~9, represe nt automatically shutdown delay time (minutes),
default value is 5 minutes.
8.7 Po wer display : The location of speed display symbol Pod, press UP/DOWN
button display symbol 0/1, represent w hether to show the power indicate on LCD.
8.8 Maintain remind : The location of speed display symbol nnA(ma), press
UP/DOWN button rotate display symbol 0/1, 0 represent maintain reminding off, 1
represent maintain reminding on.
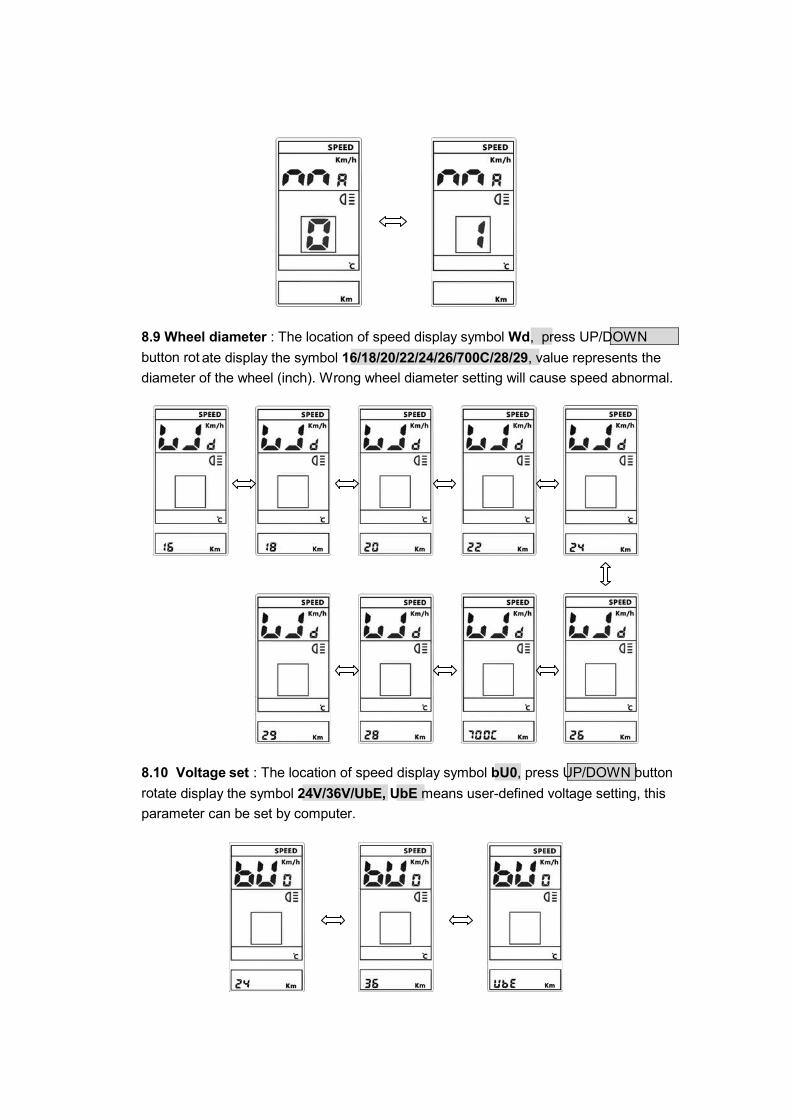
8.9 Wheel diameter : The location of speed display symbol Wd, press UP/DOWN
button rot ate display the symbol 16/18/20/22/24/26/700C/28/29, value represents the
diameter of the wheel (inch). Wrong wheel diameter setting will cause speed abnormal.
8.10 Voltage set : The location of speed display symbol bU0, press UP/DOWN button
rotate display the symbol 24V/36V/UbE, UbE means user-defined voltage setting, this
parameter can be set by computer.
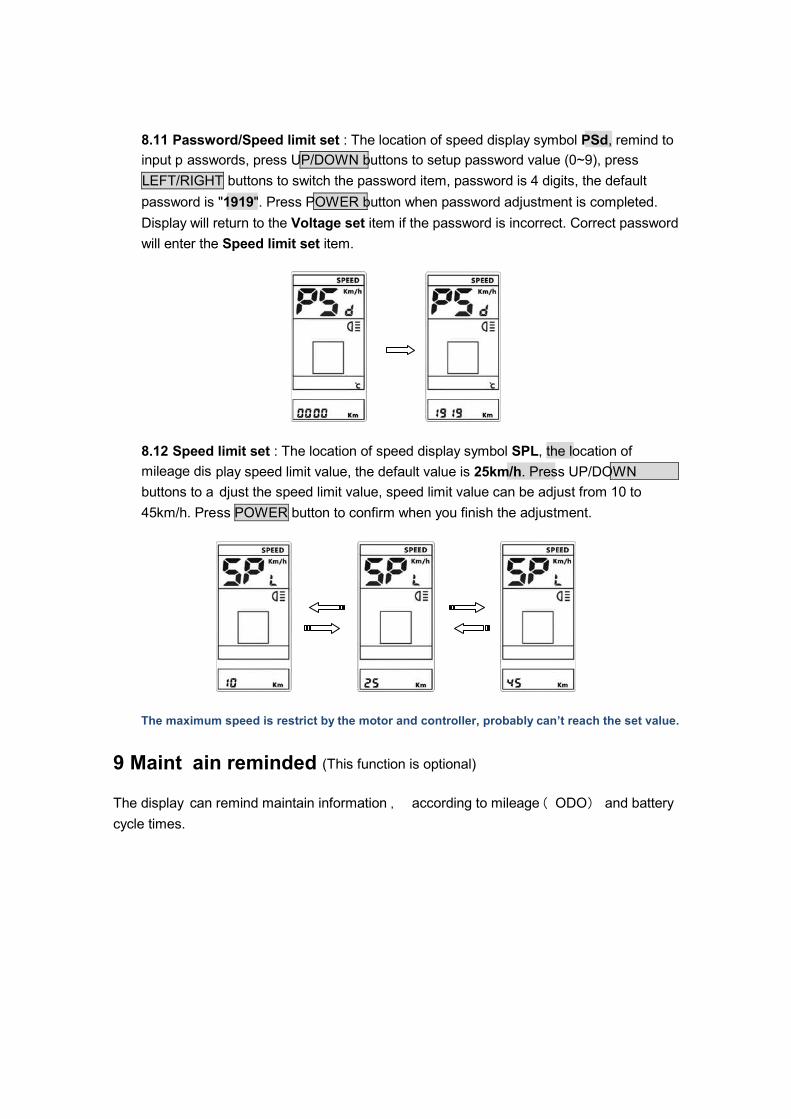
8.11 Password/Speed limit set : The location of speed display symbol PSd, remind to
input p asswords, press UP/DOWN buttons to setup password value (0~9), press
LEFT/RIGHT buttons to switch the password item, password is 4 digits, the default
password is "1919". Press POWER button when password adjustment is completed.
Display will return to the Voltage set item if the password is incorrect. Correct password
will enter the Speed limit set item.
8.12 Speed limit set : The location of speed display symbol SPL, the location of
mileage dis play speed limit value, the default value is 25km/h. Press UP/DOWN
buttons to a djust the speed limit value, speed limit value can be adjust from 10 to
45km/h. Press POWER button to confirm when you finish the adjustment.
The maximum speed is restrict by the motor and controller, probably can’t reach the set value.
9 Maint ain reminded (This function is optional)
The display can remind maintain information , according to mileage( ODO) and battery
cycle times.
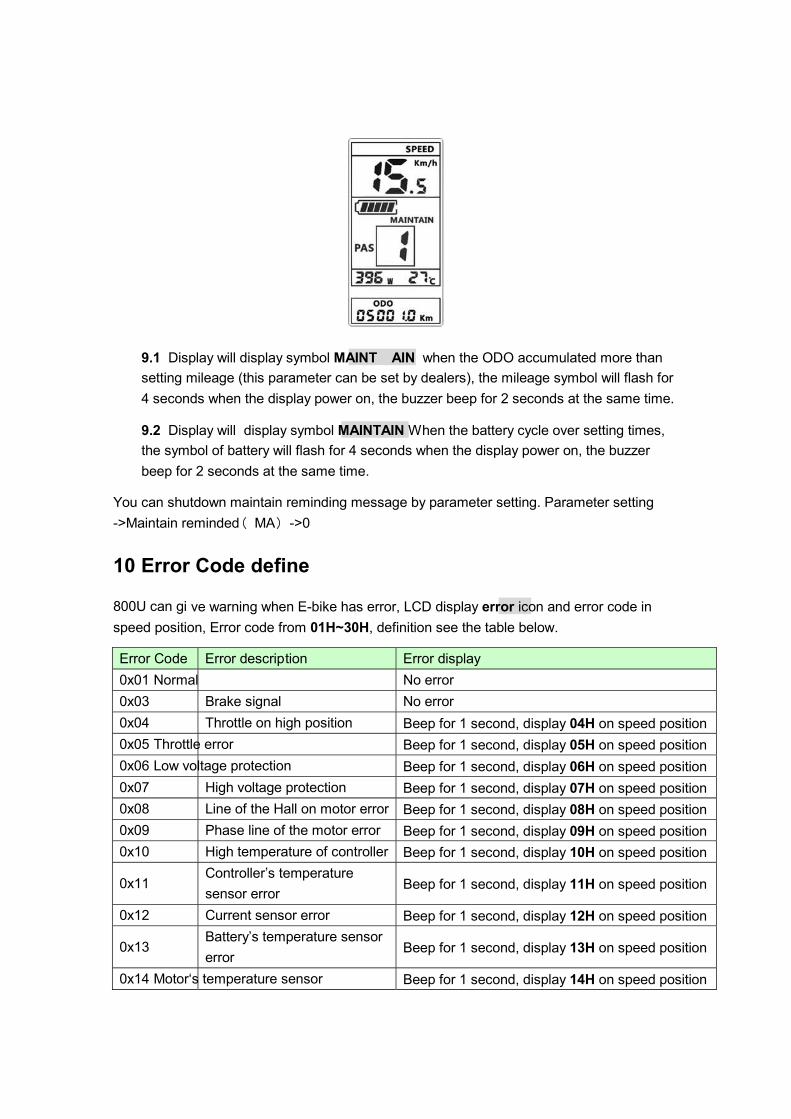
9.1 Display will display symbol MAINT AIN when the ODO accumulated more than
setting mileage (this parameter can be set by dealers), the mileage symbol will flash for
4 seconds when the display power on, the buzzer beep for 2 seconds at the same time.
9.2 Display will display symbol MAINTAIN When the battery cycle over setting times,
the symbol of battery will flash for 4 seconds when the display power on, the buzzer
beep for 2 seconds at the same time.
You can shutdown maintain reminding message by parameter setting. Parameter setting
->Maintain reminded( MA) ->0
10 Error Code define
800U can gi ve warning when E-bike has error, LCD display error icon and error code in
speed position, Error code from 01H~30H, definition see the table below.
Error Code Error description Error display
0x01 Normal No error
0x03 Brake signal No error
0x04 Throttle on high position Beep for 1 second, display 04H on speed position
0x05 Throttle error Beep for 1 second, display 05H on speed position
0x06 Low voltage protection Beep for 1 second, display 06H on speed position
0x07 High voltage protection Beep for 1 second, display 07H on speed position
0x08 Line of the Hall on motor error Beep for 1 second, display 08H on speed position
0x09 Phase line of the motor error Beep for 1 second, display 09H on speed position
0x10 High temperature of controller Beep for 1 second, display 10H on speed position
0x11 Controller’s temperature
sensor error Beep for 1 second, display 11H on speed position
0x12 Current sensor error Beep for 1 second, display 12H on speed position
0x13 Battery’s temperature sensor
error Beep for 1 second, display 13H on speed position
0x14 Motor‘s temperature sensor Beep for 1 second, display 14H on speed position
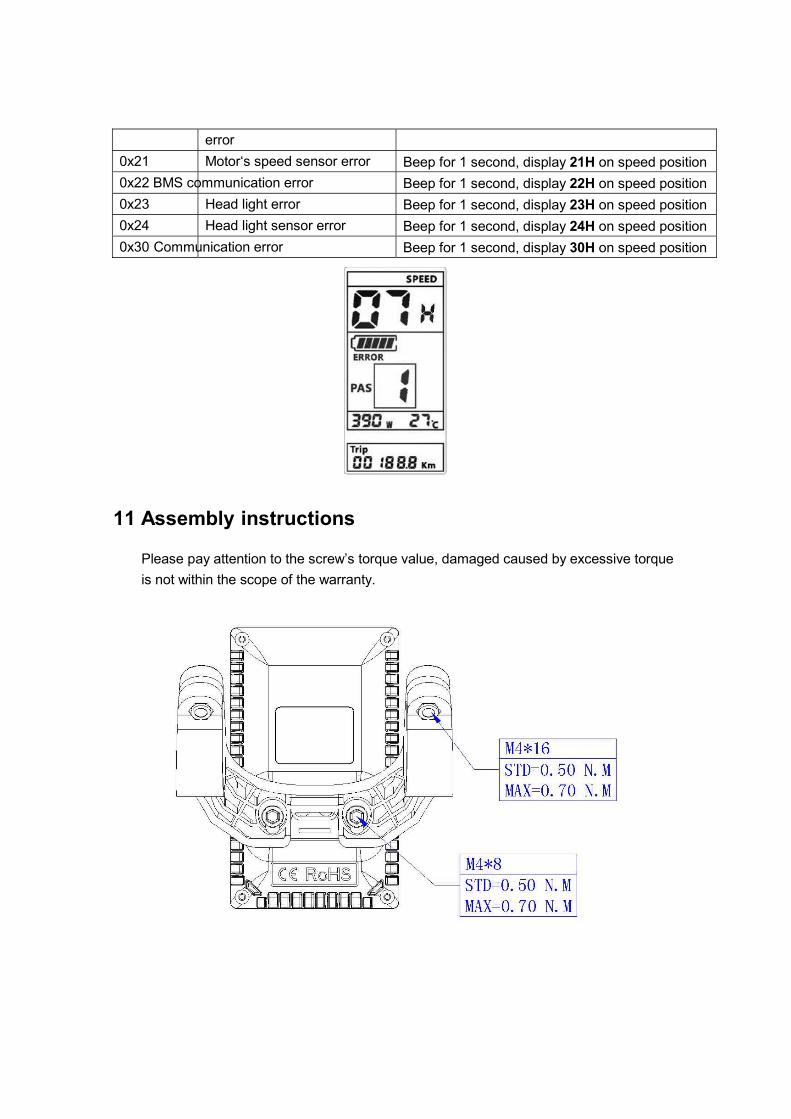
error
0x21 Motor‘s speed sensor error Beep for 1 second, display 21H on speed position
0x22 BMS communication error Beep for 1 second, display 22H on speed position
0x23 Head light error Beep for 1 second, display 23H on speed position
0x24 Head light sensor error Beep for 1 second, display 24H on speed position
0x30 Communication error Beep for 1 second, display 30H on speed position
11 Assembly instructions
Please pay attention to the screw’s torque value, damaged caused by excessive torque
is not within the scope of the warranty.
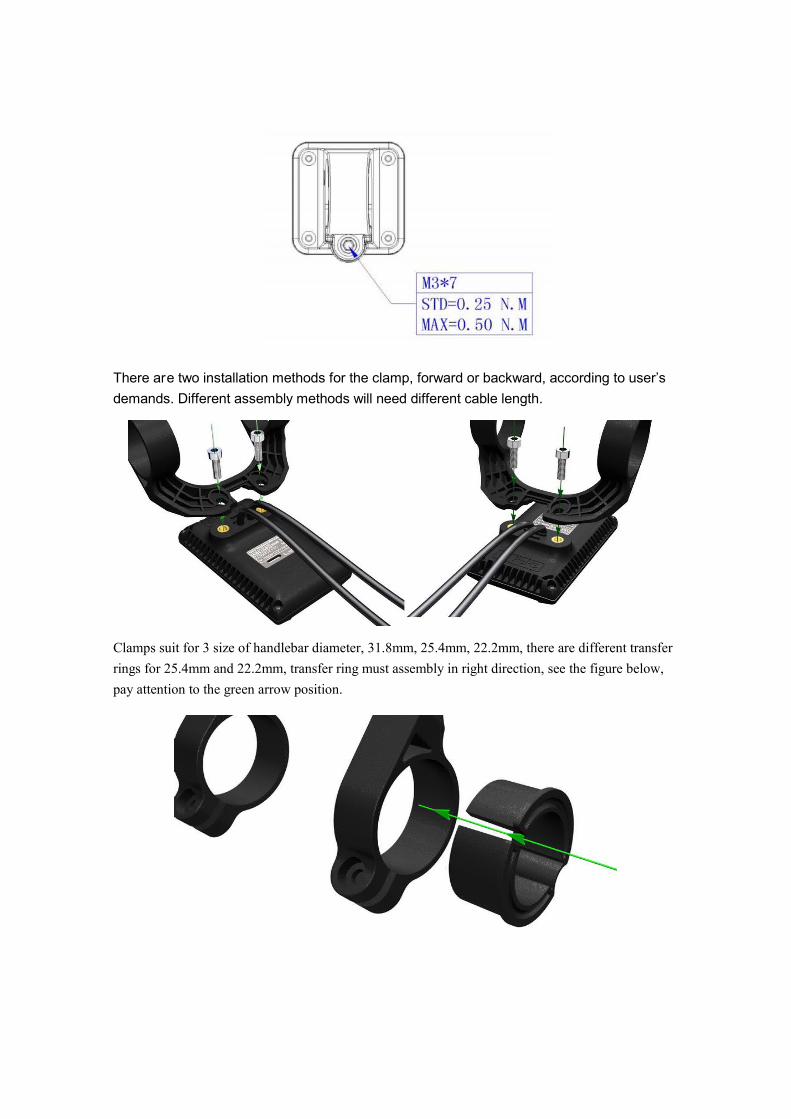
There are two installation methods for the clamp, forward or backward, according to user’s
demands. Different assembly methods will need different cable length.
Clamps suit for 3 size of handlebar diameter, 31.8mm, 25.4mm, 22.2mm, there are different transfer
rings for 25.4mm and 22.2mm, transfer ring must assembly in right direction, see the figure below,
pay attention to the green arrow position.
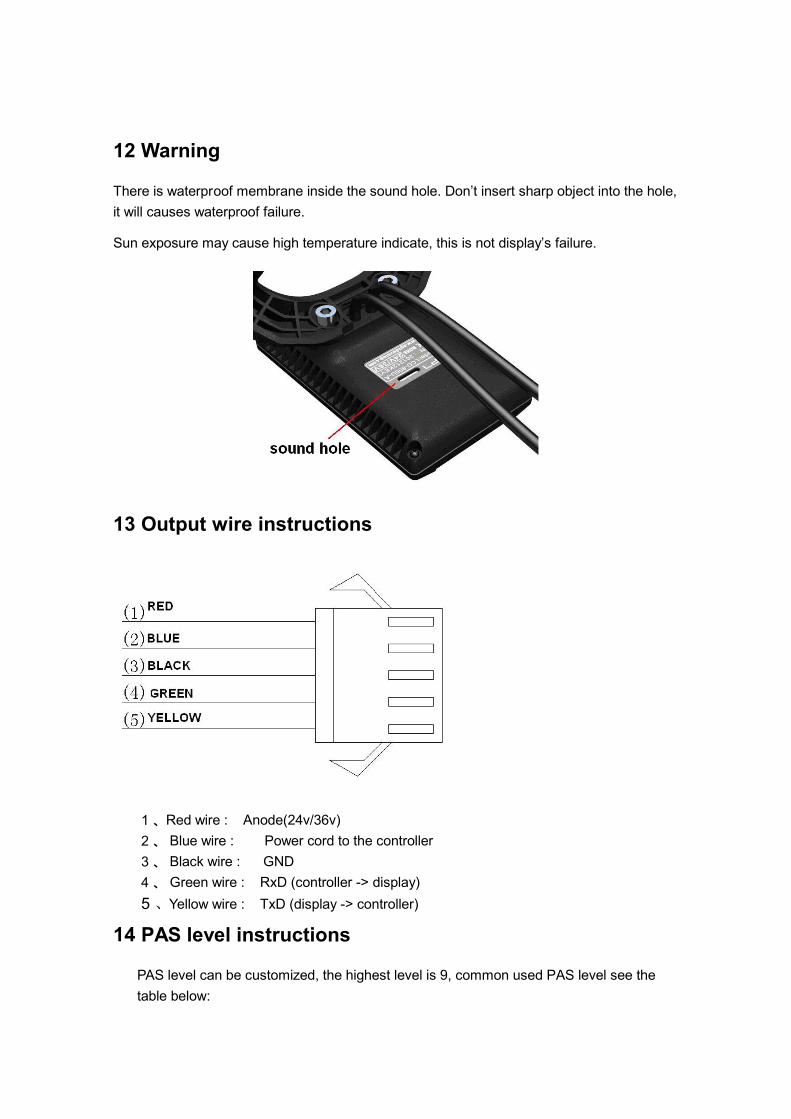
12 Warning
There is waterproof membrane inside the sound hole. Don’t insert sharp object into the hole,
it will causes waterproof failure.
Sun exposure may cause high temperature indicate, this is not display’s failure.
13 Output wire instructions
1 、 Red wire : Anode(24v/36v)
2 、 Blue wire : Power cord to the controller
3 、 Black wire : GND
4 、 Green wire : RxD (controller -> display)
5、 Yellow wire : TxD (display -> controller)
14 PAS level instructions
PAS level can be customized, the highest level is 9, common used PAS level see the
table below:
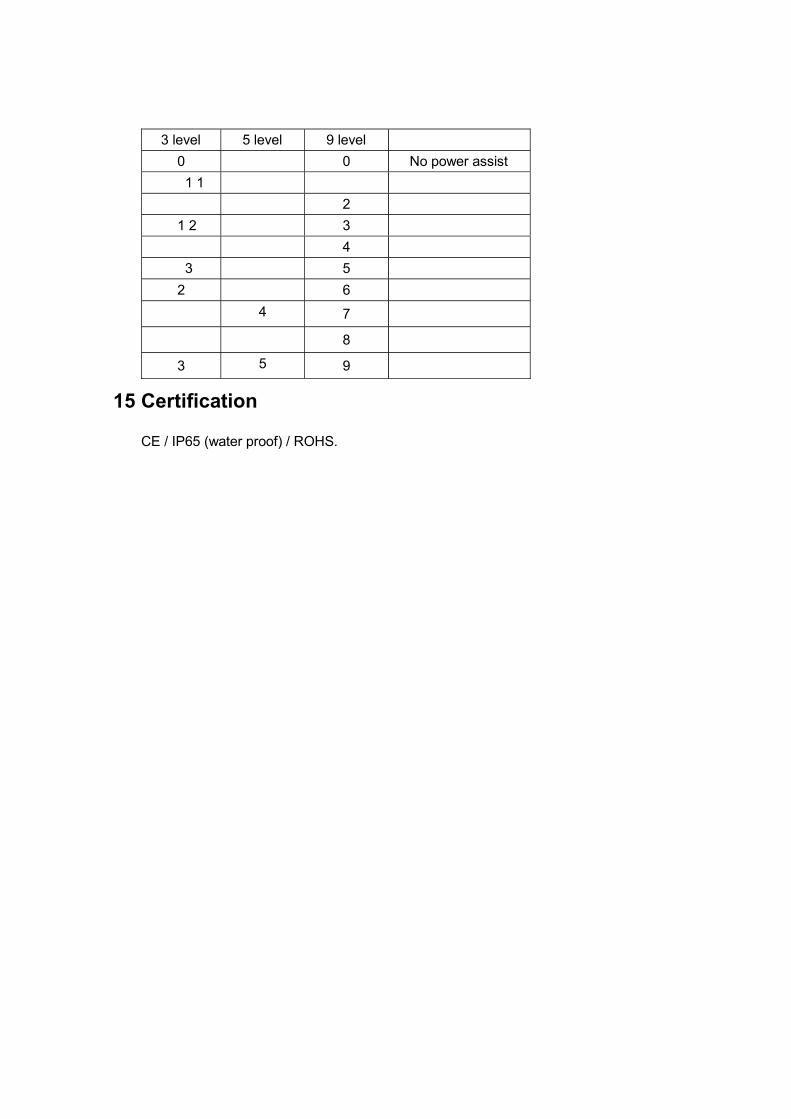
3 level 5 level 9 level
0 0 No power assist
1 1
2
1 2 3
4
3 5
2 6
4 7
8
3 5 9
15 Certification
CE / IP65 (water proof) / ROHS.


![Power Point 2016を起動する(開く)方法 vol.6 · PPT7 Power . Power Point 2016Ëi?YJÿZ (H < ) p16 r Power PointJ PPT7 Power rPower Point, r Power Point] Power Point 2016Ëi?YJÿZ](https://img.pdfslide.org/doc/110x75/5f63e2e263096f53954b2791/power-point-2016eiei-vol6-ppt7-power-power-point.jpg)