Embed Size (px)
Citation preview
Member of JOST-World
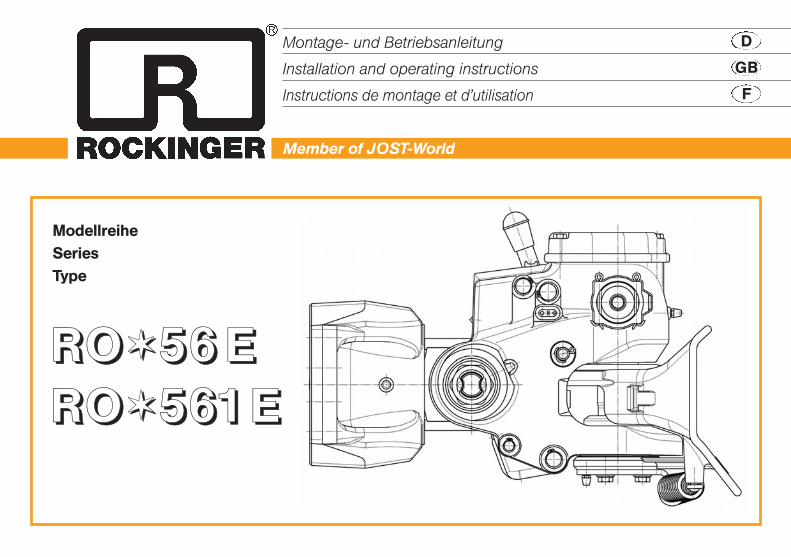
ModellreiheSeriesType
Montage- und Betriebsanleitung
Installation and operating instructions
Instructions de montage et d’utilisation
D
GB
F
RRRROOOO iiii 55556666 EEEERRRROOOO iiii 555566661111 EEEE
ROCKINGERMember of JOST-World 13
CCoonntteennttss RROOii5566EE // RROOii556611EE
Note:When fitting the towing hitch, the EC directive 94/20, in particularannex VII, as well as the relevant national regulations must beobserved. The installation and operation instructions must be kept in the vehicle.
Subject to technical changes without prior notice.
Series ROi56 E / ROi561EFully automatic tow hitche1i94/20i1630-00 / e1i94/20i1631-00
Only in conjunction with:
– 50 mm ROCKINGER towing eye ROi57005 Class D (EC)
– or in values and dimension of equivalent towing eyes
1. Installation 14 – 15
1.1 Before installation 14
1.2 Installation of the hitch 15
2. Operation 16 – 17
2.1 Tow hitch 16
2.1.1 Hitching 16
2.1.2 Unhitching 17
3. Maintenance 18
3.1 Care 18
3.2 Inspection 18
Technical data 19 – 21
Retrofit kit 21
Inspection 22
! The hitch must be fitted by qualified personnel.
Read these instructions carefully before fitting.
GB
ROCKINGERMember of JOST-World14 ROCKINGERMember of JOST-World14 ROCKINGERMember of JOST-World14
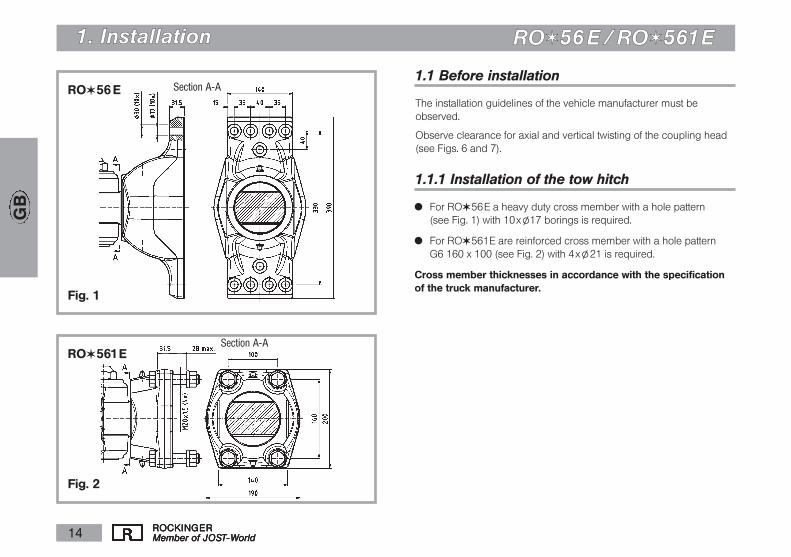
11.. IInnssttaallllaattiioonn RROOii5566EE // RROOii556611EE
1.1 Before installation
The installation guidelines of the vehicle manufacturer must beobserved.
Observe clearance for axial and vertical twisting of the coupling head(see Figs. 6 and 7).
1.1.1 Installation of the tow hitch
x For ROi56E a heavy duty cross member with a hole pattern (see Fig. 1) with 10xl17 borings is required.
x For ROi561E are reinforced cross member with a hole pattern G6 160 x 100 (see Fig. 2) with 4xl21 is required.
Cross member thicknesses in accordance with the specificationof the truck manufacturer.
Fig. 1
ROi56 E
ROi561E
Fig. 2
Section A-A
Section A-A
GB

ROCKINGERMember of JOST-World 15
11.. IInnssttaallllaattiioonn RROOii5566EE // RROOii556611EE
1.2 Installation of the hitch ROi56 E
x Put the fully preassembled tow hitch in place with the rear side ofthe fastening bracket on the cross member and bolt it tight to thecross member with the fastening bolts.
ROi56 E (Fig. 3)
x Use 10 x shaft screws G = M 16x1.5 – L -10.9 with flange locking nuts M 16x1.5-10.Tightening torque 300+30 NmThe installation on the vehicle must be documented (see section: Inspection).
ROi561E (Fig. 3)
x Use 4 x shaft screws G = M 20x1.5 – L -10.9 with flange locking nuts M 20x1.5-10.Tightening torque 570+20 NmThe installation on the vehicle must be documented (see section Inspection).
Attention: The shaft section of the fastening bolt must project at least 6 mm into the cross bar.
Fig. 3
GBM1
M1
Screw length
ROCKINGERMember of JOST-World16
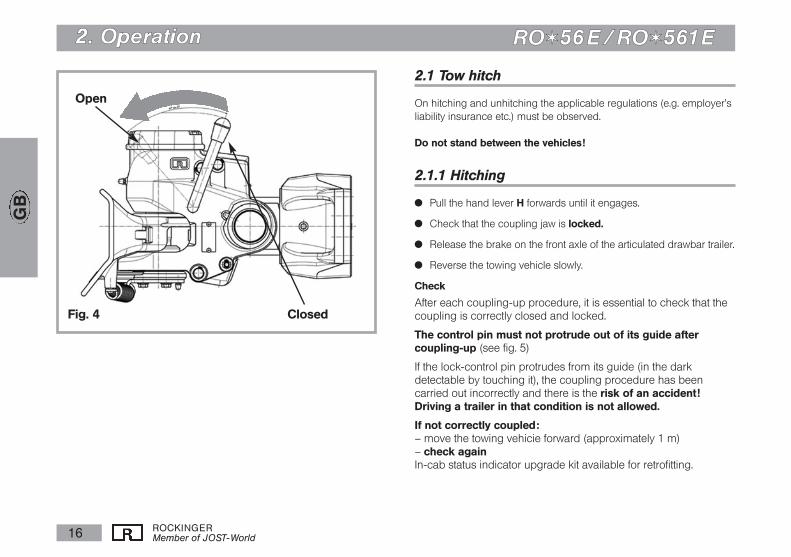
22.. OOppeerraattiioonn RROOii5566EE // RROOii556611EE
2.1 Tow hitch
On hitching and unhitching the applicable regulations (e.g. employer’s liability insurance etc.) must be observed.
Do not stand between the vehicles!
2.1.1 Hitching
x Pull the hand lever H forwards until it engages.
x Check that the coupling jaw is locked.
x Release the brake on the front axle of the articulated drawbar trailer.
x Reverse the towing vehicle slowly.
Check
After each coupling-up procedure, it is essential to check that the coupling is correctly closed and locked.
The control pin must not protrude out of its guide after coupling-up (see fig. 5)
If the lock-control pin protrudes from its guide (in the dark detectable by touching it), the coupling procedure has been carried out incorrectly and there is the risk of an accident!Driving a trailer in that condition is not allowed.
If not correctly coupled: – move the towing vehicie forward (approximately 1 m) – check againIn-cab status indicator upgrade kit available for retrofitting.
Fig. 4
Open
Closed
GB

ROCKINGERMember of JOST-World 17
22.. OOppeerraattiioonn RROOii5566EE // RROOii556611EE
‘
Closing hitch mannually
x Swing the hand lever H back (in the direction of the cross member)
2.1.2 Unhitching
x Secure the trailer against rolling away!
x Disconnect the supply lines to the trailer
x Pull the hand lever H forwards until it engages.
If there is tension between the tractor vehicle and the trailer, remedy this by jerking or with the aid of the pneumatic suspension.
x Separate the tractor vehicle
When the towing eye leaves the coupling, the coupling closes automatically
O.K.
Coupling open!
Fig. 5
GB
ROCKINGERMember of JOST-World18
33.. MMaaiinntteennaannccee RROOii5566EE // RROOii556611EE
3.1 Care
x Before cleaning with a high-pressure washer, close the coupling
x Before initial operation and after prolonged usage or cleaning witha high-pressure washer, lubricate the coupling pin, the bearingsurface for the lower bush and the towing eye with viscous, water-resistant grease (EP 3).
x Apply grease to the automatic system when changing the couplingpin.
x When changing the coupling pin remove all of the old grease and replace with multi-purpose grease (Lithium-based NLGI-2,temperature range –40 to +120 degrees).
3.2 Inspection
x After initial installation of the tow hitch, the fastening bolts must bechecked and tightened as necessary. This must be documented.
For inspection intervals and documentation see Page 22.
x The coupling pin diameter may not be less than l 46.5 mm section. Otherwise the coupling pin must be replaced.
x Coupling pin height clearance max. 3 mm
x The internal diameter of the lower bush may not be less than l 47.1 mm
x The downwards opening must be free.
GB

ROCKINGERMember of JOST-World 19
TTeecchhnniiccaall ddaattaa RROOii5566EE // RROOii556611EE
ROi56 E
Fig. 6
Section A-A
GB

ROCKINGERMember of JOST-World20
TTeecchhnniiccaall ddaattaa RROOii5566EE // RROOii556611EE
ROi561E
Fig. 7
GB
Section A-A
ROCKINGERMember of JOST-World 21
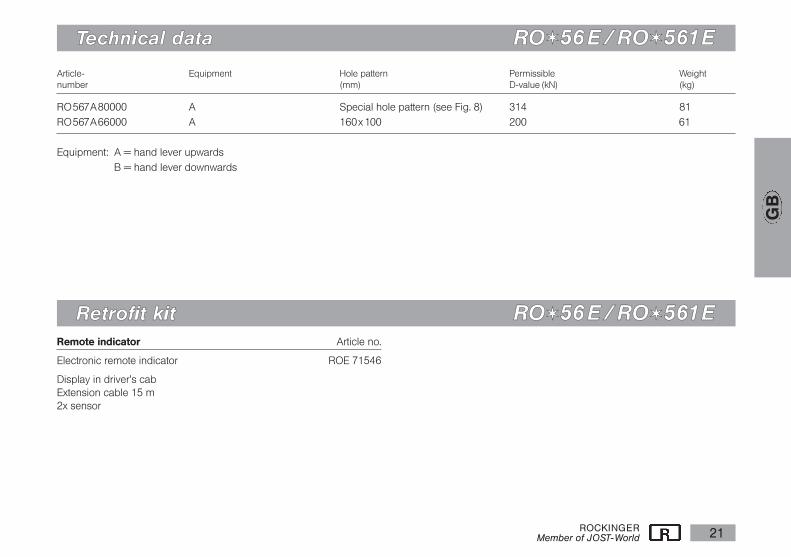
TTeecchhnniiccaall ddaattaa RROOii5566EE // RROOii556611EE
Article- Equipment Hole pattern Permissible Weightnumber (mm) D-value (kN) (kg)
RO567A80000 A Special hole pattern (see Fig. 8) 314 81RO567A66000 A 160x 100 200 61
Equipment: A = hand lever upwardsB = hand lever downwards
Remote indicator Article no.
Electronic remote indicator ROE 71546
Display in driver’s cabExtension cable 15 m2x sensor
RReettrrooffiitt kkiitt RROOii5566EE // RROOii556611EE
GB

ROCKINGERMember of JOST-World22
IInnssppeeccttiioonn RROOii5566EE // RROOii556611EE
M1 tightening torque of the fastening bolts / nuts checked Truck kilometres Interval Date Fitter’s signature Workshop stamp
Initial installation
Installation km +1,000 km
Installation km +15,000 km
Installation km +60,000 km
Installation km +120,000 km
Installation km +180,000 km
Installation km +240,000 km
Installation km +300,000 km
Inspection of the fastening bolts
GB
JOST-Werke · Siemensstr. 2, D-63263 Neu-Isenburg · Telefon +49(0)61 02 2 95-0 · Fax +49(0)61 02 2 95-298 · www.jost-world.comZDE 199 88243-0-01 · 01/2007
8824
3-0-
020
D/G
B/F
/ K
EM
A 0
107