Embed Size (px)
Citation preview
myAVR myAVR myAVR myAVR
www.myAVR.de © Laser & Co. Solutions GmbH – 04/2010 www.myAVR.com
Anwendungsbeispiel / Application Note myAVR unter Linux myAVR with Linux
myAVR unter Linux
Inhalt Contents Einleitung .......................................................................3
Voraussetzungen........................................................3 Arbeit auf der Kommandozeile .......................................4
Assembler...................................................................4 C/C++ .........................................................................6 Brennen und Testen ...................................................7
Introduction ....................................................................3 Requirements .............................................................3
Working on the command line........................................4 Assembler...................................................................4 C/C++ .........................................................................6 Upload and test...........................................................7
2/7 myAVR unter Linux / myAVR with Linux
www.myAVR.de © Laser & Co. Solutions GmbH – 04/2010 www.myAVR.com
Die Informationen in diesem Produkt werden ohne Rücksicht auf einen eventuellen Patentschutz veröffentlicht. Warennamen werden ohne Gewährleistung der freien Verwendbarkeit benutzt. Bei der Zusammenstellung von Texten und Abbildungen wurde mit größter Sorgfalt vorgegangen. Trotzdem können Fehler nicht vollständig ausgeschlossen werden. Die Autoren können für fehlerhafte Angaben und deren Folgen weder eine juristische Verantwortung noch irgendeine Haftung übernehmen. Für Verbesserungsvorschläge und Hinweise auf Fehler sind die Autoren dankbar.
In spite of the great care taken while writing this document the author is not responsible for the topicality, correctness, completeness or quality of the information provided. Liability claims regarding damage caused by the use of any information provided, including any kind of information which is incomplete or incorrect, will therefore be rejected.
Alle Rechte vorbehalten, auch die der fotomechanischen Wiedergabe und der Speicherung in elektronischen Medien. Die gewerbliche Nutzung der in diesem Produkt gezeigten Modelle und Arbeiten ist nicht zulässig.
All rights reserved. Unless otherwise specified, no part of this publication may be reproduced or utilized in any form or by any means, electronic or mechanical, including photocopying and microfilm, without permission in writing from the publisher.
Fast alle Hardware- und Softwarebezeichnungen, die in diesem Dokument erwähnt werden, sind gleichzeitig auch eingetragene Warenzeichen und sollten als solche betrachtet werden.
All trademarks and registered trademarks appearing in this document are the property of their respective owners.
© Laser & Co. Solutions GmbH Promenadenring 8 02708 Löbau Deutschland www.myAVR.de
Tel: ++49 (0) 358 470 222 Fax: ++49 (0) 358 470 233
© Laser & Co. Solutions GmbH Promenadenring 8 02708 Löbau Germany www.myAVR.com
Tel: ++49 (0) 358 470 222 Fax: ++49 (0) 358 470 233
myAVR unter Linux / myAVR with Linux 3/7
www.myAVR.de © Laser & Co. Solutions GmbH – 04/2010 www.myAVR.com
Einleitung
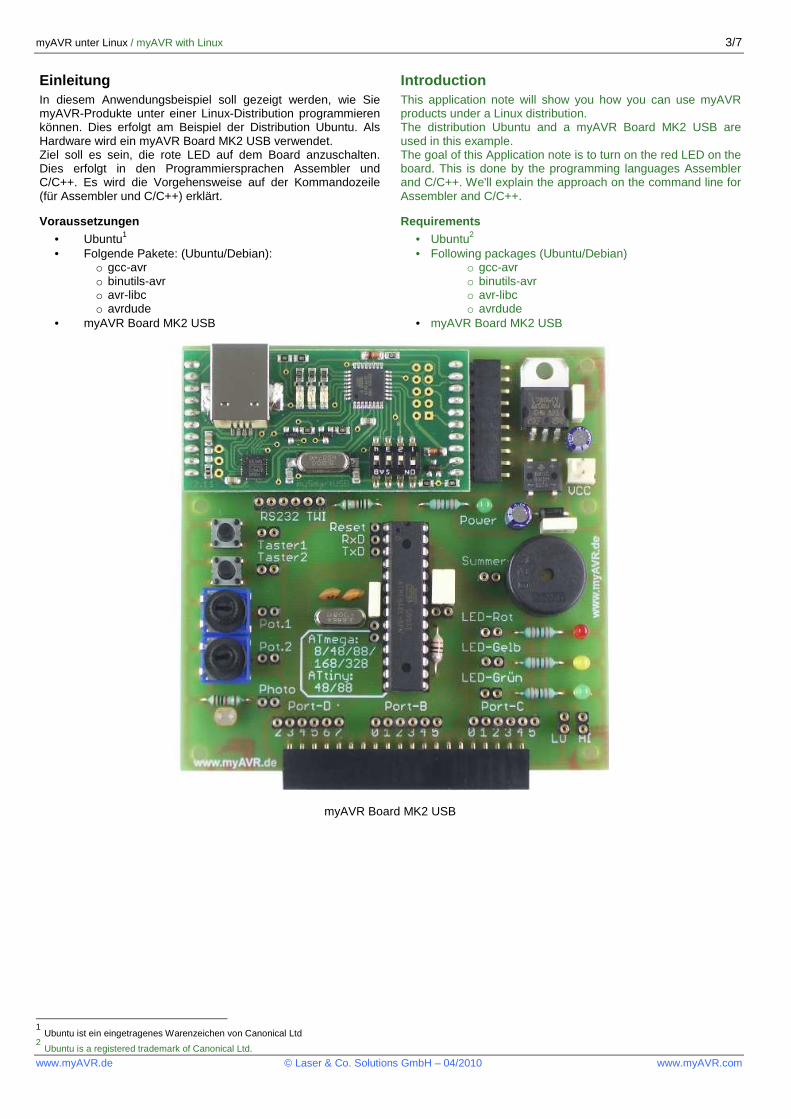
Introduction In diesem Anwendungsbeispiel soll gezeigt werden, wie Sie myAVR-Produkte unter einer Linux-Distribution programmieren können. Dies erfolgt am Beispiel der Distribution Ubuntu. Als Hardware wird ein myAVR Board MK2 USB verwendet. Ziel soll es sein, die rote LED auf dem Board anzuschalten. Dies erfolgt in den Programmiersprachen Assembler und C/C++. Es wird die Vorgehensweise auf der Kommandozeile (für Assembler und C/C++) erklärt.
This application note will show you how you can use myAVR products under a Linux distribution. The distribution Ubuntu and a myAVR Board MK2 USB are used in this example. The goal of this Application note is to turn on the red LED on the board. This is done by the programming languages Assembler and C/C++. We'll explain the approach on the command line for Assembler and C/C++.
Voraussetzungen • Ubuntu1 • Folgende Pakete: (Ubuntu/Debian):
o gcc-avr o binutils-avr o avr-libc o avrdude
• myAVR Board MK2 USB
Requirements
• Ubuntu2 • Following packages (Ubuntu/Debian)
o gcc-avr o binutils-avr o avr-libc o avrdude
• myAVR Board MK2 USB
myAVR Board MK2 USB
1 Ubuntu ist ein eingetragenes Warenzeichen von Canonical Ltd 2 Ubuntu is a registered trademark of Canonical Ltd.
4/7 myAVR unter Linux / myAVR with Linux
www.myAVR.de © Laser & Co. Solutions GmbH – 04/2010 www.myAVR.com
Arbeit auf der Kommandozeile
Working on the command line
Assembler
Assembler Erstellen Sie eine Datei mit dem Namen ledan.s und fügen Sie nachfolgenden Quelltext ein. In diesem Beispiel wird der GNU-Compiler verwendet, deshalb können auch Präprozessor-Befehle der Programmiersprache C genutzt werden.
Create a file called ledan.s and paste following code into it. Because we’ll use the GNU compiler in this example, you can also use the preprocessor commands of the programming language C.
Quelltext
Source code
;-------------------------------------------------- -------------------- ; Titel : Beispiel "LED an" fuer ATmega8 / example "LED on" for ATmega8 ;-------------------------------------------------- -------------------- ; Funktion / function : LED wird angeschalten / LED is turned on ; Schaltung / connection : PORTB.0=LED1 ;-------------------------------------------------- -------------------- .equ F_CPU, 3686400 #define __SFR_OFFSET 0 #include <avr/io.h> ;-------------------------------------------------- -------------------- begin: rjmp main ; 1 POWER ON RESET reti ; 2 Int0-Interrupt reti ; 3 Int1-Interrupt reti ; 4 TC2 Compare Match reti ; 5 TC2 Overflow reti ; 6 TC1 Capture reti ; 7 TC1 Compare Match A reti ; 8 TC1 Compare Match B reti ; 9 TC1 Overflow reti ;10 TC0 Overflow reti ;11 SPI, STC Serial Transfer Complete reti ;12 UART Rx Complete reti ;13 UART Data Register Empty reti ;14 UART Tx Complete reti ;15 ADC Conversion Complete reti ;16 EEPROM Ready reti ;17 Analog Comperator reti ;18 TWI (I �C) Serial Interface reti ;19 Strore Program Memory Ready ;-------------------------------------------------- ---------------------- main: ldi r16,lo8(RAMEND) out SPL,r16 ldi r16,hi8(RAMEND) out SPH,r16 ;init Stack sbi DDRB,0 ;-------------------------------------------------- ---------------------- mainloop: wdr ldi r16,0b00000001 ;LED ON out PORTB,r16 rjmp mainloop ;-------------------------------------------------- ----------------------
myAVR unter Linux / myAVR with Linux 5/7
www.myAVR.de © Laser & Co. Solutions GmbH – 04/2010 www.myAVR.com
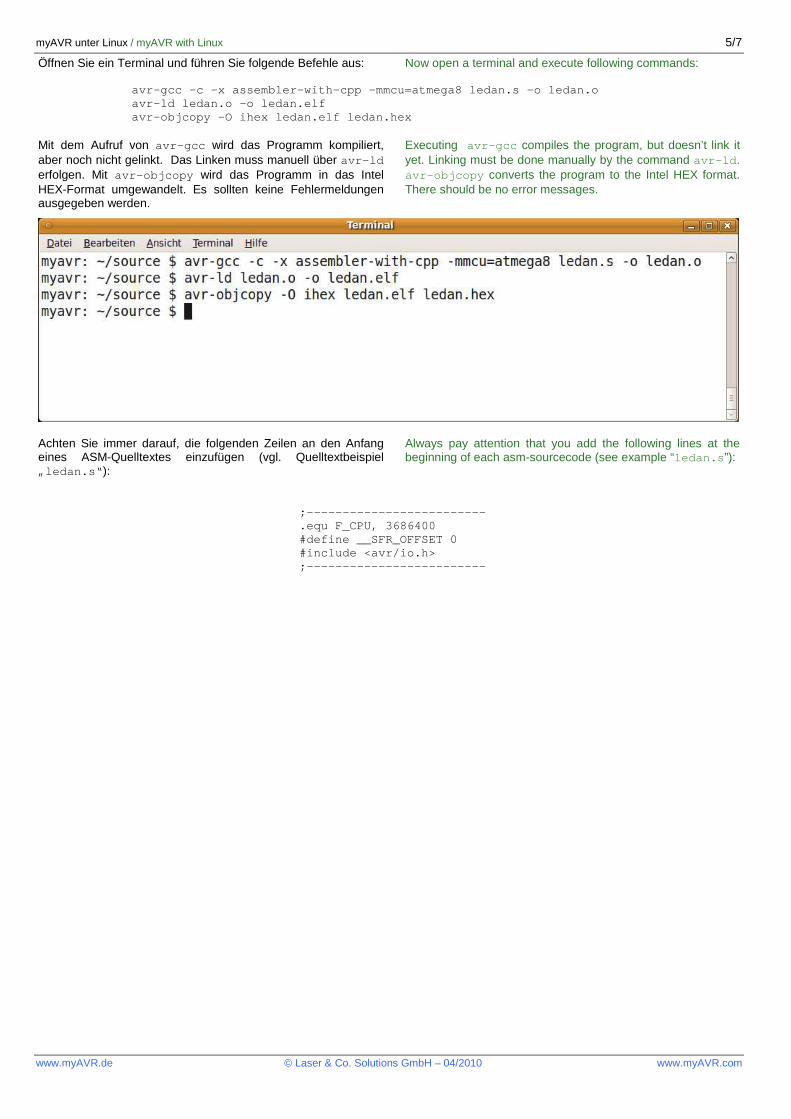
Öffnen Sie ein Terminal und führen Sie folgende Befehle aus: Now open a terminal and execute following commands:
avr-gcc -c -x assembler-with-cpp -mmcu=atmega8 leda n.s -o ledan.o avr-ld ledan.o -o ledan.elf avr-objcopy -O ihex ledan.elf ledan.hex
Mit dem Aufruf von avr-gcc wird das Programm kompiliert, aber noch nicht gelinkt. Das Linken muss manuell über avr-ld erfolgen. Mit avr-objcopy wird das Programm in das Intel HEX-Format umgewandelt. Es sollten keine Fehlermeldungen ausgegeben werden.
Executing avr-gcc compiles the program, but doesn’t link it yet. Linking must be done manually by the command avr-ld . avr-objcopy converts the program to the Intel HEX format. There should be no error messages.
Achten Sie immer darauf, die folgenden Zeilen an den Anfang eines ASM-Quelltextes einzufügen (vgl. Quelltextbeispiel „ledan.s“ ):
Always pay attention that you add the following lines at the beginning of each asm-sourcecode (see example “ledan.s ”):
;------------------------- .equ F_CPU, 3686400 #define __SFR_OFFSET 0 #include <avr/io.h> ;-------------------------
6/7 myAVR unter Linux / myAVR with Linux
www.myAVR.de © Laser & Co. Solutions GmbH – 04/2010 www.myAVR.com
C/C++
C/C++ Erstellen Sie eine Datei mit dem Namen ledan.cc und fügen Sie den folgenden Quelltext ein.
Create a file called ledan.cc and paste following code into it.
Quelltext
source code
//------------------------------------------------- --------------------- // Titel : myAVR Beispiel "LED an" fuer den AT mega8 / LED on for ATmega8 //------------------------------------------------- --------------------- // Funktion : LED wird angeschalten / LED is turned on // Schaltung : PortB.0=LED1 //------------------------------------------------- --------------------- #define F_CPU 3686400 // Taktfrequenz / Frequency #include <avr/io.h> //------------------------------------------------- --------------------- main () { DDRB=0x01; do { PORTB=0x01; } while (true); } //------------------------------------------------- ---------------------
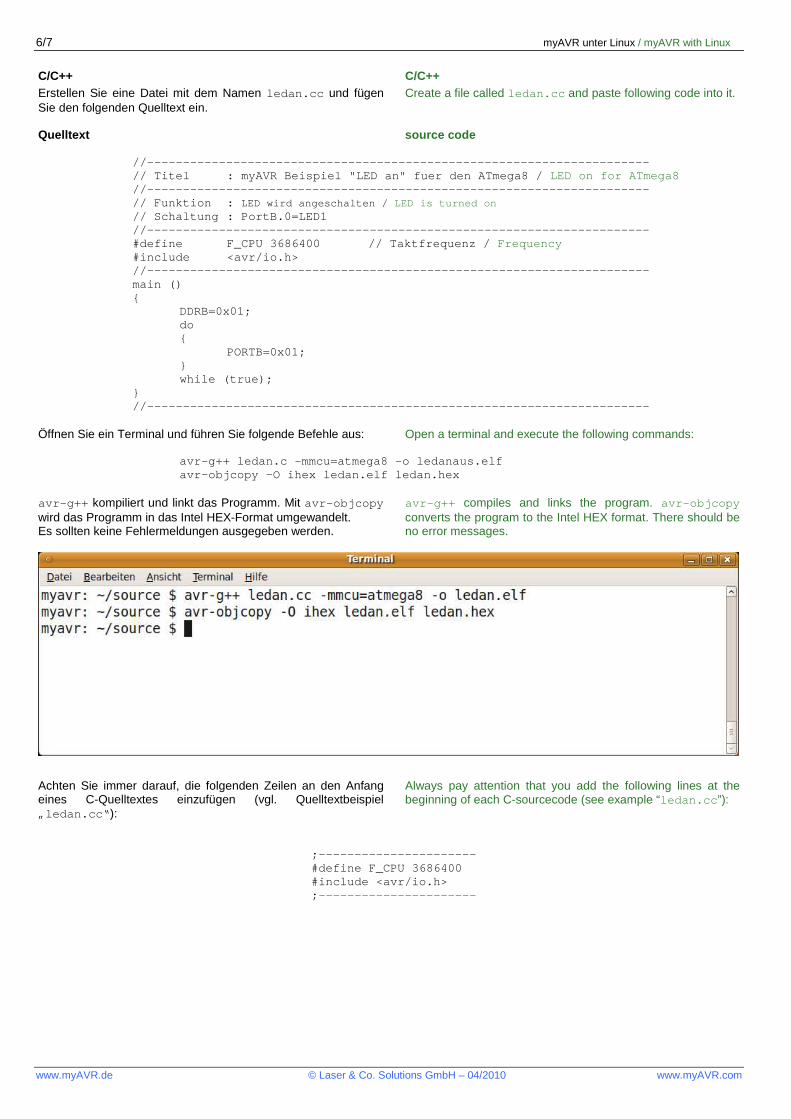
Öffnen Sie ein Terminal und führen Sie folgende Befehle aus:
Open a terminal and execute the following commands:
avr-g++ ledan.c -mmcu=atmega8 -o ledanaus.elf avr-objcopy -O ihex ledan.elf ledan.hex
avr-g++ kompiliert und linkt das Programm. Mit avr-objcopy wird das Programm in das Intel HEX-Format umgewandelt. Es sollten keine Fehlermeldungen ausgegeben werden.
avr-g++ compiles and links the program. avr-objcopy converts the program to the Intel HEX format. There should be no error messages.
Achten Sie immer darauf, die folgenden Zeilen an den Anfang eines C-Quelltextes einzufügen (vgl. Quelltextbeispiel „ledan.cc“ ):
Always pay attention that you add the following lines at the beginning of each C-sourcecode (see example “ledan.cc ”):
;---------------------- #define F_CPU 3686400 #include <avr/io.h> ;----------------------
myAVR unter Linux / myAVR with Linux 7/7
www.myAVR.de © Laser & Co. Solutions GmbH – 04/2010 www.myAVR.com
Brennen und Testen
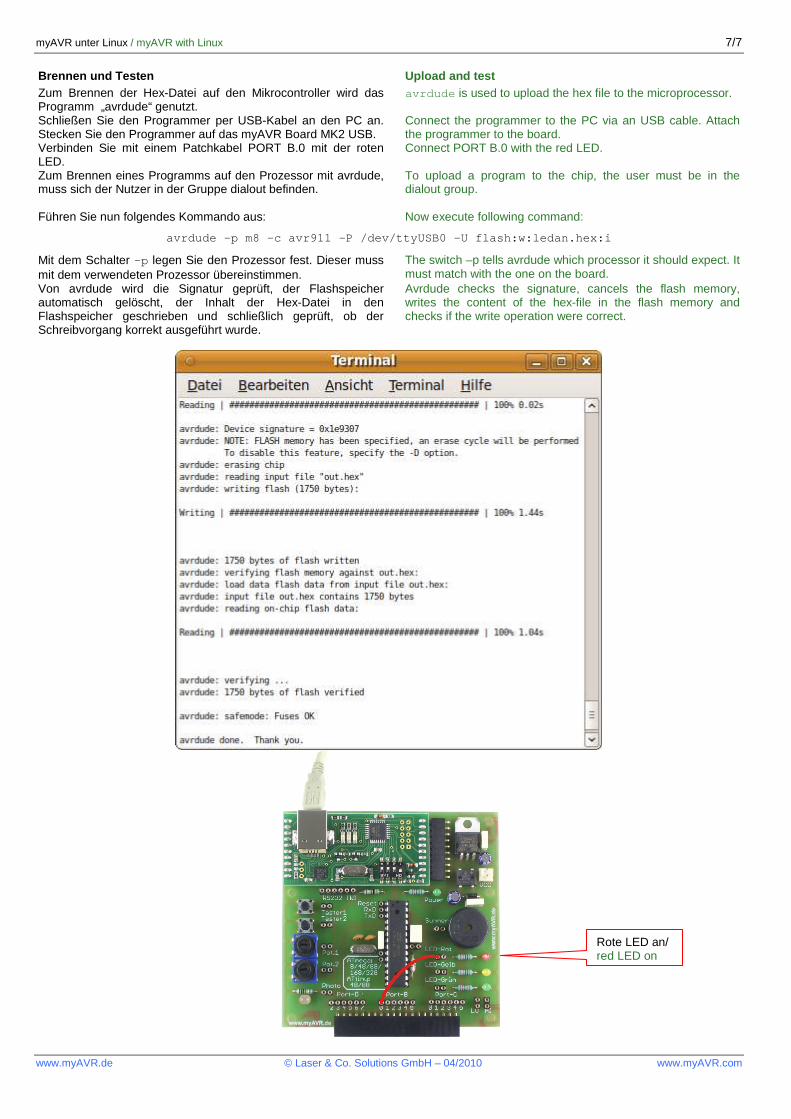
Upload and test Zum Brennen der Hex-Datei auf den Mikrocontroller wird das Programm „avrdude“ genutzt.
avrdude is used to upload the hex file to the microprocessor.
Schließen Sie den Programmer per USB-Kabel an den PC an. Stecken Sie den Programmer auf das myAVR Board MK2 USB. Verbinden Sie mit einem Patchkabel PORT B.0 mit der roten LED.
Connect the programmer to the PC via an USB cable. Attach the programmer to the board. Connect PORT B.0 with the red LED.
Zum Brennen eines Programms auf den Prozessor mit avrdude, muss sich der Nutzer in der Gruppe dialout befinden.
To upload a program to the chip, the user must be in the dialout group.
Führen Sie nun folgendes Kommando aus: Now execute following command:
avrdude -p m8 -c avr911 -P /dev/ttyUSB0 -U flash:w: ledan.hex:i
Mit dem Schalter -p legen Sie den Prozessor fest. Dieser muss mit dem verwendeten Prozessor übereinstimmen.
The switch –p tells avrdude which processor it should expect. It must match with the one on the board.
Von avrdude wird die Signatur geprüft, der Flashspeicher automatisch gelöscht, der Inhalt der Hex-Datei in den Flashspeicher geschrieben und schließlich geprüft, ob der Schreibvorgang korrekt ausgeführt wurde.
Avrdude checks the signature, cancels the flash memory, writes the content of the hex-file in the flash memory and checks if the write operation were correct.
Rote LED an/ red LED on


![Leistungsmessung im WLAN BachelorarbeitKali Debian GNU Linux-Distribution[7] ... 182. Leistungsmessung im WLAN Bachelorarbeit Angelique Vinkestijn& Fabian Beck HSR Hochschule für](https://img.pdfslide.org/doc/110x75/6092c73437effa396d679b64/leistungsmessung-im-wlan-bachelorarbeit-kali-debian-gnu-linux-distribution7-.jpg)


![Index [] · Mint 139 Modell-Übersicht 209 Modem fremdes 41 MyFRITZ! 76, 206 MyFRITZ!App 134 ... Linux-Betriebssystems, insbesondere der Debian-Distribution. Anschließend werden](https://img.pdfslide.org/doc/110x75/5b9fee3209d3f2df578bd94c/index-mint-139-modell-uebersicht-209-modem-fremdes-41-myfritz-76-206-myfritzapp.jpg)