Embed Size (px)
Citation preview
www.kaercher.com
/register-and-win
Puzzi 10/1Puzzi 10/2 Adv
59662790 01/14
Deutsch 4English 12Français 19Italiano 27Nederlands 35Español 43Português 51Dansk 59Norsk 66Svenska 73Suomi 80Ελληνικά 87Türkçe 95Русский 102Magyar 111Čeština 119Slovenščina 126Polski 133Româneşte 141Slovenčina 149Hrvatski 157Srpski 164Български 172Eesti 180Latviešu 187Lietuviškai 194Українська 201
1 2 3
4 5
7
1.2.
CHEM
MAX 50°C
MAX
6
8 9
CHEM
MAX 2L
1.
2.
A
2
16
29
6
12
17
25 24
26
23
7
10
27
34
3536
B
33
1
2
3
4
5
1115 13
18
21 14
20
22
28
30
19
8
9
3132
C
3

– 1
Please read and comply with these original instructions prior
to the initial operation of your appliance and store them for later use or subsequent own-ers.– Before initial start-up it is definitely nec-
essary to read the safety information no. 5.956-251.0!
– The non-compliance of the operating and safety instructions may lead to damages of the appliance and to dan-gers for the operator and other persons.
– In case of transport damage inform ven-dor immediately
Notes about the ingredients (REACH)You will find current information about the ingredients at: www.kaercher.com/REACH
� DangerImmediate danger that can cause severe injury or even death.� WarningPossible hazardous situation that could lead to severe injury or even death.CautionPossible hazardous situation that could lead to mild injury to persons or damage to property.
This device is intended for commercial use as a wet cleaning device for carpets as de-picted in these operating instructions as well as in the descriptions and safety notes in the enclosed brochure "Safety indica-tions for brush cleaning devices and spray extraction devices".
ContentsEnvironmental protection . . . . . EN . . .1Symbols in the operating in-structions . . . . . . . . . . . . . . . . . EN . . .1Proper use . . . . . . . . . . . . . . . . EN . . .1Overview . . . . . . . . . . . . . . . . . EN . . .2Start up. . . . . . . . . . . . . . . . . . . EN . . .2Operation . . . . . . . . . . . . . . . . . EN . . .3Cleaning methods . . . . . . . . . . EN . . .4Transport . . . . . . . . . . . . . . . . . EN . . .5Storage. . . . . . . . . . . . . . . . . . . EN . . .5Maintenance and care . . . . . . . EN . . .5Troubleshooting . . . . . . . . . . . . EN . . .5Accessories and Spare Parts. . EN . . .6Warranty. . . . . . . . . . . . . . . . . . EN . . .6EC Declaration of Conformity. . EN . . .6Technical specifications . . . . . . EN . . .7
Environmental protection
The packaging material can be recycled. Please do not throw the packaging material into household waste; please send it for recycling.
Old appliances contain valuable materials that can be recycled; these should be sent for recy-cling. Batteries, oil, and similar substances must not enter the environment. Please dispose of your old appliances using ap-propriate collection systems.
Symbols in the operating instructions
Proper use
12 EN
– 2
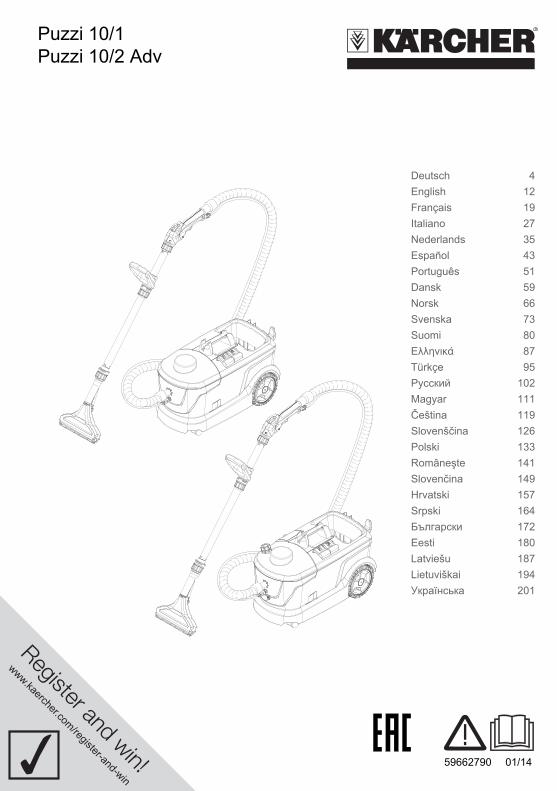
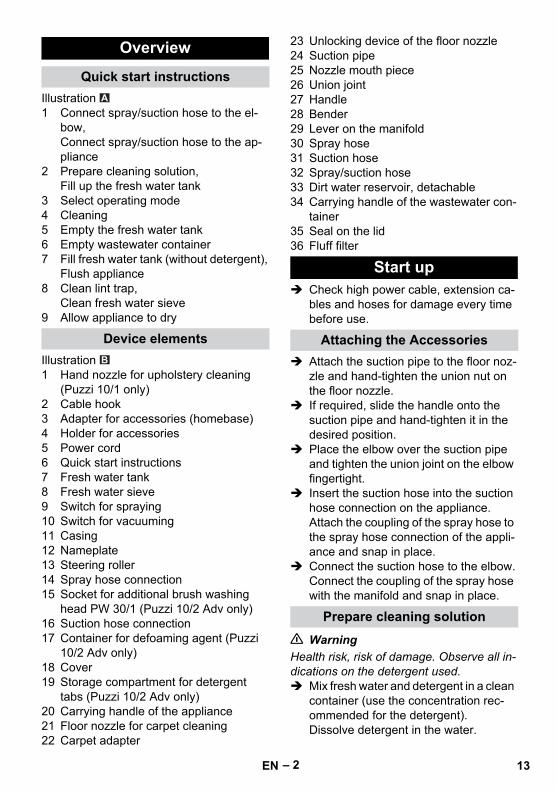
Illustration 1 Connect spray/suction hose to the el-
bow,Connect spray/suction hose to the ap-pliance
2 Prepare cleaning solution,Fill up the fresh water tank
3 Select operating mode4 Cleaning5 Empty the fresh water tank6 Empty wastewater container7 Fill fresh water tank (without detergent),
Flush appliance8 Clean lint trap,
Clean fresh water sieve9 Allow appliance to dry
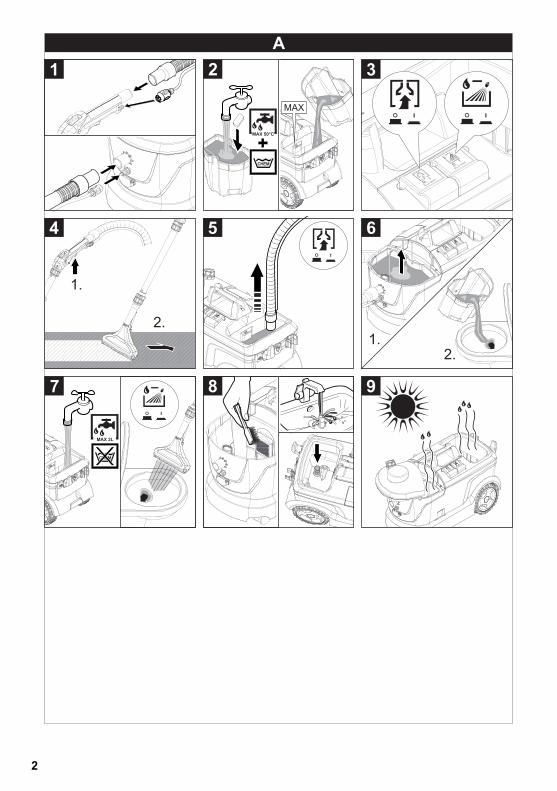
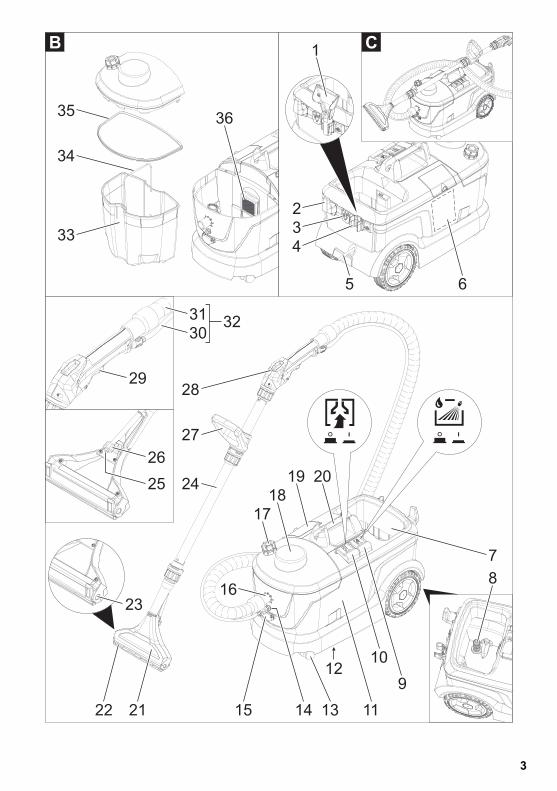
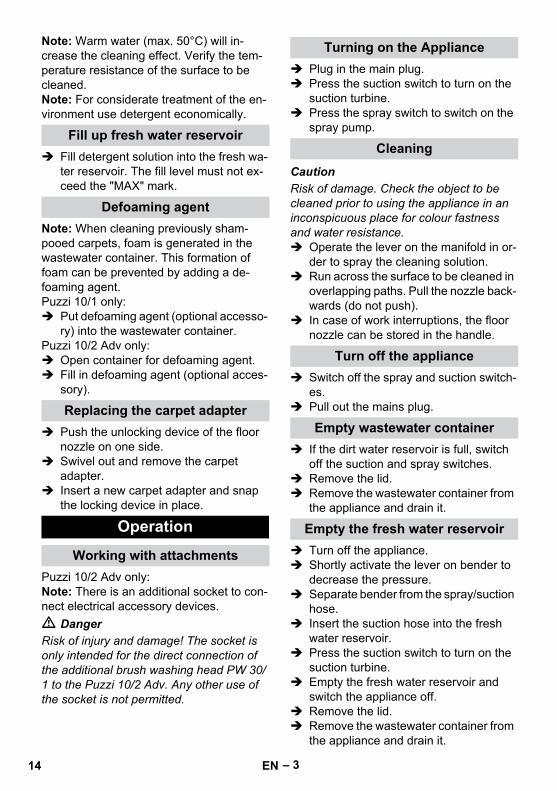
Illustration 1 Hand nozzle for upholstery cleaning
(Puzzi 10/1 only)2 Cable hook3 Adapter for accessories (homebase)4 Holder for accessories5 Power cord6 Quick start instructions7 Fresh water tank8 Fresh water sieve9 Switch for spraying10 Switch for vacuuming11 Casing12 Nameplate13 Steering roller14 Spray hose connection15 Socket for additional brush washing
head PW 30/1 (Puzzi 10/2 Adv only)16 Suction hose connection17 Container for defoaming agent (Puzzi
10/2 Adv only)18 Cover19 Storage compartment for detergent
tabs (Puzzi 10/2 Adv only)20 Carrying handle of the appliance21 Floor nozzle for carpet cleaning22 Carpet adapter
23 Unlocking device of the floor nozzle24 Suction pipe25 Nozzle mouth piece26 Union joint27 Handle28 Bender29 Lever on the manifold30 Spray hose31 Suction hose32 Spray/suction hose33 Dirt water reservoir, detachable34 Carrying handle of the wastewater con-
tainer35 Seal on the lid36 Fluff filter
Check high power cable, extension ca-bles and hoses for damage every time before use.
Attach the suction pipe to the floor noz-zle and hand-tighten the union nut on the floor nozzle.
If required, slide the handle onto the suction pipe and hand-tighten it in the desired position.
Place the elbow over the suction pipe and tighten the union joint on the elbow fingertight.
Insert the suction hose into the suction hose connection on the appliance.Attach the coupling of the spray hose to the spray hose connection of the appli-ance and snap in place.
Connect the suction hose to the elbow.Connect the coupling of the spray hose with the manifold and snap in place.
� WarningHealth risk, risk of damage. Observe all in-dications on the detergent used. Mix fresh water and detergent in a clean
container (use the concentration rec-ommended for the detergent).Dissolve detergent in the water.
Overview
Quick start instructions
Device elements
Start up
Attaching the Accessories
Prepare cleaning solution
13EN
– 3
Note: Warm water (max. 50°C) will in-crease the cleaning effect. Verify the tem-perature resistance of the surface to be cleaned.Note: For considerate treatment of the en-vironment use detergent economically.
Fill detergent solution into the fresh wa-ter reservoir. The fill level must not ex-ceed the "MAX" mark.
Note: When cleaning previously sham-pooed carpets, foam is generated in the wastewater container. This formation of foam can be prevented by adding a de-foaming agent.Puzzi 10/1 only: Put defoaming agent (optional accesso-
ry) into the wastewater container.Puzzi 10/2 Adv only: Open container for defoaming agent. Fill in defoaming agent (optional acces-
sory).
Push the unlocking device of the floor nozzle on one side.
Swivel out and remove the carpet adapter.
Insert a new carpet adapter and snap the locking device in place.
Puzzi 10/2 Adv only:Note: There is an additional socket to con-nect electrical accessory devices.� DangerRisk of injury and damage! The socket is only intended for the direct connection of the additional brush washing head PW 30/1 to the Puzzi 10/2 Adv. Any other use of the socket is not permitted.
Plug in the main plug. Press the suction switch to turn on the
suction turbine. Press the spray switch to switch on the
spray pump.
CautionRisk of damage. Check the object to be cleaned prior to using the appliance in an inconspicuous place for colour fastness and water resistance. Operate the lever on the manifold in or-
der to spray the cleaning solution. Run across the surface to be cleaned in
overlapping paths. Pull the nozzle back-wards (do not push).
In case of work interruptions, the floor nozzle can be stored in the handle.
Switch off the spray and suction switch-es.
Pull out the mains plug.
If the dirt water reservoir is full, switch off the suction and spray switches.
Remove the lid. Remove the wastewater container from
the appliance and drain it.
Turn off the appliance. Shortly activate the lever on bender to
decrease the pressure. Separate bender from the spray/suction
hose. Insert the suction hose into the fresh
water reservoir. Press the suction switch to turn on the
suction turbine. Empty the fresh water reservoir and
switch the appliance off. Remove the lid. Remove the wastewater container from
the appliance and drain it.
Fill up fresh water reservoir
Defoaming agent
Replacing the carpet adapter
Operation
Working with attachments
Turning on the Appliance
Cleaning
Turn off the appliance
Empty wastewater container
Empty the fresh water reservoir
14 EN
– 4
Connect the manifold (with suction pipe and nozzle) to the suction hose.
Connect the coupling of the spray hose with the manifold and snap in place.
Fill approx. 2 litres of fresh water into the fresh water reservoir. Do not add any detergents.
Press the spray switch to switch on the spray pump.
Hold floor nozzle over a drain. Activate lever on bender and flush the
appliance for appr. 1 to 2 minutes. Turn off the appliance.
Flush appliance. Empty the wastewater container and
clean it under running water. Empty the fresh water reservoir. Clean the outside of the appliance with
a damp cloth. Remove all water from the appliance
prior to longer periods of non-use to avoid offensive odours.
Allow appliance to dry thoroughly: Re-move or move lid sideways.
Place the appliance in a dry room and secure it from unauthorized use.
Spray and suction off detergent solution in one work cycle.
Note: Repeated suctioning without spray-ing will shorten the drying time.
Apply detergent solution with suction turbine turned off and soak for 10 to 15 minutes.
Clean the surface just like with normal soiling.
In order to further improve the cleaning result, the surface can be recleaned us-ing clear, warm water.
Puzzi 10/1 only:Attach hand nozzle instead of the floor nozzle.
With sensitive materials, use less deter-gent and spray the surface at a distance of approx. 200 mm. Then simply vacu-um off.
– Highly soiled spots should be pre-soaked and the detergent solution should soak 5 to 10 minutes.
– Always work from the light to the shade (from the window to the door).
– Always work from the cleaned to the un-cleaned surface.
– The more sensitive the surface (oriental rugs, berbers, upholstery material) the lower the cleaning solution concentra-tion should be.
– Rugs with jute backing can shrink if too much water is used and can bleed col-ours.
– Brush high-fiber rugs in the direction of the weave after cleaning (using a fiber brush or a scrubber).
– Water-proofing the fabric using Care Tex RM 762 after the wet cleaning pre-vents a quick resoiling of the textile sur-face.
– Do not step on cleaned surfaces until they have dried and do not place furni-ture on them to avoid pressure spots or rust stains.
Flush appliance
After each operation
Storing the Appliance
Cleaning methods
Normal soiling
Strong soiling or stains
Upholstery cleaning
Cleaning tips
15EN

– 5
For further information, please request product information sheet and EU safety data sheet of the relevant detergent.
CautionRisk of injury and damage! Observe the weight of the appliance when you transport it.Illustration For transport, place suction pipe on the
carrying handle and place the spray/suction hose on top of the appliance. Wind up the mains cable and hook it into the cable hook.
When transporting in vehicles, secure the appliance according to the guide-lines from slipping and tipping over.
CautionRisk of injury and damage! Note the weight of the appliance in case of storage.This appliance must only be stored in inte-rior rooms.
� DangerDanger of injury by electric shock.First pull out the plug from the mains before carrying out any tasks on the machine.
Remove the lid. Remove the wastewater container from
the appliance. Regularly clean the lint trap using a
brush.
Unscrew the fresh water sieve. Regularly clean the fresh water sieve
under running water.
Unscrew the covering nut. Clean nozzle mouthpiece.
� Danger– Danger of injury by electric shock.
First pull out the plug from the mains be-fore carrying out any tasks on the ma-chine.
– Get the electrical components checked and repaired only by authorised cus-tomer service persons.
Check the receptacle and the fuse of the power supply.
Check the power cable and the power plug of the device.
Turn on the appliance.
Fill up fresh water reservoir. Check the couplings on the spray hose
for proper seating. Clean or replace nozzle tip. Clean the sieve in the fresh water reser-
voir. Spray pump defective, contact after-
sales service.
Clean nozzle mouthpiece.
Check the correct positioning of the lid. Clean seal on lid and surface on the ap-
pliance. Clean the fluff filter. Check suction hose for blockages;
clean if required.
Detergent
Carpet and upholstery cleaning
RM 760 powderRM 760 tabsRM 764 liquid
Defoaming RM 761Waterproofing carpets RM 762
Transport
Storage
Maintenance and care
Clean the fluff filter
Cleaning the fresh water sieve
Cleaning the nozzle
Troubleshooting
Appliance is not working
No water exiting from nozzle
Spray stream one-sided
Insufficient vacuum performance
16 EN
– 6
Fill up fresh water reservoir.
Add the defoaming agent into the wastewater container or fill up the con-tainer for the defoaming agent.
If malfunction can not be fixed, the de-vice must be checked by customer ser-vice.
– Only use accessories and spare parts which have been approved by the man-ufacturer. The exclusive use of original accessories and original spare parts ensures that the appliance can be oper-ated safely and trouble free.
– At the end of the operating instructions you will find a selected list of spare parts that are often required.
– For additional information about spare parts, please go to the Service section at www.kaercher.com.
The warranty terms published by the rele-vant sales company are applicable in each country. We will repair potential failures of your appliance within the warranty period free of charge, provided that such failure is caused by faulty material or defects in man-ufacturing. In the event of a warranty claim please contact your dealer or the nearest authorized Customer Service centre. Please submit the proof of purchase.
We hereby declare that the machine de-scribed below complies with the relevant basic safety and health requirements of the EU Directives, both in its basic design and construction as well as in the version put into circulation by us. This declaration shall cease to be valid if the machine is modified without our prior approval.
5.957-534
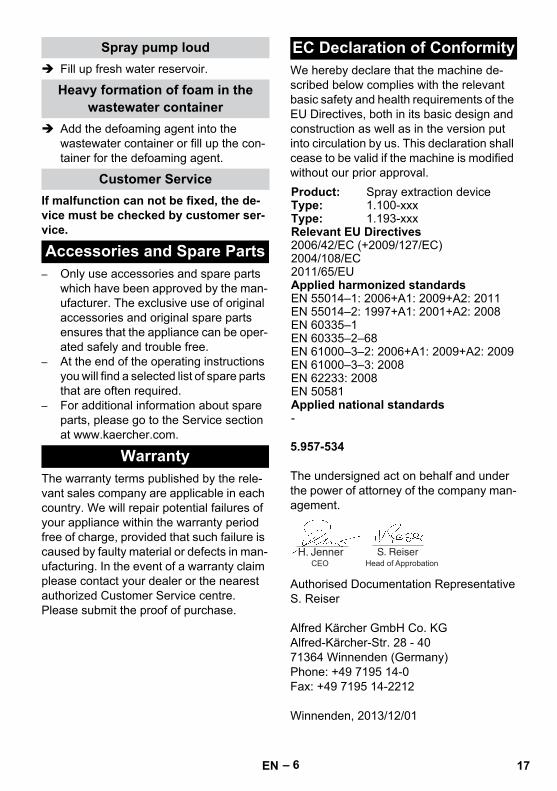
The undersigned act on behalf and under the power of attorney of the company man-agement.
Authorised Documentation RepresentativeS. Reiser
Alfred Kärcher GmbH Co. KGAlfred-Kärcher-Str. 28 - 4071364 Winnenden (Germany)Phone: +49 7195 14-0Fax: +49 7195 14-2212
Winnenden, 2013/12/01
Spray pump loud
Heavy formation of foam in the wastewater container
Customer Service
Accessories and Spare Parts
Warranty
EC Declaration of Conformity
Product: Spray extraction deviceType: 1.100-xxxType: 1.193-xxxRelevant EU Directives2006/42/EC (+2009/127/EC)2004/108/EC2011/65/EUApplied harmonized standardsEN 55014–1: 2006+A1: 2009+A2: 2011EN 55014–2: 1997+A1: 2001+A2: 2008EN 60335–1EN 60335–2–68EN 61000–3–2: 2006+A1: 2009+A2: 2009EN 61000–3–3: 2008EN 62233: 2008EN 50581Applied national standards-
CEO Head of Approbation
17EN
– 7
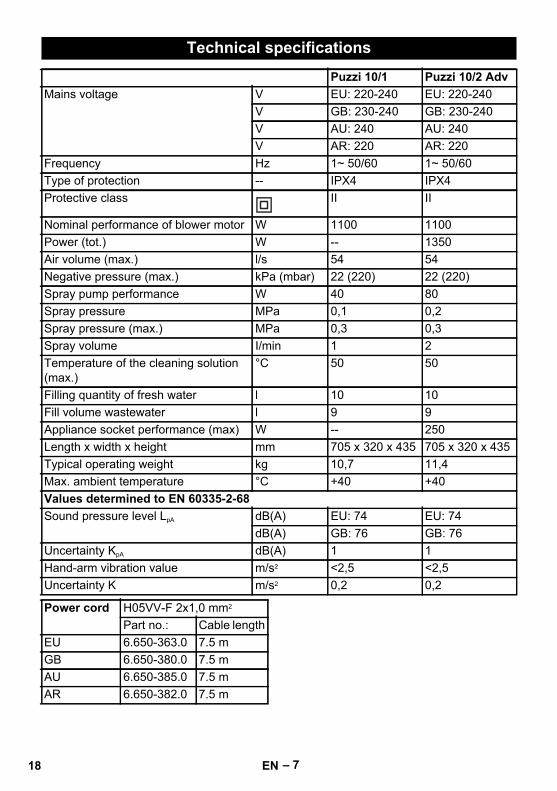
Technical specifications
Puzzi 10/1 Puzzi 10/2 AdvMains voltage V EU: 220-240 EU: 220-240
V GB: 230-240 GB: 230-240V AU: 240 AU: 240V AR: 220 AR: 220
Frequency Hz 1~ 50/60 1~ 50/60Type of protection -- IPX4 IPX4Protective class II II
Nominal performance of blower motor W 1100 1100Power (tot.) W -- 1350Air volume (max.) l/s 54 54Negative pressure (max.) kPa (mbar) 22 (220) 22 (220)Spray pump performance W 40 80Spray pressure MPa 0,1 0,2Spray pressure (max.) MPa 0,3 0,3Spray volume I/min 1 2Temperature of the cleaning solution (max.)
°C 50 50
Filling quantity of fresh water l 10 10Fill volume wastewater l 9 9Appliance socket performance (max) W -- 250Length x width x height mm 705 x 320 x 435 705 x 320 x 435Typical operating weight kg 10,7 11,4Max. ambient temperature °C +40 +40Values determined to EN 60335-2-68Sound pressure level LpA dB(A) EU: 74 EU: 74
dB(A) GB: 76 GB: 76Uncertainty KpA dB(A) 1 1Hand-arm vibration value m/s2 <2,5 <2,5Uncertainty K m/s2 0,2 0,2
Power cord H05VV-F 2x1,0 mm2
Part no.: Cable lengthEU 6.650-363.0 7.5 mGB 6.650-380.0 7.5 mAU 6.650-385.0 7.5 mAR 6.650-382.0 7.5 m
18 EN