Embed Size (px)
Citation preview
SERATO DJ INTRO 3RD PARTY CONTROLLER QUICKSTART GUIDE 1.0
NUMARK MIXTRACK PRO • NUMARK MIXDECK
NUMARK MIXDECK EXPRESS • NUMARK N4
VESTAX TYPHOON • VESTAX VCI-100 MK II
VESTAX VCI-400 • PIONEER DDJ-ERGO-V
SERATO DJ INTRO 3RD PARTY CONTROLLER QUICKSTART GUIDE 1.02
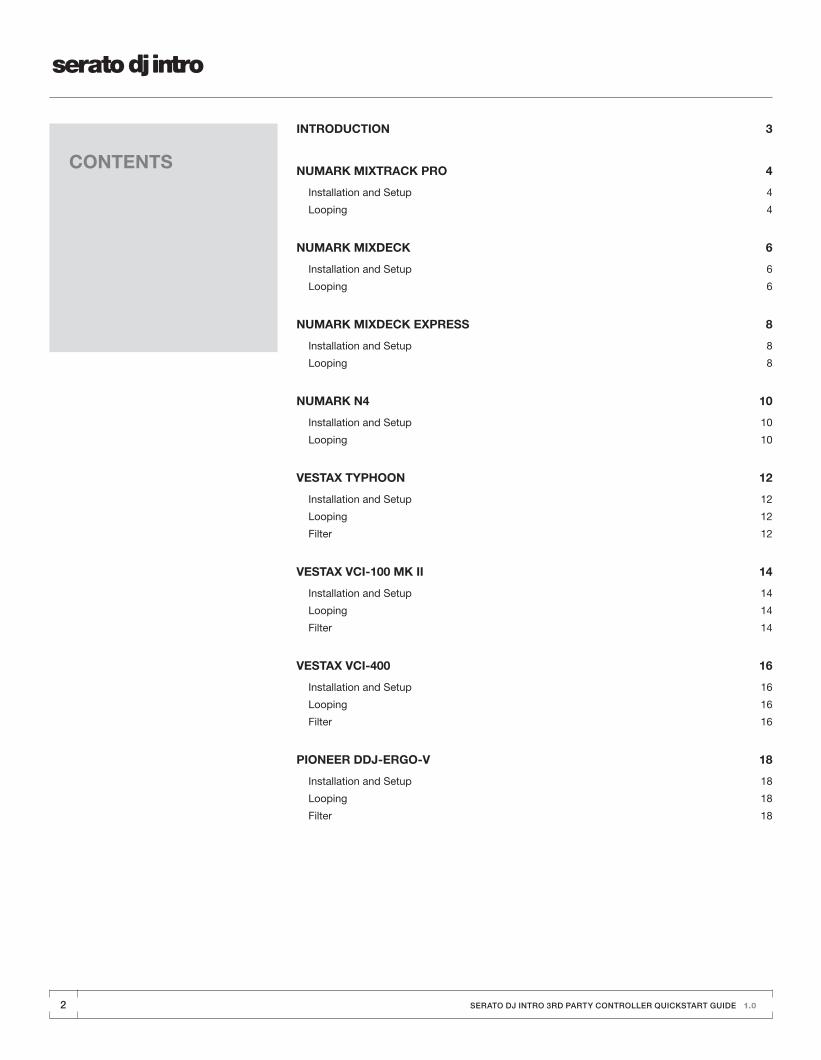
CONTENTS
INTRODUCTION 3
NUMARK MIXTRACK PRO 4
Installation and Setup 4
Looping 4
NUMARK MIXDECK 6
Installation and Setup 6
Looping 6
NUMARK MIXDECK EXPRESS 8
Installation and Setup 8
Looping 8
NUMARK N4 10
Installation and Setup 10
Looping 10
VESTAX TYPHOON 12
Installation and Setup 12
Looping 12
Filter 12
VESTAX VCI-100 MK II 14
Installation and Setup 14
Looping 14
Filter 14
VESTAX VCI-400 16
Installation and Setup 16
Looping 16
Filter 16
PIONEER DDJ-ERGO-V 18
Installation and Setup 18
Looping 18
Filter 18
SERATO DJ INTRO 3RD PARTY CONTROLLER QUICKSTART GUIDE 1.0 3
INTRODUCTION
Welcome to the Serato DJ Intro 3rd Party Controller Quick Start Guide.
This guide outlines the available 3rd party controllers that are natively supported or “plug and play”.
This means that when you plug them into your computer along side your Serato DJ Intro setup, they
will work automatically with no extra MIDI mapping or configuration required.
SERATO DJ INTRO 3RD PARTY CONTROLLER QUICKSTART GUIDE 1.04
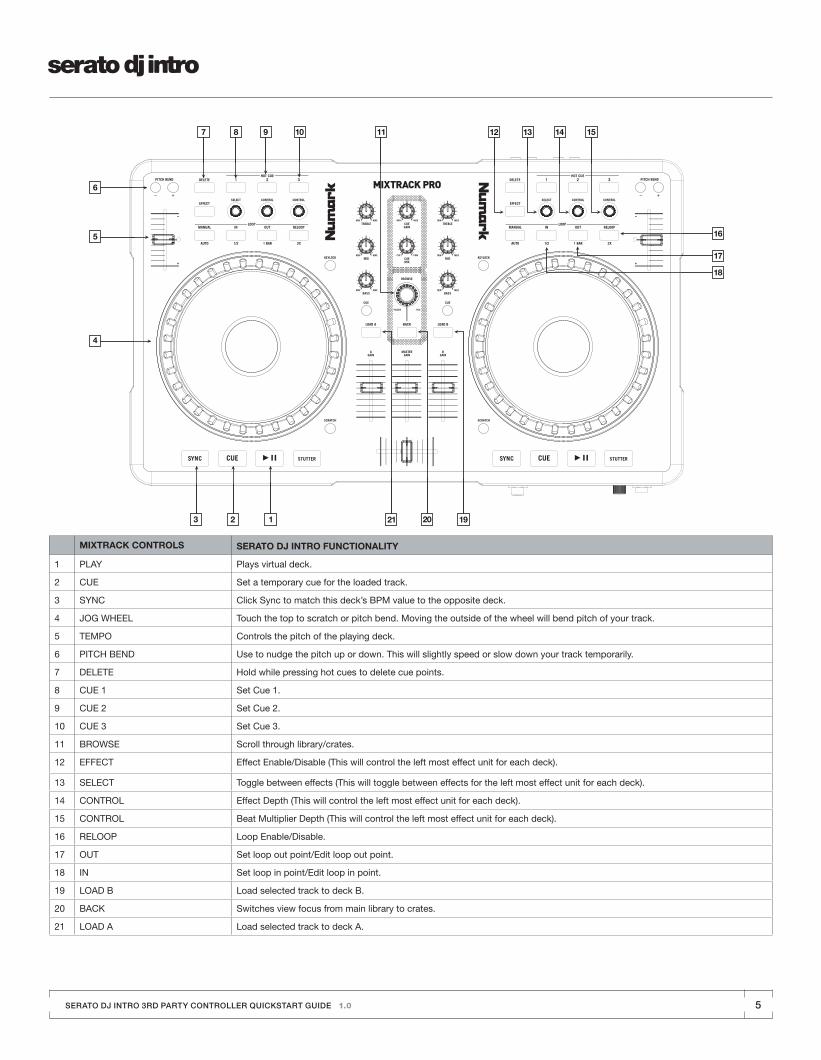
NUMARK MIXTRACK PRO
INSTALLATION AND SETUP
The Numark Mixtrack Pro is a class compliant USB plug and play device and requires no further driver
installation.
1) Connect your Mixtrack Pro to an available USB port.
2) Open Serato DJ Intro.
3) You should now see both virtual decks and be ready to DJ.
LOOPING
Looping is limited to manual looping with the Numark Mixtrack Pro.
To make a loop, set the in point by pressing the IN button, and the out point by pressing the OUT
button. To turn the loop on or off, press the RELOOP button.
To adjust the in point of the loop, press and hold down the IN button and move the platter to expand
or contract the loop start. Release the IN button to keep this change. The same applies to adjusting
the out point by holding the OUT button and adjusting the platter.
SERATO DJ INTRO 3RD PARTY CONTROLLER QUICKSTART GUIDE 1.0 5
MIXTRACK CONTROLS SERATO DJ INTRO FUNCTIONALITY
1 PLAY Plays virtual deck.
2 CUE Set a temporary cue for the loaded track.
3 SYNC Click Sync to match this deck’s BPM value to the opposite deck.
4 JOG WHEEL Touch the top to scratch or pitch bend. Moving the outside of the wheel will bend pitch of your track.
5 TEMPO Controls the pitch of the playing deck.
6 PITCH BEND Use to nudge the pitch up or down. This will slightly speed or slow down your track temporarily.
7 DELETE Hold while pressing hot cues to delete cue points.
8 CUE 1 Set Cue 1.
9 CUE 2 Set Cue 2.
10 CUE 3 Set Cue 3.
11 BROWSE Scroll through library/crates.
12 EFFECT Effect Enable/Disable (This will control the left most effect unit for each deck).
13 SELECT Toggle between effects (This will toggle between effects for the left most effect unit for each deck).
14 CONTROL Effect Depth (This will control the left most effect unit for each deck).
15 CONTROL Beat Multiplier Depth (This will control the left most effect unit for each deck).
16 RELOOP Loop Enable/Disable.
17 OUT Set loop out point/Edit loop out point.
18 IN Set loop in point/Edit loop in point.
19 LOAD B Load selected track to deck B.
20 BACK Switches view focus from main library to crates.
21 LOAD A Load selected track to deck A.
SERATO DJ INTRO 3RD PARTY CONTROLLER QUICKSTART GUIDE 1.06
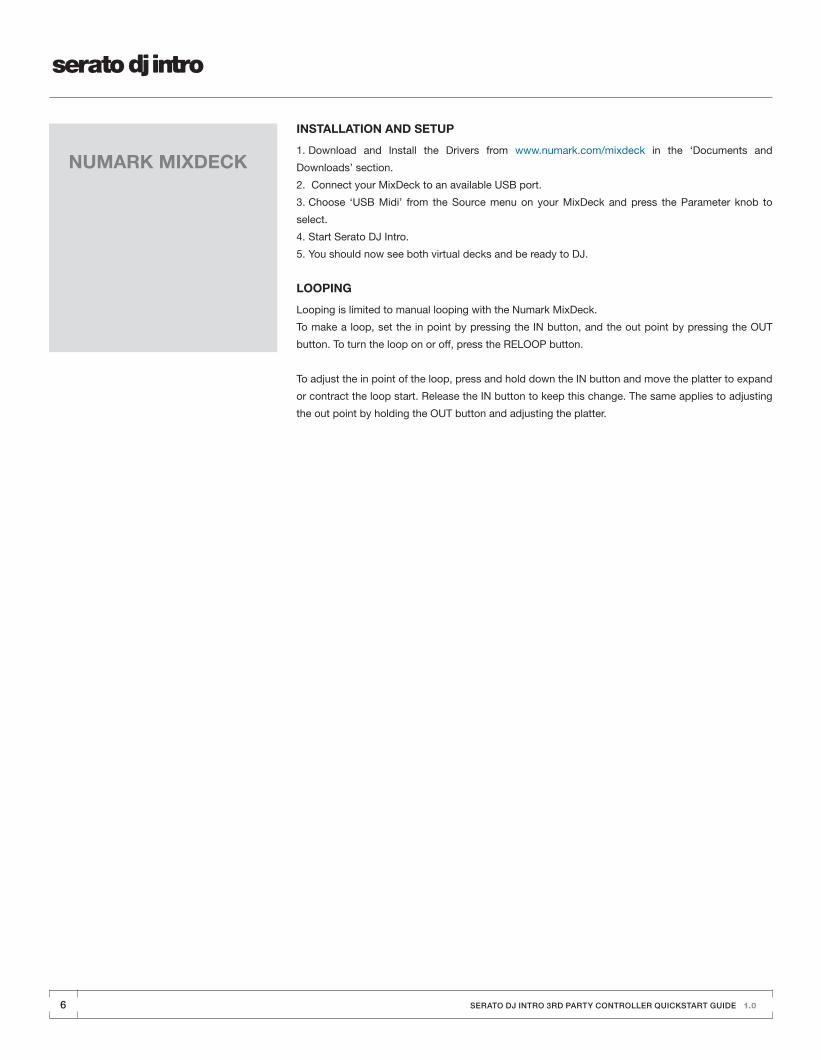
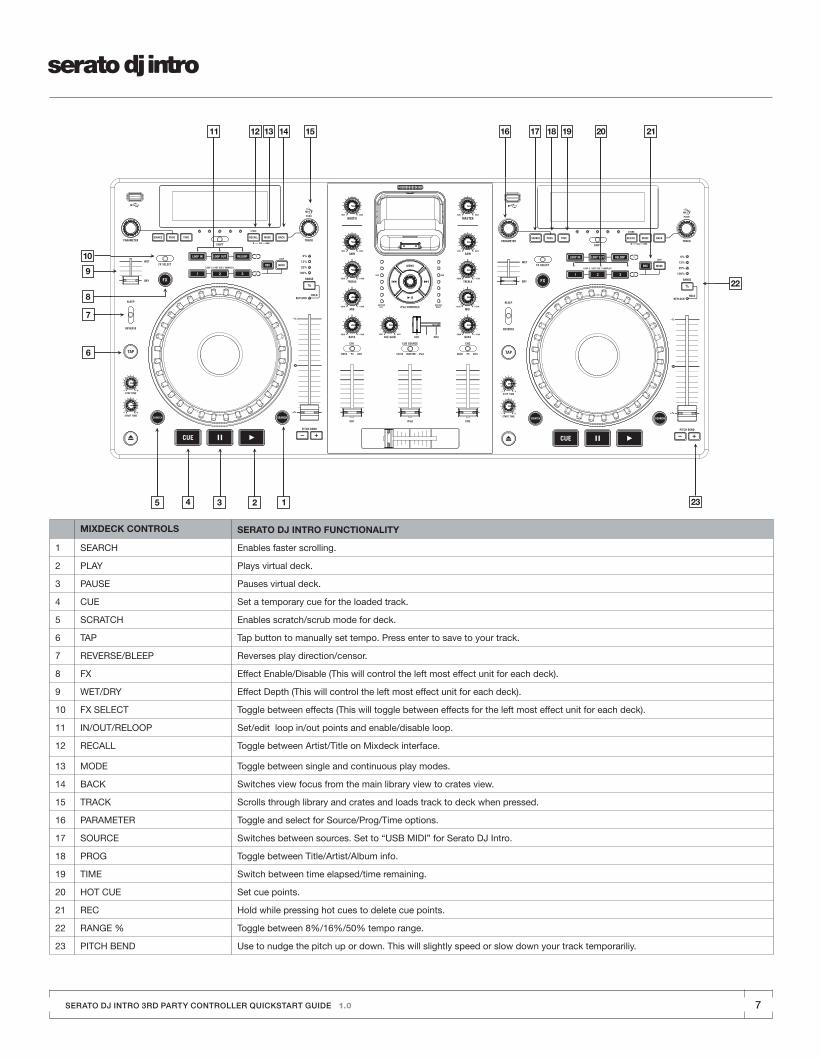
NUMARK MIXDECK
INSTALLATION AND SETUP
1. Download and Install the Drivers from www.numark.com/mixdeck in the ‘Documents and
Downloads’ section.
2. Connect your MixDeck to an available USB port.
3. Choose ‘USB Midi’ from the Source menu on your MixDeck and press the Parameter knob to
select.
4. Start Serato DJ Intro.
5. You should now see both virtual decks and be ready to DJ.
LOOPING
Looping is limited to manual looping with the Numark MixDeck.
To make a loop, set the in point by pressing the IN button, and the out point by pressing the OUT
button. To turn the loop on or off, press the RELOOP button.
To adjust the in point of the loop, press and hold down the IN button and move the platter to expand
or contract the loop start. Release the IN button to keep this change. The same applies to adjusting
the out point by holding the OUT button and adjusting the platter.
SERATO DJ INTRO 3RD PARTY CONTROLLER QUICKSTART GUIDE 1.0 7
MIXDECK CONTROLS SERATO DJ INTRO FUNCTIONALITY
1 SEARCH Enables faster scrolling.
2 PLAY Plays virtual deck.
3 PAUSE Pauses virtual deck.
4 CUE Set a temporary cue for the loaded track.
5 SCRATCH Enables scratch/scrub mode for deck.
6 TAP Tap button to manually set tempo. Press enter to save to your track.
7 REVERSE/BLEEP Reverses play direction/censor.
8 FX Effect Enable/Disable (This will control the left most effect unit for each deck).
9 WET/DRY Effect Depth (This will control the left most effect unit for each deck).
10 FX SELECT Toggle between effects (This will toggle between effects for the left most effect unit for each deck).
11 IN/OUT/RELOOP Set/edit loop in/out points and enable/disable loop.
12 RECALL Toggle between Artist/Title on Mixdeck interface.
13 MODE Toggle between single and continuous play modes.
14 BACK Switches view focus from the main library view to crates view.
15 TRACK Scrolls through library and crates and loads track to deck when pressed.
16 PARAMETER Toggle and select for Source/Prog/Time options.
17 SOURCE Switches between sources. Set to “USB MIDI” for Serato DJ Intro.
18 PROG Toggle between Title/Artist/Album info.
19 TIME Switch between time elapsed/time remaining.
20 HOT CUE Set cue points.
21 REC Hold while pressing hot cues to delete cue points.
22 RANGE % Toggle between 8%/16%/50% tempo range.
23 PITCH BEND Use to nudge the pitch up or down. This will slightly speed or slow down your track temporariliy.
SERATO DJ INTRO 3RD PARTY CONTROLLER QUICKSTART GUIDE 1.08
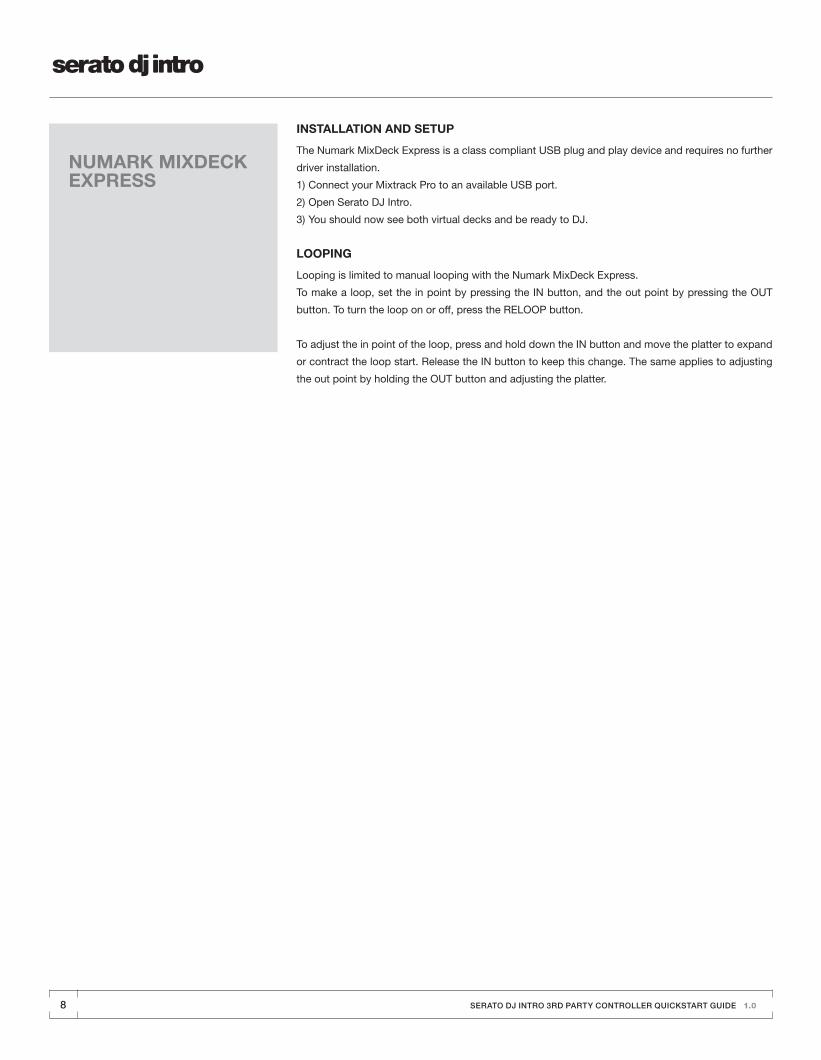
NUMARK MIXDECK EXPRESS
INSTALLATION AND SETUP
The Numark MixDeck Express is a class compliant USB plug and play device and requires no further
driver installation.
1) Connect your Mixtrack Pro to an available USB port.
2) Open Serato DJ Intro.
3) You should now see both virtual decks and be ready to DJ.
LOOPING
Looping is limited to manual looping with the Numark MixDeck Express.
To make a loop, set the in point by pressing the IN button, and the out point by pressing the OUT
button. To turn the loop on or off, press the RELOOP button.
To adjust the in point of the loop, press and hold down the IN button and move the platter to expand
or contract the loop start. Release the IN button to keep this change. The same applies to adjusting
the out point by holding the OUT button and adjusting the platter.
SERATO DJ INTRO 3RD PARTY CONTROLLER QUICKSTART GUIDE 1.0 9
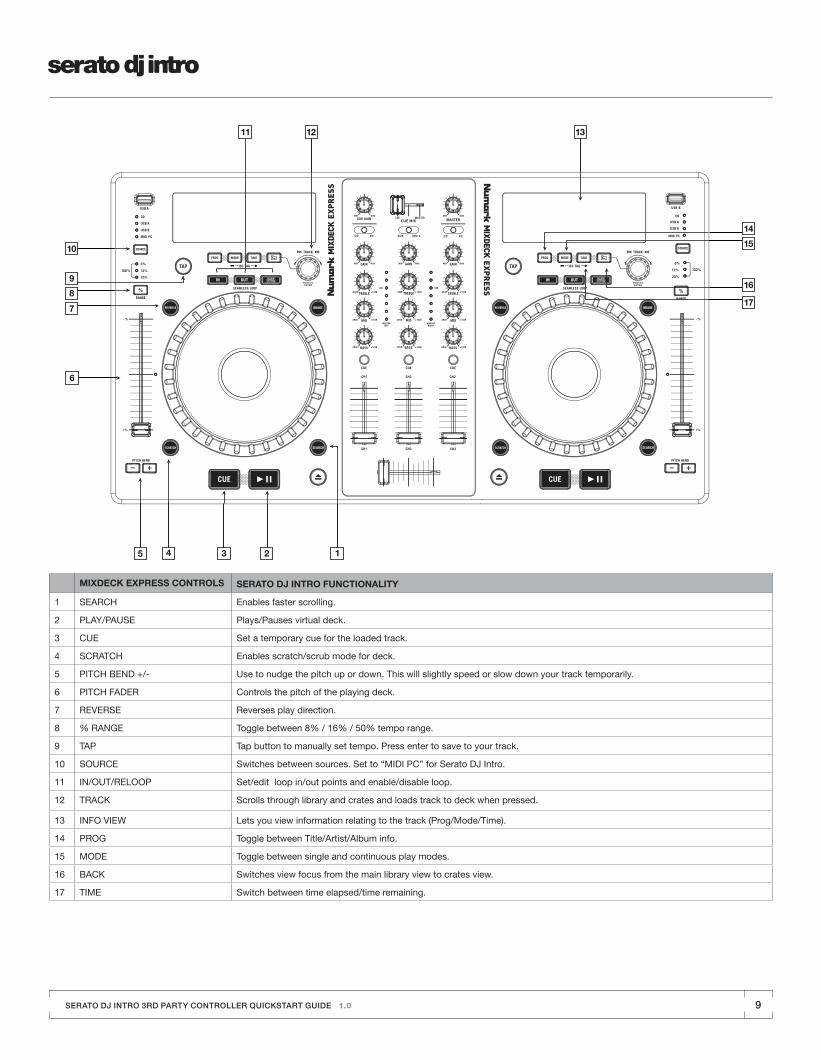
MIXDECK EXPRESS CONTROLS SERATO DJ INTRO FUNCTIONALITY
1 SEARCH Enables faster scrolling.
2 PLAY/PAUSE Plays/Pauses virtual deck.
3 CUE Set a temporary cue for the loaded track.
4 SCRATCH Enables scratch/scrub mode for deck.
5 PITCH BEND +/- Use to nudge the pitch up or down. This will slightly speed or slow down your track temporarily.
6 PITCH FADER Controls the pitch of the playing deck.
7 REVERSE Reverses play direction.
8 % RANGE Toggle between 8% / 16% / 50% tempo range.
9 TAP Tap button to manually set tempo. Press enter to save to your track.
10 SOURCE Switches between sources. Set to “MIDI PC” for Serato DJ Intro.
11 IN/OUT/RELOOP Set/edit loop in/out points and enable/disable loop.
12 TRACK Scrolls through library and crates and loads track to deck when pressed.
13 INFO VIEW Lets you view information relating to the track (Prog/Mode/Time).
14 PROG Toggle between Title/Artist/Album info.
15 MODE Toggle between single and continuous play modes.
16 BACK Switches view focus from the main library view to crates view.
17 TIME Switch between time elapsed/time remaining.
SERATO DJ INTRO 3RD PARTY CONTROLLER QUICKSTART GUIDE 1.010
NUMARK N4
INSTALLATION AND SETUP
The Numark N4 is a class compliant USB plug and play device and requires no further driver
installation.
1) Connect your N4 to an available USB port.
2) Open Serato DJ Intro.
3) You should now see both virtual decks and be ready to DJ.
LOOPING
Looping is limited to manual looping with the Numark N4.
To make a loop, set the in point by pressing the LOOP IN button, and the out point by pressing the
LOOP OUT button. To turn the loop on or off, press the RELOOP button.
To adjust the in point of the loop, press and hold down the LOOP IN button and move the platter to
expand or contract the loop start. Release the LOOP IN button to keep this change. The same applies
to adjusting the out point by holding the LOOP OUT button and adjusting the platter.
SERATO DJ INTRO 3RD PARTY CONTROLLER QUICKSTART GUIDE 1.0 11
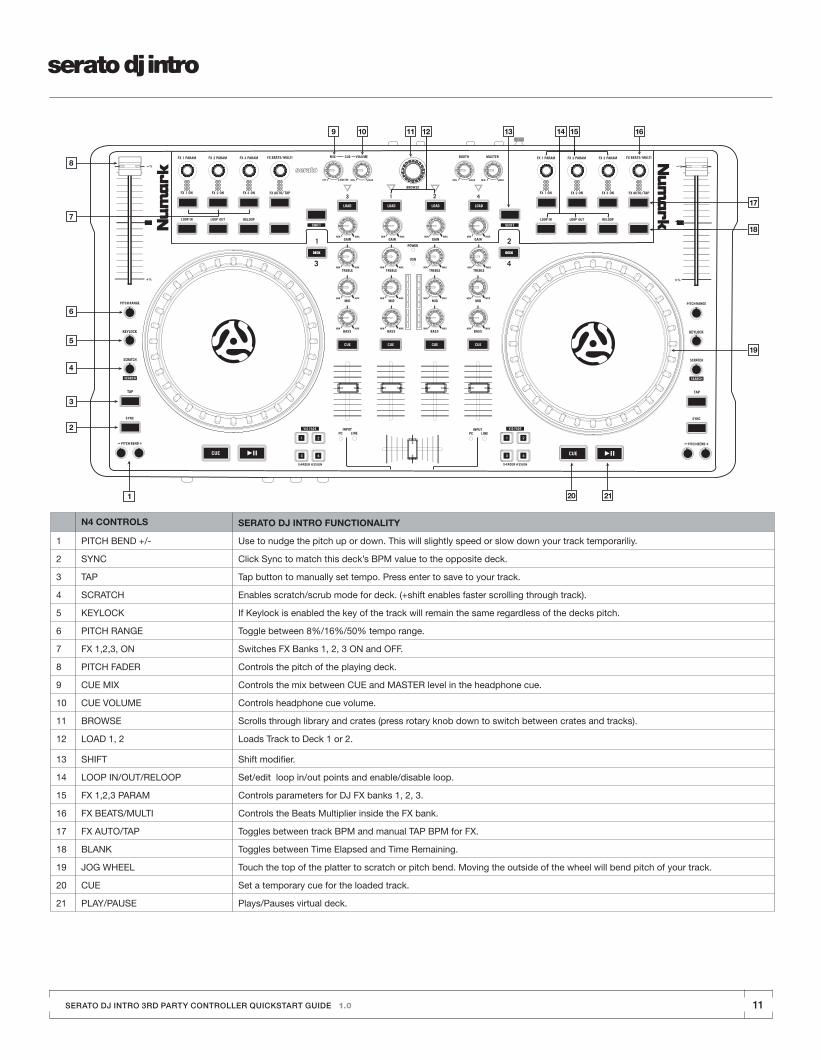
N4 CONTROLS SERATO DJ INTRO FUNCTIONALITY
1 PITCH BEND +/- Use to nudge the pitch up or down. This will slightly speed or slow down your track temporariliy.
2 SYNC Click Sync to match this deck’s BPM value to the opposite deck.
3 TAP Tap button to manually set tempo. Press enter to save to your track.
4 SCRATCH Enables scratch/scrub mode for deck. (+shift enables faster scrolling through track).
5 KEYLOCK If Keylock is enabled the key of the track will remain the same regardless of the decks pitch.
6 PITCH RANGE Toggle between 8%/16%/50% tempo range.
7 FX 1,2,3, ON Switches FX Banks 1, 2, 3 ON and OFF.
8 PITCH FADER Controls the pitch of the playing deck.
9 CUE MIX Controls the mix between CUE and MASTER level in the headphone cue.
10 CUE VOLUME Controls headphone cue volume.
11 BROWSE Scrolls through library and crates (press rotary knob down to switch between crates and tracks).
12 LOAD 1, 2 Loads Track to Deck 1 or 2.
13 SHIFT Shift modifier.
14 LOOP IN/OUT/RELOOP Set/edit loop in/out points and enable/disable loop.
15 FX 1,2,3 PARAM Controls parameters for DJ FX banks 1, 2, 3.
16 FX BEATS/MULTI Controls the Beats Multiplier inside the FX bank.
17 FX AUTO/TAP Toggles between track BPM and manual TAP BPM for FX.
18 BLANK Toggles between Time Elapsed and Time Remaining.
19 JOG WHEEL Touch the top of the platter to scratch or pitch bend. Moving the outside of the wheel will bend pitch of your track.
20 CUE Set a temporary cue for the loaded track.
21 PLAY/PAUSE Plays/Pauses virtual deck.
SERATO DJ INTRO 3RD PARTY CONTROLLER QUICKSTART GUIDE 1.012
VESTAX TYPHOON
INSTALLATION AND SETUP
The Vestax Typhoon is a class compliant USB plug and play device and requires no further driver
installation.
1) Connect your Typhoon to an available USB port.
2) Open Serato DJ Intro.
3) You should now see both virtual decks and be ready to DJ.
LOOPING
Auto-looping allows you to create loops instantly. Auto-looping range from 1 to 8 bars. You can use
the relevant Loop Set controls on your hardware to select the auto-looping range.
Pressing auto-looping again while auto-looping is active will deactivate the loop.
NOTE: Auto-looping calculates the loop from the track’s BPM value, so make sure your tracks
have been analyzed prior to Auto-looping.
FILTER
The Typhoon’s platter can be switched to control a HP/LP filter. To initiate this, press the FILTER
button. You will now be able to control a High Pass filter by turning the jog wheel to the left, and a Low
Pass filter by turning the jog wheel to the right.
SERATO DJ INTRO 3RD PARTY CONTROLLER QUICKSTART GUIDE 1.0 13
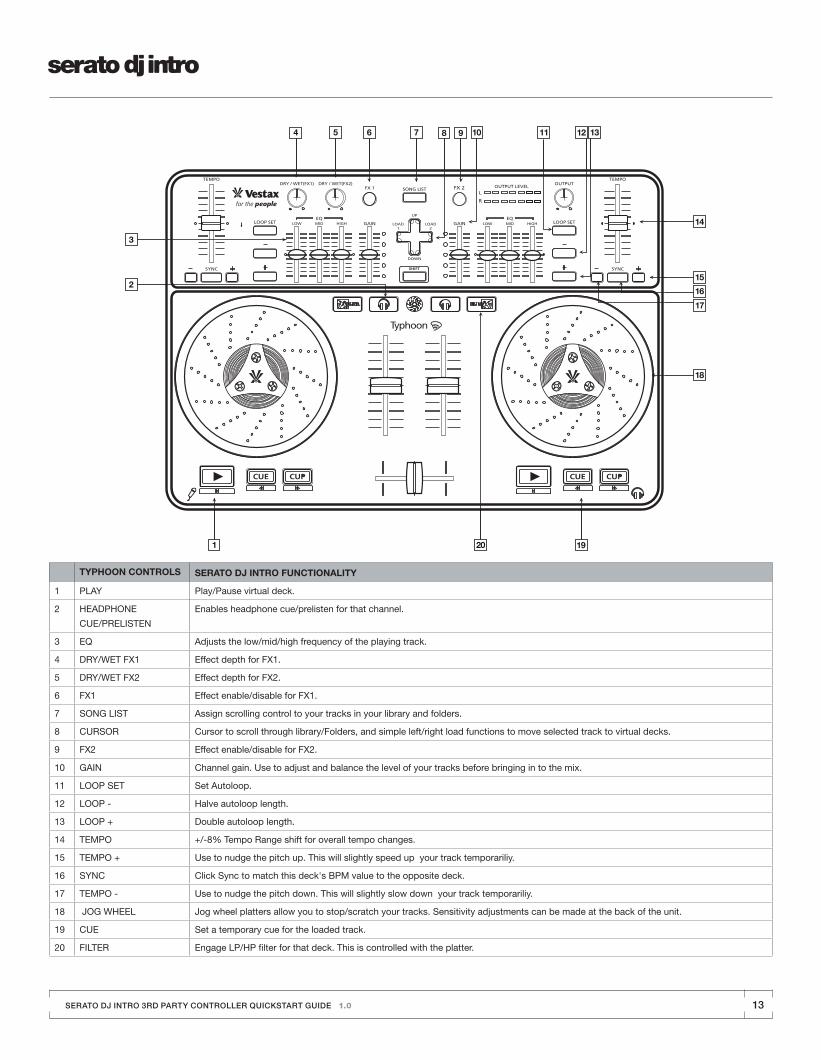
TYPHOON CONTROLS SERATO DJ INTRO FUNCTIONALITY
1 PLAY Play/Pause virtual deck.
2 HEADPHONE
CUE/PRELISTEN
Enables headphone cue/prelisten for that channel.
3 EQ Adjusts the low/mid/high frequency of the playing track.
4 DRY/WET FX1 Effect depth for FX1.
5 DRY/WET FX2 Effect depth for FX2.
6 FX1 Effect enable/disable for FX1.
7 SONG LIST Assign scrolling control to your tracks in your library and folders.
8 CURSOR Cursor to scroll through library/Folders, and simple left/right load functions to move selected track to virtual decks.
9 FX2 Effect enable/disable for FX2.
10 GAIN Channel gain. Use to adjust and balance the level of your tracks before bringing in to the mix.
11 LOOP SET Set Autoloop.
12 LOOP - Halve autoloop length.
13 LOOP + Double autoloop length.
14 TEMPO +/-8% Tempo Range shift for overall tempo changes.
15 TEMPO + Use to nudge the pitch up. This will slightly speed up your track temporariliy.
16 SYNC Click Sync to match this deck's BPM value to the opposite deck.
17 TEMPO - Use to nudge the pitch down. This will slightly slow down your track temporariliy.
18 JOG WHEEL Jog wheel platters allow you to stop/scratch your tracks. Sensitivity adjustments can be made at the back of the unit.
19 CUE Set a temporary cue for the loaded track.
20 FILTER Engage LP/HP filter for that deck. This is controlled with the platter.
SERATO DJ INTRO 3RD PARTY CONTROLLER QUICKSTART GUIDE 1.014
VESTAX VCI-100 MK II
INSTALLATION AND SETUP
The Vestax VCI-100 is a class compliant USB plug and play device and requires no further driver
installation.
1) Connect your VCI-100 to an available USB port.
2) Open Serato DJ Intro.
3) You should now see both virtual decks and be ready to DJ.
LOOPING
Auto-looping allows you to create loops instantly. Auto-looping range from 1 to 8 bars. You can use
the relevant Loop Set controls on your hardware to select the auto-looping range.
Pressing auto-looping again while auto-looping is active will deactivate the loop.
NOTE: Auto-looping calculates the loop from the track’s BPM value, so make sure your tracks
have been analyzed prior to Auto-looping.
FILTER
The Vestax VCI-100 has one HP/LP rotary filter per channel. To engage the filter, press the FILTER
button. Turn the knob to the left to engage the LP filter and to the right to engage the HP filter.
SERATO DJ INTRO 3RD PARTY CONTROLLER QUICKSTART GUIDE 1.0 15
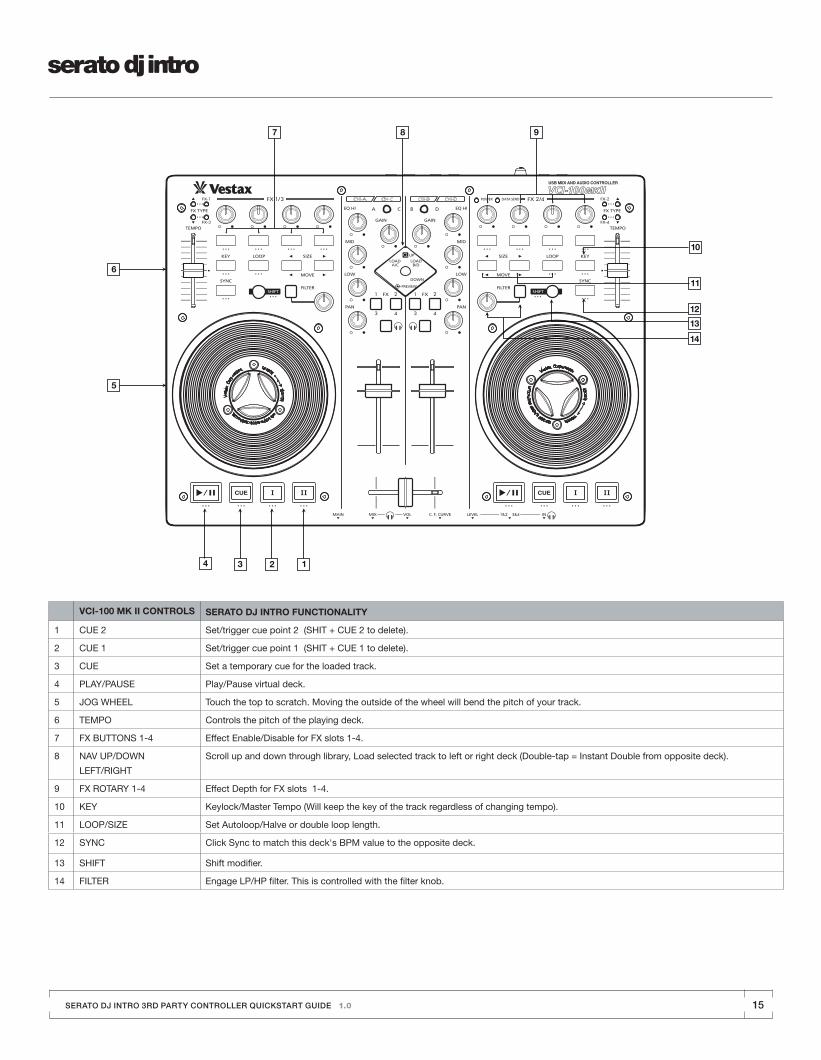
VCI-100 MK II CONTROLS SERATO DJ INTRO FUNCTIONALITY
1 CUE 2 Set/trigger cue point 2 (SHIT + CUE 2 to delete).
2 CUE 1 Set/trigger cue point 1 (SHIT + CUE 1 to delete).
3 CUE Set a temporary cue for the loaded track.
4 PLAY/PAUSE Play/Pause virtual deck.
5 JOG WHEEL Touch the top to scratch. Moving the outside of the wheel will bend the pitch of your track.
6 TEMPO Controls the pitch of the playing deck.
7 FX BUTTONS 1-4 Effect Enable/Disable for FX slots 1-4.
8 NAV UP/DOWN
LEFT/RIGHT
Scroll up and down through library, Load selected track to left or right deck (Double-tap = Instant Double from opposite deck).
9 FX ROTARY 1-4 Effect Depth for FX slots 1-4.
10 KEY Keylock/Master Tempo (Will keep the key of the track regardless of changing tempo).
11 LOOP/SIZE Set Autoloop/Halve or double loop length.
12 SYNC Click Sync to match this deck's BPM value to the opposite deck.
13 SHIFT Shift modifier.
14 FILTER Engage LP/HP filter. This is controlled with the filter knob.
SERATO DJ INTRO 3RD PARTY CONTROLLER QUICKSTART GUIDE 1.016
VESTAX VCI-400
INSTALLATION AND SETUP
The Vestax VCI-400 is a class compliant USB plug and play device and requires no further driver
installation.
1) Connect your VCI-100 to an available USB port
2) Open Serato DJ Intro.
3) You should now see both virtual decks and be ready to DJ.
NOTE: Windows users may need to install the ASIO driver available from www.vestax.com.
LOOPING
Auto-looping allows you to create loops instantly. Auto-looping range from 1 to 8 bars. You can use
the relevant Loop Set controls on your hardware to select the auto-looping range.
Pressing auto-looping again while auto-looping is active will deactivate the loop.
NOTE: Auto-looping calculates the loop from the track’s BPM value, so make sure your tracks
have been analyzed prior to Auto-looping.
FILTER
The Vestax VCI-400 has one HP/LP rotary filter per channel.Turn the knob to the left to engage the LP
filter and to the right to engage the HP filter.
SERATO DJ INTRO 3RD PARTY CONTROLLER QUICKSTART GUIDE 1.0 17
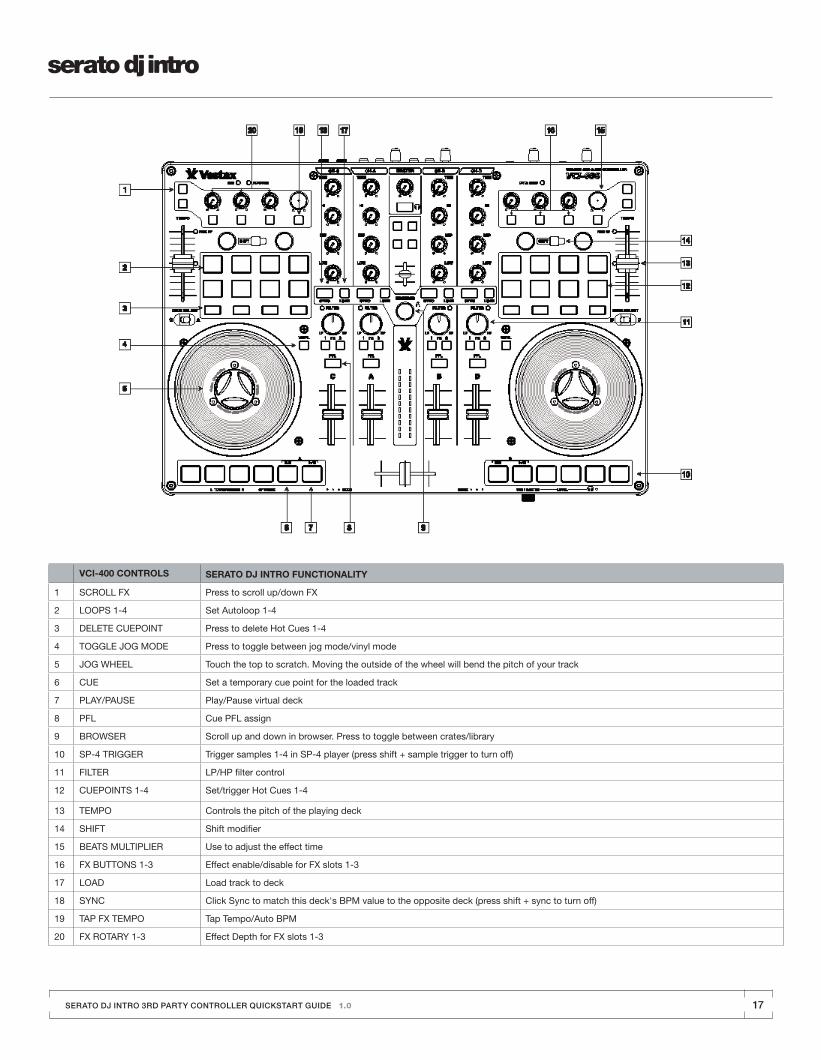
VCI-400 CONTROLS SERATO DJ INTRO FUNCTIONALITY
1 SCROLL FX Press to scroll up/down FX
2 LOOPS 1-4 Set Autoloop 1-4
3 DELETE CUEPOINT Press to delete Hot Cues 1-4
4 TOGGLE JOG MODE Press to toggle between jog mode/vinyl mode
5 JOG WHEEL Touch the top to scratch. Moving the outside of the wheel will bend the pitch of your track
6 CUE Set a temporary cue point for the loaded track
7 PLAY/PAUSE Play/Pause virtual deck
8 PFL Cue PFL assign
9 BROWSER Scroll up and down in browser. Press to toggle between crates/library
10 SP-4 TRIGGER Trigger samples 1-4 in SP-4 player (press shift + sample trigger to turn off)
11 FILTER LP/HP filter control
12 CUEPOINTS 1-4 Set/trigger Hot Cues 1-4
13 TEMPO Controls the pitch of the playing deck
14 SHIFT Shift modifier
15 BEATS MULTIPLIER Use to adjust the effect time
16 FX BUTTONS 1-3 Effect enable/disable for FX slots 1-3
17 LOAD Load track to deck
18 SYNC Click Sync to match this deck's BPM value to the opposite deck (press shift + sync to turn off)
19 TAP FX TEMPO Tap Tempo/Auto BPM
20 FX ROTARY 1-3 Effect Depth for FX slots 1-3
SERATO DJ INTRO 3RD PARTY CONTROLLER QUICKSTART GUIDE 1.018
PIONEER DDJ-ERGO-V
INSTALLATION AND SETUP
Mac:
1) Connect your Ergo to available USB port
2) Open Serato DJ Intro
3) You should now see both virtual decks and be ready to DJ
Windows:
1) Download and install the drivers from www.pioneer.eu
2) Connect your Ergo to available USB port
3) Open Serato DJ Intro
4) You should now see both virtual decks and be ready to DJ
LOOPING
The Pioneer DDJ-Ergo-V has controls for both manual and auto-looping.
To make a manual a loop, set the in point by clicking the IN button, and the out point by clicking the
OUT button. To turn the loop on or off, click the AUTOLOOP button.
To adjust the in point of the loop, press down the IN button and move the platter to expand or contract
the loop start. Press the IN button again to return to the loop. The same applies to adjusting the out
point by pressing the OUT button and adjusting the platter.
Alternatively, the Pioneer DDJ-S1 has auto looping. Auto looping allows you to create loops instantly.
Auto-loops range from 1 to 8 bars. You can use the relevant Loop Set controls on your DJ Intro
hardware to select the auto-loop range. Pressing auto-loop again while auto-loop is active will
deactivate the loop.
NOTE: Auto-loop calculates the loop from the track’s BPM value, so make sure your tracks
have been analyzed prior to Auto-looping.
FILTER
The Pioneer DDJ-Ergo-V has one HP/LP rotary filter per channel. Turn the knob to the left to engage
the LP filter and to the right to engage the HP filter.
SERATO DJ INTRO 3RD PARTY CONTROLLER QUICKSTART GUIDE 1.0 19
HI
LOW
MID
HI
GAIN GAIN
FILTER
FX
IN
FUNCTION
MIX
VOLOUT VINYL KEYLOCK
TEMPO
SYNC
VINYL KEYLOCK
TEMPO
SYNC
SHIFTSHIFT
IN OUT
AUTO LOOP HOT CUE
SAMPLER
FX2 MASTER VOL
AUX / MIC VOL
HOT CUE
SAMPLER
FX1
FILTER
FX
AUTO LOOP
LOW
MID
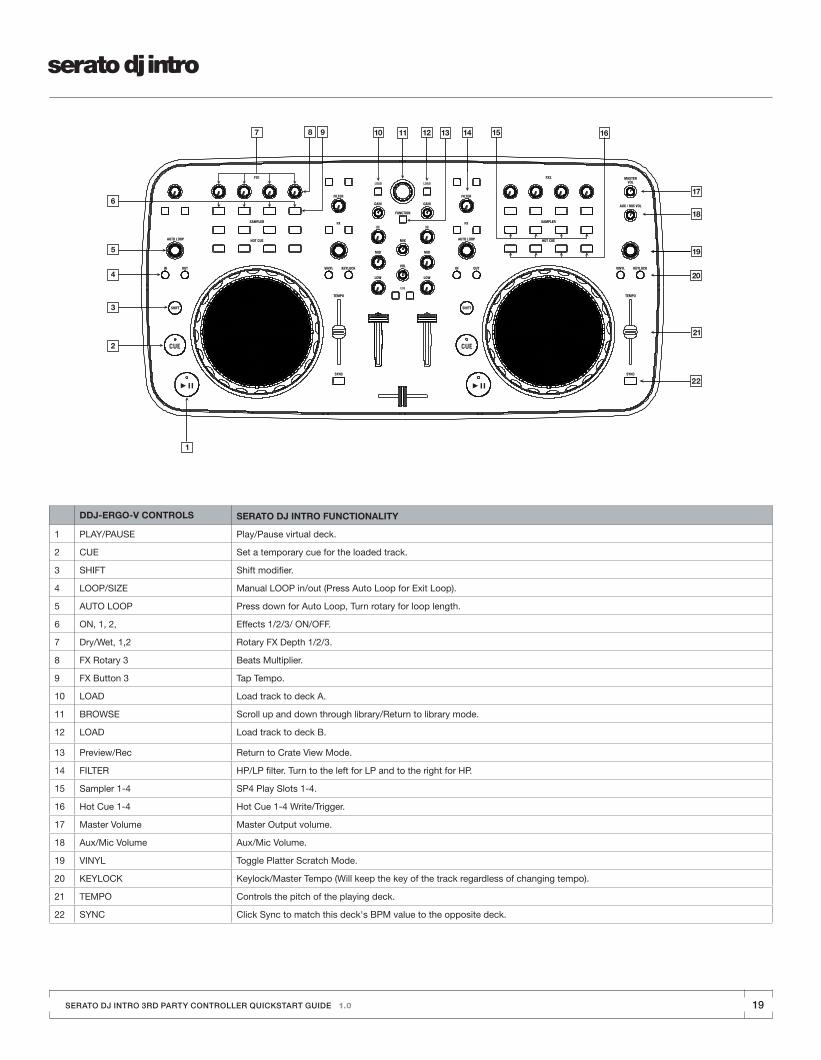
DDJ-ERGO-V CONTROLS SERATO DJ INTRO FUNCTIONALITY
1 PLAY/PAUSE Play/Pause virtual deck.
2 CUE Set a temporary cue for the loaded track.
3 SHIFT Shift modifier.
4 LOOP/SIZE Manual LOOP in/out (Press Auto Loop for Exit Loop).
5 AUTO LOOP Press down for Auto Loop, Turn rotary for loop length.
6 ON, 1, 2, Effects 1/2/3/ ON/OFF.
7 Dry/Wet, 1,2 Rotary FX Depth 1/2/3.
8 FX Rotary 3 Beats Multiplier.
9 FX Button 3 Tap Tempo.
10 LOAD Load track to deck A.
11 BROWSE Scroll up and down through library/Return to library mode.
12 LOAD Load track to deck B.
13 Preview/Rec Return to Crate View Mode.
14 FILTER HP/LP filter. Turn to the left for LP and to the right for HP.
15 Sampler 1-4 SP4 Play Slots 1-4.
16 Hot Cue 1-4 Hot Cue 1-4 Write/Trigger.
17 Master Volume Master Output volume.
18 Aux/Mic Volume Aux/Mic Volume.
19 VINYL Toggle Platter Scratch Mode.
20 KEYLOCK Keylock/Master Tempo (Will keep the key of the track regardless of changing tempo).
21 TEMPO Controls the pitch of the playing deck.
22 SYNC Click Sync to match this deck's BPM value to the opposite deck.