Embed Size (px)
Citation preview
Lamellenvorhänge
Zugschnur/Endlos-Wendekette
Montage- und Bedienungsanleitung
subject to technical changesous réserve de modifications techniques
technische Änderungen vorbehalten
9 / 2014
Assembly and operating instructions Notice de montage et mode d’emploi
Vertical blinds – Stores à bandes verticales
MarkierungMarking – Marquage
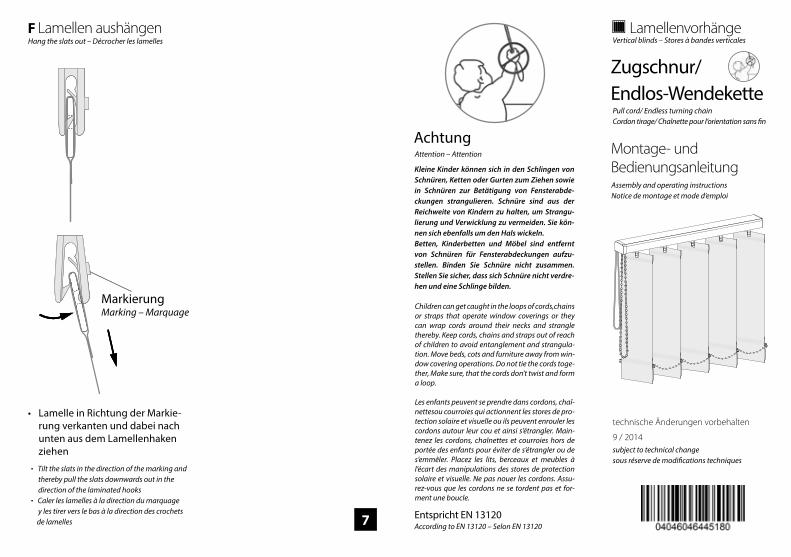
F Lamellen aushängenHang the slats out – Décrocher les lamelles
• Tilt the slats in the direction of the marking and thereby pull the slats downwards out in the direction of the laminated hooks• Caler les lamelles à la direction du marquage y les tirer vers le bas à la direction des crochets de lamelles
• Lamelle in Richtung der Markie-rung verkanten und dabei nach unten aus dem Lamellenhaken ziehen
Pull cord/ Endless turning chain Cordon tirage/ Chaînette pour l‘orientation sans fin
7 Entspricht EN 13120
Achtung
Kleine Kinder können sich in den Schlingen von Schnüren, Ketten oder Gurten zum Ziehen sowie in Schnüren zur Betätigung von Fensterabde-ckungen strangulieren. Schnüre sind aus der Reichweite von Kindern zu halten, um Strangu-lierung und Verwicklung zu vermeiden. Sie kön-nen sich ebenfalls um den Hals wickeln.Betten, Kinderbetten und Möbel sind entfernt von Schnüren für Fensterabdeckungen aufzu-stellen. Binden Sie Schnüre nicht zusammen. Stellen Sie sicher, dass sich Schnüre nicht verdre-hen und eine Schlinge bilden.
Attention – Attention
Children can get caught in the loops of cords,chains or straps that operate window coverings or they can wrap cords around their necks and strangle thereby. Keep cords, chains and straps out of reach of children to avoid entanglement and strangula-tion. Move beds, cots and furniture away from win-dow covering operations. Do not tie the cords toge-ther, Make sure, that the cords don’t twist and form a loop.
Les enfants peuvent se prendre dans cordons, chaî-nettesou courroies qui actionnent les stores de pro-tection solaire et visuelle ou ils peuvent enrouler les cordons autour leur cou et ainsi s’étrangler. Main-tenez les cordons, chaînettes et courroies hors de portée des enfants pour éviter de s’étrangler ou de s’emmêler. Placez les lits, berceaux et meubles à l’écart des manipulations des stores de protection solaire et visuelle. Ne pas nouer les cordons. Assu-rez-vous que les cordons ne se tordent pas et for-ment une boucle.
According to EN 13120 – Selon EN 13120
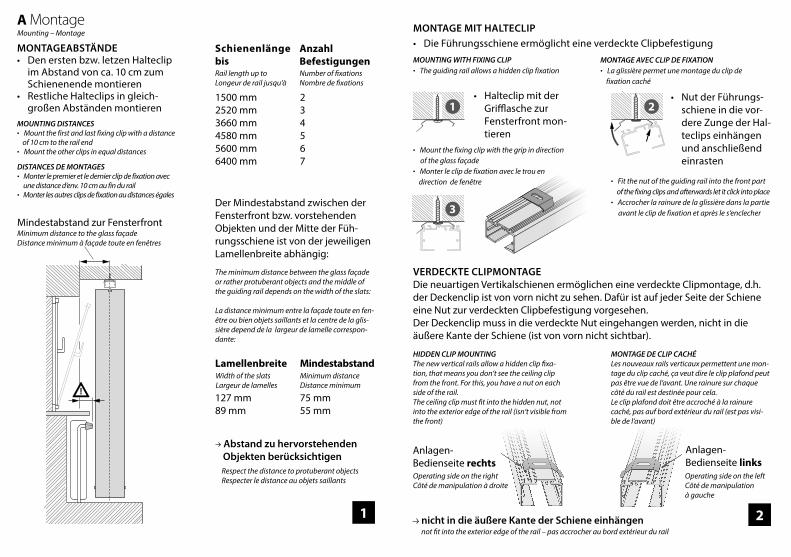
VERDECKTE CLIPMONTAGEDie neuartigen Vertikalschienen ermöglichen eine verdeckte Clipmontage, d.h. der Deckenclip ist von vorn nicht zu sehen. Dafür ist auf jeder Seite der Schiene eine Nut zur verdeckten Clipbefestigung vorgesehen.Der Deckenclip muss in die verdeckte Nut eingehangen werden, nicht in die äußere Kante der Schiene (ist von vorn nicht sichtbar).
Anlagen-Bedienseite rechts
Anlagen-Bedienseite links
HIDDEN CLIP MOUNTINGThe new vertical rails allow a hidden clip fixa-tion, that means you don‘t see the ceiling clip from the front. For this, you have a nut on each side of the rail.The ceiling clip must fit into the hidden nut, not into the exterior edge of the rail (isn‘t visible from the front)
MONTAGE DE CLIP CACHÉLes nouveaux rails verticaux permettent une mon-tage du clip caché, ça veut dire le clip plafond peut pas être vue de l‘avant. Une rainure sur chaque côté du rail est destinée pour cela.Le clip plafond doit être accroché à la rainure caché, pas auf bord extérieur du rail (est pas visi-ble de l‘avant)
Operating side on the rightCôté de manipulation à droite
Operating side on the leftCôté de manipulation à gauche
MONTAGEABSTÄNDE• Den ersten bzw. letzen Halteclip
im Abstand von ca. 10 cm zum Schienen ende montieren
• Restliche Halteclips in gleich-großen Abständen montieren
Abstand zu hervorstehenden Objekten berücksichtigen
nicht in die äußere Kante der Schiene einhängen
Der Mindestabstand zwischen der Fensterfront bzw. vorstehenden Objekten und der Mitte der Füh-rungsschiene ist von der jeweiligen Lamellenbreite abhängig:
1 2
A MontageMounting – Montage
MOUNTING DISTANCES• Mount the first and last fixing clip with a distance of 10 cm to the rail end • Mount the other clips in equal distances
DISTANCES DE MONTAGES• Monter le premier et le dernier clip de fixation avec une distance d‘env. 10 cm au fin du rail • Monter les autres clips de fixation au distances égales
Mindestabstand zur FensterfrontMinimum distance to the glass façade Distance minimum à façade toute en fenêtres
The minimum distance between the glass façade or rather protuberant objects and the middle of the guiding rail depends on the width of the slats: La distance minimum entre la façade toute en fen-être ou bien objets saillants et la centre de la glis-sière depend de la largeur de lamelle correspon-dante:
Lamellenbreite MindestabstandWidth of the slatsLargeur de lamelles
Minimum distanceDistance minimum
127 mm89 mm
75 mm55 mm
Respect the distance to protuberant objectsRespecter le distance au objets saillants
MONTAGE MIT HALTECLIP• Die Führungsschiene ermöglicht eine verdeckte Clipbefestigung
• Halteclip mit der Grifflasche zur Fensterfront mon-tieren
• Nut der Führungs-schiene in die vor-dere Zunge der Hal-teclips einhängen und anschließend einrasten
MOUNTING WITH FIXING CLIP• The guiding rail allows a hidden clip fixation
MONTAGE AVEC CLIP DE FIXATION• La glissière permet une montage du clip de fixation caché
• Mount the fixing clip with the grip in direction of the glass façade • Monter le clip de fixation avec le trou en direction de fenêtre • Fit the nut of the guiding rail into the front part
of the fixing clips and afterwards let it click into place• Accrocher la rainure de la glissière dans la partie avant le clip de fixation et après le s‘enclecher
not fit into the exterior edge of the rail – pas accrocher au bord extérieur du rail
1
3
2
Schienenlänge bis
Anzahl Befestigungen
Rail length up toLongeur de rail jusqu‘à
Number of fixationsNombre de fixations
1500 mm 22520 mm 33660 mm 44580 mm 55600 mm 66400 mm 7
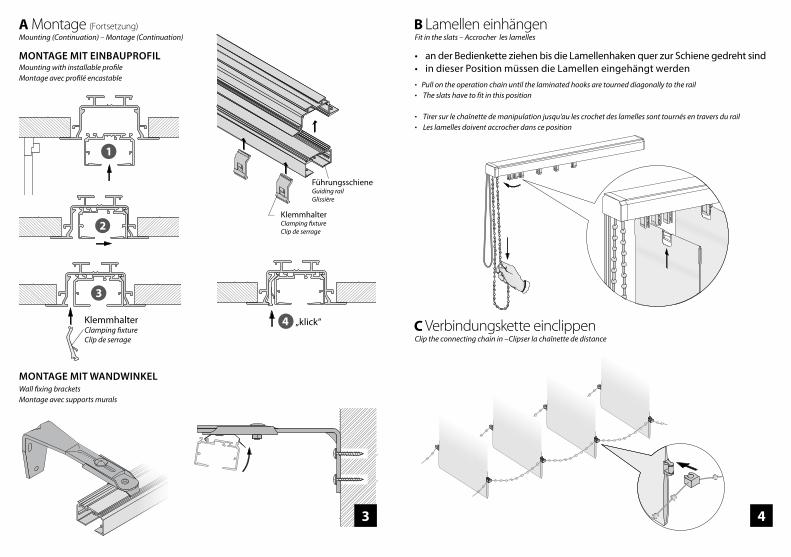
B Lamellen einhängen
C Verbindungskette einclippen
• an der Bedienkette ziehen bis die Lamellenhaken quer zur Schiene gedreht sind• in dieser Position müssen die Lamellen eingehängt werden
Fit in the slats – Accrocher les lamelles
• Pull on the operation chain until the laminated hooks are tourned diagonally to the rail• The slats have to fit in this position • Tirer sur le chaînette de manipulation jusqu‘au les crochet des lamelles sont tournés en travers du rail • Les lamelles doivent accrocher dans ce position
Clip the connecting chain in –Clipser la chaînette de distance
FührungsschieneGuiding railGlissière
KlemmhalterClamping �xtureClip de serrage
4 „klick“
3
KlemmhalterClamping �xtureClip de serrage
1
2
A Montage (Fortsetzung)
MONTAGE MIT EINBAUPROFIL
MONTAGE MIT WANDWINKEL
Mounting (Continuation) – Montage (Continuation)
Mounting with installable profile Montage avec profilé encastable
Wall fixing brackets Montage avec supports murals
43
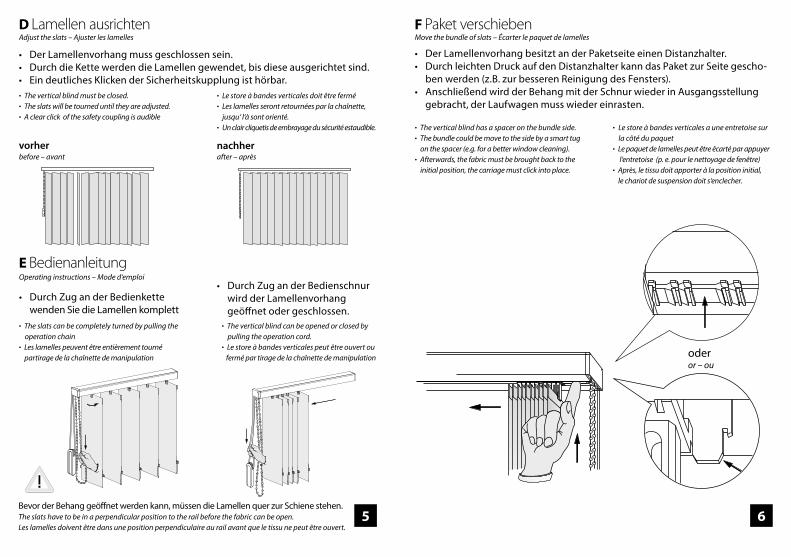
oderor – ou
Move the bundle of slats – Écarter le paquet de lamellesF Paket verschieben
• Der Lamellenvorhang besitzt an der Paketseite einen Distanzhalter. • Durch leichten Druck auf den Distanzhalter kann das Paket zur Seite gescho-
ben werden (z.B. zur besseren Reinigung des Fensters).• Anschließend wird der Behang mit der Schnur wieder in Ausgangsstellung
gebracht, der Laufwagen muss wieder einrasten.
• Der Lamellenvorhang muss geschlossen sein. • Durch die Kette werden die Lamellen gewendet, bis diese ausgerichtet sind. • Ein deutliches Klicken der Sicherheitskupplung ist hörbar.
D Lamellen ausrichtenAdjust the slats – Ajuster les lamelles
• The vertical blind must be closed.• The slats will be tourned until they are adjusted.• A clear click of the safety coupling is audible
• Le store à bandes verticales doit être fermé• Les lamelles seront retournées par la chaînette, jusqu‘ l‘à sont orienté.• Un clair cliquetis de embrayage du sécurité estaudible.
vorher nachherbefore – avant after – après
• The vertical blind has a spacer on the bundle side.• The bundle could be move to the side by a smart tug on the spacer (e.g. for a better window cleaning).• Afterwards, the fabric must be brought back to the initial position, the carriage must click into place.
• Le store à bandes verticales a une entretoise sur la côté du paquet• Le paquet de lamelles peut être êcarté par appuyer l‘entretoise (p. e. pour le nettoyage de fenêtre)• Après, le tissu doit apporter à la position initial, le chariot de suspension doit s‘enclecher.
E BedienanleitungOperating instructions – Mode d‘emploi
• Durch Zug an der Bedienkette wenden Sie die Lamellen komplett
• Durch Zug an der Bedienschnur wird der Lamellenvorhang geöffnet oder geschlossen.
Bevor der Behang geöffnet werden kann, müssen die Lamellen quer zur Schiene stehen. The slats have to be in a perpendicular position to the rail before the fabric can be open. Les lamelles doivent être dans une position perpendiculaire au rail avant que le tissu ne peut être ouvert.
• The slats can be completely turned by pulling the operation chain• Les lamelles peuvent être entièrement tourné partirage de la chaînette de manipulation
• The vertical blind can be opened or closed by pulling the operation cord.• Le store à bandes verticales peut être ouvert ou fermé par tirage de la chaînette de manipulation
5 6