Ser
vice
Cam
pai
gn
BP
W E
CO
Dis
cTr
aile
r d
isc
bra
kes
BPW BERGISCHE ACHSEN
SHSKS..LL
BPW ECO DiscTrailer disc brakeTSB 3709 / 4309 / 4312
Service Campaign
2
BPW ECO Disc Service Campaign
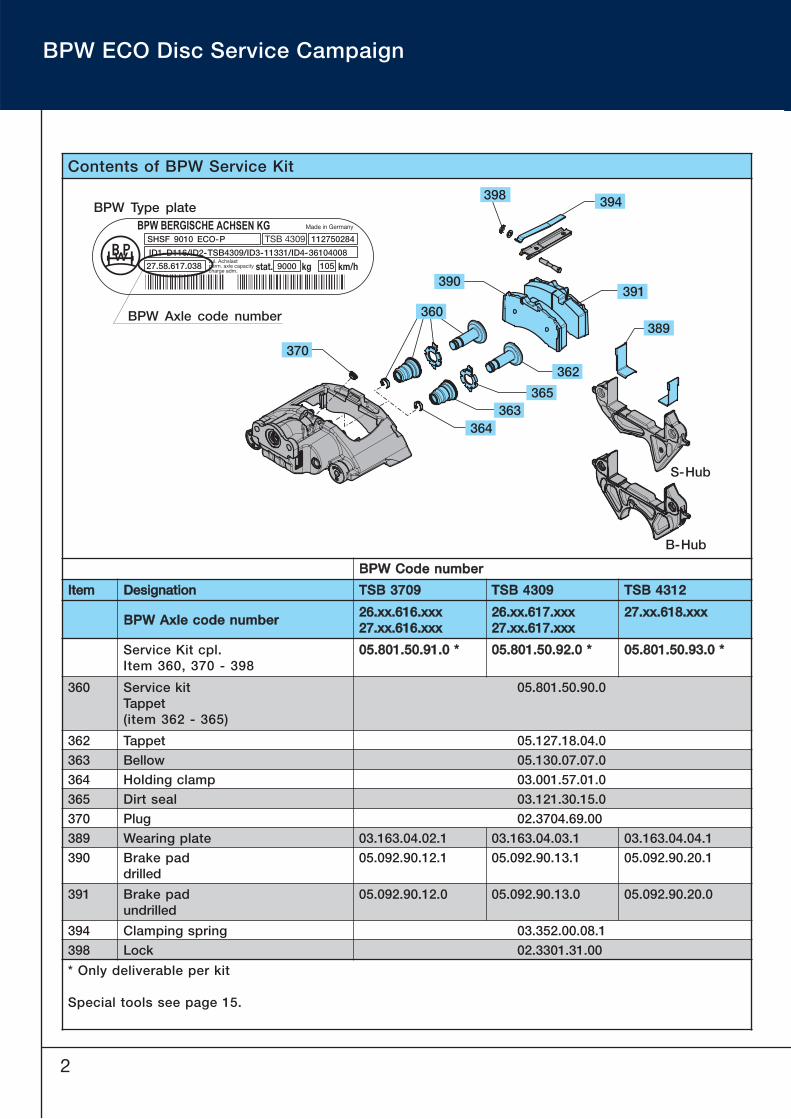
Contents of BPW Service Kit
389
B-Hub
S-Hub
391390
394398
370
362
365363
364
360
BPW BERGISCHE ACHSEN KG
112750284
27.58.617.038 9000 105
SHSF 9010 ECO-P TSB 4309
ID1-D116/ID2-TSB4309/ID3-11331/ID4-36104008
BPW Axle code number
BPW Type plate
BBPPWW CCooddee nnuummbbeerr
IItteemm DDeessiiggnnaattiioonn TTSSBB 33770099 TTSSBB 44330099 TTSSBB 44331122
BBPPWW AAxxllee ccooddee nnuummbbeerr2266..xxxx..661166..xxxxxx2277..xxxx..661166..xxxxxx
2266..xxxx..661177..xxxxxx2277..xxxx..661177..xxxxxx
2277..xxxx..661188..xxxxxx
Service Kit cpl.Item 360, 370 - 398
0055..880011..5500..9911..00 ** 0055..880011..5500..9922..00 ** 0055..880011..5500..9933..00 **
360 Service kitTappet(item 362 - 365)
05.801.50.90.0
362 Tappet 05.127.18.04.0
363 Bellow 05.130.07.07.0
364 Holding clamp 03.001.57.01.0
365 Dirt seal 03.121.30.15.0
370 Plug 02.3704.69.00
389 Wearing plate 03.163.04.02.1 03.163.04.03.1 03.163.04.04.1
390 Brake paddrilled
05.092.90.12.1 05.092.90.13.1 05.092.90.20.1
391 Brake padundrilled
05.092.90.12.0 05.092.90.13.0 05.092.90.20.0
394 Clamping spring 03.352.00.08.1
398 Lock 02.3301.31.00
* Only deliverable per kit
Special tools see page 15.
BPW ECO Disc Service Campaign BBPPWW BBEERRGGIISSCCHHEE AACCHHSSEENN
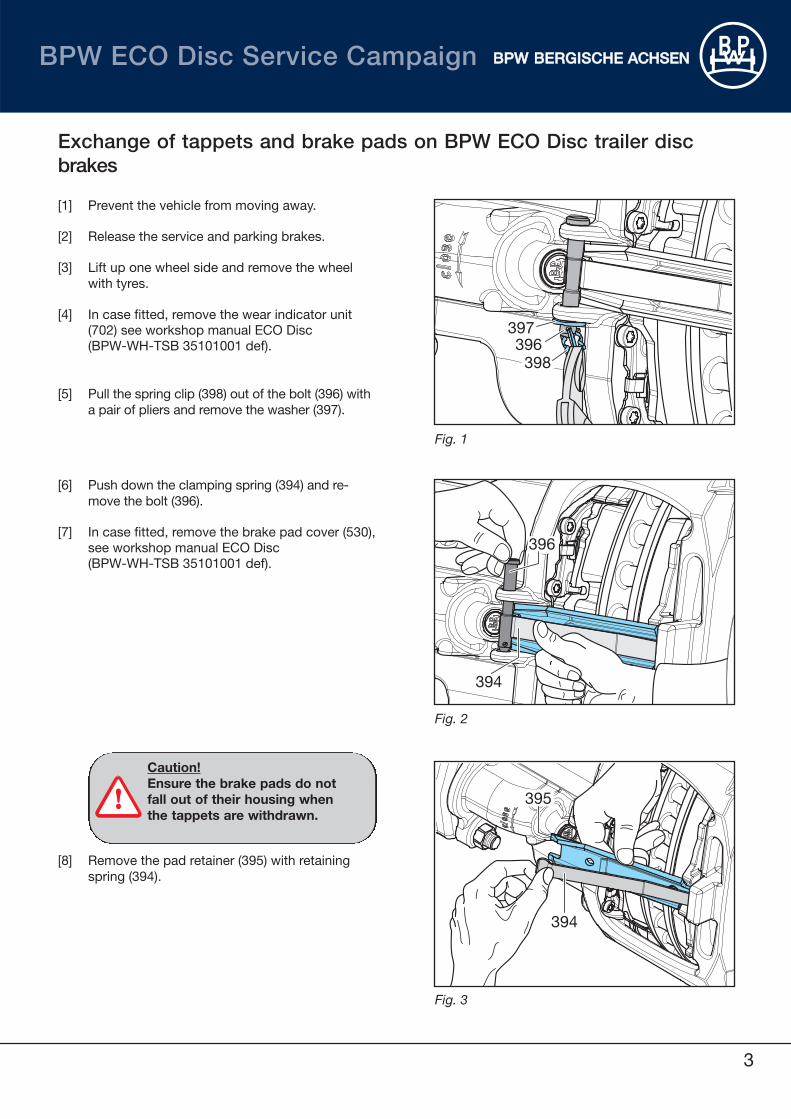
Exchange of tappets and brake pads on BPW ECO Disc trailer disc brakes
398396
397
Fig. 1
Fig. 2
Fig. 3
[1] Prevent the vehicle from moving away.
[2] Release the service and parking brakes.
[3] Lift up one wheel side and remove the wheelwith tyres.
[4] In case fitted, remove the wear indicator unit(702) see workshop manual ECO Disc(BPW�WH�TSB 35101001 def).
[5] Pull the spring clip (398) out of the bolt (396) witha pair of pliers and remove the washer (397).
[6] Push down the clamping spring (394) and re�move the bolt (396).
[7] In case fitted, remove the brake pad cover (530),see workshop manual ECO Disc (BPW�WH�TSB 35101001 def).
[8] Remove the pad retainer (395) with retainingspring (394).
394
395
396
394
Caution!Ensure the brake pads do not fall out of their housing when the tappets are withdrawn.
3

4
Fig. 4
Fig. 5
Fig. 6
390
370
[11] Remove the brake pads (390).
[9] Remove the sealing plug (370) of the adjuster(torx screw).
[10] Using a torx screw driver (T25), depress theadjuster screw and turn it clockwise (a clicking sound is heard) until the tappets have been completely reset.
BPW ECO Disc Service Campaign
iRepair guide!After the brake pads havebeen removed make surethat the calliper is shiftingeasily.
BBPPWW BBEERRGGIISSCCHHEE AACCHHSSEENN
5
389
Fig. 7
Fig. 8
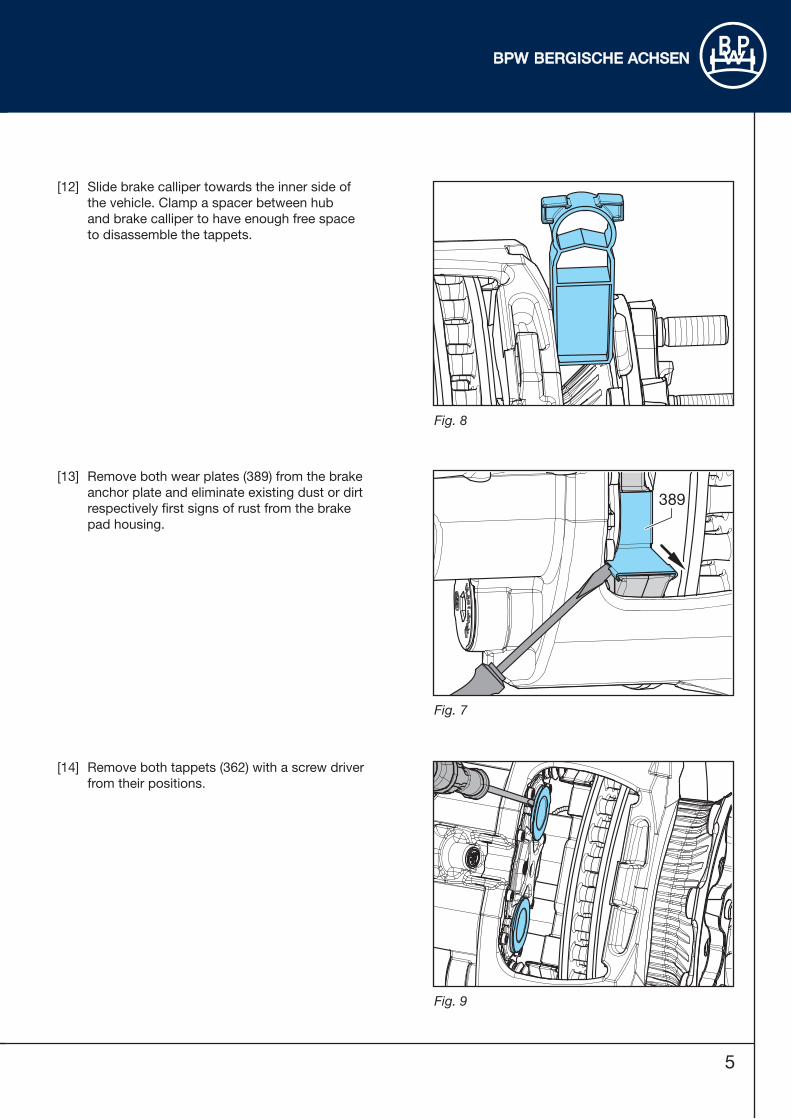
[13] Remove both wear plates (389) from the brakeanchor plate and eliminate existing dust or dirtrespectively first signs of rust from the brakepad housing.
[12] Slide brake calliper towards the inner side of the vehicle. Clamp a spacer between hub and brake calliper to have enough free space to disassemble the tappets.
Fig. 9
[14] Remove both tappets (362) with a screw driverfrom their positions.
6
362365
363
Fig. 10
Fig. 11
Fig. 12
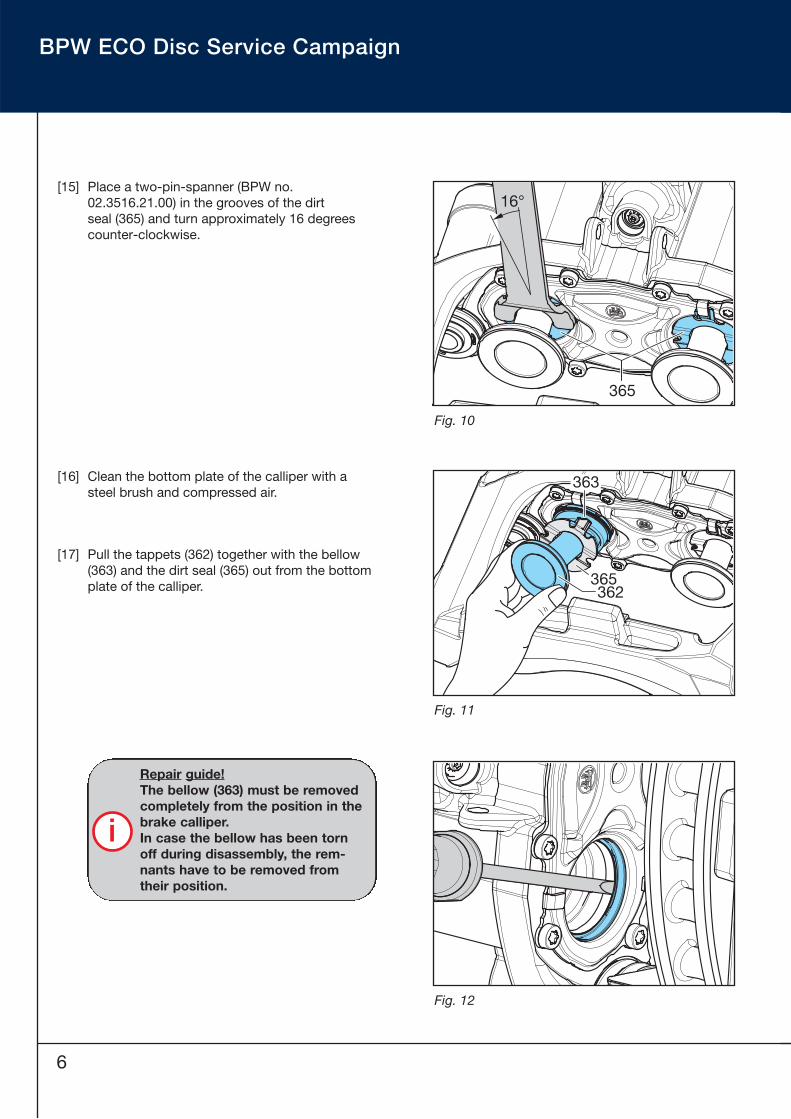
[15] Place a two�pin�spanner (BPW no.02.3516.21.00) in the grooves of the dirt seal (365) and turn approximately 16 degreescounter�clockwise.
365
16°
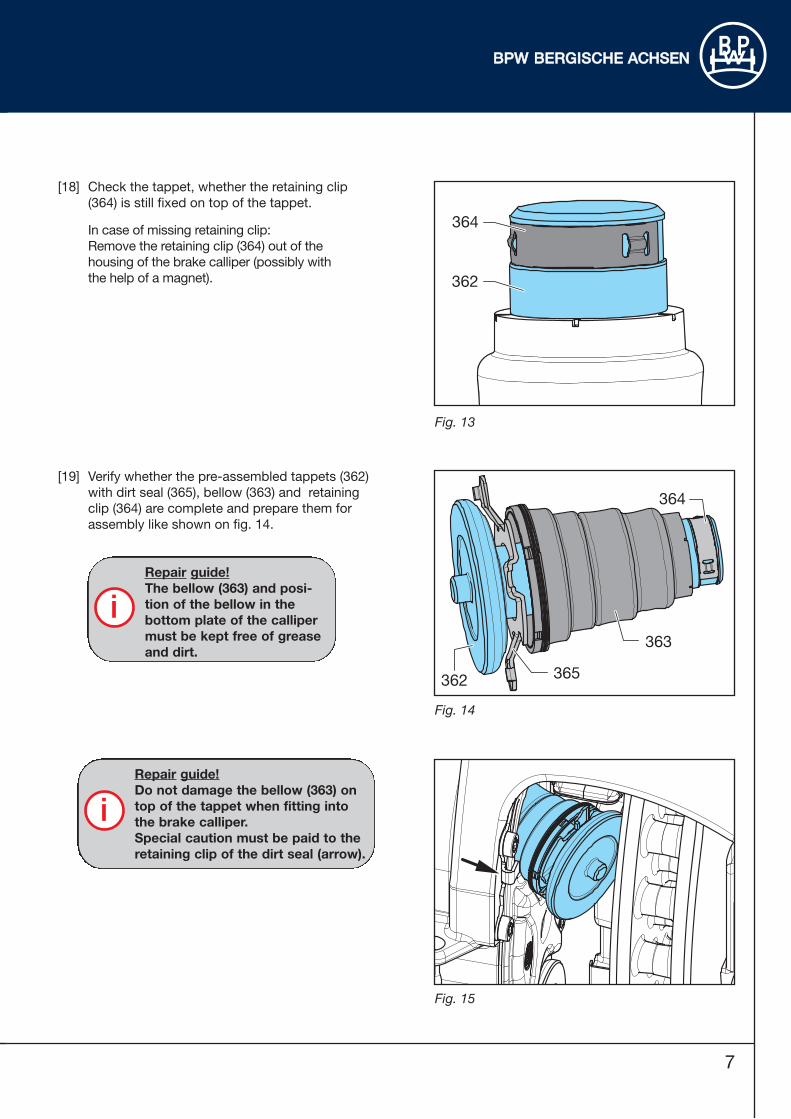
[16] Clean the bottom plate of the calliper with asteel brush and compressed air.
[17] Pull the tappets (362) together with the bellow(363) and the dirt seal (365) out from the bottomplate of the calliper.
BPW ECO Disc Service Campaign
i
Repair guide!The bellow (363) must be removedcompletely from the position in thebrake calliper.In case the bellow has been torn off during disassembly, the rem�nants have to be removed from their position.
BBPPWW BBEERRGGIISSCCHHEE AACCHHSSEENN
7
Fig. 13
364
362
[18] Check the tappet, whether the retaining clip(364) is still fixed on top of the tappet.
In case of missing retaining clip:Remove the retaining clip (364) out of the housing of the brake calliper (possibly with the help of a magnet).
Fig. 14
362 365
363
364
[19] Verify whether the pre�assembled tappets (362)with dirt seal (365), bellow (363) and retainingclip (364) are complete and prepare them forassembly like shown on fig. 14.
Fig. 15
iRepair guide!Do not damage the bellow (363) ontop of the tappet when fitting into the brake calliper.Special caution must be paid to theretaining clip of the dirt seal (arrow).
iRepair guide!The bellow (363) and posi�tion of the bellow in the bottom plate of the callipermust be kept free of greaseand dirt.
8
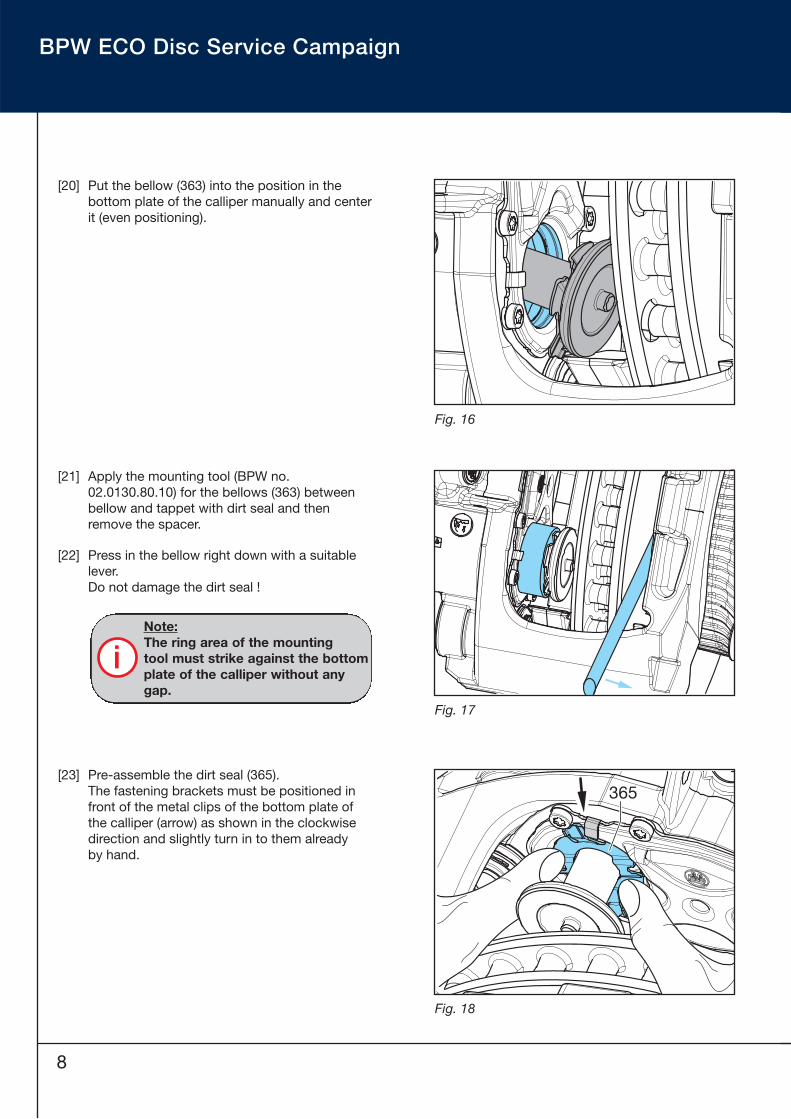
[20] Put the bellow (363) into the position in thebottom plate of the calliper manually and centerit (even positioning).
Fig. 16
Fig. 17
[21] Apply the mounting tool (BPW no.02.0130.80.10) for the bellows (363) betweenbellow and tappet with dirt seal and then remove the spacer.
[22] Press in the bellow right down with a suitablelever.Do not damage the dirt seal !
Fig. 18
365[23] Pre�assemble the dirt seal (365).
The fastening brackets must be positioned infront of the metal clips of the bottom plate ofthe calliper (arrow) as shown in the clockwisedirection and slightly turn in to them already by hand.
BPW ECO Disc Service Campaign
iNote:The ring area of the mounting tool must strike against the bottomplate of the calliper without anygap.
BBPPWW BBEERRGGIISSCCHHEE AACCHHSSEENN
9
Fig. 19
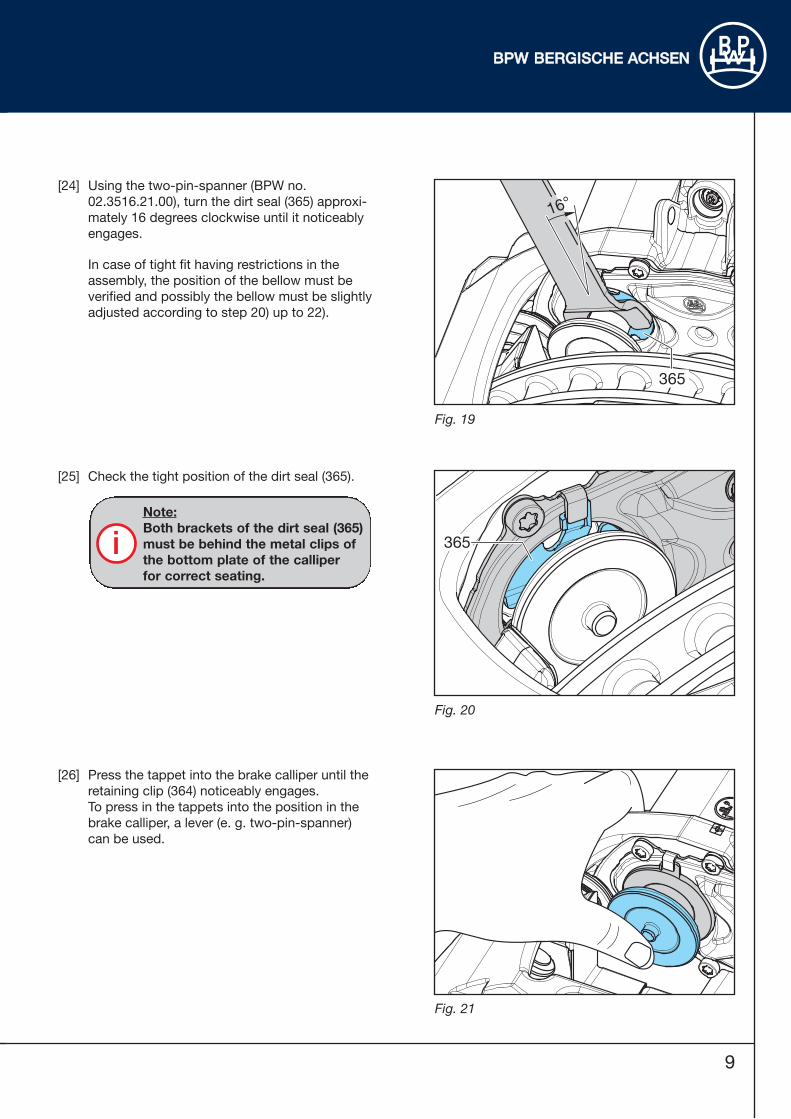
16°
365
[24] Using the two�pin�spanner (BPW no.02.3516.21.00), turn the dirt seal (365) approxi�mately 16 degrees clockwise until it noticeablyengages.
In case of tight fit having restrictions in theassembly, the position of the bellow must beverified and possibly the bellow must be slightlyadjusted according to step 20) up to 22).
Fig. 20
365
[25] Check the tight position of the dirt seal (365).
[26] Press the tappet into the brake calliper until theretaining clip (364) noticeably engages. To press in the tappets into the position in thebrake calliper, a lever (e. g. two�pin�spanner)can be used.
Fig. 21
iNote:Both brackets of the dirt seal (365)must be behind the metal clips ofthe bottom plate of the calliper for correct seating.
BPW ECO Disc Service Campaign
10
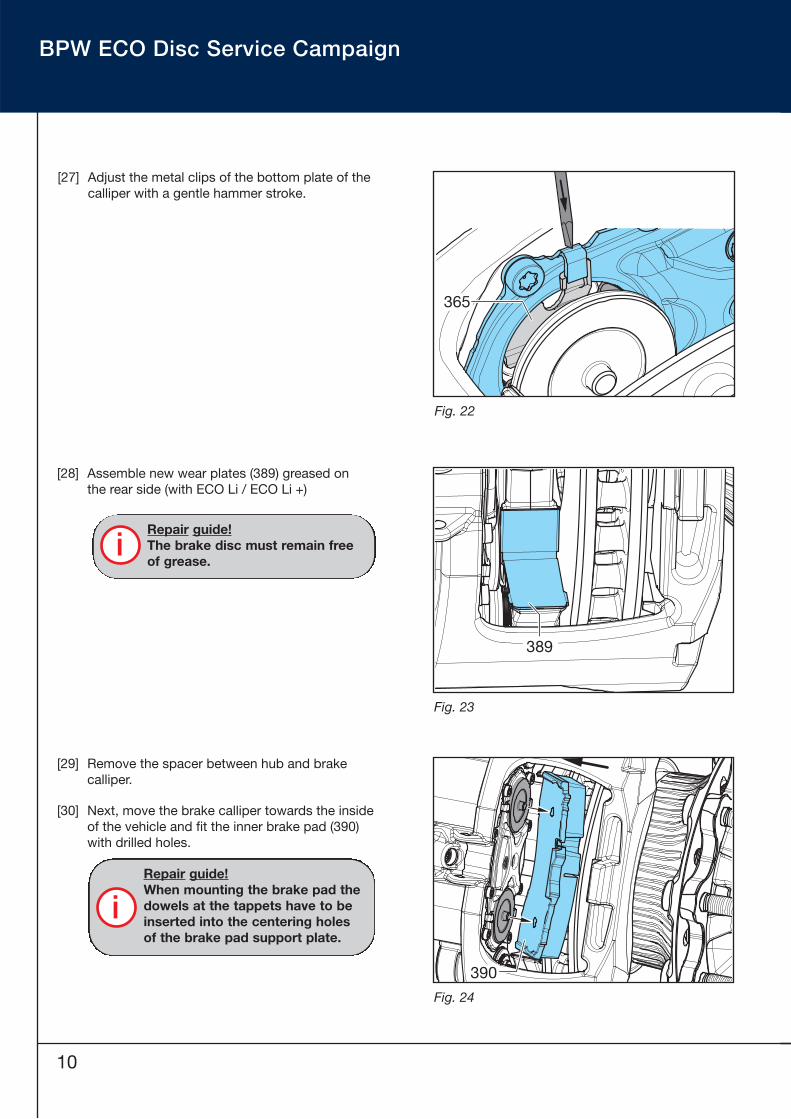
Fig. 23
Fig. 24
390
[29] Remove the spacer between hub and brakecalliper.
[30] Next, move the brake calliper towards the insideof the vehicle and fit the inner brake pad (390)with drilled holes.
389
[28] Assemble new wear plates (389) greased on the rear side (with ECO Li / ECO Li +)
365
[27] Adjust the metal clips of the bottom plate of thecalliper with a gentle hammer stroke.
Fig. 22
iRepair guide!When mounting the brake pad thedowels at the tappets have to beinserted into the centering holes of the brake pad support plate.
iRepair guide!The brake disc must remain free of grease.
BBPPWW BBEERRGGIISSCCHHEE AACCHHSSEENN
11
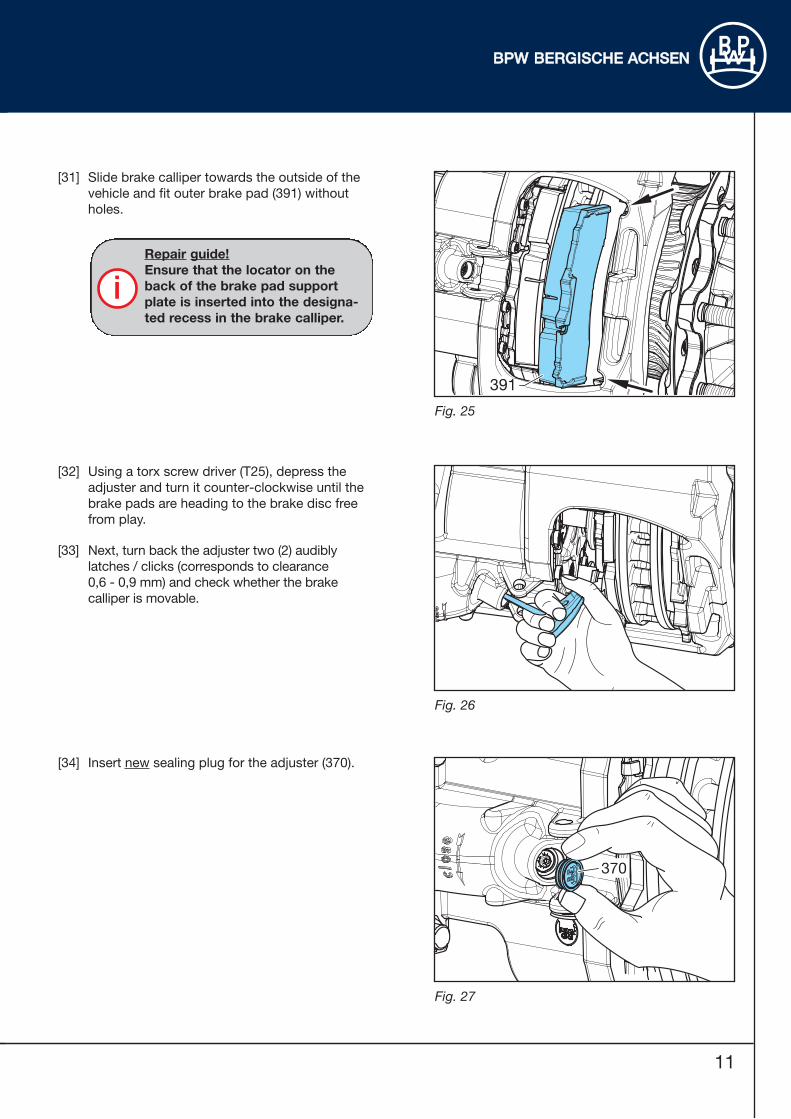
Fig. 25
391
[31] Slide brake calliper towards the outside of thevehicle and fit outer brake pad (391) withoutholes.
Fig. 26
[32] Using a torx screw driver (T25), depress theadjuster and turn it counter�clockwise until thebrake pads are heading to the brake disc freefrom play.
[33] Next, turn back the adjuster two (2) audibly latches / clicks (corresponds to clearance 0,6 � 0,9 mm) and check whether the brakecalliper is movable.
Fig. 27
370
[34] Insert new sealing plug for the adjuster (370).
iRepair guide!Ensure that the locator on the back of the brake pad supportplate is inserted into the designa�ted recess in the brake calliper.
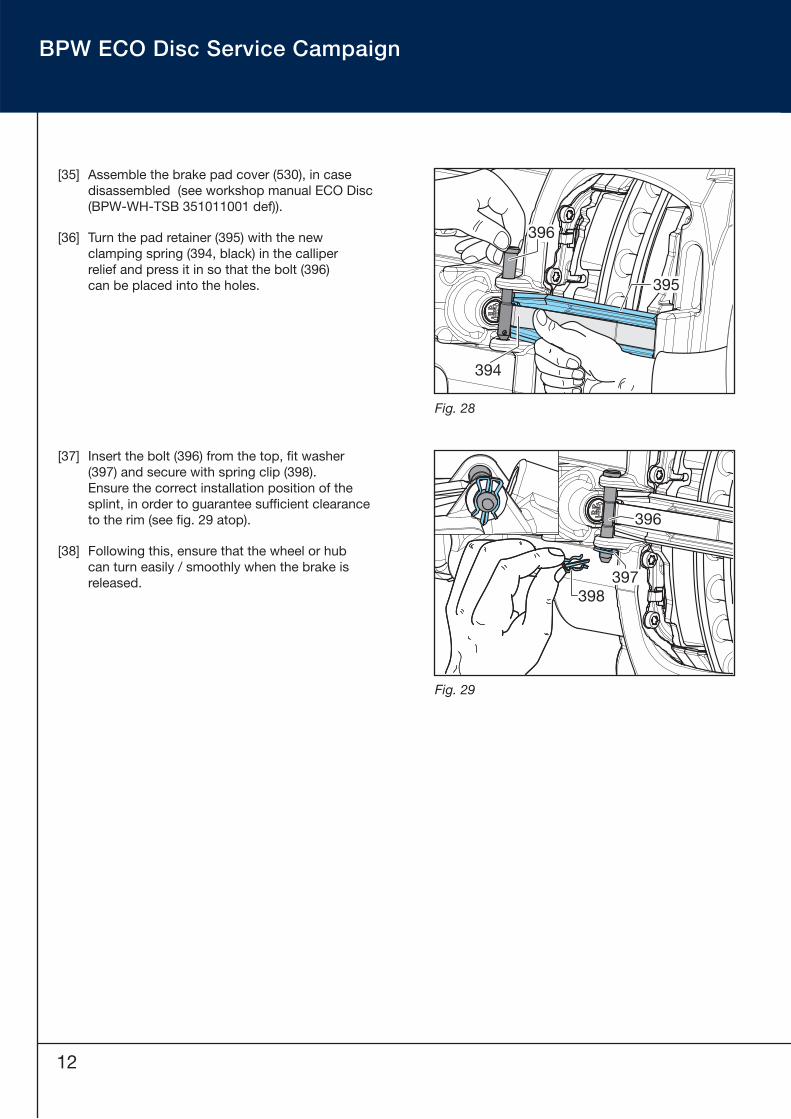
Fig. 28
BPW ECO Disc Service Campaign
12
396
394
395
[35] Assemble the brake pad cover (530), in casedisassembled (see workshop manual ECO Disc(BPW�WH�TSB 351011001 def)).
[36] Turn the pad retainer (395) with the new clamping spring (394, black) in the calliper relief and press it in so that the bolt (396) can be placed into the holes.
Fig. 29
398
396
397
[37] Insert the bolt (396) from the top, fit washer(397) and secure with spring clip (398).Ensure the correct installation position of thesplint, in order to guarantee sufficient clearanceto the rim (see fig. 29 atop).
[38] Following this, ensure that the wheel or hub can turn easily / smoothly when the brake isreleased.
[39] Install the wear indicator unit (702), in caseremoved (see workshop manual ECO Disc (BPW�WH�TSB 35101001 def)).
[40] Re�attach the wheels.
[41] Re�assemble the wheel nuts.
[42] Lower the axle and tighten the wheel nuts to therequired torque.
Set�up time per vehicle:30 minutes
Assembly time Exchange of tappet and pad: 25 minutes per wheel side
Warning!The braking effect of new discsand pads is only at its optimumafter a few braking applications.Therefore, bed in new brake pads. During the bedding avoid sharpbraking respectively lengthybrake application.
Important!
Retighten the wheel nutsafter 50 kilometres of operation.
BBPPWW BBEERRGGIISSCCHHEE AACCHHSSEENN
13

14
BPW ECO Disc Service Campaign
BBPPWW BBEERRGGIISSCCHHEE AACCHHSSEENN
15
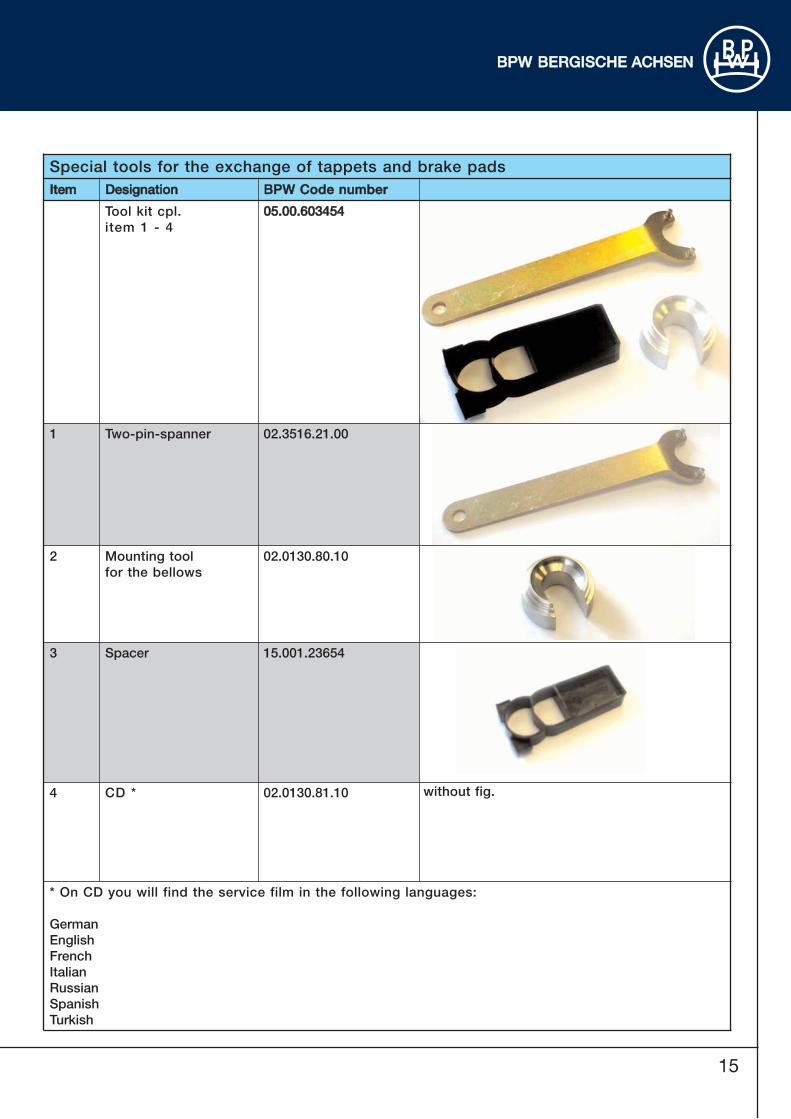
Special tools for the exchange of tappets and brake padsIItteemm DDeessiiggnnaattiioonn BBPPWW CCooddee nnuummbbeerr
Tool kit cpl.item 1 - 4
0055..0000..660033445544
1 Two-pin-spanner 02.3516.21.00
2 Mounting toolfor the bellows
02.0130.80.10
3 Spacer 15.001.23654
4 CD * 02.0130.81.10 without fig.
* On CD you will find the service film in the following languages:
GermanEnglishFrenchItalianRussianSpanishTurkish

BPW Bergische Achsen Kommanditgesellschaft, P.O. Box 12 80, D-51656 Wiehl, Phone: +49 2262 78-0, [email protected], www.bpw.de
BP
W-S
M-T
SB
e
Recommended