2
04.2004 TR30A006 RE 04.2004 TR30A006 RE 7/9 3-6/8 1/10/11 2 2 2 1 1 / 2 1 / 2 04.2004 TR30A006 RE Verriegelungs-Set für Double Door Das Verriegelungs-Set ermöglicht im Zusammenhang mit einem Garagen- torantrieb das Verriegeln eines Schwingtores mit seinen Schnäppern bzw. es ermöglicht das Entriegeln bevor der Garagentorantrieb das Tor auffährt. Für den optimalen Betrieb des Verriegelungs-Sets ist es erforderlich, dass alle Anweisungen, die in dieser Anleitung enthalten sind, eingehalten werden! Bild 1 Der Mitnehmer ist mittig auf dem oberen Torabschluss zu montieren. Bild 2 Sind die Schnäpper an dem Tor festgestellt, so sind diese jetzt zu lösen. Das Verriegelungs-Set ist, wie auf den folgenden Bildern gezeigt, zu montieren. Bild 8/10-11 Das Seil ist mit der Seil-Öse am Zahnrad zu befestigen und am Klemmstück des Mitnehmers festzuklemmen; hier ist anschließend auch die Seillänge zu justieren. Hinweis: Die Seillänge ist mit einer minimalen Vorspannung anzupassen! Wegen der verschiedenen Tor-Typen, ist das Verriegelungs-Set an jedem Tor individuell einzustellen! Achtung! Um sicherzugehen, dass die Funktion von dem Ver- riegelungs-Set gegeben ist, wird empfohlen, nach der Montage mehrere Probeläufe durchzuführen; gegebenen- falls ist der Garagentorantrieb neu einzulernen. Tipp Beim Kürzen des Drahtseiles, sollte die durchzutrennende Stelle mit einem stabilen Klebeband umwickelt werden, damit ein Aufspleißen des Seiles vermieden wird – siehe Bild 11. Latching Set for Double Door Combined with a garage door operator, the latching set allows the latches of an up-and-over door to engage or disengage before the garage door operator causes the door to open. To ensure optimum operation and functioning of the latching set, observe the following instructions in full! Figure 1 Fit the door link centrally on the top part of the door. Figure 2 If the latches on the door are fixed, these should now be released. Fit the latching set as shown in the figures. Figure 8/10-11 Fasten the cable via the cable eyelet onto the toothed wheel and clamp onto the cable clamp of the door link; afterwards also adjust the length of the cable here. Note: Adjust the length of the cable with minimum tautness. Due to the various door types, the latching set is individually set for each door! Attention! In order to ensure that the latching set is functioning correctly, it is advisable to test it several times once it has been fitted. It might be necessary to re-adjust the garage door operator. Tip On shortening the wire cable, it is advisable to wrap strong adhesive tape around the point at which the cable is to be cut to prevent it from splicing – see figure 11. Set de verrouillage pour Double Door Le set de verrouillage assure, en combinaison avec la motorisation, le verrouil- lage de la porte basculante avec ses pênes et effectue le déverrouillage avant que la motorisation ouvre la porte. Pour un fonctionnement optimal du set de verrouillage, il est indispensable que toutes les instructions, reprises dans cette notice, soient respectées! Illustration 1 L’entraîneur doit être fixé au milieu du profil d’étanchéité supérieur de la porte. Illustration 2 Lorsque les pênes de la porte sont bloqués, ceux-ci doivent être débloqués. Monter le set de verrouillage suivant les illustrations suivantes. Illustrations 8/10-11 Fixer la corde avec l’oeillet à la courroie crantée et à la pièce de serrage de l’entraîneur. Adapter la longueur de la corde. Remarque: La longueur de la corde doit être adaptée avec une tension minimale! Le set de verrouillage est adapté à chaque type de porte! Attention! Afin de vous assurer du bon fonctionnement du set de verrouillage, nous recommandons d’effectuer quelques cycles d’essai après le montage. Procéder à un nouvel apprentissage de la motorisation, le cas échéant. Mise en garde Lors du raccourcissement de la corde, envelopper celle-ci par une bande adhésive afin d’éviter l’effilage – voir illustration 11. Vergrendelingsset voor Double Door De vergrendelingsset zorgt samen met de garagedeuraandrijving voor de ver- grendeling van de kanteldeur met zijn snappers en maakt de ontgrendeling mogelijk voordat de garagedeuraandrijving de deur opent. Voor de optimale functie van de vergrendelingsset is het noodzakelijk dat alle aanwijzingen, die deze handleiding bevat, in acht genomen worden! Afbeelding 1 De meenemer moet midden op de bovenste deurafsluiting gemonteerd worden. Afbeelding 2 Zijn de snappers vastgemaakt op de deur, dan moeten deze nu losgemaakt wor- den. De vergrendelingsset monteren zoals getoond in de volgende illustraties. Afbeeldingen 8/10-11 Het koord met het oog aan de tandriem bevestigen en aan het klemstuk van de meenemer vastklemmen. Vervolgens de koordlengte aanpassen. Opmerking: De koordlengte moet met een minimale voorspanning aangepast worden! Afhankelijk van het deurtype is de vergrendelingsset individueel op elke deur afgestemd! Attentie! Om zeker te zijn dat de vergrendelingsset goed func- tioneert wordt aanbevolen na de montage de werking ervan enkele malen te testen. Eventueel moet de garagedeuraandrijving opnieuw ingeleerd worden. Tip Bij het inkorten van het koord moet de plaats waar deze door- geknipt wordt met een stevige kleefband omwikkeld worden om het uitrafelen te vermijden – zie afbeelding 11. Kit di bloccaggio Double Door Il kit di bloccaggio consente, in abbinamento con una motorizzazione, di bloc- care la porta basculante mediante i chiavistelli ed anche di sbloccarla prima che la motorizzazione apra la porta. (sincronizzatore) Per garantire un perfetto funzionamento del kit di bloccaggio devono essere rispettate tutte le avvertenze contenute nelle presenti istruzioni! Fig. 1 Montare il lo snodo di rinvio al centro del bordo superiore della porta. Fig. 2 Nel caso in cui i chiavistelli sulla porta fossero bloccati, è necessario allentarli. Montare il kit di bloccaggio come illustrato nelle seguenti figure. Fig. 8/10-11 Fissare il cappio della fune sul disco abbinato alla martelline interne e l'altra estremità all'elemento di bloccaggio del lo snodo di rinvio; di seguito va poi anche regolata la lunghezza della fune. Avvertenza: La lunghezza della fune deve essere regolata tensionandola leggermente! Il kit di bloccaggio è adattato a tutti i tipi di porta. ATTENZIONE! Per garantire un perfetto funzionamento del kit di bloc- caggio si consiglia di effettuare alcune prove dopo il montaggio. Eventualmente bisogna procedere ad una nuova regolazione della motorizzazione. Suggerimento Quando si taglia la fune metallica si consiglia di avvolgere l’estremità tagliata con un robusto nastro adesivo per evitare che la fune si rovini – vedi fig. 11. D GB F NL I Urheberrechtlich geschützt. Nachdruck, auch auszugsweise, nur mit unserer Genehmigung. Änderungen vorbehalten. Copyright. No reproduction even in part is allowed without our permission. All details subject to change. Droits d'auteur réservés. Reproduction même partielle uniquement avec notre autorisation. Changements de construction réservés. Door de auteurswet beschermd. Gehele of gedeeltelijke nadruk alleen toegelaten mits onze toestemming. Wijzigingen voorbehouden. Diritti d'autore riservati. Riproduzione, anche solo parziale, previa nostra approvazione. La Ditta si riserva di apportare modifiche al prodotto.

04.2004 TR30A006 RE 04.2004 TR30A006 RE

  • Upload
    others

  • View
    3

  • Download
    0

Embed Size (px)

Citation preview

04.2004 TR30A006 RE 04.2004 TR30A006 RE

7/9

3-6/8

1/10/11

2

2

21

1 / 2

1 / 2

04.2

004

TR

30A

006

RE

Verriegelungs-Set für Double Door

Das Verriegelungs-Set ermöglicht im Zusammenhang mit einem Garagen-torantrieb das Verriegeln eines Schwingtores mit seinen Schnäppern bzw. esermöglicht das Entriegeln bevor der Garagentorantrieb das Tor auffährt. Fürden optimalen Betrieb des Verriegelungs-Sets ist es erforderlich, dass alleAnweisungen, die in dieser Anleitung enthalten sind, eingehalten werden!

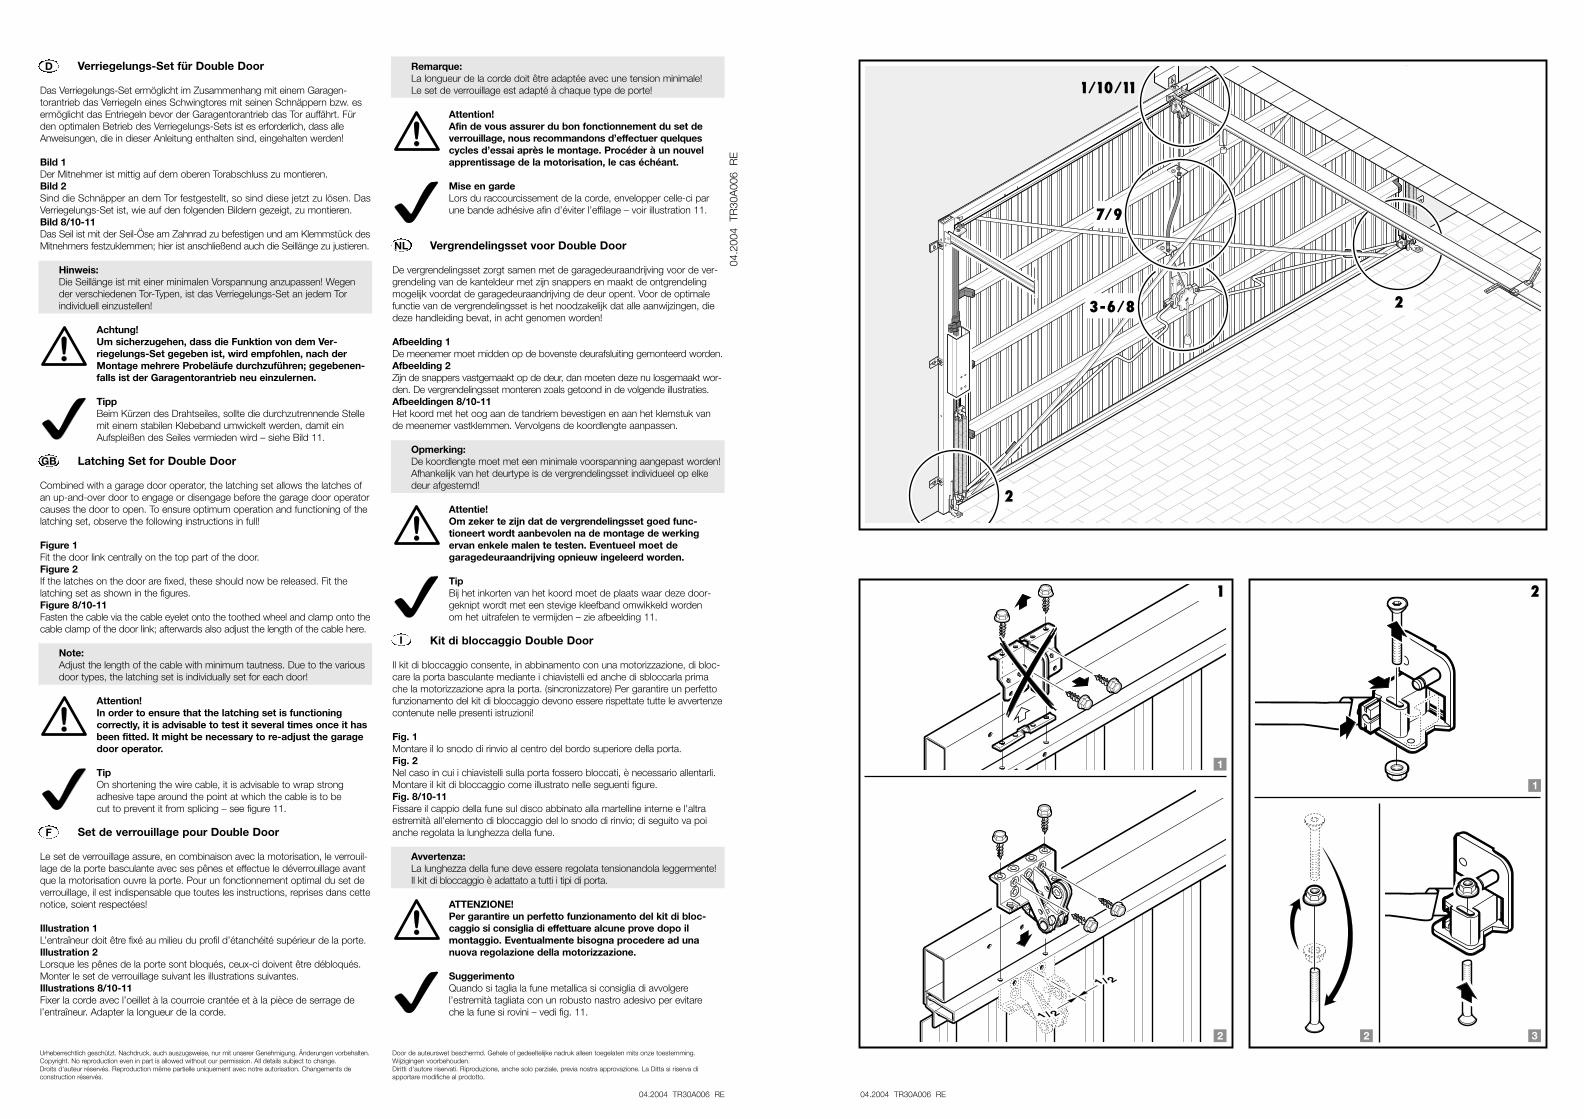
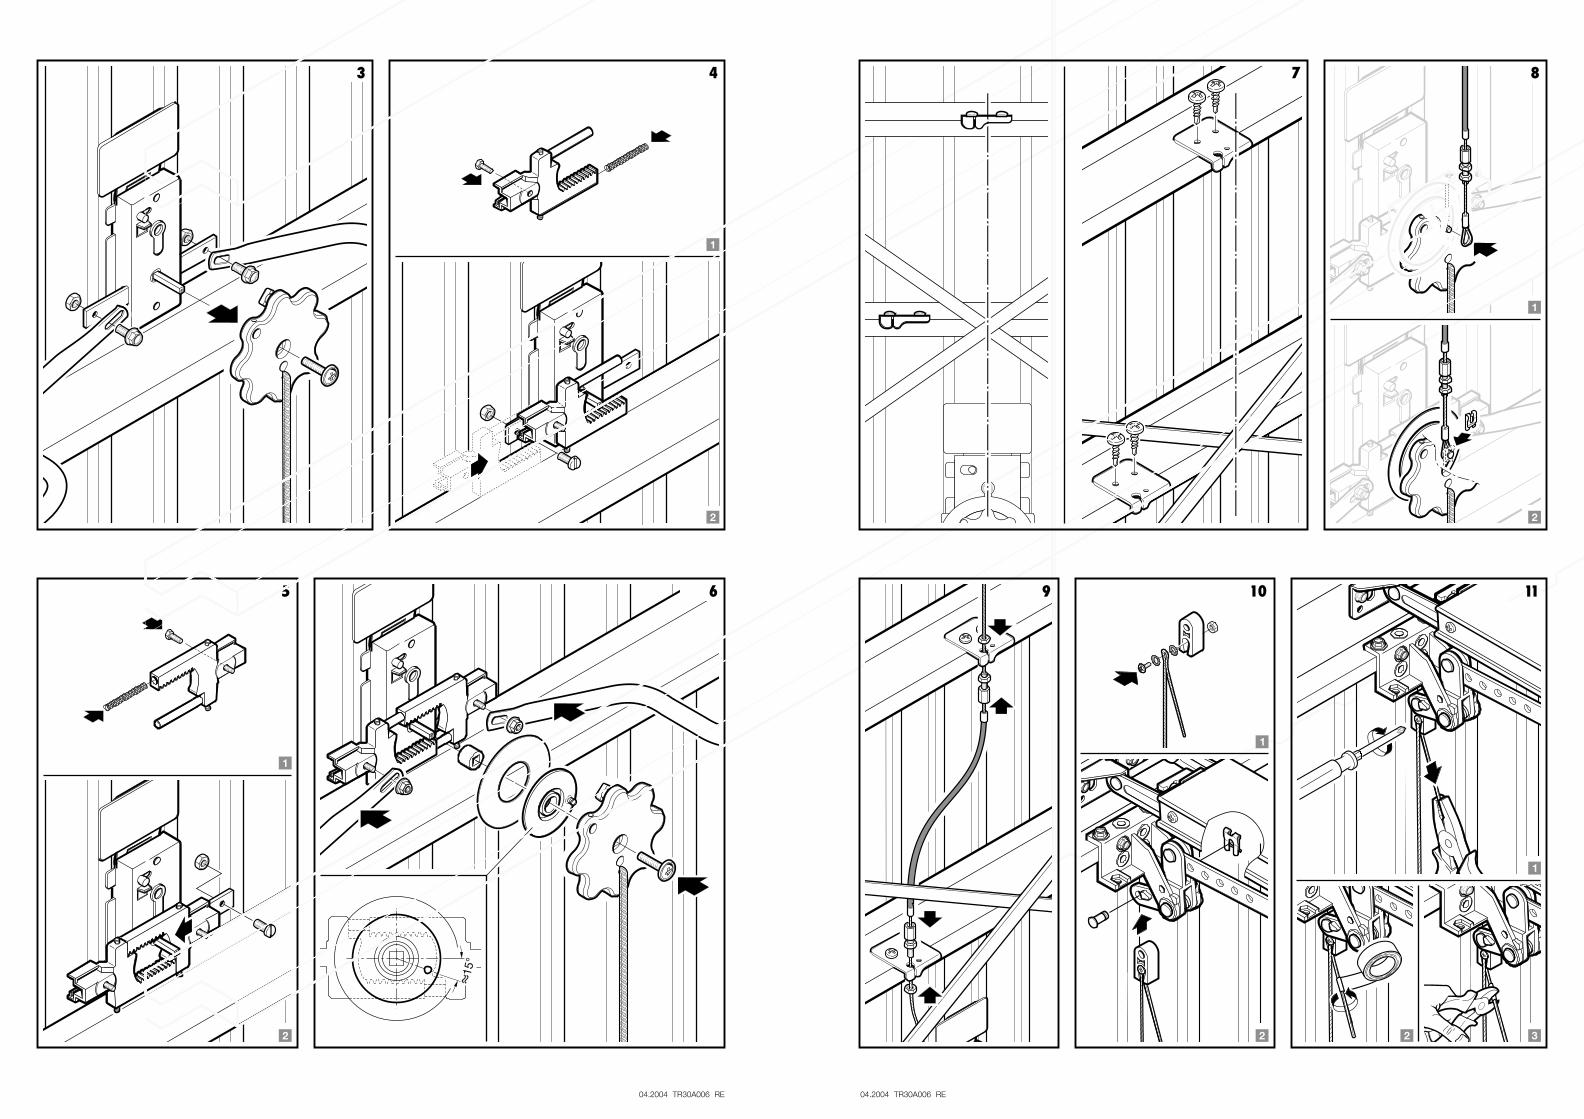
Bild 1Der Mitnehmer ist mittig auf dem oberen Torabschluss zu montieren.Bild 2Sind die Schnäpper an dem Tor festgestellt, so sind diese jetzt zu lösen. DasVerriegelungs-Set ist, wie auf den folgenden Bildern gezeigt, zu montieren.Bild 8/10-11Das Seil ist mit der Seil-Öse am Zahnrad zu befestigen und am Klemmstück desMitnehmers festzuklemmen; hier ist anschließend auch die Seillänge zu justieren.

Hinweis:Die Seillänge ist mit einer minimalen Vorspannung anzupassen! Wegender verschiedenen Tor-Typen, ist das Verriegelungs-Set an jedem Tor individuell einzustellen!

Achtung!Um sicherzugehen, dass die Funktion von dem Ver-riegelungs-Set gegeben ist, wird empfohlen, nach derMontage mehrere Probeläufe durchzuführen; gegebenen-falls ist der Garagentorantrieb neu einzulernen.

TippBeim Kürzen des Drahtseiles, sollte die durchzutrennende Stellemit einem stabilen Klebeband umwickelt werden, damit einAufspleißen des Seiles vermieden wird – siehe Bild 11.

Latching Set for Double Door

Combined with a garage door operator, the latching set allows the latches ofan up-and-over door to engage or disengage before the garage door operatorcauses the door to open. To ensure optimum operation and functioning of thelatching set, observe the following instructions in full!

Figure 1Fit the door link centrally on the top part of the door.Figure 2If the latches on the door are fixed, these should now be released. Fit the latching set as shown in the figures.Figure 8/10-11Fasten the cable via the cable eyelet onto the toothed wheel and clamp onto thecable clamp of the door link; afterwards also adjust the length of the cable here.

Note:Adjust the length of the cable with minimum tautness. Due to the variousdoor types, the latching set is individually set for each door!

Attention!In order to ensure that the latching set is functioning correctly, it is advisable to test it several times once it hasbeen fitted. It might be necessary to re-adjust the garagedoor operator.

TipOn shortening the wire cable, it is advisable to wrap strong adhesive tape around the point at which the cable is to be cut to prevent it from splicing – see figure 11.

Set de verrouillage pour Double Door

Le set de verrouillage assure, en combinaison avec la motorisation, le verrouil-lage de la porte basculante avec ses pênes et effectue le déverrouillage avantque la motorisation ouvre la porte. Pour un fonctionnement optimal du set deverrouillage, il est indispensable que toutes les instructions, reprises dans cettenotice, soient respectées!

Illustration 1L’entraîneur doit être fixé au milieu du profil d’étanchéité supérieur de la porte.Illustration 2Lorsque les pênes de la porte sont bloqués, ceux-ci doivent être débloqués.Monter le set de verrouillage suivant les illustrations suivantes.Illustrations 8/10-11Fixer la corde avec l’oeillet à la courroie crantée et à la pièce de serrage del’entraîneur. Adapter la longueur de la corde.

Remarque:La longueur de la corde doit être adaptée avec une tension minimale! Le set de verrouillage est adapté à chaque type de porte!

Attention!Afin de vous assurer du bon fonctionnement du set de verrouillage, nous recommandons d’effectuer quelquescycles d’essai après le montage. Procéder à un nouvelapprentissage de la motorisation, le cas échéant.

Mise en gardeLors du raccourcissement de la corde, envelopper celle-ci parune bande adhésive afin d’éviter l’effilage – voir illustration 11.

Vergrendelingsset voor Double Door

De vergrendelingsset zorgt samen met de garagedeuraandrijving voor de ver-grendeling van de kanteldeur met zijn snappers en maakt de ontgrendelingmogelijk voordat de garagedeuraandrijving de deur opent. Voor de optimalefunctie van de vergrendelingsset is het noodzakelijk dat alle aanwijzingen, diedeze handleiding bevat, in acht genomen worden!

Afbeelding 1De meenemer moet midden op de bovenste deurafsluiting gemonteerd worden.Afbeelding 2Zijn de snappers vastgemaakt op de deur, dan moeten deze nu losgemaakt wor-den. De vergrendelingsset monteren zoals getoond in de volgende illustraties.Afbeeldingen 8/10-11Het koord met het oog aan de tandriem bevestigen en aan het klemstuk vande meenemer vastklemmen. Vervolgens de koordlengte aanpassen.

Opmerking:De koordlengte moet met een minimale voorspanning aangepast worden!Afhankelijk van het deurtype is de vergrendelingsset individueel op elke deur afgestemd!

Attentie!Om zeker te zijn dat de vergrendelingsset goed func-tioneert wordt aanbevolen na de montage de werkingervan enkele malen te testen. Eventueel moet de garagedeuraandrijving opnieuw ingeleerd worden.

TipBij het inkorten van het koord moet de plaats waar deze door-geknipt wordt met een stevige kleefband omwikkeld worden om het uitrafelen te vermijden – zie afbeelding 11.

Kit di bloccaggio Double Door

Il kit di bloccaggio consente, in abbinamento con una motorizzazione, di bloc-care la porta basculante mediante i chiavistelli ed anche di sbloccarla primache la motorizzazione apra la porta. (sincronizzatore) Per garantire un perfettofunzionamento del kit di bloccaggio devono essere rispettate tutte le avvertenzecontenute nelle presenti istruzioni!

Fig. 1 Montare il lo snodo di rinvio al centro del bordo superiore della porta.Fig. 2Nel caso in cui i chiavistelli sulla porta fossero bloccati, è necessario allentarli. Montare il kit di bloccaggio come illustrato nelle seguenti figure. Fig. 8/10-11Fissare il cappio della fune sul disco abbinato alla martelline interne e l'altraestremità all'elemento di bloccaggio del lo snodo di rinvio; di seguito va poianche regolata la lunghezza della fune.

Avvertenza:La lunghezza della fune deve essere regolata tensionandola leggermente! Il kit di bloccaggio è adattato a tutti i tipi di porta.

ATTENZIONE!Per garantire un perfetto funzionamento del kit di bloc-caggio si consiglia di effettuare alcune prove dopo il montaggio. Eventualmente bisogna procedere ad unanuova regolazione della motorizzazione.

SuggerimentoQuando si taglia la fune metallica si consiglia di avvolgere l’estremità tagliata con un robusto nastro adesivo per evitare che la fune si rovini – vedi fig. 11.

D

GB

F

NL

I

Urheberrechtlich geschützt. Nachdruck, auch auszugsweise, nur mit unserer Genehmigung. Änderungen vorbehalten.Copyright. No reproduction even in part is allowed without our permission. All details subject to change.Droits d'auteur réservés. Reproduction même partielle uniquement avec notre autorisation. Changements de construction réservés.

Door de auteurswet beschermd. Gehele of gedeeltelijke nadruk alleen toegelaten mits onze toestemming.Wijzigingen voorbehouden.Diritti d'autore riservati. Riproduzione, anche solo parziale, previa nostra approvazione. La Ditta si riserva di apportare modifiche al prodotto.

04.2004 TR30A006 RE 04.2004 TR30A006 RE

43

5 6

7 8

9 1110