Embed Size (px)
Citation preview
RM20COMPACT 5.1 AUDIO SYSTEM
WICHTIGE SICHERHEITSHINWEISEVOR BEDIENUNG DER GERÄTE DURCHLESEN
1. Lesen Sie diese Anweisungen durch2. Behalten Sie diese Anweisungen.3. Beachten Sie alle Warnhinweise.4. Folgen Sie allen Anleitungen.5. Verwenden Sie diese Geräte nicht in der Nähe von Wasser.6. Reinigen Sie sie nur mit einem trockenen Tuch7. Blockieren Sie keine Lüftungsöffnungen. Installieren Sie die Geräte
entsprechend den Herstelleranweisungen.8. Installieren Sie sie nicht in der Nähe von Wärmequellen wie Heizkörpern,
Warmlufteintrittsöffnungen, Öfen oder anderen wärmeerzeugenden Geräten(einschließlich Verstärkern).
9. Sie dürfen die Sicherheitsfunktion polarisierter oder geerdeter Stecker nichtaußer Kraft setzen. Ein polarisierter Stecker hat zwei Klinken, wobei einedicker ist als die andere. Ein geerdeter Stecker hat zwei Klinken und einendritten Erdungsstift. Die dicke Klinke oder der dritte Stift dienen IhrerSicherheit. Wenn der mitgelieferte Stecker nicht in Ihre Steckdose passt,sollten Sie die Steckdose durch einen Elektriker ersetzen lassen.Ein polarisierter Stecker hat zwei Klinken, wobei eine dicker ist als die andere.
10. Vermeiden Sie, dass das Netzkabel belastet oder geknickt wird, vor allem bei Steckern, Zusatzsteckdosen, und beim Ausgang aus dem Gerät
11. Verwenden Sie ausschließlich vom Hersteller empfohleneZusatzgeräte/Zubehör.
12. Verwenden Sie ausschließlich Wagen, Stände, Stative, Halterungen oderTische, die von Hersteller empfohlen oder mit dem Gerät verkauft wurden. Bei Verwendung eines Wagens sollten Sie vorsichtig sein, damit Wagenund Gerät nicht umkippen und Verletzungen verursachen.
13. Trennen Sie dieses Gerät bei Gewittern vom Netz, oder wenn es längere Zeit nicht benutzt wird.
14. Lassen Sie alle Wartungen von geschulten Kundendiensttechnikerndurchführen. Eine Wartung ist nötig, wenn das Gerät auf irgendeine Weisebeschädigt wurde, z.B. durch Schäden am Netzkabel oder -stecker, durchVerschütten von Flüssigkeiten, durch das Hineinfallen von Objekten, durchRegen oder Feuchtigkeit, wenn es nicht richtig funktioniert oder wenn esfallengelassen wurde.
15. WARNUNG: Um die Gefahr eines Feuers oder Stromschlags zu verringern, ist dieses Gerät vor Regen oder Feuchtigkeit zu schützen, und mit Flüssigkeitgefüllte Gefäße, wie Vasen, sollten nicht auf diesem Gerät platziert werden.
16. Um dieses Gerät vollständig vom Netz zu trennen, ziehen Sie das Netzkabelaus der Steckdose.
17. Der Netzstecker des Netzkabels soll betriebsbereit bleiben
For more detailed hookup info, visit www.polkaudio.com.
Para obtener información más detallada sobre conexiones, visite www.polkaudio.com.
Per informazioni più dettagliate sulle configurazioni, visitare www.polkaudio.com.
Detailliertere Anschlussinformationen finden Sie bei www.polkaudio.com.
Para obter informações de instalação mais detalhadas, visite o site www.polkaudio.com.
Pour plus de détails sur le raccordement, visitez www.polkaudio.com.
IMPORTANT SAFETY INSTRUCTIONSREAD BEFORE OPERATING EQUIPMENT
1. Read these instructions.2. Keep these instructions.3. Heed all warnings.4. Follow all instructions.5. Do not use this apparatus near water.6. Clean only with dry cloth.7. Do not block any ventilation openings. Install in accordance with the
manufacturer's instructions.8. Do not install near any heat sources such as radiators, heat registers,
stoves, or other apparatus (including amplifiers) that produce heat. 9. Do not defeat the safety purpose of the polarized or grounding-type plug. A
polarized plug has two blades with one wider than the other. A grounding typeplug has two blades and a third grounding prong. The wide blade or the thirdprong are provided for your safety. If the provided plug does not fit into youroutlet, consult an electrician for replacement of the obsolete outlet.
10. Protect the power cord from being walked on or pinched particularly at plugs,convenience receptacles, and the point where they exit from the apparatus.
11. Only use attachments/accessories specified by the manufacturer.12. Use only with the cart, stand, tripod, bracket, or table specified by the
manufacturer, or sold with the apparatus. When a cart is used, use cautionwhen moving the cart/apparatus combination to avoid injury from tip-over.
13. Unplug this apparatus during lightning storms or when unused for long periodsof time.
14. Refer all servicing to qualified service personnel. Servicing is required when theapparatus has been damaged in any way, such as power-supply cord or plug isdamaged, liquid has been spilled or objects have fallen into the apparatus, the apparatus has been exposed to rain or moisture, does not operate normally, orhas been dropped.
15. WARNING: To reduce the risk of fire or electric shock, this apparatus should not be exposed to rain or moisture and objects filled with liquids, such as vases,should not be placed on this apparatus.
16. To completely disconnect this equipment from the mains, disconnect the power supply cord plug from the receptacle.
17. The mains plug of the power supply cord shall remain readily operable.
2 Contact Polk Audio Customer Service 1-800-377-7655 (Outside US: 410-358-3600) Monday-Friday, 9:00 AM-6:00 PM Eastern Time, [email protected]
IMPORTANTES INSTRUCCIONES DE SEGURIDADLEER ANTES DE HACER FUNCIONAR EL EQUIPO
1. Lea estas instrucciones. 2. Guarde estas instrucciones. 3. Respete todas las advertencias. 4. Siga todas las instrucciones. 5. No use este aparato cerca del agua.6. Límpielo solamente con un paño seco.7. No bloquee las aberturas de ventilación. Instale el aparato de acuerdo con
las instrucciones del fabricante.8. No lo instale cerca de fuentes de calor, tales como radiadores, rejillas de
piso, cocinas u otros aparatos (incluso amplificadores) que producen calor.9. No anule la seguridad implícita en el enchufe polarizado o con conexión
a tierra. Los enchufes polarizados tienen dos patas, una más ancha que la otra. Los enchufes con conexión a tierra tienen dos patas iguales y unaclavija de conexión a tierra. La pata ancha o la clavija de conexión a tierra han sido incorporadas al diseño por la seguridad del usuario. Si el enchufe no entra en el tomacorrientes, consulte a un electricista para que cambie el tomacorrientes obsoleto.
10. Evite que el cordón de alimentación sea pisado o aplastado, en particular cerca del enchufe, cerca del tomacorrientes y en el punto en que el cordón sale del aparato.
11. Use sólo los accesorios especificados por el fabricante.12. Use el aparato solamente con el carrito, pedestal, trípode, soporte o mesa
especificado por el fabricante o vendido con el aparato. Sea precavido cuando mueva el aparato en un carrito para evitar las lesiones que puedaproducir un volcamiento.
13. Desenchufe el aparato durante tormentas eléctricas o cuando no lo usedurante largos períodos de tiempo.
14. Encargue todo servicio del aparato al personal de servicio calificado. Serequiere servicio cuando el aparato ha sido dañado de alguna manera, talcomo cuando se ha dañado el enchufe o el cordón de alimentación, han caídolíquidos u objetos dentro del aparato o el aparato se ha dejado caer, ha dejadode funcionar normalmente o ha sido expuesto a la lluvia o a la humedad.
15. ADVERTENCIA. Para reducir el riesgo de incendio o de descarga eléctrica,este aparato no debe ser expuesto a la lluvia o a la humedad, y no se le debencolocar encima objetos llenos de líquido, tales como floreros.
16. Para desconectar completamente este equipo del tomacorrientes de CA de lapared, desenchufe del tomacorrientes el enchufe del cordón de alimentación.
17. El enchufe de tomacorriente del cordón de alimentación debe estar siempre enbuenas condiciones de funcionamiento.
INFORMAZIONI IMPORTANTI PER LA SICUREZZALEGGERE PRIMA DI UTILIZZARE L'EQUIPAGGIAMENTO
1. Leggere queste istruzioni.2. Conservare queste istruzioni.3. Prestare attenzione alle avvertenze.4. Seguire tutte le istruzioni5. Non utilizzare questo apparato vicino all'acqua.6. Pulire solo con un panno asciutto.7. Non bloccare alcuna apertura per la ventilazione. Installare secondo
le istruzioni fornite dal fabbricante.8. Non installare vicino a fonti di calore come ad esempio radiatori, camini,
stufe o altre apparecchiature che generino calore, inclusi gli amplificatori. 9. Non disabilitare la polarizzazione di spine di alimentazione con presa
di massa. Una spina senza massa ha due terminali. Una spina con massa ha tre terminali. Il terminale di massa è presente per migliorare la sicurezza. Se la spina non può essere inserita nella presa, contattare un elettricista per sostituire la presa.
10. Evitare che il cavo dell'alimentazione venga calpestato o stretto, soprattuttoin prossimità della spina o dell'involucro, o dove il cavo esce dall'apparato.
11. Utilizzare solo gli accessori forniti dal fabbricante.12. Utilizzare solo con il carrello, cavalletto, podio, staffa o tavolo specificato
dal fabbricante o venduto con l'apparato. Se viene usato un carrello, fareattenzione per evitare danni dovuti al ribaltamento del carrello stesso odell'apparato.
13. Scollegare l'apparato durante i temporali o se non utilizzato per lunghiperiodi di tempo.
14. Contattare personale di assistenza qualificato per qualsiasi intervento diassistenza. Ottenere assistenza se l'apparato è danneggiato in alcun modo,per esempio se si hanno danni alla spina o al cavo di alimentazione, se èstato versato del liquido, se l'apparato è stato esposto a pioggia o umidità,se non funziona normalmente o se è caduto.
15. AVVERTENZA: per evitare i rischi di incendio e di scossa elettrica, nonesporre l'apparato alla pioggia o all'umidità e non posizionare sull'unitàalcun contenitore contenente un liquido, come ad esempio un vaso.
16. Per scollegare completamente questa attrezzatura dalla presa dialimentazione c.a., scollegare il cavo di alimentazione dall'involucro.
17. Lasciare collegata la spina di rete del cavo di alimentazione, mantenendolaattiva.
INSTRUÇÕES DE SEGURANÇA IMPORTANTESLER ANTES DE USAR O EQUIPAMENTO
1. Leia estas instruções.2. Guarde estas instruções.3. Preste atenção a todos os avisos.4. Siga todas as instruções.5. Não use este aparelho perto de água.6. Limpe apenas com um pano seco.7. Não bloqueie as aberturas de ventilação. Instale de acordo com as instruções
do fabricante.8. Não instale próximo de quaisquer fontes de calor, tais como radiadores, saídas
de ar quente, fogões ou outros aparelhos (incluindo amplificadores) queproduzam calor.
9. Não anule a função de segurança do plugue polarizado ou aterrado. Umplugue polarizado tem dois pinos chatos, sendo um deles mais largo que ooutro. Um plugue aterrado tem dois pinos chatos e um terceiro pino redondode aterramento. O pino chato mais largo ou o terceiro pino redondo existempara sua segurança. Se o plugue fornecido não se encaixar na tomada,consulte um eletricista para trocar a tomada obsoleta.
10. Proteja o cabo de alimentação para que não seja pisoteado nem prensado,sobretudo no plugue, em tomadas posicionadas no piso e no ponto ondesai do aparelho.
11. Utilize apenas os acessórios especificados pelo fabricante.12. Use apenas com o carrinho, tripé, suporte ou mesa especificado pelo
fabricante ou vendido com o aparelho. Ao usar um carrinho, tenha cuidadoao movê-lo com o aparelho para evitar ferimentos causados por tropeções.
13. Desligue o aparelho da tomada durante tempestades elétricas ou quandoficar fora de uso por longos períodos de tempo.
14. Toda a manutenção deve ser realizada por pessoal de manutenção qualificado.É necessário prestar assistência técnica ao aparelho quando tiver sofridodanos de qualquer tipo, tais como danos ao cabo de alimentação ou ao plugue,derramamento de líquido ou queda de objetos sobre o aparelho, exposiçãodo aparelho à chuva ou umidade, mal funcionamento ou queda do aparelho.
15. AVISO: Para reduzir o risco de incêndio ou choque elétrico, este aparelhonão deve ser exposto à chuva ou à umidade. Objetos que contenhamlíquidos, como vasos, não devem ser colocados sobre este aparelho.
16. Para desconectar completamente este equipamento da tomada de CAde parede, desconecte o plugue do cabo de alimentação da tomada.
17. O plugue principal do cabo de alimentação deve permanecer prontamenteutilizável.
CONSIGNES DE SÉCURITÉ IMPORTANTESÀ LIRE AVANT D’UTILISER L’ÉQUIPEMENT
1. Lire les présentes instructions.2. Conserver ces instructions.3. Respecter tous les avertissements.4. Suivre toutes les instructions.5. Ne pas utiliser cet appareil à proximité de l’eau.6. Nettoyer avec un chiffon sec uniquement.7. Ne pas obstruer les ouïes de ventilation. Installer conformément aux
instructions du constructeur.8. Ne pas installer à proximité de sources de chaleur telles que les radiateurs,
les grilles de chauffage, les cuisinières et les autres appareils (notammentles amplificateurs) dégageant de la chaleur.
9. Ne pas neutraliser le dispositif de sécurité que constitue la fiche polariséeou à broche de terre. Une fiche polarisée a une lame plus large que l’autre.Une fiche à broche de terre est munie de deux lames et d’une troisièmebroche pour la terre. La lame large et la troisième broche sont prévues pourla sécurité de l’utilisateur. Si la fiche fournie ne rentre pas dans votre prise decourant, demander à un électricien de remplacer cette prise d’un type ancien.
10. Protéger le cordon d’alimentation en s’assurant qu’il ne risque pas d’êtrepiétiné ou écrasé, en particulier près des fiches, des blocs multiprises etde son point de sortie de l’appareil.
11. Utiliser uniquement les accessoires préconisés par le constructeur.12. Utiliser exclusivement avec le chariot, le support, le trépied, la console ou le
bâti recommandé par le fabricant ou vendu avec l’appareil. Lorsqu’un chariotest utilisé, faire preuve de prudence pour déplacer l’ensemble chariot/appareilafin d’éviter un renversement pouvant causer des blessures.
13. Débrancher cet appareil en cas d’orage ou lorsqu’il reste inutilisé pendant une longue durée.
14. Tout travail de dépannage doit être confié à un réparateur professionnelcompétent. En cas de dommages, il faut faire réparer l’appareil, par exemplesi la fiche ou le cordon d’alimentation a été endommagé, si un liquide a étérenversé ou si un objet a pénétré à l’intérieur de l’appareil, si l’appareil a étéexposé à la pluie ou à l’humidité, s’il ne fonctionne pas normalement ou s’il a subi une chute.
15. AVERTISSEMENT : Pour réduire les risques d’incendie et de choc électrique,ne pas exposer cet appareil à la pluie ni à l’humidité, et ne pas poser dessus de récipient rempli de liquide, tel qu'un vase.
16. Pour isoler complètement cet équipement de l’alimentation secteur,débrancher son cordon d’alimentation de la prise de courant.
17. La fiche secteur du cordon d’alimentation doit rester accessible.
RM20 Owner’s Manual For more informat ion v is i t our websi te at www.polkaudio.com 3
Y
RIGHTCHANNEL
LEFTCHANNEL
CENTERCHANNEL
X=Y=Z
ZX
SUB
REAR SPEAKERS
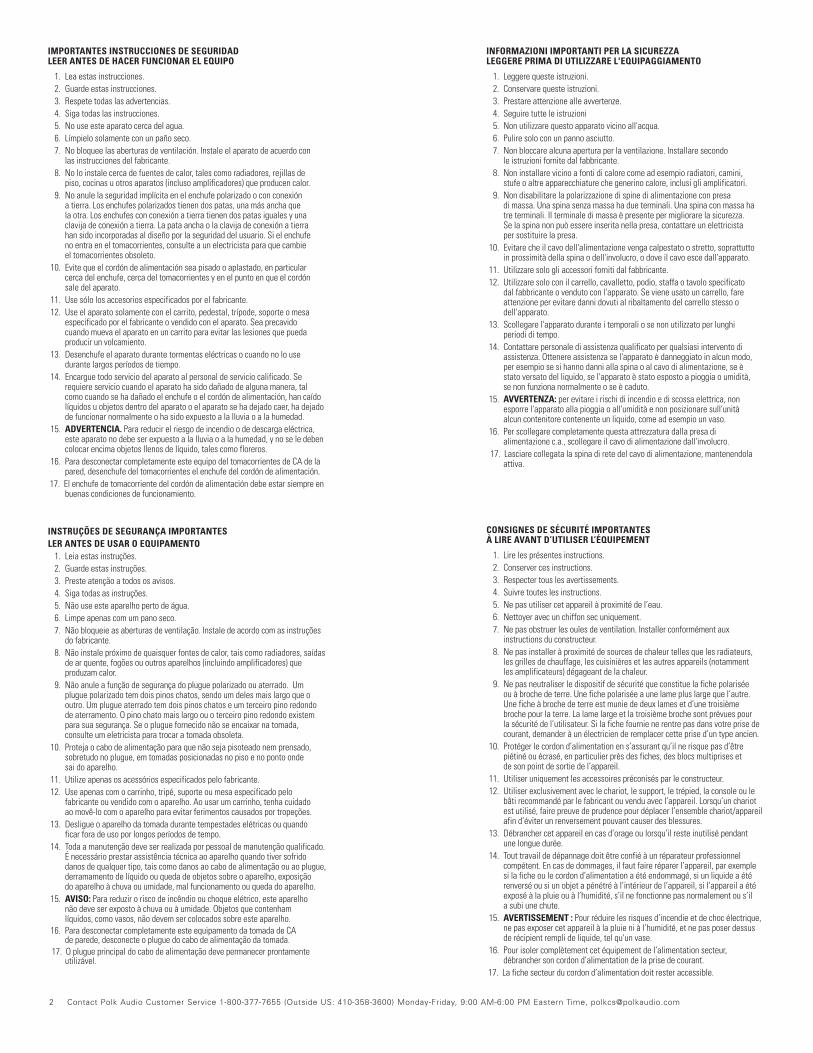
Suggested Speaker Placement WithOptions For Rear Speaker PlacementSubwoofer driver should be placed more than six inches from wall.
Ubicación De Altavoces Sugerida Con Opciones Para La Ubicación De Los Altavoces PosterioresEl lado del altavoz debe estar a más de 6 pulgadas de la pared.
Posizionamento ConsigliatoDell’altoparlante Con Opzioni Per il Posizionamento Dell’altoparlante PosterioreIl lato del driver deve essere a piùdi 15 cm dalla parete.
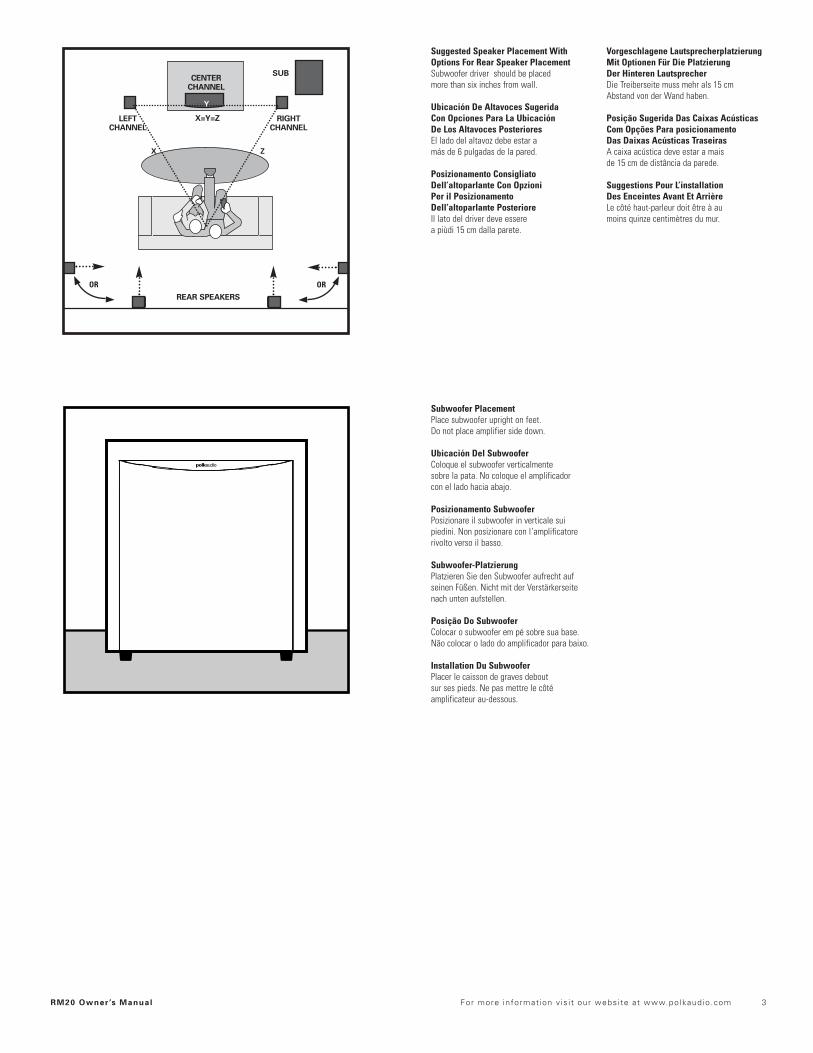
Subwoofer PlacementPlace subwoofer upright on feet. Do not place amplifier side down.
Ubicación Del SubwooferColoque el subwoofer verticalmente sobre la pata. No coloque el amplificadorcon el lado hacia abajo.
Posizionamento SubwooferPosizionare il subwoofer in verticale sui piedini. Non posizionare con l’amplificatorerivolto verso il basso.
Subwoofer-PlatzierungPlatzieren Sie den Subwoofer aufrecht aufseinen Füßen. Nicht mit der Verstärkerseitenach unten aufstellen.
Posição Do SubwooferColocar o subwoofer em pé sobre sua base.Não colocar o lado do amplificador para baixo.
Installation Du SubwooferPlacer le caisson de graves debout sur ses pieds. Ne pas mettre le côté amplificateur au-dessous.
Vorgeschlagene Lautsprecherplatzierung Mit Optionen Für Die Platzierung Der Hinteren LautsprecherDie Treiberseite muss mehr als 15 cm Abstand von der Wand haben.
Posição Sugerida Das Caixas AcústicasCom Opções Para posicionamento Das Daixas Acústicas Traseiras A caixa acústica deve estar a mais de 15 cm de distância da parede.
Suggestions Pour L’installation Des Enceintes Avant Et Arrière Le côté haut-parleur doit être à au moins quinze centimètres du mur.
OR OR
4 Contact Polk Audio Customer Service 1-800-377-7655 (Outside US: 410-358-3600) Monday-Friday, 9:00 AM-6:00 PM Eastern Time, [email protected]
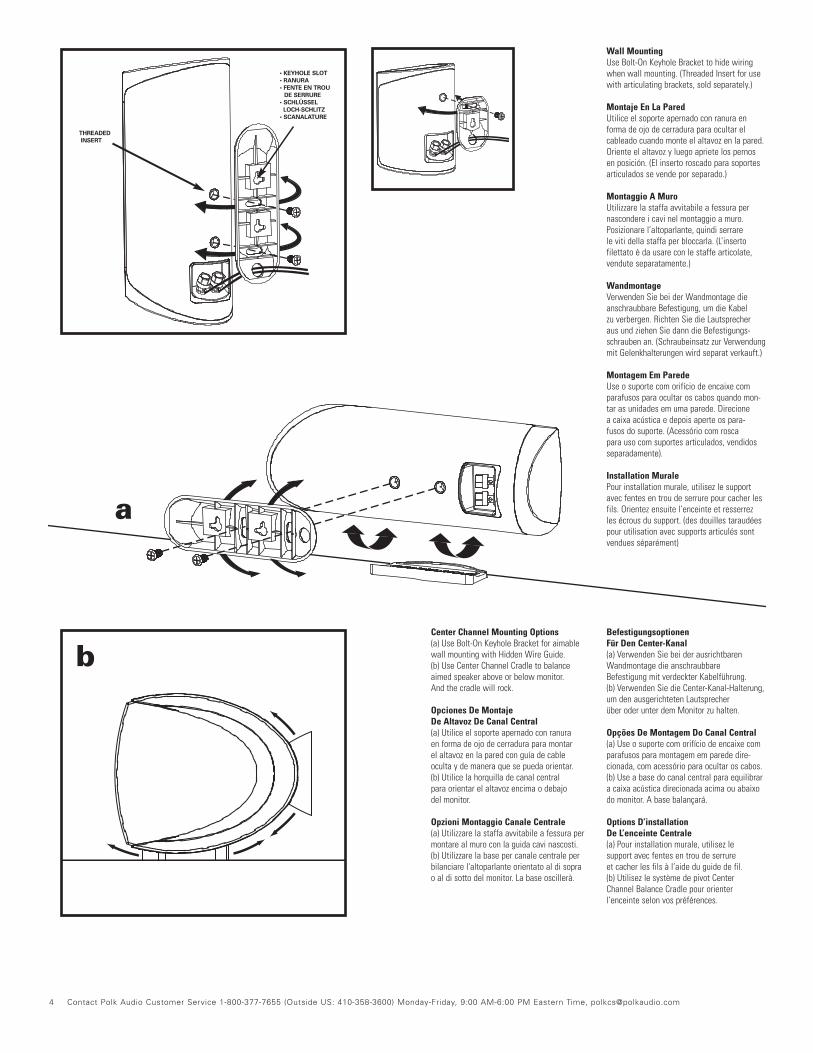
Center Channel Mounting Options(a) Use Bolt-On Keyhole Bracket for aimablewall mounting with Hidden Wire Guide. (b) Use Center Channel Cradle to balanceaimed speaker above or below monitor. And the cradle will rock.
Opciones De Montaje De Altavoz De Canal Central(a) Utilice el soporte apernado con ranura en forma de ojo de cerradura para montar el altavoz en la pared con guía de cable oculta y de manera que se pueda orientar.(b) Utilice la horquilla de canal central para orientar el altavoz encima o debajo del monitor.
Opzioni Montaggio Canale Centrale (a) Utilizzare la staffa avvitabile a fessura permontare al muro con la guida cavi nascosti. (b) Utilizzare la base per canale centrale perbilanciare l'altoparlante orientato al di sopra o al di sotto del monitor. La base oscillerà.
Wall MountingUse Bolt-On Keyhole Bracket to hide wiringwhen wall mounting. (Threaded Insert for usewith articulating brackets, sold separately.)
Montaje En La ParedUtilice el soporte apernado con ranura enforma de ojo de cerradura para ocultar elcableado cuando monte el altavoz en la pared.Oriente el altavoz y luego apriete los pernosen posición. (El inserto roscado para soportesarticulados se vende por separado.)
Montaggio A MuroUtilizzare la staffa avvitabile a fessura pernascondere i cavi nel montaggio a muro.Posizionare l’altoparlante, quindi serrare le viti della staffa per bloccarla. (L’inserto filettato è da usare con le staffe articolate,vendute separatamente.)
WandmontageVerwenden Sie bei der Wandmontage dieanschraubbare Befestigung, um die Kabel zu verbergen. Richten Sie die Lautsprecher aus und ziehen Sie dann die Befestigungs-schrauben an. (Schraubeinsatz zur Verwendungmit Gelenkhalterungen wird separat verkauft.)
Montagem Em ParedeUse o suporte com orifício de encaixe comparafusos para ocultar os cabos quando mon-tar as unidades em uma parede. Direcione a caixa acústica e depois aperte os para-fusos do suporte. (Acessório com rosca para uso com suportes articulados, vendidos separadamente).
Installation MuralePour installation murale, utilisez le supportavec fentes en trou de serrure pour cacher lesfils. Orientez ensuite l’enceinte et resserrez les écrous du support. (des douilles taraudéespour utilisation avec supports articulés sontvendues séparément)
Befestigungsoptionen Für Den Center-Kanal(a) Verwenden Sie bei der ausrichtbarenWandmontage die anschraubbare Befestigung mit verdeckter Kabelführung. (b) Verwenden Sie die Center-Kanal-Halterung,um den ausgerichteten Lautsprecher über oder unter dem Monitor zu halten.
Opções De Montagem Do Canal Central(a) Use o suporte com orifício de encaixe comparafusos para montagem em parede dire-cionada, com acessório para ocultar os cabos. (b) Use a base do canal central para equilibrara caixa acústica direcionada acima ou abaixodo monitor. A base balançará.
Options D’installation De L’enceinte Centrale(a) Pour installation murale, utilisez le support avec fentes en trou de serrure et cacher les fils à l’aide du guide de fil.(b) Utilisez le système de pivot Center Channel Balance Cradle pour orienter l’enceinte selon vos préférences.
• KEYHOLE SLOT• RANURA• FENTE EN TROU
DE SERRURE• SCHLÜSSEL
LOCH-SCHLITZ• SCANALATURE
THREADEDINSERT
a
b
RM20 Owner’s Manual For more informat ion v is i t our websi te at www.polkaudio.com 5
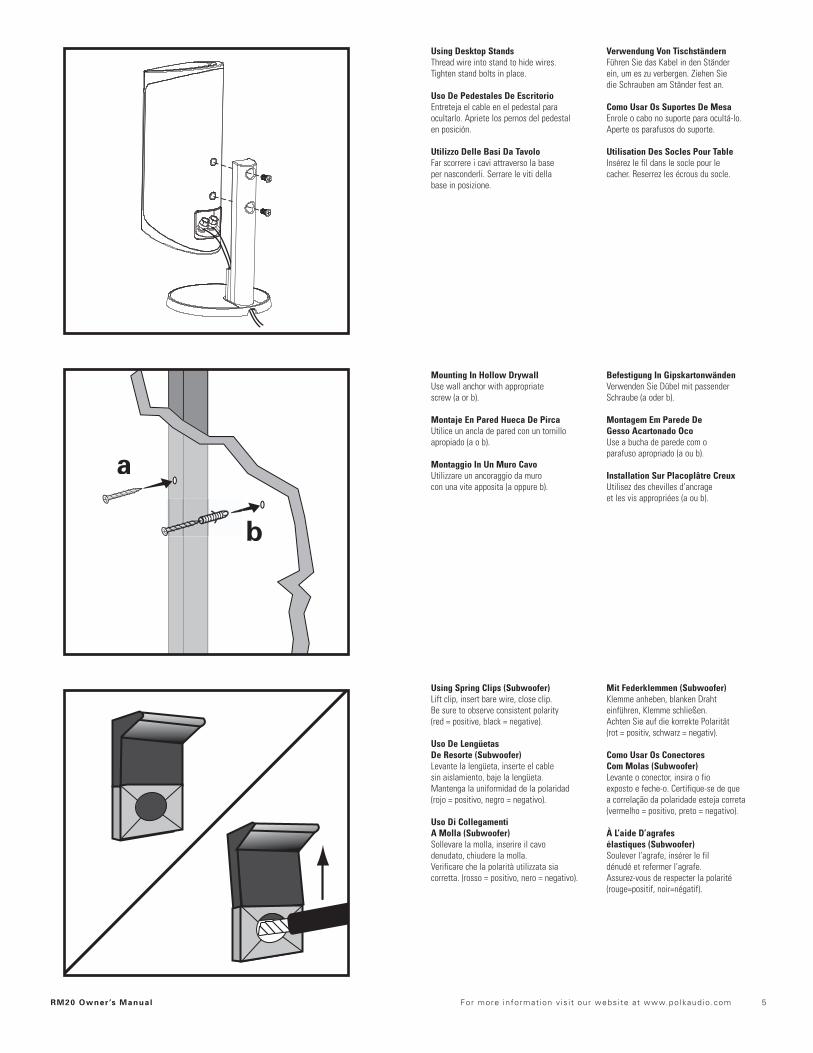
Using Desktop StandsThread wire into stand to hide wires. Tighten stand bolts in place.
Uso De Pedestales De EscritorioEntreteja el cable en el pedestal para ocultarlo. Apriete los pernos del pedestal en posición.
Utilizzo Delle Basi Da TavoloFar scorrere i cavi attraverso la base per nasconderli. Serrare le viti della base in posizione.
Mounting In Hollow Drywall Use wall anchor with appropriate screw (a or b).
Montaje En Pared Hueca De Pirca Utilice un ancla de pared con un tornilloapropiado (a o b).
Montaggio In Un Muro Cavo Utilizzare un ancoraggio da muro con una vite apposita (a oppure b).
Using Spring Clips (Subwoofer) Lift clip, insert bare wire, close clip.Be sure to observe consistent polarity (red = positive, black = negative).
Uso De Lengüetas De Resorte (Subwoofer) Levante la lengüeta, inserte el cable sin aislamiento, baje la lengüeta.Mantenga la uniformidad de la polaridad(rojo = positivo, negro = negativo).
Uso Di Collegamenti A Molla (Subwoofer) Sollevare la molla, inserire il cavo denudato, chiudere la molla.Verificare che la polarità utilizzata sia corretta. (rosso = positivo, nero = negativo).
Verwendung Von TischständernFühren Sie das Kabel in den Ständer ein, um es zu verbergen. Ziehen Sie die Schrauben am Ständer fest an.
Como Usar Os Suportes De MesaEnrole o cabo no suporte para ocultá-lo. Aperte os parafusos do suporte.
Utilisation Des Socles Pour TableInsérez le fil dans le socle pour le cacher. Reserrez les écrous du socle.
Befestigung In GipskartonwändenVerwenden Sie Dübel mit passender Schraube (a oder b).
Montagem Em Parede De Gesso Acartonado Oco Use a bucha de parede com o parafuso apropriado (a ou b).
Installation Sur Placoplâtre Creux Utilisez des chevilles d’ancrage et les vis appropriées (a ou b).
Mit Federklemmen (Subwoofer)Klemme anheben, blanken Draht einführen, Klemme schließen.Achten Sie auf die korrekte Polarität (rot = positiv, schwarz = negativ).
Como Usar Os Conectores Com Molas (Subwoofer)Levante o conector, insira o fio exposto e feche-o. Certifique-se de que a correlação da polaridade esteja correta (vermelho = positivo, preto = negativo).
À L’aide D’agrafes élastiques (Subwoofer) Soulever l’agrafe, insérer le fil dénudé et refermer l’agrafe. Assurez-vous de respecter la polarité (rouge=positif, noir=négatif).
a
b
6 Contact Polk Audio Customer Service 1-800-377-7655 (Outside US: 410-358-3600) Monday-Friday, 9:00 AM-6:00 PM Eastern Time, [email protected]
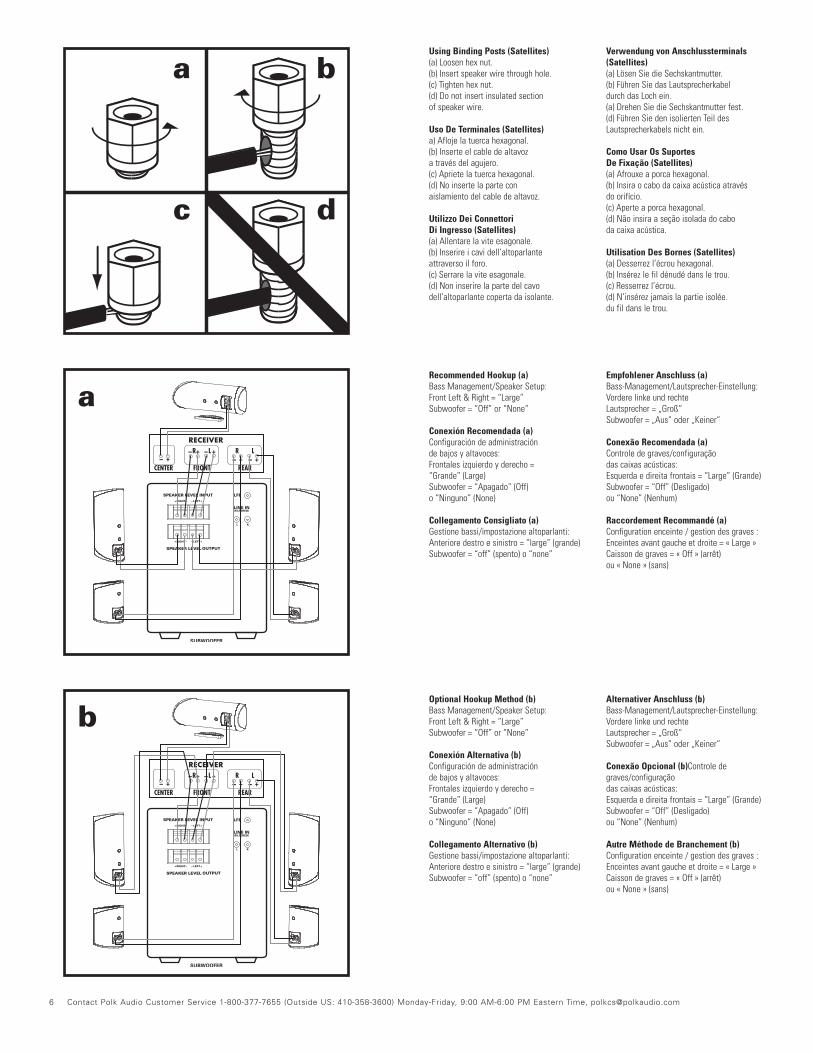
Using Binding Posts (Satellites)(a) Loosen hex nut.(b) Insert speaker wire through hole.(c) Tighten hex nut.(d) Do not insert insulated section of speaker wire.
Uso De Terminales (Satellites)a) Afloje la tuerca hexagonal.(b) Inserte el cable de altavoz a través del agujero.(c) Apriete la tuerca hexagonal.(d) No inserte la parte con aislamiento del cable de altavoz.
Utilizzo Dei Connettori Di Ingresso (Satellites)(a) Allentare la vite esagonale.(b) Inserire i cavi dell’altoparlante attraverso il foro.(c) Serrare la vite esagonale.(d) Non inserire la parte del cavo dell’altoparlante coperta da isolante.
Recommended Hookup (a)Bass Management/Speaker Setup:Front Left & Right = “Large”Subwoofer = “Off” or “None”
Conexión Recomendada (a) Configuración de administración de bajos y altavoces:Frontales izquierdo y derecho = “Grande” (Large)Subwoofer = “Apagado” (Off) o “Ninguno” (None)
Collegamento Consigliato (a)Gestione bassi/impostazione altoparlanti:Anteriore destro e sinistro = “large” (grande)Subwoofer = “off” (spento) o “none”
Optional Hookup Method (b)Bass Management/Speaker Setup:Front Left & Right = “Large”Subwoofer = “Off” or “None”
Conexión Alternativa (b)Configuración de administración de bajos y altavoces:Frontales izquierdo y derecho = “Grande” (Large)Subwoofer = “Apagado” (Off) o “Ninguno” (None)
Collegamento Alternativo (b)Gestione bassi/impostazione altoparlanti:Anteriore destro e sinistro = “large” (grande)Subwoofer = “off” (spento) o “none”
Verwendung von Anschlussterminals(Satellites)(a) Lösen Sie die Sechskantmutter.(b) Führen Sie das Lautsprecherkabel durch das Loch ein.(a) Drehen Sie die Sechskantmutter fest.(d) Führen Sie den isolierten Teil desLautsprecherkabels nicht ein.
Como Usar Os Suportes De Fixação (Satellites)(a) Afrouxe a porca hexagonal.(b) Insira o cabo da caixa acústica através do orifício.(c) Aperte a porca hexagonal.(d) Não insira a seção isolada do cabo da caixa acústica.
Utilisation Des Bornes (Satellites)(a) Desserrez l’écrou hexagonal.(b) Insérez le fil dénudé dans le trou.(c) Resserrez l’écrou.(d) N’insérez jamais la partie isolée. du fil dans le trou.
Empfohlener Anschluss (a)Bass-Management/Lautsprecher-Einstellung:Vordere linke und rechte Lautsprecher = „Groß“ Subwoofer = „Aus“ oder „Keiner“
Conexão Recomendada (a)Controle de graves/configuração das caixas acústicas:Esquerda e direita frontais = “Large” (Grande)Subwoofer = “Off” (Desligado) ou “None” (Nenhum)
Raccordement Recommandé (a)Configuration enceinte / gestion des graves :Enceintes avant gauche et droite = « Large »Caisson de graves = « Off » (arrêt) ou « None » (sans)
Alternativer Anschluss (b)Bass-Management/Lautsprecher-Einstellung:Vordere linke und rechte Lautsprecher = „Groß“ Subwoofer = „Aus“ oder „Keiner“
Conexão Opcional (b)Controle degraves/configuração das caixas acústicas:Esquerda e direita frontais = “Large” (Grande)Subwoofer = “Off” (Desligado) ou “None” (Nenhum)
Autre Méthode de Branchement (b)Configuration enceinte / gestion des graves :Enceintes avant gauche et droite = « Large »Caisson de graves = « Off » (arrêt) ou « None » (sans)
a
b
a b
c d
RM20 Owner’s Manual For more informat ion v is i t our websi te at www.polkaudio.com 7
To get the best performance and for more details about Bass Management and Subwoofer Hookup, visit The Library at www.polkaudio.com.
Para obtener el mejor rendimiento y más detalles sobre administración de bajos y conexión del subwoofer, visite la biblioteca en www.polkaudio.com
Per ottenere le prestazioni migliori e per ulteriori informazioni sul collegamento di Gestione bassi e subwoofer, visitare il sito www.polkaudio.com
Um die beste Leistung zu erzielen, oder um mehr über Bass-Management und den Anschluss des Subwoofers zu erfahren, sollten Sie unseren Informationsbereich bei www.polkaudio.com besuchen.
Para obter o melhor desempenho e mais detalhes a respeito do controle de graves e da conexão do subwoofer, visite a Biblioteca (Library) no site www.polkaudio.com.
Pour obtenir les meilleures performances et en savoir plus sur la gestion des graves et le raccordement du caisson de graves, visitez la page Library du site www.polkaudio.com
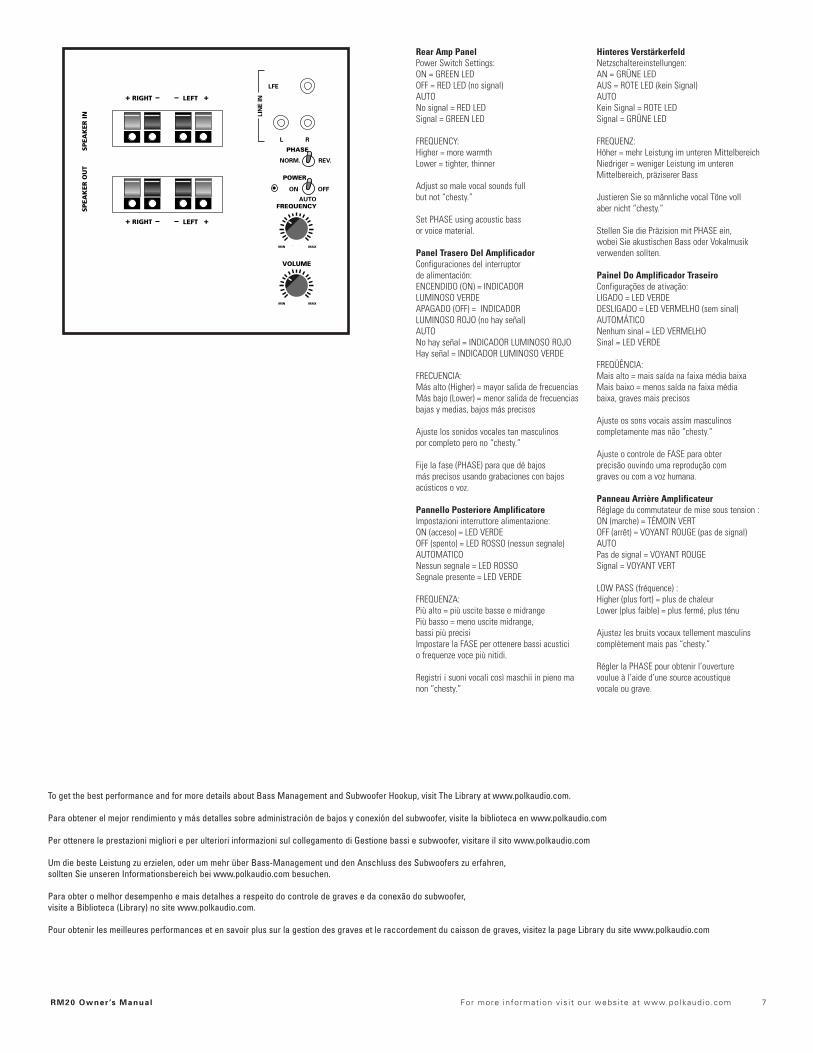
Rear Amp PanelPower Switch Settings:ON = GREEN LEDOFF = RED LED (no signal)AUTO No signal = RED LEDSignal = GREEN LED
FREQUENCY:Higher = more warmthLower = tighter, thinner
Adjust so male vocal sounds full but not “chesty.”
Set PHASE using acoustic bass or voice material.
Panel Trasero Del AmplificadorConfiguraciones del interruptor de alimentación:ENCENDIDO (ON) = INDICADOR LUMINOSO VERDEAPAGADO (OFF) = INDICADOR LUMINOSO ROJO (no hay señal)AUTONo hay señal = INDICADOR LUMINOSO ROJOHay señal = INDICADOR LUMINOSO VERDE
FRECUENCIA:Más alto (Higher) = mayor salida de frecuencias Más bajo (Lower) = menor salida de frecuenciasbajas y medias, bajos más precisos
Ajuste los sonidos vocales tan masculinos por completo pero no “chesty.”
Fije la fase (PHASE) para que dé bajos más precisos usando grabaciones con bajosacústicos o voz.
Pannello Posteriore Amplificatore Impostazioni interruttore alimentazione:ON (acceso) = LED VERDEOFF (spento) = LED ROSSO (nessun segnale)AUTOMATICO Nessun segnale = LED ROSSOSegnale presente = LED VERDE
FREQUENZA:Più alto = più uscite basse e midrangePiù basso = meno uscite midrange, bassi più precisi Impostare la FASE per ottenere bassi acustici o frequenze voce più nitidi.
Registri i suoni vocali così maschii in pieno manon “chesty.”
Hinteres VerstärkerfeldNetzschaltereinstellungen:AN = GRÜNE LEDAUS = ROTE LED (kein Signal)AUTOKein Signal = ROTE LEDSignal = GRÜNE LED
FREQUENZ:Höher = mehr Leistung im unteren MittelbereichNiedriger = weniger Leistung im unterenMittelbereich, präziserer Bass
Justieren Sie so männliche vocal Töne voll aber nicht “chesty.”
Stellen Sie die Präzision mit PHASE ein,wobei Sie akustischen Bass oder Vokalmusikverwenden sollten.
Painel Do Amplificador TraseiroConfigurações de ativação:LIGADO = LED VERDEDESLIGADO = LED VERMELHO (sem sinal)AUTOMÁTICONenhum sinal = LED VERMELHOSinal = LED VERDE
FREQÜÊNCIA:Mais alto = mais saída na faixa média baixaMais baixo = menos saída na faixa média baixa, graves mais precisos
Ajuste os sons vocais assim masculinos completamente mas não “chesty.”
Ajuste o controle de FASE para obter precisão ouvindo uma reprodução com graves ou com a voz humana.
Panneau Arrière AmplificateurRéglage du commutateur de mise sous tension :ON (marche) = TÉMOIN VERTOFF (arrêt) = VOYANT ROUGE (pas de signal)AUTOPas de signal = VOYANT ROUGESignal = VOYANT VERT
LOW PASS (fréquence) :Higher (plus fort) = plus de chaleurLower (plus faible) = plus fermé, plus ténu
Ajustez les bruits vocaux tellement masculinscomplètement mais pas “chesty.”
Régler la PHASE pour obtenir l’ouverture voulue à l’aide d’une source acoustique vocale ou grave.
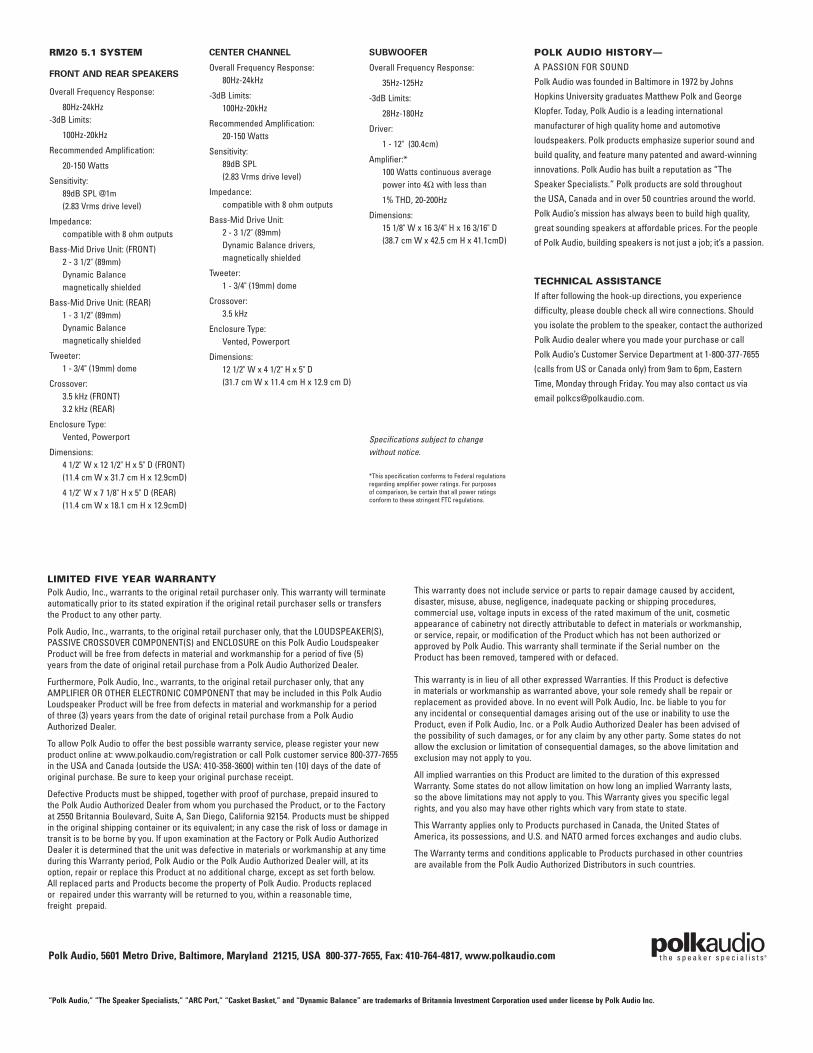
LIMITED FIVE YEAR WARRANTYPolk Audio, Inc., warrants to the original retail purchaser only. This warranty will terminateautomatically prior to its stated expiration if the original retail purchaser sells or transfers the Product to any other party.
Polk Audio, Inc., warrants, to the original retail purchaser only, that the LOUDSPEAKER(S),PASSIVE CROSSOVER COMPONENT(S) and ENCLOSURE on this Polk Audio Loudspeaker Product will be free from defects in material and workmanship for a period of five (5) years from the date of original retail purchase from a Polk Audio Authorized Dealer.
Furthermore, Polk Audio, Inc., warrants, to the original retail purchaser only, that anyAMPLIFIER OR OTHER ELECTRONIC COMPONENT that may be included in this Polk AudioLoudspeaker Product will be free from defects in material and workmanship for a period of three (3) years years from the date of original retail purchase from a Polk Audio Authorized Dealer.
To allow Polk Audio to offer the best possible warranty service, please register your newproduct online at: www.polkaudio.com/registration or call Polk customer service 800-377-7655in the USA and Canada (outside the USA: 410-358-3600) within ten (10) days of the date oforiginal purchase. Be sure to keep your original purchase receipt.
Defective Products must be shipped, together with proof of purchase, prepaid insured tothe Polk Audio Authorized Dealer from whom you purchased the Product, or to the Factoryat 2550 Britannia Boulevard, Suite A, San Diego, California 92154. Products must be shippedin the original shipping container or its equivalent; in any case the risk of loss or damage intransit is to be borne by you. If upon examination at the Factory or Polk Audio AuthorizedDealer it is determined that the unit was defective in materials or workmanship at any timeduring this Warranty period, Polk Audio or the Polk Audio Authorized Dealer will, at itsoption, repair or replace this Product at no additional charge, except as set forth below. All replaced parts and Products become the property of Polk Audio. Products replacedor repaired under this warranty will be returned to you, within a reasonable time,freight prepaid.
This warranty does not include service or parts to repair damage caused by accident, disaster, misuse, abuse, negligence, inadequate packing or shipping procedures,commercial use, voltage inputs in excess of the rated maximum of the unit, cosmeticappearance of cabinetry not directly attributable to defect in materials or workmanship,or service, repair, or modification of the Product which has not been authorized orapproved by Polk Audio. This warranty shall terminate if the Serial number on theProduct has been removed, tampered with or defaced.
This warranty is in lieu of all other expressed Warranties. If this Product is defective in materials or workmanship as warranted above, your sole remedy shall be repair or replacement as provided above. In no event will Polk Audio, Inc. be liable to you for any incidental or consequential damages arising out of the use or inability to use the Product, even if Polk Audio, Inc. or a Polk Audio Authorized Dealer has been advised of the possibility of such damages, or for any claim by any other party. Some states do notallow the exclusion or limitation of consequential damages, so the above limitation andexclusion may not apply to you.
All implied warranties on this Product are limited to the duration of this expressedWarranty. Some states do not allow limitation on how long an implied Warranty lasts,so the above limitations may not apply to you. This Warranty gives you specific legalrights, and you also may have other rights which vary from state to state.
This Warranty applies only to Products purchased in Canada, the United States ofAmerica, its possessions, and U.S. and NATO armed forces exchanges and audio clubs.
The Warranty terms and conditions applicable to Products purchased in other countries are available from the Polk Audio Authorized Distributors in such countries.
Polk Audio, 5601 Metro Drive, Baltimore, Maryland 21215, USA 800-377-7655, Fax: 410-764-4817, www.polkaudio.com
“Polk Audio,” “The Speaker Specialists,” “ARC Port,” “Casket Basket,” and “Dynamic Balance” are trademarks of Britannia Investment Corporation used under license by Polk Audio Inc.
POLK AUDIO HISTORY—
A PASSION FOR SOUND
Polk Audio was founded in Baltimore in 1972 by Johns
Hopkins University graduates Matthew Polk and George
Klopfer. Today, Polk Audio is a leading international
manufacturer of high quality home and automotive
loudspeakers. Polk products emphasize superior sound and
build quality, and feature many patented and award-winning
innovations. Polk Audio has built a reputation as “The
Speaker Specialists.” Polk products are sold throughout
the USA, Canada and in over 50 countries around the world.
Polk Audio’s mission has always been to build high quality,
great sounding speakers at affordable prices. For the people
of Polk Audio, building speakers is not just a job; it’s a passion.
TECHNICAL ASSISTANCE
If after following the hook-up directions, you experience
difficulty, please double check all wire connections. Should
you isolate the problem to the speaker, contact the authorized
Polk Audio dealer where you made your purchase or call
Polk Audio’s Customer Service Department at 1-800-377-7655
(calls from US or Canada only) from 9am to 6pm, Eastern
Time, Monday through Friday. You may also contact us via
email [email protected].
RM20 5.1 SYSTEM
FRONT AND REAR SPEAKERS
Overall Frequency Response:
80Hz-24kHz-3dB Limits:
100Hz-20kHz
Recommended Amplification:
20-150 Watts
Sensitivity:89dB SPL @1m (2.83 Vrms drive level)
Impedance:compatible with 8 ohm outputs
Bass-Mid Drive Unit: (FRONT)2 - 3 1/2" (89mm) Dynamic Balance magnetically shielded
Bass-Mid Drive Unit: (REAR)1 - 3 1/2" (89mm) Dynamic Balance magnetically shielded
Tweeter:1 - 3/4" (19mm) dome
Crossover:3.5 kHz (FRONT)3.2 kHz (REAR)
Enclosure Type:Vented, Powerport
Dimensions:4 1/2" W x 12 1/2" H x 5" D (FRONT)(11.4 cm W x 31.7 cm H x 12.9cmD)
4 1/2" W x 7 1/8" H x 5" D (REAR)(11.4 cm W x 18.1 cm H x 12.9cmD)
CENTER CHANNEL
Overall Frequency Response:80Hz-24kHz
-3dB Limits:100Hz-20kHz
Recommended Amplification:20-150 Watts
Sensitivity:89dB SPL (2.83 Vrms drive level)
Impedance:compatible with 8 ohm outputs
Bass-Mid Drive Unit:2 - 3 1/2" (89mm)Dynamic Balance drivers, magnetically shielded
Tweeter:1 - 3/4" (19mm) dome
Crossover:3.5 kHz
Enclosure Type:Vented, Powerport
Dimensions:12 1/2" W x 4 1/2" H x 5" D(31.7 cm W x 11.4 cm H x 12.9 cm D)
SUBWOOFER
Overall Frequency Response:
35Hz-125Hz
-3dB Limits:
28Hz-180Hz
Driver:
1 - 12" (30.4cm)
Amplifier:*100 Watts continuous average power into 4Ω with less than
1% THD, 20-200Hz
Dimensions:15 1/8" W x 16 3/4" H x 16 3/16" D (38.7 cm W x 42.5 cm H x 41.1cmD)
Specifications subject to change without notice.
*This specification conforms to Federal regulationsregarding amplifier power ratings. For purposes of comparison, be certain that all power ratings conform to these stringent FTC regulations.