Embed Size (px)
Citation preview
CarRadio MD 81485_AUS.fm Seite 1 Donnerstag, 17. August 2006 7:50 07
CONTENTS
Overview . . . . . . . . . . . . . . . . . . . . . . . . . . . . . . . . . . . . 2
Safety instructions . . . . . . . . . . . . . . . . . . . . . . . . . . . . 5
What’s in the box? . . . . . . . . . . . . . . . . . . . . . . . . . . . . 7
Installation. . . . . . . . . . . . . . . . . . . . . . . . . . . . . . . . . . . 7Installation instructions . . . . . . . . . . . . . . . . . . . . . . . . . . . . . . . . . . . . . . . 7Fit the installation frame . . . . . . . . . . . . . . . . . . . . . . . . . . . . . . . . . . . . . . 8Cable connections . . . . . . . . . . . . . . . . . . . . . . . . . . . . . . . . . . . . . . . . . . 9Inserting the car radio . . . . . . . . . . . . . . . . . . . . . . . . . . . . . . . . . . . . . . 10Control panel . . . . . . . . . . . . . . . . . . . . . . . . . . . . . . . . . . . . . . . . . . . . . 11RESET . . . . . . . . . . . . . . . . . . . . . . . . . . . . . . . . . . . . . . . . . . . . . . . . . . . 11Removing the unit . . . . . . . . . . . . . . . . . . . . . . . . . . . . . . . . . . . . . . . . . . 11Explanation for using the cables . . . . . . . . . . . . . . . . . . . . . . . . . . . . . . 12
Operation. . . . . . . . . . . . . . . . . . . . . . . . . . . . . . . . . . . 14Basic operation . . . . . . . . . . . . . . . . . . . . . . . . . . . . . . . . . . . . . . . . . . . . 14Radio functions . . . . . . . . . . . . . . . . . . . . . . . . . . . . . . . . . . . . . . . . . . . . 16Playing Audio CDs . . . . . . . . . . . . . . . . . . . . . . . . . . . . . . . . . . . . . . . . . . 17Playing MP3 CDs. . . . . . . . . . . . . . . . . . . . . . . . . . . . . . . . . . . . . . . . . . . 18WMA files . . . . . . . . . . . . . . . . . . . . . . . . . . . . . . . . . . . . . . . . . . . . . . . . . 19
USB connection. . . . . . . . . . . . . . . . . . . . . . . . . . . . . . 20
Card reader . . . . . . . . . . . . . . . . . . . . . . . . . . . . . . . . . 21
Troubleshooting . . . . . . . . . . . . . . . . . . . . . . . . . . . . . 22
Disposal information . . . . . . . . . . . . . . . . . . . . . . . . . 23
Technical data . . . . . . . . . . . . . . . . . . . . . . . . . . . . . . 24
MD 81485 1
CarRadio MD 81485_AUS.fm Seite 2 Donnerstag, 17. August 2006 7:50 07
OVERVIEW
1. PWR: turn device on/off (the device can also be turned on with any other key except OPEN)
2. VOL–/VOL+: Turn to control volume;Audio setting:SEL: Press repeatedly to call up the following audio settings: volume, bass, treble, balance, fader; turn to adjust selected audio setting;Volume default; time setting, sound effect:Press and hold SEL:VOL 17: Volume default; turn to adjust the volume default;ADJ 00:00 ( TIME SETTING): turn clockwise to adjust the hour; turn anticlockwise to adjust the minutes;DSP NONE: turn to select the desired sound effect FLAT, CLASSIC, ROCK and POP.CD/MP3 mode:in search mode, select track or character [see SCH key (9)].
3. Display4. LOU: loudness/BND: band selector/ENTER: confirm selection.5. LOC: select local or distance reception.
LOC ON: recommended setting in areas with strong signals;LOC OFF: recommended setting in areas with weak signals.
6. MO/ST: Select mono or stereo reception in radio FM mode.7. REL : Open control panel8. A/PS and SCH
Radio mode:– Press and hold A/PS for more than 1 second: the radio will search for six stations and store them into the preset memory 1�6 (there are 18 FM stations and 12 AM stations).– Press A/PS for less than 1 second: the radio will scan the six preset stations and stop for 5 seconds at each station.CD/MP3/ MMC/SD/USB mode:Press SCH once to enter into search mode; then turn the VOL knob to select the desired track number; then press ENTER (19) for playback.Only MP3 MODE:Press SCH twice to enter into FILE EDIT mode (searching for names of titles) or ROOT SEARCH (accessing the directories of the MP3 CD);– FILE EDIT – example: searching for the name „Duo“:Press SCH twice to enter the file edit mode; the current track number is displayed; then rotate the VOL knob to select the character „D“; the display shows „DXX“; press SEL (VOL knob) to confirm; rotate the VOL knob to select „U“, press SEL; the display shows DUX; press SEL to confirm; rotate the VOL knob to select „O“;
2
Overview
CarRadio MD 81485_AUS.fm Seite 3 Donnerstag, 17. August 2006 7:50 07
press ENTER (19) to confirm and press again to playback the title.– ROOT SEARCH: Press SCH twice to enter the file edit mode; press SEL (VOL knob) three times to enter the root search mode; the first directory will be displayed; rotate the VOL knob or press the SKIP keys (10) repeatedly to select the directory; press ENTER (19) for playback of the directory.
9. SKIPIn radio mode:press slightly repeatedly to search for a specific frequency manually;press and hold for more than two seconds to start an automatic search; the search will stop at the first found channel;In CD/SD/MMC mode:press slightly to skip to the previous/next track;press and hold to start a fast search.
10. SCAN: Automatic station search in radio mode.Press SCAN to start the search. If the unit receives a radio signal, the display will flash ten times to show the frequency; then it will continue to seek another signal until you press SCAN again or you store the station into the preset memory (press and hold M1-6 for more than one second).
11. MUTE: Press to mute the sound output.12. � 17. M1 - M6, in radio mode:
Preset memory keys. To store the current station, press and hold one of the M keys for more than one second).Press briefly to recall the stored station.
12. (M1): Play/Pause function in CD/SD/MMC/USB mode.13. RPT (M2): Repeat current track in CD/SD/MMC/USB mode.14. INT (M3): Intro function in CD/SD/MMC/USB mode; press to play each track
for 10 seconds . Press again to stop the intro function.15. RDM (M4): Random playback in CD/SD/MMC/USB mode. Press to playback
the track in random order.16. –10 (M5): Press in CD/SD/MMC/USB mode to search the –10 track.17. +10 (M5): Press in CD/SD/MMC/USB mode to search the +10 track.18. DISP
In radio mode: press repeatedly to display frequency or clock time;In any other mode: press repeatedly to display playback time, frequency or clock time.
19. BAND/ENTERIn radio mode: Press BAND repeatedly to select the radio frequency: FM1 > FM2 > FM3 > AM1 > AM2Other function modes (e. g. track search): Press ENTER to confirm selection.
20. MODE: Press repeatedly to select the mode: Radio > CD (and MP3) > USB > SD/MMC.
21. Flip cover to protect card slots (see 25�27)
MD 81485 3
Overview
CarRadio MD 81485_AUS.fm Seite 4 Donnerstag, 17. August 2006 7:50 07
CD player/card reader/USB (behind control panel and flap cover)22. EJECT: eject CD23. RESET opening: reset to factory settings24. CD compartment25. SD/MMC slot (card reader); plug SD/MMC card in for playback. The operation
is identical with MP3 discs. 26. USB plug27. Red LED as anti�theft function
4

CarRadio MD 81485_AUS.fm Seite 5 Donnerstag, 17. August 2006 7:50 07
SAFETY INSTRUCTIONS
Keep electrical equipment out of reach of childrenThe appliance is not intended for use by young children or infirm persons without supervision.
Young children should be supervised to ensure that they do not play with the appliance.
Road safetyRoad safety should be your top priority. Use your car radio only in suitable traffic conditions. Please ensure that you are familiar with the radio before setting off.
You should always be able to hear police, fire and other emergency service sirens immediately while you are in your vehicle. For this reason, please play your radio at an appropriate volume while driving.
Never undertake your own repairsUnder no circumstances should you attempt to open and/or repair this unit on your own. Refer all servicing to MEDION Help Desk on 1300 884 987.
CD playerThe CD player is a Class 1 laser product. The device has a safety system that prevents dangerous laser rays escaping from the device during normal use. In order to avoid injury to the eyes, never interfere with or damage the unit's security system.
About these instructionsPlease read these instructions carefully before using the device. Note the warnings on the device and in the operating instructions
Store the operating instructions in the car. If you sell or give the car radio away, please ensure that you also pass on these instructions.
MD 81485 5
Safety instructions
CarRadio MD 81485_AUS.fm Seite 6 Donnerstag, 17. August 2006 7:50 07
Using the CD playerNever place any objects other than CDs into the disc compartment. Otherwise you might damage the precisely engineered pull�in mechanism.
Moisture and high humidity may cause the CD player to malfunction. If this occurs, switch on the vehicle's heater to evaporate the moisture before use.
Do not expose the CD player to extremely high or low temperatures.
Installation
Before installation, disconnect the battery first. There is a risk of short-circuit and electric shock!
Please use the car radio's ISO block for installation. Never disconnect the ISO block. Disconnecting the cables voids the guarantee!
Avoid installing the set in the following circumstances:
high temperatures (e.g. caused by strong sunlight or direct heated air) dust, dirtand vibrations.
This can damage the device.
Cleaning the deviceUse a soft, dry cloth to clean the device. Avoid the use of chemical solutions and cleaning products, because these may damage the unit's surface and/or the labels on it.
IMPORTANT!
We recommend that you have this product installed by a qualified installer. The supplier will not be liable for any damages caused to this product or to other devices in the car as a result of incorrect installation.
6
CarRadio MD 81485_AUS.fm Seite 7 Donnerstag, 17. August 2006 7:50 07
WHAT’S IN THE BOX?The following are included in the delivery pack:
INSTALLATION
Before installation, disconnect the car battery! There is a risk of short-circuit and electric shock!
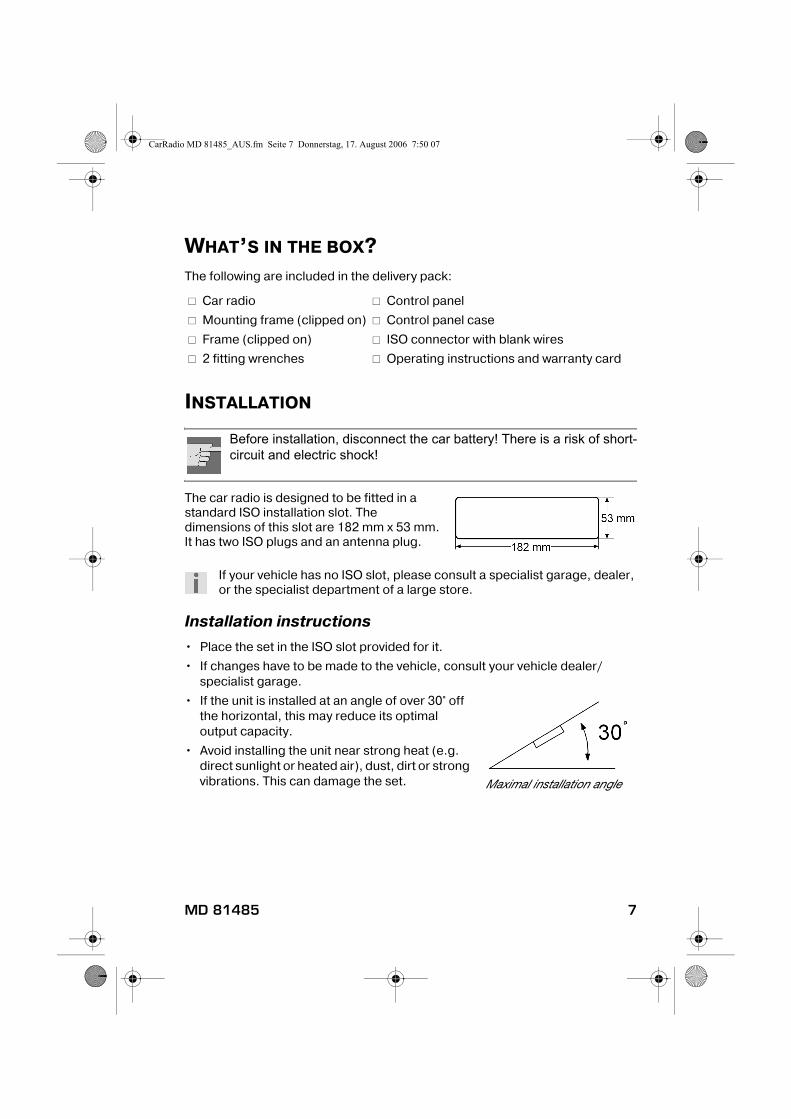
The car radio is designed to be fitted in a standard ISO installation slot. The dimensions of this slot are 182 mm x 53 mm. It has two ISO plugs and an antenna plug.
If your vehicle has no ISO slot, please consult a specialist garage, dealer, or the specialist department of a large store.
Installation instructions• Place the set in the ISO slot provided for it.
• If changes have to be made to the vehicle, consult your vehicle dealer/specialist garage.
• If the unit is installed at an angle of over 30° off the horizontal, this may reduce its optimal output capacity.
• Avoid installing the unit near strong heat (e.g. direct sunlight or heated air), dust, dirt or strong vibrations. This can damage the set.
Car radio Control panel
Mounting frame (clipped on) Control panel case
Frame (clipped on) ISO connector with blank wires
2 fitting wrenches Operating instructions and warranty card
Maximal installation angle
MD 81485 7
Installation
CarRadio MD 81485_AUS.fm Seite 8 Donnerstag, 17. August 2006 7:50 07
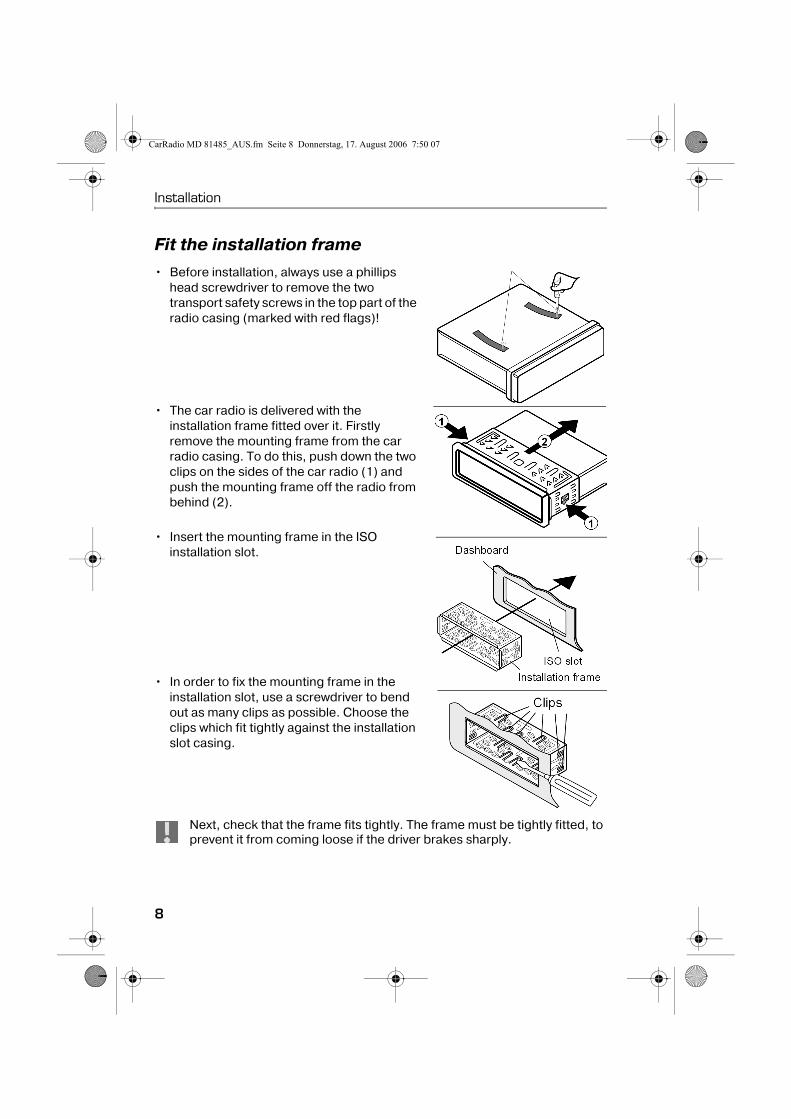
Fit the installation frame• Before installation, always use a phillips
head screwdriver to remove the two transport safety screws in the top part of the radio casing (marked with red flags)!
• The car radio is delivered with the installation frame fitted over it. Firstly remove the mounting frame from the car radio casing. To do this, push down the two clips on the sides of the car radio (1) and push the mounting frame off the radio from behind (2).
• Insert the mounting frame in the ISO installation slot.
• In order to fix the mounting frame in the installation slot, use a screwdriver to bend out as many clips as possible. Choose the clips which fit tightly against the installation slot casing.
Next, check that the frame fits tightly. The frame must be tightly fitted, to prevent it from coming loose if the driver brakes sharply.
8
Installation
CarRadio MD 81485_AUS.fm Seite 9 Donnerstag, 17. August 2006 7:50 07
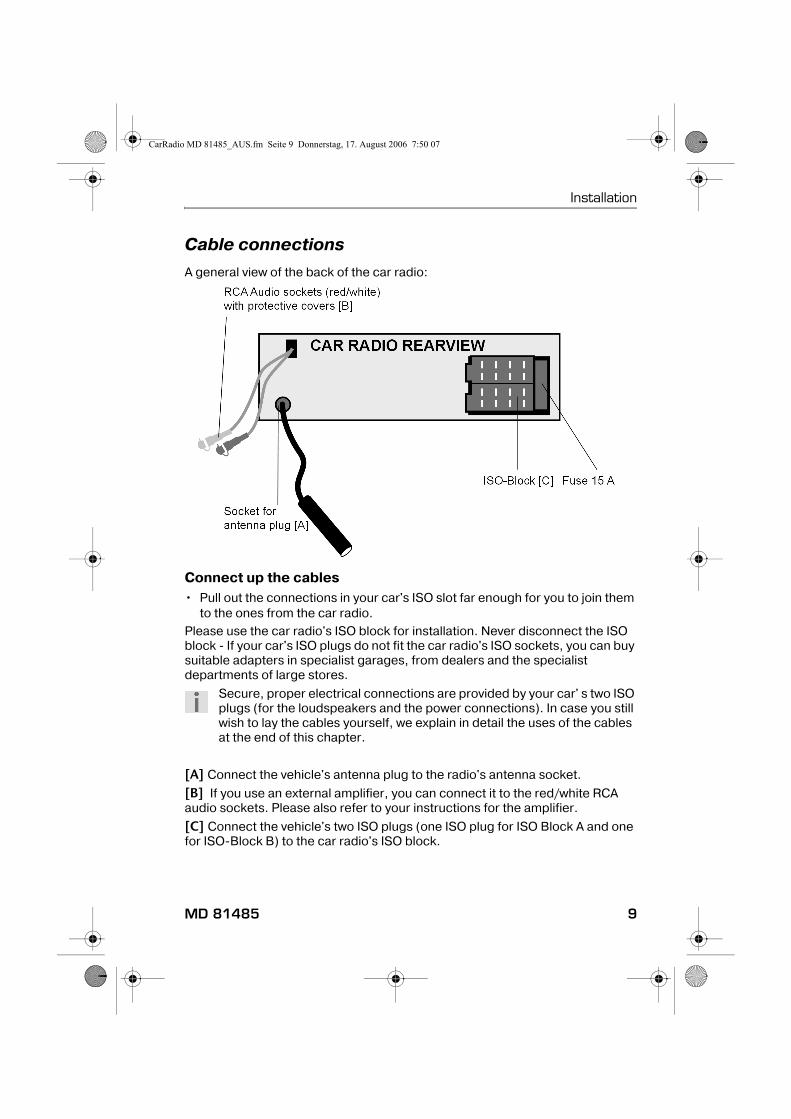
Cable connectionsA general view of the back of the car radio:
Connect up the cables• Pull out the connections in your car's ISO slot far enough for you to join them
to the ones from the car radio.Please use the car radio's ISO block for installation. Never disconnect the ISO block � If your car's ISO plugs do not fit the car radio's ISO sockets, you can buy suitable adapters in specialist garages, from dealers and the specialist departments of large stores.
Secure, proper electrical connections are provided by your car' s two ISO plugs (for the loudspeakers and the power connections). In case you still wish to lay the cables yourself, we explain in detail the uses of the cables at the end of this chapter.
[A] Connect the vehicle's antenna plug to the radio's antenna socket.
[B] If you use an external amplifier, you can connect it to the red/white RCA audio sockets. Please also refer to your instructions for the amplifier.
[C] Connect the vehicle's two ISO plugs (one ISO plug for ISO Block A and one for ISO�Block B) to the car radio's ISO block.
MD 81485 9
Installation
CarRadio MD 81485_AUS.fm Seite 10 Donnerstag, 17. August 2006 7:50 07
Test station memory
In some vehicle models the standard arrangement for the standard plus and permanent plus cables has been switched in the factory (see“Arrangement of the ISO block” on page 13). This can lead to the station memory not working.Before you finally install the car radio, try the following to find out if you have saved the stations.
• Reconnect the car battery.
• Turn on the ignition.
• Switch the radio on.
• Go through the automatic station saving process, holding down the A/PS/SCH [8]key for approx. two seconds (see also“Automatic saving” on page 16).
• Switch the ignition off.
• Switch on the ignition again and find out if the stations have been saved (press the station buttons 1 bis 6 [12-17]).
• If the stations have been saved, you can install the radio.
• If the stations are no longer in the memory, you should use an adapter, obtainable from the specialist store, or have the cable adapted in a specialist garage. If this is the case, refer to Chapter “Explanation for using the cables” on page 12.
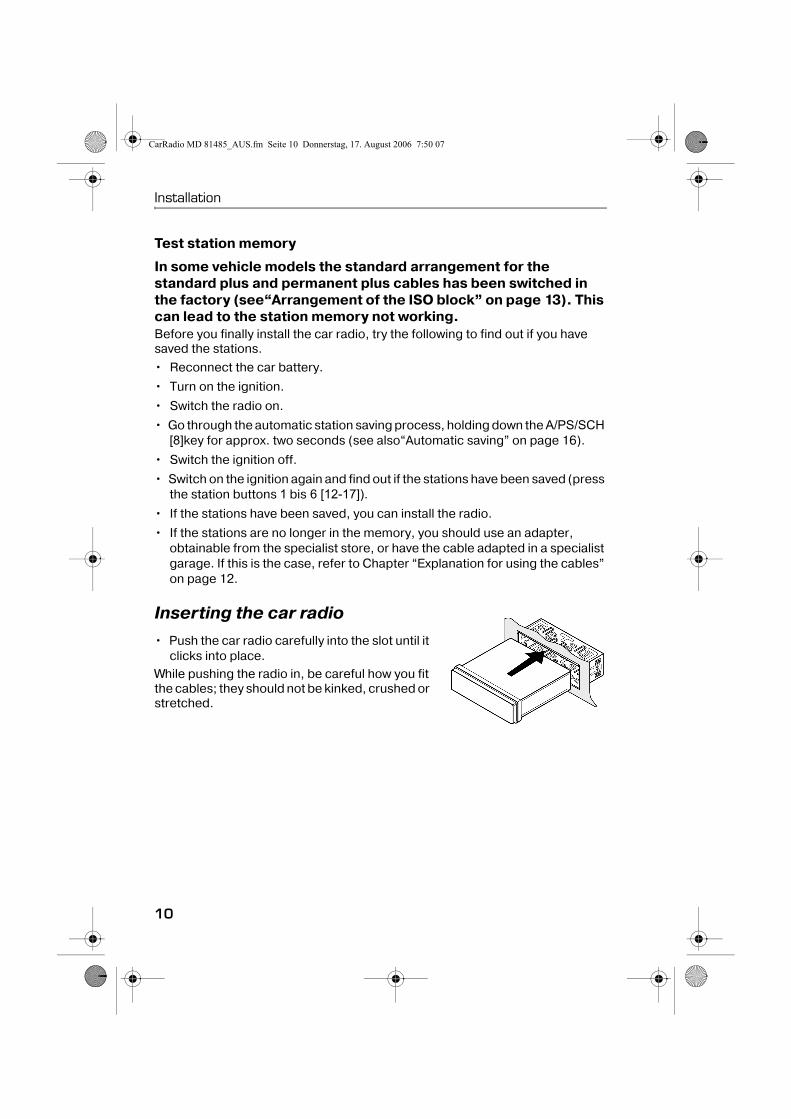
Inserting the car radio• Push the car radio carefully into the slot until it
clicks into place.While pushing the radio in, be careful how you fit the cables; they should not be kinked, crushed or stretched.
10
Installation
CarRadio MD 81485_AUS.fm Seite 11 Donnerstag, 17. August 2006 7:50 07
Control panel
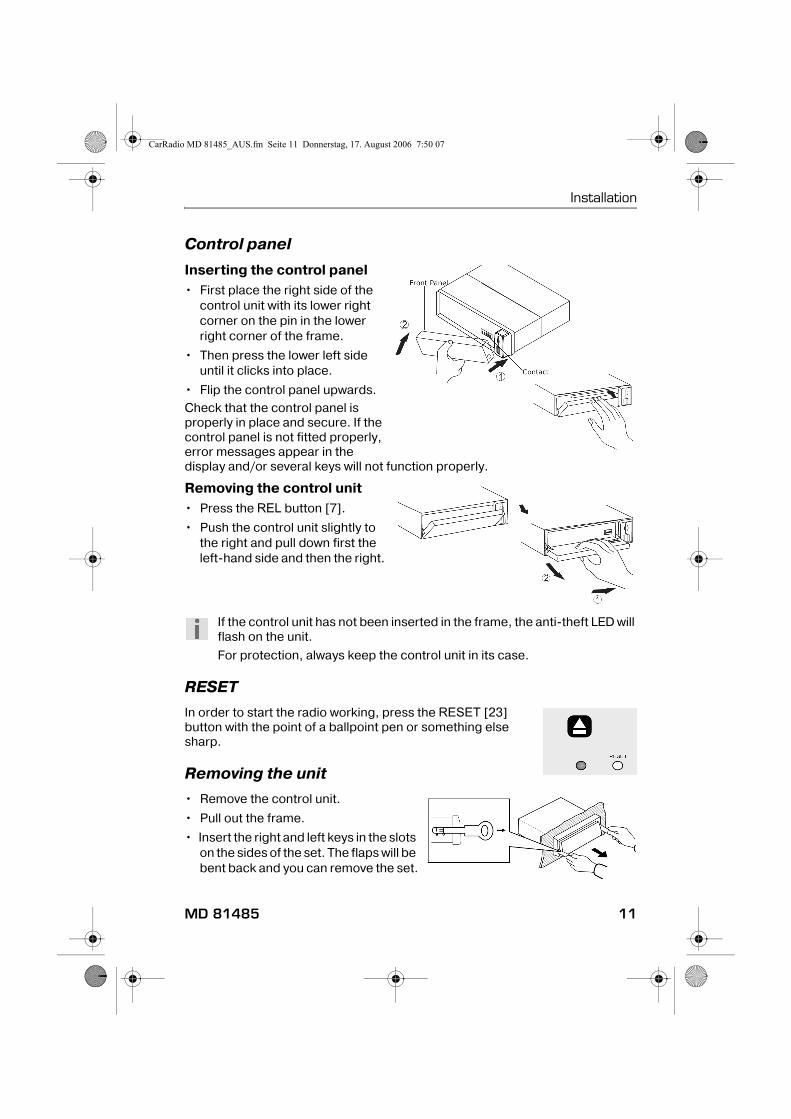
Inserting the control panel• First place the right side of the
control unit with its lower right corner on the pin in the lower right corner of the frame.
• Then press the lower left side until it clicks into place.
• Flip the control panel upwards.Check that the control panel is properly in place and secure. If the control panel is not fitted properly, error messages appear in the display and/or several keys will not function properly.
Removing the control unit• Press the REL button [7].
• Push the control unit slightly to the right and pull down first the left�hand side and then the right.
If the control unit has not been inserted in the frame, the anti�theft LED will flash on the unit.
For protection, always keep the control unit in its case.
RESETIn order to start the radio working, press the RESET [23] button with the point of a ballpoint pen or something else sharp.
Removing the unit• Remove the control unit.
• Pull out the frame.
• Insert the right and left keys in the slots on the sides of the set. The flaps will be bent back and you can remove the set.
MD 81485 11
Installation
CarRadio MD 81485_AUS.fm Seite 12 Donnerstag, 17. August 2006 7:50 07
Explanation for using the cablesThe explanatory notes for using the cables are intended for when the cables have to be fitted individually. Consult a specialist garage and pass on the information contained in this chapter.
To connect the radio to your vehicle's ISO plugs, you do not need these explanatory notes.
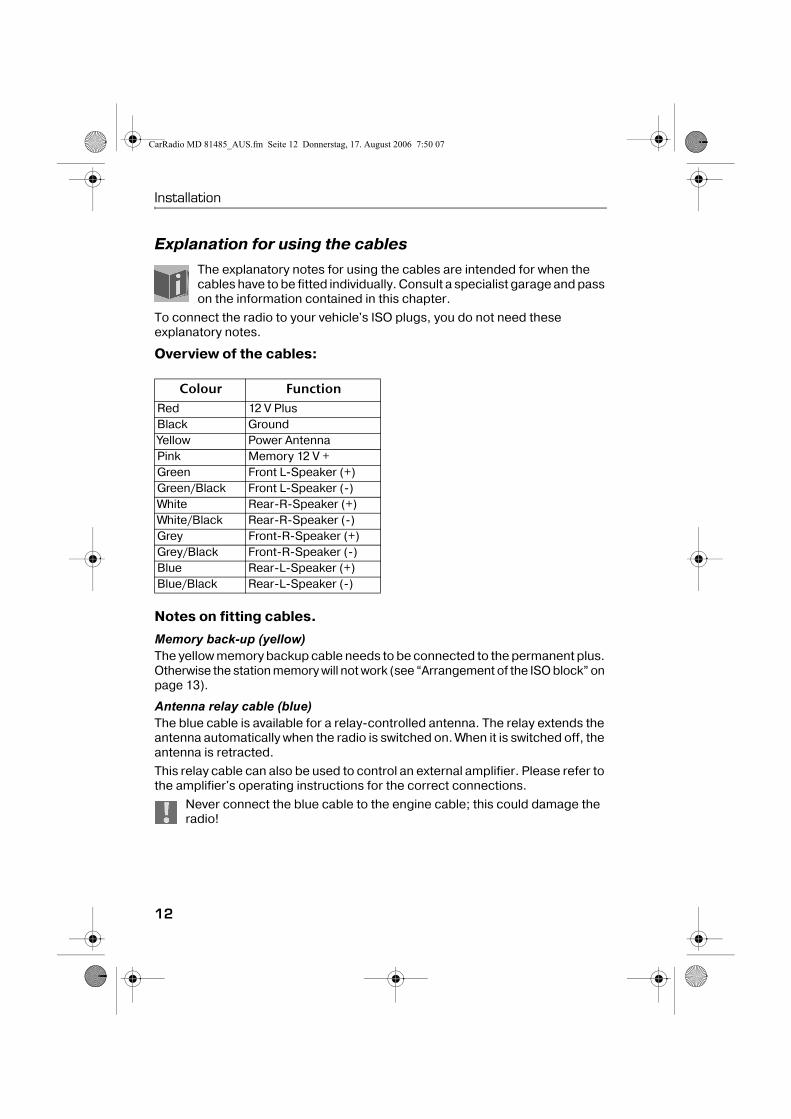
Overview of the cables:
Notes on fitting cables.
Memory back-up (yellow)The yellow memory backup cable needs to be connected to the permanent plus. Otherwise the station memory will not work (see “Arrangement of the ISO block” on page 13).
Antenna relay cable (blue)The blue cable is available for a relay�controlled antenna. The relay extends the antenna automatically when the radio is switched on. When it is switched off, the antenna is retracted.
This relay cable can also be used to control an external amplifier. Please refer to the amplifier's operating instructions for the correct connections.
Never connect the blue cable to the engine cable; this could damage the radio!
Colour FunctionRed 12 V PlusBlack GroundYellow Power AntennaPink Memory 12 V +Green Front L�Speaker (+)Green/Black Front L�Speaker (�)White Rear�R�Speaker (+)White/Black Rear�R�Speaker (�)Grey Front�R�Speaker (+)Grey/Black Front�R�Speaker (�)Blue Rear�L�Speaker (+)Blue/Black Rear�L�Speaker (�)
12
Installation
CarRadio MD 81485_AUS.fm Seite 13 Donnerstag, 17. August 2006 7:50 07
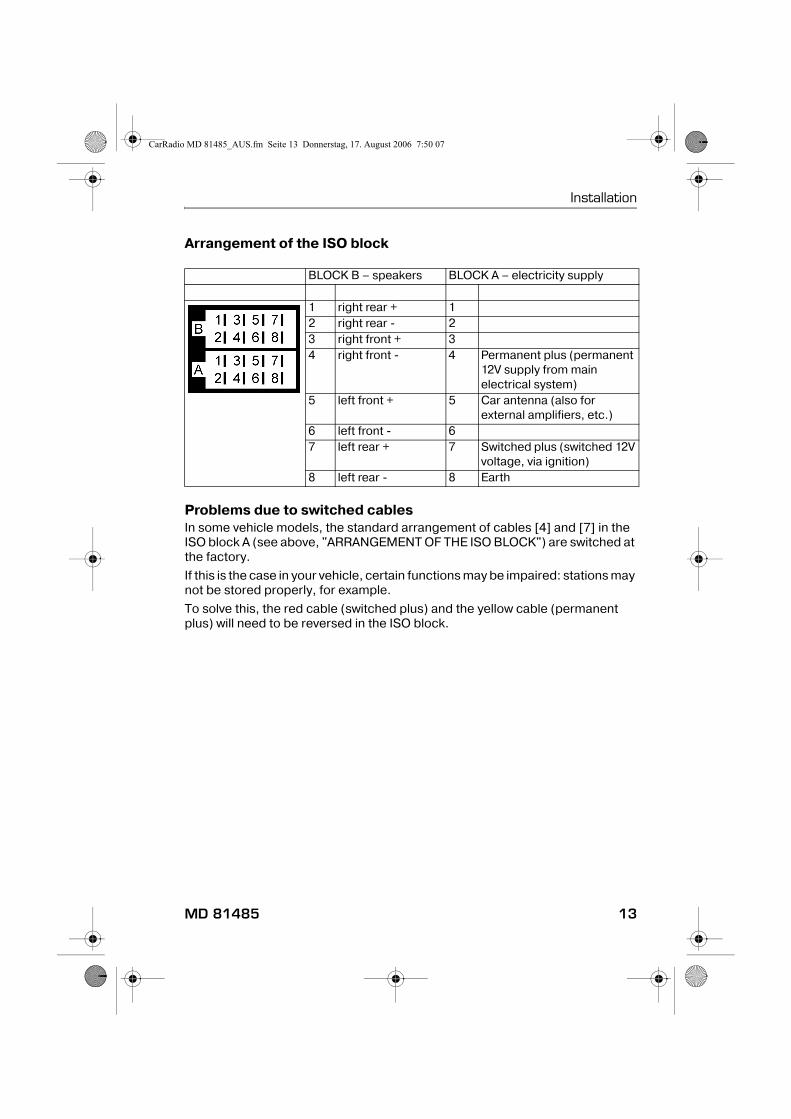
Arrangement of the ISO block
Problems due to switched cablesIn some vehicle models, the standard arrangement of cables [4] and [7] in the ISO block A (see above, "ARRANGEMENT OF THE ISO BLOCK") are switched at the factory.
If this is the case in your vehicle, certain functions may be impaired: stations may not be stored properly, for example.
To solve this, the red cable (switched plus) and the yellow cable (permanent plus) will need to be reversed in the ISO block.
BLOCK B – speakers BLOCK A – electricity supply
1 right rear + 12 right rear � 23 right front + 34 right front � 4 Permanent plus (permanent
12V supply from main electrical system)
5 left front + 5 Car antenna (also for external amplifiers, etc.)
6 left front � 67 left rear + 7 Switched plus (switched 12V
voltage, via ignition)8 left rear � 8 Earth
MD 81485 13
CarRadio MD 81485_AUS.fm Seite 14 Donnerstag, 17. August 2006 7:50 07
OPERATION
Basic operation
Switching on/offPress the PWR button (1) to switch the radio on or off.
Volume• Turn the volume control knob (2) to turn the volume up or down.
Always set the volume so that you can still clearly hear the sirens from emergency vehicles!
Functions when pressing the volume knob• Press SEL button to change the mode in the sequence of
VOLUME > BASS > TREBLE > BALANCE > FADER.
• Press once. When " VOL" is displayed, you can adjust the sound level by rotating the VOL+/ VOL knob.
• Press twice. When "BAS" is displayed, you can adjust the bass effect by rotating the VOL+/ VOL knob.
• Press three times. When "TRE" is displayed, you can adjust the treble effect by rotating the VOL+/ VOL knob.
• Press four times. When "BAL" is displayed, you can rotate VOL+ to decrease the sound level of left speakers or rotate VOL� to decrease the sound level of right speakers.
• Press five times. When"FAD" is displayed, you can rotate VOL+ to decrease the sound level of rear speakers or rotate VOL� to decrease the sound level of front speakers.
Functions when holding the volume knob• Press and hold SEL button, you can rotate VOL+/VOL� to adjust the setting of
VOL 17; ADJ 00:00; DSP NONE.
• Press once. IN VOL 17 is indicated: The volume output default setting can be adjusted. When power is on, the output level can be returned to default setting if the output level is over the default setting. Conversely, it will maintain the level if the output level is below the default setting.
• Press twice. ADJ 00:00 is indicated: TIMING SETTING. For time setting, hold the SEL button until the clock display is blinking. You can rotate the volume
14
Operation
CarRadio MD 81485_AUS.fm Seite 15 Donnerstag, 17. August 2006 7:50 07
clockwise to adjust "HOUR", and then rotate the volume anticlockwise to adjust "MINUTE".
• Press three times. � DSP NONE is indicated: To select the desired sound effect among FLAT, CLASSIC, ROCK and POP. Choose the setting DSP NONE to turn the sound effect off.
Loudness• Press the LOUD button (4) to strengthen the bass.
DisplayBy pressing the DISP button (18) you can change the screen display as follows:
• Radio Mode: press this button to display the radio frequency or clock time.
• CD/MP3 Mode: Press this button to display playback time, frequency or clock time.
MODE• Press the MOD button (20) to switch between radio reception, CD/MP3
operation, USB connection and card reader.
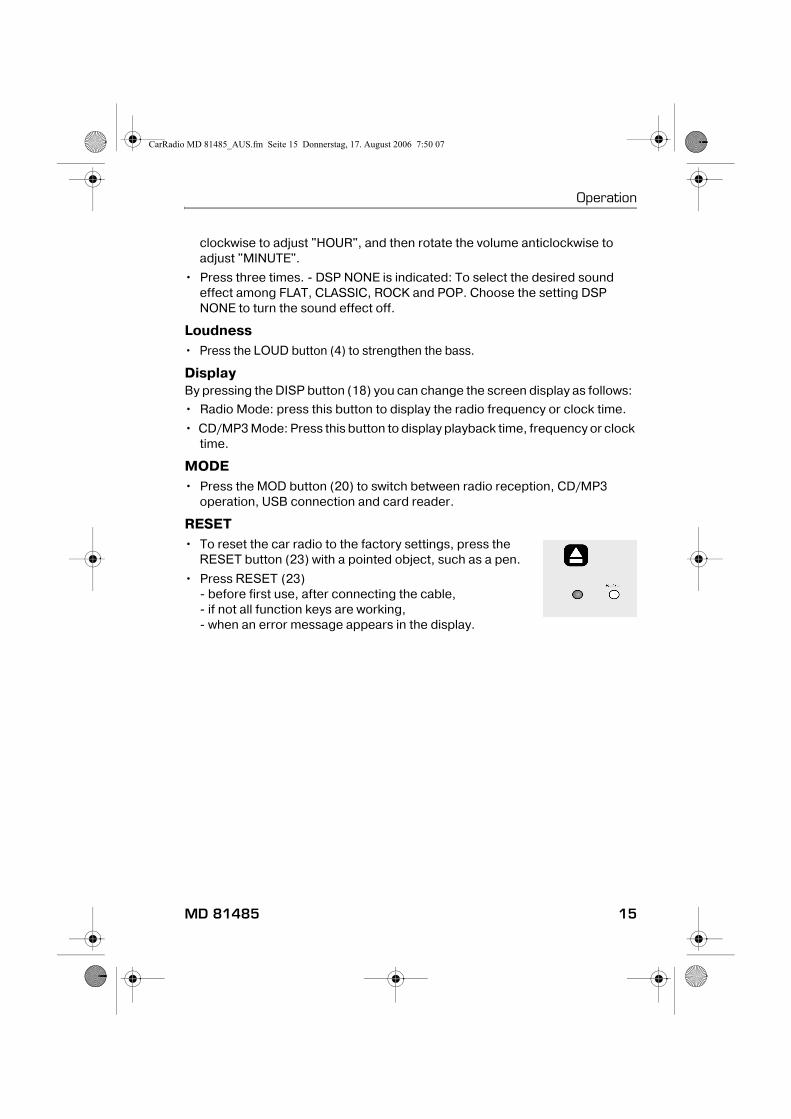
RESET• To reset the car radio to the factory settings, press the
RESET button (23) with a pointed object, such as a pen.
• Press RESET (23)� before first use, after connecting the cable,� if not all function keys are working,� when an error message appears in the display.
MD 81485 15
Operation
CarRadio MD 81485_AUS.fm Seite 16 Donnerstag, 17. August 2006 7:50 07
Radio functions
Selecting the radio frequency• Press the BAND/ENTER button (19) to switch between FM (FM1, FM2 & FM3)
and AM (AM1 & AM2). You can store up to 6 stations in each band.
Searching for a station• Briefly press the TUN/TRK 8 (17) or TUN/TRK 9 (18) scan buttons. The set will
search for the next station.
• Switch to manual station search by pressing one of the two buttons for two seconds. The display shows MANUAL.
Save station• After the search function has found a station, press one of the 1-6 (10�15)
station buttons for around three seconds. A beep will sound to indicate that the station has been stored.The radio will switch back into automatic search mode after a few seconds.
Selecting stations• Select the radio frequency by pressing BAND/ENTER (19).
• You can open one of the saved stations by pressing one of the station buttons 1-6 (10�15).
Automatic saving• Press the A/PS/SCH button (8) until you hear a beep. The display shows
SEARCH. The scan stops for five seconds each time a station is found. The number flashing on the display is the number of the button which saves the station. The search continues automatically on weak stations.
Running through saved stations• You can call up the saved stations for the current transmission areas.
• Select the radio frequency by pressing BAND/ENTER (19).
• Press the A/PS/SCH button (8) briefly. All stations are now briefly selected.
• When you hear the station you require press the A/PS/SCH button (8) briefly.
16
Operation
CarRadio MD 81485_AUS.fm Seite 17 Donnerstag, 17. August 2006 7:50 07
Playing Audio CDs
Inserting and removing CDs• Fold down the control panel (Button 1).
• Insert the CD into the slot with the labelled side upwards (25).
• Then close the control panel again. The CD will start to play. The display shows [S-CDP].
• To remove the CD open the control panel again. Press the EJECT (22) button. The CD will be ejected. The car radio will change back to radio mode.
Do not drive with a CD sticking out of the player. Remove the CD right away.
Skipping tracks• By pressing the SKIP (9) buttons, you can select the previous or next track on
the CD. The track number is shown on the display.
Pausing the CD• You can pause the CD by pressing the button (12). Pressing the button
again will restart CD playback.
Fast forward/rewind• Hold down the SKIP (9) buttons for longer, to start fast forward or fast rewind.
Preview tracks• Press the INT button (14). All tracks are played for around 10 seconds each.
Pressing the button again will change the playback mode back to normal.
ESP � Electric Shock ProtectionThe device is equipped with an anti�shock function. This function compensates for vibrations, for instance, from a bumpy road, and ensures playback without interruption, even if the player is moving around.. When the player is switched on, the memory is automatically filled with data:� with audio CDs it is for 12 seconds;� with MP3 CDs it is for 120 seconds;
Further information on playing CDsMoisture and high humidity may cause the CD player to malfunction. If this occurs, switch on the vehicle's heater to evaporate the moisture before use.
Do not expose the CD player to extremely high or low temperatures.
MD 81485 17

Operation
CarRadio MD 81485_AUS.fm Seite 18 Donnerstag, 17. August 2006 7:50 07
Repeat a track• Press the RPT button (13) to repeat the current track. Pressing the button
again will change the playback mode back to normal.
Random track playback• Press the RDM button (15). The player will "shuffle" through the tracks,
playing them in random order. Pressing the button again will change the playback mode back to normal.
Playing MP3 CDsThe basic functions are the same as those for audio CDs (refer to previous chapter). However, for MP3 CDs you can select the track and artist directly. The use of this function and other MP3�specific functions will depend to some degree on the MP3 CD itself. Please bear this in mind when producing this type of CD (refer to next chapter).
All common encodings can be played back.
Producing MP3 CDs; ID3 tagsAs with data CDs, MP3 CD�ROMs may contain individual tracks or folders. When producing an MP3 CD, please ensure that you do not save tracks on the same level as directories but only inside the directories. Mixing tracks and directories at the same level may produce playback problems.
When producing an MP3 CD you can also save so�called "ID3 tags" (we recommend using an ID3 tag editor for entries). This is a block of information stored on an MP3 CD lying "behind" the actual music information of the MP3. This may include such items as the artist, track, album name, year of publication and a short comment. The car radio can read this information block and show it on the display.
18
Operation
CarRadio MD 81485_AUS.fm Seite 19 Donnerstag, 17. August 2006 7:50 07
Searching for tracks (numbers)
Search for track numbers• When A/PS/SCH button (8) is pressed at MP3 play mode, FILE EDIT and
ROOT SEARCH become possible:
File Edit Example How to edit for the file name "DUO":
• Press A/PS/SCH (8) key twice to go into the file edit mode. The current playback track number is displayed, then rotate the VOL button once to select "D".
• At this time, the display shows "DXX�"
• Press the SEL button again, then rotate the VOL button to select "U" At this time, the display shows "DUX"
• Press the SEL button again, then rotate the VOL button to select "O"� At this time, the display shows "DUO".
• Press BAND/ENTER once to confirm, then press BAND/ENTER again to play the selected file.
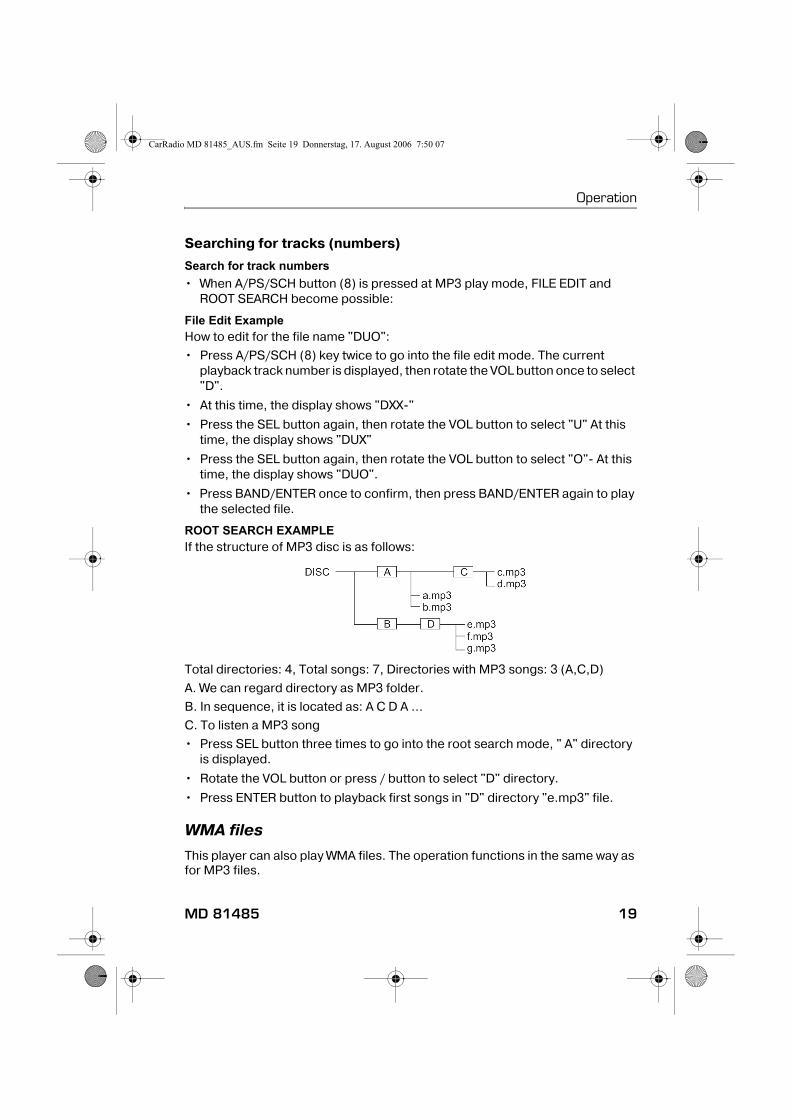
ROOT SEARCH EXAMPLEIf the structure of MP3 disc is as follows:
Total directories: 4, Total songs: 7, Directories with MP3 songs: 3 (A,C,D)
A. We can regard directory as MP3 folder.
B. In sequence, it is located as: A C D A ...
C. To listen a MP3 song
• Press SEL button three times to go into the root search mode, " A" directory is displayed.
• Rotate the VOL button or press / button to select "D" directory.
• Press ENTER button to playback first songs in "D" directory "e.mp3" file.
WMA filesThis player can also play WMA files. The operation functions in the same way as for MP3 files.
MD 81485 19
CarRadio MD 81485_AUS.fm Seite 20 Donnerstag, 17. August 2006 7:50 07
USB CONNECTION
PlaybackYou can connect an MP3 player or another data medium to the USB connection on the front of the unit.
Your car radio can process USB data media up to 1GB.
The directory structure may contain up to 1024 folders, 4096 files and a directory depth of 8 levels.
• Remove the protective cover from the USB connection (7).
• Connect your USB device to the socket. The radio will search for MP3 or WMA files on the storage medium and USB will appear on the display.
• Search and playback functions for files on an external storage medium work in the same way as for MP3 CDs.
• If the device is in another mode (CD or card reader), you can select the card reader with the MODE (20) button.
• Replace the protective cover on the USB connection when no USB device is attached to prevent dirt from getting into the system.
20
CarRadio MD 81485_AUS.fm Seite 21 Donnerstag, 17. August 2006 7:50 07
CARD READER
Your car radio has a card reader for SD cards and multimedia cards (in the upper part of the control panel).
Playback• Remove the control panel.
• Insert a memory card into the drive with the label side facing upwards. Playback of MP3 or WMA files on the card starts automatically.
• The controls for playing files are exactly the same as for MP3 CDs.
• If the device is in another mode (CD or card reader), you can select the card reader with the MODE (20) button
MD 81485 21
CarRadio MD 81485_AUS.fm Seite 22 Donnerstag, 17. August 2006 7:50 07
TROUBLESHOOTING
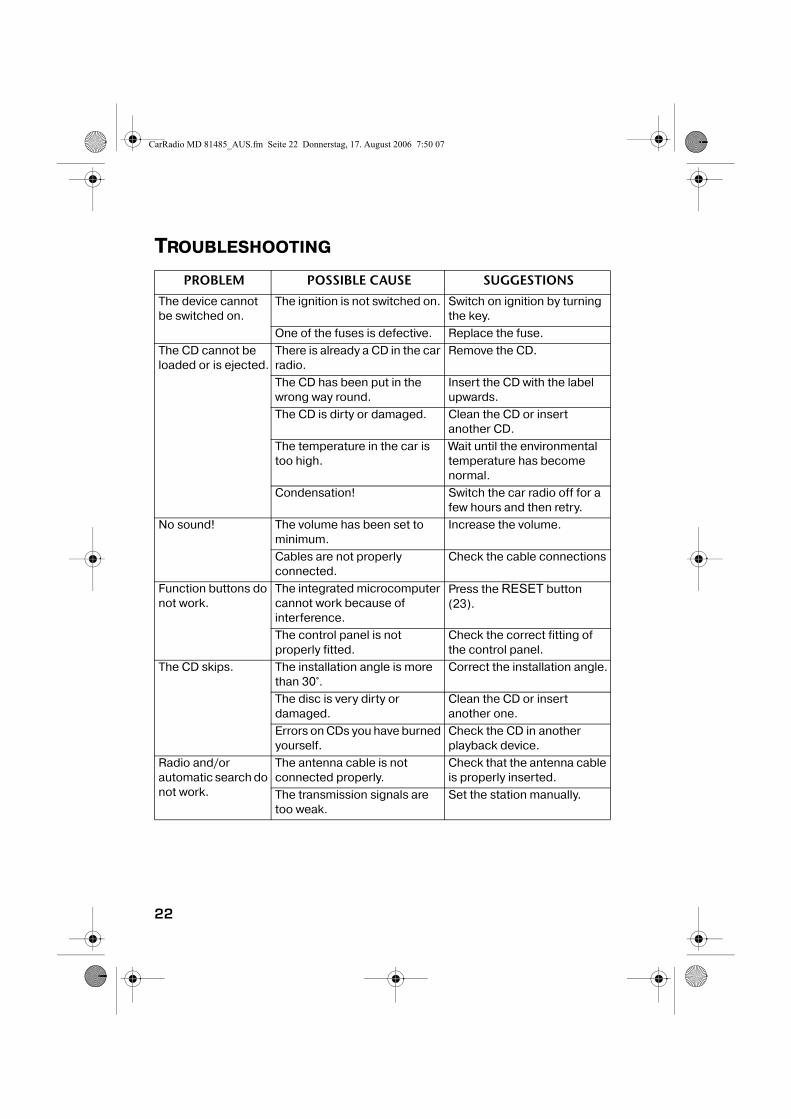
PROBLEM POSSIBLE CAUSE SUGGESTIONS
The device cannot be switched on.
The ignition is not switched on. Switch on ignition by turning the key.
One of the fuses is defective. Replace the fuse.The CD cannot be loaded or is ejected.
There is already a CD in the car radio.
Remove the CD.
The CD has been put in the wrong way round.
Insert the CD with the label upwards.
The CD is dirty or damaged. Clean the CD or insert another CD.
The temperature in the car is too high.
Wait until the environmental temperature has become normal.
Condensation! Switch the car radio off for a few hours and then retry.
No sound! The volume has been set to minimum.
Increase the volume.
Cables are not properly connected.
Check the cable connections
Function buttons do not work.
The integrated microcomputer cannot work because of interference.
Press the RESET button (23).
The control panel is not properly fitted.
Check the correct fitting of the control panel.
The CD skips. The installation angle is more than 30°.
Correct the installation angle.
The disc is very dirty or damaged.
Clean the CD or insert another one.
Errors on CDs you have burned yourself.
Check the CD in another playback device.
Radio and/or automatic search do not work.
The antenna cable is not connected properly.
Check that the antenna cable is properly inserted.
The transmission signals are too weak.
Set the station manually.
22
CarRadio MD 81485_AUS.fm Seite 23 Donnerstag, 17. August 2006 7:50 07
DISPOSAL INFORMATION
PackagingAll packaging and packaging materials that are no longer required, can and, should be recycled.
DeviceAt the end of its life, the radio should not be disposed of as household garbage. Enquire about the options for proper, environmentally�friendly disposal.
Station memory does not work.
The cable for the permanent plus (yellow) is not connected properly.
Check the cable connections For this, refer to Chapter “What’s in the box?” on page 7.
Device connected to the USB connection does not work.
The USB connection is intended for devices that conform to the USB standard. Not all devices available on the market comply with this standard. It is possible that a non�standard USB device is connected.
Connect a device that complies with the USB standard.
Card reader is not reading the card
Card is possibly damaged, dirty or incorrectly inserted.
Check the card. Insert it with the label side upwards.
MD 81485 23
CarRadio MD 81485_AUS.fm Seite 24 Donnerstag, 17. August 2006 7:50 07
TECHNICAL DATA
GENERALOperating voltage: DC 14.4 V, negative earth connectionCasing dimensions: 178 x 165 x 50 mm (W x D x H)Output power: 4 x 40 Watt max (peak music output)
RADIO (frequency ranges)FM: 87.5 – 108 MHzAM: 522 – 1620 kHz
CD/MP3 PLAYERLaser output: Class 1 laser product Frequency range: 40Hz – 18kHzMPEG rate 64 � 320kbpsMP3 playback ISO 9660 & Joliet MP3 format
SUPPORTED FORMATSCD: Audio�CDs, CD�Rs,
CD�RWsUSB storage medium: 1.1 and 2.0 up to 1 GBMemory cards: SD up to 1 GB
MMC up to 512 MB
These days there are many non�standard CD recording and copy protection procedures in use and a wide range of CD�R and CD�RW discs on the market. This can occasionally lead to read errors or delays. This does not mean the device is faulty.
Subject to technical changes!
24