Embed Size (px)
Citation preview
CATANIA / VERONA / GENUADECKENVENTILATORBedienungsanleitung
Artikel-Nr. CATANIA: 10534078VERONA: 10530168GENUA: 10530008
2
DE
INDEX
1 Sicherheitshinweise .....................................................................3
2 Reinigung ....................................................................................4
3 Eigenschaften .............................................................................4
4 Anschluss-Schema ......................................................................5
5 Lieferumfang ..............................................................................5
6 Bestandteile ................................................................................6
7 Montage ......................................................................................7
8 Bedienung ................................................................................. 11
9 Garantie / Entsorgung / Technische Änderungen ........................ 12
3
DE1 Sicherheitshinweise
Bitte lesen Sie vor erster Inbetriebnahme die Gebrauchsanweisung genau durch und beachten Sie die Sicherheitshinweise um Schäden durch falsche oder unsach-gemäße Bedienung sowie unzulässige Umgebungsbedingungen zu vermeiden. Be-wahren Sie diese zum späteren Nachschlagen gut auf.
Kontrollieren Sie das Gerät nach dem Entfernen der Verpackung auf Beschädigun-gen. Setzen Sie das Gerät bei Verdacht auf eine Beschädigung nicht in Betrieb und wenden Sie sich an einen Fachmann. Das recyclingfähige Verpackungsmaterial darf nicht für Kleinkinder zugänglich aufbewahrt oder entsorgt werden, sondern muss fachgerecht entsorgt werden.
Dieses Gerät darf nur für den Zweck, für den es ausdrücklich entwickelt wurde, verwendet werden. Jeder andere Gebrauch ist als unsachgemäss und folglich als gefährlich anzusehen. Der Lieferant haftet nicht für eventuelle Personen- und/oder Sachschäden, die auf einen unsachgemäßen oder falschen Gebrauch zurück-zuführen sind.
Dieses Gerät darf von Kindern, die 8 Jahre oder älter sind, sowie von Personen mit reduzierten körperlichen, sensorischen oder geistigen Fähigkeiten oder einem Mangel an Erfahrung und Wissen genutzt werden, sofern sie beaufsichtigt werden oder Anweisungen bezüglich der sicheren Nutzung des Geräts erhalten haben und die damit verbundenen Gefahren verstehen. Kinder dürfen nicht mit dem Gerät spielen. Kinder dürfen die Reinigung und benutzerseitige Wartung nicht ohne Be-aufsichtigung durchführen.
Dieses Produkt durchlief einen umfangreichen Qualitätssicherungsprozess. Durch hohe Sorgfalt wurde sichergestellt, dass das Produkt in einwandfreiem Zustand ist.
Warnung: bei der Verwendung von Elektrogeräten müssen grundlegende Sicher-heitsvorkehrungen befolgt werden, um die Gefahr von Feuer, Stromschlägen und Verletzungen zu reduzieren.
• Lesen Sie diese Hinweise, bevor Sie dieses Gerät in Betrieb nehmen und bewahren Sie die Anweisungen auf.
• Überprüfen Sie die auf dem Typenschild angegebene Spannung. Dieses Gerät ist für eine 220-240 V / 50 Hz Stromversorgung ausgelegt.
• Verwenden Sie keine elektrischen Verlängerungskabel für diesen Ventilator.• Führend Sie den Finger nicht durch das vordere Gehäuse ein. Lassen Sie Kinder
nicht ihre Finger durch das vordere Gehäuse einführen. Führen Sie keine Gegen-stände durch das vordere Gehäuse ein.
• Halten Sie Haare, Gardinen, Tischdecken, Kleidung und Vorhänge von den Öffnun-gen des Ventilators fern. Sie könnten in den Ventilator gezogen werden, was ihn beschädigen oder zu Verletzungen führen könnte.
• Verwenden Sie den Ventilator nicht, wenn das Kabel oder der Stecker beschädigt ist oder wenn diese in irgendeiner Art und Weise beschädigt wurden. Senden Sie den Ventilator an den Kundenservice oder lassen Sie ihn durch eine Fachperson reparieren.
4
DE • Überprüfen Sie regelmässig die elektrische Leitung des Lüfters. Wenn das elektri-sche Kabel beschädigt ist, muss es durch den Hersteller, seinen Kundendienst oder durch eine ähnlich qualifizierte Person ersetzt werden, um eine Gefahr zu vermei-den.
• Dieser Deckenventilator darf nicht draussen verwendet werden.• Verwenden Sie diesen Lüfter nicht im Badezimmer und in einem feuchten Bereich.• Der Ventilator darf nicht ohne Basis verwendet werden.• Verwenden Sie den Ventilator nicht in einem Bereich, wo Benzin verwendet wird
oder wo brennbare Flüssigkeiten gelagert werden.• Verwenden Sie diesen Lüfter nur so, wie es in dieser Anleitung beschrieben wird.• Versuchen Sie nicht, den Lüfter zu reparieren. Es gibt keine Teile, die vom Benutzer
repariert werden könnten. Wenn Sie eine Wartung benötigen, senden Sie den Venti-lator bitte an den Verkäufer zurück.
• Keine Teile des Ventiltors dürfen vom Benutzer entfernt werden. Der Lüfter darf nicht durch den Benutzer geöffnet werden.
• Die Teile müssen mit einem weichen, trockenen Tuch gereinigt werden.• Flecken müssen mit einer milden Seife (Reinigungsmittel) und einem feuch-
ten Tuch entfernt werden. Alle Spuren der Seife müssen mit einem feuchten Tuch entfernt werden.
• Verwenden Sei kein Benzin oder Lösungsmittel, die den Lüfter beschädigen können.
• Es muss darauf geachtet werden, dass Wasser (oder andere Flüssigkeiten) nicht in das Lüftungsmotorgehäuse gelangen und die Geschwindigkeits-steuereinheit nicht ausser Kraft setzen.
2 Reinigung
3 Eigenschaften
Modell ......................... CATANIA
Spannung ................. 220-240 V
Frequenz ........................... 50 Hz
Leistung ........................ 60 Watt
Masse ..................Ø 100 x 30 cm
.......................GENUA
..................220-240 V
..........................50 Hz
...................... 70 Watt
........... Ø 122 x 35 cm
.................... VERONA
..................220-240 V
..........................50 Hz
...................... 70 Watt
........... Ø 122 x 35 cm
5
DE
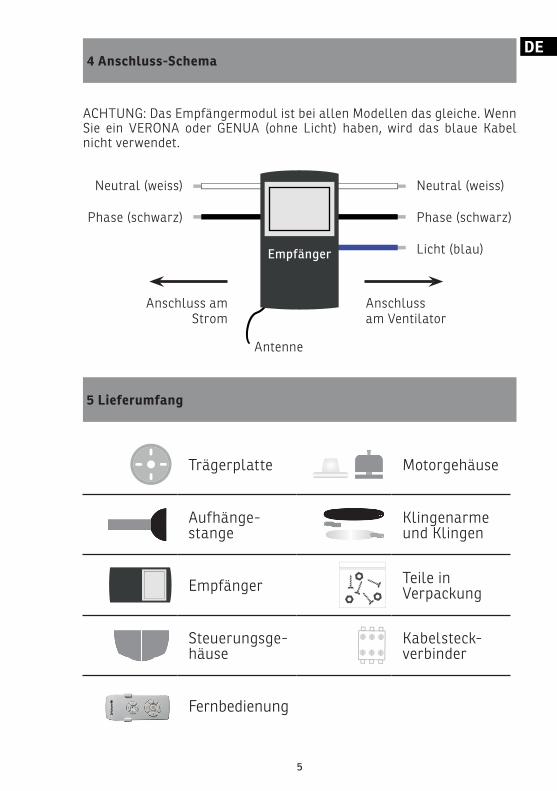
5 Lieferumfang
4 Anschluss-Schema
ACHTUNG: Das Empfängermodul ist bei allen Modellen das gleiche. Wenn Sie ein VERONA oder GENUA (ohne Licht) haben, wird das blaue Kabel nicht verwendet.
Neutral (weiss)Neutral (weiss)
Phase (schwarz)Phase (schwarz)
Antenne
Licht (blau)
Anschlussam Ventilator
Anschluss am Strom
Empfänger
Trägerplatte
Aufhänge-stange
Empfänger
Steuerungsge-häuse
Fernbedienung
Motorgehäuse
Klingenarmeund Klingen
Teile inVerpackung
Kabelsteck-verbinder
6
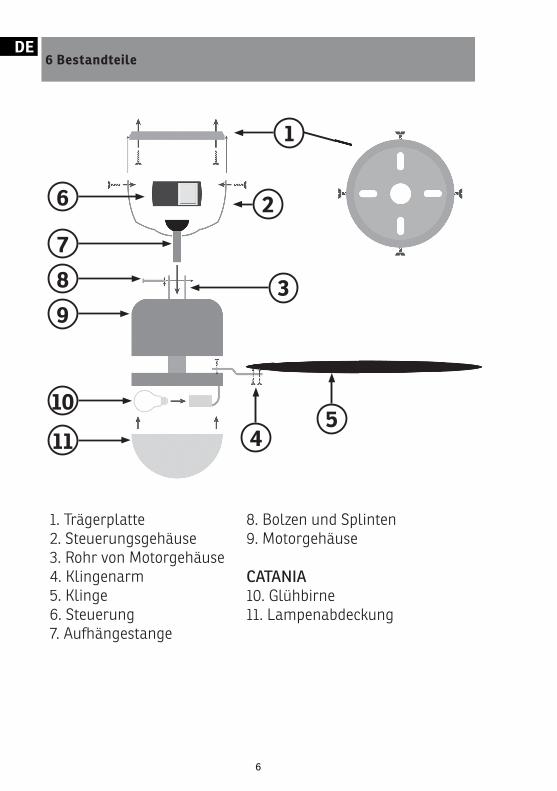
DE6 Bestandteile
1. Trägerplatte2. Steuerungsgehäuse3. Rohr von Motorgehäuse4. Klingenarm5. Klinge6. Steuerung7. Aufhängestange
8. Bolzen und Splinten9. Motorgehäuse
CATANIA10. Glühbirne11. Lampenabdeckung
1
2
3
411
105
987
6

7
DE7 Montage
Schutzbrille
Trittleiter
Mindestens 2 Personen
Bedienungsanleitung
4 x Deckenschrauben(Nicht im Lieferumfang enthalten)
1. Entnehmen Sie alle Teile der Verpackung und prüfen Sie deren Vollständig-keit.
Folgende Ausrüstung ist für die Installation von Nöten oder empfehlenswert:
2. Stellen Sie sicher, dass jegliche Leitungen keine Spannung enthalten und schalten Sie die Sicherungen aus.
8
DE
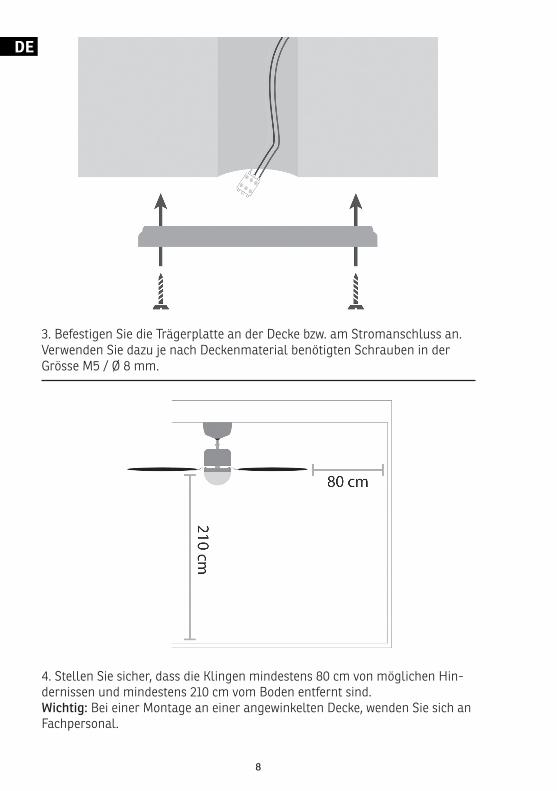
3. Befestigen Sie die Trägerplatte an der Decke bzw. am Stromanschluss an. Verwenden Sie dazu je nach Deckenmaterial benötigten Schrauben in der Grösse M5 / Ø 8 mm.
4. Stellen Sie sicher, dass die Klingen mindestens 80 cm von möglichen Hin-dernissen und mindestens 210 cm vom Boden entfernt sind.Wichtig: Bei einer Montage an einer angewinkelten Decke, wenden Sie sich an Fachpersonal.
9
DE
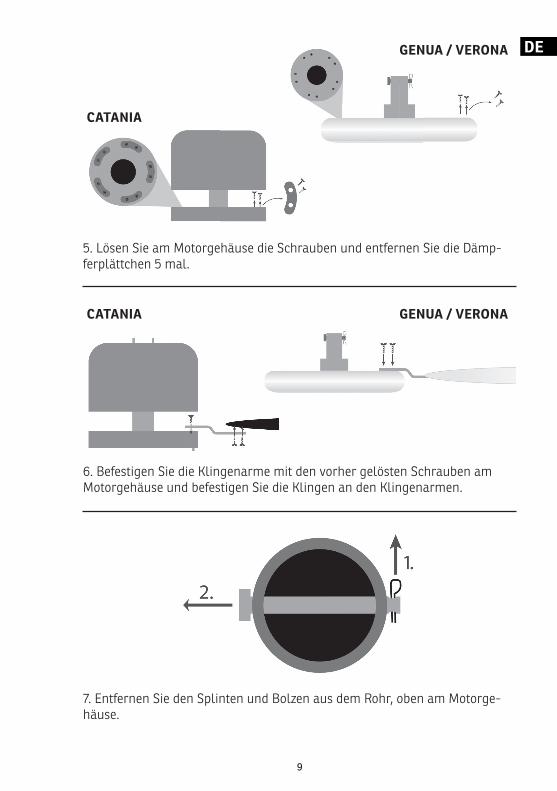
5. Lösen Sie am Motorgehäuse die Schrauben und entfernen Sie die Dämp-ferplättchen 5 mal.
6. Befestigen Sie die Klingenarme mit den vorher gelösten Schrauben am Motorgehäuse und befestigen Sie die Klingen an den Klingenarmen.
7. Entfernen Sie den Splinten und Bolzen aus dem Rohr, oben am Motorge-häuse.
GENUA / VERONA
GENUA / VERONA
CATANIA
CATANIA
10
DE
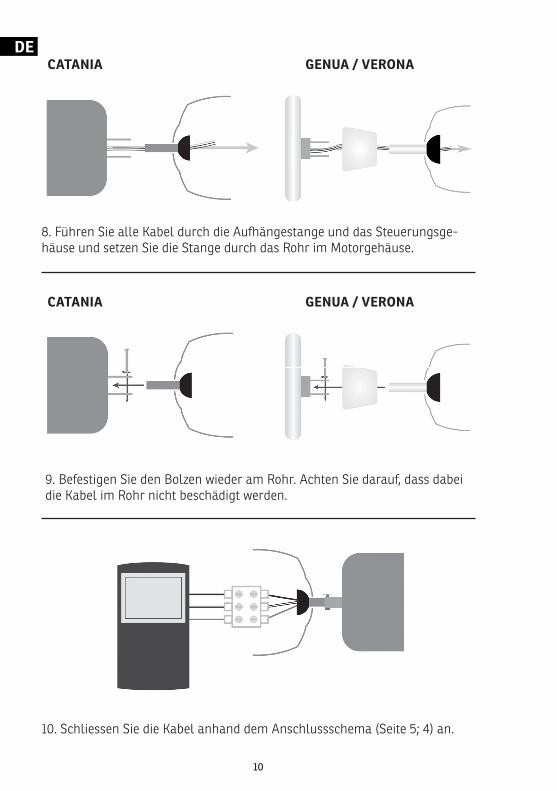
10. Schliessen Sie die Kabel anhand dem Anschlussschema (Seite 5; 4) an.
8. Führen Sie alle Kabel durch die Aufhängestange und das Steuerungsge-häuse und setzen Sie die Stange durch das Rohr im Motorgehäuse.
9. Befestigen Sie den Bolzen wieder am Rohr. Achten Sie darauf, dass dabei die Kabel im Rohr nicht beschädigt werden.
GENUA / VERONA
GENUA / VERONA
CATANIA
CATANIA
11
DE
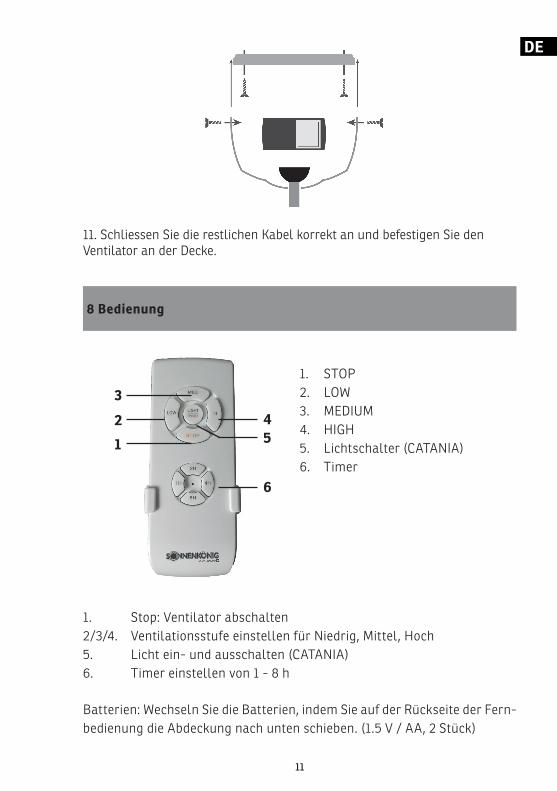
11. Schliessen Sie die restlichen Kabel korrekt an und befestigen Sie den Ventilator an der Decke.
8 Bedienung
1. Stop: Ventilator abschalten2/3/4. Ventilationsstufe einstellen für Niedrig, Mittel, Hoch5. Licht ein- und ausschalten (CATANIA)6. Timer einstellen von 1 - 8 h
Batterien: Wechseln Sie die Batterien, indem Sie auf der Rückseite der Fern-bedienung die Abdeckung nach unten schieben. (1.5 V / AA, 2 Stück)
1. STOP2. LOW3. MEDIUM4. HIGH5. Lichtschalter (CATANIA)6. Timer
3
45
6
2
1
12
DE9 Garantie / Entsorgung / Technische Änderungen
GarantieDie Geräte werden vor der Auslieferung genau kontrolliert. Sollte trotz-dem einmal ein Mangel an Ihrem Gerät auftreten, wenden Sie sich ver-trauensvoll an Ihren Verkäufer. Bitte bringen Sie den Kaufbeleg mit, denn dieser ist für jede Garantieleistung vorzulegen.Die Garantie beträgt 24 Monaten ab dem Kaufdatum
EntsorgungDas Gerät muss fachgerecht entsorgt werden. Das Gerät kann bei jedem Fachhändler kostenlos zur Entsorgung abgegeben werden.
Technische ÄnderungenTechnische Änderungen in Technik und Design vorbehalten.Bitte behalten Sie das Verpackungsmaterial für das Gerät auf.
CE-KonformitätserklärungDas Gerät entspricht folgenden Standards
EMC EN 55014-1:2017 EN 55014-2:2015 EN 61000-3-2:2014 EN 61000-3-3:2013
LVD EN 60335-1:2012+A11:2014 EN 60335-2-80:2003+A1:2004+A2:2009 EN 60598-1:2015 + A1:2018 EN 60598-2-11989 EN 62233:2008
RoHS 2015/863/EUEMC 2014/30/EULVD 2014/35/EU
13
DE
ENTSORGUNGSHINWEISE FÜR DEN ELEKTRISCHEN TEIL DES PRODUKTS
Gemäß Artikel 26 des Gesetzeserlass vom 14. März 2014 zur Umsetzung der Richtlinie 2012/19/EG und des Erlasses vom 31. März 2015 zur Umsetzung der Richtlinie 2015/863/EU zur Verringerung der Verwendung gefährlicher Stoffe in Elektro- und Elektronikgeräten und zur Abfallentsorgung.
Das Symbol der durchgestrichenen Mülltonne auf dem Gerät oder der Verpackung weist darauf hin, dass das Gerät am Ende seiner Lebensdauer getrennt von anderen Abfällen über entsprechende Sammelstellen zu entsorgen ist. Das elektronische oder elektrische Altgerät kann auch aussortiert und bei Anschaffung eines ver-gleichbaren Neugerätes an den Händler zurückgegeben werden. Die entsprechende Altgerätesammlung zwecks umweltfreundlicher Wiederverwertung verringert die Belastungen für Umwelt und Mensch und unterstützt die Wiederverwendung und/oder das Recycling von wertvollen Wertstoffen.
Die nicht fachgerechte Entsorgung des Produkts durch den Benutzer kann je nach Gesetzeslage mit Bußgeldern geahndet oder strafrechtlich verfolgt werden. Im Gerät enthaltene Akkus oder Batterien sind getrennt über die entsprechenden Behälter für die Sammlung von Altbatterien zu entsorgen.
ENTSORGUNG VON BATTERIEN UND AKKUS
Gemäß der Gesetzesverordnung 188 vom 20. November 2008 zur Umsetzung der Richtlinie 2006/66/EG im Umgang mit Altbatterien oder verbrauchten Akkus und ähnlichen Abfällen weist das Symbol der durchgestrichenen Mülltonne auf der Batterie darauf hin, dass es verboten ist, Altbatterien im Hausmüll zu entsorgen.
Batterien und Akkus enthalten stark umweltbelastende Stoffe. Der Benutzer ist verpflichtet, Altbatterien über öffentliche Sammelstellen oder entsprechende Behälter zu entsorgen. Dieser Service ist kostenlos. Auf diese Weise werden die gesetzlichen Anforderungen eingehalten und die Umwelt geschont. Die Symbole zur Kennzeichnung der in Batterien und Akkus enthaltenen Gefahrstoffe sind wie folgt: Hg= Quecksilber, Cd= Cadmium, Pb= Blei.
Firma
Armin SchmidOlensbachstrasse 9–15
CH-9631 UlisbachTel. Int. +41 58 611 60 00
Tel. Nat. [email protected]
Firma
Armin SchmidPeter-Henlein-Strasse 5
D-89331 BurgauTel: 0180 500 64 35
Festnetz 14 Cent/Minute Mobilnetz bis 42 Cent/Minute
FR
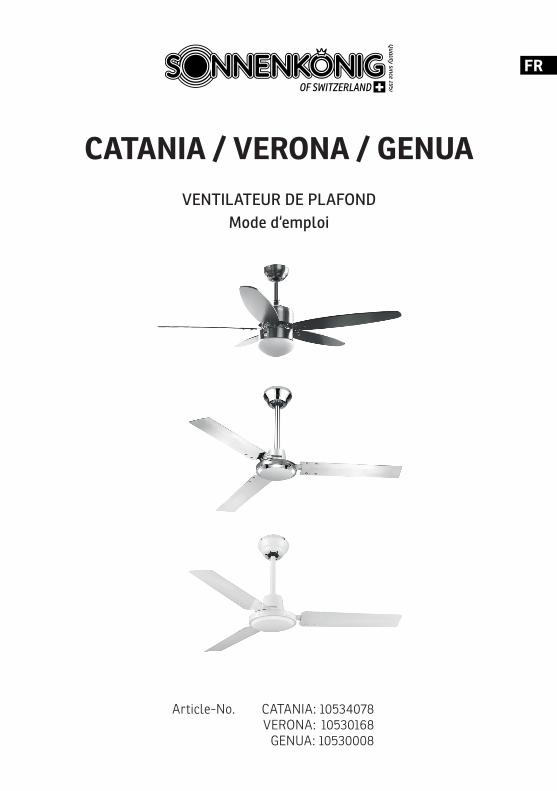
CATANIA / VERONA / GENUAVENTILATEUR DE PLAFOND
Mode d‘emploi
CATANIA: 10534078VERONA: 10530168
GENUA: 10530008
Article-No.
16
FR
INDEX
1 Consignes de sécurité ................................................................ 17
2 Entretien ................................................................................... 18
3 Spécifications ............................................................................ 18
4 Schéma de raccordement ........................................................... 19
5 Contenu de la livraison .............................................................. 19
6 Composants ..............................................................................20
7 Assemblée ................................................................................. 21
8 Opération ..................................................................................25
9 Garantie / élimination / modifications techniques ......................26
17
FR1 Consignes de sécurité
Avant la première mise en service, veuillez lire scrupuleusement le mode d‘emploi dans son Intégralité et tenir compte des consignes de sécurité afin d‘éviter les dommages liés à une commande mauvaise ou non conforme ainsi qu‘à des condi-tions d‘environnement non autorisées. Conservez ce mode d‘emploi afin de pouvoir le consulter de nouveau ultérieurement. Assurez-vous de placer l‘appareil sur une surface appropriée et étanche, de sorte que le liquide déversé ne peut pas causer de dommages.
Après avoir retiré l‘emballage, contrôler que l‘appareil ne présente aucun dom-mage. Si vous Soupçonnez des dommages, ne mettez pas l‘appareil en marche et adressez-vous à un spécialiste. L‘emballage recyclable doit être tenu hors de portée des petits enfants ou être jeté aux ordures, mais doit être jeté de manière appropriée.
Cet appareil ne doit être utilisé que pour l‘usage pour lequel il a été expressément mis au point. Toute autre utilisation doit être considérée comme inappropriée et par conséquent comme dangereuse. Le fournisseur décline toute responsabilité concernant d‘éventuels dommages corporels et/ou matériels, pouvant être im-putés à une utilisation inappropriée ou incorrecte.
Cet appareil peut être utilisé par des enfants âgés de 8 ans et plus et par des personnes à capacités physiques, sensorielles et mentales réduites ou sans ex-périence et sans les connaissances nécessaires, à condition qu‘ils soient assistés ou qu‘ils aient reçu des instructions concernant l‘utilisation en toute sécurité de l‘appareil et qu‘ils comprennent quels sont les dangers encourus. Les enfants ne doivent pas jouer avec l‘appareil. Les opérations de nettoyage et d‘entretien de l‘appareil ne doivent pas être effectuées par des enfants sans surveillance.
Ce produit a subi de nombreux tests de qualité et de sécurité. Nous nous sommes assurés que ce produit a quitté nos locaux en parfait état. Attention: lorsque vous utilisez des appareils électriques, respectez toujours certaines règles de base afin d’éviter tout risque d’incendie, d’électrocution ou de blessures.
• Lisez attentivement ces consignes avant d’utiliser l’appareil et conservez soig-neusement ce mode d’emploi.
• Vérifiez le voltage indiqué sur la plaque signalétique. Cet appareil est conçu pour une alimentation électrique de 220-240 V, 50 Hz.
• N’utilisez pas de rallonge électrique pour ce ventilateur.• N’insérez jamais les doigts dans l’avant du boîtier. Ne laissez jamais les enfants
insérer leurs doigts dans l’avant du boîtier. N’insérez aucun objet dans l’avant du boîtier.
• Éloignez cheveux, rideaux, nappes, vêtements et voilages des ouvertures du ven-tilateur. Ceux-ci risqueraient d’être happés par le ventilateur, ce qui risquerait d’entraîner dégâts matériels ou blessures.
• N’utilisez pas le ventilateur si le câble ou la fiche est endommagé ou s’ils ont été endommagés de quelque façon que ce soit. Envoyer le ventilateur au service après-vente ou le faire réparer par un spécialiste.
18
FR• Vérifiez régulièrement le câble électrique du ventilateur. Si le câble électrique
est endommagé, celui-ci devra être remplacé par le fabricant, par son service après-vente ou toute autre personne qualifiée afin d’éviter tout danger.
• Ce ventilateur ne doit pas être utilisé à l’extérieur.• N’utilisez pas ce ventilateur dans une salle de bains ou une zone humide.• Le ventilateur ne doit pas être utilisé sans sa base.• Ne couvrez jamais le câble. Ne superposez jamais de petits éléments sur le câble.
Placez le câble à un endroit où personne ne risque de trébucher dessus.• Ne pas utiliser le ventilateur dans un endroit dans lequel sont utilisés ou stockés
de l’essence ou des produits inflammables.• Veuillez utiliser ce ventilateur conformément aux indications fournies dans le
présent manuel.• N’essayez jamais de réparer le ventilateur vous-même. Il ne comprend aucun
élément susceptible d’être réparé par l’utilisateur. Pour toute maintenance du ventilateur, veuillez retourner le ventilateur au vendeur.
• L’utilisateur n’est autorisé à retirer aucune pièce du ventilateur. Le ventilateur ne doit pas être ouvert par l’utilisateur.
• Les éléments doivent être nettoyés à l’aide d’un chiffon doux et sec.• Les taches peuvent être éliminées à l’aide d’un savon doux (détergent) et
d’une éponge humide. Toutes les traces de savon doivent être retirées à l’aide d’une éponge humide.
• N’utilisez pas d’essence ni de solvant qui pourraient endommager le ven-tilateur.
• Veillez à ce qu’aucun liquide ni eau ne s’infiltre dans le boîtier du moteur et ne mettent hors service l’unité de contrôle de la vitesse.
2 Entretien
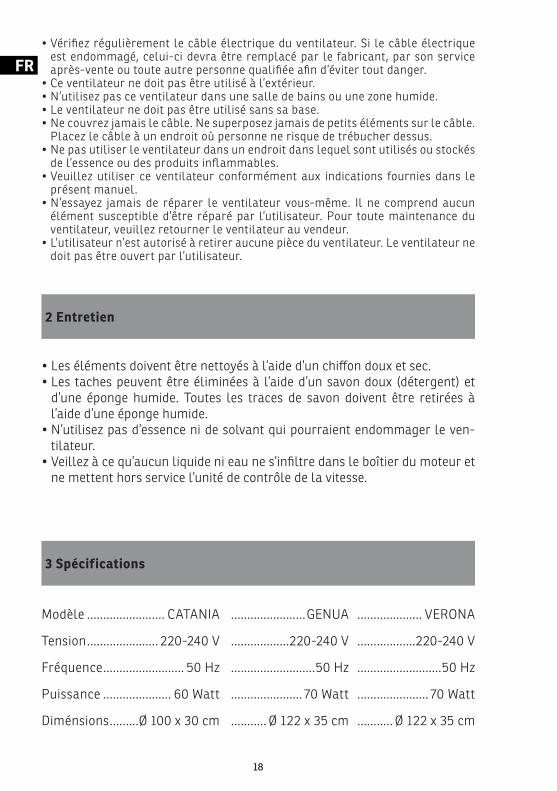
3 Spécifications
Modèle ........................ CATANIA
Tension ...................... 220-240 V
Fréquence ......................... 50 Hz
Puissance ..................... 60 Watt
Diménsions .........Ø 100 x 30 cm
.......................GENUA
..................220-240 V
..........................50 Hz
...................... 70 Watt
........... Ø 122 x 35 cm
.................... VERONA
..................220-240 V
..........................50 Hz
...................... 70 Watt
........... Ø 122 x 35 cm
19
FR
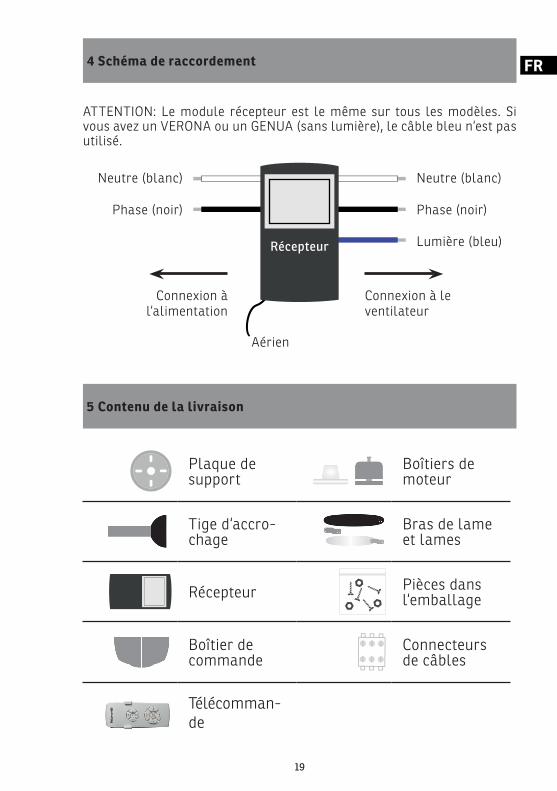
5 Contenu de la livraison
4 Schéma de raccordement
ATTENTION: Le module récepteur est le même sur tous les modèles. Si vous avez un VERONA ou un GENUA (sans lumière), le câble bleu n‘est pas utilisé.
Neutre (blanc)Neutre (blanc)
Phase (noir)Phase (noir)
Aérien
Lumière (bleu)
Connexion à le ventilateur
Connexion à l‘alimentation
Récepteur
Plaque de support
Tige d‘accro-chage
Récepteur
Boîtier de commande
Télécomman-de
Boîtiers de moteur
Bras de lameet lames
Pièces dans l‘emballage
Connecteurs de câbles
20
FR 6 Composants
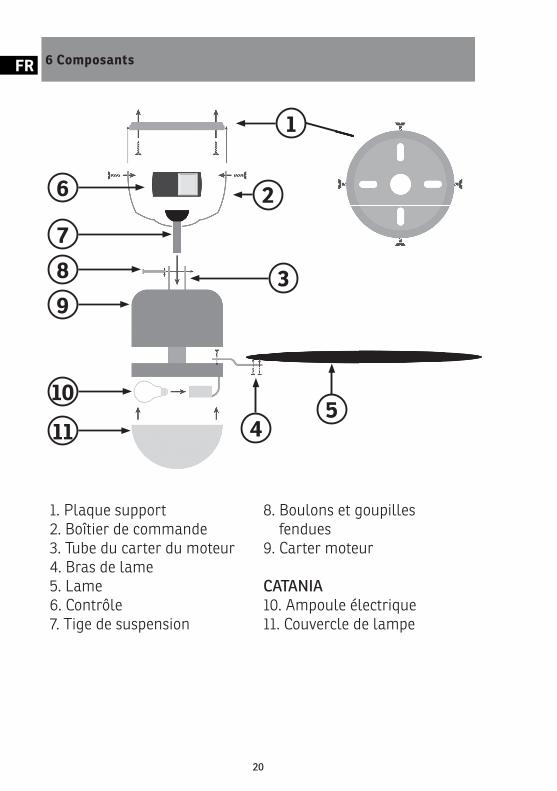
1. Plaque support2. Boîtier de commande3. Tube du carter du moteur4. Bras de lame5. Lame6. Contrôle7. Tige de suspension
8. Boulons et goupilles fendues9. Carter moteur
CATANIA10. Ampoule électrique11. Couvercle de lampe
1
2
3
411
105
987
6
21
FR7 Assemblée
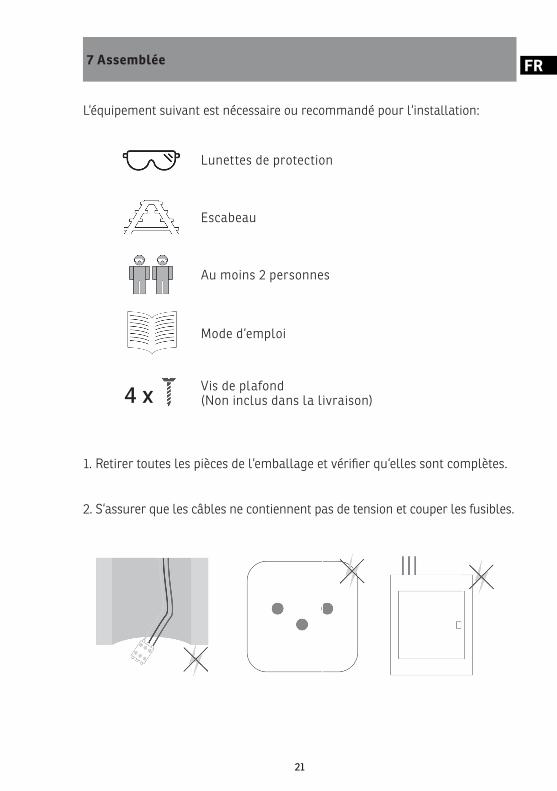
Lunettes de protection
Escabeau
Au moins 2 personnes
Mode d‘emploi
4 x Vis de plafond(Non inclus dans la livraison)
1. Retirer toutes les pièces de l‘emballage et vérifi er qu‘elles sont complètes.
L‘équipement suivant est nécessaire ou recommandé pour l‘installation:
2. S‘assurer que les câbles ne contiennent pas de tension et couper les fusibles.
22
FR
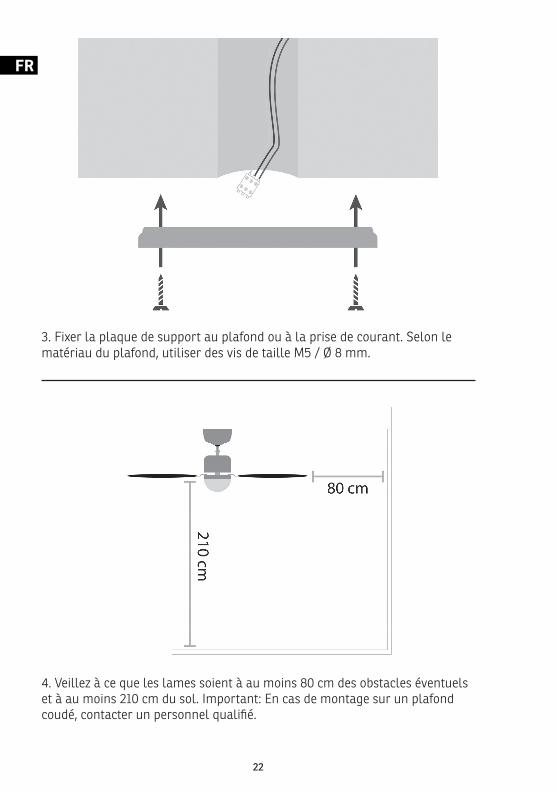
3. Fixer la plaque de support au plafond ou à la prise de courant. Selon le matériau du plafond, utiliser des vis de taille M5 / Ø 8 mm.
4. Veillez à ce que les lames soient à au moins 80 cm des obstacles éventuels et à au moins 210 cm du sol. Important: En cas de montage sur un plafond coudé, contacter un personnel qualifi é.
23
FR
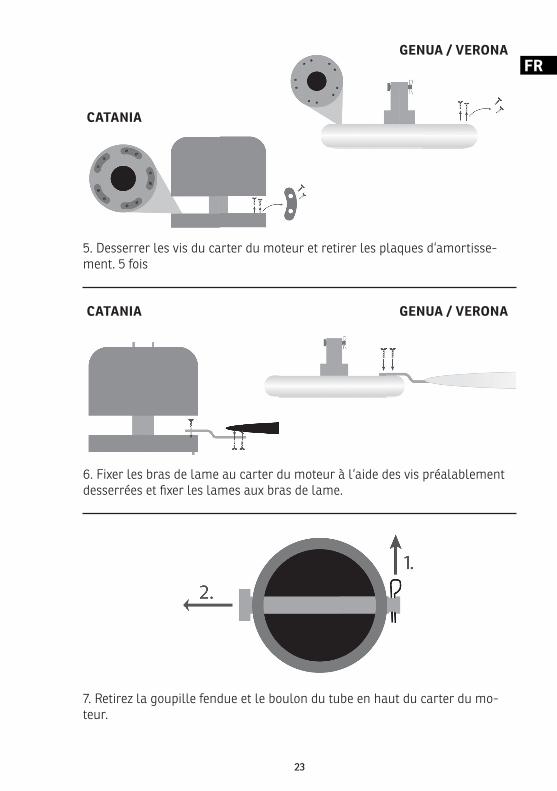
5. Desserrer les vis du carter du moteur et retirer les plaques d‘amortisse-ment. 5 fois
6. Fixer les bras de lame au carter du moteur à l‘aide des vis préalablement desserrées et fi xer les lames aux bras de lame.
7. Retirez la goupille fendue et le boulon du tube en haut du carter du mo-teur.
GENUA / VERONA
GENUA / VERONA
CATANIA
CATANIA

24
FR
10. Raccordez les câbles conformément au schéma de raccordement (page 19; 4).
8. Faire passer tous les câbles à travers la tige de suspension et le boîtier de l‘unité de commande et insérer la tige à travers le tube dans le boîtier du moteur
9. Fixez de nouveau le boulon au tuyau. S‘assurer que les câbles dans le tube ne sont pas endommagés.
GENUA / VERONA
GENUA / VERONA
CATANIA
CATANIA
25
FR
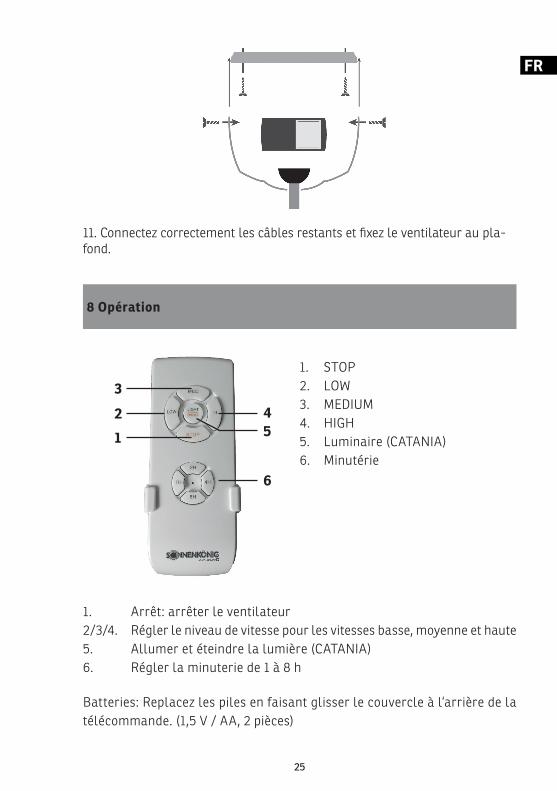
11. Connectez correctement les câbles restants et fi xez le ventilateur au pla-fond.
8 Opération
1. Arrêt: arrêter le ventilateur2/3/4. Régler le niveau de vitesse pour les vitesses basse, moyenne et haute5. Allumer et éteindre la lumière (CATANIA)6. Régler la minuterie de 1 à 8 h
Batteries: Replacez les piles en faisant glisser le couvercle à l‘arrière de la télécommande. (1,5 V / AA, 2 pièces)
1. STOP2. LOW3. MEDIUM4. HIGH5. Luminaire (CATANIA)6. Minutérie
3
45
6
2
1
26
FR 9 Garantie / élimination / modifications techniques
GarantieL‘appareil sont contrôlés de manière précise avant la livraison. Si malgré tout un vice devait être constaté sur votre appareil, adres-sez-vous en toute confiance à notre revendeur. Veuillez joindre la preu-ve d‘achat, car celle-ci doit être présentée pour la prestation de garan-tie. La période de garantie est de 24 mois à compter de la date d‘achat.
EliminationL‘appareil doit être jeté de manière appropriée. L‘appareil peut dans tous les cas être remis gratuitement à tout revendeur spécialisé.
Modifications techniquesSous réserve de modifications de la technique et du design.S‘il vous plaît conserver les matériaux d‘emballage de l‘appareil.
CE-Déclaration de conformitéL‘appareil est conforme aux normes suivantes
EMC EN 55014-1:2017 EN 55014-2:2015 EN 61000-3-2:2014 EN 61000-3-3:2013
LVD EN 60335-1:2012+A11:2014 EN 60335-2-80:2003+A1:2004+A2:2009 EN 60598-1:2015 + A1:2018 EN 60598-2-11989 EN 62233:2008
RoHS 2015/863/EUEMC 2014/30/EULVD 2014/35/EU
27
FR
INSTRUCTIONS D’ÉLIMINATION DES COMPOSANTS ÉLECTRIQUES DU PRODUITConformément à l’article 26 du décret-loi du 14 mars 2014 portant application de la directive 2012/19/CE et à la loi du 4 mars 2014 portant application de la direc-tive 2011/65/CE concernant la réduction de l’utilisation de substances dangere-uses dans les équipements électriques et électroniques et la gestion des déchets.
Le symbole de poubelle barrée sur la machine ou l’emballage indique qu’à la fin de leur vie, les composants de l’appareil doivent être collectés séparément des autres déchets. L’utilisateur doit donc apporter l’appareil aux points de collecte appropriés à la fin de sa durée de vie utile. Veuillez trier les déchets électroniques et électriques ou remettre l’appareil défectueux au concessionnaire pour l’achat d’un appareil neuf. Le tri, le traitement et l’élimination conformes des appareils électriques et électroniques permettent d’éviter d’éventuels effets néfastes sur l’environnement et la santé, et de promouvoir la réutilisation et/ou le recyclage des matériaux auxquels ils appartiennent. Une mauvaise utilisation de ce produit par l’utilisateur entraînera l’application des sanctions administratives prévues par la législation applicable. Les piles contenues dans l’appareil doivent être éliminées séparément dans les conte-neurs dédiés à la collecte des piles usagées.
ÉLIMINATION DES PILES ET DES BATTERIESConformément au décret législatif 188 du 20 novembre 2008 portant application de la directive 2006/66/CE relative aux piles, aux accumulateurs et aux déchets connexes, le symbole de poubelle barrée d’une croix placé sur la batterie indique qu’il est interdit de jeter les piles usagées avec les ordures ménagères.
Les piles et batteries contiennent des substances hautement polluantes pour l’environnement. L’utilisateur est tenu d’éliminer les piles usagées dans les points de collecte situés dans la municipalité ou dans les conteneurs appropriés. Ce service est gratuit. De cette façon, les exigences légales seront respectées et l’environnement sera protégé. Les symboles identifiant les matières dangereuses pouvant être présentes dans les piles et les accumulateurs sont les suivants: Hg = mercure, Cd = cadmium, Pb = plomb.
MaisonArmin Schmid
Olensbachstrasse 9–15CH-9631 Ulisbach
Tel. Int. +41 58 611 60 00Tel. Nat. [email protected]
MaisonArmin Schmid
Peter-Henlein-Strasse 5D-89331 Burgau
Tel: 0180 500 64 [email protected]
Festnetz 14 Cent/Minute Mobilnetz bis 42 Cent/Minute
IT
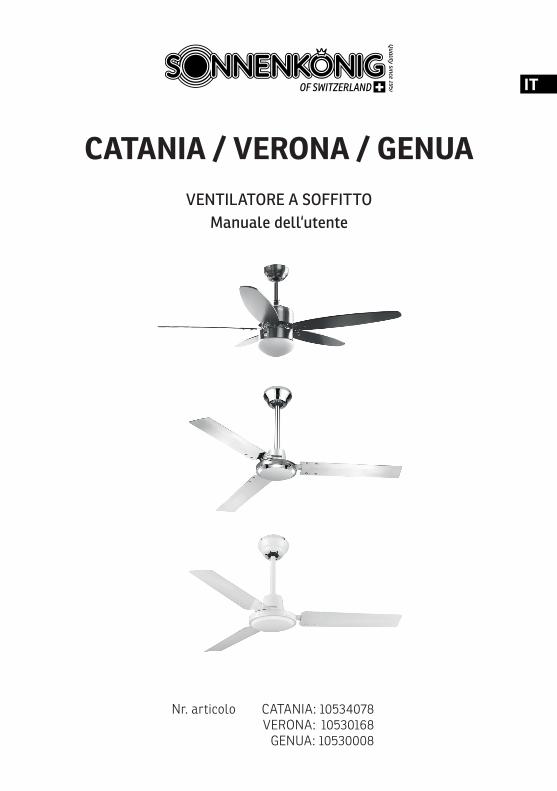
CATANIA / VERONA / GENUAVENTILATORE A SOFFITTO
Manuale dell‘utente
Nr. articolo CATANIA: 10534078VERONA: 10530168
GENUA: 10530008
30
IT
INDEX
1 Avvertenze per la sicurezza ........................................................ 31
2 Pulitura .................................................................................... 32
3 Caratteristiche e vantaggi ......................................................... 32
4 Schema dei collegamenti ........................................................... 33
5 Dotazione di fornitura ............................................................... 33
6 Componenti ...............................................................................34
7 Montaggio ................................................................................. 35
8 Operazione ................................................................................39
9 Garanzia / Smaltimento / Smaltimento / Modifiche tecniche ......40
31
IT
1 Avvertenze per la sicurezza
Prima di mettere in funzione per la prima volta il deumidificatore, si raccomanda di leggere con cura le istruzioni d’uso e di rispettare le avvertenze di sicurezza al fine di evitare un utilizzo improprio o sbagliato come pure condizioni ambientali non idonee. Si raccomanda di conservare le istruzioni per futura consultazione.
Controllare l’apparecchio dopo averlo rimosso dall’imballo. In caso di sospetto danneggiamento non mettere in funzione l’apparecchio e rivolgersi ad un tecnico specializzato. Non conservare alla portata dei bambini il materiale d’imballo ri-ciclabile, ma provvedere all’opportuno smaltimento.
Utilizzare l’apparecchio esclusivamente per lo scopo per il quale è stato espres-samente progettato. Qualsiasi altro impiego è improprio e quindi da ritenersi pe-ricoloso. Il fornitore non risponde di eventuali danni a cose e persone, che sono imputabili ad un utilizzo inappropriato o errato.
Questo elettrodomestico può essere usato da bambini che abbiano compiuto gli 8 anni di età e da persone con capacità fisiche, sensoriali o mentali ridotte, oppure che manchino di esperienza e conoscenza, purché abbiano ricevuto assistenza o formazione per un uso sicuro dell‘elettrodomestico e ne comprendano quindi i ri-schi connessi. I bambini non devono giocare con l‘apparecchio. Operazioni di puli-zia e di manutenzione non devono essere effettuate da bambini senza supervisione.
• Leggere queste istruzioni facendo riferimento alle illustrazioni prima di utilizzare il ventilatore.
• Prima di inserire la spina dell’apparecchio, verificare che la tensione nominale in-dicata dalla targhetta delle specifiche tecniche posta sul ventilatore corrisponda alla tensione dell’impianto.
• Non immergere mai un elemento dell’apparecchio nell’acqua o in qualsiasi altro liquido.
• Non inserire mai oggetti nella griglia di protezione quando la spina del ventilatore è inserita o durante il funzionamento del ventilatore.
• Fare attenzione ai bambini. Non autorizzarli mai a giocare con il ventilatore.• È sconsigliato esporre le persone (soprattutto i neonati e le persone anziane) ad un
flusso continuo d’aria fredda per un lungo periodo.• NON utilizzare il ventilatore in ambienti umidi come le stanze da bagno.• Tenere l’apparecchio lontano da tendaggi, piante, ecc. Il ventilatore deve essere
posizionato ad almeno un metro di distanza da ogni altro oggetto.• NON collegare l’apparecchio all’impianto prima che sia completamente montato
e regolato.• NON utilizzare l’apparecchio se il filo dell’alimentazione è rovinato. Esso deve
essere riparato unicamente da un riparatore autorizzato, in quanto sono neces-sari strumenti e/o elementi conoscitivi specifici.
• Posizionare il cavo di alimentazione lontano dalle zone di passaggio per evitare di inciampare.
32
IT
• Utilizzare unicamente all’interno.• Prestare attenzione agli imballi di plastica quali i sacchetti – pericolo di sof-
foca-mento. Non lasciarli alla portata di bambini e di persone che potrebbero utilizzarle in modo improprio.
• Non smontare e non aprire il ventilatore per effettuare riparazioni. Questo com-porta il decadimento della garanzia e può comportare pericolo. Per le ripa-razioni rivolgersi sempre a personale qualificato.
• Tenete il ventilatore in luoghi freschi ed asciutti• Se non utilizzate il ventilatore per lungo tempo, pulitelo e riponetelo in un
sac-chetto di plastica al riparo da fonti di calore ed umidità.
• Per la pulizia usare esclusivamente un panno inumidito con acqua e un detergente non aggressivo.
• Non utilizzare benzina o solventi che potrebbero danneggiare il ventilatore.• Assicurarsi che il panno utilizzato per la pulizia non sia troppo imbevuto
di acqua, al fine di evitare che le parti elettriche ed il motore possano bag-narsi.
• Non immergere mai il ventilatore in acqua o in qualsiasi altro liquido.• Pulite regolarmente la ventola, utilizzando un panno morbido ed acqua
saponata ed asciugandola accuratamente. Non utilizzare solventi o altre sostanze chimiche.
2 Pulitura
3 Caratteristiche e vantaggi
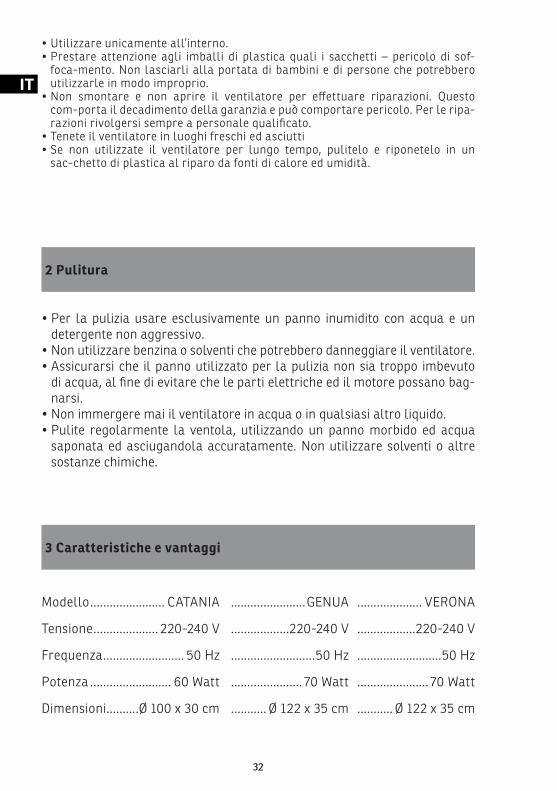
Modello ....................... CATANIA
Tensione .................... 220-240 V
Frequenza ......................... 50 Hz
Potenza ......................... 60 Watt
Dimensioni..........Ø 100 x 30 cm
.......................GENUA
..................220-240 V
..........................50 Hz
...................... 70 Watt
........... Ø 122 x 35 cm
.................... VERONA
..................220-240 V
..........................50 Hz
...................... 70 Watt
........... Ø 122 x 35 cm
33
IT4 Schema dei collegamenti
5 Dotazione di fornitura
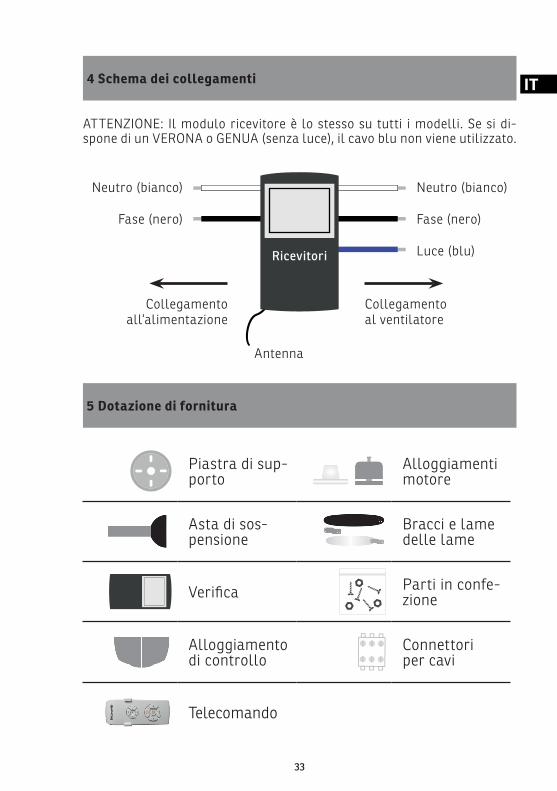
Piastra di sup-porto
Asta di sos-pensione
Verifi ca
Alloggiamento di controllo
Telecomando
Alloggiamenti motore
Bracci e lame delle lame
Parti in confe-zione
Connettoriper cavi
ATTENZIONE: Il modulo ricevitore è lo stesso su tutti i modelli. Se si di-spone di un VERONA o GENUA (senza luce), il cavo blu non viene utilizzato.
Neutro (bianco)Neutro (bianco)
Fase (nero)Fase (nero)
Antenna
Luce (blu)
Collegamento al ventilatore
Collegamento all‘alimentazione
Ricevitori
34
IT
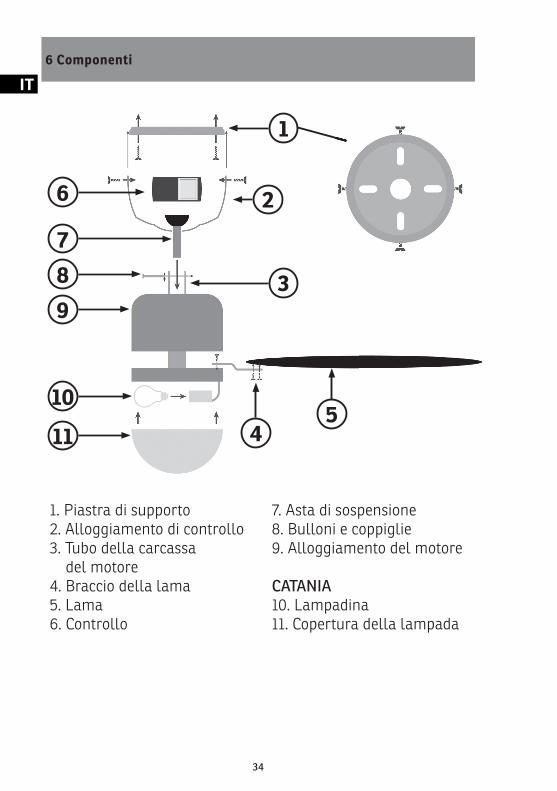
6 Componenti
1. Piastra di supporto2. Alloggiamento di controllo3. Tubo della carcassa del motore4. Braccio della lama5. Lama6. Controllo
7. Asta di sospensione8. Bulloni e coppiglie9. Alloggiamento del motore
CATANIA10. Lampadina11. Copertura della lampada
1
2
3
411
105
987
6
35
IT
7 Montaggio
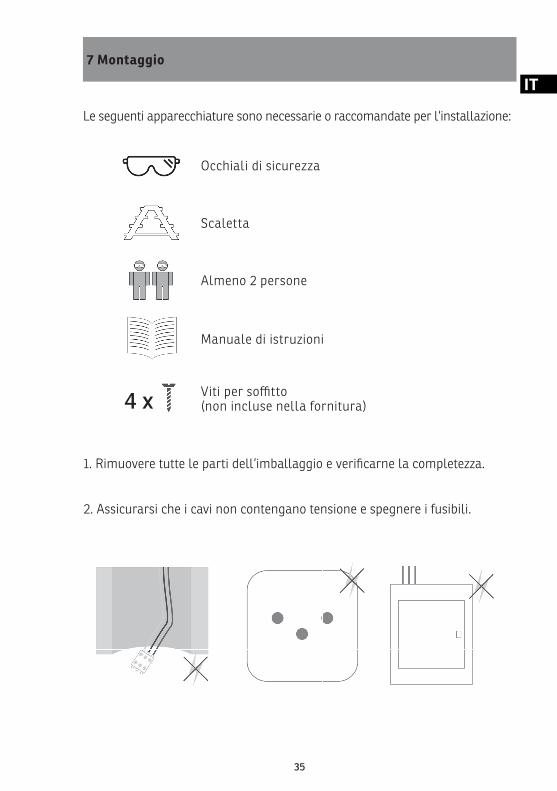
Occhiali di sicurezza
Scaletta
Almeno 2 persone
Manuale di istruzioni
4 x Viti per soffi tto(non incluse nella fornitura)
1. Rimuovere tutte le parti dell‘imballaggio e verifi carne la completezza.
Le seguenti apparecchiature sono necessarie o raccomandate per l‘installazione:
2. Assicurarsi che i cavi non contengano tensione e spegnere i fusibili.
36
IT
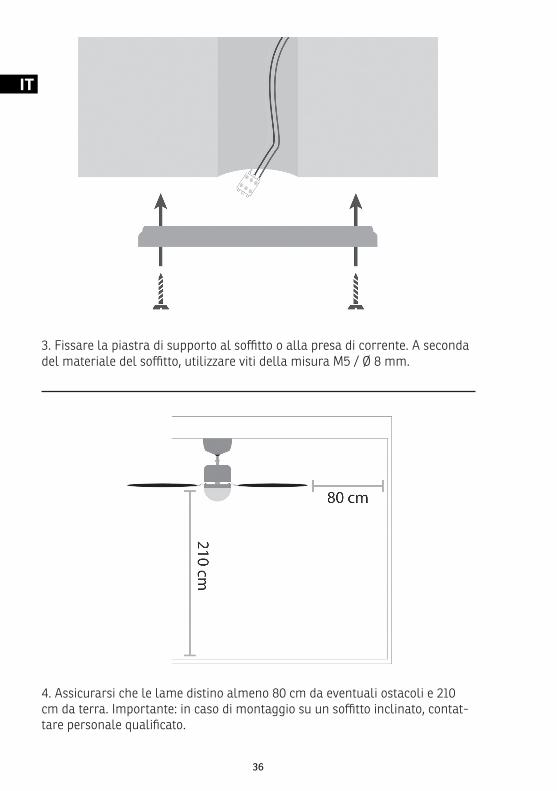
3. Fissare la piastra di supporto al soffi tto o alla presa di corrente. A seconda del materiale del soffi tto, utilizzare viti della misura M5 / Ø 8 mm.
4. Assicurarsi che le lame distino almeno 80 cm da eventuali ostacoli e 210 cm da terra. Importante: in caso di montaggio su un soffi tto inclinato, contat-tare personale qualifi cato.

37
IT
5. Allentare le viti della carcassa del motore e rimuovere le piastre di smorz-amento. 5 volte
6. Fissare i bracci delle lame all‘alloggiamento del motore utilizzando le viti allentate in precedenza e fi ssare le lame ai bracci delle lame.
7. Rimuovere la coppiglia e il bullone dal tubo nella parte superiore del corpo del motore.
GENUA / VERONA
GENUA / VERONA
CATANIA
CATANIA
38
IT
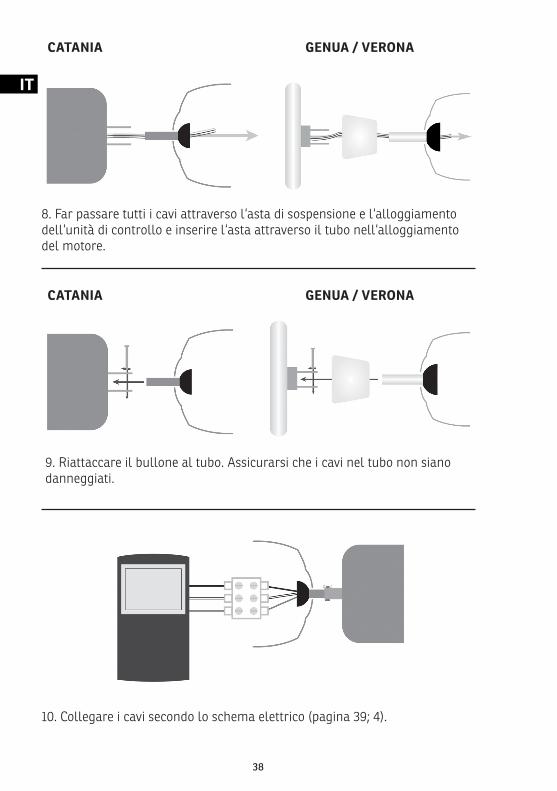
10. Collegare i cavi secondo lo schema elettrico (pagina 39; 4).
8. Far passare tutti i cavi attraverso l‘asta di sospensione e l‘alloggiamento dell‘unità di controllo e inserire l‘asta attraverso il tubo nell‘alloggiamento del motore.
9. Riattaccare il bullone al tubo. Assicurarsi che i cavi nel tubo non siano danneggiati.
GENUA / VERONA
GENUA / VERONA
CATANIA
CATANIA
39
IT
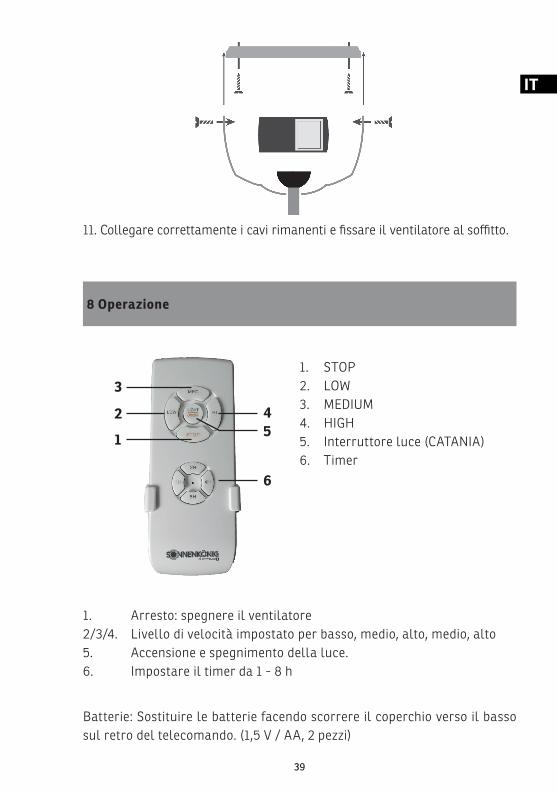
11. Collegare correttamente i cavi rimanenti e fi ssare il ventilatore al soffi tto.
8 Operazione
1. Arresto: spegnere il ventilatore2/3/4. Livello di velocità impostato per basso, medio, alto, medio, alto5. Accensione e spegnimento della luce.6. Impostare il timer da 1 - 8 h
Batterie: Sostituire le batterie facendo scorrere il coperchio verso il basso sul retro del telecomando. (1,5 V / AA, 2 pezzi)
1. STOP2. LOW3. MEDIUM4. HIGH5. Interruttore luce (CATANIA)6. Timer
3
45
6
2
1
40
IT
9 Garanzia / Smaltimento / Smaltimento / Modifiche tecniche
GaranziaI prodotti vengono controllati attentamente prima della spedizione. Se dovesse comunque presentarsi un vizio sul vostro apparecchio, vi invitiamo a rivolgervi in tutta tranquillità al vostro rivenditore. Vi ram-mentiamo di portare appresso la ricevuta d’acquisto, che deve essere presentata per ogni prestazione in garanzia. Il periodo di garanzia è di 24 mesi dalla data di acquisto.
SmaltimentoProvvedere ad un corretto smaltimento del prodotto. L’apparecchio può essere consegnato gratuitamente per il relativo smaltimento a qualsia-si rivenditore specializzato.
Modifiche tecnicheCon riserva di eventuali modifiche tecniche e di progettazione.
CE-Dichiarazione di ConformitàIl dispositivo è conforme alle seguenti norme
EMC EN 55014-1:2017 EN 55014-2:2015 EN 61000-3-2:2014 EN 61000-3-3:2013
LVD EN 60335-1:2012+A11:2014 EN 60335-2-80:2003+A1:2004+A2:2009 EN 60598-1:2015 + A1:2018 EN 60598-2-11989 EN 62233:2008
RoHS 2015/863/EUEMC 2014/30/EULVD 2014/35/EU
41
IT
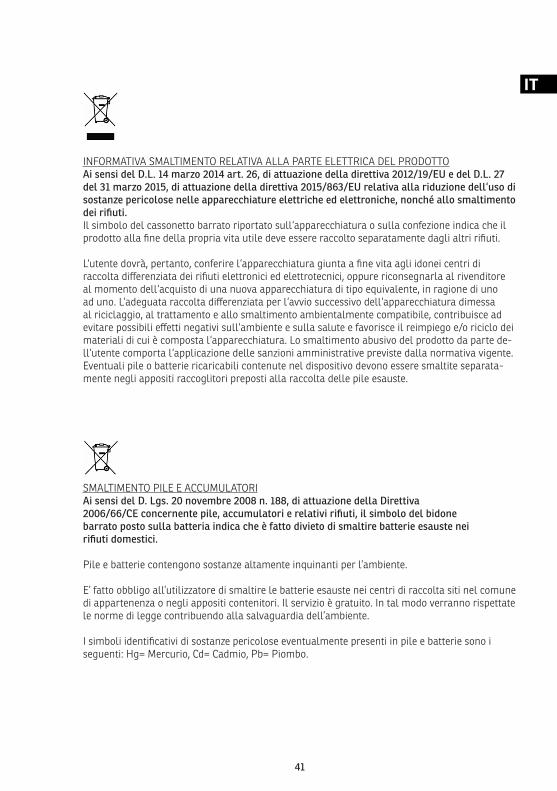
INFORMATIVA SMALTIMENTO RELATIVA ALLA PARTE ELETTRICA DEL PRODOTTOAi sensi del D.L. 14 marzo 2014 art. 26, di attuazione della direttiva 2012/19/EU e del D.L. 27 del 31 marzo 2015, di attuazione della direttiva 2015/863/EU relativa alla riduzione dell‘uso di sostanze pericolose nelle apparecchiature elettriche ed elettroniche, nonché allo smaltimento dei rifiuti.Il simbolo del cassonetto barrato riportato sull‘apparecchiatura o sulla confezione indica che il prodotto alla fine della propria vita utile deve essere raccolto separatamente dagli altri rifiuti.
L‘utente dovrà, pertanto, conferire l‘apparecchiatura giunta a fine vita agli idonei centri di raccolta differenziata dei rifiuti elettronici ed elettrotecnici, oppure riconsegnarla al rivenditore al momento dell‘acquisto di una nuova apparecchiatura di tipo equivalente, in ragione di uno ad uno. L‘adeguata raccolta differenziata per l‘avvio successivo dell‘apparecchiatura dimessa al riciclaggio, al trattamento e allo smaltimento ambientalmente compatibile, contribuisce ad evitare possibili effetti negativi sull‘ambiente e sulla salute e favorisce il reimpiego e/o riciclo dei materiali di cui è composta l‘apparecchiatura. Lo smaltimento abusivo del prodotto da parte de-ll‘utente comporta l‘applicazione delle sanzioni amministrative previste dalla normativa vigente. Eventuali pile o batterie ricaricabili contenute nel dispositivo devono essere smaltite separata-mente negli appositi raccoglitori preposti alla raccolta delle pile esauste.
SMALTIMENTO PILE E ACCUMULATORIAi sensi del D. Lgs. 20 novembre 2008 n. 188, di attuazione della Direttiva2006/66/CE concernente pile, accumulatori e relativi rifiuti, il simbolo del bidonebarrato posto sulla batteria indica che è fatto divieto di smaltire batterie esauste neirifiuti domestici.
Pile e batterie contengono sostanze altamente inquinanti per l’ambiente.
E’ fatto obbligo all’utilizzatore di smaltire le batterie esauste nei centri di raccolta siti nel comune di appartenenza o negli appositi contenitori. Il servizio è gratuito. In tal modo verranno rispettate le norme di legge contribuendo alla salvaguardia dell’ambiente.
I simboli identificativi di sostanze pericolose eventualmente presenti in pile e batterie sono i seguenti: Hg= Mercurio, Cd= Cadmio, Pb= Piombo.
DittaArmin Schmid
Olensbachstrasse 9–15CH-9631 Ulisbach
Tel. Int. +41 58 611 60 00Tel. Nat. [email protected]
DittaArmin Schmid
Peter-Henlein-Strasse 5D-89331 Burgau
Tel: 0180 500 64 [email protected]
Telefono f isso 14 Cent/Minute Telefono mobile bis 42 Cent/Minute
EN
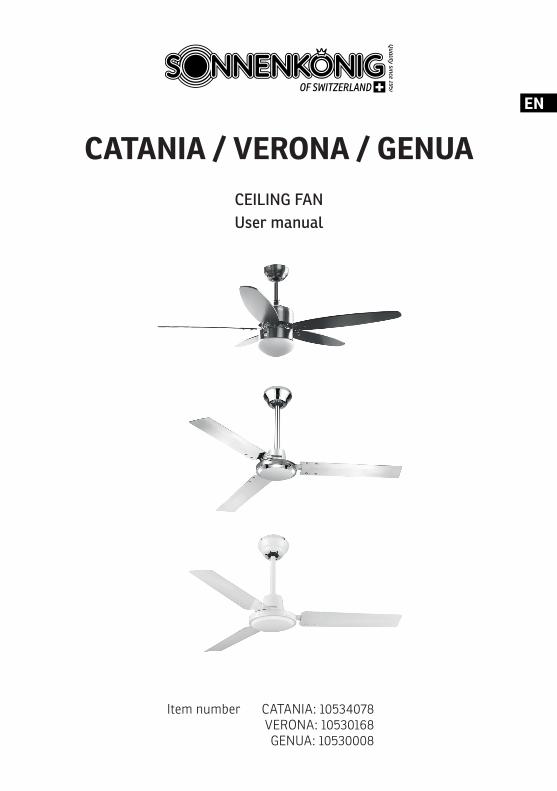
CATANIA / VERONA / GENUACEILING FANUser manual
Item number CATANIA: 10534078VERONA: 10530168GENUA: 10530008
44
EN
INDEX
1 Safety instructions ....................................................................45
2 Cleaning ...................................................................................46
3 Specification .............................................................................46
4 Connection ................................................................................ 47
5 Scope of delivery ....................................................................... 47
6 Parts .........................................................................................48
7 Assembly ..................................................................................49
8 Operation .................................................................................. 53
9 Warranty / Disposal / Technical modifications ...........................54
45
EN
1 Safety instructions
Please read before first commissioning the safety instructions carefully and observe the safety instructions to prevent damage due to misuse, improper operation, and improper environmental conditions to be avoided. Keep these for later reference.
Check the device after removing the packaging for damage . Do not put the unit in case of suspected corruption in operation and consult a specialist. The recyclable packaging material must not be stored or disposed accessible for young children , but must be disposed of properly.
This appliance is only for the purpose for which it was explicitly developed. Any other use is regarded as improper and therefore dangerous . The supplier is not liable for damage to persons and / or property damage due to an improper or incorrect use.
This appliance can be used by children aged from 8 years and above and persons with reduced physical, sensory or mental capabilities or lack of experience and knowledge if they have been given supervision or instruction concerning use of the appliance in a safe way and understand the hazards involved. Children shall not play with the appliance. Cleaning and user maintenance shall not be made by children without supervision.
Repairs to electrical appliances must only be carried out by trained personnel only. Improperly performed repairs and alterations to the equipment can have dangerous consequences for the user according to what the warranty will be rejected.
This product has passed through extensive quality assurance process. Every care has been taken to ensure that it reaches you in perfect condition.Warning! When using electric tools, basic safety precautions should be followed to reduce the risk of fire, electric shock and personal injury, including the following.
• Read all these instructions before attempting to operate this product and save these instructions.
• Check the voltage indicated on the rating plate. This tool is designed for a 230V 50Hz electric supply.
• Do not use electrical extension cord with this fan.• Do not introduce your fingers through the front case. Do not let children introduce
their fingers through the front case. Do not introduce any foreign body into the front case.
• Do not let hair, net curtains, tablecloth, clothes or curtains next to the openings of the fan. They could be aspiring into the fan, causing damaged or injuries.
• Do not use the fan if the cable or plug is damaged or if they have been damaged in any way. Send the fan to customer service or have it repaired by a specialist.
46
EN
• Periodically check the electric cable of this fan. lf the electric cable is damaged, it must be replaced by the manufacturer, its after sales service or by a similar quali-fied person in order to avoid a danger.
• Do not use this fan outside.• Do not use this fan in a damp area such as bathroom.• The fan should not be operate without a base nor used laying on its side.• Do not place the electrical cord under a cover. Do not overlay the cord with little
covers or such element. Place the cord in an area where there are not any risk to stumble over it.
• Do not operate the fan in an area where gasoline is used or stocked, painting or such flammable liquids.
• Use this fan only as it is describe in this manual.• Do not try to throw off this fan, there are not any piece that could eventually be re-
paired by the user. If you need maintenance, please send back the fan to the agent.• No part of this fan must be replaced by the user. The fan should not be opened by
user.
• Parts should be cleaned with a soft dry cloth.• Dirt marks should be removed with a mild soap (detergent) and a damp
cloth. Ensure that all traces of the soap film are removed with a damp cloth.• Do not use gasoline or solvents that may damage the fan.• Care should be taken to ensure that water (or other liquid) does not enter
the fan motor housing or the speed control unit.• Do not dip the fan into the water or in any other liquid.
2 Cleaning
3 Specification
Model .......................... CATANIA
Tension ...................... 220-240 V
Frequency ......................... 50 Hz
Power ............................ 60 Watt
Dimensions .........Ø 100 x 30 cm
.......................GENUA
..................220-240 V
..........................50 Hz
...................... 70 Watt
........... Ø 122 x 35 cm
.................... VERONA
..................220-240 V
..........................50 Hz
...................... 70 Watt
........... Ø 122 x 35 cm
47
EN
4 Connection
5 Scope of delivery
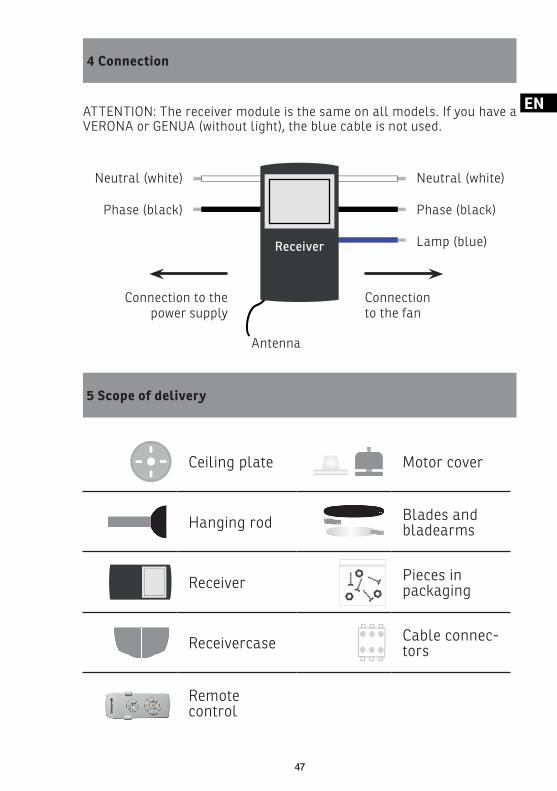
ATTENTION: The receiver module is the same on all models. If you have a VERONA or GENUA (without light), the blue cable is not used.
Neutral (white)Neutral (white)
Phase (black)Phase (black)
Antenna
Lamp (blue)
Connectionto the fan
Connection to the power supply
Receiver
Ceiling plate
Hanging rod
Receiver
Receivercase
Remotecontrol
Motor cover
Blades andbladearms
Pieces in packaging
Cable connec-tors
48
EN
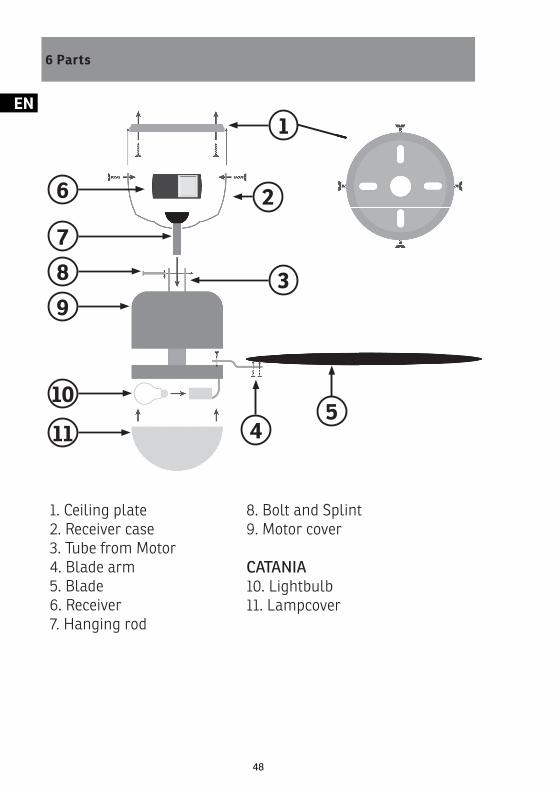
6 Parts
1. Ceiling plate2. Receiver case3. Tube from Motor4. Blade arm5. Blade6. Receiver7. Hanging rod
8. Bolt and Splint9. Motor cover
CATANIA10. Lightbulb11. Lampcover
1
2
3
411
105
987
6
49
EN
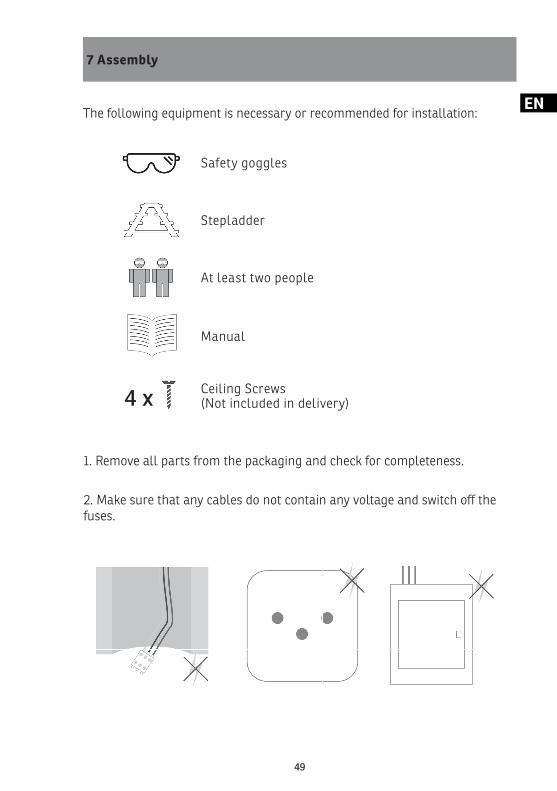
7 Assembly
Safety goggles
Stepladder
At least two people
Manual
4 x Ceiling Screws(Not included in delivery)
1. Remove all parts from the packaging and check for completeness.
The following equipment is necessary or recommended for installation:
2. Make sure that any cables do not contain any voltage and switch off the fuses.
50
EN
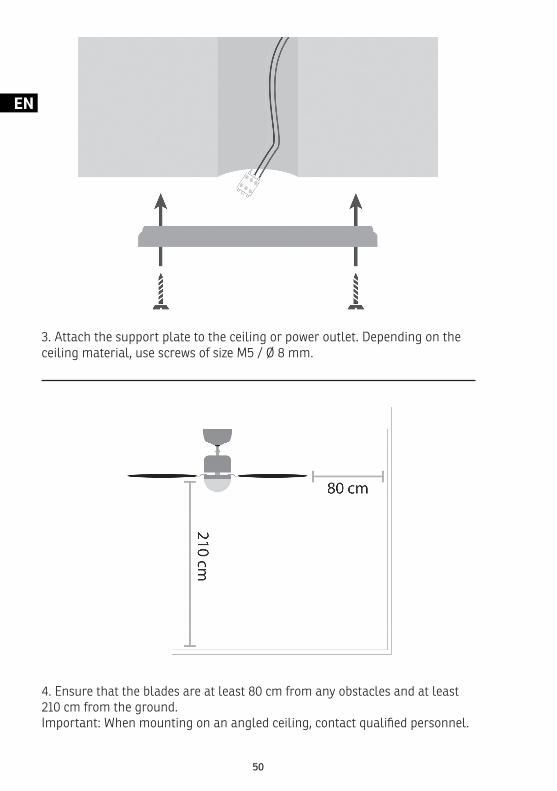
3. Attach the support plate to the ceiling or power outlet. Depending on the ceiling material, use screws of size M5 / Ø 8 mm.
4. Ensure that the blades are at least 80 cm from any obstacles and at least 210 cm from the ground.Important: When mounting on an angled ceiling, contact qualifi ed personnel.
51
EN
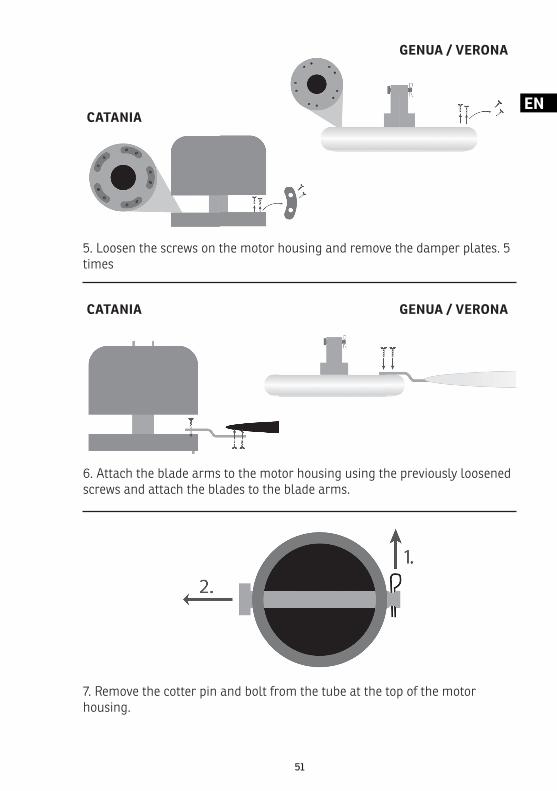
5. Loosen the screws on the motor housing and remove the damper plates. 5 times
6. Attach the blade arms to the motor housing using the previously loosened screws and attach the blades to the blade arms.
7. Remove the cotter pin and bolt from the tube at the top of the motor housing.
GENUA / VERONA
GENUA / VERONA
CATANIA
CATANIA
52
EN
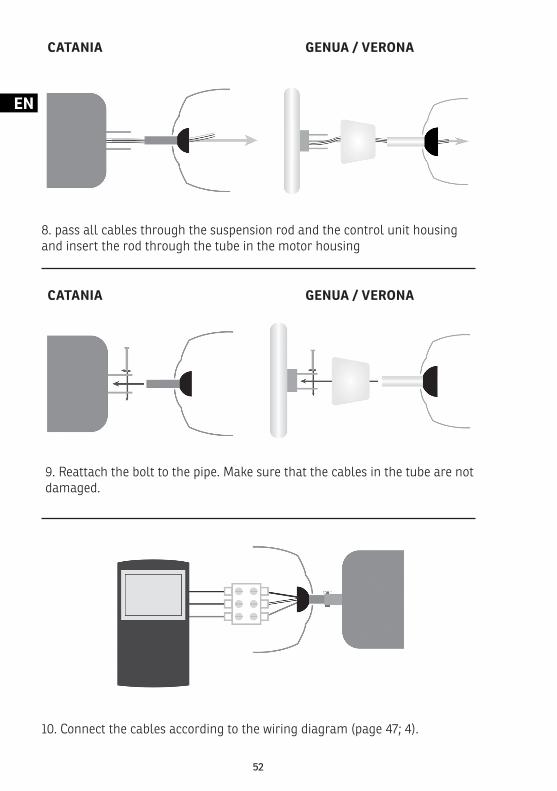
10. Connect the cables according to the wiring diagram (page 47; 4).
8. pass all cables through the suspension rod and the control unit housing and insert the rod through the tube in the motor housing
9. Reattach the bolt to the pipe. Make sure that the cables in the tube are not damaged.
GENUA / VERONA
GENUA / VERONA
CATANIA
CATANIA

53
EN
11. Connect the remaining cables correctly and attach the fan to the ceiling.
8 Operation
1. Stop: Turn off fan2/3/4. Choose between speed setting High / Middle / Low5. Switch Light on and off 6. Set timer from 1 - 8 h
Batteries: Replace the batteries by sliding the cover down on the back of the remote control. (1.5 V / AA, 2 pieces)
1. STOP2. LOW3. MEDIUM4. HIGH5. Light switch (CATANIA)6. Timer
3
45
6
2
1
54
EN
9 Warranty / Disposal / Technical modifications
GarantieDie Geräte werden vor der Auslieferung genau kontrolliert. Sollte trotz-dem einmal ein Mangel an Ihrem Gerät auftreten, wenden Sie sich ver-trauensvoll an Ihren Verkäufer. Bitte bringen Sie den Kaufbeleg mit, denn dieser ist für jede Garantieleistung vorzulegen.Die Garantie beträgt 24 Monaten ab dem Kaufdatum
EntsorgungDas Gerät muss fachgerecht entsorgt werden. Das Gerät kann bei jedem Fachhändler kostenlos zur Entsorgung abgegeben werden.
Technische ÄnderungenTechnische Änderungen in Technik und Design vorbehalten.Bitte behalten Sie das Verpackungsmaterial für das Gerät auf.
CE-KonformitätserklärungDas Gerät entspricht folgenden Standards
EMC EN 55014-1:2017 EN 55014-2:2015 EN 61000-3-2:2014 EN 61000-3-3:2013
LVD EN 60335-1:2012+A11:2014 EN 60335-2-80:2003+A1:2004+A2:2009 EN 60598-1:2015 + A1:2018 EN 60598-2-11989 EN 62233:2008
RoHS 2015/863/EUEMC 2014/30/EULVD 2014/35/EU
55
EN
DISPOSAL INSTRUCTIONS FOR THE ELECTRICAL PART OF THE PRODUCTIn accordance with Article 26 of the Decree-Law of 14 March 2014 implementing Direc-tive 2012/19/EC, and the Law of 31 March 2015 implementing Directive 2015/863/EU on the reduction of the use of hazardous substances in electrical and electronic equipment and on waste management.
The crossed-out dustbin symbol on the machine or packaging indicates that the waste ge-nerated at the end of its useful life must be collected separately from other waste. The user must therefore take the device to the appropriate collection points at the end of its service life. Sort electronic and electrical waste or send back to the retailer when purchasing new, equivalent devices in a one-to-one process. Appropriate separate collection for subsequent commissioning of the equipment to be recycled, treatment and environmentally sound di-sposal helps to avoid possible adverse effects on the environment and health, and promote the reuse and/or recycling of the materials to which they belong. Misuse of this product by the user will result in the application of the administrative penalties provided for in the applicable legislation. Batteries contained in the device must be disposed of separately in the appropriate containers for the collection of used batteries.
DISPOSAL OF BATTERIES AND ACCUMULATORSIn accordance with Legislative Decree 188 of 20 November 2008 implementing Directive 2006/66/EC on batteries, accumulators and related waste, the symbol of the crossed-out waste bin on the battery indicates that the disposal of used batteries is prohibited in household waste.
Single-use and rechargeable batteries contain substances that are highly polluting for the environment. The user is obliged to dispose of used batteries at collection points in the municipality or in appropriate containers. This service is free. In this way, legal require-ments are adhered to and the environment protected. The symbols identifying hazardous materials that may be present in single-use and rechargeable batteries are as follows: Hg = Mercury, Cd = Cadmium, Pb = Lead.
Company
Armin SchmidOlensbachstrasse 9–15
CH-9631 UlisbachTel. Int. +41 58 611 60 00
Tel. Nat. [email protected]
Company
Armin SchmidPeter-Henlein-Strasse 5
D-89331 BurgauTel: 0180 500 64 35
Landline 14 Cent/Minute Mobile network to 42 Cent/Minute
![GENUA IM TASCHENFORMAT Ein Kurzführer um die Stadt zu … im... · 2013. 9. 17. · genua im taschenformat [ein kurzführer zur entdeckung der stadt] 2 nicht verpassen 4 genua, eine](https://img.pdfslide.org/doc/110x75/60b5dd12e4c9fd7b3e1f6e40/genua-im-taschenformat-ein-kurzfhrer-um-die-stadt-zu-im-2013-9-17-genua.jpg)