Embed Size (px)
Citation preview

BedienungsanleitungOperating Instructions
Die neue bentrup Kompaktserie. Perfektion vom Marktführer.
TC 66
TC 88
TC 44
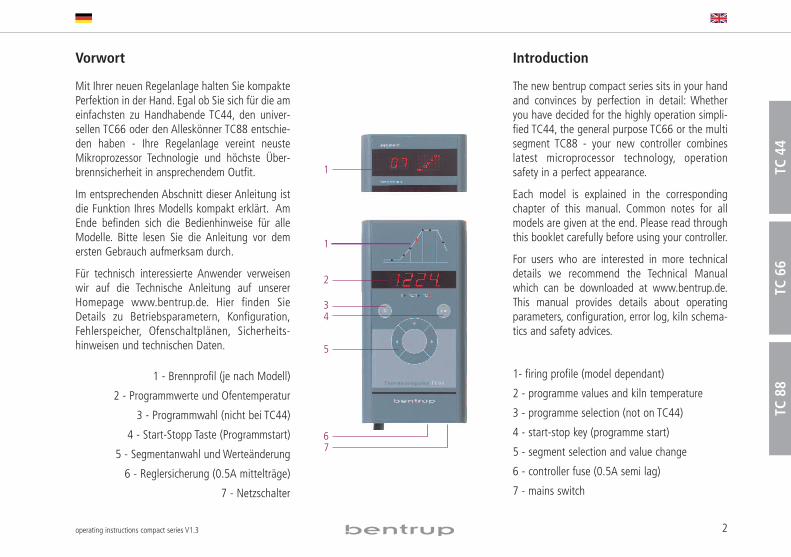
Vorwort
Mit Ihrer neuen Regelanlage halten Sie kompaktePerfektion in der Hand. Egal ob Sie sich für die ameinfachsten zu Handhabende TC44, den univer-sellen TC66 oder den Alleskönner TC88 entschie-den haben - Ihre Regelanlage vereint neusteMikroprozessor Technologie und höchste Über-brennsicherheit in ansprechendem Outfit.
Im entsprechenden Abschnitt dieser Anleitung istdie Funktion Ihres Modells kompakt erklärt. AmEnde befinden sich die Bedienhinweise für alleModelle. Bitte lesen Sie die Anleitung vor demersten Gebrauch aufmerksam durch.
Für technisch interessierte Anwender verweisenwir auf die Technische Anleitung auf unsererHomepage www.bentrup.de. Hier finden SieDetails zu Betriebsparametern, Konfiguration,Fehlerspeicher, Ofenschaltplänen, Sicherheits-hinweisen und technischen Daten.
1 - Brennprofil (je nach Modell)
2 - Programmwerte und Ofentemperatur
3 - Programmwahl (nicht bei TC44)
4 - Start-Stopp Taste (Programmstart)
5 - Segmentanwahl und Werteänderung
6 - Reglersicherung (0.5A mittelträge)
7 - Netzschalter
Introduction
The new bentrup compact series sits in your handand convinces by perfection in detail: Whetheryou have decided for the highly operation simpli-fied TC44, the general purpose TC66 or the multisegment TC88 - your new controller combineslatest microprocessor technology, operationsafety in a perfect appearance.
Each model is explained in the correspondingchapter of this manual. Common notes for allmodels are given at the end. Please read throughthis booklet carefully before using your controller.
For users who are interested in more technicaldetails we recommend the Technical Manualwhich can be downloaded at www.bentrup.de.This manual provides details about operatingparameters, configuration, error log, kiln schema-tics and safety advices.
1- firing profile (model dependant)
2 - programme values and kiln temperature
3 - programme selection (not on TC44)
4 - start-stop key (programme start)
5 - segment selection and value change
6 - controller fuse (0.5A semi lag)
7 - mains switch
2operating instructions compact series V1.3
TC44
TC66
TC88
1
6
5
43
2
1
7
3operating instructions compact series V1.3
TC44
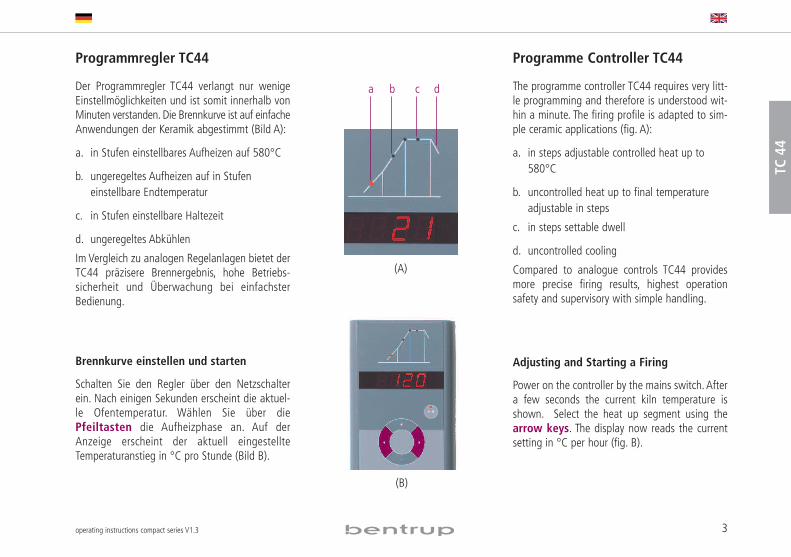
Programmregler TC44
Der Programmregler TC44 verlangt nur wenigeEinstellmöglichkeiten und ist somit innerhalb vonMinuten verstanden. Die Brennkurve ist auf einfacheAnwendungen der Keramik abgestimmt (Bild A):
a. in Stufen einstellbares Aufheizen auf 580°C
b. ungeregeltes Aufheizen auf in Stufeneinstellbare Endtemperatur
c. in Stufen einstellbare Haltezeit
d. ungeregeltes Abkühlen
Im Vergleich zu analogen Regelanlagen bietet derTC44 präzisere Brennergebnis, hohe Betriebs-sicherheit und Überwachung bei einfachsterBedienung.
Brennkurve einstellen und starten
Schalten Sie den Regler über den Netzschalterein. Nach einigen Sekunden erscheint die aktuel-le Ofentemperatur. Wählen Sie über diePfeiltasten die Aufheizphase an. Auf derAnzeige erscheint der aktuell eingestellteTemperaturanstieg in °C pro Stunde (Bild B).
Programme Controller TC44
The programme controller TC44 requires very litt-le programming and therefore is understood wit-hin a minute. The firing profile is adapted to sim-ple ceramic applications (fig. A):
a. in steps adjustable controlled heat up to580°C
b. uncontrolled heat up to final temperatureadjustable in steps
c. in steps settable dwell
d. uncontrolled cooling
Compared to analogue controls TC44 providesmore precise firing results, highest operationsafety and supervisory with simple handling.
Adjusting and Starting a Firing
Power on the controller by the mains switch.Aftera few seconds the current kiln temperature isshown. Select the heat up segment using thearrow keys. The display now reads the currentsetting in °C per hour (fig. B).
a cb d
(A)
(B)

Über die / Tasten stellen Sie die Anheizge-schwindigkeit in °C pro Stunde ein. MöglicheWerte sind 30, 60, 120, 240, 360, 480°C/h oderSKIP für ungeregeltes Aufheizen (Bild A).
Mit den Pfeiltasten wählen Sie den nächstenBrennabschnitt an und stellen dabei die ge-wünschte Brenntemperatur über die / Tastenein. Die Brenntemperatur ist in 5°C-Schritten von400°C bis ca. 1320°C (je nach Ofenmodell) ein-stellbar (Bild B).
Über die Pfeiltasten gehen Sie zum nächstenBrennabschnitt, um die Haltezeit einzustellen.Mögliche Zeiten sind 0, 0:10, 0:20, 0:30 Minutenoder 1 Stunde.
Durch Drücken der Taste Start-Stopp wird derBrennvorgang gestartet. In der Brennkurve leuch-tet nun der aktuelle Brennabschnitt, in derAnzeige steht die aktuelle Ofentemperatur. Denlaufenden Brennvorgang erkennen Sie am blin-kenden Dezimalpunkt und dem grünenLeuchtpunkt in der Start-Stopp Taste (Bild C).
Während des Brandes können die Werte derBrennkurve eingesehen, aber nicht geändert wer-den. In der Abkühlphase ist der Brand bei einerOfentemperatur von 150°C beendet. Öffnen Sieden Ofen nicht im heißen Zustand!
Die eingestellte Brennkurve bleibt auch nach demAusschalten erhalten.
Adjust the heat up rate in °C per hour using the/ keys. Available settings are 30, 60, 120,
240, 360, 480°C/h or SKIP for uncontrolled hea-ting (fig. A).
Select the next segment using the arrow keys.Adjust the firing temperature using the /keys. The firing temperature can be set in stepsof 5°C between 400°C and 1320°C dependingon kiln type (fig. B).
Step to the next segment by the arrow keys to setthe dwell time. Available settings are 0, 0:10,0:20, 0:30 minutes or 1 hour.
Pressing the start-stop key starts the firing. Fromnow on the firing curve shows the current seg-ment while the display reads the current kiln tem-perature. The flashing decimal point and a greenLED in the start-stop key indicate a programmerunning (fig. C).
During a firing the values of the firing curve canbe displayed but not changed.
The firing is completed when the kiln temperatu-re has dropped below 150°C. Caution - do notopen the kiln while hot!
The set firing curve is saved also after power off.
4operating instructions compact series V1.3
TC44
(A)
(B)
(C)

Programmregler TC66
Der Programmregler TC66 ist auf die typischenAnwendungen in der Keramik zugeschnitten. DieBrennkurve des TC66 besteht aus folgendenSegmenten (Bild A):
a. Vorlaufzeit (bis 9 Stunden 59 Minuten z.B.für Programmstart in der Nacht)
b. Aufheizen (geregelt 1 bis 999°C pro Stundeoder ungeregelt “SKIP”) aufZwischentemperatur
c. Aufheizen (geregelt 1 bis 999°C pro Stundeoder ungeregelt “SKIP”) auf Endtemperatur
d. Haltezeit (bis 9 h 59 min)
e. Abkühlen (geregelt 1 bis 999°C pro Stundeoder ungeregelt “SKIP”) bis 150°C
Programme
Der TC66 speichert 6 Brennkurven als Program-me, die Sie Aufrufen können, um sie nicht jedes-mal neu eingeben zu müssen. Sie können dieseProgramme selbst verändern. Die Werte bleibenauch nach dem Ausschalten des Reglers erhalten.Nebenstehende Tabelle zeigt die werksseitigeBelegung dieser Programme Nr. 1 bis 6 (Bild B).
Programme Controller TC66
The programme controller TC66 is designed forthe specific needs of ceramics. The firing curveconsist of the following segments (fig A):
a. programme delay (up to 9 h 59 min e.g. totake advantage of “off peak” electricity)
b. heating up (controlled 1 to 999°C per houror uncontrolled “SKIP”) to intermediate tem-perature
c. heating up (controlled 1 to 999°C per houror uncontrolled “SKIP”) to final temperature
d. dwell (up to 9 h 59 min)
e. cooling down (controlled 1 to 999°C perhour or uncontrolled “SKIP”) to 150°C
Programmes
The TC66 saves up to 6 firing curves as program-mes. This saves time and avoids errors. All valuesof the programme can be changed and are savedalso after power off.
The programme table (fig B) shows the ex factorysettings of the programmes no. 1 to 6 (fig B).
5operating instructions compact series V1.3
TC66
a edcb
P a b c d e# h:min °C/h °C °C/h °C h:min °C/h
1 0:00 30 150 SKIP 150 0:00 SKIP
2 0:00 100 600 SKIP 800 0:10 SKIP
3 0:00 100 600 SKIP 900 0:10 SKIP
4 0:00 180 400 SKIP 1050 0:30 SKIP
5 0:00 180 400 SKIP 1180 0:30 SKIP
6 0:00 250 820 SKIP 560 0:10 80
(A)
(B)
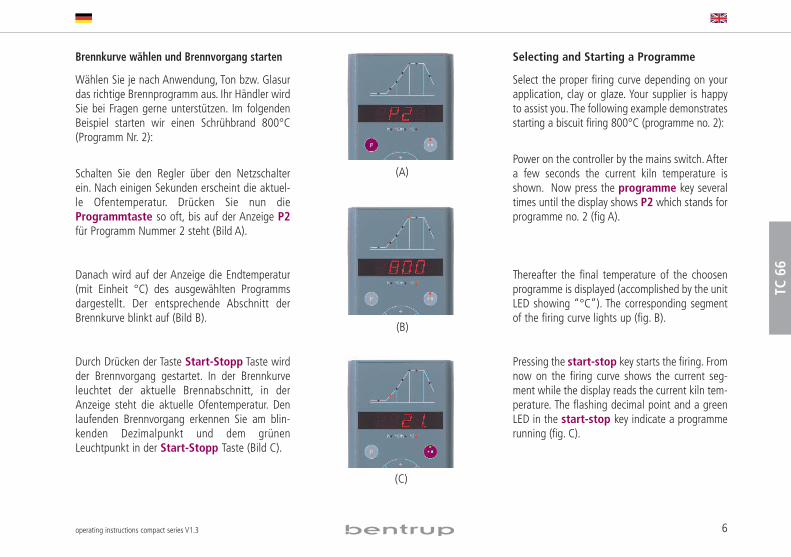
Brennkurve wählen und Brennvorgang starten
Wählen Sie je nach Anwendung, Ton bzw. Glasurdas richtige Brennprogramm aus. Ihr Händler wirdSie bei Fragen gerne unterstützen. Im folgendenBeispiel starten wir einen Schrühbrand 800°C(Programm Nr. 2):
Schalten Sie den Regler über den Netzschalterein. Nach einigen Sekunden erscheint die aktuel-le Ofentemperatur. Drücken Sie nun dieProgrammtaste so oft, bis auf der Anzeige P2für Programm Nummer 2 steht (Bild A).
Danach wird auf der Anzeige die Endtemperatur(mit Einheit °C) des ausgewählten Programmsdargestellt. Der entsprechende Abschnitt derBrennkurve blinkt auf (Bild B).
Durch Drücken der Taste Start-Stopp Taste wirdder Brennvorgang gestartet. In der Brennkurveleuchtet der aktuelle Brennabschnitt, in derAnzeige steht die aktuelle Ofentemperatur. Denlaufenden Brennvorgang erkennen Sie am blin-kenden Dezimalpunkt und dem grünenLeuchtpunkt in der Start-Stopp Taste (Bild C).
Selecting and Starting a Programme
Select the proper firing curve depending on yourapplication, clay or glaze. Your supplier is happyto assist you.The following example demonstratesstarting a biscuit firing 800°C (programme no. 2):
Power on the controller by the mains switch.Aftera few seconds the current kiln temperature isshown. Now press the programme key severaltimes until the display shows P2 which stands forprogramme no. 2 (fig A).
Thereafter the final temperature of the choosenprogramme is displayed (accomplished by the unitLED showing “°C”). The corresponding segmentof the firing curve lights up (fig. B).
Pressing the start-stop key starts the firing. Fromnow on the firing curve shows the current seg-ment while the display reads the current kiln tem-perature. The flashing decimal point and a greenLED in the start-stop key indicate a programmerunning (fig. C).
6operating instructions compact series V1.3
TC66
(A)
(B)
(C)
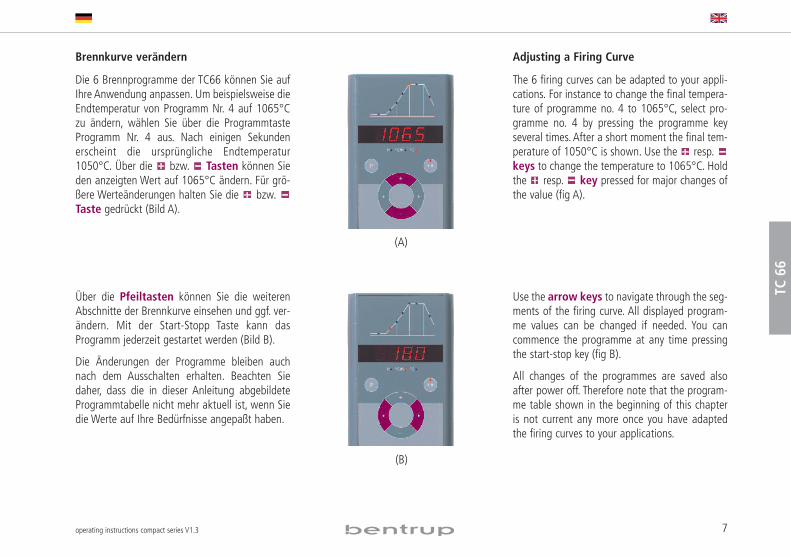
Brennkurve verändern
Die 6 Brennprogramme der TC66 können Sie aufIhre Anwendung anpassen. Um beispielsweise dieEndtemperatur von Programm Nr. 4 auf 1065°Czu ändern, wählen Sie über die ProgrammtasteProgramm Nr. 4 aus. Nach einigen Sekundenerscheint die ursprüngliche Endtemperatur1050°C. Über die bzw. Tasten können Sieden anzeigten Wert auf 1065°C ändern. Für grö-ßere Werteänderungen halten Sie die bzw.Taste gedrückt (Bild A).
Über die Pfeiltasten können Sie die weiterenAbschnitte der Brennkurve einsehen und ggf. ver-ändern. Mit der Start-Stopp Taste kann dasProgramm jederzeit gestartet werden (Bild B).
Die Änderungen der Programme bleiben auchnach dem Ausschalten erhalten. Beachten Siedaher, dass die in dieser Anleitung abgebildeteProgrammtabelle nicht mehr aktuell ist, wenn Siedie Werte auf Ihre Bedürfnisse angepaßt haben.
Adjusting a Firing Curve
The 6 firing curves can be adapted to your appli-cations. For instance to change the final tempera-ture of programme no. 4 to 1065°C, select pro-gramme no. 4 by pressing the programme keyseveral times. After a short moment the final tem-perature of 1050°C is shown. Use the resp.keys to change the temperature to 1065°C. Holdthe resp. key pressed for major changes ofthe value (fig A).
Use the arrow keys to navigate through the seg-ments of the firing curve. All displayed program-me values can be changed if needed. You cancommence the programme at any time pressingthe start-stop key (fig B).
All changes of the programmes are saved alsoafter power off. Therefore note that the program-me table shown in the beginning of this chapteris not current any more once you have adaptedthe firing curves to your applications.
7operating instructions compact series V1.3
TC66
(A)
(B)
Vorlaufzeit
Über die Vorlaufzeit kann der Brennvorgang in dieNacht verlegt werden.Wenn Sie z.B. dieWerkstattum 17 Uhr verlassen und ab 22 UhrNachtstromtarif gilt, stellen Sie eine Vorlaufzeitvon 5:00 Stunden ein. Nach dem Start wird dieverbleibende Zeit angezeigt (Bild A).
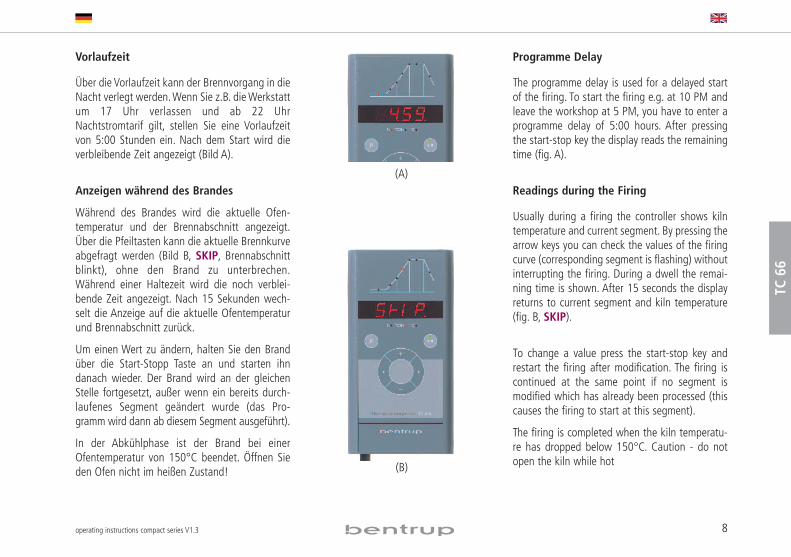
Anzeigen während des Brandes
Während des Brandes wird die aktuelle Ofen-temperatur und der Brennabschnitt angezeigt.Über die Pfeiltasten kann die aktuelle Brennkurveabgefragt werden (Bild B, SKIP, Brennabschnittblinkt), ohne den Brand zu unterbrechen.Während einer Haltezeit wird die noch verblei-bende Zeit angezeigt. Nach 15 Sekunden wech-selt die Anzeige auf die aktuelle Ofentemperaturund Brennabschnitt zurück.
Um einen Wert zu ändern, halten Sie den Brandüber die Start-Stopp Taste an und starten ihndanach wieder. Der Brand wird an der gleichenStelle fortgesetzt, außer wenn ein bereits durch-laufenes Segment geändert wurde (das Pro-gramm wird dann ab diesem Segment ausgeführt).
In der Abkühlphase ist der Brand bei einerOfentemperatur von 150°C beendet. Öffnen Sieden Ofen nicht im heißen Zustand!
Programme Delay
The programme delay is used for a delayed startof the firing. To start the firing e.g. at 10 PM andleave the workshop at 5 PM, you have to enter aprogramme delay of 5:00 hours. After pressingthe start-stop key the display reads the remainingtime (fig. A).
Readings during the Firing
Usually during a firing the controller shows kilntemperature and current segment. By pressing thearrow keys you can check the values of the firingcurve (corresponding segment is flashing) withoutinterrupting the firing. During a dwell the remai-ning time is shown. After 15 seconds the displayreturns to current segment and kiln temperature(fig. B, SKIP).
To change a value press the start-stop key andrestart the firing after modification. The firing iscontinued at the same point if no segment ismodified which has already been processed (thiscauses the firing to start at this segment).
The firing is completed when the kiln temperatu-re has dropped below 150°C. Caution - do notopen the kiln while hot
8operating instructions compact series V1.3
TC66
(A)
(B)
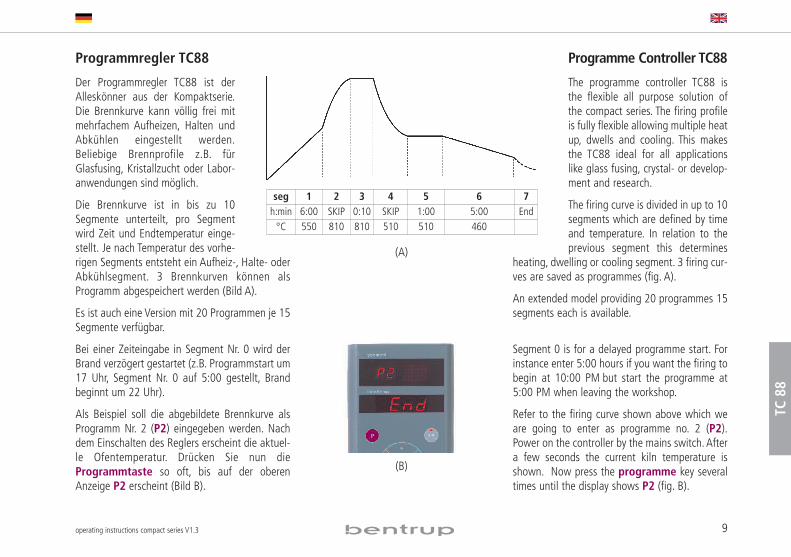
Programmregler TC88
Der Programmregler TC88 ist derAlleskönner aus der Kompaktserie.Die Brennkurve kann völlig frei mitmehrfachem Aufheizen, Halten undAbkühlen eingestellt werden.Beliebige Brennprofile z.B. fürGlasfusing, Kristallzucht oder Labor-anwendungen sind möglich.
Die Brennkurve ist in bis zu 10Segmente unterteilt, pro Segmentwird Zeit und Endtemperatur einge-stellt. Je nach Temperatur des vorhe-rigen Segments entsteht ein Aufheiz-, Halte- oderAbkühlsegment. 3 Brennkurven können alsProgramm abgespeichert werden (Bild A).
Es ist auch eine Version mit 20 Programmen je 15Segmente verfügbar.
Bei einer Zeiteingabe in Segment Nr. 0 wird derBrand verzögert gestartet (z.B. Programmstart um17 Uhr, Segment Nr. 0 auf 5:00 gestellt, Brandbeginnt um 22 Uhr).
Als Beispiel soll die abgebildete Brennkurve alsProgramm Nr. 2 (P2) eingegeben werden. Nachdem Einschalten des Reglers erscheint die aktuel-le Ofentemperatur. Drücken Sie nun dieProgrammtaste so oft, bis auf der oberenAnzeige P2 erscheint (Bild B).
Programme Controller TC88
The programme controller TC88 isthe flexible all purpose solution ofthe compact series. The firing profileis fully flexible allowing multiple heatup, dwells and cooling. This makesthe TC88 ideal for all applicationslike glass fusing, crystal- or develop-ment and research.
The firing curve is divided in up to 10segments which are defined by timeand temperature. In relation to theprevious segment this determines
heating, dwelling or cooling segment. 3 firing cur-ves are saved as programmes (fig. A).
An extended model providing 20 programmes 15segments each is available.
Segment 0 is for a delayed programme start. Forinstance enter 5:00 hours if you want the firing tobegin at 10:00 PM but start the programme at5:00 PM when leaving the workshop.
Refer to the firing curve shown above which weare going to enter as programme no. 2 (P2).Power on the controller by the mains switch.Aftera few seconds the current kiln temperature isshown. Now press the programme key severaltimes until the display shows P2 (fig. B).
9operating instructions compact series V1.3
TC88
seg 1 2 3 4 5 6 7h:min 6:00 SKIP 0:10 SKIP 1:00 5:00 End°C 550 810 810 510 510 460
(B)
(A)
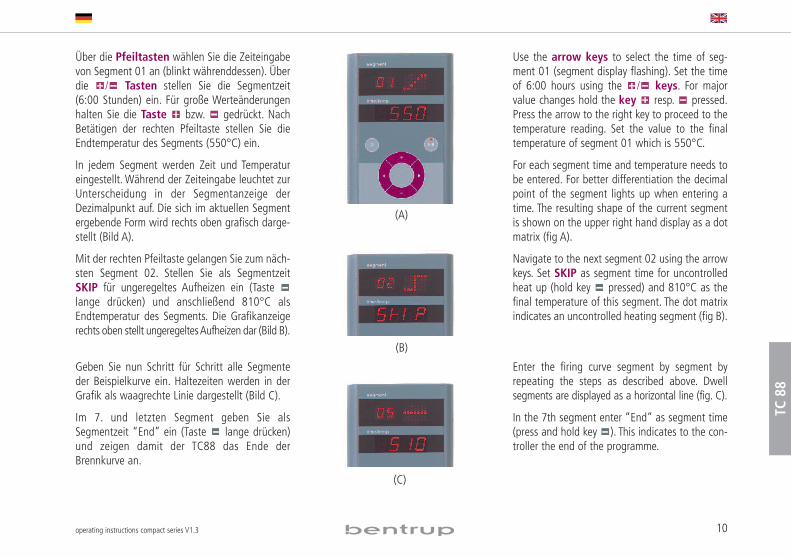
Über die Pfeiltasten wählen Sie die Zeiteingabevon Segment 01 an (blinkt währenddessen). Überdie / Tasten stellen Sie die Segmentzeit(6:00 Stunden) ein. Für große Werteänderungenhalten Sie die Taste bzw. gedrückt. NachBetätigen der rechten Pfeiltaste stellen Sie dieEndtemperatur des Segments (550°C) ein.
In jedem Segment werden Zeit und Temperatureingestellt. Während der Zeiteingabe leuchtet zurUnterscheidung in der Segmentanzeige derDezimalpunkt auf. Die sich im aktuellen Segmentergebende Form wird rechts oben grafisch darge-stellt (Bild A).
Mit der rechten Pfeiltaste gelangen Sie zum näch-sten Segment 02. Stellen Sie als SegmentzeitSKIP für ungeregeltes Aufheizen ein (Tastelange drücken) und anschließend 810°C alsEndtemperatur des Segments. Die Grafikanzeigerechts oben stellt ungeregeltesAufheizen dar (Bild B).
Geben Sie nun Schritt für Schritt alle Segmenteder Beispielkurve ein. Haltezeiten werden in derGrafik als waagrechte Linie dargestellt (Bild C).
Im 7. und letzten Segment geben Sie alsSegmentzeit “End” ein (Taste lange drücken)und zeigen damit der TC88 das Ende derBrennkurve an.
Use the arrow keys to select the time of seg-ment 01 (segment display flashing). Set the timeof 6:00 hours using the / keys. For majorvalue changes hold the key resp. pressed.Press the arrow to the right key to proceed to thetemperature reading. Set the value to the finaltemperature of segment 01 which is 550°C.
For each segment time and temperature needs tobe entered. For better differentiation the decimalpoint of the segment lights up when entering atime. The resulting shape of the current segmentis shown on the upper right hand display as a dotmatrix (fig A).
Navigate to the next segment 02 using the arrowkeys. Set SKIP as segment time for uncontrolledheat up (hold key pressed) and 810°C as thefinal temperature of this segment. The dot matrixindicates an uncontrolled heating segment (fig B).
Enter the firing curve segment by segment byrepeating the steps as described above. Dwellsegments are displayed as a horizontal line (fig. C).
In the 7th segment enter “End” as segment time(press and hold key ). This indicates to the con-troller the end of the programme.
10operating instructions compact series V1.3
TC88
(A)
(B)
(C)
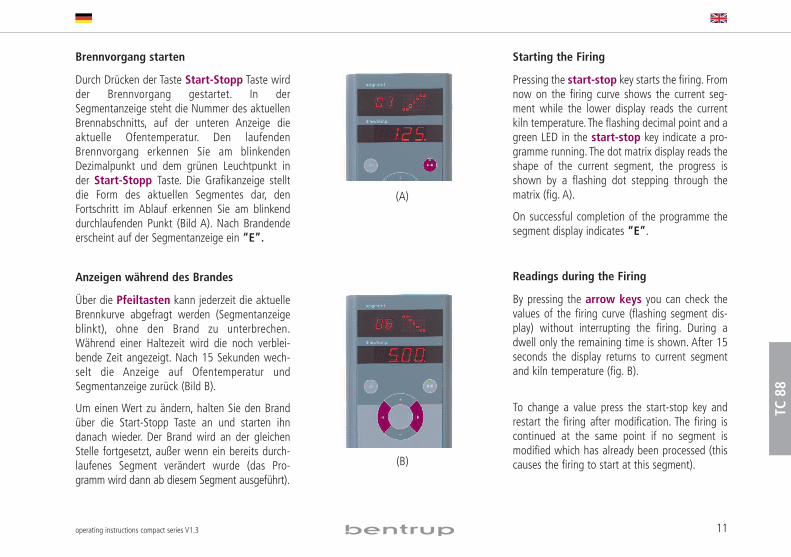
Brennvorgang starten
Durch Drücken der Taste Start-Stopp Taste wirdder Brennvorgang gestartet. In derSegmentanzeige steht die Nummer des aktuellenBrennabschnitts, auf der unteren Anzeige dieaktuelle Ofentemperatur. Den laufendenBrennvorgang erkennen Sie am blinkendenDezimalpunkt und dem grünen Leuchtpunkt inder Start-Stopp Taste. Die Grafikanzeige stelltdie Form des aktuellen Segmentes dar, denFortschritt im Ablauf erkennen Sie am blinkenddurchlaufenden Punkt (Bild A). Nach Brandendeerscheint auf der Segmentanzeige ein “E”.
Anzeigen während des Brandes
Über die Pfeiltasten kann jederzeit die aktuelleBrennkurve abgefragt werden (Segmentanzeigeblinkt), ohne den Brand zu unterbrechen.Während einer Haltezeit wird die noch verblei-bende Zeit angezeigt. Nach 15 Sekunden wech-selt die Anzeige auf Ofentemperatur undSegmentanzeige zurück (Bild B).
Um einen Wert zu ändern, halten Sie den Brandüber die Start-Stopp Taste an und starten ihndanach wieder. Der Brand wird an der gleichenStelle fortgesetzt, außer wenn ein bereits durch-laufenes Segment verändert wurde (das Pro-gramm wird dann ab diesem Segment ausgeführt).
Starting the Firing
Pressing the start-stop key starts the firing. Fromnow on the firing curve shows the current seg-ment while the lower display reads the currentkiln temperature. The flashing decimal point and agreen LED in the start-stop key indicate a pro-gramme running. The dot matrix display reads theshape of the current segment, the progress isshown by a flashing dot stepping through thematrix (fig. A).
On successful completion of the programme thesegment display indicates “E”.
Readings during the Firing
By pressing the arrow keys you can check thevalues of the firing curve (flashing segment dis-play) without interrupting the firing. During adwell only the remaining time is shown. After 15seconds the display returns to current segmentand kiln temperature (fig. B).
To change a value press the start-stop key andrestart the firing after modification. The firing iscontinued at the same point if no segment ismodified which has already been processed (thiscauses the firing to start at this segment).
11operating instructions compact series V1.3
TC88
(A)
(B)
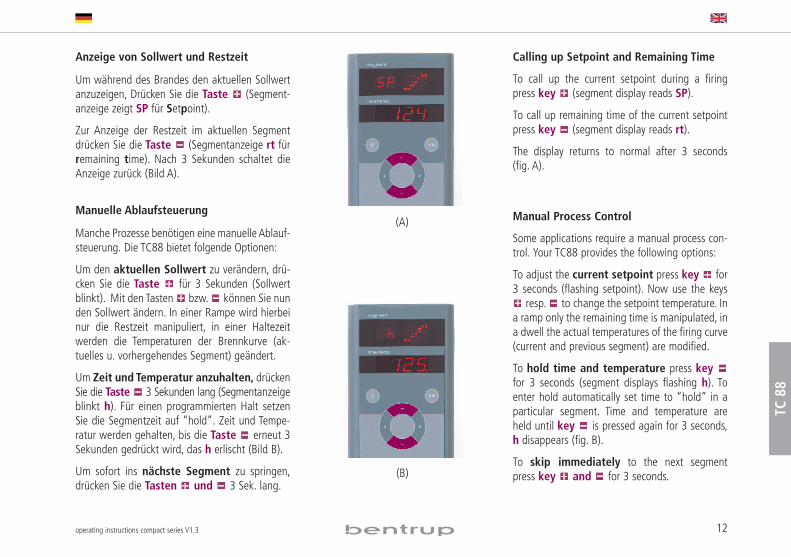
Anzeige von Sollwert und Restzeit
Um während des Brandes den aktuellen Sollwertanzuzeigen, Drücken Sie die Taste (Segment-anzeige zeigt SP für Setpoint).
Zur Anzeige der Restzeit im aktuellen Segmentdrücken Sie die Taste (Segmentanzeige rt fürremaining time). Nach 3 Sekunden schaltet dieAnzeige zurück (Bild A).
Manuelle Ablaufsteuerung
Manche Prozesse benötigen eine manuelle Ablauf-steuerung. Die TC88 bietet folgende Optionen:
Um den aktuellen Sollwert zu verändern, drü-cken Sie die Taste für 3 Sekunden (Sollwertblinkt). Mit den Tasten bzw. können Sie nunden Sollwert ändern. In einer Rampe wird hierbeinur die Restzeit manipuliert, in einer Haltezeitwerden die Temperaturen der Brennkurve (ak-tuelles u. vorhergehendes Segment) geändert.
Um Zeit und Temperatur anzuhalten, drückenSie die Taste 3 Sekunden lang (Segmentanzeigeblinkt h). Für einen programmierten Halt setzenSie die Segmentzeit auf “hold”. Zeit und Tempe-ratur werden gehalten, bis die Taste erneut 3Sekunden gedrückt wird, das h erlischt (Bild B).
Um sofort ins nächste Segment zu springen,drücken Sie die Tasten und 3 Sek. lang.
Calling up Setpoint and Remaining Time
To call up the current setpoint during a firingpress key (segment display reads SP).
To call up remaining time of the current setpointpress key (segment display reads rt).
The display returns to normal after 3 seconds(fig. A).
Manual Process Control
Some applications require a manual process con-trol. Your TC88 provides the following options:
To adjust the current setpoint press key for3 seconds (flashing setpoint). Now use the keysresp. to change the setpoint temperature. In
a ramp only the remaining time is manipulated, ina dwell the actual temperatures of the firing curve(current and previous segment) are modified.
To hold time and temperature press keyfor 3 seconds (segment displays flashing h). Toenter hold automatically set time to “hold” in aparticular segment. Time and temperature areheld until key is pressed again for 3 seconds,h disappears (fig. B).
To skip immediately to the next segmentpress key and for 3 seconds.
12operating instructions compact series V1.3
TC88
(A)
(B)
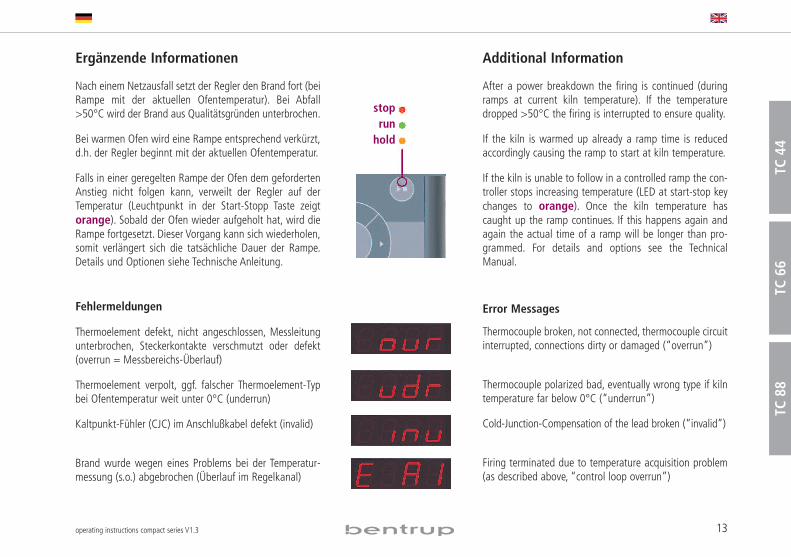
Ergänzende Informationen
Nach einem Netzausfall setzt der Regler den Brand fort (beiRampe mit der aktuellen Ofentemperatur). Bei Abfall>50°C wird der Brand aus Qualitätsgründen unterbrochen.
Bei warmen Ofen wird eine Rampe entsprechend verkürzt,d.h. der Regler beginnt mit der aktuellen Ofentemperatur.
Falls in einer geregelten Rampe der Ofen dem gefordertenAnstieg nicht folgen kann, verweilt der Regler auf derTemperatur (Leuchtpunkt in der Start-Stopp Taste zeigtorange). Sobald der Ofen wieder aufgeholt hat, wird dieRampe fortgesetzt. Dieser Vorgang kann sich wiederholen,somit verlängert sich die tatsächliche Dauer der Rampe.Details und Optionen siehe Technische Anleitung.
Fehlermeldungen
Thermoelement defekt, nicht angeschlossen, Messleitungunterbrochen, Steckerkontakte verschmutzt oder defekt(overrun = Messbereichs-Überlauf)
Thermoelement verpolt, ggf. falscher Thermoelement-Typbei Ofentemperatur weit unter 0°C (underrun)
Kaltpunkt-Fühler (CJC) im Anschlußkabel defekt (invalid)
Brand wurde wegen eines Problems bei der Temperatur-messung (s.o.) abgebrochen (Überlauf im Regelkanal)
Additional Information
After a power breakdown the firing is continued (duringramps at current kiln temperature). If the temperaturedropped >50°C the firing is interrupted to ensure quality.
If the kiln is warmed up already a ramp time is reducedaccordingly causing the ramp to start at kiln temperature.
If the kiln is unable to follow in a controlled ramp the con-troller stops increasing temperature (LED at start-stop keychanges to orange). Once the kiln temperature hascaught up the ramp continues. If this happens again andagain the actual time of a ramp will be longer than pro-grammed. For details and options see the TechnicalManual.
Error Messages
Thermocouple broken, not connected, thermocouple circuitinterrupted, connections dirty or damaged (“overrun”)
Thermocouple polarized bad, eventually wrong type if kilntemperature far below 0°C (“underrun”)
Cold-Junction-Compensation of the lead broken (“invalid”)
Firing terminated due to temperature acquisition problem(as described above, “control loop overrun”)
13operating instructions compact series V1.3
TC44
TC66
TC88
stoprunhold
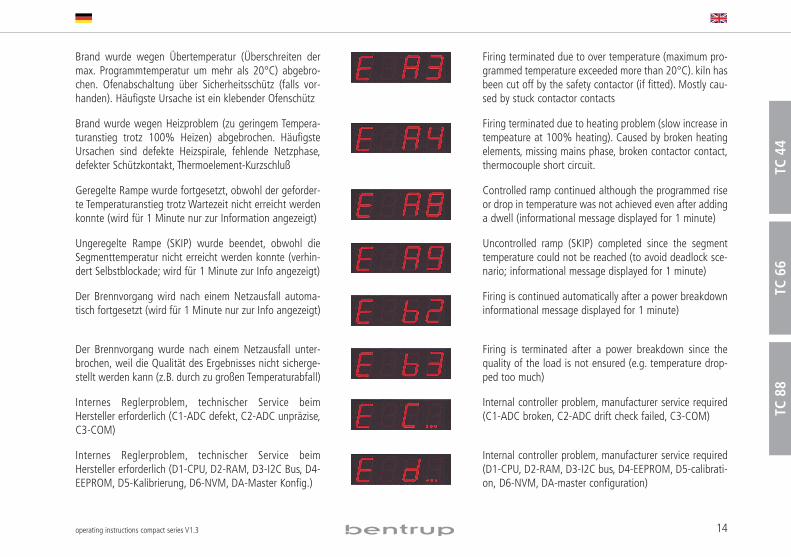
Brand wurde wegen Übertemperatur (Überschreiten dermax. Programmtemperatur um mehr als 20°C) abgebro-chen. Ofenabschaltung über Sicherheitsschütz (falls vor-handen). Häufigste Ursache ist ein klebender Ofenschütz
Brand wurde wegen Heizproblem (zu geringem Tempera-turanstieg trotz 100% Heizen) abgebrochen. HäufigsteUrsachen sind defekte Heizspirale, fehlende Netzphase,defekter Schützkontakt, Thermoelement-Kurzschluß
Geregelte Rampe wurde fortgesetzt, obwohl der geforder-te Temperaturanstieg trotz Wartezeit nicht erreicht werdenkonnte (wird für 1 Minute nur zur Information angezeigt)
Ungeregelte Rampe (SKIP) wurde beendet, obwohl dieSegmenttemperatur nicht erreicht werden konnte (verhin-dert Selbstblockade; wird für 1 Minute zur Info angezeigt)
Der Brennvorgang wird nach einem Netzausfall automa-tisch fortgesetzt (wird für 1 Minute nur zur Info angezeigt)
Der Brennvorgang wurde nach einem Netzausfall unter-brochen, weil die Qualität des Ergebnisses nicht sicherge-stellt werden kann (z.B. durch zu großen Temperaturabfall)
Internes Reglerproblem, technischer Service beimHersteller erforderlich (C1-ADC defekt, C2-ADC unpräzise,C3-COM)
Internes Reglerproblem, technischer Service beimHersteller erforderlich (D1-CPU, D2-RAM, D3-I2C Bus, D4-EEPROM, D5-Kalibrierung, D6-NVM, DA-Master Konfig.)
Firing terminated due to over temperature (maximum pro-grammed temperature exceeded more than 20°C). kiln hasbeen cut off by the safety contactor (if fitted). Mostly cau-sed by stuck contactor contacts
Firing terminated due to heating problem (slow increase intempeature at 100% heating). Caused by broken heatingelements, missing mains phase, broken contactor contact,thermocouple short circuit.
Controlled ramp continued although the programmed riseor drop in temperature was not achieved even after addinga dwell (informational message displayed for 1 minute)
Uncontrolled ramp (SKIP) completed since the segmenttemperature could not be reached (to avoid deadlock sce-nario; informational message displayed for 1 minute)
Firing is continued automatically after a power breakdowninformational message displayed for 1 minute)
Firing is terminated after a power breakdown since thequality of the load is not ensured (e.g. temperature drop-ped too much)
Internal controller problem, manufacturer service required(C1-ADC broken, C2-ADC drift check failed, C3-COM)
Internal controller problem, manufacturer service required(D1-CPU, D2-RAM, D3-I2C bus, D4-EEPROM, D5-calibrati-on, D6-NVM, DA-master configuration)
14operating instructions compact series V1.3
TC44
TC66
TC88
15operating instructions compact series V1.3
TC44
TC66
TC88
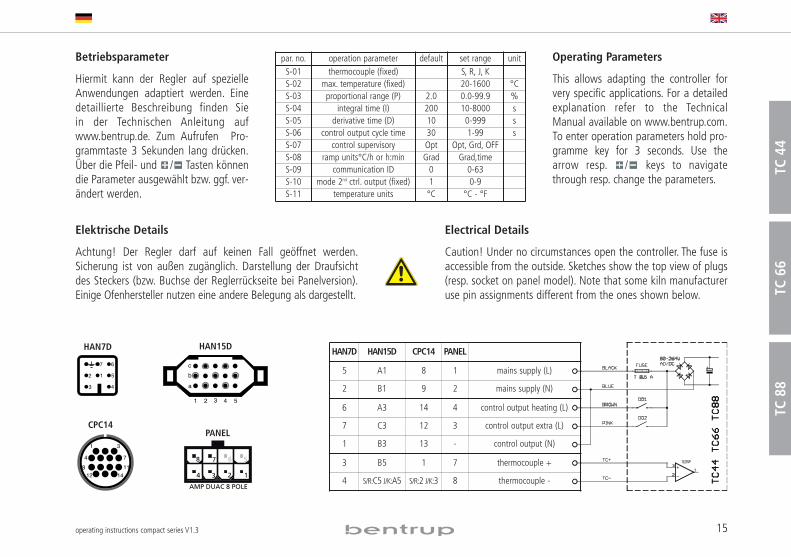
Betriebsparameter
Hiermit kann der Regler auf spezielleAnwendungen adaptiert werden. Einedetaillierte Beschreibung finden Siein der Technischen Anleitung aufwww.bentrup.de. Zum Aufrufen Pro-grammtaste 3 Sekunden lang drücken.Über die Pfeil- und / Tasten könnendie Parameter ausgewählt bzw. ggf. ver-ändert werden.
Elektrische Details
Achtung! Der Regler darf auf keinen Fall geöffnet werden.Sicherung ist von außen zugänglich. Darstellung der Draufsichtdes Steckers (bzw. Buchse der Reglerrückseite bei Panelversion).Einige Ofenhersteller nutzen eine andere Belegung als dargestellt.
Operating Parameters
This allows adapting the controller forvery specific applications. For a detailedexplanation refer to the TechnicalManual available on www.bentrup.com.To enter operation parameters hold pro-gramme key for 3 seconds. Use thearrow resp. / keys to navigatethrough resp. change the parameters.
Electrical Details
Caution! Under no circumstances open the controller. The fuse isaccessible from the outside. Sketches show the top view of plugs(resp. socket on panel model). Note that some kiln manufactureruse pin assignments different from the ones shown below.
par. no. operation parameter default set range unitS-01 thermocouple (fixed) S, R, J, KS-02 max. temperature (fixed) 20-1600 °CS-03 proportional range (P) 2.0 0.0-99.9 %S-04 integral time (I) 200 10-8000 sS-05 derivative time (D) 10 0-999 sS-06 control output cycle time 30 1-99 sS-07 control supervisory Opt Opt, Grd, OFFS-08 ramp units°C/h or h:min Grad Grad,timeS-09 communication ID 0 0-63S-10 mode 2nd ctrl. output (fixed) 1 0-9S-11 temperature units °C °C - °F
6
5
4
12
3
7
HAN7D
31
74118
1412
abc
1 2 3 4 5
CPC14
HAN15D HAN7D HAN15D CPC14 PANEL
5 A1 8 1 mains supply (L)
2 B1 9 2 mains supply (N)
6 A3 14 4 control output heating (L)
7 C3 12 3 control output extra (L)
1 B3 13 - control output (N)
3 B5 1 7 thermocouple +
4 S/R:C5 J/K:A5 S/R:2 J/K:3 8 thermocouple -14 3 2
58 7 6
AMP DUAC 8 POLE
PANEL

operating instructions compact series V1.3(C)2007 bentrup Industriesteuerungen Germany
www.bentrup.com


![Finale 2003 - [Untitled1] · B & & V? &?? b b bbb bbb # # b b b b b b b b b b b c c c c c c c c c c c c c c c c c Bb-Klarinette 1 Bb-Klarinette 2 Horn in F 1 Horn in F 2 Bb-Trompete](https://img.pdfslide.org/doc/110x75/5ed198800fa647477a71b28d/finale-2003-untitled1-b-v-b-b-bbb-bbb-b-b-b-b-b-b-b.jpg)

![Finale 2009 - [Yastay 1m]...ã? bb bb bb bb # # # b b bb bb bb bb c c c c c c c c c c c c c c c c c c c c c c c c c c Piccolo Flute Oboe Bassoon Clarinet in E b Clarinet in B b 1 Clarinet](https://img.pdfslide.org/doc/110x75/60f0f71674ede25d5b42e26b/finale-2009-yastay-1m-bb-bb-bb-bb-b-b-bb-bb-bb-bb-c-c-c-c-c-c.jpg)