Embed Size (px)
DESCRIPTION
Bedienungsanleitung
Citation preview
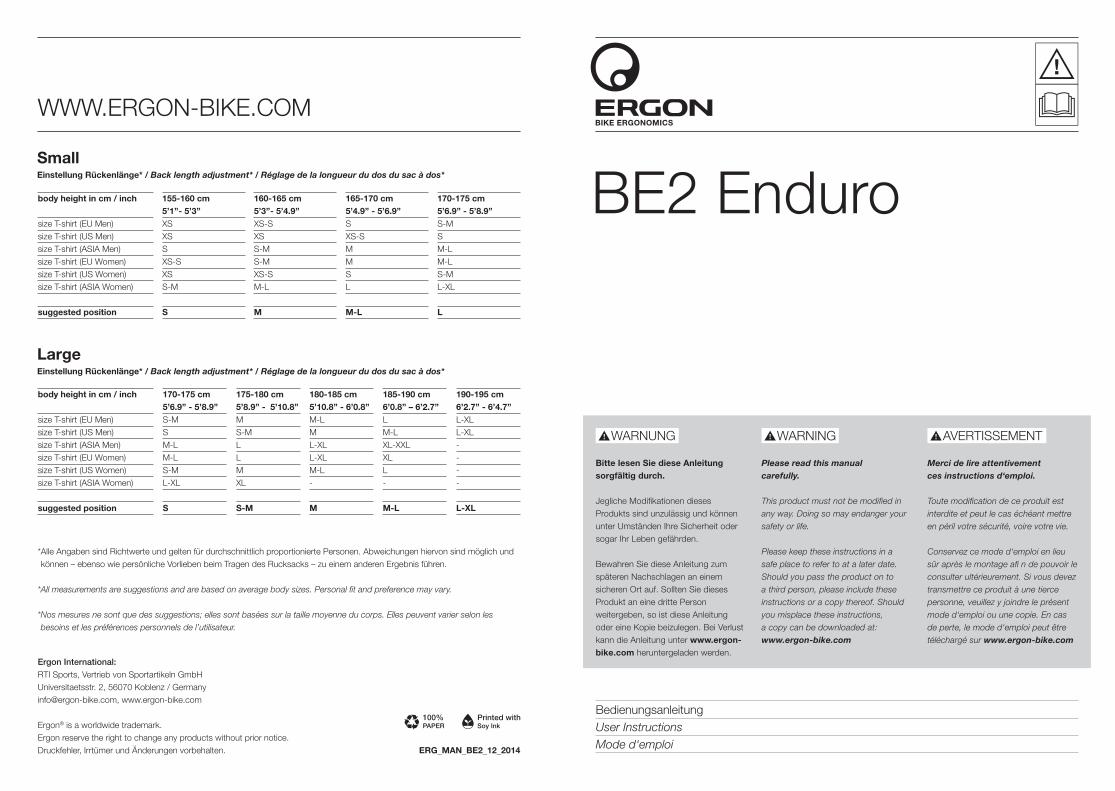
BE2 EnduroSmallEinstellung Rückenlänge* / Back length adjustment* / Réglage de la longueur du dos du sac à dos*
LargeEinstellung Rückenlänge* / Back length adjustment* / Réglage de la longueur du dos du sac à dos*
body height in cm / inch size T-shirt (EU Men)size T-shirt (US Men) size T-shirt (ASIA Men)size T-shirt (EU Women)size T-shirt (US Women)size T-shirt (ASIA Women)
suggested position
160-165 cm 5’3’’- 5’4.9’’XS-SXSS-MS-MXS-SM-L
M
165-170 cm 5’4.9’’ - 5’6.9’’SXS-SMMSL
M-L
155-160 cm 5’1’’- 5’3’’XSXSSXS-SXSS-M
S
170-175 cm 5’6.9’’ - 5’8.9’’S-MSM-LM-LS-ML-XL
L
body height in cm / inch size T-shirt (EU Men)size T-shirt (US Men)size T-shirt (ASIA Men)size T-shirt (EU Women)size T-shirt (US Women)size T-shirt (ASIA Women)
suggested position
175-180 cm 5’8.9’’ - 5’10.8’’MS-MLLMXL
S-M
180-185 cm 5’10.8’’ - 6’0.8’’M-LML-XLL-XLM-L-
M
170-175 cm 5’6.9’’ - 5’8.9’’S-MSM-LM-LS-ML-XL
S
185-190 cm 6’0.8’’ – 6’2.7’’LM-LXL-XXLXLL-
M-L
190-195 cm 6’2.7’’ - 6’4.7’’L-XLL-XL----
L-XL
Ergon International:RTI Sports, Vertrieb von Sportartikeln GmbHUniversitaetsstr. 2, 56070 Koblenz / [email protected], www.ergon-bike.com
Ergon® is a worldwide trademark.Ergon reserve the right to change any products without prior notice.Druckfehler, Irrtümer und Änderungen vorbehalten. ERG_MAN_BE2_12_2014
WWW.ERGON-BIKE.COM
BedienungsanleitungUser InstructionsMode d‘emploi
* Alle Angaben sind Richtwerte und gelten für durchschnittlich proportionierte Personen. Abweichungen hiervon sind möglich und können – ebenso wie persönliche Vorlieben beim Tragen des Rucksacks – zu einem anderen Ergebnis führen.
* All measurements are suggestions and are based on average body sizes. Personal fit and preference may vary.
* Nos mesures ne sont que des suggestions; elles sont basées sur la taille moyenne du corps. Elles peuvent varier selon les
besoins et les préférences personnels de l’utilisateur.
AVERTISSEMENT
Bitte lesen Sie diese Anleitung sorgfältig durch.
Jegliche Modifikationen dieses Produkts sind unzulässig und können unter Umständen Ihre Sicherheit oder sogar Ihr Leben gefährden.
Bewahren Sie diese Anleitung zum späteren Nachschlagen an einem sicheren Ort auf. Sollten Sie dieses Produkt an eine dritte Person weitergeben, so ist diese Anleitung oder eine Kopie beizulegen. Bei Verlust kann die Anleitung unter www.ergon-bike.com heruntergeladen werden.
Please read this manualcarefully.
This product must not be modified in
any way. Doing so may endanger your
safety or life.
Please keep these instructions in a
safe place to refer to at a later date.
Should you pass the product on to
a third person, please include these
instructions or a copy thereof. Should
you misplace these instructions,
a copy can be downloaded at:
www.ergon-bike.com
Merci de lire attentivementces instructions d‘emploi.
Toute modification de ce produit est
interdite et peut le cas échéant mettre
en péril votre sécurité, voire votre vie.
Conservez ce mode d‘emploi en lieu
sûr après le montage afi n de pouvoir le
consulter ultérieurement. Si vous devez
transmettre ce produit à une tierce
personne, veuillez y joindre le présent
mode d‘emploi ou une copie. En cas
de perte, le mode d‘emploi peut être
téléchargé sur www.ergon-bike.com
WARNUNG
4Ergon BikE Ergonomics3
DE DE
Es ist wichtig, diese Gebrauchsanleitung gelesen und verstanden zu haben, bevor Sie den BE2 Enduro verwenden. Außerdem sollten Sie sich der mit der Aktivität verbundenen Verletzungs- und Todesrisiken bewusst sein.
Erklärung Zeichen / Symbole in dieser Anleitung:Schenken Sie den folgenden Symbolen besondere Beachtung bei der Montage.
Warnung: Dieses Symbol verweist auf eine sicherheitsrelevante Information, deren Nichtbefolgen Ihr Leben / Ihre Gesundheit gefährden kann.
Information: Dieses Symbol kennzeichnet Zusatzinformationen, z.B. über die Handhabung des Produkts.
Die oben geschilderten möglichen Konsequenzen werden in der Anleitung nicht immer wieder geschildert, wenn diese Symbole auftauchen.
Die Vorteile des Rucksacks BE2 EnduroDas Ergon Entwicklungsteam hat nach verschiedenen Ansätzen ein einzigartiges Gurtsystem entwickelt, welches sich automatisch den anatomischen Gegebenheiten des Trägers anpasst. So richten sich die Schulter gurte sowie der Hüftgurt ohne weitere Ein-stellungen am natürlichen Winkel der Schultern bzw. der Hüfte aus. Durch eine 4-fache Rückenlängenverstellung ergibt sich ein vollkommen neuer, individueller Tragekomfort.
Eine weitere große Innovation stellt die Last-Kompression über das Tragesystem dar. Die beiden Schultergurte sind entlang der Unter seite des Rucksacks miteinander verbunden. Dieses intelligente Konzept gewährt stets einen körpernahen Transport des mitge führten Equipments. Konstruktionsbedingt sitzt der Rucksack deutlich stabiler und näher am Rücken als herkömmliche Rucksäcke.
Darüber hinaus beinhaltet der Rucksack BE2 Enduro serienmäßig die 1,5 Liter Trink blase Ergon BH150, sowie ein stabilisierendes Formteil aus Schaumstoff, welches durch den separat erhältlichen Rücken-Protektor BP100 ersetzt werden kann.
1,5 Liter Trinkblase BH150(inklusive)
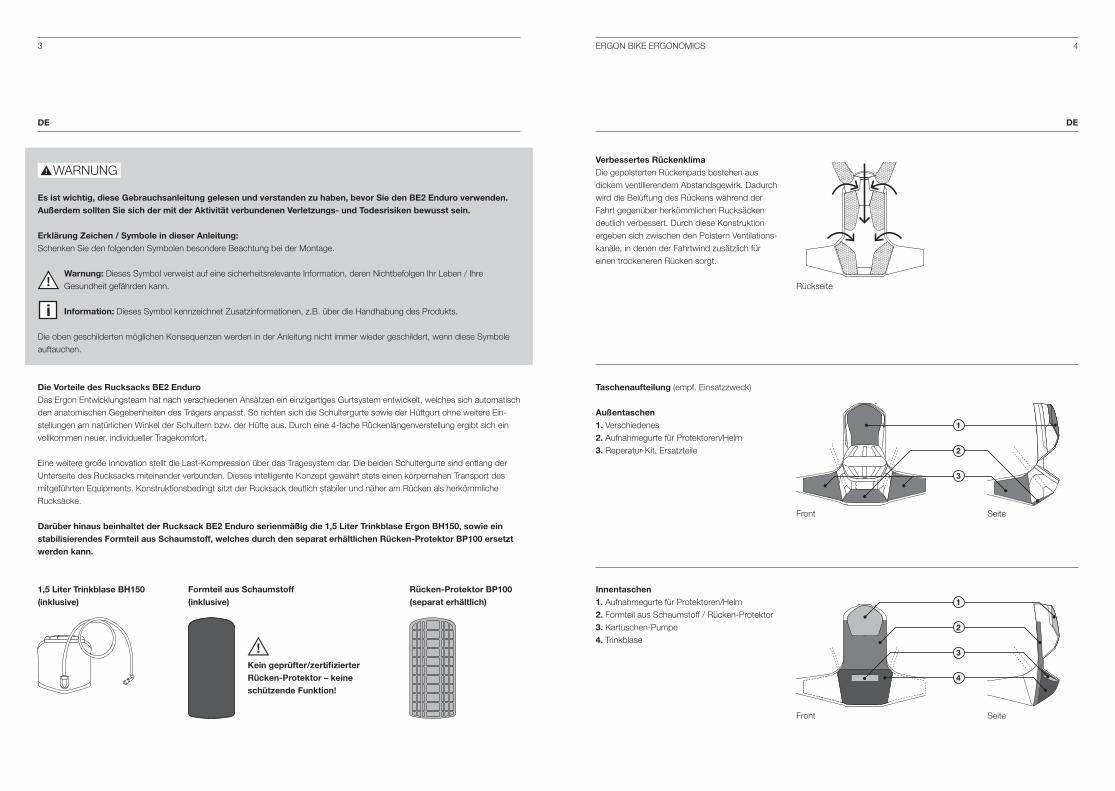
Taschenaufteilung (empf. Einsatzzweck)
Außentaschen1. Verschiedenes2. Aufnahmegurte für Protektoren/Helm3. Reperatur-Kit, Ersatzteile
Seite
Innentaschen1. Aufnahmegurte für Protektoren/Helm2. Formteil aus Schaumstoff / Rücken-Protektor3. Kartuschen-Pumpe4. Trinkblase
1
2
3
Front
Front
Verbessertes RückenklimaDie gepolsterten Rückenpads bestehen aus dickem ventilierendem Abstandsgewirk. Dadurch wird die Belüftung des Rückens während der Fahrt gegenüber herkömmlichen Rucksäcken deutlich verbessert. Durch diese Konstruktion ergeben sich zwischen den Polstern Ventilations-kanäle, in denen der Fahrtwind zusätzlich für einen trockeneren Rücken sorgt.
WARNUNG
1
2
3
4
Seite
Rückseite
Formteil aus Schaumstoff(inklusive)
Rücken-Protektor BP100(separat erhältlich)
Kein geprüfter/zertifizierter Rücken-Protektor – keine schützende Funktion!
6Ergon BikE Ergonomics5
DE DE
Einstellung der Rückenlänge
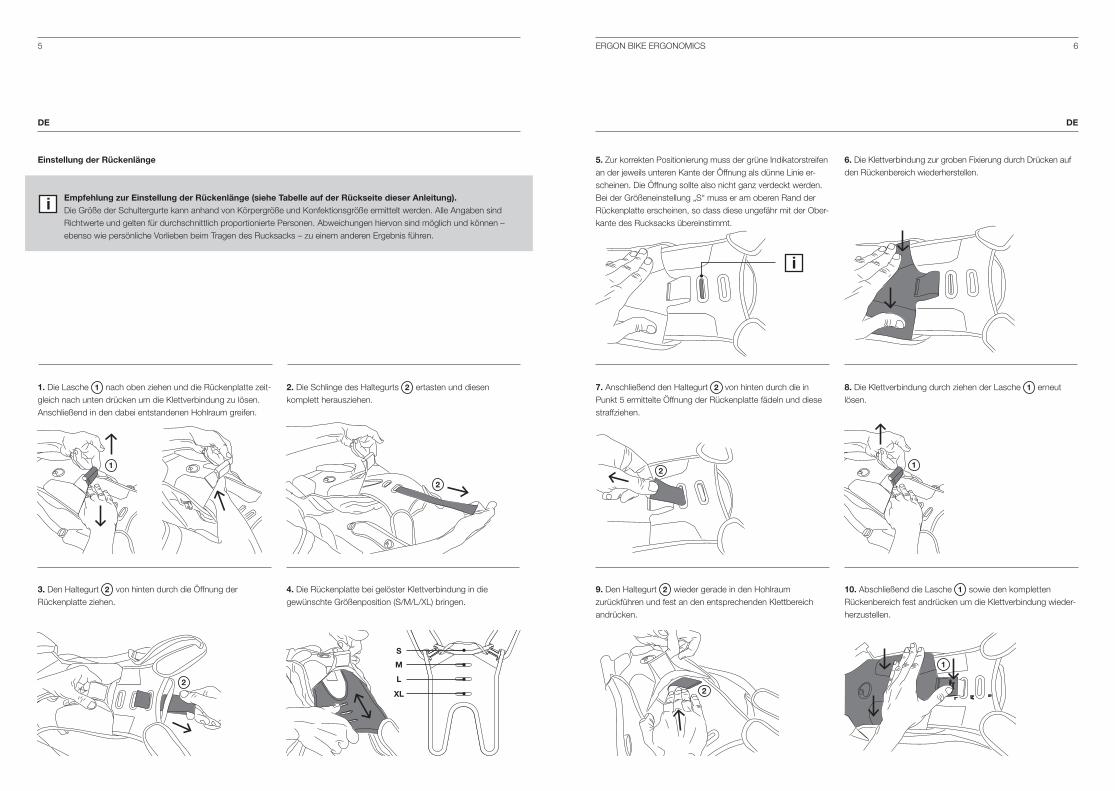
1. Die Lasche 1 nach oben ziehen und die Rückenplatte zeit-gleich nach unten drücken um die Klettverbindung zu lösen. Anschließend in den dabei entstandenen Hohlraum greifen.
2. Die Schlinge des Haltegurts 2 ertasten und diesen komplett herausziehen.
3. Den Haltegurt 2 von hinten durch die Öffnung derRückenplatte ziehen.
4. Die Rückenplatte bei gelöster Klettverbindung in die gewünschte Größenposition (S/M/L/XL) bringen.
7. Anschließend den Haltegurt 2 von hinten durch die in Punkt 5 ermittelte Öffnung der Rücken platte fädeln und diese straffziehen.
8. Die Klettverbindung durch ziehen der Lasche 1 erneut lösen.
9. Den Haltegurt 2 wieder gerade in den Hohlraum zurück führen und fest an den entsprechenden Klettbereich andrücken.
6. Die Klettverbindung zur groben Fixierung durch Drücken auf den Rückenbereich wiederherstellen.
Empfehlung zur Einstellung der Rückenlänge (siehe Tabelle auf der Rückseite dieser Anleitung).Die Größe der Schultergurte kann anhand von Körpergröße und Konfektionsgröße ermittelt werden. Alle Angaben sind Richtwerte und gelten für durchschnittlich proportionierte Personen. Abweichungen hiervon sind möglich und können – ebenso wie persönliche Vorlieben beim Tragen des Rucksacks – zu einem anderen Ergebnis führen.
10. Abschließend die Lasche 1 sowie den kompletten Rückenbereich fest andrücken um die Klettverbindung wieder-herzustellen.
SML
S
M
L
XL
1
2
2
21
2
1
5. Zur korrekten Positionierung muss der grüne Indikatorstreifen an der jeweils unteren Kante der Öffnung als dünne Linie er-scheinen. Die Öffnung sollte also nicht ganz verdeckt werden. Bei der Größeneinstellung „S“ muss er am oberen Rand der Rückenplatte erscheinen, so dass diese ungefähr mit der Ober-kante des Rucksacks übereinstimmt.

8Ergon BikE Ergonomics7
DE DE
AnprobeLösen Sie die Schultergurte etwas und setzen Sie den Ruck-sack auf. Schließen Sie den Hüftgurt. Die optimale Gewichts-verteilung wird erreicht, wenn die Oberkante des Hüftgurtes entlang der Oberkante des Becken knochens (+/– 3 cm) verläuft und die Hüfte fest umschließt (nicht den Bauch!) (Abb.1). Spannen Sie nun die Schultergurte bis diese ohne großen Druck am Körper anliegen. Setzen Sie sich auf Ihr
Fahrrad oder in ähnlicher Weise auf einen Stuhl in Fahrpositi-on und überprüfen Sie die Position der farbigen Justiermarke auf den Schultergurten wie folgt: Schultergurtgröße und Rückenlänge sind richtig, wenn Ihr Schlüsselbeinknochen den Schultergurt im Bereich der farbigen Justiermarke kreuzt (Abb.2). Wenn dies nicht der Fall ist, stellen Sie bitte die Rückenlänge neu ein.
Automatische Anpassung an die SchulterneigungDurch die zwei D-Ringe, mit denen die Schultergurte befestigt sind, passt sich das Tragesystem automatisch an die Schul ter-form an. Durch Festziehen der Gurte wird diese Position fixiert.
Trinkblase / TrinkschlauchÖffnen Sie das Trinkblasenfach und positionieren Sie die befüllte Trinkblase. Den Schlauch in seiner vollen Länge von innen durch eine der beiden Öffnungen 1 aus dem Trinkblasenfach führen und anschließend durch die gezeigten Laschen 2 bis 4 (Abb. 2) fädeln.
Durch Öffnen des Hauptfachs gelangen Sie an die Rücken-Protektortasche (Abb.2). Um diesen zu entfernen – z.B. beim Austausch eines durch einen Sturz beschädigten Protektors – lösen Sie die Klettlasche und ziehen Sie den Protektor aus der Tasche (Abb.3). Anschließend den neuen Protektor
komplett in die Tasche stecken, dabei auf einen korrekten Sitz achten und die Klettlasche wieder schließen. Achtung: Die schwarze Seite des Rücken-Protektors zeigt immer zum Rücken des Trägers (Abb.1).
Rücken-Protektor BP100 (separat erhältlich)
Abb. 1 Abb. 2
Abb. 1 Abb. 2
Die schwarze Seite des Rücken-Protektors zeigt in Richtung Rücken des Fahrers.
Abb. 1 Abb. 2 Abb. 3
1
2
3
4
Unbedingt die Anleitung des Rücken-Protektors BP100 lesen.
10Ergon BikE Ergonomics9
DE DE
Tipps zum Packen und GewichtsverteilungPacken Sie die schwersten Ausrüstungsgegenstände möglichst nahe am unteren Rücken entlang – davor die leichteren Sachen.Außen am Rucksack sollten nur ganz leichte Dinge wie etwa Helm oder Ähnliches verstaut werden.
Reinigung und PflegeReinigen und trocknen Sie Ihren Ergon Rucksack gründlich nach jedem Gebrauch. Nehmen Sie dazu kaltes bis handwarmes Wasser und einen weichen Schwamm. Wischen Sie die Innenseite des Rucksacks mit einem feuchten Tuch ab, um die Beschich-tung zu schonen. Verwenden Sie kein heißes Wasser, Bleiche, Geschirrspülmittel, Einweichlösungen oder Fleckenreiniger. Bei starker Verschmutzung sind ausschließlich detergentienfreie Seifen zu verwenden. Verwenden Sie auf keinen Fall Lösungsmittel zur Reinigung Ihres Ergon Rucksacks, da diese die Wasserbeständigkeit des Gewebes irreparabel beschädigen können. Durch die Verwendung von Lösungsmitteln erlöschen jegliche Gewährleistungs- und Garantieansprüche. Zum Trocknen hängen Sie den Rucksack in geöffnetem Zustand an einem luftigen und schattigen Ort auf und lassen ihn vollständig trocknen. Der Rucksack ist nicht für Waschmaschinen und Trockner geeignet.
Hinweis Der Rucksack ist wasserabweisend, jedoch nicht 100 % wasserdicht! Wir empfehlen elektronische Geräte separat zu ver packen.
Lagerung Lagern Sie Ihren Ergon Rucksack nie, wenn er feucht oder schmutzig ist, da sich sonst Schimmel auf dem Gewebe bilden kann. Schäden durch Schimmel führen zu Geruchsbildung und können nicht behoben werden. Bewahren Sie Ihren Rucksack an einem kühlen, trockenen Ort auf und schützen Sie ihn vor direkter Sonneneinstrahlung.
SachmängelhaftungWährend der ersten zwei Jahre nach dem Kauf dieses Produkts haben Sie vollen Anspruch auf die gesetzliche Sachmängel-haftung (vormals Gewährleistung). Sollten Mängel auftreten, wenden Sie sich bitte unter Vorlage des Kaufbelegs an Ihren Ergon-Fachhändler. Ein Gewährleistungsanspruch ist nach einem unsachgemäßen Gebrauch (Modifikation des Produktes, Nichteinhalten der Warnhinweise dieser Anleitung) nicht gegeben.
Detailliertere Informationen zur Sachmängelhaftung / Reklamation finden Sie online unter www.ergonbike.com/warranty oder einfach QR-Code scannen.
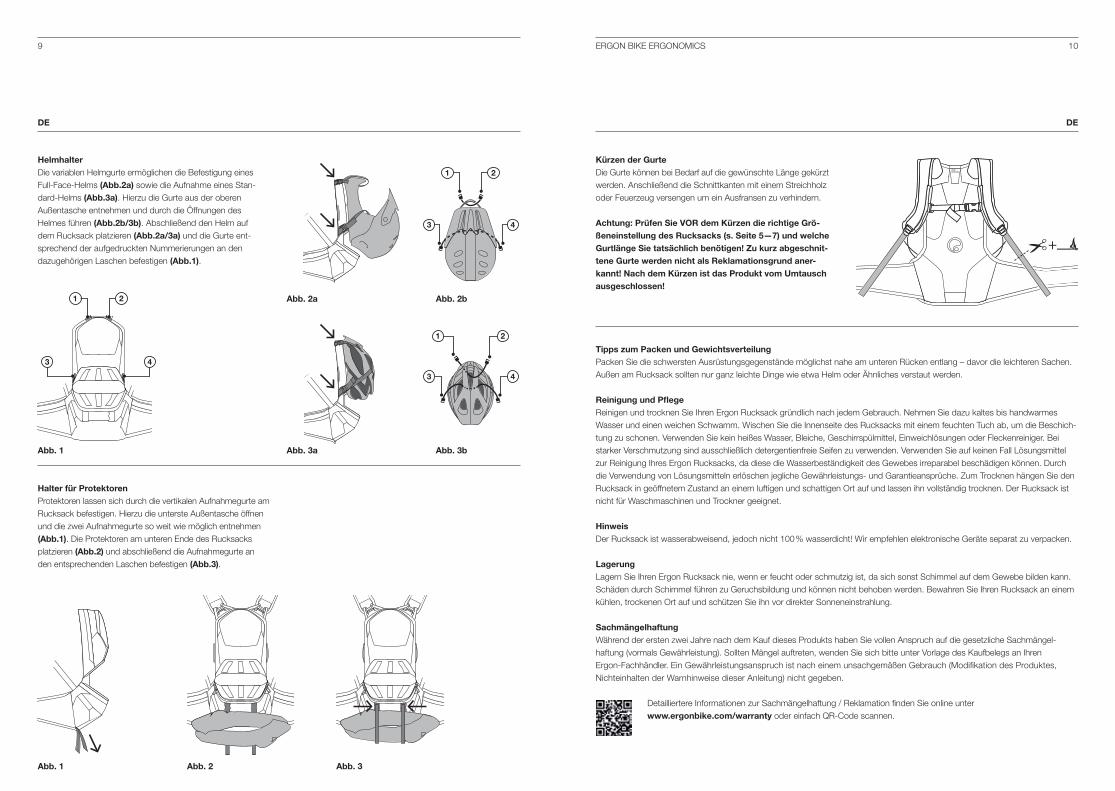
HelmhalterDie variablen Helmgurte ermöglichen die Befestigung eines Full-Face-Helms (Abb.2a) sowie die Aufnahme eines Stan-dard-Helms (Abb.3a). Hierzu die Gurte aus der oberen Außentasche entnehmen und durch die Öffnungen des Helmes führen (Abb.2b/3b). Abschließend den Helm auf dem Rucksack platzieren (Abb.2a/3a) und die Gurte ent-sprechend der aufgedruckten Nummerierungen an den dazugehörigen Laschen befestigen (Abb.1).
Halter für ProtektorenProtektoren lassen sich durch die vertikalen Aufnahmegurte am Rucksack befestigen. Hierzu die unterste Außentasche öffnen und die zwei Aufnahmegurte so weit wie möglich entnehmen (Abb.1). Die Protektoren am unteren Ende des Rucksacks platzieren (Abb.2) und abschließend die Aufnahmegurte an den entsprechenden Laschen befestigen (Abb.3).
1
3 4
2
1 2
3 4
1 2
3 4
Abb. 1
Abb. 2a
Abb. 3a
Abb. 2b
Abb. 3b
Abb. 1 Abb. 2 Abb. 3
Kürzen der GurteDie Gurte können bei Bedarf auf die gewünschte Länge gekürzt werden. Anschließend die Schnittkanten mit einem Streichholz oder Feuerzeug versengen um ein Ausfransen zu verhindern.
Achtung: Prüfen Sie VOR dem Kürzen die richtige Grö -ßen einstellung des Rucksacks (s. Seite 5—7) und welche Gurtlänge Sie tatsächlich benötigen! Zu kurz abgeschnit-tene Gurte werden nicht als Reklamationsgrund aner-kannt! Nach dem Kürzen ist das Produkt vom Umtausch ausgeschlossen!
+
12Ergon BikE Ergonomics11
ENEN
It is important to have read and understood these instructions before using the BE2 Enduro. You should also be aware of the risk of injury and death associated with the activity.
Explanation of signs / symbols used in these instructions.Please pay particular attention to the following symbols when mounting the product.
Warning: Failure to follow the warning notices in these instructions could lead to injury or endanger your life.
Information: This symbol indicates additional information, for example about how to handle the product.
The explanation here serves as a description of the possible consequences of not following the instructions. These consequences wont always be repeated when the symbols are used..
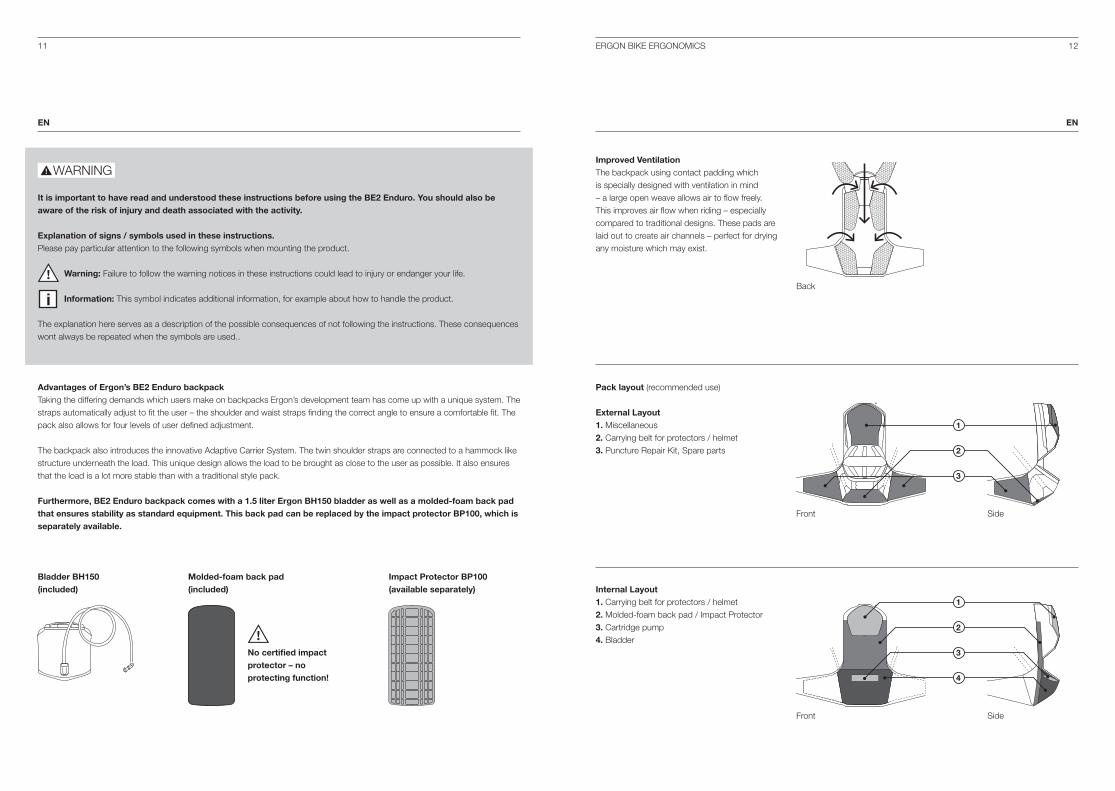
Advantages of Ergon’s BE2 Enduro backpackTaking the differing demands which users make on backpacks Ergon’s development team has come up with a unique system. The straps automatically adjust to fit the user – the shoulder and waist straps finding the correct angle to ensure a comfortable fit. The pack also allows for four levels of user defined adjustment. The backpack also introduces the innovative Adaptive Carrier System. The twin shoulder straps are connected to a hammock like structure underneath the load. This unique design allows the load to be brought as close to the user as possible. It also ensures that the load is a lot more stable than with a traditional style pack.
Furthermore, BE2 Enduro backpack comes with a 1.5 liter Ergon BH150 bladder as well as a molded-foam back pad that ensures stability as standard equipment. This back pad can be replaced by the impact protector BP100, which is separately available.
Pack layout (recommended use)
External Layout1. Miscellaneous2. Carrying belt for protectors / helmet3. Puncture Repair Kit, Spare parts
Side
Internal Layout1. Carrying belt for protectors / helmet2. Molded-foam back pad / Impact Protector3. Cartridge pump4. Bladder
Front
Front
Improved VentilationThe backpack using contact padding which is specially designed with ventilation in mind – a large open weave allows air to flow freely. This improves air flow when riding – especially compared to traditional designs. These pads are laid out to create air channels – perfect for drying any moisture which may exist.
Side
Back
Bladder BH150(included)
Molded-foam back pad(included)
Impact Protector BP100(available separately)
No certified impact protector – no protecting function!
1
2
3
1
2
3
4
14Ergon BikE Ergonomics13
Adjusting the back length
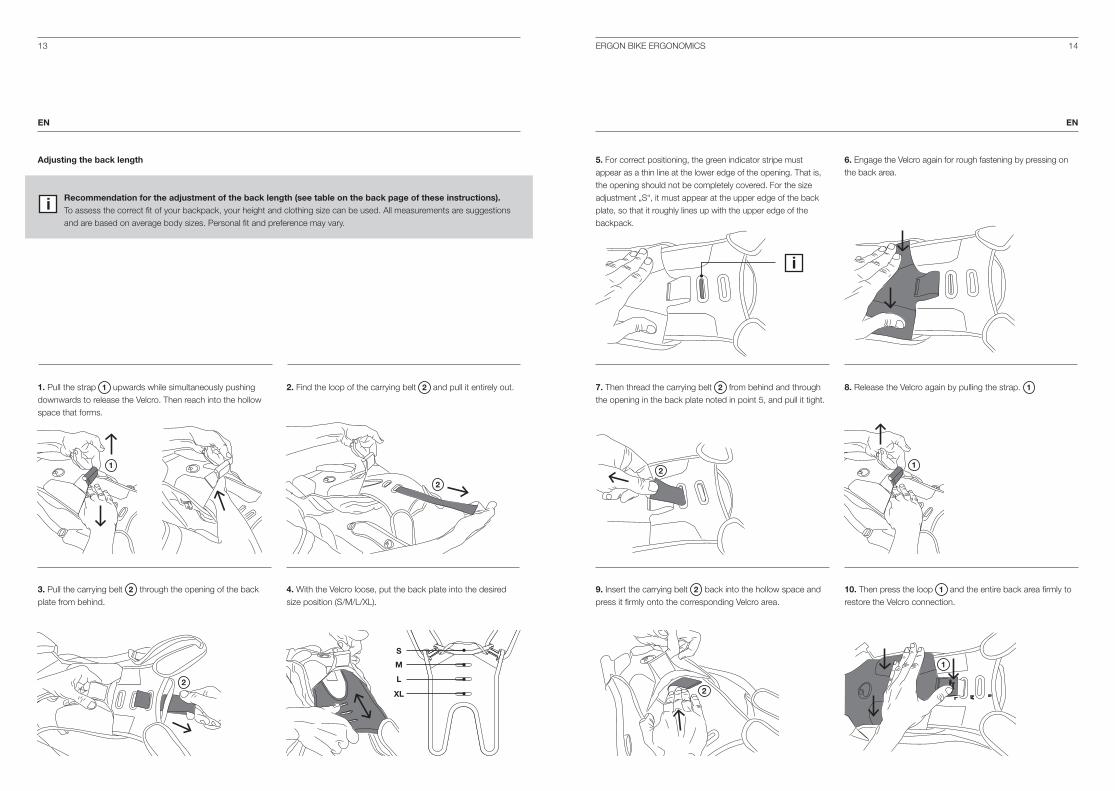
1. Pull the strap 1 upwards while simultaneously pushing downwards to release the Velcro. Then reach into the hollow space that forms.
2. Find the loop of the carrying belt 2 and pull it entirely out.
3. Pull the carrying belt 2 through the opening of the back plate from behind.
4. With the Velcro loose, put the back plate into the desired size position (S/M/L/XL).
8. Release the Velcro again by pulling the strap. 1
5. For correct positioning, the green indicator stripe must appear as a thin line at the lower edge of the opening. That is, the opening should not be completely covered. For the size adjustment „S“, it must appear at the upper edge of the back plate, so that it roughly lines up with the upper edge of the backpack.
6. Engage the Velcro again for rough fastening by pressing on the back area.
Recommendation for the adjustment of the back length (see table on the back page of these instructions).To assess the correct fit of your backpack, your height and clothing size can be used. All measurements are suggestions and are based on average body sizes. Personal fit and preference may vary.
10. Then press the loop 1 and the entire back area firmly to restore the Velcro connection.
SML
S
M
L
XL
1
2
2
21
2
1
ENEN
7. Then thread the carrying belt 2 from behind and through the opening in the back plate noted in point 5, and pull it tight.
9. Insert the carrying belt 2 back into the hollow space and press it firmly onto the corresponding Velcro area.
16Ergon BikE Ergonomics15
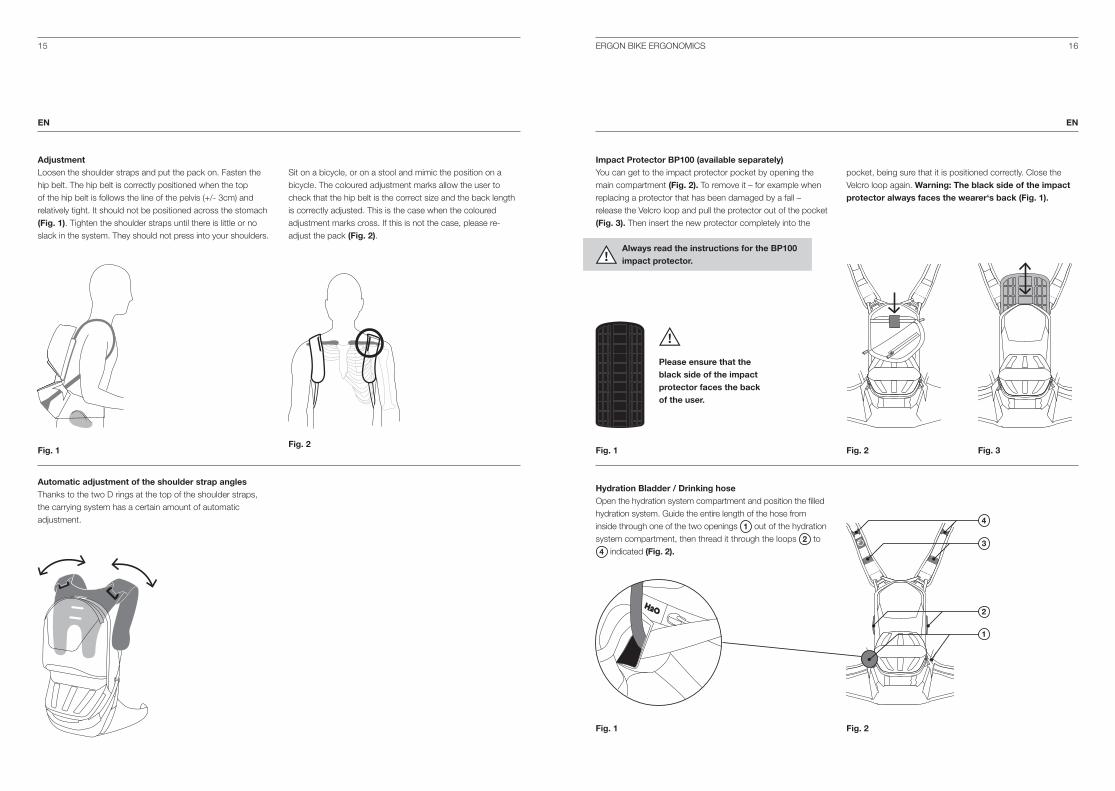
AdjustmentLoosen the shoulder straps and put the pack on. Fasten the hip belt. The hip belt is correctly positioned when the top of the hip belt is follows the line of the pelvis (+/- 3cm) and relatively tight. It should not be positioned across the stomach (Fig. 1). Tighten the shoulder straps until there is little or no slack in the system. They should not press into your shoulders.
Sit on a bicycle, or on a stool and mimic the position on a bicycle. The coloured adjustment marks allow the user to check that the hip belt is the correct size and the back length is correctly adjusted. This is the case when the coloured adjustment marks cross. If this is not the case, please re-adjust the pack (Fig. 2).
Automatic adjustment of the shoulder strap anglesThanks to the two D rings at the top of the shoulder straps, the carrying system has a certain amount of automatic adjustment.
Hydration Bladder / Drinking hoseOpen the hydration system compartment and position the filled hydration system. Guide the entire length of the hose from inside through one of the two openings 1 out of the hydrationsystem compartment, then thread it through the loops 2 to 4 indicated (Fig. 2).
You can get to the impact protector pocket by opening the main compartment (Fig. 2). To remove it – for example when replacing a protector that has been damaged by a fall – release the Velcro loop and pull the protector out of the pocket (Fig. 3). Then insert the new protector completely into the
pocket, being sure that it is positioned correctly. Close the Velcro loop again. Warning: The black side of the impact protector always faces the wearer‘s back (Fig. 1).
Impact Protector BP100 (available separately)
Fig. 1Fig. 2
Always read the instructions for the BP100 impact protector.
Please ensure that the black side of the impact protector faces the back of the user.
Fig. 1 Fig. 2 Fig. 3
ENEN
Fig. 1 Fig. 2
1
2
3
4
18Ergon BikE Ergonomics17
Tips for packing the bag and weight distributionPack heavy articles first (so they are at the bottom of the pack). Only pack lightweight items (such as a helmet or rain jacket) using the helmet holder.
Cleaning and maintenanceClean and dry your pack after each use to keep it in top condition. Use only luke warm water and a soft sponge. Wipe the pack internally with a damp cloth – this protects the coating on the fabric. Do not use hot water, bleach, washing up liquid, solvents, paint or stain removers. For stubborn stains use a detergent free soap. Use of solvents on your backpack will damage the water resistant coating irreparably. Failure to follow these instructions will result in an invalidated warranty. To dry, hang the open pack in a cool, dry, well ventilated place out of direct sunlight. The backpack may not be machine washed or dried.
Note The backpack is water resistant, however not 100% waterproof. We recommend packing electronics in a separate waterproof container.
Storage Never put an Ergon backpack away wet or dirty. This could lead to mould – which can damage the fabrics and cause unpleasant smells. Store the pack in a cool, dry place out of direct sunlight.
WarrantyErgon warrants to the original retail purchaser that this product is free from defects in material and workmanship for (2) two years from the date of original retail purchase. If you have any cause to return the product please take it to a specialist bicycle retailer together with proof of purchase. The product warranty does not cover modified products, or products used in a way not intended or set out in this document. Failure to follow all instructions will invalidate the warranty.
Please see the current full warranty policy at www.ergonbike.com/warrantyor scan QR-code for details.
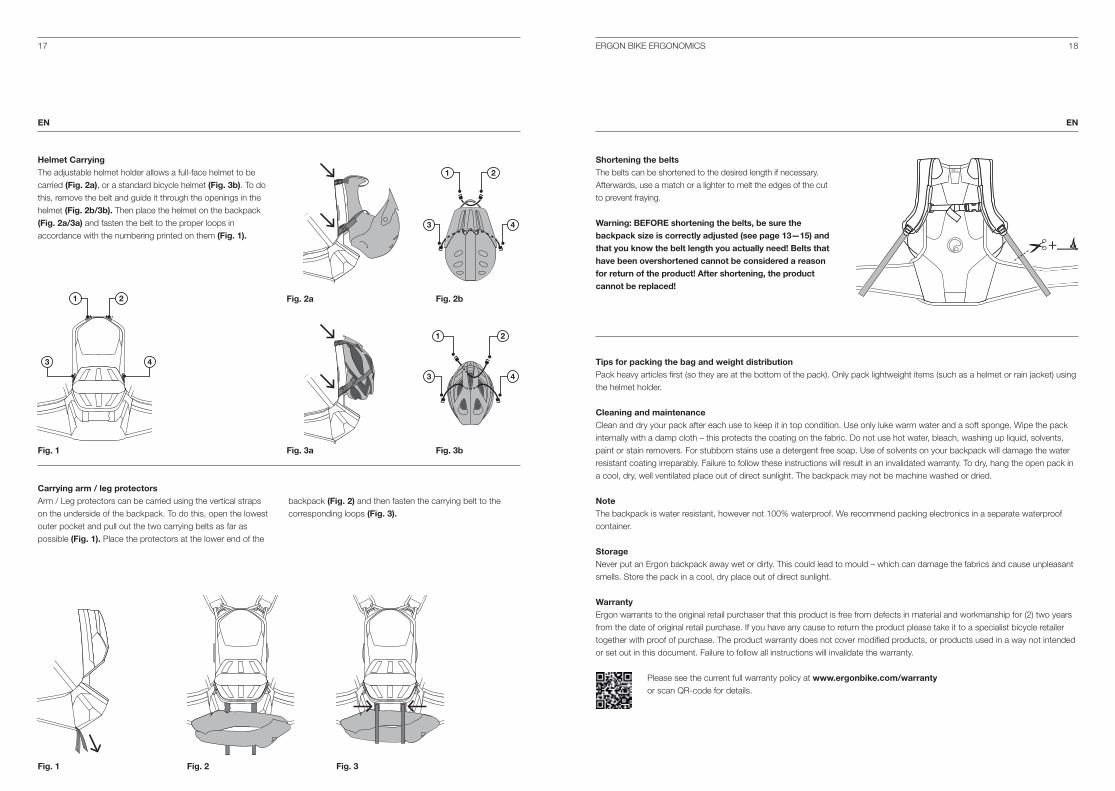
Helmet CarryingThe adjustable helmet holder allows a full-face helmet to be carried (Fig. 2a), or a standard bicycle helmet (Fig. 3b). To do this, remove the belt and guide it through the openings in the helmet (Fig. 2b/3b). Then place the helmet on the backpack (Fig. 2a/3a) and fasten the belt to the proper loops in accordance with the numbering printed on them (Fig. 1).
Carrying arm / leg protectorsArm / Leg protectors can be carried using the vertical straps on the underside of the backpack. To do this, open the lowest outer pocket and pull out the two carrying belts as far as possible (Fig. 1). Place the protectors at the lower end of the
backpack (Fig. 2) and then fasten the carrying belt to the corresponding loops (Fig. 3).
1 2
3 4
1 2
3 4
Fig. 1
Fig. 2a
Fig. 3a
Fig. 2b
Fig. 3b
Fig. 1 Fig. 2 Fig. 3
ENEN
Shortening the beltsThe belts can be shortened to the desired length if necessary. Afterwards, use a match or a lighter to melt the edges of the cut to prevent fraying.
Warning: BEFORE shortening the belts, be sure the backpack size is correctly adjusted (see page 13—15) and that you know the belt length you actually need! Belts that have been overshortened cannot be considered a reason for return of the product! After shortening, the product cannot be replaced!
+
1
3 4
2
20Ergon BikE Ergonomics19
Il est primordial d‘avoir lu et compris ces instructions d‘emploi avant d‘utiliser la BE2 Enduro. En outre, vous devriez avoir conscience des risques de blessures et de mort liés à votre activité.
Explication des caractères / symboles dans le présent mode d‘emploi:lors du montage, accordez une attention particulière aux symboles suivants.
Avertissement: Le non-respect des avertissements présents dans ce mode d’emploi peut entraîner des blessures graves ou mortelles.
Information : ce symbole fait référence à des informations supplémentaires, p. ex. sur la manipulation du produit.
Les conséquences éventuelles qui sont décrites ci-dessus ne sont pas toujours expliquées dans le mode d‘emploi quand ces symboles apparaissent.
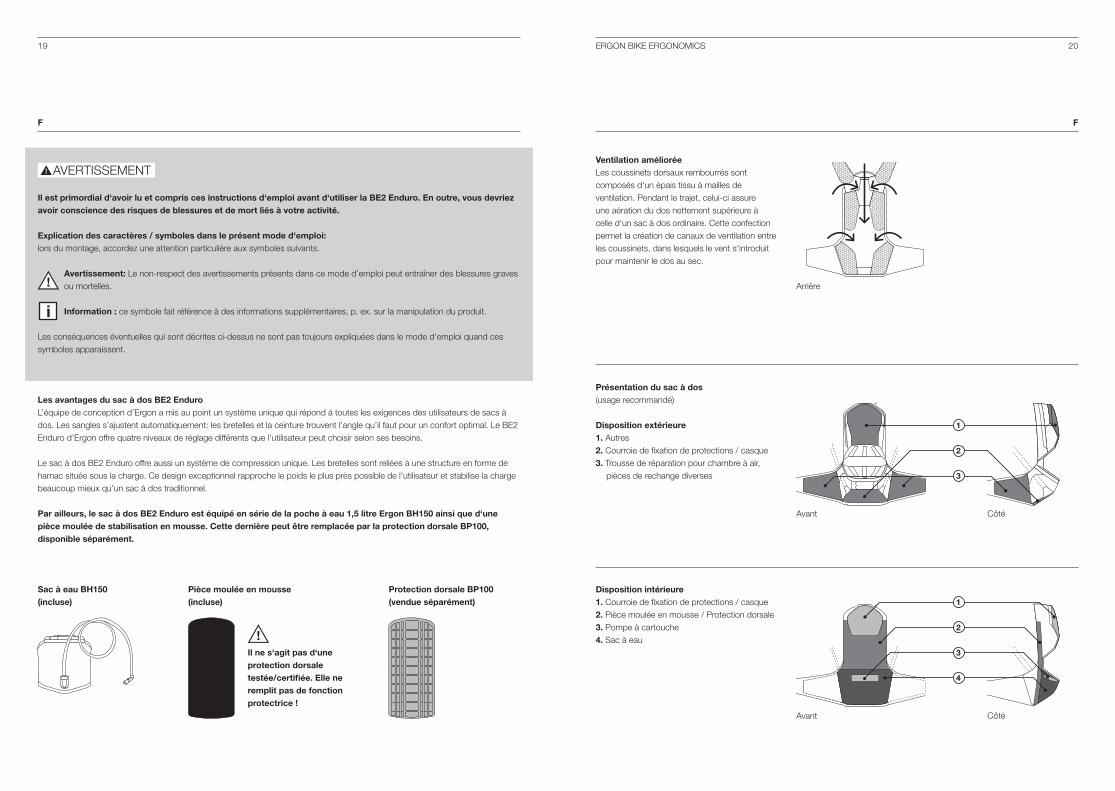
Les avantages du sac à dos BE2 EnduroL’équipe de conception d’Ergon a mis au point un système unique qui répond à toutes les exigences des utilisateurs de sacs à dos. Les sangles s’ajustent automatiquement: les bretelles et la ceinture trouvent l’angle qu’il faut pour un confort optimal. Le BE2 Enduro d’Ergon offre quatre niveaux de réglage différents que l’utilisateur peut choisir selon ses besoins. Le sac à dos BE2 Enduro offre aussi un système de compression unique. Les bretelles sont reliées à une structure en forme de hamac située sous la charge. Ce design exceptionnel rapproche le poids le plus près possible de l’utilisateur et stabilise la charge beaucoup mieux qu’un sac à dos traditionnel.
Par ailleurs, le sac à dos BE2 Enduro est équipé en série de la poche à eau 1,5 litre Ergon BH150 ainsi que d‘une pièce moulée de stabilisation en mousse. Cette dernière peut être remplacée par la protection dorsale BP100, disponible séparément.
Présentation du sac à dos (usage recommandé)
Disposition extérieure1. Autres2. Courroie de fixation de protections / casque3. Trousse de réparation pour chambre à air, pièces de rechange diverses
Côté
Disposition intérieure1. Courroie de fixation de protections / casque2. Pièce moulée en mousse / Protection dorsale3. Pompe à cartouche4. Sac à eau
Avant
Avant
Ventilation amélioréeLes coussinets dorsaux rembourrés sont composés d‘un épais tissu à mailles de ventilation. Pendant le trajet, celui-ci assure une aération du dos nettement supérieure à celle d‘un sac à dos ordinaire. Cette confection permet la création de canaux de ventilation entre les coussinets, dans lesquels le vent s‘introduit pour maintenir le dos au sec.
Côté
Arrière
AVERTISSEMENT
FF
Sac à eau BH150(incluse)
Pièce moulée en mousse(incluse)
Protection dorsale BP100(vendue séparément)
Il ne s‘agit pas d‘une protection dorsale testée/certifiée. Elle ne remplit pas de fonction protectrice !
1
2
3
1
2
3
4

22Ergon BikE Ergonomics21
Réglage de la longueur du dos
1. Tirez la bande 1 vers le haut tout en appuyant sur la plaque dorsale pour défaire la fixation Velcro. Ensuite, mettez la main dans l‘espace ainsi libéré.
2. Localisez la boucle de la courroie de maintien 2 et sortez entièrement celle-ci.
3. Tirez la courroie de maintien 2 par l‘arrière de l‘ouverture de la plaque dorsale.
4. Avec les bandes Velcro détachées, ajustez la plaque dorsale à la taille souhaitée (S/M/L/XL).
8. Tirez à nouveau sur la bande 1 pour défaire la fixation Velcro.
5. Pour un positionnement correct, la bande d‘indicateur verte doit apparaître sous forme d‘un trait fin aux bords inférieurs de l‘ouverture. L‘ouverture ne doit donc pas être complètement recouverte. En cas de réglage à la taille „S“, l‘indicateur doit apparaître sur le bord supérieur de la plaque dorsale, de sorte que celle-ci soit à peu près au niveau du bord supérieur du sac à dos.
6. Refermez la bande Velcro pour une première fixation grossière en appuyant sur la zone dorsale.
Conseils quant au réglage de la longueur du dos (voir le tableau à la dernière page de ce manuel).Le réglage des bretelles peut être déterminé par la taille du corps et des vêtements. Nos mesures ne sont que des suggestions; elles sont basées sur la taille moyenne du corps. Elles peuvent varier selon les besoins et les préférences personnels de l’utilisateur.
10. Ensuite, appuyez fermement sur la bande 1 ainsi que sur l‘ensemble de la zone dorsale pour bien rétablir la fixation Velcro.
SML
S
M
L
XL
1
2
2
21
2
1
FF
7. Ensuite, enfilez la courroie de maintien 2 par l‘arrière de l‘ouverture de la plaque dorsale indiquée dans le point 5 puis tendez bien la courroie.
9. Réintroduisez la courroie 2 bien droit dans l‘espace vide et appuyez fermement sur les zones Velcro appropriées.

24Ergon BikE Ergonomics23
AdjustmentDesserrez les bretelles et enfilez le sac à dos. Attachez maintenant la ceinture. Cette dernière devrait être assez serrée et déposée le long de la région pelvienne, pas au niveau du ventre (Fig. 1). Réglez les bretelles jusqu’à ce que tout le système soit bien ajusté (elles ne devraient pas presser les épaules). Asseyez-vous ensuite sur un vélo ou placez-vous
sur un tabouret et inclinez-vous vers l’avant (comme sur un vélo). Les marques d’ajustement coloré permettent de déterminer si la ceinture est assez serrée et si la longueur du dos est correctement réglée. Si les marques d’ajustement coloré se croisent, l’ajustement est parfait. Sinon, il faut recommencer le réglage (Fig. 2).
Ajustement automatique de l’angle des bretellesLe sac à dos BE2 Enduro d’Ergon comporte un système d’ajustement automatique: les anneaux en forme de D situés au-dessus de chacune des bretelles règle l’angle de ces dernières.
Sac à eau / Tuyau d’hydratationOuvrez le compartiment de la poche à eau et placez-y la poche remplie. Faites passer le tuyau dans toute sa longueur par une des deux ouvertures 1 du compartiment de poche à eau (de l‘intérieur vers l‘extérieur). Ensuite, enfilez-le dans les bandes 2 à 4 indiquées de à (illustration 2).
En ouvrant le compartiment principal, vous pouvez accéder à la poche de la protection dorsale (illustration 2). Afin de la retirer (par exemple, pour changer une protection endommagée par une chute), détachez la bande Velcro et tirez la protection hors de la poche (illustration 3).
Enfin, placez l‘intégralité de la nouvelle protection dans la poche, assurez-vous qu‘elle est correctement installée puis refermez la bande Velcro. Attention: La face noire de la protection doit toujours être orientée vers le dos du porteur (illustration 1).
Protection dorsale BP100 (vendue séparément)
Fig. 1Fig. 2
La face noire du protecteur est orientée vers le dos du cycliste.
Fig. 1 Fig. 2 Fig. 3
FF
Il est impératif de lire le mode d‘emploi de la protection dorsale BP100.
Fig. 1 Fig. 2
1
2
3
4
26Ergon BikE Ergonomics25
Conseils de chargement et de répartition de poidsMettre les articles les plus lourds en premier (pour qu’ils soient au bas du sac à dos). Les articles plus légers tels qu’un casque ou un imperméable seront empaquetés dans le compartiment à casque.
Nettoyage et entretien Pour le maintenir en bon état, nettoyez votre sac à dos après chaque sortie avec une éponge douce et de l’eau tiède, puis faites-les sécher. Protégez le revêtement du tissu à l’intérieur du sac en l’essuyant avec un chiffon humide. N’utilisez pas d’eau chaude, d’eau de Javel, de détergents, de solvants, de peinture ni de détachants. Pour les taches tenaces, choisissez un savon sans détergent. Les solvants endommagent le revêtement résistant à l’eau. Le non-respect de ces instructions risque d’invalider la garantie. Pour le sécher, ouvrez votre sac à dos et accrochez-le dans un endroit frais, sec, bien ventilé et à l’abri du soleil. Il ne doit pas être lavé ni séché à la machine.
Note Bien qu’il soit résistant à l’eau, ce sac à dos n’est pas hydrofuge. Nous vous recommandons de placer vos appareils électroniques dans un contenant hydrofuge séparé.
Entreposage Ne rangez jamais un sac à dos Ergon lorsqu’il est sale ou mouillé, car il risque de moisir. Cette moisissure peut endommager le tissu, en plus de causer des odeurs désagréables. Accrochez-le dans un endroit frais, sec, bien ventilé et à l’abri du soleil.
GarantiePendant les deux premières années suivant l‘achat de ce produit, vous bénéfi ciez d‘une garantie totale sur les vices cachés légaux (anciennement appelée „garantie“). N‘oubliez toutefois pas que les grips subissent une usure naturelle. En cas de manquements, adressez-vous à votre revendeur Ergon en vous munissant de la preuve d‘achat. Un emploi non conforme (modifi cation du produit, nonrespect des avertissements présents dans le présent mode d‘emploi) supprime tout droit à la garantie.
Veuillez consulter la politique de garantie complète en vigueur surwww.ergonbike.com/warranty ou scanner votre code QR pour de plus amples informations.
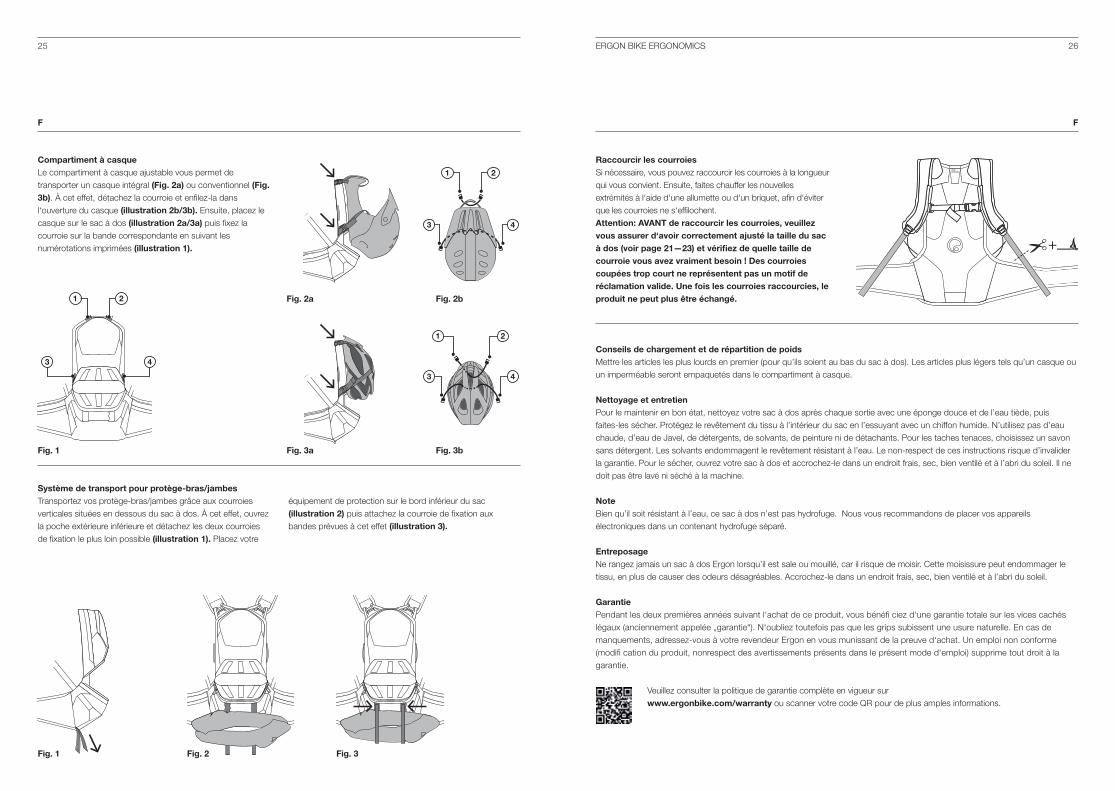
Compartiment à casqueLe compartiment à casque ajustable vous permet de transporter un casque intégral (Fig. 2a) ou conventionnel (Fig. 3b). À cet effet, détachez la courroie et enfilez-la dans l‘ouverture du casque (illustration 2b/3b). Ensuite, placez le casque sur le sac à dos (illustration 2a/3a) puis fixez la courroie sur la bande correspondante en suivant les numérotations imprimées (illustration 1).
Système de transport pour protège-bras/jambesTransportez vos protège-bras/jambes grâce aux courroies verticales situées en dessous du sac à dos. À cet effet, ouvrez la poche extérieure inférieure et détachez les deux courroies de fixation le plus loin possible (illustration 1). Placez votre
équipement de protection sur le bord inférieur du sac (illustration 2) puis attachez la courroie de fixation aux bandes prévues à cet effet (illustration 3).
1 2
3 4
1 2
3 4
Fig. 1
Fig. 2a
Fig. 3a
Fig. 2b
Fig. 3b
Fig. 1 Fig. 2 Fig. 3
FF
Raccourcir les courroies Si nécessaire, vous pouvez raccourcir les courroies à la longueur qui vous convient. Ensuite, faites chauffer les nouvelles extrémités à l‘aide d‘une allumette ou d‘un briquet, afin d‘éviter que les courroies ne s‘effilochent. Attention: AVANT de raccourcir les courroies, veuillez vous assurer d‘avoir correctement ajusté la taille du sac à dos (voir page 21—23) et vérifiez de quelle taille de courroie vous avez vraiment besoin ! Des courroies coupées trop court ne représentent pas un motif de réclamation valide. Une fois les courroies raccourcies, le produit ne peut plus être échangé.
+
1
3 4
2