Embed Size (px)
Citation preview

Knick Corporate Design 39
Manual / Bedienungsanleitungen
Formate
Die große Produktbreite des Unternehmens mit ihren unterschiedlichsten Ver- packungsgrößen erfordert entsprechende Format- varianten der Bedienungs- anleitungen.
Es gibt u.a. folgende Formate: – DIN A5 – DIN A6 – 70 x 297 mm – 70 x 230 mm – 98 x 110 mm
Faltungen
Abhängig von Format und Umfang der Bedienungs-anleitungen werden un-terschiedliche Faltungen effektiv eingesetzt: Klammerheftung, Zickzack-falz und Kreuzfalz.
Farben
Die Bedienungsanleitungen sind grundsätzlich schwarz/weiß angelegt. Farben werden nur zur Codierung, Darstellung von Farbdisplays und wichtiger Features eingesetzt.
Betriebsanleitungdeutsch Stratos Pro A2... pH
The Art of Measuring.
www.knick.deAktuelle Produktinformation:
Stratos®Pro A2... PHBetriebsanleitung
Aktuelle Produktinformation: www.knick.de
II 1 G Ex ia IIC T3/T4/T6BVS 10 ATEX E 089 X
MEMO SENS
Ø 12 mm
120
/ 225
mm
Serial No.
SE 706X/1-NMSN14163 Berlin
0044BVS 10 ATEX E089 X
II 1G Ex ia IIC T3/T4/T6
SE 706X/2-NMSN14163 Berlin
0044BVS 10 ATEX E089 X
II 1G Ex ia IIC T3/T4/T6
orange-red ringorange-red ring
Betriebs-anleitung
deutsch
SE 706
II 1 G Ex ia IIC T3/T4/T6BVS 10 ATEX E 089 X
MEMO SENS
SE 706X/1-NMSN14163 Berlin
0044BVS 10 ATEX E089 X
II 1G Ex ia IIC T3/T4/T6
SE 706X/2-NMSN14163 Berlin
0044BVS 10 ATEX E089 X
II 1G Ex ia IIC T3/T4/T6
Betriebsanleitung für Sauerstoff-Sensoren der Reihe SE 706-Memosens®
II 1 G Ex ia IIC T3/T4/T6BVS 10 ATEX E 089 X
MEMO SENS
SE 706X/1-NMSN14163 Berlin
0044BVS 10 ATEX E089 X
II 1G Ex ia IIC T3/T4/T6
SE 706X/2-NMSN14163 Berlin
0044BVS 10 ATEX E089 X
II 1G Ex ia IIC T3/T4/T6
II 1 G Ex ia IIC T3/T4/T6BVS 10 ATEX E 089 X
MEMO SENS
SE 706X/1-NMSN14163 Berlin
0044BVS 10 ATEX E089 X
II 1G Ex ia IIC T3/T4/T6
SE 706X/2-NMSN14163 Berlin
0044BVS 10 ATEX E089 X
II 1G Ex ia IIC T3/T4/T6
II 1 G Ex ia IIC T3/T4/T6BVS 10 ATEX E 089 X
MEMO SENS
SE 706X/1-NMSN14163 Berlin
0044BVS 10 ATEX E089 X
II 1G Ex ia IIC T3/T4/T6
SE 706X/2-NMSN14163 Berlin
0044BVS 10 ATEX E089 X
II 1G Ex ia IIC T3/T4/T6 Mem
osen
s® P
g 13
.5 -
Stec
kkop
fPg
13.
5M
embr
anka
ppe
Mem
bran
¡Å 
Latest Product Information: www.knick.de
User ManualEnglish Portavo® 902 PH

3Basics
Return of products under warrantyPlease contact our Service Team before returning a defective device. Ship the cleaned device to the address you have been given. If the device has been in contact with process fluids, it must be decontaminated/disinfected before shipment. In that case, please attach a corresponding certificate, for the health and safety of our service personnel.
Registered trademarksThe following names are registered trademarks. For practical reasons they are shown without trademark symbol in this manual.• Calimatic®• Memosens®• Paraly®• Portavo®• Sensocheck®• Sensoface®
DisposalPlease observe the applicable local or national regulations concerning the disposal of “waste electrical and electronic equipment”.

4 Table of Contents
Package Contents ............................................................................... 5Documentation ................................................................................... 6Overview of the Portavo 902 PH ....................................................... 7Value-Added Features ..............................................................................................8Protective Cover ..........................................................................................................9Hook ................................................................................................................................9Display ......................................................................................................................... 10Keypad ........................................................................................................................ 11Start-Up ............................................................................................. 12Inserting the Batteries ........................................................................................... 12Connecting a Sensor .............................................................................................. 13Switching On the Meter ........................................................................................ 14Icons ............................................................................................................................. 14Configuring ....................................................................................... 15Calibrating ........................................................................................ 16Measuring ......................................................................................... 22Switching the Measured Value Display ........................................................... 22Adjusting the Temperature .................................................................................. 22Enabling Options / TAN Input .......................................................... 23Option 002 Temperature Calibration .............................................. 24Clock .................................................................................................. 25Error Codes and Device Messages ................................................... 26“Sensoface” Messages ............................................................................................ 27Error Messages ......................................................................................................... 28Product Line ...................................................................................... 29Accessories ................................................................................................................ 29pH Sensors ................................................................................................................. 30Knick CaliMat Buffer Solutions ........................................................................... 31Specifications .................................................................................... 32Index .................................................................................................. 35

5Package Contents
Check the shipment for transport damage and completeness. The package of the Portavo 902 PH includes:
• The Portavo 902 PH incl. 4 AA batteries and premounted quiver
• Carrying strap
• Quickstart instructions in various languages
• Specific test report
• Safety instructions
• Data carrier with detailed user manuals
6
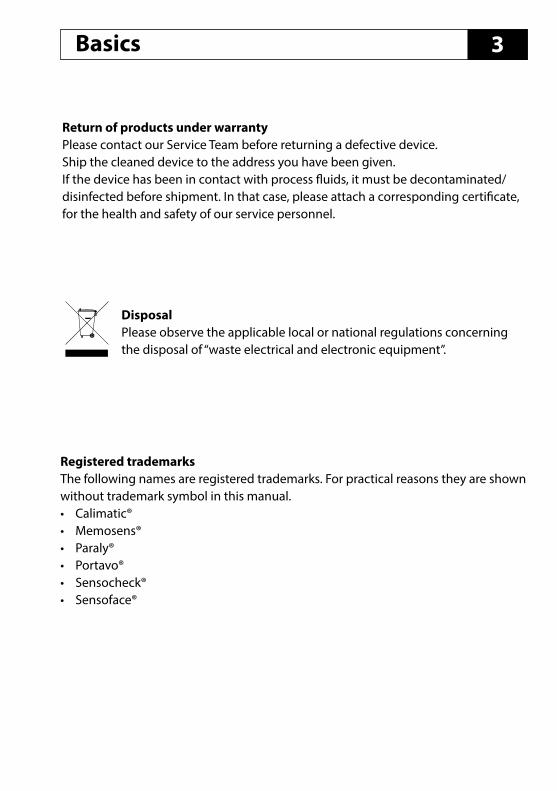
CD-ROMComplete documentation:• User manuals in different languages• Safety instructions • Certificates• Quickstart guides
Safety InstructionsIn official EU languages and others.• EC Declarations of Conformity
Quickstart GuidesInstallation and first steps:• Operation• Menu structure• Calibration• Error messages and recommended actions Various languages on CD-ROM and on our website: www.knick.de
Specific Test Report
Documentation

7
The Portavo 902 PH is a portable pH meter. A plain-text line on the high-contrast LCD screen makes operation virtually self- explanatory. The meter stands out by the following features:• Use of digital Memosens sensors• Memosens sensors and DIN pH sensors
can be used on one device.• A detachable quiver protects the sensor
and prevents it from drying out. Further-more, it can be used for calibration.
• The rugged housing is made of a high- performance polymer. It provides high impact resistance and dimensional stability even when exposed to extreme moisture.
Overview of the Portavo 902 PH
Quiver
• Scratch-proof clear glass display, perfectly readable even after years• Very long operating times with one set of batteries (4 x AA)• Sensoface icons provide single-glance information on the sensor condition
(page 27)• Calibration with “Calimatic” automatic buffer recognition (page 16) • Manual calibration by entering individual buffer values• Real-time clock and indication of battery charging level• At measuring temperatures from -20 to +100 °C the temperature detector can be
automatically identified.

8
Value-Added FeaturesMemosensThe Portavo 902 can communicate with Memosens sensors. When these digital sensors are connected to the meter, they are automatically identified and indicated by the logo shown on the right. Furthermore, Memosens allows the storage of calibration data, which will be available and can still be used when the sensor is connected to another Memosens-capable device.
SensofaceSensoface provides quick information on the sen-sor condition. The three “smiley” faces as shown on the right represent the sensor condition during measurement and after a calibration. When the condition deteriorates, an “INFO …” message gives a hint to the cause.
Automatic calibration with CalimaticCalimatic is a very convenient method for pH calibration with automatic buffer recognition. You only have to select the buffer set with the buffers used. The buffers can then be used in any order.As delivered, this calibration method is preset. It can be adjusted or disabled in the configuration menu.
Overview of the Portavo 902 PH

9
Protective CoverThe front of the meter is protected by a cover, which can be completely flipped over and secured to the back for oper-ation. A label on the inner side of the cover explains the control functions and device messages.
Overview of the Portavo 902 PH
HookA fold-out hook on the back allows suspending the meter. This leaves your hands free for the actual measurement. The rating plate is located beneath the hook.
Protective Cover and Hook CombinedCover and hook can be joined together to form a benchtop stand allowing com-fortable and fatigue-free working at a lab bench or desk.

10 Overview of the Portavo 902 PH
DisplayThe meter has a three-line display for representing alphanumeric information such as measurement and calibration data, temperatures and date/time. Additional information is provided by means of icons (Sensoface, battery icon, etc.).Some typical displays are shown below.
Measuring(display of measured value, temperature, date and time)
Calibration – step 1
Clock(display of hours and minutes, seconds and date).
End of calibration(display of slope)

11Overview of the Portavo 902 PH
KeypadThe keys of the membrane keypad have a noticeable pressure point. They have the following functions:
on/off Switches the meter on and displays the device and calibration data (see Start-Up)
meas Switches the meter on / Activates measuring mode
cal Starts calibration
set Activates configuration/ Confirms entries
clock Displays time and date, allows setting the clock using set
When this icon is displayed, you can use the arrow keys for navigation.

12 Start-Up
Inserting the Batteries
With four AA batteries, the Portavo has an operating time of over 1000 h.Open the battery compartment on the rear of the device. Be sure to observe the correct polarity when inserting the batter-ies (see markings in the battery chamber). Close the battery compartment cover and screw it handtight.
Check the shipment for transport damage and completeness (see Package Contents).
NOTICE!Do not operate the device when one of the following conditions applies:• the device shows visible damage• the device fails to perform the intended function• prolonged storage at temperatures above +70 °C / +158 °F• severe transport stressesIn this case, a professional routine test must be performed. This test should be carried out at our factory.
A battery icon in the display indicates the battery power level:
Icon fully filled Batteries at full capacity
Icon partially filled Battery capacity is sufficient
Icon empty Battery capacity not sufficient; calibration is possible
Icon blinks Max. 10 operating hours remaining, measurement is still possible NOTICE! It is absolutely necessary to replace the batteries.
13
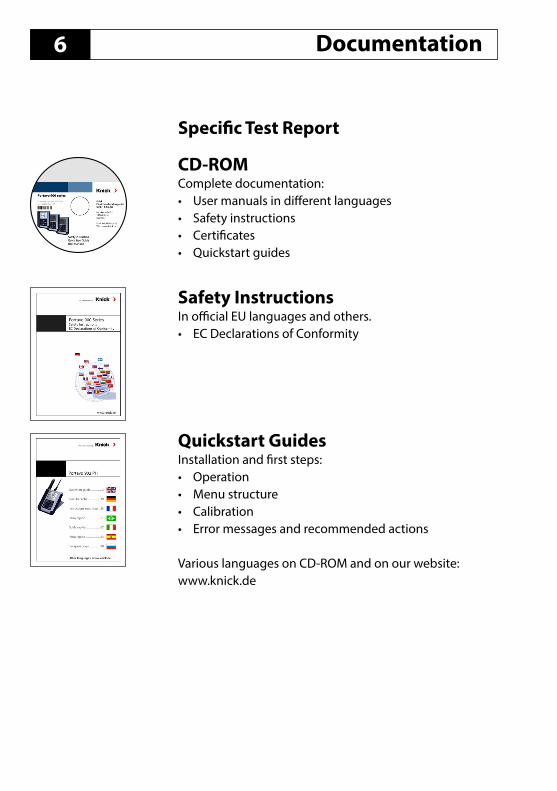
Connecting a SensorThe Portavo 902 PH provides several connections so that many types of sensors can be used for measurement. Note that only one sensor may be connected to the meter at a time. The meter automatically recognizes a connected Memosens sensor and switches accordingly. Memosens is signaled in the display.
Separate temperature probeNote: Temperature measurement using a separate temperature probe is only possible when no Memosens sensor is connected. After power-on, a separate temperature probe is automatically recognized. When you want to replace the temperature probe, you must switch off the meter and then switch it on again.
a b c d Connectionsa - M8, 4 pins for Memosens sensorsb - Temperature probe GNDc - Temperature probed - pH socket (DIN 19 262)
Start-Up
NOTICE!Always make sure that a sensor is connected to the meter before starting measure-ment. Explanation: The analog pH input of the Portavo is an electrometer amplifier with an extremely high-impedance. When the sensor is not in contact with the medium or not connected to the meter, electric charges on the input can generate arbitrary, stable pH or mV values which will be shown in the display.
Memosens sensors have a cable coupling, which allows convenient replacement of sensors while the cable remains connected to the meter. The connecting cable is connected to socket a (M8, 4 pins for Memosens sensors).

14
Switching On the MeterWhen you have connected the sensor, you can switch the meter on by pressing the on/off or meas key. When the meter is switched on with the on/off key, first a self test is performed and then the calibration data and settings are displayed before the meter switches to measuring mode. When the meter is switched on with the meas key, it immediately switches to measuring mode.Depending on the connected sensor and the specific measuring task, several steps for configuration and calibration must be performed as described on the following pages.
Start-Up
IconsImportant information about the state of the device:
Error message
Battery charging level
Sensor condition
Memosens sensor
Temperature detection
(sensor, separate or
manual)
Date
Process variable
Time

15
pH ConfigurationPrior to measurement, a configuration should be performed to match the connected sensor and the desired measurement performance. Furthermore, you can select the suitable calibration method. The following table gives you an overview. Factory settings are shown in bold print.
This icon prompts you to select a menu item using the arrow keys – the selection is confirmed by pressing set.
Configuring
Measurement
“Setup” display Select using arrow keys, confirm by pressing set.
s
t
Display 1 pH x.xx | pH x.xxx | mV | (°C for analog pH onlyDisplay 2 OFF | date + time | date | time CAL Timer OFF | 1 ... 99 days
CALCALIMATIC|Manual|DATA INPUT|(ISFET-Zero)| ORP OFFSET (for pH/ORP combo electrode)|FREE CAL
CAL POINTS 1 | 2 | 3 | 1-2-3 (for CALIMATIC, Manual, FREE CAL)
BUFFER SET(CALIMATIC, FREE CAL)
-01- Mettler-Toledo 2.00|4.01|7.00|9.21-02- Knick CaliMat 2.00|4.00|7.00|9.00|12.00-03- Ciba (94) 2.06|4.00|7.00|10.00-04- NIST technical 1.68|4.00|7.00|10.01|12.46-05- NIST standard 1.679|4.006|6.865|9.180-06- HACH 4.01|7.00|10.01|12.00-07- WTW techn. buffers 2.00|4.01|7.00|10.00-08- Hamilton 2.00|4.01|7.00|10.01|12.00-09- Reagecon 2.00|4.00|7.00|9.00|12.00-10- DIN 19267 1.09|4.65|6.79|9.23|12.75
Auto OFF OFF | 0.1h | 1h | 6h | 12hTemp Unit °C | °FTime Format 24h | 12hDate Format dd.mm.yy | mm.dd.yyTAN TEMP CAL (TAN input required, option; see page page 23)Default NO | YES (reset to factory settings)
16
Measurement
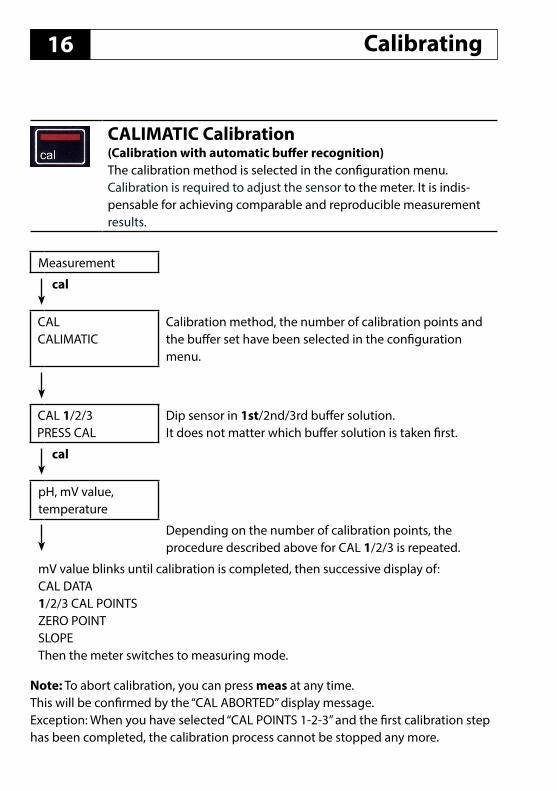
Calibration method, the number of calibration points and the buffer set have been selected in the configuration menu.
Dip sensor in 1st/2nd/3rd buffer solution.It does not matter which buffer solution is taken first.
pH, mV value, temperature
Depending on the number of calibration points, the procedure described above for CAL 1/2/3 is repeated.
mV value blinks until calibration is completed, then successive display of:CAL DATA1/2/3 CAL POINTSZERO POINT SLOPEThen the meter switches to measuring mode.
CALIMATIC Calibration(Calibration with automatic buffer recognition)The calibration method is selected in the configuration menu. Calibration is required to adjust the sensor to the meter. It is indis‑pensable for achieving comparable and reproducible measurement results.
Calibrating
Note: To abort calibration, you can press meas at any time. This will be confirmed by the “CAL ABORTED” display message. Exception: When you have selected “CAL POINTS 1‑2‑3” and the first calibration step has been completed, the calibration process cannot be stopped any more.

17Calibrating
Measurement
Use st to select the value for the zero point.
Use st to select the value for the slope.
The calibration data will be displayed successively:Date and timeZERO POINT SLOPEThen the meter switches to measuring mode.
DATA INPUT Calibration (Calibration by entering known sensor values)The calibration method is selected in the configuration menu.
Calibrating
Note: To abort calibration, you can press meas at any time.
18
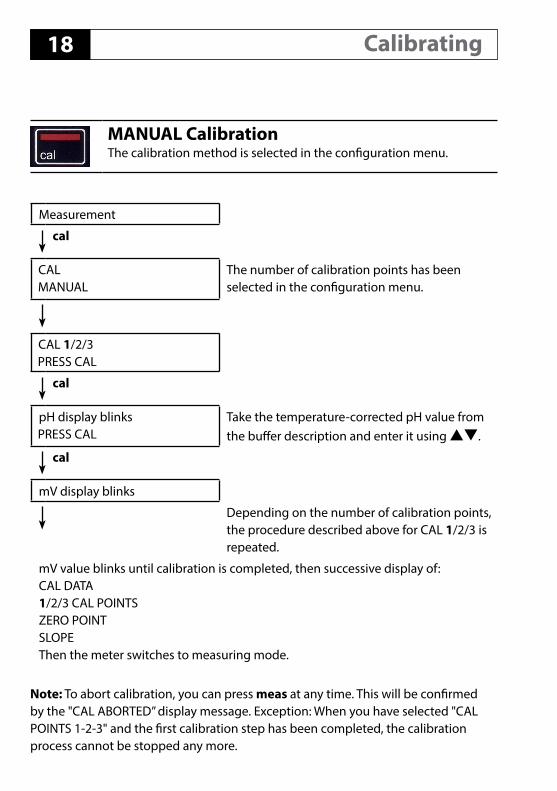
Measurement
The number of calibration points has been selected in the configuration menu.
pH display blinks Take the temperature‑corrected pH value from the buffer description and enter it using st.
mV display blinks
Depending on the number of calibration points, the procedure described above for CAL 1/2/3 is repeated.
mV value blinks until calibration is completed, then successive display of:CAL DATA1/2/3 CAL POINTSZERO POINT SLOPEThen the meter switches to measuring mode.
MANUAL Calibration The calibration method is selected in the configuration menu.
Note: To abort calibration, you can press meas at any time. This will be confirmed by the "CAL ABORTED” display message. Exception: When you have selected "CAL POINTS 1‑2‑3" and the first calibration step has been completed, the calibration process cannot be stopped any more.
Calibrating

19
ORP OFFSET Calibration– available with pH/ORP combo sensor connected –Selected in the configuration menu.
Calibrating
Measurement
cal
CALORP OFFSET
You can specify an offset for the ORP value measured by the sensor.
After calibration has been activated, the following values are listed in the display:• ORP setpoint (in mV)• temperature measured by sensor• measured ORP value (in mV)
cal
ORP setpoint blinks Use st to adjust the value for ORP.
cal
Calibration is performed, the offset value is indicated. Automatic return to measuring mode.

20
Measurement
cal
CALTEMP. OFFSET
You can specify an offset for the tem‑perature measured by the sensor.
After calibration has been activated, the following values are listed in the display:• temperature setpoint• temperature measured by sensor• offset (display in K)
cal
Temperature setpoint value blinks.
Use st to adjust the temperature setpoint value.
cal
Calibration is performed, the offset value is indicated. Automatic return to measuring mode.
TEMP. OFFSET Calibration (Option)Temperature calibration (offset)Selected in the configuration menu.
Calibrating

21
Measurement
cal
CAL CALIMATIC blinks
Use st to select the required calibration method (CALIMATIC, DATA INPUT, ORP OFFSET (with pH/ORP combo sensor connected), TEMP. OFFSET (Option) or MANUAL).
cal
Perform the selected calibration as described on the previous pages.
FREE CAL Calibration (Free selection of calibration method)FREE CAL calibration is selected in the configuration menu.
Calibrating
22
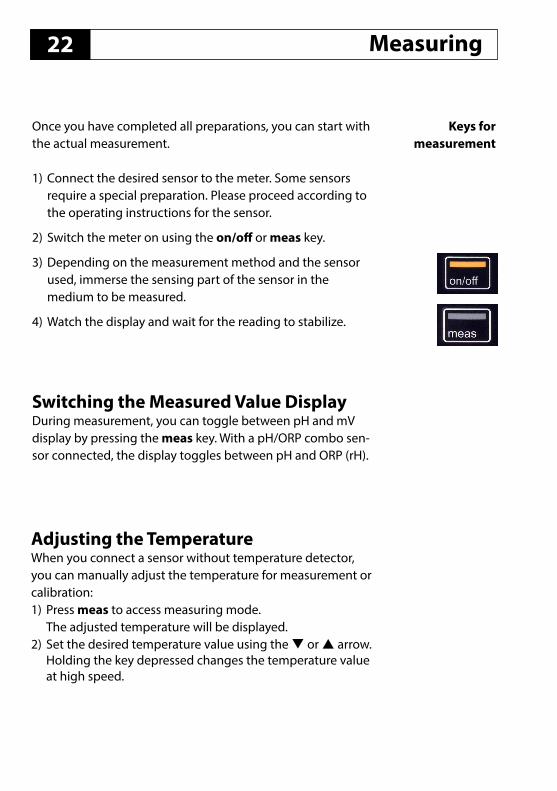
Once you have completed all preparations, you can start with the actual measurement.
1) Connect the desired sensor to the meter. Some sensors require a special preparation. Please proceed according to the operating instructions for the sensor.
2) Switch the meter on using the on/off or meas key.
3) Depending on the measurement method and the sensor used, immerse the sensing part of the sensor in the medium to be measured.
4) Watch the display and wait for the reading to stabilize.
Switching the Measured Value DisplayDuring measurement, you can toggle between pH and mV display by pressing the meas key. With a pH/ORP combo sen-sor connected, the display toggles between pH and ORP (rH).
Keys for measurement
Adjusting the TemperatureWhen you connect a sensor without temperature detector, you can manually adjust the temperature for measurement or calibration:1) Press meas to access measuring mode.
The adjusted temperature will be displayed.2) Set the desired temperature value using the or arrow.
Holding the key depressed changes the temperature value at high speed.
Measuring

23Options
When you have bought “Option 002 Temperature Calibration”, you receive a document with a code (TAN) for enabling this option on your device. Press the set key to access the configuration mode.Use the arrow keys to select the “TAN TEMP CAL” function where you can enter the TAN for enabling the option.
set
TAN TEMP CALset Press the set key.
set
Enter the TAN code.
First digit blinks. s
tSet value.
set
Next digit blinks. s
tSet value.
set
... s
tSet value, press set to save the TAN.
After correct input of the TAN, the device signals “PASS” – The option is now available.
Enabling Options / TAN Input

24
Selecting the temperature calibration (TEMP. OFFSET)
In measuring mode, press the set key. 1) Select CAL (calibration) and confirm by pressing set.2) Select the TEMP. OFFSET calibration mode and confirm by pressing set.
Performing the temperature calibration (TEMP. OFFSET)In measuring mode, press the cal key. Press cal once more to activate the function:
Options
Temperature value currently measured by the sensor
Use the st keys to enter the reference value.
Indication of currently adjusted offset value. Press cal to save the reference value.
Option 002 Temperature Calibration

25Clock
Press the clock key to access the clock mode. Date and time will be displayed in the format as set in the configuration menu. To set the clock, proceed as follows:
Display of time+date
Hour display blinksSet value.
Minute display blinksSet value.
Second display blinks and shows 00
Clock is started, the seconds count up.
Year display blinksSet value.
Month display blinksSet value.
Day display blinksSet value.
Display of corrected time+date

26 Error Codes and Device Messages
Error messages are indicated as “ERROR …” on the display. Information on the sensor condition is indicated by the “Sensoface” icon (friendly, neutral, sad) possibly accom-panied by an info message (“INFO …”).
Sensoface (the “smiley” icon) provides information on the sensor condition (main-tenance request). Measurement can still be performed. After a calibration, the corre-sponding Sensoface icon (friendly, neutral, sad) is shown together with the calibration data. Otherwise, Sensoface is only visible in measuring mode.
The most important error messages and “Sensoface” info messages are shown on the inside of the protective cover. A complete list of messages and their mean-ings is provided in the following tables.
Example of a “Sensoface” message: INFO 1 (cal timer expired)
Example of an error message: ERROR 8 (identical calibration media)

27Error Codes and Device Messages
“Sensoface” MessagesThe “Sensoface” icon provides information on the sensor condition:
Sensoface MeaningSensor is okay
Calibrate the sensor soon
Calibrate or replace the sensor
The “neutral” and “sad” Sensoface icons are accompanied by an “INFO …” message to give a hint to the cause of deterioration.
Sensoface Message Cause
INFO 1 Calibration timer
INFO 3 Sensocheck
INFO 5 Zero / Slope
INFO 6 Response time
INFO 7 ISFET: Operating point (asymmetry potential)
INFO 8 ISFET: Leakage current
INFO 9 ORP offset

28 Error Codes and Device Messages
Error MessagesThe following error messages can be shown in the display.
Message Cause Remedy
blinks
Battery empty Replace batteries
ERROR 1 pH value out of range Check whether the measurement conditions correspond to the adjusted measuring range.
ERROR 2 ORP value out of range
ERROR 3Temperature value out of range
ERROR 4Sensor zero point too high/low
Thoroughly rinse the sensor and re-calibrate. If this does not help, replace the sensor. ERROR 5 Sensor slope too high/low
ERROR 8Calibration error: Identical buffers
Use a buffer solution with a different nominal value before starting the next calibration step.
ERROR 9Calibration error: Buffer unknown
Make sure that you use the same buffer set as configured.
ERROR 10 Cal media interchanged Repeat calibration.
ERROR 11Measured value unstableDrift too high
Leave the sensor in the liquid until the temperature is stable. If this does not help, replace the sensor.
ERROR 14 Time and date invalid Set time and date
ERROR 18 Configuration invalid
Restart,reset to factory settings (Setup: DEFAULT YES), configure and calibrate.If this does not help, send in the device for repair.
ERROR 19 Factory settings error Device defective, send it in.
ERROR 21 Sensor error (Memosens)Connect operational Memosens sensor.

29
Accessories
Item Order No.
Robust field case (for meter, sensor, various small parts and user manual)
ZU 0934
Replacement quiver (5 units) ZU 0929
Memosens lab cable, M8, 4 pins CA/MS-001XFA-L
Please visit our website for more information on our product range: www.knick.de
Product Line

30
pH SensorsPlease visit our website for more information on our product range: www.knick.de
Temperature detectorsNote: When a Memosens sensor is connected, the temperature detector of the Memosens sensor is used. When no Memosens sensor is connected, the Portavo 902 PH can be used as a temperature meter.
Pt1000 temperature detector ZU 6959
Product Line
Memosens sensors have a cable coupling, which allows convenient replacement of sensors while the cable remains connected to the meter.

31Product Line
Knick CaliMat Buffer SolutionsReady-to-use quality pH buffer solutions
pH value (20 °C) Quantity Order No.
2.00 ± 0.02 250 ml CS-P0200/250
4.00 ± 0.02 250 ml CS-P0400/250
1000 ml CS-P0400/1000
3000 ml CS-P0400/30007,00 ± 0,02 250 ml CS-P0700/250
1000 ml CS-P0700/10003000 ml CS-P0700/3000
9.00 ± 0.02 250 ml CS-P0900/250
1000 ml CS-P0900/1000
3000 ml CS-P0900/3000
12.00 ± 0.05 250 ml CS-P1200/250
Buffer sets
Set 4.00 3 x 250 ml CS-PSET4
Set 7.00 3 x 250 ml CS-PSET7
Set 9.00 3 x 250 ml CS-PSET9
Set 4.00, 7.00, 9.00 250 ml each CS-PSET479
KCl solution 250 ml ZU 0960

32
pH/mV input pH socket, DIN 19 262 (13/4 mm)pH range -2 … 16Decimal places *) 2 or 3
Input resistance 1 x 10¹² Ω (0 … 35 °C)Input current 1 x 10-12 A (at RT, doubles every 10 K)
Measuring cycle Approx. 1 sMeasurement error1,2,3) < 0.01 pH, TC < 0.001 pH/KmV range -1300 … +1300 mVMeasuring cycle Approx. 1 sMeasurement error1,2,3) < 0.1 % meas. val. + 0.3 mV, TC < 0.03 mV/K
Temperature input 2 x 4 mm dia. for integrated or separate temperature detectorMeasuring ranges NTC30 temp detector -20 … +120 °C
Pt1000 temp detector -40 … +250 °CMeasuring cycle Approx. 1 sMeasurement error1,2,3) < 0.2 K (Tamb = 23 °C); TC < 25 ppm/K
Specifications
*) User-defined 1) According to EN 60746-1,
at nominal operating conditions 2) ± 1 count
3) Plus sensor error4) Ranges depending on Memosens sensor
Memosens pH input M8 socket, 4 pins, for Memosens lab cableDisplay ranges 4) pH -2.00 … +16.00
mV -2000 … +2000 mVTemperature -50 … +250 °C
Memosens pH input ISFET
M8 socket, 4 pins, for Memosens lab cable
Display ranges 4) pH -2.00 … +16.00mV -2000 … +2000 mVTemperature -50 … +250 °C
Memosens ORP input M8 socket, 4 pins, for Memosens lab cableDisplay ranges 4) mV -2000 … +2000 mV
Temperature -50 … +250 °C
Sensor standardization *) ORP calibration (zero adjustment)Permissible calibration range ΔmV (offset) -700 … +700 mV

33Specifications
Sensor standardization *) pH calibration
Operating modes *) CALIMATIC Calibration with automatic buffer recognition
MANUAL Manual calibration with entry of individual buffer values
DATA INPUT Data entry of zero and slope
Calimatic buffer sets *) -01- Mettler-Toledo 2.00/4.01/7.00/9.21-02- Knick CaliMat 2.00/4.00/7.00/9.00/12.00-03- Ciba (94) 2.06/4.00/7.00/10.00-04- NIST technical 1.68/4.00/7.00/10.01/12.46-05- NIST standard 1.679/4.006/6.865/9.180-06- HACH 4.01/7.00/10.01 /12.00-07- WTW techn. buffers 2.00/4.01/7.00/10.00-08- Hamilton 2.00/4.01/7.00/10.01/12.00-09- Reagecon 2.00/4.00/7.00/9.00/12.00-10- DIN 19267 1.09/4.65/6.79/9.23/12.75
Permissible calibration range Zero point pH 6 … 8With ISFET: Operating point (asymmetry)
-750 … +750 mV
Slope approx. 74 … 104 %(possibly restricting notes from Sensoface)
Calibration timer *) Interval 1 … 99 days, can be switched off
Sensoface Provides information on the sensor condition
Evaluation of zero/slope, response, calibration interval
*) User-defined

34 Specifications
Connections 1 x pH socket, DIN 19 2622 x 4-mm socket for separate temperature detector1 x M8 socket, 4 pins, for Memosens lab cable
Display LCD STN 7-segment display with 3 lines and iconsSensoface Status indication (friendly, neutral, sad)Status indicators Battery power levelNotices HourglassKeypad [on/off ], [cal], [meas], [set], [], [], [clock]
Diagnostics functionsSensor data(Memosens only)
Manufacturer, sensor type, serial number, operating time
Calibration data Calibration date, zero, slopeDevice self-test Automatic memory test (FLASH, EEPROM, RAM)Device data Device type, software version, hardware version
Data retention Parameters, calibration data > 10 years
EMC EN 61326-1 (General Requirements)Emitted interference Class B (residential area)Immunity to interference Industry
EN 61326-2-3(Particular Requirements for Transmitters)
RoHS conformity According to directive 2011/65/EC
Power supplyPortavo 902 4 x AA alkaline batteriesOperating time Approx. 1000 h (alkaline)
Nominal operating conditionsAmbient temperature -10 … +55 °CTransport/ Storage temperature
-25 … +70 °C
Relative humidity 0 … 95 %, short-term condensing allowed
HousingMaterial PA12 GF30 (silver gray RAL 7001) + TPE (black)Protection IP 66/67 with pressure compensationDimensions Approx. (132 x 156 x 30) mmWeight Approx. 500 g

35Index
AAA batteries 12Accessories 29Analog pH input 13Arrow keys 11Automatic pH calibration (Calimatic) 16
BBattery capacity 12Battery charge indicator 12Battery compartment 12Battery icon 12Battery replacement 12Benchtop stand 9Buffer sets 31Buffer solutions (Knick CaliMat) 31Buttons 11
CCable coupling 30Calibration, CALIMATIC 16Calibration, DATA INPUT 17Calibration, FREE CAL 21Calibration, MANUAL 18Calibration, TEMP. OFFSET, enabling 23Calibration, TEMP. OFFSET (Option) 20CaliMat buffer solutions 31Calimatic automatic calibration 16Calimatic, description 8cal key 11Carrying case (accessory) 29CD-ROM 6Charge level of batteries 12Clock 25clock key 11Configuration 15Connecting a sensor 13Connecting cable for Memosens 13Connections 13Control buttons 11

36 Index
DData input (calibration) 17Data of the meter 32Date 25Device configuration 15Device messages 26Device properties 7Display 10Display icons 14Displaying the time and date 25Display, switching between measured values 22Disposal 3Documentation 6
EEC Declarations of Conformity 6ERROR (error codes) 28Error messages 26Error messages, overview 28
FFeatures 8Field case (accessory) 29FREE CAL, free selection of calibration method 21
HHanging up the meter 9Hook 9Hours, display 25
IIcons in display 14INFO messages 27Inserting the batteries 12Introduction 7
KKeypad 11Knick CaliMat buffer solutions 31
37
MManual calibration 18meas key 11Measuring 22Memosens 8Memosens connecting cable 13Memosens lab cable (accessory) 29Menu structure of configuration 15Messages 26Minutes, display 25
Oon/off key 11Option 002 TEMP. OFFSET 24Options, TAN input 23Order numbers (accessories) 29ORP OFFSET calibration 19Overview 8Overview of configuration 15Overview of error messages 28
PPackage contents 5Parameter settings (configuration) 15pH buffer solutions 31pH configuration 15pH input, analog 13pH socket, DIN 19 262 13Ports 13Power-on 14Product features 7Product line 29Product presentation 7Protective cover 9
QQuickstart guides 6
Index

38
RRating plate 9Real-time clock 7Redox calibration 19Reference numbers (accessories) 29Registered trademarks 3Replacement quiver (accessory) 29Replacing the batteries 12
SSafety instructions 6Scope of delivery 29Seconds, display 25Sensoface messages 27Sensor connection 13Sensor without temperature detector 22set key 11Setting the configuration data 15Setting the time and date 25Setup (configuration) 15Smiley face (icon) 8Specifications 32Specific test report 6Start-up 12Suspending the meter 9Switching on the meter 14Switching the measured value display 22Symbols in the display 14
Index

39
TTable of error messages 28Table view of configuration 15TAN input 23Technical data 32Temperature calibration (TEMP. OFFSET) 20Temperature calibration (TEMP. OFFSET), enabling 23Temperature detectors, product line 30Temperature, manual adjustment 22TEMP. OFFSET (Option) 24Trademarks 3Triangle icons 11
VValue-added features 8
Index

TA-209.2PH-KNE02 20170201 Software version: 1.x
KnickElektronische Messgeräte GmbH & Co. KGBeuckestr. 2214163 BerlinGermany
Phone: +49 30 80191-0Fax: +49 30 80191-200Email: [email protected]: www.knick.de
091873

![(UVDW]WHLOOLVWH 6SDUH 3DUWV /LVW STIHL 044 … · stihl 044 (1128) (uvdw]whloolvwh 6sduh 3duwv /lvw /lvwh ghv slÙfhv $ .xuehojhkÕxvh .xuehozhooh &udqnfdvh &udqnvkdiw &duwhu 9loheuhtxlq](https://img.pdfslide.org/doc/110x75/5b00b3a77f8b9a89598d0db9/uvdwwhloolvwh-6sduh-3duwv-lvw-stihl-044-044-1128-uvdwwhloolvwh-6sduh.jpg)