Embed Size (px)
Citation preview
Mobile Station
60653
DeutschEnglish
Bedienungsanleitung
2
Inhaltsverzeichnis SeiteMobile Station Mobile Station 3 Anschluss 3 Menü, Tastenfunktion 4 Sprachauswahl 4
Lok anlegen, konfigurieren Fahren, Tastenfunktion 5 Lok mit Lokkarte anlegen 5 mfx-Lok 6 Lok erkennen 6 Lok aus Datenbank 7 Lok manuell anlegen 8 Lok konfigurieren 13
Keyboard Schalten, Tastenfunktion 11 Magnetartikelprotokoll 11 Keyboard 12
Menü Information 18 Reset 18
Central Station Anschluss 19 Lokübernahme 20 Wen Sie nachfolgende Markierung in einzelnen Kapitel finden, ist der beschriebene Menü-punkt nur für dieses Digitalprotokoll von Bedeutung.
= nur für Märklin Motorola/mfx
= nur für DCC
Die Bedienungsanleitung ist Bestandteil des Produktes und muss deshalb aufbewahrt, sowie bei Weitergabe des Produktes mitgegeben werden.
�
���
124256/0210/HaEfÄnderungen vorbehalten
© Gebr. Märklin & Cie. GmbH
Gebr. Märklin & Cie. GmbH Stuttgarter Str. 55-57D-73033 Göppingen www.maerklin.com
www.maerklin.com/en/imprint.html
3
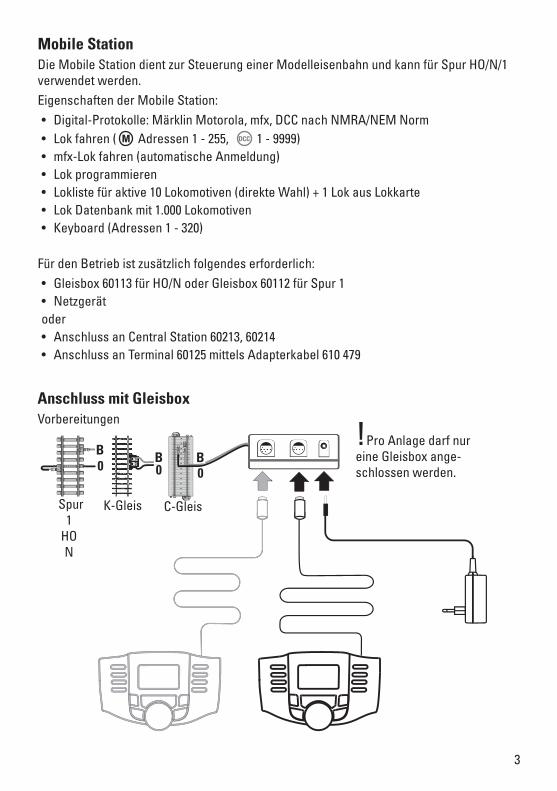
Mobile StationDie Mobile Station dient zur Steuerung einer Modelleisenbahn und kann für Spur HO/N/1 verwendet werden.Eigenschaften der Mobile Station:• Digital-Protokolle: Märklin Motorola, mfx, DCC nach NMRA/NEM Norm• Lok fahren ( � Adressen 1 - 255, ��� 1 - 9999)• mfx-Lok fahren (automatische Anmeldung) • Lok programmieren• Lokliste für aktive 10 Lokomotiven (direkte Wahl) + 1 Lok aus Lokkarte• Lok Datenbank mit 1.000 Lokomotiven• Keyboard (Adressen 1 - 320)
Für den Betrieb ist zusätzlich folgendes erforderlich:• Gleisbox 60113 für HO/N oder Gleisbox 60112 für Spur 1• Netzgerät oder• Anschluss an Central Station 60213, 60214• Anschluss an Terminal 60125 mittels Adapterkabel 610 479
B
Anschluss mit GleisboxVorbereitungen
!Pro Anlage darf nur eine Gleisbox ange-schlossen werden.
Spur1
HON
K-Gleis C-Gleis
B0
B0 0
4
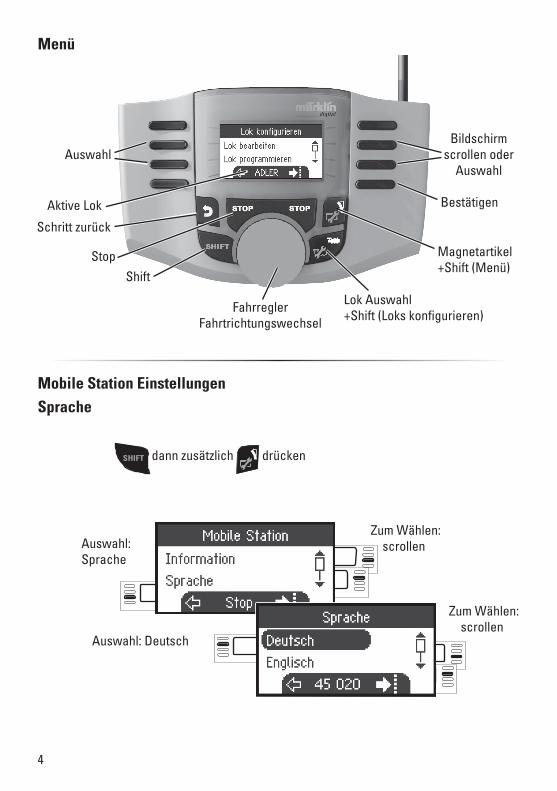
Zum Wählen: scrollen
Zum Wählen: scrollen
Auswahl: Deutsch
Fahrregler Fahrtrichtungswechsel
Lok Auswahl +Shift (Loks konfigurieren)
Magnetartikel +Shift (Menü)
Shift
Stop
Menü
AuswahlBildschirm
scrollen oder Auswahl
Aktive Lok Bestätigen
Schritt zurück
Mobile Station Einstellungen
Auswahl: Sprache
�����
Sprache
dann zusätzlich drücken
5
Magnetartikel +Shift (Menü)
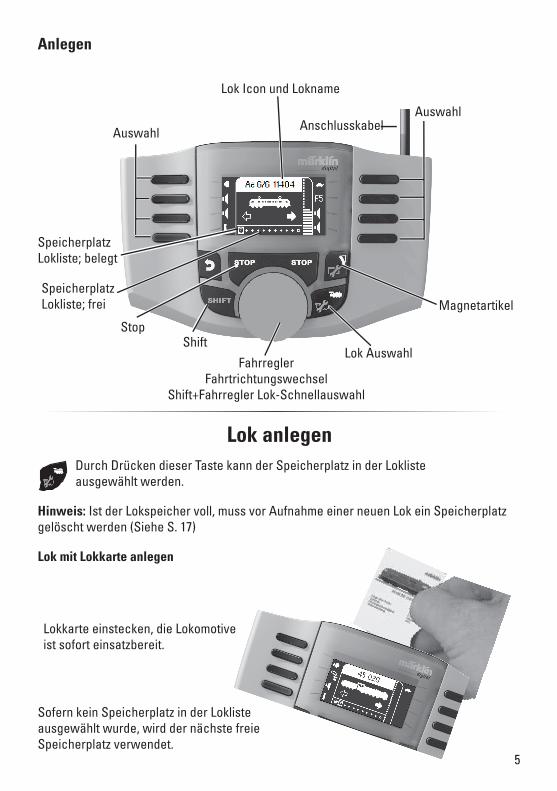
Lok mit Lokkarte anlegen
Lokkarte einstecken, die Lokomotive ist sofort einsatzbereit.
Lok anlegen Durch Drücken dieser Taste kann der Speicherplatz in der Lokliste ausgewählt werden.
Sofern kein Speicherplatz in der Lokliste ausgewählt wurde, wird der nächste freie Speicherplatz verwendet.
Hinweis: Ist der Lokspeicher voll, muss vor Aufnahme einer neuen Lok ein Speicherplatz gelöscht werden (Siehe S. 17)
Fahrregler Fahrtrichtungswechsel
Shift+Fahrregler Lok-Schnellauswahl
Lok Auswahl
Magnetartikel
Lok Icon und Lokname
Auswahl
ShiftStop
Anschlusskabel
Anlegen
Speicherplatz Lokliste; belegt
Speicherplatz Lokliste; frei
Auswahl
6
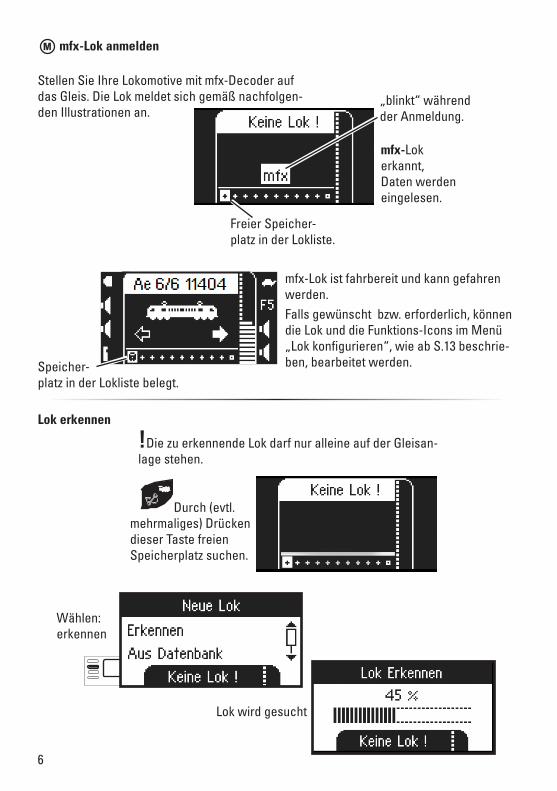
mfx-Lok erkannt, Daten werden eingelesen.
mfx-Lok ist fahrbereit und kann gefahren werden.Falls gewünscht bzw. erforderlich, können die Lok und die Funktions-Icons im Menü „Lok konfigurieren“, wie ab S.13 beschrie-ben, bearbeitet werden.
mfx-Lok anmelden
„blinkt“ während der Anmeldung.
Speicher- platz in der Lokliste belegt.
Freier Speicher- platz in der Lokliste.
�
Lok erkennen
Lok wird gesucht
!Die zu erkennende Lok darf nur alleine auf der Gleisan-lage stehen.
Wählen: erkennen
Durch (evtl. mehrmaliges) Drücken dieser Taste freien Speicherplatz suchen.
Stellen Sie Ihre Lokomotive mit mfx-Decoder auf das Gleis. Die Lok meldet sich gemäß nachfolgen-den Illustrationen an.
7
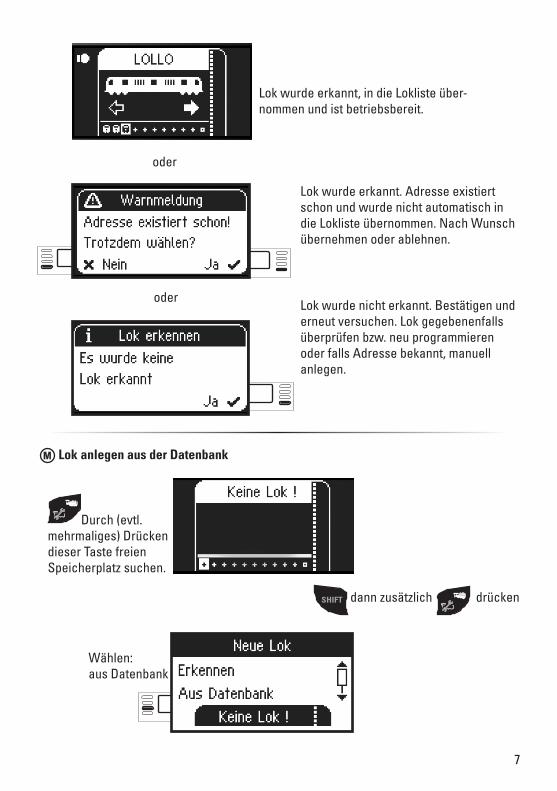
Lok anlegen aus der Datenbank
Durch (evtl. mehrmaliges) Drücken dieser Taste freien Speicherplatz suchen.
Wählen: aus Datenbank
�
Lok wurde erkannt, in die Lokliste über-nommen und ist betriebsbereit.
Lok wurde erkannt. Adresse existiert schon und wurde nicht automatisch in die Lokliste übernommen. Nach Wunsch übernehmen oder ablehnen.
Lok wurde nicht erkannt. Bestätigen und erneut versuchen. Lok gegebenenfalls überprüfen bzw. neu programmieren oder falls Adresse bekannt, manuell anlegen.
oder
oder
����� dann zusätzlich drücken
8
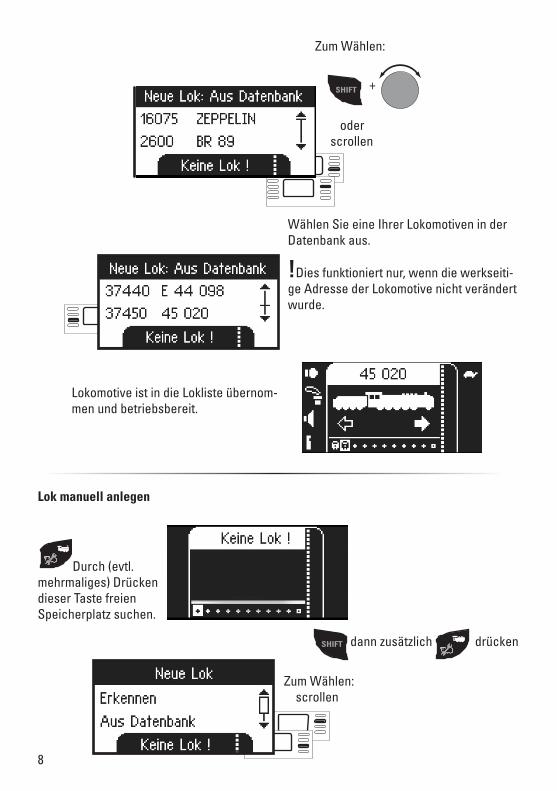
Wählen Sie eine Ihrer Lokomotiven in der Datenbank aus.
!Dies funktioniert nur, wenn die werkseiti-ge Adresse der Lokomotive nicht verändert wurde.
Lokomotive ist in die Lokliste übernom-men und betriebsbereit.
oder scrollen
����� +
Zum Wählen:
Lok manuell anlegen
Durch (evtl. mehrmaliges) Drücken dieser Taste freien Speicherplatz suchen.
Zum Wählen: scrollen
����� dann zusätzlich drücken
9
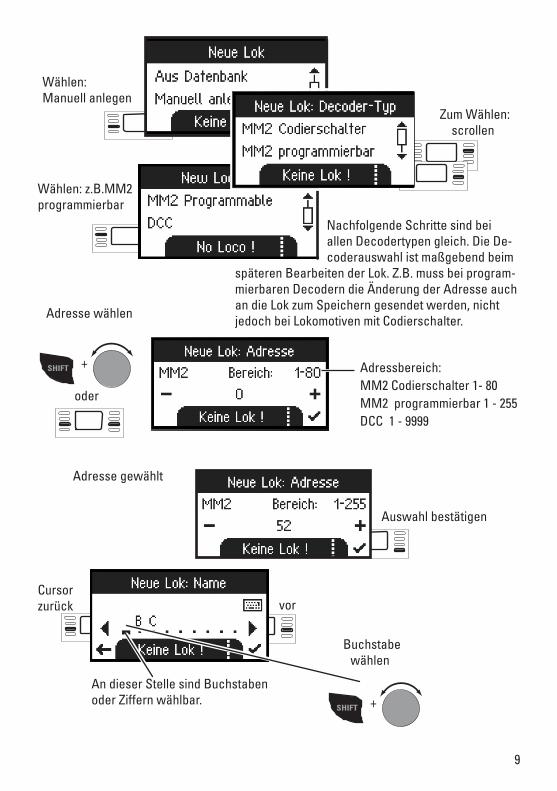
Adresse gewählt
Auswahl bestätigen
����� +
Buchstabe wählen
An dieser Stelle sind Buchstaben oder Ziffern wählbar.
Cursor zurück vor
Zum Wählen: scrollen
Nachfolgende Schritte sind bei allen Decodertypen gleich. Die De-coderauswahl ist maßgebend beim
späteren Bearbeiten der Lok. Z.B. muss bei program-mierbaren Decodern die Änderung der Adresse auch an die Lok zum Speichern gesendet werden, nicht jedoch bei Lokomotiven mit Codierschalter.
Wählen: Manuell anlegen
Wählen: z.B.MM2 programmierbar
Adressbereich:MM2 Codierschalter 1- 80MM2 programmierbar 1 - 255DCC 1 - 9999
����� +
Adresse wählen
oder
10
Zum Wählen: scrollen
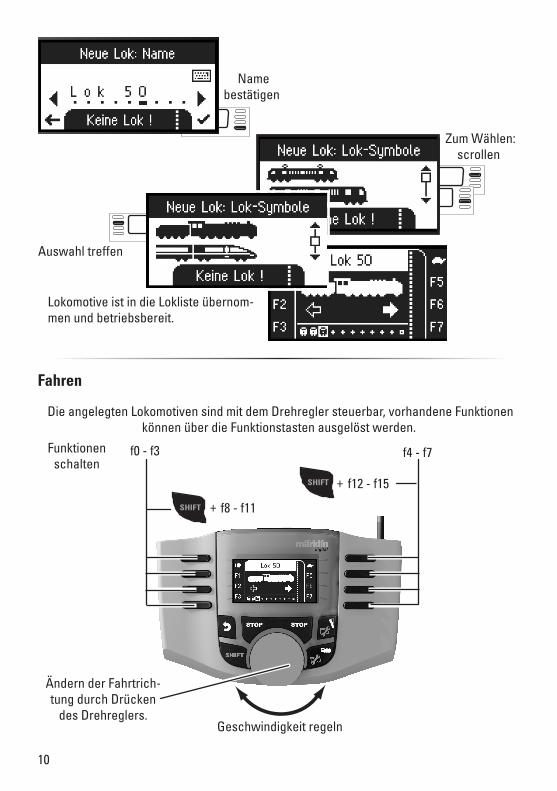
Lokomotive ist in die Lokliste übernom-men und betriebsbereit.
Name bestätigen
Auswahl treffen
Die angelegten Lokomotiven sind mit dem Drehregler steuerbar, vorhandene Funktionen können über die Funktionstasten ausgelöst werden.
Fahren
Geschwindigkeit regeln
Ändern der Fahrtrich-tung durch Drücken
des Drehreglers.
Funktionen schalten
�����
f0 - f3
f8 - f11+
f12 - f15 �����
f4 - f7
+
11
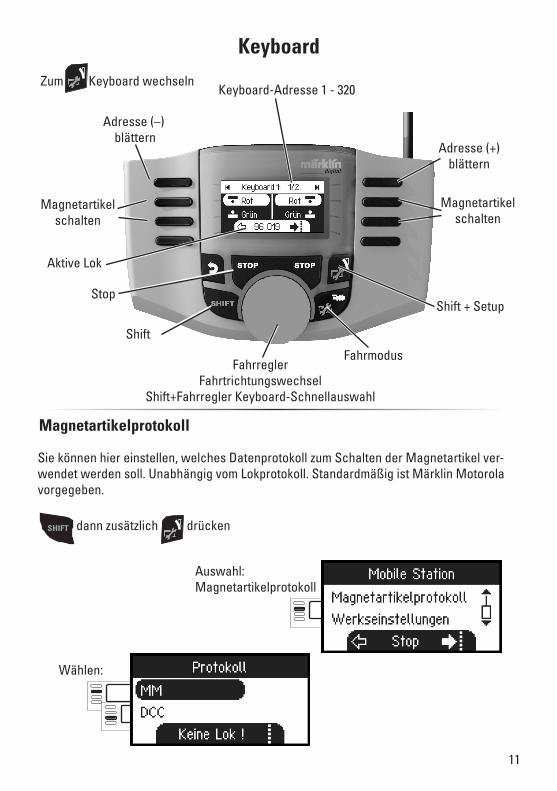
Keyboard
Auswahl: Magnetartikelprotokoll
Magnetartikelprotokoll
Sie können hier einstellen, welches Datenprotokoll zum Schalten der Magnetartikel ver-wendet werden soll. Unabhängig vom Lokprotokoll. Standardmäßig ist Märklin Motorola vorgegeben.
Fahrregler Fahrtrichtungswechsel
Shift+Fahrregler Keyboard-Schnellauswahl
Fahrmodus
Shift + Setup
Keyboard-Adresse 1 - 320
Adresse (–) blättern
Shift
Stop
Adresse (+) blättern
Magnetartikel schalten
Magnetartikel schalten
Aktive Lok
Zum Keyboard wechseln
����� dann zusätzlich drücken
Wählen:
12
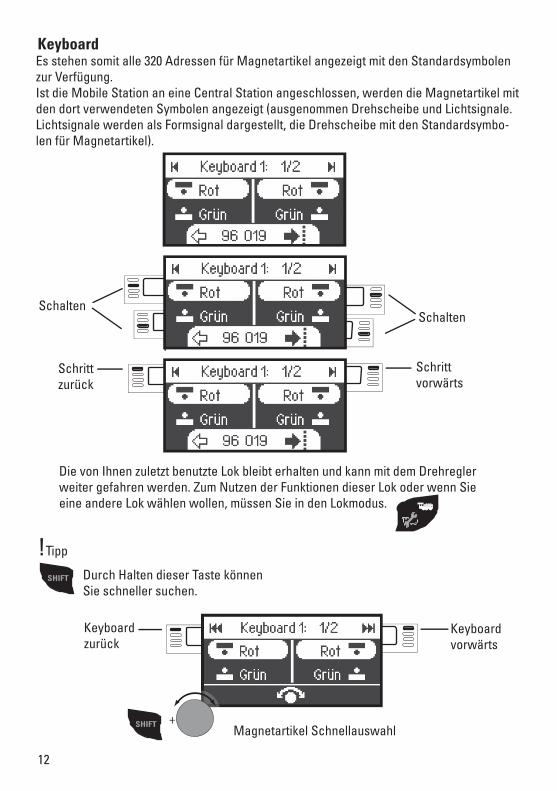
KeyboardEs stehen somit alle 320 Adressen für Magnetartikel angezeigt mit den Standardsymbolen zur Verfügung. Ist die Mobile Station an eine Central Station angeschlossen, werden die Magnetartikel mit den dort verwendeten Symbolen angezeigt (ausgenommen Drehscheibe und Lichtsignale. Lichtsignale werden als Formsignal dargestellt, die Drehscheibe mit den Standardsymbo-len für Magnetartikel).
Die von Ihnen zuletzt benutzte Lok bleibt erhalten und kann mit dem Drehregler weiter gefahren werden. Zum Nutzen der Funktionen dieser Lok oder wenn Sie eine andere Lok wählen wollen, müssen Sie in den Lokmodus.
����� Durch Halten dieser Taste können Sie schneller suchen.
SchaltenSchalten
Schritt zurück
Schritt vorwärts
Keyboard zurück
Keyboard vorwärts
����� +Magnetartikel Schnellauswahl
!Tipp
+
13
Zum Wählen: scrollen
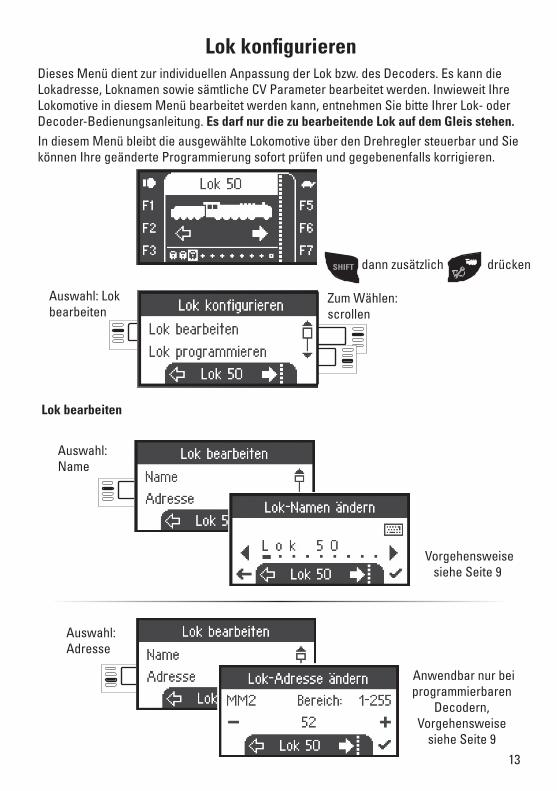
Dieses Menü dient zur individuellen Anpassung der Lok bzw. des Decoders. Es kann die Lokadresse, Loknamen sowie sämtliche CV Parameter bearbeitet werden. Inwieweit Ihre Lokomotive in diesem Menü bearbeitet werden kann, entnehmen Sie bitte Ihrer Lok- oder Decoder-Bedienungsanleitung. Es darf nur die zu bearbeitende Lok auf dem Gleis stehen. In diesem Menü bleibt die ausgewählte Lokomotive über den Drehregler steuerbar und Sie können Ihre geänderte Programmierung sofort prüfen und gegebenenfalls korrigieren.
Auswahl: Lok bearbeiten
Lok bearbeiten
Auswahl: Name
Anwendbar nur bei programmierbaren
Decodern, Vorgehensweise
siehe Seite 9
Auswahl: Adresse
Lok konfigurieren
Vorgehensweise siehe Seite 9
����� dann zusätzlich drücken
14
Auswahl bestätigen
Auswahl bestätigen
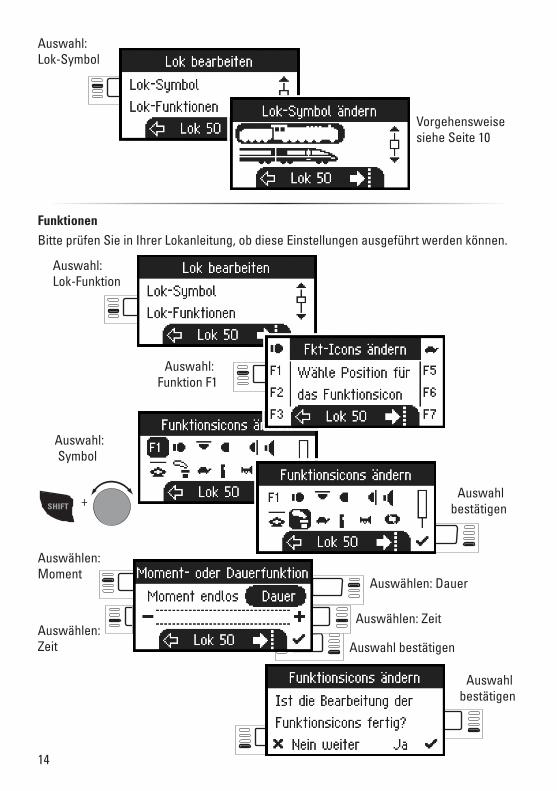
Auswahl: Lok-Symbol
Vorgehensweise siehe Seite 10
Auswahl: Lok-Funktion
Auswahl: Funktion F1
����� +
Auswahl: Symbol
Auswählen: Moment
Auswählen: Dauer
Auswählen: Zeit
Auswählen: Zeit
Auswahl bestätigen
FunktionenBitte prüfen Sie in Ihrer Lokanleitung, ob diese Einstellungen ausgeführt werden können.
15
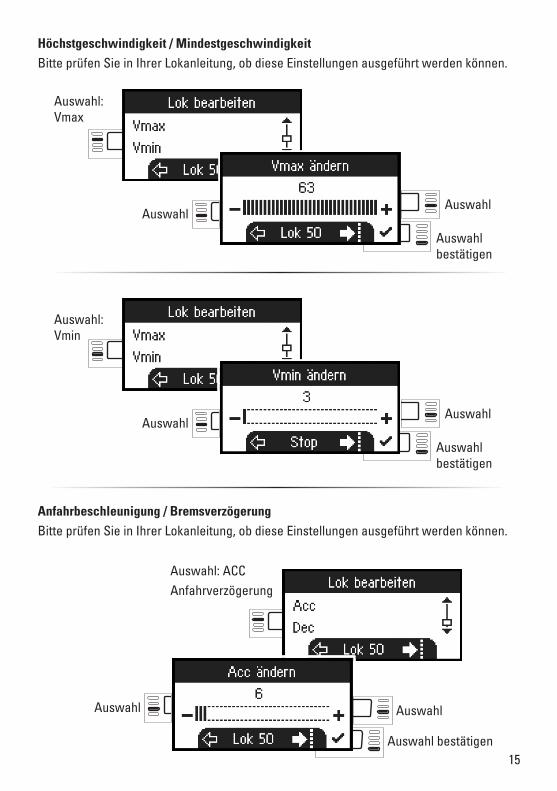
Auswahl bestätigen
Auswahl: Vmax
AuswahlAuswahl
Auswahl bestätigen
Auswahl: Vmin
AuswahlAuswahl
Auswahl bestätigen
Auswahl: ACCAnfahrverzögerung
Auswahl Auswahl
Anfahrbeschleunigung / BremsverzögerungBitte prüfen Sie in Ihrer Lokanleitung, ob diese Einstellungen ausgeführt werden können.
Höchstgeschwindigkeit / MindestgeschwindigkeitBitte prüfen Sie in Ihrer Lokanleitung, ob diese Einstellungen ausgeführt werden können.
16
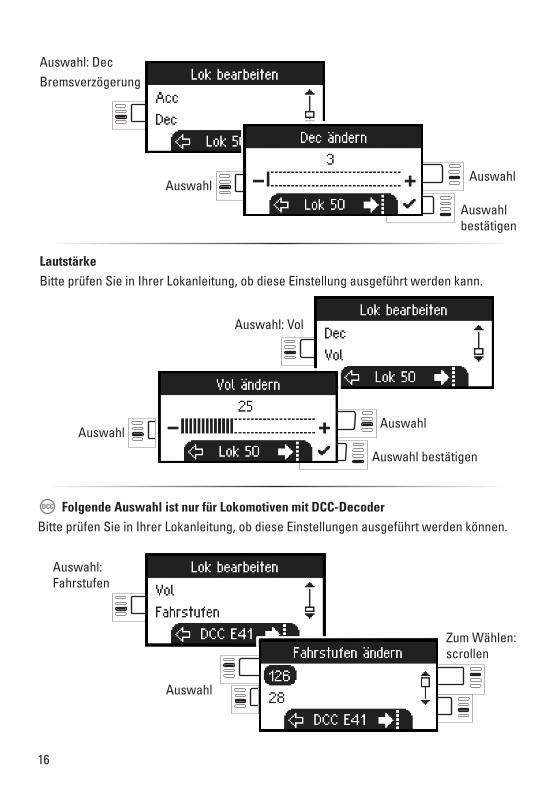
Auswahl bestätigen
Auswahl: DecBremsverzögerung
AuswahlAuswahl
LautstärkeBitte prüfen Sie in Ihrer Lokanleitung, ob diese Einstellung ausgeführt werden kann.
Auswahl: Vol
Auswahl bestätigen
AuswahlAuswahl
Auswahl: Fahrstufen
Auswahl
Folgende Auswahl ist nur für Lokomotiven mit DCC-DecoderBitte prüfen Sie in Ihrer Lokanleitung, ob diese Einstellungen ausgeführt werden können.
���
Zum Wählen: scrollen

17
Auswahl bestätigen
Lok programmieren���
Auswahl bestätigen
Auswahl: Lok programmieren
AuswahlAuswahl
Stellen Sie zuerst den zu bearbeitenden CV-Wert (laut Ihrer Decoder-/Lokanleitung) ein und bestätigen die Auswahl. Es wird zuerst der gesuchte CV-Wert eingelesen, danach können Sie im Schritt 2 den Wert ändern und bestätigen. Auf diese Weise können sie jeden zulässigen CV-Wert ändern.
Auswahl: Lok-karte schreiben
Auswahl
Lokkarte schreiben
Auswahl: Lok löschen
Auswahl Auswahl
Lokkarte einstecken (siehe Seite 5)
Lok löschen
18
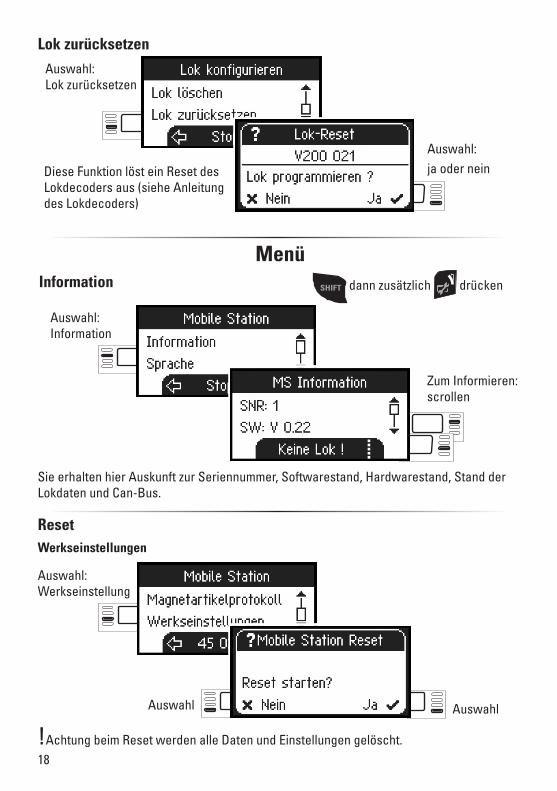
Zum Informieren: scrollen
Auswahl: Information
Information
Sie erhalten hier Auskunft zur Seriennummer, Softwarestand, Hardwarestand, Stand der Lokdaten und Can-Bus.
Reset
Auswahl: Werkseinstellung
Auswahl Auswahl
!Achtung beim Reset werden alle Daten und Einstellungen gelöscht.
Menü
Werkseinstellungen
����� dann zusätzlich drücken
Auswahl:ja oder nein
Auswahl: Lok zurücksetzen
Lok zurücksetzen
Diese Funktion löst ein Reset des Lokdecoders aus (siehe Anleitung des Lokdecoders)
19
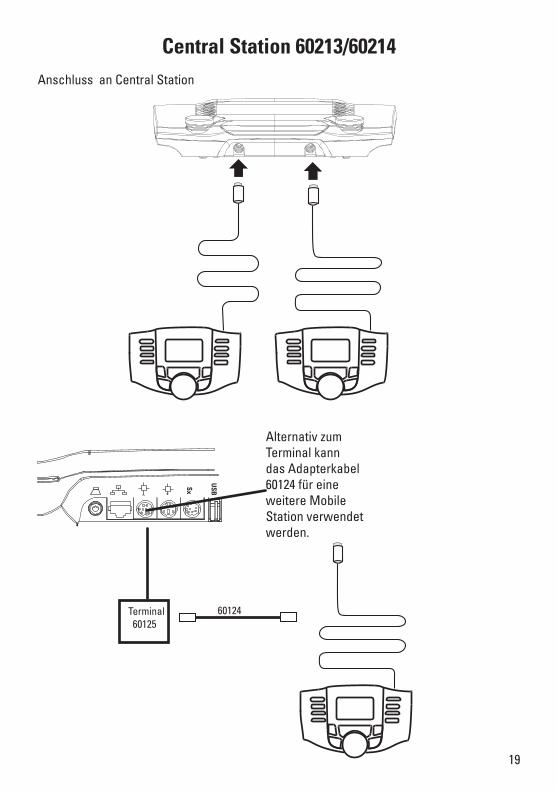
Central Station 60213/60214Anschluss an Central Station
Terminal 60125
Alternativ zum Terminal kann das Adapterkabel 60124 für eine weitere Mobile Station verwendet werden.
���
� �
60124
20
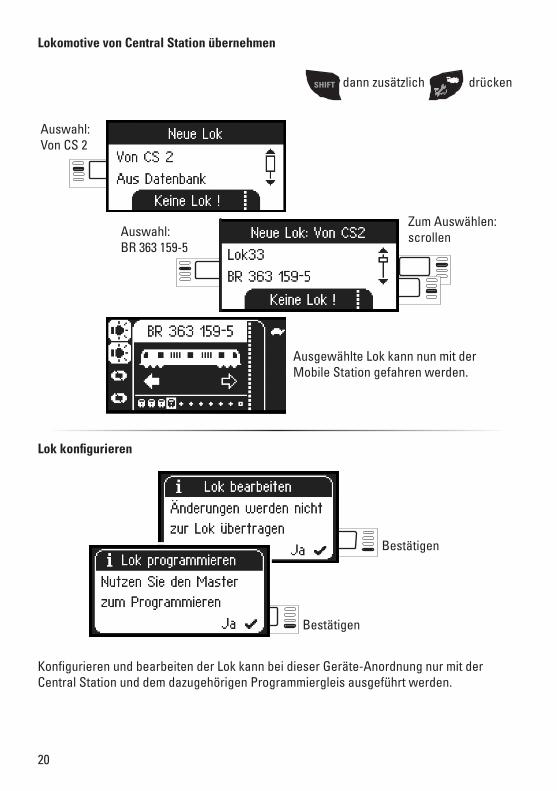
Zum Auswählen:scrollen
Lokomotive von Central Station übernehmen
Auswahl: Von CS 2
Auswahl: BR 363 159-5
Ausgewählte Lok kann nun mit der Mobile Station gefahren werden.
Lok konfigurieren
Konfigurieren und bearbeiten der Lok kann bei dieser Geräte-Anordnung nur mit der Central Station und dem dazugehörigen Programmiergleis ausgeführt werden.
����� dann zusätzlich drücken
Bestätigen
Bestätigen
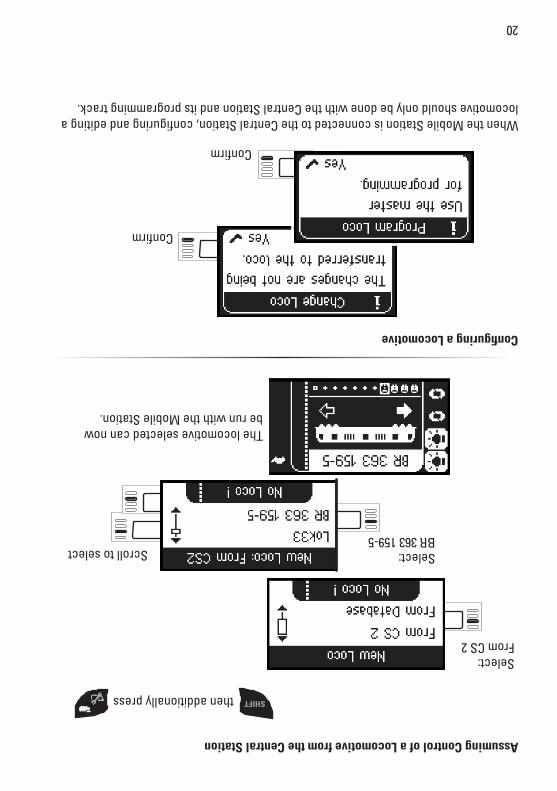
Scroll to select
Assuming Control of a Locomotive from the Central Station
Select: From CS 2
Select: BR 363 159-5
The locomotive selected can now be run with the Mobile Station.
Configuring a Locomotive
When the Mobile Station is connected to the Central Station, configuring and editing a locomotive should only be done with the Central Station and its programming track.
20
Confirm
Confirm
����� then additionally press
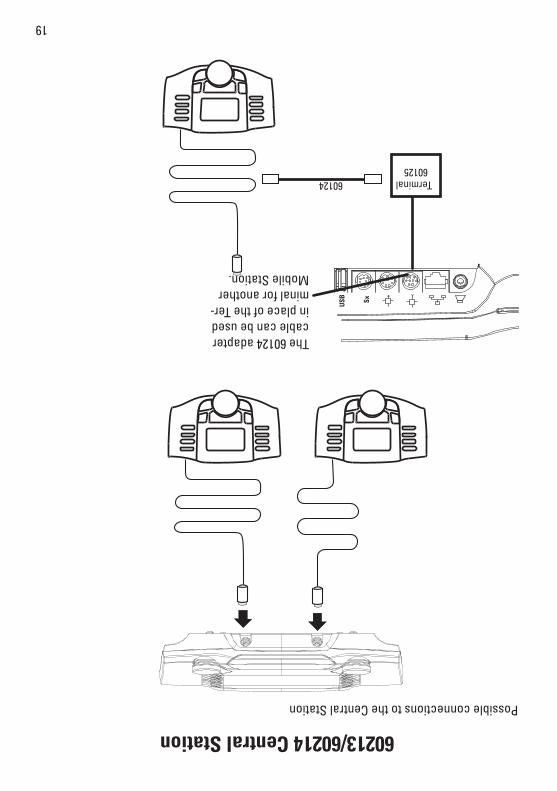
60213/60214 Central StationPossible connections to the Central Station
The 60124 adapter cable can be used in place of the Ter-minal for another Mobile Station.
���
��
19
Terminal 60125
60124
Select
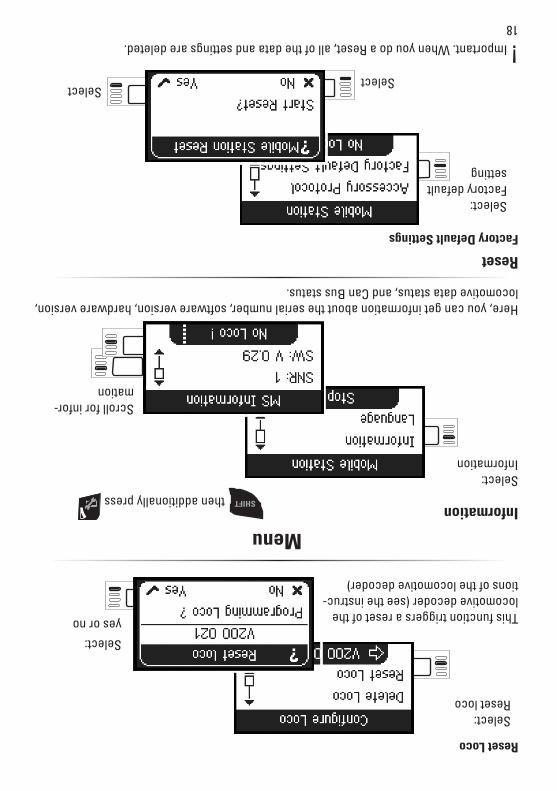
Scroll for infor-mation
Information
Here, you can get information about the serial number, software version, hardware version, locomotive data status, and Can Bus status.
Reset
Select
! Important. When you do a Reset, all of the data and settings are deleted.
Menu
Factory Default Settings
18
Select: Information
����� then additionally press
Select: Factory default setting
Select:yes or no
Select: Reset loco
Reset Loco
This function triggers a reset of the locomotive decoder (see the instruc-tions of the locomotive decoder)
Confirm selection
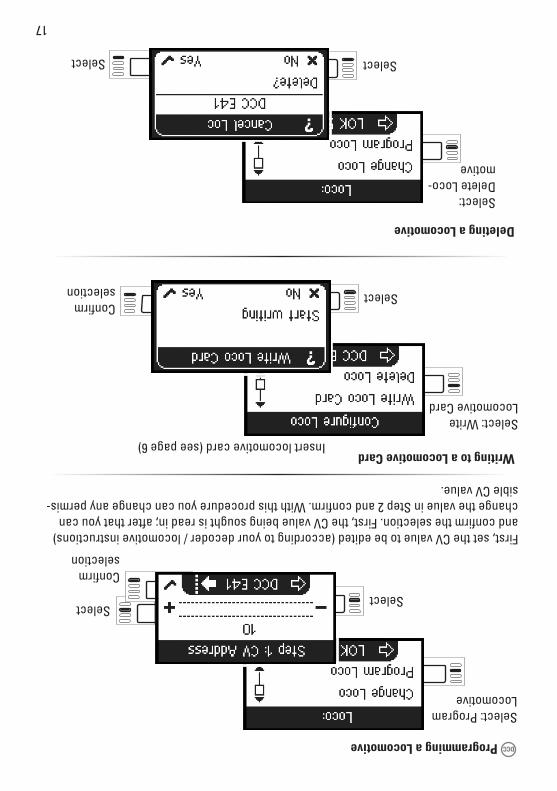
Programming a Locomotive ���
Confirm selection
Select: Program Locomotive
SelectSelect
First, set the CV value to be edited (according to your decoder / locomotive instructions) and confirm the selection. First, the CV value being sought is read in; after that you can change the value in Step 2 and confirm. With this procedure you can change any permis-sible CV value.
Select: Write Locomotive Card
Select
Writing to a Locomotive Card
Select: Delete Loco-motive
SelectSelect
Insert locomotive card (see page 6)
Deleting a Locomotive
17
Confirm selection
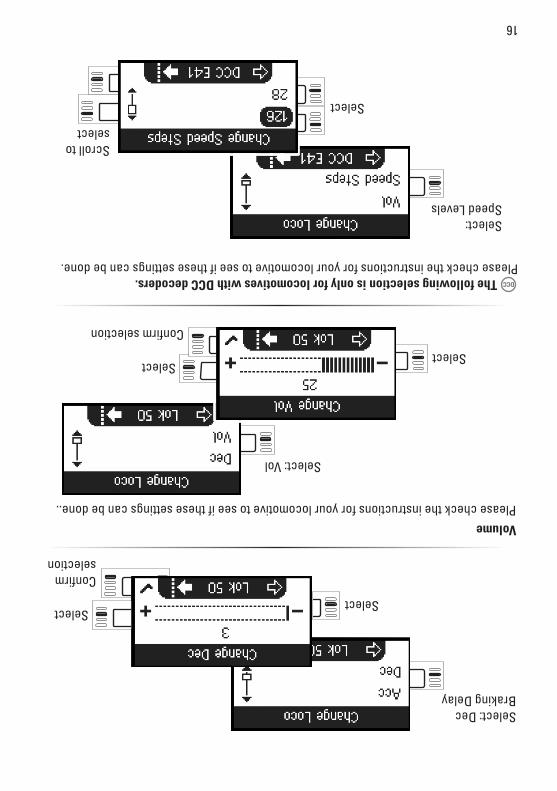
Select: Dec Braking Delay
SelectSelect
VolumePlease check the instructions for your locomotive to see if these settings can be done..
Select: Vol
Confirm selection
SelectSelect
Select: Speed Levels
Select
The following selection is only for locomotives with DCC decoders. Please check the instructions for your locomotive to see if these settings can be done.���
16
Scroll to select
Confirm selection
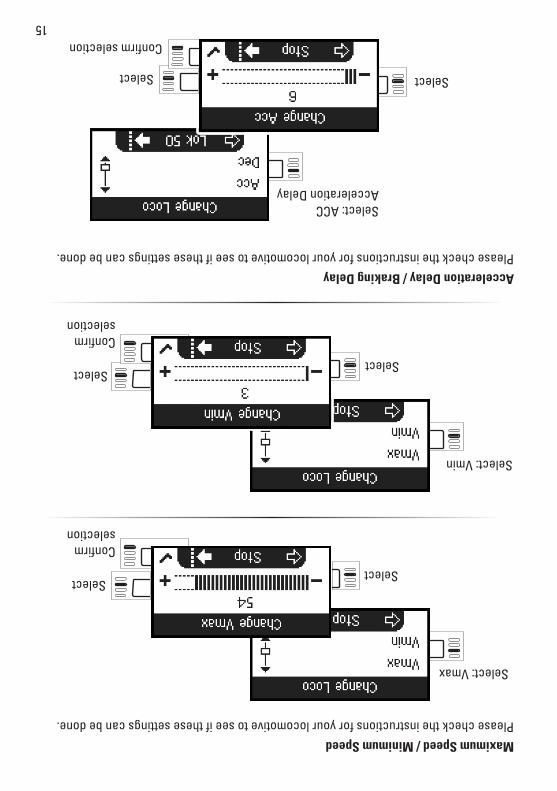
Select: Vmax
SelectSelect
Confirm selection
Select: Vmin
SelectSelect
Confirm selection
Select: ACC Acceleration Delay
Select Select
Acceleration Delay / Braking DelayPlease check the instructions for your locomotive to see if these settings can be done.
Maximum Speed / Minimum SpeedPlease check the instructions for your locomotive to see if these settings can be done.
15
Confirm selection
Confirm selection
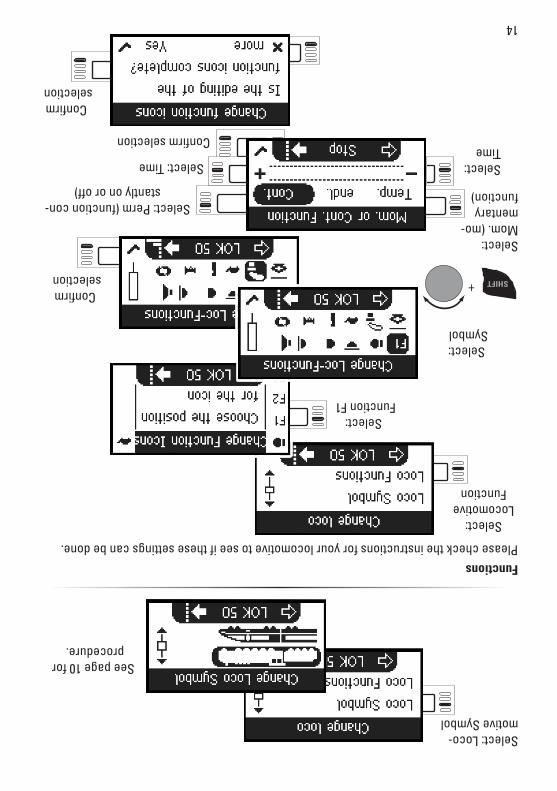
Select: Loco-motive Symbol
See page 10 for procedure.
Select: Locomotive
Function
Select: Function F1
�����+
Select: Symbol
Select: Mom. (mo-mentary function)
Select: Perm (function con-stantly on or off)
Select: Time
Select: Time
Confirm selection
FunctionsPlease check the instructions for your locomotive to see if these settings can be done.
14
Select: Scroll
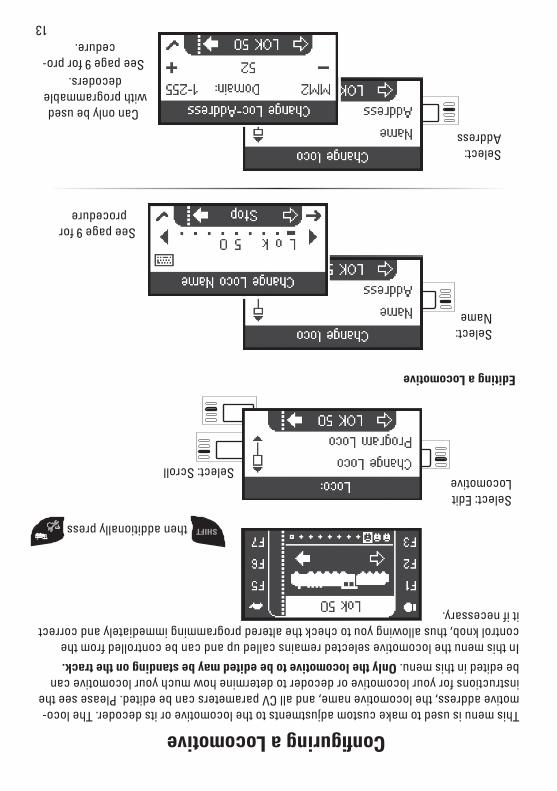
This menu is used to make custom adjustments to the locomotive or its decoder. The loco-motive address, the locomotive name, and all CV parameters can be edited. Please see the instructions for your locomotive or decoder to determine how much your locomotive can be edited in this menu. Only the locomotive to be edited may be standing on the track.In this menu the locomotive selected remains called up and can be controlled from the control knob, thus allowing you to check the altered programming immediately and correct it if necessary.
Select: Edit Locomotive
Editing a Locomotive
Select: Name
Can only be used with programmable
decoders.See page 9 for pro-
cedure.
Select: Address
Configuring a Locomotive
13
See page 9 for procedure
����� then additionally press
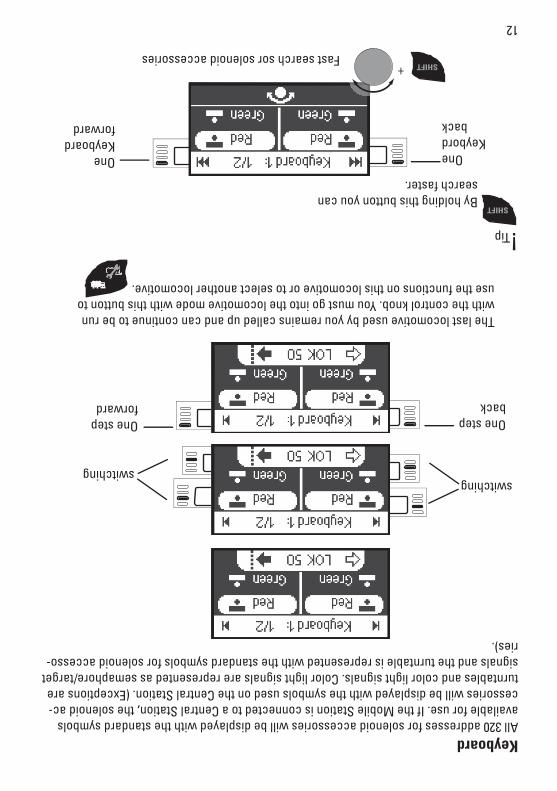
KeyboardAll 320 addresses for solenoid accessories will be displayed with the standard symbols available for use. If the Mobile Station is connected to a Central Station, the solenoid ac-cessories will be displayed with the symbols used on the Central Station. (Exceptions are turntables and color light signals. Color light signals are represented as semaphore/target signals and the turntable is represented with the standard symbols for solenoid accesso-ries).
The last locomotive used by you remains called up and can continue to be run with the control knob. You must go into the locomotive mode with this button to use the functions on this locomotive or to select another locomotive.
�����By holding this button you can search faster.
switchingswitching
One step back
One step forward
One Keybord
back
One Keyboard forward
�����+Fast search sor solenoid accessories
!Tip
12

Keyboard
Select: Solenoid Accessory Protocol
Solenoid Accessory Protocol
Here, you can set which data protocol is to be used for controlling solenoid accessories. Independently of the locomotive protocol. Märklin Motorola is already set as a standard protocol.
Locomotive control knob Reversing direction
Shift + control knop for fast Keyboardn selection
Locomotive control mode
Shift + Setup
Keyboard address 1 - 320
Scroll addresses (–)
Shift
Stop
Scroll addresses (+)
Controlling accessories
Controlling accessories
Active locomotive
Change to Keyboard
11
Confirm selection
����� then additionally press
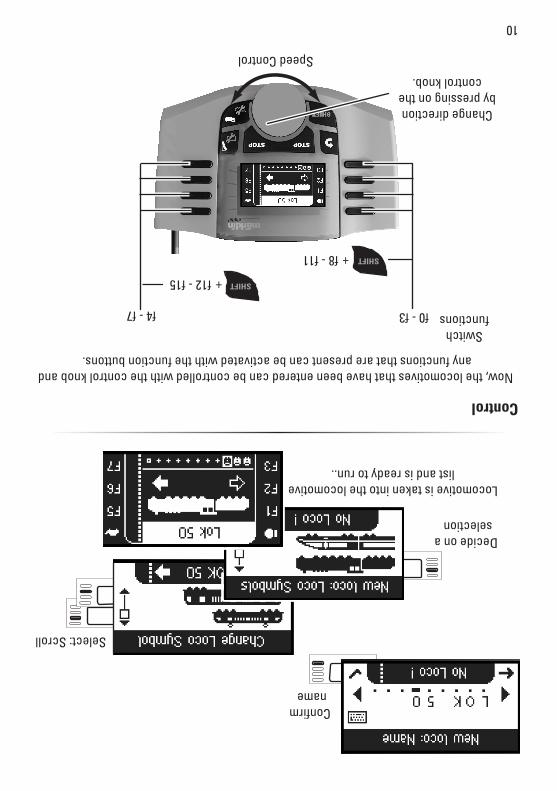
Select: Scroll
Locomotive is taken into the locomotive list and is ready to run..
Confirm name
Decide on a selection
Now, the locomotives that have been entered can be controlled with the control knob and any functions that are present can be activated with the function buttons.
Control
Speed Control
Change direction by pressing on the
control knob.
Switch functions
�����
f0 - f3
f8 - f11 +
f12 - f15 �����
f4 - f7
+
10

Address selected
Confirm selection
�����+
Select letter
The letters or digits can be selec-ted at this spot.
Cursor back Forward
Select: Scroll
The following steps are the same for all types of decoders. The selection of the decoder
controls editing of the locomotive later on. For example, with programmable decoders changing the address must also be sent to the locomotive to be stored in memory, but not for locomotives with coding switches.
Select: Enter manually
Select: Ex. MM2programmable
Address range:MM2 with coding switches 1- 80MM2 programmable 1 - 255DCC 1 - 9999
�����+
Select Address
or
9
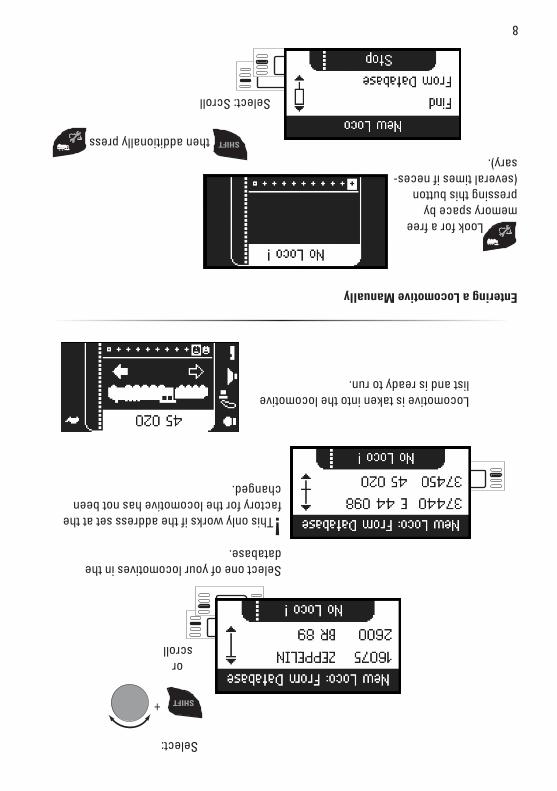
Select one of your locomotives in the database.
!This only works if the address set at the factory for the locomotive has not been changed.
Locomotive is taken into the locomotive list and is ready to run.
or scroll
�����+
Select:
Entering a Locomotive Manually
Look for a free memory space by pressing this button (several times if neces-sary).
Select: Scroll
8
����� then additionally press
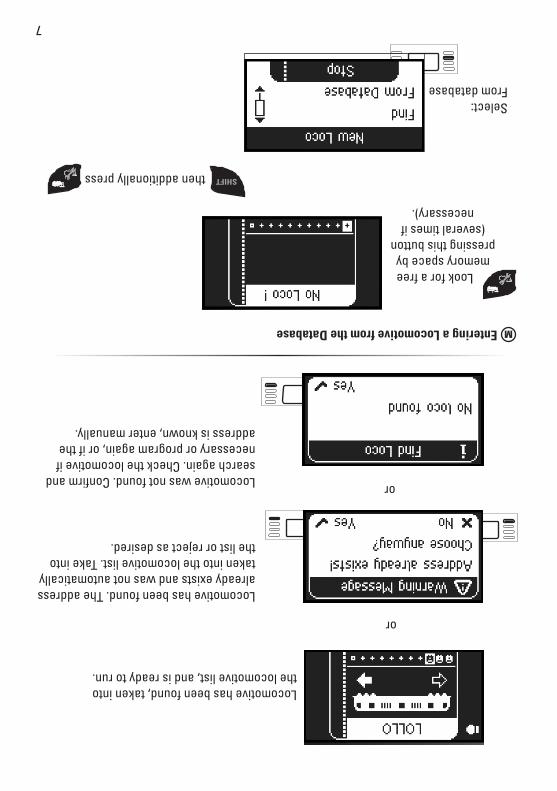
Entering a Locomotive from the Database
Look for a free memory space by
pressing this button (several times if
necessary).
Select: From database
�
Locomotive has been found, taken into the locomotive list, and is ready to run.
Locomotive has been found. The address already exists and was not automatically taken into the locomotive list. Take into the list or reject as desired.
Locomotive was not found. Confirm and search again. Check the locomotive if necessary or program again, or if the address is known, enter manually.
or
or
7
����� then additionally press

mfx locomotive is recognized; data is read in.
mfx locomotive is ready to be used and can be run.If desired or if necessary, the locomotive and function icons in the menu „Configuring Locomotives“ can be edited as described starting on page 13.
Registering an mfx Locomotive
“blinks“ during registration.
Memory space in the loco-motive list is occupied.
Free memory space in the locomotive list.
�
Finding a Locomotive
A search is made for the locomotive.
!The locomotive to be found must be the only locomotive standing on the track layout.
Select: Find
Look for a free memory space by pressing this button (several times if
necessary).
6
Place your locomotive with the mfx-decoder on the track. The locomotive registers itself as shown in the following illustrations.
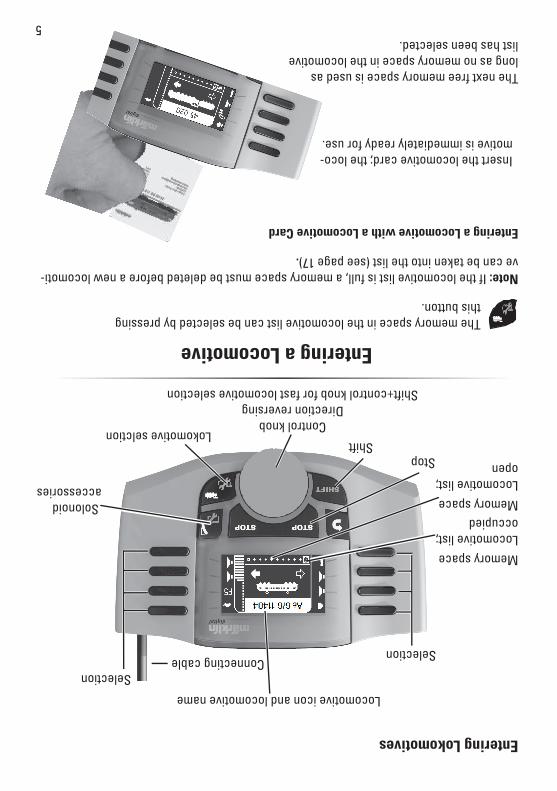
Entering a Locomotive with a Locomotive Card
Insert the locomotive card; the loco-motive is immediately ready for use.
Entering a Locomotive The memory space in the locomotive list can be selected by pressing this button.
The next free memory space is used as long as no memory space in the locomotive list has been selected.
Note: If the locomotive list is full, a memory space must be deleted before a new locomoti-ve can be taken into the list (see page 17).
Control knobDirection reversing
Shift+control knob for fast locomotive selection
Lokomotive selction
Locomotive icon and locomotive name
Selection
ShiftStop
SelectionConnecting cable
Entering Lokomotives
Memory spaceLocomotive list; occupiedMemory spaceLocomotive list; open
5
Solonoid accessories
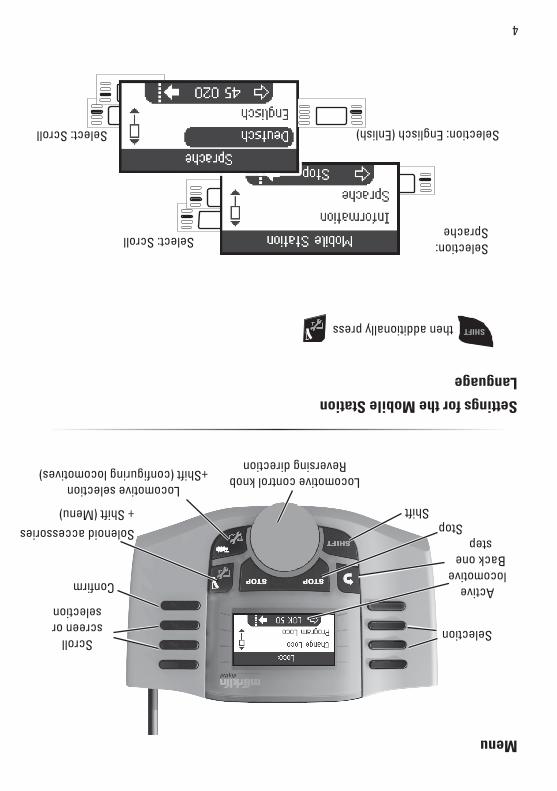
Selection: Englisch (Enlish)
Locomotive control knob Reversing direction
Locomotive selection +Shift (configuring locomotives)
Solenoid accessories+ Shift (Menu) Shift
Stop
Menu
SelectionScroll
screen or selection
Active locomotive
Confirm
Back one step
Settings for the Mobile Station
Selection: Sprache
Language
4
����� then additionally press
Select: Scroll
Select: Scroll

Mobile StationMobile Station Features:• Digital protocols: Märklin Motorola, mfx, DCC according to NMRA/NEM standards• Running locomotives (� addresses 1 - 255, ��� 1 - 9999)• Running mfx locomotives (automatic registration)• Programming locomotives• Locomotive list for 10 active locomotives (direct selection) + 1 locomotive from a
locomotive card• Locomotive data base with 1,000 locomotives• Keyboard (addresses 1 - 320)
The Mobile Station is used to control a model railroad and can be used for H0/N/1 Gauge.The following is also required for operation:• 60113 Track Box for H0/N or 60112 Track Box for 1 Gauge• A transformer or power packor• Connections to a 60213 or 60214 Central Station• Connections to a 60125 Terminal by means of a 610 479 adapter cable
B
Connections to a Track BoxPreparations
!Only one Track Box may be connected to a layout.
1HON
Gauge
K Track C Track
B0
B00
3
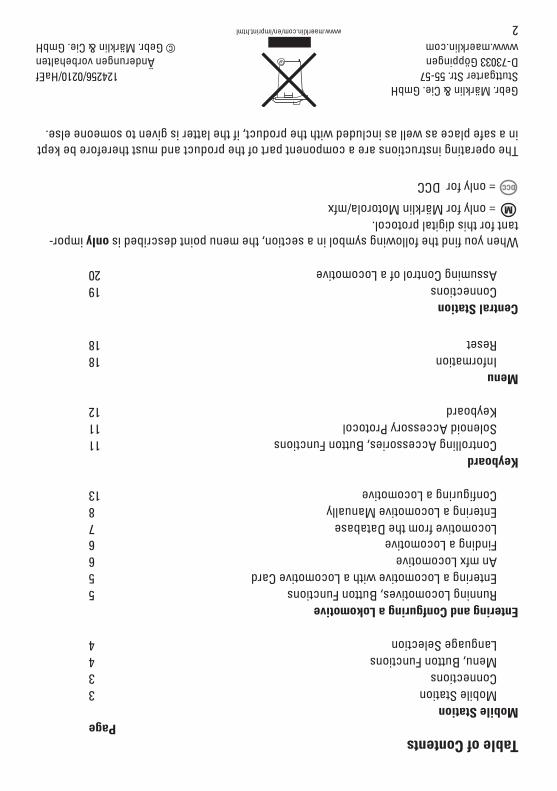
Table of Contents PageMobile Station Mobile Station 3 Connections 3 Menu, Button Functions 4 Language Selection 4
Entering and Confguring a Lokomotive Running Locomotives, Button Functions 5 Entering a Locomotive with a Locomotive Card 5 An mfx Locomotive 6 Finding a Locomotive 6 Locomotive from the Database 7 Entering a Locomotive Manually 8 Configuring a Locomotive 13
Keyboard Controlling Accessories, Button Functions 11 Solenoid Accessory Protocol 11 Keyboard 12
Menu Information 18 Reset 18
Central Station Connections 19 Assuming Control of a Locomotive 20 When you find the following symbol in a section, the menu point described is only impor-tant for this digital protocol.
= only for Märklin Motorola/mfx
= only for DCC
The operating instructions are a component part of the product and must therefore be kept in a safe place as well as included with the product, if the latter is given to someone else.
�
���
2
124256/0210/HaEfÄnderungen vorbehalten
© Gebr. Märklin & Cie. GmbH
Gebr. Märklin & Cie. GmbH Stuttgarter Str. 55-57D-73033 Göppingen www.maerklin.com
www.maerklin.com/en/imprint.html

Mobile Station
60653
EnglishDeutsch
Instruction