Embed Size (px)
Citation preview

ANBAUANLEITUNGmounting instructions • instructions de montage • instrucciones de montaje • istruzioni di montaggio
beinhaltet • contains • contient • contiene • contieneSTP.05.590.10000/B
STP.05.590.80000/B
STP.00.590.10001/B

1
STP.05.590.003
Anzahl/Pcs. 1
Anbaublech linksMounting Bracket
left side
2
STP.05.590.004
Anzahl/Pcs. 1
Anbaublech rechtsMounting Bracket
right side
5
M10 x 70 DIN 912
Anzahl/Pcs. 1
Innensechskant-schraube
Hexagon Socket Screw
9
FSH.00.008.001
Anzahl/Pcs. 2
Obere Rahmenklemme
Upper Frame Clamp
10
FSH.00.008.002
Anzahl/Pcs. 2
Untere Rahmenklemme
Lower Frame Clamp
11
M6 x 35 DIN 931
Anzahl/Pcs. 4
SechskantschraubeHexagon Screw
12
A 6,4 DIN 125
Anzahl/Pcs. 4
UnterlegscheibeWasher
6
M10 x 130 DIN 912
Anzahl/Pcs. 1
Innensechskant-schraube
Hexagon Socket Screw
FEINGEWINDE
FEINGEWINDE
7
Da:20 Di:10,5 h:44
Anzahl/Pcs. 2
DistanzbuchseSpacer
8
A 10,5 DIN 125
Anzahl/Pcs. 2
UnterlegscheibeWasher
3
STP.00.590.007
Anzahl/Pcs. 2
AdapterplatteAdapter Plate
4
M6 x 45 DIN 912
Anzahl/Pcs. 4
Innensechskant-schraube
Hexagon Socket Screw
13
BTG.00.088.057
Anzahl/Pcs. 1
SchonstreifenProtection Stripe
250 mm
Anbau-Kit für Sturzpad SUZUKI SFV 650 Gladius '09 –Mounting kit for frame slider SUZUKI SFV 650 Gladius '09 –
Montagehinweise Mounting Instructions
SW-MOTECH products should be installed by a qualified, experienced motorcycle technician. If you are unsure of your ability to properly install a product, please have the product installed by your local motorcycle dealer. SW Motech takes no responsibility for damages caused by improper installation.
All screws, bolts and nuts, including all replacement hardware provided by SW-MOTECH, should be tightened to the torque specified in the OEM maintenance manual for your motorcycle. If no torque specifications are provided in the OEM maintenance manual, the following torques may be used:
All screws, bolts and nuts should be checked after driving the first 50 km to ensure that all are tightened to the proper torque.
Medium strength liquid thread-locker (i.e., "Locktite") should be used to secure all screws, bolts and nuts.
Alle vom Motorrad gelösten Schrauben sind gemäß Herstellerangaben wieder zu montieren, oder mit von SW-MOTECH gelieferten Schrauben zu ersetzen. Falls nicht anderweitig definiert, diese Schrauben nach Tabelle anziehen.
Gegebenenfalls Schrauben mit flüssiger Schraubensicherung einkleben.
Prüfen Sie nach 50 km alle Verbindungen auf festen Sitz.
STP.05.590.80000/BRevision: 02
SW-MOTECH GmbH & Co. KGErnteweg 7-1035282 RauschenbergGermany
Tel. +49 (0) 64 25/8 16 8-050Fax +49 (0) 64 25/8 16 8-10
M6 9,6 Nm
M10 46 Nm
M6 9,6 Nm
M10 46 Nm
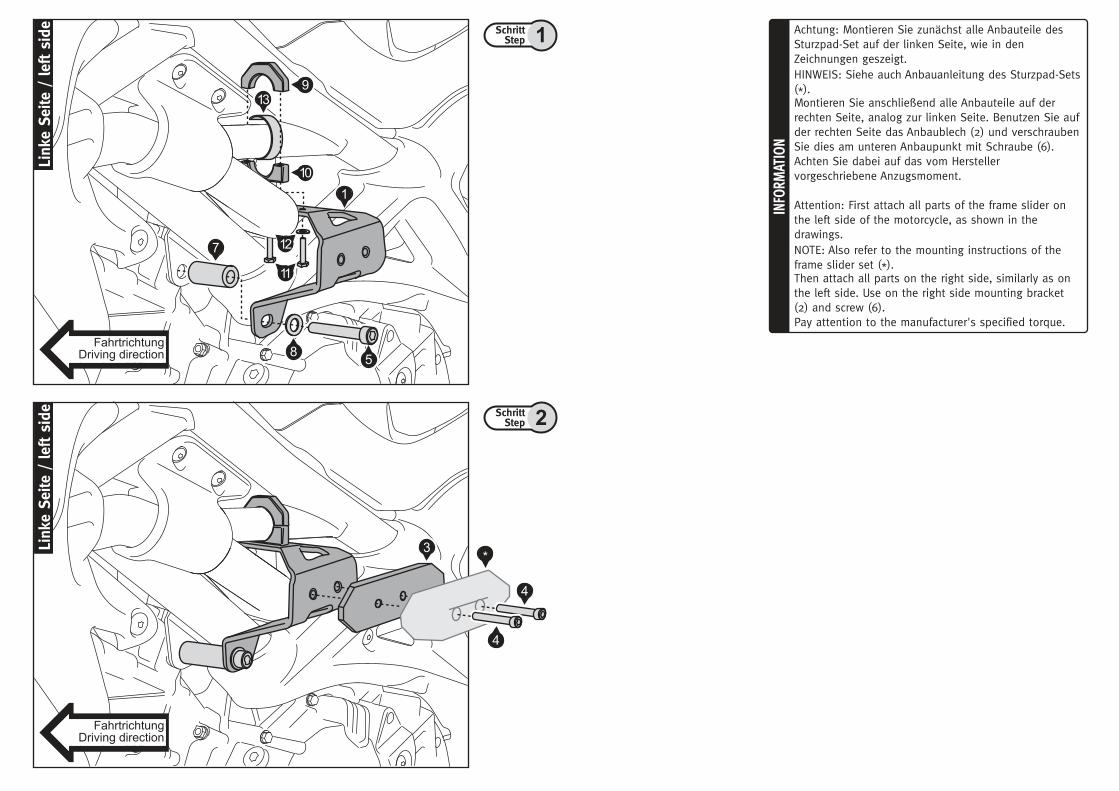
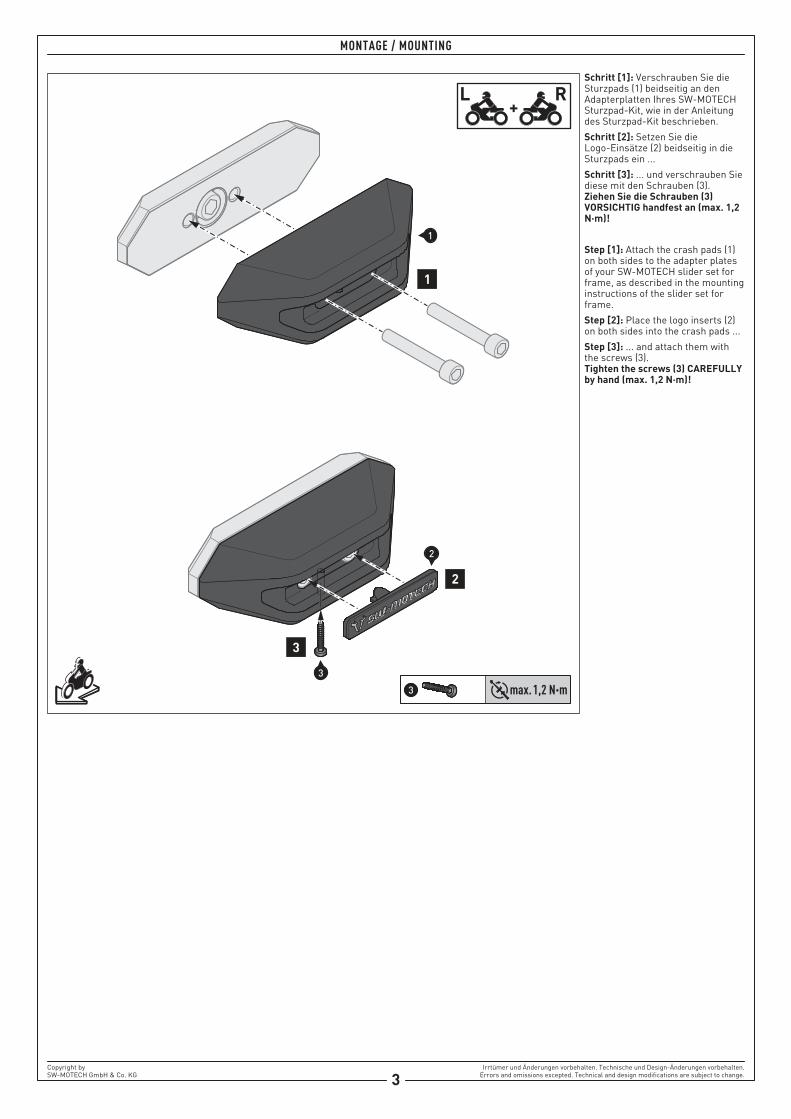
Achtung: Montieren Sie zunächst alle Anbauteile des Sturzpad-Set auf der linken Seite, wie in den Zeichnungen geszeigt.HINWEIS: Siehe auch Anbauanleitung des Sturzpad-Sets (*).Montieren Sie anschließend alle Anbauteile auf der rechten Seite, analog zur linken Seite. Benutzen Sie auf der rechten Seite das Anbaublech (2) und verschrauben Sie dies am unteren Anbaupunkt mit Schraube (6).Achten Sie dabei auf das vom Hersteller vorgeschriebene Anzugsmoment. Attention: First attach all parts of the frame slider on the left side of the motorcycle, as shown in the drawings.NOTE: Also refer to the mounting instructions of the frame slider set (*).Then attach all parts on the right side, similarly as on the left side. Use on the right side mounting bracket (2) and screw (6).Pay attention to the manufacturer's specified torque.
INFO
RMAT
ION
FahrtrichtungDriving direction
FahrtrichtungDriving direction
Link
e Se
ite /
left
side
Link
e Se
ite /
left
side
7
8
12
11
5
1
10
913
3*
4
4
SchrittStep 1
SchrittStep 2