Embed Size (px)
Citation preview
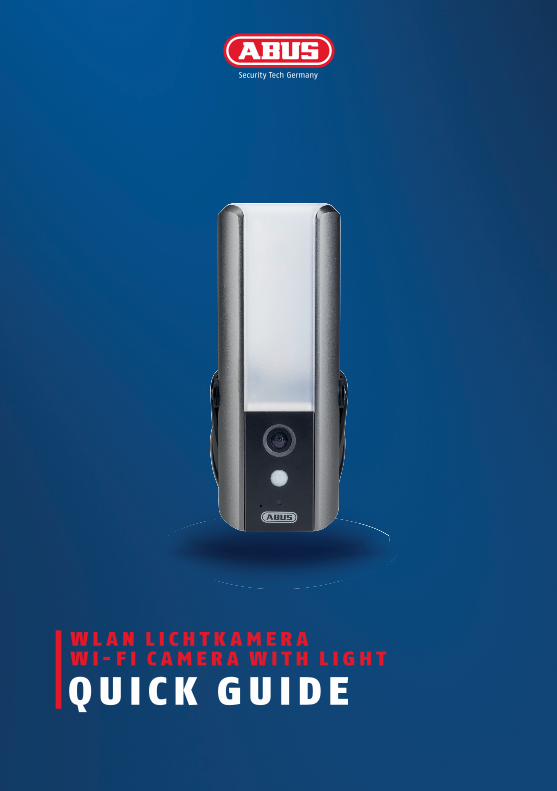
W L A N L I C H T K A M E R AW I -F I C A M E R A W I T H L I G H T
Q U I C K GU IDE

ABUS Smart Security World WLAN Lichtkamera (Art.-Nr. PPIC36520)ABUS Smart Security World Wi-Fi Camera with Light (Art. no. PPIC36520)
2 3
1
2.4 GHz WLAN Netzwerk mit Passwort und Verschlüsselung.2.4 GHz Wi-Fi network with password and encryption.
Der Standortdienst des mobilen Endgeräts muss aktiviert sein.The site service of the mobile end device must be activated.
Die Kamera kann nur in Verbindung mit der App2Cam Plus benutzt werden.The camera can only be used in conjunction with the App2Cam.
Max. 8 Kameras pro App verfügbar.Maximum of 8 cameras available per app.
Bei der Vergabe des WLAN-Passwortes sind folgende Sonderzeichen nicht möglich.The following special characters are not possible when allocating the Wi-Fi password.
S Y S T E MVO R AU S S E T ZUNGE NS Y S T E M R E Q U IR E ME NT S
L I E F E R UMFA NGS C O PE O F D E L I V E RY
Router mit einer 5 GHz Frequenz sowie Netzwerke ohne Verschlüsselung werden nicht unterstützt.Routers with a 5 GHz frequency and networks without encryption are not supported.
Erhöhung der Reichweite / SignalstärkeMit dem optional erhältlichen Signalverstärkerset TVAC17520 ist er möglich die Reichweite des WLAN-Signals zu erhöhen
Increasing the range/signal strength With the optional accessory signal amplification kit TVAC17520, you can increase the WiFi signal range of the camera.
WLAN LichtkameraWi-Fi Camera with Light
1
WandhalterungWall bracket
BohrschabloneDrilling template
AntenneAntenna
1
MontagematerialMounting material
1Reset - Tool / Imbus SchlüsselReset - Tool /Allen key
1
1
4 5
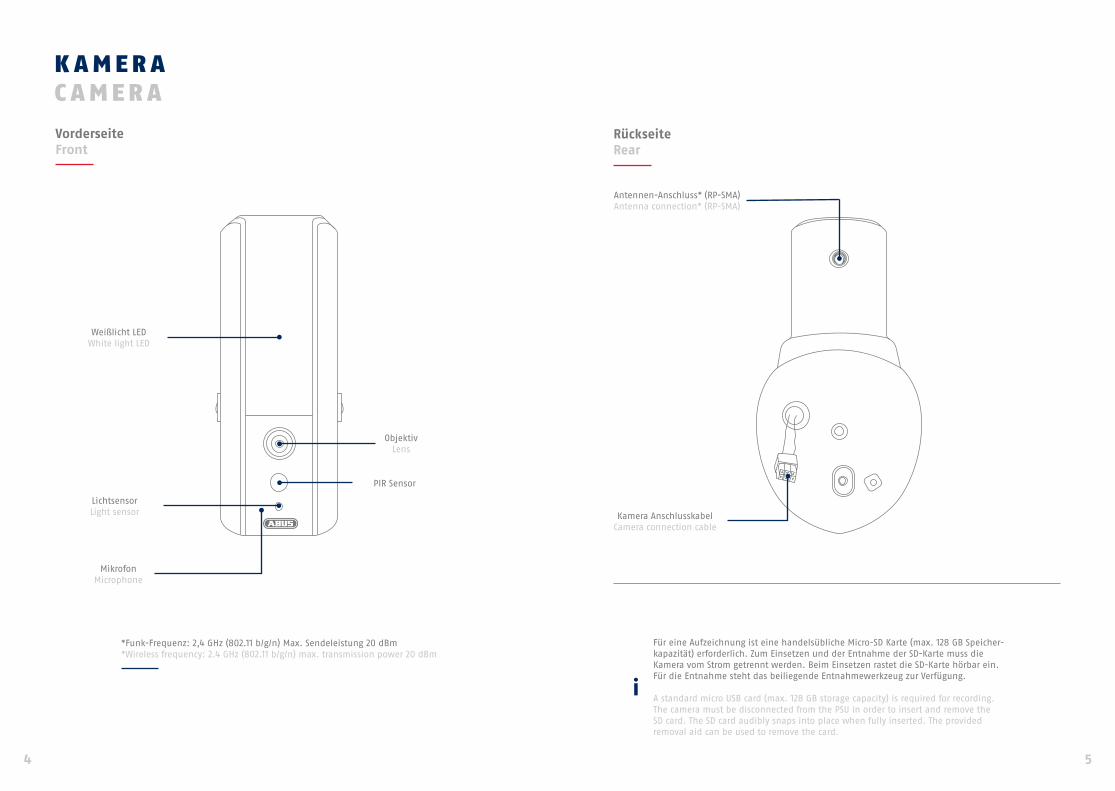
K A ME R AC A ME R A
VorderseiteFront
RückseiteRear
*Funk-Frequenz: 2,4 GHz (802.11 b/g/n) Max. Sendeleistung 20 dBm*Wireless frequency: 2.4 GHz (802.11 b/g/n) max. transmission power 20 dBm
MikrofonMicrophone
PIR Sensor
ObjektivLens
Antennen-Anschluss* (RP-SMA)Antenna connection* (RP-SMA)
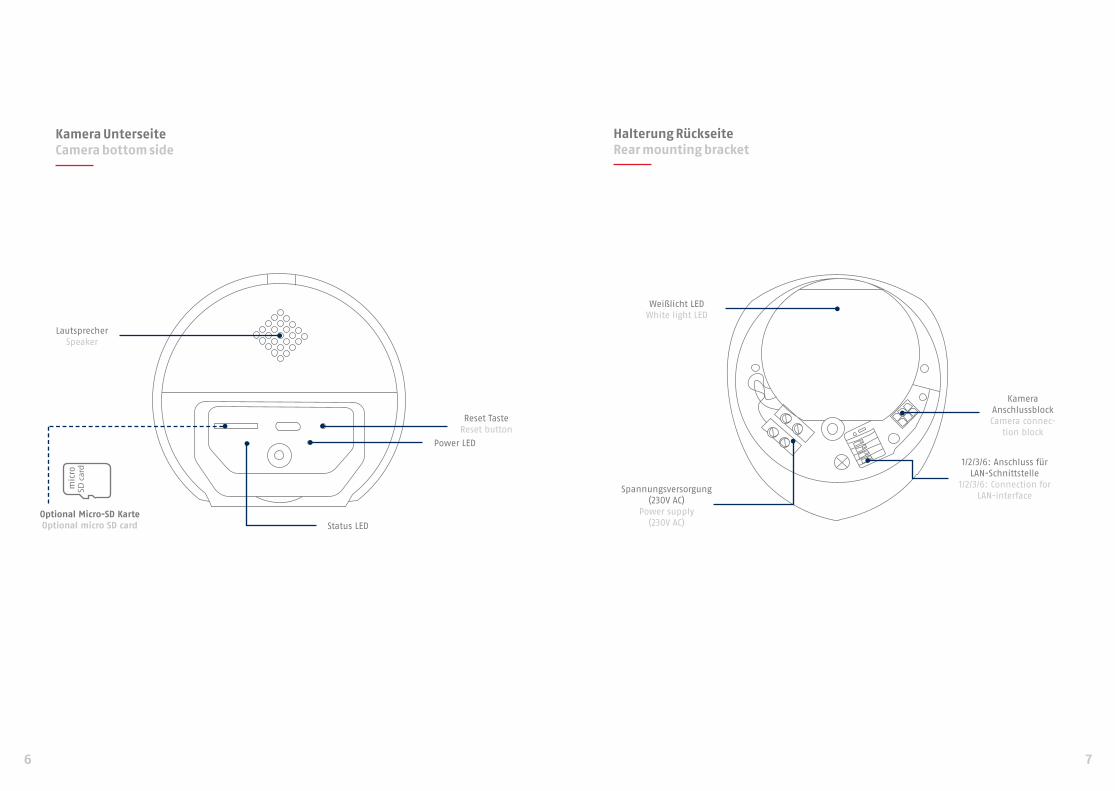
Für eine Aufzeichnung ist eine handelsübliche Micro-SD Karte (max. 128 GB Speicher-kapazität) erforderlich. Zum Einsetzen und der Entnahme der SD-Karte muss die Kamera vom Strom getrennt werden. Beim Einsetzen rastet die SD-Karte hörbar ein. Für die Entnahme steht das beiliegende Entnahmewerkzeug zur Verfügung.
A standard micro USB card (max. 128 GB storage capacity) is required for recording. The camera must be disconnected from the PSU in order to insert and remove the SD card. The SD card audibly snaps into place when fully inserted. The provided removal aid can be used to remove the card.
Weißlicht LEDWhite light LED
Lichtsensor Light sensor Kamera Anschlusskabel
Camera connection cable
6 7
Kamera UnterseiteCamera bottom side
Halterung RückseiteRear mounting bracket
Spannungsversorgung (230V AC)
Power supply (230V AC)
1/2/3/6: Anschluss für LAN-Schnittstelle
1/2/3/6: Connection for LAN-interface
Kamera AnschlussblockCamera connec-
tion block
Weißlicht LEDWhite light LED
Power LED
LautsprecherSpeaker
Reset TasteReset button
Optional Micro-SD KarteOptional micro SD card Status LED
8 9
WE R K S E IN S T E L L UNGE NFAC T O RY R E S E T
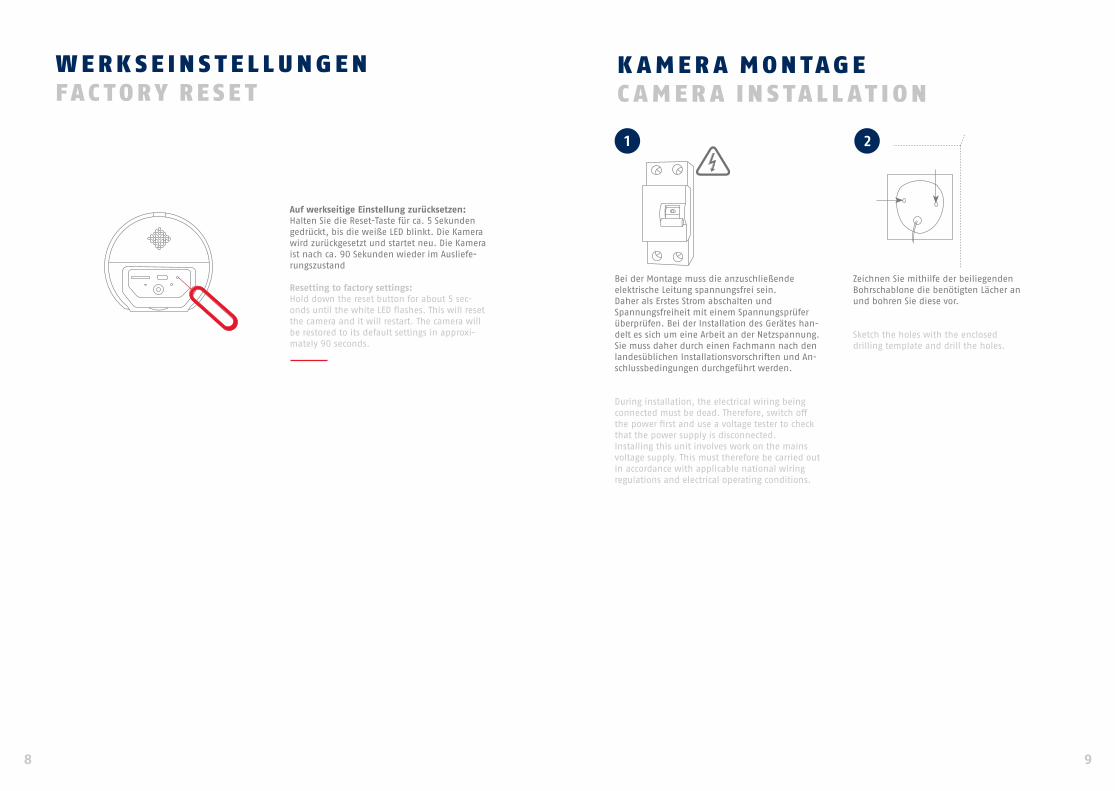
Auf werkseitige Einstellung zurücksetzen:Halten Sie die Reset-Taste für ca. 5 Sekunden gedrückt, bis die weiße LED blinkt. Die Kamera wird zurückgesetzt und startet neu. Die Kamera ist nach ca. 90 Sekunden wieder im Ausliefe-rungszustand
Resetting to factory settings:Hold down the reset button for about 5 sec-onds until the white LED flashes. This will reset the camera and it will restart. The camera will be restored to its default settings in approxi-mately 90 seconds.
K A ME R A MO NTAGEC A ME R A IN S TA L L AT I O N
1 2
Bei der Montage muss die anzuschließende elektrische Leitung spannungsfrei sein. Daher als Erstes Strom abschalten und Spannungsfreiheit mit einem Spannungsprüfer überprüfen. Bei der Installation des Gerätes han-delt es sich um eine Arbeit an der Netzspannung. Sie muss daher durch einen Fachmann nach den landesüblichen Installationsvorschriften und An-schlussbedingungen durchgeführt werden.
During installation, the electrical wiring being connected must be dead. Therefore, switch off the power first and use a voltage tester to check that the power supply is disconnected.Installing this unit involves work on the mains voltage supply. This must therefore be carried out in accordance with applicable national wiring regulations and electrical operating conditions.
Zeichnen Sie mithilfe der beiliegenden Bohrschablone die benötigten Lächer an und bohren Sie diese vor.
Sketch the holes with the enclosed drilling template and drill the holes.
10 11
3 4
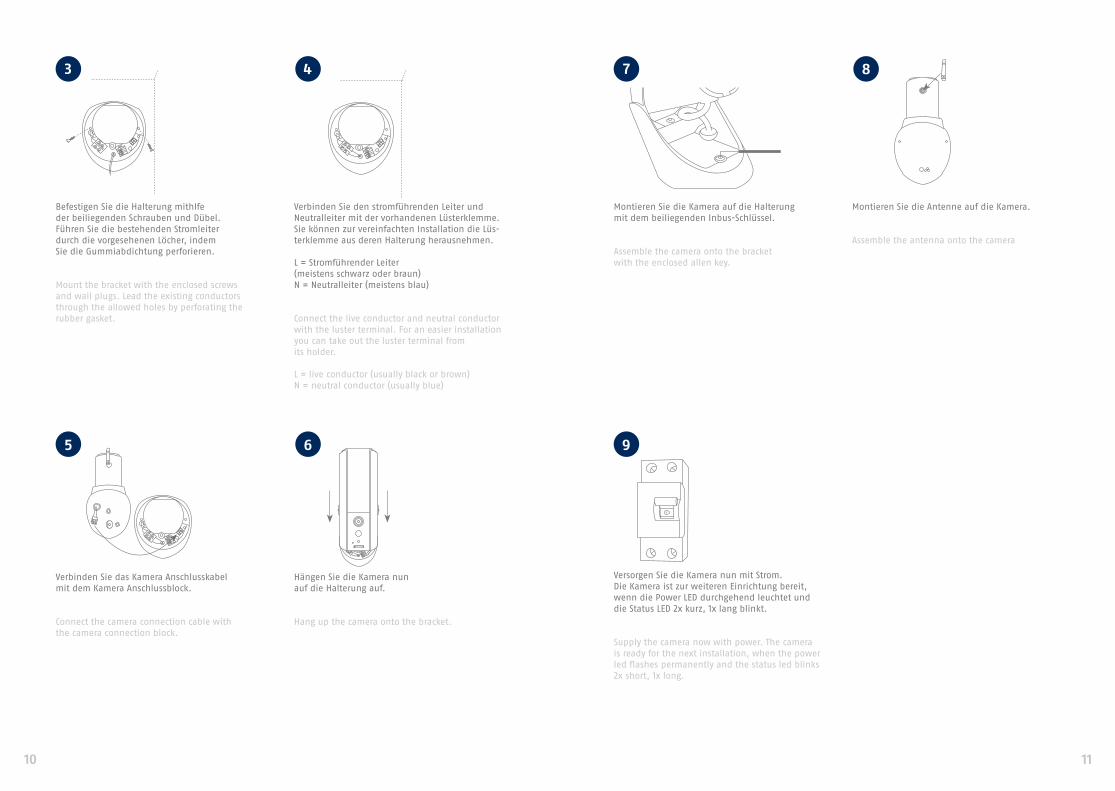
Befestigen Sie die Halterung mithlfe der beiliegenden Schrauben und Dübel. Führen Sie die bestehenden Stromleiter durch die vorgesehenen Löcher, indem Sie die Gummiabdichtung perforieren.
Mount the bracket with the enclosed screws and wall plugs. Lead the existing conductors through the allowed holes by perforating the rubber gasket.
Verbinden Sie den stromführenden Leiter und Neutralleiter mit der vorhandenen Lüsterklemme. Sie können zur vereinfachten Installation die Lüs-terklemme aus deren Halterung herausnehmen.
L = Stromführender Leiter (meistens schwarz oder braun)N = Neutralleiter (meistens blau)
Connect the live conductor and neutral conductor with the luster terminal. For an easier installation you can take out the luster terminal from its holder.
L = live conductor (usually black or brown)N = neutral conductor (usually blue)
Verbinden Sie das Kamera Anschlusskabel mit dem Kamera Anschlussblock.
Connect the camera connection cable with the camera connection block.
Hängen Sie die Kamera nun auf die Halterung auf.
Hang up the camera onto the bracket.
5 6
7 8
Montieren Sie die Kamera auf die Halterung mit dem beiliegenden Inbus-Schlüssel.
Assemble the camera onto the bracket with the enclosed allen key.
Montieren Sie die Antenne auf die Kamera.
Assemble the antenna onto the camera
Versorgen Sie die Kamera nun mit Strom. Die Kamera ist zur weiteren Einrichtung bereit, wenn die Power LED durchgehend leuchtet und die Status LED 2x kurz, 1x lang blinkt.
Supply the camera now with power. The camera is ready for the next installation, when the power led flashes permanently and the status led blinks 2x short, 1x long.
9
App- App2Cam Plus -
1
2
I N S TA L L AT I O N A PPIN S TA L L AT I O N A PP
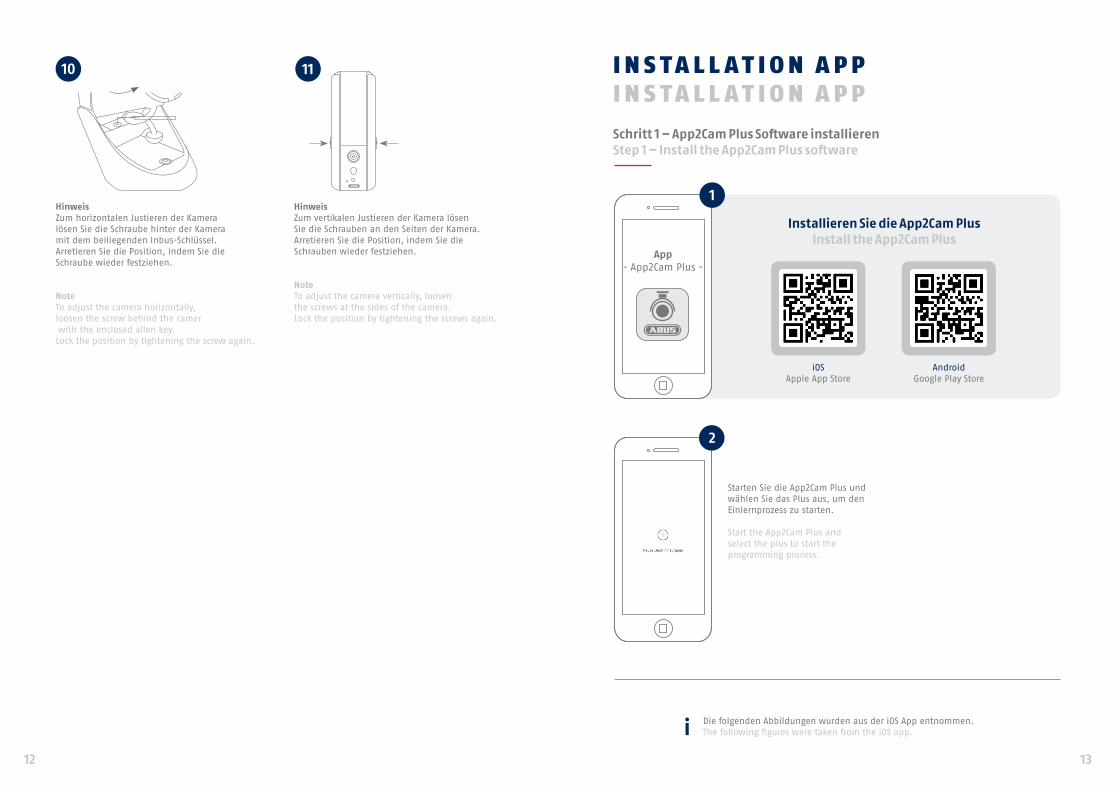
Starten Sie die App2Cam Plus und wählen Sie das Plus aus, um den Einlernprozess zu starten.
Start the App2Cam Plus and select the plus to start the programming process.
Installieren Sie die App2Cam PlusInstall the App2Cam Plus
iOSApple App Store
Android Google Play Store
Schritt 1 – App2Cam Plus Soft ware installierenStep 1 – Install the App2Cam Plus soft ware
Die folgenden Abbildungen wurden aus der iOS App entnommen.The following fi gures were taken from the iOS app.
12 13
10 11
HinweisZum horizontalen Justieren der Kameralösen Sie die Schraube hinter der Kameramit dem beiliegenden Inbus-Schlüssel. Arretieren Sie die Position, indem Sie dieSchraube wieder festziehen.
NoteTo adjust the camera horizontally,loosen the screw behind the camer with the enclosed allen key. Lock the position by tightening the screw again.
HinweisZum vertikalen Justieren der Kamera lösenSie die Schrauben an den Seiten der Kamera.Arretieren Sie die Position, indem Sie dieSchrauben wieder festziehen.
NoteTo adjust the camera vertically, loosenthe screws at the sides of the camera.Lock the position by tightening the screws again.
3
7
10
14 15
E IN L E R NE N S Y S T E MPR O GR A MMING S Y S T E M
5
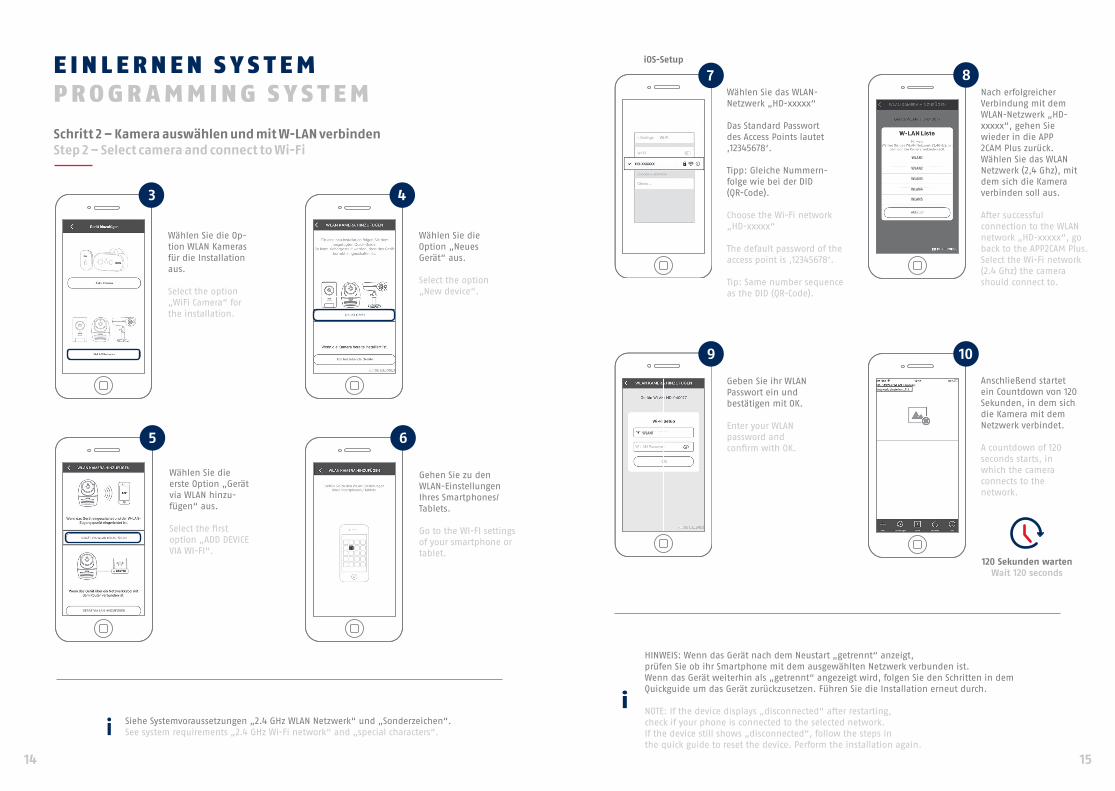
Wählen Sie die erste Option „Gerät via WLAN hinzu-fügen“ aus.
Select the fi rst option „ADD DEVICE VIA WI-FI“.
Wählen Sie die Op-tion WLAN Kameras für die Installation aus.
Select the option „WiFi Camera“ for the installation.
Schritt 2 – Kamera auswählen und mit W-LAN verbindenStep 2 – Select camera and connect to Wi-Fi
6
Gehen Sie zu den WLAN-Einstellungen Ihres Smartphones/Tablets.
Go to the WI-FI settings of your smartphone or tablet.
4
Wählen Sie die Option „NeuesGerät“ aus.
Select the option „New device“.
Siehe Systemvoraussetzungen „2.4 GHz WLAN Netzwerk“ und „Sonderzeichen“.See system requirements „2.4 GHz Wi-Fi network“ and „special characters“.
Wählen Sie das WLAN-Netzwerk „HD-xxxxx“
Das Standard Passwort des Access Points lautet ‚12345678‘.
Tipp: Gleiche Nummern-folge wie bei der DID(QR-Code).
Choose the Wi-Fi network „HD-xxxxx“
The default password of the access point is ‚12345678‘.
Tip: Same number sequence as the DID (QR-Code).
iOS-Setup
HINWEIS: Wenn das Gerät nach dem Neustart „getrennt“ anzeigt,prüfen Sie ob ihr Smartphone mit dem ausgewählten Netzwerk verbunden ist.Wenn das Gerät weiterhin als „getrennt“ angezeigt wird, folgen Sie den Schritten in demQuickguide um das Gerät zurückzusetzen. Führen Sie die Installation erneut durch.
NOTE: If the device displays „disconnected“ aft er restarting,check if your phone is connected to the selected network.If the device still shows „disconnected“, follow the steps inthe quick guide to reset the device. Perform the installation again.
Anschließend startet ein Countdown von 120 Sekunden, in dem sich die Kamera mit dem Netzwerk verbindet.
A countdown of 120 seconds starts, in which the camera connects to the network.
120 Sekunden wartenWait 120 seconds
8Nach erfolgreicher Verbindung mit dem WLAN-Netzwerk „HD-xxxxx“, gehen Siewieder in die APP2CAM Plus zurück.Wählen Sie das WLAN Netzwerk (2,4 Ghz), mit dem sich die Kameraverbinden soll aus.
Aft er successful connection to the WLAN network „HD-xxxxx“, go back to the APP2CAM Plus.Select the Wi-Fi network (2.4 Ghz) the camera should connect to.
9
Geben Sie ihr WLANPasswort ein undbestätigen mit OK.
Enter your WLAN password andconfi rm with OK.
WLAN1
WLAN2
WLAN3
WLAN4
WLAN5
WLAN1
11 13
16 17
Klicken Sie nun auf das Kamerabild in der Übersicht um das Livebild zu starten.
Click on the camera image in the overview to start the live view.
12
Sicherheitscode ändern
••••••••••••••
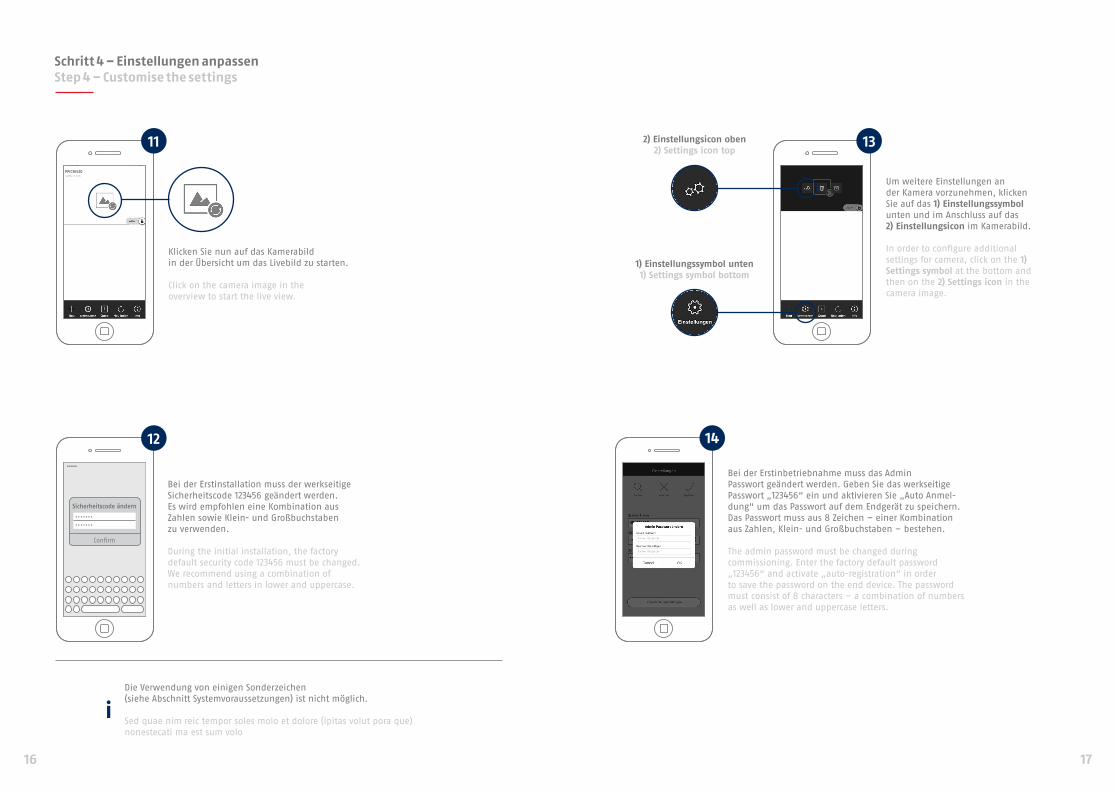
Bei der Erstinstallation muss der werkseitige Sicherheitscode 123456 geändert werden. Es wird empfohlen eine Kombination aus Zahlen sowie Klein- und Großbuchstaben zu verwenden.
During the initial installation, the factory default security code 123456 must be changed. We recommend using a combination of numbers and letters in lower and uppercase.
Schritt 4 – Einstellungen anpassenStep 4 – Customise the settings
Die Verwendung von einigen Sonderzeichen (siehe Abschnitt Systemvoraussetzungen) ist nicht möglich.
Sed quae nim reic tempor soles molo et dolore (ipitas volut pora que) nonestecati ma est sum volo
PPIC36520
1) Einstellungssymbol unten1) Settings symbol bottom
2) Einstellungsicon oben2) Settings icon top
Um weitere Einstellungen an der Kamera vorzunehmen, klicken Sie auf das 1) Einstellungssymbol unten und im Anschluss auf das 2) Einstellungsicon im Kamerabild.
In order to configure additional settings for camera, click on the 1) Settings symbol at the bottom and then on the 2) Settings icon in the camera image.
14
Bei der Erstinbetriebnahme muss das AdminPasswort geändert werden. Geben Sie das werkseitige Passwort „123456“ ein und aktivieren Sie „Auto Anmel-dung“ um das Passwort auf dem Endgerät zu speichern. Das Passwort muss aus 8 Zeichen – einer Kombination aus Zahlen, Klein- und Großbuchstaben – bestehen.
The admin password must be changed during commissioning. Enter the factory default password „123456“ and activate „auto-registration“ in order to save the password on the end device. The password must consist of 8 characters – a combination of numbers as well as lower and uppercase letters.
18 19
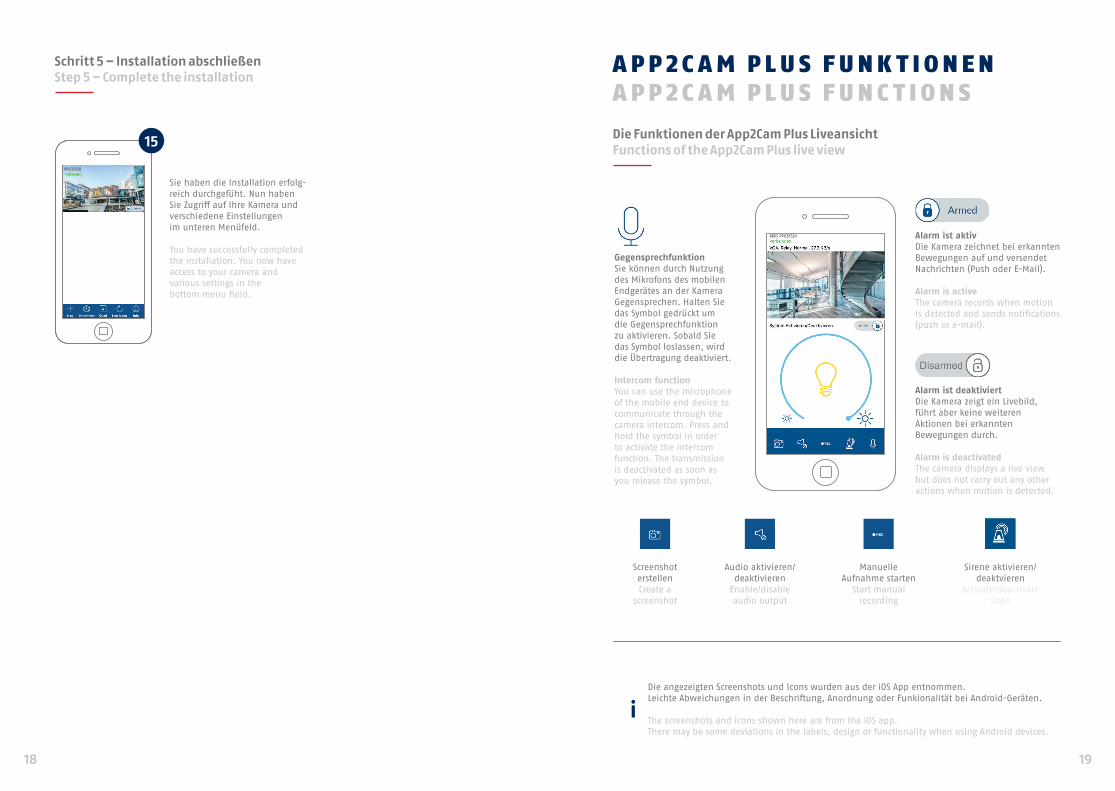
Sie haben die Installation erfolg-reich durchgefüht. Nun haben Sie Zugriff auf Ihre Kamera und verschiedene Einstellungen im unteren Menüfeld.
You have successfully completed the installation. You now have access to your camera andvarious settings in thebottom menu fi eld.
Schritt 5 – Installation abschließenStep 5 – Complete the installation
15
PPIC32520
Die angezeigten Screenshots und Icons wurden aus der iOS App entnommen. Leichte Abweichungen in der Beschrift ung, Anordnung oder Funkionalität bei Android-Geräten.
The screenshots and icons shown here are from the iOS app. There may be some deviations in the labels, design or functionality when using Android devices.
Die Funktionen der App2Cam Plus LiveansichtFunctions of the App2Cam Plus live view
A PP 2 C A M P L U S F UNK T I O NE NA PP 2 C A M P L U S F UNC T I O N S
Alarm ist aktiv Die Kamera zeichnet bei erkannten Bewegungen auf und versendet Nachrichten (Push oder E-Mail).
Alarm is active The camera records when motion is detected and sends notifi cations (push or e-mail).
Alarm ist deaktiviert Die Kamera zeigt ein Livebild, führt aber keine weiterenAktionen bei erkannten Bewegungen durch.
Alarm is deactivated The camera displays a live view but does not carry out any other actions when motion is detected.
GegensprechfunktionSie können durch Nutzung des Mikrofons des mobilen Endgerätes an der Kamera Gegensprechen. Halten Sie das Symbol gedrückt umdie Gegensprechfunktionzu aktivieren. Sobald Siedas Symbol loslassen, wird die Übertragung deaktiviert.
Intercom functionYou can use the microphone of the mobile end device to communicate through the camera intercom. Press and hold the symbol in order to activate the intercom function. The transmissionis deactivated as soon asyou release the symbol.
Screenshot erstellenCreate a
screenshot
Audio aktivieren/deaktivieren
Enable/disable audio output
Manuelle Aufnahme starten
Start manual recording
Sirene aktivieren/deaktvieren
Activate/deactivatesiren
ABUS PPIC36520
Eine alternative Inbetriebnahme sowie detaillierte Informationen zum jeweiligen Produkt erhalten Sie in der Bedienungsanleitung erhältlich auf der ABUS Internetseite.
Vous trouverez une alternative de mise en service ainsi que des informations détaillées sur le produit concerné dans le manuel d’utilisation disponible sur le site Internet ABUS.
Een alternatieve ingebruikname en gedetailleerde informatie vindt u in de gebruikershandleiding op de ABUS-website.
Per imformazioni su un attivazione alternativa o sui dettagli del prodotto, consultare le istruzioni per l‘uso disponibili sul nostro sitro ww.abus.com.
An alternative installation option as well as detailed information on the respective product can be found in the operating instructions available on the ABUS website.
Alternativ idrifttagning samt detaljerede oplysninger findes i betjeningsvejledningen, som findes på ABUS-hjemmesiden.
Informacje dotyczące alternatywnych sposobów uruchomienia oraz dodatkowe szczegóły dotyczące poszczególnych produktów znajdują się w instrukcji obsługi, którą można pobrać na stronie internetowej ABUS.
En el manual de instrucciones disponible en la página web de ABUS podrá consultar una puesta en funcionamiento alternativa, así como información más detallada.
Alternativ idrifttagning samt detaljerad information finns i bruksanvisningen som kan hämtas på ABUS-webbsidan.
Für weitere Hilfe steht unsere Support-Team für Sie zur Verfügung: [email protected]
Our Support Team will be happy to help you with any further questions: [email protected]
ABUS | Security Center GmbH & Co. KG
abus.com
Linker Kreuthweg 5
86444 Affing
Germany
Tel: +49 8207 959 90-0
Fax: +49 8207 959 90-190
abus.com/products/PPIC36520
abus.com/products/TVAC17520