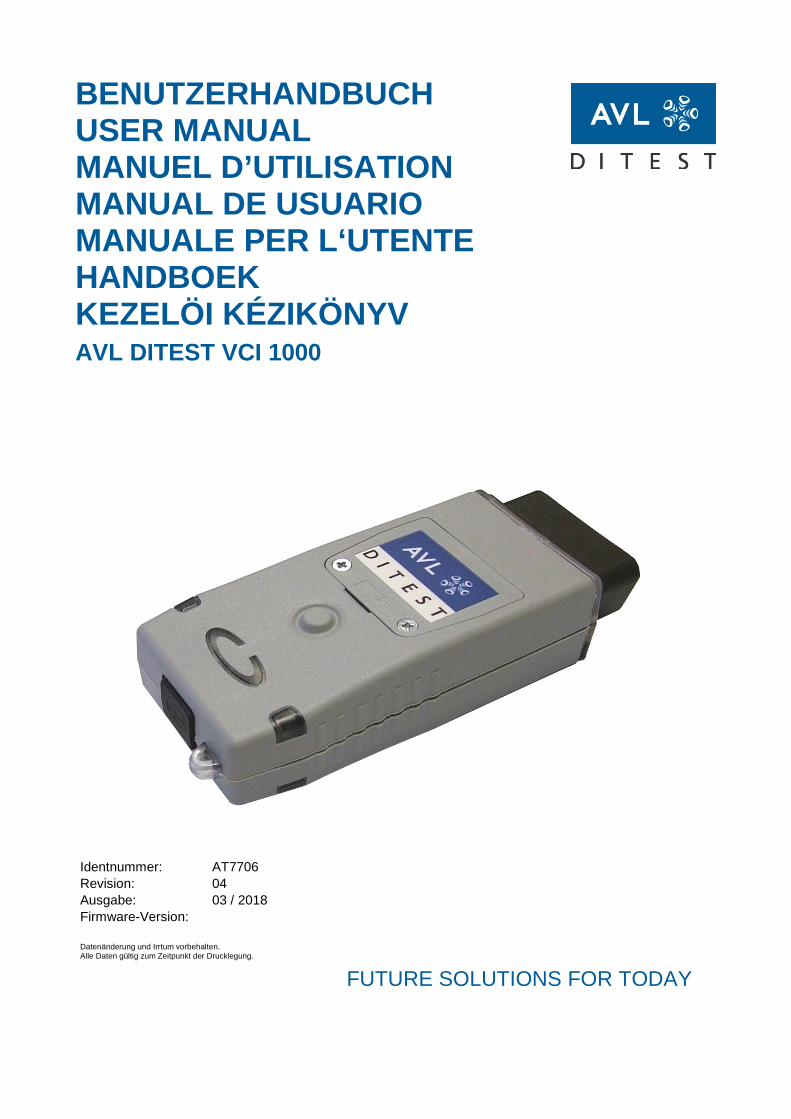
BENUTZERHANDBUCH USER MANUAL MANUEL D’UTILISATION MANUAL DE USUARIO MANUALE PER L‘UTENTE HANDBOEK KEZELÖI KÉZIKÖNYV
AVL DITEST VCI 1000
Identnummer: AT7706 Revision: 04 Ausgabe: 03 / 2018 Firmware-Version: Datenänderung und Irrtum vorbehalten. Alle Daten gültig zum Zeitpunkt der Drucklegung.
FUTURE SOLUTIONS FOR TODAY
AVL DiTEST GmbH Alte Poststraße 156 8020 Graz AUSTRIA Tel: +43 316 787-0 Fax: +43 316 787-1460 [email protected] www.avlditest.com Copyright © 2018 AVL DiTEST GMBH, alle Rechte vorbehalten.
Der Inhalt dieser Publikation darf ohne vorherige schriftliche Zustimmung von AVL DiTEST weder ganz noch teilweise in irgendeiner Form reproduziert oder an dritte Personen weitergegeben werden. Diese Publikation wurde mit der nötigen Sorgfalt erstellt, sodass für verbleibende Fehler oder Auslassungen sowie für dadurch eventuell entstehende Schäden von AVL DiTEST keine Haftung übernommen wird. Copyright © 2018 AVL DiTEST GMBH, all rights reserved.
The contents of this publication, as a whole or in part, may not be reproduced in any form or passed on to third parties without the prior written consent of AVL DiTEST. This publication has been produced with due care. AVL DiTEST does not accept responsibility for remaining errors or omissions and incidental damages thereof. Copyright © 2018 AVL DiTEST GMBH, tous droits réservés.
Il est interdit de reproduire en tout ou partie le contenu de cette publication ou de le transmettre à un tiers sans l'accord préalable écrit de la société AVL DiTEST. La présente publication a été créée avec tout le soin nécessaire, de sorte qu'AVL DiTEST ne peut être tenu responsable des erreurs ou omissions encore présentes ainsi que des éventuels dommages qui pourraient en découler. Copyright © 2018 AVL DiTEST GMBH, reservados todos los derechos.
El contenido de esta publicación no puede reproducirse ni facilitarse a terceras personas, en su totalidad o parcialmente o en cualquier otra forma, sin la previa autorización por escrito de AVL DiTEST. Esta publicación se ha redactado con el necesario cuidado, de modo que AVL DiTEST no asume ninguna responsabilidad por los errores u omisiones que hubiera o los eventuales daños que pudieran derivarse. Copyright © 2018 AVL DiTEST GMBH, tutti i diritti riservati.
Il contenuto di questa pubblicazione non può essere riprodotto o trasmesso a terzi né integralmente né parzialmente senza la precedente autorizzazione scritta di AVL DiTEST. La presente pubblicazione è stata redatta con la dovuta attenzione, pertanto AVL DiTEST non si assumerà alcuna responsabilità per eventuali errori o omissioni come pure per gli eventuali danni da essi derivanti. Copyright © 2018 AVL DiTEST GMBH, alle rechten voorbehouden.
De inhoud van deze publicatie mag zonder voorafgaande schriftelijk toestemming van AVL DiTEST noch geheel, noch gedeeltelijk in welke vorm dan ook gereproduceerd of aan derden verder gegeven worden. Deze publicatie kwam met uiterste zorgvuldigheid tot stand, zodat voor resterende fouten of weglatingen, evenals voor daardoor eventueel ontstane schades door AVL DiTEST geen aanspraken worden erkend. Copyright © 2018 AVL DiTEST GMBH, minden jog fenntartva.
E kiadvány tartalmát a AVL DITEST cég előzetes írásbeli hozzájárulása nélkül sem teljes egészében, sem részleteiben nem szabad semmilyen formában sokszorosítani vagy harmadik személyeknek továbbadni. E kiadvány a szükséges gondossággal készült, ezért benne maradt hibákért vagy kihagyásokért, valamint az esetleg emiatt bekövetkező károkért a AVL DITEST cég semmiféle felelősséget nem vállal.
AVL DiTEST VCI 1000 Allgemein
Benutzerhandbuch 1
1 Allgemein 1.1 Allgemeine Beschreibung
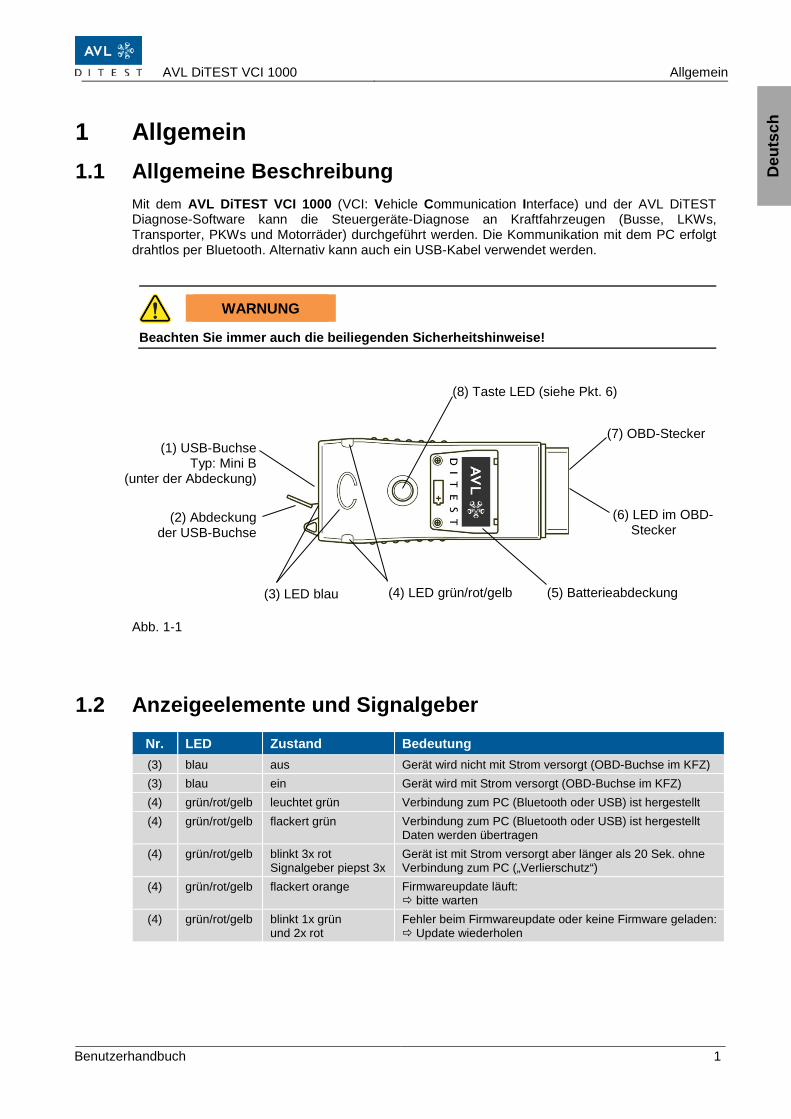
Mit dem AVL DiTEST VCI 1000 (VCI: Vehicle Communication Interface) und der AVL DiTEST Diagnose-Software kann die Steuergeräte-Diagnose an Kraftfahrzeugen (Busse, LKWs, Transporter, PKWs und Motorräder) durchgeführt werden. Die Kommunikation mit dem PC erfolgt drahtlos per Bluetooth. Alternativ kann auch ein USB-Kabel verwendet werden.
WARNUNG
Beachten Sie immer auch die beiliegenden Sicherheitshinweise! Abb. 1-1
1.2 Anzeigeelemente und Signalgeber
Nr. LED Zustand Bedeutung (3) blau aus Gerät wird nicht mit Strom versorgt (OBD-Buchse im KFZ) (3) blau ein Gerät wird mit Strom versorgt (OBD-Buchse im KFZ) (4) grün/rot/gelb leuchtet grün Verbindung zum PC (Bluetooth oder USB) ist hergestellt (4) grün/rot/gelb flackert grün Verbindung zum PC (Bluetooth oder USB) ist hergestellt
Daten werden übertragen (4) grün/rot/gelb blinkt 3x rot
Signalgeber piepst 3x Gerät ist mit Strom versorgt aber länger als 20 Sek. ohne Verbindung zum PC („Verlierschutz“)
(4) grün/rot/gelb flackert orange Firmwareupdate läuft: bitte warten
(4) grün/rot/gelb blinkt 1x grün und 2x rot
Fehler beim Firmwareupdate oder keine Firmware geladen: Update wiederholen
(7) OBD-Stecker
(2) Abdeckung der USB-Buchse
(3) LED blau
Deu
tsch
(4) LED grün/rot/gelb
(8) Taste LED (siehe Pkt. 6)
(1) USB-Buchse Typ: Mini B
(unter der Abdeckung)
(6) LED im OBD- Stecker
(5) Batterieabdeckung
Inbetriebnahme AVL DiTEST VCI 1000
2 Benutzerhandbuch
2 Inbetriebnahme 2.1 Adaptionen
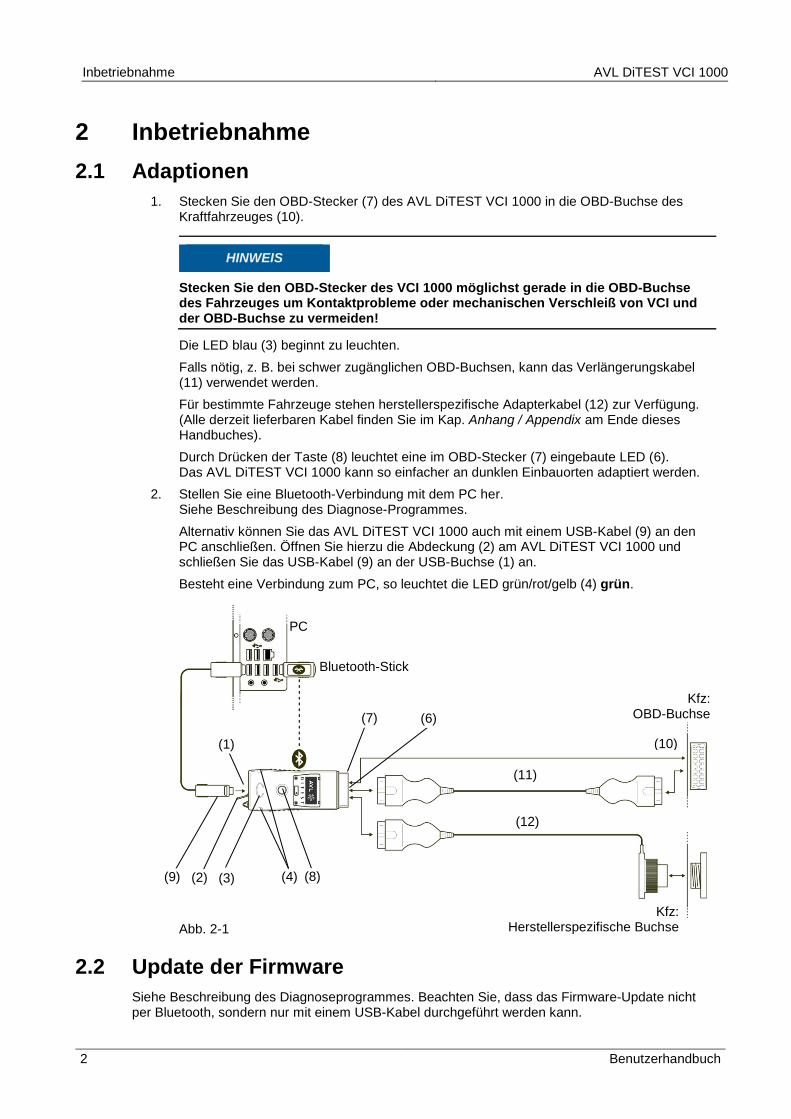
1. Stecken Sie den OBD-Stecker (7) des AVL DiTEST VCI 1000 in die OBD-Buchse des Kraftfahrzeuges (10).
HINWEIS
Stecken Sie den OBD-Stecker des VCI 1000 möglichst gerade in die OBD-Buchse des Fahrzeuges um Kontaktprobleme oder mechanischen Verschleiß von VCI und der OBD-Buchse zu vermeiden!
Die LED blau (3) beginnt zu leuchten. Falls nötig, z. B. bei schwer zugänglichen OBD-Buchsen, kann das Verlängerungskabel (11) verwendet werden. Für bestimmte Fahrzeuge stehen herstellerspezifische Adapterkabel (12) zur Verfügung. (Alle derzeit lieferbaren Kabel finden Sie im Kap. Anhang / Appendix am Ende dieses Handbuches). Durch Drücken der Taste (8) leuchtet eine im OBD-Stecker (7) eingebaute LED (6). Das AVL DiTEST VCI 1000 kann so einfacher an dunklen Einbauorten adaptiert werden.
2. Stellen Sie eine Bluetooth-Verbindung mit dem PC her. Siehe Beschreibung des Diagnose-Programmes. Alternativ können Sie das AVL DiTEST VCI 1000 auch mit einem USB-Kabel (9) an den PC anschließen. Öffnen Sie hierzu die Abdeckung (2) am AVL DiTEST VCI 1000 und schließen Sie das USB-Kabel (9) an der USB-Buchse (1) an. Besteht eine Verbindung zum PC, so leuchtet die LED grün/rot/gelb (4) grün.
Abb. 2-1
2.2 Update der Firmware Siehe Beschreibung des Diagnoseprogrammes. Beachten Sie, dass das Firmware-Update nicht per Bluetooth, sondern nur mit einem USB-Kabel durchgeführt werden kann.
(10)
(4)
(12)
(2) (8) (9)
(11)
Kfz: OBD-Buchse
Kfz: Herstellerspezifische Buchse
PC
(7)
Bluetooth-Stick
(1)
(6)
(3)
AVL DiTEST VCI 1000 Bedienung
Benutzerhandbuch 3
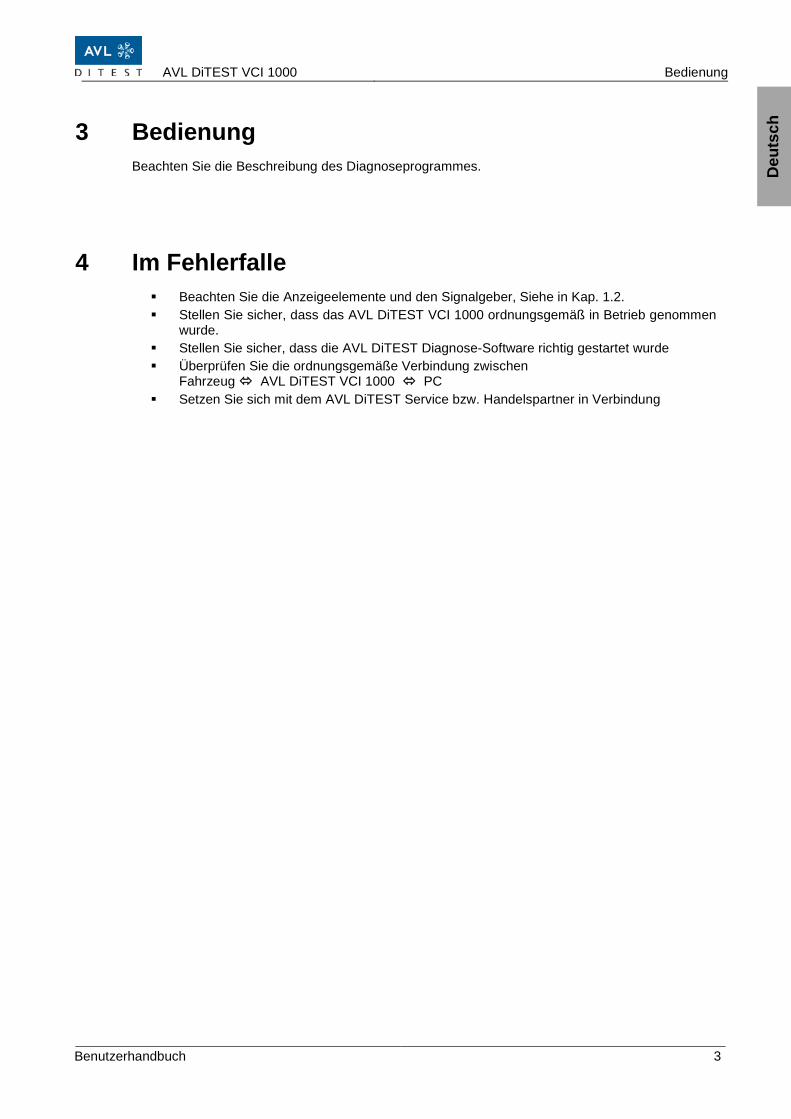
3 Bedienung Beachten Sie die Beschreibung des Diagnoseprogrammes.
4 Im Fehlerfalle Beachten Sie die Anzeigeelemente und den Signalgeber, Siehe in Kap. 1.2. Stellen Sie sicher, dass das AVL DiTEST VCI 1000 ordnungsgemäß in Betrieb genommen
wurde. Stellen Sie sicher, dass die AVL DiTEST Diagnose-Software richtig gestartet wurde Überprüfen Sie die ordnungsgemäße Verbindung zwischen
Fahrzeug AVL DiTEST VCI 1000 PC Setzen Sie sich mit dem AVL DiTEST Service bzw. Handelspartner in Verbindung
Deu
tsch
Wartung und Pflege AVL DiTEST VCI 1000
4 Benutzerhandbuch
5 Wartung und Pflege 5.1 Reinigung
Stellen Sie sicher, dass die Kontakte der USB-Buchse und des OBD-Steckers nicht verschmutzt und nicht beschädigt sind. Reinigen Sie das Gehäuse, die USB-Buchse und den OBD-Stecker falls nötig mit einem milden Reinigungsmittel.
5.2 Batterietausch
VORSICHT
Explosionsgefahr bei unsachgemäßem Austausch der Batterie! Entsorgung gebrauchter Batterien nach Anleitung!
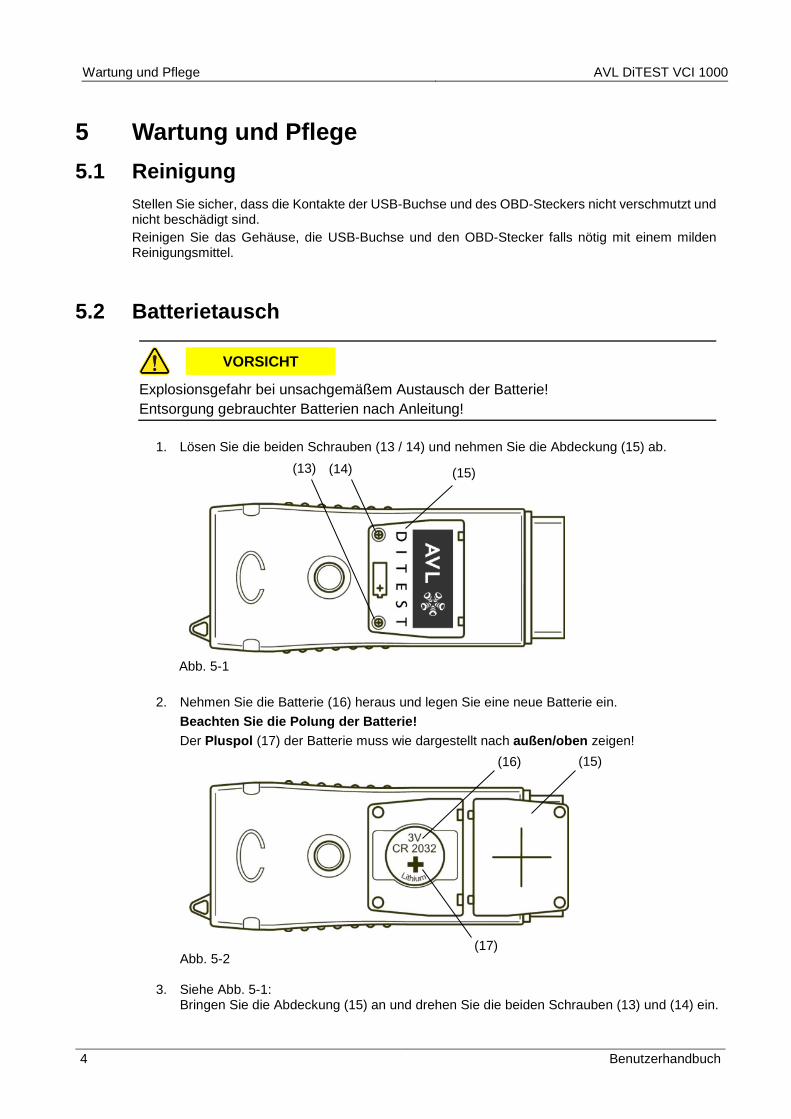
1. Lösen Sie die beiden Schrauben (13 / 14) und nehmen Sie die Abdeckung (15) ab.
Abb. 5-1
2. Nehmen Sie die Batterie (16) heraus und legen Sie eine neue Batterie ein. Beachten Sie die Polung der Batterie! Der Pluspol (17) der Batterie muss wie dargestellt nach außen/oben zeigen! Abb. 5-2
3. Siehe Abb. 5-1: Bringen Sie die Abdeckung (15) an und drehen Sie die beiden Schrauben (13) und (14) ein.
(15) (13) (14)
(16)
(17)
(15)
AVL DiTEST VCI 1000 Gewährleistung
Benutzerhandbuch 5
6 Gewährleistung 6.1 Neugeräte
Die Garantiezeit bei Neugeräten beträgt 12 Monate. Es gelten die Vereinbarungen mit Ihrem Lieferanten. Grundsätzlich von der Garantie ausgeschlossen sind Verschleißteile, Batterien und Zubehör. Für die Abwicklung gilt das Datum des Lieferscheines an den Endkunden. Die Garantie erlischt bei:
mechanischer Beschädigung (z. B. durch Sturz usw.) Eintritt von Flüssigkeiten (z. B. Wasser, Öl, Säuren usw.) Fremdeingriffen (z. B. Reparaturversuchen von nicht autorisierten Personen) Fehlbedienung (z. B. Reinigung mit Druckluft) Falsche Lagerung, Wartung und Pflege (z. B. Reinigung des Gerätes mit lösungshaltigen
Reinigern)
6.2 Tausch- oder Leihgeräte Es gelten die Vereinbarungen mit Ihrem Lieferanten. Für die Abwicklung gilt das Datum des Lieferscheines an den Endkunden.
6.3 Schadensfall Im Schadensfall wenden Sie sich an die jeweilige AVL DiTEST Niederlassung / den jeweiligen AVL DiTEST Partner in Ihrem Land.
Deu
tsch
Technische Daten AVL DiTEST VCI 1000
6 Benutzerhandbuch
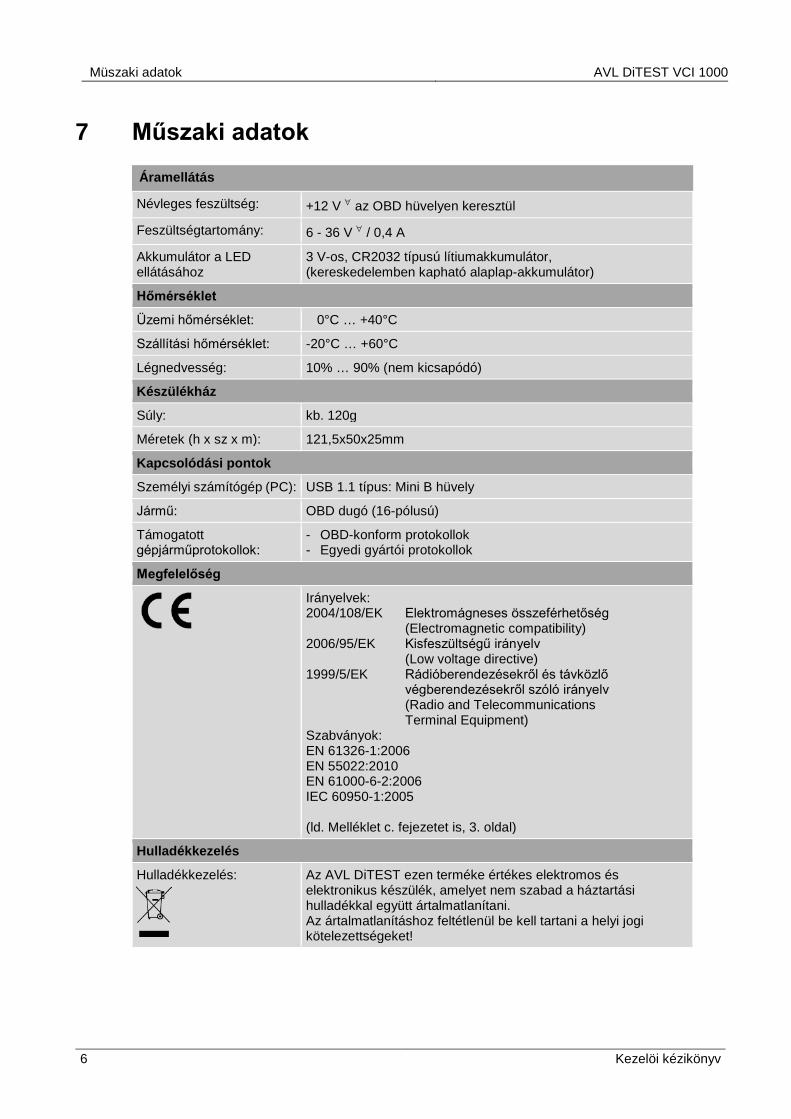
7 Technische Daten
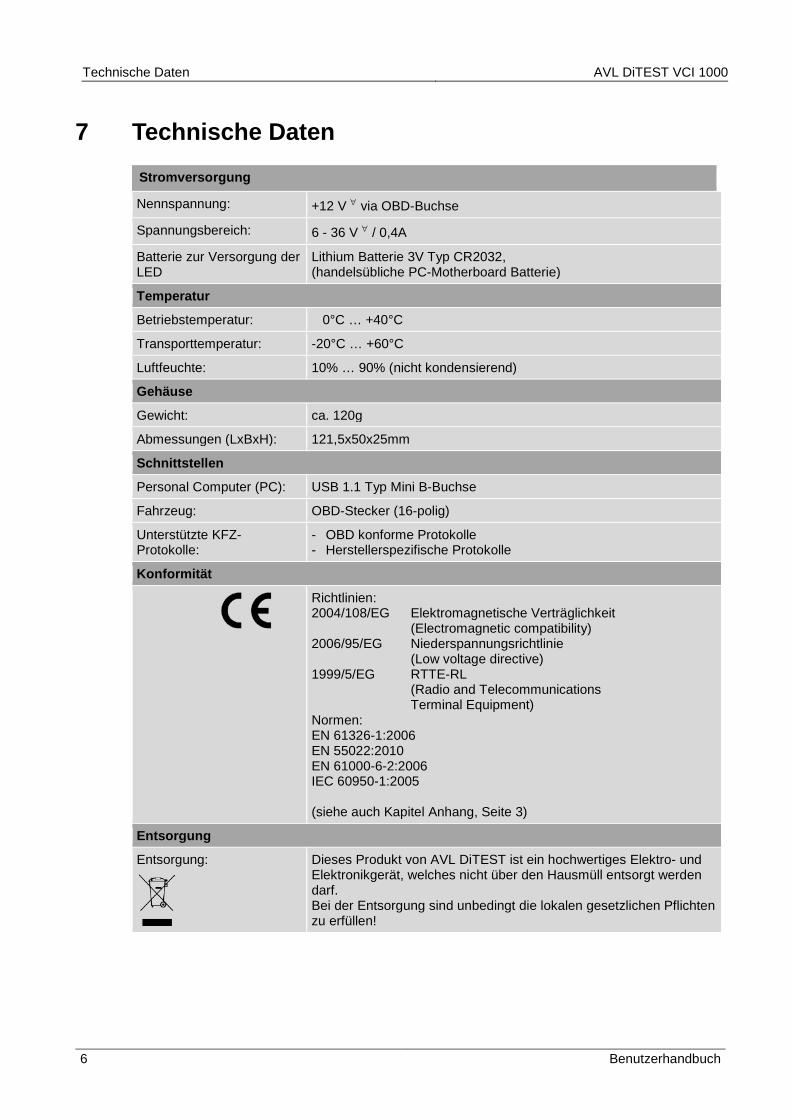
Stromversorgung
Nennspannung: +12 V ∀ via OBD-Buchse
Spannungsbereich: 6 - 36 V ∀ / 0,4A
Batterie zur Versorgung der LED
Lithium Batterie 3V Typ CR2032, (handelsübliche PC-Motherboard Batterie)
Temperatur
Betriebstemperatur: 0°C … +40°C
Transporttemperatur: -20°C … +60°C
Luftfeuchte: 10% … 90% (nicht kondensierend)
Gehäuse
Gewicht: ca. 120g
Abmessungen (LxBxH): 121,5x50x25mm
Schnittstellen
Personal Computer (PC): USB 1.1 Typ Mini B-Buchse
Fahrzeug: OBD-Stecker (16-polig)
Unterstützte KFZ-Protokolle:
- OBD konforme Protokolle - Herstellerspezifische Protokolle
Konformität
Richtlinien: 2004/108/EG Elektromagnetische Verträglichkeit (Electromagnetic compatibility) 2006/95/EG Niederspannungsrichtlinie (Low voltage directive) 1999/5/EG RTTE-RL (Radio and Telecommunications Terminal Equipment) Normen: EN 61326-1:2006 EN 55022:2010 EN 61000-6-2:2006 IEC 60950-1:2005 (siehe auch Kapitel Anhang, Seite 3)
Entsorgung
Entsorgung:
Dieses Produkt von AVL DiTEST ist ein hochwertiges Elektro- und Elektronikgerät, welches nicht über den Hausmüll entsorgt werden darf. Bei der Entsorgung sind unbedingt die lokalen gesetzlichen Pflichten zu erfüllen!
AVL DiTEST VCI 1000 General
User Manual 1
1 General 1.1 General Description
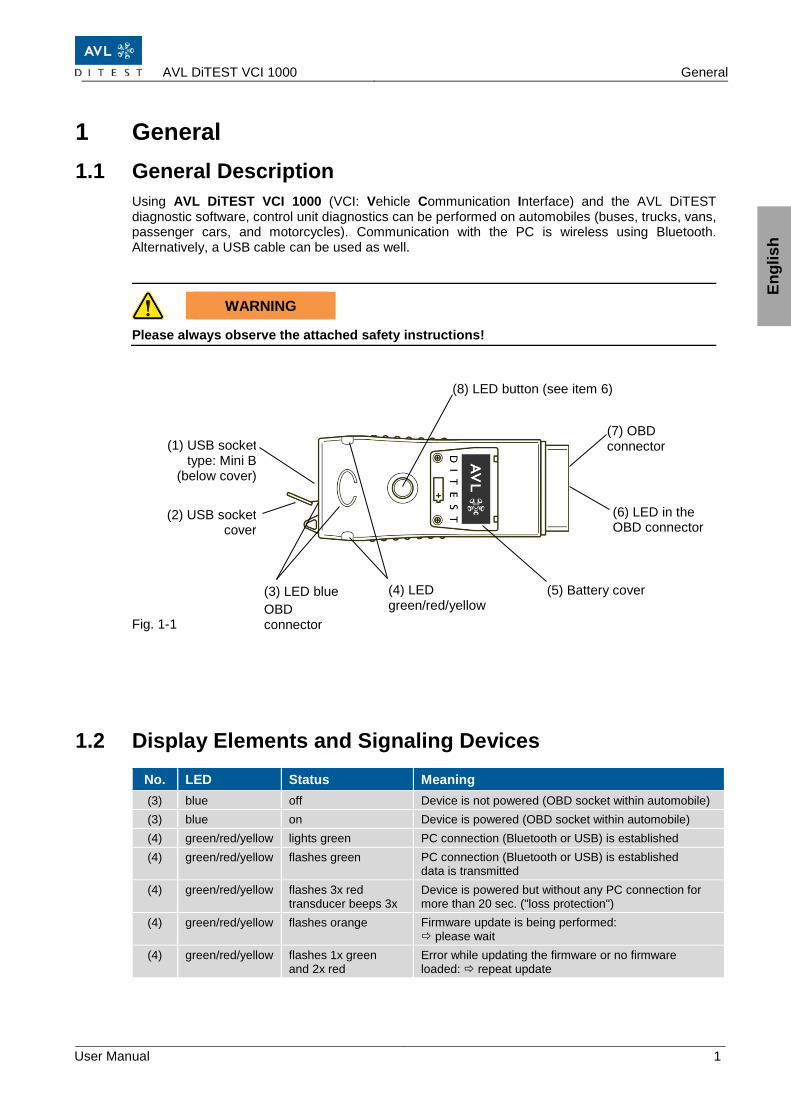
Using AVL DiTEST VCI 1000 (VCI: Vehicle Communication Interface) and the AVL DiTEST diagnostic software, control unit diagnostics can be performed on automobiles (buses, trucks, vans, passenger cars, and motorcycles). Communication with the PC is wireless using Bluetooth. Alternatively, a USB cable can be used as well.
WARNING
Please always observe the attached safety instructions! Fig. 1-1
1.2 Display Elements and Signaling Devices
No. LED Status Meaning (3) blue off Device is not powered (OBD socket within automobile) (3) blue on Device is powered (OBD socket within automobile) (4) green/red/yellow lights green PC connection (Bluetooth or USB) is established (4) green/red/yellow flashes green PC connection (Bluetooth or USB) is established
data is transmitted (4) green/red/yellow flashes 3x red
transducer beeps 3x Device is powered but without any PC connection for more than 20 sec. ("loss protection")
(4) green/red/yellow flashes orange Firmware update is being performed: please wait
(4) green/red/yellow flashes 1x green and 2x red
Error while updating the firmware or no firmware loaded: repeat update
Engl
ish
(7) OBD connector
(2) USB socket cover
(3) LED blue OBD connector
(4) LED green/red/yellow
(8) LED button (see item 6)
(1) USB socket type: Mini B
(below cover)
(6) LED in the OBD connector
(5) Battery cover
Initial Start-up AVL DiTEST VCI 1000
2 User Manual
2 Initial Start-up 2.1 Adaptations
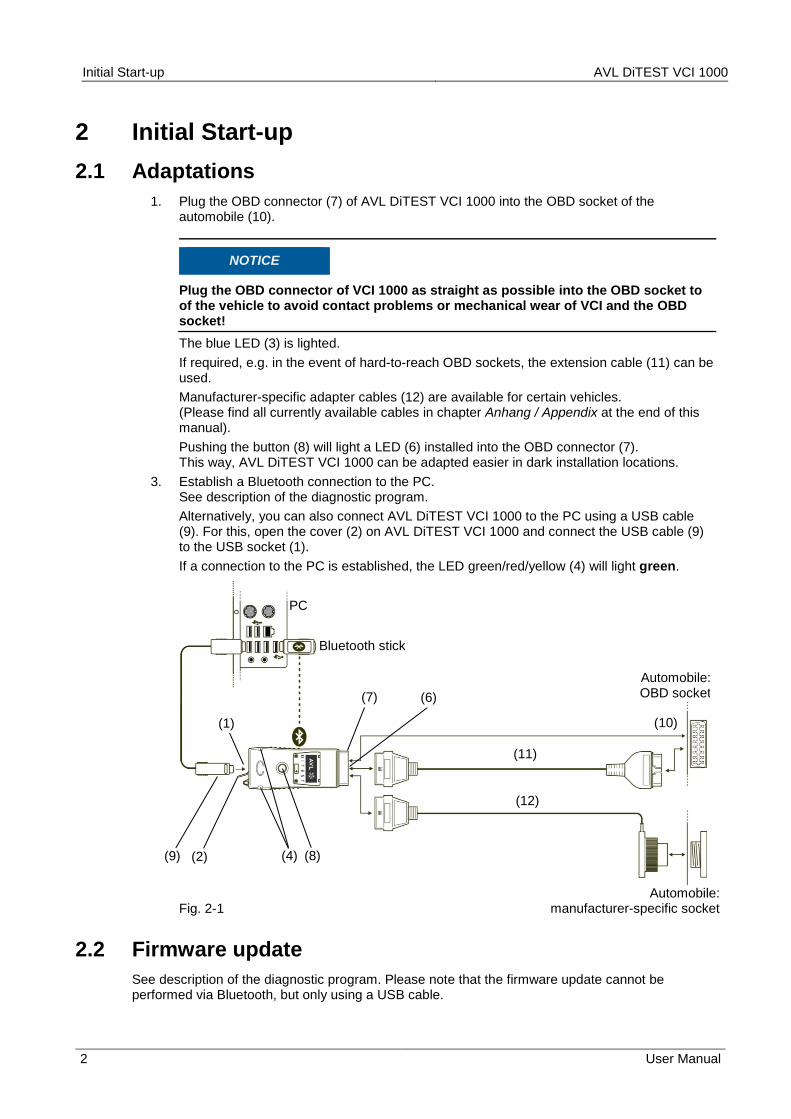
1. Plug the OBD connector (7) of AVL DiTEST VCI 1000 into the OBD socket of the automobile (10).
NOTICE
Plug the OBD connector of VCI 1000 as straight as possible into the OBD socket to of the vehicle to avoid contact problems or mechanical wear of VCI and the OBD socket!
The blue LED (3) is lighted. If required, e.g. in the event of hard-to-reach OBD sockets, the extension cable (11) can be used. Manufacturer-specific adapter cables (12) are available for certain vehicles. (Please find all currently available cables in chapter Anhang / Appendix at the end of this manual). Pushing the button (8) will light a LED (6) installed into the OBD connector (7). This way, AVL DiTEST VCI 1000 can be adapted easier in dark installation locations.
3. Establish a Bluetooth connection to the PC. See description of the diagnostic program. Alternatively, you can also connect AVL DiTEST VCI 1000 to the PC using a USB cable (9). For this, open the cover (2) on AVL DiTEST VCI 1000 and connect the USB cable (9) to the USB socket (1). If a connection to the PC is established, the LED green/red/yellow (4) will light green.
Fig. 2-1
2.2 Firmware update See description of the diagnostic program. Please note that the firmware update cannot be performed via Bluetooth, but only using a USB cable.
(10)
(4)
(12)
(2) (8) (9)
(11)
Automobile: OBD socket
Automobile: manufacturer-specific socket
PC
(7)
Bluetooth stick
(1)
(6)
AVL DiTEST VCI 1000 Operation
User Manual 3
3 Operation Please observe the description of the diagnostic program.
4 In Case of Error Observe the indicator elements and the transducer, see chapter 1.2. Ensure that AVL DiTEST VCI 1000 was commissioned properly. Ensure that the AVL DiTEST diagnostic software was started properly Check the proper connection between
automobile AVL DiTEST VCI 1000 PC Contact the AVL DiTEST service partner and/or dealer
Engl
ish
Maintenance and care AVL DiTEST VCI 1000
4 User Manual
5 Maintenance and care 5.1 Cleaning
Ensure that the contacts of the USB socket and of the OBD connector are not dirty and damaged. Clean the housing, the USB socket, and the OBD connector with a mild cleaning agent, if required.
5.2 Battery replacement
CAUTION
Danger of explosion if the battery is replaced improperly! Dispose of used batteries according to the instructions!
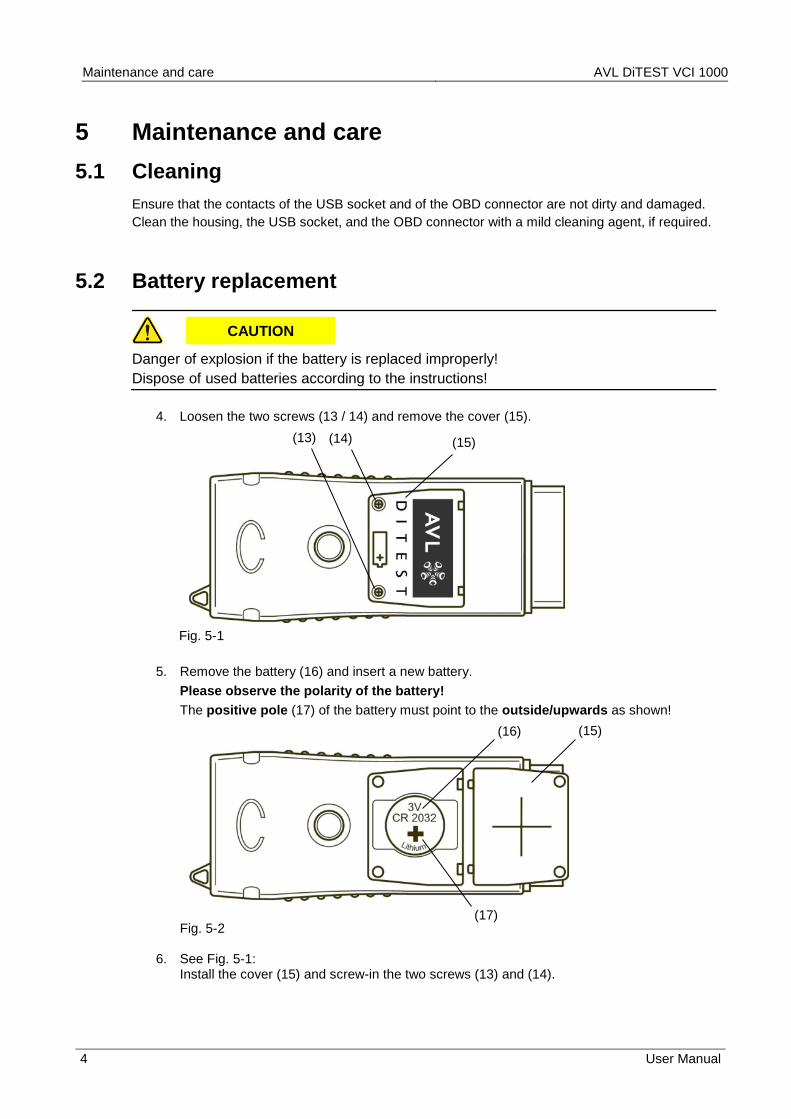
4. Loosen the two screws (13 / 14) and remove the cover (15).
Fig. 5-1
5. Remove the battery (16) and insert a new battery. Please observe the polarity of the battery! The positive pole (17) of the battery must point to the outside/upwards as shown! Fig. 5-2
6. See Fig. 5-1: Install the cover (15) and screw-in the two screws (13) and (14).
(15) (13) (14)
(16)
(17)
(15)
AVL DiTEST VCI 1000 Warranty
User Manual 5
6 Warranty 6.1 New Devices
For new devices the warranty period is 12 months. The agreements with your supplier apply. Generally excluded from the warranty are wear and tear parts, batteries and accessories. Valid for the implementation is the date of the delivery document to the final customer. The warranty expires due to:
mechanical damage (e.g. dropping the device, etc.) Penetration of liquid (e.g. water, oil, acids, etc.) External intervention (e.g. repairs carried out by non-authorized people) Improper operation (e.g. cleaning with air pressure) Improper storage, maintenance and care (e.g. cleaning the device with solvent-based
cleaners)
6.2 Exchange or Loaner Units The agreements with your supplier apply. Valid for the implementation is the date of the delivery document to the final customer.
6.3 In Case of Damage In case of damage, please contact your respective AVL DiTEST representation / the corresponding AVL DiTEST partner in your country.
Engl
ish
Technical Data AVL DiTEST VCI 1000
6 User Manual
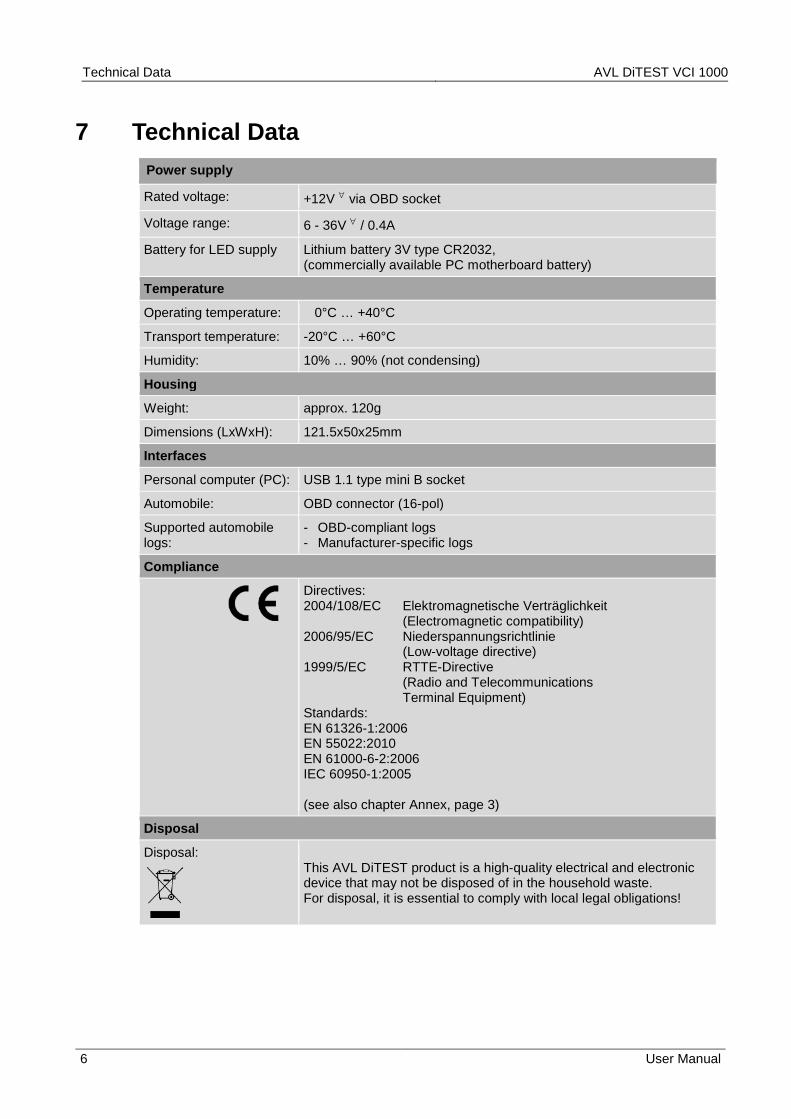
7 Technical Data Power supply
Rated voltage: +12V ∀ via OBD socket
Voltage range: 6 - 36V ∀ / 0.4A
Battery for LED supply Lithium battery 3V type CR2032, (commercially available PC motherboard battery)
Temperature
Operating temperature: 0°C … +40°C
Transport temperature: -20°C … +60°C
Humidity: 10% … 90% (not condensing)
Housing
Weight: approx. 120g
Dimensions (LxWxH): 121.5x50x25mm
Interfaces
Personal computer (PC): USB 1.1 type mini B socket
Automobile: OBD connector (16-pol)
Supported automobile logs:
- OBD-compliant logs - Manufacturer-specific logs
Compliance
Directives: 2004/108/EC Elektromagnetische Verträglichkeit (Electromagnetic compatibility) 2006/95/EC Niederspannungsrichtlinie (Low-voltage directive) 1999/5/EC RTTE-Directive (Radio and Telecommunications Terminal Equipment) Standards: EN 61326-1:2006 EN 55022:2010 EN 61000-6-2:2006 IEC 60950-1:2005 (see also chapter Annex, page 3)
Disposal
Disposal:
This AVL DiTEST product is a high-quality electrical and electronic device that may not be disposed of in the household waste. For disposal, it is essential to comply with local legal obligations!
AVL DiTEST VCI 1000 Généralités
Manuel d‘utilisation 1
1 Généralités 1.1 Description générale
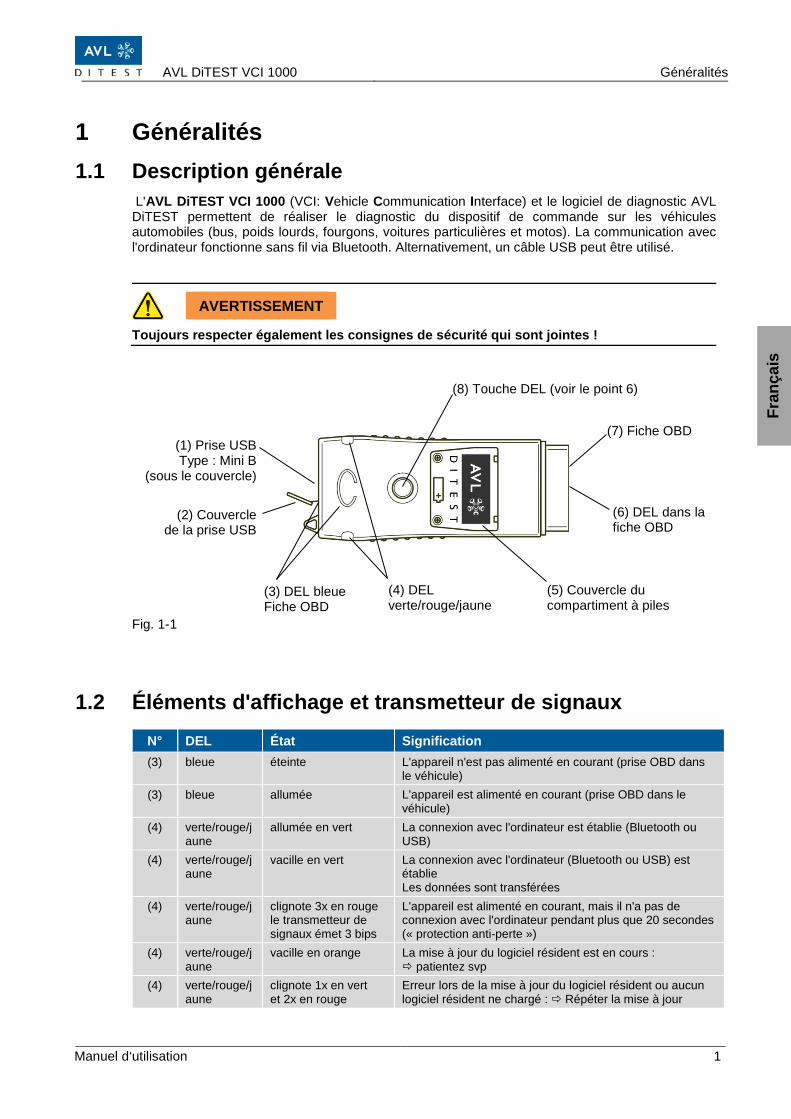
L'AVL DiTEST VCI 1000 (VCI: Vehicle Communication Interface) et le logiciel de diagnostic AVL DiTEST permettent de réaliser le diagnostic du dispositif de commande sur les véhicules automobiles (bus, poids lourds, fourgons, voitures particulières et motos). La communication avec l'ordinateur fonctionne sans fil via Bluetooth. Alternativement, un câble USB peut être utilisé.
AVERTISSEMENT
Toujours respecter également les consignes de sécurité qui sont jointes ! Fig. 1-1
1.2 Éléments d'affichage et transmetteur de signaux
N° DEL État Signification (3) bleue éteinte L'appareil n'est pas alimenté en courant (prise OBD dans
le véhicule) (3) bleue allumée L'appareil est alimenté en courant (prise OBD dans le
véhicule) (4) verte/rouge/j
aune allumée en vert La connexion avec l'ordinateur est établie (Bluetooth ou
USB) (4) verte/rouge/j
aune vacille en vert La connexion avec l'ordinateur (Bluetooth ou USB) est
établie Les données sont transférées
(4) verte/rouge/jaune
clignote 3x en rouge le transmetteur de signaux émet 3 bips
L'appareil est alimenté en courant, mais il n'a pas de connexion avec l'ordinateur pendant plus que 20 secondes (« protection anti-perte »)
(4) verte/rouge/jaune
vacille en orange La mise à jour du logiciel résident est en cours : patientez svp
(4) verte/rouge/jaune
clignote 1x en vert et 2x en rouge
Erreur lors de la mise à jour du logiciel résident ou aucun logiciel résident ne chargé : Répéter la mise à jour
Fran
çais
(7) Fiche OBD
(2) Couvercle de la prise USB
(3) DEL bleue Fiche OBD
(4) DEL verte/rouge/jaune
(8) Touche DEL (voir le point 6)
(1) Prise USB Type : Mini B
(sous le couvercle)
(6) DEL dans la fiche OBD
(5) Couvercle du compartiment à piles
Mise en service AVL DiTEST VCI 1000
2 Manuel d‘utilisation
2 Mise en service 2.1 Adaptations
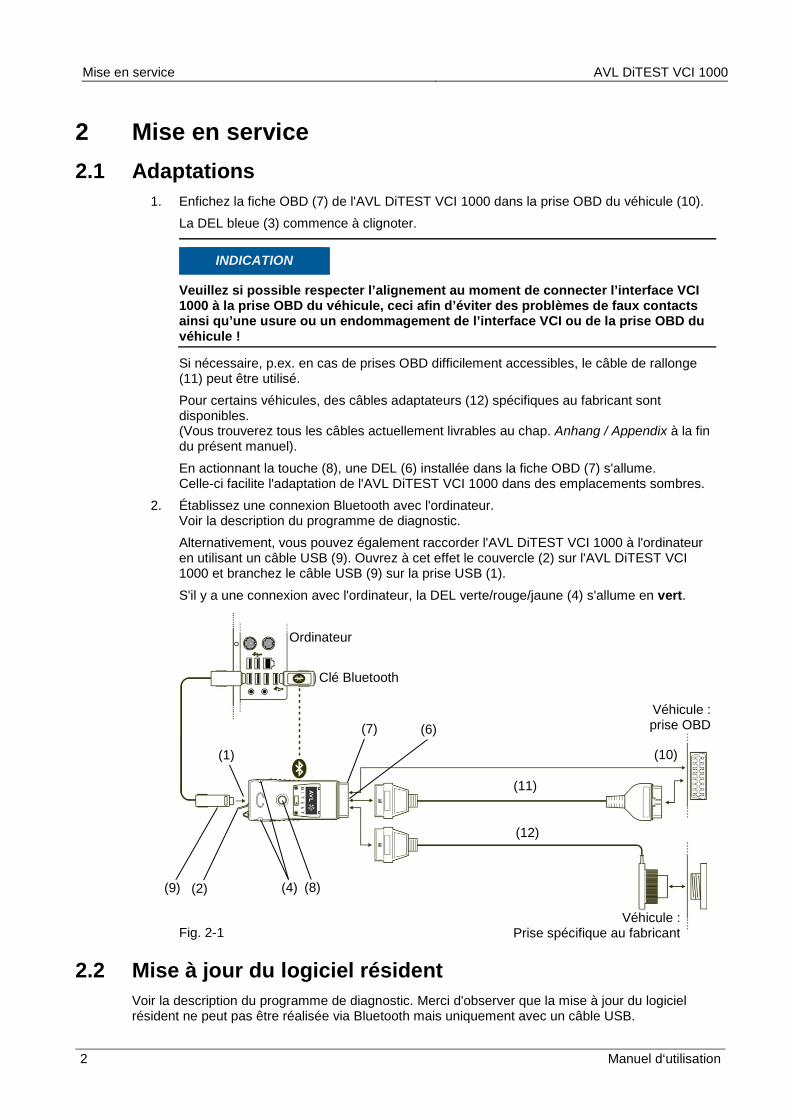
1. Enfichez la fiche OBD (7) de l'AVL DiTEST VCI 1000 dans la prise OBD du véhicule (10). La DEL bleue (3) commence à clignoter.
INDICATION
Veuillez si possible respecter l’alignement au moment de connecter l’interface VCI 1000 à la prise OBD du véhicule, ceci afin d’éviter des problèmes de faux contacts ainsi qu’une usure ou un endommagement de l’interface VCI ou de la prise OBD du véhicule !
Si nécessaire, p.ex. en cas de prises OBD difficilement accessibles, le câble de rallonge (11) peut être utilisé. Pour certains véhicules, des câbles adaptateurs (12) spécifiques au fabricant sont disponibles. (Vous trouverez tous les câbles actuellement livrables au chap. Anhang / Appendix à la fin du présent manuel). En actionnant la touche (8), une DEL (6) installée dans la fiche OBD (7) s'allume. Celle-ci facilite l'adaptation de l'AVL DiTEST VCI 1000 dans des emplacements sombres.
2. Établissez une connexion Bluetooth avec l'ordinateur. Voir la description du programme de diagnostic. Alternativement, vous pouvez également raccorder l'AVL DiTEST VCI 1000 à l'ordinateur en utilisant un câble USB (9). Ouvrez à cet effet le couvercle (2) sur l'AVL DiTEST VCI 1000 et branchez le câble USB (9) sur la prise USB (1). S'il y a une connexion avec l'ordinateur, la DEL verte/rouge/jaune (4) s'allume en vert.
Fig. 2-1
2.2 Mise à jour du logiciel résident Voir la description du programme de diagnostic. Merci d'observer que la mise à jour du logiciel résident ne peut pas être réalisée via Bluetooth mais uniquement avec un câble USB.
(10)
(4)
(12)
(2) (8) (9)
(11)
Véhicule : prise OBD
Véhicule : Prise spécifique au fabricant
Ordinateur
(7)
Clé Bluetooth
(1)
(6)
AVL DiTEST VCI 1000 Utilisation
Manuel d‘utilisation 3
3 Utilisation Merci de tenir compte de la description du programme de diagnostic.
4 En cas de problème Observez les éléments d'affichage et le transmetteur de signaux, voir chap. 1.2. Assurez-vous que l'AVL DiTEST VCI 1000 a été mis en service correctement. Assurez-vous que le logiciel de diagnostic AVL DiTEST a été lancé correctement Vérifiez si la connexion entre
véhicule AVL DiTEST VCI 1000 ordinateur est correcte. Contactez le service AVL DiTEST ou bien le distributeur compétent.
Fran
çais
Entretien et maintenance AVL DiTEST VCI 1000
4 Manuel d‘utilisation
5 Entretien et maintenance 5.1 Nettoyage
Assurez-vous que les contacts de la prise USB et de la fiche OBD ne sont ni encrassés, ni endommagés. Si nécessaire, nettoyez le boîtier, la prise USB et la fiche OBD en utilisant un produit de nettoyage doux.
5.2 Remplacement de la pile
ATTENTION
Risque d'explosion en cas de remplacement incorrect de la pile ! Éliminer les piles usées conformément aux instructions !
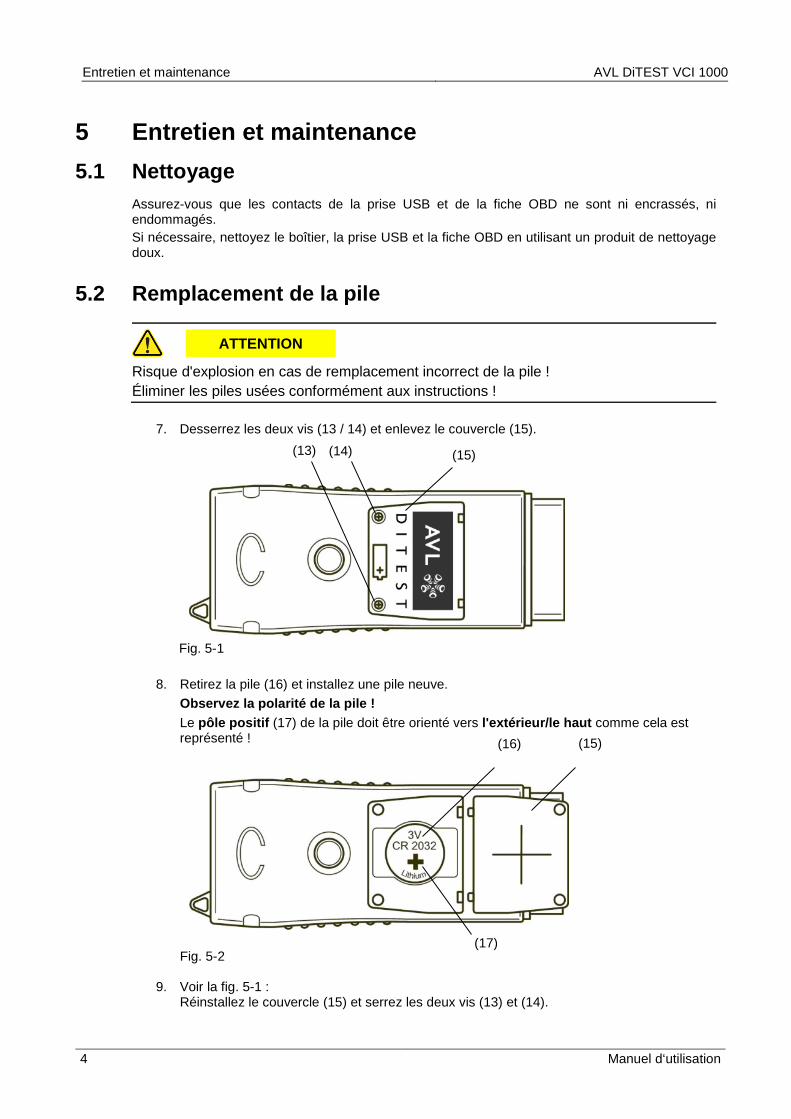
7. Desserrez les deux vis (13 / 14) et enlevez le couvercle (15).
Fig. 5-1
8. Retirez la pile (16) et installez une pile neuve. Observez la polarité de la pile ! Le pôle positif (17) de la pile doit être orienté vers l'extérieur/le haut comme cela est représenté ! Fig. 5-2
9. Voir la fig. 5-1 : Réinstallez le couvercle (15) et serrez les deux vis (13) et (14).
(15) (13) (14)
(16)
(17)
(15)
AVL DiTEST VCI 1000 Garantie
Manuel d‘utilisation 5
6 Garantie 6.1 Appareils neufs
La durée de garantie des appareils neufs est de 12 mois. Les accords conclus avec votre fournisseur s'appliquent. Les pièces d'usure et les accessoires sont toujours exclus, piles de la garantie. La procédure se base sur la date du bon de livraison au client final. La garantie expire en cas de :
dommage mécanique (p. ex. chute etc.) pénétration de liquides (p. ex. eau, huile, acides etc.) interventions externes (p. ex. tentatives de réparation par des personnes non autorisées) mauvaise utilisation (p. ex. nettoyage à l'air comprimé) entreposage, entretien et maintenance inappropriés (p. ex. nettoyage de l'appareil avec des
nettoyants contenant des solvants)
6.2 Appareils de remplacement ou de location Les accords conclus avec votre fournisseur s'appliquent. La procédure se base sur la date du bon de livraison au client final.
6.3 Dommage En cas de dommage, contacter votre filiale / partenaire AVL DiTEST dans votre pays.
Fran
çais
Caractéristiques techniques AVL DiTEST VCI 1000
6 Manuel d‘utilisation
7 Caractéristiques techniques
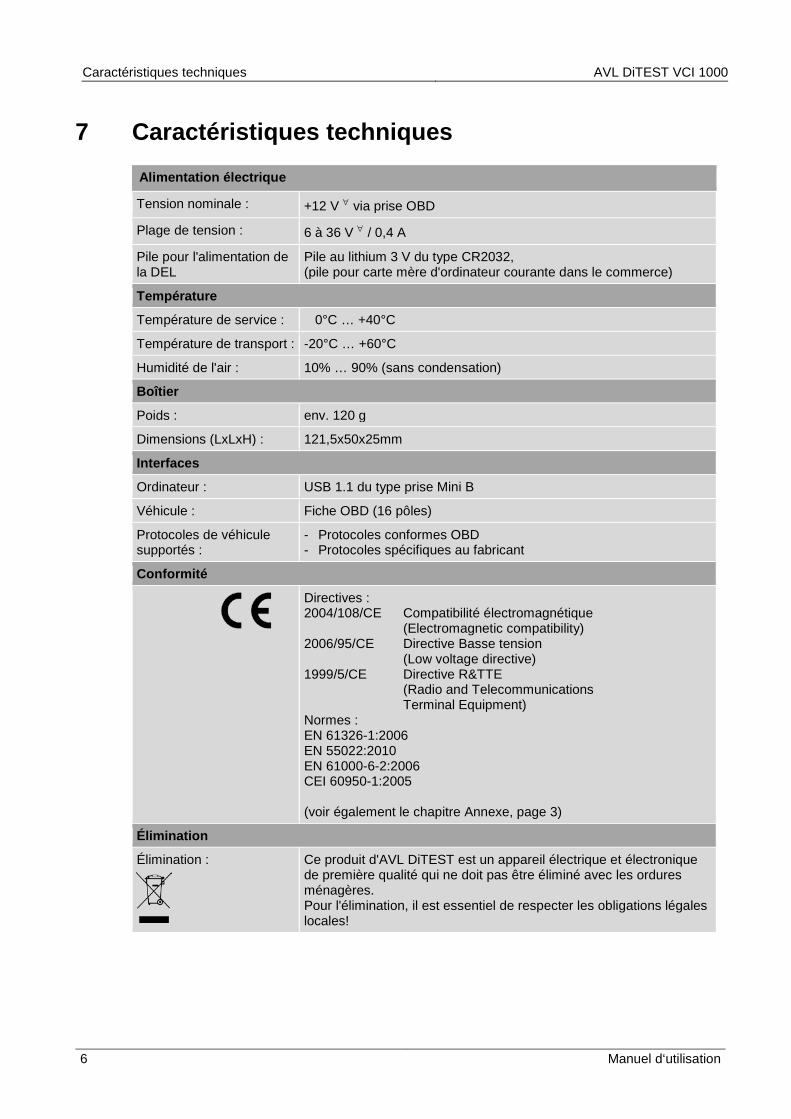
Alimentation électrique
Tension nominale : +12 V ∀ via prise OBD
Plage de tension : 6 à 36 V ∀ / 0,4 A
Pile pour l'alimentation de la DEL
Pile au lithium 3 V du type CR2032, (pile pour carte mère d'ordinateur courante dans le commerce)
Température
Température de service : 0°C … +40°C
Température de transport : -20°C … +60°C
Humidité de l'air : 10% … 90% (sans condensation)
Boîtier
Poids : env. 120 g
Dimensions (LxLxH) : 121,5x50x25mm
Interfaces
Ordinateur : USB 1.1 du type prise Mini B
Véhicule : Fiche OBD (16 pôles)
Protocoles de véhicule supportés :
- Protocoles conformes OBD - Protocoles spécifiques au fabricant
Conformité
Directives : 2004/108/CE Compatibilité électromagnétique (Electromagnetic compatibility) 2006/95/CE Directive Basse tension (Low voltage directive) 1999/5/CE Directive R&TTE (Radio and Telecommunications Terminal Equipment) Normes : EN 61326-1:2006 EN 55022:2010 EN 61000-6-2:2006 CEI 60950-1:2005 (voir également le chapitre Annexe, page 3)
Élimination
Élimination :
Ce produit d'AVL DiTEST est un appareil électrique et électronique de première qualité qui ne doit pas être éliminé avec les ordures ménagères. Pour l'élimination, il est essentiel de respecter les obligations légales locales!
AVL DiTEST VCI 1000 General
Manual de usuario 1
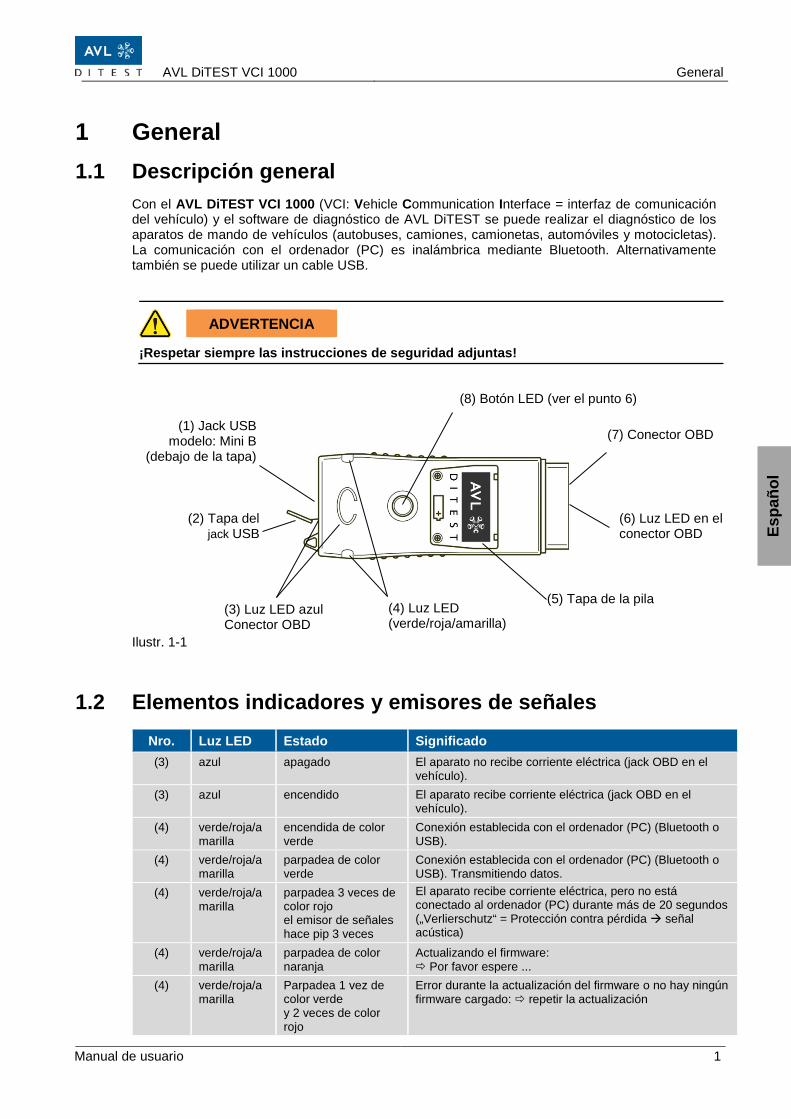
1 General 1.1 Descripción general
Con el AVL DiTEST VCI 1000 (VCI: Vehicle Communication Interface = interfaz de comunicación del vehículo) y el software de diagnóstico de AVL DiTEST se puede realizar el diagnóstico de los aparatos de mando de vehículos (autobuses, camiones, camionetas, automóviles y motocicletas). La comunicación con el ordenador (PC) es inalámbrica mediante Bluetooth. Alternativamente también se puede utilizar un cable USB.
ADVERTENCIA
¡Respetar siempre las instrucciones de seguridad adjuntas! Ilustr. 1-1
1.2 Elementos indicadores y emisores de señales
Nro. Luz LED Estado Significado (3) azul apagado El aparato no recibe corriente eléctrica (jack OBD en el
vehículo). (3) azul encendido El aparato recibe corriente eléctrica (jack OBD en el
vehículo). (4) verde/roja/a
marilla encendida de color verde
Conexión establecida con el ordenador (PC) (Bluetooth o USB).
(4) verde/roja/amarilla
parpadea de color verde
Conexión establecida con el ordenador (PC) (Bluetooth o USB). Transmitiendo datos.
(4) verde/roja/amarilla
parpadea 3 veces de color rojo el emisor de señales hace pip 3 veces
El aparato recibe corriente eléctrica, pero no está conectado al ordenador (PC) durante más de 20 segundos („Verlierschutz“ = Protección contra pérdida señal acústica)
(4) verde/roja/amarilla
parpadea de color naranja
Actualizando el firmware: Por favor espere ...
(4) verde/roja/amarilla
Parpadea 1 vez de color verde y 2 veces de color rojo
Error durante la actualización del firmware o no hay ningún firmware cargado: repetir la actualización
Espa
ñol
(7) Conector OBD
(2) Tapa del jack USB
(3) Luz LED azul Conector OBD
(4) Luz LED (verde/roja/amarilla)
(8) Botón LED (ver el punto 6)
(1) Jack USB modelo: Mini B
(debajo de la tapa)
(6) Luz LED en el conector OBD
(5) Tapa de la pila
Puesta en funcionamiento AVL DiTEST VCI 1000
2 Manual de usuario
2 Puesta en funcionamiento 2.1 Adaptaciones
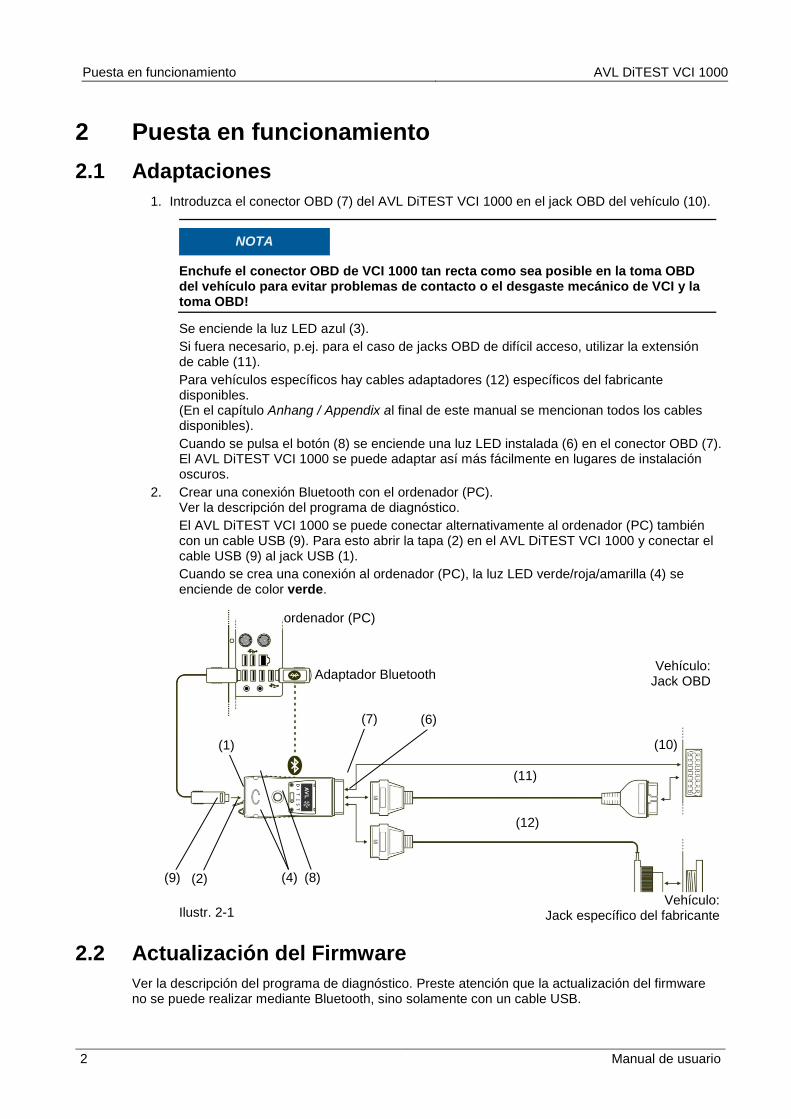
1. Introduzca el conector OBD (7) del AVL DiTEST VCI 1000 en el jack OBD del vehículo (10).
NOTA
Enchufe el conector OBD de VCI 1000 tan recta como sea posible en la toma OBD del vehículo para evitar problemas de contacto o el desgaste mecánico de VCI y la toma OBD!
Se enciende la luz LED azul (3). Si fuera necesario, p.ej. para el caso de jacks OBD de difícil acceso, utilizar la extensión de cable (11). Para vehículos específicos hay cables adaptadores (12) específicos del fabricante disponibles. (En el capítulo Anhang / Appendix al final de este manual se mencionan todos los cables disponibles). Cuando se pulsa el botón (8) se enciende una luz LED instalada (6) en el conector OBD (7). El AVL DiTEST VCI 1000 se puede adaptar así más fácilmente en lugares de instalación oscuros.
2. Crear una conexión Bluetooth con el ordenador (PC). Ver la descripción del programa de diagnóstico. El AVL DiTEST VCI 1000 se puede conectar alternativamente al ordenador (PC) también con un cable USB (9). Para esto abrir la tapa (2) en el AVL DiTEST VCI 1000 y conectar el cable USB (9) al jack USB (1). Cuando se crea una conexión al ordenador (PC), la luz LED verde/roja/amarilla (4) se enciende de color verde.
Ilustr. 2-1
2.2 Actualización del Firmware Ver la descripción del programa de diagnóstico. Preste atención que la actualización del firmware no se puede realizar mediante Bluetooth, sino solamente con un cable USB.
(10)
(4)
(12)
(2) (8) (9)
(11)
Vehículo: Jack OBD
Vehículo: Jack específico del fabricante
ordenador (PC)
(7)
Adaptador Bluetooth
(1)
(6)
AVL DiTEST VCI 1000 Manejo
Manual de usuario 3
3 Manejo Respetar la descripción del programa de diagnóstico.
4 En caso de errores Preste atención a los elementos indicadores y a los emisores de señales, ver el capítulo 1.2. Cerciorarse que el AVL DiTEST VCI 1000 haya sido puesto en funcionamiento
adecuadamente. Cerciórese que el software de diagnóstico AVL DiTEST haya sido iniciado correctamente. Verificar la conexión adecuada entre el vehículo AVL DiTEST VCI 1000 ordenador
(PC). Comunicarse con el servicio de AVL DiTEST o con su socio comercial.
Mantenimiento y cuidado AVL DiTEST VCI 1000
4 Manual de usuario
5 Mantenimiento y cuidado 5.1 Limpieza
Cerciorarse que los contactos del jack USB y del conector OBD no estén sucios ni dañados. Si fuera necesario, limpiar la carcasa, el jack USB y el conector OBD con un detergente suave.
5.2 Cambio de la pila
CUIDADO
¡Peligro de explosión en caso de cambio inadecuado de la pila! ¡Eliminar las pilas usadas según las instrucciones!
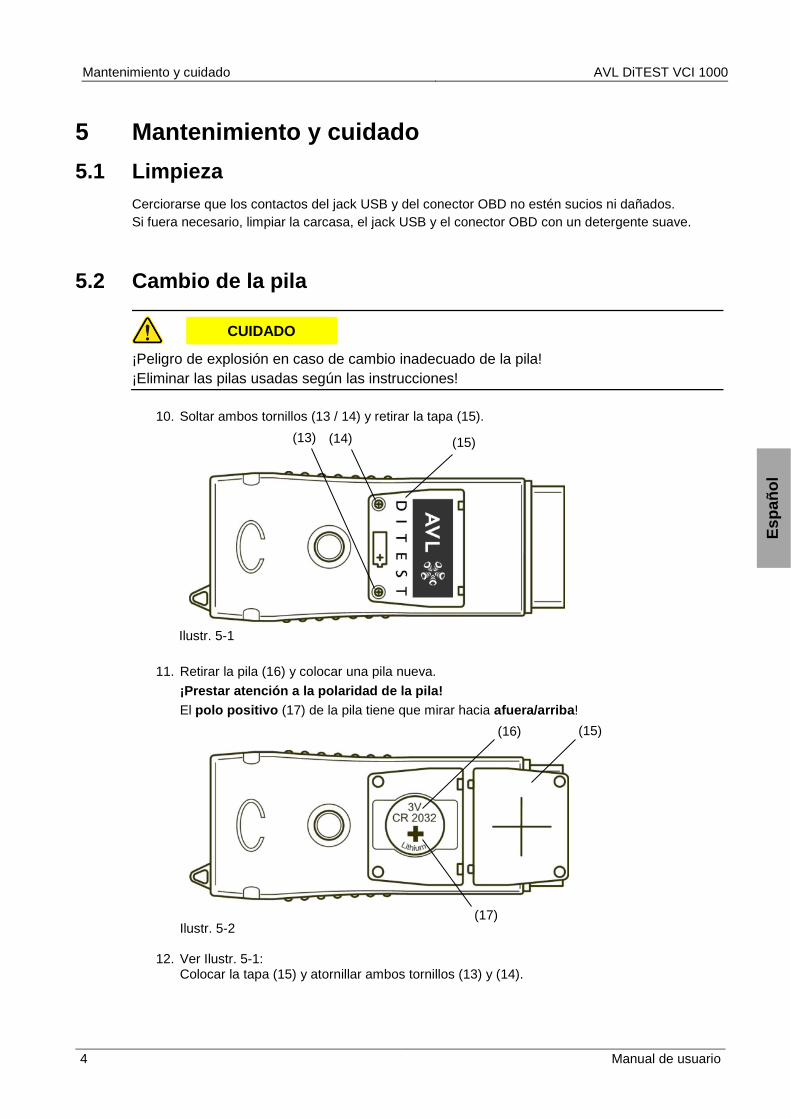
10. Soltar ambos tornillos (13 / 14) y retirar la tapa (15).
Ilustr. 5-1
11. Retirar la pila (16) y colocar una pila nueva. ¡Prestar atención a la polaridad de la pila! El polo positivo (17) de la pila tiene que mirar hacia afuera/arriba! Ilustr. 5-2
12. Ver Ilustr. 5-1: Colocar la tapa (15) y atornillar ambos tornillos (13) y (14).
Espa
ñol
(15) (14)
(17)
(13)
(16) (15)
AVL DiTEST VCI 1000 Garantia
Manual de usuario 5
6 Garantía 6.1 Equipos nuevos
Se concede una garantía de 12 meses para los nuevos equipos. Regirán las estipulaciones contractuales con el suministrador responsable. Se excluirán de la garantía los componentes de desgaste, baterías y los accesorios. El periodo de garantía comienza a partir de la fecha de entrega en las instalaciones del cliente final. El derecho a garantía quedará nulo en los siguientes casos:
Daños mecánicos (caída, etc.) Daños provocados por contacto con líquidos (agua, ácidos, aceite, etc.) Manipulaciones no autorizadas (por ejemplo, reparaciones por personal no autorizado) Manejo indebido (por ejemplo, limpieza con aire a presión)
6.2 Equipos de cambio o alquiler Regirán las estipulaciones contractuales con el suministrador responsable. El periodo de garantía comienza a partir de la fecha de de entrega en las instalaciones del cliente final.
6.3 Daños En el caso de daños, diríjase a la delegación de AVL DiTEST correspondiente / al distribuidor de AVL DiTEST en su país.
Espa
ñol
Datos técnicos AVL DiTEST VCI 1000
6 Manual de usuario
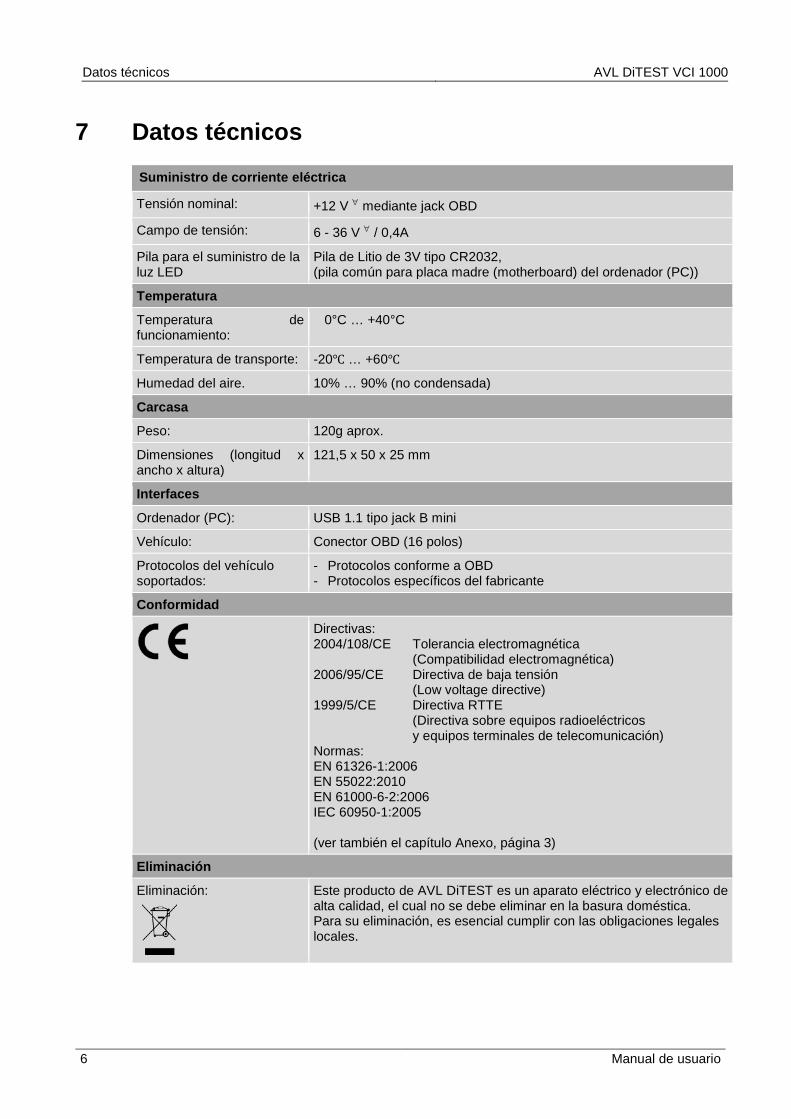
7 Datos técnicos
Suministro de corriente eléctrica
Tensión nominal: +12 V ∀ mediante jack OBD
Campo de tensión: 6 - 36 V ∀ / 0,4A
Pila para el suministro de la luz LED
Pila de Litio de 3V tipo CR2032, (pila común para placa madre (motherboard) del ordenador (PC))
Temperatura
Temperatura de funcionamiento:
0°C … +40°C
Temperatura de transporte: -20℃ … +60℃
Humedad del aire. 10% … 90% (no condensada)
Carcasa
Peso: 120g aprox.
Dimensiones (longitud x ancho x altura)
121,5 x 50 x 25 mm
Interfaces
Ordenador (PC): USB 1.1 tipo jack B mini
Vehículo: Conector OBD (16 polos)
Protocolos del vehículo soportados:
- Protocolos conforme a OBD - Protocolos específicos del fabricante
Conformidad
Directivas: 2004/108/CE Tolerancia electromagnética (Compatibilidad electromagnética) 2006/95/CE Directiva de baja tensión (Low voltage directive) 1999/5/CE Directiva RTTE (Directiva sobre equipos radioeléctricos y equipos terminales de telecomunicación) Normas: EN 61326-1:2006 EN 55022:2010 EN 61000-6-2:2006 IEC 60950-1:2005 (ver también el capítulo Anexo, página 3)
Eliminación
Eliminación:
Este producto de AVL DiTEST es un aparato eléctrico y electrónico de alta calidad, el cual no se debe eliminar en la basura doméstica. Para su eliminación, es esencial cumplir con las obligaciones legales locales.
AVL DiTEST VCI 1000 In generali
Manuale per l’utente 1
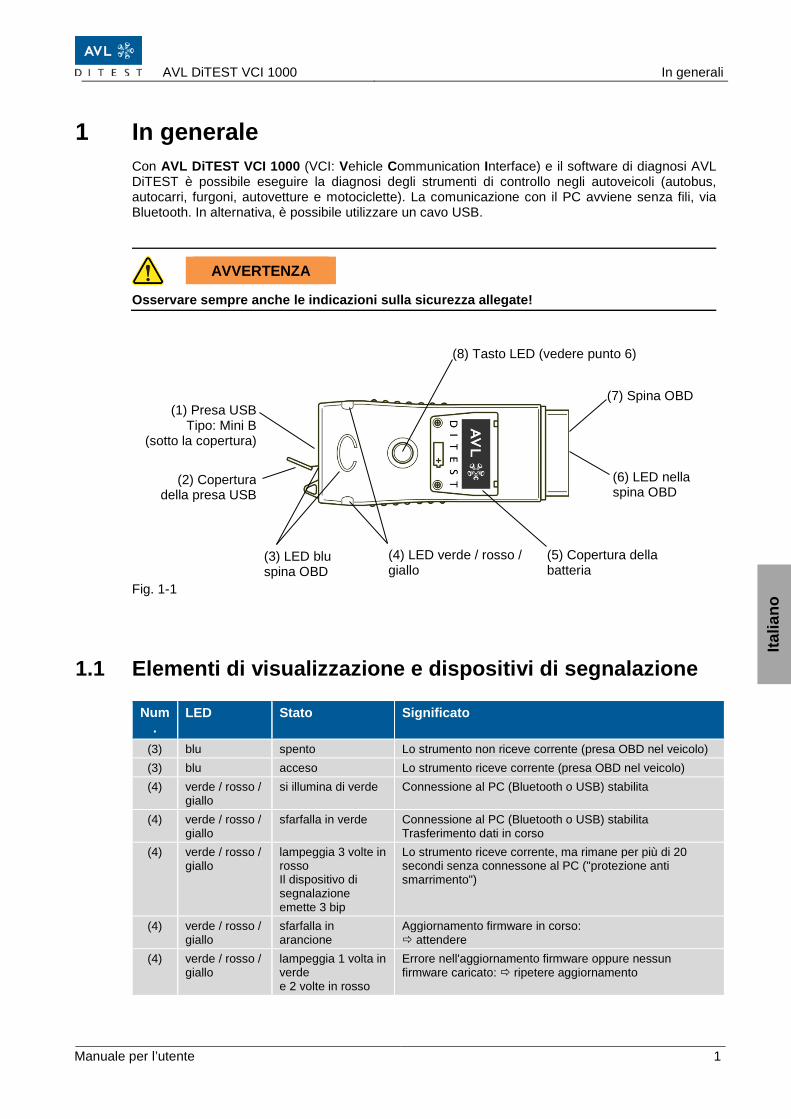
1 In generale Con AVL DiTEST VCI 1000 (VCI: Vehicle Communication Interface) e il software di diagnosi AVL DiTEST è possibile eseguire la diagnosi degli strumenti di controllo negli autoveicoli (autobus, autocarri, furgoni, autovetture e motociclette). La comunicazione con il PC avviene senza fili, via Bluetooth. In alternativa, è possibile utilizzare un cavo USB.
AVVERTENZA
Osservare sempre anche le indicazioni sulla sicurezza allegate! Fig. 1-1
1.1 Elementi di visualizzazione e dispositivi di segnalazione
Num.
LED Stato Significato
(3) blu spento Lo strumento non riceve corrente (presa OBD nel veicolo) (3) blu acceso Lo strumento riceve corrente (presa OBD nel veicolo) (4) verde / rosso /
giallo si illumina di verde Connessione al PC (Bluetooth o USB) stabilita
(4) verde / rosso / giallo
sfarfalla in verde Connessione al PC (Bluetooth o USB) stabilita Trasferimento dati in corso
(4) verde / rosso / giallo
lampeggia 3 volte in rosso Il dispositivo di segnalazione emette 3 bip
Lo strumento riceve corrente, ma rimane per più di 20 secondi senza connessone al PC ("protezione anti smarrimento")
(4) verde / rosso / giallo
sfarfalla in arancione
Aggiornamento firmware in corso: attendere
(4) verde / rosso / giallo
lampeggia 1 volta in verde e 2 volte in rosso
Errore nell'aggiornamento firmware oppure nessun firmware caricato: ripetere aggiornamento
Italia
no
(7) Spina OBD
(2) Copertura della presa USB
(3) LED blu spina OBD
(4) LED verde / rosso / giallo
(8) Tasto LED (vedere punto 6)
(1) Presa USB Tipo: Mini B
(sotto la copertura)
(6) LED nella spina OBD
(5) Copertura della batteria

Manutenzione e cura AVL DiTEST VCI 1000
2 Manuale per l’utente
2 Messa in funzione 2.1 Adattamenti
1. Inserire la spina OBD (7) di AVL DiTEST VCI 1000 nella presa OBD del veicolo (10).
NOTE
Inserire il connettore OBD del VCI 1000 il più diritta possibile nella presa OBD del veicolo al fine di evitare problemi di contatto o usura meccanica del VCI e presa OBD!
Il LED blu (3) inizia a lampeggiare. Se necessario, ad es. in caso di difficile accessibilità delle prese OBD, è possibile utilizzare il cavo di prolunga (11). Per determinati veicoli sono disponibili cavi adattatori (12) specifici del produttore. (Tutti i cavi disponibili al momento sono elencati al cap. Anhang / Appendix alla fine di questo manuale). Premendo il tasto (8) si illumina un LED (6) integrato nella spina OBD (7). In questo modo, AVL DiTEST VCI 1000 può essere adattato più semplicemente a luoghi di montaggio bui.
2. Stabilire una connessione Bluetooth con il PC. Vedere descrizione del programma di diagnosi. In alternativa, è possibile connettere AVL DiTEST VCI 1000 al PC anche con un cavo USB (9). Per farlo, aprire la copertura (2) di AVL DiTEST VCI 1000 e connettere il cavo USB (9) alla presa USB (1). Se è stabilita una connessione al PC, il LED verde / rosso / giallo (4) si accende in verde.
Fig. 2-1
2.2 Aggiornamento del firmware Vedere descrizione del programma di diagnosi. Attenzione: l'aggiornamento del firmware non può essere eseguito via Bluetooth, ma soltanto con un cavo USB.
(10)
(4)
(12)
(2) (8) (9)
(11)
Veicolo: Presa OBD
Veicolo: Presa specifica del produttore
PC
(7)
Chiavetta Bluetooth
(1)
(6)
AVL DiTEST VCI 1000 Utilizzo
Manuale per l’utente 3
3 Utilizzo Osservare la descrizione del programma di diagnosi.
4 In caso di errore Osservare gli elementi di visualizzazione e i dispositivi di segnalazione, vedere cap. 1.2. Accertarsi che AVL DiTEST VCI 1000 sia stato messo in funzione correttamente. Accertarsi che il software di diagnosi AVL DiTEST sia stato avviato correttamente. Controllare la correttezza della connessione tra
veicolo AVL DiTEST VCI 1000 PC. Mettersi in contatto con l'assistenza AVL DiTEST o con il proprio partner commerciale.
Manutenzione e cura AVL DiTEST VCI 1000
4 Manuale per l’utente
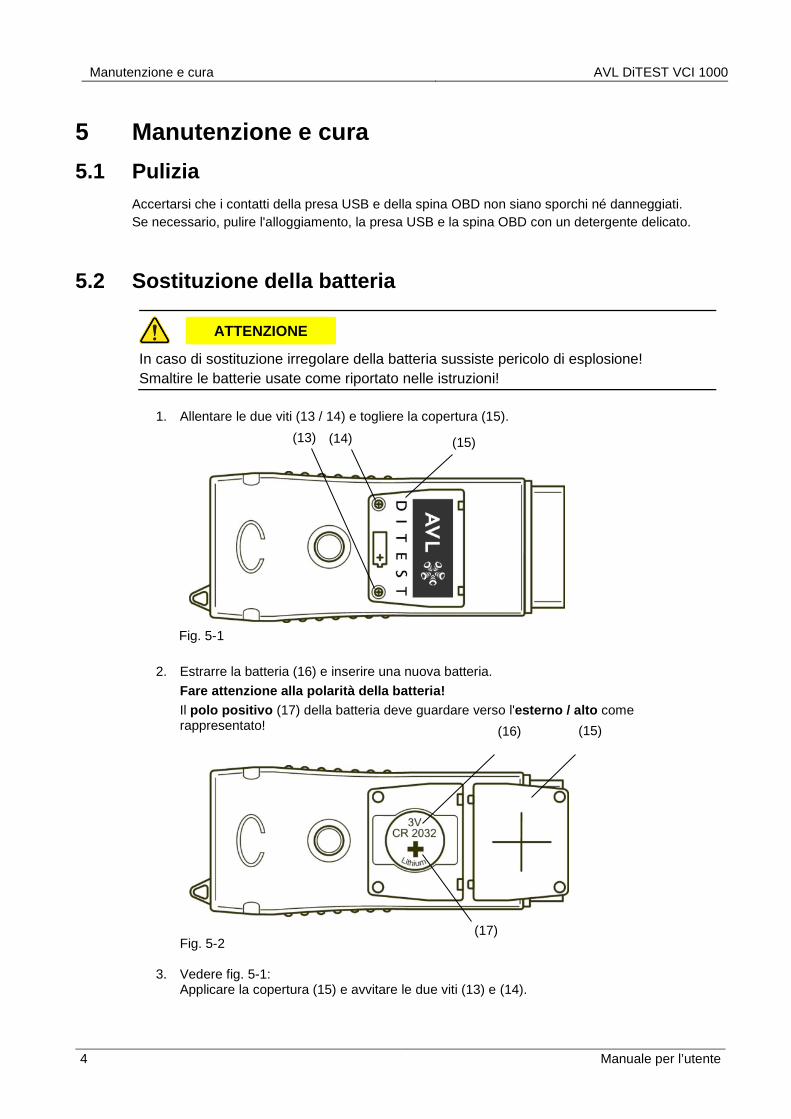
5 Manutenzione e cura 5.1 Pulizia
Accertarsi che i contatti della presa USB e della spina OBD non siano sporchi né danneggiati. Se necessario, pulire l'alloggiamento, la presa USB e la spina OBD con un detergente delicato.
5.2 Sostituzione della batteria
ATTENZIONE
In caso di sostituzione irregolare della batteria sussiste pericolo di esplosione! Smaltire le batterie usate come riportato nelle istruzioni!
1. Allentare le due viti (13 / 14) e togliere la copertura (15).
Fig. 5-1
2. Estrarre la batteria (16) e inserire una nuova batteria. Fare attenzione alla polarità della batteria! Il polo positivo (17) della batteria deve guardare verso l'esterno / alto come rappresentato! Fig. 5-2
3. Vedere fig. 5-1: Applicare la copertura (15) e avvitare le due viti (13) e (14).
(15) (13) (14)
(16)
(17)
(15)
AVL DiTEST VCI 1000 Garanzia
Manuale per l’utente 5
6 Garanzia 6.1 Apparecchi nuovi
I prodotti nuovi sono garantiti per un periodo di 12 mesi. Trovano applicazione gli accordi con il fornitore. La garanzia non copre le parti soggette, batterie a usura e gli accessori. Fa fede la data della bolla di consegna al cliente finale. La garanzia non copre:
danni di natura meccanica (ad es. caduta ecc.) danni causati da liquidi (ad es. acqua, olio, acidi ecc.) interventi esterni (ad es. tentativi di riparazione ad opera di personale non autorizzato) uso improprio (ad es. pulizia con aria compressa)
6.2 Apparecchi sostitutivi o in comodato d’uso Trovano applicazione gli accordi con il fornitore. Fa fede la data della bolla di consegna al cliente finale.
6.3 Danni In una tale evenienza, rivolgersi alla filiale AVL DiTEST / al partner AVL DiTEST della propria zona.
Italia
no
Dati tecnici AVL DiTEST VCI 1000
6 Manuale per l’utente
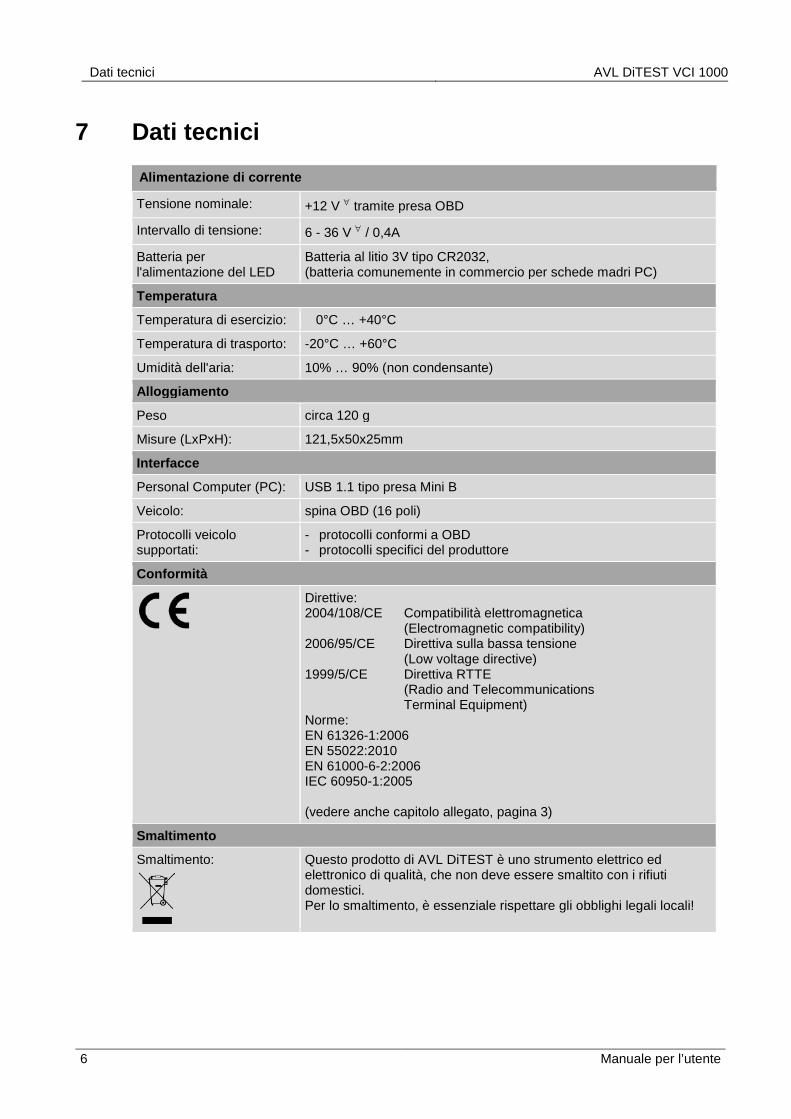
7 Dati tecnici
Alimentazione di corrente
Tensione nominale: +12 V ∀ tramite presa OBD
Intervallo di tensione: 6 - 36 V ∀ / 0,4A
Batteria per l'alimentazione del LED
Batteria al litio 3V tipo CR2032, (batteria comunemente in commercio per schede madri PC)
Temperatura
Temperatura di esercizio: 0°C … +40°C
Temperatura di trasporto: -20°C … +60°C
Umidità dell'aria: 10% … 90% (non condensante)
Alloggiamento
Peso circa 120 g
Misure (LxPxH): 121,5x50x25mm
Interfacce
Personal Computer (PC): USB 1.1 tipo presa Mini B
Veicolo: spina OBD (16 poli)
Protocolli veicolo supportati:
- protocolli conformi a OBD - protocolli specifici del produttore
Conformità
Direttive: 2004/108/CE Compatibilità elettromagnetica (Electromagnetic compatibility) 2006/95/CE Direttiva sulla bassa tensione (Low voltage directive) 1999/5/CE Direttiva RTTE (Radio and Telecommunications Terminal Equipment) Norme: EN 61326-1:2006 EN 55022:2010 EN 61000-6-2:2006 IEC 60950-1:2005 (vedere anche capitolo allegato, pagina 3)
Smaltimento
Smaltimento:
Questo prodotto di AVL DiTEST è uno strumento elettrico ed elettronico di qualità, che non deve essere smaltito con i rifiuti domestici. Per lo smaltimento, è essenziale rispettare gli obblighi legali locali!
AVL DiTEST VCI 1000 Algemeen
Handboek 1
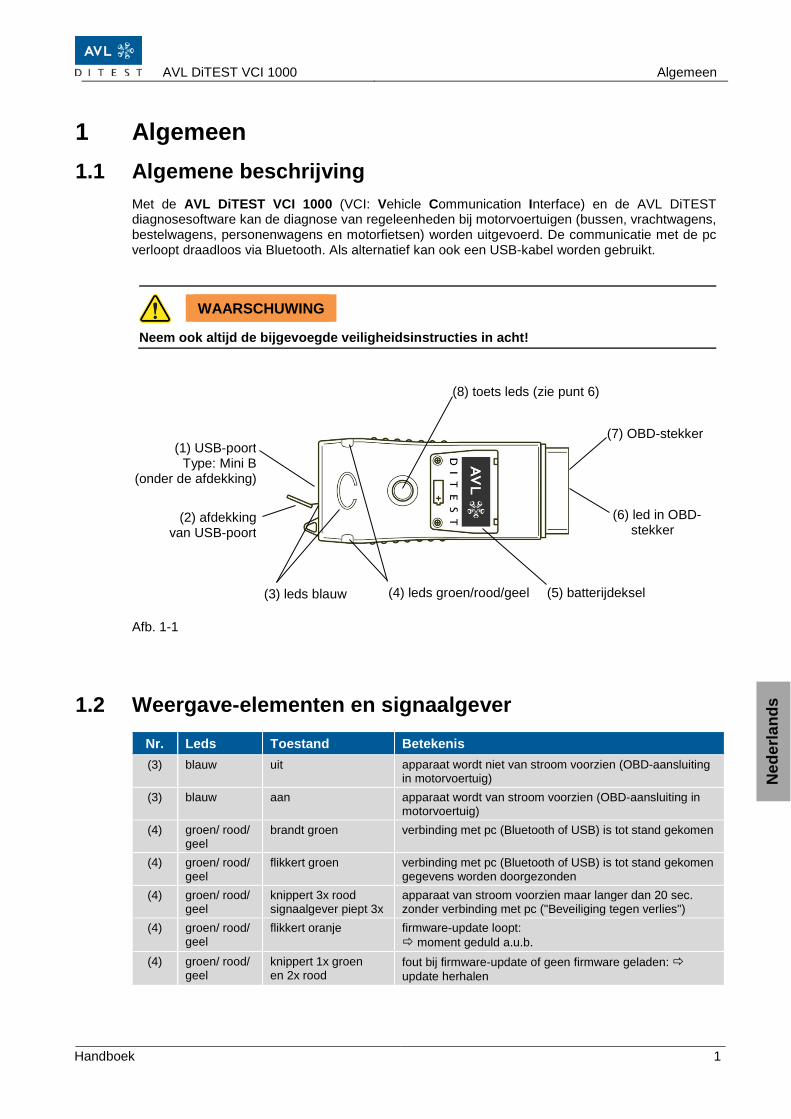
1 Algemeen 1.1 Algemene beschrijving
Met de AVL DiTEST VCI 1000 (VCI: Vehicle Communication Interface) en de AVL DiTEST diagnosesoftware kan de diagnose van regeleenheden bij motorvoertuigen (bussen, vrachtwagens, bestelwagens, personenwagens en motorfietsen) worden uitgevoerd. De communicatie met de pc verloopt draadloos via Bluetooth. Als alternatief kan ook een USB-kabel worden gebruikt.
WAARSCHUWING
Neem ook altijd de bijgevoegde veiligheidsinstructies in acht! Afb. 1-1
1.2 Weergave-elementen en signaalgever
Nr. Leds Toestand Betekenis (3) blauw uit apparaat wordt niet van stroom voorzien (OBD-aansluiting
in motorvoertuig) (3) blauw aan apparaat wordt van stroom voorzien (OBD-aansluiting in
motorvoertuig) (4) groen/ rood/
geel brandt groen verbinding met pc (Bluetooth of USB) is tot stand gekomen
(4) groen/ rood/ geel
flikkert groen verbinding met pc (Bluetooth of USB) is tot stand gekomen gegevens worden doorgezonden
(4) groen/ rood/ geel
knippert 3x rood signaalgever piept 3x
apparaat van stroom voorzien maar langer dan 20 sec. zonder verbinding met pc ("Beveiliging tegen verlies")
(4) groen/ rood/ geel
flikkert oranje firmware-update loopt: moment geduld a.u.b.
(4) groen/ rood/ geel
knippert 1x groen en 2x rood
fout bij firmware-update of geen firmware geladen: update herhalen
(7) OBD-stekker
(2) afdekking van USB-poort
(3) leds blauw
(4) leds groen/rood/geel
(8) toets leds (zie punt 6)
(1) USB-poort Type: Mini B
(onder de afdekking)
(6) led in OBD- stekker
(5) batterijdeksel
Ned
erla
nds
In bedrijf nemen AVL DiTEST VCI 1000
2 Handboek
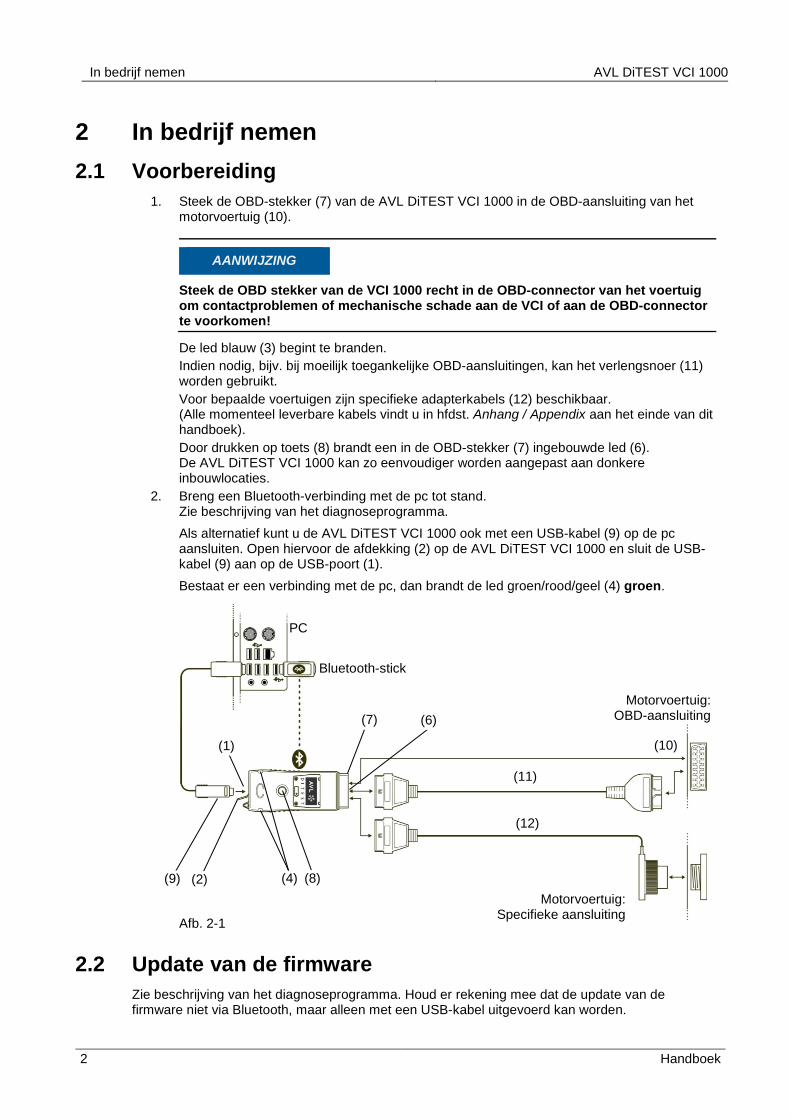
2 In bedrijf nemen 2.1 Voorbereiding
1. Steek de OBD-stekker (7) van de AVL DiTEST VCI 1000 in de OBD-aansluiting van het motorvoertuig (10).
AANWIJZING
Steek de OBD stekker van de VCI 1000 recht in de OBD-connector van het voertuig om contactproblemen of mechanische schade aan de VCI of aan de OBD-connector te voorkomen!
De led blauw (3) begint te branden. Indien nodig, bijv. bij moeilijk toegankelijke OBD-aansluitingen, kan het verlengsnoer (11) worden gebruikt. Voor bepaalde voertuigen zijn specifieke adapterkabels (12) beschikbaar. (Alle momenteel leverbare kabels vindt u in hfdst. Anhang / Appendix aan het einde van dit handboek). Door drukken op toets (8) brandt een in de OBD-stekker (7) ingebouwde led (6). De AVL DiTEST VCI 1000 kan zo eenvoudiger worden aangepast aan donkere inbouwlocaties.
2. Breng een Bluetooth-verbinding met de pc tot stand. Zie beschrijving van het diagnoseprogramma. Als alternatief kunt u de AVL DiTEST VCI 1000 ook met een USB-kabel (9) op de pc aansluiten. Open hiervoor de afdekking (2) op de AVL DiTEST VCI 1000 en sluit de USB-kabel (9) aan op de USB-poort (1). Bestaat er een verbinding met de pc, dan brandt de led groen/rood/geel (4) groen.
Afb. 2-1
2.2 Update van de firmware Zie beschrijving van het diagnoseprogramma. Houd er rekening mee dat de update van de firmware niet via Bluetooth, maar alleen met een USB-kabel uitgevoerd kan worden.
(10)
(4)
(12)
(2) (8) (9)
(11)
Motorvoertuig: OBD-aansluiting
Motorvoertuig: Specifieke aansluiting
PC
(7)
Bluetooth-stick
(1)
(6)
AVL DiTEST VCI 1000 Bediening
Handboek 3
3 Bediening Neem de beschrijving van het diagnoseprogramma in acht.
4 Bij fouten Let op de weergave-elementen en de signaalgever, zie hfdst. 1.2. Zorg dat de AVL DiTEST VCI 1000 correct in bedrijf gesteld is. Zorg dat de AVL DiTEST diagnosesoftware correct gestart is. Controleer de verbinding tussen
voertuig AVL DiTEST VCI 1000 pc Neem contact op met de AVL DiTEST service-afdeling of met uw dealer
Ned
erla
nds
Onderhoud en verzorging AVL DiTEST VCI 1000
4 Handboek
5 Onderhoud en verzorging 5.1 Reiniging
Zorg dat de contacten van de USB-poort en de OBD-stekker niet vuil of beschadigd zijn. Reinig indien nodig de behuizing, de USB-poort en de OBD-stekker met een mild schoonmaakmiddel.
5.2 Vervanging van de batterij
VOORZICHTIG
Explosiegevaar bij onjuiste vervanging van de batterij! Verwijdering van gebruikte batterijen volgens de handleiding!
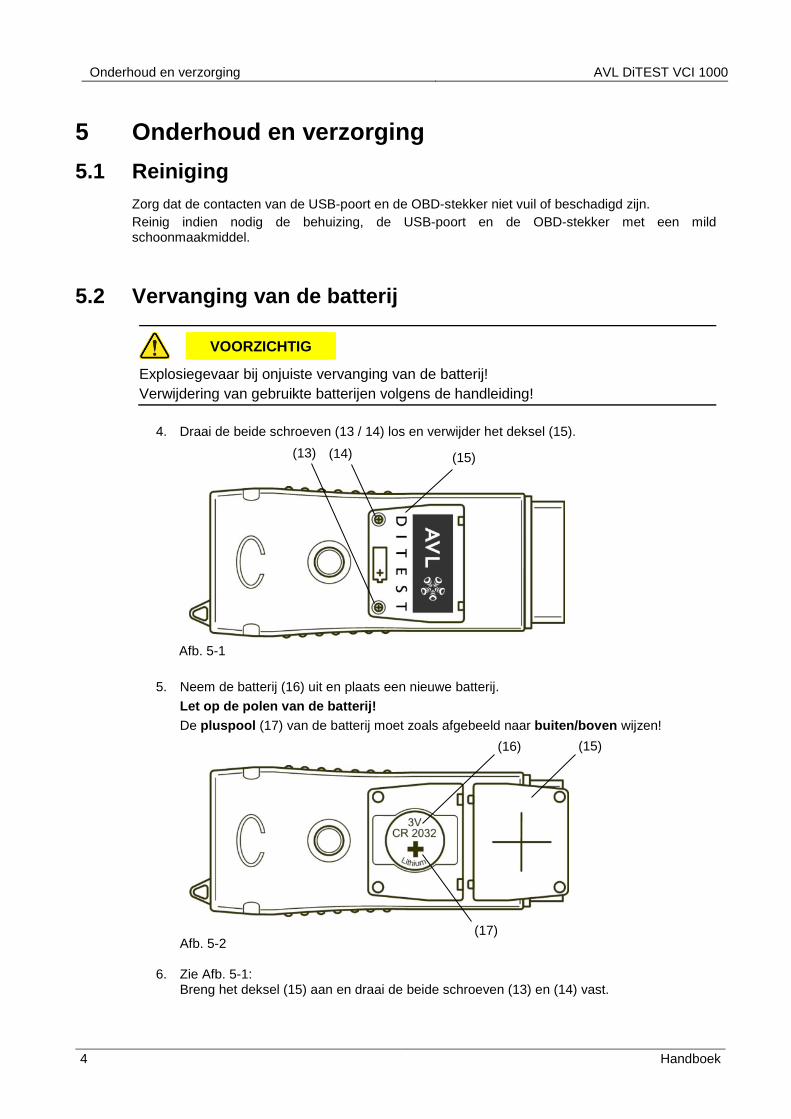
4. Draai de beide schroeven (13 / 14) los en verwijder het deksel (15).
Afb. 5-1
5. Neem de batterij (16) uit en plaats een nieuwe batterij. Let op de polen van de batterij! De pluspool (17) van de batterij moet zoals afgebeeld naar buiten/boven wijzen! Afb. 5-2
6. Zie Afb. 5-1: Breng het deksel (15) aan en draai de beide schroeven (13) en (14) vast.
(15) (13) (14)
(16)
(17)
(15)
AVL DiTEST VCI 1000 Garantie
Handboek 5
6 Garantie 6.1 Nieuwe apparatuur
De garantietijd bij nieuwe apparatuur bedraagt 12 maanden. Er gelden de overeenkomsten met uw leverancier. Principieel van de garantie uitgesloten zijn slijtagedelen, batterijen en toebehoren. Voor de afwikkeling geldt de datum van de aflever bon aan de eindverbruiker. De garantie vervalt bij:
Mechanische beschadiging (bijv. door vallen en dergelijke) Binnendringen van vloeistoffen (bijv. water, olie, zuren enz.) Ingrepen van buitenaf (bijv. reparatiepogingen van niet-geautoriseerde personen) Onjuiste bediening (bijv. reiniging met perslucht) Verkeerde opslag, onderhoud en verzorging (bijv. reiniging van het apparaat met oplossing
bevattende reinigers).
6.2 Ruil- of leenapparatuur Er gelden de overeenkomsten met uw leverancier. Voor de afwikkeling geldt de datum van de aflever bon aan de eindverbruiker.
6.3 In geval van schade In geval van schade wendt u zich tot de betreffende AVL DiTEST vestiging resp. AVL DiTEST partner in uw land.
Ned
erla
nds

Technische gegevens AVL DiTEST VCI 1000
6 Handboek
7 Technische gegevens
Stroomvoorziening
Nominale spanning: +12 V ∀ via OBD-aansluiting
Spanningsbereik: 6 - 36 V ∀ / 0,4 A
Batterij voor voeding van de leds
Lithiumbatterij 3V type CR2032, (gangbare batterij voor pc-moederbord)
Temperatuur
Bedrijfstemperatuur: 0 … + 40 °C
Transporttemperatuur: -20 … + 60 °C
Luchtvochtigheid: 10 … 90% (niet condenserend)
Behuizing
Gewicht: ca. 120 g
Afmetingen (lxbxh): 121,5 x 50 x 25 mm
Interfaces
Personal computer (PC): USB 1.1 type Mini B-poort
Voertuig: OBD-stekker (16-polig)
Ondersteunde voertuigprotocollen:
- OBD-conforme protocollen - Fabrikanteigen protocollen
Conformiteit
Richtlijnen: 2004/108/EG Elektromagnetische Compatibiliteit (Electromagnetic compatibility) 2006/95/EG Laagspanningsrichtlijn (Low voltage directive) 1999/5/EG RTTE-RL (Radio and Telecommunications Terminal Equipment) Normen: EN 61326-1:2006 EN 55022:2010 EN 61000-6-2:2006 IEC 60950-1:2005 (zie ook hoofdstuk Bijlage, pagina 3)
Verwijdering
Verwijdering:
Dit product van AVL DiTEST is een hoogwaardig elektrisch en elektronisch apparaat, dat niet met het huishoudelijke afval verwijderd mag worden. Voor verwijdering is het essentieel om te voldoen aan lokale wettelijke verplichtingen!
AVL DiTEST VCI 1000 Általános
Kezelöi kézikönyv 1
1 Általànos 1.1 Àltalànos leìrás
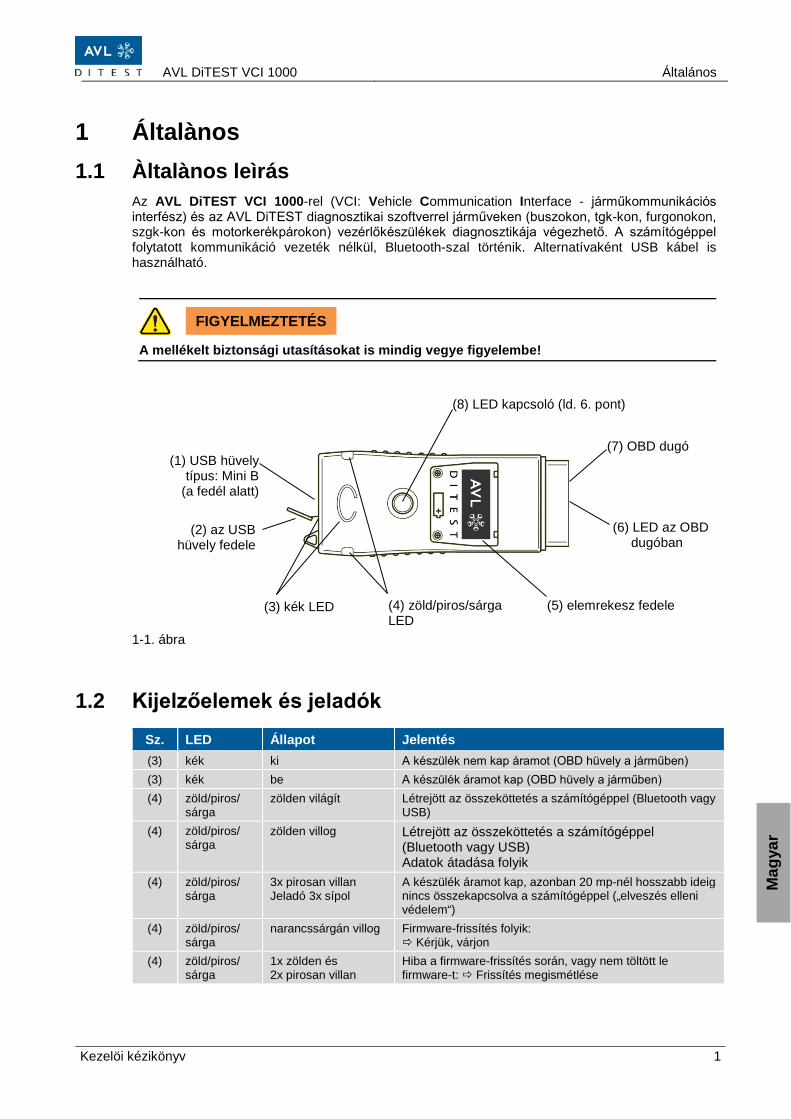
Az AVL DiTEST VCI 1000-rel (VCI: Vehicle Communication Interface - járműkommunikációs interfész) és az AVL DiTEST diagnosztikai szoftverrel járműveken (buszokon, tgk-kon, furgonokon, szgk-kon és motorkerékpárokon) vezérlőkészülékek diagnosztikája végezhető. A számítógéppel folytatott kommunikáció vezeték nélkül, Bluetooth-szal történik. Alternatívaként USB kábel is használható.
FIGYELMEZTETÉS
A mellékelt biztonsági utasításokat is mindig vegye figyelembe! 1-1. ábra
1.2 Kijelzőelemek és jeladók
Sz. LED Állapot Jelentés (3) kék ki A készülék nem kap áramot (OBD hüvely a járműben) (3) kék be A készülék áramot kap (OBD hüvely a járműben) (4) zöld/piros/
sárga zölden világít Létrejött az összeköttetés a számítógéppel (Bluetooth vagy
USB) (4) zöld/piros/
sárga zölden villog Létrejött az összeköttetés a számítógéppel
(Bluetooth vagy USB) Adatok átadása folyik
(4) zöld/piros/ sárga
3x pirosan villan Jeladó 3x sípol
A készülék áramot kap, azonban 20 mp-nél hosszabb ideig nincs összekapcsolva a számítógéppel („elveszés elleni védelem“)
(4) zöld/piros/ sárga
narancssárgán villog Firmware-frissítés folyik: Kérjük, várjon
(4) zöld/piros/ sárga
1x zölden és 2x pirosan villan
Hiba a firmware-frissítés során, vagy nem töltött le firmware-t: Frissítés megismétlése
Mag
yar
(7) OBD dugó
(2) az USB hüvely fedele
(3) kék LED (4) zöld/piros/sárga LED
(8) LED kapcsoló (ld. 6. pont)
(1) USB hüvely típus: Mini B
(a fedél alatt)
(6) LED az OBD dugóban
(5) elemrekesz fedele
Üzembe helyezés AVL DiTEST VCI 1000
2 Kezelöi kézikönyv
2 Üzembe helyezés 2.1 Adaptációk
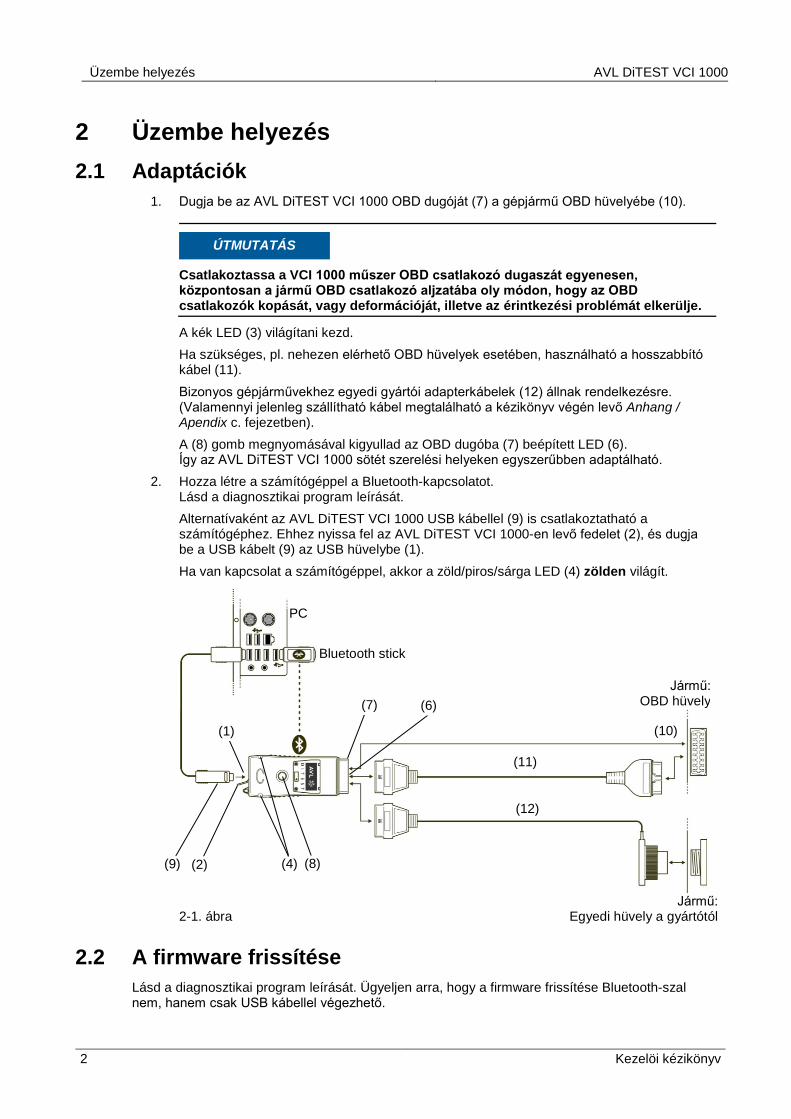
1. Dugja be az AVL DiTEST VCI 1000 OBD dugóját (7) a gépjármű OBD hüvelyébe (10).
ÚTMUTATÁS
Csatlakoztassa a VCI 1000 műszer OBD csatlakozó dugaszát egyenesen, központosan a jármű OBD csatlakozó aljzatába oly módon, hogy az OBD csatlakozók kopását, vagy deformációját, illetve az érintkezési problémát elkerülje.
A kék LED (3) világítani kezd. Ha szükséges, pl. nehezen elérhető OBD hüvelyek esetében, használható a hosszabbító kábel (11). Bizonyos gépjárművekhez egyedi gyártói adapterkábelek (12) állnak rendelkezésre. (Valamennyi jelenleg szállítható kábel megtalálható a kézikönyv végén levő Anhang / Apendix c. fejezetben). A (8) gomb megnyomásával kigyullad az OBD dugóba (7) beépített LED (6). Így az AVL DiTEST VCI 1000 sötét szerelési helyeken egyszerűbben adaptálható.
2. Hozza létre a számítógéppel a Bluetooth-kapcsolatot. Lásd a diagnosztikai program leírását. Alternatívaként az AVL DiTEST VCI 1000 USB kábellel (9) is csatlakoztatható a számítógéphez. Ehhez nyissa fel az AVL DiTEST VCI 1000-en levő fedelet (2), és dugja be a USB kábelt (9) az USB hüvelybe (1). Ha van kapcsolat a számítógéppel, akkor a zöld/piros/sárga LED (4) zölden világít.
2-1. ábra
2.2 A firmware frissítése Lásd a diagnosztikai program leírását. Ügyeljen arra, hogy a firmware frissítése Bluetooth-szal nem, hanem csak USB kábellel végezhető.
(10)
(4)
(12)
(2) (8) (9)
(11)
Jármű: OBD hüvely
Jármű: Egyedi hüvely a gyártótól
PC
(7)
Bluetooth stick
(1)
(6)
AVL DiTEST VCI 1000 Kezelés
Kezelöi kézikönyv 3
3 Kezelés Vegye figyelembe a diagnosztikai program leírását.
4 Hiba esetén Vegye figyelembe a kijelzőelemeket és a jeladót, lásd 1.2. fejezetben. Győződjön meg arról, hogy az AVL DiTEST VCI 1000-et szabályosan helyezték üzembe. Győződjön meg arról, hogy az AVL DiTEST diagnosztikai szoftvert jól indították el. Ellenőrizze a szabályos összeköttetést az alábbiak között:
jármű AVL DiTEST VCI 1000 PC Vegye fel a kapcsolatot az AVL DiTEST vevőszolgálatával, ill. kereskedelmi partnerével.
Karbantartás és ápolás AVL DiTEST VCI 1000
4 Kezelöi kézikönyv
5 Karbantartás és ápolás 5.1 Tisztítás
Győződjön meg arról, hogy a USB hüvely és az OBD dugó érintkezői nem szennyezettek, és nem sérültek. Ha szükséges, a házat, a USB hüvelyt és az OSB dugót enyhe tisztítószerrel tisztítsa.
5.2 Akkumulátor-csere
VIGYÁZAT
Az akkumulátor szakszerűtlen cseréje esetén robbanásveszély áll fenn! A használt akkumulátorokat az utasítás szerint kell ártalmatlanítani!
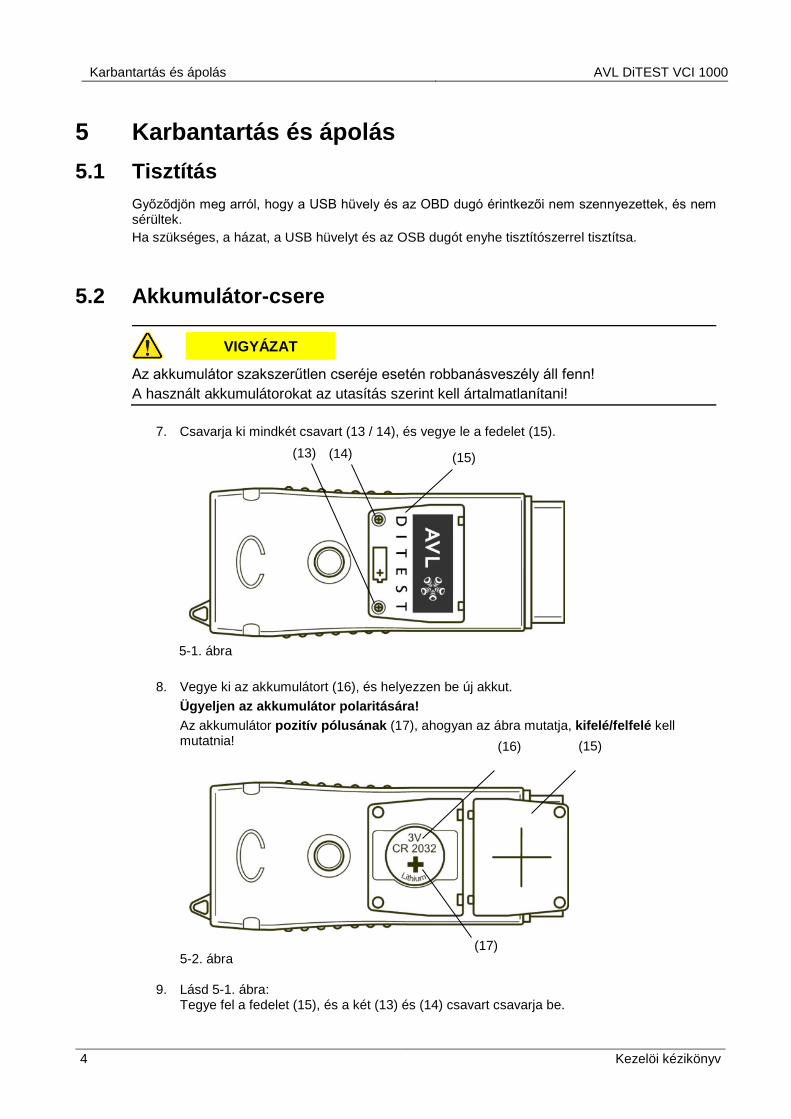
7. Csavarja ki mindkét csavart (13 / 14), és vegye le a fedelet (15).
5-1. ábra
8. Vegye ki az akkumulátort (16), és helyezzen be új akkut. Ügyeljen az akkumulátor polaritására! Az akkumulátor pozitív pólusának (17), ahogyan az ábra mutatja, kifelé/felfelé kell mutatnia! 5-2. ábra
9. Lásd 5-1. ábra: Tegye fel a fedelet (15), és a két (13) és (14) csavart csavarja be.
(15) (13) (14)
(16)
(17)
(15)
AVL DiTEST VCI 1000 Szavatosság
Kezelöi kézikönyv 5
6 Szavatosság 6.1 Új készülékek
Új készülékek szavatossági ideje 12 hónap. Mérvadó a szállítóval való megállapodás. A garancia alól kivételt képeznek a kopó részek, akkumulátorok és a tartozékok. A szavatossági idő a végfogyasztóhoz való szállítás szállítólevelének dátumától számítandó. Megszűnik a szavatosság
■ mechanikai rongálódás (pl. leesés stb.) ■ folyadék (pl. víz, olaj, savak stb.) okozta károk ■ külső behatás (pl. arra fel nem jogosított személyek szerelési próbálkozása) ■ helytelen üzemeltetés (pl. sűrített levegővel való tisztítás) esetén.
6.2 Csere- vagy kölcsönkészülékek Mérvadó a szállítóval való megállapodás. A szavatossági idő a végfogyasztóhoz való szállítás szállítólevelének dátumától számítandó.
6.3 Káresemény Káreseménynél forduljon a legközelebbi AVL DiTEST-kirendeltséghez, ill. az AVL DiTEST adott országbeli partnercégéhez.
Mag
yar
Müszaki adatok AVL DiTEST VCI 1000
6 Kezelöi kézikönyv
7 Műszaki adatok
Áramellátás
Névleges feszültség: +12 V ∀ az OBD hüvelyen keresztül
Feszültségtartomány: 6 - 36 V ∀ / 0,4 A
Akkumulátor a LED ellátásához
3 V-os, CR2032 típusú lítiumakkumulátor, (kereskedelemben kapható alaplap-akkumulátor)
Hőmérséklet
Üzemi hőmérséklet: 0°C … +40°C
Szállítási hőmérséklet: -20°C … +60°C
Légnedvesség: 10% … 90% (nem kicsapódó)
Készülékház
Súly: kb. 120g
Méretek (h x sz x m): 121,5x50x25mm
Kapcsolódási pontok
Személyi számítógép (PC): USB 1.1 típus: Mini B hüvely
Jármű: OBD dugó (16-pólusú)
Támogatott gépjárműprotokollok:
- OBD-konform protokollok - Egyedi gyártói protokollok
Megfelelőség
Irányelvek: 2004/108/EK Elektromágneses összeférhetőség (Electromagnetic compatibility) 2006/95/EK Kisfeszültségű irányelv (Low voltage directive) 1999/5/EK Rádióberendezésekről és távközlő végberendezésekről szóló irányelv (Radio and Telecommunications Terminal Equipment) Szabványok: EN 61326-1:2006 EN 55022:2010 EN 61000-6-2:2006 IEC 60950-1:2005 (ld. Melléklet c. fejezetet is, 3. oldal)
Hulladékkezelés
Hulladékkezelés:
Az AVL DiTEST ezen terméke értékes elektromos és elektronikus készülék, amelyet nem szabad a háztartási hulladékkal együtt ártalmatlanítani. Az ártalmatlanításhoz feltétlenül be kell tartani a helyi jogi kötelezettségeket!
AVL DiTEST VCI 1000 Anhang / Appendix
User Manual 1
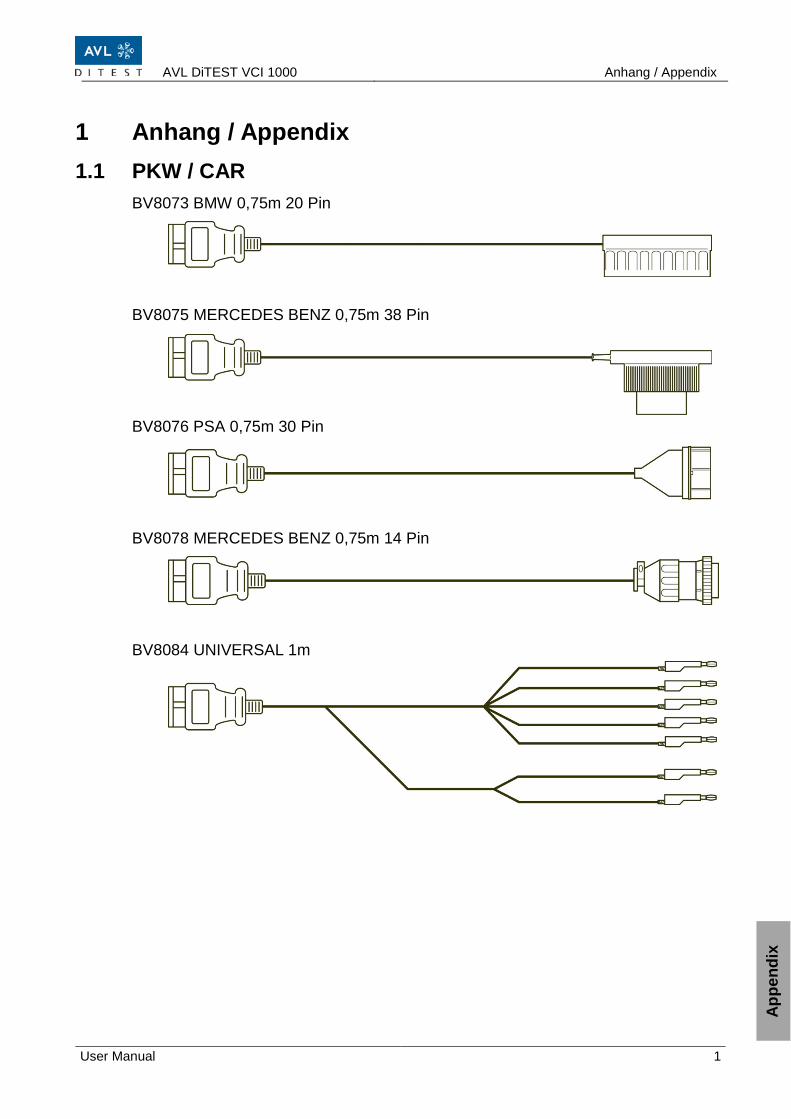
1 Anhang / Appendix 1.1 PKW / CAR
BV8073 BMW 0,75m 20 Pin BV8075 MERCEDES BENZ 0,75m 38 Pin BV8076 PSA 0,75m 30 Pin BV8078 MERCEDES BENZ 0,75m 14 Pin BV8084 UNIVERSAL 1m
Appe
ndix
Anhang / Appendix AVL DiTEST VCI 1000
2 User Manual
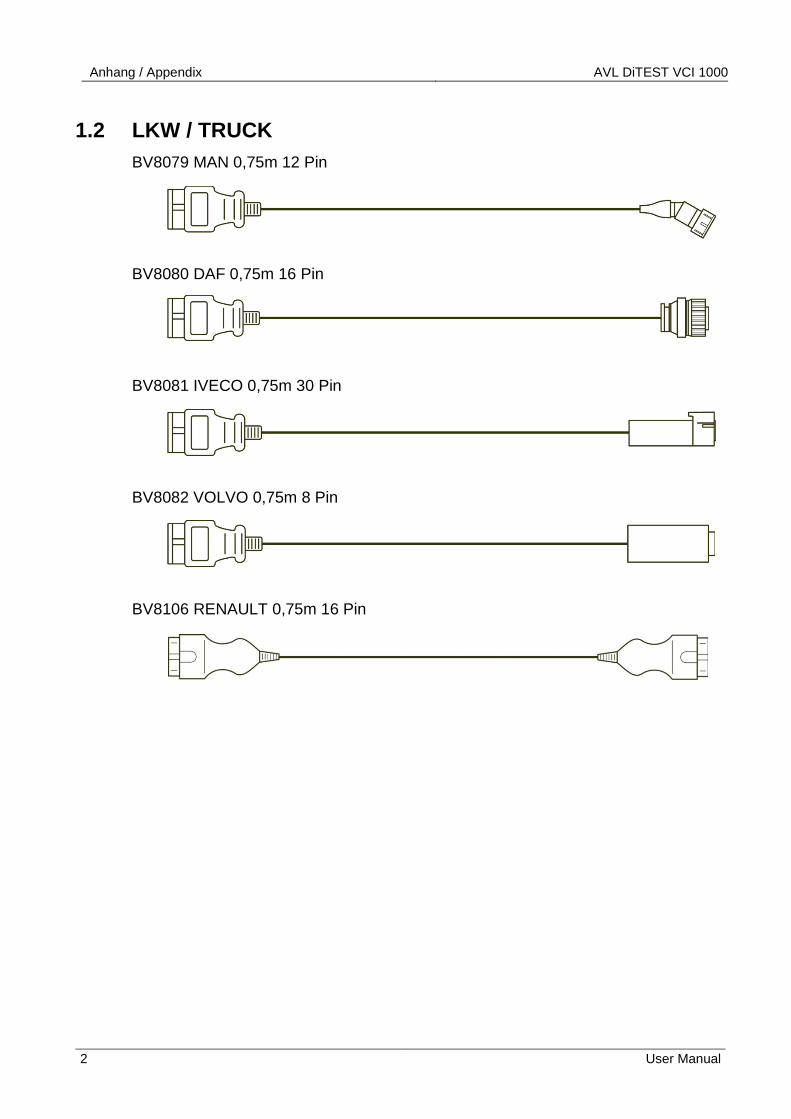
1.2 LKW / TRUCK BV8079 MAN 0,75m 12 Pin BV8080 DAF 0,75m 16 Pin BV8081 IVECO 0,75m 30 Pin BV8082 VOLVO 0,75m 8 Pin BV8106 RENAULT 0,75m 16 Pin
AVL DiTEST VCI 1000 Anhang / Appendix
User Manual 3
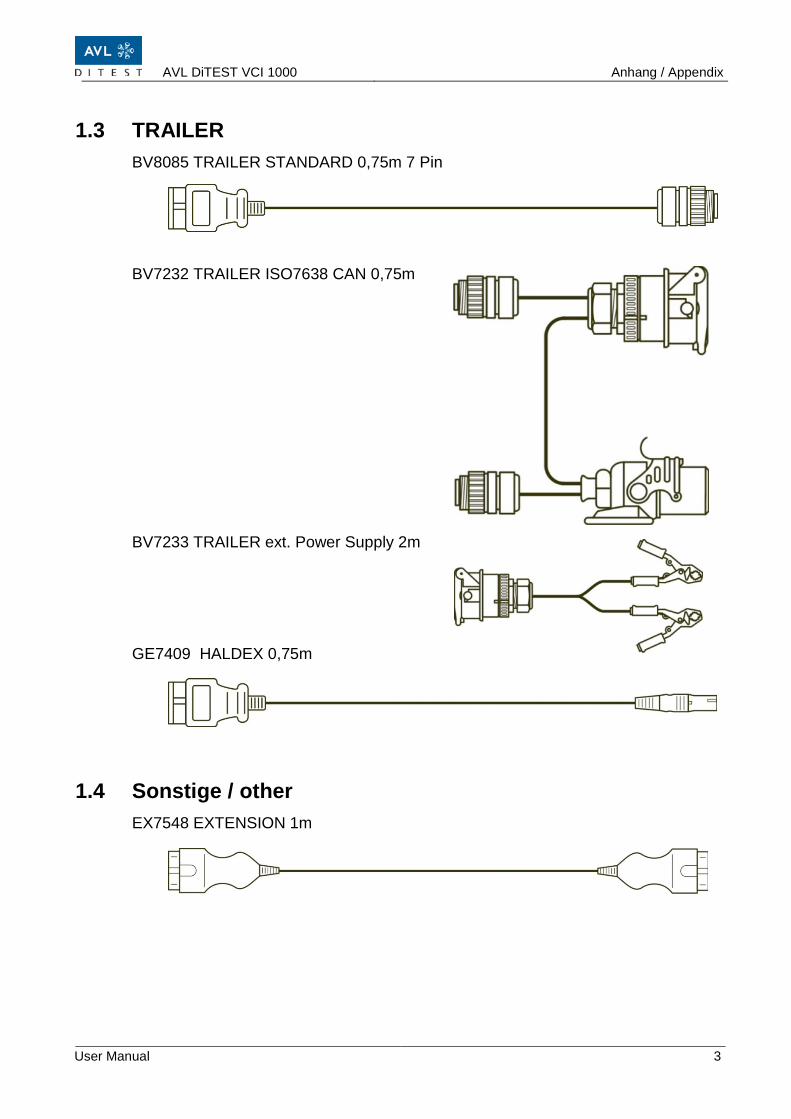
1.3 TRAILER BV8085 TRAILER STANDARD 0,75m 7 Pin BV7232 TRAILER ISO7638 CAN 0,75m BV7233 TRAILER ext. Power Supply 2m GE7409 HALDEX 0,75m
1.4 Sonstige / other EX7548 EXTENSION 1m

Anhang / Appendix AVL DiTEST VCI 1000
4 User Manual
EC – DECLARATION OF CONFORMITY


Recommended