Embed Size (px)
Citation preview
Party
Sa - 15°C
°C
VRC-VCC
+10
+2
+3
-1
-2
-35 30
VRT 390
BEDIENUNGS- UND MONTAGEANLEITUNGOPERATING AND INSTALLATION INSTRUCTIONS
INSTRUCTIONS DE MONTAGE ET MANUEL D'UTILISATION
DE GB FR
2
Verehrte Kundin, geehrter Kunde!Mit dem Vaillant Regelgerät VRT 390haben Sie ein Spitzenprodukt aus demHause Vaillant erworben. Um alleVorteile des Gerätes richtig nutzen zukönnen, nehmen Sie sich ruhig ein paarMinuten Zeit und lesen Sie dieseBedienungsanleitung. Sie ist nichtkompliziert und gibt Ihnen nützliche Tipsund Tricks.Bitte bewahren Sie diese Anleitungsorgfältig auf und geben Sie sie einemevt. Nachbesitzer weiter.
Zu Ihrer Sicherheit!Alle Arbeiten am Gerät selbst und amGesamtsystem dürfen nur autorisierteFachleute durchführen!Bitte bedenken Sie, daß bei nichtfachgerecht ausgeführten ArbeitenGefahr für Leib und Leben bestehenkann.
TIPPS!
● Beachten Sie die werkseitigen Ein-stellungen auf Seite 20. Sind Siedamit zufrieden, brauchen Sie keineweiteren Einstellungen vorzunehmen.
● Nehmen Sie bei allen Einstellvor-gängen die Ausklappseiten amAnfang und am Ende dieser Anleitungzu Hilfe.
Dear customer!By choosing the VRT 390 thermostat youhave bought a high quality product fromVaillant. In order to familiarise yourselfwith all aspects of this thermostat it isrecommended that you take some timeand carefully read this instructionmanual. It is easy to understand and willgive you many useful hints.Please keep the manual in a safe placeand make sure that is handed over topossible next owners of the control.
For your safety!All repairs on the thermostat itself andyour overall system should always becarried out by authorised professionalsonly!Please take into consideration that non-professional interference with theappliance could threaten lives.
Hints!● Please note the list of settings which
have been already programmed intothe thermostat on page 20. If you arehappy with these settings no furtherprogramming is necessary.
● Refer to the folded pages at thebeginning and the end of this manualfor re-programming the thermostat.
Chère cliente, cher client!Avec le thermostat d’ambiance VRT 390de Vaillant, vous venez d'acquérir unproduit haut de gamme. Pour pouvoirprofiter au maximum de tous lesavantages de l'appareil, n'hésitez pas àréserver quelques minutes à la lecture dece mode d'emploi. Il n'est pas compliquéet vous fournit des "tuyaux" bien utiles.Conservez soigneusement ce documentet donnez-le, le cas échéant, aupropriétaire ultérieur.
Pour votre sécurité!Sur l'appareil lui-même et sur l'ensembledu système, les travaux ne doivent êtreréalisés que par des spécialistesqualifiés!Risque de blessures et danger de mort siles travaux ne sont pas effectués selon lesrègles.
QUELQUES "TUYAUX"● Examinez les réglages effectués par le
constructeur (page 20). S’ils vousconviennent, vous n'avez pas besoind’en effectuer d'autres.
● Lors de tous les réglages, aidez-vousdes rabats du début et de la fin de cemode d'emploi.
DE GB FR
3
Party
Sa - 15¡C
°C
VRC-VCC
+10
+2
+3
-1
-2
-3
Party
Sa
°C
A B D E F
HG7 65
5 30
21VRT_390_007_0
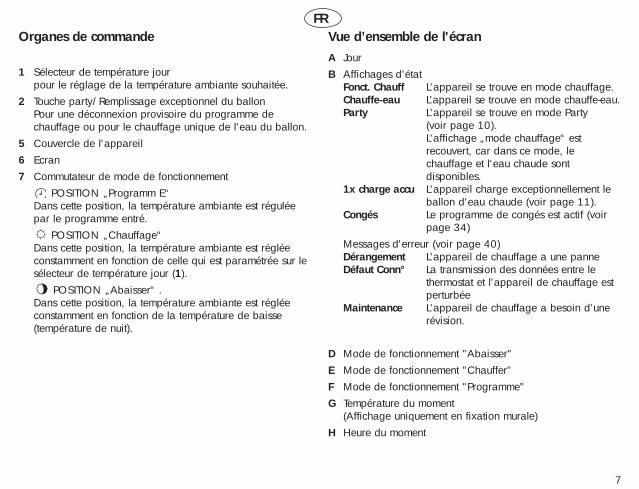
Auf Seite 54 finden Sie eine Übersichtüber die Bedienelemente unter demGerätedeckel (5)
See page 54 for an overview of the operating elements located under thecover panel (5)
En page 54, vous trouverez unrécapitulatif des organes de commandesous le couvercle de l'appareil (5)
Bedienelemente1 Tag-Temperaturwähler
zur Einstellung der gewünschten Raumtemperatur.2 Partytaste/einmaliges Laden des Speichers
zur vorübergehenden Abschaltung des Heizprogrammsoder zum einmaligen Aufheizen des Speicherwassers.
5 Gerätedeckel6 Display
Das Display gibt Auskunft über Uhrzeit und Wochentagsowie über Status und Betriebsart des Reglers.
7 BetriebsartenschalterStellung „Programm“
In dieser Stellung wird die Raumtemperatur vomeingegeben Programm geregelt.
Stellung „Heizen“ In dieser Stellung wird die Raumtemperatur ständig nachder Temperatur geregelt, die am Tag-Temperaturwähler (1)eingestellt ist.
Stellung „Absenken“ .In dieser Stellung wird die Raumtemperatur ständig nachder Absenk-Temperatur (Nacht-Temperatur) geregelt.
Display, ÜbersichtA WochentagB Statusanzeige:
Heizbetrieb Das Gerät befindet sich im Heizbetrieb.Warmwasser Das Gerät befindet sich im
Warmwasserbetrieb.Party Das Gerät befindet sich im Party-Betrieb
(siehe Seite 10). Die Anzeige „Heizbetrieb“ wird überdeckt,weil in dieser Betriebart Heizung undWarmwasser zur Verfügung stehen.
1x Ladung Das Gerät lädt den Warmwasserspeichereinmalig auf (siehe Seite 11).
Urlaub Das Ferienprogramm ist aktiv.(s. Seite 34)Fehlermeldungen (siehe Seite 40)Störung Das Heizgerät hat eine StörungVerbindung Die Datenübertragung vom Regler zum
Heizgerät ist gestört.Wartung Das Heizgerät muß gewartet werden.
D Betriebsart „Absenken“E Betriebsart „Heizen“F Betriebsart „Programm“G Aktuelle UhrzeitH Aktuelle Temperatur (Anzeige nur bei Wandmontage)
DE
4
DE GB FR
5
INHALT Seite
Bedienungsanleitung . . . . . . . .31 Geräteübersicht . . . . . . . . . . . .3, 541 Gerätebeschreibung . . . . . . . . . . . . .82 Bedienung . . . . . . . . . . . . . . . . . . .92.1 Raumtemperatur einstellen . . . . . .92.2 Lüften . . . . . . . . . . . . . . . . . . . .92.3 Partyfunktion einschalten . . . . . .102.4 Speicher einmalig aufheizen . . . .113 Energiespartipps . . . . . . . . . . . . . .124 Grundeinstellungen . . . . . . . . . . . .134.1 Betriebsart wählen . . . . . . . . . .134.2 Landessprache wählen . . . . . . .144.3 Uhrzeit/Wochentag einstellen . . .164.4 Absenktemperatur einstellen . . . .185 Zeitprogramme . . . . . . . . . . . . . .205.1 Werkseitige Einstellungen . . . . . .205.2 Übersicht . . . . . . . . . . . . . . . . .225.3 Heizzeiten einstellen . . . . . . . . .245.4 Warmwasserzeiten einstellen . . .325.5 Zirkulationszeiten einstellen . . . .335.6 Ferienprogramm aktivieren . . . . .346 Sonderfunktionen . . . . . . . . . . . . . .367 Info-Anzeige . . . . . . . . . . . . . . . . .398 Fehlermeldungen . . . . . . . . . . . . . .409 Datenübertragung . . . . . . . . . . . . .4110 Fernsteuerung . . . . . . . . . . . . . . .4111 Werkseinstellung . . . . . . . . . . . . .4112 Werksgarantie . . . . . . . . . . . . . . .42
Montageanleitung . . . . . . . . .43
CONTENTS Page
Operating instructions . . . . . . .31 Thermostat overview . . . . . . . . .3, 541 Description of the appliance . . . . . . .82 Operation . . . . . . . . . . . . . . . . . . . .92.1 Adjusting day temperature . . . . . .92.2 Ventilation or house airing . . . . . .92.3 Override mode . . . . . . . . . . . . .102.4 One-off heating up of tank . . . .113 Energy saving hints . . . . . . . . . . . .124 Basic settings . . . . . . . . . . . . . . . .134.1 Choose operating mode . . . . . .134.2 Choose a language . . . . . . . . .144.3 Date & time setting . . . . . . . . . .164.4 Adjusting night temperature . . . .185 Heating periods . . . . . . . . . . . . . .205.1 Pre-set values . . . . . . . . . . . . . .205.2 Overview . . . . . . . . . . . . . . . .225.3 Programming heating periods . . .245.4 Set hot water supply periods . . . .325.5 Set circulating periods . . . . . . . .335.6 Holiday program . . . . . . . . . . .346 Special functions . . . . . . . . . . . . . .367 Display of information . . . . . . . . . .398 Error messages . . . . . . . . . . . . . . .409 Data transfer . . . . . . . . . . . . . . . . .4110 Remote control by telephone . . . . .4111 Factory-adjusted elements . . . . . . .4112 Manufacturer’s warranty . . . . . . .42
Installation instructions . . . . .43
TABLE DES MATIERES Page
Mode d'emploi . . . . . . . . . . . .31 Vue d’ensemble de l'appareil . . .3, 541 Description de l'appareil . . . . . . . . .82 Commande . . . . . . . . . . . . . . . . . . .92.1 Réglage de la température jour . . .92.2 Ventilation . . . . . . . . . . . . . . . . .92.3 Touche party . . . . . . . . . . . . . .102.4 Chauffage exceptionnel du ballon 113 Quelques "tuyaux" pour vos
économies d'énergie . . . . . . . . . . .124 Pour effectuer les réglages de base .124.1 Choix du mode de fonctionnement134.2 Choix de la langue . . . . . . . . . .144.3 Réglage de l'heure et du jour . . .164.4 Réglage de la temp. nocturne . . .185 Les périodes de chauffage . . . . . . .205.1 Réglages du constructeur . . . . . .205.2 Présentation générale . . . . . . . .225.3 Programmer les périodes de 5.4 chauffage . . . . . . . . . . . . . . . .245.4 Régler les périodes d’ ECS . . . . .325.5 Régler les périodes de recyclage .335.6 Programme de congés . . . . . . . .346 Fonctions spéciales . . . . . . . . . . . . .367 Affichage d’informations . . . . . . . .398 Messages d'erreur . . . . . . . . . . . . .409 Transfert de données . . . . . . . . . . .4110 Commande à distance . . . . . . . . .4111 Réglage usine . . . . . . . . . . . . . . .4112 Garantie usine . . . . . . . . . . . . . . .42
Instructions de montage . . . . .43
GB
6
Operating elements
1 Day temperature selectorfor adjusting to required room temperature.
2 Override/one-off filling of cylinderfor temporary deactivation of heating program or for one-off heating up of tank water (Domestic hot water for VUWcombination boilers only in GB)
5 Device cover6 Display
The display shows the time and day, along with controllermode and status information
7 Operating mode switch”Program“ setting
In this setting, the room temperature is controlled by thepre-set program.
“Heating“ settingIn this setting, the room temperature is permanentlycontrolled according to the temperature pre-selected on theday-temperature selector (1).
“Reduce“ settingIn this setting, the room temperature is permanentlycontrolled according to the reduced (night) temperature.
Display, OverviewA Day of the weekB Status indicator
Heating mode The appliance is in heating mode.Hot Water The appliance is in hot water mode.Party The appliance is in party (override) mode
(see page 10). The “Heating mode“ display message isblocked-out as heating and hot water areboth available in this operating mode.
1x filling The appliance fills the hot-water tank on asingle occasion (see page 11). (Notapplicable in GB).
Holiday The holiday program is active (see p. 34).Error messages (see page 40)Malfunction There is heating system fault.Connection Data transfer from the controller to the
heating unit has been interrupted.Maintenance The heating appliance must be serviced.
(only available with compatible boilerand electronics; not available in GB)
D Operating mode "Night setting”E Operating mode "Heating”F Operating mode "Program”G Actual temperature
(only shown on wall-mounted version)H Actual time
FR
7
Organes de commande
1 Sélecteur de température jourpour le réglage de la température ambiante souhaitée.
2 Touche party/Remplissage exceptionnel du ballonPour une déconnexion provisoire du programme dechauffage ou pour le chauffage unique de l'eau du ballon.
5 Couvercle de l'appareil6 Ecran7 Commutateur de mode de fonctionnement
POSITION „Programm E“ Dans cette position, la température ambiante est réguléepar le programme entré.
POSITION „Chauffage“ Dans cette position, la température ambiante est régléeconstamment en fonction de celle qui est paramétrée sur lesélecteur de température jour (1).
POSITION „Abaisser“ .Dans cette position, la température ambiante est régléeconstamment en fonction de la température de baisse(température de nuit).
Vue d’ensemble de l'écranA JourB Affichages d’état
Fonct. Chauff L'appareil se trouve en mode chauffage.Chauffe-eau L’appareil se trouve en mode chauffe-eau.Party L'appareil se trouve en mode Party
(voir page 10). L'affichage „mode chauffage“ est recouvert, car dans ce mode, le chauffage et l'eau chaude sont disponibles.
1x charge accu L'appareil charge exceptionnellement leballon d'eau chaude (voir page 11).
Congés Le programme de congés est actif (voir page 34)
Messages d'erreur (voir page 40)Dérangement L'appareil de chauffage a une panneDéfaut Conn° La transmission des données entre le
thermostat et l'appareil de chauffage est perturbée
Maintenance L'appareil de chauffage a besoin d'une révision.
D Mode de fonctionnement "Abaisser"E Mode de fonctionnement "Chauffer"F Mode de fonctionnement "Programme"G Température du moment
(Affichage uniquement en fixation murale)H Heure du moment
DE GB FR
8
1 GerätebeschreibungDer VRT 390 ist ein Raumtemperatur-regler mit Wochen-Heizprogramm.Darüber hinaus kann er die Warm-wasserbereitung und eine Zirkulations-pumpe steuern.
Sobald der Regler angeschlossen ist unddie Uhrzeit eingestellt ist, führt er einsinnvolles Heizprogramm durch. Hierfürmuß der Betriebsartenschalter (7, vordereKlappseite) in der Stellung „Programm“
stehen.
1 Device descriptionVRT 390 is a programmable roomthermostat. It can also control the hotwater supply and a circulation pump.
Once the controller is connected and thetimer set, it efficiently runs the heatingprogram. Note that the operating modeswitch (7, on front-panel side) should beset to the “Program“ position.
1 Description de l'appareilL’appareil VRT 390 est un thermostatd’ambiance à programmationhebdomadaire d’un circuit de chauffage.Il peut commander en plus la préparationde l'eau chaude et une pompe derecyclage.
Dés que le thermostat est raccordé et quel'heure est réglée, il exécute un pro-gramme de chauffage approprié. Il fautpour ce faire que l'interrupteur de sélec-tion de mode de service (7, clapet frontal)se trouve en position „Programme“ .

DE GB FR
9
2 BedienungDamit Ihr Heizgerät optimal arbeitet,stellen Sie den Betriebsartenschalter (7,vordere Klappseite) auf „Programm“ .
2.1 Raumtemperatur einstellenMit dem Tag-Temperaturwähler (1,vordere Klappseite) können Sie dieRaumtemperatur Ihren individuellenBedürfnissen anpassen. Position „•“entspricht einer gewünschten Raum-temperatur von ca. 20 °C.● Raumtemperatur „Erhöhen“
Drehen Sie den Tag-Temperaturwählernach rechts.
● Raumtemperatur „Senken“Drehen Sie den Tag-Temperaturwählernach links.
Diese Temperaturregelung ist nur aktiv,wenn die Betriebsart oder eingestellt ist.
2.2 LüftenStellen Sie den Betriebsartenschalter (7,vordere Klappseite) während des Lüftensauf Absenken . Damit vermeiden Sieeine unnötige Heizungseinschaltung.Nach dem Lüften stellen Sie ihn wiederzurück in Stellung Programm .
2 OperationIn order to ensure optimum operation ofyour heating appliance, set the modeswitch (7, on front-panel side) to“Program“ .
2.1 Adjusting day temperatureWith the day temperature selector(1,front folding page) you can adjust theroom temperature to individual needs.Position “•“ is set to approx. 20 °C.● “To increase“ temperature
Turn the day temperature selector to the right.
● “To decrease“ temperatureTurn the day temperature selector to the left.
The temperature can only be adjusted ifthe operation mode of the appliance isset to heating or program .
2.2 Ventilation or house airingDuring airing switch the operating mode(7, front folding page) of the applianceto “Night setting“ to avoid activatingthe heating mode. After ventilating,return it to the Program setting .
2 CommandePour un fonctionnement optimal de votre appareil de chauffage (7, clapetfrontal) placez l'interrupteur de sélectionde mode sur „Programme“ .
2.1 Réglage de la température jourAvec le sélecteur de température jour (1,clapet frontal), vous pouvez adapter latempérature ambiante à vos besoinsindividuels. La Position „•“ correspond àune température ambiante de consigned’environ 20 °C. ● „Augmenter“ la température ambiante
Tournez le sélecteur de températurevers la droite.
● „Abaisser“ la température ambianteTournez le sélecteur de températurevers la gauche.
Cette régulation n’est activée que si lemode de fonctionnement Chauffer ouProgramme est sélectionné.2.2 VentilationPendant l’aération, mettez le commuta-teur de mode de fonctionnement (7,clapet frontal)) sur „Abaisser“ . Vous éviterez ainsi un fonctionnementinutile de la chaudière.Après la ventilation, ramenez-le enposition Programme .
DE GB FR
10
2.3 Partyfunktion einschaltenIhr Gerät ist mit einer Party-Funktionausgestattet. Diese erlaubt es Ihnen, daßdie Heiz- und Warmwasserzeiten überden nächsten Abschaltpunkt hinausfortgesetzt werden. Dies ist z. B. beieiner Feier sinnvoll, denn der Regler stelltsich am nächsten Morgen automatischzurück auf die Zeitfunktion.Diese Funktion läßt sich nur aktivieren,wenn der Betriebsartenschalter auf derPosition steht.● Drücken Sie die Partytaste (2, vordere
Klappseite).Im Display erscheint der SchriftzugParty und neben dem Symbolerscheint das Symbol .
● Mit dem Start der nächstenprogrammierten Heizzeit endet derParty-betrieb automatisch. Der Reglerarbeitet dann wieder nach denprogrammierten Zeiten.
☞ Sie können die Party-Funktion aberauch dadurch beenden, indem Siedie Partytaste (2) zweimal drücken.
2.3 Override modeYour thermostat is equipped with an override mode, which enables you tooverride the next stopping time for yourheating and hot water. It is therefore notnecessary to change your programmedstandard settings e.g. for a one-off override. This function can only be activated if theoperating switch is set to symbol .● Press the override button (2).
The display says override, and next tosymbol the symbol appears.
● With the start of the next programmedheating period the override modeswitches off automatically. Thethermostat returns to the programmedtimings.
☞ The override mode can also be stopped by pressing the override button (2) twice.
2.3 Touche partyVotre appareil est équipé d'une fonctionparty. Ceci vous permet de prolonger letemps de chauffage ou la période d'eauchaude au-delà du prochain point dedésactivation. Cette fonction est utile sivous organisez une réception ou unesoirée, car vous n'êtes pas alorsobligé(e) de modifier la programmationdu thermostat. Cette fonction ne peut êtreactivée que si le commutateur de modede fonctionnement est en position .
● Appuyez sur la touche party (2).L'inscription Party apparaît à l'écranet à côté du symbole apparaît lesymbole .
● Quand la période de chauffage programmable suivante commence, lemode party s'arrête automatiquement.Le thermostat fonctionne ensuite denouveau selon les périodes programmées.
☞ Vous pouvez également désactiver lafonction Party en pressant deux fois latouche Party (2).
DE GB FR
11
2.4 Einmalige Ladung für WarmwasserIhr Gerät ist mit einer Funktion zureinmaligen Ladung des Speicherwassersausgestattet. Diese erlaubt es Ihnen, denWarmwasserspeicher sofort aufzuladenbzw. bei VCW-Geräten den Warmstartdes Aqua-Comfort-Systems zu aktivieren.Dies ist sinnvoll, wenn Sie z. B. eineStunde früher als gewöhnlich einegrössere Menge Warmwasser benötigen.Diese Funktion läßt sich nur aktivieren,wenn der Betriebsartenschalter auf derPosition steht.● Drücken Sie die Partytaste (2, vordere
Klappseite) zweimal.Im Display erscheint der Schriftzug1x Speicherl..
Der Regler fragt das Heizgerät ab, undschaltet die einmalige Aufladung aus,sobald das Heizgerät den Speicheraufgeladen hat.
☞ Ist der Speicher bereits Aufgeladenwird die einmalige Aufladung nach45 Minuten abgeschaltet.
☞ Sie können die einmalige Aufladungauch manuell abschalten, indem Siedie Partytaste einmal drücken. DerSchriftzug 1x Speicherl. verschwindet.
2.4 One-off filling for hot water (Not for stored water in GB)
Your appliance is fitted with a functionthat provides for one-off filling with tankwater. This allows you to fill the hot-watertank immediately or – in case ofcombination boilers (VUW, VMW) – toactivate the warm-start function of theAqua-Comfort system. This function isuseful when – for example – a largequantity of hot water is required an hourearlier than normal. This function canonly be activated if the operating modeswitch is in the position .● Press the “party“ override button (2,
front-side of panel) twice.The display will show the message 1x tank-fill.
The controller polls the heating applianceand shuts down the one-off fillingfunction, as soon as the heatingappliance has filled up the tank.
☞ If the tank is already full, the one-offfilling function is shut down after 45minutes.
☞ You can also shut down the one-offfilling function manually by pressingthe „party“ button once. The 1x tank-fill display message willnow disappear.
2.4 Remplissage unique de l'eau chaudeVotre appareil est doté de la fonction deremplissage exceptionnel de l'eau duballon. Celle-ci vous permet de remplir le ballon d'eau chaude et activer lesystème de Aqua-Comfort sur les appa-reils VUW. Cela est recommandé quandvous avez besoin d'une plus grandequantité d'eau chaude que d'habitudeune heure plus tôt par exemple.Cette fonction ne peut être activée que sil'interrupteur de sélection de mode estsur la position .● Pressez la touche Party (2, clapet
frontal) deux fois.Sur l'écran apparaît l'inscription 1x remplissage ballon
Le thermostat interroge l'appareil dechauffage et désactive le remplissageexceptionnel dès que l'appareil dechauffage a rempli le ballon.
☞ Si le ballon est déjà rempli, leremplissage exceptionnel s'éteintaprès 45 minutes.
☞ Vous pouvez arrêter manuellement leremplissage exceptionnel en pressantune fois la touche Party. L'inscription1x remplissage ballon disparaît.
DE GB FR
12
3 Energiespartipps
☞ Stellen Sie die Raumtemperatur nur sohoch ein, daß diese für Ihr Behaglich-keitsempfinden gerade ausreicht.Jedes Grad darüber hinaus bedeuteteinen unnötigen Energieverbrauchvon etwa 6 %.
☞ Senken Sie die Raumtemperatur fürdie Zeiten Ihrer Nachtruhe undAbwesenheit ab.
☞ Öffnen Sie während der Heizperiodedas Fenster nur zum Lüften und nichtzur Temperaturregelung. Eine kurzeStoßlüftung ist wirkungsvoller undenergiesparender als langeoffenstehende Kippfenster.
☞ Stellen Sie während des Lüftens denBetriebsartenschalter (s. Geräteüber-sicht) auf „Absenken“ (Symbol ).Damit vermeiden Sie eine unnötigeHeizungseinschaltung.
☞ Lassen Sie in dem Zimmer, in demsich Ihr Regelgerät befindet, stets alleHeizkörperventile voll geöffnet.
☞ Verdecken Sie Ihr Regelgerät nichtdurch Möbel, Vorhänge oder andereGegenstände. Es muß diezirkulierende Raumluft ungehinderterfassen können.
3 Energy saving hints
☞ Set your room temperature in such away that it just reaches your comfortlevel. Every degree over and abovethat level represents an unnecessarywaste of energy of about 6%.
☞ Reduce your room temperature duringthe night and when the dwelling isnot occupied.
☞ When the heating is on openwindows for airing only - not forregulating the room temperature.Short periods of airing are moreeffective than having a small windowopen for long periods.
☞ During airing switch the operatingmode of the appliance to “Night setting” (Symbol ) to avoid activating the heating mode.
☞ In the room where the thermostat isfixed all radiator valves should be leftin the fully open position.
☞ Do not cover your thermostat with furniture, curtains or other objects. Itmust have free access to the air circulating in the room.
3 Quelques "tuyaux" pour voséconomies d'énergie
☞ Ne réglez la température ambianteque sur une valeur juste suffisantepour qu’elle soit agréable. Chaquedegré supérieur à cette limite signifieune consommation inutile d'énergied'environ 6 %.
☞ Abaissez la température ambiantepour les périodes de repos nocturneet les périodes d'absence.
☞ Pendant que vous chauffez, n'ouvrezla fenêtre que pour aérer et non pourréguler la température. Une brèveaération est plus efficace et écono-mise davantage d'énergie quel'ouverture prolongée de fenêtresentrouvertes.
☞ Pendant l'aération, mettez le commu-tateur de mode de fonctionnement(voir vue d’ensemble de l'appareil)sur "Abaisser" (symbole ). Vouséviterez ainsi un fonctionnementinutile de l’installation de chauffage.
☞ Dans la pièce dans laquelle votrethermostat est installé, laissez toujourstous les robinets des radiateurscomplètement ouverts.
☞ Faites en sorte que votre thermostatne soit pas recouvert par desmeubles, des rideaux ou d'autresobjets. Il doit pouvoir capter sansaucune entrave l'air qui circule dans
DE GB FR
13
4 Grundeinstellungen4.1 Betriebsart wählenMit dem Betriebsartenschalter (7, vordereKlappseite) können Sie die BetriebsweiseIhrer Anlage einstellen.● Stellung „Programm“
In dieser Stellungwird die Raumtemperatur vomeingegeben Programm geregelt.Während der Heizzeiten wird dieTemperatur nach der am Tag-Temperaturwähler (1) eingestelltenTemperatur geregelt, während der Ab-senkphase nach der Absenk-Temperatur.
● Stellung „Heizen“ In dieser Stellung wird die Raumtem-peratur ständig nach der Temperaturgeregelt, die am Tag-Temperatur-wähler (1) eingestellt ist. Im Displayerscheint . Die Programmierungder Schaltuhr wird nichtberücksichtigt.
● Stellung „Absenken“ .In dieser Stellung wird die Raumtem-peratur ständig nach der Absenk-Temperatur geregelt. Im Displayerscheint . Die Programmierungder Schaltuhr wird nichtberücksichtigt. Werkseitig ist dieAbsenkung auf 15 °C eingestellt.
4 Basic settings4.1 Choose the operating modeThe operating mode switch (7, front folding page) allows you to set the control for your particular needs. ● Position “Program“
The roomtemperature is controlled by theprogrammed settings. During warm-up periods, thetemperature is controlled by means ofthe day-temperature selector (1)setting, and by the reductiontemperature during the reductionphase.
● Position “Heating” The roomtemperature is constantly adjusted tothe set day temperature. The displayshows . Any programming is overridden.
● Position “Night setting” With this setting theroom temperature is constantly set atthe night temperature. The display shows .Any programming is overridden. Thefactory setting for this mode is 15 °C.
4 Les réglages de base4.1 Choisir le mode de fonctionnementAvec le commutateur de modes de fonc-tionnement (7, clapet frontal), vouspouvez adapter le mode de fonctionne-ment de votre installation à vos besoins. ● Position "Programme"
Avec ce réglage, latempérature ambiante est réglée enfonction des données programmées.Pendant les périodes de chauffage, latempérature est régulée selon latempérature paramétrée sur lesélecteur de température jour (1),pendant la phase de baisse d'après latempérature d’abaissement.
● Position "Chauffage" Avec ce réglage, la températureambiante est constamment réglée enfonction de la température définieavec le sélecteur de température jour.Le symbole apparaît à l'écran. Laprogrammation de la minuterie n'estpas prise en considération.
● Position "Abaissement"Avec ce réglage, la température de lapièce est constamment réglée en fonc-tion de la température nocturne. Lesymbole apparaît à l'écran. La pro-grammation de la minuterie n'est pasprise en considération. L'abaissementest réglé sur 15 °C par le constructeur.
43
VRC_VC2_032/0
DE Sprache GB Language
43
VRC_VC2_032/0
DE Sprache GB Language
43
VRC_VC2_032/0
DE Sprache FR Langue
14
DE GB FR
15
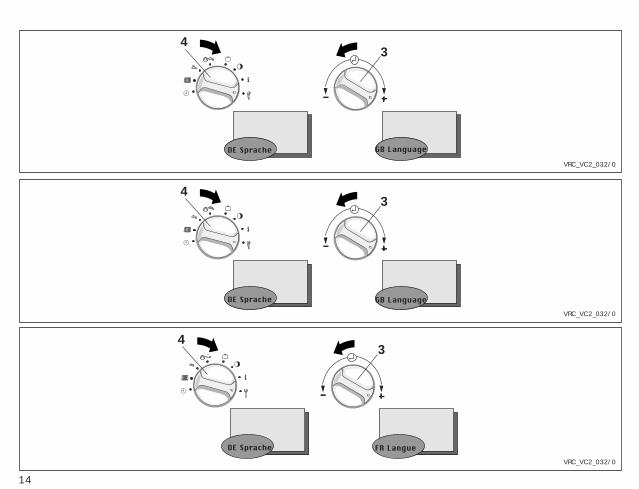
4.2 Landessprache wählen
☞ Der Regler wird werkseitig in derLandessprache „Deutsch“ bzw.„Spanisch“ ausgeliefert. DieEinstellung Ihrer Landessprache hat IhrInstallateur bei der Erstinbetriebnahmevorgenommen. Im Normalfall ist keineÄnderung mehr erforderlich. WollenSie die Einstellung doch einmaländern gehen Sie bitte wie folgt vor:
● Klappen Sie den Gerätedeckel (5)auf.
● Drehen Sie den Schalter (4) auf dasSymbol .Im Display erscheint die„internationale Länderkennung“ undder Schriftzug „Sprache“ in derjeweiligen Landessprache.
● Drehen Sie nun den Einsteller (3)nach rechts oder links und wählen Siedie gewünschte Sprache.
● Schließen Sie den Gerätedeckel (5).
☞ Die Einstellung wird automatischgespeichert. Sie müssen diese alsonicht mehr bestätigen.
4.2 Choose a language
☞ The control is pre-set by the factoryto "German”. The re-setting to the language required (English, French,…) has already been done by yourinstaller when the control was commissioned. Normally it is notnecessary to re-set anything again.Should you wish to re-set the language yourself please proceed asfollows:
● Open the control cover (5).● Turn the switch (4) to symbol .
The display shows the flashing writing“International Country-Identification”and the text message “Language“ inthe corresponding language.
● Now turn the setting switch (3) left orright and choose die appropriatelanguage.
● Close the control cover (5).
☞ Your setting is automatically saved.You do not need to confirm yourchoice.
4.2 Choix de la langue
☞ Le thermostat est livré avec réglagesur la langue allemande. C'est votreinstallateur qui a effectué le réglagesur la langue requise (anglais,français, ...) lors de la première miseen service. Normalement, aucunemodification n'est plus nécessaire. Si vous désirez cependant modifier leréglage, veuillez procéder commesuit:
● Ouvrez le couvercle (5).● Placez le commutateur (4) sur le
symbole .L'inscription "Désignation interna-tionale des pays" et l'inscription"Langue" dans la langue nationaleapparaît à l'écran et clignote.
● Tournez maintenant le sélecteur (3)vers la droite ou vers la gauche etchoisissez la langue.
☞ Le réglage est mémoriséautomatiquement. Vous n'êtes doncplus obligé(e) de le confirmer denouveau.
334
3
VRC-VC2_033/0
SoUhrzeit
SoUhrzeit
SoWochentag
MiWochentag
334
3
VRC_VC2_033/0
SuTime
SuTime
SuDay
WeDay
334
3
VRC_VC2_033/0
DiHeure
DiHeure
DiJour
MeJour
16
DE GB FR
17
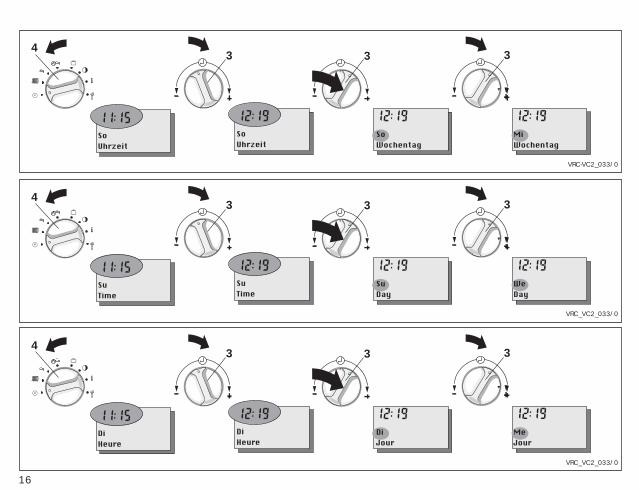
4.3 Uhrzeit und Wochentag einstellenMüssen Sie Uhrzeit oder Wochentagjedoch einmal ändern gehen Sie bittewie folgt vor:● Klappen Sie den Gerätedeckel (5)
auf.● Drehen Sie den Schalter (4) auf das
Symbol .Im Display erscheint eine blinkendeUhrzeit und der Schriftzug „Uhrzeit“.
● Drehen Sie nun den Einsteller (3) - nach links, um die Uhrzeit zurück-
zustellen- nach rechts, um die Uhrzeit vorzu-
stellen.● Drücken Sie den Einsteller (3).
Im Display erscheint ein blinkenderWochentag mit dem Schriftzug„Wochentag“.
● Nehmen Sie die Einstellung wie beider Uhrzeit beschrieben für denWochentag vor.
☞ Uhrzeit und Datum werden auto-matisch gespeichert. Sie müssen dieneuen Werte also nicht bestätigen.
4.2 Date and time settingShould you, however, need to adjusteither time or date manually pleaseproceed as follows:● Open the control cover (5)● Turn switch (4) to symbol .
The display shows a flashing time andthe word “Time“ next to it.
● Now turn the knob (3)- to the left to adjust time backwards- to the right to adjust time forward
● Press the knob (3)The display shows a flashing day withthe wording “Day“.
● Follow the same steps as for time alsofor day adjusting.
☞ The new time and date are automatically saved, there is no needto confirm the new setting.
4.3 Réglage de l'heure et du jourSi vous devez modifier l'heure ou le jour,veuillez procéder comme suit:● Ouvrez le couvercle de l'appareil (5).● Placez le commutateur (4) sur le
symbole .A l'écran, l'inscription "Heure" etl'heure apparaissent ; l'heure clignote.
● Tournez maintenant le sélecteur (3)- vers la gauche, pour retarder
l'horloge- vers la droite, pour faire avancer
l'horloge.● Appuyez sur le sélecteur (3).
A l'écran, l'inscription "Jour" apparaîtet le nom d'un des jours de lasemaine clignote.
● Effectuez le réglage du jour de lasemaine comme celui de l'heure.
☞ L'heure et le jour sont mémorisésautomatiquement. Vous n'êtes doncpas obligé(e) de confirmer lesnouvelles valeurs.
°C°C 34
VRC-VC2_034/0
Abaissement Abaissement
°C°C 34
VRC-VC2_034/0
Min. Temp. Min. Temp.
18
°C°C 34
VRC-VC2_034/0
Absenktemp Absenktemp
DE GB FR
19
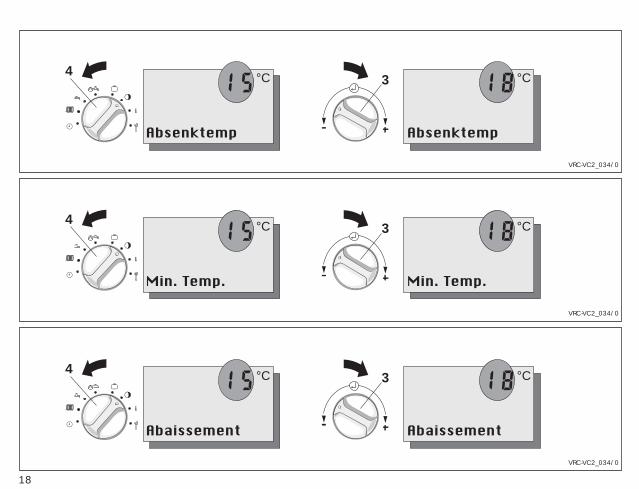
4.4 Absenktemperatur einstellen● Klappen Sie den Gerätedeckel (5) auf.● Drehen Sie den Funktionsartenschalter
(4) auf das Symbol .Im Display erscheint eine blinkende 15und die Anzeige „Absenktemp“.
● Drehen Sie nun den Einsteller (3)- nach links, um die Absenktemperaturzu verringern- nach rechts, um die Absenktemperaturzu erhöhen.
☞ Der Wert wird automatischgespeichert. Sie müssen den neuenWert also nicht bestätigen.
☞ Die Absenk-Temperatur kann in einemBereich von 5 °C bis 20 °C verstelltwerden.
4.4 Adjusting night temperature● Open the control cover (5)● Turn switch (4) to symbol
The display shows a flashing 15 andthe words “Min. Temp.“ next to it.
● Now turn the knob (3)- to the left to decrease thetemperature- to the right to increase thetemperature.
☞ The new temperature is automaticallysaved, there is no need to confirm thenew setting.
☞ The reduction temperature can be adjusted within a range of 5 °C to 20 °C.
4.4 Régler la température d’abaissement● Ouvrez le couvercle de l'appareil (5).● Placez le commutateur (4) sur le
symbole .Le nombre 15 et les incriptions"Abaissement" apparaisent à l’écranet le 15 clignote.
● Tournez maintenant l’ajusteur (3)- vers la gauche, pour réduire latempérature d’abaissement- vers la droite, pour faire augmenterla température d’abaissement
☞ La valeur est mémoriséeautomatiquement. Vous n'êtes doncpas obligé(e) de confirmer lesnouvelles valeurs.
☞ La température d’abaissement peutêtre réglée dans une plage compriseentre 5 °C et 20 °C.
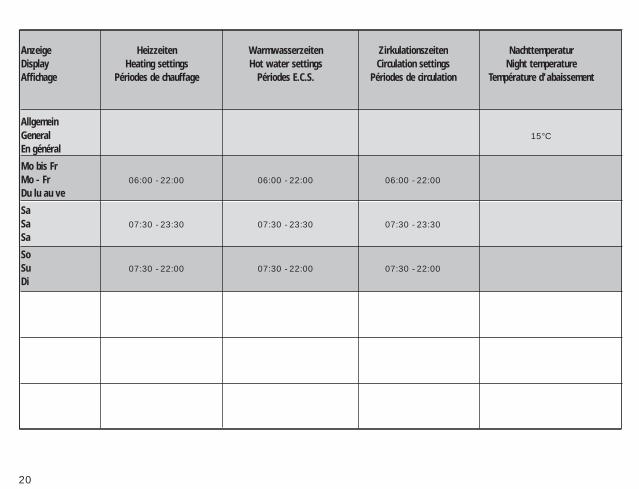
20
Anzeige Heizzeiten Warmwasserzeiten Zirkulationszeiten NachttemperaturDisplay Heating settings Hot water settings Circulation settings Night temperatureAffichage Périodes de chauffage Périodes E.C.S. Périodes de circulation Température d’abaissement
AllgemeinGeneral 15°CEn général
Mo bis FrMo - Fr 06:00 - 22:00 06:00 - 22:00 06:00 - 22:00Du lu au ve
SaSa 07:30 - 23:30 07:30 - 23:30 07:30 - 23:30Sa
SoSu 07:30 - 22:00 07:30 - 22:00 07:30 - 22:00Di
DE GB FR
21
5 Zeitprogramme einstellenDas Regelgerät kann einen Heizkreissteuern. Darüber hinaus kann dieWarmwasserbereitung und dieZirkulationspumpe gesteuert werden.
5.1 Werkseitige EinstellungenWerkseitig sind sinnvolle Zeitprogrammefür die einzelnen Kreise voreingestellt.Der nebenstehenden Tabelle können Siedie werkseitigen Einstellungenentnehmen.
Sind Sie mit den Einstellungen zufriedenbrauchen Sie keine weiteren Änderungenmehr vorzunehmen.Wollen Sie die eine oder andere Einstel-lung ändern, gehen Sie bitte in dasentsprechende Kapitel der Bedienungsan-leitung.
Tipp!Bei geänderten Einstellungen ist essinnvoll, die Daten in die freien Felderder nebenstehenden Tabelle einzutragen.
5 Setting the timer programsThe system can control a heating circuit,the hot-water supply and the circulationpump.
5.1 Pre-set valuesThe timer programs for the individualcircuits are factory adjusted to normaldefault settings. The opposite table showsall values which already have been pre-set. If you are happy with those settingsthere is no need for any further action.
Should you wish to change the one orother settings please look at the respective chapter in the instructions.
HINT !You might find it helpful to enter anychanged settings into the empty boxes of the table opposite.
5 Paramétrage des programmestemps
La régulation peut commander un circuitde chauffage. Il peut en outre piloter lapréparation d'eau chaude et la pompede recyclage.
5.1 Réglages du constructeurDes programmes temps recommandéspour chacun des circuits sont préréglésen usine. Le tableau ci-contre donne les réglagesdu constructeur.
Si ces réglages vous conviennent, aucunemodification n’est nécessaire.Si vous désirez faire telle ou telle modification, veuillez vous reporter auchapitre correspondant des instructionsde service.
UN "TUYAU"!En cas de modification des réglages, ilpeut être utile de noter les diversesdonnées et de les inscrire dans les casesvides du tableau ci-contre
VRC_VC_135/0
Mo-FrFenster 1
Mo-FrFenster 2
Mo-FrFenster 3
VRC_VC_135/0
Mo-FrProgramme 1
Mo-FrProgramme 2
Mo-FrProgramme 3
VRC_VC_135/0
Lu-VeFen�tre hor. 1
Lu-VeFen�tre hor. 2
Lu-VeFen�tre hor. 3
22
DE GB FR
23
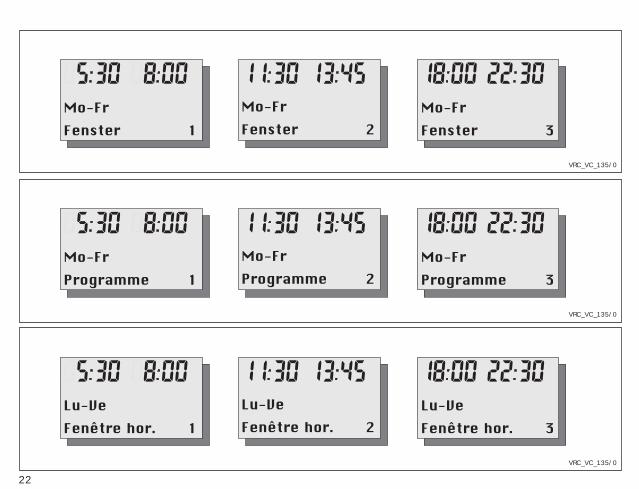
5.2 Übersicht ZeitprogrammeFür den Heizkreis, sowie für die Warm-wasserbereitung können Sie bis zu dreiHeizzeiten pro Tag programmieren, diein sogenannten Fenstern angezeigtwerden, z. B.Fenster 1:
Heizung an: 5:30Heizung aus: 8:00
Fenster 2:Heizung an: 11:30Heizung aus: 13:45
Fenster 3:Heizung an: 18:00Heizung aus: 22:30
Die Heizzeiten können Sie für die BlöckeMontag bis Sonntag (Mo-So)Montag bis Freitag (Mo-Fr)Samstag bis Sonntag (Sa-So)
oder für einzelne Tage (Mo, Di, Mi, Do,Fr, Sa, So) eingeben.
Die Ansteuerung der Zirkulationspumpeerfolgt ebenfalls über maximal dreiZeitfenster pro Tag.
5.2 OverviewYou can program the heating circuit andthe hot water supply to activate up to three times a day, using a “windows“-type system. For example,Programme 1:
Heating start: 5:30Heating stop: 8:00
Programme 2:Heating start: 11:30Heating stop: 13:45
Programme 3:Heating start: 18:00Heating stop: 22:30
These heating periods can be entered forsets of days, like
Monday to SundayMonday to FridaySaturday to Sunday
or individual days (Mo, Tu, We, Th, Fr,Sa, Su).
The activation of the circulation pump isalso carried out via a maximum of three“time windows“ per day.
5.2 Présentation généralePour le circuit de chauffage ainsi quepour la préparation d'eau chaude, vouspouvez programmer jusqu'à troispériodes de chauffage par jour qui serontaffichées dans les dites fenêtres, par ex.Fenêtre 1:
Mise en marche du chauffage: 5:30Arrêt du chauffage: 8:00
Fenêtre 2:Mise en marche du chauffage: 11:30Arrêt du chauffage: 13:45
Fenêtre 3:Mise en marche du chauffage: 18:00Arrêt du chauffage: 22:30
Vous pouvez définir ces périodes dechauffage pour les blocs
Lundi à dimanche (Lu - Di)Lundi à vendredi (Lu - Ve)Samedi à dimanche (Sa - Di)
ou pour des jours isolés (Lu, Ma, Me, Je,Ve, Sa, Di).
Le pilotage de la pompe de recyclages'effectue également par trois fenêtres detemps maximum par jour.
4
VRC-VC2_036/0
Mo-FrFenster 1
4
VRC-VC2_036/0
Mo-FrProgramme 1
4
VRC-VC2_036/0
Lu-VeFen�tre hor. 1
24
DE GB FR
25
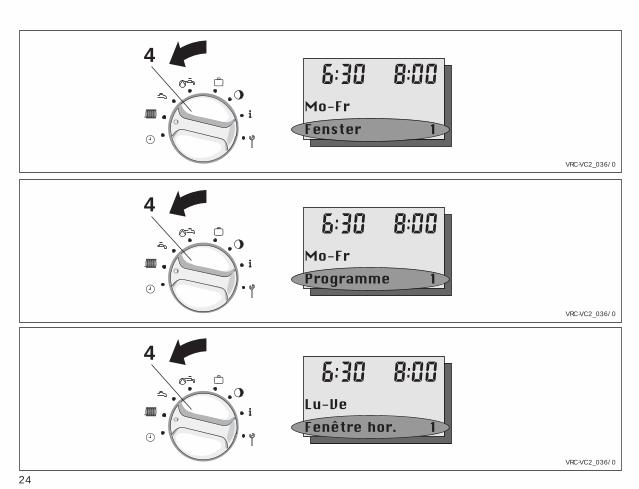
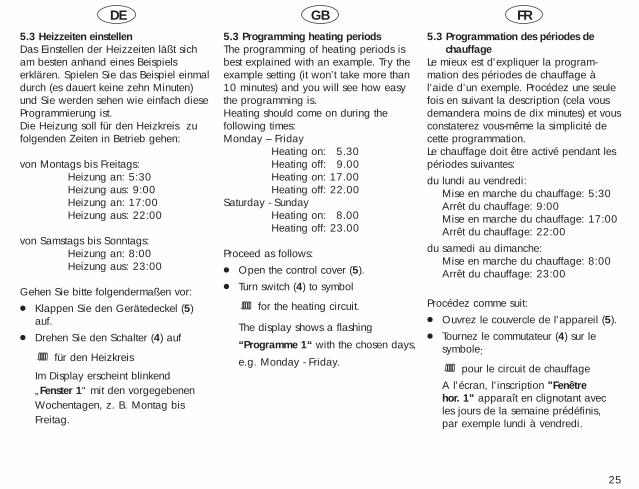
5.3 Heizzeiten einstellen Das Einstellen der Heizzeiten läßt sicham besten anhand eines Beispielserklären. Spielen Sie das Beispiel einmaldurch (es dauert keine zehn Minuten)und Sie werden sehen wie einfach dieseProgrammierung ist.Die Heizung soll für den Heizkreis zufolgenden Zeiten in Betrieb gehen:
von Montags bis Freitags:Heizung an: 5:30Heizung aus: 9:00Heizung an: 17:00Heizung aus: 22:00
von Samstags bis Sonntags:Heizung an: 8:00Heizung aus: 23:00
Gehen Sie bitte folgendermaßen vor:● Klappen Sie den Gerätedeckel (5)
auf.● Drehen Sie den Schalter (4) auf
für den Heizkreis
Im Display erscheint blinkend„Fenster 1“ mit den vorgegebenenWochentagen, z. B. Montag bisFreitag.
5.3 Programming heating periodsThe programming of heating periods isbest explained with an example. Try theexample setting (it won’t take more than10 minutes) and you will see how easythe programming is.Heating should come on during the following times:Monday – Friday
Heating on: 05.30Heating off: 09.00Heating on: 17.00Heating off: 22.00
Saturday - SundayHeating on: 08.00Heating off: 23.00
Proceed as follows:● Open the control cover (5).● Turn switch (4) to symbol
for the heating circuit.
The display shows a flashing
“Programme 1“ with the chosen days,
e.g. Monday - Friday.
5.3 Programmation des périodes de chauffage
Le mieux est d'expliquer la program-mation des périodes de chauffage àl’aide d’un exemple. Procédez une seulefois en suivant la description (cela vousdemandera moins de dix minutes) et vousconstaterez vous-même la simplicité decette programmation.Le chauffage doit être activé pendant lespériodes suivantes:du lundi au vendredi:
Mise en marche du chauffage: 5:30Arrêt du chauffage: 9:00Mise en marche du chauffage: 17:00Arrêt du chauffage: 22:00
du samedi au dimanche:Mise en marche du chauffage: 8:00Arrêt du chauffage: 23:00
Procédez comme suit:● Ouvrez le couvercle de l'appareil (5).● Tournez le commutateur (4) sur le
symbole:
pour le circuit de chauffageA l'écran, l'inscription "Fenêtrehor. 1" apparaît en clignotant avecles jours de la semaine prédéfinis,par exemple lundi à vendredi.
33 3 3
VRC-VC2_015/0
Mo-FrOn time 1
Mo-FrOn time 1
Mo-FrOff time 1
Mo-FrOff time 1
33 3 3
VRC-VC2_015/0
Lu-VeD�but 1
Lu-VeD�but 1
Lu-VeFin 1
Lu-VeFin 1
33 3 3
VRC-VC2_015/0
Mo-FrBeginn 1
Mo-FrBeginn 1
Mo-FrEnde 1
Mo-FrEnde 1
26
DE GB FR
27
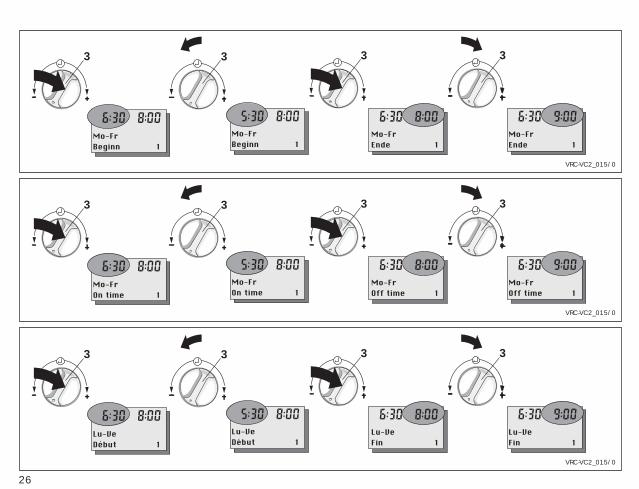
5.3 Heizzeiten einstellen (Fortsetzung)● Drücken Sie den Einsteller (3) bis die
linke Uhrzeit blinkt.Im Display steht in der Klarschriftzeile„Beginn 1“, d. h. Sie bestimmen denEinschaltzeitpunkt der Heizung für das1. Schaltfenster.
● Drehen Sie den Einsteller (3) nachlinks bis im Display oben links „5:30“erscheint.
● Drücken Sie den Einsteller (3) bis dierechte Uhrzeit blinkt.Im Display steht in der Klarschriftzeile„Ende 1“, d. h. Sie bestimmen denAusschaltzeitpunkt der Heizung fürdas 1. Schaltfenster.
● Drehen Sie den Einsteller (3) nachrechts bis im Display oben rechts„9:00“ erscheint.
☞ Die Werte werden automatischgespeichert. Sie müssen die neuenEingaben also nicht mehr bestätigen.
Damit haben Sie das erste Zeitfensterschon programmiert.
5.3 Programming heating periods (cont.)● Press the button (3) until the time on
the left starts flashing.The display shows “On Time 1”,which means you are setting the starting time for heating period 1.
● Turn button (3) to the left until “5:30“appears on the upper left of thedisplay.
● Press button (3) until the time on theright starts flashing.
● The display shows “Off Time 1”,which means you are setting the offtime for heating for period 1.
● Turn button (3) to the right until“9:00“ appears on the upper right ofthe display.
☞ All new settings are automaticallysaved, there is no need to confirmyour settings.
Heating period 1 has now been programmed.
5.3 Programmation des périodes dechauffage (suite)
● Appuyez sur le sélecteur (3) jusqu'àce que l'heure de gauche clignote.A l'écran, "Début 1" apparaît dans laligne de texte, c'est-à-dire que vousdéterminez le moment de mise enmarche du chauffage pour la première fenêtre de commutation.
● Tournez le sélecteur (3) vers la gauchejusqu'à ce que "5:30" apparaisse enhaut à gauche.
● Appuyez sur le sélecteur (3) jusqu'àce que l'heure de droite clignote.A l'écran, "Fin 1" apparaît dans laligne de texte, c'est-à-dire que vousdéterminez l'heure d'arrêt du chauffage pour la première fenêtre decommutation.
● Tournez le sélecteur (3) vers la droitejusqu'à ce que "9:00" apparaisse enhaut à droite.
☞ Les valeurs sont mémoriséesautomatiquement. Vous n'êtes doncplus obligé(e) de confirmer lesnouvelles valeurs.
Et voilà, vous avez déjà programmé lapremière fenêtre de périodes. Ce n'étaitpas bien difficile, ne trouvez-vous pas ?

3 3 3 3
VRC-VC2_016/0
Lu-VeFen�tre hor. 1
Lu-VeFen�tre hor 2
Lu-VeD�but 2
Lu-VeD�but 2
3 3 3 3
VRC-VC2_016/0
Mo-FrProgramme 1
Mo-FrProgramme 2
Mo-FrOn time 2
Mo-FrOn time 2
3 3 3 3
VRC-VC2_016/0
Mo-FrFenster 1
Mo-FrFenster 2
Mo-FrBeginn 2
Mo-FrBeginn 2
28
DE GB FR
29
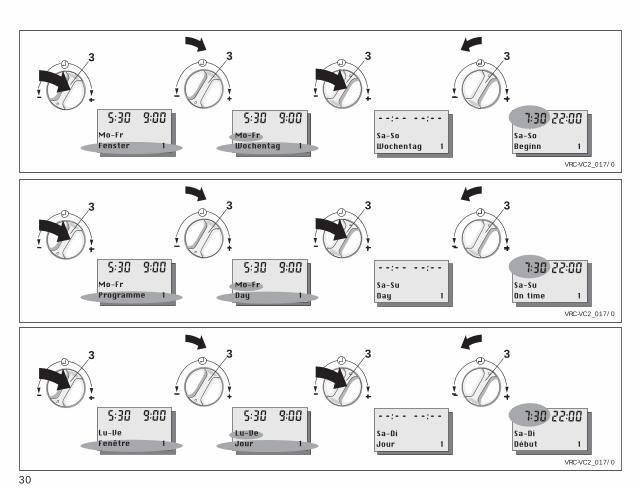
5.3 Heizzeiten einstellen (Fortsetzung)Nun soll das zweite Zeitfensterprogrammiert werden:● Drücken Sie den Einsteller (3) bis die
Zeile „Fenster 1“ im Display blinkt.● Drehen Sie den Einsteller (3) nach
rechts (vor) bis die Zeile „Fenster 2“im Display erscheint.Im Display erscheint „- -:- -“, wennEin- und Ausschaltzeitpunkt gleichsind. Andernfalls erscheinen dieeingestellten Uhrzeiten im Display.
● Drücken Sie den Einsteller (3) bis dielinke Uhrzeit blinkt.Jetzt erscheinen immer die Zeiten imDisplay (auch wenn Ein- und Aus-schaltzeitpunkt gleich sind).Im Display steht in der Klarschriftzeile„Beginn 2“, d. h. Sie bestimmen denEinschaltzeitpunkt der Heizung inFenster 2.
● Stellen Sie die Uhrzeiten für Fenster 2genauso ein wie für Fenster 1beschrieben.
Damit ist auch das zweite Zeitfensterprogrammiert, d. h. für unser Beispiel,die Einstellzeiten für Montag bis Freitagsind eingegeben.
5.3 Programming heating periods (cont.)Now we program the second window:● Press knob (3) until the display
“Programme 1” is flashing.● Turn the knob (3) to the right until the
display shows “Programme 2”.The display will show „- -:- -“, if theset on and off times are the same. Inall other cases the normal time settings will be shown.
● Press the knob (3) until the heating ontime (upper left of the display) startsflashing.From now on you will always see theactual programmed time displayed(even if starting and stopping timesare the same).The display shows “On Time 2”,which means you are setting the starting time for heating period 2.
● Adjust the timer setting for window 2in the same way as described forwindow 1.
Thus, the second window is alsoprogrammed, i.e. (for our example) thesetting times for Monday to Friday areentered.
5.3 Programmation des périodes dechauffage (suite)
Il faut maintenant programmer la deuxième fenêtre de périodes:● Appuyez sur le sélecteur (3) jusqu'à
ce que la ligne "Fenêtre hor. 1"clignote à l’écran.
● Tournez le sélecteur (3) vers la droite(avance) jusqu'à ce que la ligne"Fenêtre hor. 2" apparaisse à l'écran."--:--" apparaît à l'écran quand l'heure de mise en marche et d'arrêtsont identiques. Sinon, les heures normales apparaissent à l'écran.
● Appuyez sur le sélecteur (3) jusqu'àce que l'heure de gauche clignote.A partir de ce point, les heures apparaissent toujours à l'écran (mêmesi l'heure de mise en marche etd'arrêt sont identiques).A l'écran, "Début 2" apparaît dans laligne de texte, c'est-à-dire que vousdéterminez l'heure de mise en marchedu chauffage dans la fenêtre 2.
● Paramétrez les heures pour la fenêtre2 tel que décrit pour la fenêtre 1.
Ainsi, la seconde fenêtre temps estégalement programmée, c'est-à-dire pournotre exemple, les temps de réglage dulundi au vendredi sont entrés.
3 3 3 3
VRC-VC2_017/0
Mo-FrFenster 1
Mo-FrWochentag 1
Sa-SoWochentag 1
Sa-SoBeginn 1
3 3 3 3
VRC-VC2_017/0
Mo-FrProgramme 1
Mo-FrDay 1
Sa-SuDay 1
Sa-SuOn time 1
3 3 3 3
VRC-VC2_017/0
Lu-VeFen�tre 1
Lu-VeJour 1
Sa-DiJour 1
Sa-DiD�but 1
30
DE GB FR
31
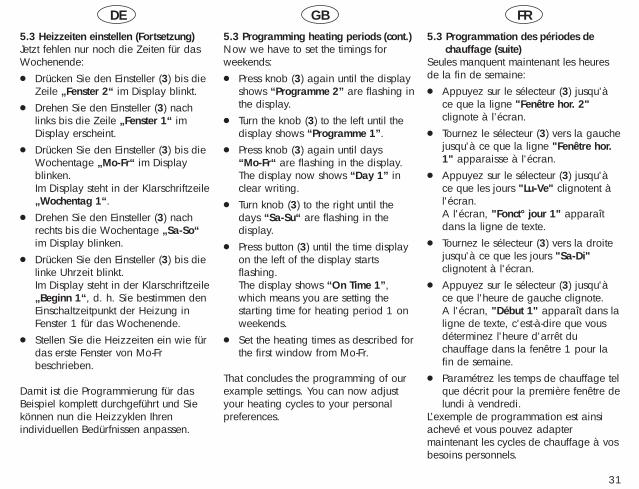
5.3 Heizzeiten einstellen (Fortsetzung)Jetzt fehlen nur noch die Zeiten für dasWochenende:● Drücken Sie den Einsteller (3) bis die
Zeile „Fenster 2“ im Display blinkt.● Drehen Sie den Einsteller (3) nach
links bis die Zeile „Fenster 1“ imDisplay erscheint.
● Drücken Sie den Einsteller (3) bis dieWochentage „Mo-Fr“ im Displayblinken.Im Display steht in der Klarschriftzeile„Wochentag 1“.
● Drehen Sie den Einsteller (3) nachrechts bis die Wochentage „Sa-So“im Display blinken.
● Drücken Sie den Einsteller (3) bis dielinke Uhrzeit blinkt.Im Display steht in der Klarschriftzeile„Beginn 1“, d. h. Sie bestimmen denEinschaltzeitpunkt der Heizung inFenster 1 für das Wochenende.
● Stellen Sie die Heizzeiten ein wie fürdas erste Fenster von Mo-Frbeschrieben.
Damit ist die Programmierung für dasBeispiel komplett durchgeführt und Siekönnen nun die Heizzyklen Ihrenindividuellen Bedürfnissen anpassen.
5.3 Programming heating periods (cont.)Now we have to set the timings forweekends:● Press knob (3) again until the display
shows “Programme 2” are flashing inthe display.
● Turn the knob (3) to the left until thedisplay shows “Programme 1”.
● Press knob (3) again until days “Mo-Fr“ are flashing in the display.The display now shows “Day 1” inclear writing.
● Turn knob (3) to the right until thedays “Sa-Su“ are flashing in the display.
● Press button (3) until the time displayon the left of the display starts flashing.The display shows “On Time 1”,which means you are setting thestarting time for heating period 1 onweekends.
● Set the heating times as described forthe first window from Mo-Fr.
That concludes the programming of ourexample settings. You can now adjustyour heating cycles to your personalpreferences.
5.3 Programmation des périodes dechauffage (suite)
Seules manquent maintenant les heuresde la fin de semaine:● Appuyez sur le sélecteur (3) jusqu’à
ce que la ligne "Fenêtre hor. 2"clignote à l’écran.
● Tournez le sélecteur (3) vers la gauchejusqu'à ce que la ligne "Fenêtre hor.1" apparaisse à l'écran.
● Appuyez sur le sélecteur (3) jusqu'àce que les jours "Lu-Ve" clignotent àl'écran.A l'écran, "Fonct° jour 1" apparaîtdans la ligne de texte.
● Tournez le sélecteur (3) vers la droitejusqu'à ce que les jours "Sa-Di"clignotent à l'écran.
● Appuyez sur le sélecteur (3) jusqu'àce que l'heure de gauche clignote.A l'écran, "Début 1" apparaît dans laligne de texte, c'est-à-dire que vousdéterminez l'heure d'arrêt du chauffage dans la fenêtre 1 pour lafin de semaine.
● Paramétrez les temps de chauffage telque décrit pour la première fenêtre delundi à vendredi.
L’exemple de programmation est ainsiachevé et vous pouvez adaptermaintenant les cycles de chauffage à vosbesoins personnels.
32
5.4 Warmwasserzeiten einstellen
Mit Ihrem Regelgerät können Sie bis zudrei Warmwasserzeiten pro Tagprogrammieren. Der Schalter 4 unterdem Gerätedeckel muß auf Symbolstehen. Die programmmierten Zeitenwerden in sogenannten Fensternangezeigt (siehe Seite 24).
Da die Programmierung analog zu denHeizzeiten durchzuführen ist, fahren Siebitte fort, wie auf den Seiten 24 bis 31beschrieben.
5.4 Set hot water supply periods (For GB VUW combination boilers with warmstart only)
Your thermostat allows you to programup to 3 periods of time per day for thesupply of hot water. Switch 4 underneaththe control cover has to be set tosymbol .The programmed timings are displayedin periods (see page 24).
The programming for hot water is performed in exactly the same manner as programming heating times, which isdescribed on pages 24 to 31.
5.4 Réglage des périodes d’eau chaudeVotre régulation vous permet deprogrammer jusqu'à trois périodes d'eauchaude par jour. Le commutateur 4 situéau-dessous du couvercle de l'appareildoit être placé sur le symbole . Lespériodes programmées sont affichéesdans les fenêtres (voir page 24).
Comme la programmation doit être réalisée de façon analogue à celle despériodes de chauffage, veuillez continueren suivant les instructions des pages 21à 31.
DE GB FR
DE GB FR
33
5.5 Zirkulationszeiten einstellenAls Zubehör zum Gerät ist eine Zirkula-tionspumpe erhältlich. Einige Heizgerätebenötigen zusätzlich ein Zubehörmodulzur Steuerung der Zirkulationspumpe,bitte lesen Sie in der Installationsanlei-tung Ihres Heizgerätes nach. Ist IhreAnlage mit einer Zirkulationsleitungausgestattet, können Sie mit IhremRegelgerät bis zu drei Zirkulationszeitenpro Tag programmieren. Der Schalter 4 unter dem Gerätedeckelmuß auf Symbol stehen. Die programmierten Zeiten werden insogenannten Fenstern angezeigt (sieheSeite 24).
Da die Programmierung analog zu denHeizzeiten durchzuführen ist, fahren Siebitte fort, wie auf den Seiten 24 bis 31beschrieben.
5.5 Set circulating periodsA circulation pump is available as anaccessory to your appliance. Thesecondary circulation pump functionrequires a additional PCB accessory forthe UK market. This is available fromVaillant.Should your appliance alreadyhave a circulation pump you canprogram with your thermostat up to 3operation periods per day. Switch 4 underneath the appliance coverhas to be set to symbol .The programmed timings are displayedin periods (see page 24).
The programming is performed in exactlythe same manner as programming heating times, which is described onpages 24 to 31.
5.5 Réglage des périodes de recyclageUne pompe de recyclage est disponiblecomme accessoire. Quelques chaudièresnécessitent un accessoire supplémentairepour commander la pompe derecyclage, veuillez vous respecter lanotice d’installation de votre chaudière.Si votre installation est équipée d'uneboucle de recyclage, vous pouvez programmer jusqu'à troispériodes de recyclage par jour. Le commutateur 4 situé au-dessous ducouvercle de l'appareil doit être placé sur le symbole . Les périodesprogrammées sont affichées dans lesfenêtres (voir page 24).
Comme la programmation doit être réalisée de façon analogue à celle des périodes de chauffage, veuillez continuer en suivant les instructions despages 24 à 31.
3 3 34
VRC-VC2_037/0
DiD�but cong�s
JeD�but cong�s
JeFin cong�s
JeFin cong�s
3 3 34
VRC-VC2_037/0
SuHoliday Start
ThHoliday Start
ThNo. of days
ThNo. of days
3 3 34
VRC-VC2_037/0
SoUrlaub Start
DoUrlaub Start
DoUrlaubstage
DoUrlaubstage
34
DE GB FR
35
5.7 FerienprogrammIhr Gerät hat ein Ferienprogramm, mit demSie Heizung, Warmwasser und Zirkulationfür die Dauer Ihres Urlaubs abschalten oderabsenken können. Diese Funktion kann 6Tage vor Urlaubsbeginn gestartet werden.Bitte beachten Sie, dass das Ferienpro-gramm nur wirksam ist, wenn der Betriebs-artenschalter (7, Klappseite) auf Stellung steht.● Klappen Sie den Gerätedeckel (5) auf.● Drehen Sie den Schalter (4) auf das
Symbol .Im Display erscheint ein blinkenderWochentag und der Schriftzug „UrlaubStart“.☞ Sie können dies frühestens 6 Tage
vor Urlaubsantritt eingeben.● Drehen Sie nun den Einsteller (3) nach
links oder rechts, um den gewünschtenWochentag für den Beginn des Ferien-programms einzustellen.
● Drücken Sie den Einsteller (3).Im Display erscheint eine blinkende Zahlmit dem Schriftzug „Urlaubstage“.☞ Sie können maximal 99 Urlaubs-
tage eingeben.☞ Drehen auf Null beendet das
Ferienprogramm.● Nehmen Sie die Einstellung durch
Drehen des Einstellers (3) nach linksoder rechts vor.
☞ Urlaubsstart und Urlaubstage werdenautomatisch gespeichert. Sie müssen dieneuen Werte also nicht bestätigen.
5.7 Holiday programYour thermostat is equipped with a holi-day program which allows you to turn offheating, hot water and the circulationpump for the duration of your holiday.The programming can be done up to 6days in advance. Please note, that theholiday program can only be activated if the operating switch (7, front foldingpage) is set to positiong .● Open the control cover (5).● Turn switch (4) to symbol .
Now the display shows a flashingday of the week with the wording“Holiday start“.☞ You can enter the holiday start
day the earliest 6 days in advance.
● Turn the knob (3)- to the left or to the right to set
your holiday start● Press knob (3).
The display shows a flashing numberand the word “No. of days“, whichindicates the number of days that thesystem will be turned off.☞ You can enter a maximum of 99
days.☞ Turning to zero stops the holiday
program.● Set the number of days in exactly the
same way as described above.☞ Holiday start and the number of days
are saved automatically, there is noneed to confirm the new setting.
5.7 Programme de congésVotre appareil a un programme de congésavec lequel vous pouvez désactiver ou baisser le chauffage, l'eau chaude et lerecyclage pour la durée de vos vacances.Vous pouvez mettre en oeuvre le programmede votre période de congés 6 jours avant ledébut de celle-ci. Veuillez tenir compte dufait que le programme de congés n'estactivé que si le commutateur de modes defonctionnement (7,clapet) est en position ● Ouvrez le couvercle de l'appareil (5).● Placez le commutateur (4) sur le symbole
. Un jour de la semaine apparaît àl’écran avec l'inscription "Début congés"et clignote.☞ Vous pouvez entrer les données
correspondantes au plus tôt 6 joursavant le début des congés.
● Tournez maintenant le sélecteur (3)vers la gauche ou vers la droite poureffectuer le réglage sur le jour de lasemaine que vous avez choisi pour ledébut du programme de congés.
● Appuyez sur le sélecteur (3). Un nombreapparaît à l'écran avec l'inscription „Fincongés“ et clignote.☞ Vous pouvez entrer au maximum
99 jours de congés.☞ En effectuant le réglage sur zéro,
vous mettez fin au programme de congés.
● Effectuez le réglage en tournant le sélec-teur (3) vers la gauche ou vers la droite.
☞ Début congés et jours de congés sontmémorisés automatiquement. Vous n'êtes donc pas obligé(e) de confirmerles nouvelles valeurs.

36
Sonderfunktionen Minimal Maximal Schrittweite WerkseinstellungSpecial functions Minimum Maximum Stepped Factory settingFonctions spéciales Minimal Maximal Pas Réglage usine
Zweipunktregelung 0 = aus 1 = ein - 1 = einOn-off control 0 = off 1 = on - 1 = onRégulation tout ou rien 0 = arrêt 1 = marche - 1 = marche
Regelverhalten/StreckenanpassungControl mode/line matching - 5 5 1 0Adaption
Raumtemperatur (RT)-AbgleichRoom temperature (RT) equalization - 3°C 3°C 0,1°C 0°CCompensation Température ambiante (RT)
Thermische Desinfektion 0 = aus 1 = ein - 0 = ausThermal disinfecting 0 = off 1 = on - 0 = offDésinfection thermique 0 = arrêt 1 = marche - 0 = arrêt
Tab. 6.1: Sonderfunktionen / Special functions / Fonctions spéciales
DE GB FR
37
6 SonderfunktionenDas Regelgerät verfügt über eine Reihevon Sonderfunktionen, die es ermöglichenden Regler an die Heizungsanlageanzupassen. Die Funktionen,Einstellbereiche und werkseitigenEinstellungen können Sie dernebenstehenden Tabelle entnehmen. Die Anpassung auf Ihre Heizungsanlagehat Ihr Installateur bei der Erstinbetrieb-nahme vorgenommen. Im Normalfall istkeine Änderung mehr erforderlich. Da diese Einstellungen einen Einfluss aufdie Arbeitsweise und WirtschaftlichkeitIhrer Anlage haben, sollten sie nur voneinem Fachmann vorgenommen werden.● Klappen Sie den Gerätedeckel (5) auf.● Drehen Sie den Schalter (4) auf das
Symbol .Im Display erscheint die internationaleLänderkennung und der Schriftzug„Sprache“ in der jeweiligen Sprache.
● Drücken Sie den Einsteller (3) so oft,bis im Display die gewünschte Sonder-funktion angezeigt wird. Dereingestellte Wert blinkt.
● Drehen Sie nun den Einsteller (3) nach rechts um den Wert zu erhöhenoder links um den Wert zu verringern
☞ Die Einstellung wird automatischgespeichert. Sie müssen diese alsonicht mehr bestätigen.
6 Special functionsThe control system can run a series ofspecial functions, which allow the con-troller to be compatible with the heatingsystem. These functions, adjustmentranges and factory-adjusted settings canbe seen in the table shown here.Compatibility with your heating systemwill have been configured by the installerat the initial start-up phase. No furtheradjustment is required under normalcircumstances.As these adjustments have a bearing onthe running and efficient operation ofyour system, they should only be carriedout by a qualified servicing technician.● Swivel the cover panel (5) of the unit
open.● Turn the switch (4) to the symbol .
The display will show the internationalcountry-identification letter and the textmessage „Language“ in thecorresponding language.
● Press the adjuster (3) repeatedly untilthe desired special function appearson the display. The pre-set value flashes.
● Now turn the adjuster (3) clockwise to increase the value, or counter-clockwise to reduce it.
☞ The setting is automatically saved, andneed not therefore be confirmed again.
6 Fonctions spécialesL'appareil de réglage dispose d'une sériede fonctions spéciales qui permettentd'adapter la régulation à l'installation dechauffage. Les fonctions, les plages deréglage et les réglages usine figurentdans les tableaux ci-contre. Votre installateur a effectué l'adaptation à votre installation de chauffage.Normalement plus aucune modificationn'est nécessaire. Etant donné que ces paramétrages ontune répercussion sur le fonctionnement etla rentabilité de votre installation, il estrecommandé de les faire faire par unspécialiste.● Ouvrez le couvercle de l'appareil (5).● Tournez l'interrupteur (4) sur le
symbole .Sur l'écran apparaît la désignationinternationale des pays et l'inscription„langue“ dans la langue respective.
● Pressez le sélecteur (3) autant de foisque nécessaire pour faire apparaîtrela fonction souhaitée. La valeur paramétrée clignote.
● Tournez le sélecteur (3) vers la droitepour augmenter la valeur ou vers lagauche pour la diminuer
☞ Le réglage est automatiquementmémorisé. Il n'est pas nécessaire devalider.
DE GB FR
38
ZweipunktregelungBei Bedarf kann der Regler vonZweipunkt- auf Stetigregelung umgestelltwerden.Regelverhalten/StreckenanpassungMit dieser Funktion kann das Verhaltendes Reglers auf die Charakteristik derHeizungsanlage angepaßt werden (z. B.großes Volumen in der Heizungsanlage,Leistung des Heizgerätes etc.). Zum Beispiel kann bei Problemen miteiner überdimensionierten Anlage durchVerringerung des Wertes das Regel-verhalten verbessert werden.
Raumtemperatur (RT)-AbgleichMit dieser Funktion können ungünstigeEinflüsse auf den Raumtemperaturfühlerausgeglichen werden.
Thermische DesinfektionIst die Funktion auf „ein“ gesetzt, wirdjeden Mittwoch mit dem ersten Schalt-fenster für die Speicherladung diethermische Desinfektion freigegeben.Diese Funktion wird nicht von allenGeräten unterstützt, bitte lesen Sie in derentsprechenden Bedienungs- bzw.Installationsanleitung nach. Solange das Heizgerät die Desinfektionauf „ein“ gesetzt hält, wird vom Reglerdie Zirkulationspumpe angesteuert.Die thermische Desinfektion dauert ca. 2Stunden, während dieser Zeit ist keinHeizbetrieb möglich.
Régulation tout ou rienEn cas de besoin, il est possible demodifier la régulation tout ou rien enrégulation constante.
AdaptationAvec cette fonction, la régulation peutêtre adaptée en fonction des carac-teristiques de l'installation chauffage (parexemple gros volume dans l'installation,puissance de l'appareil, etc.).Par exemple, en cas de problème avecune installation surdimensionnée, on peutaméliorer la réaction de la régulation enabaissant la valeur
Compensation de temp. ambiante (RT)Cette fonction permet de compenser desinfluences défavorables sur la sonde detempérature ambiante.
Désinfection thermiqueSi la fonction est mise sur "marche",chaque mercredi, la désinfection ther-mique est déclenchée avec la premièrefenêtre de commande pour le remplissagedu ballon. Cette fonction n'est pas sup-portée par tous les appareils, veuillezconsulter votre manuel d'installation etd'utilisation. Tant que l'appareil de chauffage main-tient la désinfection sur "marche", lapompe de recyclage est pilotée par lethermostat. La désinfection thermique dureenviron 2 heures. Pendant cette désin-fection, le chauffage ne peut fonctionner.
On-off control When required, the regulator can beconverted from on-off to continuouscontrol mode.
Control mode/line matching This function allows the regulator mode tobe matched to the characteristics of theheating system (e.g. large volume in theheating system, performance of heatingdevice, etc.). In the case of problems with anexcessively-large system – for example –this value can be decreased in order toimprove controller performance.
Room temperature (RT) equalizationThis function can be used to compensatefor any undesired influences on the room-temperature sensor.
Thermal Disinfecting(only available with a compatible boilerand electronics)If this function is set to “ON“, the thermaldisinfecting system is activated everyWednesday along with the first activationwindow of the tank-filling function. This function is not supported by allappliances, so please read thecorresponding operating or installationinstructions.For as long as the heating systemdisinfecting function is set to “ON“, thecontroller runs the circulation pump.The thermal disinfection lasts approxi-
DE GB FR
39
☞ Wenn die Thermische Desinfektionaktiviert ist, wird das 1. Fenster zurSpeicherladung am Mittwochautomatisch um eine Stundevorgezogen.
Ist die Urlaubsfunktion eingestellt, so wirddie thermische Desinfektion unterbunden.
7 Info-AnzeigeDas Regelgerät ist mit einer Info-Anzeigeausgestattet. Diese ermöglicht es sichverschiedene wichtige Werte bzw. Einstel-lungen der Heizungsanlage anzeigen zulassen.Der nebenstehenden Tabelle können Siedie Bedeutung der angezeigten Werteentnehmen.Um die Anzeige aufzurufen, gehen Siewie folgt vor:● Klappen Sie den Gerätedeckel (5) auf.● Drehen Sie den Schalter (4) auf das
Symbol .Im Display erscheint der Schriftzug„Sp.Temperat.“ und ein Wert in °C.Sie können die aktuelle Speicher-temperatur ablesen, dabei könnendurch die DatenübertragungVerzögerungen auftreten.
mately two hours, during which time theheating function is not possible.
☞ When the Thermal Disinfectionfunction is activated, the 1st windowfor loading the memory isautomatically advanced by an hour onWednesday.
If the “holiday“ function is active, thermaldisinfecting is suppressed.
7 Display of informationThe control device is fitted with aninformation display system. This allowsreadings to be taken of several differentimportant values and adjustment levels forthe heating system.Refer to the table shown here forinformation on the meaning of thedisplayed values.To display these items, proceed asfollows:● Swivel the cover panel (5) of the unit
open.● Turn the switch (4) to the symbol .
The display will show the message„Tank temp.“ and a value in °C. You can now read the current tank-temperature, allowing data transfer tolead to delays. (This function is notcurrently available for stored water inGB).
☞ Lorsque la désinfection thermique estactivée, la 1ère fenêtre de chargementdu ballon avance automatiquementd’une heure le mercredi.
Si la fonction congés est activée, ladésinfection thermique est neutralisée.
7 Affichage d'informationLa régulation est équipé d'un affichaged'informations. Cela permet de visualiserdifférentes valeurs importantes ainsi queles paramètres de l'installation dechauffage.Les tableaux ci-contre vous indiquent lasignification des valeurs affichées.Pour appeler l'affichage, procédezcomme suit:● Soulevez le couvercle de l'appareil
(5).● Tournez l'interrupteur (4) sur le
symbole .Sur l'écran apparaît l'inscription„Temp.ballon“ et une valeur en °C.Vous pouvez lire la températureactuelle du ballon, la transmission dedonnées peut provoquer des retards.

DE GB FR
40
8 FehlermeldungenIm Display des Gerätes können imStörungsfall folgende Fehlermeldungenerscheinen:
„Störung“:Das Heizgerät hat eine Störung.„Verbindung“: Die Datenübertragung vom Reglerzum Heizgerät ist gestört.
Prüfen Sie in der Bedienungsanleitungdes Heizgerätes, ob Sie diesen Fehlerbeheben können. In allen anderen Fällenrufen Sie bitte Ihren Installateur.
„Wartung“: Die Wartungsanzeige zeigt an, dassdas Heizgerät gewartet werden soll. Nach einer im Heizgerät eingestelltenBetriebsdauer sendet das Heizgerätan den Regler ein Wartungssignal. Die Wartungsanzeige wird vomHeizgerät aktiviert/durchgeführt.Diese Funktion wird nicht von allenGeräten unterstützt, bitte lesen Sie inder entsprechenden Bedienungs- bzw.Installationsanleitung nach.
8 Error messagesIn case of a fault with the thermostat thefollowing error messages can appear:
“Fault”A fault has occurred in the appliance.“No Connect.”The connection between applianceand thermostat is not working.
Check in your operating instructions ofthe appliance if you can rectify the problem yourself, if not please call aninstaller.
“Maintenance“: (only available with a compatibleboiler and electronics; currently notavailable in GB)The maintenance display indicatesthat the heating system is due forservicing. Once the heating systemhas reached a certain pre-set periodof operation, the appliance sends amaintenance signal to the controller.The maintenance signal is activated/processed by the heating appliance.This function is not supported by allappliances, so please read thecorresponding operating orinstallation instructions.
8 Messages d'erreur En cas de perturbation, les messagesd'erreur suivants peuvent apparaître àl'écran de l'appareil :
"Dérangement":Perturbation de l'appareil dechauffage."Connexion":Le transfert des données de la régula-tion à l'appareil de chauffage estperturbé.
Vérifiez dans le mode d’emploi del'appareil de chauffage si vous pouvezéliminer ce défaut. Si tel n'est pas le cas,veuillez faire appel à votre installateur.
„Révision“: L'affichage de révision indique quel'appareil de chauffage doit être révisé.Après une durée de service paramétréedans l'appareil de chauffage, celui-cienvoie un signal de révision à la régu-lation. L'affichage de révision estactivé/ exécuté par l'appareil dechauffage. Cette fonction n'est passupportée par tous les appareils,veuillez consulter votre manueld'installation et d'utilisation.
DE GB FR
41
9 DatenübertragungJe nach örtlichen Gegebenheiten kann esbis zu 15 Minuten dauern, bis alle Daten(Gerätestatus usw.) aktualisiert sind.
10 TelefonfernsteuerungDie Heizungsanlage kann über eineKommunikationsschnittstelle (Zubehör)ferngesteuert werden. Gesteuert werdenunter anderem die Betriebsart und dieRaumsolltemperatur (beachten Sie dieInstallationsanleitung des Zubehörs).Bei Fernsteuerung erscheint im Displaydas Symbol , die eingestellteRaumsolltemperatur und dieferngesteuerte Betriebsart.Durch Betätigen des Betriebsartenschaltersoder des Tag-Temperaturwählers wird dieFernsteuerung beendet.
11 WerkseinstellungWollen Sie das Regelgerät auf dieWerkeinstellungen zurücksetzen, sodrücken Sie die Partytaste (2) und denEinsteller (3) gleichzeitig (hintereKlappseite, Seite 58) im Display blinktder Schriftzug „Werkseinst.“. Halten Siedie beiden Tasten solange gedrückt, bisder Schriftzug aufhört zu blinken, erstdann werden die Daten zurückgesetzt.
9 Data transfer (not currently available in GB)
Depending on local circumstances, therecan be a delay of up to 15 minutes untilall data (system status, etc.) are updated.
10 Remote control by telephone (not currently available in GB)
The heating system can be controlledremotely by means of a communicationsinterface (accessory). This controls,among other things, the operating modeand the required room temperature(follow the installation instructions for theaccessory).When remote control is being used, thedisplay shows the symbol , therequired room temperature that has beenset and the remote controlled operatingmode.By activating the function switch or theday temperature selector, the remotecontrol function is discontinued.
11 Factory-adjusted elementsIf you wish to return the device to itsfactory-adjusted default settings, press the“party“ button (2) and the adjuster (3) atthe same time (rear-face of panel, page58). The display shows the flashing“default set.“ message. Keep both buttons pressed until messagestops flashing. The data can now bereset.
9 Transfert de donnéesSelon les conditions locales, cela peutprendre 15 minutes pour que toutes lesdonnées (statut de l'appareil etc..) soientactualisées.
10 Commande à distance par téléphone
La chaudière peut être commandée àdistance par le biais d'une interface decommunication (accessoire). Le mode etla température théorique de la piècepeuvent entre autres être commandés(respectez les instructions d'installation del'accessoire).En cas de commande à distance, lesymbole , la température théoriqueréglée de la pièce et le mode demandéapparaissent à l'écran.Appuyez sur le commutateur de mode oule sélecteur de température diurne pourquitter la commande à distance.
11 Réglage usineSi vous voulez revenir au réglage usineinitial, pressez la touche Party (2) et lesélecteur (3) simultanément (rabat arrière,page 58). L'inscription „réglage usine.“clignote. Maintenez les deux touchesenfoncées jusqu'à ce que l'inscription neclignote plus, les données sont alorsréinitialisées.
42
12 WerksgarantieWerksgarantie gewähren wir nur beiInstallation durch einen anerkanntenFachhandwerksbetrieb.Dem Eigentümer des Gerätes räumen wireine Werksgarantie entsprechend denlandesspezifischen Vaillant Geschäftsbe-dingungen ein. Garantiearbeiten werdengrundsätzlich nur von unserem Werks-kundendienst (Deutschland, Österreich)oder durch einen anerkannten Fachhand-werksbetrieb (Schweiz) ausgeführt.Wir können Ihnen daher etwaige Kosten,die Ihnen bei der Durchführung vonArbeiten an dem Gerät während derGarantiezeit entstehen, nur dann er-statten, falls wir Ihnen einen entsprechen-den Auftrag erteilt haben und es sich umeinen Garantiefall handelt.
12 Manufacturer’s WarrantyWe provide a manufacturer’s warrantyonly when a recognised specialist hascarried out the installation.
We grant a manufacturer’s warranty tothe owner of the appliance according tothe specific Vaillant terms of business forthe country. Warranty work must only becarried out by our company’s customerservice department. Because of that, wecan only then refund any expense to you,which you have incurred from workcarried out on your appliance during thewarranty period, if we have placed anappropriate order with you and it is awarranty case.
12 Garantie usinePour la FranceVous venez d’acquérir un appareilVAILLANT. Félicitations !VAILLANT, leader européen pour lafabrication des chaudières gaz, assure lagarantie des appareils VAILLANT dans lecadre de la législation en vigueur (Loi78-12 du 4/10/78).Pour bénéficier de la garantie légale dedeux ans, l’appareil doit impérativementêtre installé par un professionnel qualifié,suivant les règles de l’art et normes envigueur.
D’autre paysNous accordons une garantie usineuniquement pour les installations faitespar des professionnels qualifiés.Nous accordons une garantie aupropriétaire de l’appareil conformémentaux conditions spécifiques du pays. Lestravaux de garantie ne sont exécutés quepar notre SAV usine (Allemagne,Autriche) ou par un SAV professionnel(Suisse).Nous ne pouvons donc vous remboursercertains coûts engendrés par des travauxsur les appareils durant la période degarantie, si nous vous avons fait uncontrat correspondant et s’il s’agit d’uncas de garantie.
DE GB FR
DE GB FR
43
Montageanleitung
Seite1 Allgemeines . . . . . . . . . . . . . . . . .442 Regelgerät montieren . . . . . . . . . . .452.1 Wandmontage . . . . . . . . . . . . .452.2 Elektrischer Anschluß . . . . . . . . .483 Erstinbetriebnahme . . . . . . . . . . . .506 Display, Übersicht . . . . . . . . . . . . .516 Technische Daten . . . . . . . . . . . . . .55
Installation instructions
Page1 General . . . . . . . . . . . . . . . . . . . .442 Fitting the control device . . . . . . . . .452.1 Installation on a wall . . . . . . . . .452.2 Electrical connection . . . . . . . . .483 Initial start-up . . . . . . . . . . . . . . .506 Operating elements . . . . . . . . . . . .526 Technical specifications . . . . . . . . .55
Instructions de montage
Page1 Génératités . . . . . . . . . . . . . . . . . .442 Montage du thermostat d’ambiance .452.1 Montage mural . . . . . . . . . . . . .452.2 Connexion électrique . . . . . . . . .483 Première mise en service . . . . . . . .506 Organes de commande . . . . . . . . .536 Données techniques . . . . . . . . . . . .55
44
1 Allgemeines
Die Montage, der elektrischeAnschluß, die Einstellungen imGerät sowie die Erstinbetrieb-nahme dürfen nur durch einenanerkannten Fachhandwerks-betrieb vorgenommen werden!
CE-KennzeichnungMit der CE-Kennzeichnung wirddokumentiert, dass die Regelgeräte VRT390 in Verbindung mit VaillantHeizgeräten die grundlegendenAnforderungen der Richtlinie über dieelektromagnetische Verträglichkeit(Richtlinie 89/336/EWG des Rates)erfüllen.
1 General
The installation, the electricalconnections, the settings withinthe appliance and the commissioning of the applianceshould only be performed by aprofessional installer.
CE-CodingThe CE-coding demonstrates, that thethermostats VRT 390 - in conjunction withthe Vaillant appliances - comply with thebasic requirements of the guidelines forelectromagnetic compliance.
1 Généralités
Le montage, le raccordementélectrique, les réglages de l'appareil et la première mise enservice ne doivent être effectuésque par un professionnelqualifié!
Sigle CELe sigle CE prouve que les régulationsVRT 390, connectées aux chaudièresVaillant chauflage, répondent aux exigences fondamentales de la directivesur la compatibilité électromagnétique(directive 89/336/CEE du Conseil).
DE GB FR
45
2 Regelgerät montieren
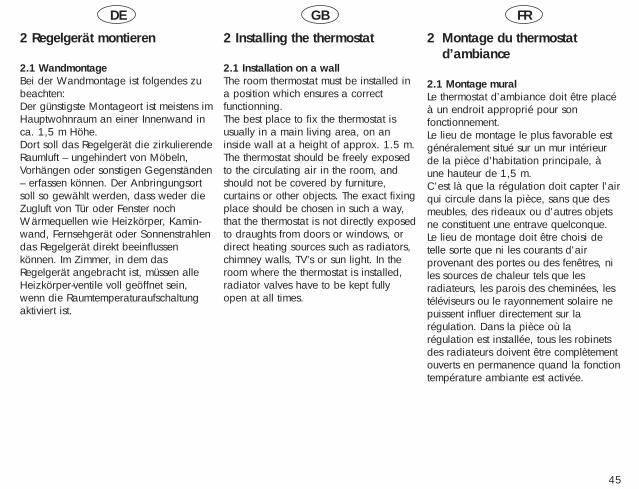
2.1 WandmontageBei der Wandmontage ist folgendes zubeachten:Der günstigste Montageort ist meistens imHauptwohnraum an einer Innenwand inca. 1,5 m Höhe.Dort soll das Regelgerät die zirkulierendeRaumluft – ungehindert von Möbeln,Vorhängen oder sonstigen Gegenständen– erfassen können. Der Anbringungsortsoll so gewählt werden, dass weder dieZugluft von Tür oder Fenster nochWärmequellen wie Heizkörper, Kamin-wand, Fernsehgerät oder Sonnenstrahlendas Regelgerät direkt beeinflussenkönnen. Im Zimmer, in dem dasRegelgerät angebracht ist, müssen alleHeizkörper-ventile voll geöffnet sein,wenn die Raumtemperaturaufschaltungaktiviert ist.
2 Installing the thermostat
2.1 Installation on a wall The room thermostat must be installed ina position which ensures a correctfunctionning.The best place to fix the thermostat isusually in a main living area, on an inside wall at a height of approx. 1.5 m.The thermostat should be freely exposedto the circulating air in the room, andshould not be covered by furniture, curtains or other objects. The exact fixingplace should be chosen in such a way,that the thermostat is not directly exposedto draughts from doors or windows, ordirect heating sources such as radiators,chimney walls, TV’s or sun light. In theroom where the thermostat is installed,radiator valves have to be kept fullyopen at all times.
2 Montage du thermostat d’ambiance
2.1 Montage muralLe thermostat d’ambiance doit être placéà un endroit approprié pour sonfonctionnement.Le lieu de montage le plus favorable estgénéralement situé sur un mur intérieurde la pièce d’habitation principale, àune hauteur de 1,5 m.C'est là que la régulation doit capter l'airqui circule dans la pièce, sans que desmeubles, des rideaux ou d'autres objetsne constituent une entrave quelconque.Le lieu de montage doit être choisi detelle sorte que ni les courants d'airprovenant des portes ou des fenêtres, niles sources de chaleur tels que lesradiateurs, les parois des cheminées, lestéléviseurs ou le rayonnement solaire nepuissent influer directement sur larégulation. Dans la pièce où larégulation est installée, tous les robinetsdes radiateurs doivent être complètementouverts en permanence quand la fonctiontempérature ambiante est activée.
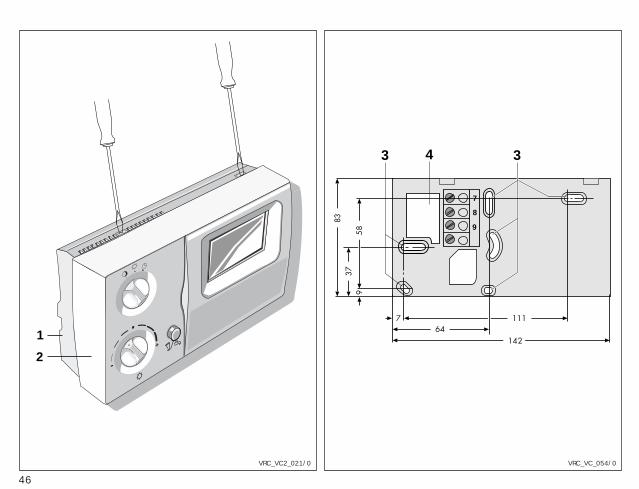
46
1
2+
-
3 3
7
8
9
4
VRC_VC_054/0VRC_VC2_021/0
DE GB FR
47
2.1 Wandmontage (Fortsetzung)Verlegen Sie die elektrischen Leitungenzum Heizgerät zweckmäßigerweiseschon vor Anbringen des Regelgerätes.Gehen Sie wie folgt vor:● Stellen Sie sicher, dass das Kabel
zum Regelgerät stromlos ist.● Drücken Sie eine Schraubendreher-
spitze in die Haltenocken an derOberseite des Regelgerätes leicht einund nehmen Sie die Montageplatte(1) vom Regelgerät (2) ab.
● Bringen Sie zwei Befestigungsbohrun-gen (3) mit Durchmesser 6 mmentsprechend nebenstehenderAbbildung an und setzen Sie diemitgelieferten Dübel ein.
● Führen Sie das Anschlußkabel durchdie Kabeldurchführung (4).
● Befestigen Sie die Montageplatte mitden beiden mitgelieferten Schraubenan der Wand.
● Schließen Sie das Anschlußkabelgemäß dem folgenden Kapitel 2.2„Elektrischer Anschluß“ an. BeachtenSie die Hinweise!
● Setzen Sie das Regleroberteil so aufdie Montageplatte, dass die Stifte ander Rückseite des Oberteils in dieAufnahmen passen.
● Drücken Sie das Regleroberteil aufdie Montageplatte, bis es einrastet.
2.1 Installation on a wall (cont.)It is advisable to run the electric cablingto the heating appliance before theactual fixing of the thermostat. To installthe thermostat proceed as follows:
● Turn the main switch of the applianceto "off”.
● Press the end of a screw driver intothe fixing holes on top of the thermostat and carefully remove thecover (1) from the thermostat (2).
● Make two fixing holes (3) of 6mmdiameter as per the attached drawingand insert the wall plugs supplied.
● Run the connection cable through thecable channel (4).
● Fix the mounting plate on the wallusing the two screws supplied.
● Connect the cable as shown to the terminal strip (1) of the thermostat.
● Place the thermostat top onto themounting plate in such a way that thefixing lugs at the top of the thermostatlocate into the fixing holes.
● Press the thermostat onto the plateuntil it clicks in position.
2.1 Montage mural (suite)Posez, comme il se doit, les câblesélectriques de raccordement à l'appareilavant même d'installer la régulation.Procédez comme suit:● Mettez l'interrupteur principal de
l'appareil sur "Arrêt".● Enfoncez légèrement une pointe de
tournevis dans les ergots de retenue dela face supérieure de la régulation etretirez la plaque de montage (1) de larégulation (2).
● Introduisez les chevilles comprises dansle matériel livré dans deux alésagesde fixation (3) d'un diamètre de 6 mm,selon la figure ci-contre.
● Faites passer le câble de raccordementà travers le passage pour câble (4).
● Fixez la plaque de montage au muravec les deux vis comprises dans lematériel livré.
● Connectez le câble de raccordement àla réglette à bornes (1) de la régulationconformément à la figure ci-contre.
● Posez la partie supérieure de larégulation sur la plaque de montagede telle sorte que les broches de laface arrière de la partie supérieurepénètrent dans les ouvertures.
● Serrez la partie supérieure de larégulation sur la plaque de montagejusqu'à ce qu'elle prenne l'encoche.
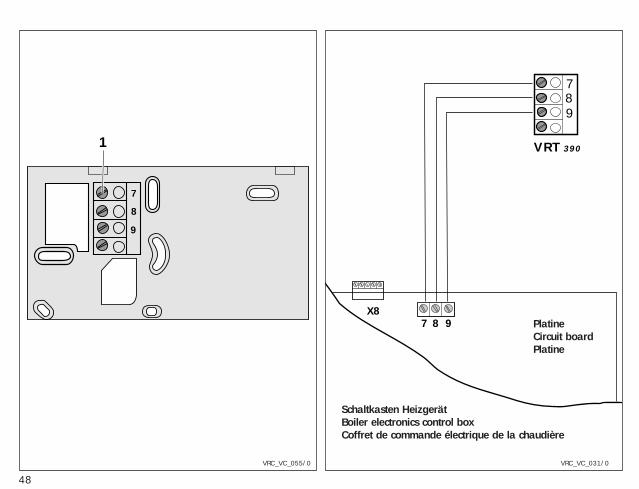
48
7
8
9
1
VRC_VC_055/0
7
98
VRT 390
7 8 9X8
VRC_VC_031/0
Schaltkasten HeizgerätBoiler electronics control boxCoffret de commande électrique de la chaudière
PlatineCircuit boardPlatine
DE GB FR
49
2.2 Elektrischer AnschlußDer elektrische Anschluß darf nur voneinem anerkannten Fachhandwerks-betrieb vorgenommen werden.
Lebensgefahr durch Stromschlagan spannungsführendenAnschlüssen.Vor Arbeiten am Gerät dieStromzufuhr abschalten und vorWiedereinschalten sichern.
● Öffnen Sie den Schaltkasten desHeizgerätes gemäß der Installations-anleitung.
● Nehmen Sie die Anschlußverdrahtunggemäß der nebenstehendenAbbildung vor.
☞ An den Anschlußklemmen 7, 8, 9wird der Regler angeschlossen.
☞ Bei Anschluß des VRT 390 muss eineBrücke zwischen Klemme 3 und 4 desHeizgerätes eingesetzt werden.
2.2 Electrical connectionThe electrical connection should only becompleted by a professional installer.
There is a danger of fatal injurydue to electric shock in all live sections. ALWAYS shut off the powersupply and ensure it cannot bereconnected by accident beforestarting work on the system.
● Open the boiler electronics controlbox as shown in the installationinstructions.
● Connect the wiring system asindicated in the diagram shown here.
☞ Connection terminals 7, 8, 9 are usedfor the thermostat.
☞ When connecting the VRT 390 unit,there must be a bridge connectionbetween terminals 3 and 4 of theheating appliance.
2.2 Raccordement électirqueLe raccordement électrique ne doit êtreeffectué que par une entreprisespécialisée et reconnue.
Risque d’électrocution sur desbranchements conducteurs detension.Avant les travaux sur lesappareils, couper l'alimentationélectrique, en particulier de lachaudière et protéger contre uneremise en route.
● Ouvrez le coffret de commandeélectrique de l'appareil de chauffaged'après les instructions d'installation.
● Procédez au câblage de raccorde-ment d'après la figure ci-contre.
☞ Le thermostat d’ambiance estraccordé sur les bornes 7,8,9.
☞ Au raccordement du VRT 390 il fautprévoir un pont entre la borne 3 et 4de l'appareil de chauffage.
DE GB FR
50
3 Erstinbetriebnahme
Die erste Inbetriebnahme des Regel-gerätes mit der Heiz- und Brauchwasser-anlage sowie die ersten Eingabenentsprechend den Wünschen desBenutzers soll von einem anerkanntenFachhand-werksbetrieb vorgenommenwerden, der auch die Verantwortung fürdie Instal- lation übernommen hat.
Dabei sind insbesondere folgendeMaßnahmen durchzuführen:
☞ Hinweis auf Energiesparmöglichkeiten(Seite 12)
☞ Eingabe der Heizzeiten(Seite 24ff)
☞ Eingabe der Warmwasserzeiten(Seite 32)
☞ Prüfen aller Funktionen
3 Initial start-up
The initial start-up of the thermostat inconnection with the heating applianceand the first settings according to thecustomer preferences, should be performed by a professional installer,who also takes the responsibility for theinstallation.
The following measures are pointed outespecially:
☞ Information about energy saving(page 12)
☞ Programming of heating times(page 24ff)
☞ Programming of hot water times(page 32)
☞ Checking of all functions
3 Première mise en service
La première mise en service de larégulation avec l'installation d'eau de chauffage et d’eau sanitaire ainsi que lespremières entrées des donnéessouhaitées par l'utilisateur doivent être effectuées par l’entreprise spécialisée etreconnue qui a également pris en chargela responsabilité de l'installation de l’équipement.
Effectuer tout particulièrement, à cetégard, les opérations suivantes:
☞ Possibilités d'économies d'énergie(page 12)
☞ Entrée des périodes de chauffage(pages 24 et suivantes.)
☞ Entrée des périodes d'eau chaude(page 32)
☞ Contrôle de toutes les fonctions
DE
51
Bedienelemente und Funktionen (Abbildung siehe Aufklappseite 54)
1 Tag-TemperaturwählerZur Verstellung der Raum-Solltemperatur – Seite 9
2 Partytaste/1 x Ladung WWTaste zum Einschalten der Partyfunktion und zum einmaligen Aufladen eines Speicher-Wassererwärmers – Seite 10
3 Einsteller (+, - uunndd wweeiitteerr)Drücken des „Einstellers“ zur Bewegung durch das jeweilge Menü(die ausgewählte Funktion wird unten im Display mit einem Stichwort beschrieben)Drehen des „Einstellers“ ändert den ausgewählten Wert– rechts => größerer Wert– links => kleinerer Wert
4 FunktionsartenschalterZur Einstellung, Zeitprogrammierung und Information können folgende Funktionen ausgewählt werden:
Einstellung Tag/Uhrzeit – Seite 16
Programmierung von bis zu drei Heizzeiten pro Tag für den Heizkreis – Seite 24 ff
Programmierung von bis zu drei Warmwasserzeiten pro Tag zur Ladung eines Speicher-Wassererwärmers – Seite 32
Programmierung von bis zu drei Zirkulationszeiten pro Tag – Seite 33
Einstellung von bis zu 99 Urlaubstagen, an denen die Heizung im Absenkbetrieb läuft – Seite 34
Einstellung der Absenktemperatur für den Heizkreis – Seite 18
Anzeige der aktuellen Speichertemperatur – Seite 39
Einstellung verschiedener Werte des Heizungssystems (u. a. Sprache) – Seite 36
5 Gerätedeckel6 Display7 Betriebsartenschalter
Umschalten zwischen Absenkbetrieb, Tagbetrieb oder Zeitprogramm

GB
52
Operating elements and functions (figure see back folding page 54)
1 Day temperature selectorRefer to page 9 for details of how to adjust the target room-temperature
2 Override/1 x filling HW (hot water)Button for activating „Party“ function and for one-off filling of tank water heater – page 10
3 Control knob (+, - onwardsPress the “adjuster“ to navigate through the corresponding menu(the selected function is shown at the bottom of the display with a keyword description)Turn the “adjuster“ to alter the selected value – clockwise => increased value – counterclockwise => decreased value
4 Function selection switchThe following functions can be selected for the purposes of adjustment, timer programming and information:
Day/time adjustment – page 16
Programming of up to three daily heating periods for heating circuit – page 24 et seq.
Programming of up to three daily hot-water period for filling a hot-water tank – page 32
Programming of up to three daily circulation periods – page 33
Setting of up to 99 daily holiday periods, on which heating runs in reduction mode – page 34
Setting of reduction temperature for the heating circuit – page 18
Display of the current temperature of the hot water storage cylinder – page 39
Setting of various heating system parameters (language, etc.) – page 36
5 Control cover6 Display7 Operating mode switch
Switchover between reduction mode, daily mode and timer program
FR
53
Organe de commande et fonctions (Figures voir rabat 54)
1 Sélecteur de température jourPour le réglage de la température ambiante de consigne – page 9
2 Touche party/1 x remplissage WW (eau chaude)Touche pour la mise en route de la fonction Party et pour le remplissage exceptionnel d'un ballon – page 10
3 Sélecteur (+, - et suivant)Pression du sélecteur pour se déplacer dans le menu (la fonction sélectionnée est décrite en bas sur l'écran par un mot clé)Rotation du sélecteur modifie la valeur sélectionnée– droite => augmentation de la valeur– gauche => diminution de la valeur
4 Commutateur de type de fonction
Les fonctions suivantes peuvent être sélectionnées pour le paramétrage, la programmation différée et les informations:
Réglage date/heure – page 16
Programmation de 3 temps de chauffage maximum par jour pour le circuit de chauffage – page 24 et suivantes
Programmation de 3 temps d'eau chaude max. par jour pour remplissage d'un ballon d'eau chaude – p. 32
Programmation de 3 temps de circulation maximum par jour – page 33
Paramétrage de 99 jours de vacances maximum où le chauffage tourne au ralenti – page 34
Paramétrage de la température d’abaissement pour le circuit de chauffage – page 18
Affichage de la température du ballon – page 39
Paramétrage des différentes valeurs du système de chauffage (langue, etc.) – page 36
5 Couvercle de l’appareil6 Ecran7 Commutateur de mode de fonctionnement
Commutation entre le mode veille, le mode jour ou le programme différé
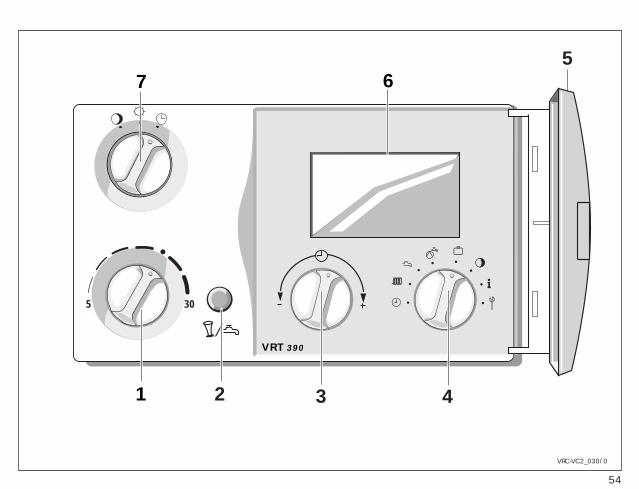
54
Party
Sa - 15°C
°C
VRC-VCC
+10
+2
+3
-1
-2
-3305
21
7 65
3 4
VRT 390
VRC-VC2_030/0
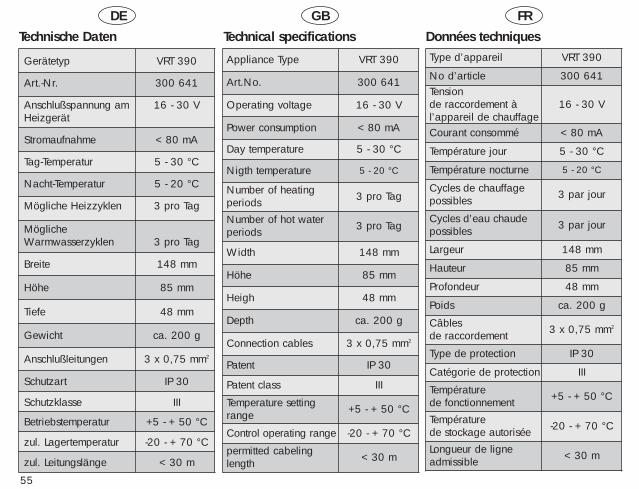
DE GB FR
55
Technische Daten
Gerätetyp VRT 390
Art.-Nr. 300 641
Anschlußspannung am 16 - 30 VHeizgerät
Stromaufnahme < 80 mA
Tag-Temperatur 5 - 30 °C
Nacht-Temperatur 5 - 20 °C
Mögliche Heizzyklen 3 pro Tag
Mögliche Warmwasserzyklen 3 pro Tag
Breite 148 mm
Höhe 85 mm
Tiefe 48 mm
Gewicht ca. 200 g
Anschlußleitungen 3 x 0,75 mm2
Schutzart IP 30
Schutzklasse III
Betriebstemperatur +5 - + 50 °C
zul. Lagertemperatur -20 - + 70 °C
zul. Leitungslänge < 30 m
Technical specifications Données techniques
Appliance Type
Art.No.
Operating voltage
Power consumption
Day temperature
Nigth temperature
Number of heatingperiodsNumber of hot waterperiods
Width
Höhe
Heigh
Depth
Connection cables
Patent
Patent class
Temperature settingrange
Control operating range
VRT 390
300 641
16 - 30 V
< 80 mA
5 - 30 °C
5 - 20 °C
3 pro Tag
3 pro Tag
148 mm
85 mm
48 mm
ca. 200 g
3 x 0,75 mm2
IP 30
III
+5 - + 50 °C
-20 - + 70 °C
Type d’appareil
No d’articleTensionde raccordement à l’appareil de chauffageCourant consommé
Température jour
Température nocturne
Cycles de chauffagepossibles
Cycles d’eau chaudepossibles
Largeur
Hauteur
Profondeur
Poids
Câblesde raccordement
Type de protection
Catégorie de protection
Températurede fonctionnementTempératurede stockage autorisée
VRT 390
300 641
16 - 30 V
< 80 mA
5 - 30 °C
5 - 20 °C
3 par jour
3 par jour
148 mm
85 mm
48 mm
ca. 200 g
3 x 0,75 mm2
IP 30
III
+5 - + 50 °C
-20 - + 70 °C
permitted cabelinglength < 30 m
Longueur de ligneadmissible < 30 m
Vaillant GmbHBerghauser Straße 40 · 42859 Remscheid
Telefon: 0 21 91/18-0 · Telefax: 0 21 91/18-28 10http://www.vaillant.de · E-Mail: [email protected]
83 4
2 48
DE/
GB/F
R02
·02/
02 V
·Än
deru
ngen
vorb
ehalt
en -
Subje
ct to
alte
ratio
n - S
ous r
éserv
e de
mod
ificat
ions
Vaillant Ltd.Vaillant House · Medway City Estate
Rochester / Kent ME2 4EZFon: (1) 63 42 92 300 · Fax: (1) 63 42 90 166
Vaillant S.A.R.L.Europarc · 13, rue Claude Nicolas Ledoux
94045 Créteil CedexTél. (1) 45 13 51 00 · Fax (1) 45 13 51 02