Embed Size (px)
Citation preview

DeutschEnglish
Bedienungsanleitung Mobile Station 2 (Version 3.55 oder höher)
60653 / 60657 / 66950 / 66955
2
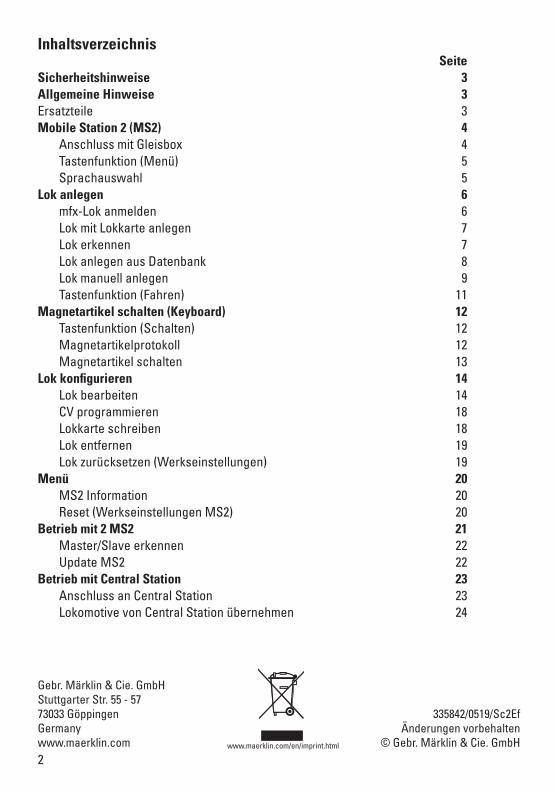
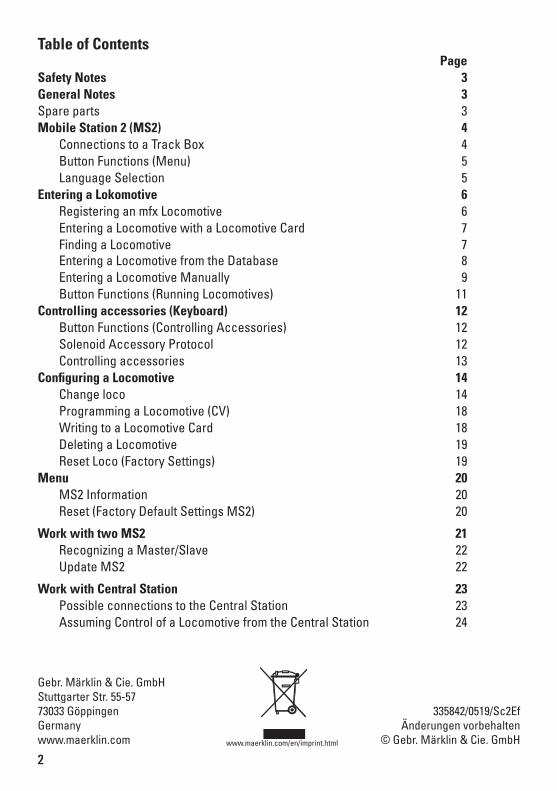
Inhaltsverzeichnis SeiteSicherheitshinweise 3Allgemeine Hinweise 3Ersatzteile 3Mobile Station 2 (MS2) 4 Anschluss mit Gleisbox 4 Tastenfunktion (Menü) 5 Sprachauswahl 5Lok anlegen 6 mfx-Lok anmelden 6 Lok mit Lokkarte anlegen 7 Lok erkennen 7 Lok anlegen aus Datenbank 8 Lok manuell anlegen 9 Tastenfunktion (Fahren) 11Magnetartikel schalten (Keyboard) 12 Tastenfunktion (Schalten) 12 Magnetartikelprotokoll 12 Magnetartikel schalten 13Lok konfigurieren 14 Lok bearbeiten 14 CV programmieren 18 Lokkarte schreiben 18 Lok entfernen 19 Lok zurücksetzen (Werkseinstellungen) 19 Menü 20 MS2 Information 20 Reset (Werkseinstellungen MS2) 20 Betrieb mit 2 MS2 21 Master/Slave erkennen 22 Update MS2 22Betrieb mit Central Station 23 Anschluss an Central Station 23 Lokomotive von Central Station übernehmen 24
335842/0519/Sc2EfÄnderungen vorbehalten
© Gebr. Märklin & Cie. GmbH
Gebr. Märklin & Cie. GmbH Stuttgarter Str. 55 - 5773033 Göppingen Germanywww.maerklin.com www.maerklin.com/en/imprint.html
3
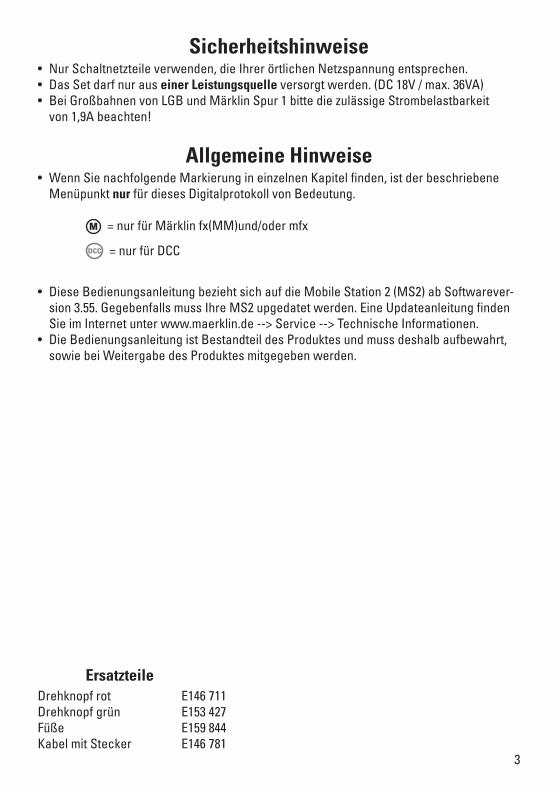
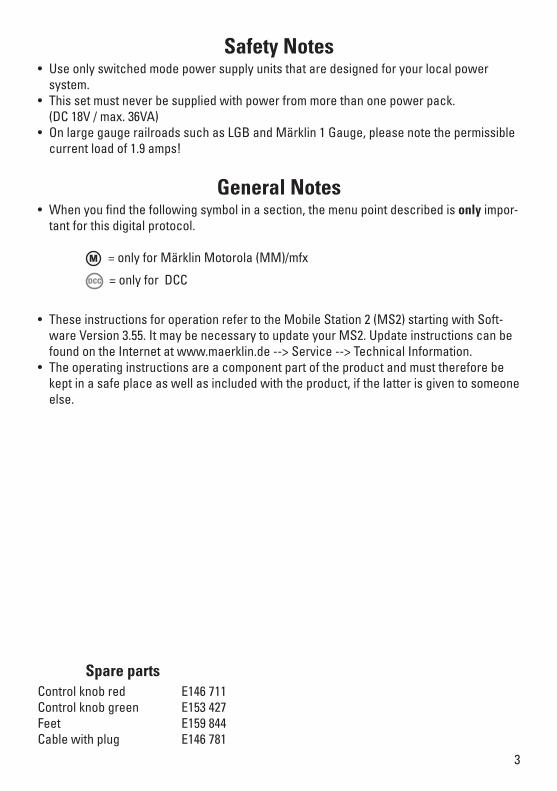
Sicherheitshinweise• Nur Schaltnetzteile verwenden, die Ihrer örtlichen Netzspannung entsprechen.• Das Set darf nur aus einer Leistungsquelle versorgt werden. (DC 18V / max. 36VA)• Bei Großbahnen von LGB und Märklin Spur 1 bitte die zulässige Strombelastbarkeit
von 1,9A beachten!
Allgemeine Hinweise• Wenn Sie nachfolgende Markierung in einzelnen Kapitel finden, ist der beschriebene
Menüpunkt nur für dieses Digitalprotokoll von Bedeutung.
M = nur für Märklin fx(MM)und/oder mfx
DCC = nur für DCC
• Diese Bedienungsanleitung bezieht sich auf die Mobile Station 2 (MS2) ab Softwarever-sion 3.55. Gegebenfalls muss Ihre MS2 upgedatet werden. Eine Updateanleitung finden Sie im Internet unter www.maerklin.de --> Service --> Technische Informationen.
• Die Bedienungsanleitung ist Bestandteil des Produktes und muss deshalb aufbewahrt, sowie bei Weitergabe des Produktes mitgegeben werden.
ErsatzteileDrehknopf rot E146 711Drehknopf grün E153 427Füße E159 844Kabel mit Stecker E146 781
4
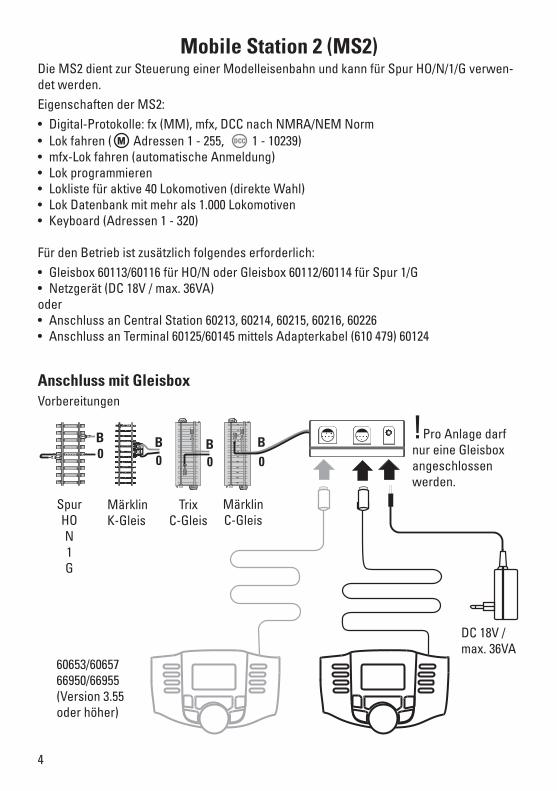
B!Pro Anlage darf nur eine Gleisbox angeschlossen werden.
Spur HO N 1 G
Märklin K-Gleis
Trix C-Gleis
B0
B0 0
Anschluss mit GleisboxVorbereitungen
60653/60657 66950/66955 (Version 3.55 oder höher)
Mobile Station 2 (MS2)Die MS2 dient zur Steuerung einer Modelleisenbahn und kann für Spur HO/N/1/G verwen-det werden.Eigenschaften der MS2:• Digital-Protokolle: fx (MM), mfx, DCC nach NMRA/NEM Norm• Lok fahren ( M Adressen 1 - 255, DCC 1 - 10239)• mfx-Lok fahren (automatische Anmeldung) • Lok programmieren• Lokliste für aktive 40 Lokomotiven (direkte Wahl) • Lok Datenbank mit mehr als 1.000 Lokomotiven• Keyboard (Adressen 1 - 320)
Für den Betrieb ist zusätzlich folgendes erforderlich:• Gleisbox 60113/60116 für HO/N oder Gleisbox 60112/60114 für Spur 1/G• Netzgerät (DC 18V / max. 36VA)oder• Anschluss an Central Station 60213, 60214, 60215, 60216, 60226• Anschluss an Terminal 60125/60145 mittels Adapterkabel (610 479) 60124
Märklin C-Gleis
B0
DC 18V / max. 36VA

5
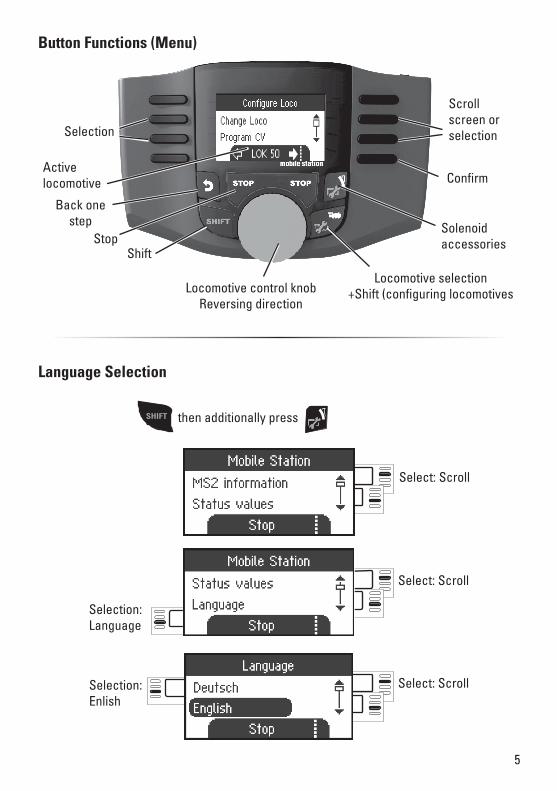
Zum Wählen: scrollen
Zum Wählen: scrollen
Auswahl: Deutsch
Fahrregler Fahrtrichtungswechsel
Lok Auswahl +Shift (Loks konfigurieren)
Magnetartikel +Shift (Menü)
Shift
Stop
Tastenfunktion (Menü)
AuswahlBildschirm scrollen oder Auswahl
Aktive Lok Bestätigen
Schritt zurück
Sprachauswahl
Auswahl: Sprache
SHIFT dann zusätzlich drücken
Zum Wählen: scrollen
6
Fahrregler Fahrtrichtungswechsel
Shift+Fahrregler Lok-Schnellauswahl
Lok Auswahl
Magnetartikel
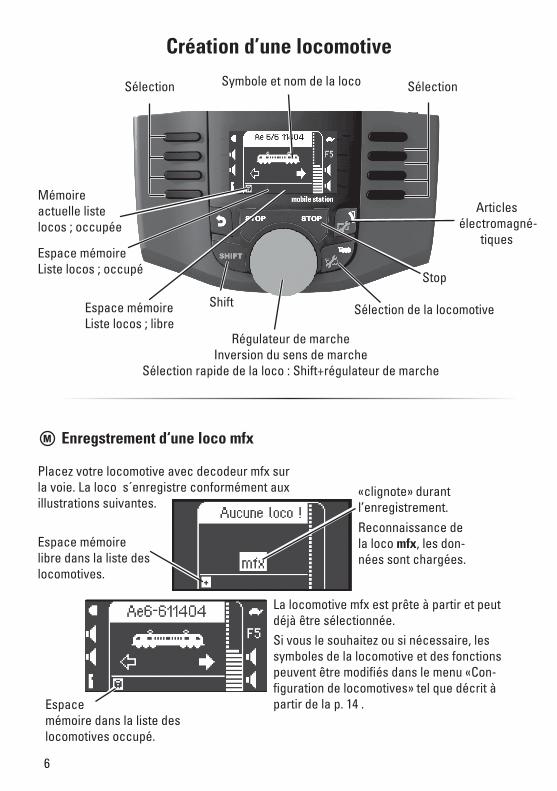
Lok Icon und Lokname
Auswahl
ShiftStop
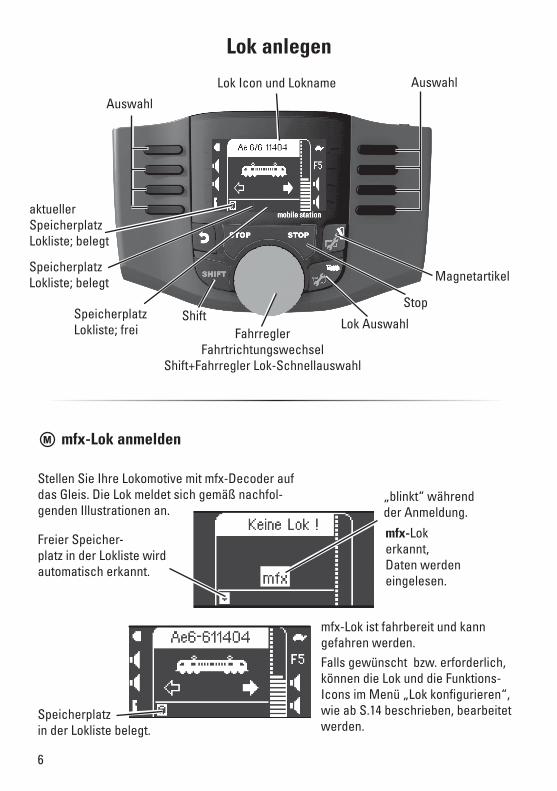
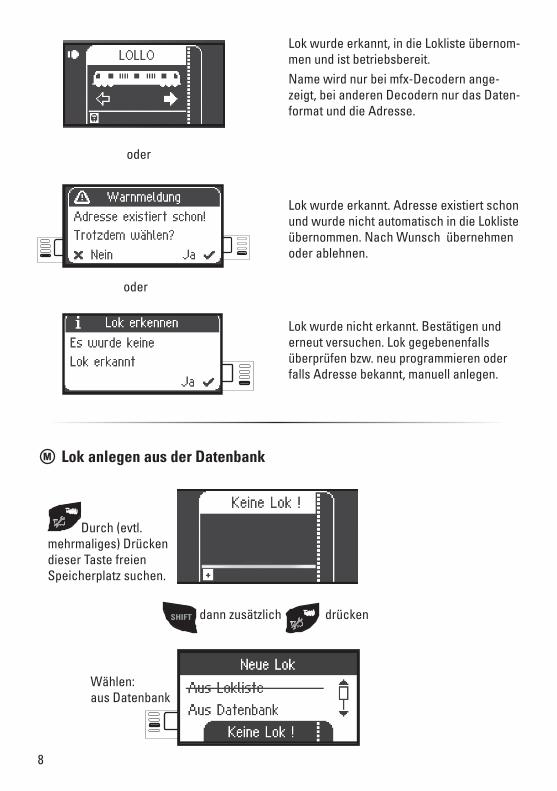
Lok anlegen
Speicherplatz Lokliste; belegt
Speicherplatz Lokliste; frei
Auswahl
mfx-Lok erkannt, Daten werden eingelesen.
M mfx-Lok anmelden
„blinkt“ während der Anmeldung.
Freier Speicher- platz in der Lokliste wird automatisch erkannt.
Stellen Sie Ihre Lokomotive mit mfx-Decoder auf das Gleis. Die Lok meldet sich gemäß nachfol-genden Illustrationen an.
mfx-Lok ist fahrbereit und kann gefahren werden.Falls gewünscht bzw. erforderlich, können die Lok und die Funktions-Icons im Menü „Lok konfigurieren“, wie ab S.14 beschrieben, bearbeitet werden.
Speicherplatz in der Lokliste belegt.
aktueller Speicherplatz Lokliste; belegt
7
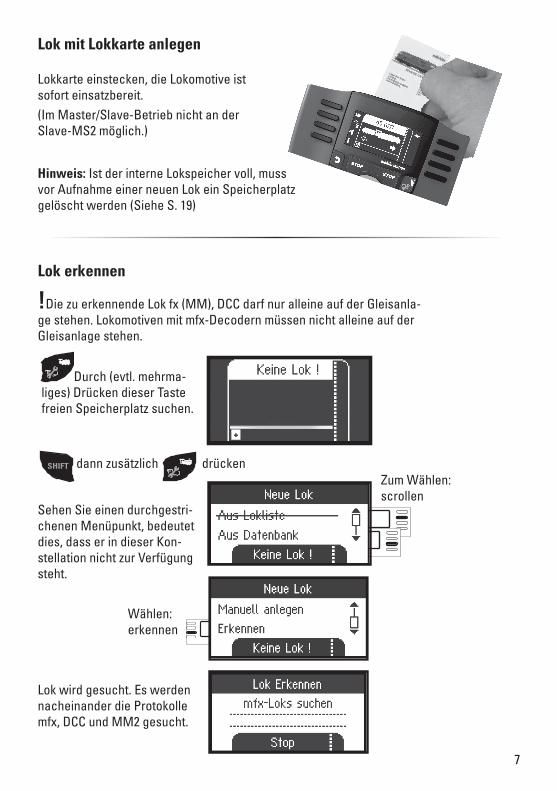
Lok erkennen
Lok wird gesucht. Es werden nacheinander die Protokolle mfx, DCC und MM2 gesucht.
!Die zu erkennende Lok fx (MM), DCC darf nur alleine auf der Gleisanla-ge stehen. Lokomotiven mit mfx-Decodern müssen nicht alleine auf der Gleisanlage stehen.
Wählen: erkennen
Durch (evtl. mehrma-liges) Drücken dieser Taste freien Speicherplatz suchen.
Lok mit Lokkarte anlegen
Lokkarte einstecken, die Lokomotive ist sofort einsatzbereit.(Im Master/Slave-Betrieb nicht an der Slave-MS2 möglich.)
Hinweis: Ist der interne Lokspeicher voll, muss vor Aufnahme einer neuen Lok ein Speicherplatz gelöscht werden (Siehe S. 19)
SHIFT dann zusätzlich drücken Zum Wählen: scrollen
Sehen Sie einen durchgestri-chenen Menüpunkt, bedeutet dies, dass er in dieser Kon-stellation nicht zur Verfügung steht.
8
Lok wurde erkannt, in die Lokliste übernom-men und ist betriebsbereit.Name wird nur bei mfx-Decodern ange-zeigt, bei anderen Decodern nur das Daten-format und die Adresse.
Lok wurde erkannt. Adresse existiert schon und wurde nicht automatisch in die Lokliste übernommen. Nach Wunsch übernehmen oder ablehnen.
Lok wurde nicht erkannt. Bestätigen und erneut versuchen. Lok gegebenenfalls überprüfen bzw. neu programmieren oder falls Adresse bekannt, manuell anlegen.
oder
oder
M Lok anlegen aus der Datenbank
Durch (evtl. mehrmaliges) Drücken dieser Taste freien Speicherplatz suchen.
Wählen: aus Datenbank
SHIFT dann zusätzlich drücken
9
Wählen Sie eine Ihrer Lokomoti-ven in der Datenbank aus.
!Dies funktioniert nur, wenn die werkseitige Adresse der Loko-motive nicht verändert wurde.
Lokomotive ist in die Lokliste übernommen und betriebs-bereit.
oder scrollen
SHIFT +
Zum Wählen:
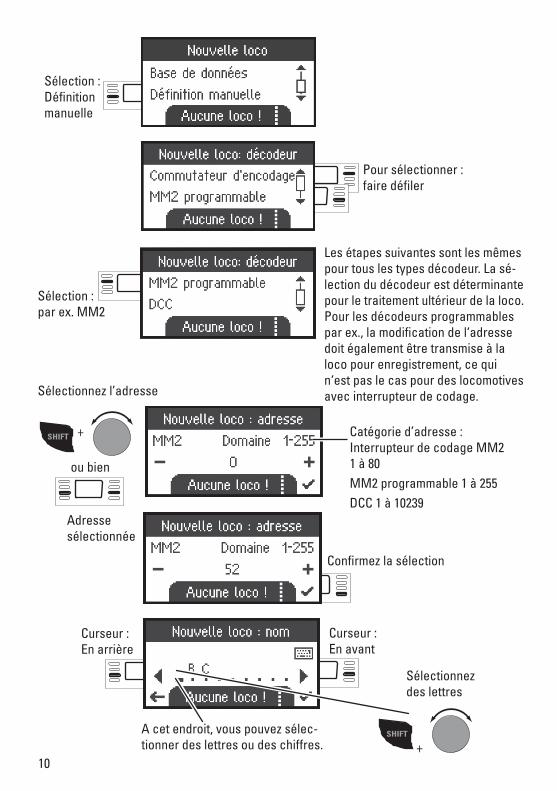
Lok manuell anlegen
Durch (evtl. mehrmaliges) Drücken dieser Taste freien Speicherplatz suchen.
Zum Wählen: scrollen
SHIFT dann zusätzlich drücken
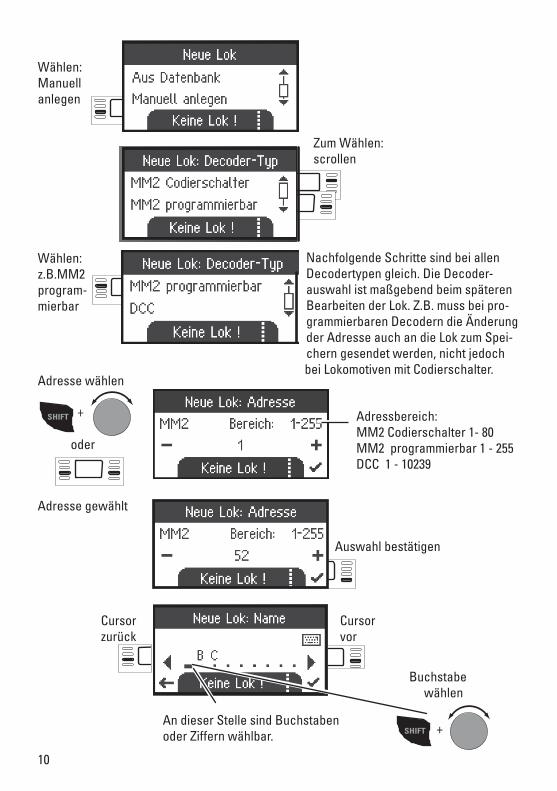
10
SHIFT +
Buchstabe wählen
An dieser Stelle sind Buchstaben oder Ziffern wählbar.
Cursor zurück
Cursor vor
Zum Wählen: scrollen
Nachfolgende Schritte sind bei allen Decodertypen gleich. Die Decoder-auswahl ist maßgebend beim späteren Bearbeiten der Lok. Z.B. muss bei pro-grammierbaren Decodern die Änderung der Adresse auch an die Lok zum Spei-chern gesendet werden, nicht jedoch bei Lokomotiven mit Codierschalter.
Wählen: Manuell anlegen
Wählen: z.B.MM2 program-mierbar
Adressbereich:MM2 Codierschalter 1- 80MM2 programmierbar 1 - 255DCC 1 - 10239
SHIFT +
Adresse wählen
oder
Adresse gewählt
Auswahl bestätigen
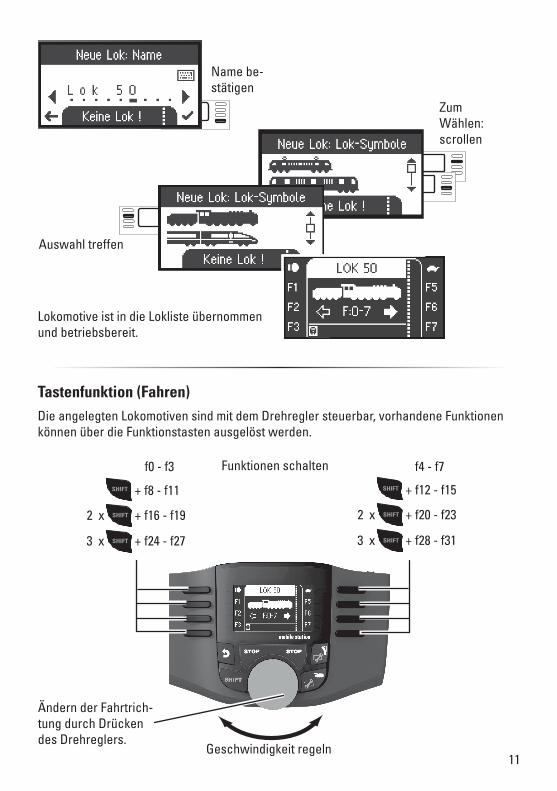
11
Zum Wählen: scrollen
Lokomotive ist in die Lokliste übernommen und betriebsbereit.
Name be-stätigen
Auswahl treffen
Die angelegten Lokomotiven sind mit dem Drehregler steuerbar, vorhandene Funktionen können über die Funktionstasten ausgelöst werden.
Tastenfunktion (Fahren)
Ändern der Fahrtrich-tung durch Drücken des Drehreglers.
Funktionen schalten f0 - f3
SHIFT
Geschwindigkeit regeln
+ f24 - f27
2 x + f16 - f19
3 x
+ f8 - f11
SHIFT
SHIFT
f4 - f7
SHIFT + f28 - f31
2 x + f20 - f23
3 x
+ f12 - f15
SHIFT
SHIFT

12
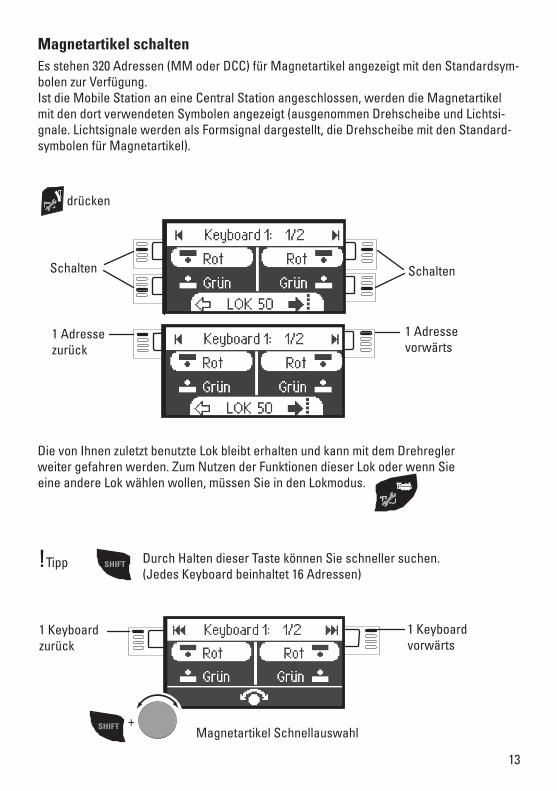
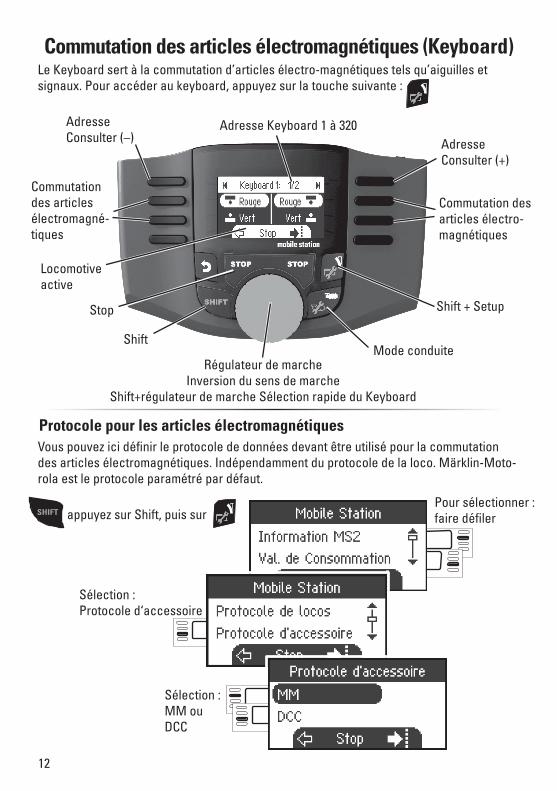
Das Keyboard ist zum Schalten von Magnetartikeln wie Weichen und Signale. Um zum Keyboard zu wechseln, drücken Sie folgende Taste:
Magnetartikel schalten (Keyboard)
Fahrregler Fahrtrichtungswechsel
Shift+Fahrregler Keyboard-Schnellauswahl
Fahrmodus
Shift + Setup
Keyboard-Adresse 1 - 320
Adresse blättern (–)
Shift
Stop
Adresse blättern (+)
Magnetartikel schalten
Magnetartikel schalten
Aktive Lok
Zum Wählen: scrollen
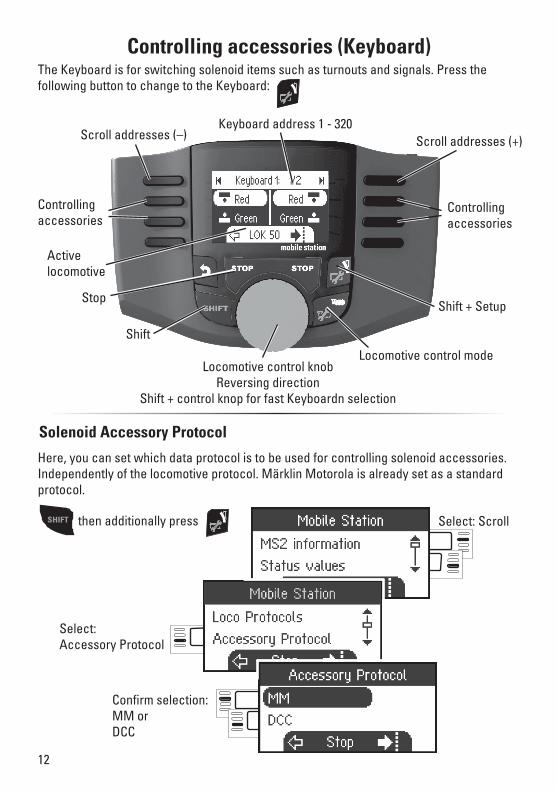
Auswahl: Magnetartikelprotokoll
Magnetartikelprotokoll Sie können hier einstellen, welches Datenprotokoll zum Schalten der Magnetartikel verwendet werden soll. Unabhängig vom Lokprotokoll. Standardmäßig ist fx (MM) vorge-geben.
SHIFT dann zusätzlich drücken
Wählen: MM oder DCC
13
Magnetartikel schaltenEs stehen 320 Adressen (MM oder DCC) für Magnetartikel angezeigt mit den Standardsym-bolen zur Verfügung. Ist die Mobile Station an eine Central Station angeschlossen, werden die Magnetartikel mit den dort verwendeten Symbolen angezeigt (ausgenommen Drehscheibe und Lichtsi-gnale. Lichtsignale werden als Formsignal dargestellt, die Drehscheibe mit den Standard-symbolen für Magnetartikel).
Die von Ihnen zuletzt benutzte Lok bleibt erhalten und kann mit dem Drehregler weiter gefahren werden. Zum Nutzen der Funktionen dieser Lok oder wenn Sie eine andere Lok wählen wollen, müssen Sie in den Lokmodus.
Schalten Schalten
1 Adresse zurück
1 Adresse vorwärts
drücken
SHIFT Durch Halten dieser Taste können Sie schneller suchen. (Jedes Keyboard beinhaltet 16 Adressen)
1 Keyboard zurück
1 Keyboard vorwärts
SHIFT +Magnetartikel Schnellauswahl
!Tipp
14
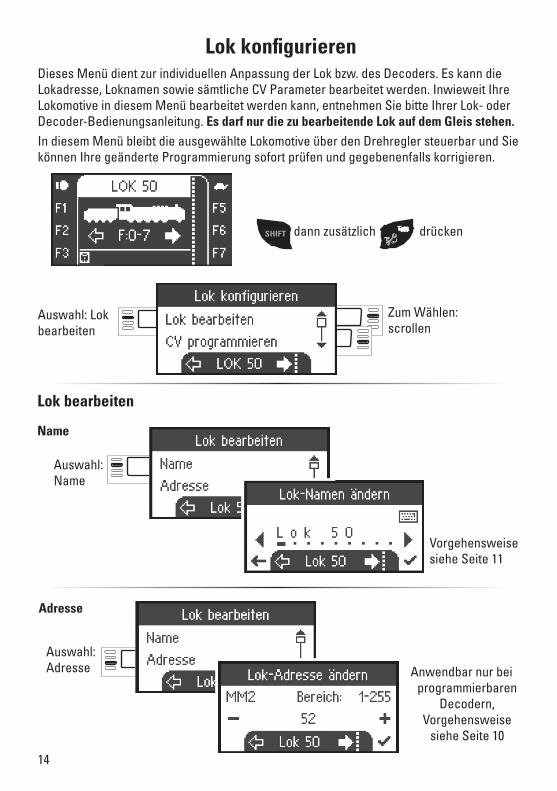
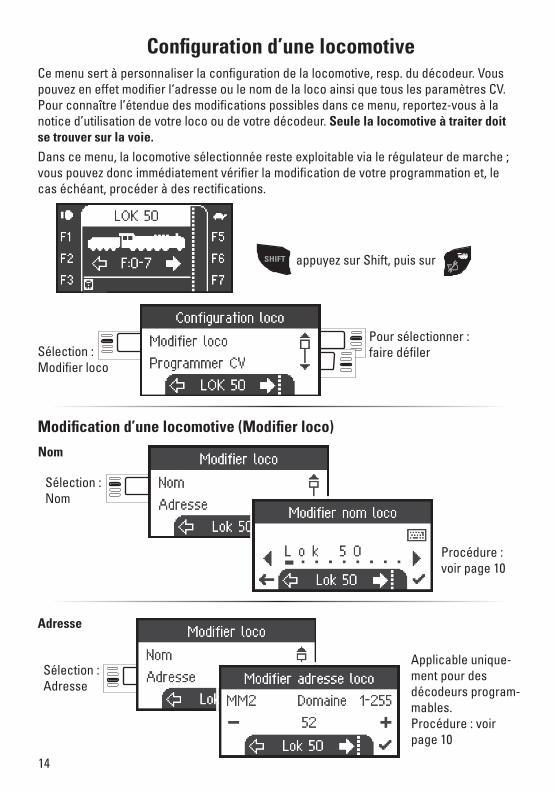
Dieses Menü dient zur individuellen Anpassung der Lok bzw. des Decoders. Es kann die Lokadresse, Loknamen sowie sämtliche CV Parameter bearbeitet werden. Inwieweit Ihre Lokomotive in diesem Menü bearbeitet werden kann, entnehmen Sie bitte Ihrer Lok- oder Decoder-Bedienungsanleitung. Es darf nur die zu bearbeitende Lok auf dem Gleis stehen. In diesem Menü bleibt die ausgewählte Lokomotive über den Drehregler steuerbar und Sie können Ihre geänderte Programmierung sofort prüfen und gegebenenfalls korrigieren.
Lok konfigurieren
SHIFT dann zusätzlich drücken
Zum Wählen: scrollen
Auswahl: Lok bearbeiten
Lok bearbeiten
Auswahl: Name
Anwendbar nur bei programmierbaren
Decodern, Vorgehensweise
siehe Seite 10
Auswahl: Adresse
Vorgehensweise siehe Seite 11
Name
Adresse
15
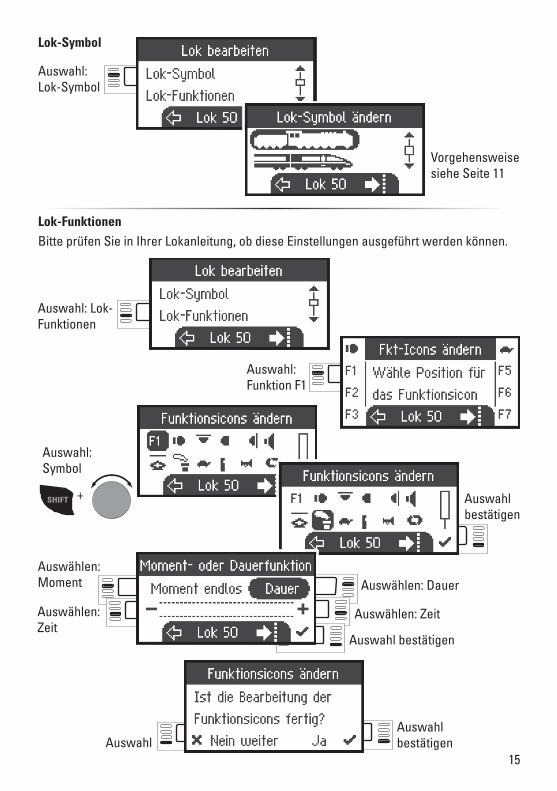
Auswahl: Lok-Symbol
Vorgehensweise siehe Seite 11
Auswahl: Lok-Funktionen
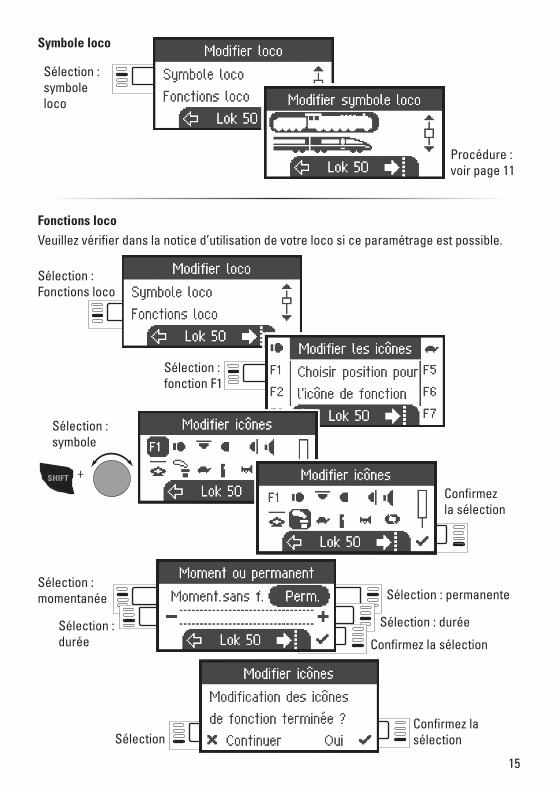
Lok-FunktionenBitte prüfen Sie in Ihrer Lokanleitung, ob diese Einstellungen ausgeführt werden können.
Lok-Symbol
Auswahl bestätigen
Auswahl bestätigen
Auswahl: Funktion F1
SHIFT +
Auswahl: Symbol
Auswählen: Moment Auswählen: Dauer
Auswählen: Zeit
Auswählen: Zeit
Auswahl bestätigen
Auswahl

16
Auswahl bestätigen
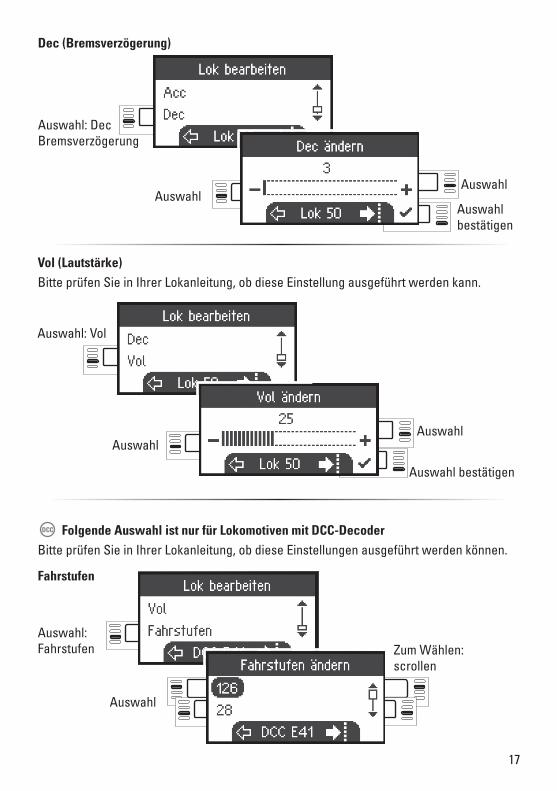
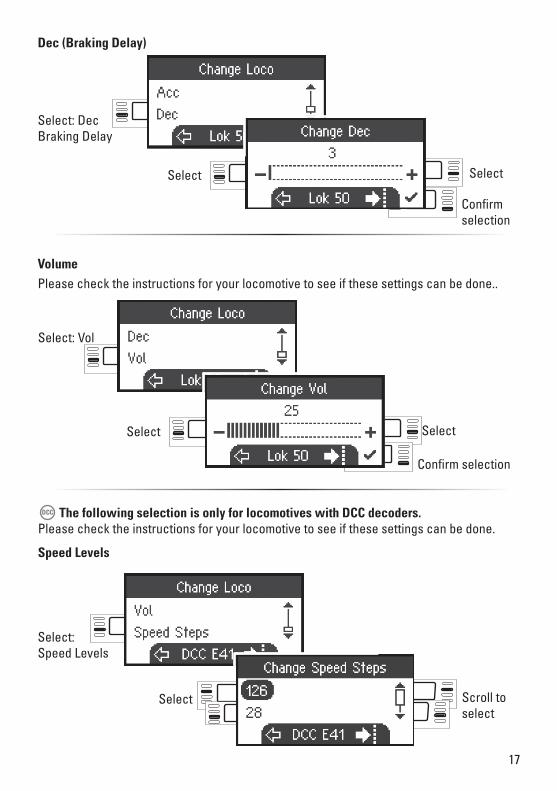
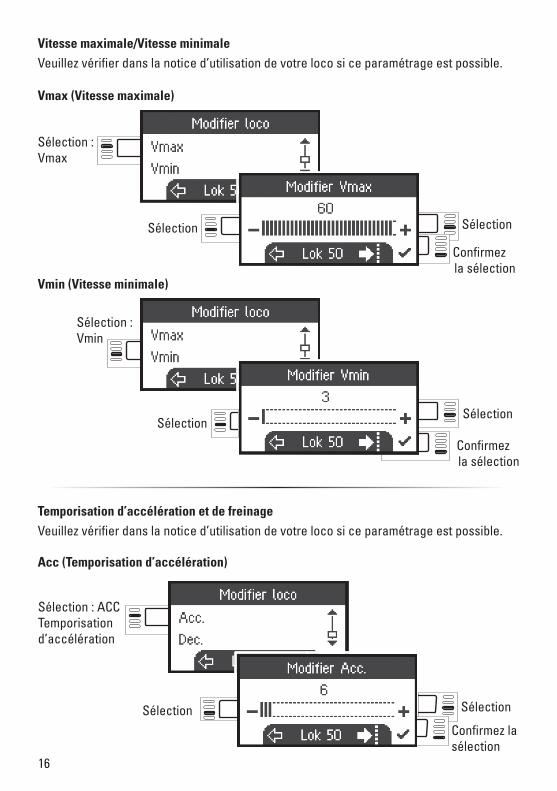
Auswahl: Acc Anfahrverzögerung
Auswahl Auswahl
Anfahrverzögerung / BremsverzögerungBitte prüfen Sie in Ihrer Lokanleitung, ob diese Einstellungen ausgeführt werden können.
Auswahl bestätigen
Auswahl: Vmax
Auswahl Auswahl
Vmax (Maximalgeschwindigkeit)
Acc (Anfahrverzögerung)
Auswahl bestätigen
Auswahl: Vmin
Auswahl Auswahl
Vmin (Mindestgeschwindigkeit)
Maximalgeschwindigkeit / MindestgeschwindigkeeitBitte prüfen Sie in Ihrer Lokanleitung, ob diese Einstellungen ausgeführt werden können.
17
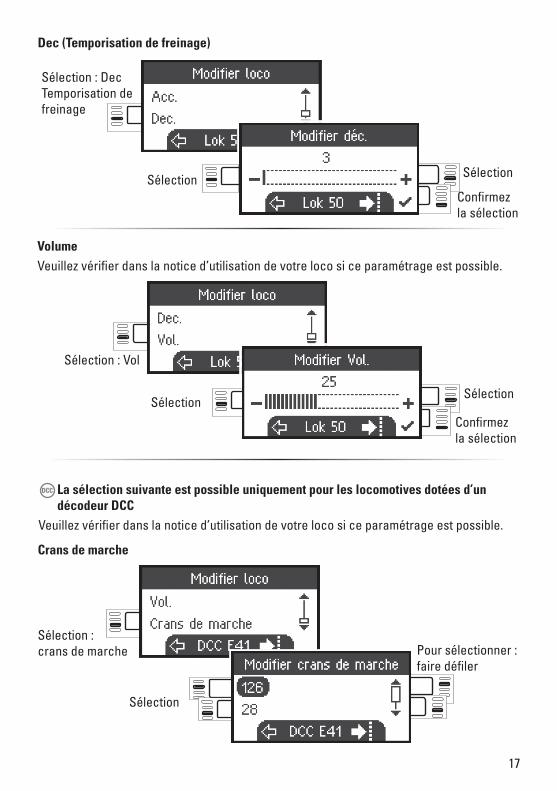
Vol (Lautstärke)Bitte prüfen Sie in Ihrer Lokanleitung, ob diese Einstellung ausgeführt werden kann.
Auswahl: Vol
Auswahl bestätigen
AuswahlAuswahl
Auswahl: Fahrstufen
Auswahl
Folgende Auswahl ist nur für Lokomotiven mit DCC-DecoderBitte prüfen Sie in Ihrer Lokanleitung, ob diese Einstellungen ausgeführt werden können.
DCC
Zum Wählen: scrollen
Fahrstufen
Auswahl bestätigen
Auswahl: Dec Bremsverzögerung
AuswahlAuswahl
Dec (Bremsverzögerung)
18
Auswahl
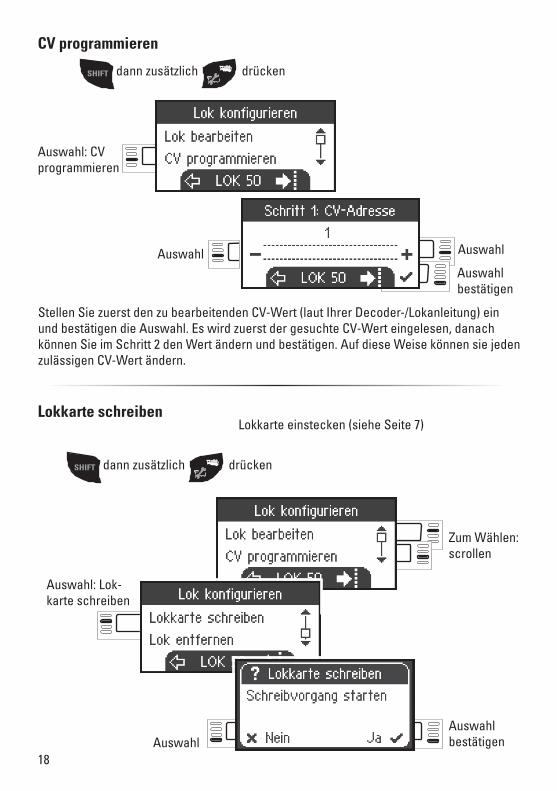
CV programmieren
Auswahl bestätigen
Auswahl: CV programmieren
Auswahl
Stellen Sie zuerst den zu bearbeitenden CV-Wert (laut Ihrer Decoder-/Lokanleitung) ein und bestätigen die Auswahl. Es wird zuerst der gesuchte CV-Wert eingelesen, danach können Sie im Schritt 2 den Wert ändern und bestätigen. Auf diese Weise können sie jeden zulässigen CV-Wert ändern.
SHIFT dann zusätzlich drücken
Auswahl bestätigen
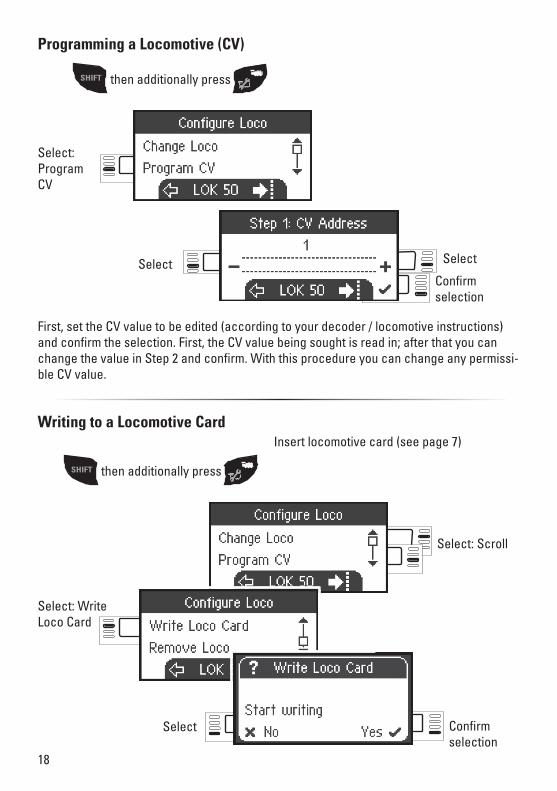
Auswahl: Lok-karte schreiben
Auswahl
Lokkarte schreiben Lokkarte einstecken (siehe Seite 7)
SHIFT dann zusätzlich drücken
Zum Wählen: scrollen
19
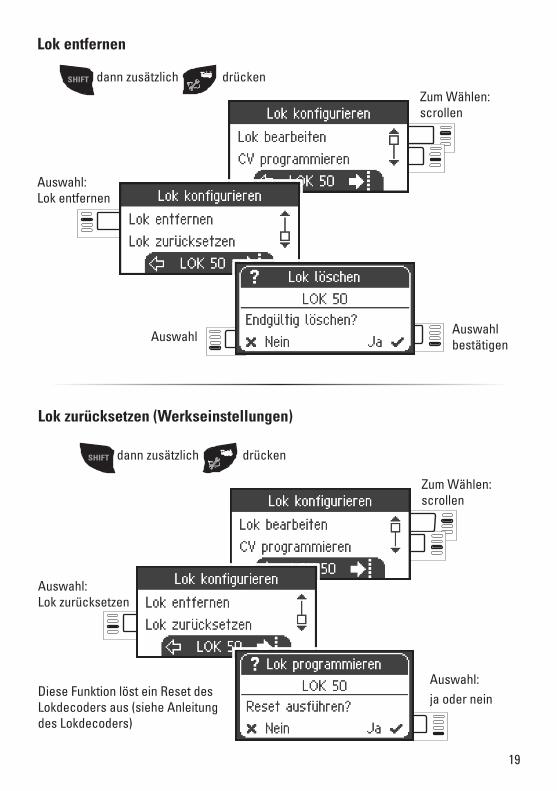
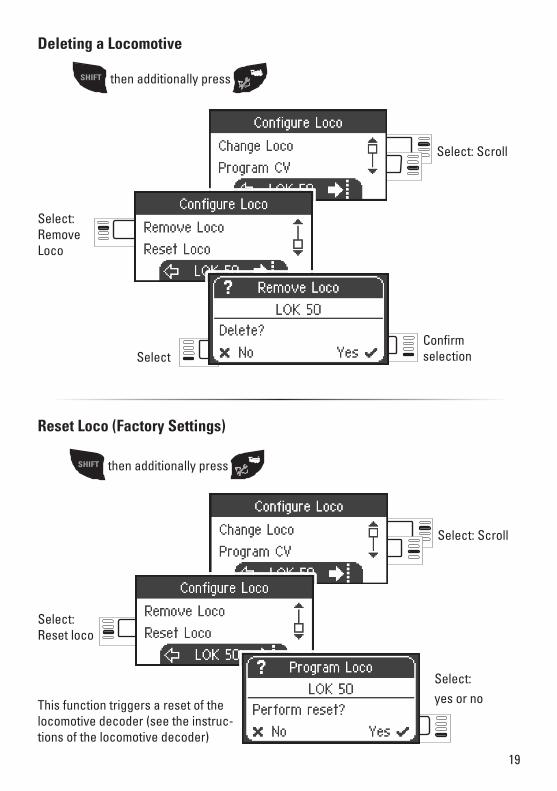
Auswahl: Lok entfernen
Lok entfernen
Auswahl Auswahl bestätigen
SHIFT dann zusätzlich drücken Zum Wählen: scrollen
Auswahl:ja oder nein
Auswahl: Lok zurücksetzen
Lok zurücksetzen (Werkseinstellungen)
Diese Funktion löst ein Reset des Lokdecoders aus (siehe Anleitung des Lokdecoders)
SHIFT dann zusätzlich drücken
Zum Wählen: scrollen
20
Zum Wählen: scrollen
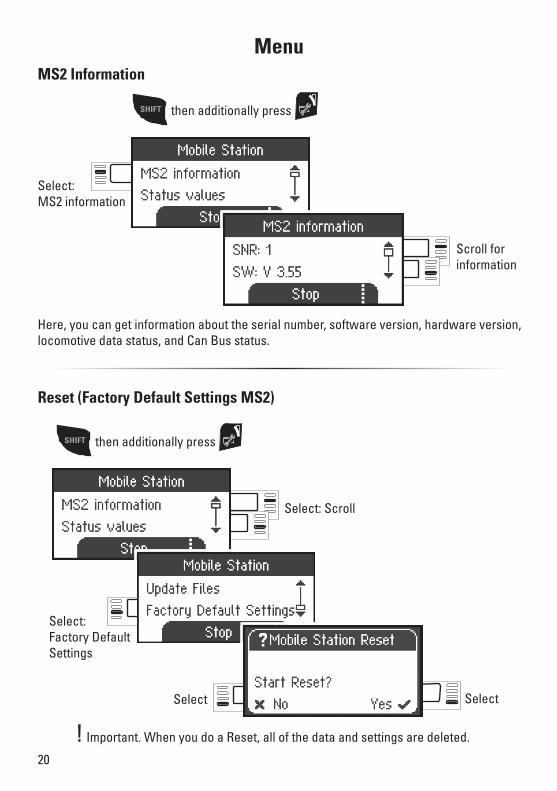
Reset (Werkseinstellungen MS2)
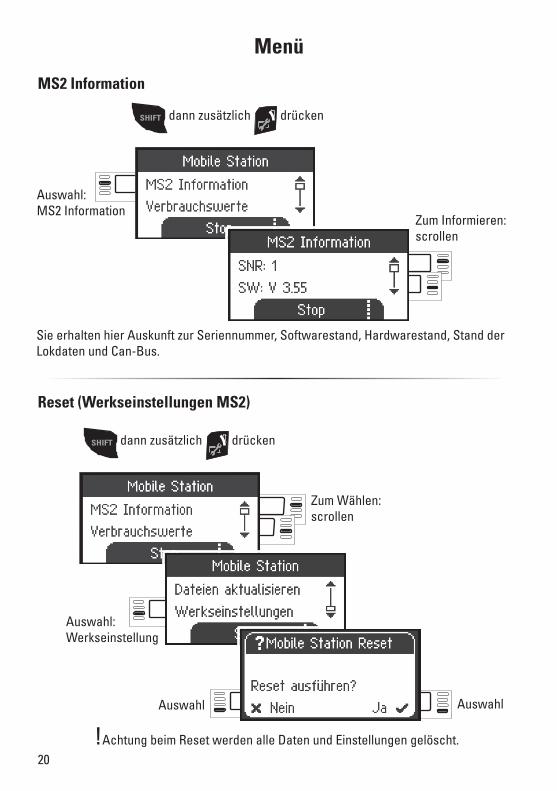
Auswahl: Werkseinstellung
Auswahl Auswahl
!Achtung beim Reset werden alle Daten und Einstellungen gelöscht.
Zum Informieren: scrollen
Auswahl: MS2 Information
MS2 Information
Sie erhalten hier Auskunft zur Seriennummer, Softwarestand, Hardwarestand, Stand der Lokdaten und Can-Bus.
Menü
SHIFT dann zusätzlich drücken
SHIFT dann zusätzlich drücken

21
Es können maximal 2 MS2 an die Gleisbox angeschlossen werden. Es wird die „Master“-MS2 automatisch erkannt. Die andere MS2 wird dann automatisch auf „Slave“ eingestellt.Das Anlegen, Erkennen und das Programmieren erfolgt nur durch die „Master“-MS2. Die „Slave“-MS2 übernimmt alle Lokomotiven aus der „Master“-MS2.
Betrieb mit 2 MS2
B!Pro Anlage darf nur eine Gleisbox angeschlossen werden.
Spur HO N 1 G
Märklin K-Gleis
Trix C-Gleis
B0
B0 0
60653/60657 66950/66955 (Version 3.55 oder höher)
Märklin C-Gleis
B0
DC 18V / max. 36VA

22
Master/Slave erkennen
Die Lokomotiven müssen zunächst an der „Master“-MS2 angemeldet werden. Verwenden Sie dazu die MS2 mit der niedrigeren Seriennummer, denn diese wird automatisch zum „Master“.Die Seriennummer ist im Menü der MS2 wie folgt ablesbar.
SHIFT dann zusätzlich drücken
Zum Informieren: scrollen
Wählen:MS2 Information
Seriennummer ablesen
Zum Wählen: scrollen
Auswahl: Update MS2
Update MS2
SHIFT dann zusätzlich drücken
Auswahl: Update Gleisbox
Eine Updateanleitung finden Sie im Internet unter www.maerklin.de --> Service --> Tech-nische Informationen.
23
Betrieb mit Central Station (ab 60213)
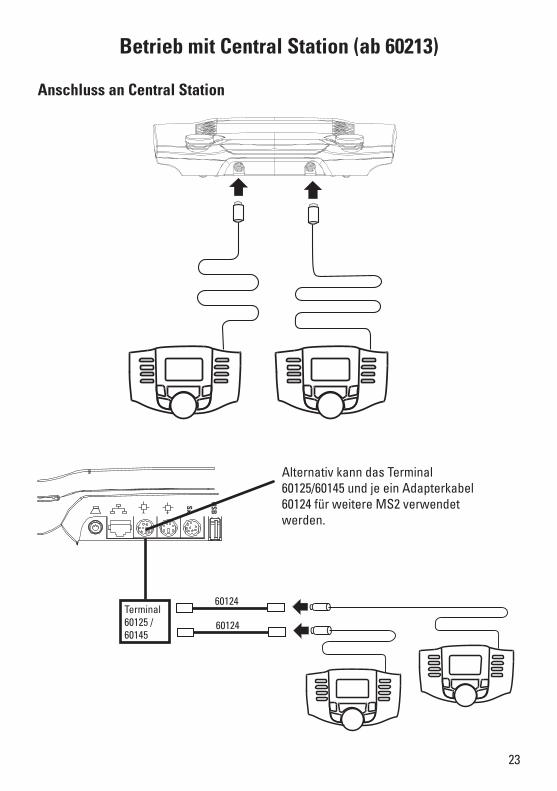
Anschluss an Central Station
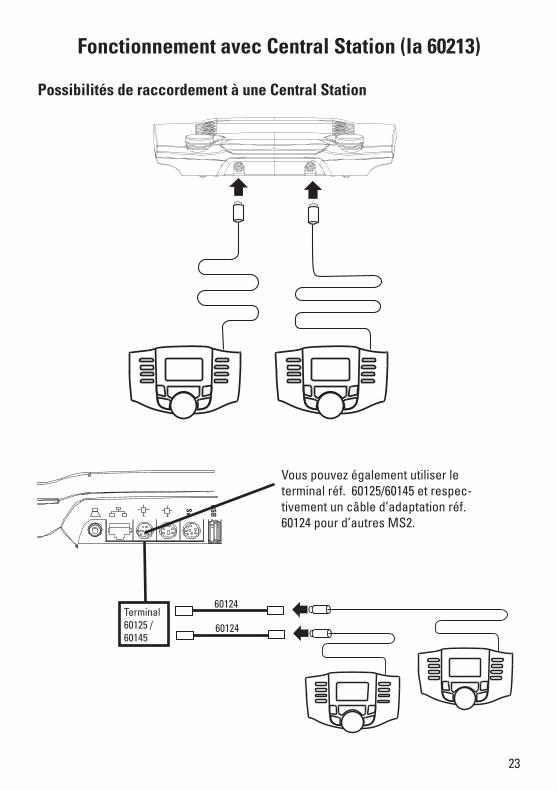
Terminal 60125 / 60145
Alternativ kann das Terminal 60125/60145 und je ein Adapterkabel 60124 für weitere MS2 verwendet werden.
BSU
xS
60124
60124
24
Zum Auswählen:scrollen
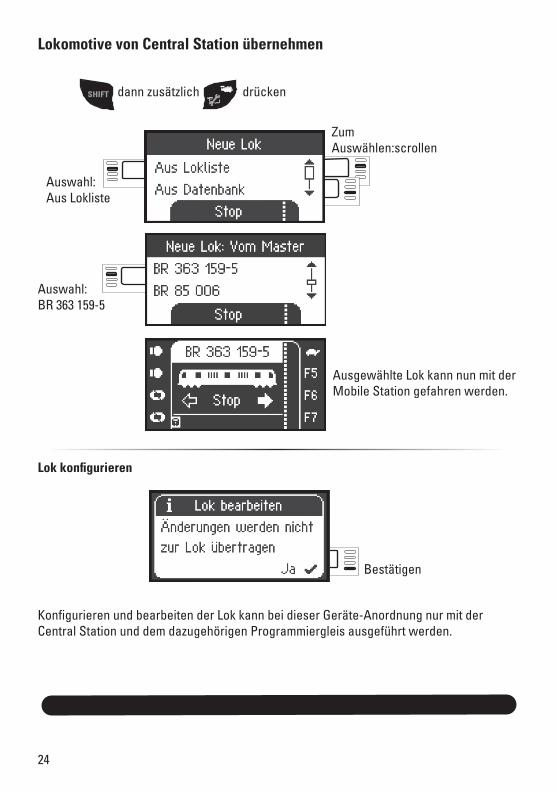
Lokomotive von Central Station übernehmen
Auswahl: Aus Lokliste
Auswahl: BR 363 159-5
Ausgewählte Lok kann nun mit der Mobile Station gefahren werden.
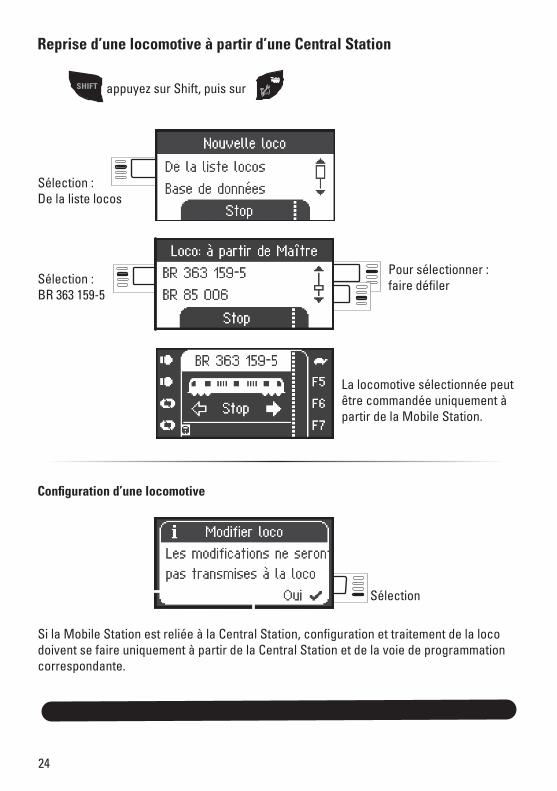
Lok konfigurieren
Konfigurieren und bearbeiten der Lok kann bei dieser Geräte-Anordnung nur mit der Central Station und dem dazugehörigen Programmiergleis ausgeführt werden.
SHIFT dann zusätzlich drücken
Bestätigen

EnglishDeutsch
Instruction Mobile Station 2 (version 3.55 or higher)
60653 / 60657 / 66950 / 66955
2
Table of Contents PageSafety Notes 3General Notes 3Spare parts 3Mobile Station 2 (MS2) 4 Connections to a Track Box 4 Button Functions (Menu) 5 Language Selection 5Entering a Lokomotive 6 Registering an mfx Locomotive 6 Entering a Locomotive with a Locomotive Card 7 Finding a Locomotive 7 Entering a Locomotive from the Database 8 Entering a Locomotive Manually 9 Button Functions (Running Locomotives) 11Controlling accessories (Keyboard) 12 Button Functions (Controlling Accessories) 12 Solenoid Accessory Protocol 12 Controlling accessories 13Configuring a Locomotive 14 Change loco 14 Programming a Locomotive (CV) 18 Writing to a Locomotive Card 18 Deleting a Locomotive 19 Reset Loco (Factory Settings) 19Menu 20 MS2 Information 20 Reset (Factory Default Settings MS2) 20
Work with two MS2 21 Recognizing a Master/Slave 22 Update MS2 22
Work with Central Station 23 Possible connections to the Central Station 23 Assuming Control of a Locomotive from the Central Station 24
2
335842/0519/Sc2EfÄnderungen vorbehalten
© Gebr. Märklin & Cie. GmbH
Gebr. Märklin & Cie. GmbH Stuttgarter Str. 55-5773033 Göppingen Germanywww.maerklin.com www.maerklin.com/en/imprint.html
3
Safety Notes• Use only switched mode power supply units that are designed for your local power
system.• This set must never be supplied with power from more than one power pack.
(DC 18V / max. 36VA)• On large gauge railroads such as LGB and Märklin 1 Gauge, please note the permissible
current load of 1.9 amps!
General Notes• When you find the following symbol in a section, the menu point described is only impor-
tant for this digital protocol.
M = only for Märklin Motorola (MM)/mfx
DCC = only for DCC
• These instructions for operation refer to the Mobile Station 2 (MS2) starting with Soft-ware Version 3.55. It may be necessary to update your MS2. Update instructions can be found on the Internet at www.maerklin.de --> Service --> Technical Information.
• The operating instructions are a component part of the product and must therefore be kept in a safe place as well as included with the product, if the latter is given to someone else.
Spare partsControl knob red E146 711Control knob green E153 427Feet E159 844Cable with plug E146 781
4
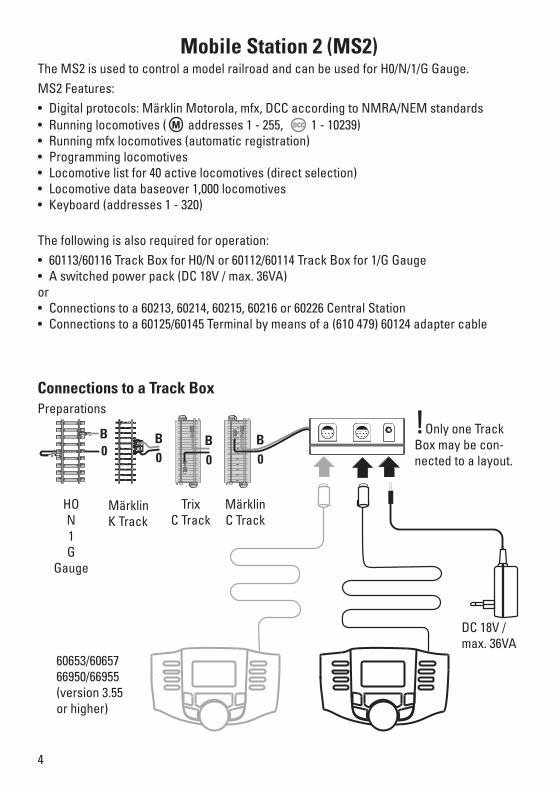
Mobile Station 2 (MS2)The MS2 is used to control a model railroad and can be used for H0/N/1/G Gauge.MS2 Features:• Digital protocols: Märklin Motorola, mfx, DCC according to NMRA/NEM standards• Running locomotives ( M addresses 1 - 255, DCC 1 - 10239)• Running mfx locomotives (automatic registration)• Programming locomotives• Locomotive list for 40 active locomotives (direct selection)• Locomotive data baseover 1,000 locomotives• Keyboard (addresses 1 - 320)
The following is also required for operation:• 60113/60116 Track Box for H0/N or 60112/60114 Track Box for 1/G Gauge• A switched power pack (DC 18V / max. 36VA)or• Connections to a 60213, 60214, 60215, 60216 or 60226 Central Station• Connections to a 60125/60145 Terminal by means of a (610 479) 60124 adapter cable
B
Connections to a Track BoxPreparations
!Only one Track Box may be con-nected to a layout.
HO N 1 G
Gauge
Märklin K Track
Trix C Track
B0
B0 0
B0
Märklin C Track
60653/60657 66950/66955 (version 3.55 or higher)
DC 18V / max. 36VA
5
Locomotive control knob Reversing direction
ShiftStop
Button Functions (Menu)
Selection
Active locomotive
Back one step
Language Selection
SHIFT then additionally press
Selection: Enlish
Selection: Language
Select: Scroll
Select: Scroll
Select: Scroll
Scroll screen or selection
Confirm
Solenoid accessories
Locomotive selection +Shift (configuring locomotives
6
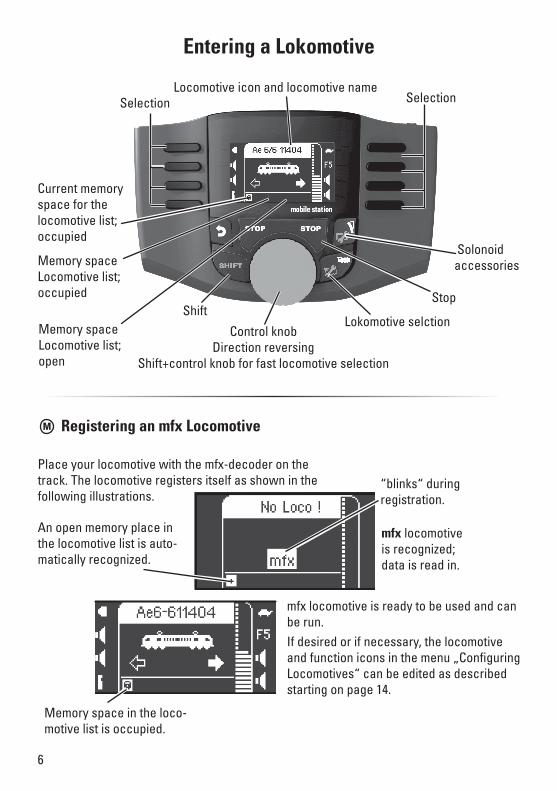
Control knob Direction reversing
Shift+control knob for fast locomotive selection
Lokomotive selction
Locomotive icon and locomotive nameSelection
ShiftStop
Selection
Entering a Lokomotive
Memory space Locomotive list; occupied
Memory space Locomotive list; open
Solonoid accessories
mfx locomotive is recognized; data is read in.
mfx locomotive is ready to be used and can be run.If desired or if necessary, the locomotive and function icons in the menu „Configuring Locomotives“ can be edited as described starting on page 14.
M Registering an mfx Locomotive
“blinks“ during registration.
Memory space in the loco-motive list is occupied.
An open memory place in the locomotive list is auto-matically recognized.
Place your locomotive with the mfx-decoder on the track. The locomotive registers itself as shown in the following illustrations.
Current memory space for the locomotive list; occupied
7
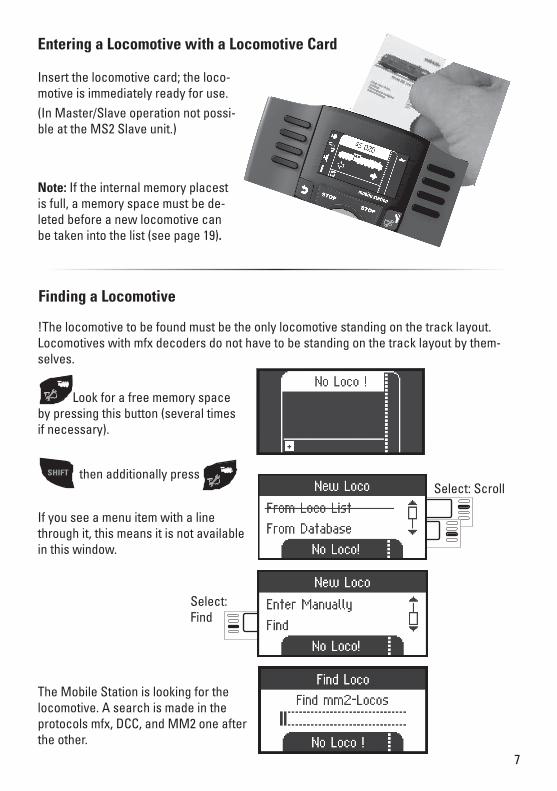
Finding a Locomotive
!The locomotive to be found must be the only locomotive standing on the track layout. Locomotives with mfx decoders do not have to be standing on the track layout by them-selves.
Select: Find
Look for a free memory space by pressing this button (several times if necessary).
Entering a Locomotive with a Locomotive Card
Insert the locomotive card; the loco-motive is immediately ready for use.(In Master/Slave operation not possi-ble at the MS2 Slave unit.)
Note: If the internal memory placest is full, a memory space must be de-leted before a new locomotive can be taken into the list (see page 19).
SHIFT then additionally press
The Mobile Station is looking for the locomotive. A search is made in the protocols mfx, DCC, and MM2 one after the other.
Select: Scroll
If you see a menu item with a line through it, this means it is not available in this window.
8
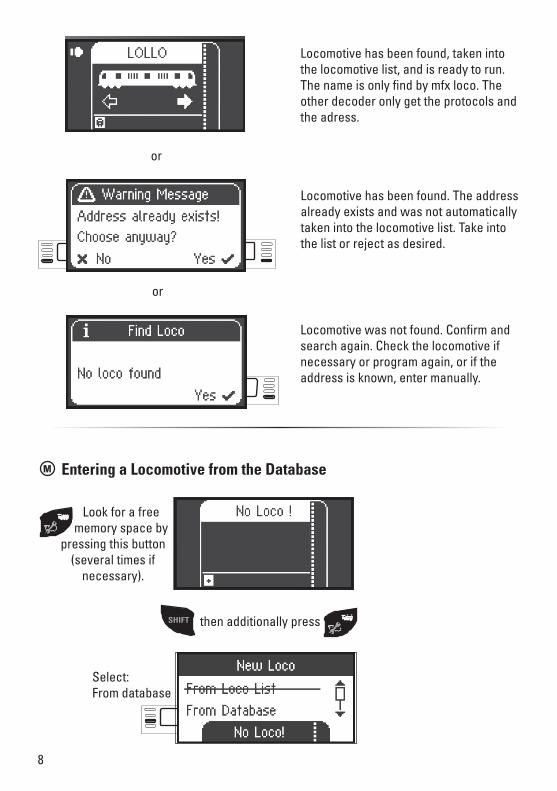
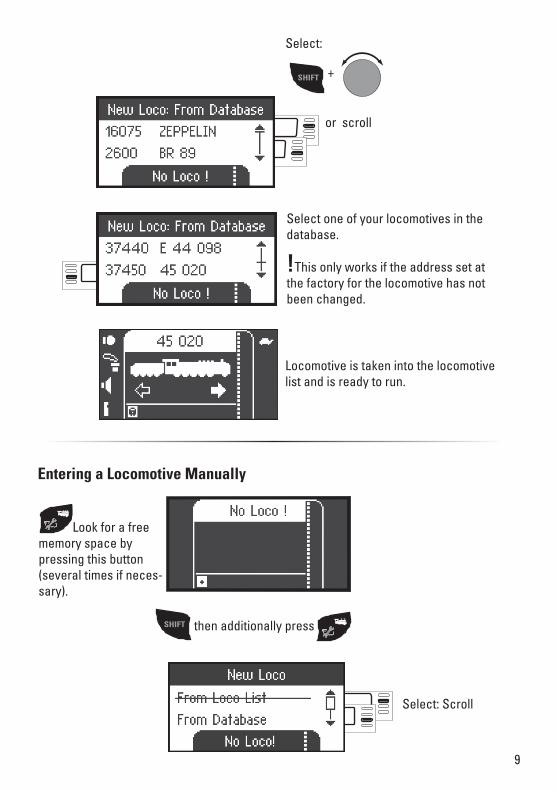
M Entering a Locomotive from the Database
Look for a free memory space by
pressing this button (several times if
necessary).
Select: From database
Locomotive has been found, taken into the locomotive list, and is ready to run. The name is only find by mfx loco. The other decoder only get the protocols and the adress.
Locomotive has been found. The address already exists and was not automatically taken into the locomotive list. Take into the list or reject as desired.
Locomotive was not found. Confirm and search again. Check the locomotive if necessary or program again, or if the address is known, enter manually.
or
or
SHIFT then additionally press
9
Select one of your locomotives in the database.
!This only works if the address set at the factory for the locomotive has not been changed.
Locomotive is taken into the locomotive list and is ready to run.
or scroll
SHIFT +
Select:
Entering a Locomotive Manually
Look for a free memory space by pressing this button (several times if neces-sary).
Select: Scroll
SHIFT then additionally press
10
Address selected
Confirm selection
SHIFT +
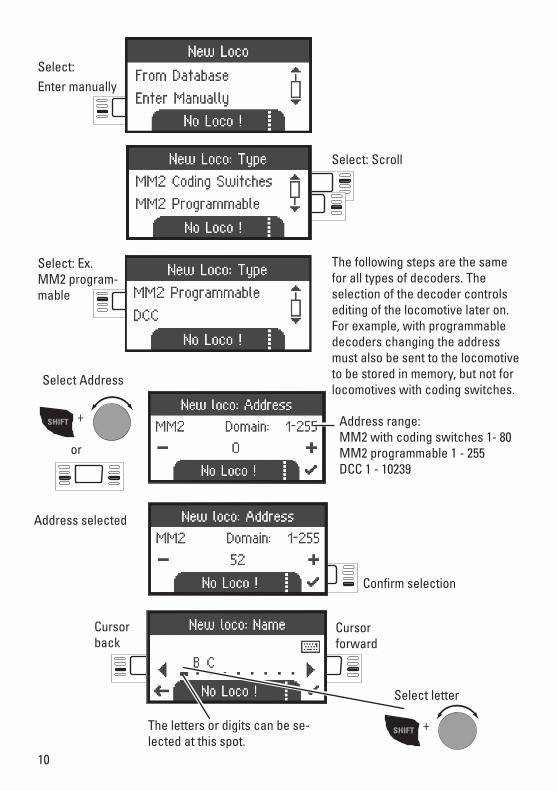
Select letter
The letters or digits can be se-lected at this spot.
Cursor back
Cursor forward
Select: Scroll
The following steps are the same for all types of decoders. The selection of the decoder controls editing of the locomotive later on. For example, with programmable decoders changing the address must also be sent to the locomotive to be stored in memory, but not for locomotives with coding switches.
Select: Enter manually
Select: Ex. MM2 program-mable
Address range:MM2 with coding switches 1- 80MM2 programmable 1 - 255DCC 1 - 10239
SHIFT +
Select Address
or
11
Select: Scroll
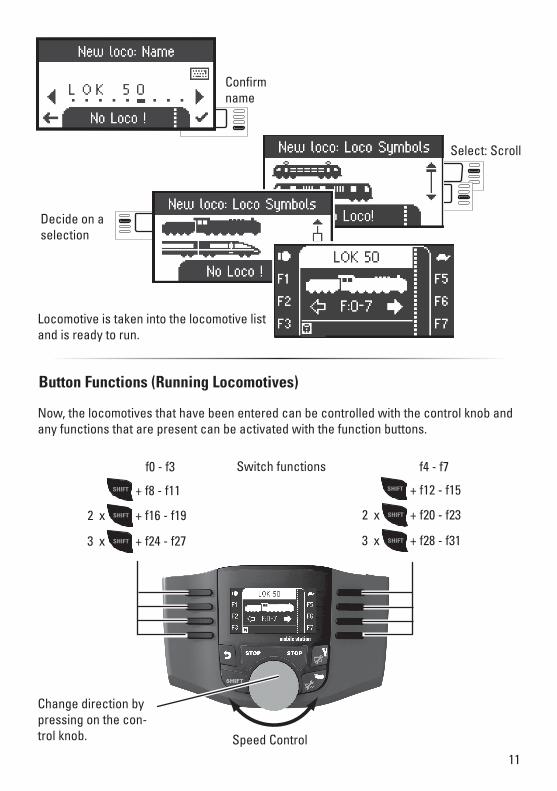
Locomotive is taken into the locomotive list and is ready to run.
Confirm name
Decide on a selection
Now, the locomotives that have been entered can be controlled with the control knob and any functions that are present can be activated with the function buttons.
Button Functions (Running Locomotives)
Speed Control
Change direction by pressing on the con-trol knob.
Switch functions f0 - f3
SHIFT + f24 - f27
2 x + f16 - f19
3 x
+ f8 - f11
SHIFT
SHIFT
f4 - f7
SHIFT + f28 - f31
2 x + f20 - f23
3 x
+ f12 - f15
SHIFT
SHIFT
12
Confirm selection: MM or DCC
Select: Scroll
Controlling accessories (Keyboard)
Select: Accessory Protocol
Solenoid Accessory Protocol
Here, you can set which data protocol is to be used for controlling solenoid accessories. Independently of the locomotive protocol. Märklin Motorola is already set as a standard protocol.
Locomotive control knob Reversing direction
Shift + control knop for fast Keyboardn selection
Locomotive control mode
Shift + Setup
Keyboard address 1 - 320Scroll addresses (–)
Shift
Stop
Scroll addresses (+)
Controlling accessories
Controlling accessories
Active locomotive
SHIFT then additionally press
The Keyboard is for switching solenoid items such as turnouts and signals. Press the following button to change to the Keyboard:
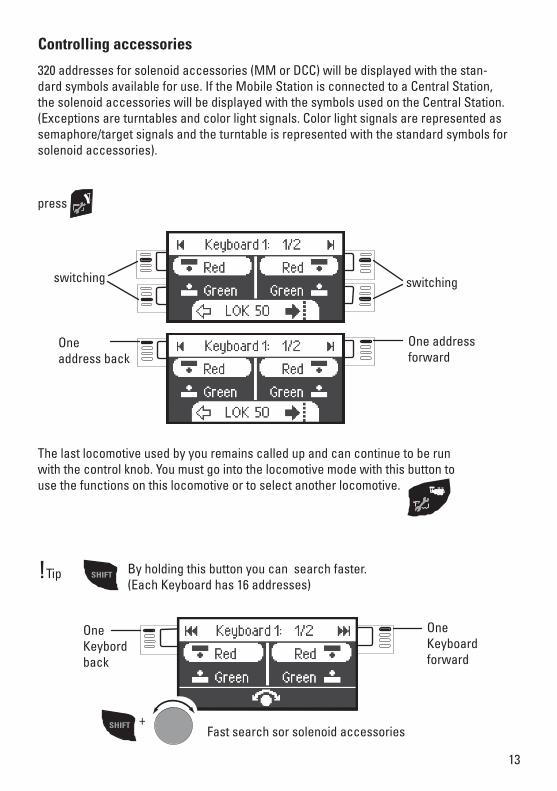
13
Controlling accessories
320 addresses for solenoid accessories (MM or DCC) will be displayed with the stan-dard symbols available for use. If the Mobile Station is connected to a Central Station, the solenoid accessories will be displayed with the symbols used on the Central Station. (Exceptions are turntables and color light signals. Color light signals are represented as semaphore/target signals and the turntable is represented with the standard symbols for solenoid accessories).
The last locomotive used by you remains called up and can continue to be run with the control knob. You must go into the locomotive mode with this button to use the functions on this locomotive or to select another locomotive.
switching switching
One address back
One address forward
press
SHIFT By holding this button you can search faster. (Each Keyboard has 16 addresses)
One Keybord back
One Keyboard forward
SHIFT +Fast search sor solenoid accessories
!Tip
14
Select: Scroll
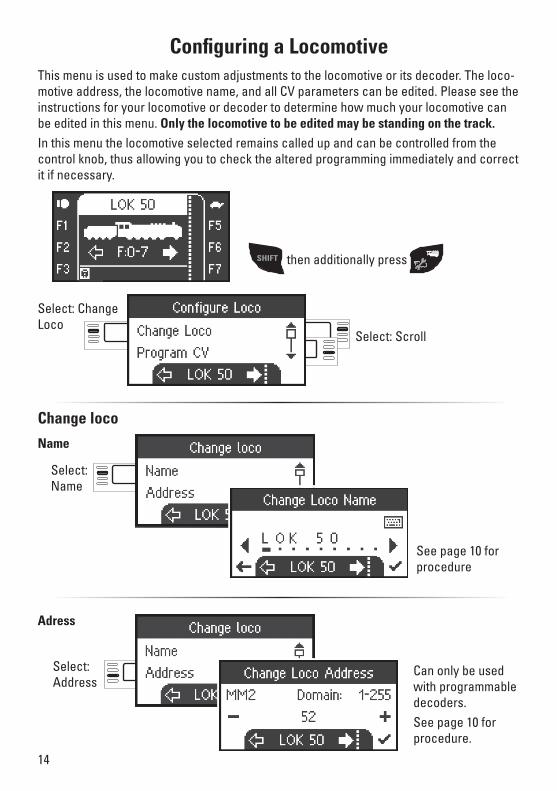
This menu is used to make custom adjustments to the locomotive or its decoder. The loco-motive address, the locomotive name, and all CV parameters can be edited. Please see the instructions for your locomotive or decoder to determine how much your locomotive can be edited in this menu. Only the locomotive to be edited may be standing on the track.In this menu the locomotive selected remains called up and can be controlled from the control knob, thus allowing you to check the altered programming immediately and correct it if necessary.
Select: Change Loco
Change loco
Select: Name
Configuring a Locomotive
See page 10 for procedure
SHIFT then additionally press
Can only be used with programmable decoders.See page 10 for procedure.
Select: Address
Name
Adress
15
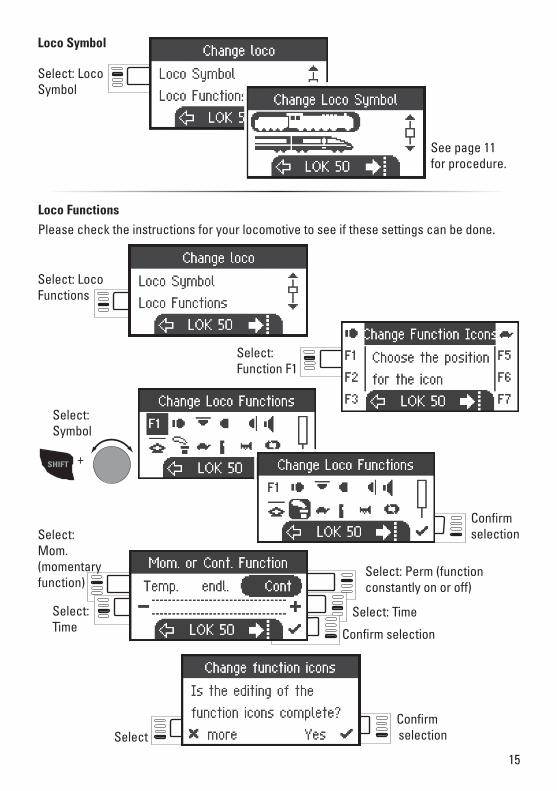
Select: Loco Symbol
See page 11 for procedure.
Select: Loco Functions
Select: Function F1
SHIFT +
Select: Symbol
Loco FunctionsPlease check the instructions for your locomotive to see if these settings can be done.
Loco Symbol
Confirm selection
Confirm selection
Select: Mom. (momentary function)
Select: Perm (function constantly on or off)
Select: Time
Select: Time
Confirm selection
Select
16
Confirm selection
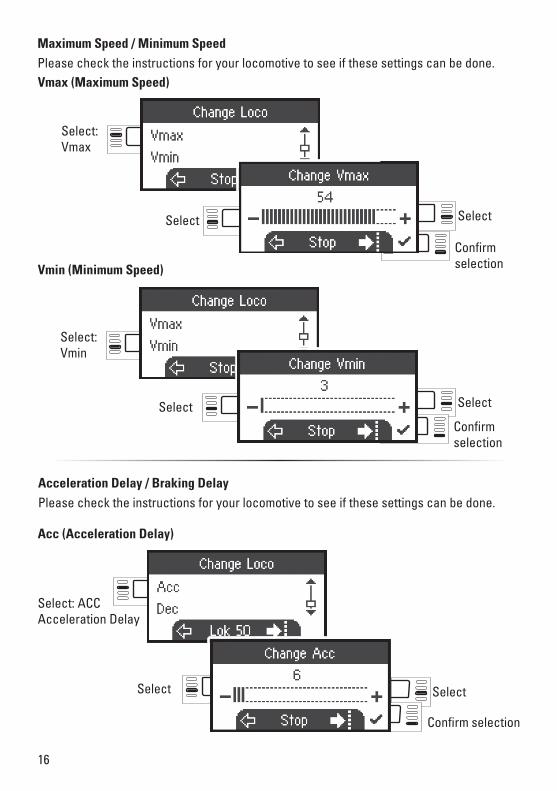
Select: Vmax
Select Select
Confirm selection
Select: Vmin
Select Select
Maximum Speed / Minimum SpeedPlease check the instructions for your locomotive to see if these settings can be done.Vmax (Maximum Speed)
Vmin (Minimum Speed)
Confirm selection
Select: ACC Acceleration Delay
Select Select
Acceleration Delay / Braking DelayPlease check the instructions for your locomotive to see if these settings can be done.
Acc (Acceleration Delay)
17
Confirm selection
Select: Dec Braking Delay
Select Select
VolumePlease check the instructions for your locomotive to see if these settings can be done..
Select: Vol
Confirm selection
Select Select
Dec (Braking Delay)
Select: Speed Levels
Select
DCC The following selection is only for locomotives with DCC decoders. Please check the instructions for your locomotive to see if these settings can be done.
Scroll to select
Speed Levels
18
Select: Write Loco Card
Select
Writing to a Locomotive CardInsert locomotive card (see page 7)
Programming a Locomotive (CV)
Confirm selection
Select Select
First, set the CV value to be edited (according to your decoder / locomotive instructions) and confirm the selection. First, the CV value being sought is read in; after that you can change the value in Step 2 and confirm. With this procedure you can change any permissi-ble CV value.
Select: Program CV
SHIFT then additionally press
Select: Scroll
SHIFT then additionally press
Confirm selection
19
Deleting a Locomotive
Select: Scroll
SHIFT then additionally press
Select: Remove Loco
SelectConfirm selection
Select:yes or no
Select: Reset loco
Reset Loco (Factory Settings)
This function triggers a reset of the locomotive decoder (see the instruc-tions of the locomotive decoder)
SHIFT then additionally press
Select: Scroll
20
Select: Scroll
Select
Reset (Factory Default Settings MS2)
Select
! Important. When you do a Reset, all of the data and settings are deleted.
Select: Factory Default Settings
Scroll for information
MS2 Information
Here, you can get information about the serial number, software version, hardware version, locomotive data status, and Can Bus status.
Menu
Select: MS2 information
SHIFT then additionally press
SHIFT then additionally press
21
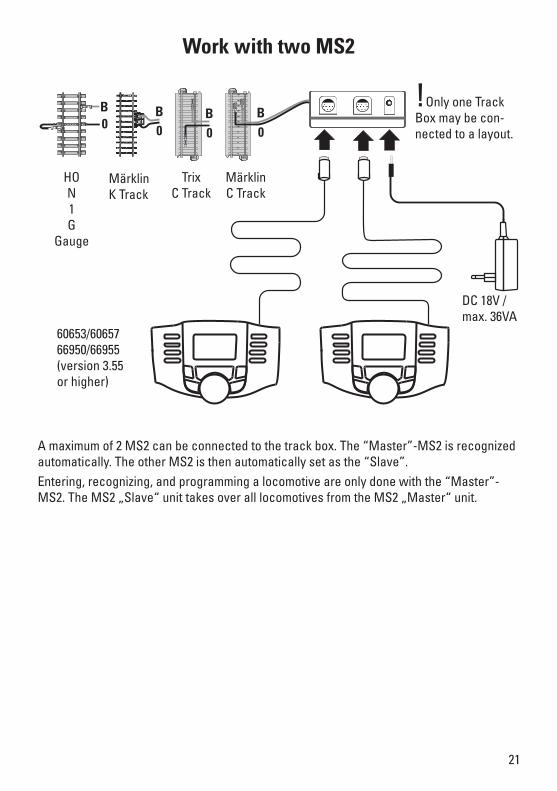
A maximum of 2 MS2 can be connected to the track box. The “Master”-MS2 is recognized automatically. The other MS2 is then automatically set as the “Slave”.Entering, recognizing, and programming a locomotive are only done with the “Master”-MS2. The MS2 „Slave“ unit takes over all locomotives from the MS2 „Master“ unit.
Work with two MS2
B!Only one Track Box may be con-nected to a layout.
HO N 1 G
Gauge
Märklin K Track
Trix C Track
B0
B0 0
B0
Märklin C Track
60653/60657 66950/66955 (version 3.55 or higher)
DC 18V / max. 36VA
22
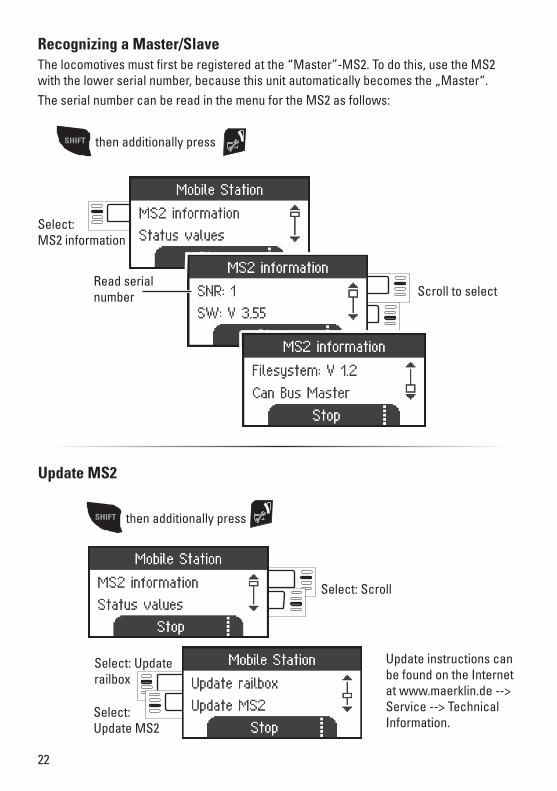
Recognizing a Master/SlaveThe locomotives must first be registered at the “Master”-MS2. To do this, use the MS2 with the lower serial number, because this unit automatically becomes the „Master“.The serial number can be read in the menu for the MS2 as follows:
SHIFT then additionally press
Select: MS2 information
Scroll to selectRead serial number
Select: Update MS2
Update MS2
Select: Scroll
SHIFT then additionally press
Select: Update railbox
Update instructions can be found on the Internet at www.maerklin.de --> Service --> Technical Information.
23
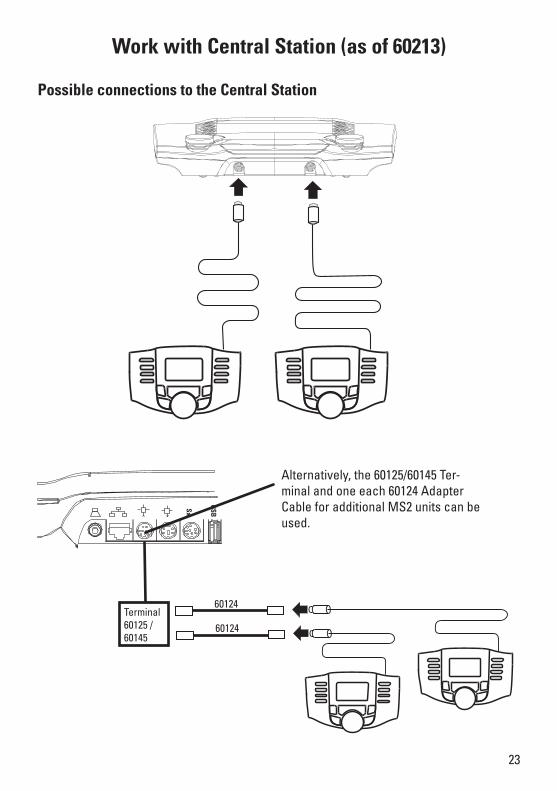
Work with Central Station (as of 60213)
Possible connections to the Central Station
Terminal 60125 / 60145
Alternatively, the 60125/60145 Ter-minal and one each 60124 Adapter Cable for additional MS2 units can be used.
BSU
xS
60124
60124
24
Scroll to select
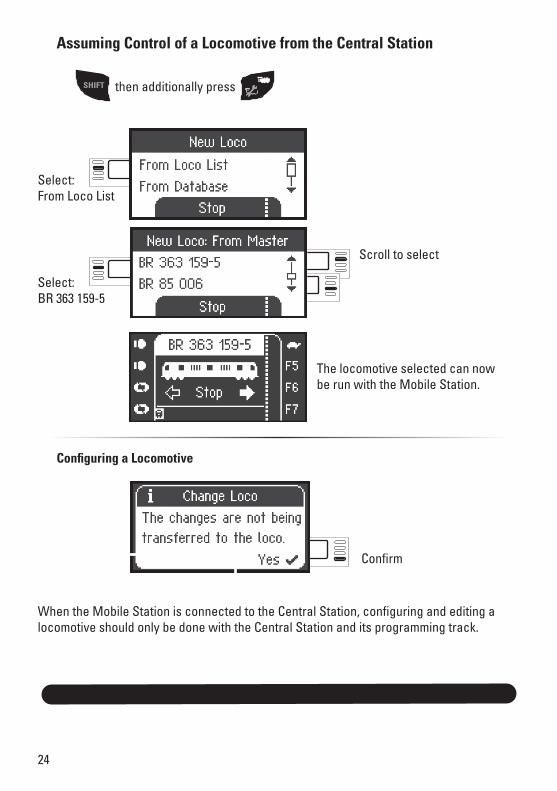
Assuming Control of a Locomotive from the Central Station
Select: From Loco List
Select: BR 363 159-5
The locomotive selected can now be run with the Mobile Station.
Configuring a Locomotive
When the Mobile Station is connected to the Central Station, configuring and editing a locomotive should only be done with the Central Station and its programming track.
Confirm
SHIFT then additionally press

FrançaisNederlands
Manuel d‘instruction Mobile Station 2 (version 3.55 ou supérieure)60653 / 60657 / 66950 / 66955
2
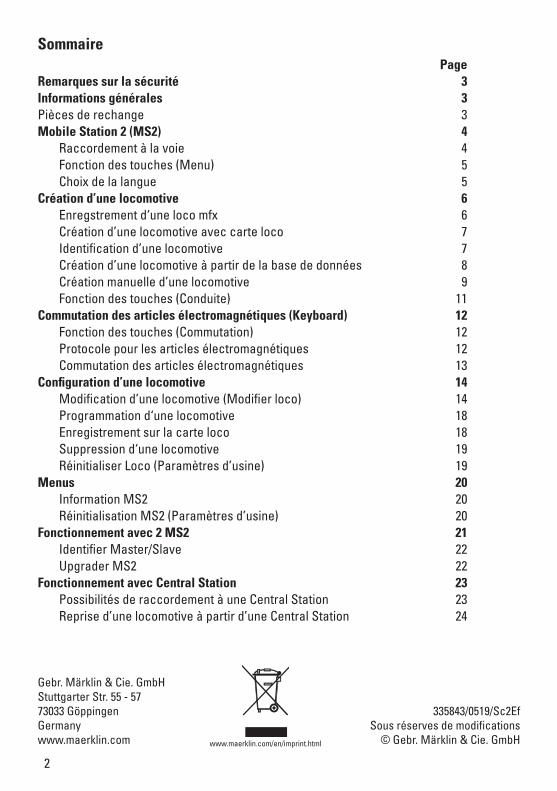
Sommaire PageRemarques sur la sécurité 3Informations générales 3 Pièces de rechange 3Mobile Station 2 (MS2) 4 Raccordement à la voie 4 Fonction des touches (Menu) 5 Choix de la langue 5Création d’une locomotive 6 Enregstrement d‘une loco mfx 6 Création d’une locomotive avec carte loco 7 Identification d’une locomotive 7 Création d’une locomotive à partir de la base de données 8 Création manuelle d’une locomotive 9 Fonction des touches (Conduite) 11Commutation des articles électromagnétiques (Keyboard) 12 Fonction des touches (Commutation) 12 Protocole pour les articles électromagnétiques 12 Commutation des articles électromagnétiques 13Configuration d’une locomotive 14 Modification d’une locomotive (Modifier loco) 14 Programmation d‘une locomotive 18 Enregistrement sur la carte loco 18 Suppression d‘une locomotive 19 Réinitialiser Loco (Paramètres d’usine) 19Menus 20 Information MS2 20 Réinitialisation MS2 (Paramètres d’usine) 20 Fonctionnement avec 2 MS2 21 Identifier Master/Slave 22 Upgrader MS2 22Fonctionnement avec Central Station 23 Possibilités de raccordement à une Central Station 23 Reprise d’une locomotive à partir d’une Central Station 24
335843/0519/Sc2EfSous réserves de modifications
© Gebr. Märklin & Cie. GmbH
Gebr. Märklin & Cie. GmbH Stuttgarter Str. 55 - 5773033 GöppingenGermanywww.maerklin.com www.maerklin.com/en/imprint.html
3
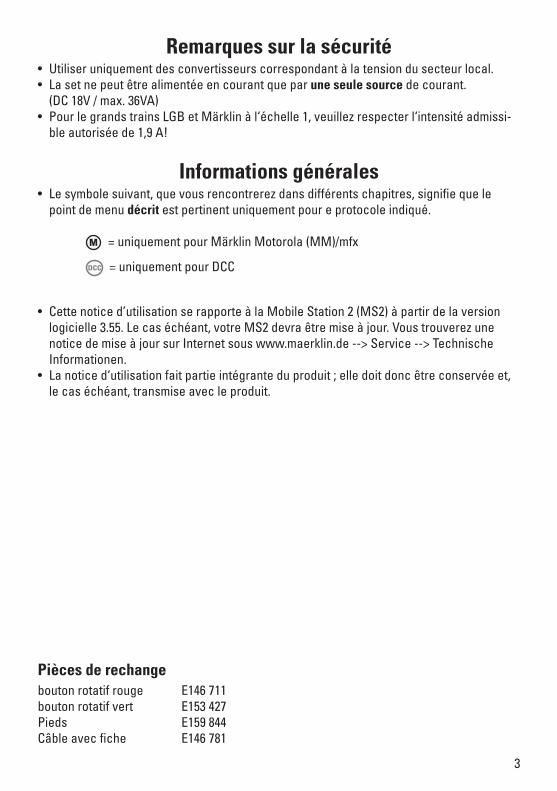
Remarques sur la sécurité• Utiliser uniquement des convertisseurs correspondant à la tension du secteur local.• La set ne peut être alimentée en courant que par une seule source de courant.
(DC 18V / max. 36VA)• Pour le grands trains LGB et Märklin à l‘échelle 1, veuillez respecter l‘intensité admissi-
ble autorisée de 1,9 A!
Informations générales• Le symbole suivant, que vous rencontrerez dans différents chapitres, signifie que le
point de menu décrit est pertinent uniquement pour e protocole indiqué.
M = uniquement pour Märklin Motorola (MM)/mfx
DCC = uniquement pour DCC
• Cette notice d’utilisation se rapporte à la Mobile Station 2 (MS2) à partir de la version logicielle 3.55. Le cas échéant, votre MS2 devra être mise à jour. Vous trouverez une notice de mise à jour sur Internet sous www.maerklin.de --> Service --> Technische Informationen.
• La notice d‘utilisation fait partie intégrante du produit ; elle doit donc être conservée et, le cas échéant, transmise avec le produit.
Pièces de rechangebouton rotatif rouge E146 711bouton rotatif vert E153 427Pieds E159 844Câble avec fiche E146 781
4
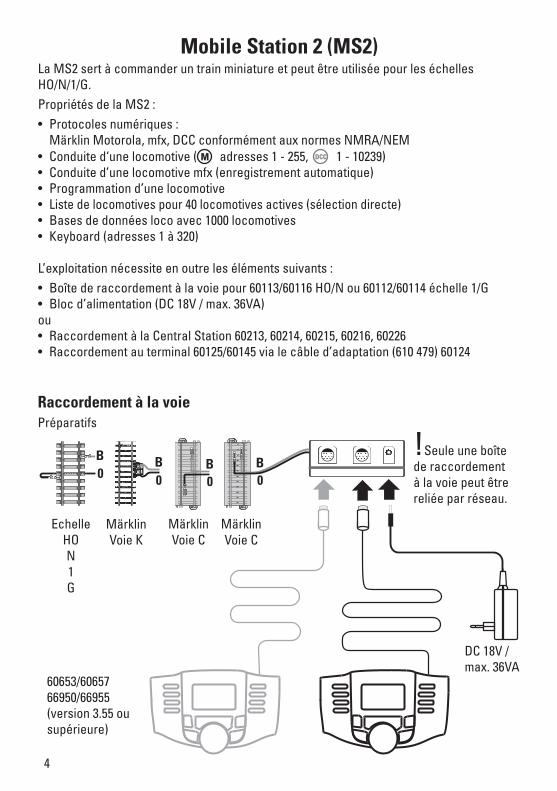
Mobile Station 2 (MS2)La MS2 sert à commander un train miniature et peut être utilisée pour les échelles HO/N/1/G.Propriétés de la MS2 : • Protocoles numériques :
Märklin Motorola, mfx, DCC conformément aux normes NMRA/NEM• Conduite d‘une locomotive ( M adresses 1 - 255, DCC 1 - 10239)• Conduite d’une locomotive mfx (enregistrement automatique) • Programmation d’une locomotive• Liste de locomotives pour 40 locomotives actives (sélection directe)• Bases de données loco avec 1000 locomotives• Keyboard (adresses 1 à 320)
L’exploitation nécessite en outre les éléments suivants :• Boîte de raccordement à la voie pour 60113/60116 HO/N ou 60112/60114 échelle 1/G• Bloc d’alimentation (DC 18V / max. 36VA)ou• Raccordement à la Central Station 60213, 60214, 60215, 60216, 60226• Raccordement au terminal 60125/60145 via le câble d’adaptation (610 479) 60124
B
Raccordement à la voiePréparatifs
!Seule une boîte de raccordement à la voie peut être reliée par réseau.
Echelle HO N 1 G
Märklin Voie K
Märklin Voie C
B0
B0 0
Märklin Voie C
B0
60653/60657 66950/66955 (version 3.55 ou supérieure)
DC 18V / max. 36VA
5
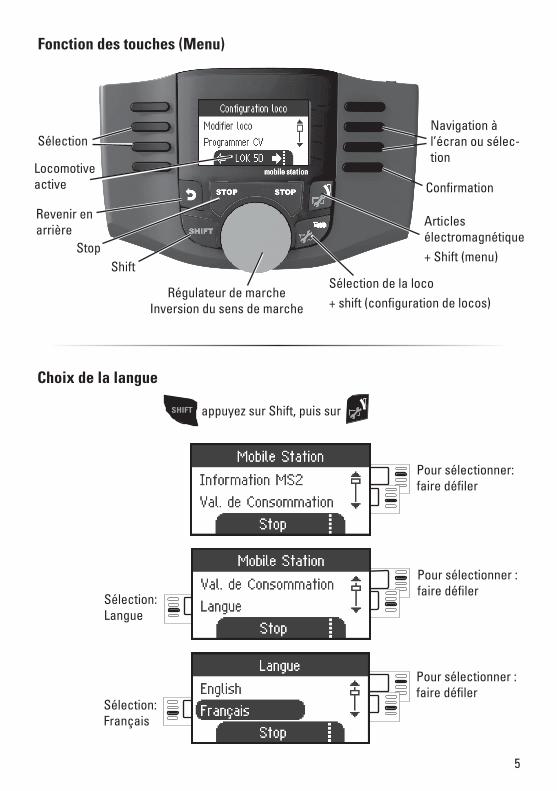
Sélection: Français
Régulateur de marche Inversion du sens de marche
Sélection de la loco+ shift (configuration de locos)
Articles électromagnétique+ Shift (menu)
ShiftStop
SélectionNavigation à l’écran ou sélec-tion
Locomotive active Confirmation
Revenir en arrière
Choix de la langue
SHIFT appuyez sur Shift, puis sur
Pour sélectionner : faire défiler
Sélection: Langue
Pour sélectionner: faire défiler
Fonction des touches (Menu)
Pour sélectionner : faire défiler
6
Régulateur de marche Inversion du sens de marche
Sélection rapide de la loco : Shift+régulateur de marche
Sélection de la locomotive
Articles électromagné-
tiques
Symbole et nom de la locoSélection
Shift
Stop
Création d’une locomotive
Espace mémoire Liste locos ; occupé
Espace mémoire Liste locos ; libre
Sélection
Reconnaissance de la loco mfx, les don-nées sont chargées.
La locomotive mfx est prête à partir et peut déjà être sélectionnée.Si vous le souhaitez ou si nécessaire, les symboles de la locomotive et des fonctions peuvent être modifiés dans le menu «Con-figuration de locomotives» tel que décrit à partir de la p. 14 .
M Enregstrement d‘une loco mfx
«clignote» durant l’enregistrement.
Espace mémoire dans la liste des locomotives occupé.
Espace mémoire libre dans la liste des locomotives.
Placez votre locomotive avec decodeur mfx sur la voie. La loco s´enregistre conformément aux illustrations suivantes.
Mémoire actuelle liste locos ; occupée
7
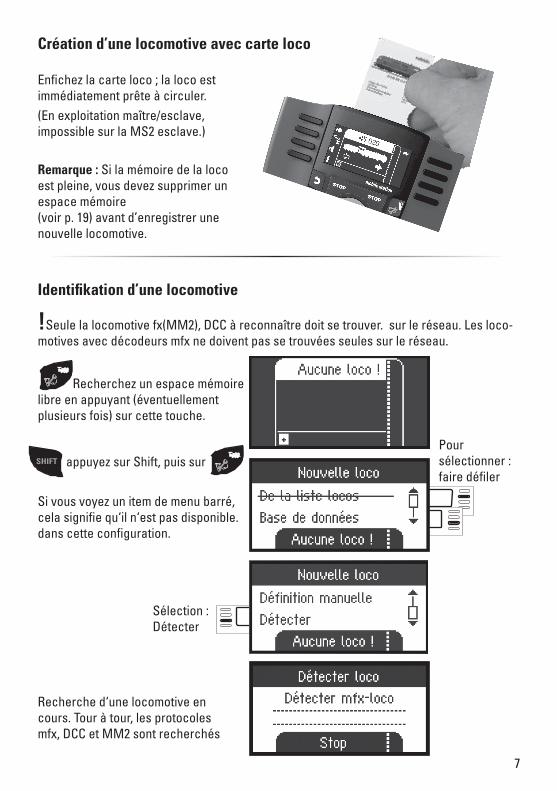
Identifikation d’une locomotive
Recherche d‘une locomotive en cours. Tour à tour, les protocoles mfx, DCC et MM2 sont recherchés
!Seule la locomotive fx(MM2), DCC à reconnaître doit se trouver. sur le réseau. Les loco-motives avec décodeurs mfx ne doivent pas se trouvées seules sur le réseau.
Sélection : Détecter
Recherchez un espace mémoire libre en appuyant (éventuellement plusieurs fois) sur cette touche.
Création d’une locomotive avec carte loco
Enfichez la carte loco ; la loco est immédiatement prête à circuler.(En exploitation maître/esclave, impossible sur la MS2 esclave.)
Remarque : Si la mémoire de la loco est pleine, vous devez supprimer un espace mémoire (voir p. 19) avant d’enregistrer une nouvelle locomotive.
SHIFT appuyez sur Shift, puis surPour sélectionner : faire défiler
Si vous voyez un item de menu barré, cela signifie qu‘il n‘est pas disponible. dans cette configuration.
8
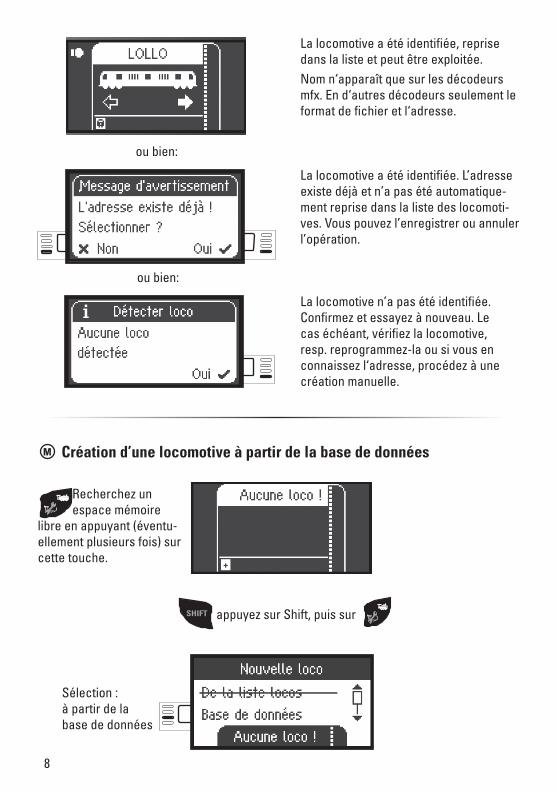
M Création d’une locomotive à partir de la base de données
Recherchez un espace mémoire
libre en appuyant (éventu-ellement plusieurs fois) sur cette touche.
Sélection : à partir de la base de données
La locomotive a été identifiée, reprise dans la liste et peut être exploitée. Nom n‘apparaît que sur les décodeurs mfx. En d‘autres décodeurs seulement le format de fichier et l‘adresse.
La locomotive a été identifiée. L’adresse existe déjà et n’a pas été automatique-ment reprise dans la liste des locomoti-ves. Vous pouvez l’enregistrer ou annuler l’opération.
La locomotive n’a pas été identifiée. Confirmez et essayez à nouveau. Le cas échéant, vérifiez la locomotive, resp. reprogrammez-la ou si vous en connaissez l‘adresse, procédez à une création manuelle.
ou bien:
ou bien:
SHIFT appuyez sur Shift, puis sur
9
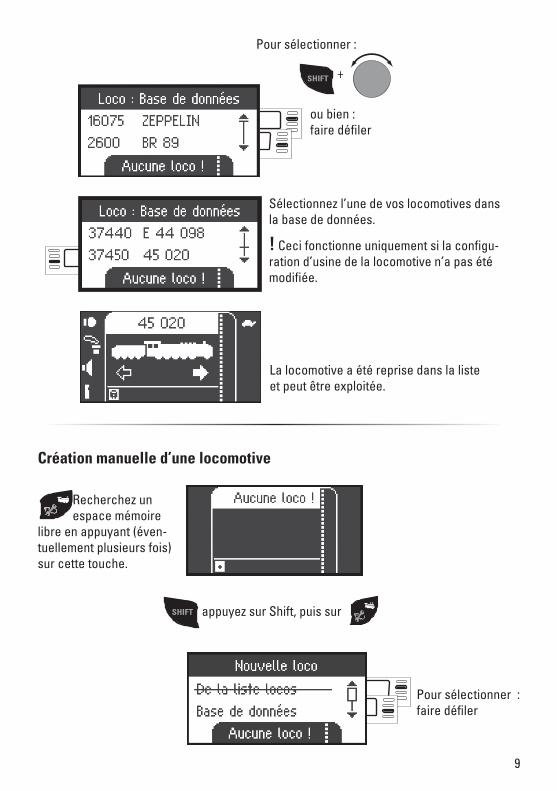
Sélectionnez l’une de vos locomotives dans la base de données.
! Ceci fonctionne uniquement si la configu-ration d’usine de la locomotive n’a pas été modifiée.
La locomotive a été reprise dans la liste et peut être exploitée.
ou bien : faire défiler
SHIFT +
Pour sélectionner :
Création manuelle d’une locomotive
Pour sélectionner : faire défiler
SHIFT
Recherchez un espace mémoire
libre en appuyant (éven-tuellement plusieurs fois) sur cette touche.
appuyez sur Shift, puis sur
10
Adresse sélectionnée
Confirmez la sélection
SHIFT
+
Sélectionnez des lettres
A cet endroit, vous pouvez sélec-tionner des lettres ou des chiffres.
Curseur : En arrière
Curseur : En avant
Pour sélectionner : faire défiler
Les étapes suivantes sont les mêmes pour tous les types décodeur. La sé-lection du décodeur est déterminante pour le traitement ultérieur de la loco. Pour les décodeurs programmables par ex., la modification de l‘adresse doit également être transmise à la loco pour enregistrement, ce qui n‘est pas le cas pour des locomotives avec interrupteur de codage.
Sélection : Définition manuelle
Sélection : par ex. MM2
Catégorie d’adresse :Interrupteur de codage MM2 1 à 80MM2 programmable 1 à 255DCC 1 à 10239
SHIFT +
Sélectionnez l’adresse
ou bien
11
Pour sélec-tionner : faire défiler
La locomotive a été reprise dans la liste et peut être exploitée.
Confirmez le nom
Pointez la sélection
Les locomotives créées peuvent désormais être commandées à partir du régulateur de marche et les fonctions disponibles peuvent être activées via les touches correspon-dantes.
Fonction des touches (Conduite)
Régulation de vitesse
Pour inverser le sens de marche, appuyez sur le régulateur de marche.
f0 - f3
SHIFT + f24 - f27
2 x + f16 - f19
3 x
+ f8 - f11
SHIFT
SHIFT
f4 - f7
SHIFT + f28 - f31
2 x + f20 - f23
3 x
+ f12 - f15
SHIFT
SHIFT
Commutation des fonctions
12
Commutation des articles électromagnétiques (Keyboard)
Sélection : Protocole d‘accessoire
Protocole pour les articles électromagnétiquesVous pouvez ici définir le protocole de données devant être utilisé pour la commutation des articles électromagnétiques. Indépendamment du protocole de la loco. Märklin-Moto-rola est le protocole paramétré par défaut.
Régulateur de marche Inversion du sens de marche
Shift+régulateur de marche Sélection rapide du Keyboard
Mode conduite
Shift + Setup
Adresse Keyboard 1 à 320Adresse Consulter (–)
Shift
Stop
Adresse Consulter (+)
Commutation des articles électromagné-tiques
Commutation des articles électro-magnétiques
Locomotive active
SHIFT appuyez sur Shift, puis surPour sélectionner : faire défiler
Sélection : MM ou DCC
Le Keyboard sert à la commutation d’articles électro-magnétiques tels qu’aiguilles et signaux. Pour accéder au keyboard, appuyez sur la touche suivante :

13
Commutation des articles électromagnétiquesLes 320 adresses (MM ou DCC) pour articles électromagnétiques disponibles s‘affichent alors avec les symboles standard.Si la Mobile Station est reliée à une Central Station, les articles électromagnétiques sont affichés avec les symboles utilisés sur cette dernière (exceptés les plaques tournantes et les signaux lumineux. Les signaux lumineux sont représentés sous forme de signaux mécaniques et les plaques tournantes par les symboles standard pour articles électroma-gnétiques).
La dernière locomotive que vous avez utilisée est conservée et vous pouvez donc en poursuivre l’exploitation avec le régulateur de marche. Pour activer les fonctions de cette locomotive ou sélectionner une autre locomotive, passez en mode loco en appuyant sur cette touche.
SHIFTCe bouton vous permet une recherche plus rapide. (chaque Keyboard comprend 16 adresses)
Commutation Commutation
1 Adresse En arrière
1 Adresse En avant
1 Keybord En arrière
1 Keyboard En avant
SHIFT +Sélection rapide d‘un article èlectromagnétique.
!Astuce
appuyez
14
Pour sélectionner : faire défiler
Ce menu sert à personnaliser la configuration de la locomotive, resp. du décodeur. Vous pouvez en effet modifier l‘adresse ou le nom de la loco ainsi que tous les paramètres CV. Pour connaître l’étendue des modifications possibles dans ce menu, reportez-vous à la notice d’utilisation de votre loco ou de votre décodeur. Seule la locomotive à traiter doit se trouver sur la voie.Dans ce menu, la locomotive sélectionnée reste exploitable via le régulateur de marche ; vous pouvez donc immédiatement vérifier la modification de votre programmation et, le cas échéant, procéder à des rectifications.
Sélection : Modifier loco
Modification d’une locomotive (Modifier loco)
Sélection : Nom
Applicable unique-ment pour des décodeurs program-mables. Procédure : voir page 10
Sélection : Adresse
Configuration d’une locomotive
Procédure : voir page 10
SHIFT appuyez sur Shift, puis sur
Nom
Adresse
15
Confirmez la sélection
Confirmez la sélection
Sélection : symbole loco
Procédure : voir page 11
Sélection : Fonctions loco
Sélection : fonction F1
SHIFT +
Sélection : symbole
Sélection : momentanée Sélection : permanente
Sélection : durée
Sélection : durée
Confirmez la sélection
Fonctions locoVeuillez vérifier dans la notice d’utilisation de votre loco si ce paramétrage est possible.
Symbole loco
Sélection
16
Confirmez la sélection
Sélection : Vmax
Sélection Sélection
Confirmez la sélection
Sélection : Vmin
SélectionSélection
Confirmez la sélection
Sélection : ACC Temporisation d’accélération
Sélection Sélection
Temporisation d’accélération et de freinageVeuillez vérifier dans la notice d’utilisation de votre loco si ce paramétrage est possible.
Vitesse maximale/Vitesse minimaleVeuillez vérifier dans la notice d’utilisation de votre loco si ce paramétrage est possible.
Vmax (Vitesse maximale)
Vmin (Vitesse minimale)
Acc (Temporisation d’accélération)
17
Confirmez la sélection
Sélection : Dec Temporisation de freinage
Sélection Sélection
VolumeVeuillez vérifier dans la notice d’utilisation de votre loco si ce paramétrage est possible.
Sélection : Vol
Confirmez la sélection
SélectionSélection
Sélection : crans de marche
Sélection
La sélection suivante est possible uniquement pour les locomotives dotées d’un décodeur DCC
Veuillez vérifier dans la notice d’utilisation de votre loco si ce paramétrage est possible.
DCC
Pour sélectionner : faire défiler
Dec (Temporisation de freinage)
Crans de marche
18
Confirmez la sélection
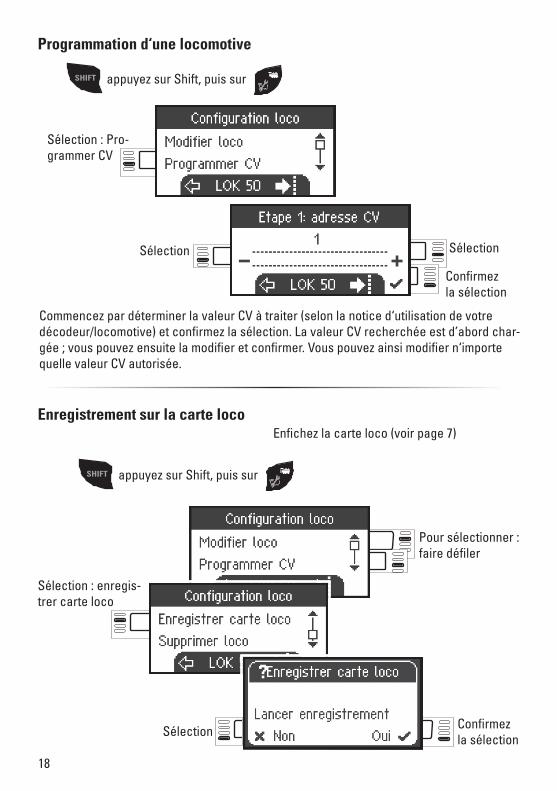
Programmation d‘une locomotive
Confirmez la sélection
Sélection : Pro-grammer CV
Sélection Sélection
Commencez par déterminer la valeur CV à traiter (selon la notice d‘utilisation de votre décodeur/locomotive) et confirmez la sélection. La valeur CV recherchée est d’abord char-gée ; vous pouvez ensuite la modifier et confirmer. Vous pouvez ainsi modifier n‘importe quelle valeur CV autorisée.
Sélection : enregis-trer carte loco
Sélection
Enregistrement sur la carte loco Enfichez la carte loco (voir page 7)
SHIFT appuyez sur Shift, puis sur
Pour sélectionner : faire défiler
SHIFT appuyez sur Shift, puis sur
19
Sélection: Non ou Oui
Sélection : Réinitialiser Loco
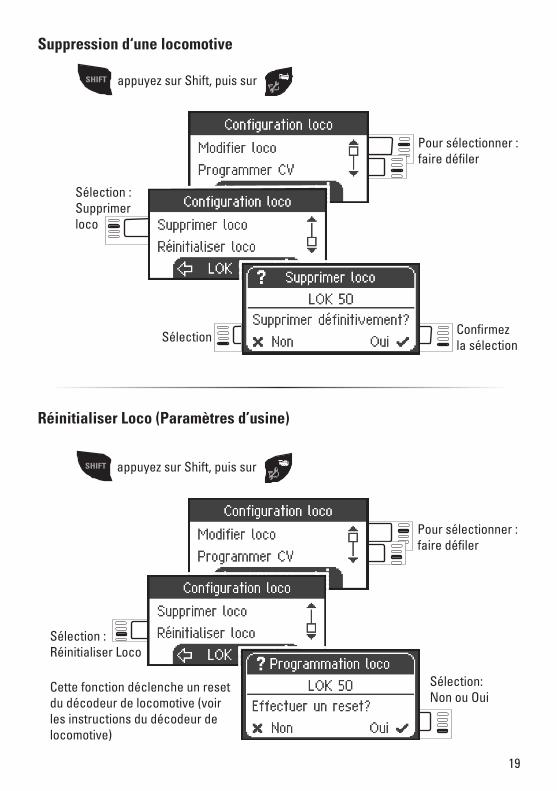
Réinitialiser Loco (Paramètres d’usine)
Cette fonction déclenche un reset du décodeur de locomotive (voir les instructions du décodeur de locomotive)
Suppression d‘une locomotive
Confirmez la sélection
Sélection : Supprimer loco
Sélection
Pour sélectionner : faire défiler
SHIFT appuyez sur Shift, puis sur
Pour sélectionner : faire défiler
SHIFT appuyez sur Shift, puis sur
20
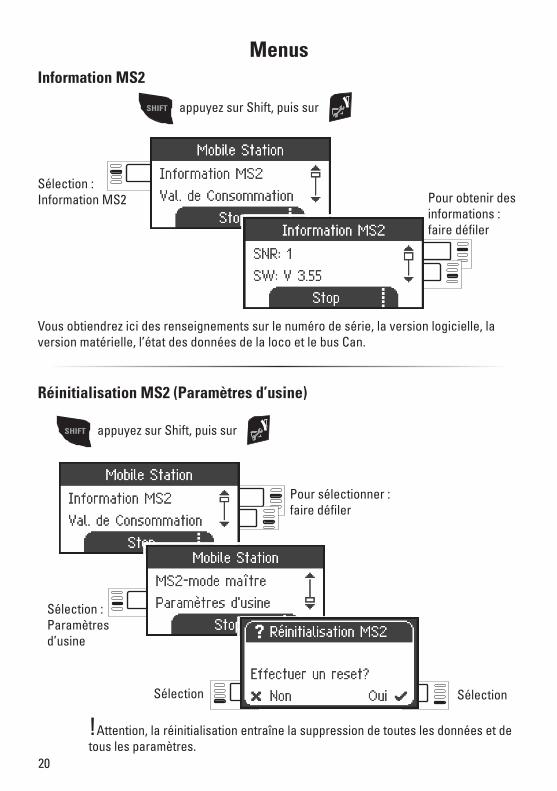
Pour sélectionner : faire défiler
Pour obtenir des informations : faire défiler
Sélection : Information MS2
Information MS2
Vous obtiendrez ici des renseignements sur le numéro de série, la version logicielle, la version matérielle, l’état des données de la loco et le bus Can.
Réinitialisation MS2 (Paramètres d’usine)
Sélection : Paramètres d’usine
Sélection Sélection
!Attention, la réinitialisation entraîne la suppression de toutes les données et de tous les paramètres.
Menus
SHIFT appuyez sur Shift, puis sur
SHIFT appuyez sur Shift, puis sur
21
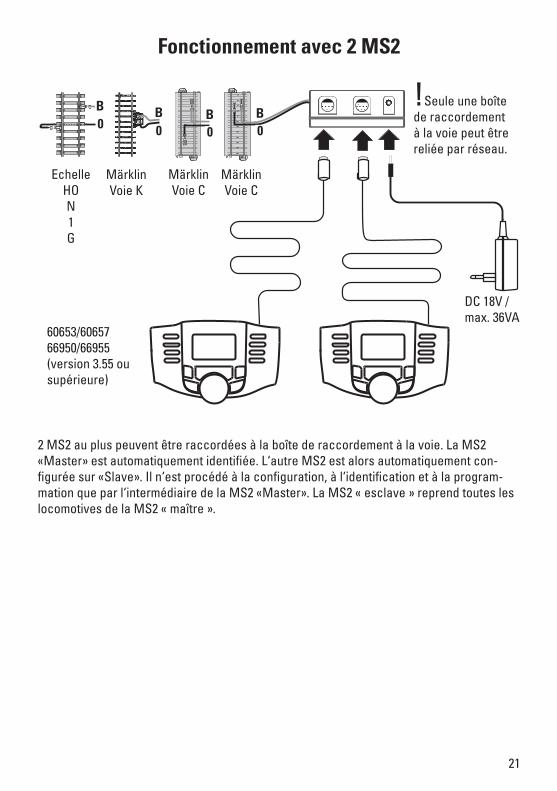
Fonctionnement avec 2 MS2
2 MS2 au plus peuvent être raccordées à la boîte de raccordement à la voie. La MS2 «Master» est automatiquement identifiée. L‘autre MS2 est alors automatiquement con-figurée sur «Slave». Il n‘est procédé à la configuration, à l‘identification et à la program-mation que par l‘intermédiaire de la MS2 «Master». La MS2 « esclave » reprend toutes les locomotives de la MS2 « maître ».
B!Seule une boîte de raccordement à la voie peut être reliée par réseau.
Echelle HO N 1 G
Märklin Voie K
Märklin Voie C
B0
B0 0
Märklin Voie C
B0
60653/60657 66950/66955 (version 3.55 ou supérieure)
DC 18V / max. 36VA
22
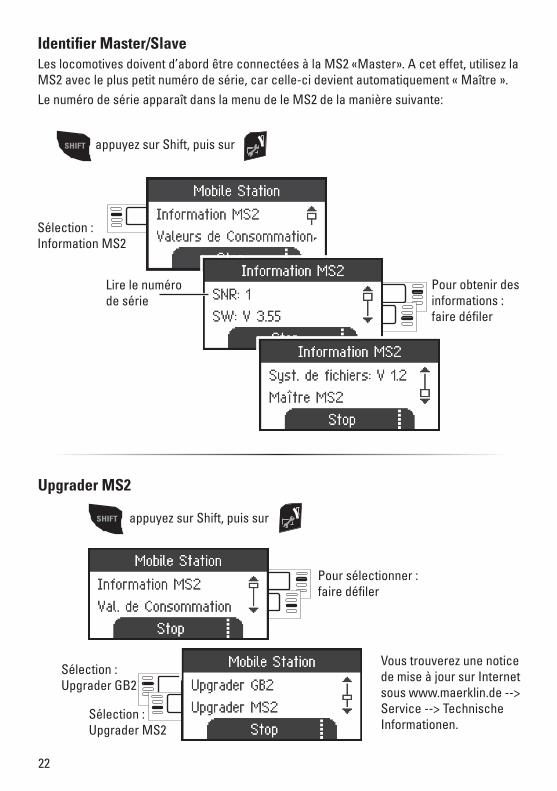
Pour obtenir des informations : faire défiler
Identifier Master/SlaveLes locomotives doivent d’abord être connectées à la MS2 «Master». A cet effet, utilisez la MS2 avec le plus petit numéro de série, car celle-ci devient automatiquement « Maître ».Le numéro de série apparaît dans la menu de le MS2 de la manière suivante:
SHIFT appuyez sur Shift, puis sur
Sélection : Information MS2
Lire le numéro de série
Sélection : Upgrader MS2
Upgrader MS2
Pour sélectionner : faire défiler
SHIFT appuyez sur Shift, puis sur
Sélection : Upgrader GB2
Vous trouverez une notice de mise à jour sur Internet sous www.maerklin.de --> Service --> Technische Informationen.
23
Fonctionnement avec Central Station (la 60213)
Possibilités de raccordement à une Central Station
Terminal 60125 / 60145
Vous pouvez également utiliser le terminal réf. 60125/60145 et respec-tivement un câble d’adaptation réf. 60124 pour d’autres MS2.
BSU
xS
60124
60124
24
Pour sélectionner : faire défiler
Reprise d’une locomotive à partir d’une Central Station
Sélection : De la liste locos
Sélection : BR 363 159-5
La locomotive sélectionnée peut être commandée uniquement à partir de la Mobile Station.
Configuration d’une locomotive
Si la Mobile Station est reliée à la Central Station, configuration et traitement de la loco doivent se faire uniquement à partir de la Central Station et de la voie de programmation correspondante.
SHIFT
Sélection
appuyez sur Shift, puis sur

NederlandsFrançais
Handleiding Mobile Station 2 (versie 3.55 of hoger) 60653 / 60657 / 66950 / 66955
2
Inhoudsopgave PaginaVeiligheidsvoorschriften 3Algemene informatie 3Onderdelen 3Mobile Station 2 (MS2) 4 Aansluiten met de railbox 4 Toetsfuncties (Menu) 5 Taalkeuze 5Loc invoeren 6 mfx-loc aanmelden 6 Loc met lockaart invoeren 7 Loc herkennen 7 Loc invoeren uit de databank 8 Loc handmatig invoeren 9 Toetsfuncties (Rijden) 11Magneetartikel schakelen (Keyboard) 12 Toetsfuncties (Schakelen) 12 Magneetartikel protocol 12 Magneetartikel schakelen 13Loc configureren 14 Loc wijzigen 14 Loc programmeren 18 Lockaart beschrijven 18 Loc wissen 19 Loc resetten (Fabrieksinstellingen) 19 Menu 20 MS2 Informatie 20 Reset (Fabrieksinstelling MS2) 20Bediening met twee MS2 21 Master/Slave herkennen 22 Updaten MS2 22Bediening met Central Station 23 Aansluitmogelijkheden aan het Central Station 23 Locomotieven overnemen van het Central Station 24
335843/0519/Sc2EfWijzigingen voorbehouden
© Gebr. Märklin & Cie. GmbH
Gebr. Märklin & Cie. GmbH Stuttgarter Str. 55 - 5773033 GöppingenGermanywww.maerklin.com www.maerklin.com/en/imprint.html
3
Veiligheidsvoorschriften• Alleen net-adapters gebruiken waarvan de aangegeven netspanning overeenkomt met
de netspanning ter plaatse.• De set mag niet vanuit meer dan één stroomvoorziening gelijktijdig gevoed worden.
(DC 18V / max. 36VA)• Let bij grote modelbanen van LGB en Märklin spoor 1 op de toegelaten stroombelast-
baarheid van 1,9A.
Algemene informatie• Als u de onderstaande markering in de verschillende hoofdstukken aantreft, is het be-
schreven menupunt alleen van toepassing voor dat digitaalprotocol.
M = alleen voor Märklin Motorola (MM)/mfx
DCC = alleen voor DCC
• Deze handleiding heeft betrekking op de Mobile Station 2 (MS2) vanaf versie 3.55. Even-tueel moet uw MS2 worden geüpdatet. Een updatehandleiding vindt u op www.maerklin.de --> Service --> Technische Informationen.
• De gebruiksaanwijzing is een essentieel onderdeel van het product en dient daarom bewaard te worden en bij het overdragen van het product meegegeven te worden.
OnderdelenDraaiknop rood E146 711Draaiknop groen E153 427Voeten E159 844Kabel met stekker E146 781
4
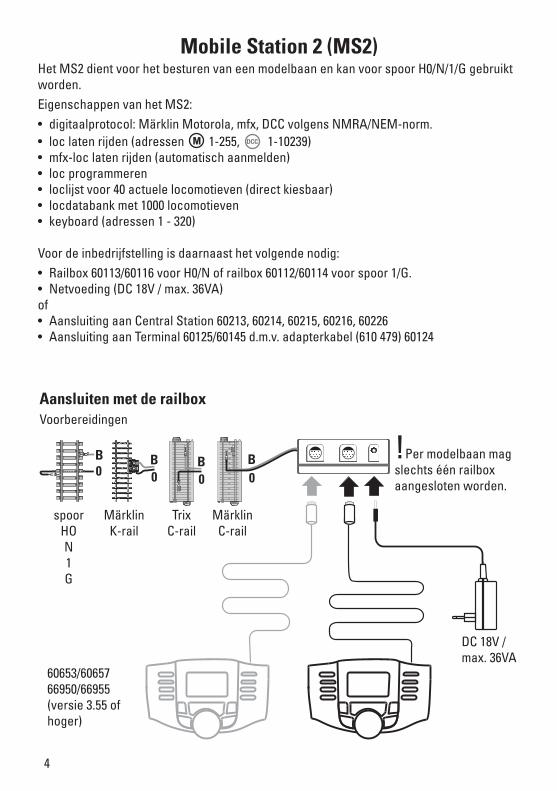
Mobile Station 2 (MS2)Het MS2 dient voor het besturen van een modelbaan en kan voor spoor H0/N/1/G gebruikt worden.Eigenschappen van het MS2:• digitaalprotocol: Märklin Motorola, mfx, DCC volgens NMRA/NEM-norm.• loc laten rijden (adressen M 1-255, DCC 1-10239)• mfx-loc laten rijden (automatisch aanmelden)• loc programmeren• loclijst voor 40 actuele locomotieven (direct kiesbaar)• locdatabank met 1000 locomotieven• keyboard (adressen 1 - 320)
Voor de inbedrijfstelling is daarnaast het volgende nodig:• Railbox 60113/60116 voor H0/N of railbox 60112/60114 voor spoor 1/G.• Netvoeding (DC 18V / max. 36VA)of• Aansluiting aan Central Station 60213, 60214, 60215, 60216, 60226• Aansluiting aan Terminal 60125/60145 d.m.v. adapterkabel (610 479) 60124
B
Aansluiten met de railboxVoorbereidingen
!Per modelbaan mag slechts één railbox aangesloten worden.
spoor HO N 1 G
Märklin K-rail
Trix C-rail
B0
B0 0
Märklin C-rail
B0
60653/60657 66950/66955 (versie 3.55 of hoger)
DC 18V / max. 36VA
5
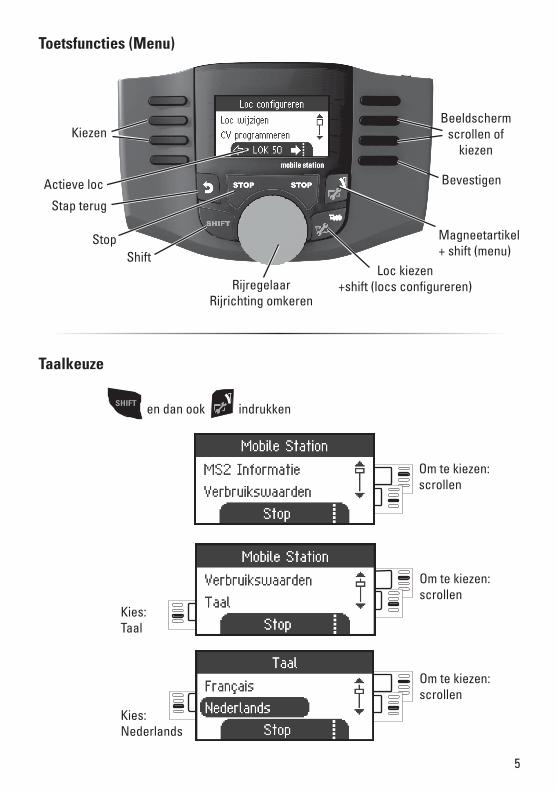
Om te kiezen: scrollen
Om te kiezen: scrollen
Om te kiezen: scrollen
Kies: Nederlands
Rijregelaar Rijrichting omkeren
Loc kiezen +shift (locs configureren)
Magneetartikel + shift (menu) Shift
Stop
Toetsfuncties (Menu)
KiezenBeeldscherm
scrollen of kiezen
Actieve loc Bevestigen
Stap terug
Taalkeuze
Kies: Taal
SHIFT en dan ook indrukken
6
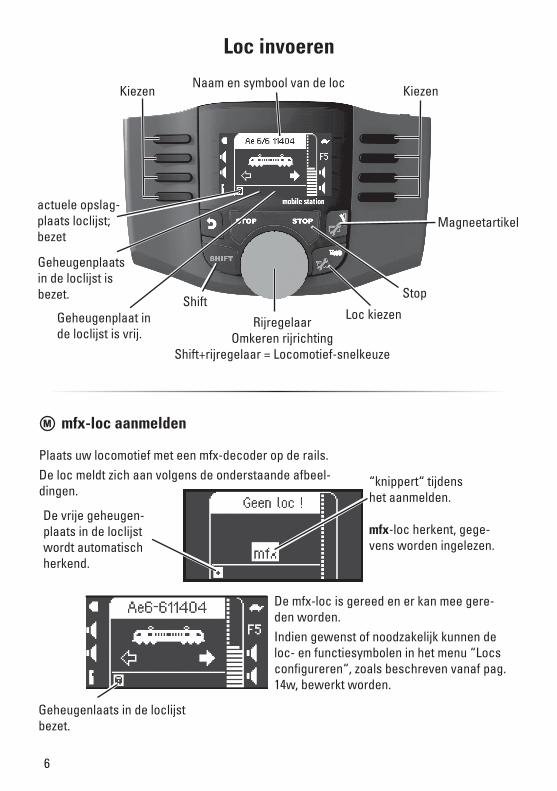
Rijregelaar Omkeren rijrichting
Shift+rijregelaar = Locomotief-snelkeuze
Loc kiezen
Naam en symbool van de locKiezen
ShiftStop
Kiezen
Loc invoeren
Geheugenplaats in de loclijst is bezet.
Geheugenplaat in de loclijst is vrij.
Magneetartikel
mfx-loc herkent, gege-vens worden ingelezen.
De mfx-loc is gereed en er kan mee gere-den worden.Indien gewenst of noodzakelijk kunnen de loc- en functiesymbolen in het menu “Locs configureren“, zoals beschreven vanaf pag. 14w, bewerkt worden.
M mfx-loc aanmelden
“knippert“ tijdens het aanmelden.
Geheugenlaats in de loclijst bezet.
De vrije geheugen-plaats in de loclijst wordt automatisch herkend.
Plaats uw locomotief met een mfx-decoder op de rails. De loc meldt zich aan volgens de onderstaande afbeel-dingen.
actuele opslag-plaats loclijst; bezet

7
Loc met lockaart invoeren
Lockaart insteken, de locomotief is direct inzetbaar.(in Master/Slave-bedrijf niet mogelijk aan de Slave-MS2.)
Opmerking: is de loclijst vol, dan dient voor het invoeren van een nieuwe loc eerst een geheugenplaats gewist te worden (zie pag. 19)
Loc herkennen
!Alleen de loc fx(MM2), DCC die herkent moet worden mag op de baan resp. het programmeerspoor staan. Locomotieven met mfx-decoders hoeven niet alleen op de modelbaan te staan.
Kies: Herkennen
Door (evt. meerdere keren) indrukken van deze toets een vrije plaats zoeken.
SHIFT en dan ook indrukken
De loc wordt gezocht. Na elkaar wordt met de protocollen mfx, DCC en MM2 gezocht.
Om te kiezen: scrollen
Ziet u een doorgestreepte menu-optie dan betekend dit dat, in deze situatie, de optie niet beschikbaar is.
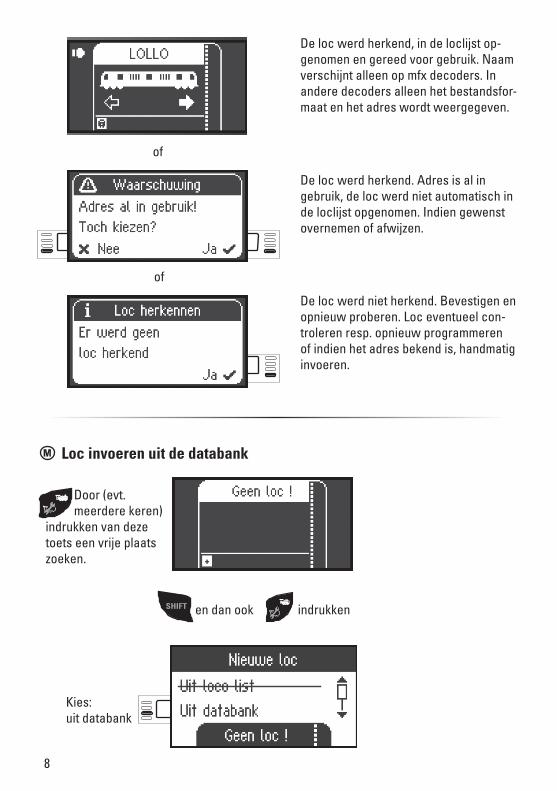
8
M Loc invoeren uit de databank
Kies: uit databank
De loc werd herkend, in de loclijst op-genomen en gereed voor gebruik. Naam verschijnt alleen op mfx decoders. In andere decoders alleen het bestandsfor-maat en het adres wordt weergegeven.
De loc werd herkend. Adres is al in gebruik, de loc werd niet automatisch in de loclijst opgenomen. Indien gewenst overnemen of afwijzen.
De loc werd niet herkend. Bevestigen en opnieuw proberen. Loc eventueel con-troleren resp. opnieuw programmeren of indien het adres bekend is, handmatig invoeren.
of
of
Door (evt. meerdere keren)
indrukken van deze toets een vrije plaats zoeken.
SHIFT en dan ook indrukken
9
Kies één van uw locomotieven uit de databank.
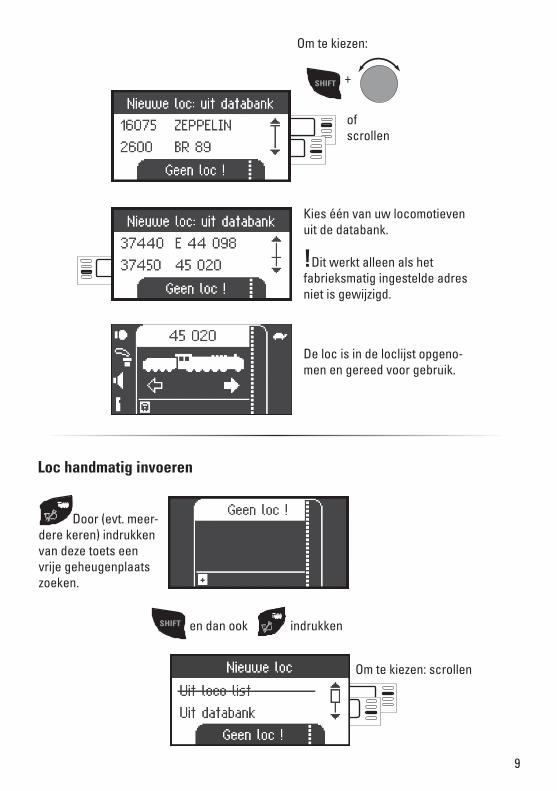
!Dit werkt alleen als het fabrieksmatig ingestelde adres niet is gewijzigd.
De loc is in de loclijst opgeno-men en gereed voor gebruik.
of scrollen
SHIFT +
Om te kiezen:
Loc handmatig invoeren
Door (evt. meer-dere keren) indrukken van deze toets een vrije geheugenplaats zoeken.
Om te kiezen: scrollen
SHIFT en dan ook indrukken
10
Adres gekozen
Keuze bevestigen
SHIFT +
Letter kiezen
Op deze plaats kunnen letters en cijfers gekozen worden.
Cursor terug
Cursor vooruit
Om te kiezen: scrollen
De volgende stappen zijn bij alle decodertypes hetzelfde. De keuze van de decoder is daarbij bepalend voor verdere verwerking in de loc. Voorbe-eld; bij een programmeerbare decoder moet het adres ook aan de loc verzon-den worden om daar op geslagen te worden, dit in tegenstelling tot een loc met een codeerschakelaar.
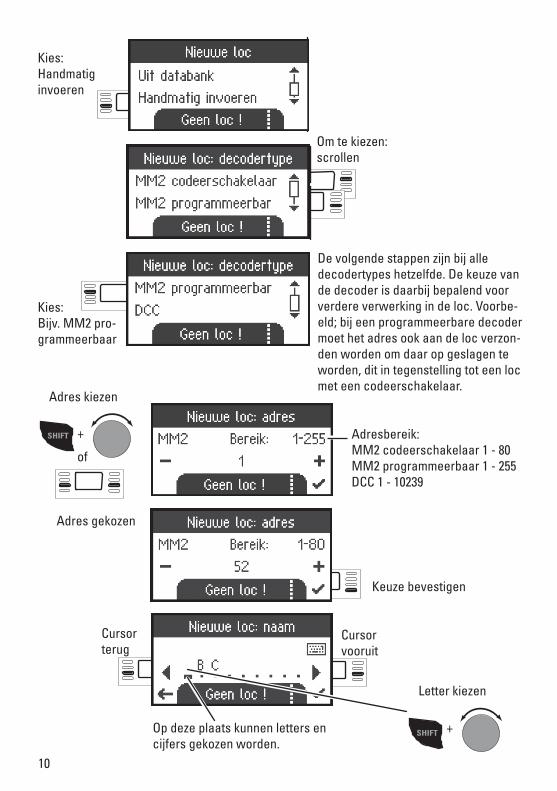
Kies: Handmatig invoeren
Kies: Bijv. MM2 pro-grammeerbaar
Adresbereik:MM2 codeerschakelaar 1 - 80MM2 programmeerbaar 1 - 255DCC 1 - 10239
SHIFT +
Adres kiezen
of
11
Om te kiezen:scrollen
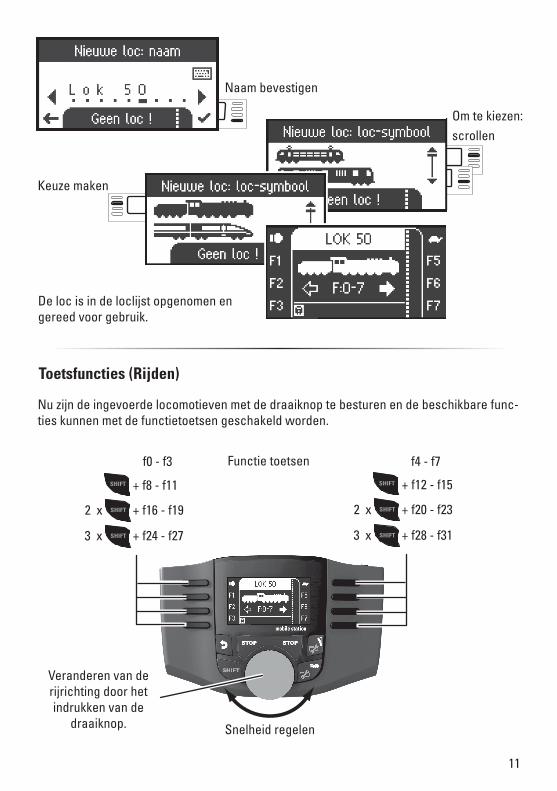
De loc is in de loclijst opgenomen en gereed voor gebruik.
Naam bevestigen
Keuze maken
Nu zijn de ingevoerde locomotieven met de draaiknop te besturen en de beschikbare func-ties kunnen met de functietoetsen geschakeld worden.
Toetsfuncties (Rijden)
Snelheid regelen
Veranderen van de rijrichting door het indrukken van de
draaiknop.
Functie toetsenf0 - f3
SHIFT + f24 - f27
2 x + f16 - f19
3 x
+ f8 - f11
SHIFT
SHIFT
f4 - f7
SHIFT + f28 - f31
2 x + f20 - f23
3 x
+ f12 - f15
SHIFT
SHIFT
12
Om te kiezen: scrollen
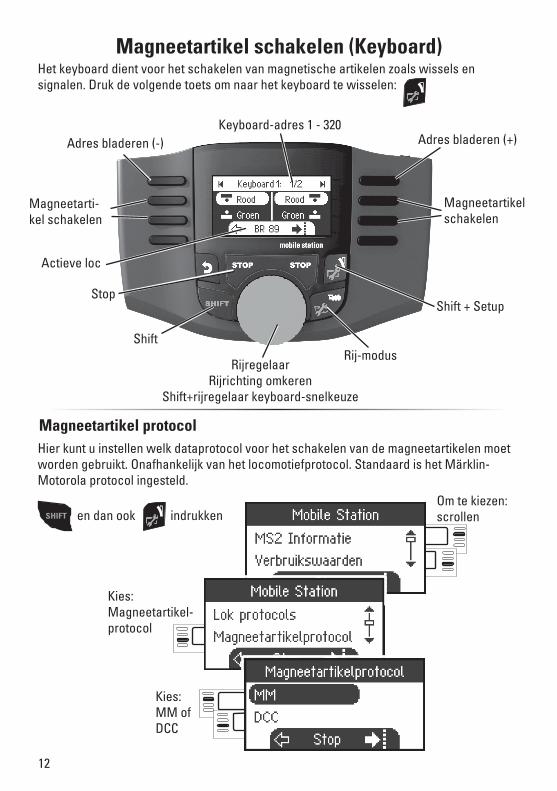
Magneetartikel schakelen (Keyboard)
Kies: Magneetartikel- protocol
Magneetartikel protocol Hier kunt u instellen welk dataprotocol voor het schakelen van de magneetartikelen moet worden gebruikt. Onafhankelijk van het locomotiefprotocol. Standaard is het Märklin-Motorola protocol ingesteld.
SHIFT
Rijregelaar Rijrichting omkeren
Shift+rijregelaar keyboard-snelkeuze
Rij-modus
Shift + Setup
Keyboard-adres 1 - 320Adres bladeren (-)
Shift
Stop
Adres bladeren (+)
Magneetarti-kel schakelen
Magneetartikel schakelen
Actieve loc
en dan ook indrukken
Het keyboard dient voor het schakelen van magnetische artikelen zoals wissels en signalen. Druk de volgende toets om naar het keyboard te wisselen:
Kies: MM of DCC
13
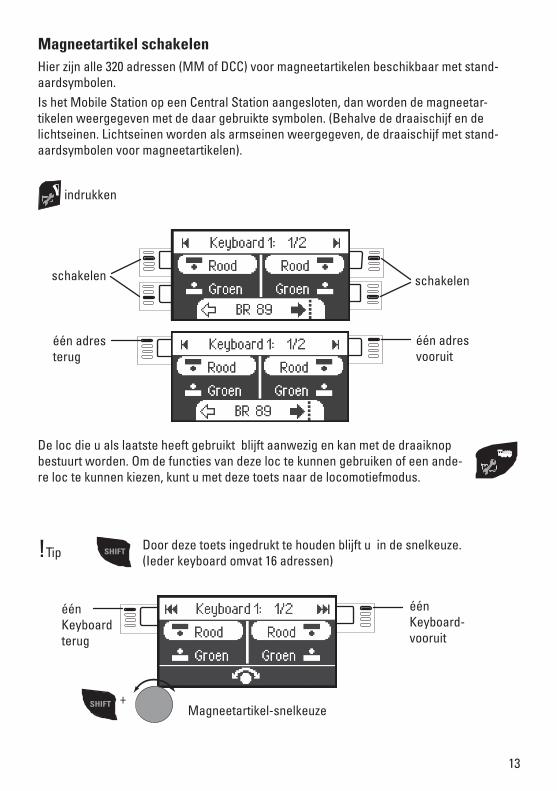
Magneetartikel schakelenHier zijn alle 320 adressen (MM of DCC) voor magneetartikelen beschikbaar met stand-aardsymbolen. Is het Mobile Station op een Central Station aangesloten, dan worden de magneetar-tikelen weergegeven met de daar gebruikte symbolen. (Behalve de draaischijf en de lichtseinen. Lichtseinen worden als armseinen weergegeven, de draaischijf met stand-aardsymbolen voor magneetartikelen).
De loc die u als laatste heeft gebruikt blijft aanwezig en kan met de draaiknop bestuurt worden. Om de functies van deze loc te kunnen gebruiken of een ande-re loc te kunnen kiezen, kunt u met deze toets naar de locomotiefmodus.
SHIFTDoor deze toets ingedrukt te houden blijft u in de snelkeuze. (Ieder keyboard omvat 16 adressen)
schakelen schakelen
één adres terug
één adres vooruit
één Keyboard terug
één Keyboard-vooruit
SHIFT +Magneetartikel-snelkeuze
!Tip
indrukken
14
Om te kiezen:scrollen
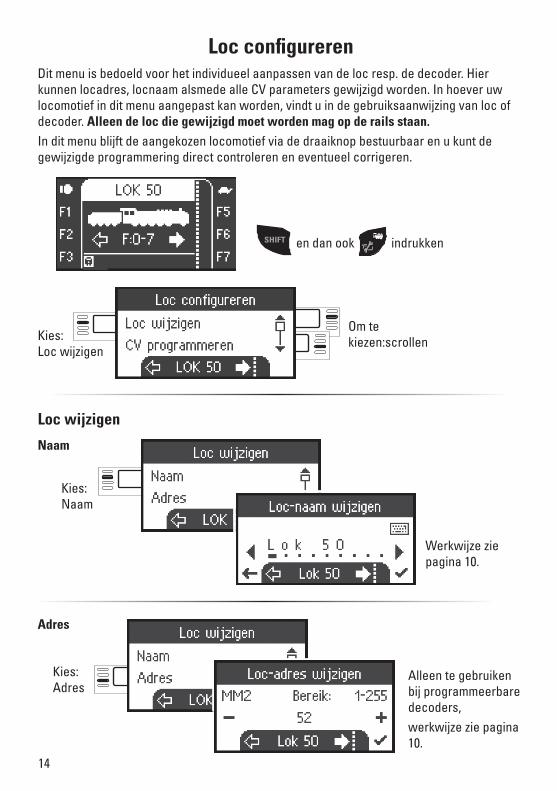
Dit menu is bedoeld voor het individueel aanpassen van de loc resp. de decoder. Hier kunnen locadres, locnaam alsmede alle CV parameters gewijzigd worden. In hoever uw locomotief in dit menu aangepast kan worden, vindt u in de gebruiksaanwijzing van loc of decoder. Alleen de loc die gewijzigd moet worden mag op de rails staan. In dit menu blijft de aangekozen locomotief via de draaiknop bestuurbaar en u kunt de gewijzigde programmering direct controleren en eventueel corrigeren.
Kies: Loc wijzigen
Loc wijzigen
Kies: Naam
Alleen te gebruiken bij programmeerbare decoders,werkwijze zie pagina 10.
Kies: Adres
Loc configureren
SHIFT
Werkwijze zie pagina 10.
en dan ook indrukken
Naam
Adres
15
Keuze bevestigen
Keuze bevestigen
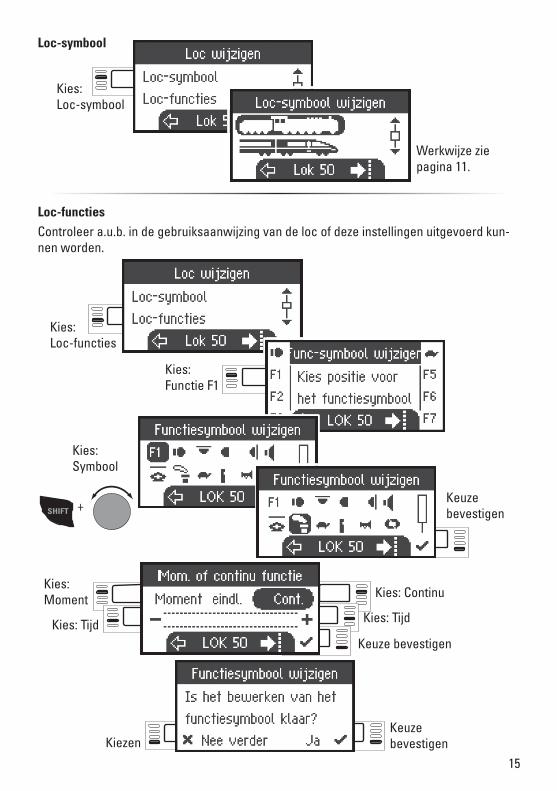
Kies: Loc-symbool
Werkwijze zie pagina 11.
Kies: Loc-functies
Kies: Functie F1
SHIFT +
Kies: Symbool
Kies: Moment Kies: Continu
Kies: Tijd Kies: Tijd
Keuze bevestigen
Loc-functiesControleer a.u.b. in de gebruiksaanwijzing van de loc of deze instellingen uitgevoerd kun-nen worden.
Loc-symbool
Kiezen
16
Keuze bevestigen
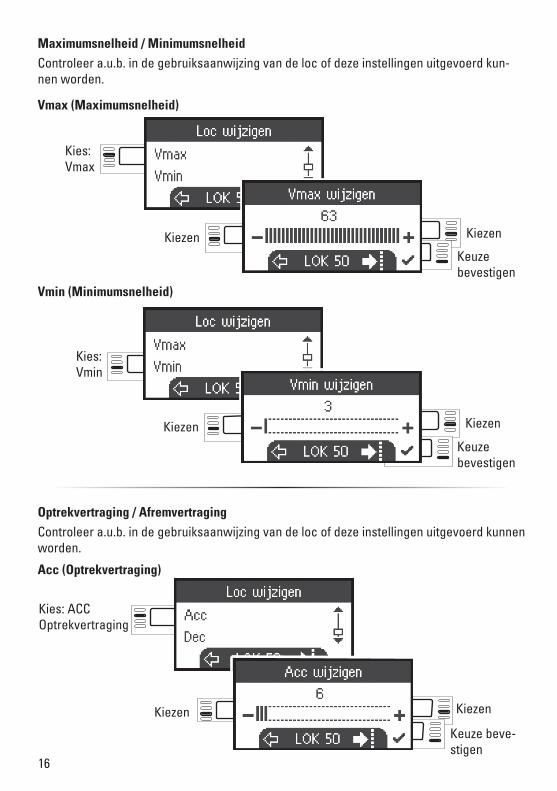
Kies: Vmax
Kiezen Kiezen
Keuze bevestigen
Kies: Vmin
Kiezen Kiezen
Keuze beve-stigen
Kies: ACC Optrekvertraging
Kiezen Kiezen
Optrekvertraging / AfremvertragingControleer a.u.b. in de gebruiksaanwijzing van de loc of deze instellingen uitgevoerd kunnen worden.
Maximumsnelheid / MinimumsnelheidControleer a.u.b. in de gebruiksaanwijzing van de loc of deze instellingen uitgevoerd kun-nen worden.
Vmax (Maximumsnelheid)
Vmin (Minimumsnelheid)
Acc (Optrekvertraging)
17
Keuze bevestigen
Kies: Dec afremvertraging
KiezenKiezen
VolumeControleer a.u.b. in de gebruiksaanwijzing van de loc of deze instelling uitgevoerd kan worden.
Kies: Vol
Keuze bevestigen
Kiezen Kiezen
Kies: Rijstappen
Kiezen
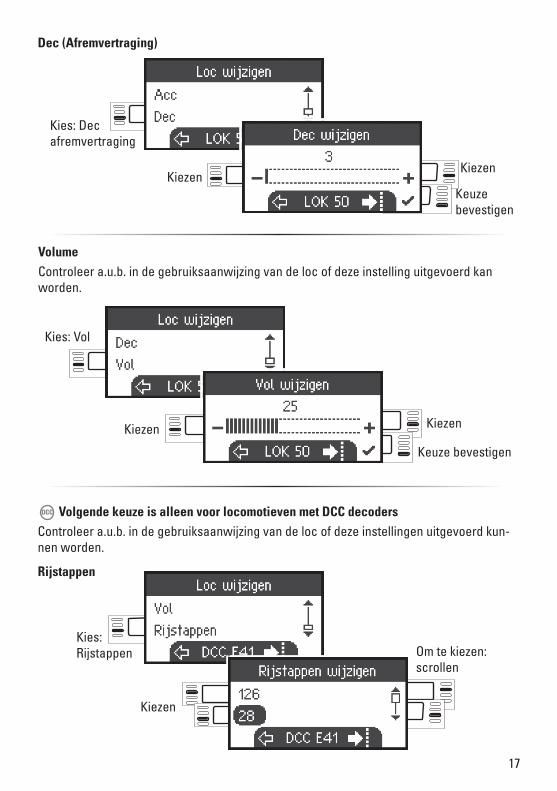
Volgende keuze is alleen voor locomotieven met DCC decodersControleer a.u.b. in de gebruiksaanwijzing van de loc of deze instellingen uitgevoerd kun-nen worden.
DCC
Om te kiezen: scrollen
Dec (Afremvertraging)
Rijstappen
18
keuze bevestigen
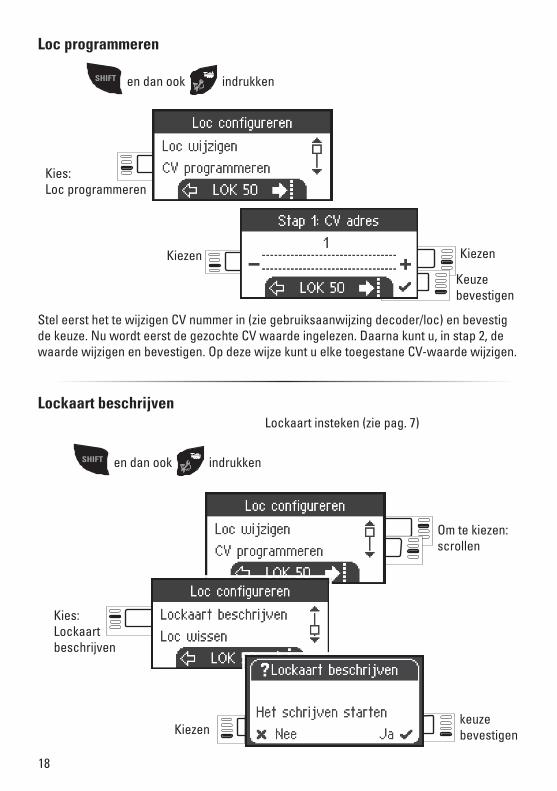
Loc programmeren
Keuze bevestigen
Kies: Loc programmeren
Kiezen Kiezen
Stel eerst het te wijzigen CV nummer in (zie gebruiksaanwijzing decoder/loc) en bevestig de keuze. Nu wordt eerst de gezochte CV waarde ingelezen. Daarna kunt u, in stap 2, de waarde wijzigen en bevestigen. Op deze wijze kunt u elke toegestane CV-waarde wijzigen.
Kies: Lockaart beschrijven
Kiezen
Lockaart beschrijvenLockaart insteken (zie pag. 7)
SHIFT en dan ook indrukken
SHIFT en dan ook indrukken
Om te kiezen: scrollen
19
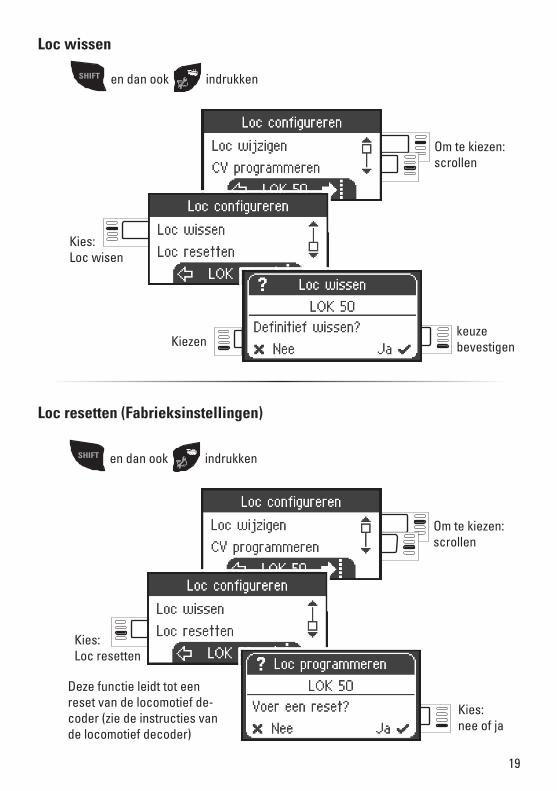
Loc wissen
Kies: nee of ja
Loc resetten (Fabrieksinstellingen)
Kies: Loc resetten
Deze functie leidt tot een reset van de locomotief de-coder (zie de instructies van de locomotief decoder)
keuze bevestigen
Kies: Loc wisen
Kiezen
SHIFT en dan ook indrukken
Om te kiezen: scrollen
SHIFT en dan ook indrukken
Om te kiezen: scrollen
20
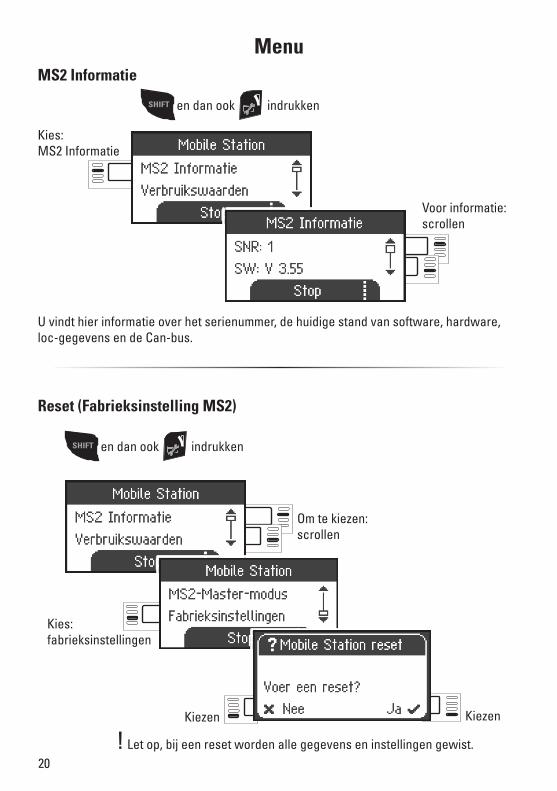
Om te kiezen: scrollen
Reset (Fabrieksinstelling MS2)
Kiezen
Kies: fabrieksinstellingen
Voor informatie: scrollen
MS2 Informatie
U vindt hier informatie over het serienummer, de huidige stand van software, hardware, loc-gegevens en de Can-bus.
Menu
SHIFT
Kies: MS2 Informatie
en dan ook indrukken
! Let op, bij een reset worden alle gegevens en instellingen gewist.
Kiezen
SHIFT en dan ook indrukken
21
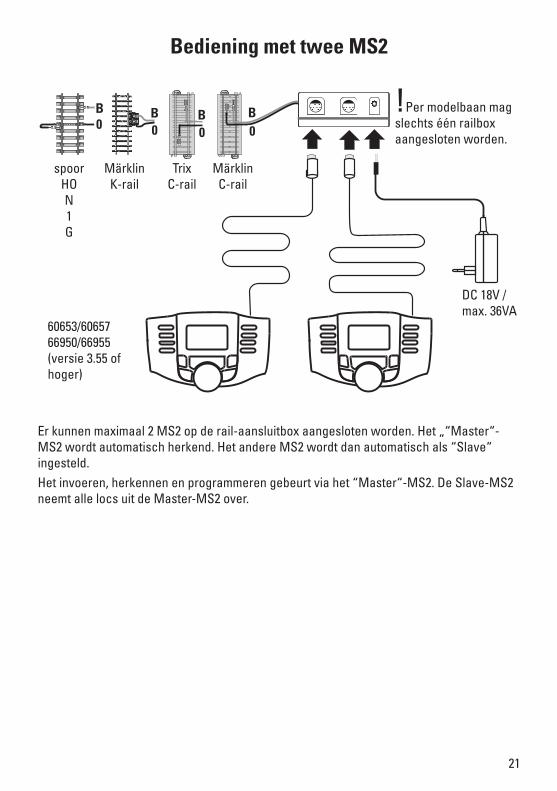
Bediening met twee MS2
Er kunnen maximaal 2 MS2 op de rail-aansluitbox aangesloten worden. Het „“Master“-MS2 wordt automatisch herkend. Het andere MS2 wordt dan automatisch als “Slave“ ingesteld.Het invoeren, herkennen en programmeren gebeurt via het “Master“-MS2. De Slave-MS2 neemt alle locs uit de Master-MS2 over.
B!Per modelbaan mag slechts één railbox aangesloten worden.
spoor HO N 1 G
Märklin K-rail
Trix C-rail
B0
B0 0
Märklin C-rail
B0
60653/60657 66950/66955 (versie 3.55 of hoger)
DC 18V / max. 36VA
22
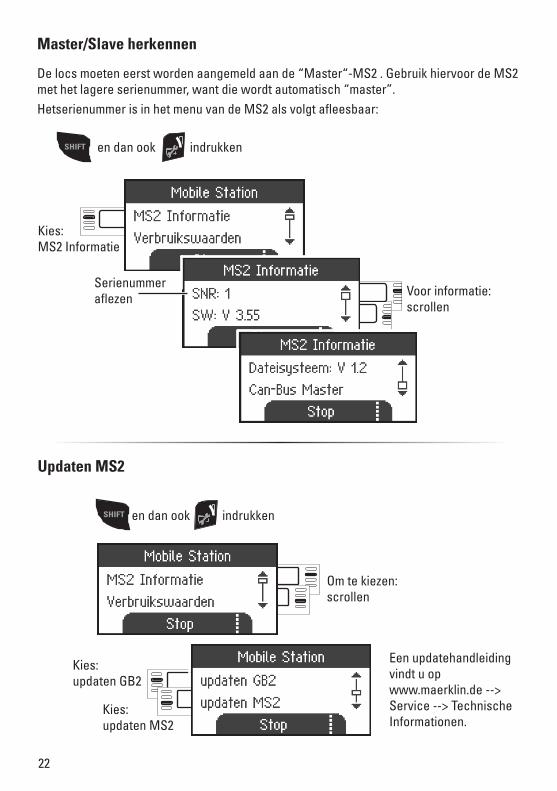
Voor informatie: scrollen
Kies: MS2 Informatie
Master/Slave herkennen
De locs moeten eerst worden aangemeld aan de “Master“-MS2 . Gebruik hiervoor de MS2 met het lagere serienummer, want die wordt automatisch “master”.Hetserienummer is in het menu van de MS2 als volgt afleesbaar:
SHIFT en dan ook indrukken
Serienummer aflezen
Kies: updaten MS2
Updaten MS2
Om te kiezen: scrollen
SHIFT en dan ook indrukken
Kies: updaten GB2
Een updatehandleiding vindt u op www.maerklin.de --> Service --> Technische Informationen.
23
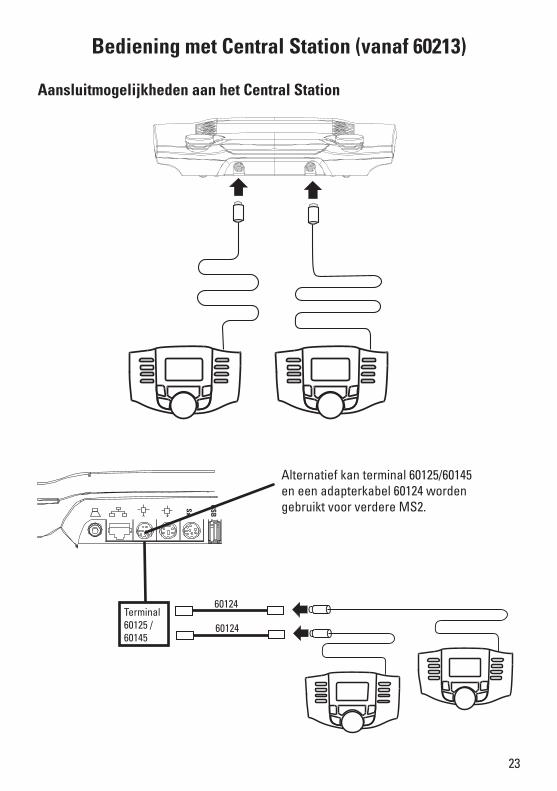
Bediening met Central Station (vanaf 60213)
Aansluitmogelijkheden aan het Central Station
Terminal 60125 / 60145
Alternatief kan terminal 60125/60145 en een adapterkabel 60124 worden gebruikt voor verdere MS2.BS
U
xS
60124
60124
24
en dan ook indrukken
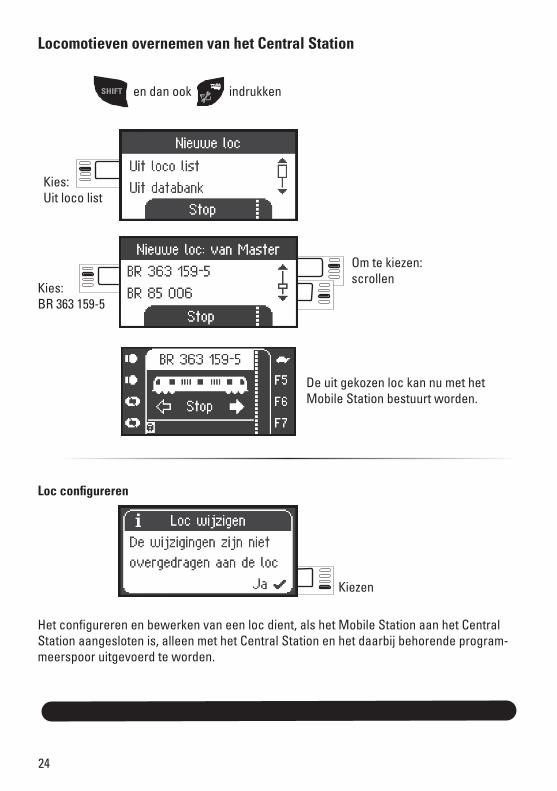
Om te kiezen: scrollen
Locomotieven overnemen van het Central Station
Kies: Uit loco list
Kies: BR 363 159-5
De uit gekozen loc kan nu met het Mobile Station bestuurt worden.
Loc configureren
Het configureren en bewerken van een loc dient, als het Mobile Station aan het Central Station aangesloten is, alleen met het Central Station en het daarbij behorende program-meerspoor uitgevoerd te worden.
SHIFT
Kiezen