Embed Size (px)
Citation preview

F732- WIZARD Bedienungsanleitung © 2000 by DATALOGIC GmbH

© 2000 DATALOGIC GmbH, Erkenbrechtsweiler (Germany) Alle Angaben in dieser Dokumentation sind nach sorgfältiger Prüfung zusammengestellt worden, gelten jedoch nicht als Zusicherung von Produkteigenschaften. DATALOGIC GmbH haftet ausschließlich in dem Umfang, der in den Verkaufs- und Lieferbedingungen festgelegt ist. Weitergabe und Vervielfältigung der zu diesem Produkt gehörenden Dokumentation und Software und die Verwendung ihres Inhalts sind nur mit schriftlicher Erlaubnis von DATALOGIC GmbH gestattet. Änderungen, die dem Technischen Fortschritt dienen, bleiben vorbehalten. Marken Alle verwendeten Namen und Bezeichnungen können Marken oder eingetragene Marken ihrer jeweiligen Eigentümer sein. Das FORMULA-Logo ist eine eingetragene Marke von DATALOGIC GmbH. DATALOGIC GmbH behält sich vor, die genannten Daten ohne Ankündigung zu ändern, und übernimmt keine Gewähr für technische Ungenauigkeiten und /oder Auslassungen und für die Folgen, die sich daraus ergeben könnten. DATALOGIC GmbH Uracher Strasse 22 73260 Erkenbrechtsweiler Germany www.datalogic.com Erkenbrechtsweiler, März 2000
Änderungen vorbehalten!
Ein Wort vorab Vielen Dank für Ihr Vertrauen! Mit dem F-732 „WIZARD“ haben Sie sich für ein Barcode - Scannersystem entschieden, daß für professionelle Anwendungen im mobilen Identifikations - Markt prädestiniert ist. Höchste Qualitätsanforderungen in der Fertigung und eine ausgiebige Qualitätskontrolle bilden die Basis für den hohen Produktstandard und sind Voraussetzung für gleichbleibende Produktqualität. Bevor Sie den Barcodescanner F-732 „WIZARD“ benutzen: Lesen Sie bitte diese Bedienungsanleitung und beachten Sie unbedingt die Sicherheitshinweise! Welches Modell haben Sie erworben? Die Anweisungen in dieser Bedienungsanleitung beziehen sich auf das Modell F-732 „WIZARD“. An der Rückseite des Scanners finden Sie die Modellbezeichnung Ihres Gerätes (s. Seite 3).
!Information: Sollten Sie zu dem in diesem Handbuch besprochenen Themen noch Fragen haben oder zusätzliche Hilfe benötigen, wenden Sie sich bitte direkt an den an den Händler, bei dem Sie das Produkt gekauft haben. Haben Sie das Produkt direkt von DATALOGIC GmbH bezogen, steht Ihnen unser Online-Dienst werktags zur Verfügung. Bitte halten Sie in diesem Fall Ihre Kundennummer bereit. E-mail: [email protected] - Internet: www.datalogic.com In dringenden Fällen wenden Sie sich bitte an die DATALOGIC-Support-Hotline: !+49-(0)7026-608-0
Seite 1
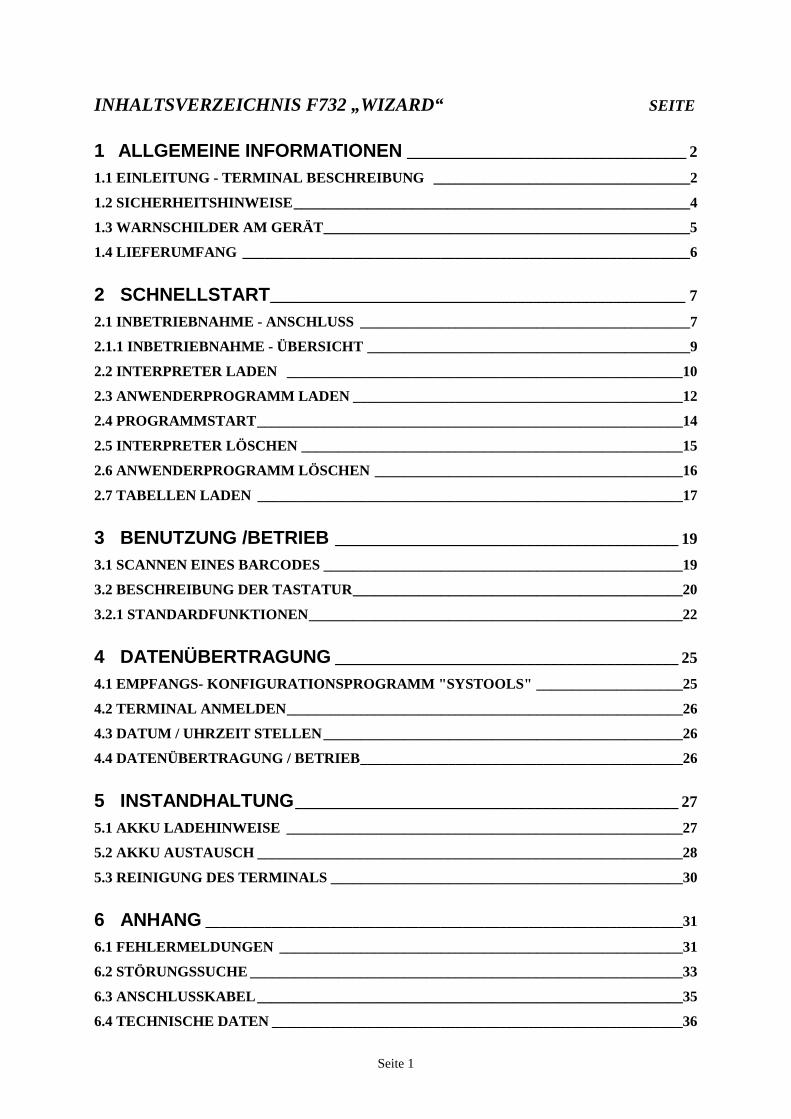
INHALTSVERZEICHNIS F732 „WIZARD“ SEITE
1 ALLGEMEINE INFORMATIONEN ___________________________________ 2 1.1 EINLEITUNG - TERMINAL BESCHREIBUNG ___________________________________2
1.2 SICHERHEITSHINWEISE______________________________________________________4
1.3 WARNSCHILDER AM GERÄT__________________________________________________5
1.4 LIEFERUMFANG _____________________________________________________________6
2 SCHNELLSTART____________________________________________________ 7 2.1 INBETRIEBNAHME - ANSCHLUSS _____________________________________________7
2.1.1 INBETRIEBNAHME - ÜBERSICHT ____________________________________________9
2.2 INTERPRETER LADEN ______________________________________________________10
2.3 ANWENDERPROGRAMM LADEN _____________________________________________12
2.4 PROGRAMMSTART__________________________________________________________14
2.5 INTERPRETER LÖSCHEN ____________________________________________________15
2.6 ANWENDERPROGRAMM LÖSCHEN __________________________________________16
2.7 TABELLEN LADEN __________________________________________________________17
3 BENUTZUNG /BETRIEB ___________________________________________ 19 3.1 SCANNEN EINES BARCODES _________________________________________________19
3.2 BESCHREIBUNG DER TASTATUR_____________________________________________20
3.2.1 STANDARDFUNKTIONEN___________________________________________________22
4 DATENÜBERTRAGUNG ___________________________________________ 25 4.1 EMPFANGS- KONFIGURATIONSPROGRAMM "SYSTOOLS" ____________________25
4.2 TERMINAL ANMELDEN______________________________________________________26
4.3 DATUM / UHRZEIT STELLEN_________________________________________________26
4.4 DATENÜBERTRAGUNG / BETRIEB____________________________________________26
5 INSTANDHALTUNG________________________________________________ 27 5.1 AKKU LADEHINWEISE ______________________________________________________27
5.2 AKKU AUSTAUSCH __________________________________________________________28
5.3 REINIGUNG DES TERMINALS ________________________________________________30
6 ANHANG _________________________________________________________________31 6.1 FEHLERMELDUNGEN _______________________________________________________31
6.2 STÖRUNGSSUCHE ___________________________________________________________33
6.3 ANSCHLUSSKABEL__________________________________________________________35
6.4 TECHNISCHE DATEN ________________________________________________________36
Seite 2
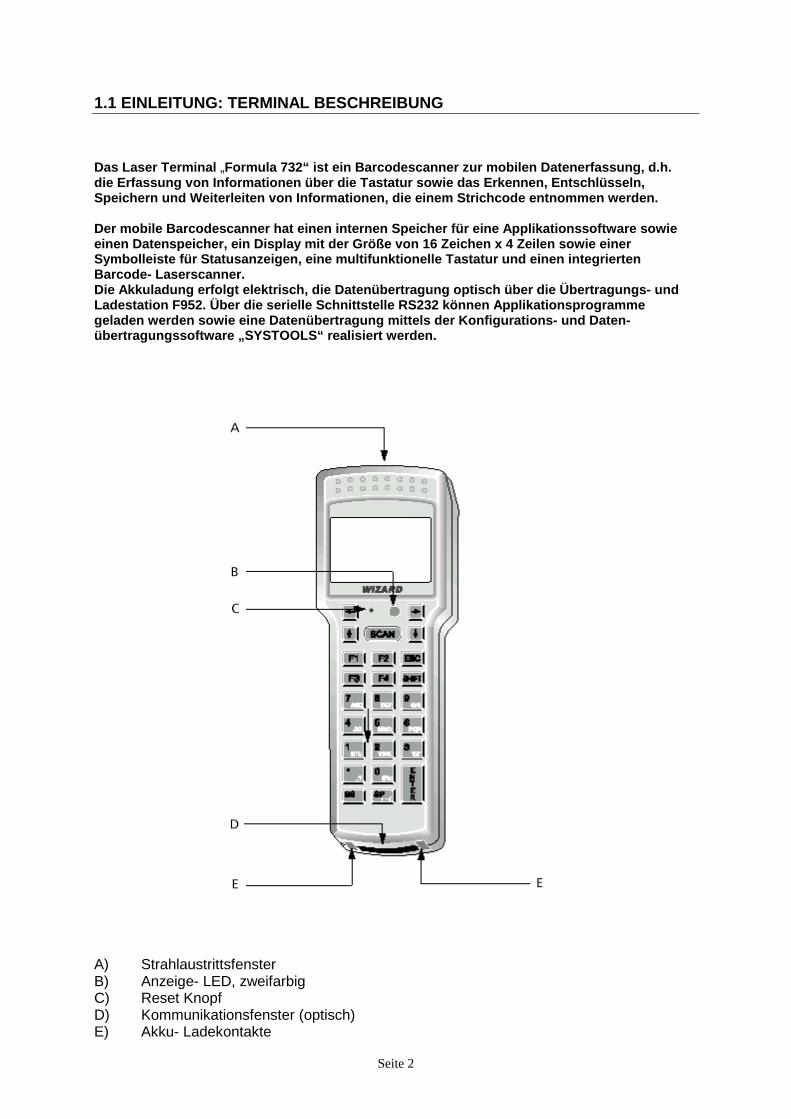
1.1 EINLEITUNG: TERMINAL BESCHREIBUNG Das Laser Terminal „Formula 732“ ist ein Barcodescanner zur mobilen Datenerfassung, d.h. die Erfassung von Informationen über die Tastatur sowie das Erkennen, Entschlüsseln, Speichern und Weiterleiten von Informationen, die einem Strichcode entnommen werden. Der mobile Barcodescanner hat einen internen Speicher für eine Applikationssoftware sowie einen Datenspeicher, ein Display mit der Größe von 16 Zeichen x 4 Zeilen sowie einer Symbolleiste für Statusanzeigen, eine multifunktionelle Tastatur und einen integrierten Barcode- Laserscanner. Die Akkuladung erfolgt elektrisch, die Datenübertragung optisch über die Übertragungs- und Ladestation F952. Über die serielle Schnittstelle RS232 können Applikationsprogramme geladen werden sowie eine Datenübertragung mittels der Konfigurations- und Daten-übertragungssoftware „SYSTOOLS“ realisiert werden.
A) Strahlaustrittsfenster B) Anzeige- LED, zweifarbig C) Reset Knopf D) Kommunikationsfenster (optisch) E) Akku- Ladekontakte
Seite 3
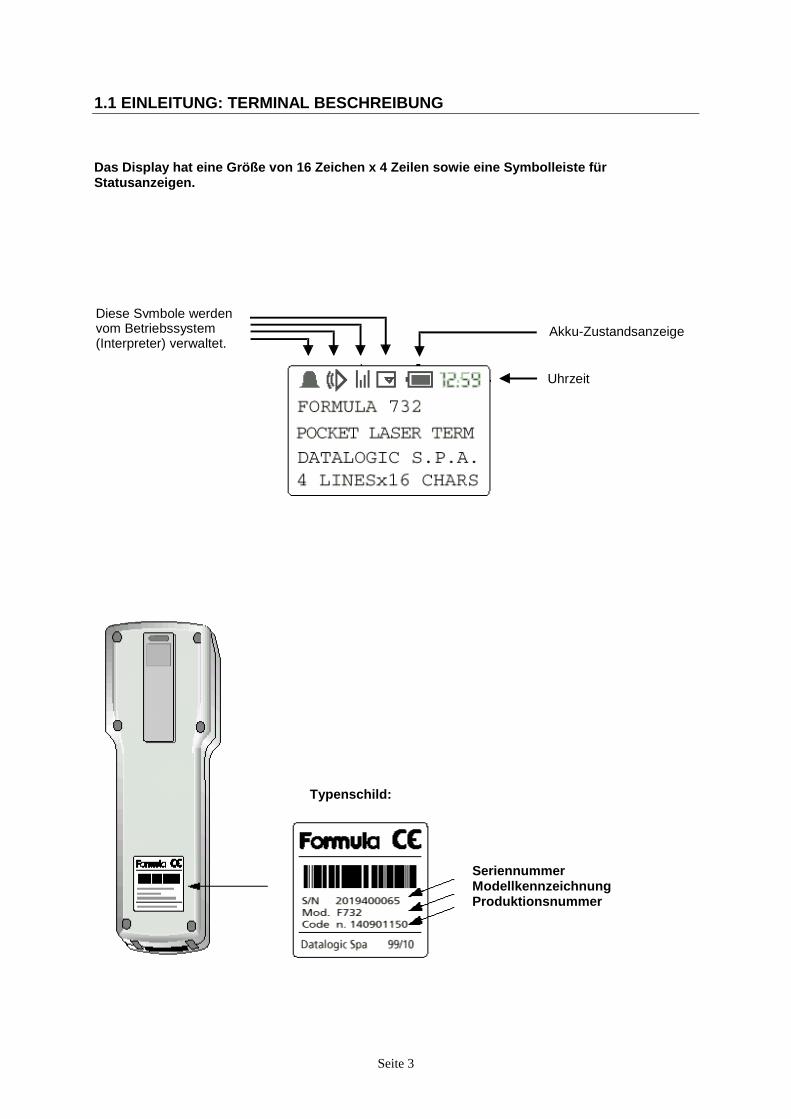
1.1 EINLEITUNG: TERMINAL BESCHREIBUNG Das Display hat eine Größe von 16 Zeichen x 4 Zeilen sowie eine Symbolleiste für Statusanzeigen.
Typenschild:
Seriennummer Modellkennzeichnung Produktionsnummer
Akku-Zustandsanzeige
Uhrzeit
Diese Symbole werdenvom Betriebssystem(Interpreter) verwaltet.
Seite 4
1.2 SICHERHEITSHINWEISE
Lesen Sie vor allen Tätigkeiten am und mit dem WIZARD-Terminal sowie dessen Zubehör, die entsprechenden Abschnitte in dieser Bedienungsanleitung aufmerksam durch ! Beachten Sie insbesondere die Sicherheitshinweise !
Achtung ! Vermeiden Sie es, in den Laserstrahl zu schauen !
Der Laserstrahl des Scanners ist sehr schwach. Trotzdem ist es für das menschliche Auge schädlich, wenn man über einen längeren Zeitraum in den Laserstrahl schaut ! Schauen Sie deshalb nicht über längere Zeit in das Strahlaustrittsfenster des Laserstrahls, wenn der Strichcode-Leser in Betrieb ist ! Die Laserstrahlung ist für das menschliche Auge erkennbar (Rotlicht) und wird am Strahlaustritts-fenster auf der Vorderseite des Lesegerätes ausgesendet.
Achtung ! Verhindern Sie unkontrollierte Emission von Laserstrahlung !
Jegliche Änderungen am Gerät sowie Vorgehensweisen, die nicht in dieser Bedienungsanleitung beschrieben werden, sind strengstens untersagt ! Lassen Sie Schäden am Gerät umgehend beheben. Beschädigungen der optischen Bauteile können Laserstrahlung verursachen, welche die Grenzwerte überschreiten ! Nehmen Sie defekte Geräte sofort außer Betrieb !
1.2.1 GELTUNGSBEREICH Die allgemeinen Sicherheitshinweise (Abschnitt 1.2) gelten in gleichem Maße für Installations, Bedien-, Wartungs- und Reparaturpersonal.
1.2.2 BESTIMMUNGSGEMÄSSE UND SACHWIDRIGE VERWENDUNG Die bestimmungsgemäße Verwendung des WIZARD-Terminals besteht in der mobilen Datenerfassung, d.h. die Erfassung von Informationen über die Tastatur sowie das Erkennen, Entschlüsseln und Weiterleiten von Informationen, die einem Strichcode-Etikett entnommen werden. Alle anderen Verwendungszwecke sind sachwidrig und deshalb aus Sicherheitsgründen nicht zulässig !
1.2.3 EMISSIONSWERTE Das vorliegende Gerät ist ein Laserprodukt der Klasse 2. (IEC 825) Maximale Energie der Laserstrahlung (am Austrittsfenster) 1,0 mW Wellenlänge 680 nm
Seite 5
1.2.4 SICHERHEIT BEI DER WARTUNG • Das Terminal braucht nur dann geöffnet zu werden, wenn der Akku ausgetauscht werden
muß (nur durch Fachpersonal durchzuführen; siehe Kapitel 5.3). Versuchen Sie nicht das Terminal auseinander zu montieren, es enthält keine Teile, die vom Benutzer repariert werden können. Wird das Terminal oder die Lade- und Übertragungsstation geöffnet, führt dies zum Verfall der Garantie.
• Beim Auswechseln/Entsorgung des Akkus und bei der Entsorgung des Terminals nach
dessen Außerbetriebnahme muß die geltende Gesetzgebung beachtet werden. • Das Terminal darf nicht in Flüssigkeiten getaucht werden. Zum Reinigen verwenden Sie
bitte ein feuchtes Tuch. Vorsicht: Rauhe Tücher oder Papier kann das Strahlaustrittsfenster beschädigen (Kratzer). Verwenden Sie keinen Alkohol und keine Lösungsmittel oder ätzende Produkte.
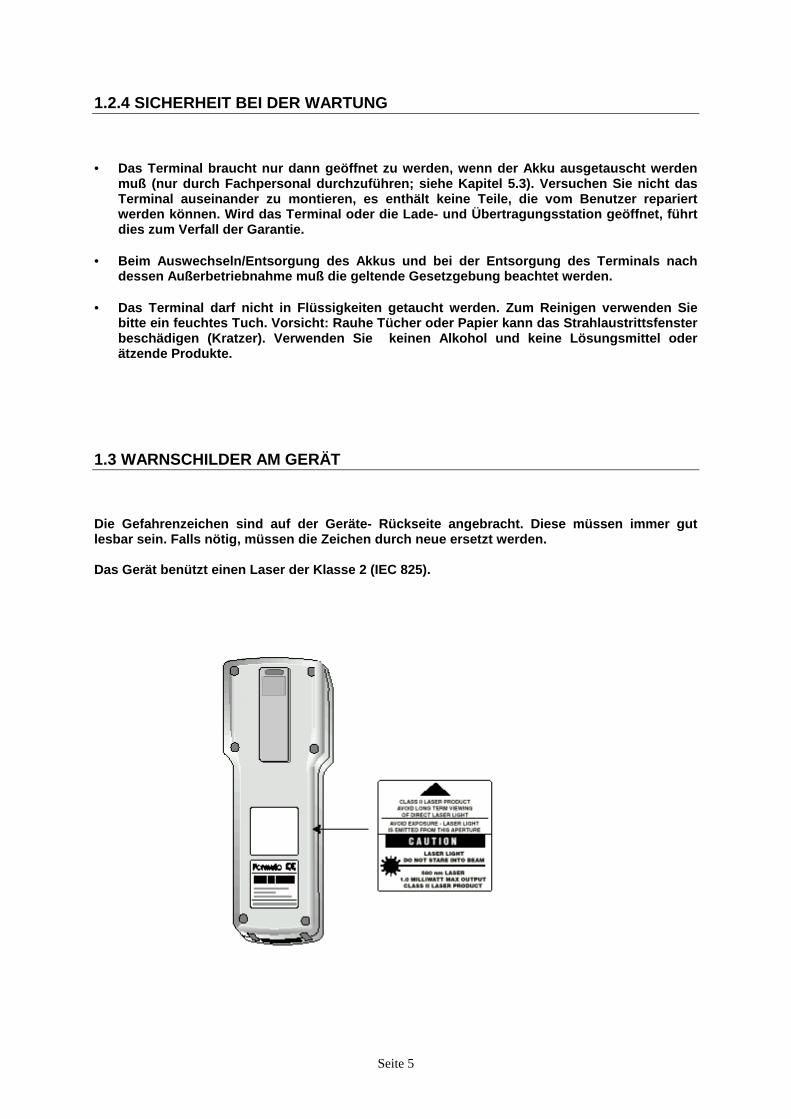
1.3 WARNSCHILDER AM GERÄT Die Gefahrenzeichen sind auf der Geräte- Rückseite angebracht. Diese müssen immer gut lesbar sein. Falls nötig, müssen die Zeichen durch neue ersetzt werden. Das Gerät benützt einen Laser der Klasse 2 (IEC 825).
Seite 6
1.4 LIEFERUMFANG Das WIZARD- Paket Europa enthält folgende Komponenten: !!!! Terminal F732 mit Akku; der Interpreter „PWG732.HEX“ (PowerGen 2000- Interpreter Program) ist bereits installiert. !!!! Lade- Übertragungsstation F952. !!!! Netzteil. !!!! Anschlußkabel für serielle Schnittstelle (RS-232). !!!! Programm- Diskette(n) ☞ siehe unten. !!!! Handbuch Englisch „User Manual & PowerGen 2000 Interpreter Program“. !!!! Bedienungshandbuch Deutsch.
1.4.1 DISKETTENINHALT Auf den beiliegenden Disketten befinden sich folgende Programme: !!!! PWG732.HEX Betriebssytem (PowerGen 2000- Interpreter Program). !!!! DOSDL + DL Transferprogramme unter MS-DOS zum Laden von Programmen, Interpreter und Tabellen in das Terminal F732. !!!! SysTools A.E. „Systools Advanced Edition“ Konfigurations- und Datenempfangs- Software für Windows 95/98/NT. !!!! PowerGen 2000 Programmgenerator für Win 95/98/NT (30-Tage- Demoversion!). !!!! Demo‘s fünf verschiedene Beispielprogramme (Anwenderprogramme).
HINWEIS: Nehmen Sie alle Einzelteile aus der Verpackung. Kontrollieren Sie, ob die Teile
unversehrt sind und mit den mitgeschickten Unterlagen übereinstimmen. Bewahren Sie die Verpackung für den Fall auf, daß die Notwendigkeit besteht, Produkte an das Kundendienstzentrum zu schicken. Schäden, die bei Rücksendung durch eine ungeeignete Verpackung verursacht werden, fallen nicht unter die Garantie.
Seite 7
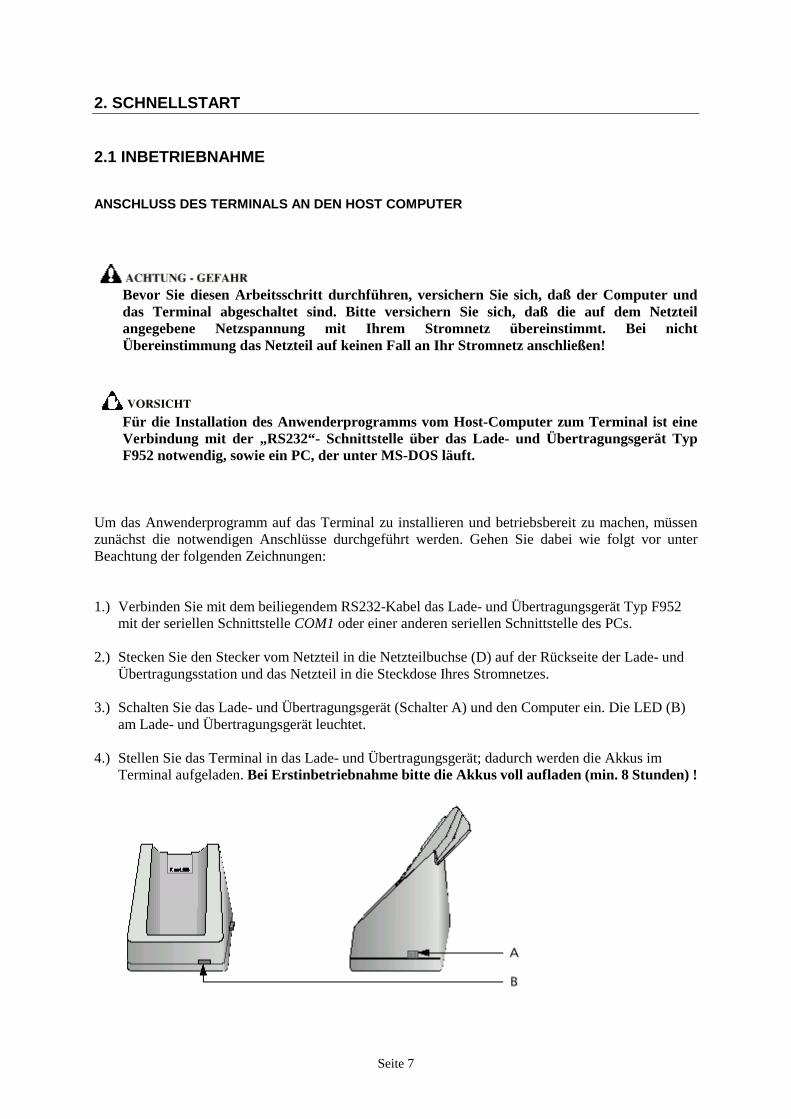
2. SCHNELLSTART 2.1 INBETRIEBNAHME ANSCHLUSS DES TERMINALS AN DEN HOST COMPUTER
Bevor Sie diesen Arbeitsschritt durchführen, versichern Sie sich, daß der Computer und das Terminal abgeschaltet sind. Bitte versichern Sie sich, daß die auf dem Netzteil angegebene Netzspannung mit Ihrem Stromnetz übereinstimmt. Bei nicht Übereinstimmung das Netzteil auf keinen Fall an Ihr Stromnetz anschließen!
Für die Installation des Anwenderprogramms vom Host-Computer zum Terminal ist eine Verbindung mit der „RS232“- Schnittstelle über das Lade- und Übertragungsgerät Typ F952 notwendig, sowie ein PC, der unter MS-DOS läuft.
Um das Anwenderprogramm auf das Terminal zu installieren und betriebsbereit zu machen, müssen zunächst die notwendigen Anschlüsse durchgeführt werden. Gehen Sie dabei wie folgt vor unter Beachtung der folgenden Zeichnungen: 1.) Verbinden Sie mit dem beiliegendem RS232-Kabel das Lade- und Übertragungsgerät Typ F952
mit der seriellen Schnittstelle COM1 oder einer anderen seriellen Schnittstelle des PCs. 2.) Stecken Sie den Stecker vom Netzteil in die Netzteilbuchse (D) auf der Rückseite der Lade- und
Übertragungsstation und das Netzteil in die Steckdose Ihres Stromnetzes. 3.) Schalten Sie das Lade- und Übertragungsgerät (Schalter A) und den Computer ein. Die LED (B)
am Lade- und Übertragungsgerät leuchtet. 4.) Stellen Sie das Terminal in das Lade- und Übertragungsgerät; dadurch werden die Akkus im
Terminal aufgeladen. Bei Erstinbetriebnahme bitte die Akkus voll aufladen (min. 8 Stunden) !
Seite 8
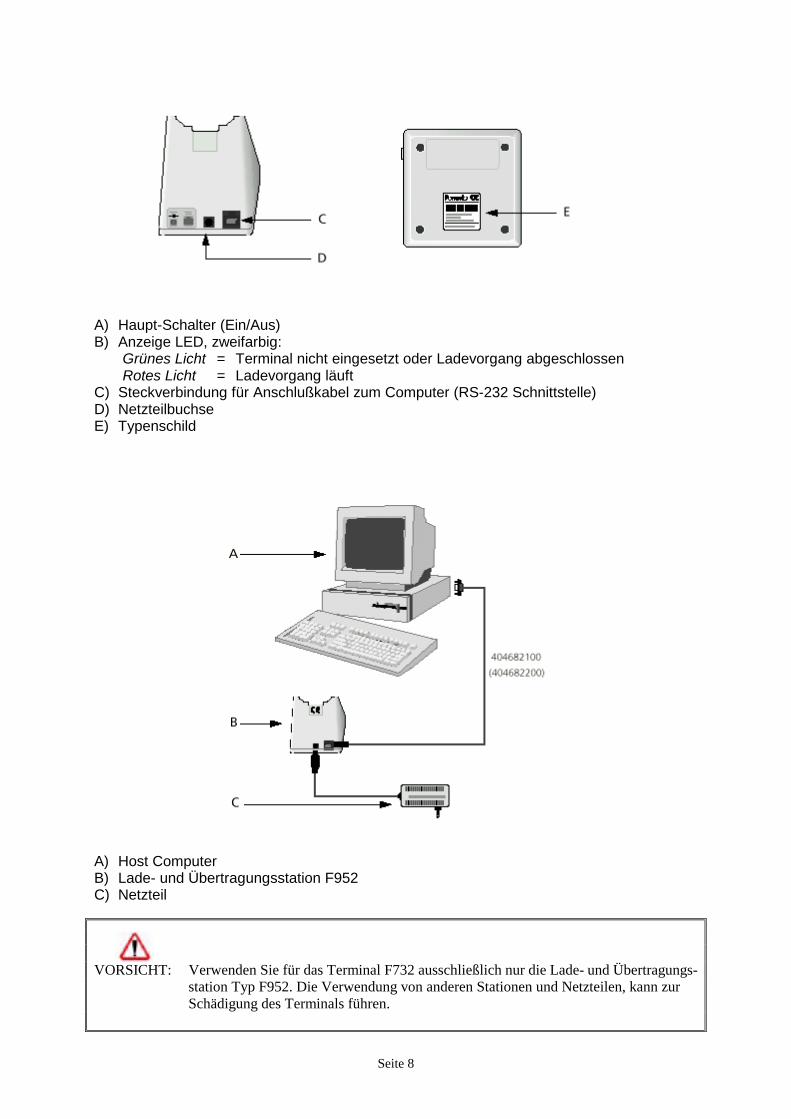
A) Haupt-Schalter (Ein/Aus) B) Anzeige LED, zweifarbig: Grünes Licht = Terminal nicht eingesetzt oder Ladevorgang abgeschlossen Rotes Licht = Ladevorgang läuft C) Steckverbindung für Anschlußkabel zum Computer (RS-232 Schnittstelle) D) Netzteilbuchse E) Typenschild
A) Host Computer B) Lade- und Übertragungsstation F952 C) Netzteil VORSICHT: Verwenden Sie für das Terminal F732 ausschließlich nur die Lade- und Übertragungs-
station Typ F952. Die Verwendung von anderen Stationen und Netzteilen, kann zur Schädigung des Terminals führen.
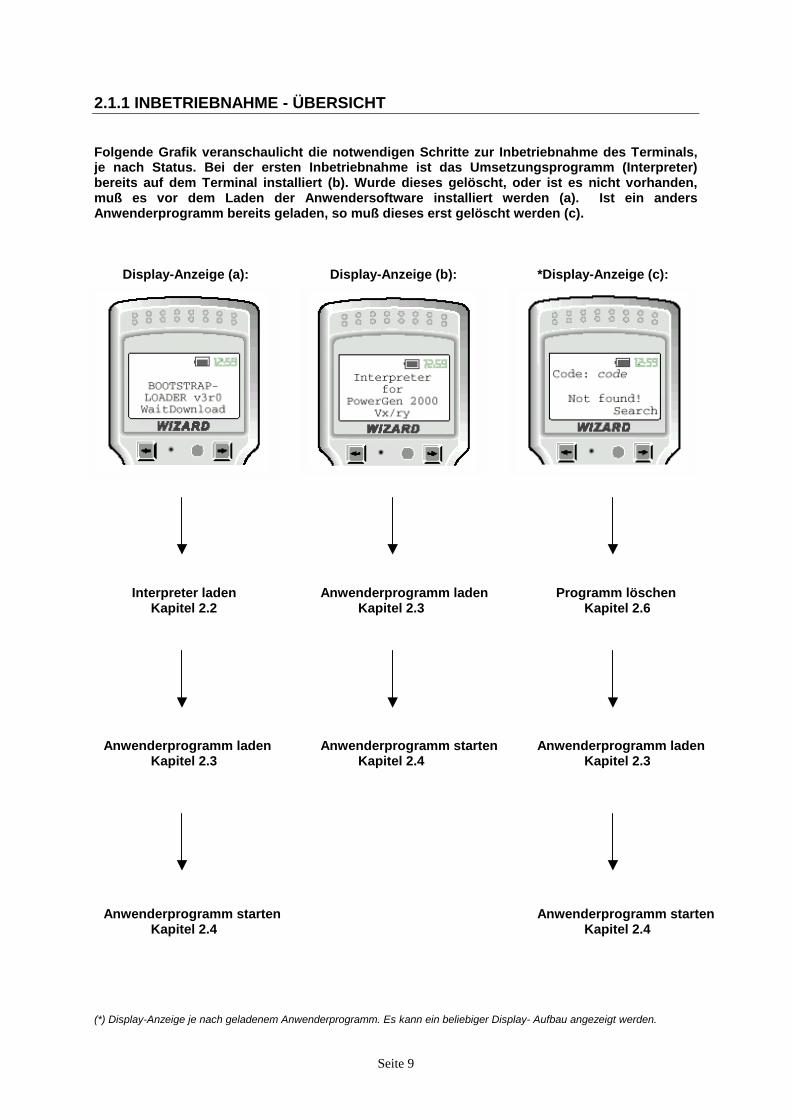
2.1.1 INBETRIEBNAHME - ÜBERSICHT Folgende Grafik veranschaulicht die notwendigen Schritte zur Inbetriebnahme des Terminals, je nach Status. Bei der ersten Inbetriebnahme ist das Umsetzungsprogramm (Interpreter) bereits auf dem Terminal installiert (b). Wurde dieses gelöscht, oder ist es nicht vorhanden, muß es vor dem Laden der Anwendersoftware installiert werden (a). Ist ein anders Anwenderprogramm bereits geladen, so muß dieses erst gelöscht werden (c). Display-Anzeige (a): Display-Anzeige (b): *Display-Anzeige (c):
Interpreter laden Kapitel 2.2 Anwenderprogramm laden Kapitel 2.3 Anwenderprogramm starten Kapitel 2.4 (*) Display-Anzeige je nach geladenem Anw
Seite 9
Anwenderprogramm laden Programm löschen Kapitel 2.3 Kapitel 2.6
Anwenderprogramm starten Anwenderprogramm laden Kapitel 2.4 Kapitel 2.3
Anwenderprogramm starten Kapitel 2.4
enderprogramm. Es kann ein beliebiger Display- Aufbau angezeigt werden.
Seite 10
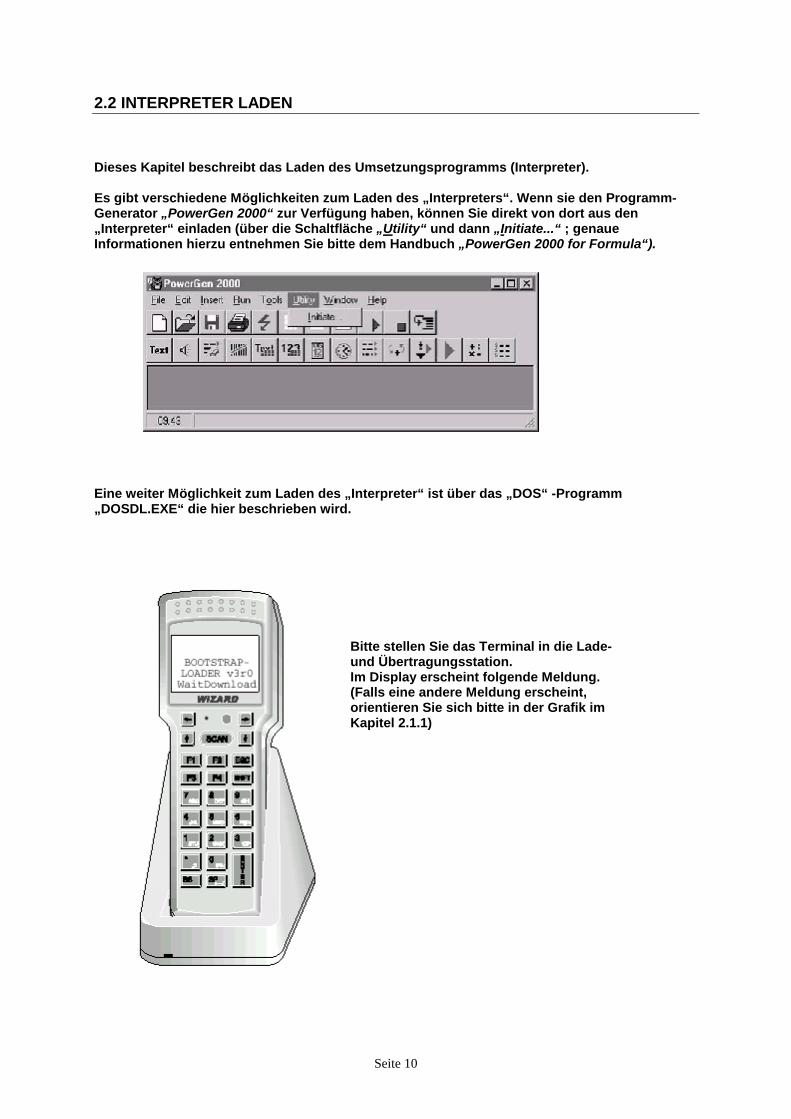
2.2 INTERPRETER LADEN Dieses Kapitel beschreibt das Laden des Umsetzungsprogramms (Interpreter). Es gibt verschiedene Möglichkeiten zum Laden des „Interpreters“. Wenn sie den Programm- Generator „PowerGen 2000“ zur Verfügung haben, können Sie direkt von dort aus den „Interpreter“ einladen (über die Schaltfläche „Utility“ und dann „Initiate...“ ; genaue Informationen hierzu entnehmen Sie bitte dem Handbuch „PowerGen 2000 for Formula“).
Eine weiter Möglichkeit zum Laden des „Interpreter“ ist über das „DOS“ -Programm „DOSDL.EXE“ die hier beschrieben wird.
Bitte stellen Sie das Terminal in die Lade- und Übertragungsstation. Im Display erscheint folgende Meldung. (Falls eine andere Meldung erscheint, orientieren Sie sich bitte in der Grafik im Kapitel 2.1.1)
Seite 11
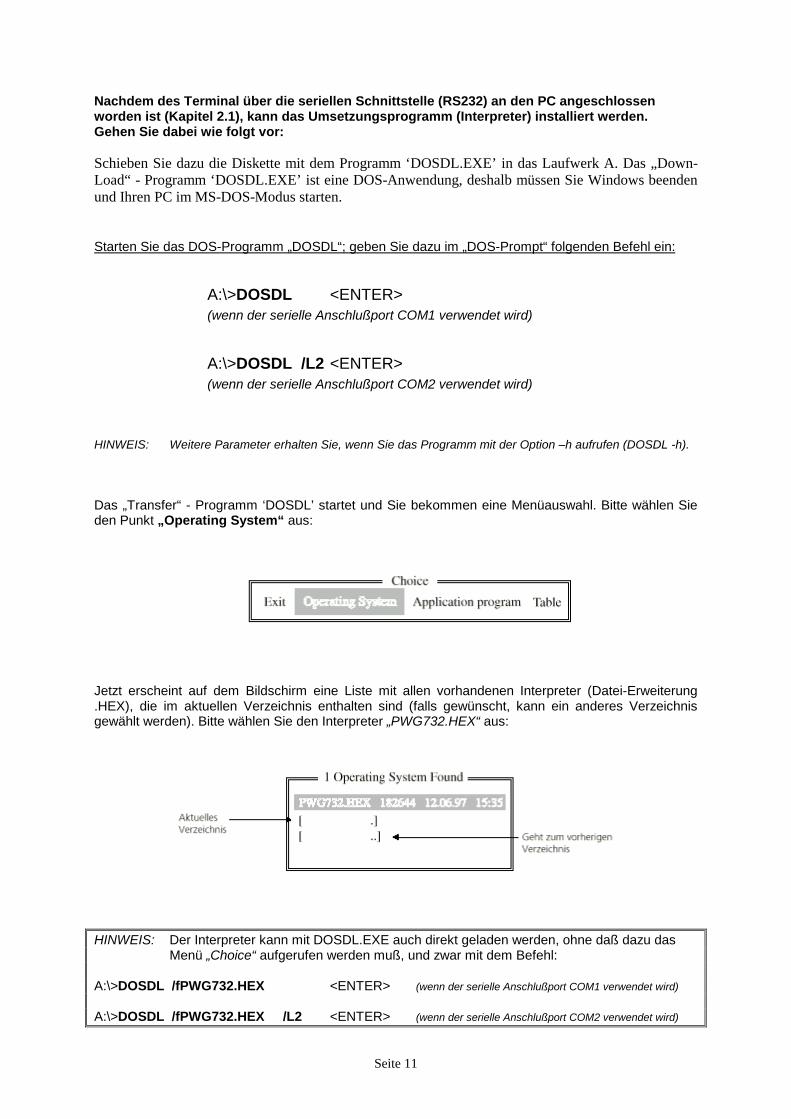
Nachdem des Terminal über die seriellen Schnittstelle (RS232) an den PC angeschlossen worden ist (Kapitel 2.1), kann das Umsetzungsprogramm (Interpreter) installiert werden. Gehen Sie dabei wie folgt vor: Schieben Sie dazu die Diskette mit dem Programm ‘DOSDL.EXE’ in das Laufwerk A. Das „Down-Load“ - Programm ‘DOSDL.EXE’ ist eine DOS-Anwendung, deshalb müssen Sie Windows beenden und Ihren PC im MS-DOS-Modus starten. Starten Sie das DOS-Programm „DOSDL“; geben Sie dazu im „DOS-Prompt“ folgenden Befehl ein:
A:\>DOSDL <ENTER> (wenn der serielle Anschlußport COM1 verwendet wird)
A:\>DOSDL /L2 <ENTER> (wenn der serielle Anschlußport COM2 verwendet wird) HINWEIS: Weitere Parameter erhalten Sie, wenn Sie das Programm mit der Option –h aufrufen (DOSDL -h). Das „Transfer“ - Programm ‘DOSDL’ startet und Sie bekommen eine Menüauswahl. Bitte wählen Sie den Punkt „Operating System“ aus:
Jetzt erscheint auf dem Bildschirm eine Liste mit allen vorhandenen Interpreter (Datei-Erweiterung .HEX), die im aktuellen Verzeichnis enthalten sind (falls gewünscht, kann ein anderes Verzeichnis gewählt werden). Bitte wählen Sie den Interpreter „PWG732.HEX“ aus:
HINWEIS: Der Interpreter kann mit DOSDL.EXE auch direkt geladen werden, ohne daß dazu das
Menü „Choice“ aufgerufen werden muß, und zwar mit dem Befehl: A:\>DOSDL /fPWG732.HEX <ENTER> (wenn der serielle Anschlußport COM1 verwendet wird) A:\>DOSDL /fPWG732.HEX /L2 <ENTER> (wenn der serielle Anschlußport COM2 verwendet wird)
Seite 12
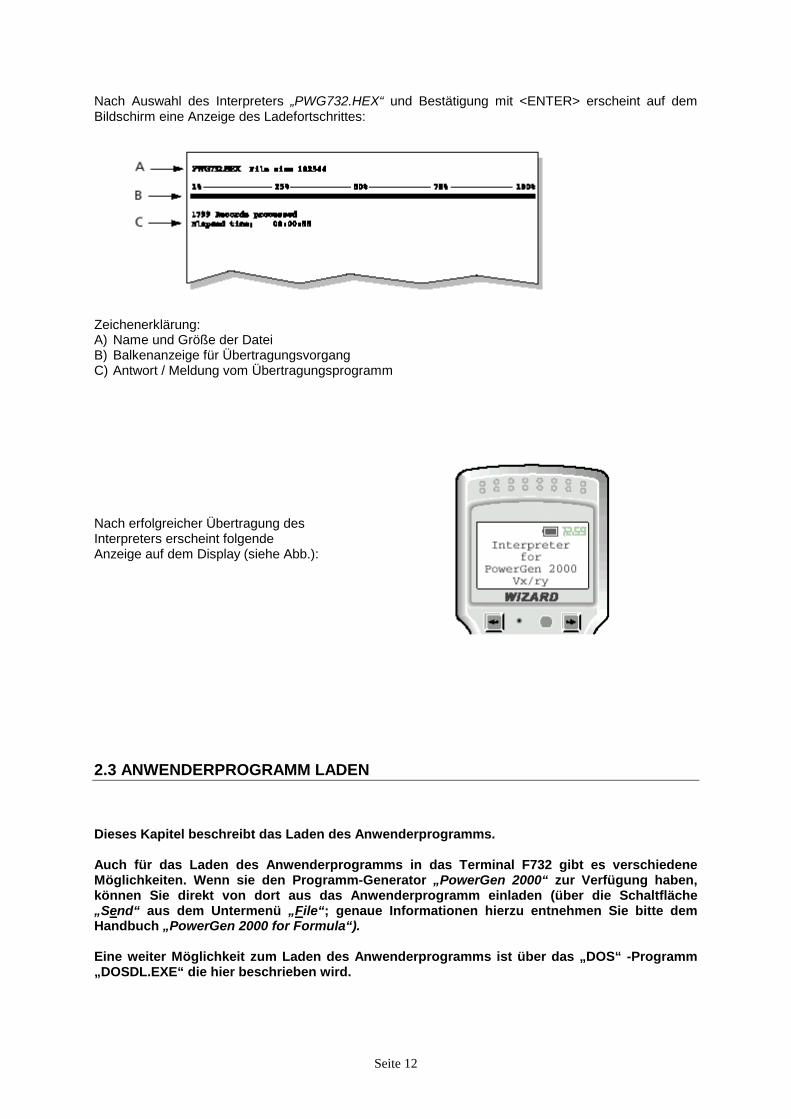
Nach Auswahl des Interpreters „PWG732.HEX“ und Bestätigung mit <ENTER> erscheint auf dem Bildschirm eine Anzeige des Ladefortschrittes:
Zeichenerklärung: A) Name und Größe der Datei B) Balkenanzeige für Übertragungsvorgang C) Antwort / Meldung vom Übertragungsprogramm Nach erfolgreicher Übertragung des Interpreters erscheint folgende Anzeige auf dem Display (siehe Abb.): 2.3 ANWENDERPROGRAMM LADEN Dieses Kapitel beschreibt das Laden des Anwenderprogramms. Auch für das Laden des Anwenderprogramms in das Terminal F732 gibt es verschiedene Möglichkeiten. Wenn sie den Programm-Generator „PowerGen 2000“ zur Verfügung haben, können Sie direkt von dort aus das Anwenderprogramm einladen (über die Schaltfläche „Send“ aus dem Untermenü „File“; genaue Informationen hierzu entnehmen Sie bitte dem Handbuch „PowerGen 2000 for Formula“). Eine weiter Möglichkeit zum Laden des Anwenderprogramms ist über das „DOS“ -Programm „DOSDL.EXE“ die hier beschrieben wird.
Seite 13
Nachdem das Terminal F732 über die seriellen Schnittstelle (RS232) an den PC angeschlossen und der Interpreter „PWG732.HEX“ in das Terminal F732 geladen worden ist (Kapitel 2.2), kann das Anwenderprogramm mittels der Übertragungssoftware „DOSDL“ mit der Auswahl „Application Program“ aus dem Menü „Choice“ geladen werden. Gehen Sie dabei wie folgt vor: Schieben Sie dazu die Diskette mit dem Programm ‘DOSDL.EXE’ in das Laufwerk A. Das „Down-Load“ - Programm ‘DOSDL.EXE’ ist eine DOS-Anwendung, deshalb müssen Sie Windows beenden und Ihren PC im MS-DOS-Modus starten. Das Terminal F732 bitte in die Übertragungsstation stellen. Starten Sie das DOS-Programm „DOSDL“; geben Sie dazu im „DOS-Prompt“ folgenden Befehl ein:
A:\>DOSDL <ENTER> (wenn der serielle Anschlußport COM1 verwendet wird)
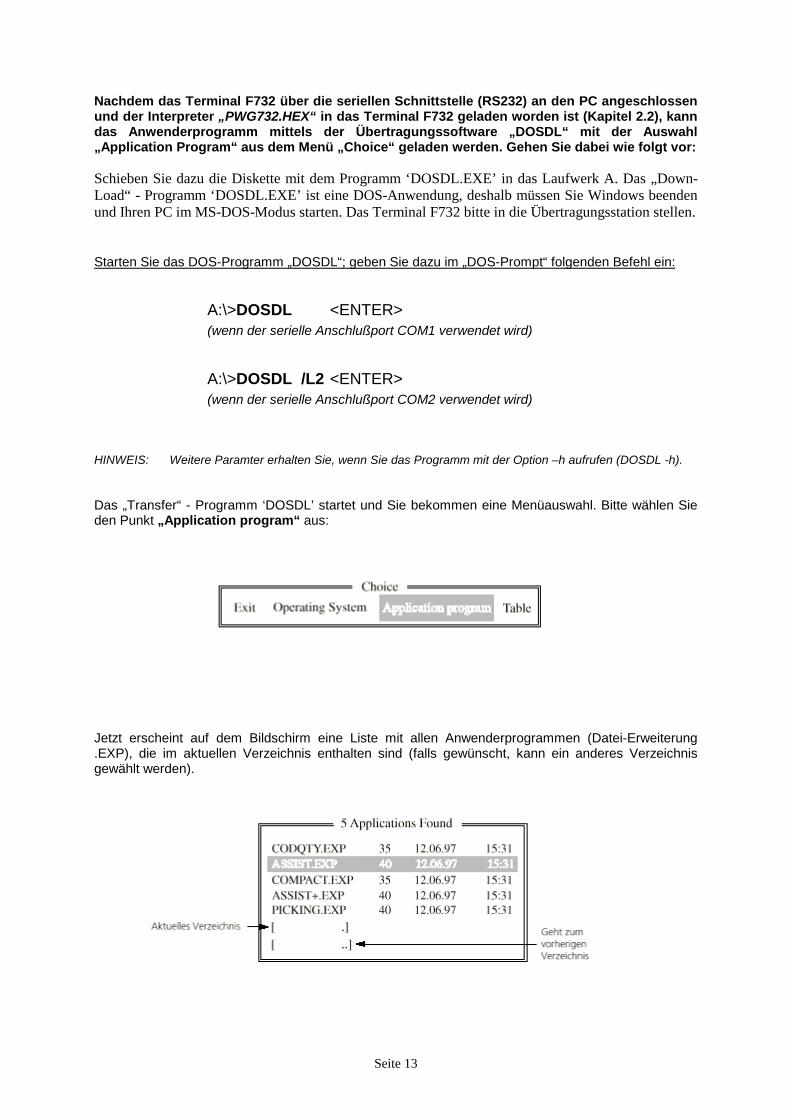
A:\>DOSDL /L2 <ENTER> (wenn der serielle Anschlußport COM2 verwendet wird) HINWEIS: Weitere Paramter erhalten Sie, wenn Sie das Programm mit der Option –h aufrufen (DOSDL -h). Das „Transfer“ - Programm ‘DOSDL’ startet und Sie bekommen eine Menüauswahl. Bitte wählen Sie den Punkt „Application program“ aus:
Jetzt erscheint auf dem Bildschirm eine Liste mit allen Anwenderprogrammen (Datei-Erweiterung .EXP), die im aktuellen Verzeichnis enthalten sind (falls gewünscht, kann ein anderes Verzeichnis gewählt werden).
Seite 14
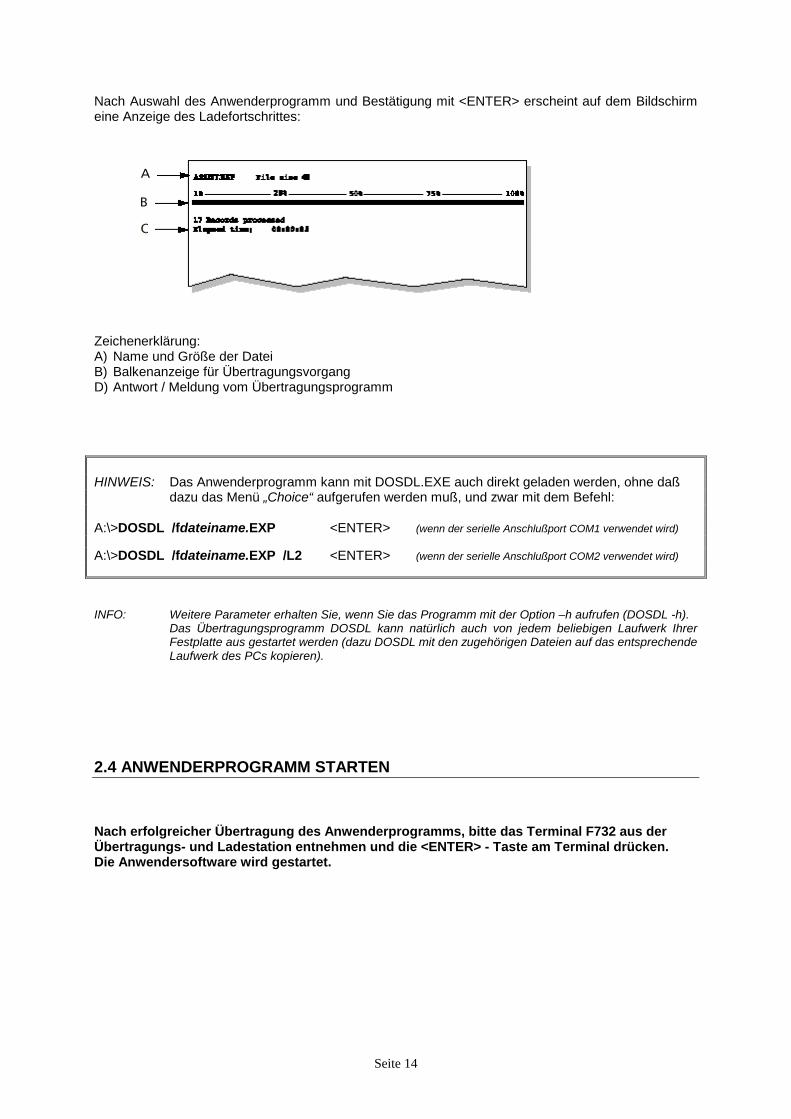
Nach Auswahl des Anwenderprogramm und Bestätigung mit <ENTER> erscheint auf dem Bildschirm eine Anzeige des Ladefortschrittes:
Zeichenerklärung: A) Name und Größe der Datei B) Balkenanzeige für Übertragungsvorgang D) Antwort / Meldung vom Übertragungsprogramm HINWEIS: Das Anwenderprogramm kann mit DOSDL.EXE auch direkt geladen werden, ohne daß
dazu das Menü „Choice“ aufgerufen werden muß, und zwar mit dem Befehl: A:\>DOSDL /fdateiname.EXP <ENTER> (wenn der serielle Anschlußport COM1 verwendet wird) A:\>DOSDL /fdateiname.EXP /L2 <ENTER> (wenn der serielle Anschlußport COM2 verwendet wird) INFO: Weitere Parameter erhalten Sie, wenn Sie das Programm mit der Option –h aufrufen (DOSDL -h). Das Übertragungsprogramm DOSDL kann natürlich auch von jedem beliebigen Laufwerk Ihrer
Festplatte aus gestartet werden (dazu DOSDL mit den zugehörigen Dateien auf das entsprechende Laufwerk des PCs kopieren).
2.4 ANWENDERPROGRAMM STARTEN Nach erfolgreicher Übertragung des Anwenderprogramms, bitte das Terminal F732 aus der Übertragungs- und Ladestation entnehmen und die <ENTER> - Taste am Terminal drücken. Die Anwendersoftware wird gestartet.
Seite 15
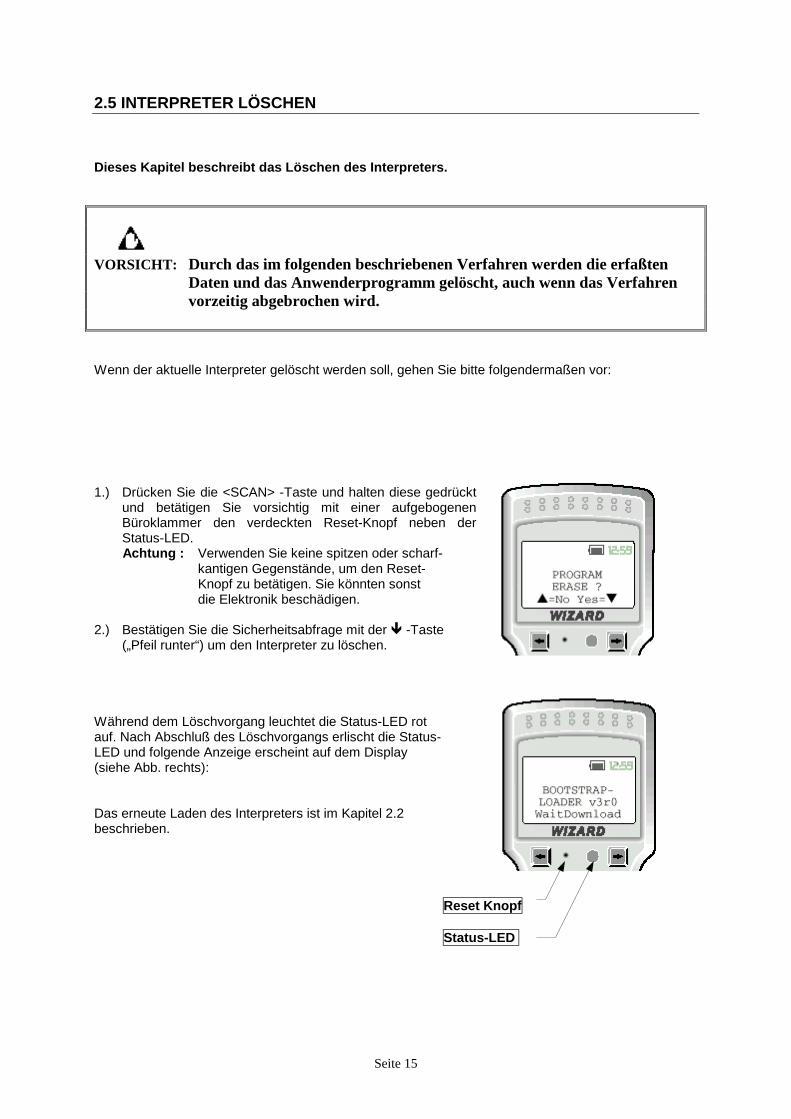
2.5 INTERPRETER LÖSCHEN Dieses Kapitel beschreibt das Löschen des Interpreters.
VORSICHT: Durch das im folgenden beschriebenen Verfahren werden die erfaßten
Daten und das Anwenderprogramm gelöscht, auch wenn das Verfahren vorzeitig abgebrochen wird. Wenn der aktuelle Interpreter gelöscht werden soll, gehen Sie bitte folgendermaßen vor: 1.) Drücken Sie die <SCAN> -Taste und halten diese gedrückt
und betätigen Sie vorsichtig mit einer aufgebogenen Büroklammer den verdeckten Reset-Knopf neben der Status-LED.
Achtung : Verwenden Sie keine spitzen oder scharf- kantigen Gegenstände, um den Reset- Knopf zu betätigen. Sie könnten sonst die Elektronik beschädigen. 2.) Bestätigen Sie die Sicherheitsabfrage mit der " -Taste
(„Pfeil runter“) um den Interpreter zu löschen. Während dem Löschvorgang leuchtet die Status-LED rot auf. Nach Abschluß des Löschvorgangs erlischt die Status- LED und folgende Anzeige erscheint auf dem Display (siehe Abb. rechts): Das erneute Laden des Interpreters ist im Kapitel 2.2 beschrieben. Reset Knopf Status-LED
Seite 16
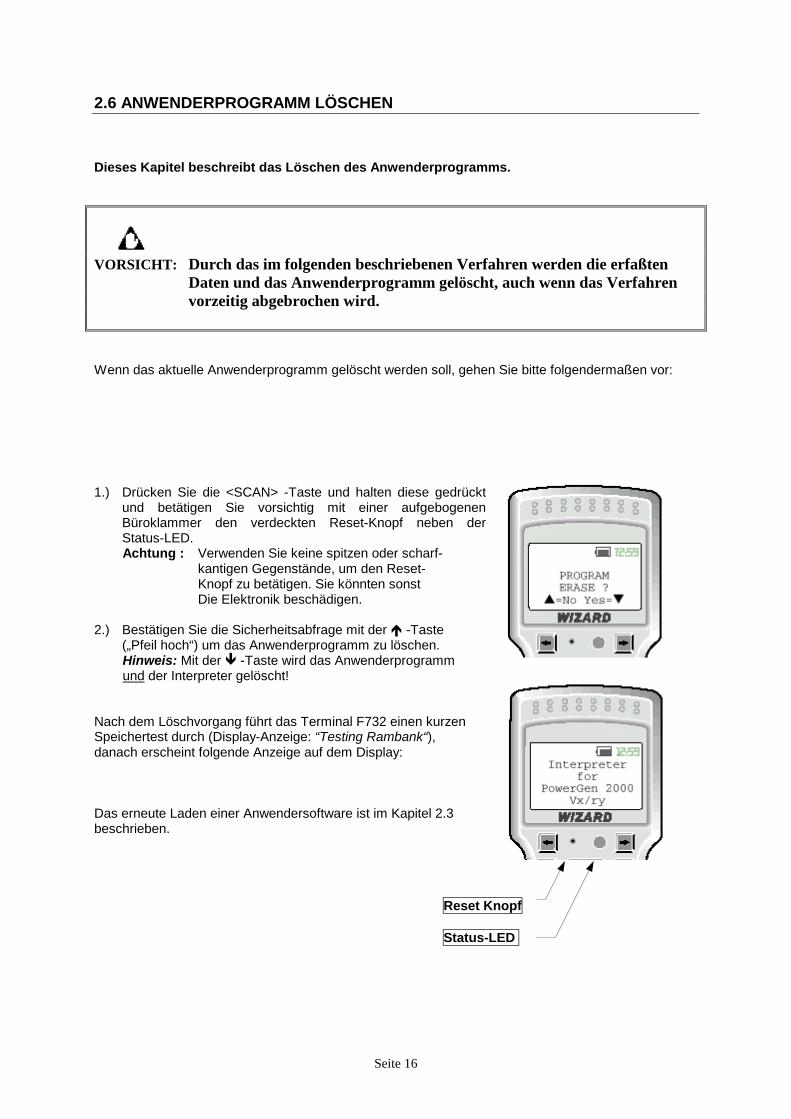
2.6 ANWENDERPROGRAMM LÖSCHEN Dieses Kapitel beschreibt das Löschen des Anwenderprogramms.
VORSICHT: Durch das im folgenden beschriebenen Verfahren werden die erfaßten
Daten und das Anwenderprogramm gelöscht, auch wenn das Verfahren vorzeitig abgebrochen wird. Wenn das aktuelle Anwenderprogramm gelöscht werden soll, gehen Sie bitte folgendermaßen vor: 1.) Drücken Sie die <SCAN> -Taste und halten diese gedrückt
und betätigen Sie vorsichtig mit einer aufgebogenen Büroklammer den verdeckten Reset-Knopf neben der Status-LED.
Achtung : Verwenden Sie keine spitzen oder scharf- kantigen Gegenstände, um den Reset- Knopf zu betätigen. Sie könnten sonst Die Elektronik beschädigen. 2.) Bestätigen Sie die Sicherheitsabfrage mit der # -Taste
(„Pfeil hoch“) um das Anwenderprogramm zu löschen. Hinweis: Mit der " -Taste wird das Anwenderprogramm und der Interpreter gelöscht! Nach dem Löschvorgang führt das Terminal F732 einen kurzen Speichertest durch (Display-Anzeige: “Testing Rambank“), danach erscheint folgende Anzeige auf dem Display: Das erneute Laden einer Anwendersoftware ist im Kapitel 2.3 beschrieben. Reset Knopf Status-LED
Seite 17
2.7 TABELLEN LADEN Dieses Kapitel beschreibt das Laden von Tabellen in das Terminal F732 (Optional). Auch für das Laden von Tabellen für ein Anwenderprogramm in das Terminal F732 gibt es verschiedene Möglichkeiten. Wenn sie den Programm-Generator „PowerGen 2000“ zur Verfügung haben, können Sie direkt von dort aus Tabellen für ein Anwenderprogramm einladen (über die Schaltfläche „Send“ aus dem Untermenü „File“; genaue Informationen hierzu entnehmen Sie bitte dem Handbuch „PowerGen 2000 for Formula“). Eine weiter Möglichkeit zum Laden von Tabellen ist über das „DOS“ -Programm „DOSDL.EXE“ die hier beschrieben wird. Nachdem das Terminal F732 über die RS-232 Schnittstellen an den Host-Computer angeschlossen (Kapitel 2.1) und der Interpreter und das Anwenderprogramm (Kapitel 2.2 und 2.3) geladen wurden, können Tabellen mit dem Punkt „Table“ aus dem Menü „Choice“ geladen werden. Starten Sie hierzu das DOS-Programm „DOSDL“ und wählen den Menü-Punkt „Table“ aus.
Auf dem Bildschirm wird dann eine Liste mit allen Tabellen (Datei-Erweiterung .INP) angezeigt, die im aktuellen Verzeichnis enthalten sind (falls gewünscht, kann ein anderes Verzeichnis gewählt werden).
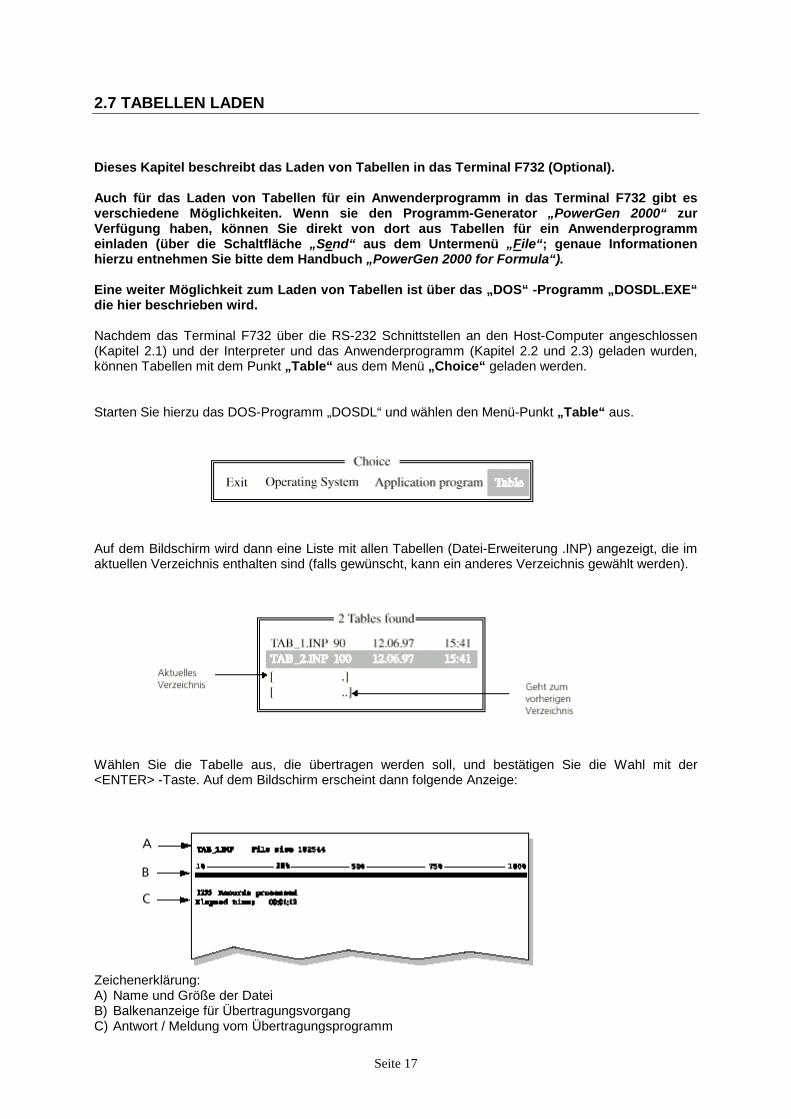
Wählen Sie die Tabelle aus, die übertragen werden soll, und bestätigen Sie die Wahl mit der <ENTER> -Taste. Auf dem Bildschirm erscheint dann folgende Anzeige:
Zeichenerklärung: A) Name und Größe der Datei B) Balkenanzeige für Übertragungsvorgang C) Antwort / Meldung vom Übertragungsprogramm

Seite 18
HINWEIS: Eine Tabelle kann mit DOSDL.EXE auch direkt geladen werden, ohne daß dazu das
Menü „Choice“ aufgerufen werden muß, und zwar mit dem Befehl: A:\>DOSDL /ftable_name.INP <ENTER> (wenn der serielle Anschlußport COM1 verwendet wird) A:\>DOSDL /ftable_name.INP /L2 <ENTER> (wenn der serielle Anschlußport COM2 verwendet wird) INFO: Weitere Parameter erhalten Sie, wenn Sie das Programm mit der Option –h aufrufen (DOSDL -h). Das Übertragungsprogramm DOSDL kann natürlich auch von jedem beliebigen Laufwerk Ihrer
Festplatte aus gestartet werden (dazu DOSDL mit den zugehörigen Dateien auf das entsprechende Laufwerk des PCs kopieren).
Seite 19
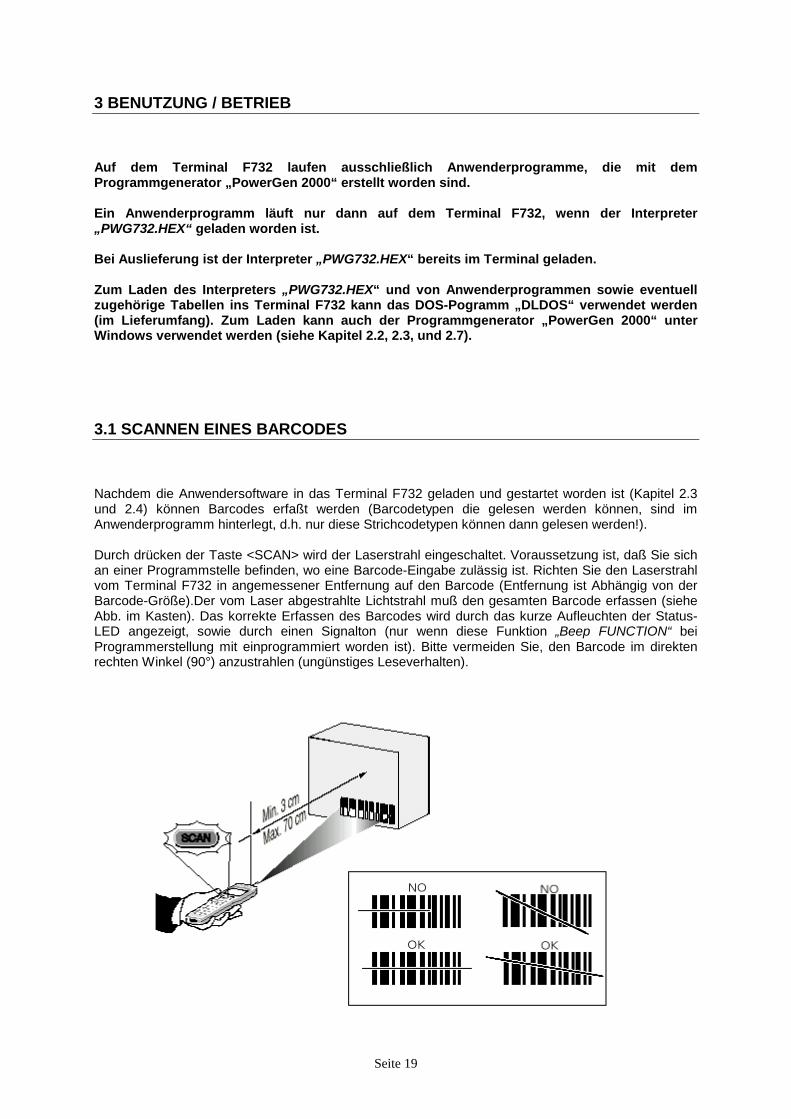
3 BENUTZUNG / BETRIEB Auf dem Terminal F732 laufen ausschließlich Anwenderprogramme, die mit dem Programmgenerator „PowerGen 2000“ erstellt worden sind. Ein Anwenderprogramm läuft nur dann auf dem Terminal F732, wenn der Interpreter „PWG732.HEX“ geladen worden ist. Bei Auslieferung ist der Interpreter „PWG732.HEX“ bereits im Terminal geladen. Zum Laden des Interpreters „PWG732.HEX“ und von Anwenderprogrammen sowie eventuell zugehörige Tabellen ins Terminal F732 kann das DOS-Pogramm „DLDOS“ verwendet werden (im Lieferumfang). Zum Laden kann auch der Programmgenerator „PowerGen 2000“ unter Windows verwendet werden (siehe Kapitel 2.2, 2.3, und 2.7). 3.1 SCANNEN EINES BARCODES Nachdem die Anwendersoftware in das Terminal F732 geladen und gestartet worden ist (Kapitel 2.3 und 2.4) können Barcodes erfaßt werden (Barcodetypen die gelesen werden können, sind im Anwenderprogramm hinterlegt, d.h. nur diese Strichcodetypen können dann gelesen werden!). Durch drücken der Taste <SCAN> wird der Laserstrahl eingeschaltet. Voraussetzung ist, daß Sie sich an einer Programmstelle befinden, wo eine Barcode-Eingabe zulässig ist. Richten Sie den Laserstrahl vom Terminal F732 in angemessener Entfernung auf den Barcode (Entfernung ist Abhängig von der Barcode-Größe).Der vom Laser abgestrahlte Lichtstrahl muß den gesamten Barcode erfassen (siehe Abb. im Kasten). Das korrekte Erfassen des Barcodes wird durch das kurze Aufleuchten der Status-LED angezeigt, sowie durch einen Signalton (nur wenn diese Funktion „Beep FUNCTION“ bei Programmerstellung mit einprogrammiert worden ist). Bitte vermeiden Sie, den Barcode im direkten rechten Winkel (90°) anzustrahlen (ungünstiges Leseverhalten).
Seite 20
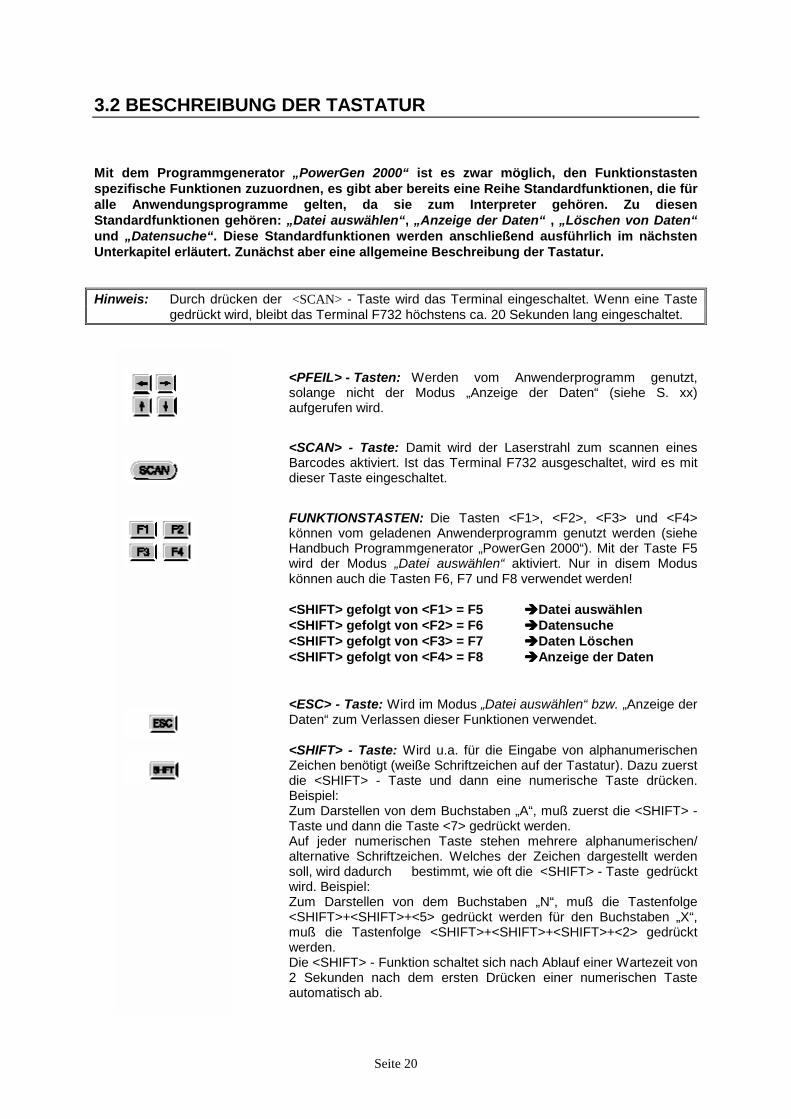
3.2 BESCHREIBUNG DER TASTATUR Mit dem Programmgenerator „PowerGen 2000“ ist es zwar möglich, den Funktionstasten spezifische Funktionen zuzuordnen, es gibt aber bereits eine Reihe Standardfunktionen, die für alle Anwendungsprogramme gelten, da sie zum Interpreter gehören. Zu diesen Standardfunktionen gehören: „Datei auswählen“, „Anzeige der Daten“ , „Löschen von Daten“ und „Datensuche“. Diese Standardfunktionen werden anschließend ausführlich im nächsten Unterkapitel erläutert. Zunächst aber eine allgemeine Beschreibung der Tastatur. Hinweis: Durch drücken der <SCAN> - Taste wird das Terminal eingeschaltet. Wenn eine Taste
gedrückt wird, bleibt das Terminal F732 höchstens ca. 20 Sekunden lang eingeschaltet.
<PFEIL> - Tasten: Werden vom Anwenderprogramm genutzt, solange nicht der Modus „Anzeige der Daten“ (siehe S. xx) aufgerufen wird.
<SCAN> - Taste: Damit wird der Laserstrahl zum scannen eines Barcodes aktiviert. Ist das Terminal F732 ausgeschaltet, wird es mit dieser Taste eingeschaltet.
FUNKTIONSTASTEN: Die Tasten <F1>, <F2>, <F3> und <F4>
können vom geladenen Anwenderprogramm genutzt werden (siehe Handbuch Programmgenerator „PowerGen 2000“). Mit der Taste F5 wird der Modus „Datei auswählen“ aktiviert. Nur in disem Modus können auch die Tasten F6, F7 und F8 verwendet werden!
<SHIFT> gefolgt von <F1> = F5 !!!!Datei auswählen <SHIFT> gefolgt von <F2> = F6 !!!!Datensuche <SHIFT> gefolgt von <F3> = F7 !!!!Daten Löschen <SHIFT> gefolgt von <F4> = F8 !!!!Anzeige der Daten
<ESC> - Taste: Wird im Modus „Datei auswählen“ bzw. „Anzeige der Daten“ zum Verlassen dieser Funktionen verwendet.
<SHIFT> - Taste: Wird u.a. für die Eingabe von alphanumerischen
Zeichen benötigt (weiße Schriftzeichen auf der Tastatur). Dazu zuerst die <SHIFT> - Taste und dann eine numerische Taste drücken. Beispiel:
Zum Darstellen von dem Buchstaben „A“, muß zuerst die <SHIFT> - Taste und dann die Taste <7> gedrückt werden.
Auf jeder numerischen Taste stehen mehrere alphanumerischen/ alternative Schriftzeichen. Welches der Zeichen dargestellt werden soll, wird dadurch bestimmt, wie oft die <SHIFT> - Taste gedrückt wird. Beispiel:
Zum Darstellen von dem Buchstaben „N“, muß die Tastenfolge <SHIFT>+<SHIFT>+<5> gedrückt werden für den Buchstaben „X“, muß die Tastenfolge <SHIFT>+<SHIFT>+<SHIFT>+<2> gedrückt werden.
Die <SHIFT> - Funktion schaltet sich nach Ablauf einer Wartezeit von 2 Sekunden nach dem ersten Drücken einer numerischen Taste automatisch ab.
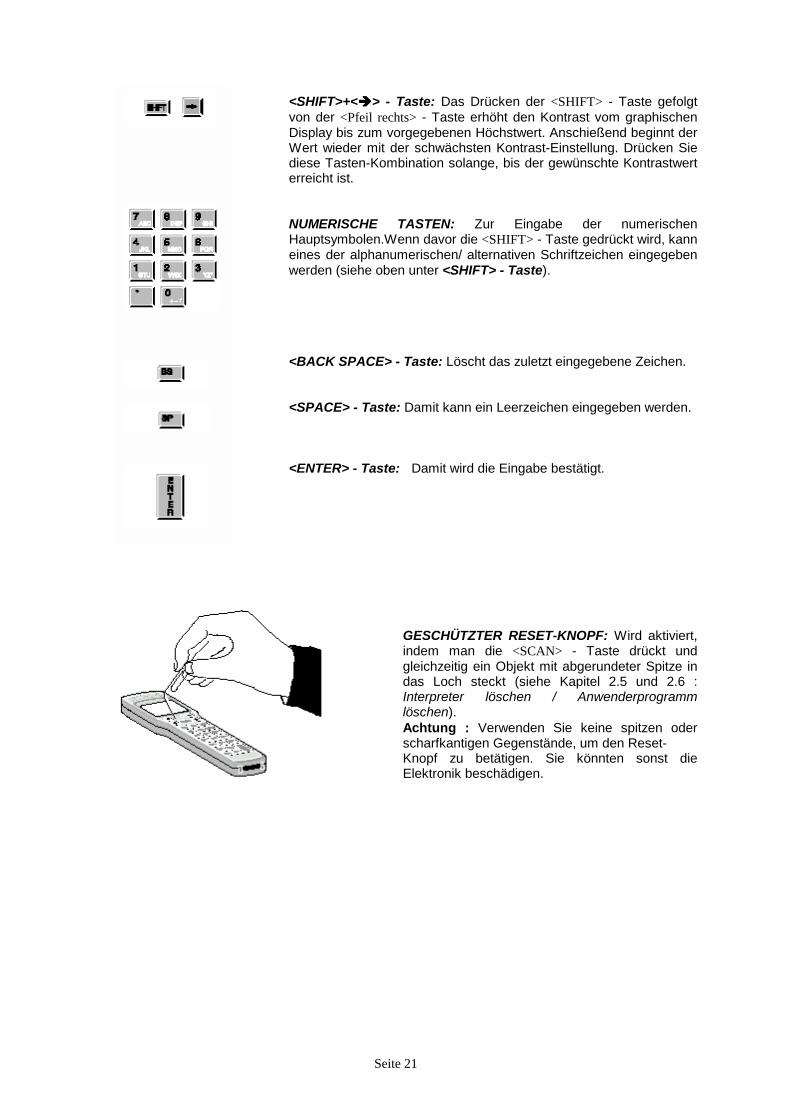
<SHIFT>+<!!!!> - Taste: Das Drücken der <SHIFT> - Taste gefolgt von der <Pfeil rechts> - Taste erhöht den Kontrast vom graphischen Display bis zum vorgegebenen Höchstwert. Anschießend beginnt der Wert wieder mit der schwächsten Kontrast-Einstellung. Drücken Sie diese Tasten-Kombination solange, bis der gewünschte Kontrastwert erreicht ist.
NUMERISCHE TASTEN: Zur Eingabe der numerischen
Hauptsymbolen.Wenn davor die <SHIFT> - Taste gedrückt wird, kann eines der alphanumerischen/ alternativen Schriftzeichen eingegeben werden (siehe oben unter <SHIFT> - Taste).
<BACK SPACE> - Taste: Löscht das zuletzt eingegebene Zeichen. <SPACE> - Taste: Damit kann ein Leerzeichen eingegeben werden. <ENTER> - Taste: Damit wird die Eingabe bestätigt.
Seite 21
GESCHÜTZTER RESET-KNOPF: Wird aktiviert, indem man die <SCAN> - Taste drückt und gleichzeitig ein Objekt mit abgerundeter Spitze in das Loch steckt (siehe Kapitel 2.5 und 2.6 : Interpreter löschen / Anwenderprogramm löschen). Achtung : Verwenden Sie keine spitzen oder scharfkantigen Gegenstände, um den Reset- Knopf zu betätigen. Sie könnten sonst die Elektronik beschädigen.
Seite 22
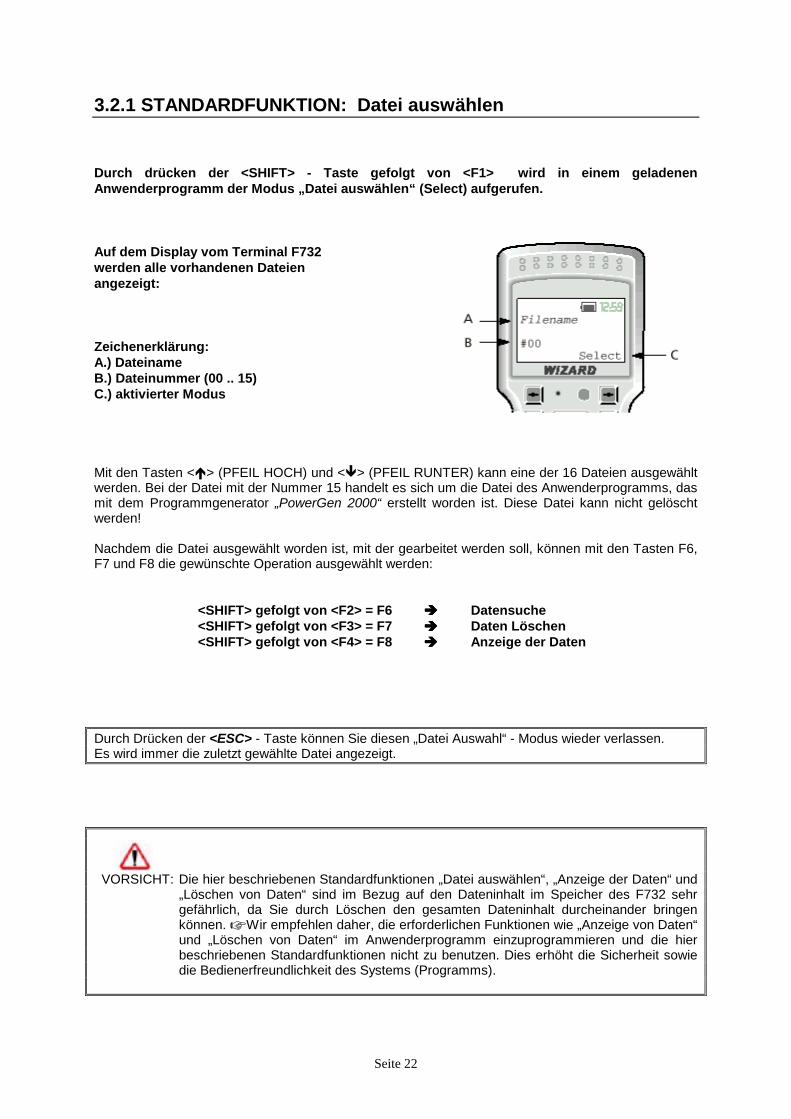
3.2.1 STANDARDFUNKTION: Datei auswählen Durch drücken der <SHIFT> - Taste gefolgt von <F1> wird in einem geladenen Anwenderprogramm der Modus „Datei auswählen“ (Select) aufgerufen. Auf dem Display vom Terminal F732 werden alle vorhandenen Dateien angezeigt: Zeichenerklärung: A.) Dateiname B.) Dateinummer (00 .. 15) C.) aktivierter Modus Mit den Tasten <"> (PFEIL HOCH) und <#> (PFEIL RUNTER) kann eine der 16 Dateien ausgewählt werden. Bei der Datei mit der Nummer 15 handelt es sich um die Datei des Anwenderprogramms, das mit dem Programmgenerator „PowerGen 2000“ erstellt worden ist. Diese Datei kann nicht gelöscht werden! Nachdem die Datei ausgewählt worden ist, mit der gearbeitet werden soll, können mit den Tasten F6, F7 und F8 die gewünschte Operation ausgewählt werden: <SHIFT> gefolgt von <F2> = F6 !!!! Datensuche <SHIFT> gefolgt von <F3> = F7 !!!! Daten Löschen <SHIFT> gefolgt von <F4> = F8 !!!! Anzeige der Daten Durch Drücken der <ESC> - Taste können Sie diesen „Datei Auswahl“ - Modus wieder verlassen. Es wird immer die zuletzt gewählte Datei angezeigt. VORSICHT: Die hier beschriebenen Standardfunktionen „Datei auswählen“, „Anzeige der Daten“ und
„Löschen von Daten“ sind im Bezug auf den Dateninhalt im Speicher des F732 sehr gefährlich, da Sie durch Löschen den gesamten Dateninhalt durcheinander bringen können. ☞ Wir empfehlen daher, die erforderlichen Funktionen wie „Anzeige von Daten“ und „Löschen von Daten“ im Anwenderprogramm einzuprogrammieren und die hier beschriebenen Standardfunktionen nicht zu benutzen. Dies erhöht die Sicherheit sowie die Bedienerfreundlichkeit des Systems (Programms).
Seite 23
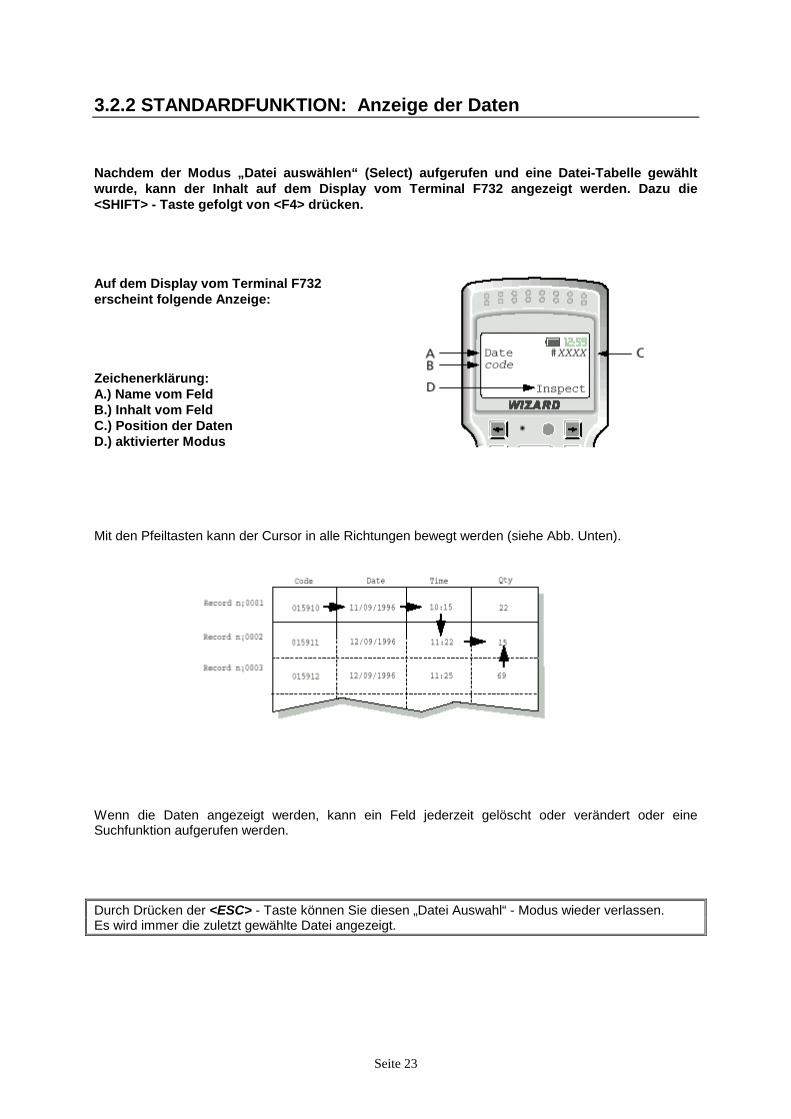
3.2.2 STANDARDFUNKTION: Anzeige der Daten Nachdem der Modus „Datei auswählen“ (Select) aufgerufen und eine Datei-Tabelle gewählt wurde, kann der Inhalt auf dem Display vom Terminal F732 angezeigt werden. Dazu die <SHIFT> - Taste gefolgt von <F4> drücken. Auf dem Display vom Terminal F732 erscheint folgende Anzeige: Zeichenerklärung: A.) Name vom Feld B.) Inhalt vom Feld C.) Position der Daten D.) aktivierter Modus Mit den Pfeiltasten kann der Cursor in alle Richtungen bewegt werden (siehe Abb. Unten).
Wenn die Daten angezeigt werden, kann ein Feld jederzeit gelöscht oder verändert oder eine Suchfunktion aufgerufen werden. Durch Drücken der <ESC> - Taste können Sie diesen „Datei Auswahl“ - Modus wieder verlassen. Es wird immer die zuletzt gewählte Datei angezeigt.

Seite 24
3.2.3 STANDARDFUNKTION: Löschen von Daten Nachdem der Modus „Datei auswählen“ (Select) aufgerufen und eventuell eine Datei-Tabelle gewählt wurde (Modus „Anzeige der Daten“), kann durch drücken der <SHIFT> - Taste gefolgt von der <F3> - Taste: - der Inhalt eines Feldes gelöscht werden; - eine Datei mit Daten gelöscht werden. Um ein Feld zu löschen, muß der Select- Modus aufgerufen und das Feld auf dem Display angezeigt werden. Zum Löschen die Taste <SHIFT> gefolgt von <F3> drücken. Auf dem Display erscheint eine Sicherheitsabfrage, die eine Bestätigung verlangt. Durch Drücken der <ENTER> - Taste wird das Löschen bestätigt und der Inhalt des Feldes definitiv gelöscht. Durch Drücken der <ESC> - Taste wird dagegen das Löschen nicht bestätigt und der Inhalt des Feldes bleibt erhalten. Um den Inhalt einer Datei-Tabelle zu löschen, muß der Select-Modus aufgerufen und die Datei auf dem Display ausgewählt werden. Zum Löschen die Taste <SHIFT> gefolgt von <F3> drücken. Aud dem Display erscheint eine Sicherheitsabfrage, die eine Bestätigung verlangt. Durch Drücken der <ENTER> - Taste wird das Löschen bestätigt und die Datei definitiv gelöscht. Durch Drücken der <ESC> - Taste wird dagegen das Löschen nicht bestätigt und die Datei bleibt erhalten. HINWEIS: Die gelöschte Datei wird nicht aus dem Terminal F732 entfernt, sondern es wird der Inhalt
aller Felder gelöscht und der Index geht automatisch auf den ersten Eintrag zurück.
Seite 25
4. DATENÜBERTRAGUNG Dieses Kapitel beschreibt die Konfigurations- und Datenempfangssoftware „SysTools“ (Lieferumfang) die unter Windows 95/98 und NT läuft. Diese Software empfängt die gespeicherten Daten vom Terminal F732 und speichert diese Daten in eine ASCII- Datei ab. Bitte halten Sie sich genau an die folgenden Schritte, da „SysTools“ auch noch für andere Geräte der FORMULA- Serie eingesetzt wird und es somit in dieser Software weitere Einstellungen gibt, die mit dem Terminal F732 nicht notwendig , bzw. nicht durchführbar sind. 4.1 Empfangs- und Konfigurationsprogramm „SysTools“
Schritt 1: Installation der Software SysTools Installieren Sie die Software SysTools, indem Sie die Diskette ‘Disk1’ einlegen und unter ‘Start’ - ‘Ausführen’ die Datei ‘a:setup’ angeben und bestätigen. Das Programm wird automatisch in ein Programmverzeichnis installiert und es wird ein neuer Eintrag im Start-Verzeichnis angelegt.
Schritt 2: Anschluss der Komponenten Verbinden Sie, falls noch nicht geschehen, die Übertragungsstation und Ihren PC mit dem seriellen Kabel, wie in Kapite2.1 (Inbetriebnahme-Anschluß) beschrieben ist.
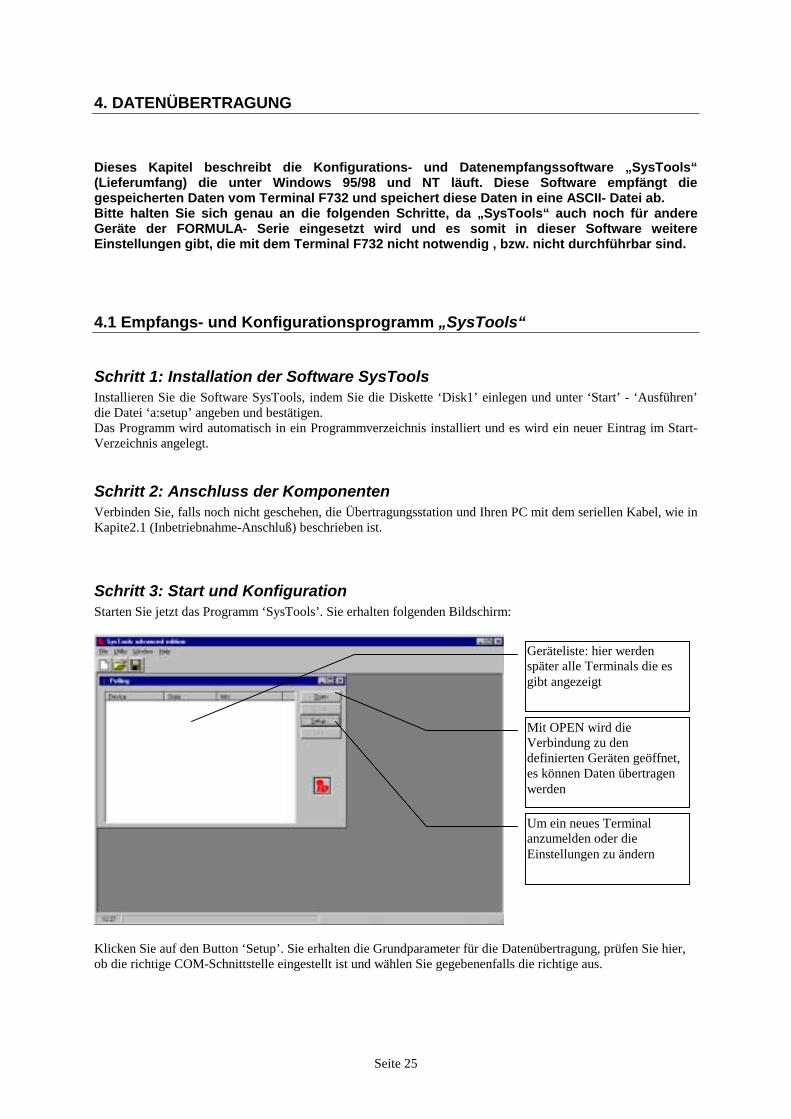
Schritt 3: Start und Konfiguration Starten Sie jetzt das Programm ‘SysTools’. Sie erhalten folgenden Bildschirm:
Klicken Sie auf den Button ‘Setup’. Sie erhalten die Grundparameter für die Datenübertragung, prüfen Sie hier, ob die richtige COM-Schnittstelle eingestellt ist und wählen Sie gegebenenfalls die richtige aus.
Geräteliste: hier werden später alle Terminals die es gibt angezeigt
Um ein neues Terminal anzumelden oder die Einstellungen zu ändern
Mit OPEN wird die Verbindung zu den definierten Geräten geöffnet, es können Daten übertragen werden
Seite 26
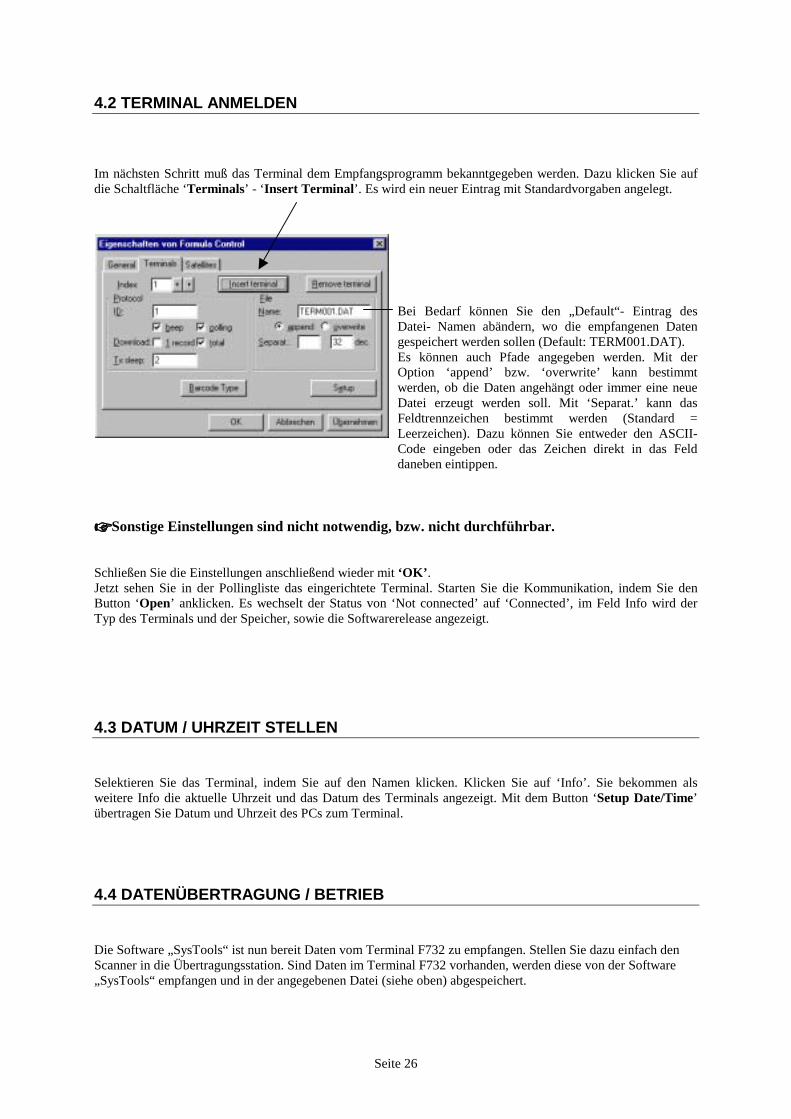
4.2 TERMINAL ANMELDEN Im nächsten Schritt muß das Terminal dem Empfangsprogramm bekanntgegeben werden. Dazu klicken Sie auf die Schaltfläche ‘Terminals’ - ‘Insert Terminal’. Es wird ein neuer Eintrag mit Standardvorgaben angelegt.
Bei Bedarf können Sie den „Default“- Eintrag des Datei- Namen abändern, wo die empfangenen Daten gespeichert werden sollen (Default: TERM001.DAT). Es können auch Pfade angegeben werden. Mit der Option ‘append’ bzw. ‘overwrite’ kann bestimmt werden, ob die Daten angehängt oder immer eine neue Datei erzeugt werden soll. Mit ‘Separat.’ kann das Feldtrennzeichen bestimmt werden (Standard = Leerzeichen). Dazu können Sie entweder den ASCII-Code eingeben oder das Zeichen direkt in das Feld daneben eintippen.
☞☞☞☞ Sonstige Einstellungen sind nicht notwendig, bzw. nicht durchführbar. Schließen Sie die Einstellungen anschließend wieder mit ‘OK’. Jetzt sehen Sie in der Pollingliste das eingerichtete Terminal. Starten Sie die Kommunikation, indem Sie den Button ‘Open’ anklicken. Es wechselt der Status von ‘Not connected’ auf ‘Connected’, im Feld Info wird der Typ des Terminals und der Speicher, sowie die Softwarerelease angezeigt. 4.3 DATUM / UHRZEIT STELLEN Selektieren Sie das Terminal, indem Sie auf den Namen klicken. Klicken Sie auf ‘Info’. Sie bekommen als weitere Info die aktuelle Uhrzeit und das Datum des Terminals angezeigt. Mit dem Button ‘Setup Date/Time’ übertragen Sie Datum und Uhrzeit des PCs zum Terminal. 4.4 DATENÜBERTRAGUNG / BETRIEB Die Software „SysTools“ ist nun bereit Daten vom Terminal F732 zu empfangen. Stellen Sie dazu einfach den Scanner in die Übertragungsstation. Sind Daten im Terminal F732 vorhanden, werden diese von der Software „SysTools“ empfangen und in der angegebenen Datei (siehe oben) abgespeichert.
Seite 27
5. INSTANDHALTUNG 5.1 AKKU LADEHINWEISE Die Akkuladung hängt von vielen Faktoren ab, in der Regel kann aber davon ausgegangen werden, daß der Akku dem Terminal F732 unter normalen Betriebsbedingungen eine Autonomie von einem Arbeitstag garantiert. Der Zustand der Akkuladung wird von einem Symbol auf dem Display in vier Stufen angezeigt. Diese Anzeige kann nur als ungefährer Richtwert dienen. Der Akku sollte erst dann wieder aufgeladen werden, wenn er sich fast vollständig entladen hat (Vermeidung des „Memory - Effekts“ bei Akku des Typs NiCd). Zum Laden des Akkus genügt es, das Terminal F732 in die Lade- und Übertragungsstation zu stellen. Es wird eine Ladedauer von mindestens acht Stunden ohne Unterbrechung empfohlen. Wenn es sich dagegen um neue Akkus handelt, oder wenn die Akkus seit sehr langer Zeit nicht mehr aufgeladen worden sind, sind zwei bis drei komplette Lade- und Entladezyklen nötig (keine Teilladungen durchführen). Erst dann erreichen die Akkus ihre volle Kapazität. HINWEIS: Während des Ladevorgangs wechselt die Farbe der Kontrolleuchte an der Lade- und
Übertragungsstation von Rot nach Grün. Der Farbwechsel zeigt an, daß der Akku 70-80 % der maximalen Ladung erreicht hat.
VORSICHT: Sollte das Terminal F732 längere Zeit nicht mehr benutzt werden, bitte die
Akkus vollständig aufladen und alle 6 Monate nachladen.
Seite 28
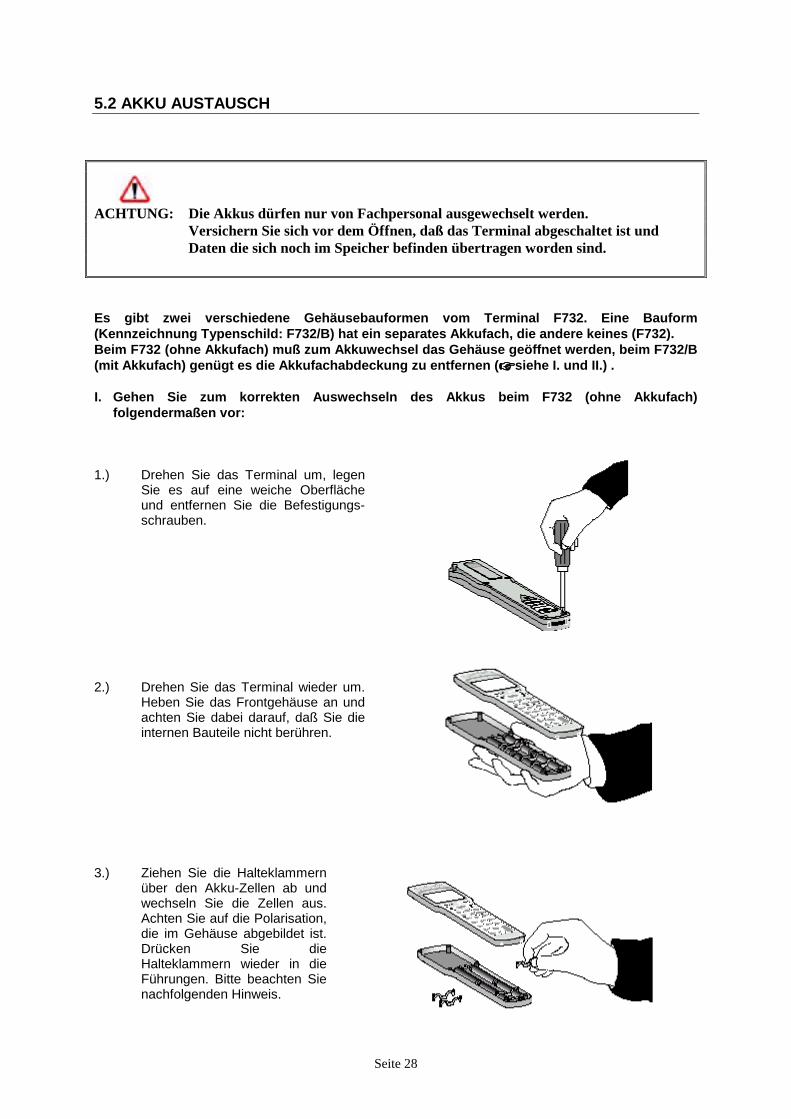
5.2 AKKU AUSTAUSCH ACHTUNG: Die Akkus dürfen nur von Fachpersonal ausgewechselt werden. Versichern Sie sich vor dem Öffnen, daß das Terminal abgeschaltet ist und
Daten die sich noch im Speicher befinden übertragen worden sind. Es gibt zwei verschiedene Gehäusebauformen vom Terminal F732. Eine Bauform (Kennzeichnung Typenschild: F732/B) hat ein separates Akkufach, die andere keines (F732). Beim F732 (ohne Akkufach) muß zum Akkuwechsel das Gehäuse geöffnet werden, beim F732/B (mit Akkufach) genügt es die Akkufachabdeckung zu entfernen (☞☞☞☞ siehe I. und II.) . I. Gehen Sie zum korrekten Auswechseln des Akkus beim F732 (ohne Akkufach)
folgendermaßen vor: 1.) Drehen Sie das Terminal um, legen
Sie es auf eine weiche Oberfläche und entfernen Sie die Befestigungs-schrauben.
2.) Drehen Sie das Terminal wieder um.
Heben Sie das Frontgehäuse an und achten Sie dabei darauf, daß Sie die internen Bauteile nicht berühren.
3.) Ziehen Sie die Halteklammern
über den Akku-Zellen ab und wechseln Sie die Zellen aus. Achten Sie auf die Polarisation, die im Gehäuse abgebildet ist. Drücken Sie die Halteklammern wieder in die Führungen. Bitte beachten Sie nachfolgenden Hinweis.
Seite 29
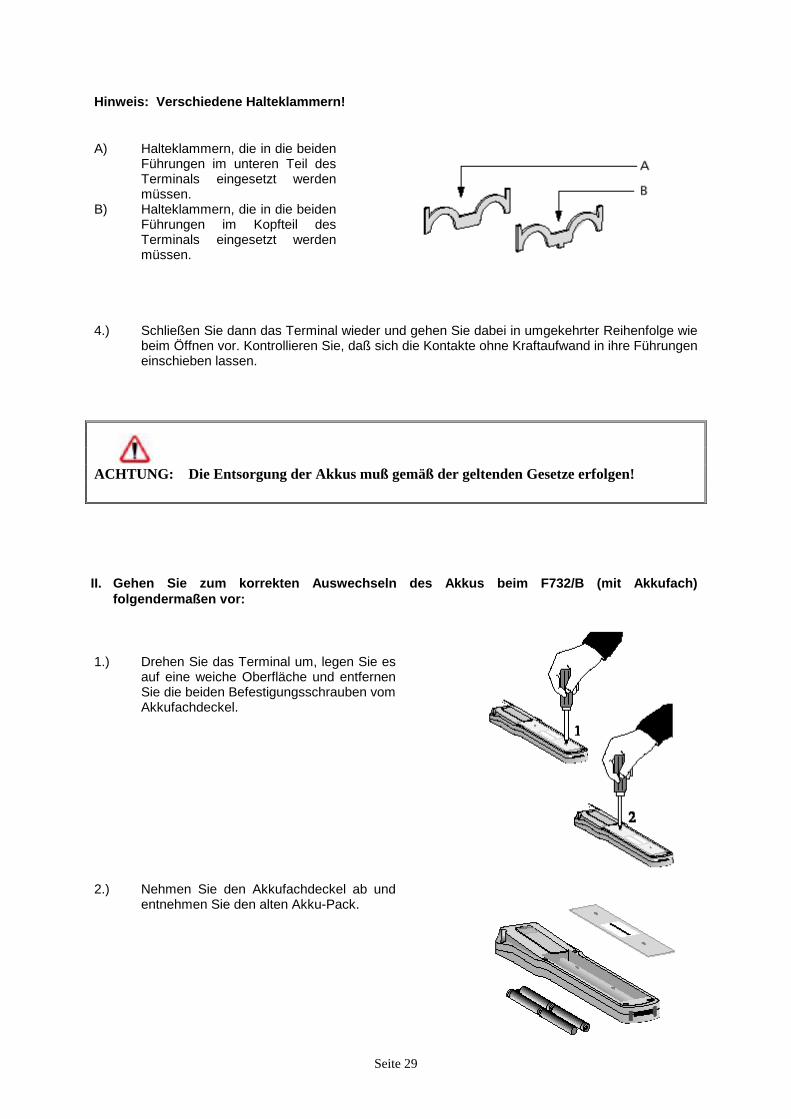
Hinweis: Verschiedene Halteklammern! A) Halteklammern, die in die beiden
Führungen im unteren Teil des Terminals eingesetzt werden müssen.
B) Halteklammern, die in die beiden Führungen im Kopfteil des Terminals eingesetzt werden müssen.
4.) Schließen Sie dann das Terminal wieder und gehen Sie dabei in umgekehrter Reihenfolge wie
beim Öffnen vor. Kontrollieren Sie, daß sich die Kontakte ohne Kraftaufwand in ihre Führungen einschieben lassen.
ACHTUNG: Die Entsorgung der Akkus muß gemäß der geltenden Gesetze erfolgen! II. Gehen Sie zum korrekten Auswechseln des Akkus beim F732/B (mit Akkufach)
folgendermaßen vor: 1.) Drehen Sie das Terminal um, legen Sie es
auf eine weiche Oberfläche und entfernen Sie die beiden Befestigungsschrauben vom Akkufachdeckel.
2.) Nehmen Sie den Akkufachdeckel ab und
entnehmen Sie den alten Akku-Pack.

Seite 30
3.) Setzen Sie den neunen Akku-Pack ein unter Beachtung der Polarisation, die im Gehäuse abgebildet ist.
4.) Schließen Sie dann den Akkufachdeckel und bringen die Befestigungsschrauben wieder an. ACHTUNG: Die Entsorgung der Akkus muß gemäß der geltenden Gesetze erfolgen! 5.3 REINIGUNG DES TERMINALS Zum Reinigen verwenden Sie bitte ein feuchtes, weiches Tuch. Vorsicht: Rauhe Tücher oder Papier kann das Strahlaustrittsfenster beschädigen (Kratzer). Verwenden Sie keinen Alkohol und keine Lösungsmittel oder ätzende Produkte. Das Terminal darf nicht in Flüssigkeiten getaucht werden.
Seite 31
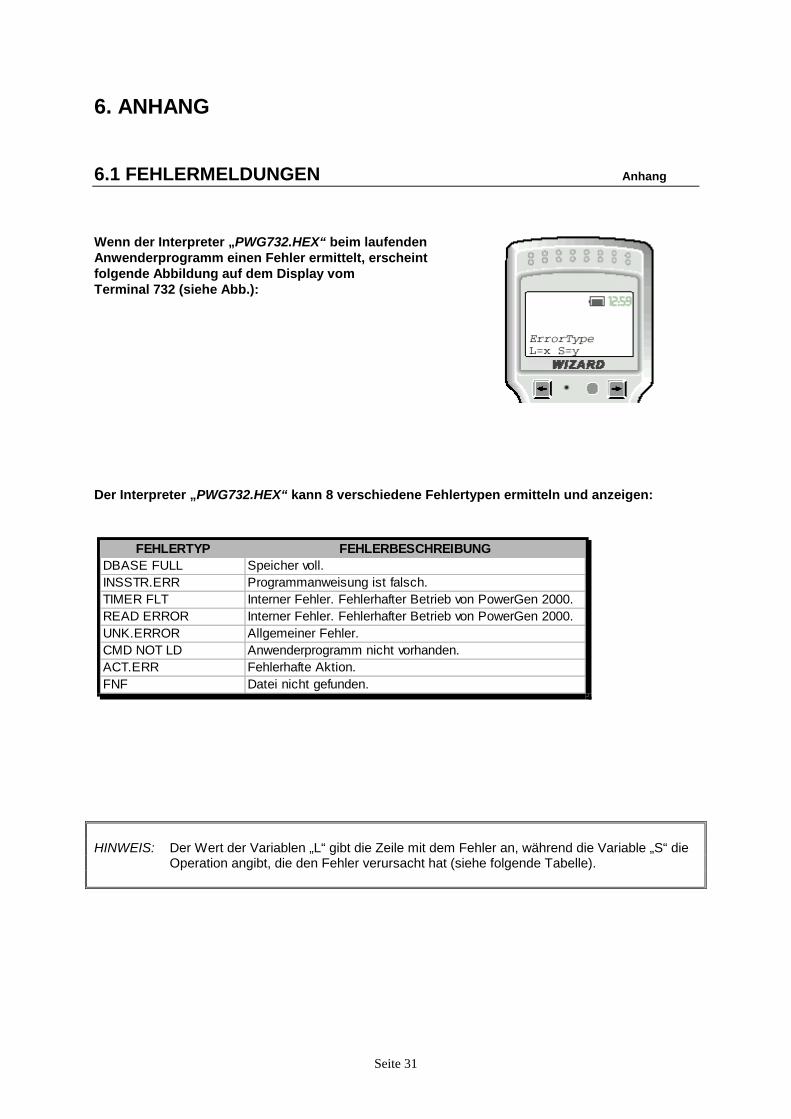
6. ANHANG 6.1 FEHLERMELDUNGEN Anhang Wenn der Interpreter „PWG732.HEX“ beim laufenden Anwenderprogramm einen Fehler ermittelt, erscheint folgende Abbildung auf dem Display vom Terminal 732 (siehe Abb.): Der Interpreter „PWG732.HEX“ kann 8 verschiedene Fehlertypen ermitteln und anzeigen:
FEHLERTYP FEHLERBESCHREIBUNGDBASE FULL Speicher voll.INSSTR.ERR Programmanweisung ist falsch.TIMER FLT Interner Fehler. Fehlerhafter Betrieb von PowerGen 2000.READ ERROR Interner Fehler. Fehlerhafter Betrieb von PowerGen 2000.UNK.ERROR Allgemeiner Fehler.CMD NOT LD Anwenderprogramm nicht vorhanden.ACT.ERR Fehlerhafte Aktion.FNF Datei nicht gefunden.
HINWEIS: Der Wert der Variablen „L“ gibt die Zeile mit dem Fehler an, während die Variable „S“ die
Operation angibt, die den Fehler verursacht hat (siehe folgende Tabelle).
Seite 32
TABELLE: FEHLERMELDUNGEN „S“ Anhang
S FEHLERFUNKTION FEHLERURSACHE0 Erfassung Mögliche Fehlerursachen:
1) Versuch, eine nicht erlaubte Erfassung auszuführen.2) Versuch, eine Felderfassung einer nicht vorhandenen Tabelle auszuführen.3) Die nächste Anweisung existiert nicht
1 Prüfung Die zu prüfende Tabelle existiert nicht.2 Decodierung Dem Terminal wurde ein Befehl mit einer nicht vorhandenen
Decodierung zugesandt.3 Dekodierungsbefähigung Die nächste Anweisung existiert nicht.4 Sequenzielle Suche Suche nach möglichen Fehlerursachen:
1) Die Tabelle, in der die Suche ausgeführt werden soll, existiertnicht.2) Der Operator des angezeigten Vergleichs ist nicht zugelassen.
6 Angabe Mögliche Fehlerursachen:1.) Fehler in der laufenden Anweisung.2.) Die nächste Anweisung existiert nicht.3.) Allgemeiner Fehler des Anwenderprogramms.
7 Cursor Mögliche Fehlerursachen:1) Stellung auf eine nicht existierende Tabelle.2) Die nächte Anweisung ist nicht vorgesehen.
8 Typ der Suche Zwei mögliche Suchtypen:1) BINÄRE SUCHE: Die Tabellefolgt einer wachsenden Ordnungauf dem Feld.2) SEQUENZIELLE SUCHE: Die Tabelle hat keine bestimmteFolgeordnung.
9 Typ des Vergleichs Zwei mögliche Vergleichstypen:1) mit dem Feld "Database".2) mit Konstanten
11 Speicherung Zwei mögliche Vergleichstypen:1) Die Tabelle existiert nicht.2) Versuch, die Angabe einer nicht existierenden Stelle zu speichern.
29 Teilbare Angabe Nächste Anweisung existiert nicht.30 Operation auf Index Vier mögliche Fehlertypen:
1) Tabelle existiert nicht2) Falscher Operator: nur Zu- und Abnahme ist möglich.3) Versuch, auf eine nicht existierende Eintragsnummerzuzugreifen.4) Nächste Anweisung existiert nicht.
35 Gehe zu Reihe Die angegebene Reihe ist nicht vorhanden.36 Definition Beep Nächste Anweisung existiert nicht.38 Binäre Suche Die Tabelle ist nicht vorhanden.42 Anzeige Drei mögliche Fehlertypen:
1) Die Tabelle ist nicht vorhanden.2) Fehler des Betriebssystems3) Nächste Anweisung existiert nicht.
43 Start Das Programm ist nicht vorhanden.
Seite 33
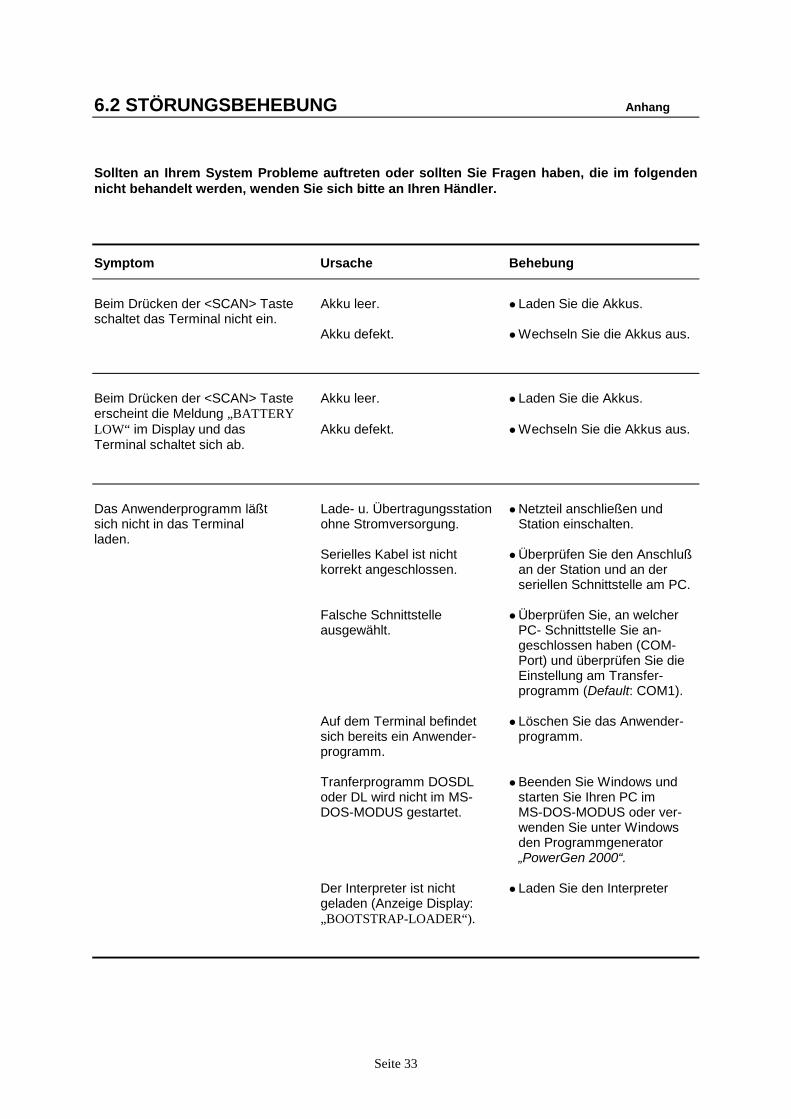
6.2 STÖRUNGSBEHEBUNG Anhang Sollten an Ihrem System Probleme auftreten oder sollten Sie Fragen haben, die im folgenden nicht behandelt werden, wenden Sie sich bitte an Ihren Händler. Symptom Ursache Behebung Beim Drücken der <SCAN> Taste Akku leer. ! Laden Sie die Akkus. schaltet das Terminal nicht ein. Akku defekt. ! Wechseln Sie die Akkus aus. Beim Drücken der <SCAN> Taste Akku leer. ! Laden Sie die Akkus. erscheint die Meldung „BATTERY LOW“ im Display und das Akku defekt. ! Wechseln Sie die Akkus aus. Terminal schaltet sich ab. Das Anwenderprogramm läßt Lade- u. Übertragungsstation ! Netzteil anschließen und sich nicht in das Terminal ohne Stromversorgung. Station einschalten. laden. Serielles Kabel ist nicht ! Überprüfen Sie den Anschluß korrekt angeschlossen. an der Station und an der seriellen Schnittstelle am PC. Falsche Schnittstelle ! Überprüfen Sie, an welcher ausgewählt. PC- Schnittstelle Sie an- geschlossen haben (COM- Port) und überprüfen Sie die Einstellung am Transfer- programm (Default: COM1). Auf dem Terminal befindet ! Löschen Sie das Anwender- sich bereits ein Anwender- programm. programm. Tranferprogramm DOSDL ! Beenden Sie Windows und oder DL wird nicht im MS- starten Sie Ihren PC im DOS-MODUS gestartet. MS-DOS-MODUS oder ver- wenden Sie unter Windows den Programmgenerator „PowerGen 2000“. Der Interpreter ist nicht ! Laden Sie den Interpreter geladen (Anzeige Display: „BOOTSTRAP-LOADER“).
Seite 34
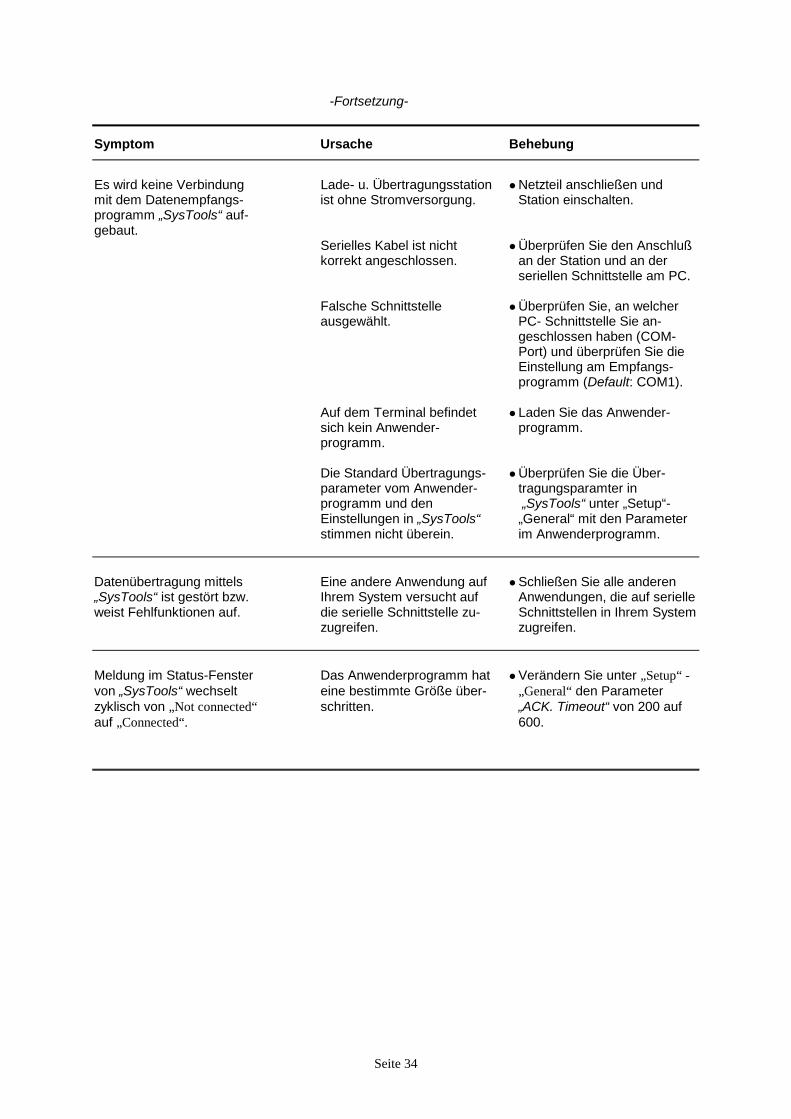
-Fortsetzung- Symptom Ursache Behebung Es wird keine Verbindung Lade- u. Übertragungsstation ! Netzteil anschließen und mit dem Datenempfangs- ist ohne Stromversorgung. Station einschalten. programm „SysTools“ auf- gebaut. Serielles Kabel ist nicht ! Überprüfen Sie den Anschluß korrekt angeschlossen. an der Station und an der seriellen Schnittstelle am PC. Falsche Schnittstelle ! Überprüfen Sie, an welcher ausgewählt. PC- Schnittstelle Sie an- geschlossen haben (COM- Port) und überprüfen Sie die Einstellung am Empfangs- programm (Default: COM1). Auf dem Terminal befindet ! Laden Sie das Anwender- sich kein Anwender- programm. programm. Die Standard Übertragungs- ! Überprüfen Sie die Über- parameter vom Anwender- tragungsparamter in programm und den „SysTools“ unter „Setup“- Einstellungen in „SysTools“ „General“ mit den Parameter stimmen nicht überein. im Anwenderprogramm. Datenübertragung mittels Eine andere Anwendung auf ! Schließen Sie alle anderen „SysTools“ ist gestört bzw. Ihrem System versucht auf Anwendungen, die auf serielle weist Fehlfunktionen auf. die serielle Schnittstelle zu- Schnittstellen in Ihrem System zugreifen. zugreifen. Meldung im Status-Fenster Das Anwenderprogramm hat ! Verändern Sie unter „Setup“ - von „SysTools“ wechselt eine bestimmte Größe über- „General“ den Parameter zyklisch von „Not connected“ schritten. „ACK. Timeout“ von 200 auf auf „Connected“. 600.
Seite 35
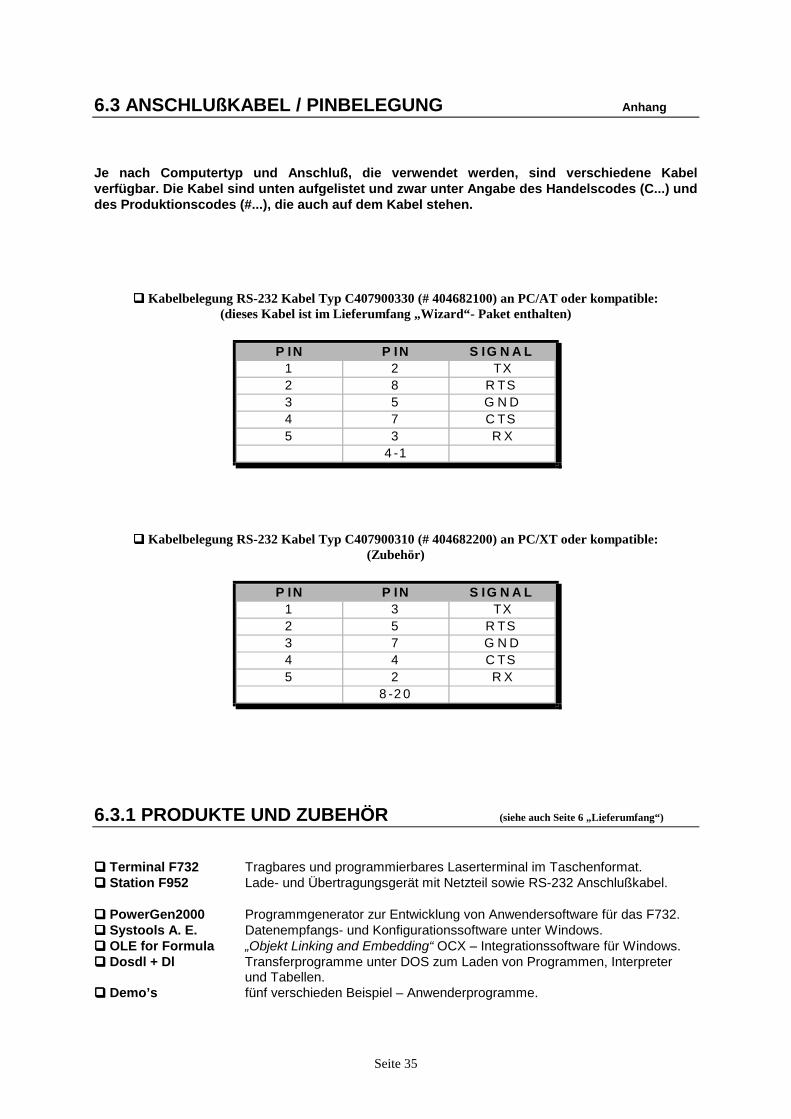
6.3 ANSCHLUßKABEL / PINBELEGUNG Anhang Je nach Computertyp und Anschluß, die verwendet werden, sind verschiedene Kabel verfügbar. Die Kabel sind unten aufgelistet und zwar unter Angabe des Handelscodes (C...) und des Produktionscodes (#...), die auch auf dem Kabel stehen.
"""" Kabelbelegung RS-232 Kabel Typ C407900330 (# 404682100) an PC/AT oder kompatible: (dieses Kabel ist im Lieferumfang „Wizard“- Paket enthalten)
P IN P IN S IG N A L1 2 TX2 8 R TS3 5 G N D4 7 C TS5 3 R X
4 -1
"""" Kabelbelegung RS-232 Kabel Typ C407900310 (# 404682200) an PC/XT oder kompatible: (Zubehör)
P IN P IN S IG N A L1 3 TX2 5 R TS3 7 G N D4 4 C TS5 2 R X
8 -2 0
6.3.1 PRODUKTE UND ZUBEHÖR (siehe auch Seite 6 „Lieferumfang“)
"""" Terminal F732 Tragbares und programmierbares Laserterminal im Taschenformat. """" Station F952 Lade- und Übertragungsgerät mit Netzteil sowie RS-232 Anschlußkabel. """" PowerGen2000 Programmgenerator zur Entwicklung von Anwendersoftware für das F732. """" Systools A. E. Datenempfangs- und Konfigurationssoftware unter Windows. """" OLE for Formula „Objekt Linking and Embedding“ OCX – Integrationssoftware für Windows. """" Dosdl + Dl Transferprogramme unter DOS zum Laden von Programmen, Interpreter
und Tabellen. """" Demo’s fünf verschieden Beispiel – Anwenderprogramme.
Seite 36
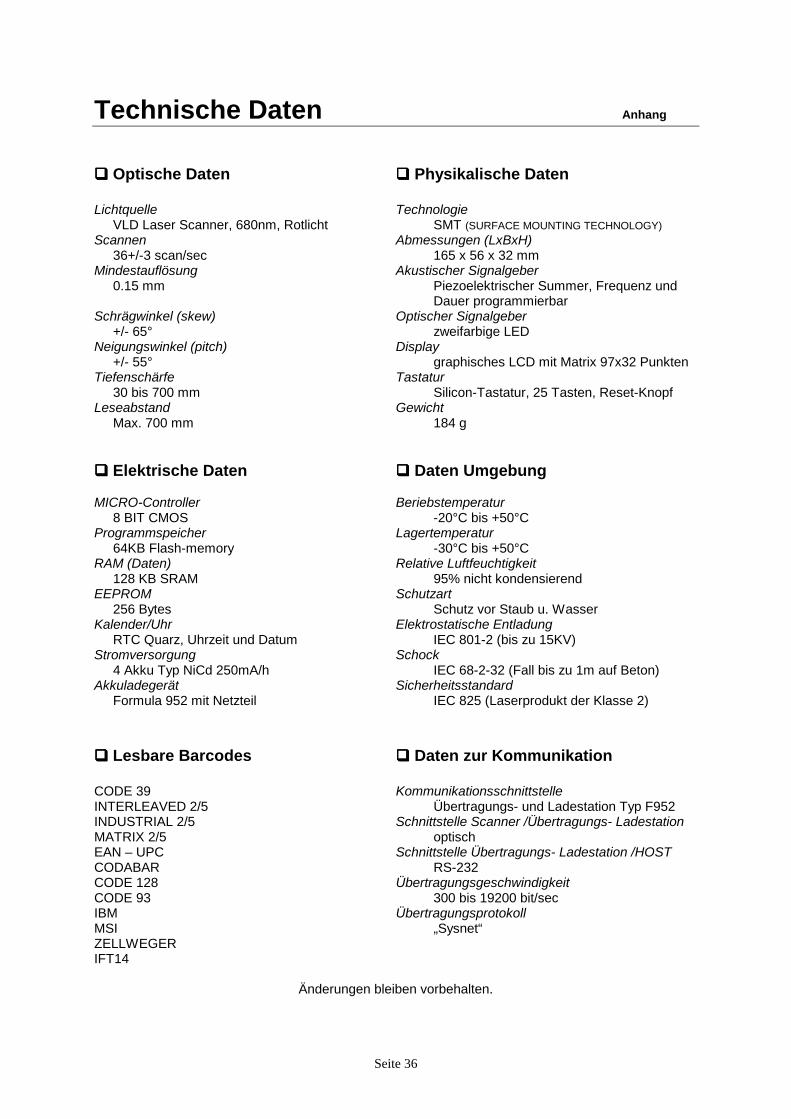
Technische Daten Anhang !!!! Optische Daten !!!! Physikalische Daten Lichtquelle Technologie VLD Laser Scanner, 680nm, Rotlicht SMT (SURFACE MOUNTING TECHNOLOGY) Scannen Abmessungen (LxBxH) 36+/-3 scan/sec 165 x 56 x 32 mm Mindestauflösung Akustischer Signalgeber 0.15 mm Piezoelektrischer Summer, Frequenz und Dauer programmierbar Schrägwinkel (skew) Optischer Signalgeber +/- 65° zweifarbige LED Neigungswinkel (pitch) Display +/- 55° graphisches LCD mit Matrix 97x32 Punkten Tiefenschärfe Tastatur 30 bis 700 mm Silicon-Tastatur, 25 Tasten, Reset-Knopf Leseabstand Gewicht Max. 700 mm 184 g !!!! Elektrische Daten !!!! Daten Umgebung MICRO-Controller Beriebstemperatur 8 BIT CMOS -20°C bis +50°C Programmspeicher Lagertemperatur 64KB Flash-memory -30°C bis +50°C RAM (Daten) Relative Luftfeuchtigkeit 128 KB SRAM 95% nicht kondensierend EEPROM Schutzart 256 Bytes Schutz vor Staub u. Wasser Kalender/Uhr Elektrostatische Entladung RTC Quarz, Uhrzeit und Datum IEC 801-2 (bis zu 15KV) Stromversorgung Schock 4 Akku Typ NiCd 250mA/h IEC 68-2-32 (Fall bis zu 1m auf Beton) Akkuladegerät Sicherheitsstandard Formula 952 mit Netzteil IEC 825 (Laserprodukt der Klasse 2) !!!! Lesbare Barcodes !!!! Daten zur Kommunikation CODE 39 Kommunikationsschnittstelle INTERLEAVED 2/5 Übertragungs- und Ladestation Typ F952 INDUSTRIAL 2/5 Schnittstelle Scanner /Übertragungs- Ladestation MATRIX 2/5 optisch EAN – UPC Schnittstelle Übertragungs- Ladestation /HOST CODABAR RS-232 CODE 128 Übertragungsgeschwindigkeit CODE 93 300 bis 19200 bit/sec IBM Übertragungsprotokoll MSI „Sysnet“ ZELLWEGER IFT14
Änderungen bleiben vorbehalten.
WIZARD INVENT FInventurlösung mit mobiler Datenerfassung
Version: 1.2Stand vom: 18.03.2003
KUMAident GmbHDieselstrasse 1870771 Leinfelden-EchterdingenTelefon 0711/160 69 60Telefax 0711/160 69 66www.kumaident.de
InventurlösungWIZARD INVENT F
Seite 2
Inhaltsverzeichnis
1 Einleitung.......................................................................................................................................... 32 Voraussetzungen für den Einsatz des Paketes „Wizard / Invent F“ ................................................ 3
2.1.1 Hardware: .......................................................................................................................... 32.1.2 Betriebssystem: ................................................................................................................. 32.1.3 Software:............................................................................................................................ 3
3 Inbetriebnahme des Terminals und der Empfangssoftware ............................................................ 43.1 PC Software .............................................................................................................................. 43.2 Hardware................................................................................................................................... 4
3.2.1.1 Software für Terminal „Wizard“ .................................................................................. 43.2.1.2 Datensätze ................................................................................................................. 83.2.1.3 Eingabe....................................................................................................................... 83.2.1.4 Barcode ...................................................................................................................... 83.2.1.5 Einstellen der Parameter im Übertragungsmodul ...................................................... 93.2.1.6 Überprüfen Sie die Verbindung zum Terminal ......................................................... 103.2.1.7 Empfangen der Datensätze...................................................................................... 113.2.1.8 Die Taste „Übertragung Stop“ .................................................................................. 113.2.1.9 Datenspeicherung .................................................................................................... 133.2.1.10 Daten in der Empfangstabelle löschen..................................................................... 13
InventurlösungWIZARD INVENT F
Seite 3
1 Einleitung
Durch das Paket WIZARD INVENT F haben Sie die Möglichkeit Ihre Inventur- bzw.Erfassungsaufgaben sehr einfach, effizient und kostengünstig zu lösen.Mit dem mobilen Terminal „Wizard“ erfassen Sie Artikel, Mengen, Lagerorte, beteiligte Personen unddas Datum der Eingaben.Die Eingaben können wahlweise über die alphanumerische Tastatur oder den integrierten Scannererfolgen.Jedes Terminal besitzt eine eigene Identifikationsnummer. Daher ist es möglich bis zu 99 Terminalszu betreiben.Die Software „Invent F.xls“ empfängt die erfaßten Daten aus dem Terminal und überträgt diese in eineExcel Tabelle.Sie können dann die erfaßten Daten weitergehend nach Ihren Bedürfnissen bearbeiten.
Das Paket „Wizard / Invent F“ besteht aus den folgenden Hardware Komponenten:• Terminal „Wizard“ (technische Bezeichnung F732)• Lade- und Empfangsstation (technische Bezeichnung F952 Cradle)• Netzteil 9V• RS232 Kabel
Außerdem umfasst das WIZARD INVENT F Paket folgende Software Komponenten:• EasyGen• Invent F.xls• Invent F V1 2.app
2 Voraussetzungen für den Einsatz des Paketes „Wizard / Invent F“
2.1.1 Hardware:• PC mit Pentium Prozessor• 16MB RAM bei Win9x• 32MB RAM bei Win NT/ME/2000• 30MB freien Speicher auf der Festplatte
2.1.2 Betriebssystem:• Win95 SR2• Win98• WinME• WinNT 4.0 ab SP4• Win2000
2.1.3 Software:• Excel 97 SR2• Acrobat Reader 4.0
InventurlösungWIZARD INVENT F
Seite 4
3 Inbetriebnahme des Terminals und der Empfangssoftware
3.1 PC Software
Installieren Sie die EasyGen Software auf Ihrem PC.Durch diese Installation werden folgende Programme in Ihren PC geladen.
• EasyGen:Programmgenerator zur Erstellung von Anwendungsprogrammen.
• SysTools:Tool zum Laden von System- und Anwendungsprogrammen
• OLE for Formula:Active X Komponenten, die für das Programm Invent-F.xls benötigt werden.
Kopieren Sie „Invent F.xls“ und „Invent F V 1 2.app“ auf Ihren PC in ein beliebiges Verzeichnis.• Invent F.xls:
Excel Tabelle, die über ein VBA Programm die Steuerung des Terminals übernimmt und alsEmpfangsprogramm für die erfaßten Daten dient.
• Invent F V 1 2.app:Anwendungssoftware, die auf dem Terminal „Wizard“ ausgeführt wird.
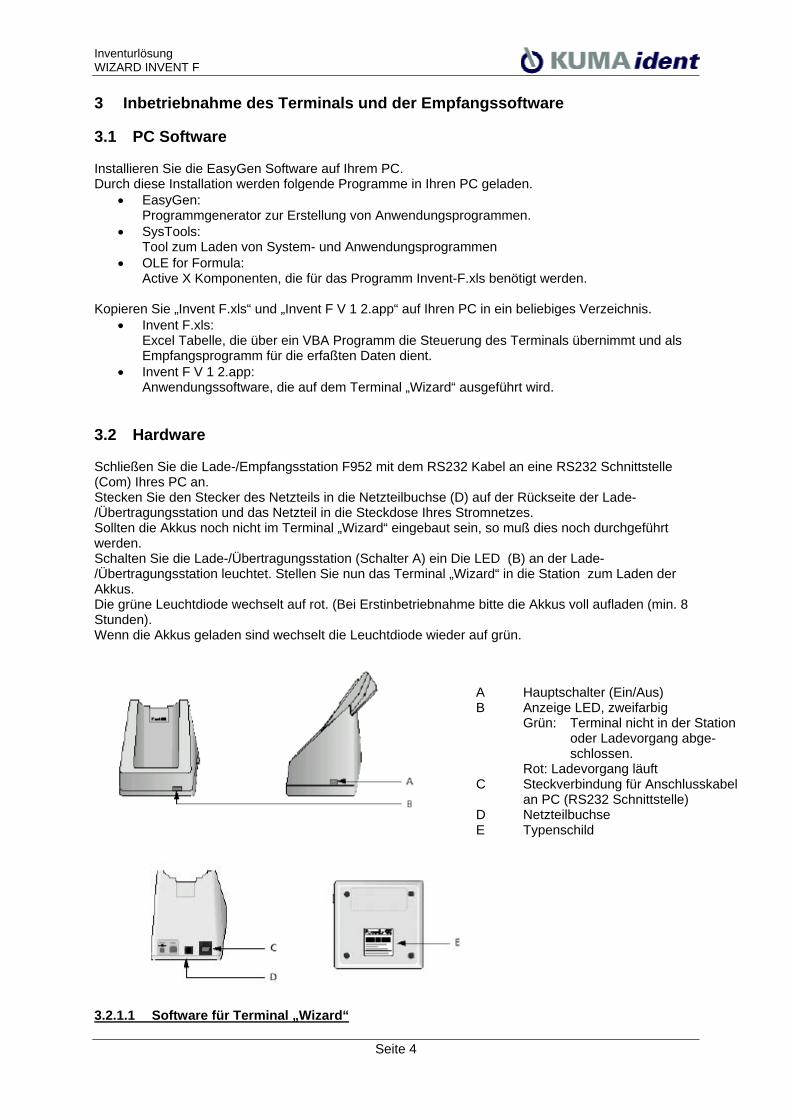
3.2 Hardware
Schließen Sie die Lade-/Empfangsstation F952 mit dem RS232 Kabel an eine RS232 Schnittstelle(Com) Ihres PC an.Stecken Sie den Stecker des Netzteils in die Netzteilbuchse (D) auf der Rückseite der Lade-/Übertragungsstation und das Netzteil in die Steckdose Ihres Stromnetzes.Sollten die Akkus noch nicht im Terminal „Wizard“ eingebaut sein, so muß dies noch durchgeführtwerden.Schalten Sie die Lade-/Übertragungsstation (Schalter A) ein Die LED (B) an der Lade-/Übertragungsstation leuchtet. Stellen Sie nun das Terminal „Wizard“ in die Station zum Laden derAkkus.Die grüne Leuchtdiode wechselt auf rot. (Bei Erstinbetriebnahme bitte die Akkus voll aufladen (min. 8Stunden).Wenn die Akkus geladen sind wechselt die Leuchtdiode wieder auf grün.
3.2.1.1 Software für Terminal „Wizard“
A Hauptschalter (Ein/Aus)B Anzeige LED, zweifarbig
Grün: Terminal nicht in der Stationoder Ladevorgang abge-schlossen.
Rot: Ladevorgang läuftC Steckverbindung für Anschlusskabel
an PC (RS232 Schnittstelle)D NetzteilbuchseE Typenschild
InventurlösungWIZARD INVENT F
Seite 5
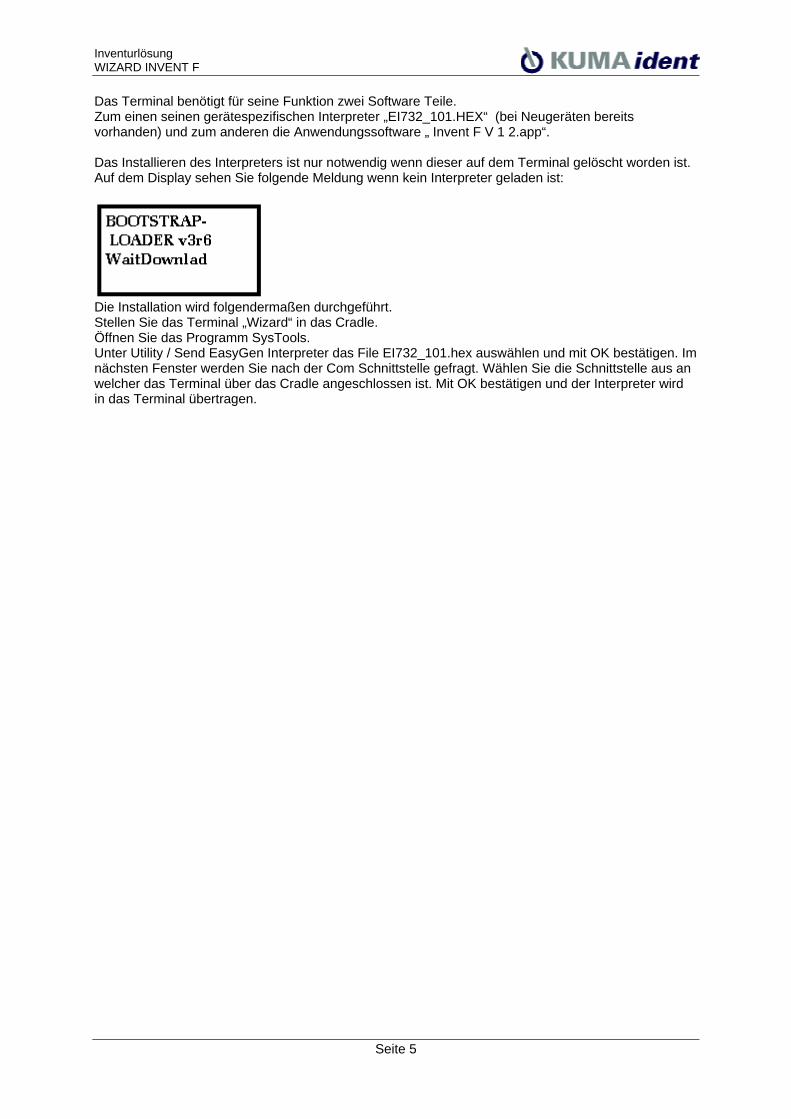
Das Terminal benötigt für seine Funktion zwei Software Teile.Zum einen seinen gerätespezifischen Interpreter „EI732_101.HEX“ (bei Neugeräten bereitsvorhanden) und zum anderen die Anwendungssoftware „ Invent F V 1 2.app“.
Das Installieren des Interpreters ist nur notwendig wenn dieser auf dem Terminal gelöscht worden ist.Auf dem Display sehen Sie folgende Meldung wenn kein Interpreter geladen ist:
Die Installation wird folgendermaßen durchgeführt.Stellen Sie das Terminal „Wizard“ in das Cradle.Öffnen Sie das Programm SysTools.Unter Utility / Send EasyGen Interpreter das File EI732_101.hex auswählen und mit OK bestätigen. Imnächsten Fenster werden Sie nach der Com Schnittstelle gefragt. Wählen Sie die Schnittstelle aus anwelcher das Terminal über das Cradle angeschlossen ist. Mit OK bestätigen und der Interpreter wirdin das Terminal übertragen.
InventurlösungWIZARD INVENT F
Seite 6
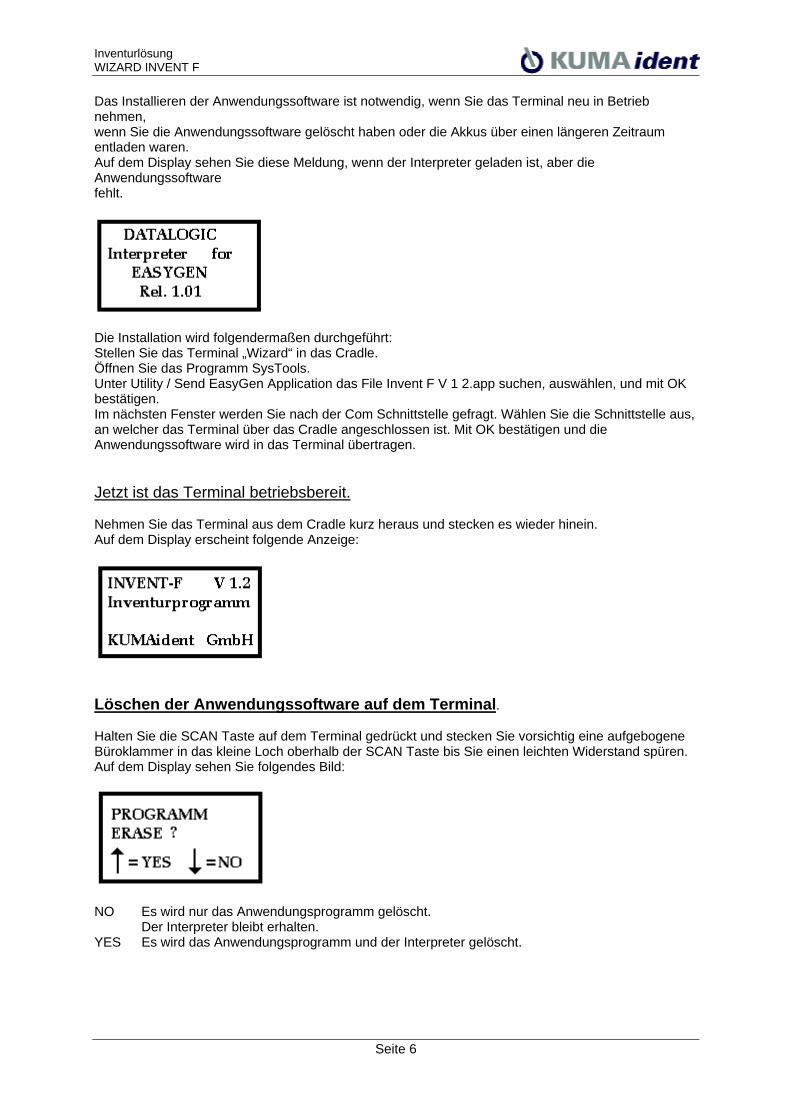
Das Installieren der Anwendungssoftware ist notwendig, wenn Sie das Terminal neu in Betriebnehmen,wenn Sie die Anwendungssoftware gelöscht haben oder die Akkus über einen längeren Zeitraumentladen waren.Auf dem Display sehen Sie diese Meldung, wenn der Interpreter geladen ist, aber dieAnwendungssoftwarefehlt.
Die Installation wird folgendermaßen durchgeführt:Stellen Sie das Terminal „Wizard“ in das Cradle.Öffnen Sie das Programm SysTools.Unter Utility / Send EasyGen Application das File Invent F V 1 2.app suchen, auswählen, und mit OKbestätigen.Im nächsten Fenster werden Sie nach der Com Schnittstelle gefragt. Wählen Sie die Schnittstelle aus,an welcher das Terminal über das Cradle angeschlossen ist. Mit OK bestätigen und dieAnwendungssoftware wird in das Terminal übertragen.
Jetzt ist das Terminal betriebsbereit.
Nehmen Sie das Terminal aus dem Cradle kurz heraus und stecken es wieder hinein.Auf dem Display erscheint folgende Anzeige:
Löschen der Anwendungssoftware auf dem Terminal.
Halten Sie die SCAN Taste auf dem Terminal gedrückt und stecken Sie vorsichtig eine aufgebogeneBüroklammer in das kleine Loch oberhalb der SCAN Taste bis Sie einen leichten Widerstand spüren.Auf dem Display sehen Sie folgendes Bild:
NO Es wird nur das Anwendungsprogramm gelöscht.Der Interpreter bleibt erhalten.
YES Es wird das Anwendungsprogramm und der Interpreter gelöscht.

InventurlösungWIZARD INVENT F
Seite 7
Beschreibung der Terminal Anwendungssoftware Invent F V 1 2.app
Wenn das Terminal „Wizard“ erstmals seine Anwendungssoftware erhalten hat, müssen Sie nach derEntnahme aus dem Cradle die Enter Taste betätigen um das Programm zu starten.Auf dem Display erscheint „PERSONAL:“.Geben Sie die Bezeichnung , den Namen oder den Code für die Person ein, welche mit dem Terminalarbeitet.
Als nächstes erscheint „LAGER:“.Geben Sie die Bezeichnung, den Namen oder den Code für das Lager ein, in welchem die Inventurstattfinden soll.
Nun sehen Sie auf dem Display in der ersten Zeile hinter „L:“ die von Ihnen eingegebeneLagerbezeichnungzur Kontrolle angezeigt.In der zweiten Zeile sehen Sie „ARTIKEL:“Dahinter kann nun die Artikelbezeichnung eingegeben werden.
Es erscheint nun in der zweiten Zeile der von Ihnen eingegebene Artikel zur Kontrolle.In der vierten Zeile sehen Sie ein „M:“Dahinter kann die Menge des Artikels eingegeben werden.
Sie werden im nächsten Menü gefragt ob Ihre Eingaben OK sind oder nicht.Wenn sie OK sind dann muß Enter gedrückt werden.Der Datensatz wird gespeichert und das Programm springt zur erneuten Artikeleingabe.Wenn nicht dann drücken Sie die F3-Taste und das Programm springt zur Artikeleingabe zurück.Der Datensatz wird nicht gespeichert.
Bei jeder neuen Artikeleingabe mit entsprechender Mengeneingabe wird im gespeicherten Datensatzdie vorab eingegebene Person und das vorab eingegebene Lager übernommen.Möchten Sie die Lagerbezeichnung wechseln, so drücken Sie während der Displayanzeige „Artikel:“die Taste F1.Sie gelangen dadurch in den Obermenüpunkt und können den Lagerort und den Bediener wechseln.Drücken Sie 1 und dann Enter so können Sie das Lager ändern und anschließend mit der neuenLagerbezeichnung Ihre Artikeleingabe durchführen.Drücken Sie 3 und dann Enter so können Sie den Bediener wechseln.Anschließend wird das Lager eingegeben und danach wiederum die Artikelbezeichnung usw.Drücken Sie die 7 und dann Enter so wird Ihnen die aktuelle Datensatzanzahl angezeigt.Durch erneutes Drücken der Enter Taste kommen Sie wieder zum Menü zurück.Drücken Sie die 9 und dann Enter so springt das Programm ohne Änderungen wieder zurArtikeleingabe.Sie können beliebig oft Ihre Eingaben korrigieren, der Datensatz wird erst in das Terminalübernommen, wenn Sie Menü : „Eingaben OK Enter“ die Enter Taste betätigt haben.
InventurlösungWIZARD INVENT F
Seite 8
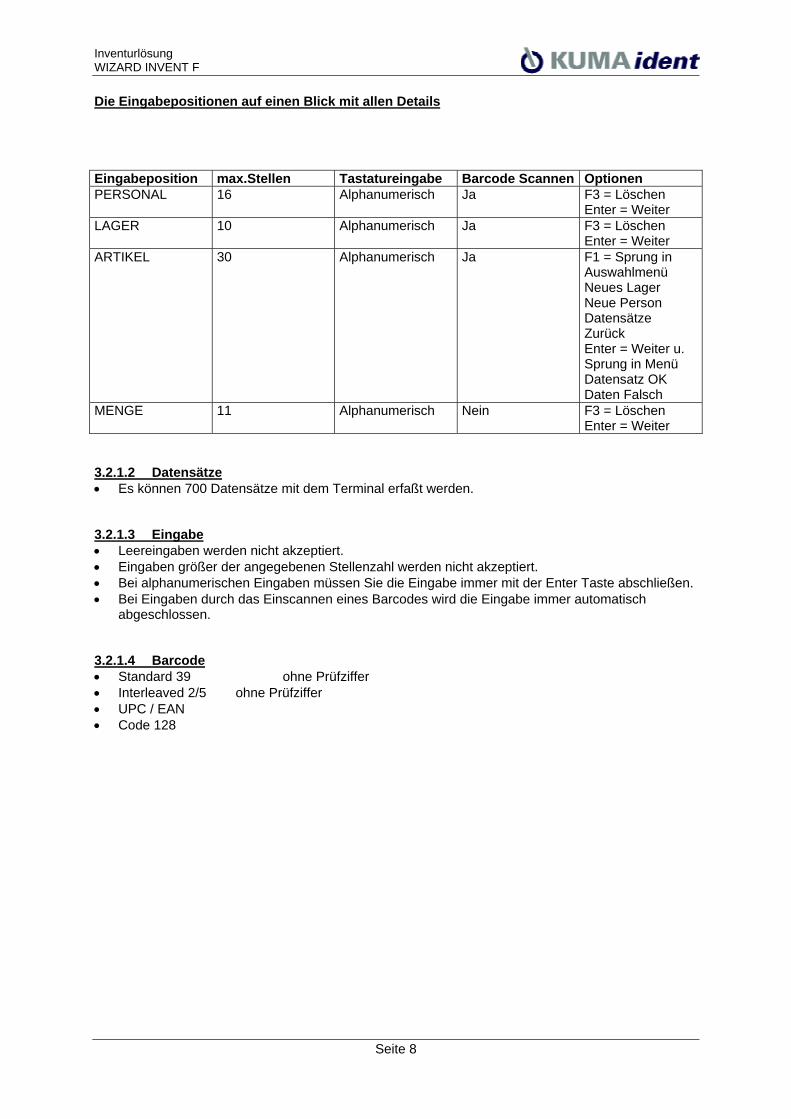
Die Eingabepositionen auf einen Blick mit allen Details
Eingabeposition max.Stellen Tastatureingabe Barcode Scannen OptionenPERSONAL 16 Alphanumerisch Ja F3 = Löschen
Enter = WeiterLAGER 10 Alphanumerisch Ja F3 = Löschen
Enter = WeiterARTIKEL 30 Alphanumerisch Ja F1 = Sprung in
AuswahlmenüNeues LagerNeue PersonDatensätzeZurückEnter = Weiter u.Sprung in MenüDatensatz OKDaten Falsch
MENGE 11 Alphanumerisch Nein F3 = LöschenEnter = Weiter
3.2.1.2 Datensätze• Es können 700 Datensätze mit dem Terminal erfaßt werden.
3.2.1.3 Eingabe• Leereingaben werden nicht akzeptiert.• Eingaben größer der angegebenen Stellenzahl werden nicht akzeptiert.• Bei alphanumerischen Eingaben müssen Sie die Eingabe immer mit der Enter Taste abschließen.• Bei Eingaben durch das Einscannen eines Barcodes wird die Eingabe immer automatisch
abgeschlossen.
3.2.1.4 Barcode• Standard 39 ohne Prüfziffer• Interleaved 2/5 ohne Prüfziffer• UPC / EAN• Code 128
InventurlösungWIZARD INVENT F
Seite 9
Funktionen der PC Empfangssoftware Invent.xls
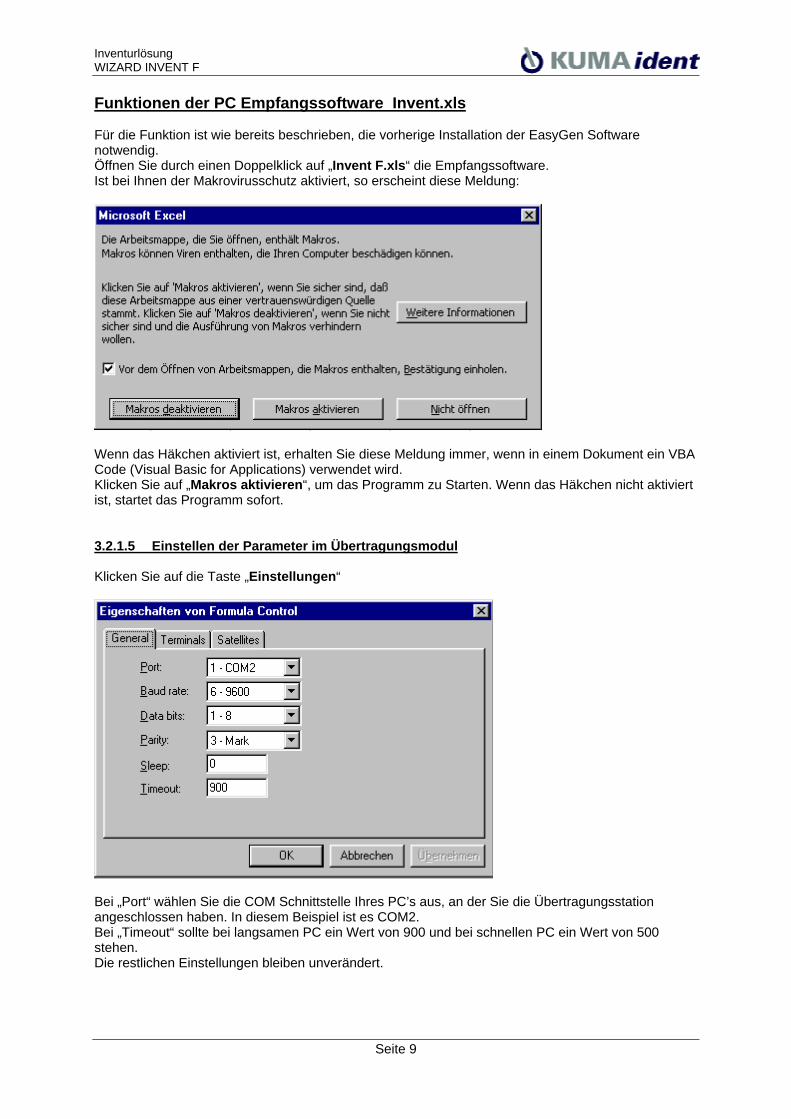
Für die Funktion ist wie bereits beschrieben, die vorherige Installation der EasyGen Softwarenotwendig.Öffnen Sie durch einen Doppelklick auf „Invent F.xls“ die Empfangssoftware.Ist bei Ihnen der Makrovirusschutz aktiviert, so erscheint diese Meldung:
Wenn das Häkchen aktiviert ist, erhalten Sie diese Meldung immer, wenn in einem Dokument ein VBACode (Visual Basic for Applications) verwendet wird.Klicken Sie auf „Makros aktivieren“, um das Programm zu Starten. Wenn das Häkchen nicht aktiviertist, startet das Programm sofort.
3.2.1.5 Einstellen der Parameter im Übertragungsmodul
Klicken Sie auf die Taste „Einstellungen“
Bei „Port“ wählen Sie die COM Schnittstelle Ihres PC’s aus, an der Sie die Übertragungsstationangeschlossen haben. In diesem Beispiel ist es COM2.Bei „Timeout“ sollte bei langsamen PC ein Wert von 900 und bei schnellen PC ein Wert von 500stehen.Die restlichen Einstellungen bleiben unverändert.
InventurlösungWIZARD INVENT F
Seite 10
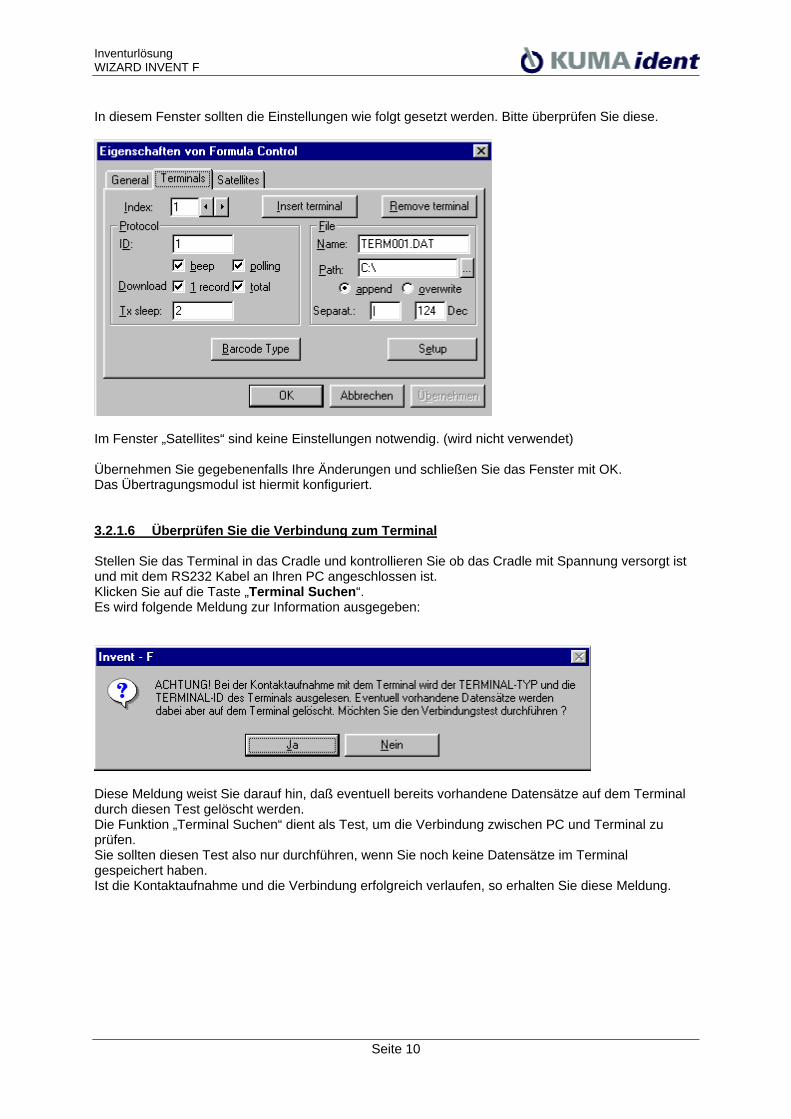
In diesem Fenster sollten die Einstellungen wie folgt gesetzt werden. Bitte überprüfen Sie diese.
Im Fenster „Satellites“ sind keine Einstellungen notwendig. (wird nicht verwendet)
Übernehmen Sie gegebenenfalls Ihre Änderungen und schließen Sie das Fenster mit OK.Das Übertragungsmodul ist hiermit konfiguriert.
3.2.1.6 Überprüfen Sie die Verbindung zum Terminal
Stellen Sie das Terminal in das Cradle und kontrollieren Sie ob das Cradle mit Spannung versorgt istund mit dem RS232 Kabel an Ihren PC angeschlossen ist.Klicken Sie auf die Taste „Terminal Suchen“.Es wird folgende Meldung zur Information ausgegeben:
Diese Meldung weist Sie darauf hin, daß eventuell bereits vorhandene Datensätze auf dem Terminaldurch diesen Test gelöscht werden.Die Funktion „Terminal Suchen“ dient als Test, um die Verbindung zwischen PC und Terminal zuprüfen.Sie sollten diesen Test also nur durchführen, wenn Sie noch keine Datensätze im Terminalgespeichert haben.Ist die Kontaktaufnahme und die Verbindung erfolgreich verlaufen, so erhalten Sie diese Meldung.
InventurlösungWIZARD INVENT F
Seite 11
Sie können nun mit dem Terminal arbeiten und Ihre Inventur durchführen oder Artikeldaten sammeln.Die gesammelten Daten können wie folgt in die Excel Tabelle übertragen werden.Stellen Sie das Terminal in das Cradle, und führen Sie die folgenden Anweisungen durch.
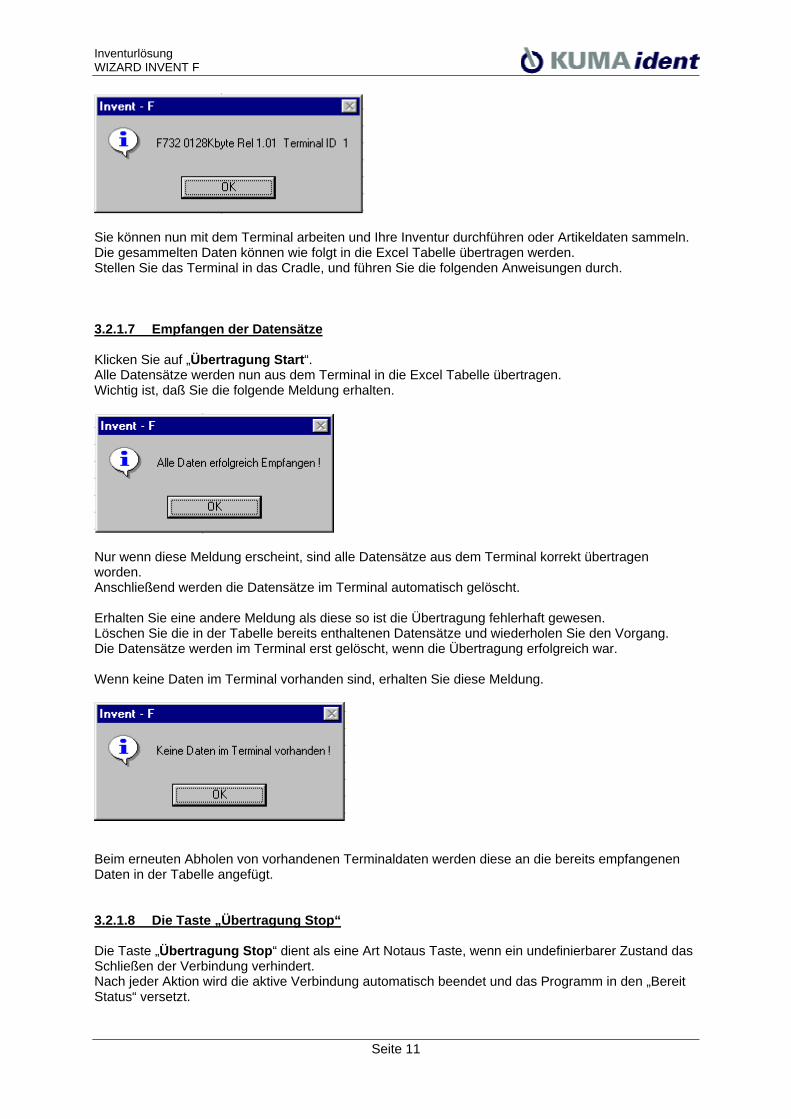
3.2.1.7 Empfangen der Datensätze
Klicken Sie auf „Übertragung Start“.Alle Datensätze werden nun aus dem Terminal in die Excel Tabelle übertragen.Wichtig ist, daß Sie die folgende Meldung erhalten.
Nur wenn diese Meldung erscheint, sind alle Datensätze aus dem Terminal korrekt übertragenworden.Anschließend werden die Datensätze im Terminal automatisch gelöscht.
Erhalten Sie eine andere Meldung als diese so ist die Übertragung fehlerhaft gewesen.Löschen Sie die in der Tabelle bereits enthaltenen Datensätze und wiederholen Sie den Vorgang.Die Datensätze werden im Terminal erst gelöscht, wenn die Übertragung erfolgreich war.
Wenn keine Daten im Terminal vorhanden sind, erhalten Sie diese Meldung.
Beim erneuten Abholen von vorhandenen Terminaldaten werden diese an die bereits empfangenenDaten in der Tabelle angefügt.
3.2.1.8 Die Taste „Übertragung Stop“
Die Taste „Übertragung Stop“ dient als eine Art Notaus Taste, wenn ein undefinierbarer Zustand dasSchließen der Verbindung verhindert.Nach jeder Aktion wird die aktive Verbindung automatisch beendet und das Programm in den „BereitStatus“ versetzt.

InventurlösungWIZARD INVENT F
Seite 12
Sollten Sie aber die „Übertragung Starten“ Taste betätigt haben ohne daß sich das Terminal im Cradlebefindet, so bleibt die Verbindung solange aktiv, bis das Terminal in das Cradle gestellt wird und durchdie Übertragung von Daten die Verbindung schließt oder Sie den „Übertragung Stop“ Taster betätigen.
InventurlösungWIZARD INVENT F
Seite 13
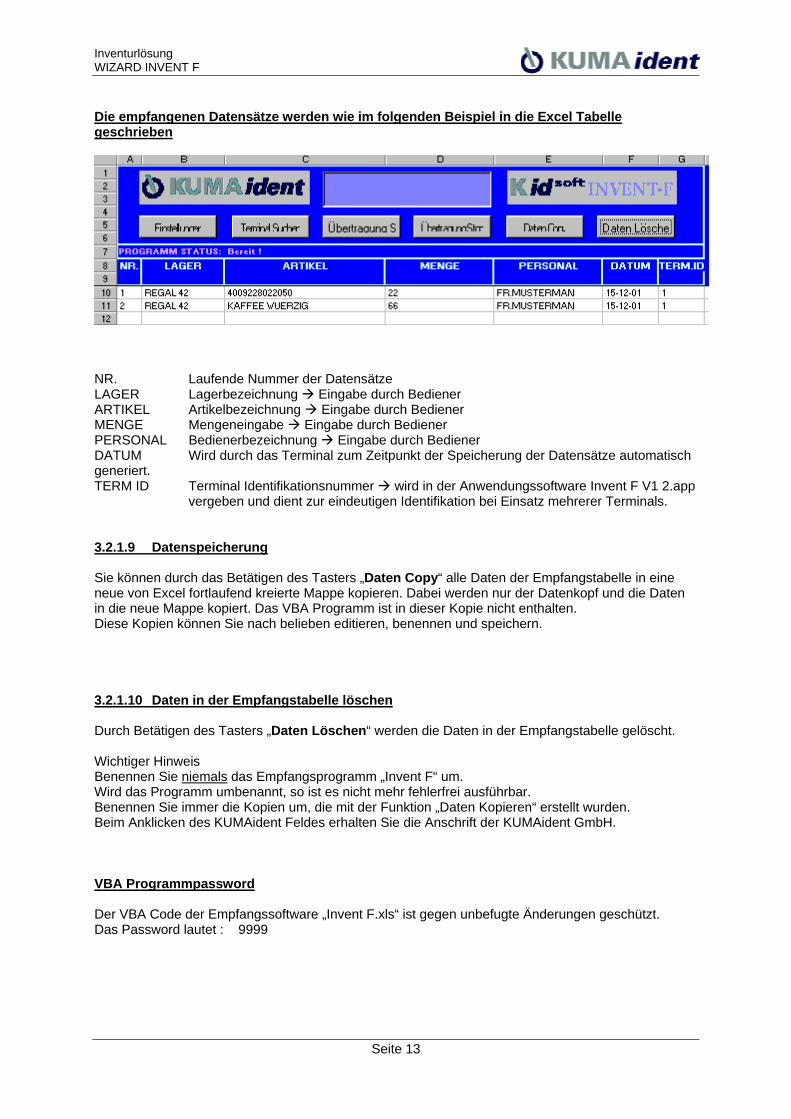
Die empfangenen Datensätze werden wie im folgenden Beispiel in die Excel Tabellegeschrieben
NR. Laufende Nummer der DatensätzeLAGER Lagerbezeichnung Eingabe durch BedienerARTIKEL Artikelbezeichnung Eingabe durch BedienerMENGE Mengeneingabe Eingabe durch BedienerPERSONAL Bedienerbezeichnung Eingabe durch BedienerDATUM Wird durch das Terminal zum Zeitpunkt der Speicherung der Datensätze automatischgeneriert.TERM ID Terminal Identifikationsnummer wird in der Anwendungssoftware Invent F V1 2.app
vergeben und dient zur eindeutigen Identifikation bei Einsatz mehrerer Terminals.
3.2.1.9 Datenspeicherung
Sie können durch das Betätigen des Tasters „Daten Copy“ alle Daten der Empfangstabelle in eineneue von Excel fortlaufend kreierte Mappe kopieren. Dabei werden nur der Datenkopf und die Datenin die neue Mappe kopiert. Das VBA Programm ist in dieser Kopie nicht enthalten.Diese Kopien können Sie nach belieben editieren, benennen und speichern.
3.2.1.10 Daten in der Empfangstabelle löschen
Durch Betätigen des Tasters „Daten Löschen“ werden die Daten in der Empfangstabelle gelöscht.
Wichtiger HinweisBenennen Sie niemals das Empfangsprogramm „Invent F“ um.Wird das Programm umbenannt, so ist es nicht mehr fehlerfrei ausführbar.Benennen Sie immer die Kopien um, die mit der Funktion „Daten Kopieren“ erstellt wurden.Beim Anklicken des KUMAident Feldes erhalten Sie die Anschrift der KUMAident GmbH.
VBA Programmpassword
Der VBA Code der Empfangssoftware „Invent F.xls“ ist gegen unbefugte Änderungen geschützt.Das Password lautet : 9999
InventurlösungWIZARD INVENT F
Seite 14
Kundenwünsche
Sehr geehrter Kunde, sollten Sie Anpassungen der Empfangssoftware oder der TerminalAnwendungssoftware wünschen, um diese für Ihre spezielle Situation optimaler verwenden zukönnen, so setzen Sie sich mit uns in Verbindung.
Änderungen können wir gerne für Sie umsetzen.Wir, die Mitarbeiter der KUMAident, beraten Sie gern.
EasyGen™User’s Manual

EasyGen™User’s Manual
EasyGen™USER'S MANUAL
DATALOGIC S.p.A.Via Candini 240012 - Lippo di Calderara di RenoBologna - Italy
EasyGen™ - User's Manual
Vers.: 1.00 and laterEd.: 04/01Code: 820042310
ALL RIGHTS RESERVEDDatalogic reserves the right to make modifications and improvements without prior notification.Product names mentioned herein are for identification purposes only and may be trademarksand or registered trademarks of their respective companies.
© - 2001 Datalogic S.p.A.

DATALOGIC S.p.A. Software License Agreement
This legal document is an agreement between you, the end user and DATALOGIC S.p.A. BY INSTALLINGTHE SOFTWARE, YOU ARE AGREEING TO BECOME BOUND BY THE TERMS OF THIS AGREEMENT,which includes the SOFTWARE LICENSE, LIMITED WARRANTY and ACKNOWLEDGMENT.
GRANT OF LICENSE. DATALOGIC grants to you the right to use one copy of the enclosed DATALOGICS.p.A., program (the "SOFTWARE") on a single terminal connected to a single computer (i.e.; with a singleCPU). You may not network the SOFTWARE or otherwise use it on more than one computer or computerterminal at the same time.
COPYRIGHT. The SOFTWARE is owned by DATALOGIC S.p.A. or its suppliers and is protected by copyrightlaws and international treaty provisions. Therefore, you must treat the SOFTWARE like any other copyrightedmaterial (i.e.; a book or musical recording) except that you may either (a) make one copy of the SOFTWAREsolely for backup or archival purposes, or (b) transfer the SOFTWARE to a single hard disk provided youkeep the original solely for backup or archival purposes. You may not copy the written materialsaccompanying the software.
NON PERMITTED USES: Without the express permission of DATALOGIC S.p.A., you may not:1. Use the software in a computer service business including rental, networking or time sharing software,
nor may you use it for multiple users, or multiple computer system applications in the absence ofindividual network licenses with DATALOGIC S.p.A.
2. Use, Copy or modify, alter or transfer, electronically or otherwise, the software or documentation exceptas expressly allowed in this agreement.
3. Translate, reverse engineer, de-assemble, de-compile or create derivative works based on the writtenmaterials.
4. Sub-license or lease this program or its documentation.
LIMITED WARRANTY: This software and accompanying written materials are provided "as is" withoutwarranty of any kind. THE ENTIRE RISK AS TO THE RESULTS AND PERFORMANCE OF THISSOFTWARE IS ASSUMED BY YOU. SHOULD THE SOFTWARE PROVE DEFECTIVE IN USE, YOU (ANDNOT DATALOGIC OR ITS AGENTS) ASSUME THE ENTIRE COST OF ALL NECESSARY SERVICING,REPAIR OR CORRECTION OF DATA. FURTHER, DATALOGIC DOES NOT WARRANT, GUARANTEE ORMAKE ANY REPRESENTATIONS REGARDING THE USE OF, OR THE RESULTS OF THE USE OF THESOFTWARE, IN TERMS OF CORRECTNESS, ACCURACY, RELIABILITY, CURRENTNESS, OROTHERWISE AND YOU RELY ON THE SOFTWARE AND RESULTS AT YOUR OWN RISK.
DATALOGIC warrants to the original licensee that the CD-Rom on which the SOFTWARE is recorded is freefrom defects in materials and workmanship under normal use and service for a period of ninety (90) days fromthe date of delivery as evidenced by a copy of your receipt. DATALOGIC's entire liability and your exclusiveremedy shall be at DATALOGIC's option, replacement of the CD-Rom which shall be returned toDATALOGIC with a copy of your receipt. If failure of the CD-Rom has resulted from accident, abuse ormisapplication of the product, then DATALOGIC shall have no responsibility to replace the product under thiswarranty.
THE ABOVE IS THE ONLY WARRANTY OF ANY KIND, EITHER EXPRESSED OR IMPLIED, INCLUDING,BUT NOT LIMITED TO, THE IMPLIED WARRANTIES OF MERCHANTABILITY AND FITNESS FOR APARTICULAR PURPOSE, THAT IS MADE BY DATALOGIC ON THIS DATALOGIC PRODUCT. IN NOEVENT SHALL DATALOGIC OR ITS SUPPLIERS, NOR ANYONE ELSE WHO HAS BEEN INVOLVED INTHE CREATION, PRODUCTION OR DELIVERY OF THIS PRODUCT, BE LIABLE FOR ANY DIRECT,INDIRECT, CONSEQUENTIAL, OR INCIDENTAL DAMAGES WHATSOEVER (INCLUDING, WITHOUTLIMITATION, DAMAGES FOR LOSS OF BUSINESS PROFITS, BUSINESS INTERRUPTION, LOSS OFBUSINESS INFORMATION, OR OTHER PECUNIARY LOSS) ARISING OUT OF THE USE, THE RESULTSOF USE, OR INABILITY TO USE SUCH PRODUCT, EVEN IF DATALOGIC HAS BEEN ADVISED OF THEPOSSIBILITY OF SUCH DAMAGES.ACKNOWLEDGMENT: You acknowledge that you have read this LICENSE and Limited Warranty,understand them and agree to be bound by their terms and conditions. You also agree that the LICENSE andLimited Warranty are the complete and exclusive statement between the parties and supersedes all othercommunications between the parties relating to the subject matter of the LICENSE or the Limited Warranty.
iv
CONTENTS
1 GENERAL INFORMATION .......................................................................... 11.1 Scope of this Manual .................................................................................... 11.2 Description of the Applications Package....................................................... 11.3 Package Contents......................................................................................... 21.4 Minimum Configuration Required.................................................................. 2
2 INSTALLATION............................................................................................ 32.1 Installing EasyGen ..................................................................................... 32.2 Connecting the Terminal to the Host Computer via RS-232 ......................... 42.3 Loading EasyGen™ Interpreter .................................................................... 62.4 Loading a Sample Program .......................................................................... 6
3 USE OF EASYGEN ................................................................................... 73.1 Introducing EasyGen .................................................................................. 73.2 Starting EasyGen ..................................................................................... 103.3 Limits of EasyGen .................................................................................... 123.4 Error Reporting ........................................................................................... 13
4 MENU DESCRIPTION ................................................................................ 144.1 Description of the Main Menu ..................................................................... 144.2 File Menu .................................................................................................... 154.2.1 New ...................................................................................................... 154.2.2 Open ...................................................................................................... 164.2.3 Save ...................................................................................................... 194.2.4 Save as ... ................................................................................................... 194.2.5 Print Setup .................................................................................................. 194.2.6 Print ...................................................................................................... 204.2.7 Send ...................................................................................................... 204.2.8 Export ...................................................................................................... 214.2.9 Exit ...................................................................................................... 224.3 Edit Menu.................................................................................................... 234.3.1 Search ...................................................................................................... 244.4 Insert Menu ................................................................................................. 254.5 Run Menu ................................................................................................... 264.5.1 Compile ...................................................................................................... 264.5.2 Start ...................................................................................................... 274.5.3 Stop ...................................................................................................... 284.5.4 Step ...................................................................................................... 284.6 Tools Menu ................................................................................................. 294.6.1 Editor Tables............................................................................................... 304.6.2 Editor Variables........................................................................................... 354.6.3 Options ...................................................................................................... 36
v
4.7 Utility Menu ................................................................................................. 384.8 Window Menu ............................................................................................. 39
5 INSERT MENU FUNCTIONS ..................................................................... 405.1 Remark Function......................................................................................... 405.2 Beep Function............................................................................................. 415.3 Clear Display Function................................................................................ 425.4 Input Barcode Function............................................................................... 435.5 Input Text Function ..................................................................................... 475.6 Input Number Function ............................................................................... 495.7 Input Date Function..................................................................................... 515.8 Input Time Function .................................................................................... 525.9 Menu Function ............................................................................................ 535.10 Loop Function ............................................................................................. 545.11 Comparison Function.................................................................................. 555.12 Go to Function ............................................................................................ 565.13 Mathematical Operation Function ............................................................... 575.14 Find Function .............................................................................................. 60
6 EASYGEN INTERPRETER PROGRAM.................................................. 626.1 Interpreter Program Use ............................................................................. 626.2 Use of the Formula Terminal....................................................................... 626.2.1 Description of Keys ..................................................................................... 636.2.2 Select Table ................................................................................................ 656.2.3 Data Display................................................................................................ 666.2.4 Data Deletion .............................................................................................. 676.2.5 Data Search ................................................................................................ 686.2.6 Error Messages........................................................................................... 716.3 Deletion of the Application Program............................................................ 746.4 Deletion of the Interpreter program ............................................................. 75
A PROGRAMMING EXAMPLES ................................................................... 77A.1 Example 1: Code+Quantity ......................................................................... 78A.2 Example 2: EAN128 3 Fields ...................................................................... 82A.3 Example 3: Assisted Sales.......................................................................... 86A.4 Example 4: Listed Picking........................................................................... 91A.5 Example 5: Inventory .................................................................................. 94
B DOSDL ....................................................................................................... 97B.1. Loading Files Using DOSDL.EXE ............................................................... 97B1.1. DOSDL.EXE - Interpreter Program ............................................................. 98B1.2. DOSDL.EXE - Application program .......................................................... 100B1.3. DOSDL.EXE - Tables ............................................................................... 102B.2. Alternative File Loading Method................................................................ 104
vi
C COMMUNICATION PROTOCOL.............................................................. 106C.1. Communications frame ............................................................................. 106C.2 Data Transmission .................................................................................... 109C2.1 RS-232 and RS-485 Interfaces ................................................................. 109C.2.2 Eavesdrop Connection Interface............................................................... 109C.3 Host Computer Commands....................................................................... 110C.4 Configuring the Terminal (Serial Command “S”) ....................................... 115
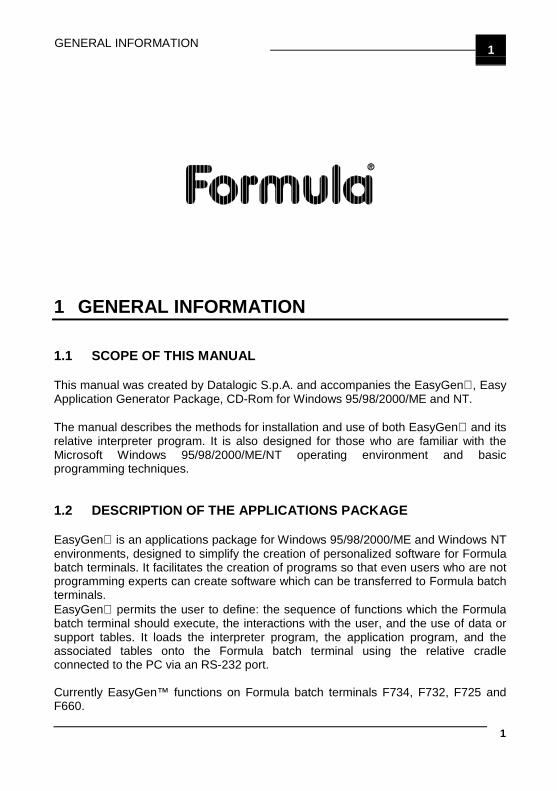
GENERAL INFORMATION 1
1
1 GENERAL INFORMATION
1.1 SCOPE OF THIS MANUAL
This manual was created by Datalogic S.p.A. and accompanies the EasyGen , EasyApplication Generator Package, CD-Rom for Windows 95/98/2000/ME and NT.
The manual describes the methods for installation and use of both EasyGen and itsrelative interpreter program. It is also designed for those who are familiar with theMicrosoft Windows 95/98/2000/ME/NT operating environment and basicprogramming techniques.
1.2 DESCRIPTION OF THE APPLICATIONS PACKAGE
EasyGen is an applications package for Windows 95/98/2000/ME and Windows NTenvironments, designed to simplify the creation of personalized software for Formulabatch terminals. It facilitates the creation of programs so that even users who are notprogramming experts can create software which can be transferred to Formula batchterminals.EasyGen permits the user to define: the sequence of functions which the Formulabatch terminal should execute, the interactions with the user, and the use of data orsupport tables. It loads the interpreter program, the application program, and theassociated tables onto the Formula batch terminal using the relative cradleconnected to the PC via an RS-232 port.
Currently EasyGen™ functions on Formula batch terminals F734, F732, F725 andF660.
EASYGEN™1
2
1.3 PACKAGE CONTENTS
The EasyGen package includes:
• 1 CD-Rom containing the following programs:
− EasyGen™ with example programs
− EasyGen™ Interpreter
− SysTools™2001
− OLE for Formula
− DOSDL program
• The following manuals:
− EasyGen™ (this manual)
− SysTools™2001
− OLE for Formula
1.4 MINIMUM CONFIGURATION REQUIRED
In order to install and use the EasyGen program, it is necessary to have at least thefollowing:− PC with a Pentium processor;− one of the following operating systems:
• Windows 95 - SR2 or later• Windows 98• Windows 2000• Windows ME• Windows NT + Service Pack 4
− Internet Explorer 4.01 SP2 (installed in the Active Desktop);− *HTML Help Viewer 1.32 (available in the EasyGen™ installation directory);− free serial port;− 16 MB memory for Windows 95/98, 32 MB for Windows ME/2000/NT;− hard disk with at least 30 MB free space to run;− VGA video card or better.
* Advised only for Windows NT 4.0 or Windows 95.
INSTALLATION 2
3
2 INSTALLATION
2.1 INSTALLING EASYGEN
Once the CD is inserted, launch the Windows software application EasyGen forWIN 95/98/2000/ME/NT by pressing the Setup button. Through this procedure thefollowing programs will be installed:
− EASYGEN.EXE Permits the creation and modification of personalizedapplication programs and their loading onto a Formula batchterminal.
− DOSDL.EXE Allows you to load the Interpreter Program, the applicationprogram (which was created with EasyGen ), and the tablesassociated with it onto a Formula batch terminal with a PCrunning DOS.
− EIXXX_YYY.HEX Permits the interpretation by Formula terminals of operationsdefined with the application program EasyGen . Thecharacters xxx refer to the terminal name, while yyy indicatethe software version.
− SYSTOOLS™2001
Permits the connection of the computer to the terminal via acradle, for configuration and the creation of archivescontaining collected data.

EASYGEN™2
4
− OLE for Formula is for very skilled users only. It can be used to loadapplications and collect data from the Formula batchterminals from within your own application, using anyDevelopment System for Windows that supports the“Microsoft OLE” Technology.
2.2 CONNECTING THE TERMINAL TO THE HOST COMPUTER VIARS-232
It is necessary to make the proper RS-232 connection for your PC to the Formulabatch terminal.
CAUTION
Before proceeding to this phase, make sure that both thecomputer and the terminal are turned off.
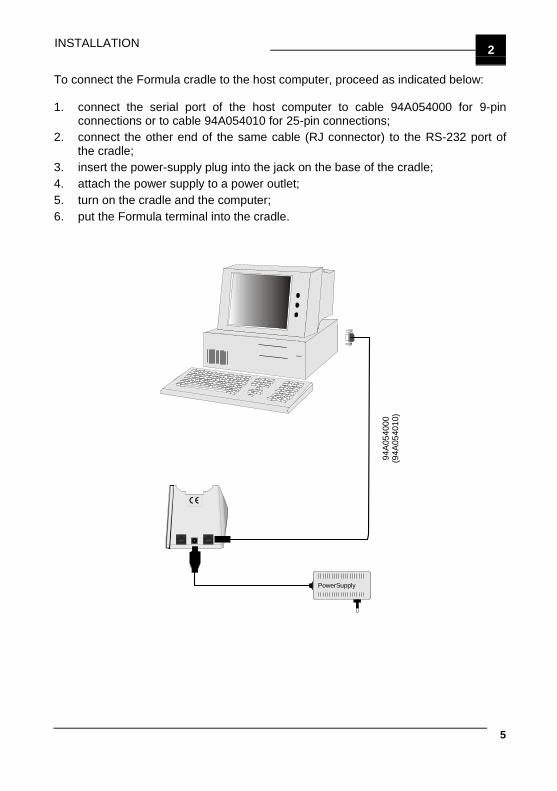
INSTALLATION 2
5
To connect the Formula cradle to the host computer, proceed as indicated below:
1. connect the serial port of the host computer to cable 94A054000 for 9-pinconnections or to cable 94A054010 for 25-pin connections;
2. connect the other end of the same cable (RJ connector) to the RS-232 port ofthe cradle;
3. insert the power-supply plug into the jack on the base of the cradle;4. attach the power supply to a power outlet;5. turn on the cradle and the computer;6. put the Formula terminal into the cradle.
PowerSupply
94A0
5400
0(9
4A05
4010
)
EASYGEN™2
6
2.3 LOADING EASYGEN™ INTERPRETER
Load the EasyGen Interpreter Program EIXXX_YYY.HEX onto the Formulaterminal with the EasyGen command “INITIATE” (see par. 4.7). You can also loadthe EasyGen™ Interpreter Program with a DOS system using the DOSDL.EXEprogram (see Appendix B). Before proceeding with this operation verify if anotherinterpreter program has been previously loaded. In this case it is required to deletethe program by using the shielded reset key (see par. 6.2.1 and par. 6.4 for details).
2.4 LOADING A SAMPLE PROGRAM
Select an EasyGen sample application, the simplest one is “EXAMPLE1.APP”found in the “Installation Directory \ Examples \ Your Language \ EXAMPLE 1(Code+Quantity)”, and load it onto the Formula terminal using the “SEND” command(see par. 4.2.7 for details).
You should be able to run the loaded application on the Formula terminal. Theexample application “EXAMPLE1.APP” helps you to build a program which storescollected barcodes, date and time in a table.
To collect data from the sample application, use the SysTools™2001 program.Follow the SysTools™2001 User's Manual for details on how to install and use thisprogram to collect data from Formula terminals.
USE OF EASYGEN™ 3
7
3 USE OF EASYGEN
3.1 INTRODUCING EASYGEN
EasyGen is the fastest and easiest way to create applications for many Datalogichand held terminals. Whether you are an experienced professional or brand new tohand held scanner programming, EasyGen provides you with a tool to simplifyrapid application development.
Rather than writing numerous lines of code to create your application running on theterminal, you add simple functions into a list on the PC screen.
The functions, properly described in chapter 5, give the EasyGen™ user access tothe main features of the terminal.
EASYGEN™3
8
A full list of available functions is:
− Remark to write text on the display;
− Beep to make a sound;
− Clear display
− Input barcode define the scanner barcode reading;
− Input text to key in or read with the scanner alphanumeric text;
− Input number to key in or read with the scanner a number;
− Input date to read the date from the real time clock of the terminal;
− Input time to read the time from the real time clock of the terminal;
− Menu to display different choices and allow the user to select one;
− Loop to go to a function and update the tables/indexes (seeparagraph "Editor tables" on page 30);
− Comparison to make a comparison between numbers or text;
− Go to to go to a function;
− Mathematicaloperation
to make a basic mathematical operation;
− Find to find text or a number inside a table (see paragraph "Editortables" on page 30);
If your operation must store data, either previously prepared tables, or an output filefor uploading to the PC, you must define several different tables, each one composedof a fixed number of records in which you have different fields (see paragraph 4.6.1).
USE OF EASYGEN™ 3
9
To develop a new program with EasyGen we suggest that you proceed with thefollowing steps:
1. perform an analysis of the application and build a flow chart using the availablefunctions;
2. open a new program [File menu - New] see par. 4.2.1;
3. choose the type of Formula terminal to be used;
4. define the tables and fields [Tools menu - Editor Tables] see par. 4.6.1;
5. define names for variables [Tools menu - Editor Variables] see par. 4.6.2;
6. proceed with the insertion of all the functions that must be executed by theterminal as defined by your flow chart [Insert menu] see par. 4.4;
7. save the program [File menu - Save] see par. 4.2.3;
8. set the Formula terminal with the serial parameters that must be used by yourapplication [Tools menu - Options] see par. 4.6.3;
9. send the interpreter program EIXXX_YYY.HEX to the Formula terminal (this“Initialization” operation is only performed the first time that a program must beloaded) [Utility menu - Initiate] see par. 4.7;
10. load the actual application program on the Formula terminal [File menu - Send]see par. 4.2.7.
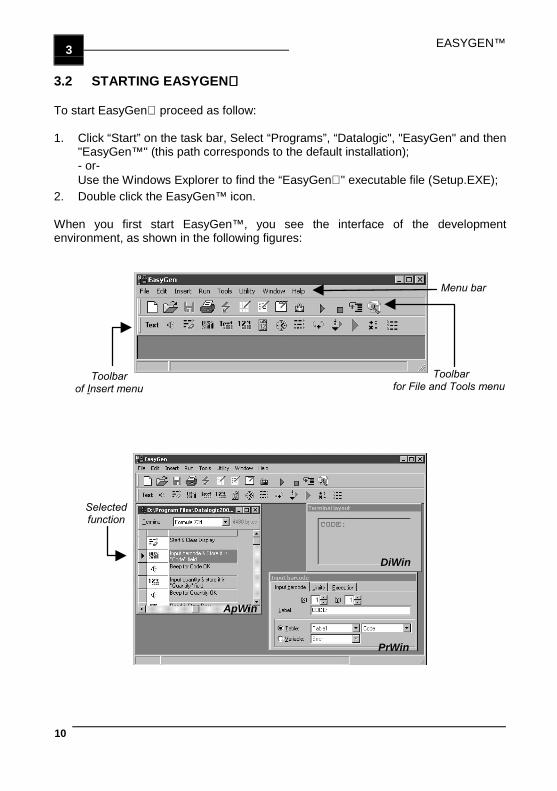
EASYGEN™3
10
3.2 STARTING EASYGEN
To start EasyGen proceed as follow:
1. Click “Start” on the task bar, Select “Programs”, “Datalogic", "EasyGen" and then"EasyGen™" (this path corresponds to the default installation);- or-Use the Windows Explorer to find the “EasyGen " executable file (Setup.EXE);
2. Double click the EasyGen™ icon.
When you first start EasyGen™, you see the interface of the developmentenvironment, as shown in the following figures:
Toolbarof Insert menu
Toolbarfor File and Tools menu
Menu bar
ApWin
DiWin
PrWin
Selectedfunction

USE OF EASYGEN™ 3
11
The development environment interface of EasyGen™ is similar to other programsfor Windows 95/98/2000/ME/NT.
The main elements are:
− Menu bar displays the commands you use to work withEasyGen™;
− Tool bar Button Provides quick access to commonly usedcommands in the programming environment;The icons on the first line correspond to theselections of the File and Tools menu, while theicons of the second line correspond to those ofthe Insert menu.
− Application Window (ApWin) Lists, from top to bottom, the functions of yourapplication as they are executed by the terminalwhen loaded;
− Display Window (DiWin) Emulates the display of the selected terminal asit appears after the complete execution of theselected function;
− Property Window (PrWin) Lists the property settings for the selectedfunction.
Chapter 5 will give a more detailed description of these windows.
EASYGEN™3
12
3.3 LIMITS OF EASYGEN
Message/Comment: This is a sequence of a maximum of 32 alphanumericcharacters;
Number: is formed by a maximum of 7 integers and two decimalnumbers in the format
±XXXXXXX.YYThe programmer is responsible to ensure that allnumerical operations do not exceed this limit;
Variables: 7 temporary variables of a maximum of 32 alphanumericcharacters are available. The first one is reserved as an“Error Variable” the other 6 can be named (see par.4.6.2).
Tables: It is possible to use simultaneously up to 15 named tables(1..15). In general, table 0 is used to store acquired data.A numeric index variable is associated with each table.Tables are composed of records and each record canhave a maximum of 30 fields (see par. 4.6.1).The indexvariable points to the nth record. It assumes the minimumvalue of zero, or “first record”, and the maximum value of“maximum number of records” minus one.
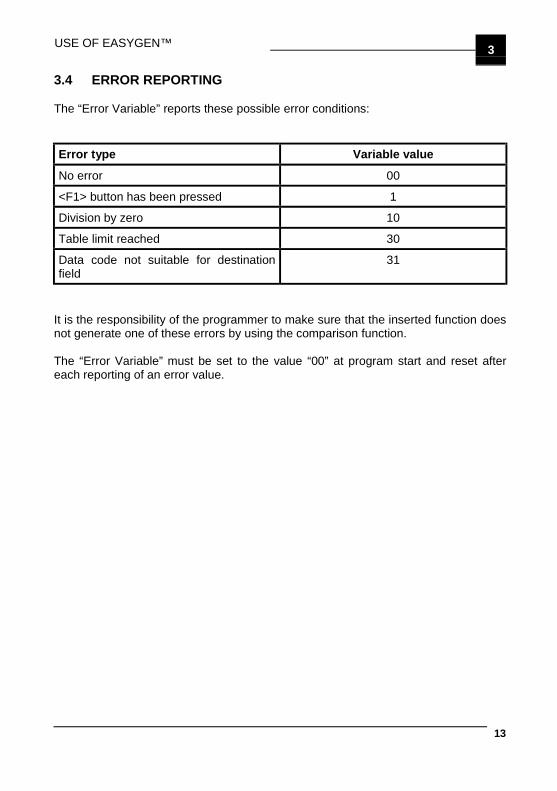
USE OF EASYGEN™ 3
13
3.4 ERROR REPORTING
The “Error Variable” reports these possible error conditions:
Error type Variable value
No error 00
<F1> button has been pressed 1
Division by zero 10
Table limit reached 30
Data code not suitable for destinationfield
31
It is the responsibility of the programmer to make sure that the inserted function doesnot generate one of these errors by using the comparison function.
The “Error Variable” must be set to the value “00” at program start and reset aftereach reporting of an error value.
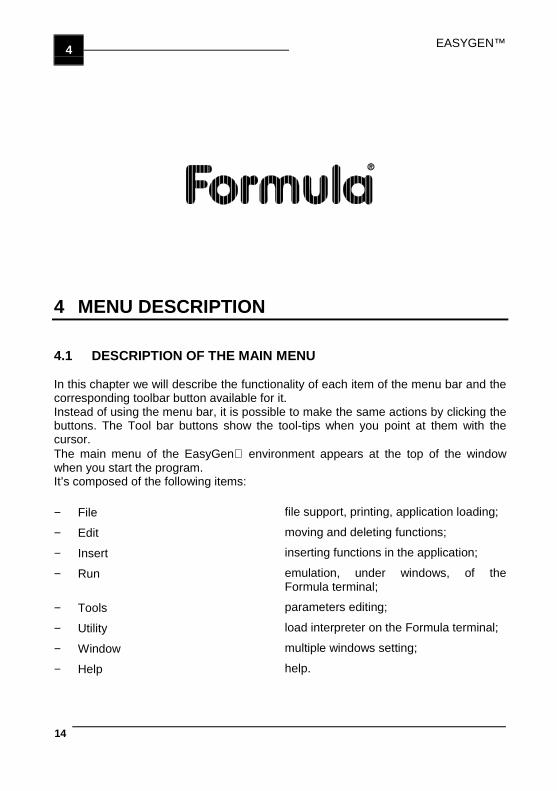
EASYGEN™4
14
4 MENU DESCRIPTION
4.1 DESCRIPTION OF THE MAIN MENU
In this chapter we will describe the functionality of each item of the menu bar and thecorresponding toolbar button available for it.Instead of using the menu bar, it is possible to make the same actions by clicking thebuttons. The Tool bar buttons show the tool-tips when you point at them with thecursor.The main menu of the EasyGen environment appears at the top of the windowwhen you start the program.It’s composed of the following items:
− File file support, printing, application loading;
− Edit moving and deleting functions;
− Insert inserting functions in the application;
− Run emulation, under windows, of theFormula terminal;
− Tools parameters editing;
− Utility load interpreter on the Formula terminal;
− Window multiple windows setting;
− Help help.

MENU DESCRIPTION 4
15
4.2 FILE MENU
Manage application file, printing and loading to the Formula terminal.
4.2.1 New
Choosing this command allows you to create a new application program.An Empty Application Window (ApWin) appears on the screen:
ApWin
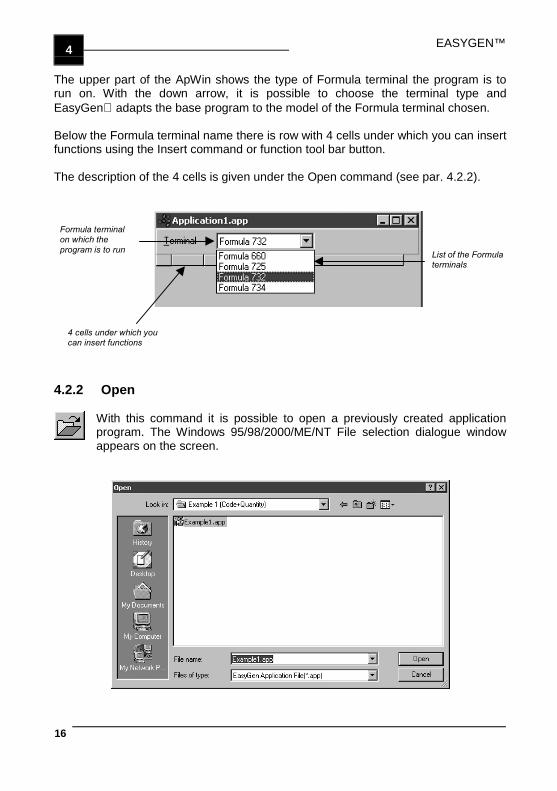
EASYGEN™4
16
The upper part of the ApWin shows the type of Formula terminal the program is torun on. With the down arrow, it is possible to choose the terminal type andEasyGen adapts the base program to the model of the Formula terminal chosen.
Below the Formula terminal name there is row with 4 cells under which you can insertfunctions using the Insert command or function tool bar button.
The description of the 4 cells is given under the Open command (see par. 4.2.2).
Formula terminalon which theprogram is to run
4 cells under which youcan insert functions
List of the Formulaterminals
4.2.2 Open
With this command it is possible to open a previously created applicationprogram. The Windows 95/98/2000/ME/NT File selection dialogue windowappears on the screen.
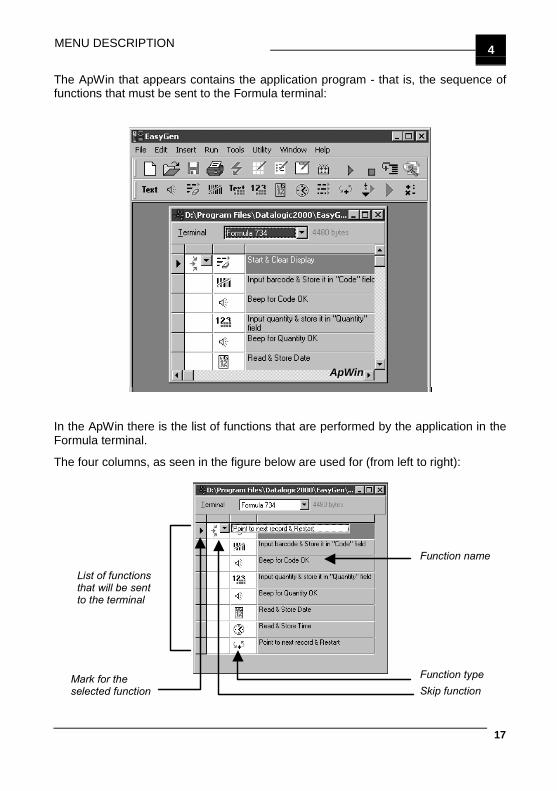
MENU DESCRIPTION 4
17
The ApWin that appears contains the application program - that is, the sequence offunctions that must be sent to the Formula terminal:
ApWin
In the ApWin there is the list of functions that are performed by the application in theFormula terminal.
The four columns, as seen in the figure below are used for (from left to right):
Function name
Function typeSkip function
Mark for theselected function
List of functionsthat will be sentto the terminal
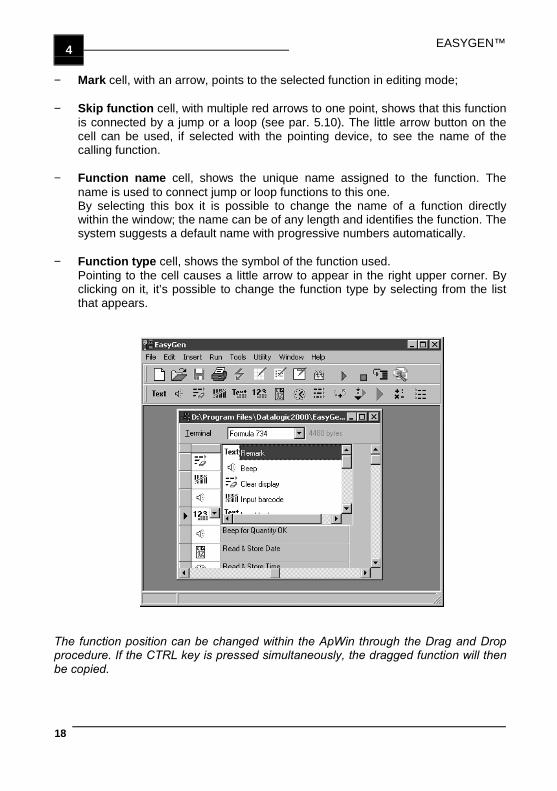
EASYGEN™4
18
− Mark cell, with an arrow, points to the selected function in editing mode;
− Skip function cell, with multiple red arrows to one point, shows that this functionis connected by a jump or a loop (see par. 5.10). The little arrow button on thecell can be used, if selected with the pointing device, to see the name of thecalling function.
− Function name cell, shows the unique name assigned to the function. Thename is used to connect jump or loop functions to this one.By selecting this box it is possible to change the name of a function directlywithin the window; the name can be of any length and identifies the function. Thesystem suggests a default name with progressive numbers automatically.
− Function type cell, shows the symbol of the function used.Pointing to the cell causes a little arrow to appear in the right upper corner. Byclicking on it, it’s possible to change the function type by selecting from the listthat appears.
The function position can be changed within the ApWin through the Drag and Dropprocedure. If the CTRL key is pressed simultaneously, the dragged function will thenbe copied.
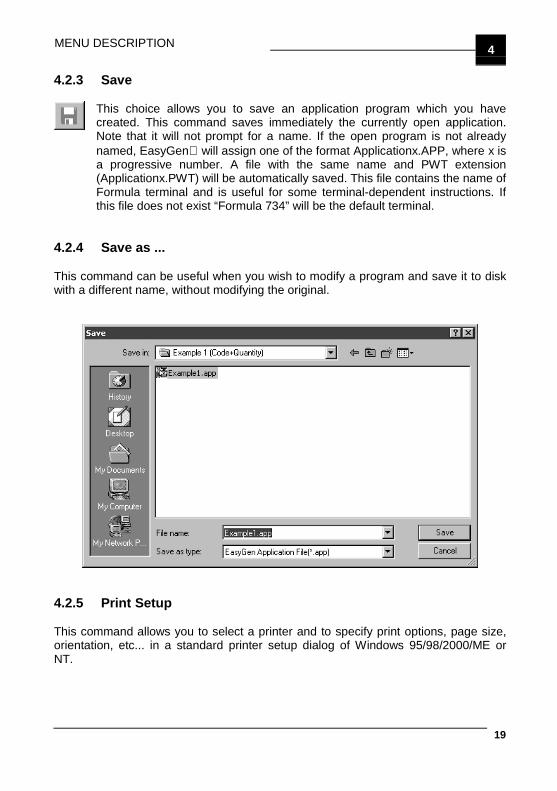
MENU DESCRIPTION 4
19
4.2.3 Save
This choice allows you to save an application program which you havecreated. This command saves immediately the currently open application.Note that it will not prompt for a name. If the open program is not alreadynamed, EasyGen will assign one of the format Applicationx.APP, where x isa progressive number. A file with the same name and PWT extension(Applicationx.PWT) will be automatically saved. This file contains the name ofFormula terminal and is useful for some terminal-dependent instructions. Ifthis file does not exist “Formula 734” will be the default terminal.
4.2.4 Save as ...
This command can be useful when you wish to modify a program and save it to diskwith a different name, without modifying the original.
4.2.5 Print Setup
This command allows you to select a printer and to specify print options, page size,orientation, etc... in a standard printer setup dialog of Windows 95/98/2000/ME orNT.
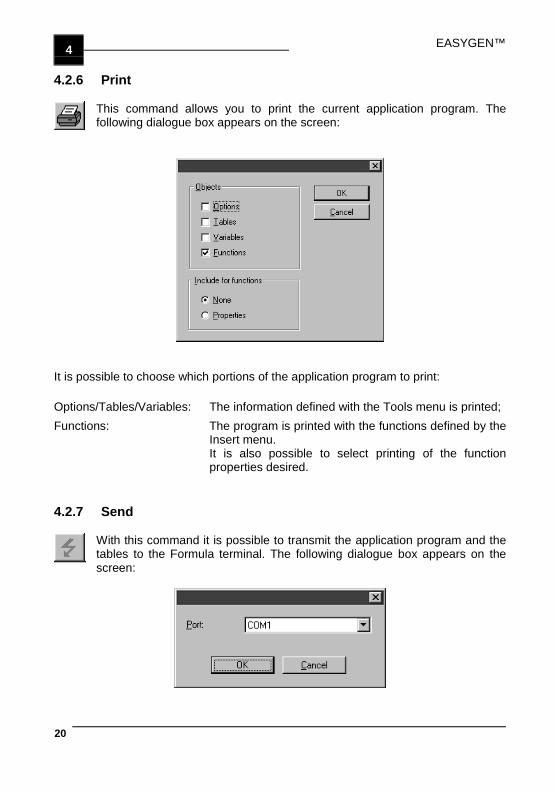
EASYGEN™4
20
4.2.6 Print
This command allows you to print the current application program. Thefollowing dialogue box appears on the screen:
It is possible to choose which portions of the application program to print:
Options/Tables/Variables: The information defined with the Tools menu is printed;Functions: The program is printed with the functions defined by the
Insert menu.It is also possible to select printing of the functionproperties desired.
4.2.7 Send
With this command it is possible to transmit the application program and thetables to the Formula terminal. The following dialogue box appears on thescreen:
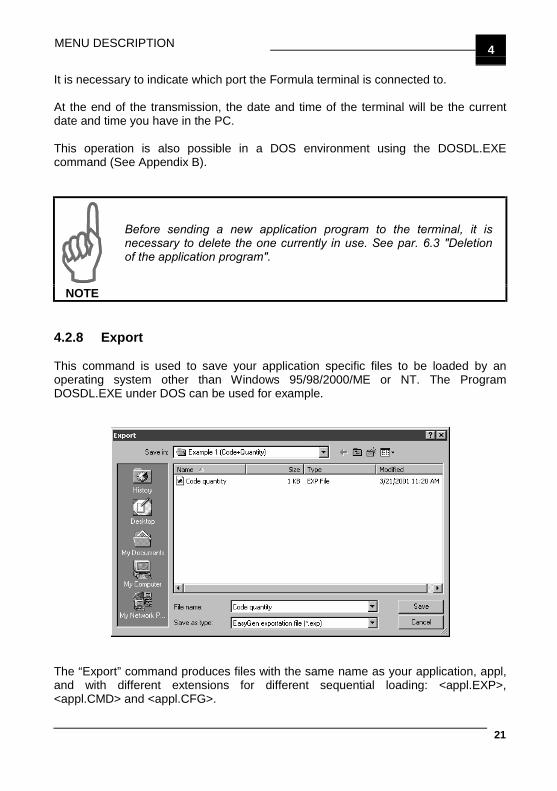
MENU DESCRIPTION 4
21
It is necessary to indicate which port the Formula terminal is connected to.
At the end of the transmission, the date and time of the terminal will be the currentdate and time you have in the PC.
This operation is also possible in a DOS environment using the DOSDL.EXEcommand (See Appendix B).
NOTE
Before sending a new application program to the terminal, it isnecessary to delete the one currently in use. See par. 6.3 "Deletionof the application program".
4.2.8 Export
This command is used to save your application specific files to be loaded by anoperating system other than Windows 95/98/2000/ME or NT. The ProgramDOSDL.EXE under DOS can be used for example.
The “Export” command produces files with the same name as your application, appl,and with different extensions for different sequential loading: <appl.EXP>,<appl.CMD> and <appl.CFG>.
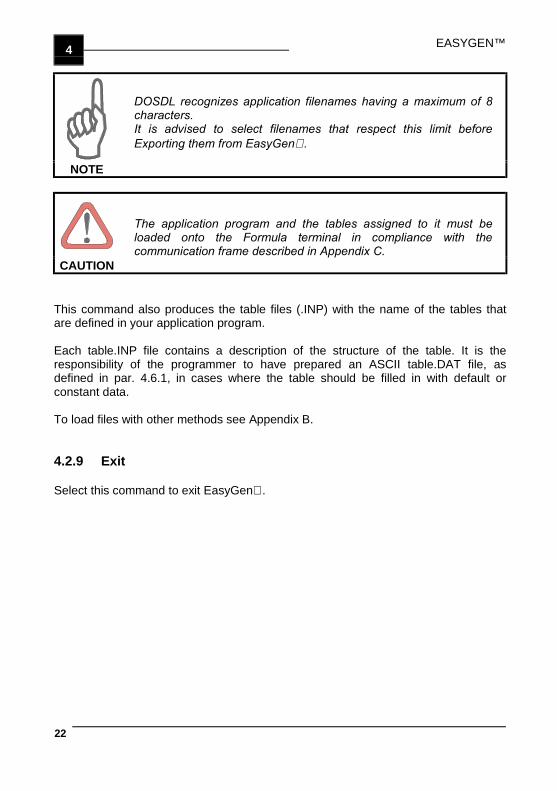
EASYGEN™4
22
NOTE
DOSDL recognizes application filenames having a maximum of 8characters.It is advised to select filenames that respect this limit beforeExporting them from EasyGen .
CAUTION
The application program and the tables assigned to it must beloaded onto the Formula terminal in compliance with thecommunication frame described in Appendix C.
This command also produces the table files (.INP) with the name of the tables thatare defined in your application program.
Each table.INP file contains a description of the structure of the table. It is theresponsibility of the programmer to have prepared an ASCII table.DAT file, asdefined in par. 4.6.1, in cases where the table should be filled in with default orconstant data.
To load files with other methods see Appendix B.
4.2.9 Exit
Select this command to exit EasyGen .
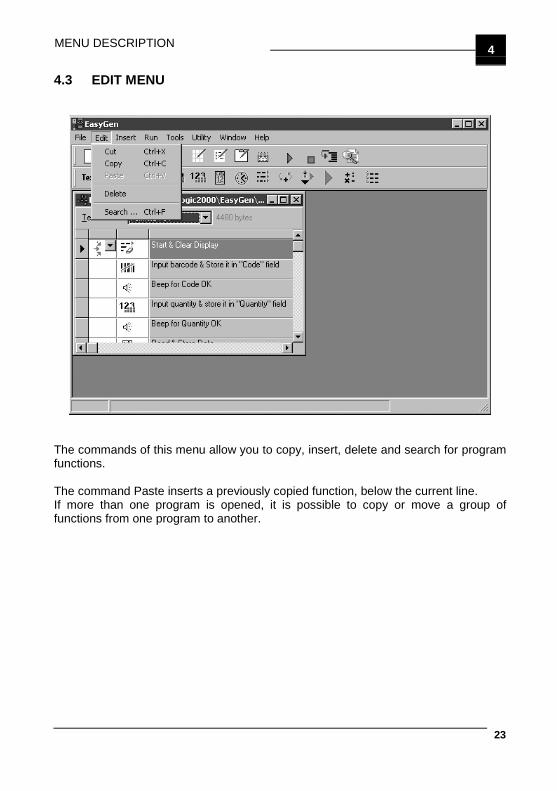
MENU DESCRIPTION 4
23
4.3 EDIT MENU
The commands of this menu allow you to copy, insert, delete and search for programfunctions.
The command Paste inserts a previously copied function, below the current line.If more than one program is opened, it is possible to copy or move a group offunctions from one program to another.
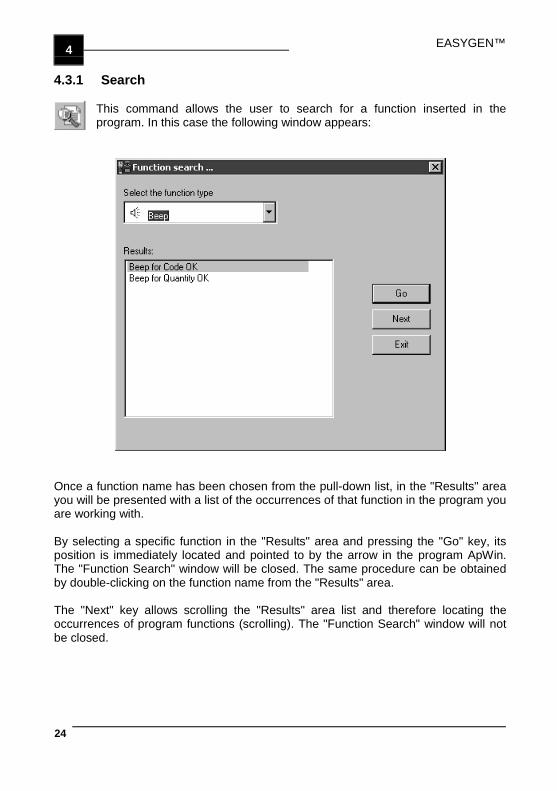
EASYGEN™4
24
4.3.1 Search
This command allows the user to search for a function inserted in theprogram. In this case the following window appears:
Once a function name has been chosen from the pull-down list, in the "Results" areayou will be presented with a list of the occurrences of that function in the program youare working with.
By selecting a specific function in the "Results" area and pressing the "Go" key, itsposition is immediately located and pointed to by the arrow in the program ApWin.The "Function Search" window will be closed. The same procedure can be obtainedby double-clicking on the function name from the "Results" area.
The "Next" key allows scrolling the "Results" area list and therefore locating theoccurrences of program functions (scrolling). The "Function Search" window will notbe closed.
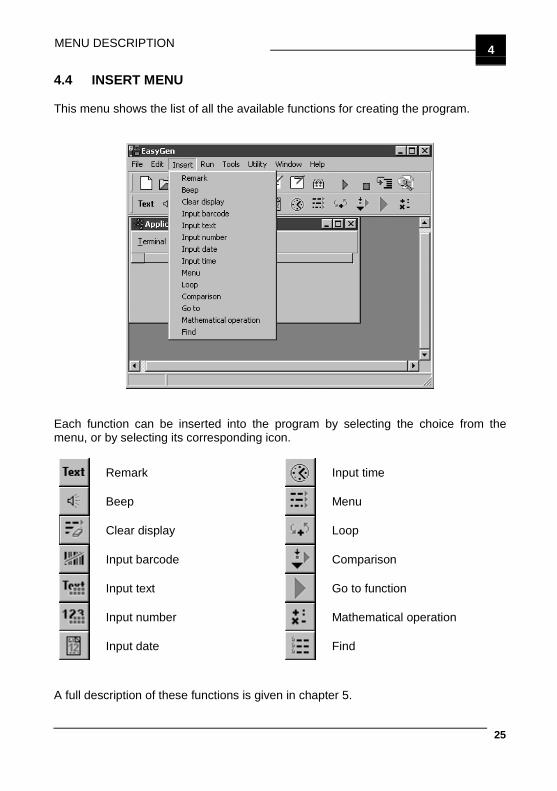
MENU DESCRIPTION 4
25
4.4 INSERT MENU
This menu shows the list of all the available functions for creating the program.
Each function can be inserted into the program by selecting the choice from themenu, or by selecting its corresponding icon.
Remark Input time
Beep Menu
Clear display Loop
Input barcode Comparison
Input text Go to function
Input number Mathematical operation
Input date Find
A full description of these functions is given in chapter 5.
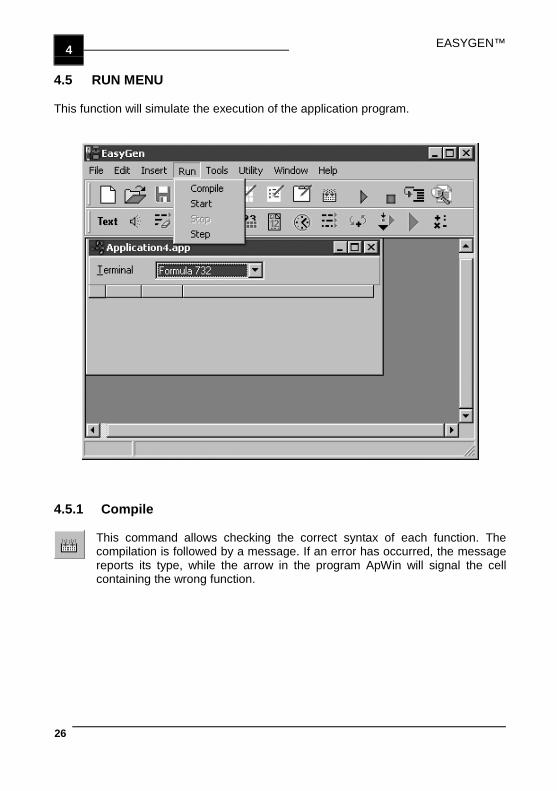
EASYGEN™4
26
4.5 RUN MENU
This function will simulate the execution of the application program.
4.5.1 Compile
This command allows checking the correct syntax of each function. Thecompilation is followed by a message. If an error has occurred, the messagereports its type, while the arrow in the program ApWin will signal the cellcontaining the wrong function.
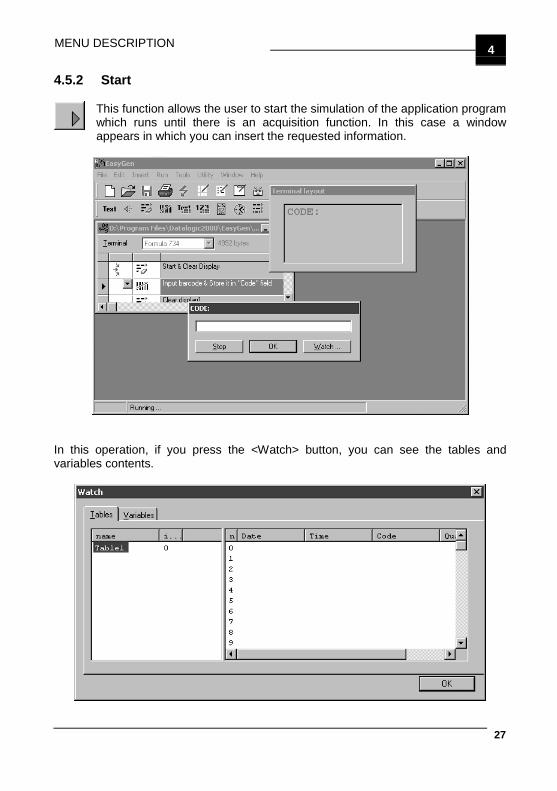
MENU DESCRIPTION 4
27
4.5.2 Start
This function allows the user to start the simulation of the application programwhich runs until there is an acquisition function. In this case a windowappears in which you can insert the requested information.
In this operation, if you press the <Watch> button, you can see the tables andvariables contents.
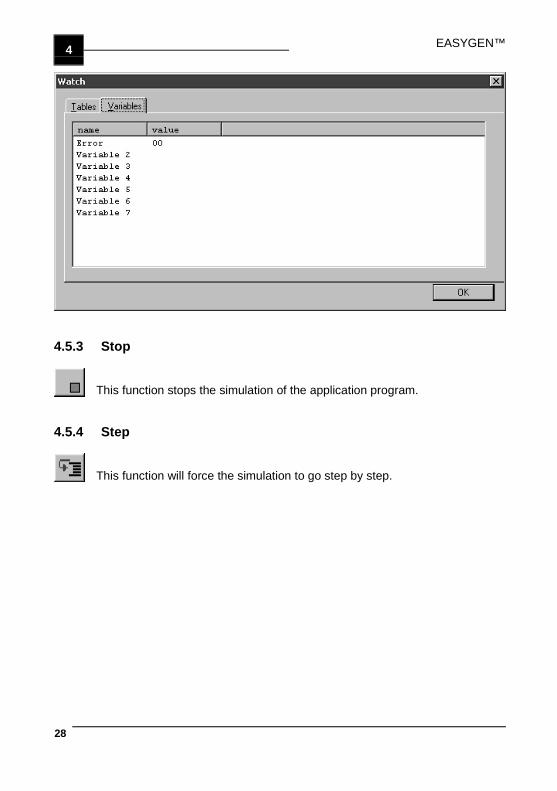
EASYGEN™4
28
4.5.3 Stop
This function stops the simulation of the application program.
4.5.4 Step
This function will force the simulation to go step by step.
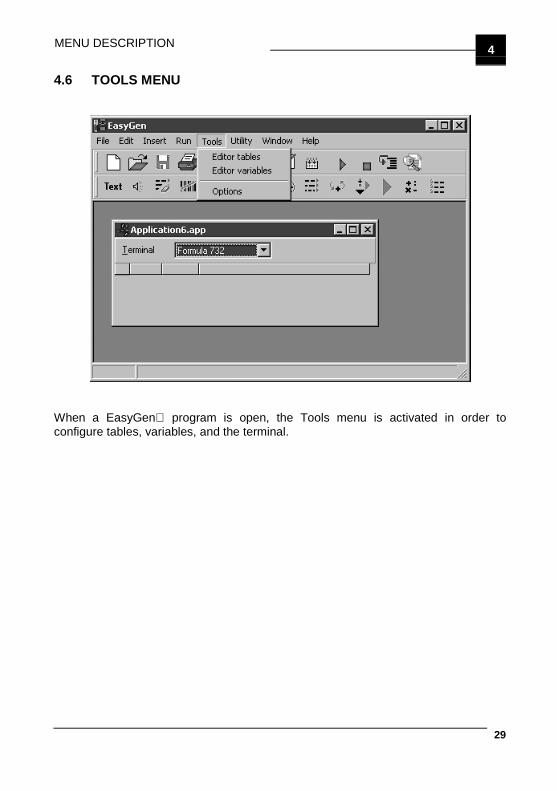
MENU DESCRIPTION 4
29
4.6 TOOLS MENU
When a EasyGen program is open, the Tools menu is activated in order toconfigure tables, variables, and the terminal.

EASYGEN™4
30
4.6.1 Editor Tables
Choosing this command causes a window of the following type to bedisplayed:
The programmer may define up to 15 General type tables which may be used forreading or writing.Each table may be associated with a .DAT file which has the same name as the tableand which contains its data.The format of the .DAT file must be compliant with that of the table defined withEasyGen .Each field must be divided by the character “|” (pipe) and each record must bepositioned on a single line.
EXAMPLE
Suppose that we have defined with EasyGen a table “Fruits” consisting of twofields:
Fruit : 10 charactersCode : 5 characters.
The file with extension .DAT is called “FRUITS.DAT” and contains the data:
Pearxxxxxx |00123 |Orangexxxx |00257 |Melonxxxxx |00378 |
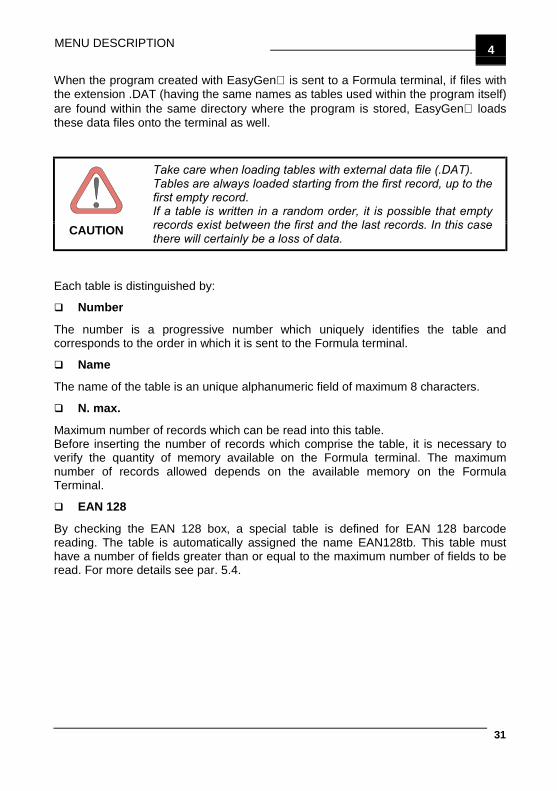
MENU DESCRIPTION 4
31
When the program created with EasyGen is sent to a Formula terminal, if files withthe extension .DAT (having the same names as tables used within the program itself)are found within the same directory where the program is stored, EasyGen loadsthese data files onto the terminal as well.
CAUTION
Take care when loading tables with external data file (.DAT).Tables are always loaded starting from the first record, up to thefirst empty record.If a table is written in a random order, it is possible that emptyrecords exist between the first and the last records. In this casethere will certainly be a loss of data.
Each table is distinguished by:
Number
The number is a progressive number which uniquely identifies the table andcorresponds to the order in which it is sent to the Formula terminal.
Name
The name of the table is an unique alphanumeric field of maximum 8 characters.
N. max.
Maximum number of records which can be read into this table.Before inserting the number of records which comprise the table, it is necessary toverify the quantity of memory available on the Formula terminal. The maximumnumber of records allowed depends on the available memory on the FormulaTerminal.
EAN 128
By checking the EAN 128 box, a special table is defined for EAN 128 barcodereading. The table is automatically assigned the name EAN128tb. This table musthave a number of fields greater than or equal to the maximum number of fields to beread. For more details see par. 5.4.
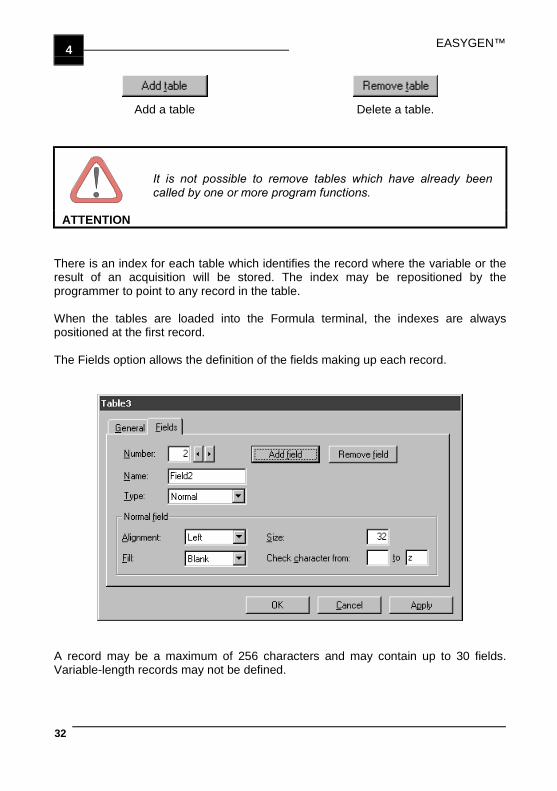
EASYGEN™4
32
Add a table Delete a table.
ATTENTION
It is not possible to remove tables which have already beencalled by one or more program functions.
There is an index for each table which identifies the record where the variable or theresult of an acquisition will be stored. The index may be repositioned by theprogrammer to point to any record in the table.
When the tables are loaded into the Formula terminal, the indexes are alwayspositioned at the first record.
The Fields option allows the definition of the fields making up each record.
A record may be a maximum of 256 characters and may contain up to 30 fields.Variable-length records may not be defined.
MENU DESCRIPTION 4
33
Each field is distinguished by:
Number
The number is a progressive number which uniquely identifies a field andcorresponds to the order in which it is sent to the Formula terminal.
Name
The name of the field is an alphanumeric field with a maximum length of 10characters.
Type
The field type may be selected from:
− Normal (for example code, price, location, ...)
− Time (internal to the terminal) contains the time in the format hh:mm:ss. Anytime a record is updated, the time will be automatically updated as well.
− Date (internal to the terminal) contains the date in the format dd/mm/yy. Any timea record is updated, the date will be automatically updated as well.
For each field of type Normal it is possible to define:
− AlignmentIt is possible to define the alignment of data within the field, whenever the fillcharacter is not defined as being equal to zero.
− FillThe character to be used to complete acquired data (if the data has a lengthshorter than the field length).
Space Data is considered to be alphanumeric.Zero Data is considered to be numeric and the alignment is set flush right.
This selection assumes relative importance when the data is used (forexample, equivalence tests and arithmetic operations).
− SizeIt is possible to enable control of the length of data to be inserted into the field.Control is done by verifying whether the length is within the defined value.The maximum length allowed is 32 characters.Length control is disabled as the default.
EASYGEN™4
34
− Check characters from…toBy defining a range of characters, it is possible to enable a control on the type ofcharacters which will be inserted into the field.By default, character control is between the character “space” and the character“z”.For whole numbers insert the control from "0" to "9". For real numbers insert thecontrol from "." to "9".
Add a field Delete a field
ATTENTION
It is not possible to remove fields contained in the tables whichhave already been called by one or more program functions.
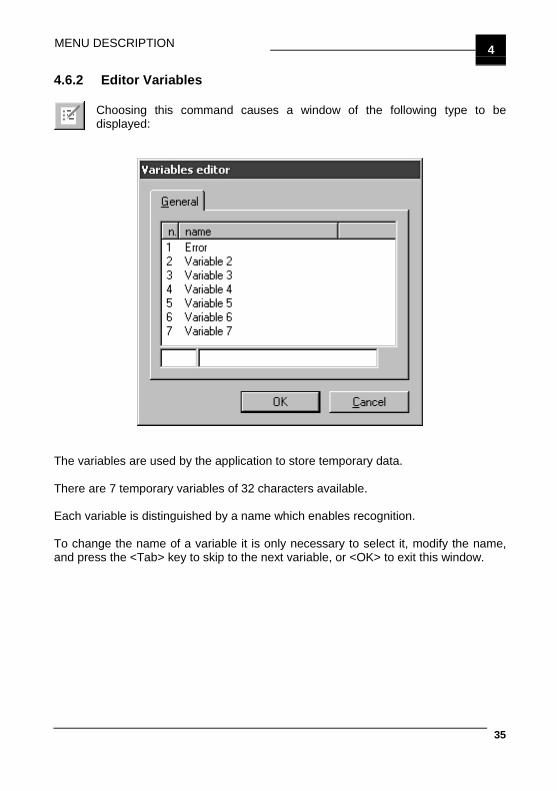
MENU DESCRIPTION 4
35
4.6.2 Editor Variables
Choosing this command causes a window of the following type to bedisplayed:
The variables are used by the application to store temporary data.
There are 7 temporary variables of 32 characters available.
Each variable is distinguished by a name which enables recognition.
To change the name of a variable it is only necessary to select it, modify the name,and press the <Tab> key to skip to the next variable, or <OK> to exit this window.
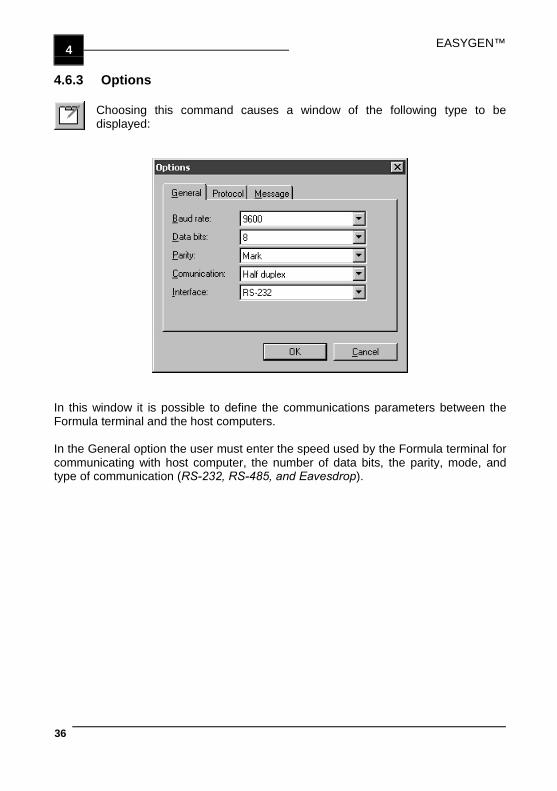
EASYGEN™4
36
4.6.3 Options
Choosing this command causes a window of the following type to bedisplayed:
In this window it is possible to define the communications parameters between theFormula terminal and the host computers.
In the General option the user must enter the speed used by the Formula terminal forcommunicating with host computer, the number of data bits, the parity, mode, andtype of communication (RS-232, RS-485, and Eavesdrop).
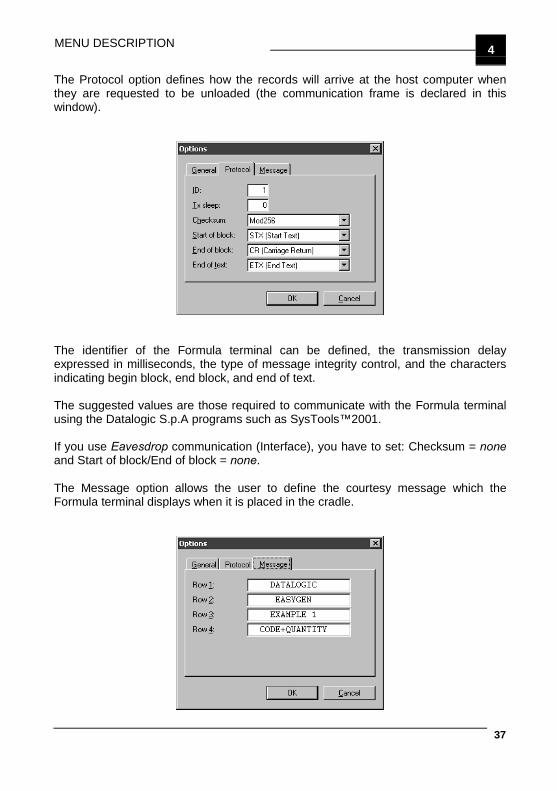
MENU DESCRIPTION 4
37
The Protocol option defines how the records will arrive at the host computer whenthey are requested to be unloaded (the communication frame is declared in thiswindow).
The identifier of the Formula terminal can be defined, the transmission delayexpressed in milliseconds, the type of message integrity control, and the charactersindicating begin block, end block, and end of text.
The suggested values are those required to communicate with the Formula terminalusing the Datalogic S.p.A programs such as SysTools™2001.
If you use Eavesdrop communication (Interface), you have to set: Checksum = noneand Start of block/End of block = none.
The Message option allows the user to define the courtesy message which theFormula terminal displays when it is placed in the cradle.
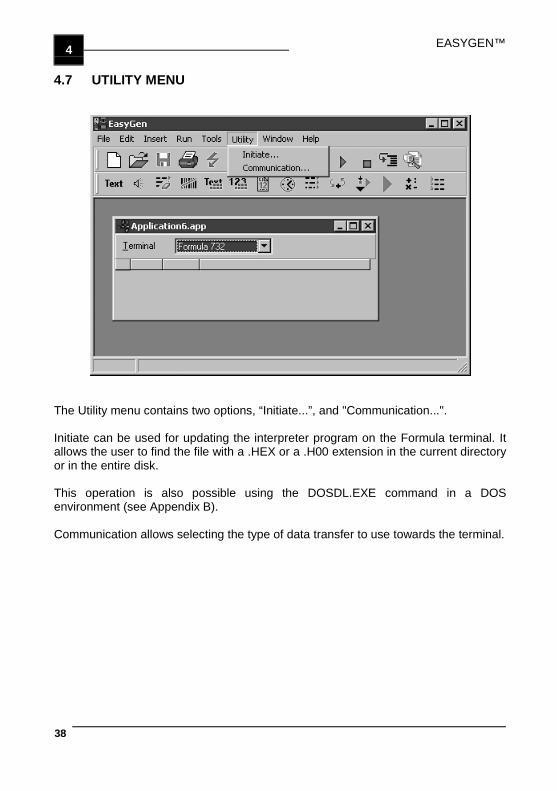
EASYGEN™4
38
4.7 UTILITY MENU
The Utility menu contains two options, “Initiate...”, and "Communication...".
Initiate can be used for updating the interpreter program on the Formula terminal. Itallows the user to find the file with a .HEX or a .H00 extension in the current directoryor in the entire disk.
This operation is also possible using the DOSDL.EXE command in a DOSenvironment (see Appendix B).
Communication allows selecting the type of data transfer to use towards the terminal.
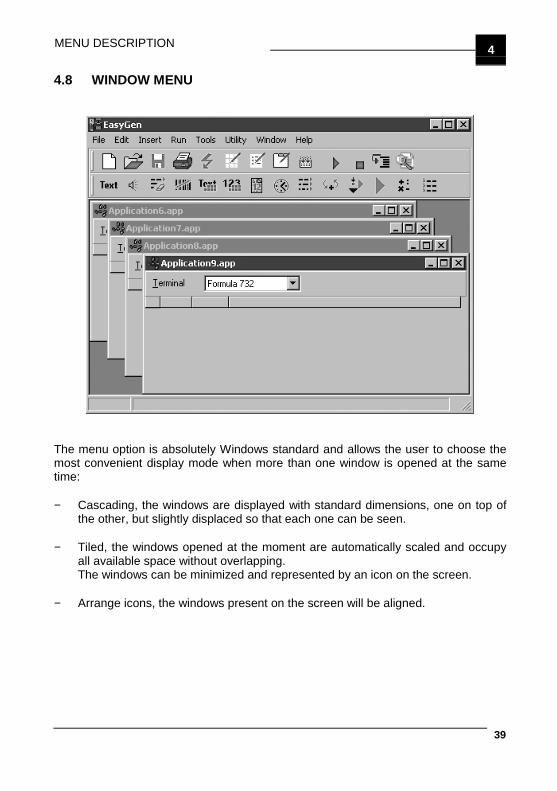
MENU DESCRIPTION 4
39
4.8 WINDOW MENU
The menu option is absolutely Windows standard and allows the user to choose themost convenient display mode when more than one window is opened at the sametime:
− Cascading, the windows are displayed with standard dimensions, one on top ofthe other, but slightly displaced so that each one can be seen.
− Tiled, the windows opened at the moment are automatically scaled and occupyall available space without overlapping.The windows can be minimized and represented by an icon on the screen.
− Arrange icons, the windows present on the screen will be aligned.
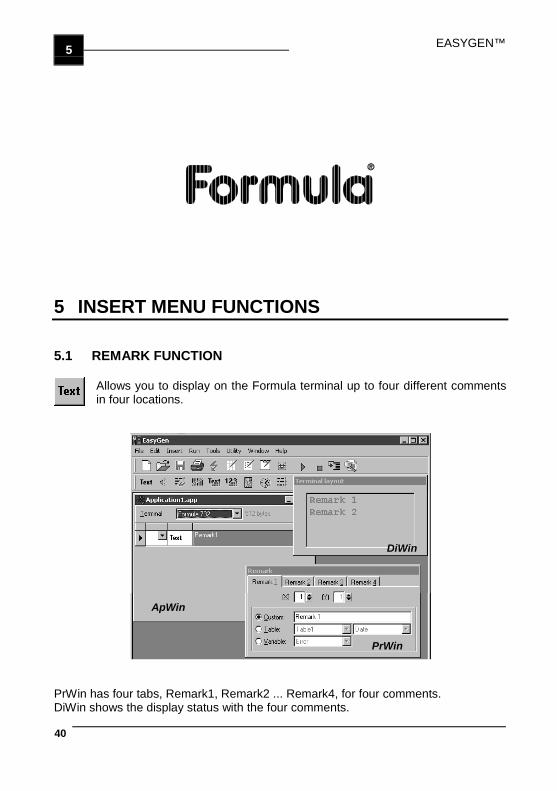
EASYGEN™5
40
5 INSERT MENU FUNCTIONS
5.1 REMARK FUNCTION
Allows you to display on the Formula terminal up to four different commentsin four locations.
ApWin
DiWin
PrWin
PrWin has four tabs, Remark1, Remark2 ... Remark4, for four comments.DiWin shows the display status with the four comments.
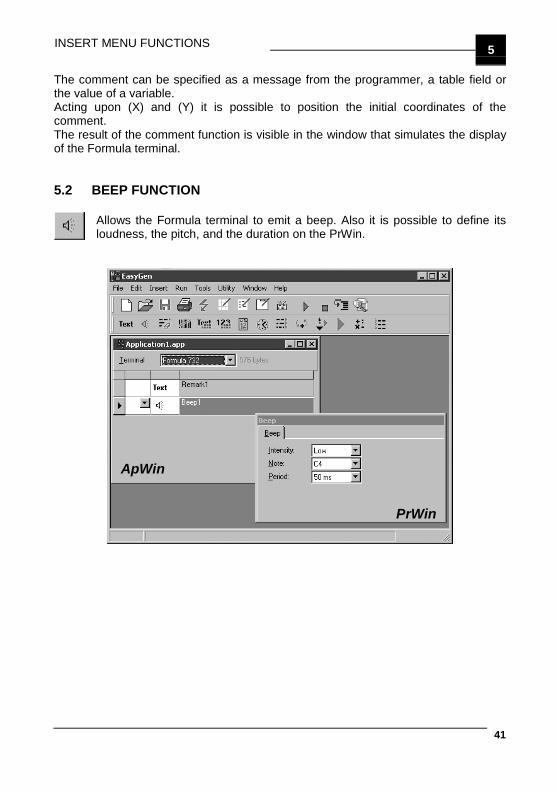
INSERT MENU FUNCTIONS 5
41
The comment can be specified as a message from the programmer, a table field orthe value of a variable.Acting upon (X) and (Y) it is possible to position the initial coordinates of thecomment.The result of the comment function is visible in the window that simulates the displayof the Formula terminal.
5.2 BEEP FUNCTION
Allows the Formula terminal to emit a beep. Also it is possible to define itsloudness, the pitch, and the duration on the PrWin.
ApWin
PrWin
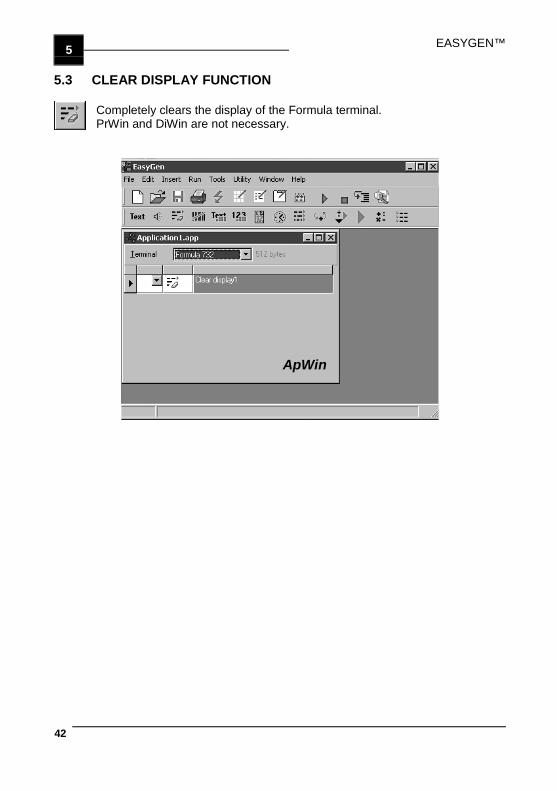
EASYGEN™5
42
5.3 CLEAR DISPLAY FUNCTION
Completely clears the display of the Formula terminal.PrWin and DiWin are not necessary.
ApWin
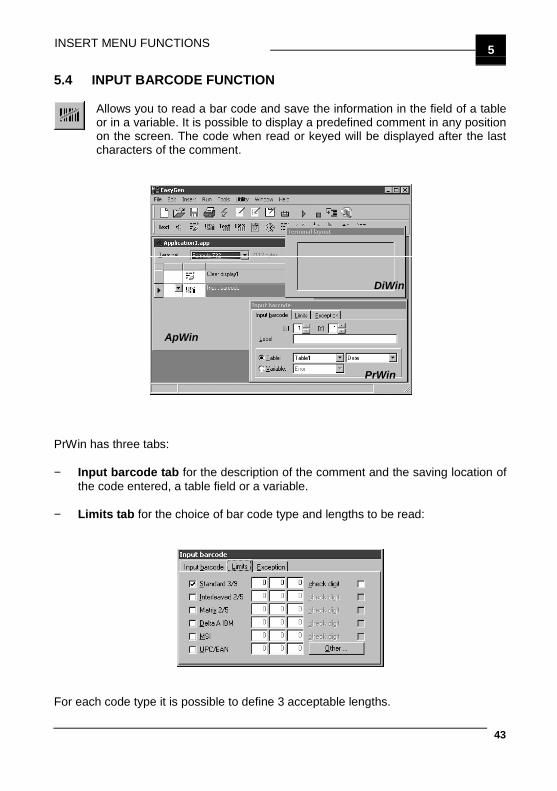
INSERT MENU FUNCTIONS 5
43
5.4 INPUT BARCODE FUNCTION
Allows you to read a bar code and save the information in the field of a tableor in a variable. It is possible to display a predefined comment in any positionon the screen. The code when read or keyed will be displayed after the lastcharacters of the comment.
ApWin
DiWin
PrWin
PrWin has three tabs:
− Input barcode tab for the description of the comment and the saving location ofthe code entered, a table field or a variable.
− Limits tab for the choice of bar code type and lengths to be read:
For each code type it is possible to define 3 acceptable lengths.
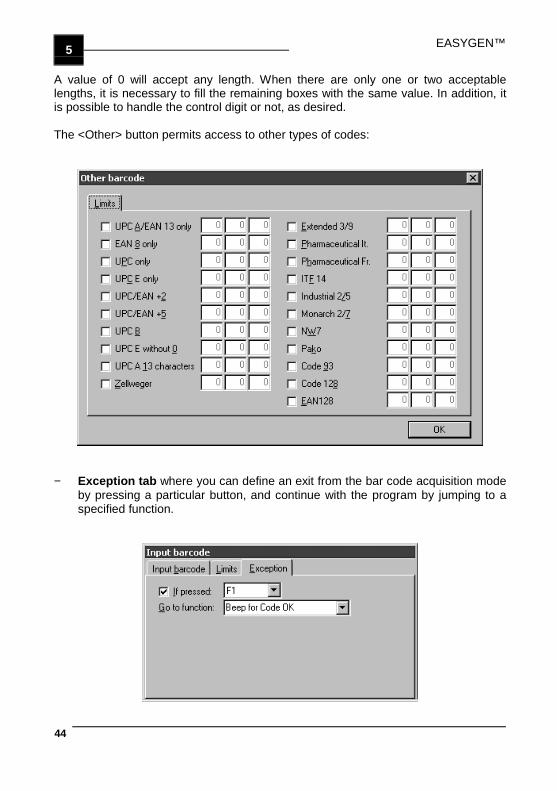
EASYGEN™5
44
A value of 0 will accept any length. When there are only one or two acceptablelengths, it is necessary to fill the remaining boxes with the same value. In addition, itis possible to handle the control digit or not, as desired.
The <Other> button permits access to other types of codes:
− Exception tab where you can define an exit from the bar code acquisition modeby pressing a particular button, and continue with the program by jumping to aspecified function.
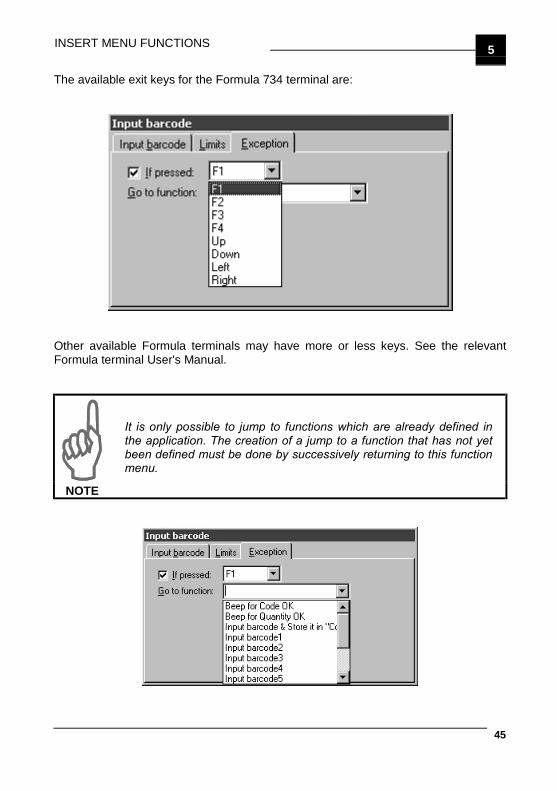
INSERT MENU FUNCTIONS 5
45
The available exit keys for the Formula 734 terminal are:
Other available Formula terminals may have more or less keys. See the relevantFormula terminal User's Manual.
NOTE
It is only possible to jump to functions which are already defined inthe application. The creation of a jump to a function that has not yetbeen defined must be done by successively returning to this functionmenu.
EASYGEN™5
46
− EAN128 & CODE 128By enabling CODE 128 codes, it is possible to read, not only normal CODE 128barcodes, but also single field EAN 128 codes.By enabling EAN 128 codes, it is possible to read, not only single field EAN 128barcodes, but also CODE 128 codes.
NOTE
To correctly read EAN 128 codes of more than one field, it isnecessary to create the special EAN128tb table. (See par. 4.6.1).
This table must have a number of fields greater than or equal to themaximum number of fields to be read.
The EAN 128 code content will ALWAYS be assigned to theEAN128tb table. The code fields will automatically be separated andsaved in their respective fields defined in the table, always startingfrom the first field.
The EAN128tb table is made up of ONLY one record. Therefore it isnecessary to save this data elsewhere before reading a new code(otherwise it will be overwritten).
Enabling multiple code types simultaneously
− If data is to be saved in the EAN128tb table, all other code types read (differentfrom EAN 128) will be saved in the specified field of the EAN128tb table.
− If data is to be saved in a table other than EAN128tb (for example "table1"), allother code types read (different from EAN 128) will be saved in the specifiedtable.
To test a program that allows reading EAN 128 codes using the simulator (see par.4.5):
− use the "|" (Pipe) character as the first character of the code
− use the "|" (Pipe) character as the field separator (instead of character 'GS')For example: "|ONE|TWO|THREE"
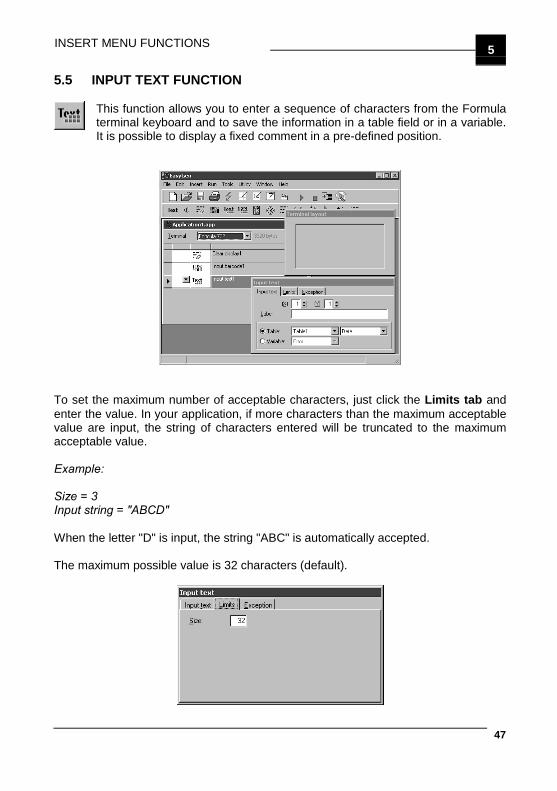
INSERT MENU FUNCTIONS 5
47
5.5 INPUT TEXT FUNCTION
This function allows you to enter a sequence of characters from the Formulaterminal keyboard and to save the information in a table field or in a variable.It is possible to display a fixed comment in a pre-defined position.
To set the maximum number of acceptable characters, just click the Limits tab andenter the value. In your application, if more characters than the maximum acceptablevalue are input, the string of characters entered will be truncated to the maximumacceptable value.
Example:
Size = 3Input string = "ABCD"
When the letter "D" is input, the string "ABC" is automatically accepted.
The maximum possible value is 32 characters (default).
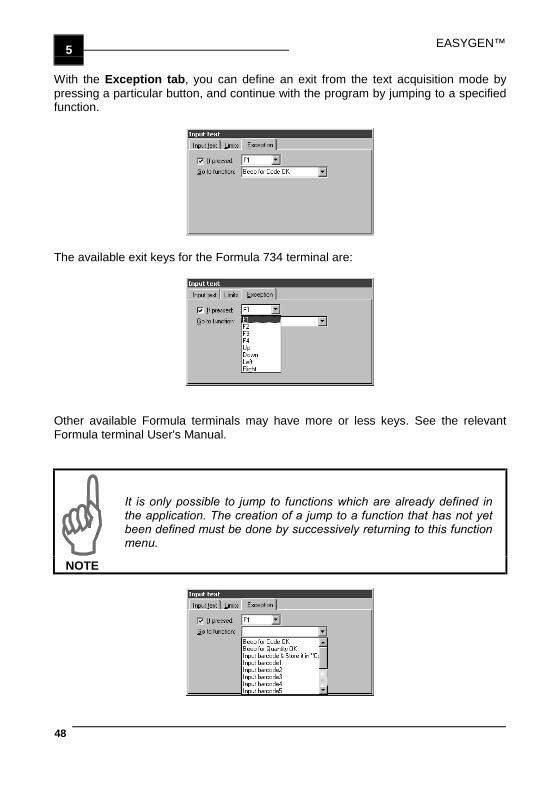
EASYGEN™5
48
With the Exception tab, you can define an exit from the text acquisition mode bypressing a particular button, and continue with the program by jumping to a specifiedfunction.
The available exit keys for the Formula 734 terminal are:
Other available Formula terminals may have more or less keys. See the relevantFormula terminal User's Manual.
NOTE
It is only possible to jump to functions which are already defined inthe application. The creation of a jump to a function that has not yetbeen defined must be done by successively returning to this functionmenu.
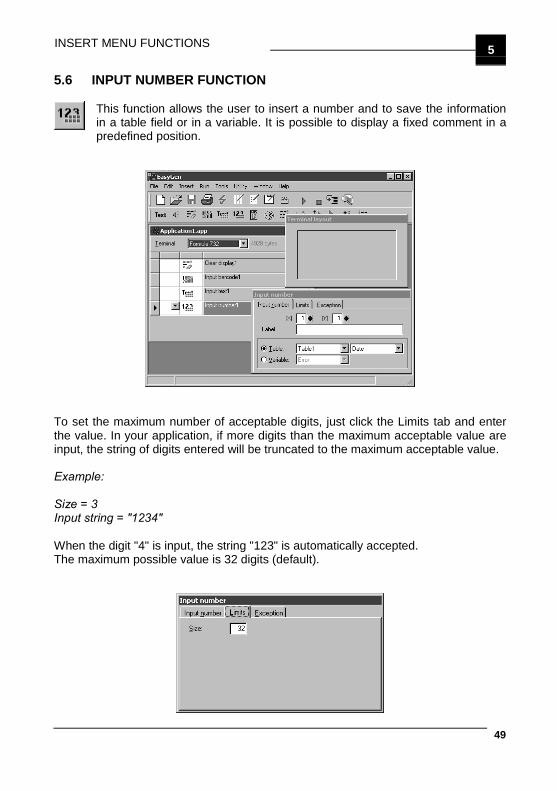
INSERT MENU FUNCTIONS 5
49
5.6 INPUT NUMBER FUNCTION
This function allows the user to insert a number and to save the informationin a table field or in a variable. It is possible to display a fixed comment in apredefined position.
To set the maximum number of acceptable digits, just click the Limits tab and enterthe value. In your application, if more digits than the maximum acceptable value areinput, the string of digits entered will be truncated to the maximum acceptable value.
Example:
Size = 3Input string = "1234"
When the digit "4" is input, the string "123" is automatically accepted.The maximum possible value is 32 digits (default).
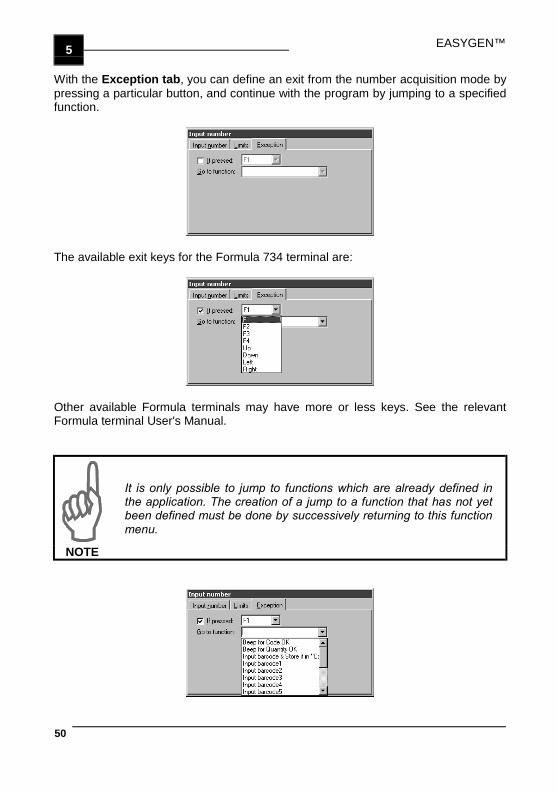
EASYGEN™5
50
With the Exception tab, you can define an exit from the number acquisition mode bypressing a particular button, and continue with the program by jumping to a specifiedfunction.
The available exit keys for the Formula 734 terminal are:
Other available Formula terminals may have more or less keys. See the relevantFormula terminal User's Manual.
NOTE
It is only possible to jump to functions which are already defined inthe application. The creation of a jump to a function that has not yetbeen defined must be done by successively returning to this functionmenu.
INSERT MENU FUNCTIONS 5
51
5.7 INPUT DATE FUNCTION
This function allows the user to save the system date in a table field or in avariable.
To avoid possible errors, it is recommended that the field in which you wish to savethe date be defined as a “date” field (see par. 4.6.1).
EASYGEN™5
52
5.8 INPUT TIME FUNCTION
This function allows the user to save the system time (handled by an internalclock in the terminal) in a table field or in a variable.
To avoid possible errors, it is recommended that the field in which you wish to savethe time be defined as a “time” field (see par. 4.6.1).

INSERT MENU FUNCTIONS 5
53
5.9 MENU FUNCTION
Allows the creation of a menu with a maximum of 4 choices. For each choiceit is possible to define the position, the key to press, the text, and the functionto be executed.
The menu always uses a numerical key for the choice options.
NOTE
It is only possible to jump to functions which are already defined inthe application. The creation of a jump to a function that has not yetbeen defined must be done by successively returning to this functionmenu.
EASYGEN™5
54
5.10 LOOP FUNCTION
This function allows the user to increment the index of three tables anddefine a function loop which repeats until a specified condition is met.
ApWin
PrWin
The loop begins with the function defined with the parameters in the PrWin and endswith the function “Loop”. This loop is repeated until a jump is made to a functionwhich allows an exit.
The first time the program is used, or when a table is re-loaded, the index is alwayspointing to the first record. The user can choose which index(es) to increment in thePrWin of the loop function.
If the index is not incremented, it always points to the same record, and thereforeeach successive code read will overwrite the previous one.
INSERT MENU FUNCTIONS 5
55
5.11 COMPARISON FUNCTION
The first element is compared with the second, and based on the result (trueor false) a decision is made as to where the program continues.
The comparison can be made between numbers or character strings.Both the first and second elements may be constants or a table field.
In the case of numerical comparison, the constant must always be defined as thesecond element.
NOTE
It is only possible to jump to functions which are already defined inthe application. The creation of a jump to a function that has not yetbeen defined must be done by successively returning to this functionmenu.
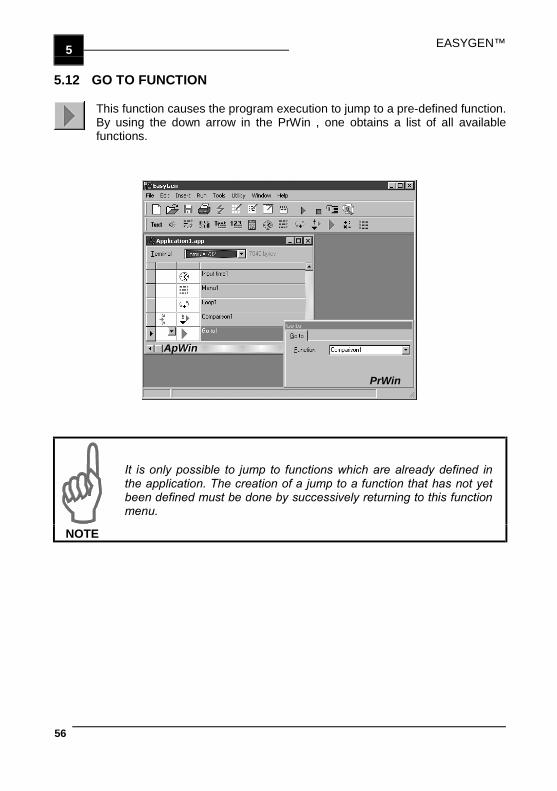
EASYGEN™5
56
5.12 GO TO FUNCTION
This function causes the program execution to jump to a pre-defined function.By using the down arrow in the PrWin , one obtains a list of all availablefunctions.
ApWin
PrWin
NOTE
It is only possible to jump to functions which are already defined inthe application. The creation of a jump to a function that has not yetbeen defined must be done by successively returning to this functionmenu.
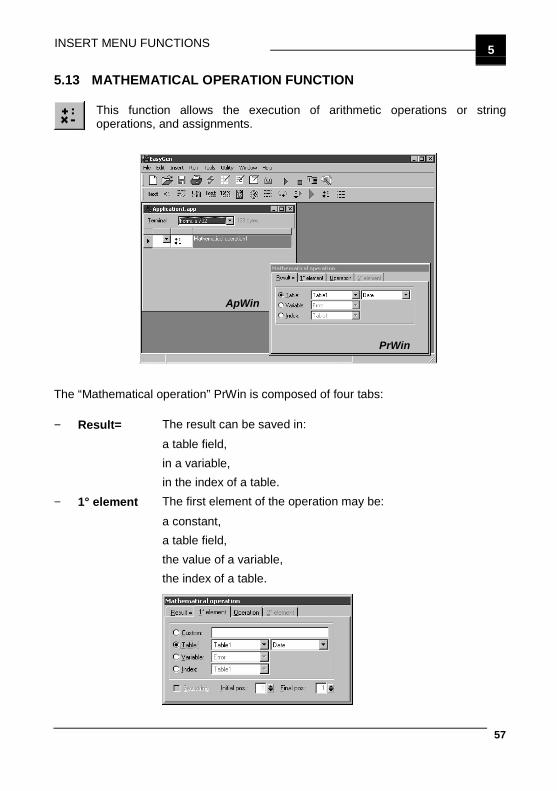
INSERT MENU FUNCTIONS 5
57
5.13 MATHEMATICAL OPERATION FUNCTION
This function allows the execution of arithmetic operations or stringoperations, and assignments.
ApWin
PrWin
The “Mathematical operation” PrWin is composed of four tabs:
− Result= The result can be saved in:a table field,in a variable,in the index of a table.
− 1° element The first element of the operation may be:a constant,a table field,the value of a variable,the index of a table.
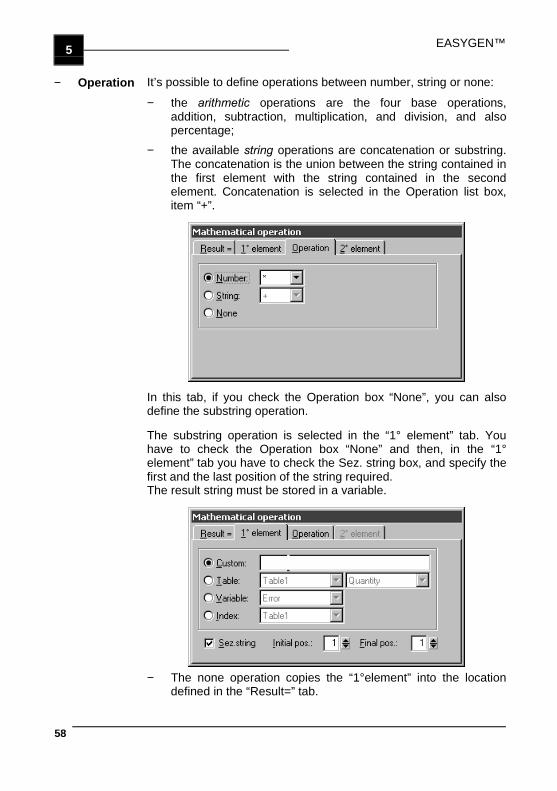
EASYGEN™5
58
− Operation It’s possible to define operations between number, string or none:
− the arithmetic operations are the four base operations,addition, subtraction, multiplication, and division, and alsopercentage;
− the available string operations are concatenation or substring.The concatenation is the union between the string contained inthe first element with the string contained in the secondelement. Concatenation is selected in the Operation list box,item “+”.
In this tab, if you check the Operation box “None”, you can alsodefine the substring operation.
The substring operation is selected in the “1° element” tab. Youhave to check the Operation box “None” and then, in the “1°element” tab you have to check the Sez. string box, and specify thefirst and the last position of the string required.The result string must be stored in a variable.
− The none operation copies the “1°element” into the locationdefined in the “Result=” tab.
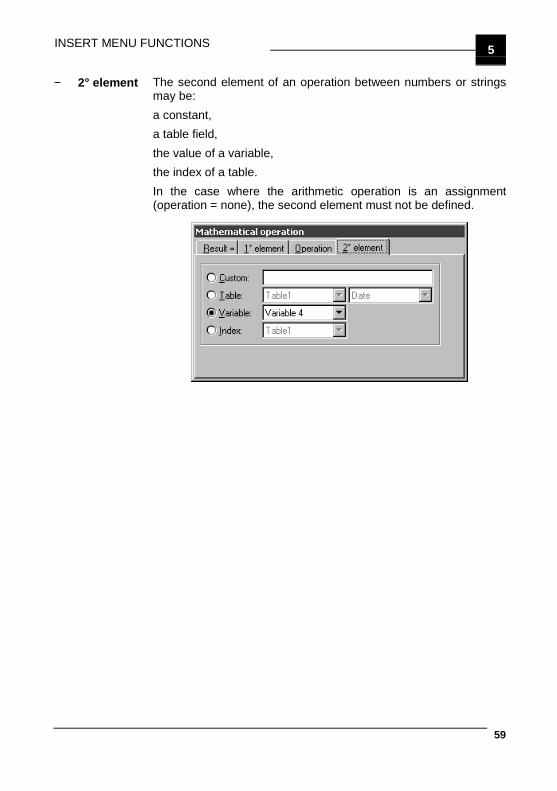
INSERT MENU FUNCTIONS 5
59
− 2° element The second element of an operation between numbers or stringsmay be:a constant,a table field,the value of a variable,the index of a table.In the case where the arithmetic operation is an assignment(operation = none), the second element must not be defined.
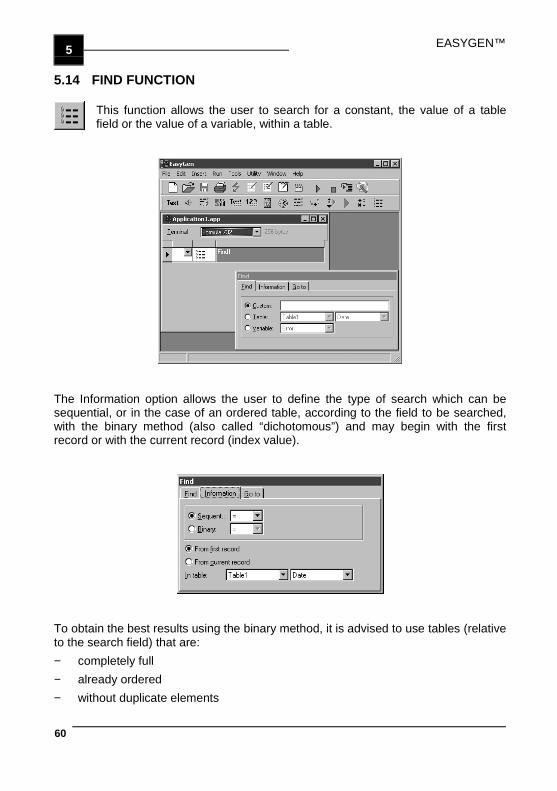
EASYGEN™5
60
5.14 FIND FUNCTION
This function allows the user to search for a constant, the value of a tablefield or the value of a variable, within a table.
The Information option allows the user to define the type of search which can besequential, or in the case of an ordered table, according to the field to be searched,with the binary method (also called “dichotomous”) and may begin with the firstrecord or with the current record (index value).
To obtain the best results using the binary method, it is advised to use tables (relativeto the search field) that are:− completely full− already ordered− without duplicate elements
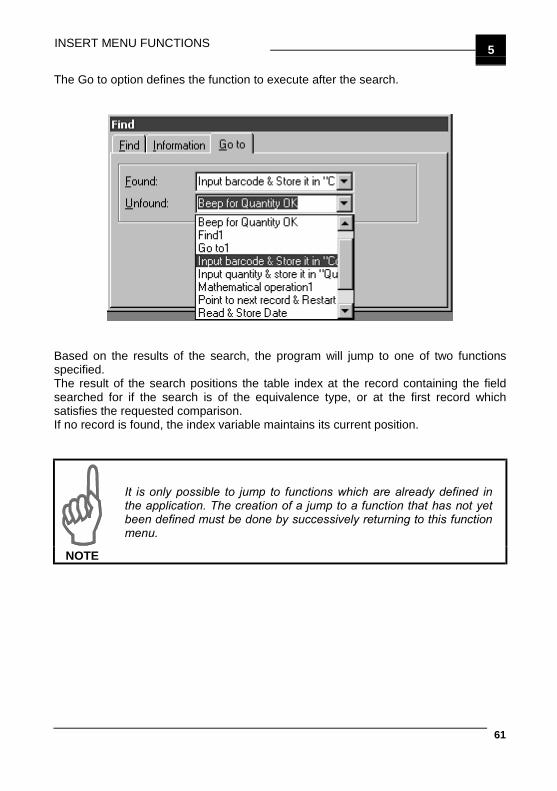
INSERT MENU FUNCTIONS 5
61
The Go to option defines the function to execute after the search.
Based on the results of the search, the program will jump to one of two functionsspecified.The result of the search positions the table index at the record containing the fieldsearched for if the search is of the equivalence type, or at the first record whichsatisfies the requested comparison.If no record is found, the index variable maintains its current position.
NOTE
It is only possible to jump to functions which are already defined inthe application. The creation of a jump to a function that has not yetbeen defined must be done by successively returning to this functionmenu.
EASYGEN™6
62
6 EASYGEN INTERPRETER PROGRAM
NOTE
In this chapter the images representing the Formula terminal are onlyused as examples to demonstrate use of the keys and messagesappearing on the display.
6.1 INTERPRETER PROGRAM USE
Application programs created by EasyGen™ can be run on the Formula terminal onlyif the EIxxx_yyy.HEX interpreter program has been previously loaded onto theterminal.
Some example application programs are installed onto the PC and can be loadedonto the Formula terminal using either EasyGen™ (see par. 4.2.7) or DOSDL.EXE(see Appendix B).
6.2 USE OF THE FORMULA TERMINAL
Once the application software is loaded onto the Formula terminal (either an examplesupplied or an application developed with EasyGen™) to launch it, it is necessary toextract the Formula terminal from the cradle and press <SHIFT> and then the <UPARROW> key.If the barcode scanning function has been used in the application, scanning ispossible.
EASYGEN™ INTERPRETER 6
63
6.2.1 Description of Keys
Although EasyGen™ allows assigning customized functions to function keys, thereare some standard functions common to all applications because they areimplemented in the interpreter software.
NOTE
Every time a key is pressed, the Formula terminal remains turned onfor a maximum of 20 seconds.
ARROW KEYS: only available for the application when not in“Select or Data Edit” (see par. 6.2.3).
SCAN KEY: Enables the laser for barcode scanning and turnsthe terminal on if it is off.
FUNCTION KEYS: up to eight function keys are available withthe following meaning:
F734 <F1>, <F2>, <F3>, <F4>F732 <F1>, <F2>, <F3>, <F4>F725 <F1>, <F2>
Free forEasyGen™Application
F660 <F1>, <F2>F734 <F5> = <SHIFT><F1>F732 <F5> = <SHIFT><F1>F725 <F5> = <SHIFT><SHIFT><UP ARROW>
Select Table
F660 <F3> = <SHIFT> <F1>F734 <F6> = <SHIFT> <F2>F732 <F6> = <SHIFT> <F2>F725 <F6> = <SHIFT><SHIFT><DOWN
ARROW>
Data Search
F660 <F4> = <SHIFT> <F2>F734 <F7> = <SHIFT> <F3>F732 <F7> = <SHIFT> <F3>F725 <F7> = <SHIFT><SHIFT><LEFT
ARROW>
Deletion
F660 <F5> = <SHIFT><SHIFT><F1>F734 <F8> = <SHIFT> <F4>F732 <F8> = <SHIFT> <F4>F725 <F8> = <SHIFT><SHIFT><RIGHT
ARROW>
Data Display
F660 <F6> = <SHIFT><SHIFT><F2>
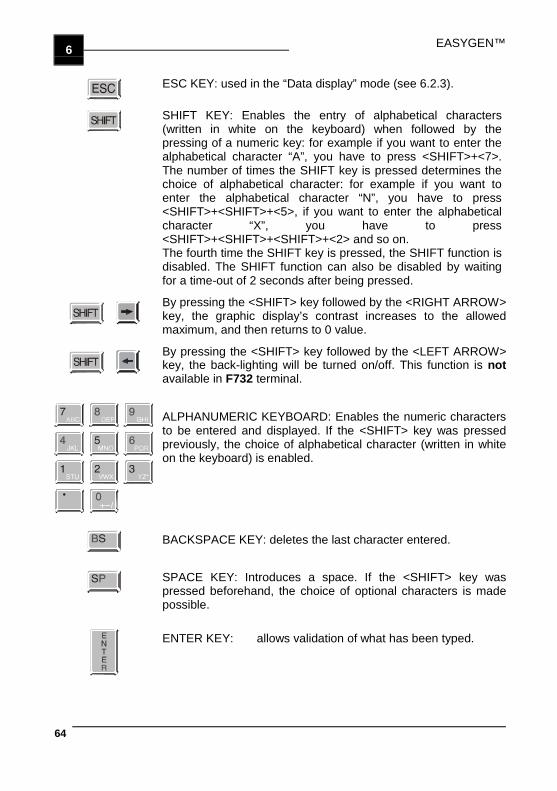
EASYGEN™6
64
ESC KEY: used in the “Data display” mode (see 6.2.3).
SHIFT KEY: Enables the entry of alphabetical characters(written in white on the keyboard) when followed by thepressing of a numeric key: for example if you want to enter thealphabetical character “A”, you have to press <SHIFT>+<7>.The number of times the SHIFT key is pressed determines thechoice of alphabetical character: for example if you want toenter the alphabetical character “N”, you have to press<SHIFT>+<SHIFT>+<5>, if you want to enter the alphabeticalcharacter “X”, you have to press<SHIFT>+<SHIFT>+<SHIFT>+<2> and so on.The fourth time the SHIFT key is pressed, the SHIFT function isdisabled. The SHIFT function can also be disabled by waitingfor a time-out of 2 seconds after being pressed.
By pressing the <SHIFT> key followed by the <RIGHT ARROW>key, the graphic display’s contrast increases to the allowedmaximum, and then returns to 0 value.
By pressing the <SHIFT> key followed by the <LEFT ARROW>key, the back-lighting will be turned on/off. This function is notavailable in F732 terminal.
ALPHANUMERIC KEYBOARD: Enables the numeric charactersto be entered and displayed. If the <SHIFT> key was pressedpreviously, the choice of alphabetical character (written in whiteon the keyboard) is enabled.
BACKSPACE KEY: deletes the last character entered.
SPACE KEY: Introduces a space. If the <SHIFT> key waspressed beforehand, the choice of optional characters is madepossible.
ENTER KEY: allows validation of what has been typed.
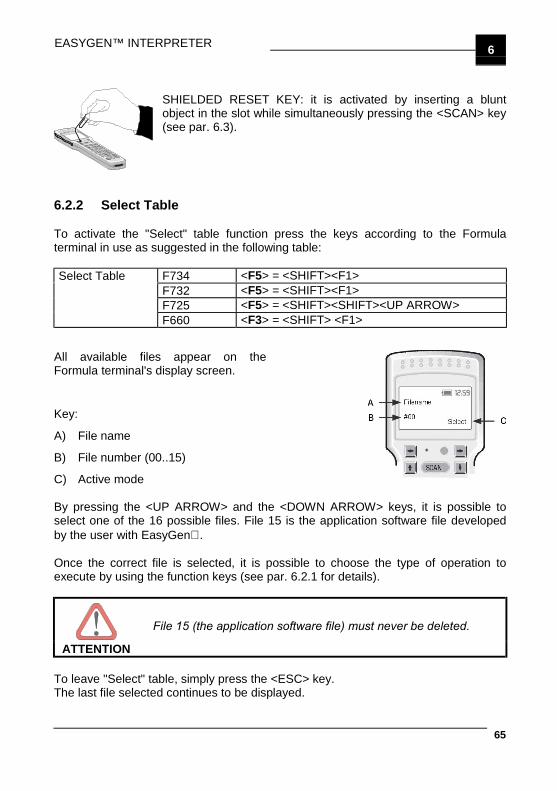
EASYGEN™ INTERPRETER 6
65
SHIELDED RESET KEY: it is activated by inserting a bluntobject in the slot while simultaneously pressing the <SCAN> key(see par. 6.3).
6.2.2 Select Table
To activate the "Select" table function press the keys according to the Formulaterminal in use as suggested in the following table:
F734 <F5> = <SHIFT><F1>F732 <F5> = <SHIFT><F1>F725 <F5> = <SHIFT><SHIFT><UP ARROW>
Select Table
F660 <F3> = <SHIFT> <F1>
All available files appear on theFormula terminal's display screen.
Key:
A) File name
B) File number (00..15)
C) Active mode
By pressing the <UP ARROW> and the <DOWN ARROW> keys, it is possible toselect one of the 16 possible files. File 15 is the application software file developedby the user with EasyGen .
Once the correct file is selected, it is possible to choose the type of operation toexecute by using the function keys (see par. 6.2.1 for details).
ATTENTION
File 15 (the application software file) must never be deleted.
To leave "Select" table, simply press the <ESC> key.The last file selected continues to be displayed.
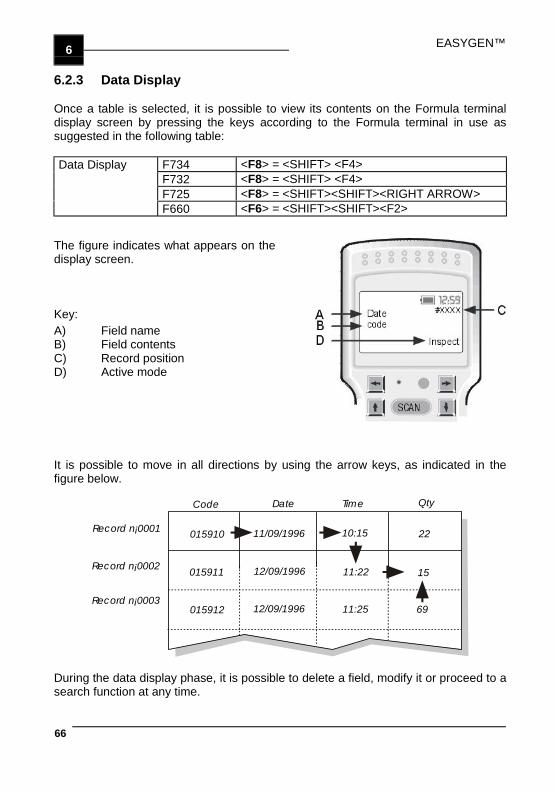
EASYGEN™6
66
6.2.3 Data Display
Once a table is selected, it is possible to view its contents on the Formula terminaldisplay screen by pressing the keys according to the Formula terminal in use assuggested in the following table:
F734 <F8> = <SHIFT> <F4>F732 <F8> = <SHIFT> <F4>F725 <F8> = <SHIFT><SHIFT><RIGHT ARROW>
Data Display
F660 <F6> = <SHIFT><SHIFT><F2>
The figure indicates what appears on thedisplay screen.
Key:A) Field nameB) Field contentsC) Record positionD) Active mode
It is possible to move in all directions by using the arrow keys, as indicated in thefigure below.
Date TimeCode Qty
11/09/1996
12/09/1996
12/09/1996
10:15
11:22
11:25
015910
015911
015912
22
15
69
Record n¡0001
Record n¡0002
Record n¡0003
During the data display phase, it is possible to delete a field, modify it or proceed to asearch function at any time.
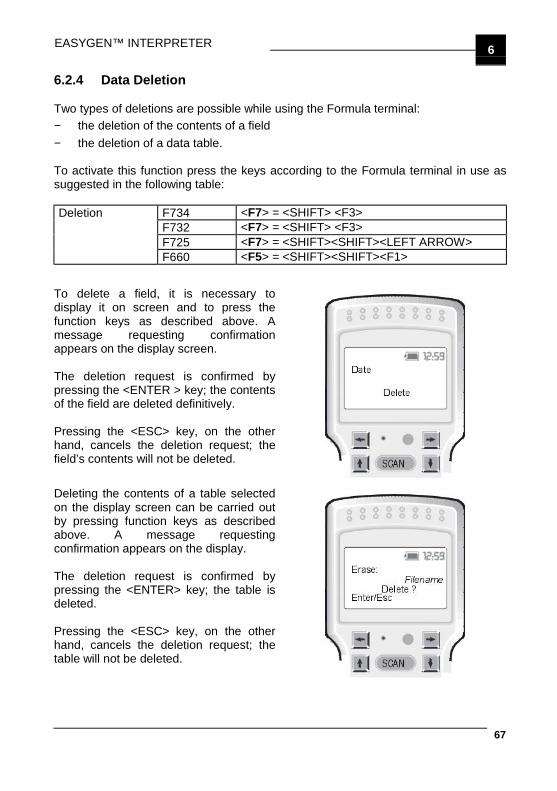
EASYGEN™ INTERPRETER 6
67
6.2.4 Data Deletion
Two types of deletions are possible while using the Formula terminal:− the deletion of the contents of a field− the deletion of a data table.
To activate this function press the keys according to the Formula terminal in use assuggested in the following table:
F734 <F7> = <SHIFT> <F3>F732 <F7> = <SHIFT> <F3>F725 <F7> = <SHIFT><SHIFT><LEFT ARROW>
Deletion
F660 <F5> = <SHIFT><SHIFT><F1>
To delete a field, it is necessary todisplay it on screen and to press thefunction keys as described above. Amessage requesting confirmationappears on the display screen.
The deletion request is confirmed bypressing the <ENTER > key; the contentsof the field are deleted definitively.
Pressing the <ESC> key, on the otherhand, cancels the deletion request; thefield’s contents will not be deleted.
Deleting the contents of a table selectedon the display screen can be carried outby pressing function keys as describedabove. A message requestingconfirmation appears on the display.
The deletion request is confirmed bypressing the <ENTER> key; the table isdeleted.
Pressing the <ESC> key, on the otherhand, cancels the deletion request; thetable will not be deleted.
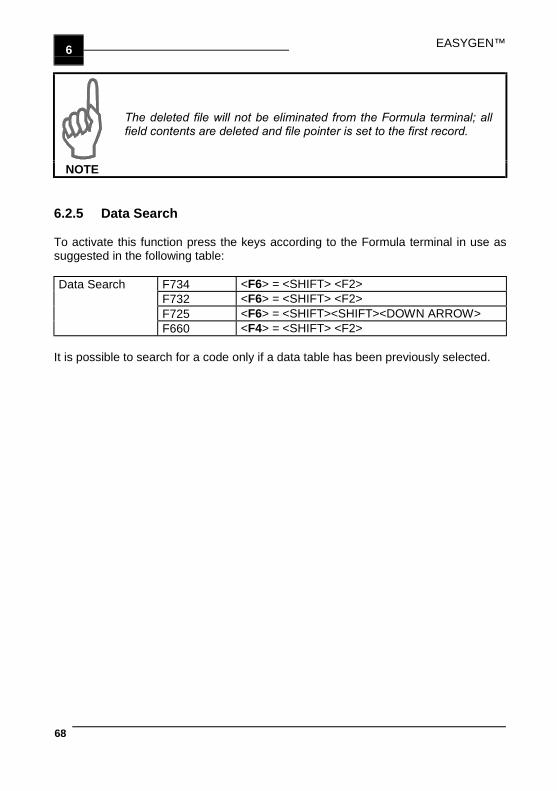
EASYGEN™6
68
NOTE
The deleted file will not be eliminated from the Formula terminal; allfield contents are deleted and file pointer is set to the first record.
6.2.5 Data Search
To activate this function press the keys according to the Formula terminal in use assuggested in the following table:
F734 <F6> = <SHIFT> <F2>F732 <F6> = <SHIFT> <F2>F725 <F6> = <SHIFT><SHIFT><DOWN ARROW>
Data Search
F660 <F4> = <SHIFT> <F2>
It is possible to search for a code only if a data table has been previously selected.
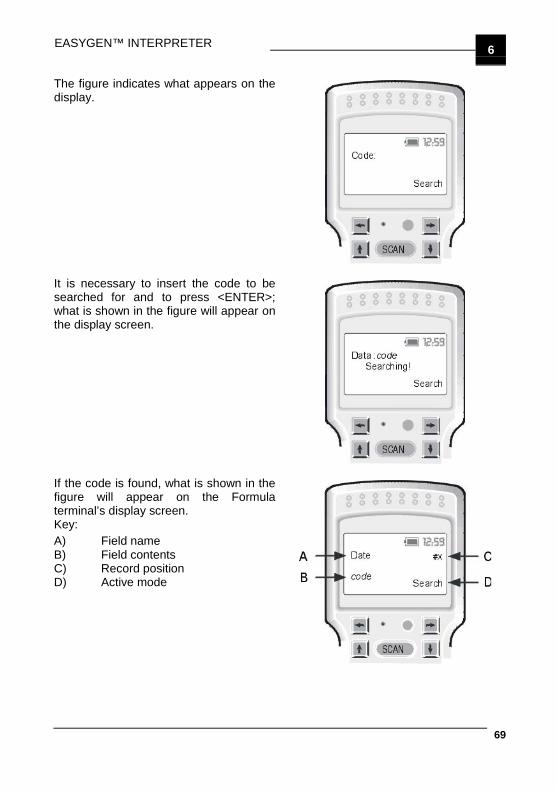
EASYGEN™ INTERPRETER 6
69
The figure indicates what appears on thedisplay.
It is necessary to insert the code to besearched for and to press <ENTER>;what is shown in the figure will appear onthe display screen.
If the code is found, what is shown in thefigure will appear on the Formulaterminal’s display screen.Key:A) Field nameB) Field contentsC) Record positionD) Active mode
EASYGEN™6
70
Once a code is found, it is possible to continue searching toward the beginning of thedata table <UP ARROW> or toward the end of the data table <DOWN ARROW>. Ifother fields with that code are present, they will be displayed.
Once the code searched for is found, it ispossible to modify its contents simply byinserting a new value and confirming itpressing <ENTER>. By doing this, “Edit”mode is entered and the figure indicateswhat appears on the display screen.
If the number of characters entered isless than the length of the field, it is filledby a series of zeroes (0).
If the code is not found, the figureindicates what appears on the Formulaterminal’s display screen.
Press <ESC> to exit the “Search” mode.
ATTENTION
There should not be more than three consecutive emptyrecords during the data search phase, otherwise the currentoperation will be terminated.

EASYGEN™ INTERPRETER 6
71
6.2.6 Error Messages
If the EIxxx_yyy.HEX program detects anerror during the execution of theapplication, the figure indicates whatappears on the Formula terminal display.
EIxxx_yyy.HEX can detect eight possible types of errors:
ERROR TYPE DESCRIPTION
DBASE FULL Database full. During a SAVE or CHECKoperation the data could not be written tothe database or the record pointerreached its maximum limit.
INSTR. ERR Wrong program instruction.
TIMER FLT Internal error. EasyGen™ malfunction.
READ ERROR Internal error. EasyGen™ malfunction.
UNK. ERROR Unknown or generic type of error.
CMD NOT LD Application program not present.
ACT. ERR Wrong action.
FNF File not found.
The “L” variable gives the line number containing the error, while the “S” variableindicates the type of operation that caused the error.
EASYGEN™6
72
The possible values of the “S” variable and the corresponding error causes areindicated in the following table.
S FUNCTION WITH ERROR REMEDY
0 Acquisition The causes of this error could be:1 Non-permissible acquisition
executed2 Field acquisition of a non existent
table executed.3 Field acquisition executed where
addressed record does not exist intable.
4 Next instruction does not exist.
1 Check Error causes are:1 Table to check does not exist.
2 Decode Command containing an unexpecteddecode sent to terminal.
3 Enable Decode Next instruction does not exist.
4 Sequential search Possible causes are:1 Table to check does not exist.2 Comparison operator indicated not
permissible.
6 Data Element Possible causes are:1 Error in current instruction.2 Next instruction does not exist.3 General user program error.
7 Pointer Element Possible errors are:1 Points to a non existent table.2 Next instruction not among
expected ones.
8 Search Type Only two types of searches are possible:1 BINARY: where the table must be
ordered in ascending order in thefield in question.
2 SEQUENTIAL: where the table mayhave any order.
9 Comparison Type Only two types of comparison arepossible:1 With database field.2 With constant.
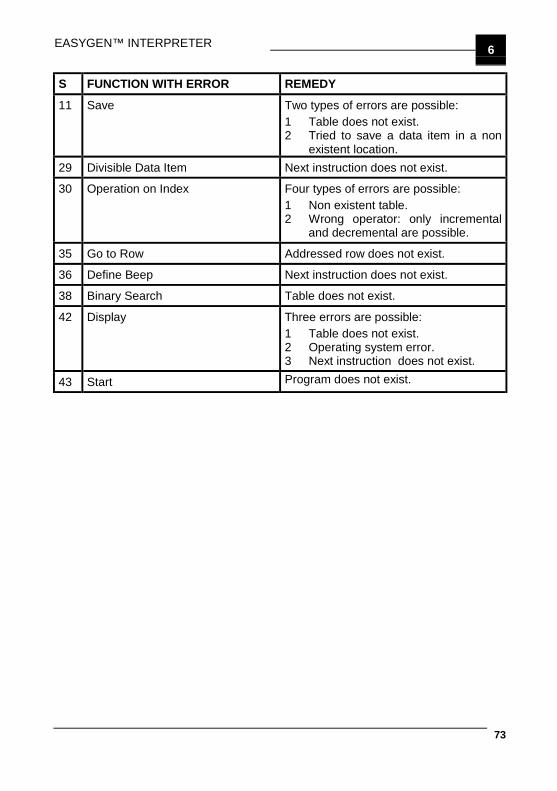
EASYGEN™ INTERPRETER 6
73
S FUNCTION WITH ERROR REMEDY
11 Save Two types of errors are possible:1 Table does not exist.2 Tried to save a data item in a non
existent location.29 Divisible Data Item Next instruction does not exist.
30 Operation on Index Four types of errors are possible:1 Non existent table.2 Wrong operator: only incremental
and decremental are possible.
35 Go to Row Addressed row does not exist.
36 Define Beep Next instruction does not exist.
38 Binary Search Table does not exist.
42 Display Three errors are possible:1 Table does not exist.2 Operating system error.3 Next instruction does not exist.
43 Start Program does not exist.
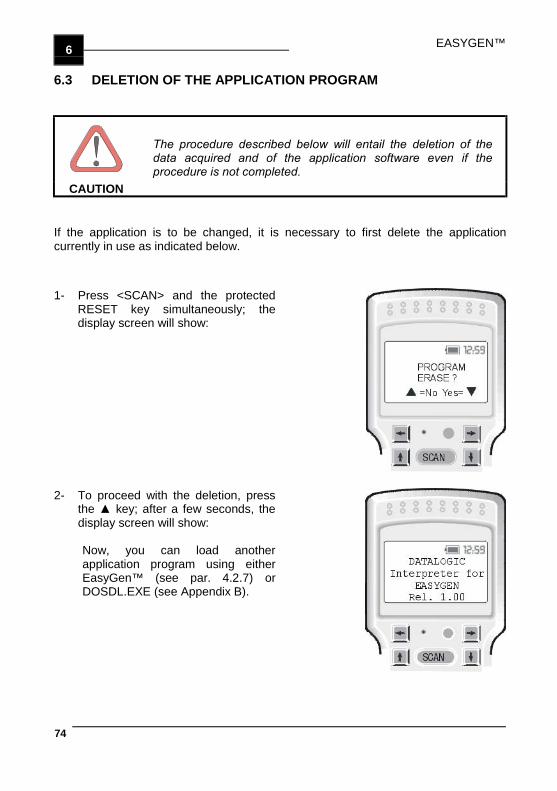
EASYGEN™6
74
6.3 DELETION OF THE APPLICATION PROGRAM
CAUTION
The procedure described below will entail the deletion of thedata acquired and of the application software even if theprocedure is not completed.
If the application is to be changed, it is necessary to first delete the applicationcurrently in use as indicated below.
1- Press <SCAN> and the protectedRESET key simultaneously; thedisplay screen will show:
2- To proceed with the deletion, pressthe ▲ key; after a few seconds, thedisplay screen will show:
Now, you can load anotherapplication program using eitherEasyGen™ (see par. 4.2.7) orDOSDL.EXE (see Appendix B).
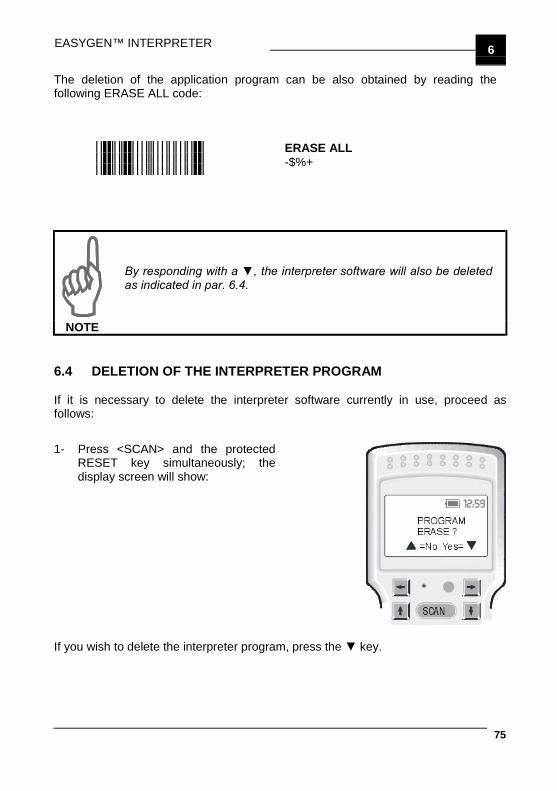
EASYGEN™ INTERPRETER 6
75
The deletion of the application program can be also obtained by reading thefollowing ERASE ALL code:
ERASE ALL-$%+
NOTE
By responding with a ▼, the interpreter software will also be deletedas indicated in par. 6.4.
6.4 DELETION OF THE INTERPRETER PROGRAM
If it is necessary to delete the interpreter software currently in use, proceed asfollows:
1- Press <SCAN> and the protectedRESET key simultaneously; thedisplay screen will show:
If you wish to delete the interpreter program, press the ▼ key.
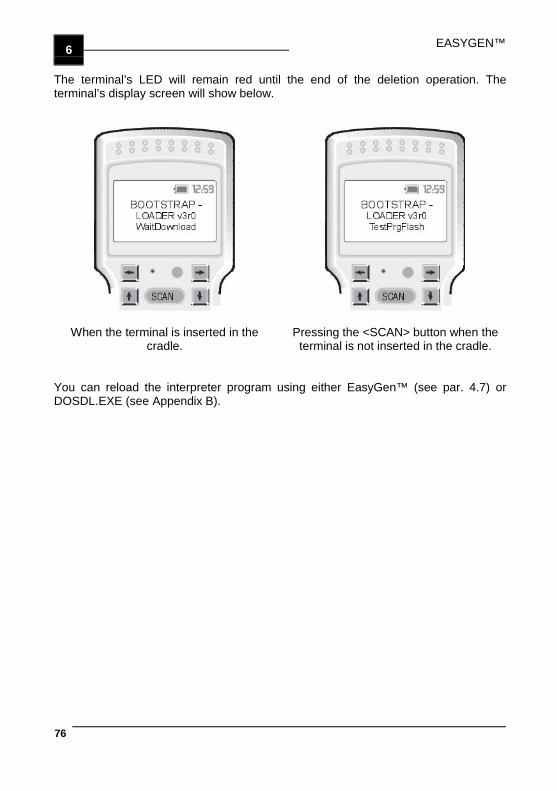
EASYGEN™6
76
The terminal’s LED will remain red until the end of the deletion operation. Theterminal’s display screen will show below.
When the terminal is inserted in thecradle.
Pressing the <SCAN> button when theterminal is not inserted in the cradle.
You can reload the interpreter program using either EasyGen™ (see par. 4.7) orDOSDL.EXE (see Appendix B).
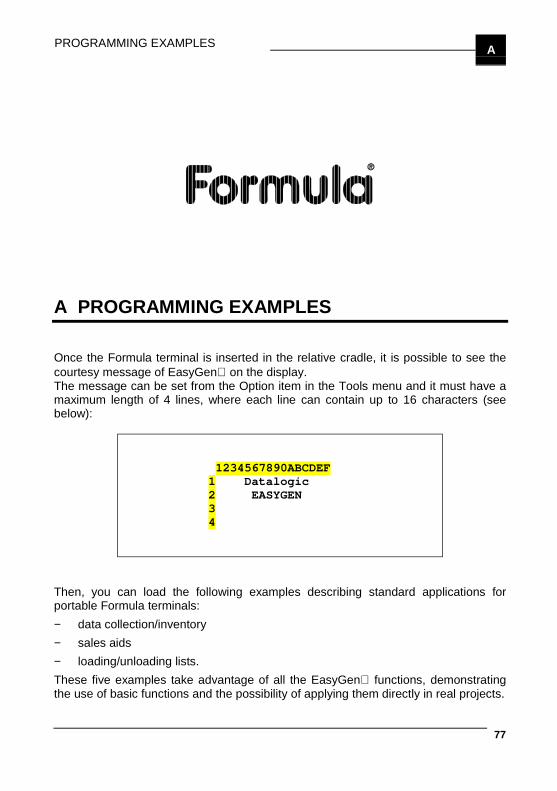
PROGRAMMING EXAMPLES A
77
A PROGRAMMING EXAMPLES
Once the Formula terminal is inserted in the relative cradle, it is possible to see thecourtesy message of EasyGen on the display.The message can be set from the Option item in the Tools menu and it must have amaximum length of 4 lines, where each line can contain up to 16 characters (seebelow):
1234567890ABCDEF 1 Datalogic 2 EASYGEN 3 4
Then, you can load the following examples describing standard applications forportable Formula terminals:− data collection/inventory− sales aids− loading/unloading lists.These five examples take advantage of all the EasyGen functions, demonstratingthe use of basic functions and the possibility of applying them directly in real projects.
EASYGEN™A
78
For each example, the "new" functions will be explained in detail, leaving out theexplanations for the more familiar and more often-used ones.It is advised that these pages should be at hand when studying the applicationsdirectly.
A.1 EXAMPLE 1: CODE+QUANTITY
The first simple example, for inventory applications, allows the acquisition ofbarcodes, the setting of a quantity per code and the saving of everything inside theFormula terminal in a table. An internal calendar clock in the terminal also saves thedate and time of the acquisition.
This program is totally linear, i.e. it is run from beginning to end without jumps orinterruptions, as will be seen from the more complex examples below.
To understand how the examples functions, the first thing to check is the compositionof the data table. In the EDITOR TABLES item of the TOOLS menu there is a settingselected for TABLE1 which is used to save all the scans.
There are 4 fields: DATE - TIME - CODE - QUANTITY
The Date and Time fields are automatically acquired from the terminal's internal clockvia dedicated EasyGen™ functions.
The Code and Quantity fields, on the other hand, will be requested from the user.
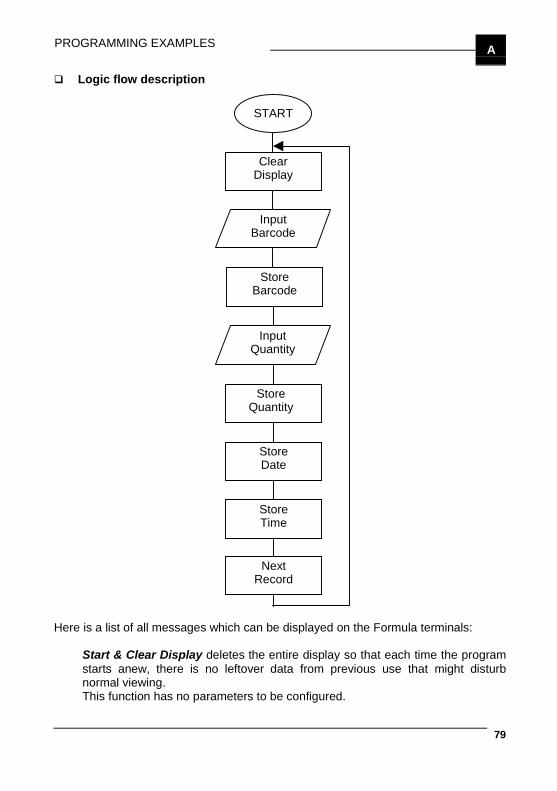
PROGRAMMING EXAMPLES A
79
Logic flow description
Here is a list of all messages which can be displayed on the Formula terminals:
Start & Clear Display deletes the entire display so that each time the programstarts anew, there is no leftover data from previous use that might disturbnormal viewing.This function has no parameters to be configured.
START
ClearDisplay
InputBarcode
StoreBarcode
InputQuantity
StoreQuantity
StoreDate
StoreTime
NextRecord
EASYGEN™A
80
Input Barcode & Store it in “Code” Field stands by for the scanning of abarcode whose specifications are indicated between configurable parameters.After the scan, the data is saved in TABLE1 in the Code field.
Beep for OK code emits an acoustic signal to confirm the code scanning.
Input Quantity & Store it in “Quantity” Field stands by for the quantityreading (numeric value).After the scan, the data is saved in TABLE1 in the Quantity field.Note that among the settings under LIMITS the SIZE value is set to 5 or themaximum number of acceptable characters defined in the Quantity fielddescription in TABLE1. If this value is left at 0 (default) during input, more than 5characters will be accepted but the data will not be recorded and the Errorvariable will assume the value of 31 to indicate this.
Beep for Quantity OK emits an acoustic signal to confirm the quantity inserted.
Read & Store Date saves the date in the Date field, acquiring it in real timefrom the Hardware clock.
Read & Store Time saves the date in the Time field, acquiring it in real timefrom the Hardware clock.
Point to next record & Restart allows the program to restart and so request abarcode and a quantity once more.
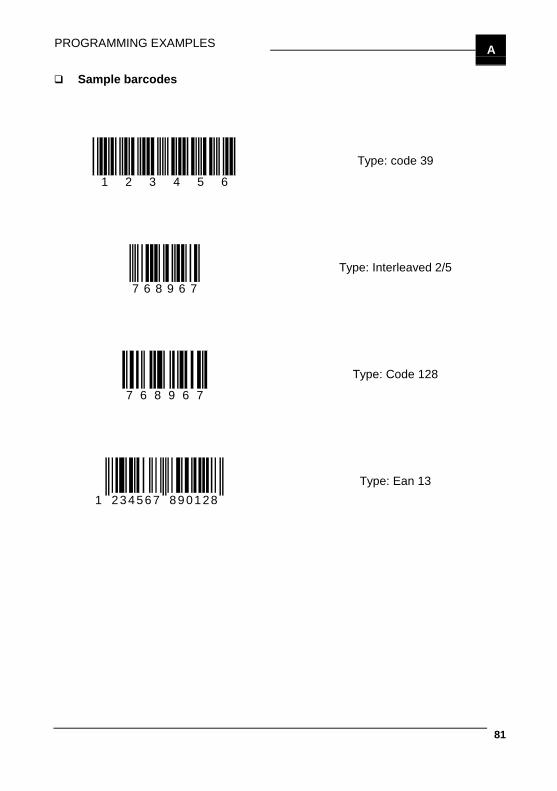
PROGRAMMING EXAMPLES A
81
Sample barcodes
1 2 3 4 5 6
Type: code 39
7 6 8 9 6 7
Type: Interleaved 2/5
7 6 8 9 6 7
Type: Code 128
1 234567 890128 Type: Ean 13
EASYGEN™A
82
A.2 EXAMPLE 2: EAN128 3 FIELDS
This is a special version of EXAMPLE 1 so please refer to that example for generalspecifications.
The example demonstrates how the use of code EAN128 can simplify repetitiveoperations which often take place in the warehouses.This code gives information about the article, its producer and its quantity, which theuser can get through a single read of the barcode label. This is very useful whenseveral pieces of the same article are shipped together in the same box, as it allowsto get all information required by reading the barcode of just one piece.
Through EasyGen™ it is possible to select the special table EAN128tb (see par.4.6.1), which allows to read the code fields. Then, it is necessary to download theacquired data from the EAN128tb to TABLE 1.
There are five fields: ARTICLE - QUANTITY - PRODUCER - DATE - TIME.

PROGRAMMING EXAMPLES A
83
Logic flow description
Read & StoreDate
Read & StoreTime
Next Record
TrueFalse
Copy Field Article from EAN128tbtable to Table1
Copy Field Quantity from EAN128tbtable to Table1
Copy Field Producer from EAN128tbtable to Table1
Start
Start & ClearDisplay
Reset ErrorVariable
Input Barcode
Error =00 ?
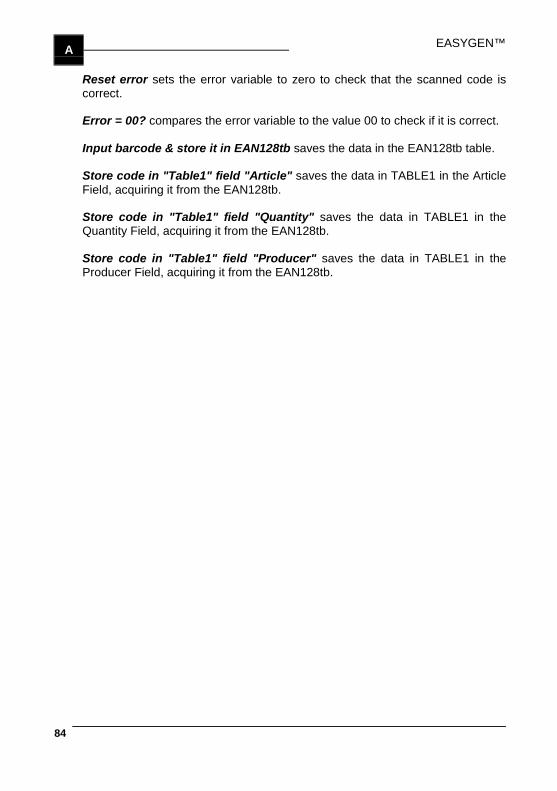
EASYGEN™A
84
Reset error sets the error variable to zero to check that the scanned code iscorrect.
Error = 00? compares the error variable to the value 00 to check if it is correct.
Input barcode & store it in EAN128tb saves the data in the EAN128tb table.
Store code in "Table1" field "Article" saves the data in TABLE1 in the ArticleField, acquiring it from the EAN128tb.
Store code in "Table1" field "Quantity" saves the data in TABLE1 in theQuantity Field, acquiring it from the EAN128tb.
Store code in "Table1" field "Producer" saves the data in TABLE1 in theProducer Field, acquiring it from the EAN128tb.
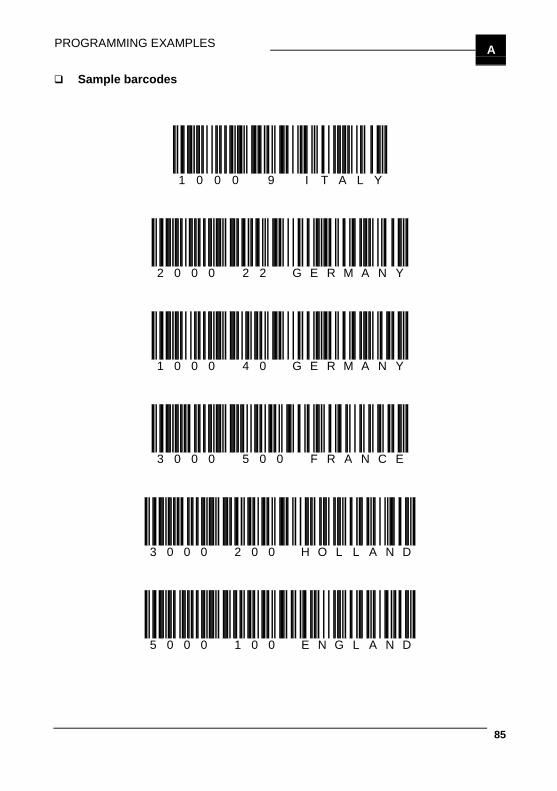
PROGRAMMING EXAMPLES A
85
Sample barcodes
1 0 0 0 � 9 � I T A L Y
2 0 0 0 � 2 2 � G E R M A N Y
1 0 0 0 � 4 0 � G E R M A N Y
3 0 0 0 � 5 0 0 � F R A N C E
3 0 0 0 � 2 0 0 � H O L L A N D
5 0 0 0 � 1 0 0 � E N G L A N D
EASYGEN™A
86
A.3 EXAMPLE 3: ASSISTED SALES
This example shows how all EasyGen™ options work.
The idea is to assist sales by referring to an item database inside the Formulaterminal. Thanks to a customized menu, it is possible to organize the clientmanagement and get an on-line total cost for him.
Two ASCII files must be created (with any DOS-Windows ASCII compatible texteditor). The first file is INPUT.DAT, which contains the article codes of the warehouseand gives them an item description and unit price. The second one is CLIENT.DAT,which contains a reference table with a Client Code and a Client Description.
The program starts by offering a personalized menu through the MENU function,which allows the creation of a series of customizable items associated with akeyboard character (see par. 5.5).Two choices are available: the client setting and the cost setting. If the client settingis selected, the program will refer to the CLIENT.DAT table. In this way all thefollowing "cost" readings will refer to that particular client and a client code fieldappears in the output table.
The code scanning allows to verify the presence or lack of the code in the warehouseand get the item description, its unit price, and (after entering the item "quantityfound") its total cost.The "search functions" are used in the example to search for the code in the internaldatabase, while the "mathematical functions" allow to calculate the total costs.
There are two exceptions. The first one occurs when the article is requested. In thiscase the program goes back to the main menu by pressing F1. This allows to closethe cost for a client and to go on with a new client's setting.The second exception regards the progressive calculation of the total. The Increasevariable sums all the separate costs Then, by pressing F2 instead of Enter tocontinue, it is possible to see on the display a client total cost up to that moment. Thisdoes not mean that the sale is closed, rather that it can be displayed (check) at alltimes.
There are three Tables:− INPUT TABLE: contains the field structure of the code reference table (created
with DOS edit command) with the item description and its price. The file shouldbe called INPUT.DAT and its fields are: ARTICLE - DESCRIPTION - PRICE.
− CLIENT TABLE: contains the field structure of the client reference table (createdwith DOS edit command) with the client code and the client description. Its fieldsare: CLIENT CODE - CLIENT DESCRIPTION.
− OUTPUT TABLE: contains the field structure of the output table (datadownloading): DATE, TIME, CODE, QUANTITY, TOTAL.
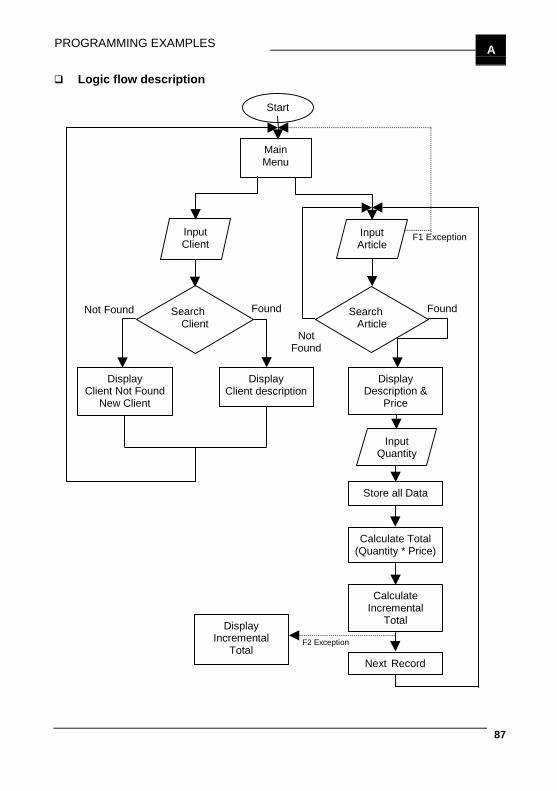
PROGRAMMING EXAMPLES A
87
Logic flow description
Start
MainMenu
InputClient
SearchClient
SearchArticle
DisplayDescription &
Price
InputQuantity
Store all Data
Calculate Total(Quantity * Price)
DisplayClient Not Found
New Client
DisplayClient description
CalculateIncremental
Total
Next Record
InputArticle
F1 Exception
NotFound
FoundFoundNot Found
DisplayIncremental
TotalF2 Exception
EASYGEN™A
88
Menu prompts the "define client" option OR the "shopping" (article) one.
Input barcode article stands by for the scanning of a barcode whosespecifications are indicated between configurable parameters.After the scan, the data is recorded in the Article variable. The choice of thevariable originates from the fact that before saving it in the INPUT table, it isnecessary to check that the code scanned is present in the codes referencetable.
Search for article in input database is used to search for the code that hasjust been scanned and recorded in the Article variable in the INPUT table.Depending on the outcome (found or not found), the program will proceed todifferent phases.
Press Enter 0 allows to go on with the program.
Found - Display description & price is called when the article is found in thedatabase of the INPUT table. It allows to display the item description and theunit price.
Input quantity stands for the article quantity, which is directly recorded in theQuantity field of the OUTPUT table.
Calculate & Store total this function is a real mathematical operation. The totalis calculated by multiplying the Price field of the INPUT table by the Quantityfield of the OUTPUT table. The product is recorded in the Total field of theOUTPUT table.
Calculate incremental total this function is a real mathematical operation. Thecurrent total is added to the previous incremental total. The amount is recordedin the Incremental variable.
Input barcode client stands by for the scanning of a barcode whosespecifications are indicated between configurable parameters.After the scan, the data is recorded in the CLIENT table.
Search for client in the CLIENT table is used to search for the client that hasjust been scanned and recorded in the CLIENT table. Depending on theoutcome (found or not found), the program will proceed to different phases.
Client found - Display description is called when the client is found in theCLIENT table. It allows to display the client description.
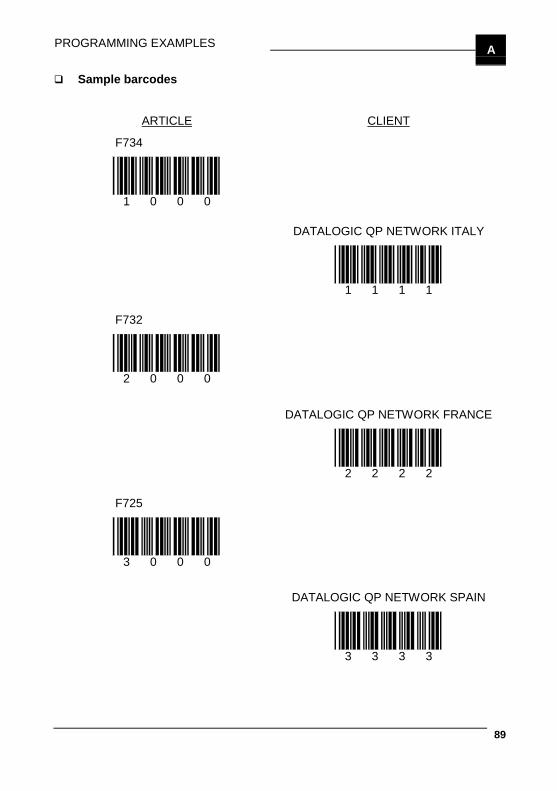
PROGRAMMING EXAMPLES A
89
Sample barcodes
ARTICLE CLIENT
F734
1 0 0 0
DATALOGIC QP NETWORK ITALY
1 1 1 1
F732
2 0 0 0
DATALOGIC QP NETWORK FRANCE
2 2 2 2
F725
3 0 0 0
DATALOGIC QP NETWORK SPAIN
3 3 3 3
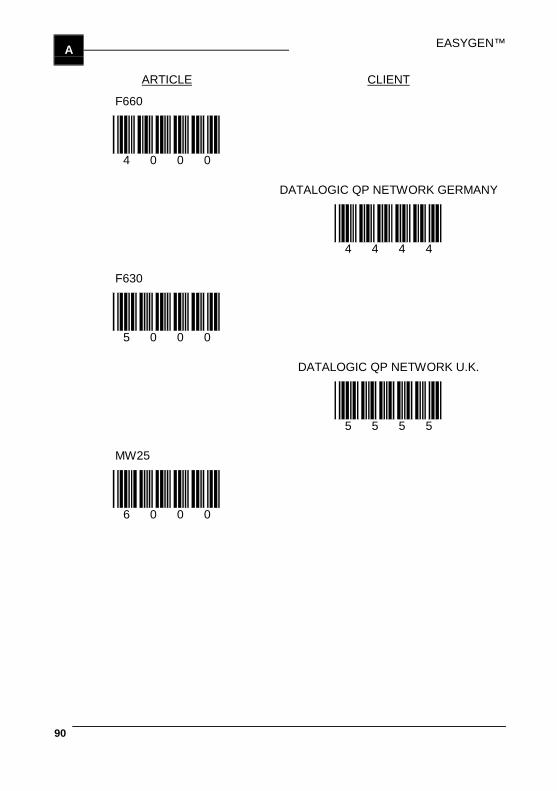
EASYGEN™A
90
ARTICLE CLIENT
F660
4 0 0 0
DATALOGIC QP NETWORK GERMANY
4 4 4 4
F630
5 0 0 0
DATALOGIC QP NETWORK U.K.
5 5 5 5
MW25
6 0 0 0
PROGRAMMING EXAMPLES A
91
A.4 EXAMPLE 4: LISTED PICKING
This example demonstrates that the INPUT files can also be used as OUTPUT filesafter processing by the terminal.
A LIST table is loaded that refers to the LIST.DAT ASCII file containing a series ofarticles to be taken.
The operator is told which code to take, its position and the quantity to be taken.
After checking that the code read ,matches the one requested, the exact quantity tobe taken is requested and the processed record is marked with an "X" in the FLAGfield.
If you press F1 before selecting a code, it is possible to jump to the following code ofthe LIST table. In this way the ignored code will not be flagged.
At the end of the loading list, checked by setting an "END! Code", the operator isasked to download the processed table by using SysTools™2001 program (seeSysTools™2001 User's Manual).
Once the table is downloaded, it is necessary to delete it before creating a new one.Then, the new table is sent to the interpreter. By clicking the F2 button on theterminal it is possible to start again.
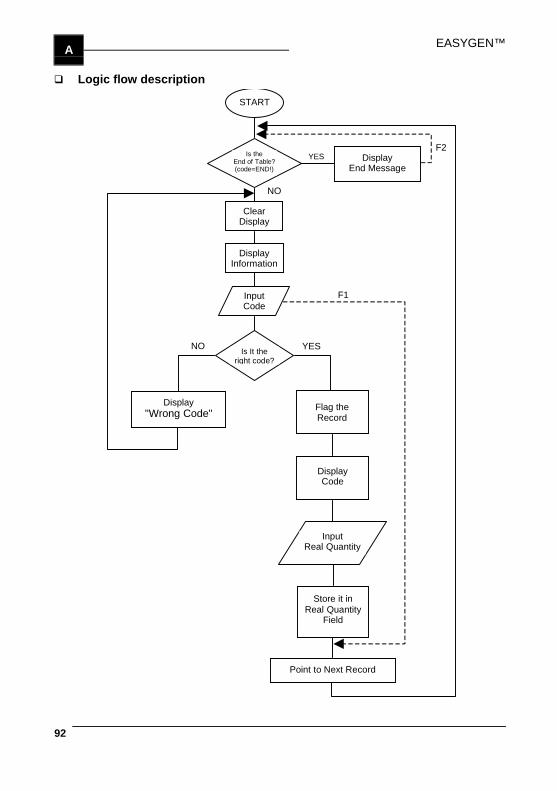
EASYGEN™A
92
Logic flow description
START
Is theEnd of Table?(code=END!)
F2Display
End Message
ClearDisplay
DisplayInformation
InputCode
F1
Is It theright code?
Display"Wrong Code"
YESNO
Flag theRecord
DisplayCode
InputReal Quantity
Store it inReal Quantity
Field
Point to Next Record
YES
NO
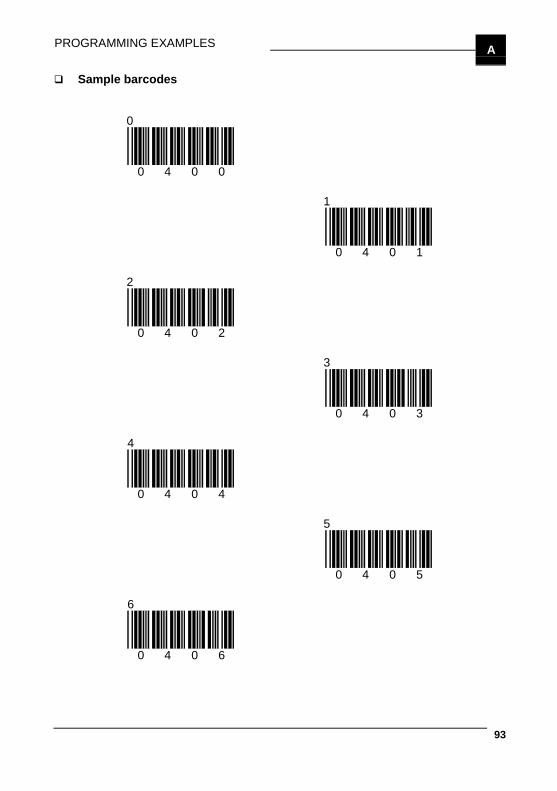
PROGRAMMING EXAMPLES A
93
Sample barcodes
0
0 4 0 0
1
0 4 0 1
2
0 4 0 2
3
0 4 0 3
4
0 4 0 4
5
0 4 0 5
6
0 4 0 6
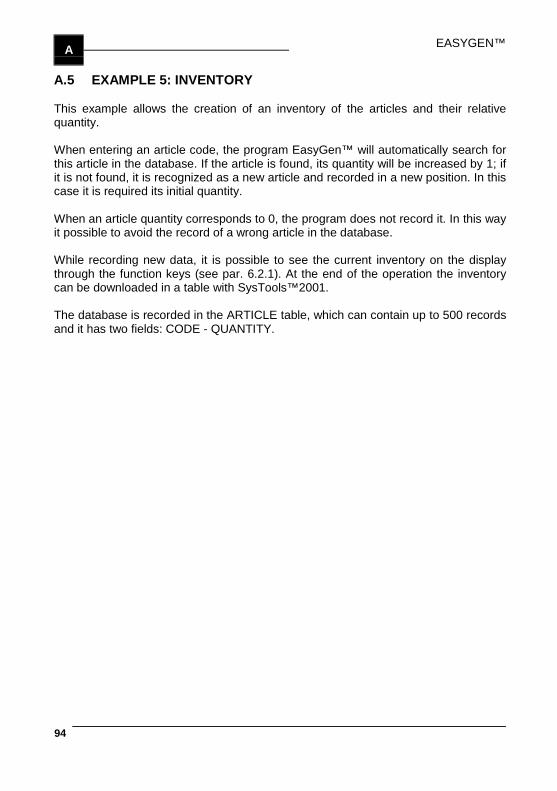
EASYGEN™A
94
A.5 EXAMPLE 5: INVENTORY
This example allows the creation of an inventory of the articles and their relativequantity.
When entering an article code, the program EasyGen™ will automatically search forthis article in the database. If the article is found, its quantity will be increased by 1; ifit is not found, it is recognized as a new article and recorded in a new position. In thiscase it is required its initial quantity.
When an article quantity corresponds to 0, the program does not record it. In this wayit possible to avoid the record of a wrong article in the database.
While recording new data, it is possible to see the current inventory on the displaythrough the function keys (see par. 6.2.1). At the end of the operation the inventorycan be downloaded in a table with SysTools™2001.
The database is recorded in the ARTICLE table, which can contain up to 500 recordsand it has two fields: CODE - QUANTITY.
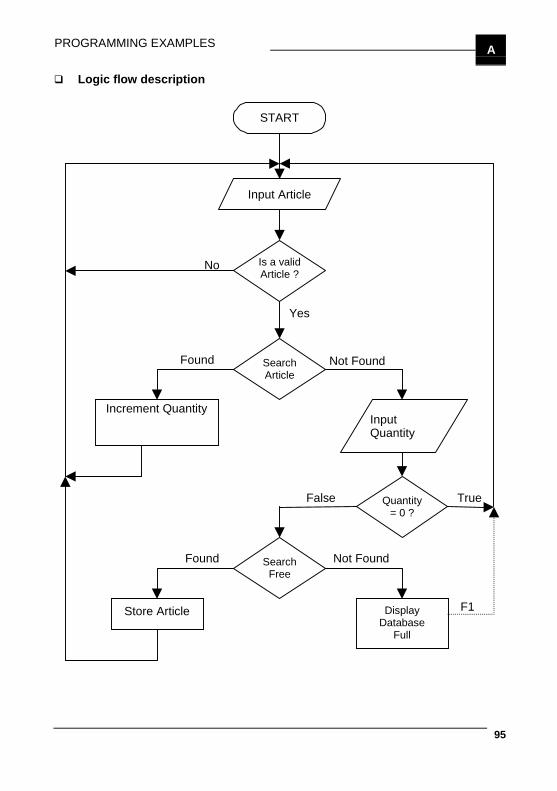
PROGRAMMING EXAMPLES A
95
Logic flow description
SearchArticle
START
Input Article
Quantity= 0 ?
SearchFree
DisplayDatabase
Full
Store Article F1
False True
Found Not Found
Found Not Found
Increment QuantityInputQuantity
Is a validArticle ?
Yes
No
EASYGEN™A
96
Sample barcodes
A 0 0 0 0 1
A 0 0 2 0 0
B 0 0 2 0 0
C 0 1 0 1 0
DOSDL B
97
B DOSDL
B.1. LOADING FILES USING DOSDL.EXE
DOSDL.EXE is a utility program that allows the loading of files to the Formulaterminal under the DOS environment (DOS 5.0 or higher).
The following files can be loaded:− EasyGen™ Interpreter program− application files with associated tables exported by EasyGen™− individual tables.
DOSDL is placed in the installation directory of EasyGen™ on your PC.
After making the RS-232 connection between the Formula terminal and the hostcomputer, execute DOSDL.EXE by entering the following at the DOS prompt:
DOSDL if the COM1 serial port is used;DOSDL /L2 if the COM2 serial port is used.
It is possible run the command “DOSDL /?” to display the help.
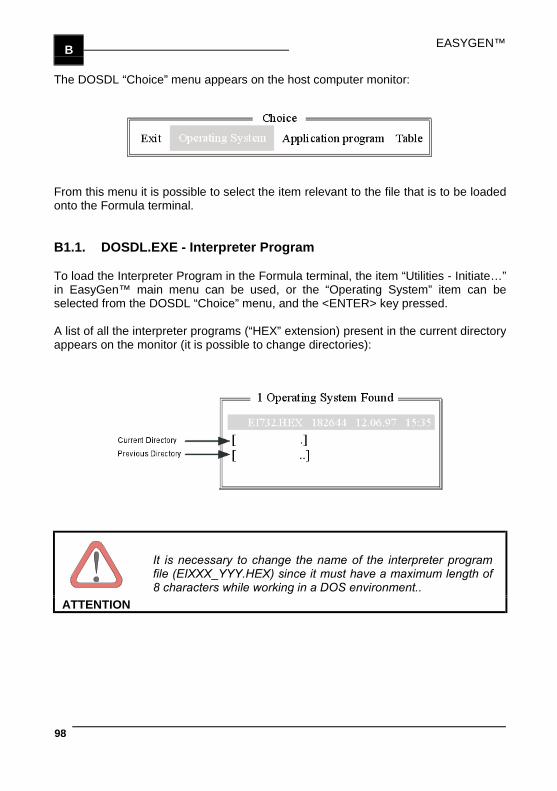
EASYGEN™B
98
The DOSDL “Choice” menu appears on the host computer monitor:
From this menu it is possible to select the item relevant to the file that is to be loadedonto the Formula terminal.
B1.1. DOSDL.EXE - Interpreter Program
To load the Interpreter Program in the Formula terminal, the item “Utilities - Initiate…”in EasyGen™ main menu can be used, or the “Operating System” item can beselected from the DOSDL “Choice” menu, and the <ENTER> key pressed.
A list of all the interpreter programs (“HEX” extension) present in the current directoryappears on the monitor (it is possible to change directories):
ATTENTION
It is necessary to change the name of the interpreter programfile (EIXXX_YYY.HEX) since it must have a maximum length of8 characters while working in a DOS environment..
DOSDL B
99
Select EIXXX_YYY.HEX and press <ENTER>, and the following appears on themonitor:
Key:A) File name and sizeB) Loading status barC) Reply message
To interrupt the installation of the EasyGen™ Interpreter Program at any time, justpress <CTRL>+<BREAK> from the computer keyboard.It is also possible to load the EasyGen™ Interpreter Program using DOSDL.EXEdirectly from the DOS prompt. Enter the command:
DOSDL / EIXXX_YYY.HEXif the COM1 serial port is used;
DOSDL / L2 / EIXXX_YYY.HEXif the COM2 serial port is used.
When the Interpreter Program hasfinished loading, the Formula terminalbegins a memory test. The displayscreen shows what is indicated in thefigure.
In case of error detected during therunning of the test, the Formula terminalfreezes. In this case, it is advisable not torun other operations and to contact atechnician.
EASYGEN™B
100
If no errors are detected during therunning of the test, the Formula terminalis able to interpret the applicationcommands created with EasyGen™ andthe display screen shows what isindicated in the figure.
The interpreter program EIXXX_YYY.HEX can be deleted just like any otherapplication.
ATTENTION
The activation of the reset button always causes the deletion ofdata and application programs, which must then be reloaded.
The reading of ERASE ALL causes the initialization of theinterpreter program with deletion of the data and applicationprogram (see par. 6.3)The EasyGen™ Interpreter for Formula 732 does not handlethe RETURN TO DEFAULT PARAMETERS barcode.
B1.2. DOSDL.EXE - Application program
To load the application in the Formula terminal, the item “File – Send” can beselected from EasyGen™ main menu, or the DOSDL.EXE program can be used.
First of all it is necessary to use the item “File - Export” in the EasyGen™ main menuto prepare the files required by DOSDL for application loading. Place any table.DATfiles required by your application in the same directory as the “Export” saved files.
After making the RS-232 connection between the Formula terminal and the hostcomputer and loading the application onto the Formula terminal, it is necessary toselect the “Application program” item from the DOSDL “Choice” menu:
DOSDL B
101
A list of all applications (“EXP” extension) present in the current directory appears onthe monitor (it is possible to change directories):
NOTE
DOSDL.EXE recognizes application filenames having a maximum of8 characters.
It is advised to select filenames that respect this limit beforeexporting them from EasyGen™.
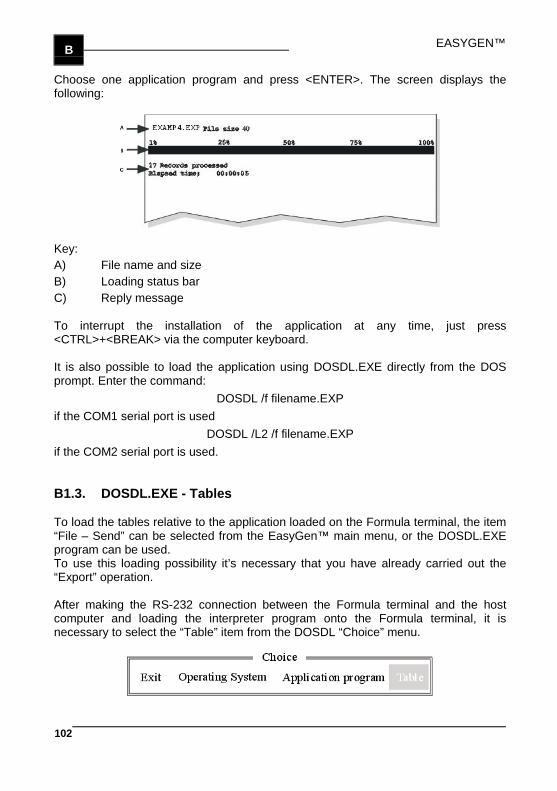
EASYGEN™B
102
Choose one application program and press <ENTER>. The screen displays thefollowing:
Key:A) File name and sizeB) Loading status barC) Reply message
To interrupt the installation of the application at any time, just press<CTRL>+<BREAK> via the computer keyboard.
It is also possible to load the application using DOSDL.EXE directly from the DOSprompt. Enter the command:
DOSDL /f filename.EXPif the COM1 serial port is used
DOSDL /L2 /f filename.EXPif the COM2 serial port is used.
B1.3. DOSDL.EXE - Tables
To load the tables relative to the application loaded on the Formula terminal, the item“File – Send” can be selected from the EasyGen™ main menu, or the DOSDL.EXEprogram can be used.To use this loading possibility it’s necessary that you have already carried out the“Export” operation.
After making the RS-232 connection between the Formula terminal and the hostcomputer and loading the interpreter program onto the Formula terminal, it isnecessary to select the “Table” item from the DOSDL “Choice” menu.
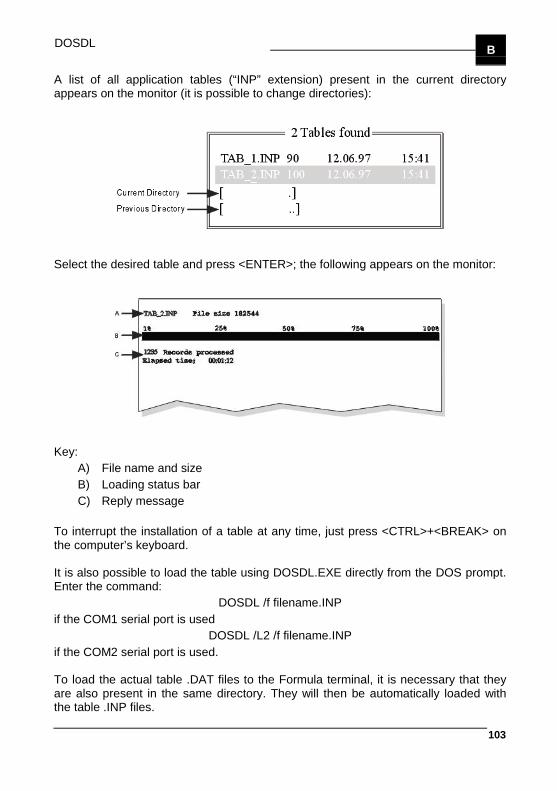
DOSDL B
103
A list of all application tables (“INP” extension) present in the current directoryappears on the monitor (it is possible to change directories):
Select the desired table and press <ENTER>; the following appears on the monitor:
Key:A) File name and sizeB) Loading status barC) Reply message
To interrupt the installation of a table at any time, just press <CTRL>+<BREAK> onthe computer’s keyboard.
It is also possible to load the table using DOSDL.EXE directly from the DOS prompt.Enter the command:
DOSDL /f filename.INPif the COM1 serial port is used
DOSDL /L2 /f filename.INPif the COM2 serial port is used.
To load the actual table .DAT files to the Formula terminal, it is necessary that theyare also present in the same directory. They will then be automatically loaded withthe table .INP files.
EASYGEN™B
104
B.2. ALTERNATIVE FILE LOADING METHOD
Application programs and tables "Exported" (see par. 4.2.8) from EasyGen™ can besent to the Formula terminal using a serial port under a different operating systemthan Windows 95/98/2000/ME or NT.
Loading an application program
To load the application program in a Formula terminal, in which the interpreter isalready loaded, you must use the default protocol with the serial port set to 9600baud, 8 bits and MARK parity.
The data or command of the “communication frame” (see Appendix C) must be inputas a single line [without the terminating characters CR(0D Hex) and LF(0A Hex)], ofthe file to be sent maintaining the following FIXED sequence:
1. Appl.CFG file: contains the configuration parameters of the Formula terminal;2. table1.INP file: contains the first table definition;3. table1.DAT file: this is a “data” table with the format defined in table1.INP. This
file must be created outside EasyGen following the rulesdescribed in par. 4.6.1.The single text “data” line, without the terminating charactersCR(0D Hex) and LF(0A Hex) preceded by ESC(1B Hex),“2”(32Hex) and followed by ESC(1BHex), becomes the“communication frame” (see Appendix C) to be sent.If your application does not require this file go to step 4.
2N - 3N. tableN.INP Repeat step 2 and 3 for every table defined.4. appl.CMD file: contains the actual application program.
For your convenience “Export” also creates an appl.EXP file which is the list withoutthe table.DAT files required by your application.
DOSDL B
105
Loading a single table
Similarly, it is possible to send the data of an individual table to the Formula terminal.
This means that a table from an already loaded application program can be changedand the terminal file can be updated without reloading the program.
Using the definition of a table.INP file created with “Export”, you can send the newtable.DAT file directly to the Formula terminal using the fixed sequence and formatdescribed in points 2) and 3) of the previous paragraph, “Loading an ApplicationProgram onto the Formula Terminal”.
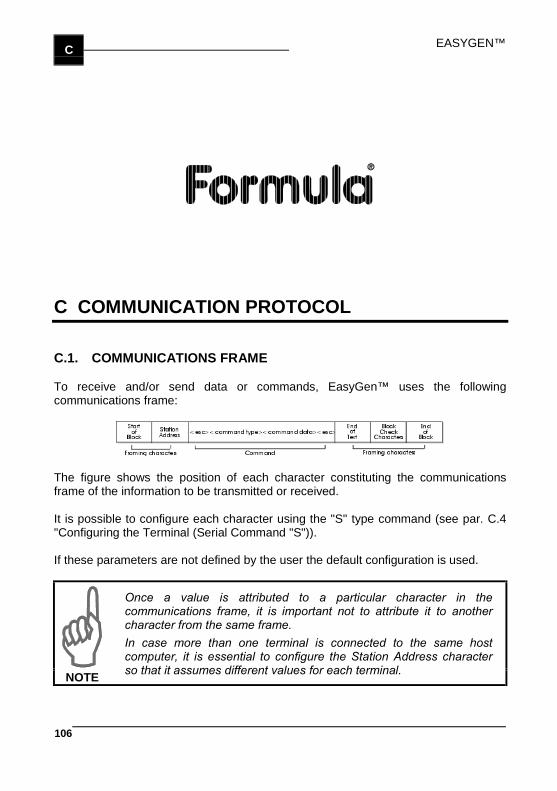
EASYGEN™C
106
C COMMUNICATION PROTOCOL
C.1. COMMUNICATIONS FRAME
To receive and/or send data or commands, EasyGen™ uses the followingcommunications frame:
The figure shows the position of each character constituting the communicationsframe of the information to be transmitted or received.
It is possible to configure each character using the "S" type command (see par. C.4"Configuring the Terminal (Serial Command "S")).
If these parameters are not defined by the user the default configuration is used.
NOTE
Once a value is attributed to a particular character in thecommunications frame, it is important not to attribute it to anothercharacter from the same frame.In case more than one terminal is connected to the same hostcomputer, it is essential to configure the Station Address characterso that it assumes different values for each terminal.
COMMUNICATION PROTOCOL C
107
The Formula terminal can use two different Block check characters (BCC). Thesecan be set by using the serial command "S" described in Appendix C:− LRCC = Longitudinal Redundancy Check Character− Checksum 256
The use of any type or other is completely arbitrary. The only existing limitationregards the specifications of the management program residing in the host computer.Depending on the BBC used, the calculating method of the two characters thatcompose it varies:− If LRCC is used, it is necessary to calculate the xor operation of all characters
preceding the LRCC (including any Start of Block and <etb> or etx> characters).The ASCII character corresponding to the value thus obtained must be insertedin the communications frame.
− If Checksum 256 is used, it will be necessary to calculate the sum of all thecharacters preceding the Block Check Characters (including any “Start of Block”and <etb> or <etx> characters) and subtract from the result 256 dec.
The value obtained must be broken down into the two nibbles that its composed of(groups of 4 bits) and the two ASCII characters corresponding to the values obtainedmust be inserted in the communications frame.
EXAMPLE
Let us imagine that you have to send the command <ESC>5<ESC><CR> using BBC= LRCC. The value of the Block Check Characters must be calculated as follows:
ASCII Hexadecimal BinaryESC = 1B16 = 00011011 xor"5" = 3516 = 00110101 xor<ESC> = 1B16 = 00011011 xor<CR> = 0D16 = 00001101 ="8" 3816 = 00111000
If you carry out the xor operation with hexadecimal values, the result will be 3816.
If you carry out the xor operation with binary values, the result will be 00111000.
The ASCII character "8" must be inserted into the communication frame.
EASYGEN™C
108
EXAMPLE
Let us imagine that you have to send the message <ESC>7CKSUM<ESC><CR>using BCC=Checksum module 256. The Block Check Characters value must becalculated as follows:
ASCII Hexadecimal BinaryESC = 1B16 = 00011011 +"7" = 3716 = 00110111 +"C" = 4316 = 01000011 +"K" = 4B16 = 01001011 +"S" = 5316 = 01010011 +"U" = 5516 = 01010101 +"M" = 4D16 = 01001101 +<ESC> = 1B16 = 00011011 +<CR> = 0D16 = 00001101 =
1FD16 111111101
If you calculate the sum with hexadecimal values, you obtain the result 1FD16; divideit by 10016 (256Dec) and you are left with FD16. In practice only the last two lessimportant digits of the hexadecimal sum are considered.
If you calculate the sum with binary values, you obtain 1.1111.1101; divide it by1.0000.0000 Bin. (256Dec) and you are left with: 1111.1101, when that is changedinto hexadecimal form it is FD16. In practice only the last two less important nibbles ofthe binary sum are considered.
The value obtained must be broken down into the two nibbles that make it up, thusthe characters to be inserted into the communication frame are the ASCII values “F”and “D”.
COMMUNICATION PROTOCOL C
109
C.2 DATA TRANSMISSION
The transmission of data from the Formula terminal towards the host computerdepends on the interface used.
C2.1 RS-232 and RS-485 Interfaces
Data transmission for both of these interfaces is virtually identical.To receive and/or send data in this mode every unit of information must have thefollowing structure:
C.2.2 Eavesdrop Connection Interface
In this operating mode the Formula terminal will begin to transmit data contained inthe table to the host computer as soon as it is inserted into the cradle. This data isnot sent record by record but rather field by field. To do this, each field is changedinto a record before being transmitted. While this is being done the separators areremoved.
Let us imagine that the following record has been input to the terminal:
0 5 / 0 3 / 9 0 | 1 5 : 4 5 | 8 8 0 7 4 3 2 9 | 0 2 |
Before being sent to the host computer it is broken down as shown below:
0 5 / 0 3 / 9 0 1 5 : 4 5 8 8 0 7 4 3 2 9 0 2
ATTENTION
This operating mode is not available for the F732 terminal.
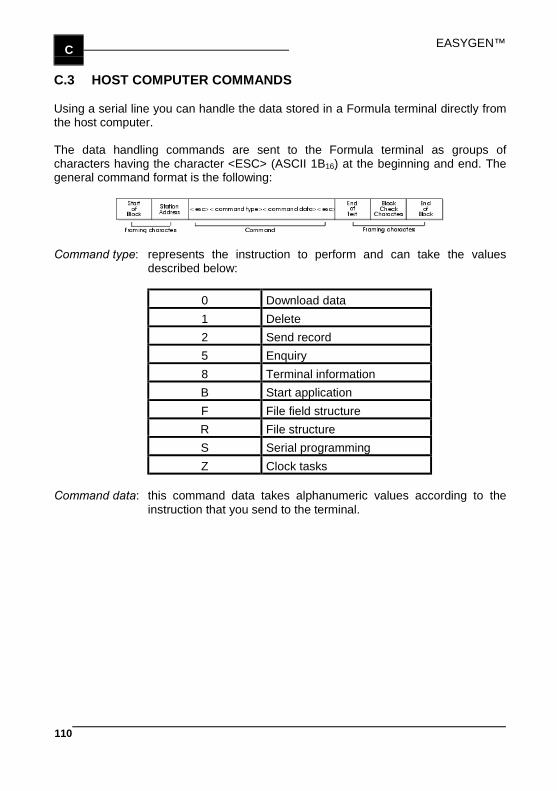
EASYGEN™C
110
C.3 HOST COMPUTER COMMANDS
Using a serial line you can handle the data stored in a Formula terminal directly fromthe host computer.
The data handling commands are sent to the Formula terminal as groups ofcharacters having the character <ESC> (ASCII 1B16) at the beginning and end. Thegeneral command format is the following:
Command type: represents the instruction to perform and can take the valuesdescribed below:
0 Download data1 Delete2 Send record5 Enquiry8 Terminal informationB Start applicationF File field structureR File structureS Serial programmingZ Clock tasks
Command data: this command data takes alphanumeric values according to theinstruction that you send to the terminal.
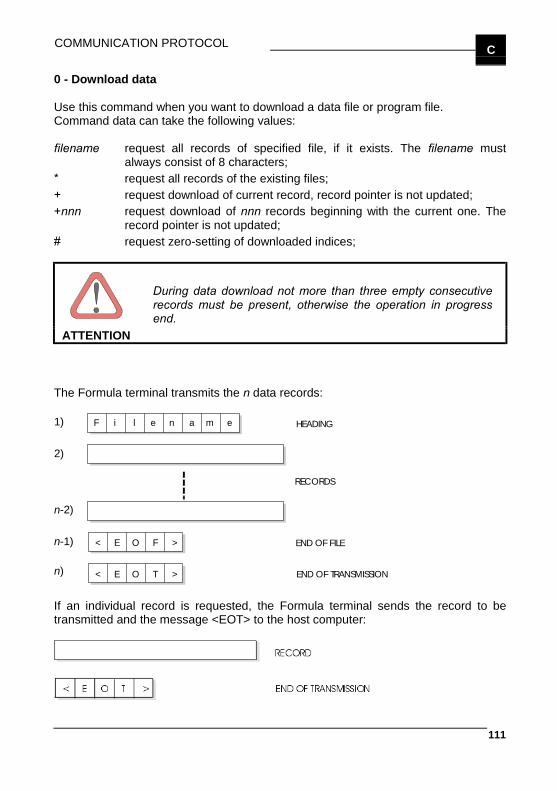
COMMUNICATION PROTOCOL C
111
0 - Download data
Use this command when you want to download a data file or program file.Command data can take the following values:
filename request all records of specified file, if it exists. The filename mustalways consist of 8 characters;
* request all records of the existing files;+ request download of current record, record pointer is not updated;+nnn request download of nnn records beginning with the current one. The
record pointer is not updated;# request zero-setting of downloaded indices;
ATTENTION
During data download not more than three empty consecutiverecords must be present, otherwise the operation in progressend.
The Formula terminal transmits the n data records:
HEADING
< E O T >
< E O F >
RECORDS
END OF FILE
END OF TRANSMISSION
F i l e n a m e1)
2)
n-2)
n-1)
n)
If an individual record is requested, the Formula terminal sends the record to betransmitted and the message <EOT> to the host computer:
EASYGEN™C
112
1 - Delete
This command deletes/clears one or more data or program files.Command data can take the following values:
filename the specified file is deleted, whether it is a data file or a program file;* all output file records are deleted;- deletes the current record and moves the pointer by one position.
The answers are:
“DEL” Records deleted.“CLR” Records deleted.“WAI” Wait, deleting.“FNF” File not found.
2 - Load record
Use this command when you want to load a record into the Formula terminal.Command data takes the value of the record as its value.
The answers are:
“ACK” Records saved.“NAK” Record not conforming with previously given definition or file full.
5 - Enquiry
Each time that the Formula terminal receives this command, it transmits a messagethat defines its internal status to the host computer.Command data does not take up any value.
The answers are:
“RUN” Terminal connected.
COMMUNICATION PROTOCOL C
113
8 - Terminal information
This command allows the host computer to identify the type of Formula terminal.Command data can take the following values:
no value Formula terminal transmits its name to the host computer.$ Formula terminal sends version and firmware release to the host
computer in the format v.x/r.y;* Formula terminal sends the RAM extension in the format XXX Kbyte.
The answers are:
name name of the terminal.v.X / r.Y X is the version and Y is the release of the terminal in use.XXX RAM memory of the terminal.“NAK” Wrong command.
B - Start application
This command allows the host computer to send the application program startcommand.Command data does not take up any value.
F – File fields structure
This command defines the structure of the file fields. It is not used directly by the userbut it can be found inside the files that are obtained by exporting the application inuse in EasyGen™.
R – File structure
This command defines the file structure. It is not used directly by the user but it canbe found inside the files that are obtained by exporting the application in use inEasyGen™.
EASYGEN™C
114
S - Serial programming
This command allows you to configure the Formula terminal from the host computervia serial line. Due to the complexity of the topic, refer to the par. C.4 “Configuring theterminal (serial command “S”)”.
Z - Clock tasks
This command allows the host computer to carry out special tasks on the internalclock of the Formula terminal.Command data can take the following values:
YYMMDDHHMMSS date and time setting;? request date and time of Formula terminal.
The answers are:
“ACK” Operation ready.“NAK” Wrong format.YYMMDDHHMMSS Year, Month, Day, Hours, Minutes, Seconds.
COMMUNICATION PROTOCOL C
115
C.4 CONFIGURING THE TERMINAL (SERIAL COMMAND “S”)
Configure Formula terminal communication parameters by choosing the items Tools -Options from the main menu of the EasyGen™. You can edit the configuration byusing the serial command “S”.
Command data must have the following structure:
The parameters that must not be edited, must in any case be included in thecommand data with the value unchanged.
NOTE
In the following tables the default values are placed in a square.
Baud rate
VALUE SERIAL COMMAND300 0 = 3016
600 1 = 3116
1200 2 = 3216
2400 3 = 3316
4800 4 = 3416
9600 5 = 3516
19200 6 = 3616
This parameter allows you to set the transmission speed.
EASYGEN™C
116
Parity
VALUE SERIAL COMMANDOdd 0 = 3016
Even 1 = 3116
Mark 2 = 3216
Space 3 = 3316
None 4 = 3416
Allows you to set parity check
Data Bit
VALUE SERIAL COMMAND7 0 = 3016
8 1 = 3116
The instrument uses ASCII code exclusively, so 7 bits are sufficient forcommunication.
Interface
VALUE SERIAL COMMANDRS-485 0 = 3016
RS- 232 1 = 3116
EAVESDROP 2 = 3216
Allows you to define serial interface for connection between Formula terminal andhost computer.
Station Address
This parameter defines the Formula terminal address unequivocally.The Station Address must be defined as a two-digit number from 00 to 99.The default value of this parameter is “01”.
COMMUNICATION PROTOCOL C
117
Block Check Characters
VALUE SERIAL COMMANDLRCC 0 = 3016
Checksum 256 1 = 3116
Disable none = 2016
When this parameter is enabled all data transmitted to host computer or Formulaterminal is completed by Block Check Characters that carry out a transmission check.If transmission is successful the receiving instrument sends an ACK character. Bycontrast if transmission occurs with a wrong checksum, the receiving instrumentreplies with a NAK character.It is advisable to always define the Block Check Characters when connecting hostcomputer to Formula terminal because this is the only way to check that data is notlost or corrupted during transmission (refer to the paragraph entitled“Communications frame”).
Characters Delay
This parameter defines the time the Formula terminal waits before transmitting thenext character.This delay must be defined as a one-digit number from 0 to 9 and is calculated as:
Delay sec.50 = (command data) msec.
For example, set command data to “9” to obtain a Delay of 0.45 seconds:
0,45 sec.50 = 9 msec.

EASYGEN™C
118
Reception Mode
VALUE SERIAL COMMANDHalf Duplex 0 = 3016
Full Duplex 1 = 3116
This parameter allows you to set the type of communication.In Full Duplex mode the Formula terminal can transmit and receive datasimultaneously; in Half Duplex mode the Formula terminal cannot receive data whileit is transmitting, so the transmitted data is lost.
Check characters
The block check characters are:− Start of Block (default <stx>)− End of Text (default <etx>)− End of Block (default <cr>)The next section provides all the possible values associated with block checkcharacters.You cannot associate the same value to different block check characters.
soh 0116 dc1 1116
stx 0216 dc2 1216
etx 0316 dc3 1316
eot 0416 dc4 1416
enq 0516 nak 1516
ack 0616 syn 1616
bel 0716 etb 1716
bs 0816 can 1816
ht 0916 em 1916
lf 0A16 sub 1A16
vt 0B16 esc 1B16
ff 0C16 fs 1C16
cr 0D16 gs 1D16
so 0E16 rs 1E16
si 0F16 us 1F16
dle 1016 none 2016
SysTools™2001User’s Manual

SysTools™2001User’s Manual
SysTools™2001USER'S MANUAL
DATALOGIC S.p.A.Via Candini 240012 - Lippo di Calderara di RenoBologna - Italy
SysTools™2001 - User's Manual
Ed.: 04/01Vers.: 2.10 and laterCode: 820042320
ALL RIGHTS RESERVEDDatalogic reserves the right to make modifications and improvements without prior notification. Productnames mentioned herein are for identification purposes only and may be trademarks and or registeredtrademarks of their respective companies.
© - 2001 Datalogic S.p.A.

DATALOGIC S.p.A. Software License Agreement
This legal document is an agreement between you, the end user and DATALOGIC S.p.A. BY INSTALLINGTHE SOFTWARE, YOU ARE AGREEING TO BECOME BOUND BY THE TERMS OF THIS AGREEMENT,which includes the SOFTWARE LICENSE, LIMITED WARRANTY and ACKNOWLEDGMENT.
GRANT OF LICENSE. DATALOGIC grants to you the right to use one copy of the enclosed DATALOGICS.p.A., program (the "SOFTWARE") on a single terminal connected to a single computer (i.e.; with a singleCPU). You may not network the SOFTWARE or otherwise use it on more than one computer or computerterminal at the same time.
COPYRIGHT. The SOFTWARE is owned by DATALOGIC S.p.A. or its suppliers and is protected by copyrightlaws and international treaty provisions. Therefore, you must treat the SOFTWARE like any other copyrightedmaterial (i.e.; a book or musical recording) except that you may either (a) make one copy of the SOFTWAREsolely for backup or archival purposes, or (b) transfer the SOFTWARE to a single hard disk provided youkeep the original solely for backup or archival purposes. You may not copy the written materialsaccompanying the software.
NON PERMITTED USES: Without the express permission of DATALOGIC S.p.A., you may not:1. Use the software in a computer service business including rental, networking or time sharing software,
nor may you use it for multiple users, or multiple computer system applications in the absence ofindividual network licenses with DATALOGIC S.p.A.
2. Use, Copy or modify, alter or transfer, electronically or otherwise, the software or documentation exceptas expressly allowed in this agreement.
3. Translate, reverse engineer, de-assemble, de-compile or create derivative works based on the writtenmaterials.
4. Sub-license or lease this program or its documentation.
LIMITED WARRANTY: This software and accompanying written materials are provided "as is" withoutwarranty of any kind. THE ENTIRE RISK AS TO THE RESULTS AND PERFORMANCE OF THISSOFTWARE IS ASSUMED BY YOU. SHOULD THE SOFTWARE PROVE DEFECTIVE IN USE, YOU (ANDNOT DATALOGIC OR ITS AGENTS) ASSUME THE ENTIRE COST OF ALL NECESSARY SERVICING,REPAIR OR CORRECTION OF DATA. FURTHER, DATALOGIC DOES NOT WARRANT, GUARANTEE ORMAKE ANY REPRESENTATIONS REGARDING THE USE OF, OR THE RESULTS OF THE USE OF THESOFTWARE, IN TERMS OF CORRECTNESS, ACCURACY, RELIABILITY, CURRENTNESS, OROTHERWISE AND YOU RELY ON THE SOFTWARE AND RESULTS AT YOUR OWN RISK.
DATALOGIC warrants to the original licensee that the CD-Rom on which the SOFTWARE is recorded is freefrom defects in materials and workmanship under normal use and service for a period of ninety (90) days fromthe date of delivery as evidenced by a copy of your receipt. DATALOGIC's entire liability and your exclusiveremedy shall be at DATALOGIC's option, replacement of the CD-Rom which shall be returned toDATALOGIC with a copy of your receipt. If failure of the CD-Rom has resulted from accident, abuse ormisapplication of the product, then DATALOGIC shall have no responsibility to replace the product under thiswarranty.
THE ABOVE IS THE ONLY WARRANTY OF ANY KIND, EITHER EXPRESSED OR IMPLIED, INCLUDING,BUT NOT LIMITED TO, THE IMPLIED WARRANTIES OF MERCHANTABILITY AND FITNESS FOR APARTICULAR PURPOSE, THAT IS MADE BY DATALOGIC ON THIS DATALOGIC PRODUCT. IN NOEVENT SHALL DATALOGIC OR ITS SUPPLIERS, NOR ANYONE ELSE WHO HAS BEEN INVOLVED INTHE CREATION, PRODUCTION OR DELIVERY OF THIS PRODUCT, BE LIABLE FOR ANY DIRECT,INDIRECT, CONSEQUENTIAL, OR INCIDENTAL DAMAGES WHATSOEVER (INCLUDING, WITHOUTLIMITATION, DAMAGES FOR LOSS OF BUSINESS PROFITS, BUSINESS INTERRUPTION, LOSS OFBUSINESS INFORMATION, OR OTHER PECUNIARY LOSS) ARISING OUT OF THE USE, THE RESULTSOF USE, OR INABILITY TO USE SUCH PRODUCT, EVEN IF DATALOGIC HAS BEEN ADVISED OF THEPOSSIBILITY OF SUCH DAMAGES.
ACKNOWLEDGMENT: You acknowledge that you have read this LICENSE and Limited Warranty,understand them and agree to be bound by their terms and conditions. You also agree that the LICENSE andLimited Warranty are the complete and exclusive statement between the parties and supersedes all othercommunications between the parties relating to the subject matter of the LICENSE or the Limited Warranty.
iv
CONTENTS
1 GENERAL INFORMATION .......................................................................... 11.1 Program Description ..................................................................................... 1
2 CONNECTION .............................................................................................. 32.1 Connecting the Terminal to the Host Computer ............................................ 32.1.1 RS-232 Connection....................................................................................... 32.1.2 RS-485 Connection....................................................................................... 5
3 MENU DESCRIPTION .................................................................................. 73.1 General Menu Descriptions........................................................................... 73.2 Menu File ...................................................................................................... 93.2.1 EasyGen™ Mode.......................................................................................... 93.2.2 Standard/Enhanced Mode .......................................................................... 153.3 Menu Utility ................................................................................................. 213.3.1 EasyGen™ Mode........................................................................................ 213.3.2 Standard/Enhanced Mode .......................................................................... 243.3.3 Startup Mode .............................................................................................. 263.4 Menu Window ............................................................................................. 273.5 Menu Help................................................................................................... 28
4 USE AND OPERATION.............................................................................. 294.1 Using the Data Collection Window.............................................................. 294.2 Network Setup ............................................................................................ 314.2.1 On-Line Configuration................................................................................. 324.2.2 Off-Line Configuration................................................................................. 454.3 Options........................................................................................................ 48
5 TROUBLESHOOTING................................................................................ 50

GENERAL INFORMATION 1
1
1 GENERAL INFORMATION
This manual describes the installation and use of SysTools™2001 and is intended forthose who are already familiar with the MS Windows operating systems.
1.1 PROGRAM DESCRIPTION
SysTools™2001 is a program for Windows 95/98/2000/ME and Windows NT,capable of managing Formula terminals either via an RS-232 connection or via anRS-485 Sysnet network.It manages two types of communication environments between the host computerand Formula terminals depending on the Startup Mode:- EasyGen™ Mode- Standard/Enhanced Mode
For EasyGen™ Mode SysTools™2001 enables:- interpreters to be loaded onto terminals;- application programs to be loaded onto terminals (.APP, .POW files);- collected data from the terminals to be transferred to the host computer (receive
table);- data to be transferred from the host computer to terminals (send table);
SYSTOOLS™20011
2
For Standard/Enhanced Mode SysTools™2001 enables:- application programs to be loaded onto terminals (.HEX, .H00 files);- the record layout from terminals to be configured;- collected data to be transferred to the host computer.
CONNECTION 2
3
2 CONNECTION
2.1 CONNECTING THE TERMINAL TO THE HOST COMPUTER
ATTENTION
Before continuing with this phase, ensure that both thecomputer and terminal are switched off.
2.1.1 RS-232 Connection
To load the program onto the Formula terminal it is necessary to insert it in theFormula Transceiver Charger cradle which has previously been connected to thepower supply and to a host computer with an available RS-232 serial line.
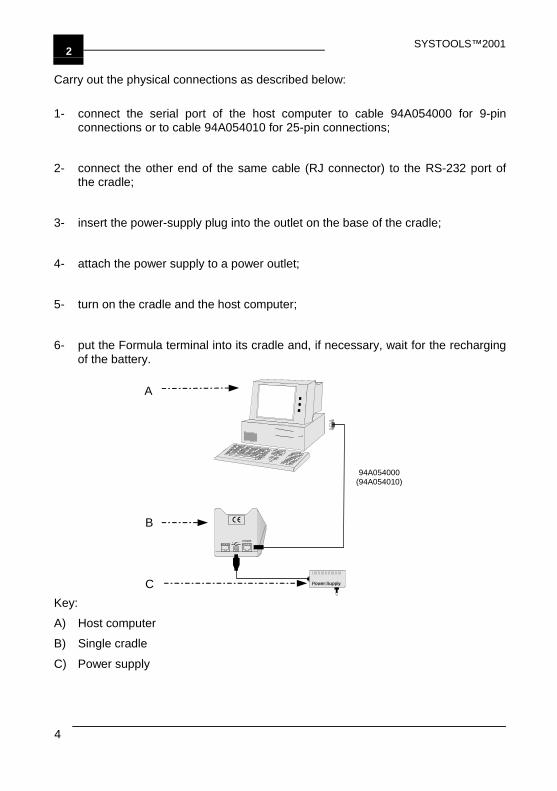
SYSTOOLS™20012
4
Carry out the physical connections as described below:
1- connect the serial port of the host computer to cable 94A054000 for 9-pinconnections or to cable 94A054010 for 25-pin connections;
2- connect the other end of the same cable (RJ connector) to the RS-232 port ofthe cradle;
3- insert the power-supply plug into the outlet on the base of the cradle;
4- attach the power supply to a power outlet;
5- turn on the cradle and the host computer;
6- put the Formula terminal into its cradle and, if necessary, wait for the rechargingof the battery.
RS485RS485RS232
Power Supply
Key:A) Host computerB) Single cradle
C) Power supply
A
B
C
94A054000(94A054010)
CONNECTION 2
5
2.1.2 RS-485 Connection
RS-485 allows the connection of several terminals on a single RS-232 line throughthe installation of a Sysnet network (see the “Formula 904/N User's Manual”).
A simplified Sysnet network allows up to 5 different types of Formula cradles to beconnected; the total length of the line cannot exceed 10 m.
If the Sysnet network is made using Formula 902 T-Box the line can extend up to1200 m linking up to 32 different types of Formula cradles (if multiple cradles areused, the individual work stations must be counted).
NOTE
The RS-485 connection is the only one that allows all the stations ofa multi-cradle to be available for the transmission/reception from thehost computer.
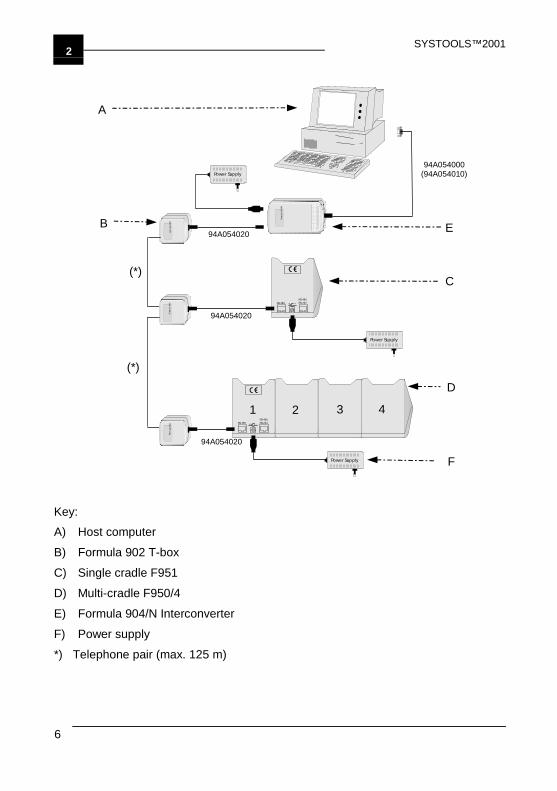
SYSTOOLS™20012
6
Form
ula
90
4/N
Form
ula
902
Form
ula
902
Form
ula
902
1 2 3 4
Power Supply
Power Supply
Power Supply
RS-485RS-485 RS-232
RS-485RS-485 RS-232
Key:A) Host computer
B) Formula 902 T-box
C) Single cradle F951
D) Multi-cradle F950/4
E) Formula 904/N Interconverter
F) Power supply
*) Telephone pair (max. 125 m)
A
B E
C
D
F
94A054000(94A054010)
94A054020
94A054020
94A054020
(*)
(*)
MENU DESCRIPTION 3
7
3 MENU DESCRIPTION
SysTools™2001 offers two types of communication environments (EasyGen™Mode and Standard/Enhanced Mode) which enable different options in some ofthe program menus. For this reason the information referring to these menus isdivided into their relative paragraphs.
3.1 GENERAL MENU DESCRIPTIONS
To start SysTools™2001 from Windows, press the <Start> button, select Programs,Datalogic, EasyGen™ then select SysTools™2001 from the list.
The first time the program is run it will start in EasyGen™ Mode and you will then bepresented with the following display.
NOTE
If you want to change the Startup Mode of SysTools™2001 you canchoose it from the Utility menu. To activate this mode you mustrestart the program (see par. 3.3.3 "Startup Mode").
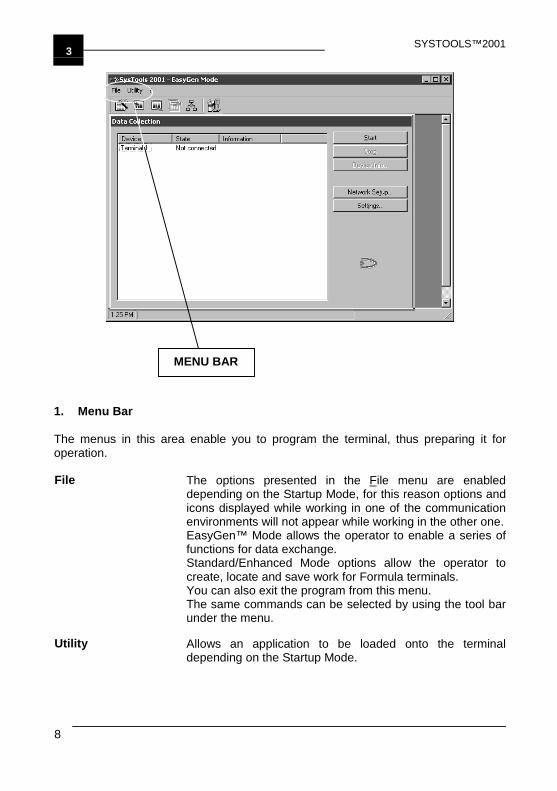
SYSTOOLS™20013
8
1. Menu Bar
The menus in this area enable you to program the terminal, thus preparing it foroperation.
File The options presented in the File menu are enableddepending on the Startup Mode, for this reason options andicons displayed while working in one of the communicationenvironments will not appear while working in the other one.EasyGen™ Mode allows the operator to enable a series offunctions for data exchange.Standard/Enhanced Mode options allow the operator tocreate, locate and save work for Formula terminals.You can also exit the program from this menu.The same commands can be selected by using the tool barunder the menu.
Utility Allows an application to be loaded onto the terminaldepending on the Startup Mode.
MENU BAR
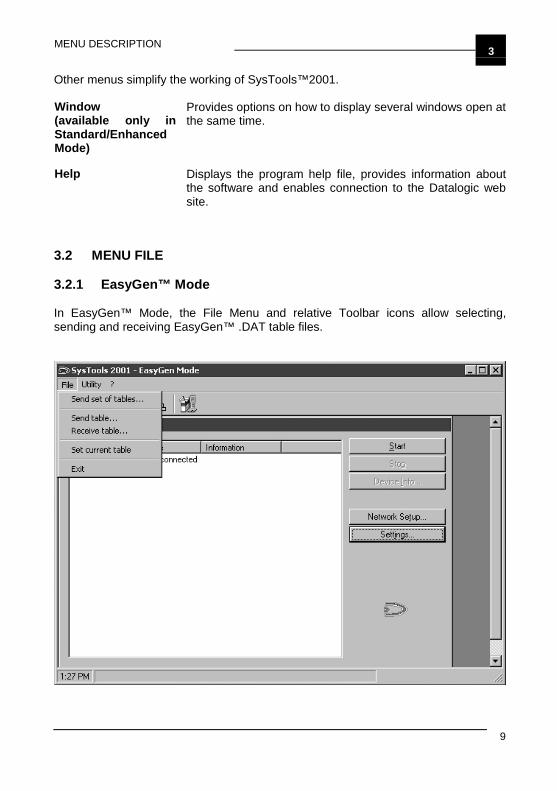
MENU DESCRIPTION 3
9
Other menus simplify the working of SysTools™2001.
Window(available only inStandard/EnhancedMode)
Provides options on how to display several windows open atthe same time.
Help Displays the program help file, provides information aboutthe software and enables connection to the Datalogic website.
3.2 MENU FILE
3.2.1 EasyGen™ Mode
In EasyGen™ Mode, the File Menu and relative Toolbar icons allow selecting,sending and receiving EasyGen™ .DAT table files.
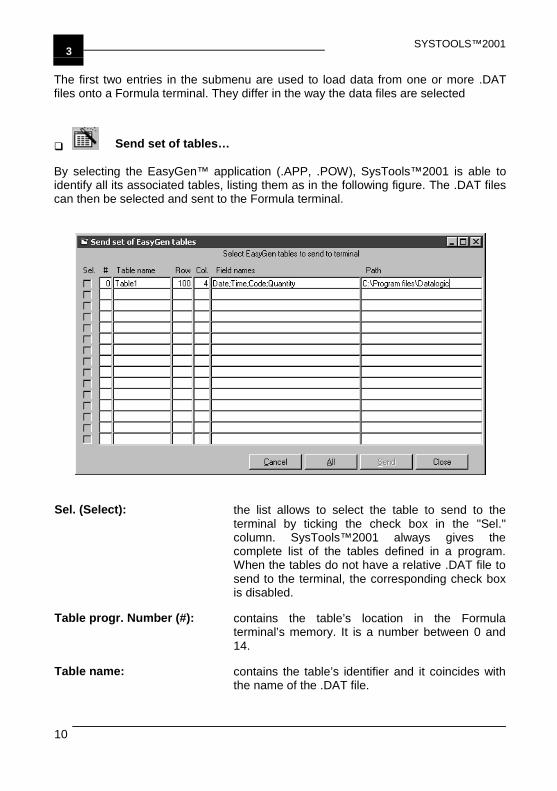
SYSTOOLS™20013
10
The first two entries in the submenu are used to load data from one or more .DATfiles onto a Formula terminal. They differ in the way the data files are selected
Send set of tables…
By selecting the EasyGen™ application (.APP, .POW), SysTools™2001 is able toidentify all its associated tables, listing them as in the following figure. The .DAT filescan then be selected and sent to the Formula terminal.
Sel. (Select): the list allows to select the table to send to theterminal by ticking the check box in the "Sel."column. SysTools™2001 always gives thecomplete list of the tables defined in a program.When the tables do not have a relative .DAT file tosend to the terminal, the corresponding check boxis disabled.
Table progr. Number (#): contains the table’s location in the Formulaterminal’s memory. It is a number between 0 and14.
Table name: contains the table’s identifier and it coincides withthe name of the .DAT file.
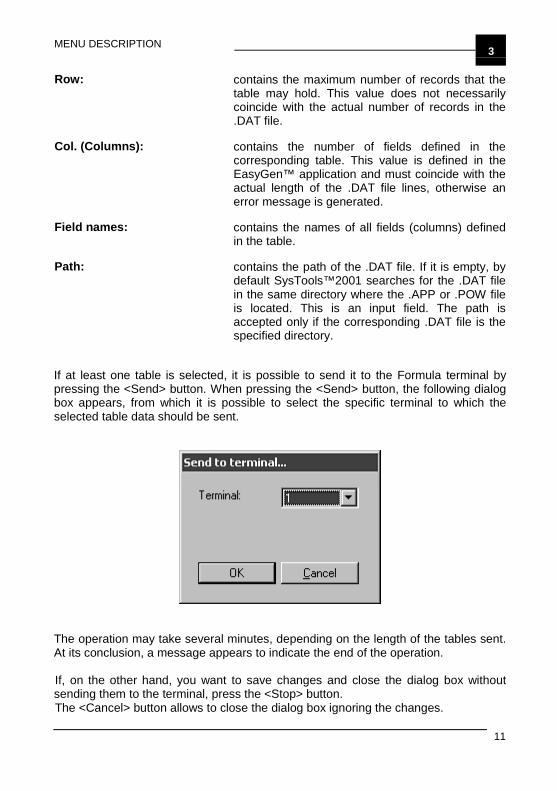
MENU DESCRIPTION 3
11
Row: contains the maximum number of records that thetable may hold. This value does not necessarilycoincide with the actual number of records in the.DAT file.
Col. (Columns): contains the number of fields defined in thecorresponding table. This value is defined in theEasyGen™ application and must coincide with theactual length of the .DAT file lines, otherwise anerror message is generated.
Field names: contains the names of all fields (columns) definedin the table.
Path: contains the path of the .DAT file. If it is empty, bydefault SysTools™2001 searches for the .DAT filein the same directory where the .APP or .POW fileis located. This is an input field. The path isaccepted only if the corresponding .DAT file is thespecified directory.
If at least one table is selected, it is possible to send it to the Formula terminal bypressing the <Send> button. When pressing the <Send> button, the following dialogbox appears, from which it is possible to select the specific terminal to which theselected table data should be sent.
The operation may take several minutes, depending on the length of the tables sent.At its conclusion, a message appears to indicate the end of the operation.
If, on the other hand, you want to save changes and close the dialog box withoutsending them to the terminal, press the <Stop> button.The <Cancel> button allows to close the dialog box ignoring the changes.
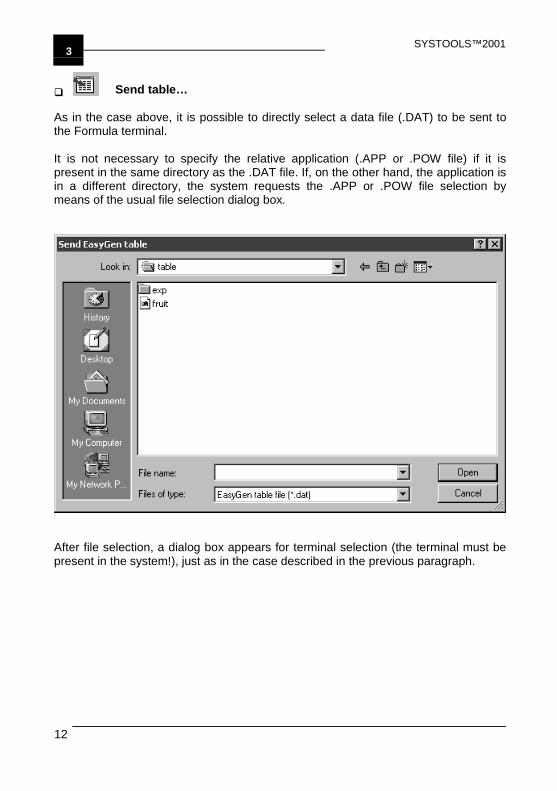
SYSTOOLS™20013
12
Send table…
As in the case above, it is possible to directly select a data file (.DAT) to be sent tothe Formula terminal.
It is not necessary to specify the relative application (.APP or .POW file) if it ispresent in the same directory as the .DAT file. If, on the other hand, the application isin a different directory, the system requests the .APP or .POW file selection bymeans of the usual file selection dialog box.
After file selection, a dialog box appears for terminal selection (the terminal must bepresent in the system!), just as in the case described in the previous paragraph.
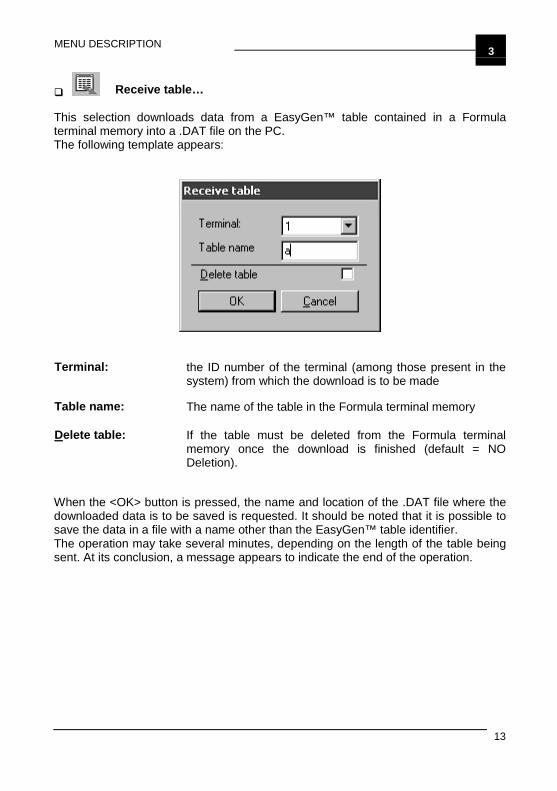
MENU DESCRIPTION 3
13
Receive table…
This selection downloads data from a EasyGen™ table contained in a Formulaterminal memory into a .DAT file on the PC.The following template appears:
Terminal: the ID number of the terminal (among those present in thesystem) from which the download is to be made
Table name: The name of the table in the Formula terminal memory
Delete table: If the table must be deleted from the Formula terminalmemory once the download is finished (default = NODeletion).
When the <OK> button is pressed, the name and location of the .DAT file where thedownloaded data is to be saved is requested. It should be noted that it is possible tosave the data in a file with a name other than the EasyGen™ table identifier.The operation may take several minutes, depending on the length of the table beingsent. At its conclusion, a message appears to indicate the end of the operation.
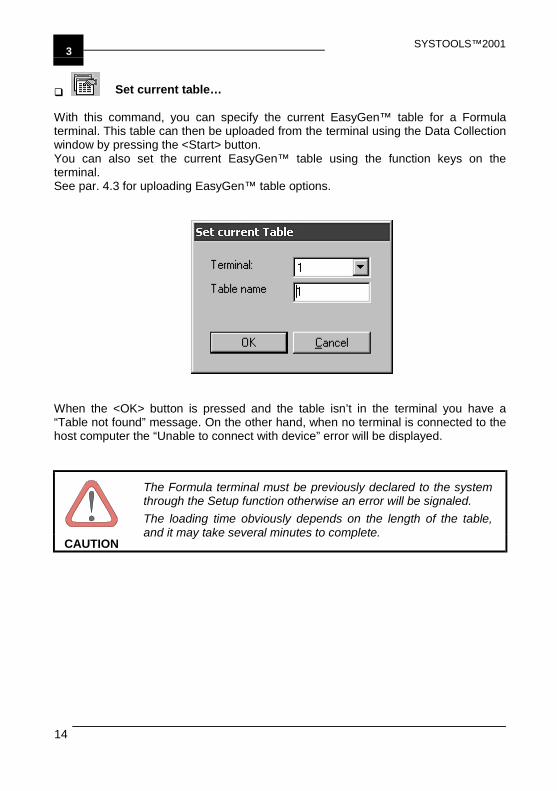
SYSTOOLS™20013
14
Set current table…
With this command, you can specify the current EasyGen™ table for a Formulaterminal. This table can then be uploaded from the terminal using the Data Collectionwindow by pressing the <Start> button.You can also set the current EasyGen™ table using the function keys on theterminal.See par. 4.3 for uploading EasyGen™ table options.
When the <OK> button is pressed and the table isn’t in the terminal you have a“Table not found” message. On the other hand, when no terminal is connected to thehost computer the “Unable to connect with device” error will be displayed.
CAUTION
The Formula terminal must be previously declared to the systemthrough the Setup function otherwise an error will be signaled.The loading time obviously depends on the length of the table,and it may take several minutes to complete.
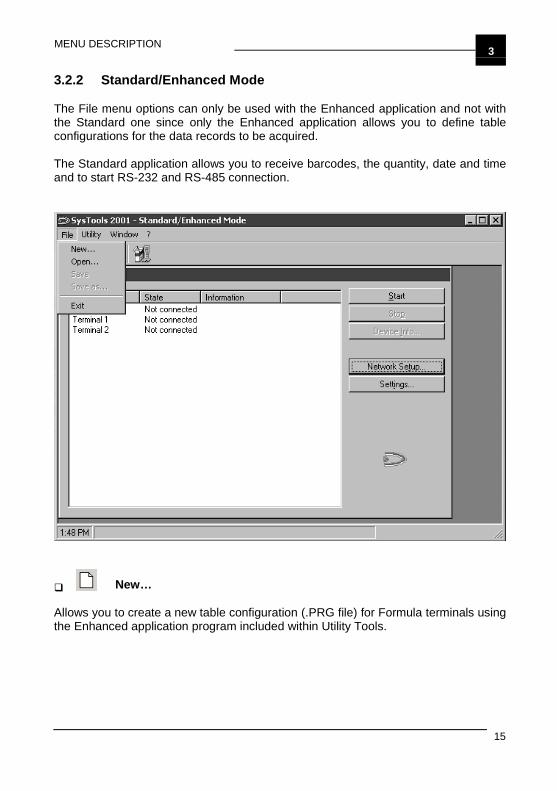
MENU DESCRIPTION 3
15
3.2.2 Standard/Enhanced Mode
The File menu options can only be used with the Enhanced application and not withthe Standard one since only the Enhanced application allows you to define tableconfigurations for the data records to be acquired.
The Standard application allows you to receive barcodes, the quantity, date and timeand to start RS-232 and RS-485 connection.
New…
Allows you to create a new table configuration (.PRG file) for Formula terminals usingthe Enhanced application program included within Utility Tools.
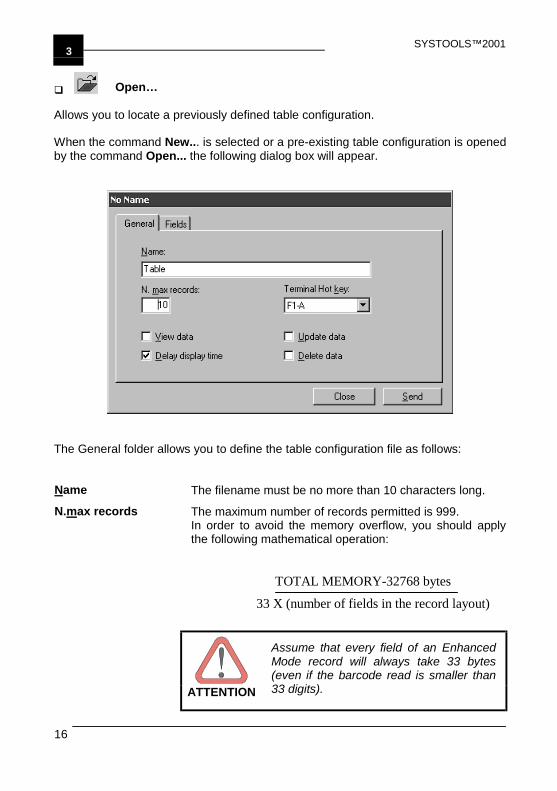
SYSTOOLS™20013
16
Open…
Allows you to locate a previously defined table configuration.
When the command New... is selected or a pre-existing table configuration is openedby the command Open... the following dialog box will appear.
The General folder allows you to define the table configuration file as follows:
Name The filename must be no more than 10 characters long.
N.max records The maximum number of records permitted is 999.In order to avoid the memory overflow, you should applythe following mathematical operation:
TOTAL MEMORY-32768 bytes
33 X (number of fields in the record layout)
ATTENTION
Assume that every field of an EnhancedMode record will always take 33 bytes(even if the barcode read is smaller than33 digits).

MENU DESCRIPTION 3
17
EXAMPLE
For a terminal with 128 Kbyte memory size, a tableconfiguration (.PRG file) is defined declaring 5 fields foreach record. To calculate the maximum number of recordsemploying the entire memory:
131072 – 32768 bytes33 X 5 = 595
The maximum number of records is 595.Using this example, if another table configuration file isdefined (also having 5 fields per record), then each tablecould contain 297 records.If a number of records smaller than the maximum value isdeclared, there will be a part of memory free.
Terminal Hot key Enables the recognition of up to 8 different tableconfigurations identified by letters from A to H. They areaccessible on the same terminal by using its function keys.
View Data If enabled, the terminal activates the arrow buttons to scrollthrough the data present in the terminal memory.
Delay display time If enabled, this delays the display of received data to theterminal screen by using the appropriate bar codes in the“Menu & Commands Booklet”.
Update data If enabled, this allows data present in the terminal memoryto be altered by using the appropriate bar codes in the“Menu & Commands Booklet”.
Delete data If enabled, this allows data present in the terminal memoryto be cancelled by using the appropriate bar codes in the“Menu & Commands Booklet”.

SYSTOOLS™20013
18
The Fields folder (see below) allows you to define the specifications of every fieldmaking up the record transmitted from the terminals. This record should be no morethan 256 characters long.
Number number given to current field and total field number.
buttons allow you to scroll the list of fields forward andback.
Enable you to update the list of fields.
Name The name of each field must be no more than 10characters long.
Type Allows you to choose what data should be inserted into thefield.Normal: generally used for fields containing data (codes,prices, goods location…);
Time: the time configured on the terminal is inserted;
Date: the date configured on the terminal is inserted;
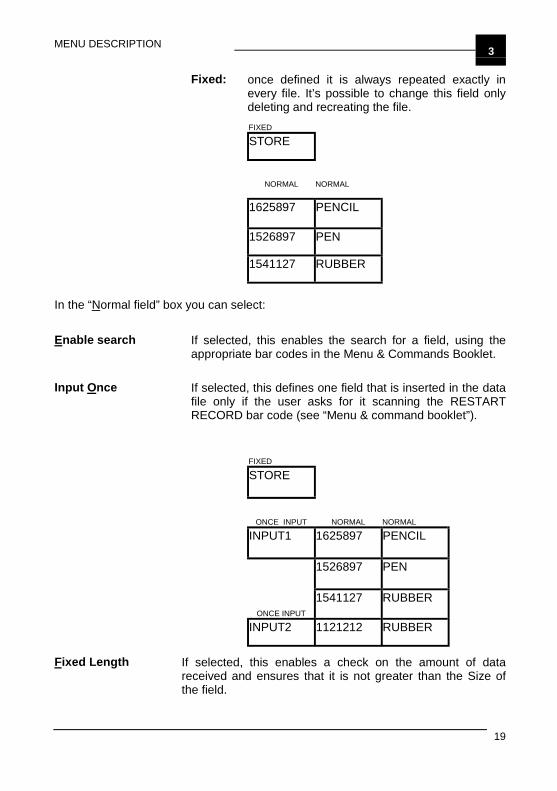
MENU DESCRIPTION 3
19
Fixed: once defined it is always repeated exactly inevery file. It’s possible to change this field onlydeleting and recreating the file.FIXED
STORE
NORMAL NORMAL
1625897 PENCIL
1526897 PEN
1541127 RUBBER
In the “Normal field” box you can select:
Enable search If selected, this enables the search for a field, using theappropriate bar codes in the Menu & Commands Booklet.
If selected, this defines one field that is inserted in the datafile only if the user asks for it scanning the RESTARTRECORD bar code (see “Menu & command booklet”).
FIXED
STORE
ONCE INPUT NORMAL NORMAL
INPUT1 1625897 PENCIL
1526897 PEN
ONCE INPUT
1541127 RUBBER
Input Once
INPUT2 1121212 RUBBER
Fixed Length If selected, this enables a check on the amount of datareceived and ensures that it is not greater than the Size ofthe field.
SYSTOOLS™20013
20
Max len. Defines the maximum length of the field.
Verify Characters If this is selected, it enables a check on the type ofcharacters the received data is composed of, also checkingthat these characters are within the defined limits (0 to 9 fornumerical digits and A to Z for alphabetical characters).
Allows you to send the file created in this dialog box to theterminal
Allows you to exit the dialog box and save the changedvalues.
ATTENTION
Before sending the file, ensure the terminal has already beenconfigured and that the Enhanced Mode application programhas been loaded.
ATTENTION
Sending a new table configuration, automatically cancels datapresent in the terminal memory
Save…
Is enabled when you save a new table configuration, or alterations to a pre-existingone, onto the hard disk.
Save as...
Is enabled when you save a pre-existing table configuration onto the hard disk undera different name.
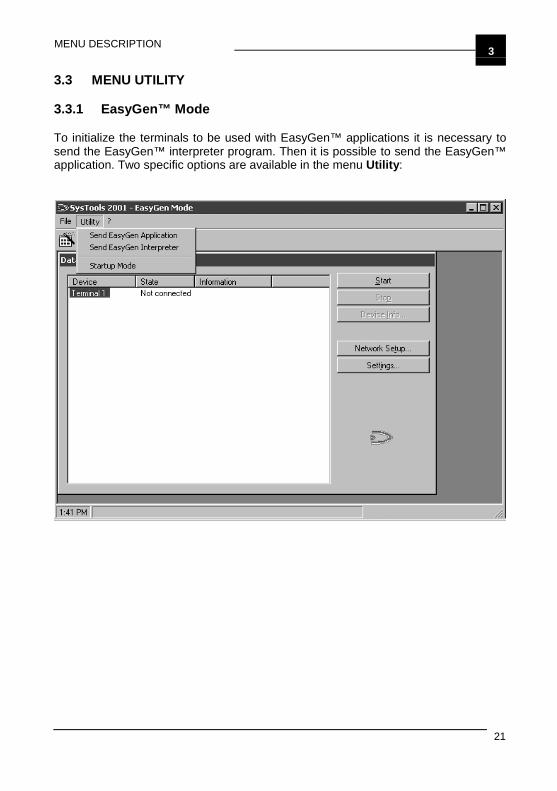
MENU DESCRIPTION 3
21
3.3 MENU UTILITY
3.3.1 EasyGen™ Mode
To initialize the terminals to be used with EasyGen™ applications it is necessary tosend the EasyGen™ interpreter program. Then it is possible to send the EasyGen™application. Two specific options are available in the menu Utility:
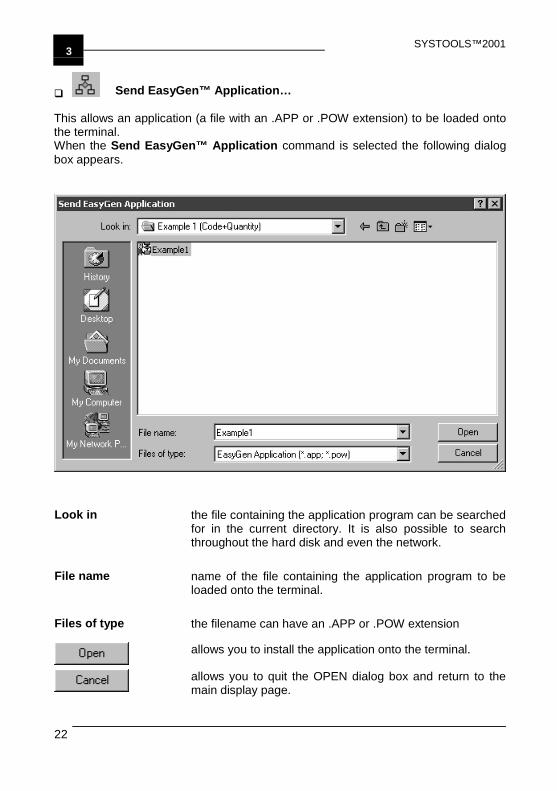
SYSTOOLS™20013
22
Send EasyGen™ Application…
This allows an application (a file with an .APP or .POW extension) to be loaded ontothe terminal.When the Send EasyGen™ Application command is selected the following dialogbox appears.
Look in the file containing the application program can be searchedfor in the current directory. It is also possible to searchthroughout the hard disk and even the network.
File name name of the file containing the application program to beloaded onto the terminal.
Files of type the filename can have an .APP or .POW extension
allows you to install the application onto the terminal.
allows you to quit the OPEN dialog box and return to themain display page.

MENU DESCRIPTION 3
23
Send EasyGen™ Interpreter
This allows an interpreter program (a file with a .HEX or H00 extension) to be loadedonto the terminal.When the Send EasyGen™ Interpreter command is selected the following dialogbox appears.
Look in The file containing the application program can besearched for in the current directory. It is also possible tosearch throughout the hard disk and even the network.
File name Name of the file containing the application program to beloaded onto the terminal.
Files of type The filename has a .HEX extension or a .H00 extension.The latter refers to the files of terminals with extendedmemory (i. e.: H01, H02, etc.) which are automatically setby choosing one of them.
allows you to install the interpreter onto the terminal.
allows you to quit the OPEN dialog box and return to themain display page.

SYSTOOLS™20013
24
3.3.2 Standard/Enhanced Mode
Standard and Enhanced mode allows just one option to initiate the terminals to beused with their respective applications.
ATTENTION
Before proceeding with this phase, ensure that the terminal tobe initialized is the only one accessible in the network and hasbeen configured with the default values.
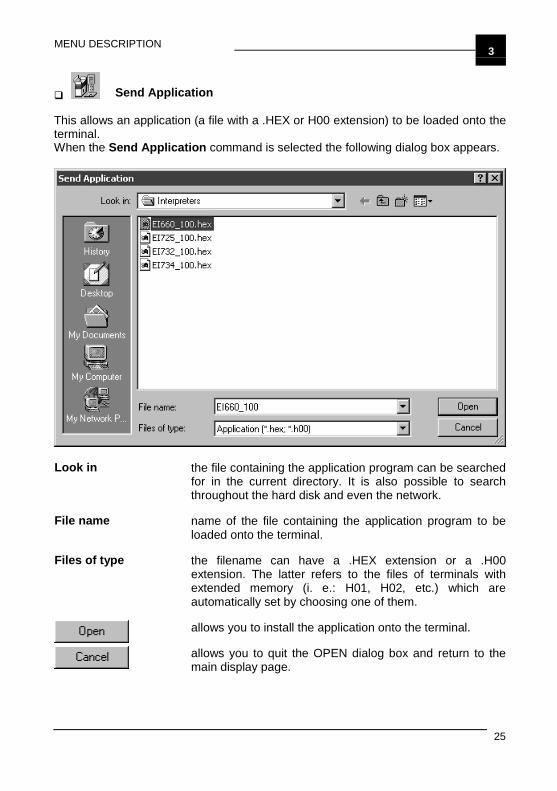
MENU DESCRIPTION 3
25
Send Application
This allows an application (a file with a .HEX or H00 extension) to be loaded onto theterminal.When the Send Application command is selected the following dialog box appears.
Look in the file containing the application program can be searchedfor in the current directory. It is also possible to searchthroughout the hard disk and even the network.
File name name of the file containing the application program to beloaded onto the terminal.
Files of type the filename can have a .HEX extension or a .H00extension. The latter refers to the files of terminals withextended memory (i. e.: H01, H02, etc.) which areautomatically set by choosing one of them.
allows you to install the application onto the terminal.
allows you to quit the OPEN dialog box and return to themain display page.
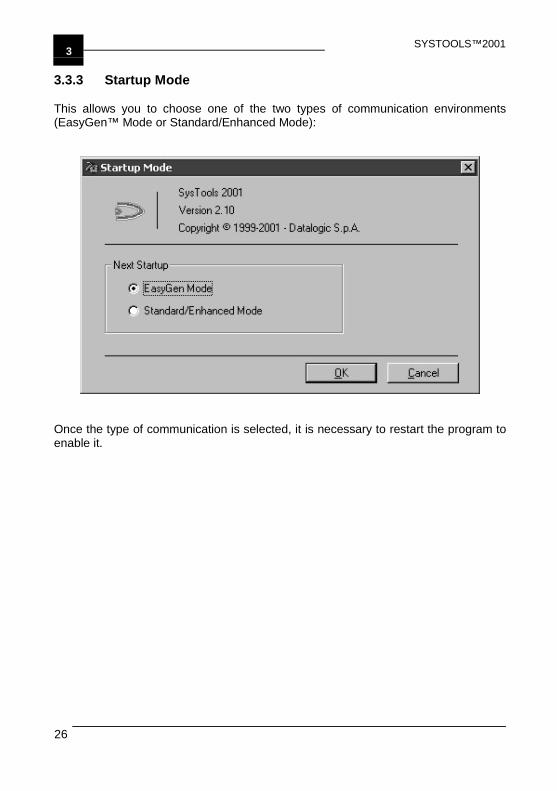
SYSTOOLS™20013
26
3.3.3 Startup Mode
This allows you to choose one of the two types of communication environments(EasyGen™ Mode or Standard/Enhanced Mode):
Once the type of communication is selected, it is necessary to restart the program toenable it.
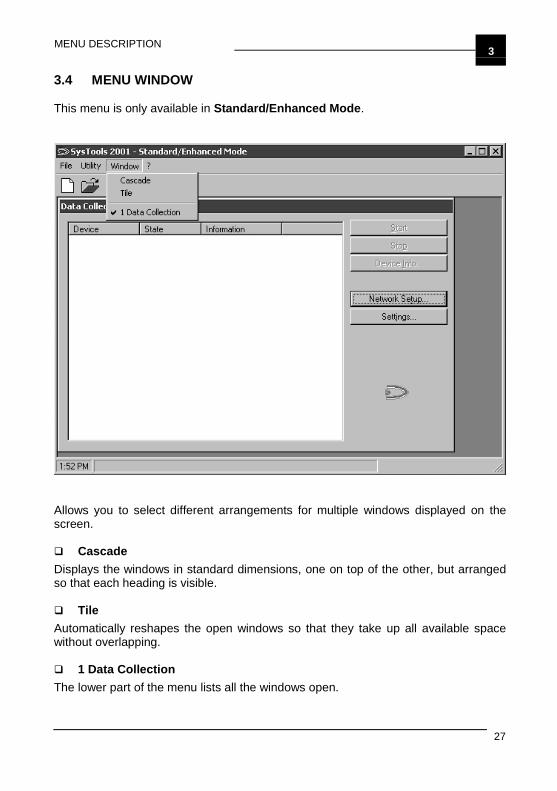
MENU DESCRIPTION 3
27
3.4 MENU WINDOW
This menu is only available in Standard/Enhanced Mode.
Allows you to select different arrangements for multiple windows displayed on thescreen.
CascadeDisplays the windows in standard dimensions, one on top of the other, but arrangedso that each heading is visible.
TileAutomatically reshapes the open windows so that they take up all available spacewithout overlapping.
1 Data CollectionThe lower part of the menu lists all the windows open.
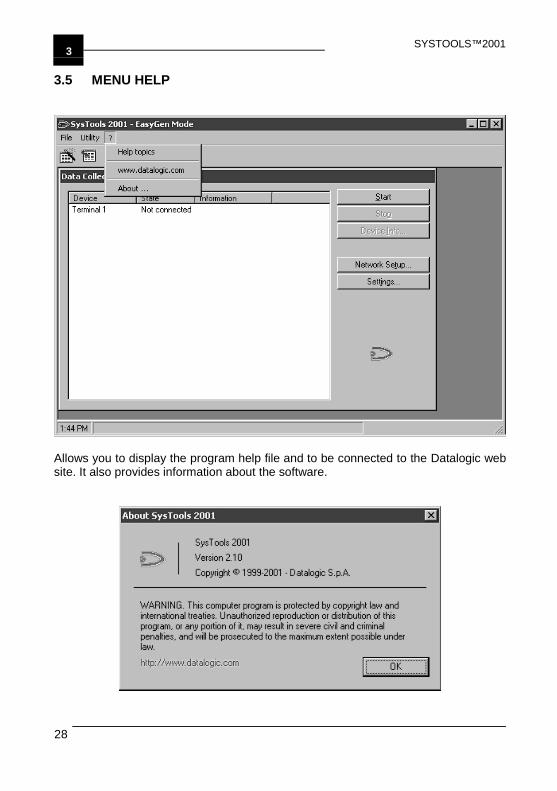
SYSTOOLS™20013
28
3.5 MENU HELP
Allows you to display the program help file and to be connected to the Datalogic website. It also provides information about the software.
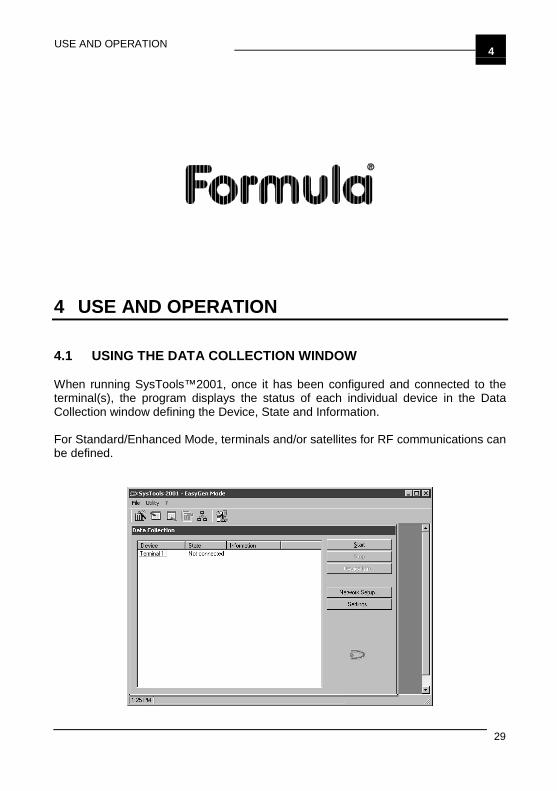
USE AND OPERATION 4
29
4 USE AND OPERATION
4.1 USING THE DATA COLLECTION WINDOW
When running SysTools™2001, once it has been configured and connected to theterminal(s), the program displays the status of each individual device in the DataCollection window defining the Device, State and Information.
For Standard/Enhanced Mode, terminals and/or satellites for RF communications canbe defined.
SYSTOOLS™20014
30
By selecting a column heading (Device, State, Information) the list is alphabeticallyreordered.
DeviceIndicates the device name.
StateIndicates the operating status between device and the host computer.Possible messages are:
Connected indicates that the satellite is connected and operating, orthat the terminal is inserted in the cradle.
Not connected indicates that the satellite is either disconnected from thenetwork or cut off from the power source, or that theterminal is not inserted in its own cradle.
Busy indicates that the device and the host computer areexchanging data.
Error indicates a malfunction.Check the device’s physical connections and retry. If theerror message persists, contact the Datalogic technicalassistance service or the supplier.
Information
Indicates the specific type of terminal or satellite configured and the version of thefirmware.
begins transmission with all the devices on which pollinghas been enabled (downloading of data onto the hostcomputer). To activate the polling of one device, see par.4.2.1 under "Terminal Properties" and "SatelliteProperties".
allows you to end transmission between host computer anddevices, which has been previously started by pressing theStart button.
supplies information on the configuration values for theterminals selected as well as permitting the date and timeto be programmed.
USE AND OPERATION 4
31
allows you to configure the transmission parameters (seepar. 4.2).
allows you to select the options for data collection (see par.4.3)
4.2 NETWORK SETUP
SysTools™2001 is able to manage up to 99 terminals and 99 satellitessimultaneously since they have different identifying number systems (StationAddresses).
This identifying number can be assigned by programming through serial connectionby SysTools™2001 itself (On-Line configuration), or by scanning the appropriate barcodes in the “Menu & Commands Booklet” (Off-Line configuration).
By following these specifications the program allows definition of differenttransmission parameters for each device needing to communicate with the hostcomputer.
The configuration process is started by pressing the Network Setup… button in theData Collection window.
SYSTOOLS™20014
32
4.2.1 On-Line Configuration
NOTE
Before starting the configuration, the Formula terminal must beinitialized to the default parameters (scan the RETURN TODEFAULT PARAMETERS barcode) and must be inserted in thecradle.
The configuration process is started by pressing the Network Setup...button in theData Collection window.
The window Formula Control Properties presents three folders:
General Properties: allows you to define the transmission parameters betweenhost computer and devices that must be used in the nextcommunications.
Terminals Properties: allows you to define the networked terminals and theirtransmission mode.
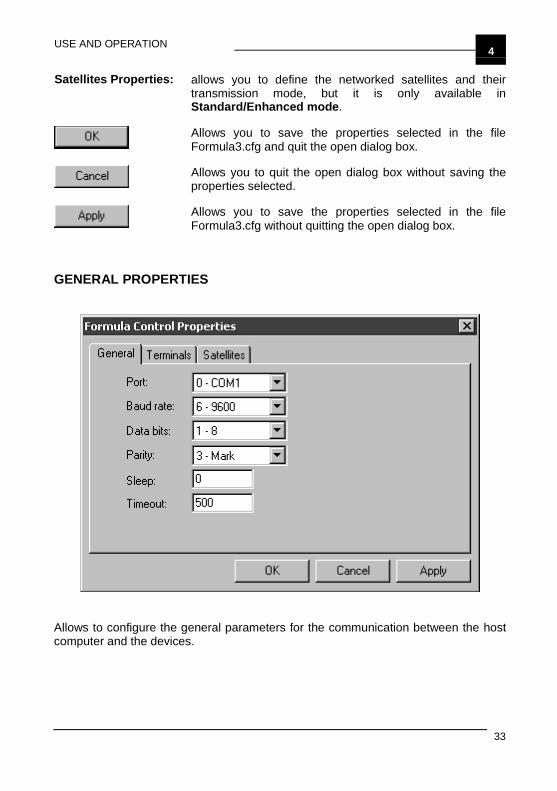
USE AND OPERATION 4
33
Satellites Properties: allows you to define the networked satellites and theirtransmission mode, but it is only available inStandard/Enhanced mode.
Allows you to save the properties selected in the fileFormula3.cfg and quit the open dialog box.
Allows you to quit the open dialog box without saving theproperties selected.
Allows you to save the properties selected in the fileFormula3.cfg without quitting the open dialog box.
GENERAL PROPERTIES
Allows to configure the general parameters for the communication between the hostcomputer and the devices.
SYSTOOLS™20014
34
PortHost serial port used to connect the terminals.
Baud RateTransmission speed between host computer and terminals.
Data bitsNumber of bits making up the transmitted data.
ParityType of control parity.
SleepThe waiting time (expressed in milliseconds) for communication between oneterminal and the next.A value of 0 ensures the fastest polling but slows down other programs considerably.You are therefore advised to insert a Sleep time of several hundredths of amillisecond.
TimeoutThis is the maximum waiting time for a reply from terminals or satellites, expressed inmilliseconds.The default value is 500 ms. Depending on the specifications of the equipment inuse, this value can be reduced to speed communication.
ATTENTION
When satellites are also being used, the choice of Baud Rateand Timeout is restricted to the values they can support. Theseare stated in the relevant documentation.
USE AND OPERATION 4
35
TERMINALS PROPERTIES
Allows you to define the networked terminals and their transmission mode.
IndexShows the terminal that the displayed data refer to.
buttons allow you to scroll the list of the networked terminals.
Enable you to update the list of programmed terminals.
ProtocolID Identifying number (from 1 to 99) given to each terminal.
beep Allows you to enable or disable the beep within the terminal.
polling Allows you to enable or disable the downloading of datafrom the terminal.
Tx sleep Allows you to define, in milliseconds, the transmission delaybetween host computer and terminal.Generally, the suggested value should not be altered.
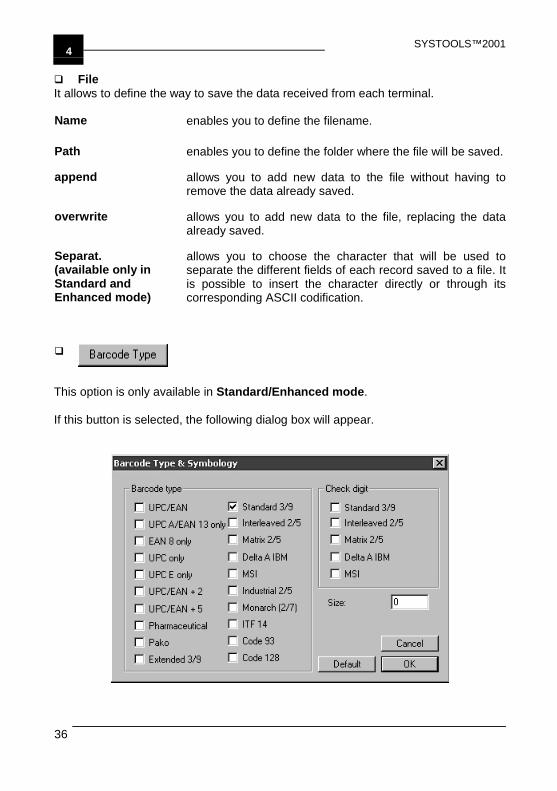
SYSTOOLS™20014
36
FileIt allows to define the way to save the data received from each terminal.
Name enables you to define the filename.
Path enables you to define the folder where the file will be saved.
append allows you to add new data to the file without having toremove the data already saved.
overwrite allows you to add new data to the file, replacing the dataalready saved.
Separat.(available only inStandard andEnhanced mode)
allows you to choose the character that will be used toseparate the different fields of each record saved to a file. Itis possible to insert the character directly or through itscorresponding ASCII codification.
This option is only available in Standard/Enhanced mode.
If this button is selected, the following dialog box will appear.
USE AND OPERATION 4
37
The Barcode Type & Symbology window allows you to define:
Barcode type types of codes used for receiving data.
Check digit only available for some types of code. It checks the correctreading of the code’s constituent characters.
Size limits the readable codes to their fixed dimensions.This limit is cancelled by the 0 value, thus allowing thereading of any code whose length comes within themaximum value of 32 characters.
allows you to return to the Terminals Properties windowwithout saving the options selected.
Saves the selected parameters and returns you to theTerminals Properties dialog box.
Reverts the parameters of this window to the default values.
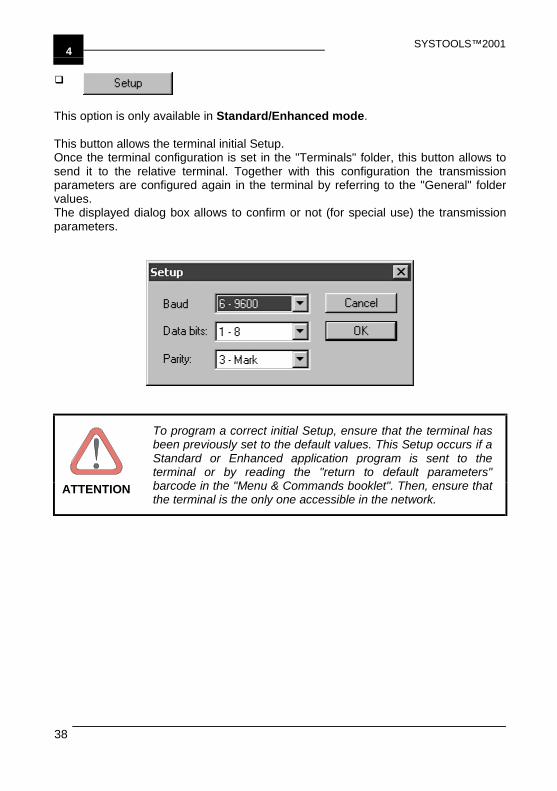
SYSTOOLS™20014
38
This option is only available in Standard/Enhanced mode.
This button allows the terminal initial Setup.Once the terminal configuration is set in the "Terminals" folder, this button allows tosend it to the relative terminal. Together with this configuration the transmissionparameters are configured again in the terminal by referring to the "General" foldervalues.The displayed dialog box allows to confirm or not (for special use) the transmissionparameters.
ATTENTION
To program a correct initial Setup, ensure that the terminal hasbeen previously set to the default values. This Setup occurs if aStandard or Enhanced application program is sent to theterminal or by reading the "return to default parameters"barcode in the "Menu & Commands booklet". Then, ensure thatthe terminal is the only one accessible in the network.
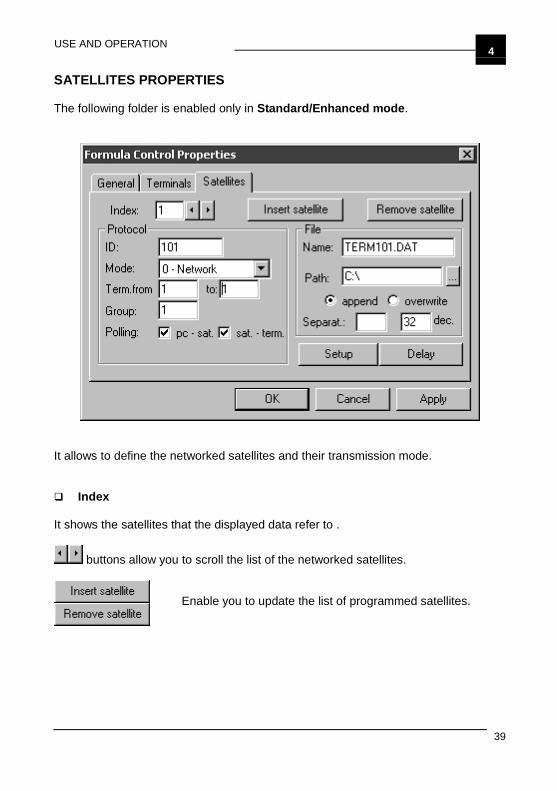
USE AND OPERATION 4
39
SATELLITES PROPERTIES
The following folder is enabled only in Standard/Enhanced mode.
It allows to define the networked satellites and their transmission mode.
Index
It shows the satellites that the displayed data refer to .
buttons allow you to scroll the list of the networked satellites.
Enable you to update the list of programmed satellites.

SYSTOOLS™20014
40
Protocol
ID Identifying number (from 101 to 199) given to each satellite.
Allows you to define the method of connection to thesystem:
0 - Network = RS-485 connection with Sysnetnetwork;
1 - Transmit Immediate = Single RS-232 connectionwithout the support of atransmission protocol;
2 - Test site survey = Reserved for the testingprocedure;
3 - Test echo = Reserved for the testingprocedure
Mode
4 - Test RSSI = Reserved for the testingprocedure.
Term. from... to is necessary to indicate the first and last identifying numberin the group of terminals managed by each satellite.If one terminal must transfer data within the coverage rangeof different satellites, its identifying number should beincluded in each group.
Group Numerical value from 1 to 6 which allows management ofdifferent satellites (communicating with the same terminal)to be distinguished, so that no problems arise in theoverlapping coverage zones.The polling operation requires the system to know whichsatellites share or not radio overlapping coverage zones. Toget this information it is necessary that the satellites aredivided into different groups. The satellites of each groupmust not share overlapping coverage and communicate withthe same terminals at the same time.This procedure allows the different groups to be activatedalternatively, so that they never contain two satellites pollingthe same terminal at the same time. Furthermore, by givingthe same group number to satellites communicating withdifferent terminals, the connection can take placesimultaneously.
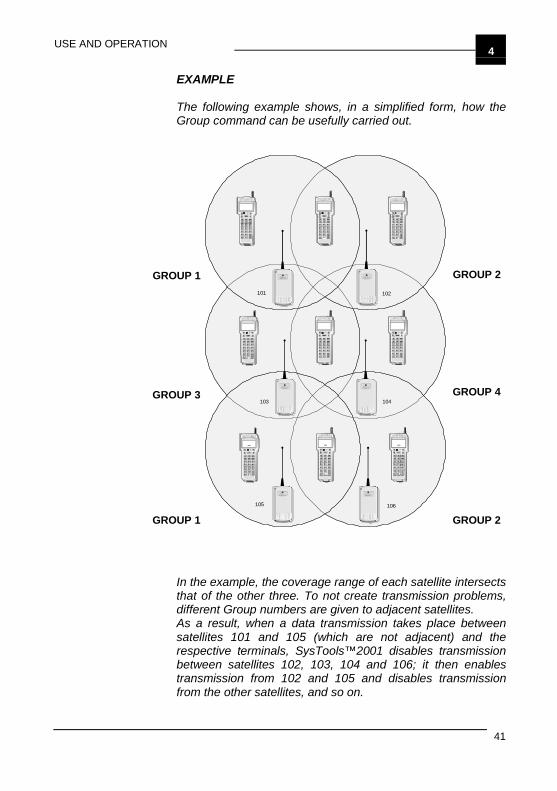
USE AND OPERATION 4
41
EXAMPLE
The following example shows, in a simplified form, how theGroup command can be usefully carried out.
F1 F2 ESC
7 8 9ABC DEF GHI
4 5 6JKL MNO PQR
1 2 3STU VWX YZ*
¥ 0,;? $%:
B S SP
F3 F4 SHIFT
ENTER
SCAN
F1 F2 ESC
7 8 9ABC DEF GHI
4 5 6JKL MNO PQR
1 2 3STU VWX YZ*
¥ 0,;? $%:
BS S P
F3 F4 SHIFT
ENTER
SCAN
F1 F2 ESC
7 8 9ABC DEF GHI
4 5 6JKL MNO PQR
1 2 3STU VWX YZ*
¥ 0,;? $%:
B S SP
F3 F4 SHIFT
ENTER
SCAN
F1 F2 ESC
7 8 9ABC DEF GHI
4 5 6JKL MNO PQR
1 2 3STU VWX YZ*
¥ 0,;? $%:
BS S P
F3 F4 SHIFT
ENTER
SCAN
F1 F2 ESC
7 8 9ABC DEF GHI
4 5 6JKL MNO PQR
1 2 3STU VWX YZ*
¥ 0,;? $%:
B S S P
F3 F4 SHIFT
ENTER
SCAN
F1 F2 ESC
7 8 9ABC DEF GHI
4 5 6JKL MNO PQR
1 2 3STU VWX YZ*
¥ 0,;? $%:
B S SP
F3 F4 SHIFT
ENTER
SCAN
F1 F2 ESC
7 8 9ABC DEF GHI
4 5 6JKL MNO PQR
1 2 3STU VWX YZ*
¥ 0,;? $%:
BS S P
F3 F4 SHIFT
ENTER
SCAN
F1 F2 ESC
7 8 9ABC DEF GHI
4 5 6JKL MNO PQR
1 2 3STU VWX YZ*
¥ 0, ;? $%:
BS SP
F3 F4 SHIFT
ENTER
SCAN
F1 F2 ESC
7 8 9ABC DEF GHI
4 5 6JKL MNO PQR
1 2 3STU VWX YZ*
¥ 0,;? $%:
BS S P
F3 F4 SHIFT
ENTER
SCAN
SATELLITE RFFo rm u la
SATELLITE RFFo rm u la
SATELLITE RFFo rm u la
SATELLITE RFFo rm u la
SATELLITE RFFo rm u la
SATELLITE RFFo rm u la
101 102
103 104
105 106
GROUP 1 GROUP 2
GROUP 3
GROUP 1
GROUP 4
GROUP 2
In the example, the coverage range of each satellite intersectsthat of the other three. To not create transmission problems,different Group numbers are given to adjacent satellites.As a result, when a data transmission takes place betweensatellites 101 and 105 (which are not adjacent) and therespective terminals, SysTools™2001 disables transmissionbetween satellites 102, 103, 104 and 106; it then enablestransmission from 102 and 105 and disables transmissionfrom the other satellites, and so on.
SYSTOOLS™20014
42
Polling Allows the satellites polling. To receive data, either thetransmission between the host computer and the satellite(pc - sat.) or between the satellite and terminals (sat. -term.) must be initiated.
File
It allows to define the way to save the data received through each satellite.
CAUTION
When the same satellite receives different data, it is not possibleto identify the terminal they have been sent from.
Name enables you to define the text filename.
Path enables you to define the folder where the file will be saved.
Append allows you to add new data to the file without having toremove the data already saved.
Overwrite allows you to add new data to the file, replacing the dataalready saved.
Separat. allows you to choose the character which will be used toseparate the different fields of each record saved to a file. Itis possible to insert the character directly or through itscorresponding ASCII codification.
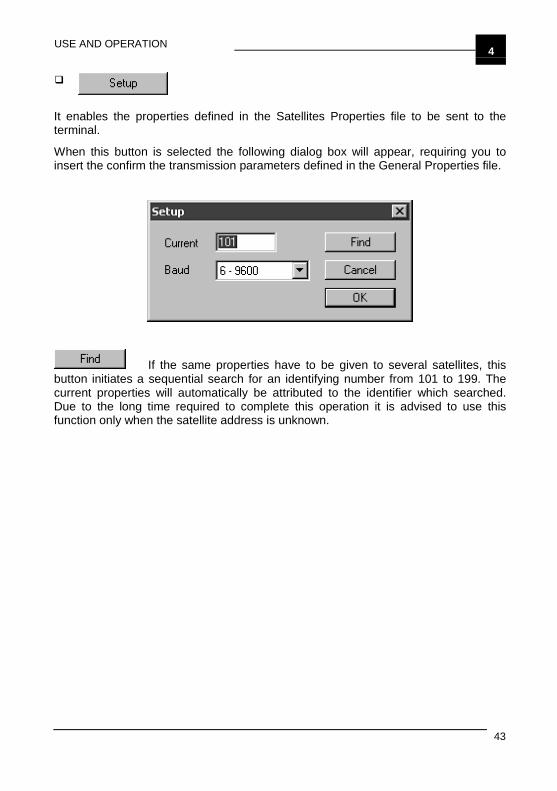
USE AND OPERATION 4
43
It enables the properties defined in the Satellites Properties file to be sent to theterminal.
When this button is selected the following dialog box will appear, requiring you toinsert the confirm the transmission parameters defined in the General Properties file.
If the same properties have to be given to several satellites, thisbutton initiates a sequential search for an identifying number from 101 to 199. Thecurrent properties will automatically be attributed to the identifier which searched.Due to the long time required to complete this operation it is advised to use thisfunction only when the satellite address is unknown.
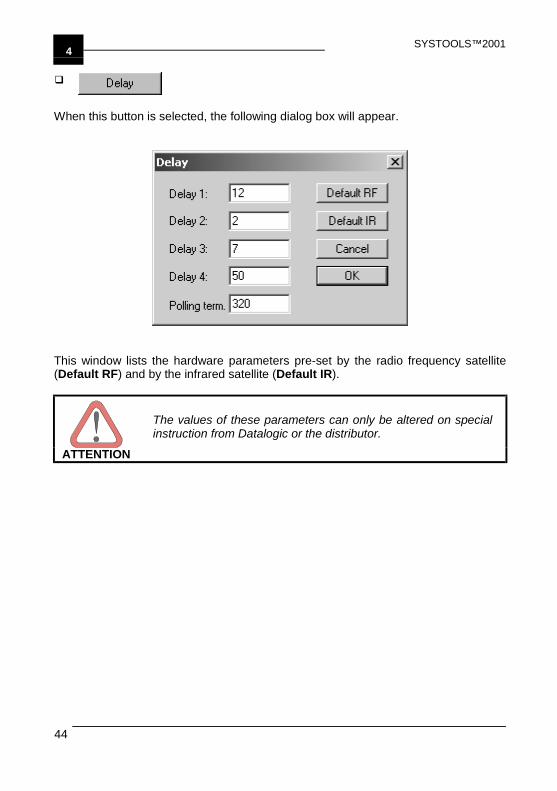
SYSTOOLS™20014
44
When this button is selected, the following dialog box will appear.
This window lists the hardware parameters pre-set by the radio frequency satellite(Default RF) and by the infrared satellite (Default IR).
ATTENTION
The values of these parameters can only be altered on specialinstruction from Datalogic or the distributor.
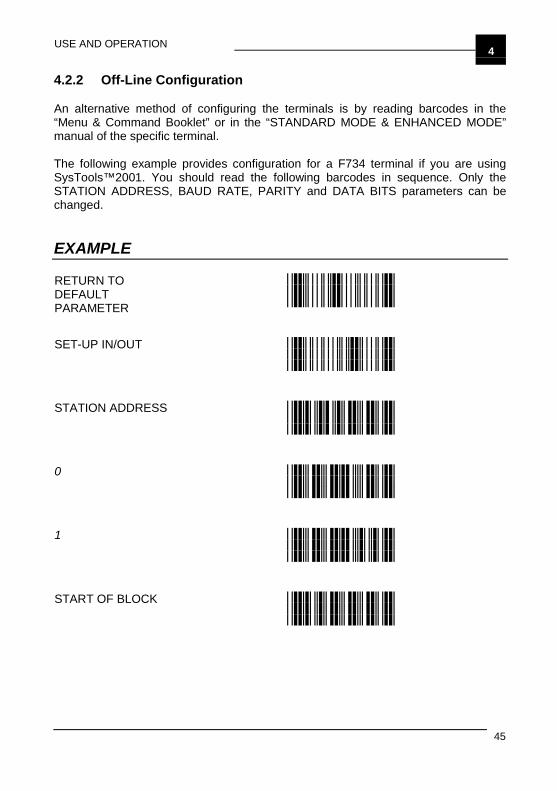
USE AND OPERATION 4
45
4.2.2 Off-Line Configuration
An alternative method of configuring the terminals is by reading barcodes in the“Menu & Command Booklet” or in the “STANDARD MODE & ENHANCED MODE”manual of the specific terminal.
The following example provides configuration for a F734 terminal if you are usingSysTools™2001. You should read the following barcodes in sequence. Only theSTATION ADDRESS, BAUD RATE, PARITY and DATA BITS parameters can bechanged.
EXAMPLE
RETURN TODEFAULTPARAMETER
SET-UP IN/OUT
STATION ADDRESS
0
1
START OF BLOCK
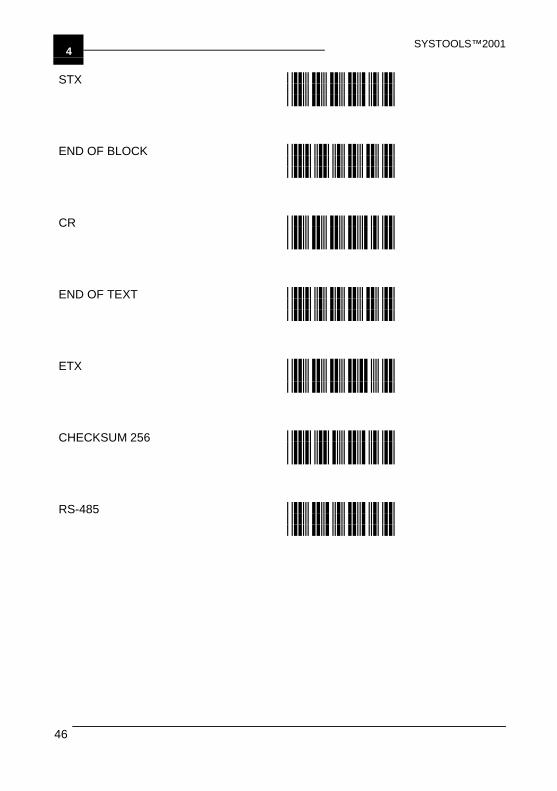
SYSTOOLS™20014
46
STX
END OF BLOCK
CR
END OF TEXT
ETX
CHECKSUM 256
RS-485
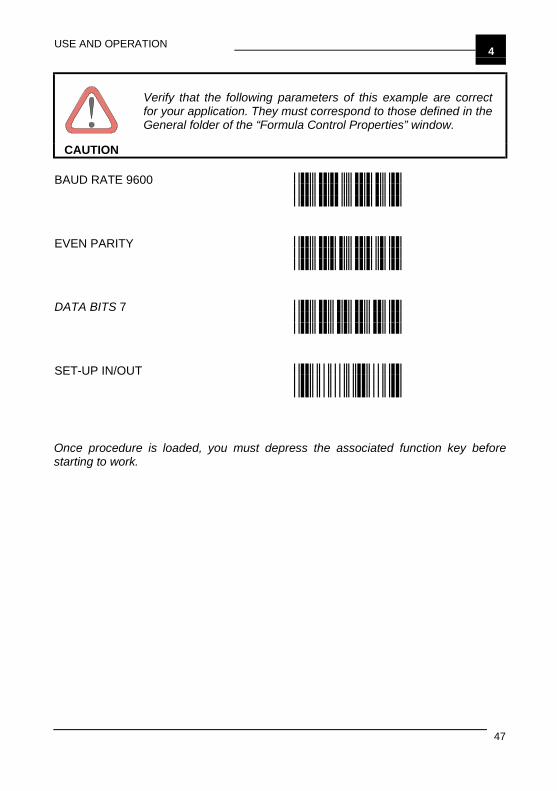
USE AND OPERATION 4
47
CAUTION
Verify that the following parameters of this example are correctfor your application. They must correspond to those defined in theGeneral folder of the “Formula Control Properties” window.
BAUD RATE 9600
EVEN PARITY
DATA BITS 7
SET-UP IN/OUT
Once procedure is loaded, you must depress the associated function key beforestarting to work.
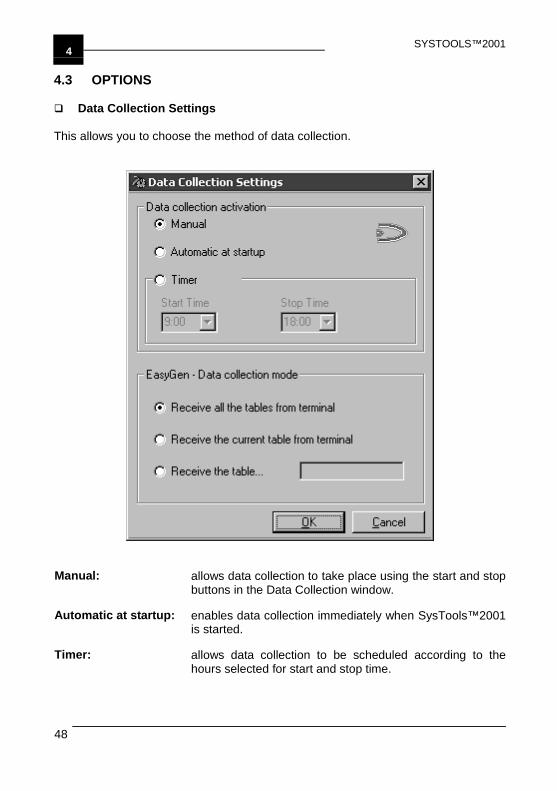
SYSTOOLS™20014
48
4.3 OPTIONS
Data Collection Settings
This allows you to choose the method of data collection.
Manual: allows data collection to take place using the start and stopbuttons in the Data Collection window.
Automatic at startup: enables data collection immediately when SysTools™2001is started.
Timer: allows data collection to be scheduled according to thehours selected for start and stop time.

USE AND OPERATION 4
49
For EasyGen™ Mode, the data table(s) to receive from the terminal can bepredefined.
Receive all the tablesfrom the terminal:
collects all the data tables specified in the EasyGen™application running on the terminal.
Receive the currenttable from terminal:
collects the active data table from the terminal withoutreference to its name. This selection activates the SetCurrent Table icon on the Toolbar and relative option in theFile menu. In this way SysTools™2001 can set the currenttable for a specific terminal for uploading its data to the PC
Receive the table…: allows a specifically named data table to be uploaded tothe PC.
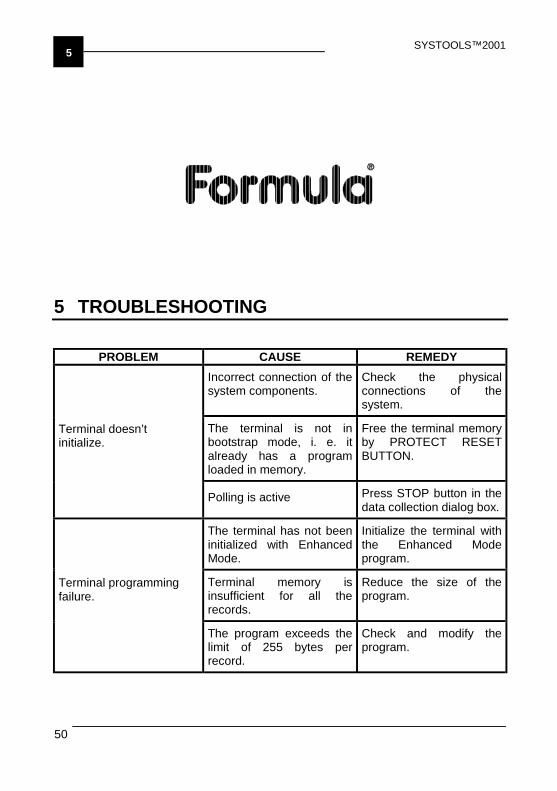
SYSTOOLS™20015
50
5 TROUBLESHOOTING
PROBLEM CAUSE REMEDYIncorrect connection of thesystem components.
Check the physicalconnections of thesystem.
The terminal is not inbootstrap mode, i. e. italready has a programloaded in memory.
Free the terminal memoryby PROTECT RESETBUTTON.
Terminal doesn’tinitialize.
Polling is active Press STOP button in thedata collection dialog box.
The terminal has not beeninitialized with EnhancedMode.
Initialize the terminal withthe Enhanced Modeprogram.
Terminal memory isinsufficient for all therecords.
Reduce the size of theprogram.
Terminal programmingfailure.
The program exceeds thelimit of 255 bytes perrecord.
Check and modify theprogram.
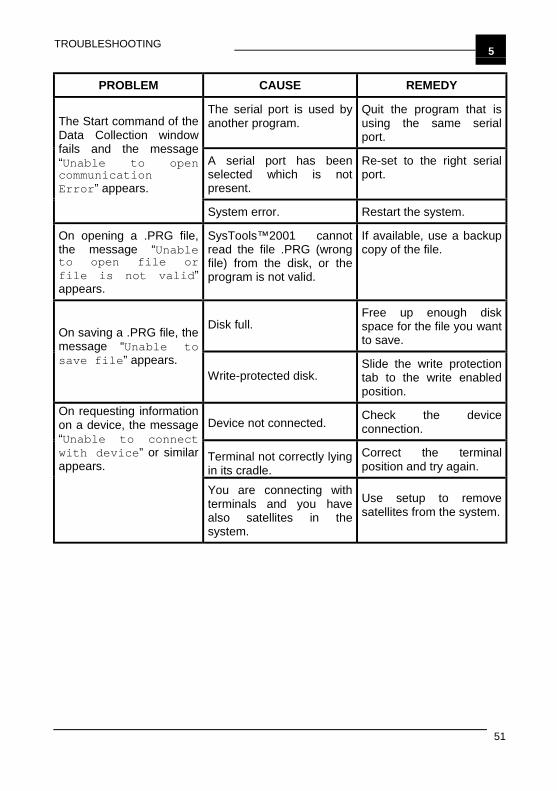
TROUBLESHOOTING 5
51
PROBLEM CAUSE REMEDY
The serial port is used byanother program.
Quit the program that isusing the same serialport.
A serial port has beenselected which is notpresent.
Re-set to the right serialport.
The Start command of theData Collection windowfails and the message“Unable to opencommunicationError” appears.
System error. Restart the system.
On opening a .PRG file,the message “Unableto open file orfile is not valid”appears.
SysTools™2001 cannotread the file .PRG (wrongfile) from the disk, or theprogram is not valid.
If available, use a backupcopy of the file.
Disk full.Free up enough diskspace for the file you wantto save.On saving a .PRG file, the
message “Unable tosave file” appears.
Write-protected disk.Slide the write protectiontab to the write enabledposition.
Device not connected. Check the deviceconnection.
Terminal not correctly lyingin its cradle.
Correct the terminalposition and try again.
On requesting informationon a device, the message“Unable to connectwith device” or similarappears.
You are connecting withterminals and you havealso satellites in thesystem.
Use setup to removesatellites from the system.