Embed Size (px)
Citation preview
1
Couvertures de sécurité à barres Safety cover with bars / Sicherheitsabdeckung
WALU POOL
Typengeprüft nach
Norm NF P 90-308
DOCUMENT A CONSERVER SANS LIMITE DE TEMPS POUR UNE CONSULTATION ULTERIEURE / DOCUMENT TO BE RETAIN WITH NO TIME LIMIT FOR FUTURE CONSULTATION / FÜR EINE SPÄTERE BERATUNG IST DAS DOKUMENT FÜR EINE UNBEGRENZTE ZEIT ZU KONSERVIEREN
Notice d’installation Notice techniques :
- Notice d’utilisation- Notice d’entretien- Notice de maintenance
Conditions de garantie
Modèles :
ADVANTAGE
EVOLUTION
STARLIGHT
WALTER PISCINE S.A.S.1 rue du Bruch- F 67170 BRUMATH
Tel. +33 (0)3 90 29 51 00 - Fax. +33 (0)3 90 29 51 19www.walter-piscine.com • [email protected]
Installation instruction Technical instruction :
- Instructions- Care instructions- Maintenance instructions
Warranty terms
Installationsanleitung Technische Anleitung:
- Gebrauchsanleitung - Instandhaltung - Wartung
Garantiebedingungen
Compliant with
standard NF P 90-308Conforme à la norme
NF P 90-308
FR DEGB
FR
GB
DE
2
WALU POOL
Notice d’installation / Installation
1
2
3
5
4
Vous avez choisi WALU POOL pour protéger votre piscine, nous vous remercions de votre confiance.
You have chosen WALU POOL to protect your pool. We appreciate your confidence.
Sie haben sich zum Schutz ihres Swimming Pools für WALU POOL entschieden. Wir danken ihnen für ihr Vertrauen.
Conforme à la norme
NF P 90-308
Typengeprüft nach
Norm NF P 90-308
Compliant with
standard NF P 90-308
FR
DE
GB
3
instruction / Installationsanleitung
> Liste des éléments constitutifsde votre WALU POOL :
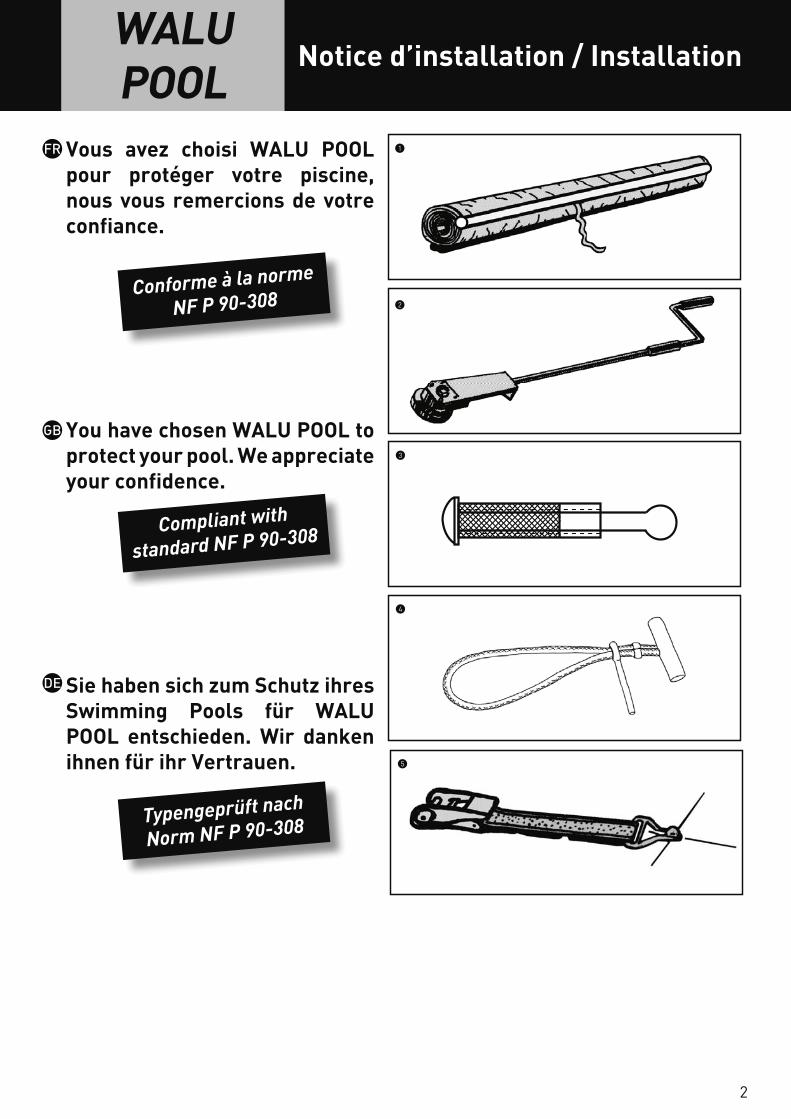
Une couverture déjà montée en usine et enrouléeUne ou deux manivelles selon les dimensions du bassin
Un sachet plastique contenant :Des pitons inox avec douille pour ancrage sur dallage (largeurs couverture)Des tendeurs cabiclics avec pitons pour les longueurs de la couverture*Cliquets de tension
• La présente notice*sur modèles EVOLUTION et STARLIGHT non équipés de l’option WINDSAFE (système anti-soulèvement sur les longueurs)
> Contrôle à la livraisonNous ne pouvons être tenus pour responsable des pertes ou dommages dus au transport. Nos marchandises sont vendues départ Brumath. Elles voyagent aux risques et périls du destinataire(Art. 100 Code de Commerce), même si le port est avancé par nous, pour votre compte.
A la livraison de votre commande :• Ouvrir le colis en présence du livreur, pour vérifier l’état de la marchandise et sa conformité.• Conserver l’emballage d’origine.
En cas de dégâts ou de manquants :• Formuler ses réserves sur le bordereau de transport. Exemple : colis éventré La seule mention “sous réserve de déballage” est nulle et non avenue.• Adresser au transporteur un courrier recommandé (avec demande d’avis de réception) posté dans les trois jours suivants la livraison. Ce courrier devra détailler précisément les dommages constatés.• En expédier une copie à la société WALTER pour information.• Si la marchandise a été acceptée “sous réserve”, celle-ci devra être conservée en l’état durant un délai minimum de 8 jours.
> Nécessaire d’installation• Matériel :- 1 perceuse à percussion (sans fil impératif)- 2 forets ø 10 mm et ø 7 mm (adaptés à votre sol)- 1 marteau- 1 mètre• Nombre de personnes : 2
> Poids moyen de la couverture WALU POOL• Modèle ADVANTAGE :1,150 kg/m2• Modèles EVOLUTION et STARLIGHT :1,250 kg/m2
> List of parts that make up yourWALU POOL:
A cover already factory assembledand rolled upOne or two handles dependingon the pool’s dimensions
A plastic packet containing:Stainless steel pegs with sockets for anchoringon pool surround (along cover width)Cabiclic tighteners with pegsfor cover lengths*Ratchet tighteners
• These instructions*EVOLUTION or STARLIGHTS covers without the option WINDSAFE SYSTEM (anti-uprising system on the lengths)
> Checks to be made on deliveryWe cannot be held liable for loss or damage during carriage. Our goods are sold ex works Brumath. Carriage is at the recipient’s risk (Art. 100 of the Commercial Code), even if carriage is arranged by us on your behalf.
On delivery of your order:• Open the parcel in the presence of the delivery driver in order to check the condition of the goods and that everything is correct.• Please retain the original packaging.
In case of damage or missing parts:• Note any loss or damage on the transport document. For example: parcel ripped open. Merely stating that there was a “problem with the packaging” is null and void.• Write to the transport company by registered mail posted within three days of the delivery. This letter should give a precise description of the damage suffered.• Send a copy of the letter to WALTERfor information.• If you accepted the goods “subject toreservations”, they should be retainedin that condition for a minimum periodof 8 days.
> Required for installation• Equipment:- 1 hammer drill (must be cordless).- 2 drills ø 10 mm and ø 7 mm. (suitable for your ground).- 1 hammer- 1 metering rule• Numbers of people : 2
> Average weight of the WALU POOL cover• ADVANTAGE model:1,150 kg/m2• EVOLUTION and STARLIGHT models:1,250 kg/m2
> Stückliste der WALU POOLAbdeckung
Eine werkseitig montierteund eingerollte AbdeckungEine oder zwei Handkurbelnje nach Beckengröße
Eines Kunststoffbeutel mit:Edelstahlstiften mit Hülse für die Verankerung in der Bodenplatte (Stirnseiten der Abdeckung)Cabiclic-Spannbänder mit Stiftenfür die Längsseiten der Abdeckung*Spannratschen
• Installationsanleitung* EVOLUTION und STARLIGHT ohne die Option WINDSAFE SYSTEM (integrierte Hebeschutz-Gurte an beiden Längsseiten)
> Kontrolle bei der LieferungWir haften nicht für transportbedingte Fehlmengen und Beschädigungen. Unsere Waren werden ab Werk Brumath verkauft. Sie werden auf Rechnung und Gefahr des Empfängers versandt (Art.100 desHandelsgesetzbuches), auch wenn die Frachtkosten von uns für Sie vorausbezahlt werden.
Bei der Lieferung des Materials:• Öffnen Sie die Verpackung in Anwesenheit des Lieferfahrers und überprüfen den Zustand.• Bewahren Sie die Originalverpackung auf.
Bei Beschädigungen oder Fehlmengen:• Melden Sie Vorbehalte auf dem Frachtbrief an. - Beispiel: Kolli auseinandergerissen. Der Vermerk “vorbehaltlich der Auspackung” allein ist null und nichtig.• Schicken Sie dem Spediteur einen eingeschriebenen Brief (mit Rückschein) binnen drei Tagen nach der Lieferung. In diesem Schreiben beschreiben Sie genau den festgestellten Schaden.• Senden Sie eine Kopie des Schreibens an die Firma WALTER zur Information.• Wurde die Ware “mit Vorbehalten” entgegen genommen, muss sie mindestens 8 Tage lang in dem Zustand. in dem sie angeliefert wurde, bleiben.
> Installationsmaterial• Material:- 1 Schlagbohrmaschine (unbedingt Kabellos)- 2 Bohrer ø 10 mm und ø 7 mm (geeignet für Ihre Bodenbeschaffenheit)- 1 Hammer- 1 Metermaß• Personenanzahl: 2
> Mittleres Gewicht der Abdeckung WALU POOL• Modell ADVANTAGE :1,150 kg/qm• Modell EVOLUTION und STARLIGHT :1,250 kg/qm
1
2
3
4
5
1
2
3
4
5
1
2
3
4
5
FR DEGB
4
WALU POOL
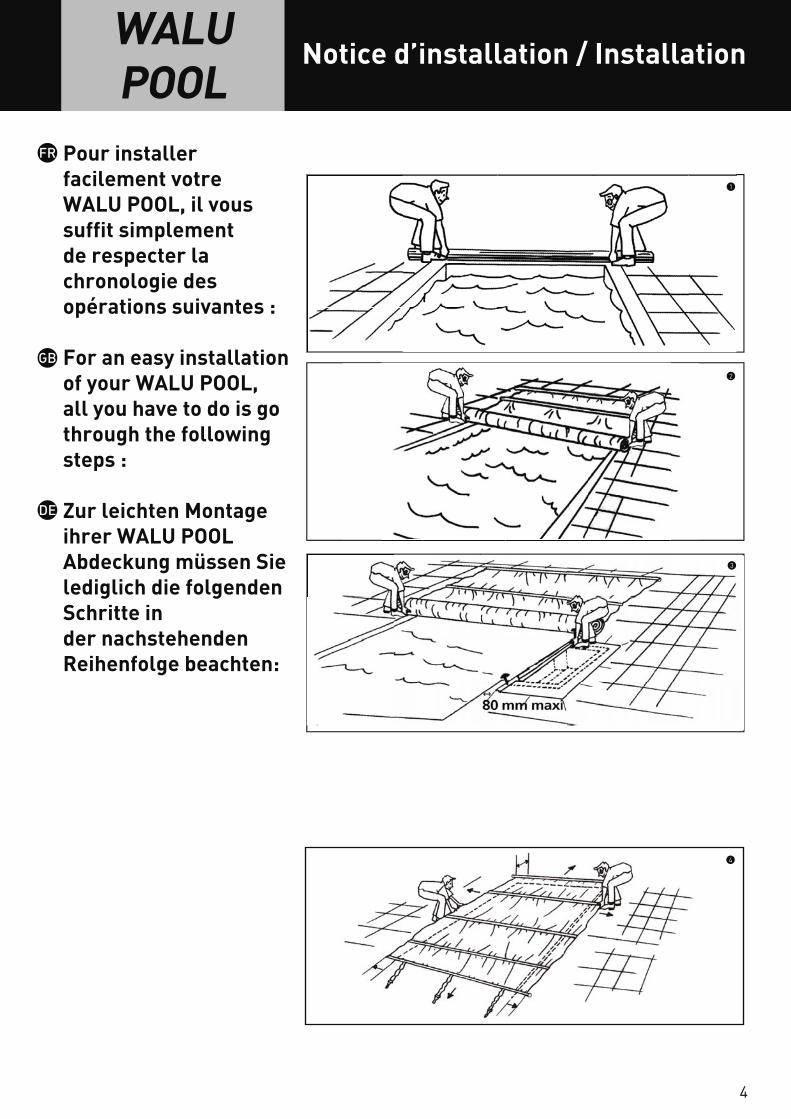
Pour installer facilement votre WALU POOL, il vous suffit simplement de respecter la chronologie des opérations suivantes :
For an easy installation of your WALU POOL, all you have to do is go through the following steps :
Zur leichten Montage ihrer WALU POOL Abdeckung müssen Sie lediglich die folgenden Schritte inder nachstehenden Reihenfolge beachten:
Notice d’installation / Installation
4
1
2
333
FR
DE
GB
5
Positionner la couverture au bout de la piscine du côté choisi pour son rangement (stockage).
Dérouler la couverture à deux personnes en se tenant de chaque côté de la piscine.Veillez à ce que la couverture se déroule correctement et ne tombe pas dans la piscine.
Remarque : pour les piscines avec un escalier sur la longueur, positionner l’ensemble profil de remplacement de margelle/bavette d’escalier selon schéma. Percer avec précision la margelle au droit des cavités pour pitons, situées sur les deux extrémités de la bavette (diamètre 10 mm) et enfiler les douilles dans le dallage. Placer ensuite les 2 pitons crochet dans leur emplacement afin de bloquer le profilé.
ATTENTION TRÈS IMPORTANT :Percer à une distance de 80 mm maxi. du bord intérieur bassin de la margelle. Pour la fixation et la tension de la bavette d’escalier sur le dallage au moyen des cliquets, se référer aux conseils du point 8, page suivante.
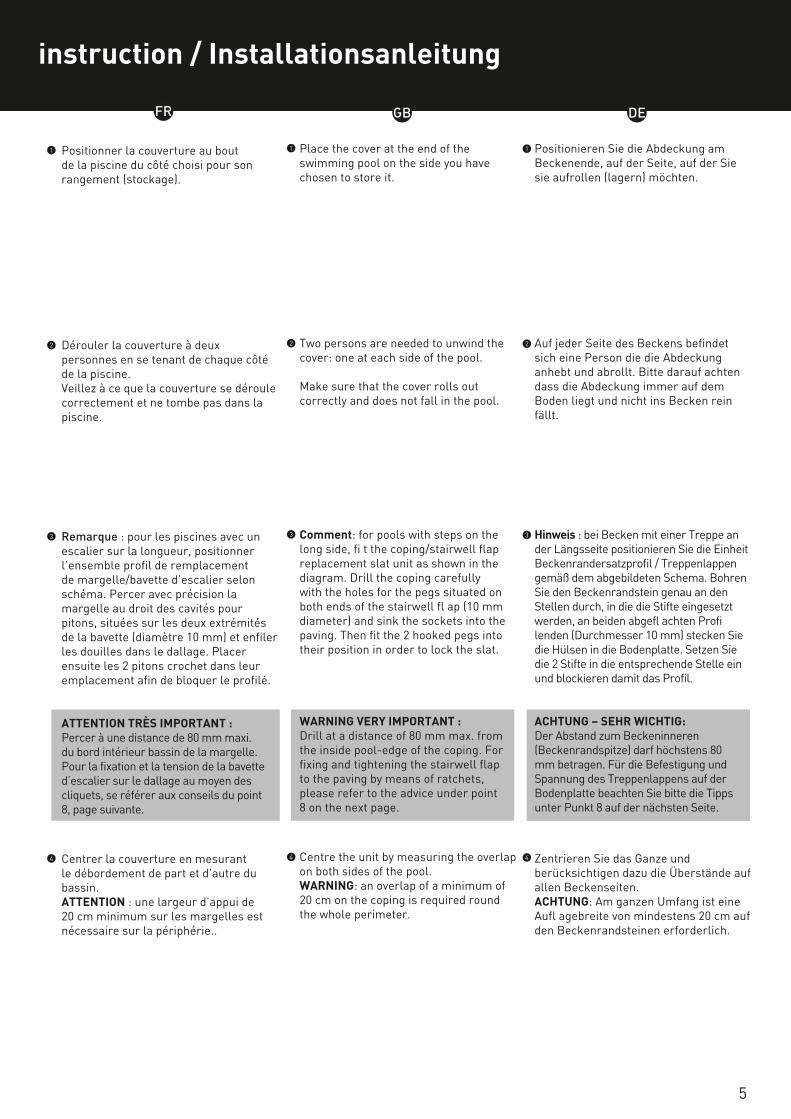
Centrer la couverture en mesurant le débordement de part et d’autre du bassin.ATTENTION : une largeur d’appui de 20 cm minimum sur les margelles est nécessaire sur la périphérie..
1
2
3
4
3
Place the cover at the end of the swimming pool on the side you have chosen to store it.
Two persons are needed to unwind the cover: one at each side of the pool.
Make sure that the cover rolls out correctly and does not fall in the pool.
Comment: for pools with steps on the long side, fi t the coping/stairwell flap replacement slat unit as shown in the diagram. Drill the coping carefully with the holes for the pegs situated on both ends of the stairwell fl ap (10 mm diameter) and sink the sockets into the paving. Then fit the 2 hooked pegs into their position in order to lock the slat.
WARNING VERY IMPORTANT :Drill at a distance of 80 mm max. from the inside pool-edge of the coping. For fixing and tightening the stairwell flap to the paving by means of ratchets, please refer to the advice under point 8 on the next page.
Centre the unit by measuring the overlapon both sides of the pool.WARNING: an overlap of a minimum of20 cm on the coping is required round the whole perimeter.
1
2
4
Positionieren Sie die Abdeckung am Beckenende, auf der Seite, auf der Sie sie aufrollen (lagern) möchten.
Auf jeder Seite des Beckens befindet sich eine Person die die Abdeckung anhebt und abrollt. Bitte darauf achten dass die Abdeckung immer auf dem Boden liegt und nicht ins Becken rein fällt.
Hinweis : bei Becken mit einer Treppe an der Längsseite positionieren Sie die Einheit Beckenrandersatzprofil / Treppenlappen gemäß dem abgebildeten Schema. Bohren Sie den Beckenrandstein genau an den Stellen durch, in die die Stifte eingesetzt werden, an beiden abgefl achten Profi lenden (Durchmesser 10 mm) stecken Sie die Hülsen in die Bodenplatte. Setzen Sie die 2 Stifte in die entsprechende Stelle ein und blockieren damit das Profil.
ACHTUNG – SEHR WICHTIG:Der Abstand zum Beckeninneren (Beckenrandspitze) darf höchstens 80 mm betragen. Für die Befestigung und Spannung des Treppenlappens auf der Bodenplatte beachten Sie bitte die Tipps unter Punkt 8 auf der nächsten Seite.
Zentrieren Sie das Ganze und berücksichtigen dazu die Überstände auf allen Beckenseiten.ACHTUNG: Am ganzen Umfang ist eineAufl agebreite von mindestens 20 cm aufden Beckenrandsteinen erforderlich.
3
1
2
4
instruction / Installationsanleitung
FR DEGB
6
Notice d’installation / InstallationWALU POOL
5
6
8
7
9
180 mm
Nota pour le modèle ADVANTAGE :Dans les régions venteuses, il est recommandé de rajouterun KIT VENT composé de sangles de maintien (en option).
IMPORTANT :Les pitons et pitons à douilles doivent être fixés sur un dallage solide et dans le strict respect des conseils de pose.
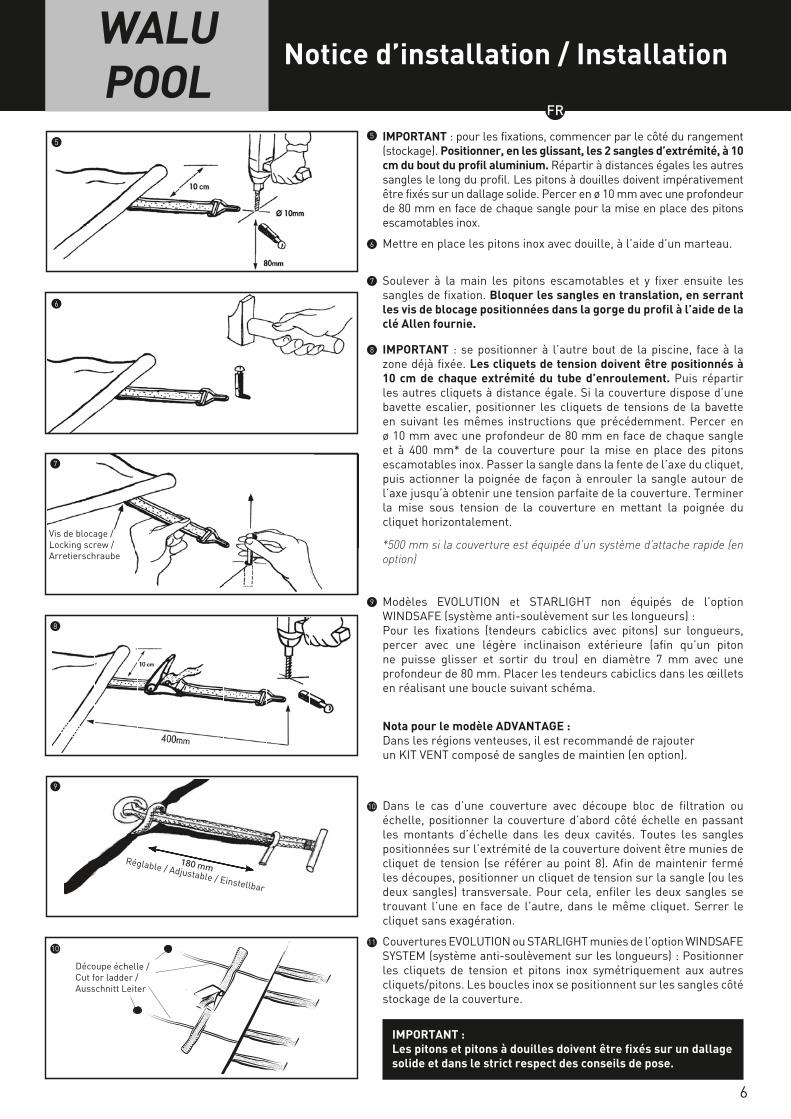
IMPORTANT : pour les fixations, commencer par le côté du rangement (stockage). Positionner, en les glissant, les 2 sangles d’extrémité, à 10 cm du bout du profil aluminium. Répartir à distances égales les autres sangles le long du profil. Les pitons à douilles doivent impérativement être fixés sur un dallage solide. Percer en ø 10 mm avec une profondeur de 80 mm en face de chaque sangle pour la mise en place des pitons escamotables inox.
5
Mettre en place les pitons inox avec douille, à l’aide d’un marteau.6
Soulever à la main les pitons escamotables et y fixer ensuite les sangles de fixation. Bloquer les sangles en translation, en serrant les vis de blocage positionnées dans la gorge du profil à l’aide de la clé Allen fournie.
7
*500 mm si la couverture est équipée d’un système d’attache rapide (en option)
IMPORTANT : se positionner à l’autre bout de la piscine, face à la zone déjà fixée. Les cliquets de tension doivent être positionnés à 10 cm de chaque extrémité du tube d’enroulement. Puis répartir les autres cliquets à distance égale. Si la couverture dispose d’une bavette escalier, positionner les cliquets de tensions de la bavette en suivant les mêmes instructions que précédemment. Percer en ø 10 mm avec une profondeur de 80 mm en face de chaque sangle et à 400 mm* de la couverture pour la mise en place des pitons escamotables inox. Passer la sangle dans la fente de l’axe du cliquet, puis actionner la poignée de façon à enrouler la sangle autour de l’axe jusqu’à obtenir une tension parfaite de la couverture. Terminer la mise sous tension de la couverture en mettant la poignée du cliquet horizontalement.
8
Dans le cas d’une couverture avec découpe bloc de filtration ou échelle, positionner la couverture d’abord côté échelle en passant les montants d’échelle dans les deux cavités. Toutes les sangles positionnées sur l’extrémité de la couverture doivent être munies de cliquet de tension (se référer au point 8). Afin de maintenir fermé les découpes, positionner un cliquet de tension sur la sangle (ou les deux sangles) transversale. Pour cela, enfiler les deux sangles se trouvant l’une en face de l’autre, dans le même cliquet. Serrer le cliquet sans exagération.
10
Modèles EVOLUTION et STARLIGHT non équipés de l’option WINDSAFE (système anti-soulèvement sur les longueurs) :Pour les fixations (tendeurs cabiclics avec pitons) sur longueurs, percer avec une légère inclinaison extérieure (afin qu’un piton ne puisse glisser et sortir du trou) en diamètre 7 mm avec une profondeur de 80 mm. Placer les tendeurs cabiclics dans les œillets en réalisant une boucle suivant schéma.
9
Réglable / Adjustable / Einstellbar
Couvertures EVOLUTION ou STARLIGHT munies de l’option WINDSAFE SYSTEM (système anti-soulèvement sur les longueurs) : Positionner les cliquets de tension et pitons inox symétriquement aux autres cliquets/pitons. Les boucles inox se positionnent sur les sangles côté stockage de la couverture.
1110
Découpe échelle / Cut for ladder /Ausschnitt Leiter
Vis de blocage / Locking screw / Arretierschraube
FR
7
Note for the ADVANTAGE model:In windy areas, it is advisable to add a WIND KITcomposed of securing straps (optional).
IMPORTANT :The pegs and socket pegs must be fi xed to solid paving,strictly in accordance with the installation instructions.
Hinweis bei ADVANTAGE:In windigen Regionen, empfehlen wir ein Wind-Kit (Zusatzaustattungen) um die Windfestigkeit ihrer Walu Pool zu erhöhen. (Umfasst 1 Gurt 35mm, 1 Spanner mit Ratsche, 2 D-Ringe und 2 Arretierstifte.)
IMPORTANT : for fi xing start on the storage side. Position the 2 end straps by sliding them, 10 cm from the end of the aluminium slat. Position the other straps equidistant along the slat. It is essential that the pegs and sockets should be fixed to solid paving. Using a ø 10 mm drill, drill a hole 80 mm deep opposite each strap in order to install the stainless steel retractable pegs.
5 WICHTIG: Zum Befestigen beginnen Sie mit der Aufrollseite (Lagerung). Ziehen Sie die 2 Endgurte auf 10 cm Abstand vom Ende des Aluprofi ls aus. Verteilen Sie die restlichen Gurte in gleichmäßigen Abständen entlang des Profils. Die Stifte mit Hülse müssen unbedingt auf einer soliden Bodenplatte festgemacht werden. Für jeden Gurt bohren Sie mit ø 10 mm - Tiefe 80 mm die Einsetzstellen für die herausziehbaren Edelstahlstifte.
5
Fix the stainless steel socket pegs using a hammer.6 Schlagen Sie die Edelstahlstifte mit Hülse mit einem Hammer ein.
6
Raise the retractable pegs by hand and fix the fixing straps to them. Lock the straps, tightening the locking screws in the groove in the slat using the Allen key provided.
7 Heben Sie die herausziehbaren Stifte mit der Hand an und befestigen Sie dort die Befestigungsgurte. Blockieren Sie die Gurte im Profil, in dem Sie die Arretierschrauben in der Profilkehle mit dem mitgelieferten Inbusschlüssel festziehen.
7
*500 mm if the cover is equipped with a fast straps system (extra)
IMPORTANT : stand at the other end of the swimming pool, facing the part that is already fi xed. The ratchet tighteners must be positioned 10 cm from either end of the winding tube. Then position the other ratchets at equal distances. If the cover has a stairwell fl ap, also fi x the ratchet tighteners at the same place as the straps. Using a ø 10 mm drill, drill a hole 80 mm deep opposite each strap and 400 mm* from the cover in order to install the stainless steel retractable pegs.Fix the strap into the slot in the ratchet spindle, then activate the handle so as to roll the strap around the spindle in order to tighten the cover correctly. Finish tightening the cover by leaving the handle in the horizontal position.
8 WICHTIG: Stellen Sie sich auf die andere Beckenseite hin, gegenüber dem Bereich, den Sie bereits befestigt haben. Die Spannratschen müssen jeweils 10 cm von jedem Aufrollrohrende positioniert werden. Verteilen Sie die restlichen Ratschen in gleichmäßigen Abständen. Besitzt die Abdeckung einen Treppenlappen, positionieren Sie die Spannratschen ebenfalls an den entsprechenden Gurtstellen. Für jeden Gurt bohren Sie in 400 mm* Abstand von der Abdeckung mit ø 10 mm und einer Tiefe von 80 mm die Einsetzstellen für die herausziehbaren Edelstahlstifte. Führen Sie den Gurt durch den Schlitz in der Ratschenachse durch und betätigen den Griff so, dass der Gurt um die Achse eingerollt und die Abdeckung richtig gespannt wird. Wenn die Abdeckung gut gespannt ist, positionieren Sie den Griff waagerecht.
* 500 mm, falls die Abdeckung mit einem Schnellabspannsystem (optional) ausgerüstet ist.
8
Models: EVOLUTION and STARLIGHT only:For fi xing on the long side, drill a hole 80 mm deep at a slight outwards angle (so that the peg doesn’t slip out of the hole) using a 7mm drill. Fix the cable tighteners into the eyelets using a loop as shown in the diagram.
9 Modelle EVOLUTION und STARLIGHT:Für die Befestigungen an den Längsseiten bohren Sie leicht abgeschrägt nach außen (damit die Stifte nicht aus dem Loch rutschen können): Durchmesser 7 mm - Tiefe 80 mm. Setzen Sie Cabiclic-Spannbänder in den Ösen mit Hilfe der Schlaufen – wie abgebildet – ein. Die Cabiclic-Spannbänder dienen nicht zur Sicherheit, sind aber unentbehrlich, um Beschädigungen bei Unwetter vorzubeugen.
9
In the case of a cover with a cut-out for a fi ltration unit or ladder, first fi t the cover on the ladder side by passing the ladder sides into the two holes. All the straps on the end of the cover must have a ratchet tightener (please see point 8).In order to keep the cut-outs tight, fix a ratchet tightener to the horizontal strap (or two straps). In order to achieve this, thread the two straps that are opposite each other, into the same ratchet. Tighten the ratchet, but do not over tighten.
10 Bei einer Abdeckung mit Ausschnitt für Leiter oder Filterblock, positionieren Sie zuerst die Abdeckung auf Seite der Ausschnitt (Leiter in den beiden Segmenten). Alle Gurte am Ende der Decke müssen mit Spannratschen befestigt werden. (siehe Punkt 8). Um die Segmente geschlossen zu halten, positionieren Sie einen Spannratsche auf das Quergurtband (oder zwei Gurte). Führen Sie die Gurte durch den Schlitz in der Ratschenachse durch. Ziehen Sie die Spannratsche nicht übermäßig an.
10
WICHTIG: Die Stifte und die Stifte mit Hülse müssen aufeiner soliden Bodenplatte und unter Einhaltung derMontageanweisungen festgemacht werden.
instruction / Installationsanleitung
Modelle Evolution und Starlight mit der Option WINDSAFE SYSTEM also ausgerüstet mit integrierten Hebeschutz-Gurte an beiden Längsseiten: Spannratschen & Edelstahlstifte bitte symmetrisch mit den anderen Spannratschen & Edelstahlstifte positionieren. Die verstellbaren Befestigungen bitte auf die Verankerungsgurte an der Lagerseite anbringen.
11EVOLUTION or STARLIGHTS covers with the option WINDSAFE SYSTEM (anti-uprising system on the lengths) : Place the tie-down ratchet and stainless steel piton symmetrically to the other ratchets/pitons. The stainless steel buckles are placed on the straps, at the storage side of the cover.
11
DEGB
8
Notices techniquesWALU POOL
NOTICE D’UTILISATION :Avertissement : la piscine peut constituer un danger grave pour vos enfants. Une noyade est très vite arrivée. Des enfants à proximité d’une piscine réclament votre constante vigilance et votre surveillance active, même s’ils savent nager. Toujours garder la vue sur le bassin pendant les opérations d’ouverture et de fermeture du bassin.
1. ENROULEMENTL’enroulement de la couverture doit être effectué par des adultes responsables suivant les indications ci-dessous. La couverture doit être systématiquement remise en place en cas d’absence même momentanée.
• Détendre les cliquets de tension en tirant sur la languette à ressort tout en basculant la poignée à 180° afin de libérer la sangle de l’axe du cliquet.• Démonter les cliquets de tension. Ne laisser en aucun cas ces cliquets s’enrouler avec la couverture sous peine de détérioration.• Positionner la sangle de tirage sur la longueur de la couverture en son milieu.• Connecter l’embout de la manivelle dans l’extrémité du tube d’enroulement.• Enrouler la couverture à l’aide de la (ou les deux) manivelle(s), en prenant soin d’enrouler sur (et non pas sous) la couverture.Avertissement : la présence physique d’un adulte responsable est indispensable lorsque le bassin est ouvert.
Mémoriser et afficher près de la piscine les numéros des premiers secours : Pompiers : 18 / SAMU : 15 / Centre antipoison
2. DÉROULEMENTLe déroulement de la couverture doit être effectué après contrôle du bassin dans lequel ne doit se trouver aucun baigneur ou corps étrangers avant et pendant la manoeuvre.
• Tirer sur la sangle de tirage en se positionnant du côté opposé au stockage de la couverture.• La dérouler entièrement avec précaution.• Remonter les cliquets de tension suivant le point 8 de la NOTICE D’INSTALLATION, afin de verrouiller la couverture.• Vérifier que la couverture soit parfaitement tendue sur sa longueur au moyen des cliquets positionnés sur les largeurs.• Ranger la manivelle hors de la portée des enfants.Pour des questions de sécurité et de pérennité du système, il est impératif de veiller à ce que le niveau d’eau dans le bassin soit toujours à hauteur d’utilisation (2/3 haut des skimmers) afin de soulager votre WALU POOL en évitant ainsi la flexion des profilés alu en cas de surcharge, et ce été comme hiver.
CONSEILS DE SÉCURITÉ :Avertissement : Attention, la sécurité n’est assurée qu’avec une couverture fermée, verrouillée et correctement installée conformément à nos instructions. Cette couverture ne se substitue pas au bon sens ni à la responsabilité individuelle. Elle n’a pas pour but de se substituer à la vigilance des parents et/ou des adultes responsables qui demeure le facteur essentiel pour la protection des jeunes enfants. Cette couverture ne doit en aucun cas être considérée comme une aire de circulation ; en conséquence, ne jamais monter, marcher ou sauter intentionnellement sur la couverture de sécurité !
NOTICE D’ENTRETIEN :Le nettoyage de la couverture doit être effectué par vos soins au minimum deux fois par an (de préférence avant et après la saison de baignade), à l’aide d’un produit de nettoyage spécifique pour toile PVC. Le nettoyage courant s’effectue par simple nettoyage au jet. En tous les cas éviter les produits agressifs, moussant ou solvant ainsi que les éponges abrasives.
NOTICE DE MAINTENANCE :L’ensemble de la couverture ainsi que les éléments de fixation doivent être inspectés deux fois dans l’année (par exemple lors du nettoyage de la couverture). Une vérification supplémentaire est nécessaire si la couverture a du être utilisée dans sa fonction sécuritaire, ou après une période ou celle-ci a pu être sollicitée dans des conditions extrêmes (tempête, forte chute de neige ...). Suite à ces différentes vérifications, il est impératif de changer tous les éléments présentant une détérioration. En cas de doute, veuillez vous adresser à un installateur piscinier. Toutes les pièces détachées de remplacement doivent être de fabrication WALTER afin que votre couverture respecte son cahier des charges initial, conserve sa garantie et sa conformité à la norme.Prendre toutes les mesures afin d’empêcher l’accès du bassin aux jeunes enfants et ce, jusqu’à la réparation de la couverture ou lors d’un constat de dysfonctionnement empêchant la fermeture et la sécurisation du bassin. Le service après vente est assuré en priorité par votre revendeur.Pour tout autre renseignement notre SAV est à votre disposition au numéro de téléphone suivant 03 90 29 51 00.
SPÉCIFICATIONS PARTICULIÈRES EN PÉRIODE HIVERNALE : Votre WALU POOL vous donnera toute satisfaction en utilisation hivernale sous couvert du respect des quelques règles énoncées ci-après :Le niveau d’eau dans le bassin étant impérativement toujours à hauteur d’utilisation (2/3 haut des skimmers) et ce, été comme hiver, veiller à prendre les précautions d’usage pour éviter que l’eau ne déborde et ne passe derrière le liner (utilisation d’un trop plein) ou que les pièces à sceller et tuyauteries ne gèlent ; pour ce faire, il est conseiller d’utiliser les gizzmos et bouchons appropriés, ainsi qu’une ligne de flotteurs d’hivernage pour éviter toute détérioration du bassin. Au-delà de 10 cm de neige maximum, il est nécessaire, soit d’assurer le déneigement de la couverture, de l’étayer au moyen du kit neige spécialement prévu à cet usage afin d’éviter des déformations irréversibles. Le non respect du maintien du niveau d’eau «haut» annule la garantie sur la couverture. En période de fortes précipitations, veiller à retirer les impuretés déposées sur les cavités d’évacuation des eaux pluviales, afin d’éviter leur obturation et la formation de poches d’eau.
FR
9
Technical instruction
INSTRUCTIONS :Warning: a swimming pool can be a serious danger for your children. Drowning happens very quickly.Children close to a swimming pool need your constant vigilance and active surveillance, even if they can swim.Always keep an eye on the pool during opening or closing operations.
1. ROLLING UPRolling the cover up should be carried out by responsible adults according to the following instructions.The cover should always be replaced in case of absence, even if just for a few moments.
• Undo all the cable tighteners.• Slacken the ratchet tighteners by pulling on the spring tongue while turning the handle by 180° in order to release the strap from the spindle of the ratchet.• Remove the ratchet tighteners. Do not allow any of the ratchets to roll up with the cover or else they may damage it.• Deploy the telescopic bars if there are any.• Attach the draw-strap to the length of the cover in its middle.• Connect the end of the crank handle into the end of the winding tube.• Roll up the cover using the handle(s).Warning: the physical presence of an adult is essential when the pool is open.
2 . UNROLLINGWhen unrolling the cover you should check that no swimmer or foreign body is still in the pool before and during the operation.
• Pull the draw strap, standing on the side opposite the side where the cover is stored.• Unroll it fully taking great care.• Install the ratchet tighteners as described in point 8 of the INSTALLATION INSTRUCTIONS, in order to lock the cover.• Check that the cover is perfectly tight throughout its length using the ratchets attached to the widths.• Attach all the cable tighteners on the lengths.• Where there are steps on the long side, do not forget after unrolling, to fi x it to the right of the stairwell fl ap using the long 1.50 m elasticated cords provided.• Store the handle(s) out of the reach of children.With regard to questions of safety and the durability of the system, it is essential to ensure that the water level in the pool is always at its operational height (2/3 the height of the skimmers) in order to relieve the strain on your WALU POOL, thus avoiding bending of the aluminium slats in case of overload, both in summer and winter.
SAFETY ADVICE:Warning: Safety is only guaranteed with the cover closed, locked and correctly installed in accordance with our instructions.This cover is not a substitute for common sense, nor for individual responsibility. It’s purpose is not to be a substitute for vigilance on the part of parents and/or other responsible adults which is an essential factor in the protection of young children. Under no circumstances should this cover be walked on; as a consequence, never climb, walk or intentionally jump on the safety cover!
CARE INSTRUCTIONS :You should clean the cover a minimum of twice a year (preferably before and after the swimming season), using a cleaning product specifi cally suitable for PVC sheet. Day to day cleaning can be with a simple water jet. Always avoid using harsh or foam products, or those that contain solvents, as well as scouring pads.
MAINTENANCE INSTRUCTIONS:The whole of the cover as well as its fi xings should be inspected twice a year (for example during cleaning of the cover). Additional checks are necessary if the safety function of the cover has been called on, or after a period of stress under extreme conditions (storm, heavy snowfall, etc.). After carrying out these various checks it is essential to replace any items subject to damage. As WALU POOL can be fully dismantled and repaired, do not hesitate to replace any parts showing any type of defect or wear immediately. In case of doubt, please contact your pool installer. All spare parts must be made by WALTER so that your cover complies with its initial specifi cation, the validity of its guarantee is retained and it remains compliant with the standard. Take all measures necessary to prevent access to the pool by young children until the cover has been repaired or when checking faults that prevent closure and the pool being made secure.After sales service is provided by the reseller in the fi rst instance. For all other information our After Sales Service department is available on the following telephone number: +33 (0)3 90 29 51 00.
SPECIAL WINTER SPECIFICATIONS:WALU POOL will prove completely satisfactory for use over winter as long as you follow the few rules listed below: As it is essential that the water level in the pool is always at its operational height (2/3 the height of the skimmers) both in summer and winter, you should take precautions to ensure that the water does not overfl ow the pool and get behind the liner (use an overfl ow) or that embedded parts and pipework do not freeze. In order to achieve this, we recommend using the appropriate gadgets and stoppers, as well as a line of winter fl oats to avoid any damage to the pool. When there is more than a maximum of 10 cm of snow, you will need either to remove the snow from the cover, or support it using the special snow kit in order to avoid irreparable damage. Non-compliance with instructions concerning maintenance of the water level renders the WALU POOL guarantee null and void. It is essential that the cable tighteners and their pegs, located between the tubes on the lengths, should be fi xed into the ground in order to avoid any movement or lifting due to the wind. At times of heavy rain, make sure that you remove any deposits forming on the rainwater evacuation holes in order to avoid them being blocked and pools of water forming.
GB
10
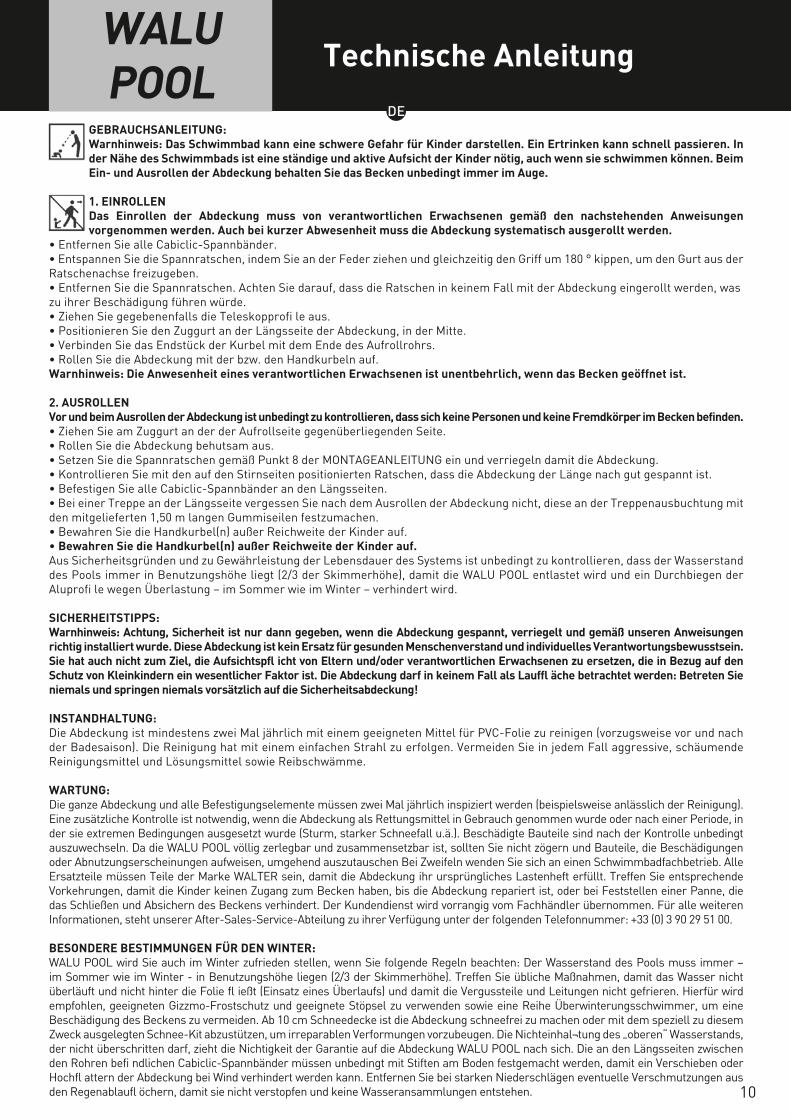
GEBRAUCHSANLEITUNG:Warnhinweis: Das Schwimmbad kann eine schwere Gefahr für Kinder darstellen. Ein Ertrinken kann schnell passieren. In der Nähe des Schwimmbads ist eine ständige und aktive Aufsicht der Kinder nötig, auch wenn sie schwimmen können. Beim Ein- und Ausrollen der Abdeckung behalten Sie das Becken unbedingt immer im Auge.
1. EINROLLENDas Einrollen der Abdeckung muss von verantwortlichen Erwachsenen gemäß den nachstehenden Anweisungen vorgenommen werden. Auch bei kurzer Abwesenheit muss die Abdeckung systematisch ausgerollt werden.
• Entfernen Sie alle Cabiclic-Spannbänder.• Entspannen Sie die Spannratschen, indem Sie an der Feder ziehen und gleichzeitig den Griff um 180 ° kippen, um den Gurt aus der Ratschenachse freizugeben.• Entfernen Sie die Spannratschen. Achten Sie darauf, dass die Ratschen in keinem Fall mit der Abdeckung eingerollt werden, was zu ihrer Beschädigung führen würde.• Ziehen Sie gegebenenfalls die Teleskopprofi le aus.• Positionieren Sie den Zuggurt an der Längsseite der Abdeckung, in der Mitte.• Verbinden Sie das Endstück der Kurbel mit dem Ende des Aufrollrohrs.• Rollen Sie die Abdeckung mit der bzw. den Handkurbeln auf.Warnhinweis: Die Anwesenheit eines verantwortlichen Erwachsenen ist unentbehrlich, wenn das Becken geöffnet ist.
2. AUSROLLENVor und beim Ausrollen der Abdeckung ist unbedingt zu kontrollieren, dass sich keine Personen und keine Fremdkörper im Becken befinden.• Ziehen Sie am Zuggurt an der der Aufrollseite gegenüberliegenden Seite.• Rollen Sie die Abdeckung behutsam aus.• Setzen Sie die Spannratschen gemäß Punkt 8 der MONTAGEANLEITUNG ein und verriegeln damit die Abdeckung.• Kontrollieren Sie mit den auf den Stirnseiten positionierten Ratschen, dass die Abdeckung der Länge nach gut gespannt ist.• Befestigen Sie alle Cabiclic-Spannbänder an den Längsseiten.• Bei einer Treppe an der Längsseite vergessen Sie nach dem Ausrollen der Abdeckung nicht, diese an der Treppenausbuchtung mit den mitgelieferten 1,50 m langen Gummiseilen festzumachen.• Bewahren Sie die Handkurbel(n) außer Reichweite der Kinder auf.• Bewahren Sie die Handkurbel(n) außer Reichweite der Kinder auf.Aus Sicherheitsgründen und zu Gewährleistung der Lebensdauer des Systems ist unbedingt zu kontrollieren, dass der Wasserstand des Pools immer in Benutzungshöhe liegt (2/3 der Skimmerhöhe), damit die WALU POOL entlastet wird und ein Durchbiegen der Aluprofi le wegen Überlastung – im Sommer wie im Winter – verhindert wird.
SICHERHEITSTIPPS:Warnhinweis: Achtung, Sicherheit ist nur dann gegeben, wenn die Abdeckung gespannt, verriegelt und gemäß unseren Anweisungen richtig installiert wurde. Diese Abdeckung ist kein Ersatz für gesunden Menschenverstand und individuelles Verantwortungsbewusstsein. Sie hat auch nicht zum Ziel, die Aufsichtspfl icht von Eltern und/oder verantwortlichen Erwachsenen zu ersetzen, die in Bezug auf den Schutz von Kleinkindern ein wesentlicher Faktor ist. Die Abdeckung darf in keinem Fall als Lauffl äche betrachtet werden: Betreten Sie niemals und springen niemals vorsätzlich auf die Sicherheitsabdeckung!
INSTANDHALTUNG:Die Abdeckung ist mindestens zwei Mal jährlich mit einem geeigneten Mittel für PVC-Folie zu reinigen (vorzugsweise vor und nach der Badesaison). Die Reinigung hat mit einem einfachen Strahl zu erfolgen. Vermeiden Sie in jedem Fall aggressive, schäumende Reinigungsmittel und Lösungsmittel sowie Reibschwämme.
WARTUNG:Die ganze Abdeckung und alle Befestigungselemente müssen zwei Mal jährlich inspiziert werden (beispielsweise anlässlich der Reinigung). Eine zusätzliche Kontrolle ist notwendig, wenn die Abdeckung als Rettungsmittel in Gebrauch genommen wurde oder nach einer Periode, in der sie extremen Bedingungen ausgesetzt wurde (Sturm, starker Schneefall u.ä.). Beschädigte Bauteile sind nach der Kontrolle unbedingt auszuwechseln. Da die WALU POOL völlig zerlegbar und zusammensetzbar ist, sollten Sie nicht zögern und Bauteile, die Beschädigungen oder Abnutzungserscheinungen aufweisen, umgehend auszutauschen Bei Zweifeln wenden Sie sich an einen Schwimmbadfachbetrieb. Alle Ersatzteile müssen Teile der Marke WALTER sein, damit die Abdeckung ihr ursprüngliches Lastenheft erfüllt. Treffen Sie entsprechende Vorkehrungen, damit die Kinder keinen Zugang zum Becken haben, bis die Abdeckung repariert ist, oder bei Feststellen einer Panne, die das Schließen und Absichern des Beckens verhindert. Der Kundendienst wird vorrangig vom Fachhändler übernommen. Für alle weiteren Informationen, steht unserer After-Sales-Service-Abteilung zu ihrer Verfügung unter der folgenden Telefonnummer: +33 (0) 3 90 29 51 00.
BESONDERE BESTIMMUNGEN FÜR DEN WINTER: WALU POOL wird Sie auch im Winter zufrieden stellen, wenn Sie folgende Regeln beachten: Der Wasserstand des Pools muss immer – im Sommer wie im Winter - in Benutzungshöhe liegen (2/3 der Skimmerhöhe). Treffen Sie übliche Maßnahmen, damit das Wasser nicht überläuft und nicht hinter die Folie fl ießt (Einsatz eines Überlaufs) und damit die Vergussteile und Leitungen nicht gefrieren. Hierfür wird empfohlen, geeigneten Gizzmo-Frostschutz und geeignete Stöpsel zu verwenden sowie eine Reihe Überwinterungsschwimmer, um eine Beschädigung des Beckens zu vermeiden. Ab 10 cm Schneedecke ist die Abdeckung schneefrei zu machen oder mit dem speziell zu diesem Zweck ausgelegten Schnee-Kit abzustützen, um irreparablen Verformungen vorzubeugen. Die Nichteinhal¬tung des „oberen“ Wasserstands, der nicht überschritten darf, zieht die Nichtigkeit der Garantie auf die Abdeckung WALU POOL nach sich. Die an den Längsseiten zwischen den Rohren befi ndlichen Cabiclic-Spannbänder müssen unbedingt mit Stiften am Boden festgemacht werden, damit ein Verschieben oder Hochfl attern der Abdeckung bei Wind verhindert werden kann. Entfernen Sie bei starken Niederschlägen eventuelle Verschmutzungen aus den Regenablaufl öchern, damit sie nicht verstopfen und keine Wasseransammlungen entstehen.
Technische AnleitungWALU POOL
DE
11
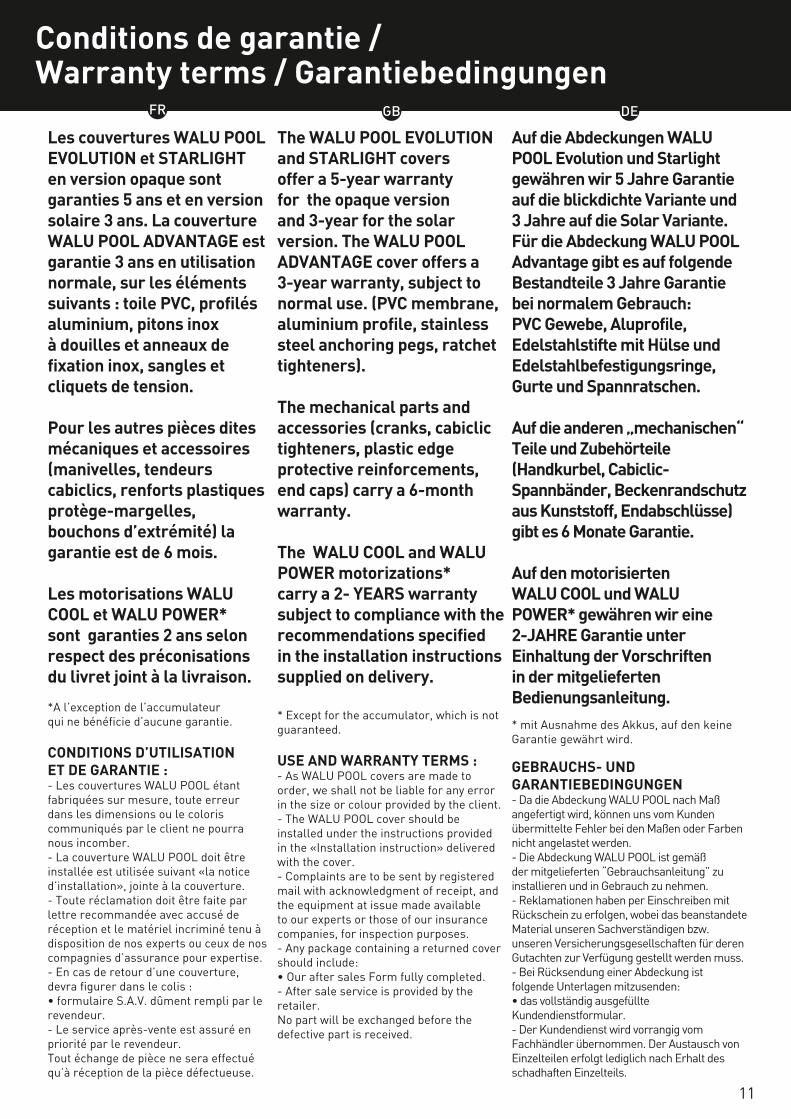
Les couvertures WALU POOL EVOLUTION et STARLIGHT en version opaque sont garanties 5 ans et en version solaire 3 ans. La couverture WALU POOL ADVANTAGE est garantie 3 ans en utilisation normale, sur les éléments suivants : toile PVC, profilés aluminium, pitons inox à douilles et anneaux de fixation inox, sangles et cliquets de tension.
Pour les autres pièces dites mécaniques et accessoires(manivelles, tendeurs cabiclics, renforts plastiquesprotège-margelles, bouchons d’extrémité) la garantie est de 6 mois.
Les motorisations WALU COOL et WALU POWER* sont garanties 2 ans selon respect des préconisations du livret joint à la livraison.
*A l’exception de l’accumulateurqui ne bénéficie d’aucune garantie.
CONDITIONS D’UTILISATIONET DE GARANTIE :- Les couvertures WALU POOL étant fabriquées sur mesure, toute erreur dans les dimensions ou le coloris communiqués par le client ne pourra nous incomber.- La couverture WALU POOL doit être installée est utilisée suivant «la notice d’installation», jointe à la couverture.- Toute réclamation doit être faite par lettre recommandée avec accusé de réception et le matériel incriminé tenu à disposition de nos experts ou ceux de nos compagnies d’assurance pour expertise.- En cas de retour d’une couverture, devra figurer dans le colis :• formulaire S.A.V. dûment rempli par le revendeur.- Le service après-vente est assuré en priorité par le revendeur.Tout échange de pièce ne sera effectué qu’à réception de la pièce défectueuse.
The WALU POOL EVOLUTION and STARLIGHT covers offer a 5-year warranty for the opaque version and 3-year for the solar version. The WALU POOL ADVANTAGE cover offers a 3-year warranty, subject to normal use. (PVC membrane, aluminium profile, stainless steel anchoring pegs, ratchet tighteners).
The mechanical parts and accessories (cranks, cabiclictighteners, plastic edge protective reinforcements, end caps) carry a 6-month warranty.
The WALU COOL and WALU POWER motorizations* carry a 2- YEARS warranty subject to compliance with the recommendations specified in the installation instructions supplied on delivery.
* Except for the accumulator, which is not guaranteed.
USE AND WARRANTY TERMS :- As WALU POOL covers are made to order, we shall not be liable for any error in the size or colour provided by the client.- The WALU POOL cover should be installed under the instructions provided in the «Installation instruction» delivered with the cover.- Complaints are to be sent by registered mail with acknowledgment of receipt, and the equipment at issue made available to our experts or those of our insurance companies, for inspection purposes.- Any package containing a returned cover should include:• Our after sales Form fully completed.- After sale service is provided by the retailer.No part will be exchanged before the defective part is received.
Auf die Abdeckungen WALU POOL Evolution und Starlight gewähren wir 5 Jahre Garantie auf die blickdichte Variante und 3 Jahre auf die Solar Variante. Für die Abdeckung WALU POOL Advantage gibt es auf folgende Bestandteile 3 Jahre Garantie bei normalem Gebrauch: PVC Gewebe, Aluprofile, Edelstahlstifte mit Hülse und Edelstahlbefestigungsringe, Gurte und Spannratschen.
Auf die anderen „mechanischen“ Teile und Zubehörteile (Handkurbel, Cabiclic-Spannbänder, Beckenrandschutz aus Kunststoff, Endabschlüsse) gibt es 6 Monate Garantie.
Auf den motorisierten WALU COOL und WALU POWER* gewähren wir eine 2-JAHRE Garantie unter Einhaltung der Vorschriften in der mitgelieferten Bedienungsanleitung.* mit Ausnahme des Akkus, auf den keine Garantie gewährt wird.
GEBRAUCHS- UND GARANTIEBEDINGUNGEN- Da die Abdeckung WALU POOL nach Maß angefertigt wird, können uns vom Kunden übermittelte Fehler bei den Maßen oder Farben nicht angelastet werden.- Die Abdeckung WALU POOL ist gemäß der mitgelieferten “Gebrauchsanleitung” zu installieren und in Gebrauch zu nehmen.- Reklamationen haben per Einschreiben mit Rückschein zu erfolgen, wobei das beanstandete Material unseren Sachverständigen bzw. unseren Versicherungsgesellschaften für deren Gutachten zur Verfügung gestellt werden muss.- Bei Rücksendung einer Abdeckung ist folgende Unterlagen mitzusenden:• das vollständig ausgefüllte Kundendienstformular.- Der Kundendienst wird vorrangig vom Fachhändler übernommen. Der Austausch von Einzelteilen erfolgt lediglich nach Erhalt des schadhaften Einzelteils.
Conditions de garantie / Warranty terms / Garantiebedingungen
FR DEGB
12
Conditions de garantie / Warranty terms / Garantiebedingungen
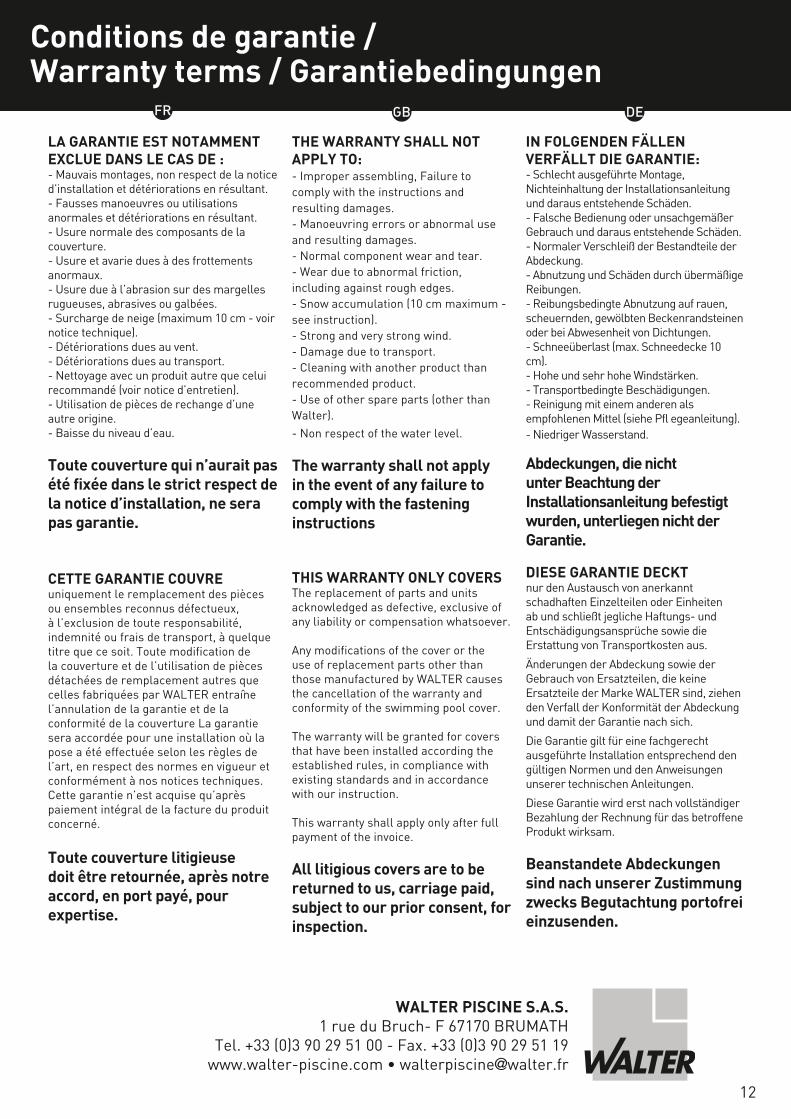
LA GARANTIE EST NOTAMMENTEXCLUE DANS LE CAS DE :- Mauvais montages, non respect de la notice d’installation et détériorations en résultant.- Fausses manoeuvres ou utilisations anormales et détériorations en résultant.- Usure normale des composants de la couverture.- Usure et avarie dues à des frottements anormaux.- Usure due à l’abrasion sur des margelles rugueuses, abrasives ou galbées.- Surcharge de neige (maximum 10 cm - voir notice technique).- Détériorations dues au vent.- Détériorations dues au transport.- Nettoyage avec un produit autre que celui recommandé (voir notice d’entretien).- Utilisation de pièces de rechange d’une autre origine.- Baisse du niveau d’eau.
Toute couverture qui n’aurait pas été fixée dans le strict respect de la notice d’installation, ne sera pas garantie.
CETTE GARANTIE COUVREuniquement le remplacement des pièces ou ensembles reconnus défectueux, à l’exclusion de toute responsabilité, indemnité ou frais de transport, à quelque titre que ce soit. Toute modification de la couverture et de l’utilisation de pièces détachées de remplacement autres que celles fabriquées par WALTER entraîne l’annulation de la garantie et de la conformité de la couverture La garantie sera accordée pour une installation où la pose a été effectuée selon les règles de l’art, en respect des normes en vigueur et conformément à nos notices techniques. Cette garantie n’est acquise qu’après paiement intégral de la facture du produit concerné.
Toute couverture litigieusedoit être retournée, après notre accord, en port payé, pour expertise.
THE WARRANTY SHALL NOT APPLY TO:- Improper assembling, Failure to comply with the instructions and resulting damages.- Manoeuvring errors or abnormal use and resulting damages.- Normal component wear and tear.- Wear due to abnormal friction, including against rough edges.- Snow accumulation (10 cm maximum - see instruction).- Strong and very strong wind.- Damage due to transport.- Cleaning with another product than recommended product.- Use of other spare parts (other than Walter).- Non respect of the water level.
The warranty shall not apply in the event of any failure to comply with the fastening instructions
THIS WARRANTY ONLY COVERSThe replacement of parts and units acknowledged as defective, exclusive of any liability or compensation whatsoever.
Any modifications of the cover or the use of replacement parts other than those manufactured by WALTER causes the cancellation of the warranty and conformity of the swimming pool cover.
The warranty will be granted for covers that have been installed according the established rules, in compliance with existing standards and in accordance with our instruction.
This warranty shall apply only after full payment of the invoice.
All litigious covers are to be returned to us, carriage paid, subject to our prior consent, for inspection.
IN FOLGENDEN FÄLLEN VERFÄLLT DIE GARANTIE:- Schlecht ausgeführte Montage, Nichteinhaltung der Installationsanleitung und daraus entstehende Schäden.- Falsche Bedienung oder unsachgemäßer Gebrauch und daraus entstehende Schäden.- Normaler Verschleiß der Bestandteile der Abdeckung.- Abnutzung und Schäden durch übermäßige Reibungen.- Reibungsbedingte Abnutzung auf rauen, scheuernden, gewölbten Beckenrandsteinen oder bei Abwesenheit von Dichtungen.- Schneeüberlast (max. Schneedecke 10 cm).- Hohe und sehr hohe Windstärken.- Transportbedingte Beschädigungen.- Reinigung mit einem anderen als empfohlenen Mittel (siehe Pfl egeanleitung).- Niedriger Wasserstand.
Abdeckungen, die nicht unter Beachtung der Installationsanleitung befestigt wurden, unterliegen nicht der Garantie.
DIESE GARANTIE DECKTnur den Austausch von anerkannt schadhaften Einzelteilen oder Einheiten ab und schließt jegliche Haftungs- und Entschädigungsansprüche sowie die Erstattung von Transportkosten aus.
Änderungen der Abdeckung sowie der Gebrauch von Ersatzteilen, die keine Ersatzteile der Marke WALTER sind, ziehen den Verfall der Konformität der Abdeckung und damit der Garantie nach sich.
Die Garantie gilt für eine fachgerecht ausgeführte Installation entsprechend den gültigen Normen und den Anweisungen unserer technischen Anleitungen.
Diese Garantie wird erst nach vollständiger Bezahlung der Rechnung für das betroffene Produkt wirksam.
Beanstandete Abdeckungen sind nach unserer Zustimmung zwecks Begutachtung portofrei einzusenden.
WALTER PISCINE S.A.S.1 rue du Bruch- F 67170 BRUMATH
Tel. +33 (0)3 90 29 51 00 - Fax. +33 (0)3 90 29 51 19www.walter-piscine.com • [email protected]
FR DEGB