Embed Size (px)
Citation preview
Heizstrahler Einheit 1500 W Heat transmission unit grey 1500 W Unité de transmission de chaleur 1500 W Unità emittente di calore 1500 W
06.2010-DEFI 1
Montage- & Gebrauchsanleitung E Page 8 F Page 14 I Pagina 20
Heizstrahler Einheit 1500 W Heat transmission unit 1500 W
Unité de transmission de chaleur 1500 W Unità emittente di calore 1500 W
2 10.2006-DEFI
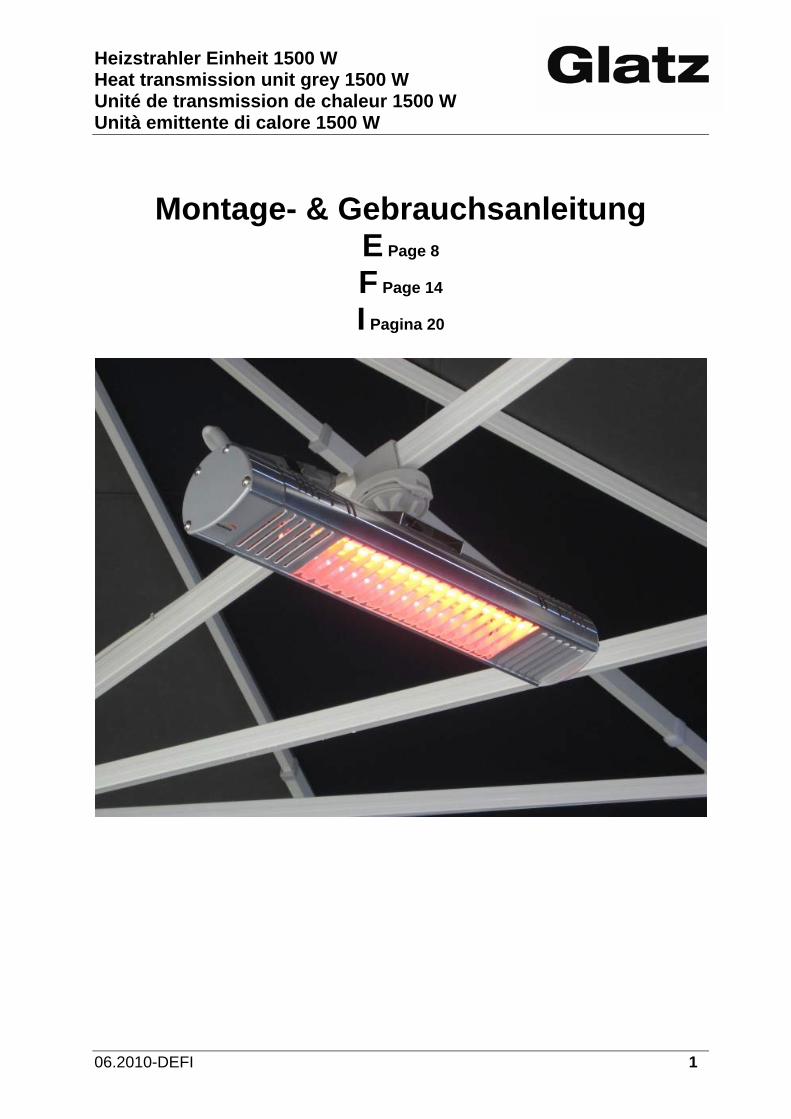
Deutsch 1. Lieferumfang
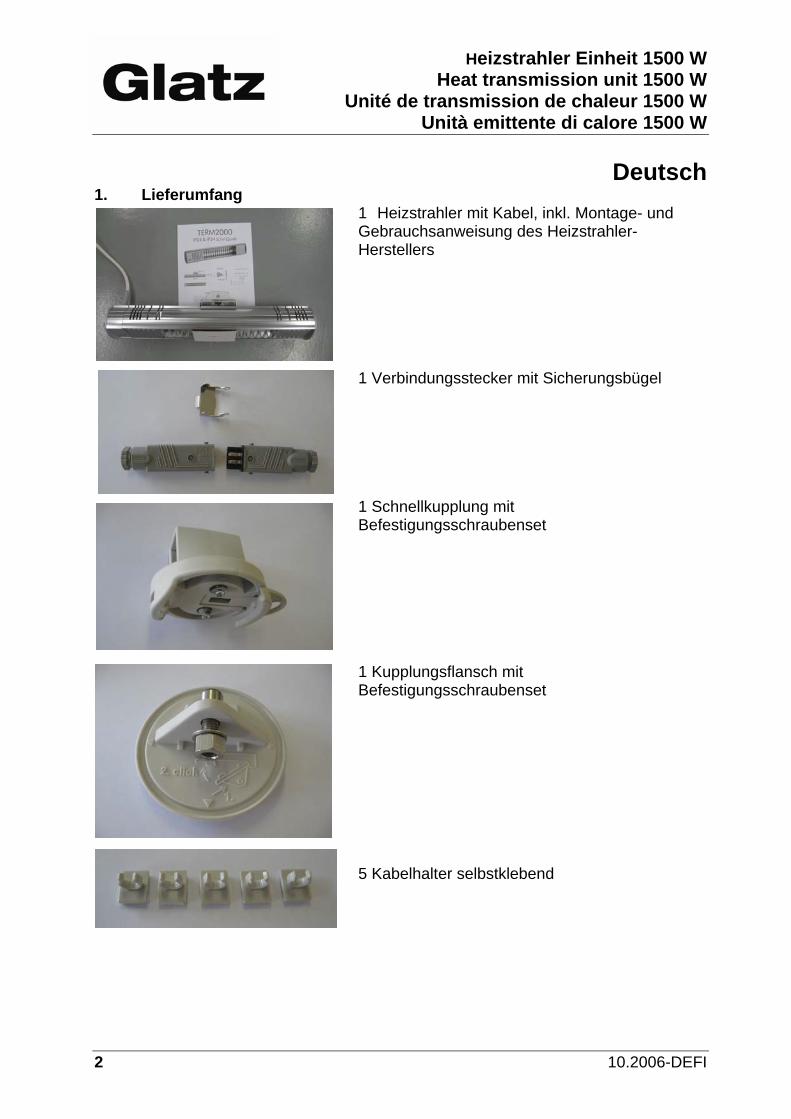
1 Heizstrahler mit Kabel, inkl. Montage- und Gebrauchsanweisung des Heizstrahler-Herstellers 1 Verbindungsstecker mit Sicherungsbügel 1 Schnellkupplung mit Befestigungsschraubenset 1 Kupplungsflansch mit Befestigungsschraubenset 5 Kabelhalter selbstklebend
Heizstrahler Einheit 1500 W Heat transmission unit grey 1500 W Unité de transmission de chaleur 1500 W Unità emittente di calore 1500 W
06.2010-DEFI 3
3. Bestimmungsgemässe Verwendung Die Heizstrahler Einheit 1500W ist ausschliesslich für den Anbau an Glatz Schirme Castello®, Palazzo® M8 und Palazzo® M16 ausgelegt. Sie dient ausschliesslich zur Beheizung der Fläche unter dem Schirmdach. 4. Sicherheitsvorschriften
Montage- und Gebrauchsanweisung des Heizstrahler-Herstellers sind Bestandteil der Sicherheitsvorschriften.
Heizstrahler vor dem Entfernen abschalten und auskühlen lassen. Es können sonst Brandverletzungen entstehen
Nie Schirme mit eingeschalteten oder heissen Heizstrahlern schliessen oder Heizstrahler an nicht vollständig geöffnetem Schirm einschalten – Brandgefahr!
Heizstrahler dürfen nicht in Kombination mit Windwächter für das automatische Schliessen verwendet werden. Brandgefahr!
Wir empfehlen die Heizstrahler vor dem Schliessen des Schirmes zu entfernen. Stoffschäden, die durch Scheuern der Heizstrahler am geschlossenen Schirm entstehen sind von der Gewährleistung ausgeschlossen, ebenso Beschädigungen an Heizstrahlern die durch äussere Krafteinwirkung entstanden ist.
Die Installation der Heizstrahler, insbesondere den Anschluss an das Stromnetz und die Erstinbetriebnahme darf nur von einem ausgewiesenen Fachmann vorgenommen werden. Die lokalen Vorschriften sind zu beachten.
Heizstrahler Einheit 1500 W Heat transmission unit 1500 W
Unité de transmission de chaleur 1500 W Unità emittente di calore 1500 W
4 10.2006-DEFI
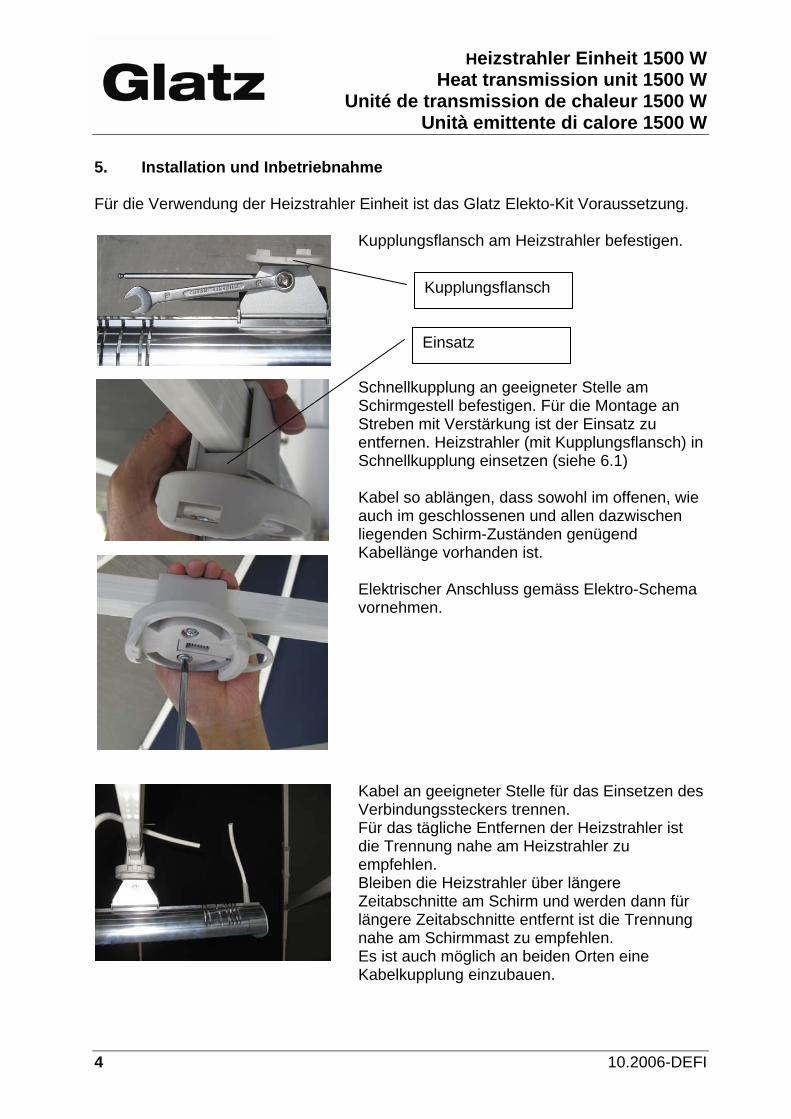
5. Installation und Inbetriebnahme Für die Verwendung der Heizstrahler Einheit ist das Glatz Elekto-Kit Voraussetzung.
Kupplungsflansch am Heizstrahler befestigen. Schnellkupplung an geeigneter Stelle am Schirmgestell befestigen. Für die Montage an Streben mit Verstärkung ist der Einsatz zu entfernen. Heizstrahler (mit Kupplungsflansch) in Schnellkupplung einsetzen (siehe 6.1) Kabel so ablängen, dass sowohl im offenen, wie auch im geschlossenen und allen dazwischen liegenden Schirm-Zuständen genügend Kabellänge vorhanden ist. Elektrischer Anschluss gemäss Elektro-Schema vornehmen. Kabel an geeigneter Stelle für das Einsetzen des Verbindungssteckers trennen. Für das tägliche Entfernen der Heizstrahler ist die Trennung nahe am Heizstrahler zu empfehlen. Bleiben die Heizstrahler über längere Zeitabschnitte am Schirm und werden dann für längere Zeitabschnitte entfernt ist die Trennung nahe am Schirmmast zu empfehlen. Es ist auch möglich an beiden Orten eine Kabelkupplung einzubauen.
Kupplungsflansch
Einsatz
Heizstrahler Einheit 1500 W Heat transmission unit grey 1500 W Unité de transmission de chaleur 1500 W Unità emittente di calore 1500 W
06.2010-DEFI 5
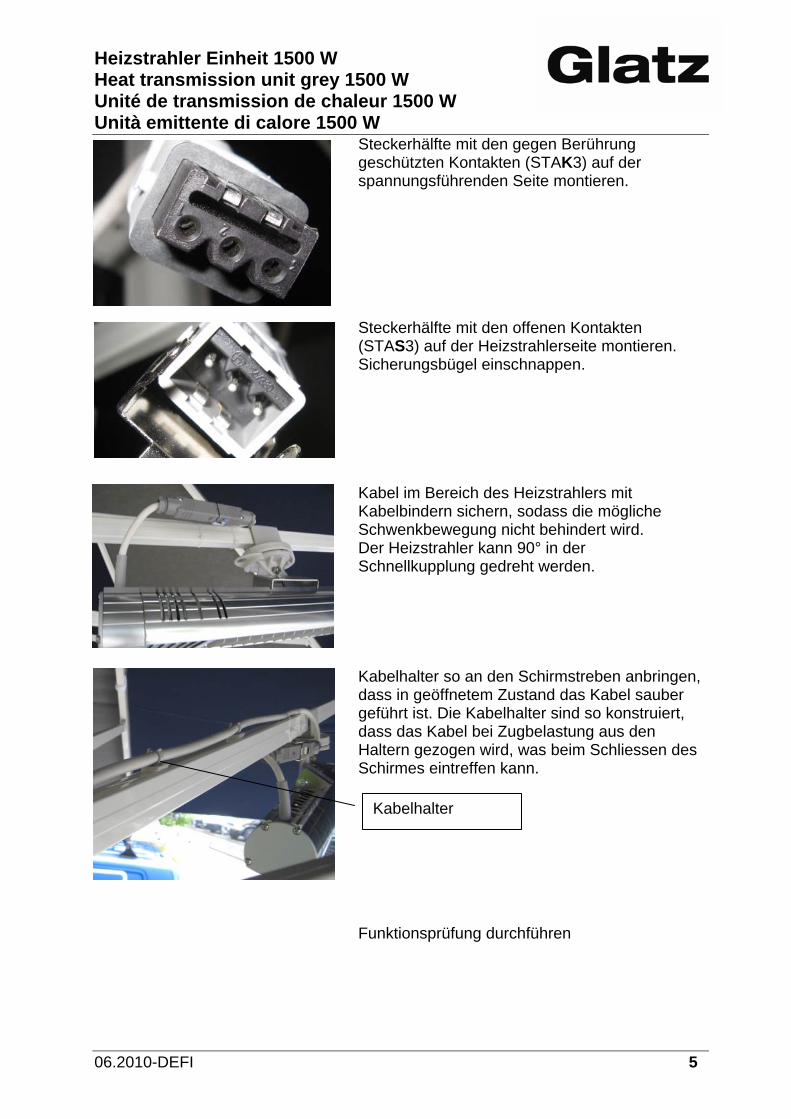
Steckerhälfte mit den gegen Berührung geschützten Kontakten (STAK3) auf der spannungsführenden Seite montieren. Steckerhälfte mit den offenen Kontakten (STAS3) auf der Heizstrahlerseite montieren. Sicherungsbügel einschnappen. Kabel im Bereich des Heizstrahlers mit Kabelbindern sichern, sodass die mögliche Schwenkbewegung nicht behindert wird. Der Heizstrahler kann 90° in der Schnellkupplung gedreht werden. Kabelhalter so an den Schirmstreben anbringen, dass in geöffnetem Zustand das Kabel sauber geführt ist. Die Kabelhalter sind so konstruiert, dass das Kabel bei Zugbelastung aus den Haltern gezogen wird, was beim Schliessen des Schirmes eintreffen kann. Funktionsprüfung durchführen
Kabelhalter
Heizstrahler Einheit 1500 W Heat transmission unit 1500 W
Unité de transmission de chaleur 1500 W Unità emittente di calore 1500 W
6 10.2006-DEFI
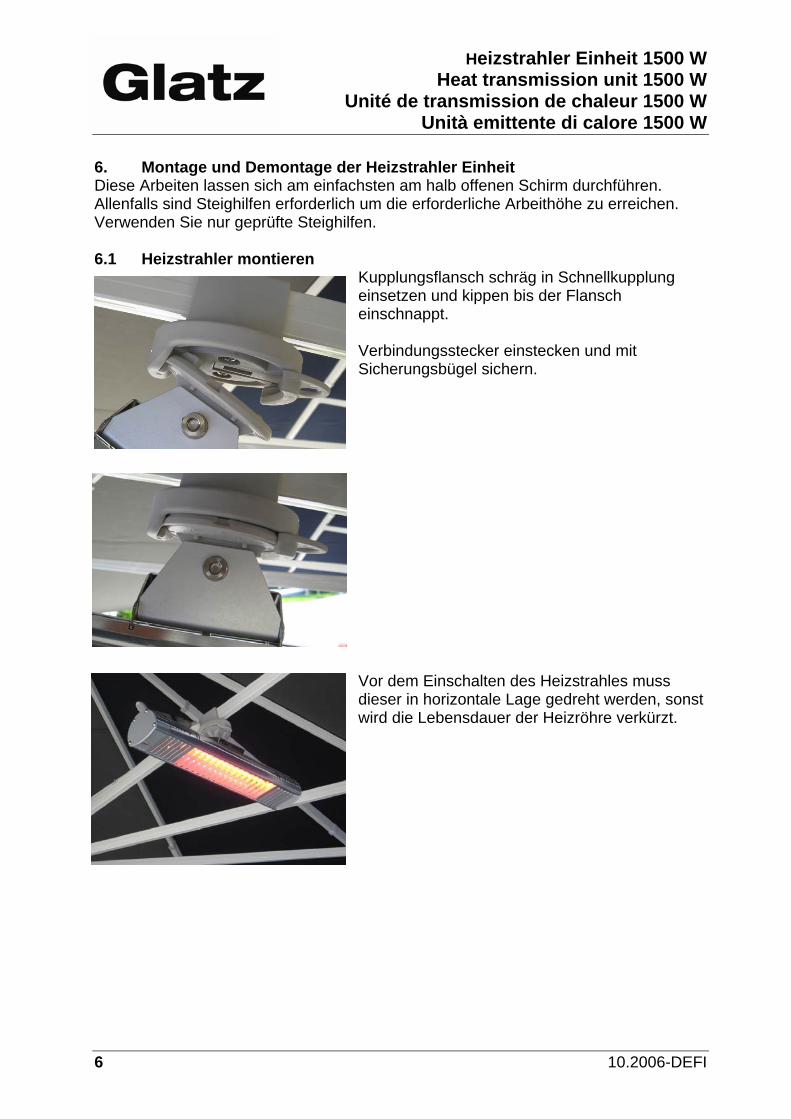
6. Montage und Demontage der Heizstrahler Einheit Diese Arbeiten lassen sich am einfachsten am halb offenen Schirm durchführen. Allenfalls sind Steighilfen erforderlich um die erforderliche Arbeithöhe zu erreichen. Verwenden Sie nur geprüfte Steighilfen. 6.1 Heizstrahler montieren
Kupplungsflansch schräg in Schnellkupplung einsetzen und kippen bis der Flansch einschnappt. Verbindungsstecker einstecken und mit Sicherungsbügel sichern. Vor dem Einschalten des Heizstrahles muss dieser in horizontale Lage gedreht werden, sonst wird die Lebensdauer der Heizröhre verkürzt.
Heizstrahler Einheit 1500 W Heat transmission unit grey 1500 W Unité de transmission de chaleur 1500 W Unità emittente di calore 1500 W
06.2010-DEFI 7
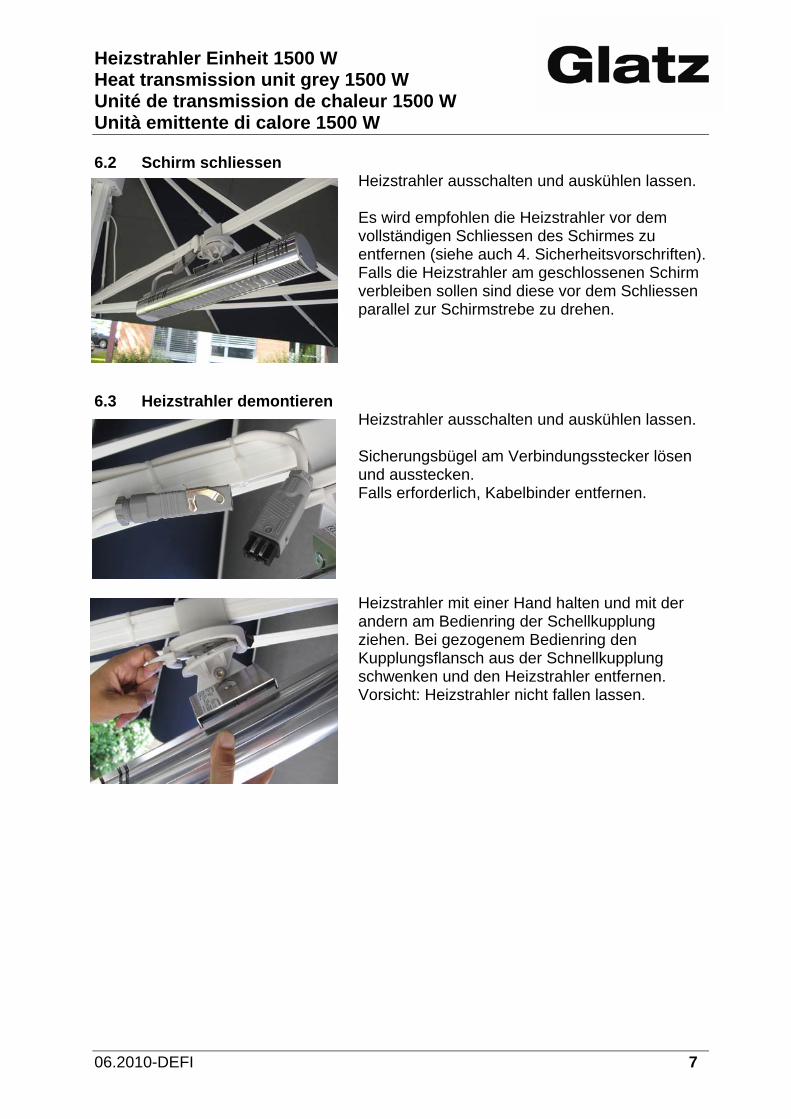
6.2 Schirm schliessen
Heizstrahler ausschalten und auskühlen lassen. Es wird empfohlen die Heizstrahler vor dem vollständigen Schliessen des Schirmes zu entfernen (siehe auch 4. Sicherheitsvorschriften). Falls die Heizstrahler am geschlossenen Schirm verbleiben sollen sind diese vor dem Schliessen parallel zur Schirmstrebe zu drehen.
6.3 Heizstrahler demontieren
Heizstrahler ausschalten und auskühlen lassen. Sicherungsbügel am Verbindungsstecker lösen und ausstecken. Falls erforderlich, Kabelbinder entfernen. Heizstrahler mit einer Hand halten und mit der andern am Bedienring der Schellkupplung ziehen. Bei gezogenem Bedienring den Kupplungsflansch aus der Schnellkupplung schwenken und den Heizstrahler entfernen. Vorsicht: Heizstrahler nicht fallen lassen.
Heizstrahler Einheit 1500 W Heat transmission unit 1500 W
Unité de transmission de chaleur 1500 W Unità emittente di calore 1500 W
8 10.2006-DEFI
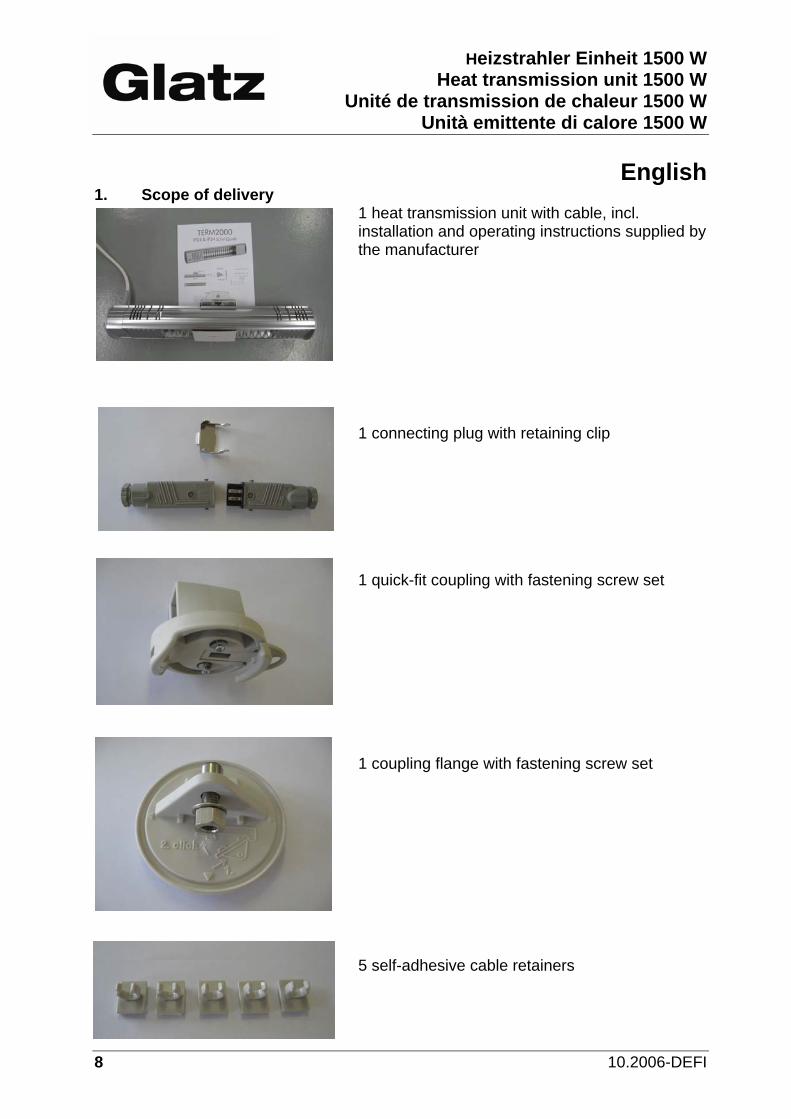
English 1. Scope of delivery
1 heat transmission unit with cable, incl. installation and operating instructions supplied by the manufacturer 1 connecting plug with retaining clip 1 quick-fit coupling with fastening screw set 1 coupling flange with fastening screw set 5 self-adhesive cable retainers
Heizstrahler Einheit 1500 W Heat transmission unit grey 1500 W Unité de transmission de chaleur 1500 W Unità emittente di calore 1500 W
06.2010-DEFI 9
3. Intended use The heat transmission unit 1500W is exclusively designed for the installation on sunshades of the brands Glatz Castello®, Palazzo® M8 and Palazzo® M16. It is solely intended for heating the area below the sunshade roof. 4. Safety instructions
The installation and operating instructions supplied by the manufacturer of the heat transmission unit are part of the safety instructions.
Before removal, turn the heat transmission unit off and let it cool down for avoiding the risk of burns
Never close sunshades while the heat transmission units are turned on or hot, and never turn on heat transmission units on sunshades which are not fully opened – Risk of fire!
Heat transmission units may not be used together with wind detectors for automatic closing. Risk of fire!
We recommend to remove the heat transmission units prior to closing the sunshade. Damages to the fabric due to the heat transmission unit rubbing against the closed sunshade are excluded from warranty, as are damages to the heat transmission unit caused by effects of external forces.
The installation of the heat transmission unit, in particular its connection to the mains supply, may only be executed by a certified expert. Local regulations must be observed.
Heizstrahler Einheit 1500 W Heat transmission unit 1500 W
Unité de transmission de chaleur 1500 W Unità emittente di calore 1500 W
10 10.2006-DEFI
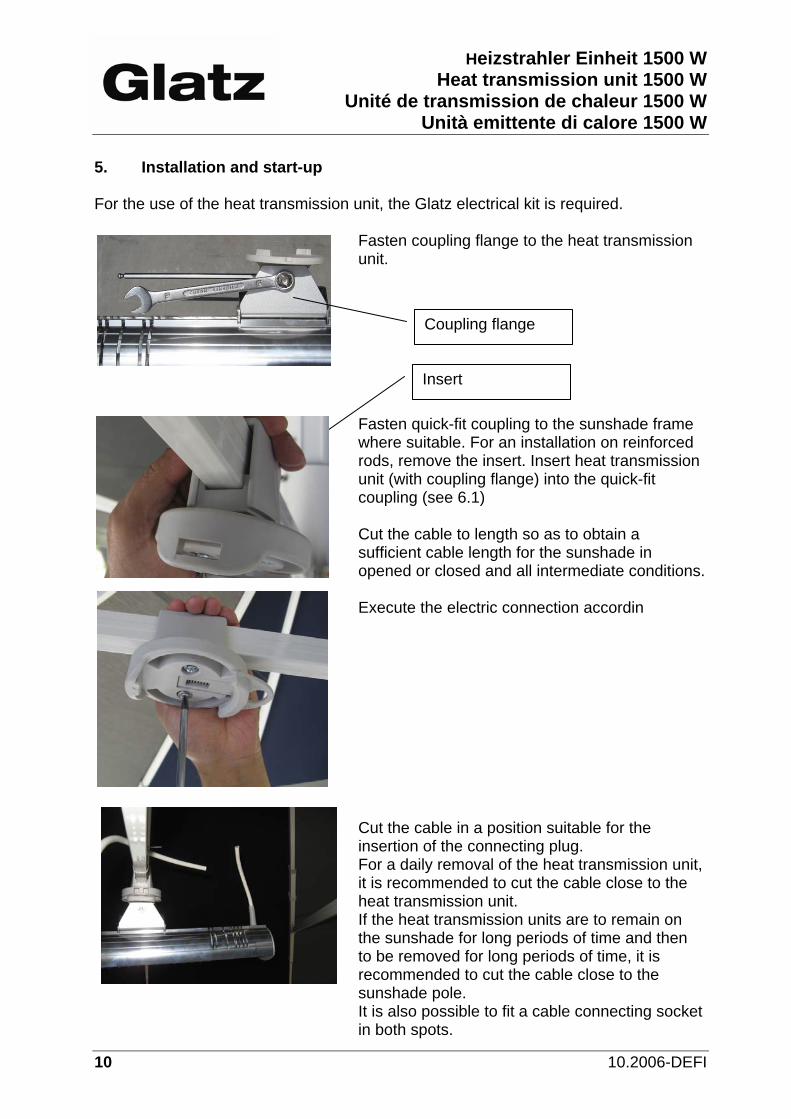
5. Installation and start-up For the use of the heat transmission unit, the Glatz electrical kit is required.
Fasten coupling flange to the heat transmission unit. Fasten quick-fit coupling to the sunshade frame where suitable. For an installation on reinforced rods, remove the insert. Insert heat transmission unit (with coupling flange) into the quick-fit coupling (see 6.1) Cut the cable to length so as to obtain a sufficient cable length for the sunshade in opened or closed and all intermediate conditions. Execute the electric connection accordin
Cut the cable in a position suitable for the insertion of the connecting plug. For a daily removal of the heat transmission unit, it is recommended to cut the cable close to the heat transmission unit. If the heat transmission units are to remain on the sunshade for long periods of time and then to be removed for long periods of time, it is recommended to cut the cable close to the sunshade pole. It is also possible to fit a cable connecting socket in both spots.
Coupling flange
Insert
Heizstrahler Einheit 1500 W Heat transmission unit grey 1500 W Unité de transmission de chaleur 1500 W Unità emittente di calore 1500 W
06.2010-DEFI 11
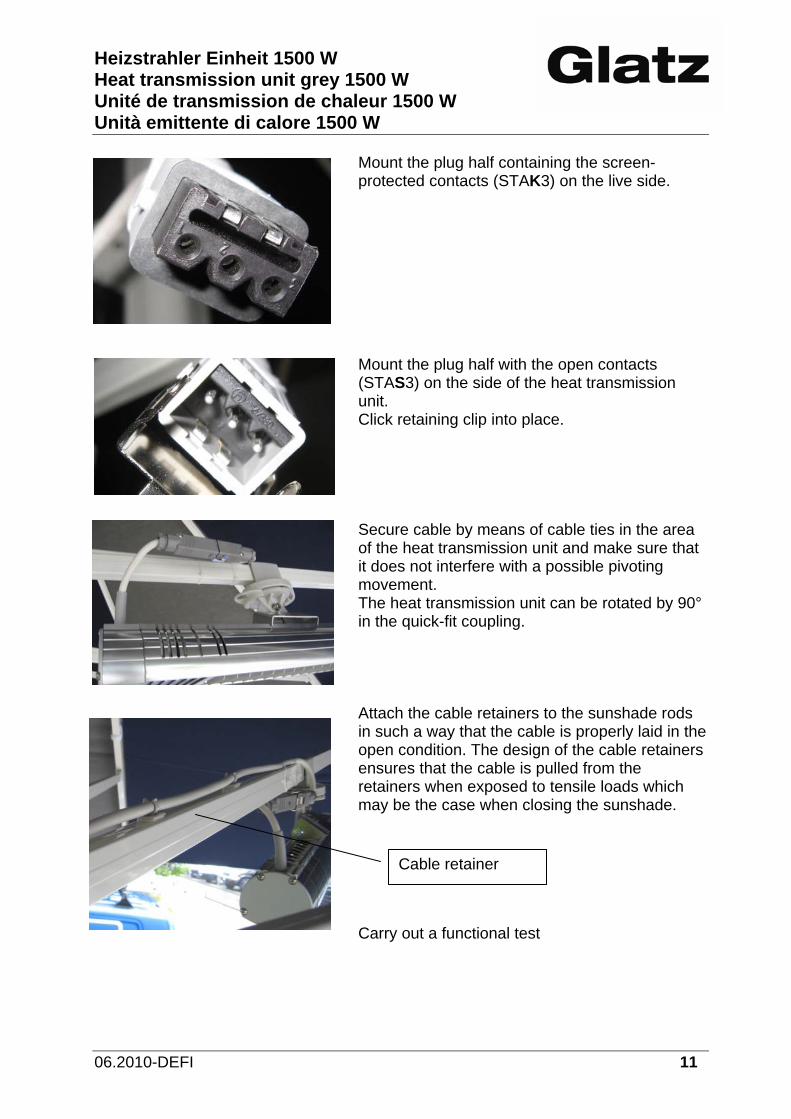
Mount the plug half containing the screen-protected contacts (STAK3) on the live side. Mount the plug half with the open contacts (STAS3) on the side of the heat transmission unit. Click retaining clip into place.
Secure cable by means of cable ties in the area of the heat transmission unit and make sure that it does not interfere with a possible pivoting movement. The heat transmission unit can be rotated by 90° in the quick-fit coupling.
Attach the cable retainers to the sunshade rods in such a way that the cable is properly laid in the open condition. The design of the cable retainers ensures that the cable is pulled from the retainers when exposed to tensile loads which may be the case when closing the sunshade. Carry out a functional test
Cable retainer
Heizstrahler Einheit 1500 W Heat transmission unit 1500 W
Unité de transmission de chaleur 1500 W Unità emittente di calore 1500 W
12 10.2006-DEFI
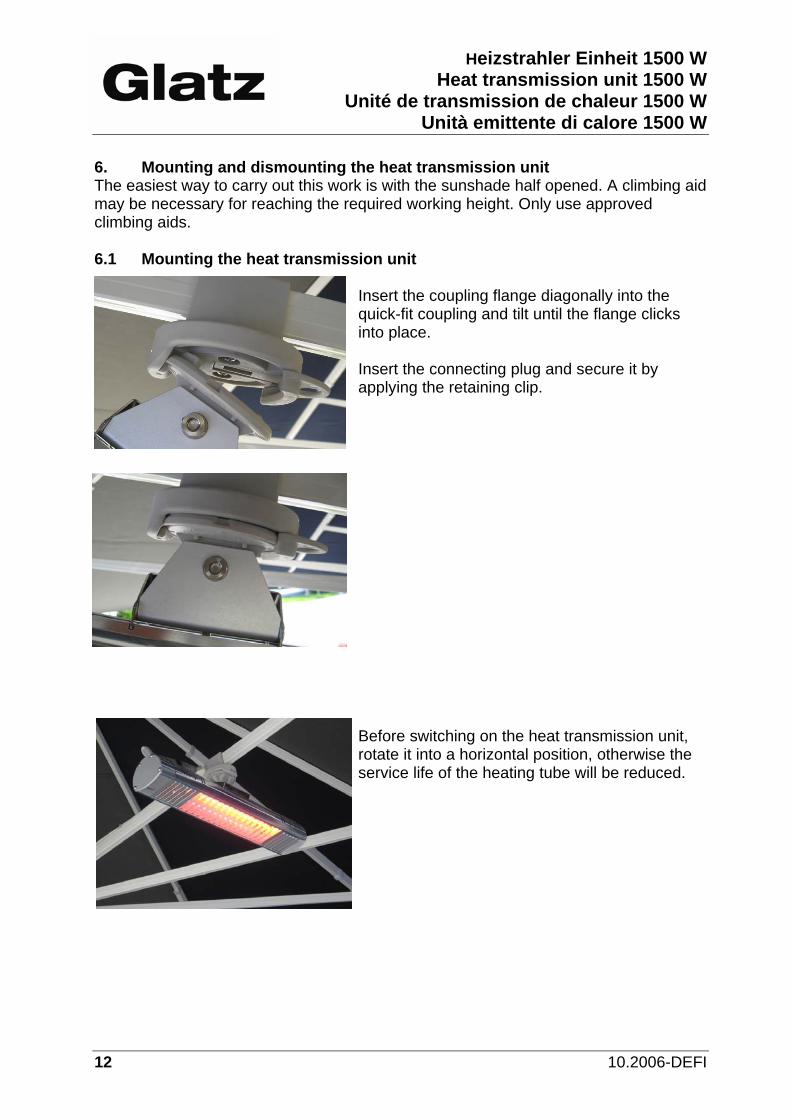
6. Mounting and dismounting the heat transmission unit The easiest way to carry out this work is with the sunshade half opened. A climbing aid may be necessary for reaching the required working height. Only use approved climbing aids. 6.1 Mounting the heat transmission unit
Insert the coupling flange diagonally into the quick-fit coupling and tilt until the flange clicks into place. Insert the connecting plug and secure it by applying the retaining clip.
Before switching on the heat transmission unit, rotate it into a horizontal position, otherwise the service life of the heating tube will be reduced.
Heizstrahler Einheit 1500 W Heat transmission unit grey 1500 W Unité de transmission de chaleur 1500 W Unità emittente di calore 1500 W
06.2010-DEFI 13
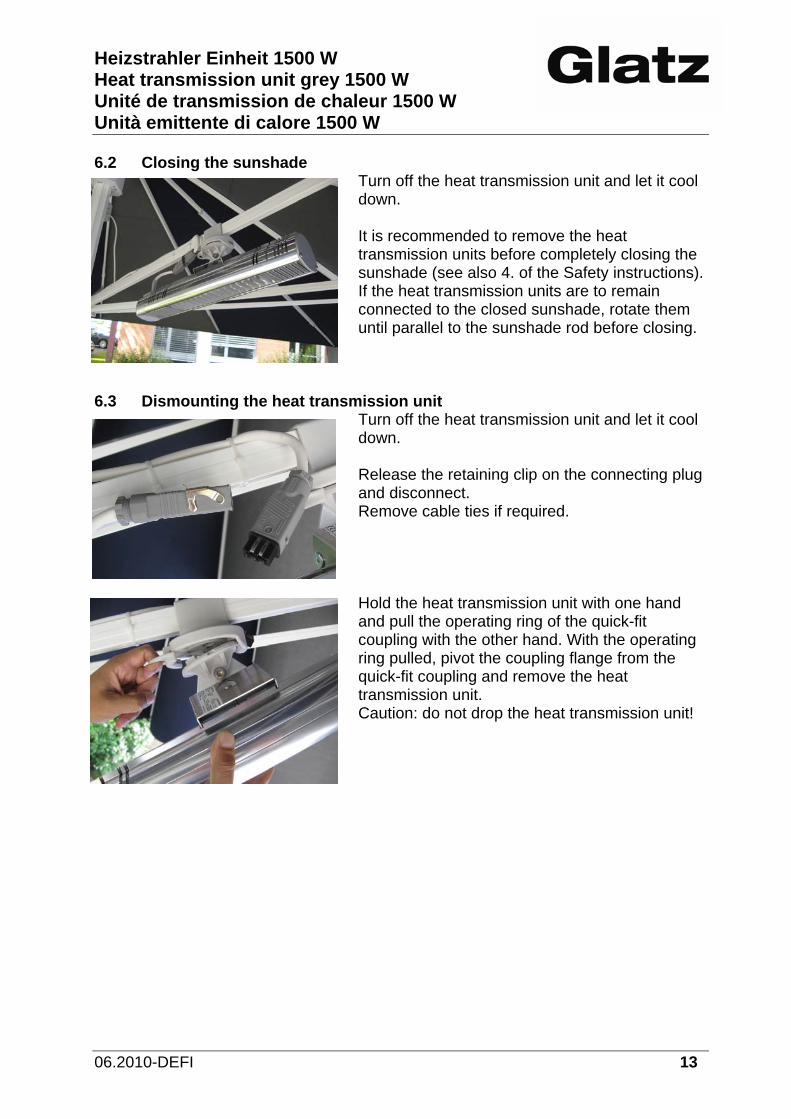
6.2 Closing the sunshade
Turn off the heat transmission unit and let it cool down. It is recommended to remove the heat transmission units before completely closing the sunshade (see also 4. of the Safety instructions). If the heat transmission units are to remain connected to the closed sunshade, rotate them until parallel to the sunshade rod before closing.
6.3 Dismounting the heat transmission unit
Turn off the heat transmission unit and let it cool down. Release the retaining clip on the connecting plug and disconnect. Remove cable ties if required.
Hold the heat transmission unit with one hand and pull the operating ring of the quick-fit coupling with the other hand. With the operating ring pulled, pivot the coupling flange from the quick-fit coupling and remove the heat transmission unit. Caution: do not drop the heat transmission unit!
Heizstrahler Einheit 1500 W Heat transmission unit 1500 W
Unité de transmission de chaleur 1500 W Unità emittente di calore 1500 W
14 10.2006-DEFI
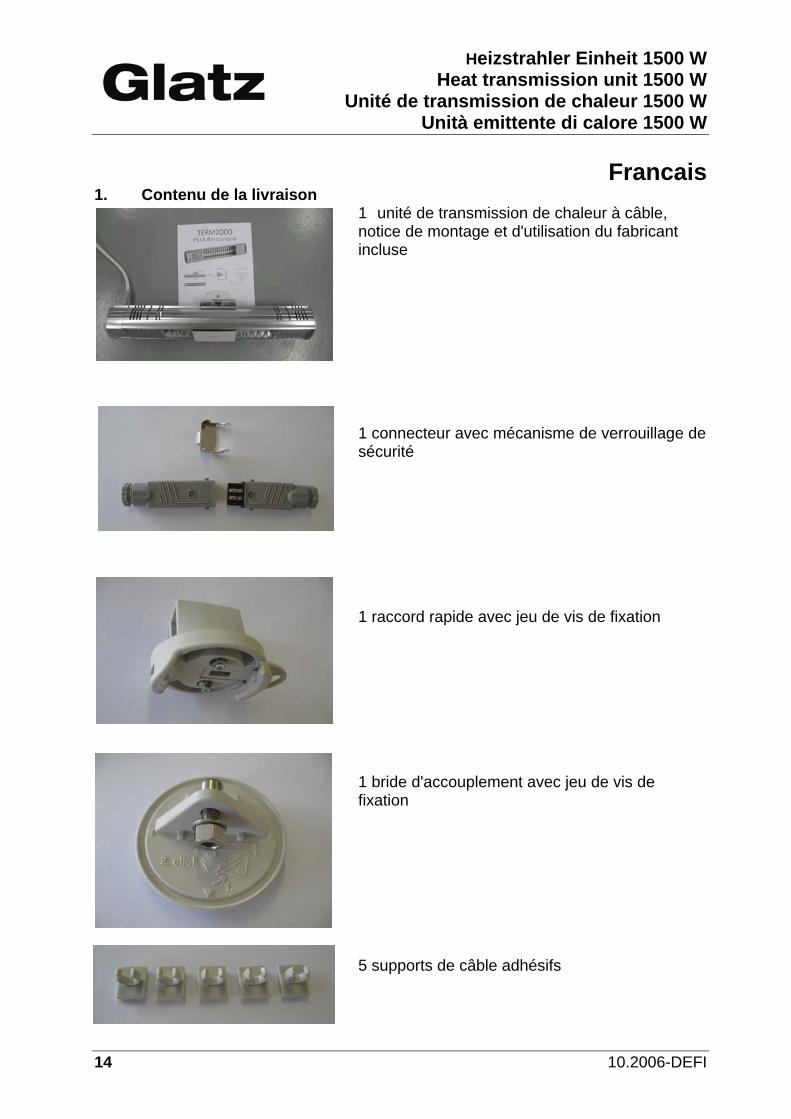
Francais 1. Contenu de la livraison
1 unité de transmission de chaleur à câble, notice de montage et d'utilisation du fabricant incluse 1 connecteur avec mécanisme de verrouillage de sécurité
1 raccord rapide avec jeu de vis de fixation 1 bride d'accouplement avec jeu de vis de fixation 5 supports de câble adhésifs
Heizstrahler Einheit 1500 W Heat transmission unit grey 1500 W Unité de transmission de chaleur 1500 W Unità emittente di calore 1500 W
06.2010-DEFI 15
3. Utilisation conforme L'unité de transmission de chaleur 1500 W est exclusivement destinée à être installée sur les parasols de la marque Glatz Castello®, Palazzo® M8 et Palazzo® M16. Elle a uniquement pour but de chauffer le dessous du parasol de toiture. 4. Consignes de sécurité
La notice de montage et d'utilisation du fabricant fait partie intégrante des consignes de sécurité.
Arrêter et laisser refroidir l'unité de transmission de chaleur avant de l'ôter du parasol pour prévenir le risque de brûlures.
Ne jamais fermer les parasols lorsque les unités de transmission de chaleur sont allumées ou encore chaudes et ne jamais mettre en marche l'unité de transmission de chaleur lorsque le parasol n'est pas entièrement ouvert. Risque d'incendie!
Les unités de transmission de chaleur ne doivent pas être utilisées en combinaison avec un système de fermeture automatique par vents forts. Risque d'incendie!
Nous recommandons d'enlever l'unité de transmission de chaleur avant de fermer le parasol. Les dégâts de la toile occasionnés par le frottement de l'unité de transmission de chaleur contre le parasol fermé sont exclus de la garantie, au même titre que les dommages des unités de transmission de chaleur engendrés par des contraintes extérieures.
L'installation des unités de transmission de chaleur, en particulier le branchement électrique et la première mise en service ne doivent être effectués que par un professionnel qualifié. Prière d'observer les réglementations locales.
Heizstrahler Einheit 1500 W Heat transmission unit 1500 W
Unité de transmission de chaleur 1500 W Unità emittente di calore 1500 W
16 10.2006-DEFI
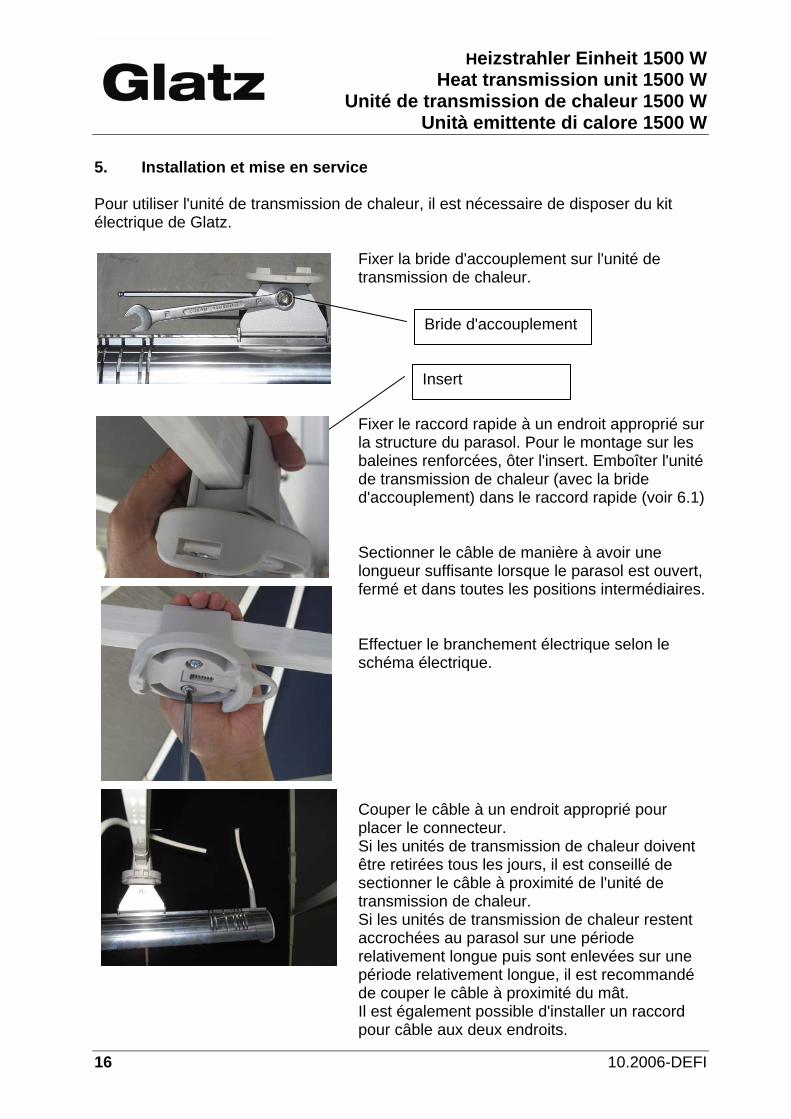
5. Installation et mise en service Pour utiliser l'unité de transmission de chaleur, il est nécessaire de disposer du kit électrique de Glatz.
Fixer la bride d'accouplement sur l'unité de transmission de chaleur. Fixer le raccord rapide à un endroit approprié sur la structure du parasol. Pour le montage sur les baleines renforcées, ôter l'insert. Emboîter l'unité de transmission de chaleur (avec la bride d'accouplement) dans le raccord rapide (voir 6.1) Sectionner le câble de manière à avoir une longueur suffisante lorsque le parasol est ouvert, fermé et dans toutes les positions intermédiaires. Effectuer le branchement électrique selon le schéma électrique.
Couper le câble à un endroit approprié pour placer le connecteur. Si les unités de transmission de chaleur doivent être retirées tous les jours, il est conseillé de sectionner le câble à proximité de l'unité de transmission de chaleur. Si les unités de transmission de chaleur restent accrochées au parasol sur une période relativement longue puis sont enlevées sur une période relativement longue, il est recommandé de couper le câble à proximité du mât. Il est également possible d'installer un raccord pour câble aux deux endroits.
Bride d'accouplement
Insert
Heizstrahler Einheit 1500 W Heat transmission unit grey 1500 W Unité de transmission de chaleur 1500 W Unità emittente di calore 1500 W
06.2010-DEFI 17
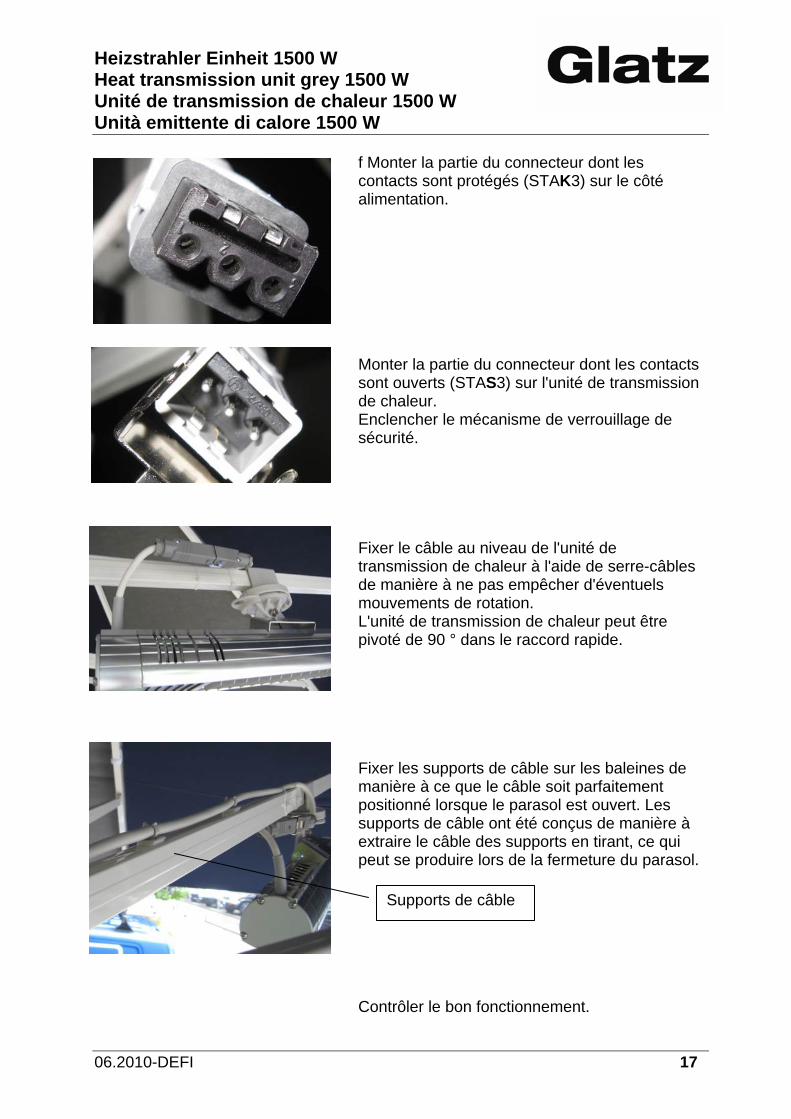
f Monter la partie du connecteur dont les contacts sont protégés (STAK3) sur le côté alimentation. Monter la partie du connecteur dont les contacts sont ouverts (STAS3) sur l'unité de transmission de chaleur. Enclencher le mécanisme de verrouillage de sécurité. Fixer le câble au niveau de l'unité de transmission de chaleur à l'aide de serre-câbles de manière à ne pas empêcher d'éventuels mouvements de rotation. L'unité de transmission de chaleur peut être pivoté de 90 ° dans le raccord rapide. Fixer les supports de câble sur les baleines de manière à ce que le câble soit parfaitement positionné lorsque le parasol est ouvert. Les supports de câble ont été conçus de manière à extraire le câble des supports en tirant, ce qui peut se produire lors de la fermeture du parasol. Contrôler le bon fonctionnement.
Supports de câble
Heizstrahler Einheit 1500 W Heat transmission unit 1500 W
Unité de transmission de chaleur 1500 W Unità emittente di calore 1500 W
18 10.2006-DEFI
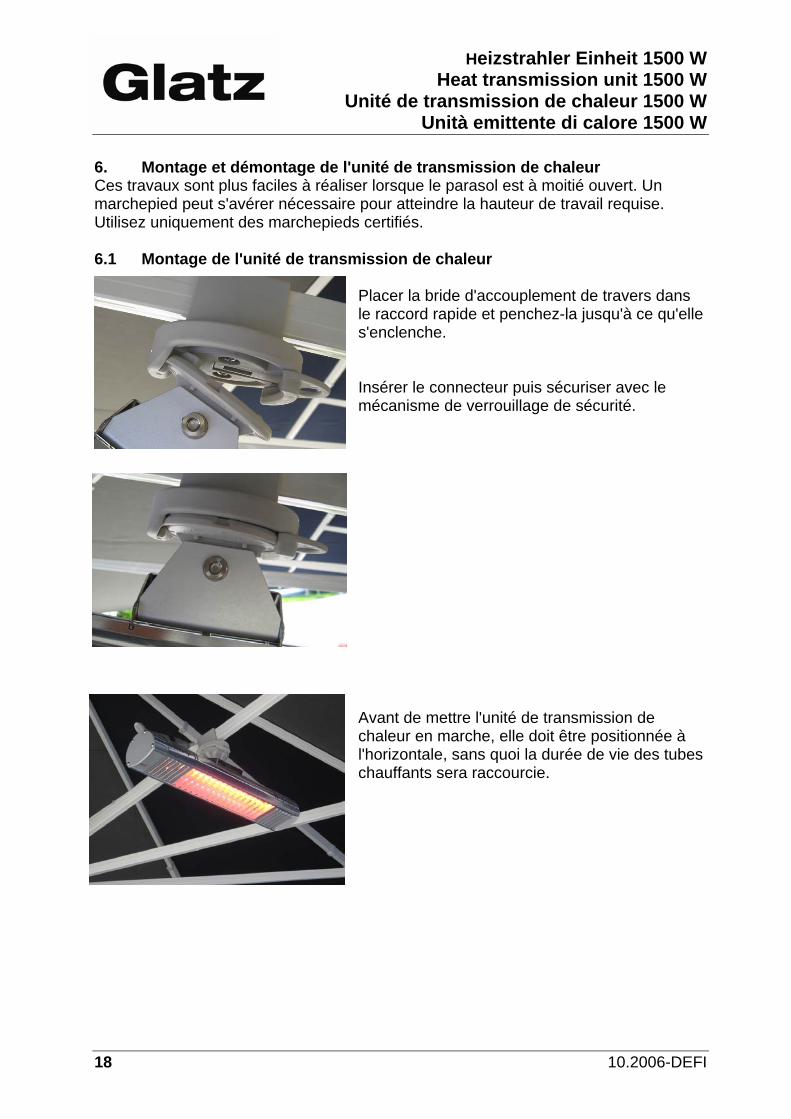
6. Montage et démontage de l'unité de transmission de chaleur Ces travaux sont plus faciles à réaliser lorsque le parasol est à moitié ouvert. Un marchepied peut s'avérer nécessaire pour atteindre la hauteur de travail requise. Utilisez uniquement des marchepieds certifiés. 6.1 Montage de l'unité de transmission de chaleur
Placer la bride d'accouplement de travers dans le raccord rapide et penchez-la jusqu'à ce qu'elle s'enclenche. Insérer le connecteur puis sécuriser avec le mécanisme de verrouillage de sécurité. Avant de mettre l'unité de transmission de chaleur en marche, elle doit être positionnée à l'horizontale, sans quoi la durée de vie des tubes chauffants sera raccourcie.
Heizstrahler Einheit 1500 W Heat transmission unit grey 1500 W Unité de transmission de chaleur 1500 W Unità emittente di calore 1500 W
06.2010-DEFI 19
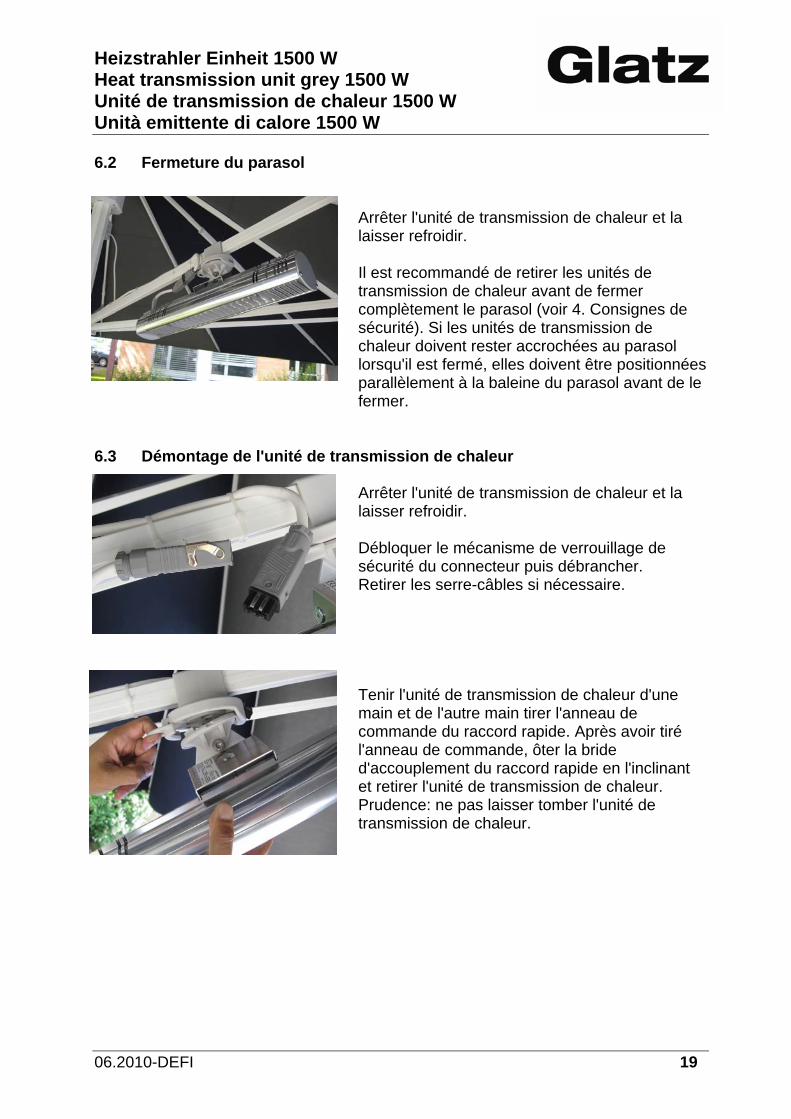
6.2 Fermeture du parasol
Arrêter l'unité de transmission de chaleur et la laisser refroidir. Il est recommandé de retirer les unités de transmission de chaleur avant de fermer complètement le parasol (voir 4. Consignes de sécurité). Si les unités de transmission de chaleur doivent rester accrochées au parasol lorsqu'il est fermé, elles doivent être positionnées parallèlement à la baleine du parasol avant de le fermer.
6.3 Démontage de l'unité de transmission de chaleur
Arrêter l'unité de transmission de chaleur et la laisser refroidir. Débloquer le mécanisme de verrouillage de sécurité du connecteur puis débrancher. Retirer les serre-câbles si nécessaire. Tenir l'unité de transmission de chaleur d'une main et de l'autre main tirer l'anneau de commande du raccord rapide. Après avoir tiré l'anneau de commande, ôter la bride d'accouplement du raccord rapide en l'inclinant et retirer l'unité de transmission de chaleur. Prudence: ne pas laisser tomber l'unité de transmission de chaleur.
Heizstrahler Einheit 1500 W Heat transmission unit 1500 W
Unité de transmission de chaleur 1500 W Unità emittente di calore 1500 W
20 10.2006-DEFI
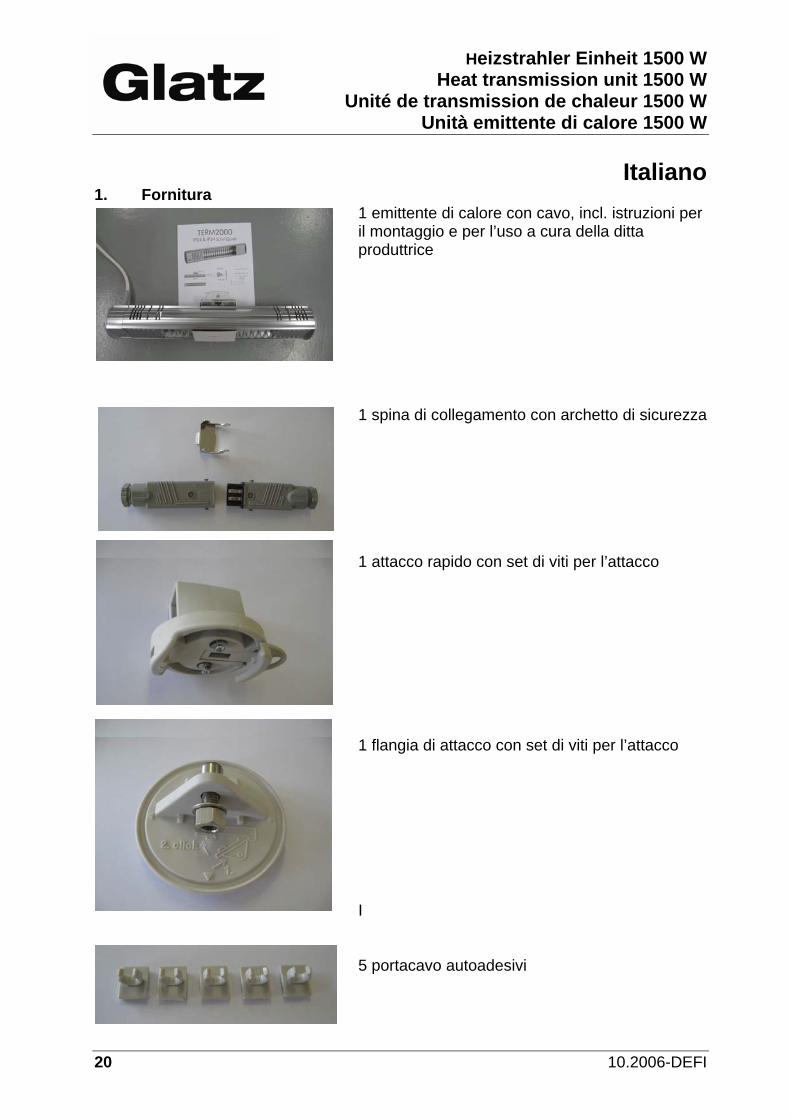
Italiano 1. Fornitura
1 emittente di calore con cavo, incl. istruzioni per il montaggio e per l’uso a cura della ditta produttrice 1 spina di collegamento con archetto di sicurezza 1 attacco rapido con set di viti per l’attacco 1 flangia di attacco con set di viti per l’attacco I 5 portacavo autoadesivi
Heizstrahler Einheit 1500 W Heat transmission unit grey 1500 W Unité de transmission de chaleur 1500 W Unità emittente di calore 1500 W
06.2010-DEFI 21
3. Uso a norma L’unità emittente di calore 1500W è progettata esclusivamente per il montaggio sui modelli di ombrelloni Glatz: Castello®, Palazzo® M8 e Palazzo® M16. Serve esclusivamente a riscaldare la superficie sotto il tetto dell’ombrellone. 4. Norme di sicurezza
Le presenti istruzioni per il montaggio e l’uso a cura della ditta produttrice sono parte integrante delle norme di sicurezza.
Prima di rimuovere l’emittente di calore, spegnerla e lasciarla raffreddare, per non correre il rischio di ustioni
Non chiudere mai gli ombrelloni con le emittenti di calore accese o ancora calde, non accedere le emittenti di calore se l’ombrellone non è completamente aperto – Pericolo di incendio!
Non utilizzare le emittenti di calore insieme a segnalatori di vento che predispongono la chiusura automatica dell’ombrellone. Pericolo di incendio!
É consigliabile rimuovere le emittenti di calore prima di chiudere l’ombrellone. Non è prevista garanzia per danni alla stoffa dovuti a sfregamento dell’emittente di calore con l’ombrellone chiuso o per danni all’emittente di calore causati dall’azione di forze esterne.
L’installazione delle emittenti di calore deve essere effettuata solo da personale specializzato, in particolare per quanto riguarda l’allacciamento alla corrente e la prima messa in funzione. Osservare le disposizioni locali in vigore.
Heizstrahler Einheit 1500 W Heat transmission unit 1500 W
Unité de transmission de chaleur 1500 W Unità emittente di calore 1500 W
22 10.2006-DEFI
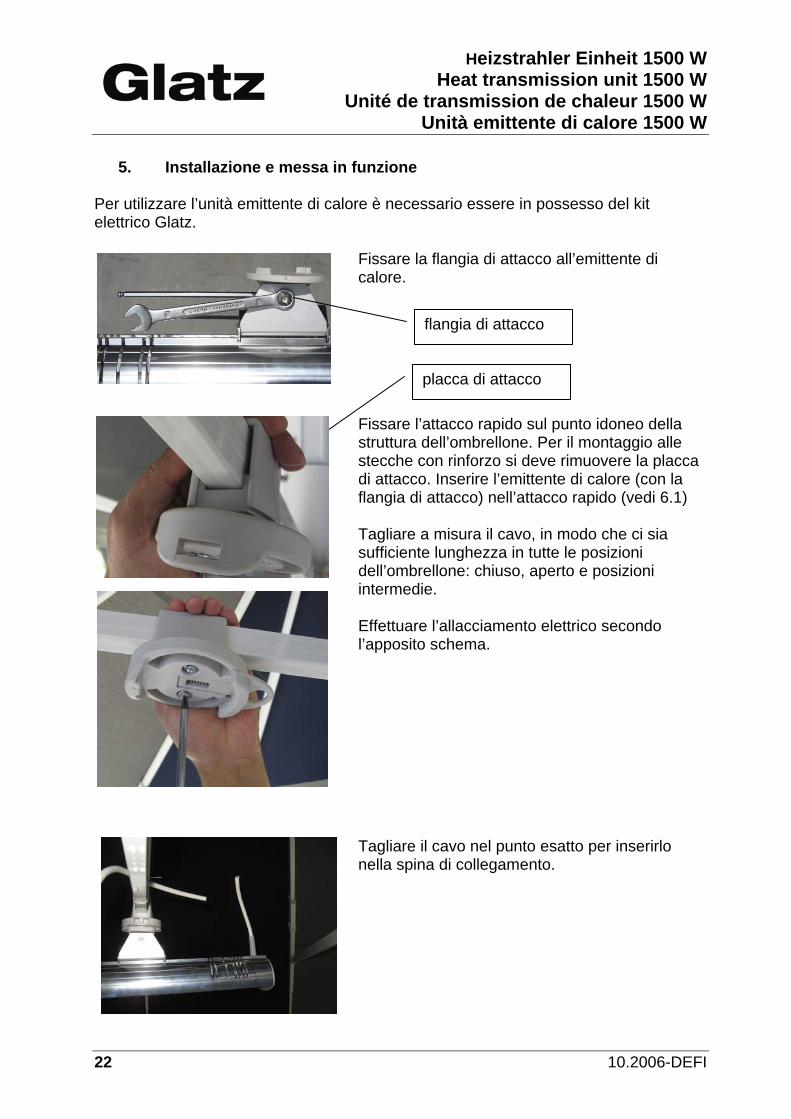
5. Installazione e messa in funzione
Per utilizzare l’unità emittente di calore è necessario essere in possesso del kit elettrico Glatz.
Fissare la flangia di attacco all’emittente di calore. Fissare l’attacco rapido sul punto idoneo della struttura dell’ombrellone. Per il montaggio alle stecche con rinforzo si deve rimuovere la placca di attacco. Inserire l’emittente di calore (con la flangia di attacco) nell’attacco rapido (vedi 6.1) Tagliare a misura il cavo, in modo che ci sia sufficiente lunghezza in tutte le posizioni dell’ombrellone: chiuso, aperto e posizioni intermedie. Effettuare l’allacciamento elettrico secondo l’apposito schema. Tagliare il cavo nel punto esatto per inserirlo nella spina di collegamento.
flangia di attacco
placca di attacco
Heizstrahler Einheit 1500 W Heat transmission unit grey 1500 W Unité de transmission de chaleur 1500 W Unità emittente di calore 1500 W
06.2010-DEFI 23
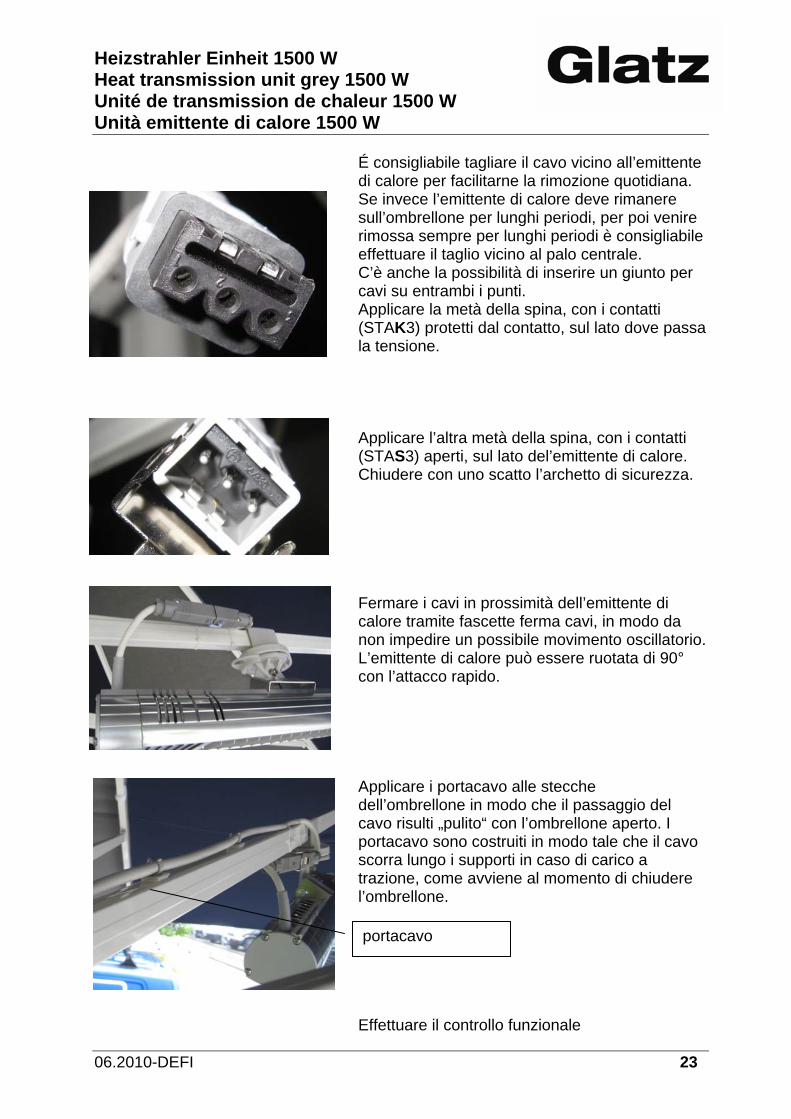
É consigliabile tagliare il cavo vicino all’emittente di calore per facilitarne la rimozione quotidiana. Se invece l’emittente di calore deve rimanere sull’ombrellone per lunghi periodi, per poi venire rimossa sempre per lunghi periodi è consigliabile effettuare il taglio vicino al palo centrale. C’è anche la possibilità di inserire un giunto per cavi su entrambi i punti. Applicare la metà della spina, con i contatti (STAK3) protetti dal contatto, sul lato dove passa la tensione. Applicare l’altra metà della spina, con i contatti (STAS3) aperti, sul lato del’emittente di calore. Chiudere con uno scatto l’archetto di sicurezza. Fermare i cavi in prossimità dell’emittente di calore tramite fascette ferma cavi, in modo da non impedire un possibile movimento oscillatorio. L’emittente di calore può essere ruotata di 90° con l’attacco rapido. Applicare i portacavo alle stecche dell’ombrellone in modo che il passaggio del cavo risulti „pulito“ con l’ombrellone aperto. I portacavo sono costruiti in modo tale che il cavo scorra lungo i supporti in caso di carico a trazione, come avviene al momento di chiudere l’ombrellone.
Effettuare il controllo funzionale
portacavo
Heizstrahler Einheit 1500 W Heat transmission unit 1500 W
Unité de transmission de chaleur 1500 W Unità emittente di calore 1500 W
24 10.2006-DEFI
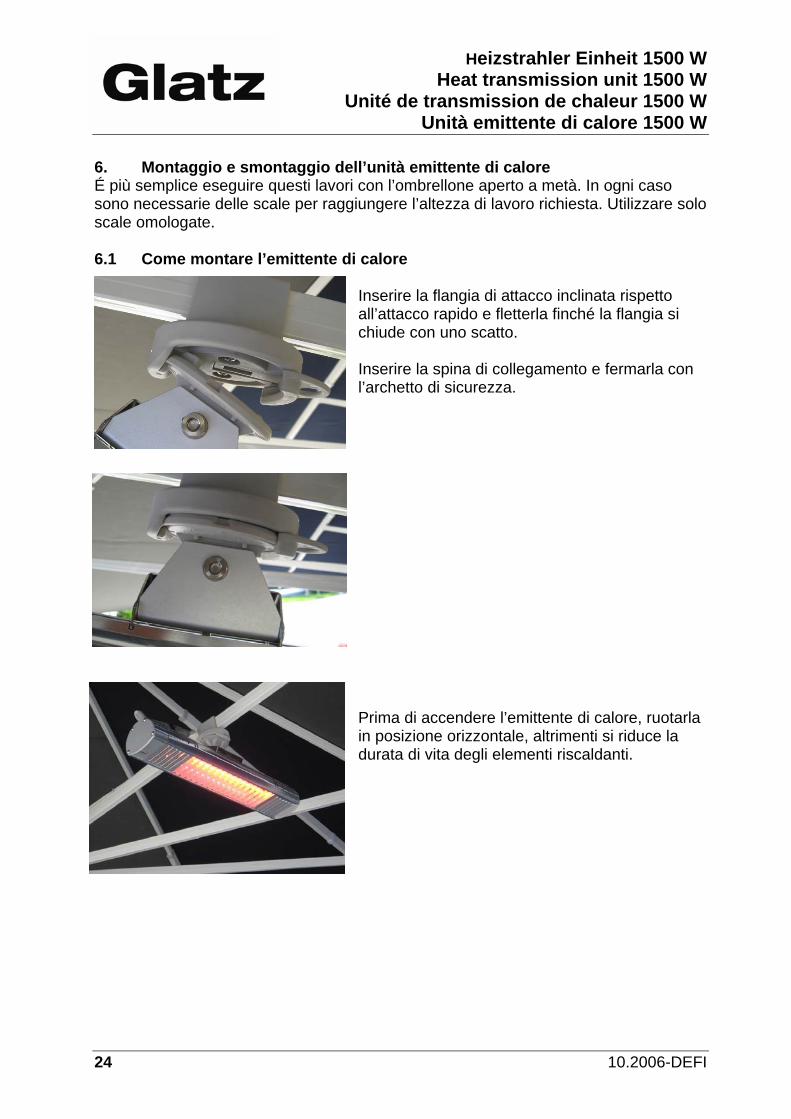
6. Montaggio e smontaggio dell’unità emittente di calore É più semplice eseguire questi lavori con l’ombrellone aperto a metà. In ogni caso sono necessarie delle scale per raggiungere l’altezza di lavoro richiesta. Utilizzare solo scale omologate. 6.1 Come montare l’emittente di calore
Inserire la flangia di attacco inclinata rispetto all’attacco rapido e fletterla finché la flangia si chiude con uno scatto. Inserire la spina di collegamento e fermarla con l’archetto di sicurezza. Prima di accendere l’emittente di calore, ruotarla in posizione orizzontale, altrimenti si riduce la durata di vita degli elementi riscaldanti.
Heizstrahler Einheit 1500 W Heat transmission unit grey 1500 W Unité de transmission de chaleur 1500 W Unità emittente di calore 1500 W
06.2010-DEFI 25
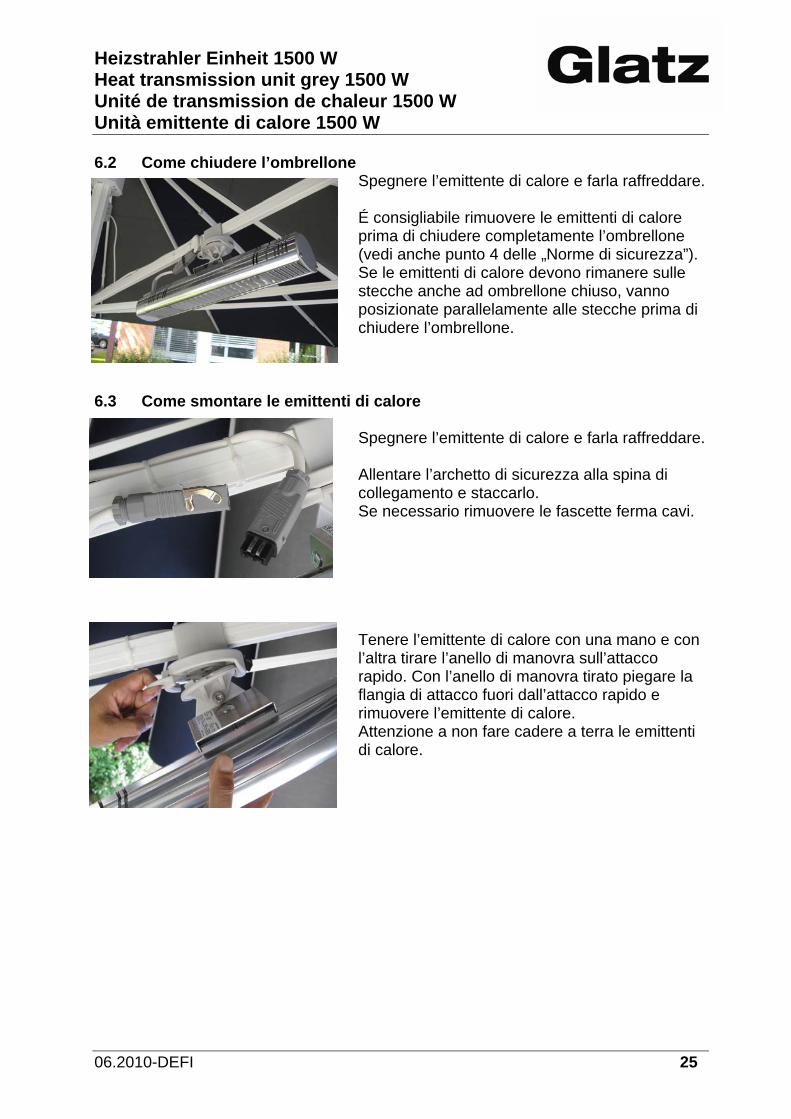
6.2 Come chiudere l’ombrellone
Spegnere l’emittente di calore e farla raffreddare. É consigliabile rimuovere le emittenti di calore prima di chiudere completamente l’ombrellone (vedi anche punto 4 delle „Norme di sicurezza”). Se le emittenti di calore devono rimanere sulle stecche anche ad ombrellone chiuso, vanno posizionate parallelamente alle stecche prima di chiudere l’ombrellone.
6.3 Come smontare le emittenti di calore
Spegnere l’emittente di calore e farla raffreddare. Allentare l’archetto di sicurezza alla spina di collegamento e staccarlo. Se necessario rimuovere le fascette ferma cavi. Tenere l’emittente di calore con una mano e con l’altra tirare l’anello di manovra sull’attacco rapido. Con l’anello di manovra tirato piegare la flangia di attacco fuori dall’attacco rapido e rimuovere l’emittente di calore. Attenzione a non fare cadere a terra le emittenti di calore.
Heizstrahler Einheit 1500 W Heat transmission unit 1500 W
Unité de transmission de chaleur 1500 W Unità emittente di calore 1500 W
26 10.2006-DEFI
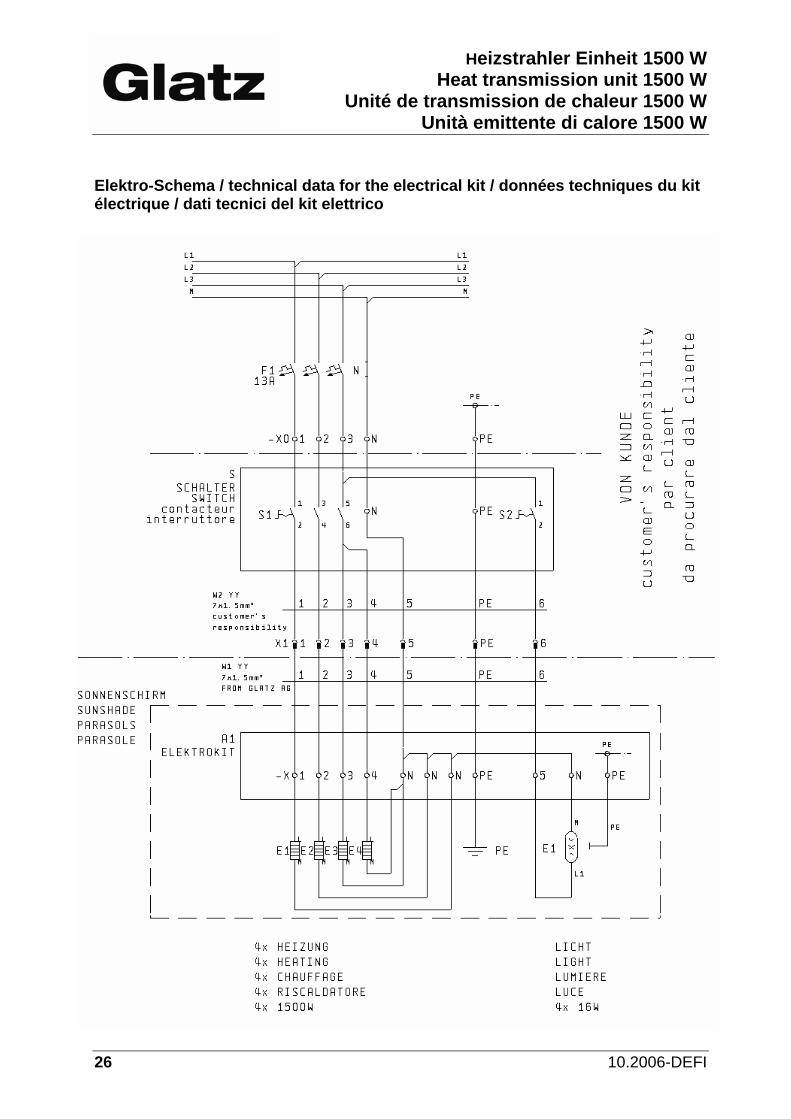
Elektro-Schema / technical data for the electrical kit / données techniques du kit électrique / dati tecnici del kit elettrico
Heizstrahler Einheit 1500 W Heat transmission unit grey 1500 W Unité de transmission de chaleur 1500 W Unità emittente di calore 1500 W
06.2010-DEFI 27
Glatz AG, Neuhofstrasse 12, 8500 FRAUENFELD / SWITZERLAND – www.glatz.ch
Heizstrahler Einheit 1500 W Heat transmission unit 1500 W
Unité de transmission de chaleur 1500 W Unità emittente di calore 1500 W
28 10.2006-DEFI
INFORMATIONSSERVICE D Herzlichen Dank, dass Sie ein Produkt von Glatz gekauft haben! Wünschen Sie bezüglich Sicherheit oder Schirmverankerung weitere Informationen, so wenden Sie sich an den Fachhändler oder an: Glatz AG, Neuhofstrasse 12, 8500 FRAUENFELD / SWITZERLAND – www.glatz.ch Technische Änderungen vorbehalten © Glatz AG Document Art. 261 00 350 211 Gedruckt auf 100% chlorfrei hergestelltem Papier. Unserer Umwelt zuliebe.
INFORMATION SERVICE E Thank you very much for purchasing a product from Glatz! If you would like further information with regard to safety as well as the shade anchoring, please get in touch with your specialist dealer or directly with: Glatz AG, Neuhofstrasse 12, 8500 FRAUENFELD / SWITZERLAND – www.glatz.ch We reserve the right to make technical alterations. © Glatz AG Document Art. 261 00 350 211 Printed on 100% chlorine-free paper. For the benefit of our environment.
SERVICE D’INFORMATIONS F Merci beaucoup d’avoir acheté un produit de Glatz! Si vous désirez en savoir plus sur la sécurité ainsi que sur l’ancrage du parasol, adressez-vous s.v.p. au commerçant spécialisé ou directement à: Glatz AG Neuhofstrasse 12, 8500 FRAUENFELD / SWITZERLAND – www.glatz.ch Sous réserve de modifications techniques. © Glatz AG Document Art. 261 00 350 211 Imprimé sur papier fabriqué 100% sans chlore. Pour l’amour de notre environment.
SERVIZIO INFORMAZIONI I La ringraziamo sentitamente per avere scelto un prodotto della Glatz! Qualora Lei desiderasse ulteriori informazioni con riguardo alla sicurezza o all’ancoraggio dell’ombrellone, La invitiamo a rivolgersi al Suo rivenditore specializzato oppure a: Glatz AG, Neuhofstrasse 12, 8500 FRAUENFELD / SWITZERLAND – www.glatz.ch Con riserva di modifiche tecniche © Glatz AG Document Art. 261 00 350 211 Stampato su carta ecologica al 100% e senza cloro. Per amore del nostro ambiente.