Embed Size (px)
Citation preview
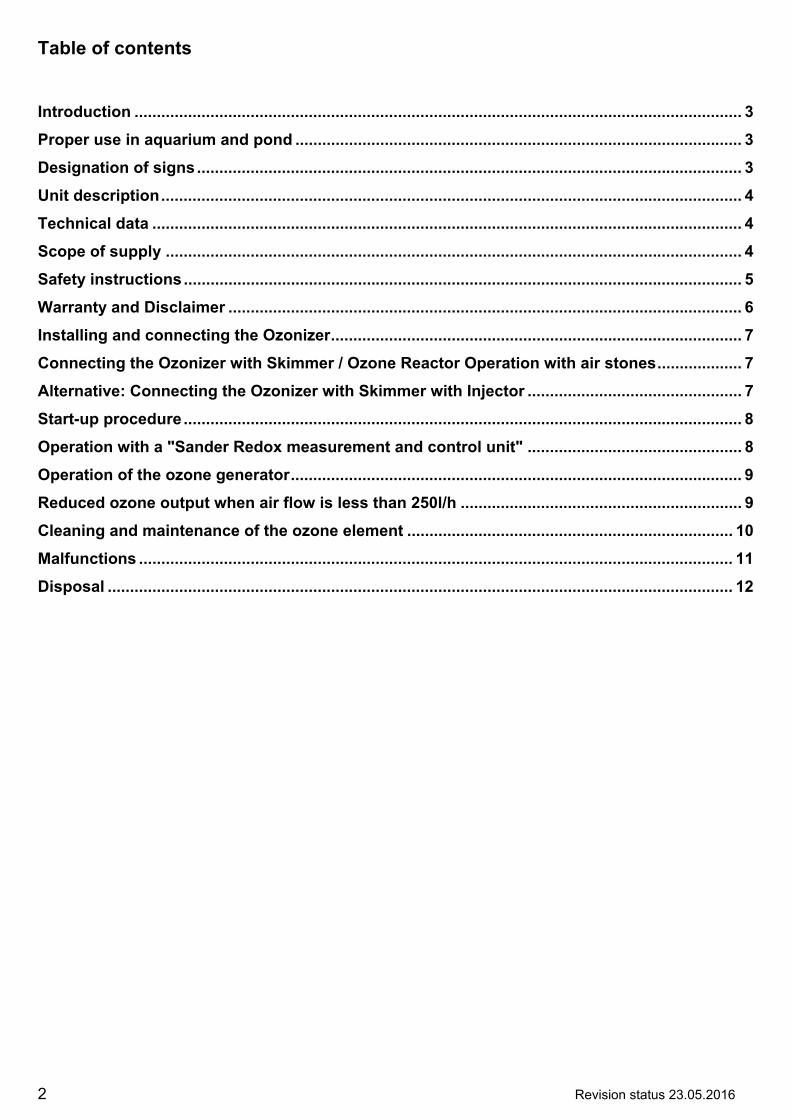
Erwin Sander Elektroapparatebau GmbH Aquarientechnik Am Osterberg 22
DE - 31311 Uetze-Eltze Tel : +49 5173 / 971-0
Fax : +49 5173 / 971-197 Internet: http://www.aqua-sander.de
E-mail: [email protected]
instruction manual
Revision status 23.05.2016
Instructions
Ozonizer XT 2000
2 Revision status 23.05.2016
Table of contents Introduction ........................................................................................................................................ 3
Proper use in aquarium and pond .................................................................................................... 3
Designation of signs .......................................................................................................................... 3
Unit description .................................................................................................................................. 4
Technical data .................................................................................................................................... 4
Scope of supply ................................................................................................................................. 4
Safety instructions ............................................................................................................................. 5
Warranty and Disclaimer ................................................................................................................... 6
Installing and connecting the Ozonizer ............................................................................................ 7
Connecting the Ozonizer with Skimmer / Ozone Reactor Operation with air stones ................... 7
Alternative: Connecting the Ozonizer with Skimmer with Injector ................................................ 7
Start-up procedure ............................................................................................................................. 8
Operation with a "Sander Redox measurement and control unit" ................................................ 8
Operation of the ozone generator ..................................................................................................... 9
Reduced ozone output when air flow is less than 250l/h ............................................................... 9
Cleaning and maintenance of the ozone element ......................................................................... 10
Malfunctions ..................................................................................................................................... 11
Disposal ............................................................................................................................................ 12
Revision status 23.05.2016 3
Introduction Thank you for buying this quality product from Sander! We are confident that you will be satisfied with this device. You will benefit in every respect from our many years of experience in the manufacture of aquarium technology. Please familiarize yourself with the product before using it for the first time. To do so, carefully read through the instruction manual and safety information. Unpack the ozonizer and check it for shipping damage. Operate the device only as described below for the specified applications. Keep this instruction manual in a safe place for future reference. If you give, sell, or lend this device to a third party, please do not forget to include this instruction manual when you do so. Proper use in aquarium and pond The ozonizer has a power rating of 2000 mg ozone/hour (measured in dry air). While used in damp surrounding air (40 - 80 % air moisture), the ozone performance may be diminished by 50 %. The ozonizer generates ozone from the air and has been specially developed for aquariums and ponds. It is important that the ozone is injected into the water at a sufficient depth (at least 20 cm), which is why we recommend the use of a skimmer in marine water (e.g. our product range Helgoland). For freshwater applications, we recommend our product range Fresh-Skim. Other applications of, or modifications to, the ozonizer constitute misuse and entail a risk of personal injury and/or damage to the device. The manufacturer shall assume no liability for injury/damage caused by misuse of the device. The device is not intended for commercial use. Designation of signs IMPORTANT INFORMATION ATTENTION, DANGER THROUGH ELECTRICAL ENERGY ATTENTION! DANGER! ATTENTION, DANGER THROUGH POISONOUS MATERIAL ATTENTION, HOT SURFACES
4 Revision status 23.05.2016
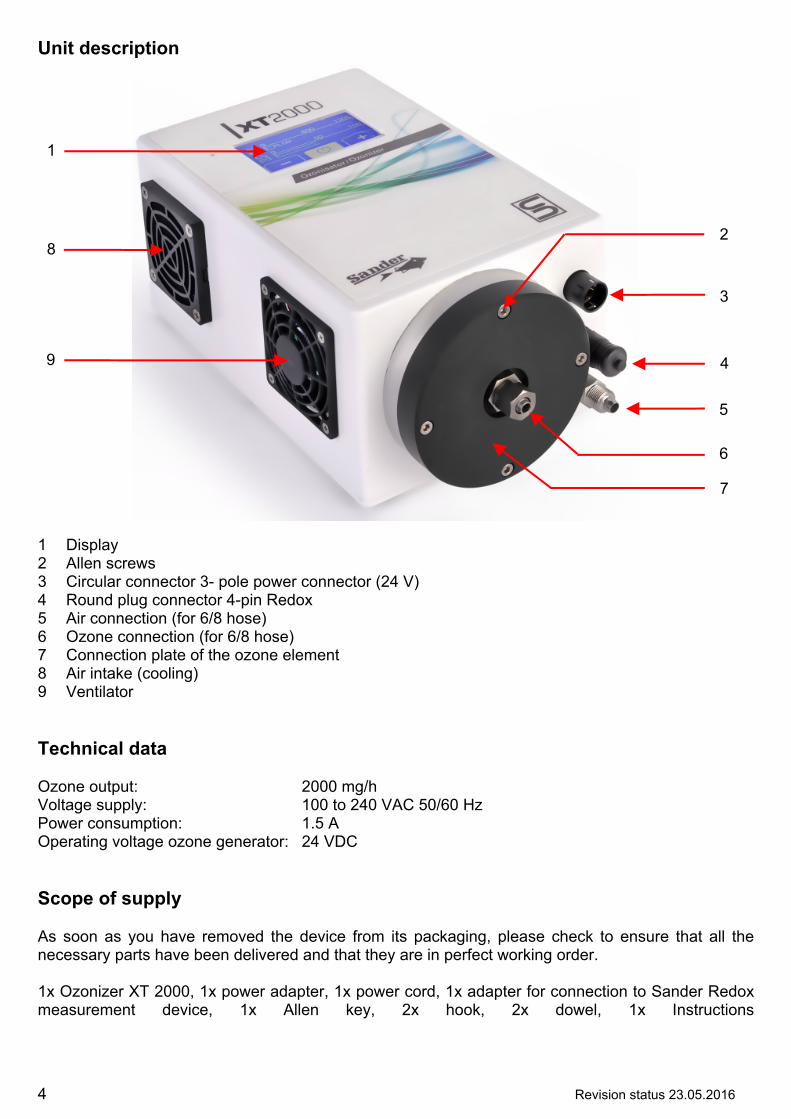
Unit description 1 Display 2 Allen screws 3 Circular connector 3- pole power connector (24 V) 4 Round plug connector 4-pin Redox 5 Air connection (for 6/8 hose) 6 Ozone connection (for 6/8 hose) 7 Connection plate of the ozone element 8 Air intake (cooling) 9 Ventilator Technical data Ozone output: 2000 mg/h Voltage supply: 100 to 240 VAC 50/60 Hz Power consumption: 1.5 A Operating voltage ozone generator: 24 VDC Scope of supply As soon as you have removed the device from its packaging, please check to ensure that all the necessary parts have been delivered and that they are in perfect working order. 1x Ozonizer XT 2000, 1x power adapter, 1x power cord, 1x adapter for connection to Sander Redox measurement device, 1x Allen key, 2x hook, 2x dowel, 1x Instructions
7
2
1
6
3
5
4
8
9
Revision status 23.05.2016 5
Safety instructions
The Ozonizer unit is used on the owner’s risk. The ozonizer must not be allowed to fall into water or otherwise come into contact with water. Do not use the Ozonizer in a flammable or explosive atmosphere. Airborne ozone can be harmful to health if it enters the respiratory system. The Owner should therefore take care that only the needed amount of Ozone is produced. The actual allowed amount of Ozone at working places (MAK) is a maximum of 0.1 ppm (Pieces per million/ 200 microgram). Ozone can already be detected in 1/5 to 1/10 (0.02 ppm) of that amount. If excess ozone is produced (ozone odor), the air discharged from the skimmer should be released into the atmosphere or passed through a residual ozone destructor. Ensure that enough air passes through the ozone element (min. 75l/h). If this minimum value is undershot, the ozonizer is at risk of overheating. Children from the age of 8 years as well as disabled or handicapped persons or persons with no or small technical experience may use the ozonizer when under surveillance or after having received a thorough tuition about the use and safety measures. Children may not play with the ozonizer. Children may do the cleaning and servicing of the unit only under surveillance. Do not dismantle the unit under any circumstances. Improper repairs can seriously endanger the user. If repairs are necessary, please contact a specialist dealer or the manufacturer directly. Do not operate the ozonizer if it is damaged. Damaged ozonizers can seriously endanger the user. Operate your Sander ozonizer exclusively with the power supply unit type GS60A24-P1J 24V 60W 2.5A enclosed in this package. The surfaces of the ozone element (7) can be hot. First let the appliance cool down before starting any cleaning work. Do not operate the ozonizer if it is damaged. Damaged ozonizers can seriously endanger the user.
6 Revision status 23.05.2016
Warranty and Disclaimer All of the Ozonizer units we produce have a 24-month guarantee. Within the guarantee, all parts effected by material defects or improper assembly will be replaced with no further cost. Please note: the following are not covered by warranty: Any damage resulting from misuse by misuse (differing to the description in these
instructions)
Any damage resulting from unauthorized repair, disassembly, improper cleaning or opening the device.
Damage caused by improper transportation, dropping, exposure to shocks, etc. after
the purchase date. The guarantee and liability of Erwin Sander Elektroapparatebau GmbH Company covers only the delivered Ozonizer..
Revision status 23.05.2016 7
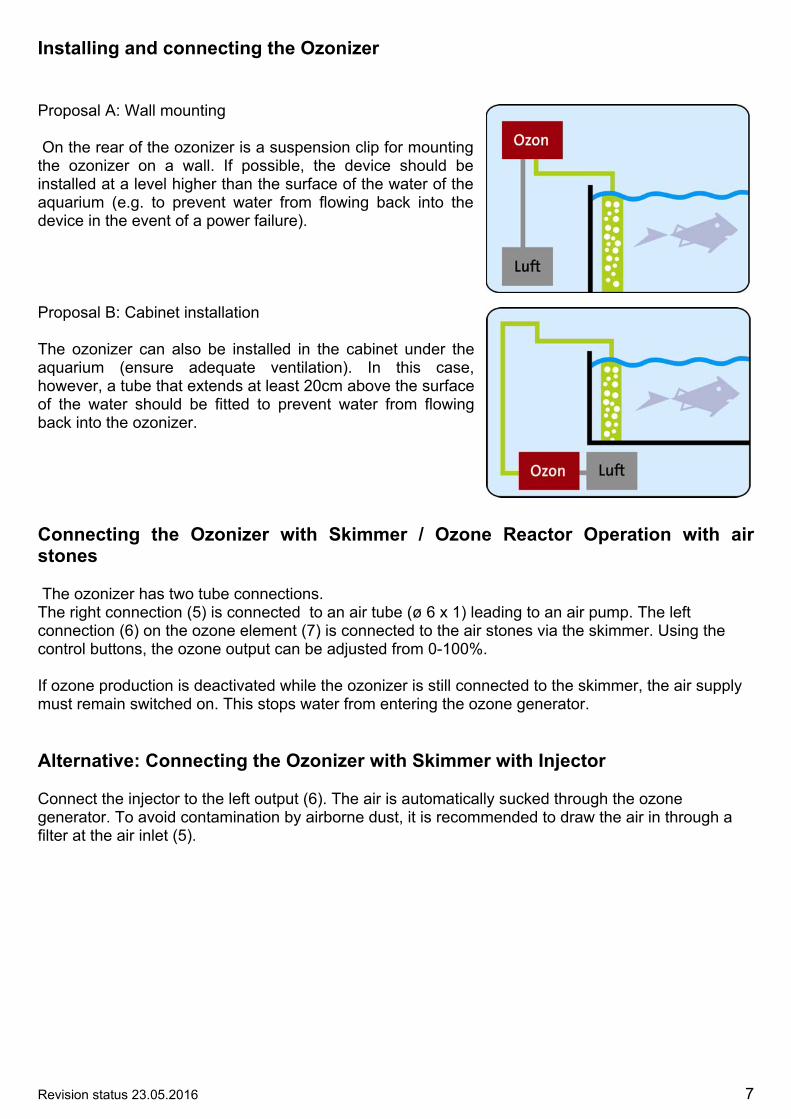
Installing and connecting the Ozonizer Proposal A: Wall mounting On the rear of the ozonizer is a suspension clip for mounting the ozonizer on a wall. If possible, the device should be installed at a level higher than the surface of the water of the aquarium (e.g. to prevent water from flowing back into the device in the event of a power failure). Proposal B: Cabinet installation The ozonizer can also be installed in the cabinet under the aquarium (ensure adequate ventilation). In this case, however, a tube that extends at least 20cm above the surface of the water should be fitted to prevent water from flowing back into the ozonizer. Connecting the Ozonizer with Skimmer / Ozone Reactor Operation with air stones The ozonizer has two tube connections. The right connection (5) is connected to an air tube (ø 6 x 1) leading to an air pump. The left connection (6) on the ozone element (7) is connected to the air stones via the skimmer. Using the control buttons, the ozone output can be adjusted from 0-100%. If ozone production is deactivated while the ozonizer is still connected to the skimmer, the air supply must remain switched on. This stops water from entering the ozone generator. Alternative: Connecting the Ozonizer with Skimmer with Injector Connect the injector to the left output (6). The air is automatically sucked through the ozone generator. To avoid contamination by airborne dust, it is recommended to draw the air in through a filter at the air inlet (5).
8 Revision status 23.05.2016
Start-up procedure When the air supply is connected, the device can be connected to the power supply. For this purpose first plug the 24V plug into the power supply socket (3) of the ozonizer. Then insert the IEC power cord of the power adapter into the power supply. Only when this is done, plug the safety plug into the socket. The following guide values for setting the ozone volume apply: approx. 10 mg of ozone per hour for 100 ml sea water; approx. 10 mg of ozone per hour for 200 litres of fresh water. To determine the ozone requirements, we recommend measuring the redox potential with a Sander redox measuring and regulating device, which switches the ozonizer on and off automatically depending on the set target value..
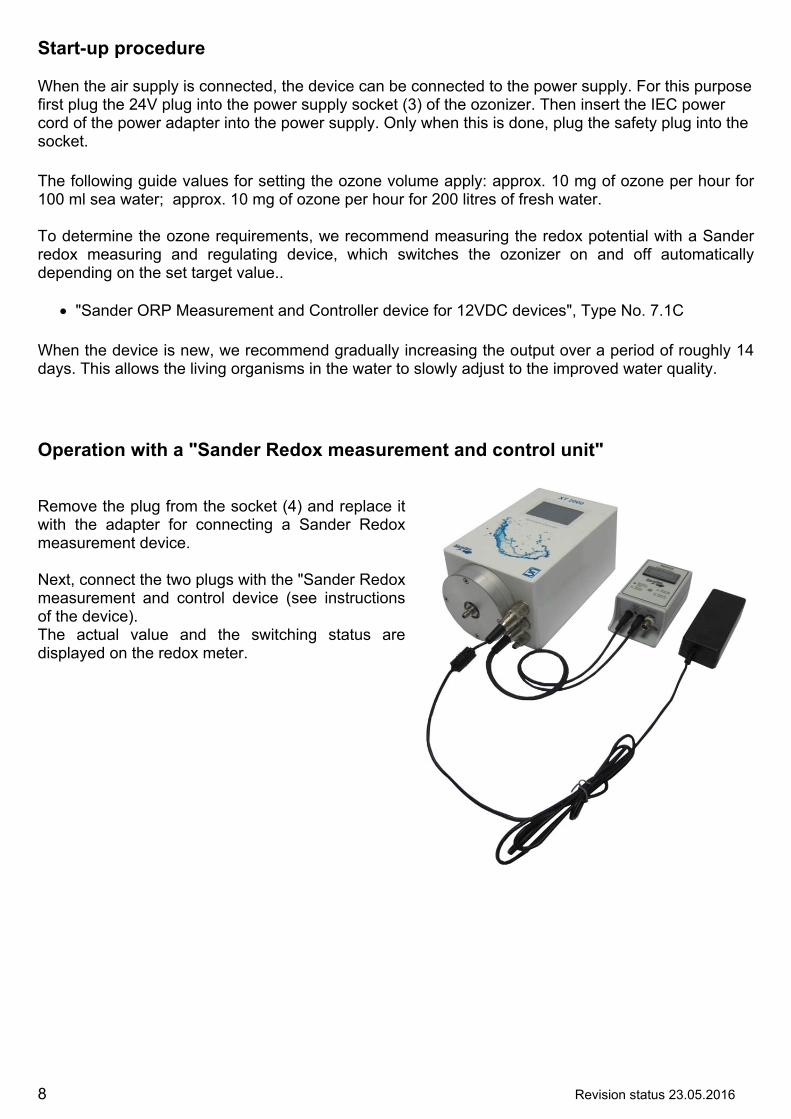
"Sander ORP Measurement and Controller device for 12VDC devices", Type No. 7.1C When the device is new, we recommend gradually increasing the output over a period of roughly 14 days. This allows the living organisms in the water to slowly adjust to the improved water quality. Operation with a "Sander Redox measurement and control unit" Remove the plug from the socket (4) and replace it with the adapter for connecting a Sander Redox measurement device. Next, connect the two plugs with the "Sander Redox measurement and control device (see instructions of the device). The actual value and the switching status are displayed on the redox meter.
Revision status 23.05.2016 9
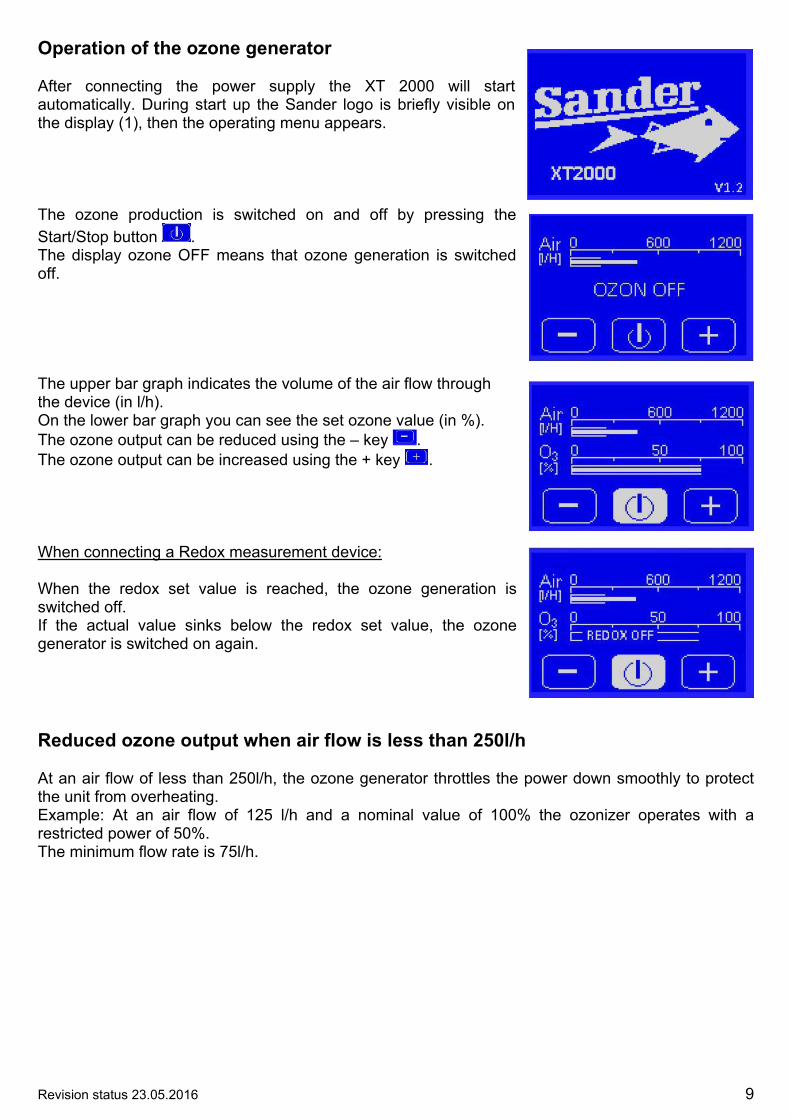
Operation of the ozone generator After connecting the power supply the XT 2000 will start automatically. During start up the Sander logo is briefly visible on the display (1), then the operating menu appears. The ozone production is switched on and off by pressing the Start/Stop button . The display ozone OFF means that ozone generation is switched off. The upper bar graph indicates the volume of the air flow through the device (in l/h). On the lower bar graph you can see the set ozone value (in %). The ozone output can be reduced using the – key . The ozone output can be increased using the + key . When connecting a Redox measurement device: When the redox set value is reached, the ozone generation is switched off. If the actual value sinks below the redox set value, the ozone generator is switched on again. Reduced ozone output when air flow is less than 250l/h At an air flow of less than 250l/h, the ozone generator throttles the power down smoothly to protect the unit from overheating. Example: At an air flow of 125 l/h and a nominal value of 100% the ozonizer operates with a restricted power of 50%. The minimum flow rate is 75l/h.
10 Revision status 23.05.2016
Cleaning and maintenance of the ozone element The ozone output is reduced considerably with high humidity and dust. Therefore an ozone element (4) has been developed that can be easily opened and cleaned if necessary. . If the device is in permanent use, we recommend checking the ozone element every three to six weeks for dirt particles.. Before cleaning the ozone generator let it run for a few minutes without ozone to have the ozone element ozone free Procedure when cleaning:
Switch off the ozone generator (Press Start/Stop button ) Allow the connection plate (7) to cool down Unplug the power supply unit Remove the power plug (3) from the ozonizer Remove the tubes from the tube connections Unscrew locking screws (2) of the connection plate (7) using a commercial hexagon socket
wrench Remove cover from the connection plate (7) Clean the ceramic plates using a cloth and warm water (and standard cream cleanser, if
necessary); when doing so, also remove any dirt from the connection nipples Allow the device to dry thoroughly
Assembly and switching on again:
Place the connection plate (7) in position, making sure that the sealing ring is firmly seated in the groove
Reinsert the Allen screws (2) and then crosswise tighten them evenly by hand Connect the hoses to the hose connections Plug the 24V plug into the power socket (3) Plug the wall power supply unit back into the socket. Switch on ozone generator (press Start/Stop button ).
Revision status 23.05.2016 11
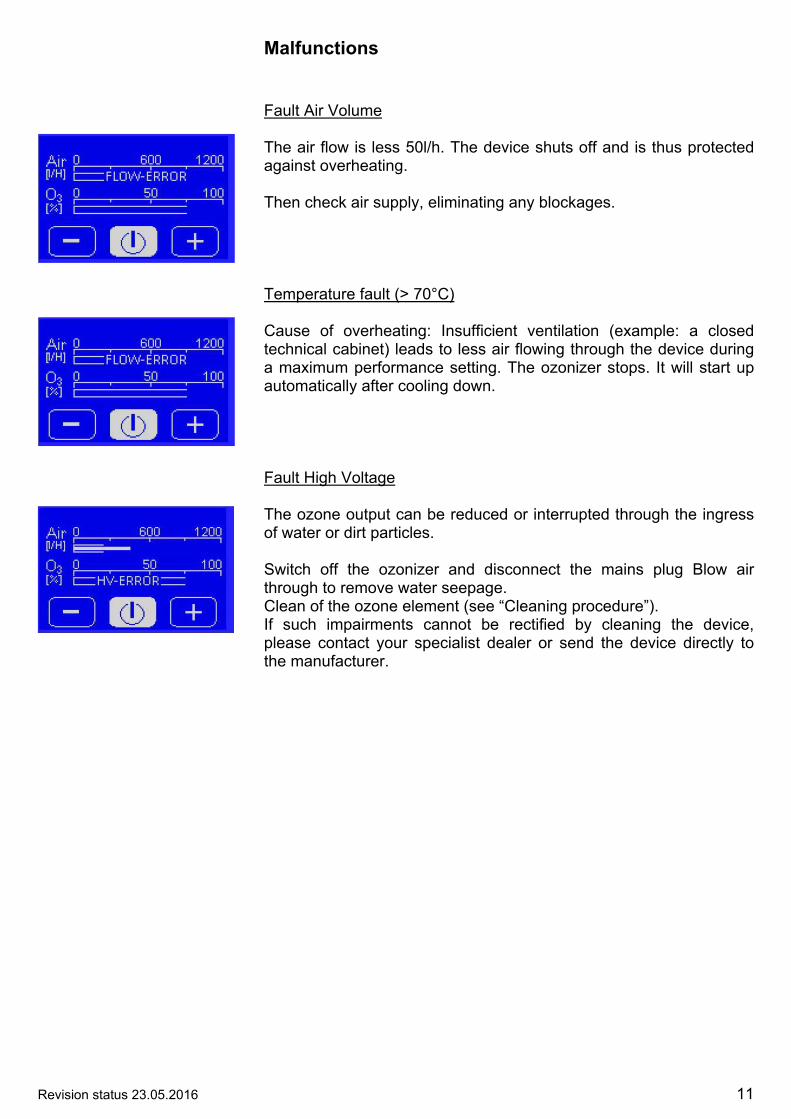
Malfunctions Fault Air Volume The air flow is less 50l/h. The device shuts off and is thus protected against overheating. Then check air supply, eliminating any blockages. Temperature fault (> 70°C) Cause of overheating: Insufficient ventilation (example: a closed technical cabinet) leads to less air flowing through the device during a maximum performance setting. The ozonizer stops. It will start up automatically after cooling down.
Fault High Voltage The ozone output can be reduced or interrupted through the ingress of water or dirt particles. Switch off the ozonizer and disconnect the mains plug Blow air through to remove water seepage. Clean of the ozone element (see “Cleaning procedure”). If such impairments cannot be rectified by cleaning the device, please contact your specialist dealer or send the device directly to the manufacturer.
12 Revision status 23.05.2016
Disposal The packaging is made from eco-friendly materials that you can dispose of at your local recycling center. Possibilities for disposing the used product can be asked about at your municipal administration. In interest of general environmental protection, do not dispose of the device in domestic garbage, but provide for an appropriate way of disposal. You can be informed about garbage collecting places and opening hours at your public administration.
Erwin Sander Elektroapparatebau GmbH Aquarientechnik Am Osterberg 22 DE 31311 Uetze-Eltze
Telephone +49 5173 971-0 Telefax +49 5173 971-197 [email protected] www.aqua-sander.de