Embed Size (px)
Citation preview
User Manual
Digital PartylineAudio Assignment Software for C44

© 2008 Riedel Communications GmbH & Co. KG. Alle Rechte vorbehalten. Dieses Handbuch ist urheberrechtlich geschützt. Das Kopieren, Vervielfältigen, Übersetzen oder Umsetzen in irgendein elektronisches Medium oder maschinell lesbare Form im Ganzen oder in Teilen ohne vorherige schriftliche Genehmigung von Riedel ist nicht gestattet. Riedel übernimmt keine Gewähr für die Richtigkeit des Inhalts dieses Handbuchs. Die Rechte an anderen in diesem Handbuch erwähnten Marken- und Produktnamen liegen bei ihren Inhabern und werden hiermit anerkannt.
© 2008 Riedel Communications GmbH & Co. KG. All rights reserved. Under the copyright laws, this manual may not be copied, in whole or in part, without the written consent of Riedel. Every effort has been made to ensure that the information in this manual is accurate. Riedel is not responsible for printing or clerical errors. All trademarks are the property of their respective owners.
PERFORMER Audio Assignment Software, User Manual, Version 1.0
Page 3
TABLE OF CONTENTS
1 GENERAL 4 2 LIMITED WARRANTY 5 3 SETUP 6
3.1 What’s needed? .................................................................................................................................................................. 6 3.2 PC Requirements ................................................................................................................................................................ 6 3.3 Software Installation........................................................................................................................................................... 6
3.3.1 Default Configuration File.................................................................................................................................... 7 3.4 Important Prerequisites ..................................................................................................................................................... 7 3.5 Hardware Connection......................................................................................................................................................... 7
3.5.1 COM Port Settings ................................................................................................................................................ 7 3.6 Establish Connection to C44 ............................................................................................................................................. 8
4 SOFTWARE OVERVIEW 10 4.1 Input / Output / Cross Point Change ..............................................................................................................................10
4.1.1 Single Cross Point Change ................................................................................................................................11 4.1.2 Mirrored Cross Points ........................................................................................................................................11 4.1.3 Multiple Cross Point Change .............................................................................................................................12
4.2 Load / Save Configurations .............................................................................................................................................13 4.2.1 DIP Switch Storage Places.................................................................................................................................13 4.2.2 Load from / Save to Computer .........................................................................................................................14 4.2.3 Read from / Write to C44 ..................................................................................................................................14
4.3 Live Mode ..........................................................................................................................................................................14 5 TROUBLESHOOTING 15 6 SERVICE 16
PERFORMER Audio Assignment Software, User Manual, Version 1.0
Page 4
1 GENERAL Thank you for purchasing this Riedel product.
In order to make the installation and use of this product as simple as possible, we have compiled the following user manual.
Please carefully read the following information before using or installing the Audio Assignment Software.
The software is designed to work with the Performer C44 system interfaces, version 1.14 or higher. If a C44 unit has a version 1.12 or lower please contact your local distributor.
This document describes how to install the software and how to configure the hardware. A short description how to use the software is also given.
NOTICE This manual, as well as the software and any examples contained herein are provided “as is” and are subject to change without notice. The content of this manual is for informational use only and should not be construed as a commitment by RIEDEL Communications GmbH & Co. KG or its suppliers. RIEDEL Communications GmbH & Co. KG gives no warranty of any kind with regard to this manual or the software, including, but not limited to, the implied warranties of merchantability and fitness for a particular purpose. RIEDEL Communications GmbH & Co. KG shall not be liable for any errors, inaccuracies or for incidental or consequential damages in connection with the performance or use of this manual, the software or the examples herein. RIEDEL Communications GmbH & Co. KG reserves all patent, proprietary design, title and intellectual property rights contained herein, including, but not limited to, any images, text, photographs incorporated into the manual or software.
All title and intellectual property rights in and to the content that is accessed through use of the products is the property of the respective owner and may be protected by applicable copyright or other intellectual property laws and treaties.
© 2008 Copyright Riedel Communications GmbH & Co. KG. All rights reserved. Reproduction, adaptation, or translation of this manual in whole or in part is prohibited without prior written permission of Riedel GmbH & Co. KG, except as allowed under the copyright laws.
Microsoft® and Windows® are registered trademarks of Microsoft Corporation. Inc. Pentium is a registered trademark of Intel Corporation. All other trademarks are the property of their respective owner.
PERFORMER Audio Assignment Software, User Manual, Version 1.0
Page 5
2 LIMITED WARRANTY LIMITED WARRANTY. RIEDEL Communications GmbH & Co. KG warrants that the software will perform substantially in accordance with the accompanying written materials for a period of ninety (90) days from the date of receipt and the media containing the software will be free from defects in materials and workmanship under normal use and service for a period of one (1) year from the date of receipt. Any implied warranties on the software or media are limited to ninety (90) days and one (1) year, respectively.
CUSTOMER REMEDIES. RIEDEL Communications GmbH & Co. KG´s and its suppliers’ entire liability and your exclusive remedy shall be, at RIEDEL Communications GmbH & Co. KG’s option, either the return of the price paid, or the repair or replacement of the software or media that does not meet this limited Warranty and which is returned to RIEDEL Communications GmbH & Co. KG with documentary support. This Limited Warranty is void if failure of the software or media has resulted from accident, abuse or misapplication. Any replacement software or media will be warranted for the remainder of the original warranty period or thirty (30) days, whichever is longer.
NO OTHER WARRANTIES. To the maximum extent permitted by applicable law, RIEDEL Communications GmbH & Co. KG and its suppliers disclaim all other representations, warranties, conditions, or other terms, expressed or implied, including, but not limited to, implied warranties or conditions of merchantability and fitness for a particular purpose, with regard to the software, media and accompanying written material. This limited warranty gives you specific legal rights. You may have others that are in accordance with your jurisdiction.
NO LIABILITY FOR CONSEQUENTIAL DAMAGES. To the maximum extent permitted by applicable law, in no event shall RIEDEL Communications GmbH & Co. KG and its suppliers be liable for any damages whatsoever (including, without limitation, direct or indirect damages for personal injury, loss of business profits, business interruption, loss of business information, or any other pecuniary loss) arising out of the use of or inability to use the product, even if RIEDEL Communications GmbH & Co. KG has been advised of the possibility of such damages. In any case, RIEDEL Communications GmbH & Co. KG and its suppliers’ entire liability under any provision of this agreement shall be limited to the amount actually paid by you for the software, the media and accompanying written materials. Because some jurisdictions do not allow the exclusion or limitation of liability for consequential or incidental damages, the above limitation may not apply to you.
PERFORMER Audio Assignment Software, User Manual, Version 1.0
Page 6
3 SETUP The Audio Assignment Software (AAS) and operating environment can easily be implemented by carrying out the following simple and straightforward instructions.
3.1 What’s needed? The following items are required in order to install and establish the software set-up.
• Personal computer (Microsoft Windows 2000/XP/VISTA) with a RS232 interface • Audio Assignment Software (included in C44 package) • Null-modem cable (included in C44 package) • Performer C44 device
3.2 PC Requirements The minimum PC specification recommended for running the Audio Assignment Software successfully is as follows:
• Minimum 1GHz Pentium processor • 5 MB of free hard disk space • 512 MB RAM • Minimum of 1024 x 768 monitor resolution, capable of displaying 256 colours • Microsoft Windows 2000/XP/VISTA operating system • RS232 connector (alternative: USB to RS232 converter or similar) • Microsoft .NET Framework 2.0 installed • CD ROM drive (CD-R) • Mouse or other pointing device
3.3 Software Installation To install the Audio Assignment Software (AAS) on your computer, simply insert the Riedel Performer CD into your CD-Rom drive and follow the instructions. The installation process should start automatically (administrator rights required).
However, if it doesn’t, open the CD content with your MS explorer and run the SETUP.EXE file. The AAS installation context should start now.
Follow the instructions on the display. The Audio Assignment Software is a One-Click-Install application. After running setup.exe you will find an application reference in your start menu under Start Programs Riedel Communications
If the installation aborts during the setup process, because Microsoft .NET Framework is NOT installed on your computer, please run the Microsoft .NET Framework 2.0\dotnetfx.exe from the installation CD.
The Installation of the Framework may take several minutes. When finished, please run the SETUP.EXE again. The installation should now finish without any problems.
PERFORMER Audio Assignment Software, User Manual, Version 1.0
Page 7
3.3.1 Default Configuration File The installation CD contains the default C44 audio matrix configuration file which is not required for the installation. To set the C44 back to default, please copy the file default.aas to the AAS working directory of your choice. The file default.aas contains the default AAS configuration which is also the initial configuration of the C44 when shipped. It can be used to reload the initial configuration into the C44 once it has been changed.
3.4 Important Prerequisites Note: If the C44 is connected to a Riedel matrix via the digital Artist ports of the C44, the Audio Assignment Software is disabled. All C44 audio cross points are in a 1 to 1 mode! The AAS indicates: “C44 – Connected (Artist)”. Thus, the AAS can only be used if the C44 is in a ‘stand alone mode’!
Note: If no DIP switch is set (active) at the C44, the AAS cannot be set to Live Mode or changes cannot be written to the C44 although the connection is established correctly!
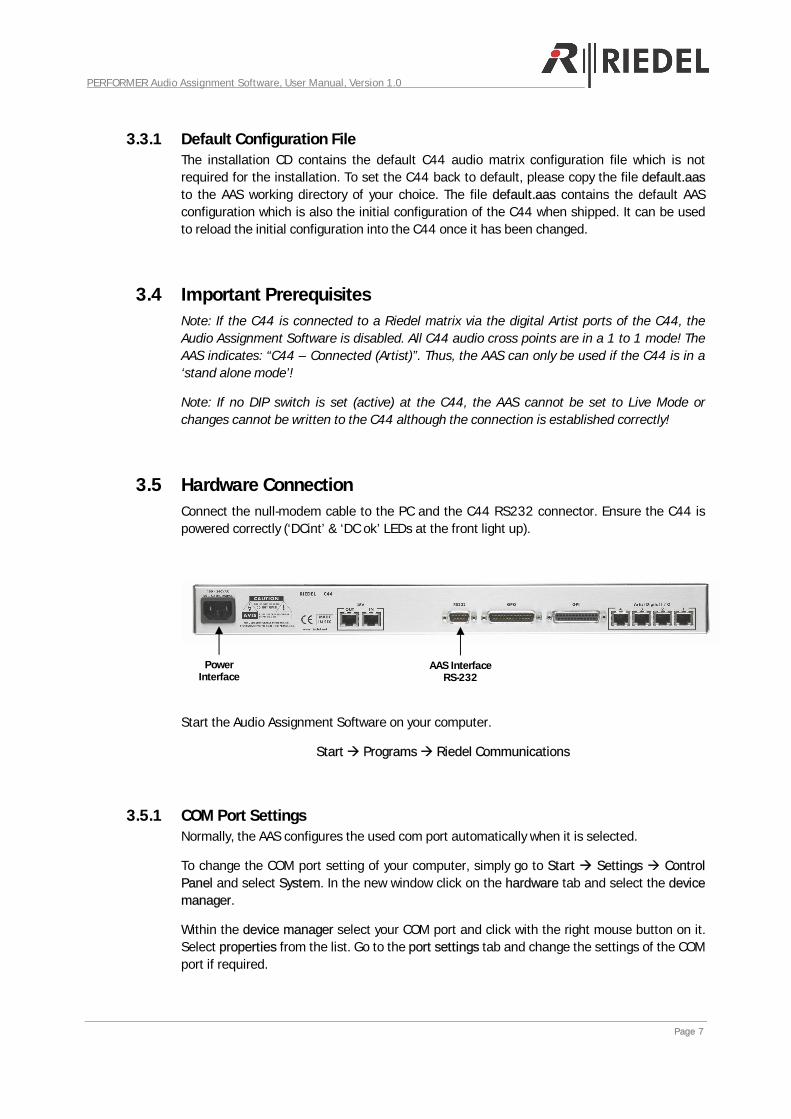
3.5 Hardware Connection Connect the null-modem cable to the PC and the C44 RS232 connector. Ensure the C44 is powered correctly (‘DCint’ & ‘DC ok’ LEDs at the front light up).
Start the Audio Assignment Software on your computer.
Start Programs Riedel Communications
3.5.1 COM Port Settings Normally, the AAS configures the used com port automatically when it is selected.
To change the COM port setting of your computer, simply go to Start Settings Control Panel and select System. In the new window click on the hardware tab and select the device manager.
Within the device manager select your COM port and click with the right mouse button on it. Select properties from the list. Go to the port settings tab and change the settings of the COM port if required.
AAS Interface RS-232
PowerInterface

PERFORMER Audio Assignment Software, User Manual, Version 1.0
Page 8
COM port setting Value
Baud rate 38400
Data bit 8
Parity None
Stop bit 1
Flow control None
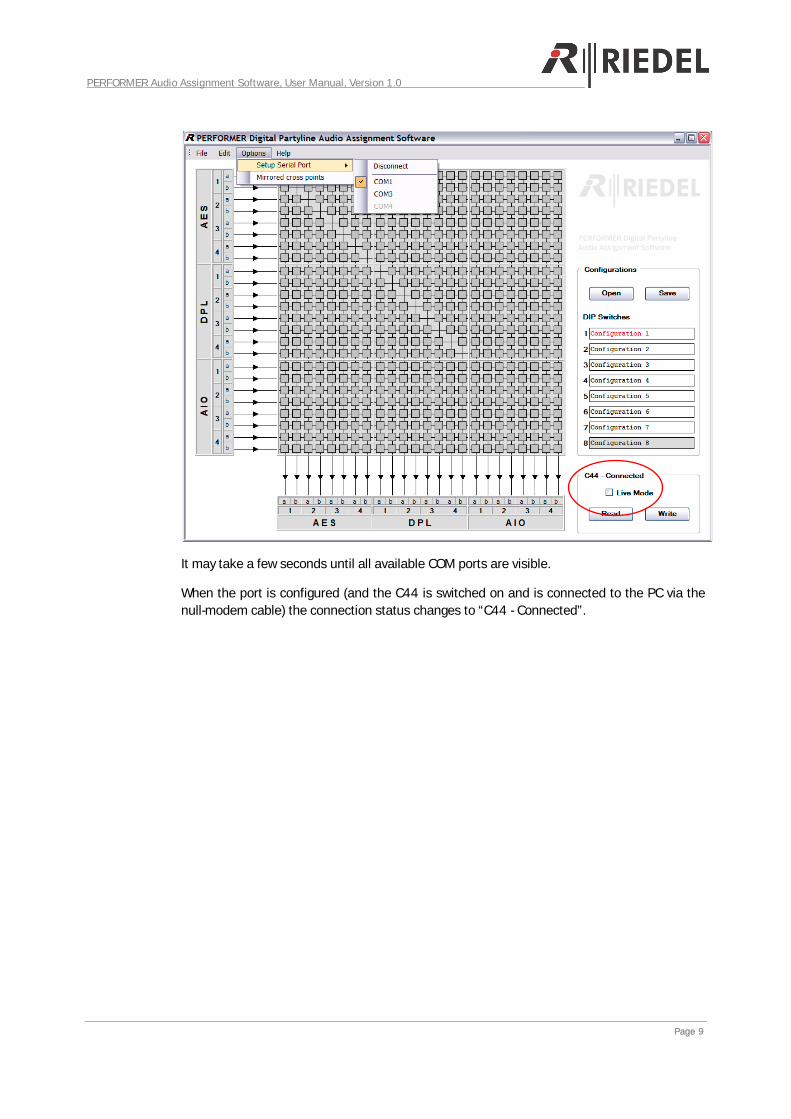
3.6 Establish Connection to C44 The connection status of the C44 is displayed at the bottom right in the AAS main window. Initially the connection status is “C44 - Not connected” because the serial port is not configured.
Configure the port in the menu Options Setup Serial Port of your AAS.
PERFORMER Audio Assignment Software, User Manual, Version 1.0
Page 9
It may take a few seconds until all available COM ports are visible.
When the port is configured (and the C44 is switched on and is connected to the PC via the null-modem cable) the connection status changes to “C44 - Connected”.
PERFORMER Audio Assignment Software, User Manual, Version 1.0
Page 10
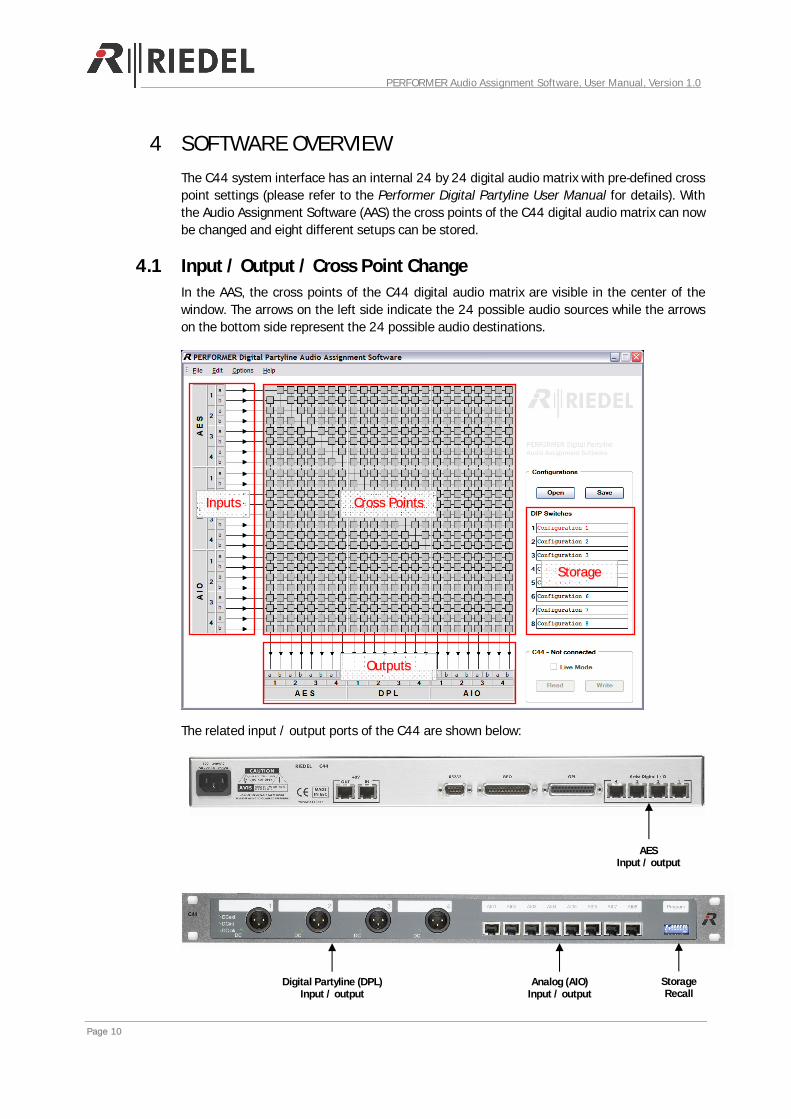
4 SOFTWARE OVERVIEW The C44 system interface has an internal 24 by 24 digital audio matrix with pre-defined cross point settings (please refer to the Performer Digital Partyline User Manual for details). With the Audio Assignment Software (AAS) the cross points of the C44 digital audio matrix can now be changed and eight different setups can be stored.
4.1 Input / Output / Cross Point Change In the AAS, the cross points of the C44 digital audio matrix are visible in the center of the window. The arrows on the left side indicate the 24 possible audio sources while the arrows on the bottom side represent the 24 possible audio destinations.
The related input / output ports of the C44 are shown below:
Analog (AIO)
Input / output Digital Partyline (DPL)
Input / output
Cross Points
Outputs
Inputs
Storage
StorageRecall
AESInput / output
PERFORMER Audio Assignment Software, User Manual, Version 1.0
Page 11
See the Performer Digital Partyline User Manual for a detailed pin out of the C44 connectors shown above.
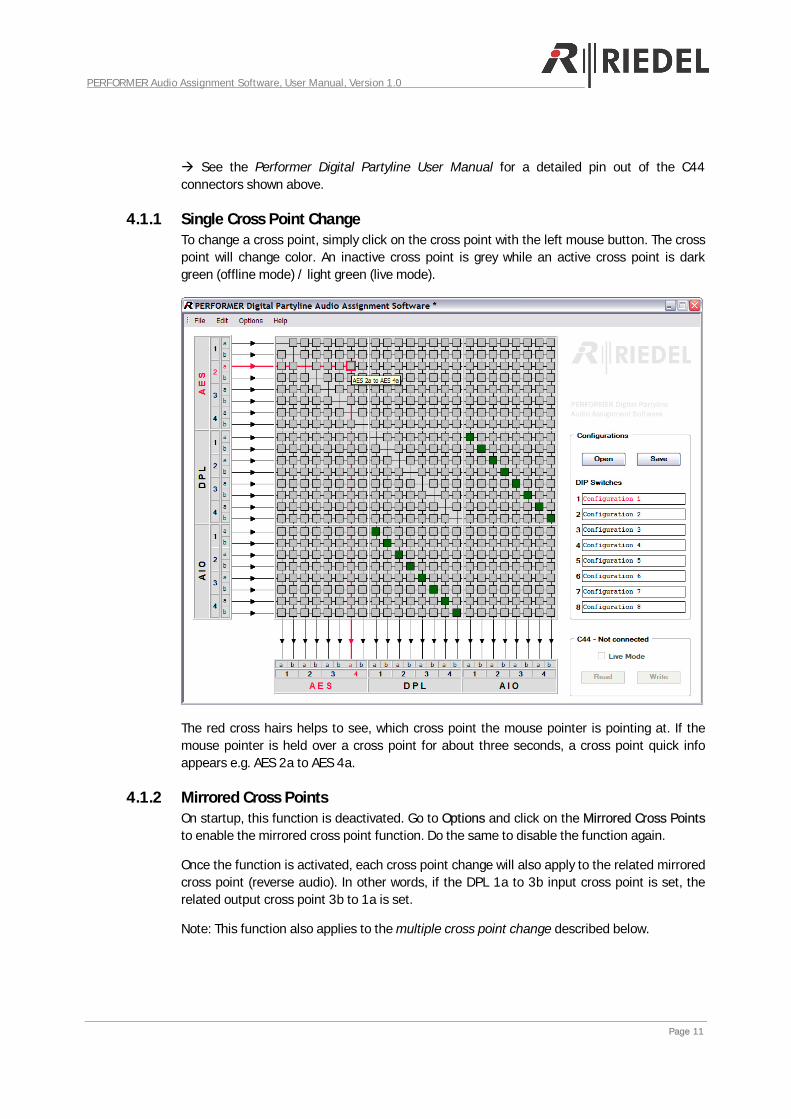
4.1.1 Single Cross Point Change To change a cross point, simply click on the cross point with the left mouse button. The cross point will change color. An inactive cross point is grey while an active cross point is dark green (offline mode) / light green (live mode).
The red cross hairs helps to see, which cross point the mouse pointer is pointing at. If the mouse pointer is held over a cross point for about three seconds, a cross point quick info appears e.g. AES 2a to AES 4a.
4.1.2 Mirrored Cross Points On startup, this function is deactivated. Go to Options and click on the Mirrored Cross Points to enable the mirrored cross point function. Do the same to disable the function again.
Once the function is activated, each cross point change will also apply to the related mirrored cross point (reverse audio). In other words, if the DPL 1a to 3b input cross point is set, the related output cross point 3b to 1a is set.
Note: This function also applies to the multiple cross point change described below.
PERFORMER Audio Assignment Software, User Manual, Version 1.0
Page 12
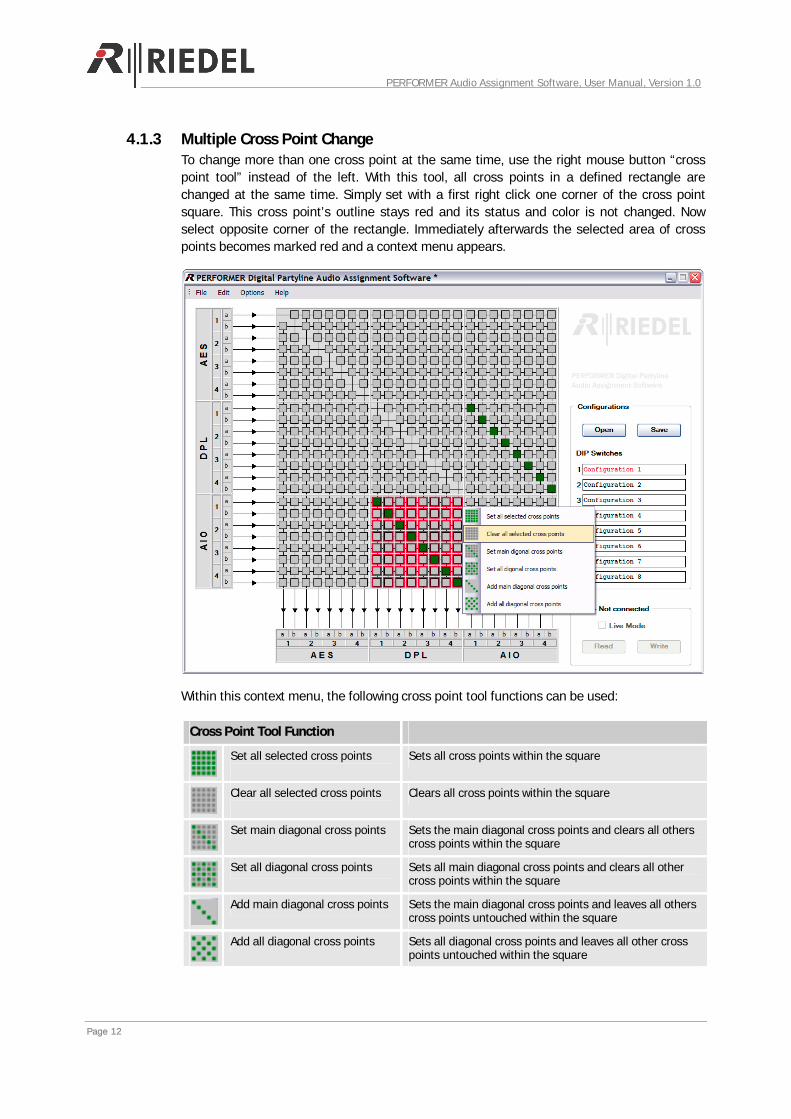
4.1.3 Multiple Cross Point Change To change more than one cross point at the same time, use the right mouse button “cross point tool” instead of the left. With this tool, all cross points in a defined rectangle are changed at the same time. Simply set with a first right click one corner of the cross point square. This cross point’s outline stays red and its status and color is not changed. Now select opposite corner of the rectangle. Immediately afterwards the selected area of cross points becomes marked red and a context menu appears.
Within this context menu, the following cross point tool functions can be used:
Cross Point Tool Function
Set all selected cross points
Sets all cross points within the square
Clear all selected cross points
Clears all cross points within the square
Set main diagonal cross points Sets the main diagonal cross points and clears all others
cross points within the square
Set all diagonal cross points Sets all main diagonal cross points and clears all other
cross points within the square
Add main diagonal cross points Sets the main diagonal cross points and leaves all others
cross points untouched within the square
Add all diagonal cross points Sets all diagonal cross points and leaves all other cross
points untouched within the square
PERFORMER Audio Assignment Software, User Manual, Version 1.0
Page 13
4.2 Load / Save Configurations Configurations can be stored to computer drives directly or to the C44.
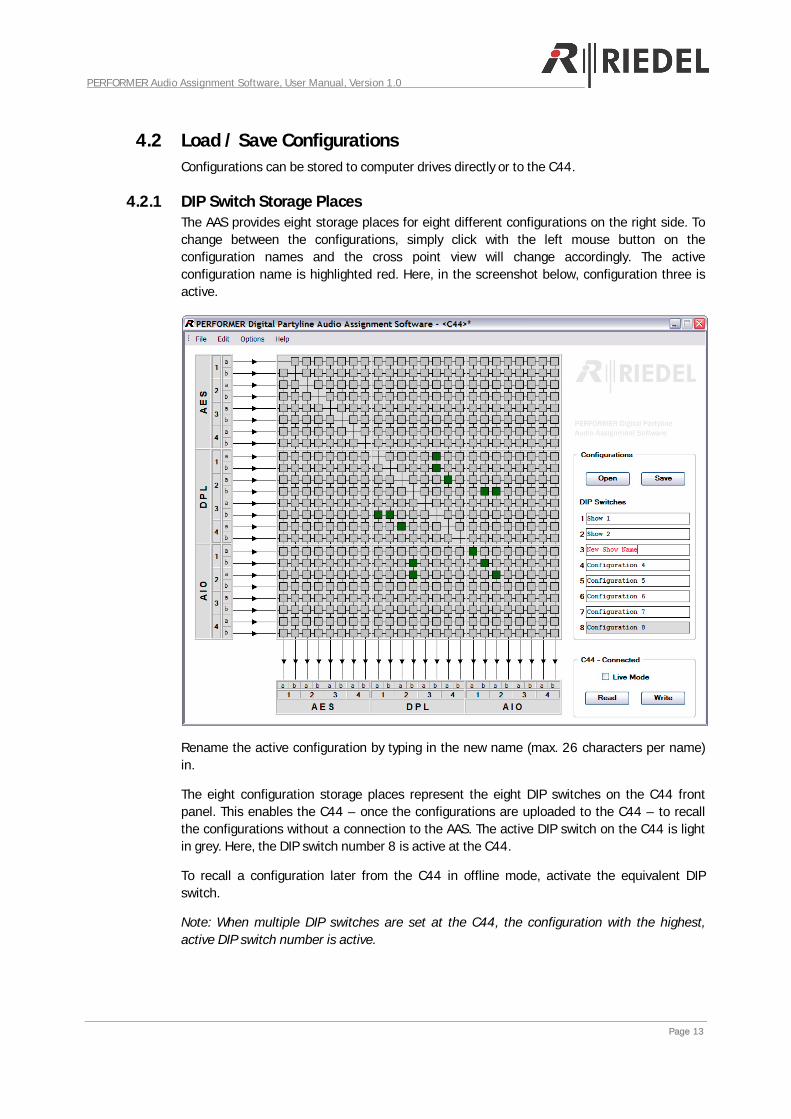
4.2.1 DIP Switch Storage Places The AAS provides eight storage places for eight different configurations on the right side. To change between the configurations, simply click with the left mouse button on the configuration names and the cross point view will change accordingly. The active configuration name is highlighted red. Here, in the screenshot below, configuration three is active.
Rename the active configuration by typing in the new name (max. 26 characters per name) in.
The eight configuration storage places represent the eight DIP switches on the C44 front panel. This enables the C44 – once the configurations are uploaded to the C44 – to recall the configurations without a connection to the AAS. The active DIP switch on the C44 is light in grey. Here, the DIP switch number 8 is active at the C44.
To recall a configuration later from the C44 in offline mode, activate the equivalent DIP switch.
Note: When multiple DIP switches are set at the C44, the configuration with the highest, active DIP switch number is active.
PERFORMER Audio Assignment Software, User Manual, Version 1.0
Page 14
4.2.2 Load from / Save to Computer Load or save your configuration to or from your computer with the OPEN / SAVE buttons. Alternatively, use the AAS menu FILE OPEN / SAVE / SAVE AS.
Note: A star next to the AAS title bar indicates a changed, but unsaved configuration.
Before a previously saved configuration is loaded from the computer into the AAS, the software asks if the current configuration version should be discarded (if changed and unsaved).
To reload the original Riedel default settings to your AAS, load the file default.aas which is on the Performer CD.
4.2.3 Read from / Write to C44 Note: The computer needs to be connected correctly to the C44 for this operation (check if the AAS shows “C44 – Connected” in the lower right corner)
Write or read your configuration to or from your C44 with the READ / WRITE buttons.
Before a new configuration is downloaded from the C44 into the AAS, the software asks if the current configuration version in the AAS should be discarded (if new and unsaved).
Before a new configuration is uploaded to the C44 from the AAS, the software asks if the current configuration version in the C44 should be overwritten (if the configuration is new and unsaved).
Note: The AAS software remembers the origin of the data (C44, file, new) being edited. When changes are written back to the storage the data was read from, the software does not ask for confirmation!
Note: If no DIP switch is set at the C44, changes cannot be written to the C44 although the connection is established correctly!
4.3 Live Mode Note: The computer needs to be connected correctly to the C44 for this operation (check if the AAS shows “C44 – Connected” in the lower right corner)
The Offline Mode is the default AAS mode. To enable the Live Mode, check the box Live Mode in the lower right corner. This will immediately download the current cross point configuration from the C44 and all active cross points in the AAS will change immediately from dark green to light green.
Before the Live Mode is enabled, the software asks if the current configuration in the AAS should be discarded (if new and unsaved).
In the Live Mode, all cross point changes will be written to the C44 immediately. During the processing, the cross point is yellow.
Note: If no DIP switch is set at the C44, the Live Mode is not possible and changes cannot be written to the C44 although the connection is established correctly!
PERFORMER Audio Assignment Software, User Manual, Version 1.0
Page 15
5 TROUBLESHOOTING
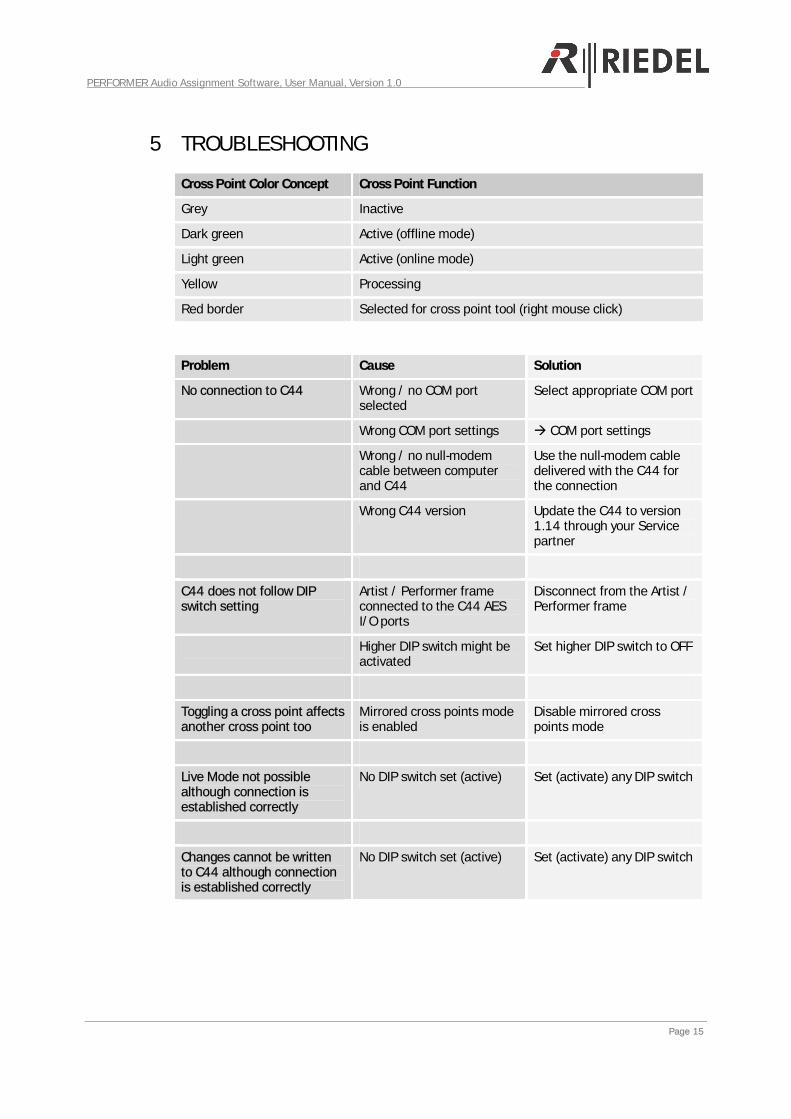
Cross Point Color Concept Cross Point Function
Grey Inactive
Dark green Active (offline mode)
Light green Active (online mode)
Yellow Processing
Red border Selected for cross point tool (right mouse click)
Problem Cause Solution
No connection to C44 Wrong / no COM port selected
Select appropriate COM port
Wrong COM port settings COM port settings
Wrong / no null-modem cable between computer and C44
Use the null-modem cable delivered with the C44 for the connection
Wrong C44 version Update the C44 to version 1.14 through your Service partner
C44 does not follow DIP switch setting
Artist / Performer frame connected to the C44 AES I/O ports
Disconnect from the Artist / Performer frame
Higher DIP switch might be activated
Set higher DIP switch to OFF
Toggling a cross point affects another cross point too
Mirrored cross points mode is enabled
Disable mirrored cross points mode
Live Mode not possible although connection is established correctly
No DIP switch set (active) Set (activate) any DIP switch
Changes cannot be written to C44 although connection is established correctly
No DIP switch set (active) Set (activate) any DIP switch
PERFORMER Audio Assignment Software, User Manual, Version 1.0
Page 16
6 SERVICE If you have any further questions, we offer comprehensive customer service options for this product including:
• Telephone / Skype service • E-mail service • Fax service • Configuration support • Trainings • Repairs
Your primary point of contact for any service issues is your local dealer.
In addition, Riedel Customer Service in Wuppertal, Germany is also available to assist you.
Telephone: +49 (0) 202 292 9400
Skype: riedel.communications.service
(Monday - Friday, 8am – 5pm, Central European Time)
Fax: +49 (0) 202 292 9419
Or use the contact form on our webpage:
www.riedel.net
For repairs, please contact your local dealer. Your dealer will be able to help process your repair as fast as possible and/or arrange for the delivery of spare parts.
The address for repairs sent directly to Riedel Communications is:
Riedel Communications GmbH & Co. KG
- Repairs -
Uellendahler Str. 353
D-42109 Wuppertal
Germany

PERFORMER Audio Assignment Software, User Manual, Version 1.0
Page 17
NOTES

PERFORMER Audio Assignment Software, User Manual, Version 1.0
Page 18
NOTES

Riedel Communications GmbH & Co. KG • Uellendahler Str. 353 • 42109 Wuppertal • Germany
Phone: +49 (0) 202 292-90 • Fax: +49 (0) 202 292-99 99 • [email protected]
Riedel Communications GmbH & Co. KG • Ernst-Augustin-Str. 12 • 12489 Berlin • Germany
Phone: +49 (0) 30 67 82 61-0 • Fax: +49 (0) 30 67 82 61-59 • [email protected]
Riedel Austria Communications GmbH • Schottenfeldgasse 60/2/1 • 1070 Wien • Austria
Phone: +43 1 523 66 85-0 • Fax: +43 1 523 66 85-50 • [email protected]
Riedel Communications • 51 Bukit Batok Crescent • #06-07 Unity Centre • Singapore 658077
Phone: +65 6260 2913 • Fax: +65 6234 4819 • [email protected]
Riedel Communications Inc. • 200 Clearbrook Road• Elmsford, NY 10523 • USA
Phone: +1 914.592.0220 • Fax: +1 914.592.0550 • [email protected]
www.riedel.net