Embed Size (px)
Citation preview
ペダルティンパニ / PEDAL TIMPANI / PEDALPAUKE / TIMBAL À PÉDALE / TIMBAL DE PEDAL / Педаль литавр / 踏板式定音鼓 / 팀파니 페달
TP8300 series / TP7300 series
TP6300 series / TP4300 series
取扱説明書Owner’s ManualBedienungsanleitungMode d’emploiManual de instruccionesРуководство пользователя用户手册
사용설명서
日本
語English
Русский
Fran
çais
한국
어Deu
tsch
中文
Españ
ol
TP7323
English
PEDAL TIMPANI
TP8300 series / TP7300 series
TP6300 series / TP4300 series
Owner’s Manual
Thank you for purchasing a Yamaha Timpani.
Please keep this manual in a safe and convenient place for future
reference.
Before using your timpani for the first time be sure to carefullyread the instructions on “Initial Preparation” pages 18 and 19.
Contents
PRECAUTIONS ............................................................14
Daily Maintenance ......................................................15
Nomenclature & Lubrication ......................................16
Setting Up the Timpan ................................................17
Initial Preparation .......................................................18
Adjusting the Pitch .................................................... 20
Pedal Adjustment....................................................... 22
Tuning Indicator Adjustment .................................... 23
Replacing the Head ................................................... 24
14
PRECAUTIONSPLEASE READ CAREFULLY BEFORE PROCEEDING
Please keep this manual in a safe and handy place for future reference.
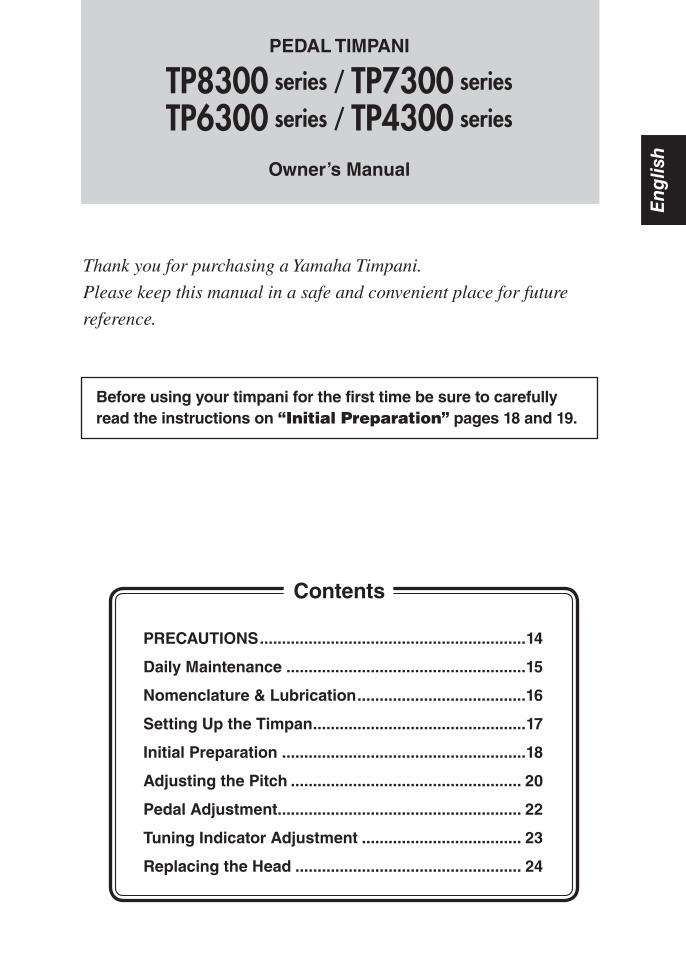
WARNINGAlways follow the basic precautions listed below to avoid the possibility of serious injury or even death from damages or other hazards. These precautions include, but are not limited to, the following:
Transporting/Setup• Neverplacethetimpanionunstablesurfacessuchasan
unstableriserorslopedsurface.Thetimpanimaytipoverorfallresultingindamageorinjury.
• Whenrollingthetimpanionitscasters,gripitbyitsframeandmoveitonlyonsmooth,flatsurfaces.
1. Donotmoveonsloping,rough,orgravelsurfaces.
2. Donotrunwiththetimpani.Itmaybedifficulttostoptheinstrumentwhichcancauseinjuryordamage.
• Ifthetimpanimustbecarried,dosowithtwoormorepersons,makesuretogripthetimpanibyitsframe.
• Exceptforwhenmovingtheinstrument,alwaysengagebothcasterbrakes.Notengagingthebrakescanresultintheinstrumentfallingoverormovingresultingininjury.
Handlingcaution• Neverleanonorclimbontheinstrument.Itmayoverturn
resultingindamageorinjury.
• Becarefularoundtheinstrument.Bumpingintoitmayresultininjuryorcauseittooverturn.Keepsmallchildrenawayfromtheinstrument.
• Neverplaceyourfingersorfeetintothespacesunderneaththepedal,thebaseportionoftheinstrument,orbetweenmovingpartssuchasthecasters.Seriousinjurycanresultiffingersorfeetbecomepinched.
Brake
ON
15
CAUTIONAlways follow the basic precautions listed below to avoid the possibility of physical injury to you or others, or damage to the instrument or other property. These precautions include, but are not limited to, the following:
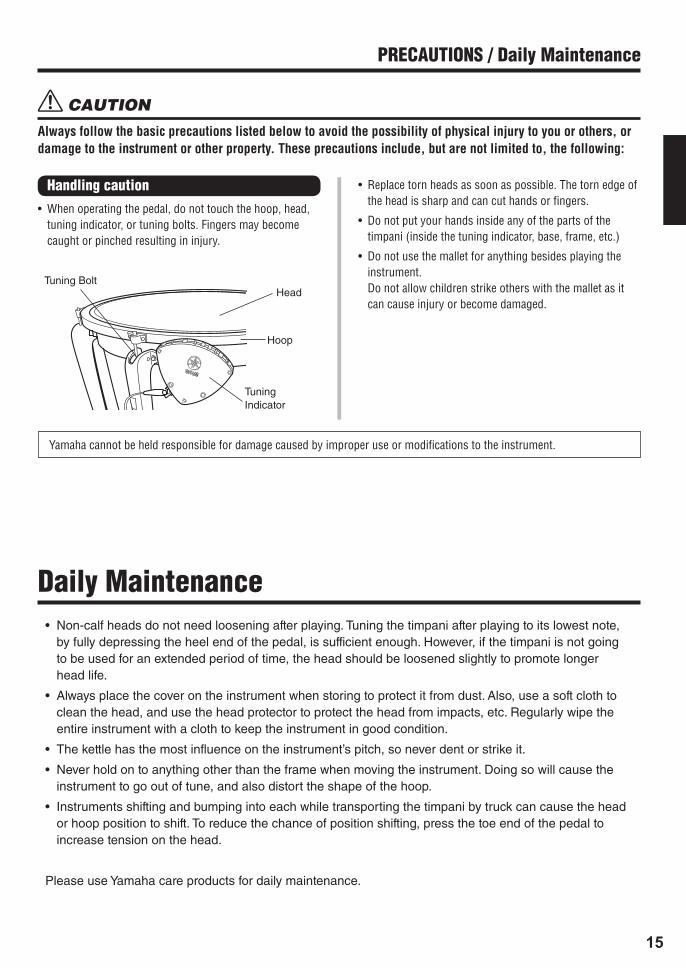
Handlingcaution• Whenoperatingthepedal,donottouchthehoop,head,
tuningindicator,ortuningbolts.Fingersmaybecomecaughtorpinchedresultingininjury.
PRECAUTIONS/DailyMaintenance
Hoop
Tuning Indicator
Tuning BoltHead
• Replacetornheadsassoonaspossible.Thetornedgeoftheheadissharpandcancuthandsorfingers.
• Donotputyourhandsinsideanyofthepartsofthetimpani(insidethetuningindicator,base,frame,etc.)
• Donotusethemalletforanythingbesidesplayingtheinstrument.Donotallowchildrenstrikeotherswiththemalletasitcancauseinjuryorbecomedamaged.
Yamahacannotbeheldresponsiblefordamagecausedbyimproperuseormodificationstotheinstrument.
DailyMaintenance• Non-calf heads do not need loosening after playing. Tuning the timpani after playing to its lowest note,
by fully depressing the heel end of the pedal, is sufficient enough. However, if the timpani is not going to be used for an extended period of time, the head should be loosened slightly to promote longer head life.
• Always place the cover on the instrument when storing to protect it from dust. Also, use a soft cloth to clean the head, and use the head protector to protect the head from impacts, etc. Regularly wipe the entire instrument with a cloth to keep the instrument in good condition.
• The kettle has the most influence on the instrument’s pitch, so never dent or strike it.
• Never hold on to anything other than the frame when moving the instrument. Doing so will cause the instrument to go out of tune, and also distort the shape of the hoop.
• Instruments shifting and bumping into each while transporting the timpani by truck can cause the head or hoop position to shift. To reduce the chance of position shifting, press the toe end of the pedal to increase tension on the head.
Please use Yamaha care products for daily maintenance.
16
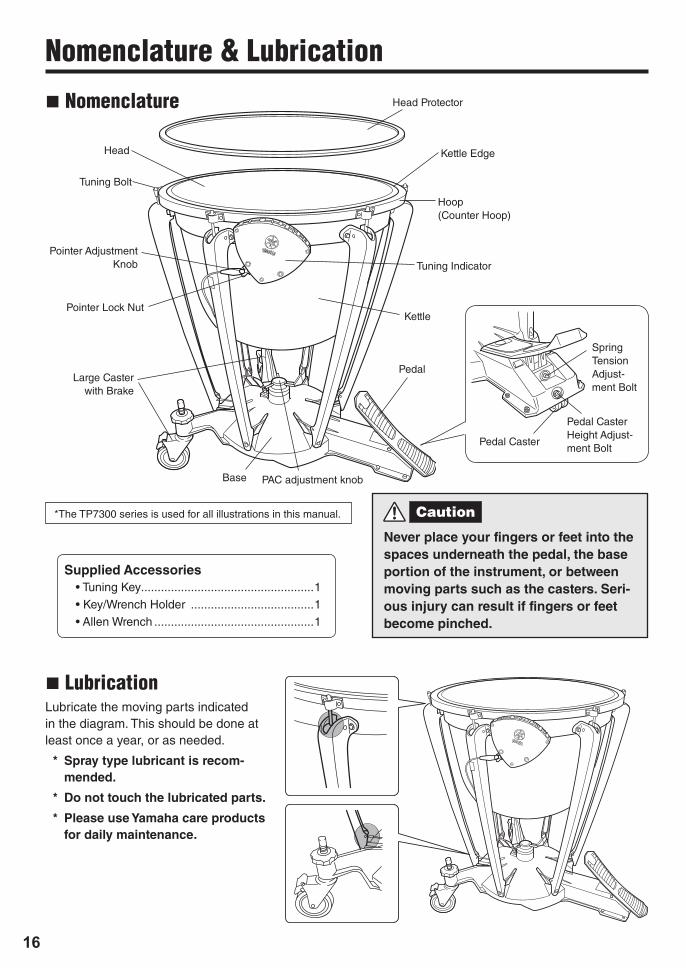
Never place your fingers or feet into the spaces underneath the pedal, the base portion of the instrument, or between moving parts such as the casters. Seri-ous injury can result if fingers or feet become pinched.
Nomenclature&Lubrication
nNomenclature
Supplied Accessories • Tuning Key....................................................1 • Key/Wrench Holder .....................................1 • Allen Wrench ................................................1
Tuning Bolt
Pointer Lock Nut
Head
Kettle
Pointer Adjustment Knob Tuning Indicator
Hoop (Counter Hoop)
Kettle Edge
Head Protector
Large Caster with Brake
Pedal
Base
Caution
PAC adjustment knob
*The TP7300 series is used for all illustrations in this manual.
nLubricationLubricate the moving parts indicated in the diagram. This should be done at least once a year, or as needed.
* Spray type lubricant is recom-mended.
* Do not touch the lubricated parts.
* Please use Yamaha care products for daily maintenance.
Spring Tension Adjust-ment Bolt
Pedal Caster
Pedal Caster Height Adjust-ment Bolt
17
Pedal Caster Height Adjustment Bolt
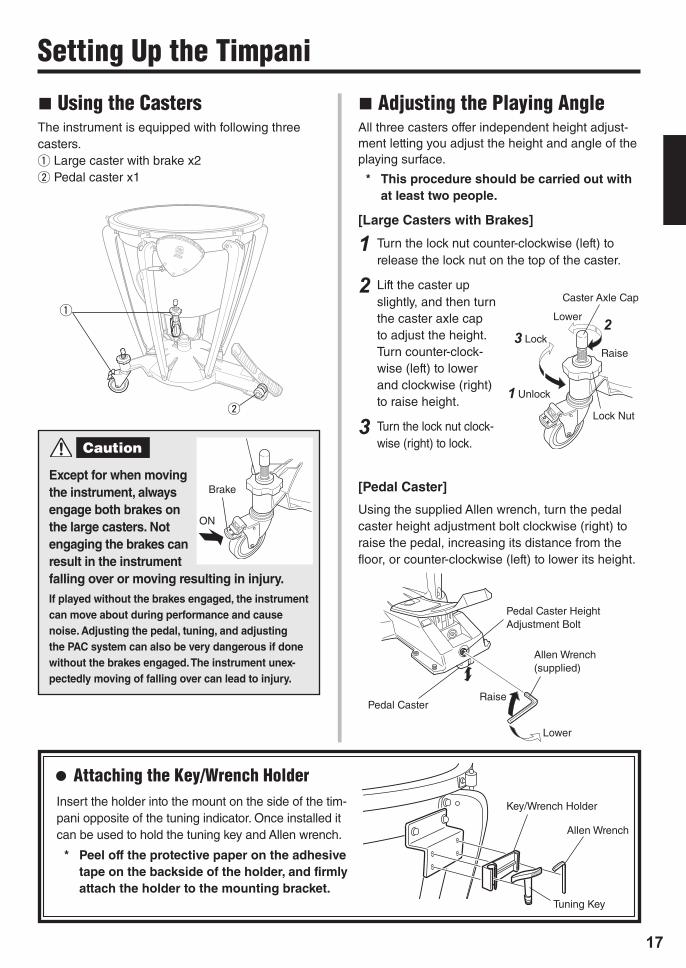
SettingUptheTimpani
nUsingtheCastersThe instrument is equipped with following three casters.q Large caster with brake x2w Pedal caster x1
nAdjustingthePlayingAngleAll three casters offer independent height adjust-ment letting you adjust the height and angle of the playing surface.
* This procedure should be carried out with at least two people.
[Large Casters with Brakes]
1Turn the lock nut counter-clockwise (left) to release the lock nut on the top of the caster.
2Lift the caster up slightly, and then turn the caster axle cap to adjust the height. Turn counter-clock-wise (left) to lower and clockwise (right) to raise height.
3Turn the lock nut clock-wise (right) to lock.
[Pedal Caster]
Using the supplied Allen wrench, turn the pedal caster height adjustment bolt clockwise (right) to raise the pedal, increasing its distance from the floor, or counter-clockwise (left) to lower its height.
Except for when moving the instrument, always engage both brakes on the large casters. Not engaging the brakes can result in the instrument falling over or moving resulting in injury. If played without the brakes engaged, the instrument can move about during performance and cause noise. Adjusting the pedal, tuning, and adjusting the PAC system can also be very dangerous if done without the brakes engaged. The instrument unex-pectedly moving of falling over can lead to injury.
q
Pedal Caster
Allen Wrench (supplied)
lAttachingtheKey/WrenchHolderInsert the holder into the mount on the side of the tim-pani opposite of the tuning indicator. Once installed it can be used to hold the tuning key and Allen wrench.
* Peel off the protective paper on the adhesive tape on the backside of the holder, and firmly attach the holder to the mounting bracket.
Lock Nut
3 Lock
1 Unlock
Caster Axle Cap
Raise
2Lower
Caution
w
Allen Wrench
Key/Wrench Holder
Tuning Key
Brake
ON
Raise
Lower

18
Your Yamaha timpani is equipped with a plastic head carefully mounted and adjusted at the factory. However, new heads tend to stretch during shipping and storage, so it may be neces-sary to re-tune the instrument before using. Please perform the following steps to check and, if necessary, readjust your instrument.
1The area between the kettle edge and the inner circle of the counter hoop is called the collar. Please make sure that the width of this collar is uniform, as shown in the illustration titled “Cor-rect”.
20”, 23”, 24”
If collar width is not uniform, fully depress the heel end of the pedal. While holding the pedal in this position, realign the head and hoop as shown in the “Correct” illustration.
InitialPreparation
[Correct] [Wrong]
3 Take your foot off the pedal.
• Heel still moves up
gRepeat steps 2 through 3.
• Heel stays down
gGo to step 4.
Collar
KettleEdge
Collar
Kettle EdgeCounter Hoop Counter Hoop
Tuning Key
26”, 27”, 29”, 32”
Never place your fingers or feet into the spaces underneath the pedal, the base por-tion of the instrument, or between moving parts such as the casters. Serious injury can result if fingers or feet become pinched.
2Fully depress the heel end of the pedal. While holding the pedal in this position, use the sup-plied tuning wrench to tighten the tuning bolts one by one ¼ of a turn (90°) in the order shown in the illustration below.
It is very important that all tuning bolts be turned the same amount.
Caution
19
InitialPreparation
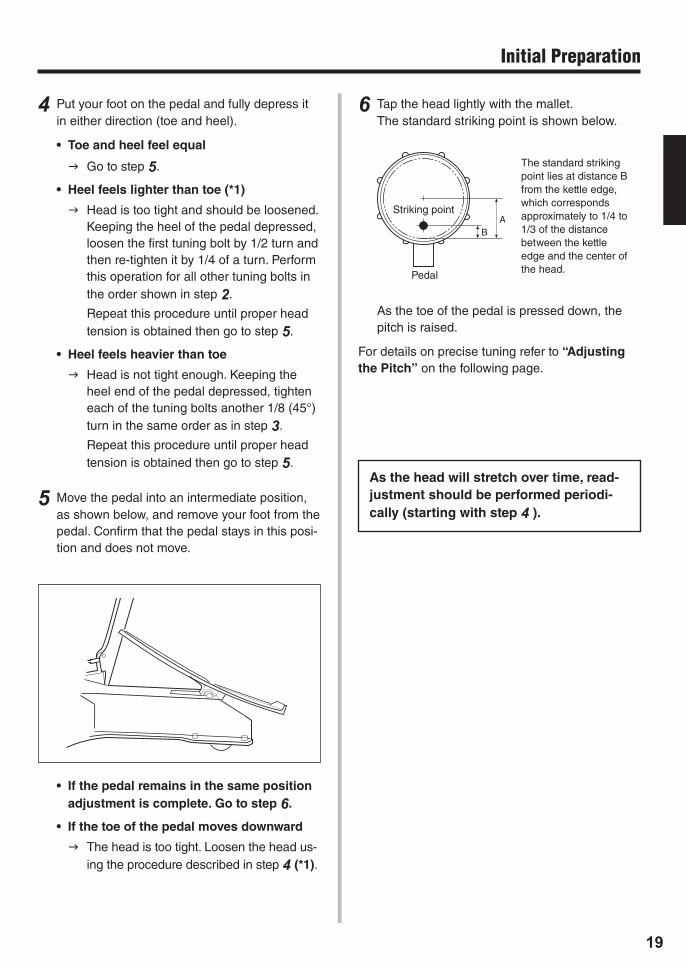
4 Put your foot on the pedal and fully depress it in either direction (toe and heel).
• Toe and heel feel equal
gGo to step 5.
• Heel feels lighter than toe (*1)
gHead is too tight and should be loosened. Keeping the heel of the pedal depressed, loosen the first tuning bolt by 1/2 turn and then re-tighten it by 1/4 of a turn. Perform this operation for all other tuning bolts in the order shown in step 2.
Repeat this procedure until proper head tension is obtained then go to step 5.
• Heel feels heavier than toe
gHead is not tight enough. Keeping the heel end of the pedal depressed, tighten each of the tuning bolts another 1/8 (45°) turn in the same order as in step 3.
Repeat this procedure until proper head tension is obtained then go to step 5.
5 Move the pedal into an intermediate position, as shown below, and remove your foot from the pedal. Confirm that the pedal stays in this posi-tion and does not move.
6 Tap the head lightly with the mallet. The standard striking point is shown below.
As the toe of the pedal is pressed down, the pitch is raised.
For details on precise tuning refer to “Adjusting the Pitch” on the following page.
• If the pedal remains in the same position adjustment is complete. Go to step 6.
• If the toe of the pedal moves downward
gThe head is too tight. Loosen the head us-ing the procedure described in step 4(*1).
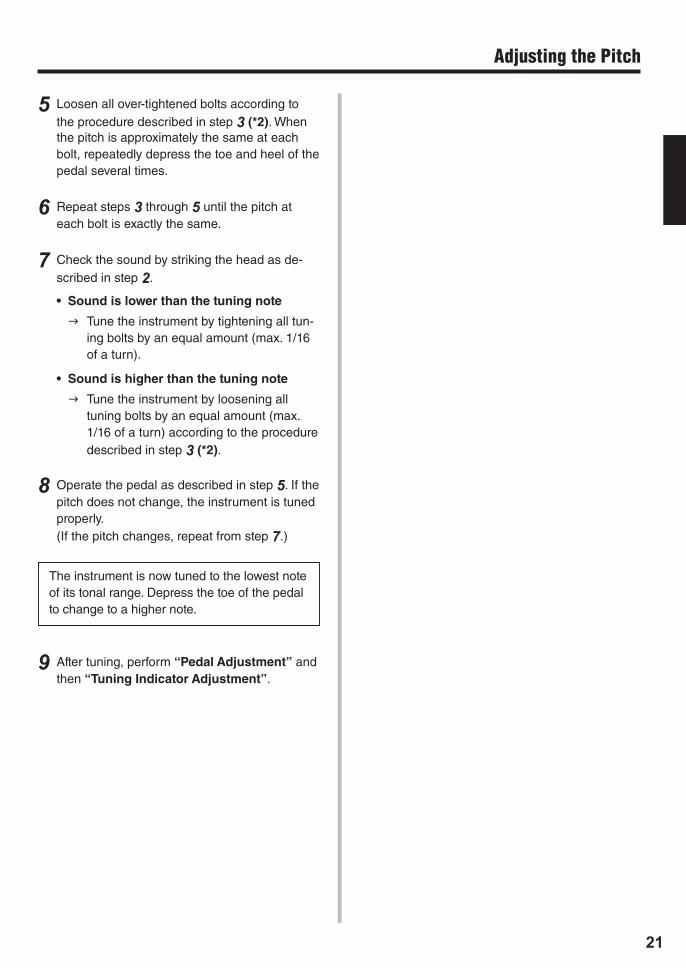
The standard strikingpoint lies at distance Bfrom the kettle edge,which correspondsapproximately to 1/4 to1/3 of the distancebetween the kettleedge and the center ofthe head.
Striking point
Pedal
As the head will stretch over time, read-justment should be performed periodi-cally (starting with step 4 ).
20
When using the timpani for the first time, be sure to set it up according to the instructions of “Initial Preparation” on pages 18 and 19.
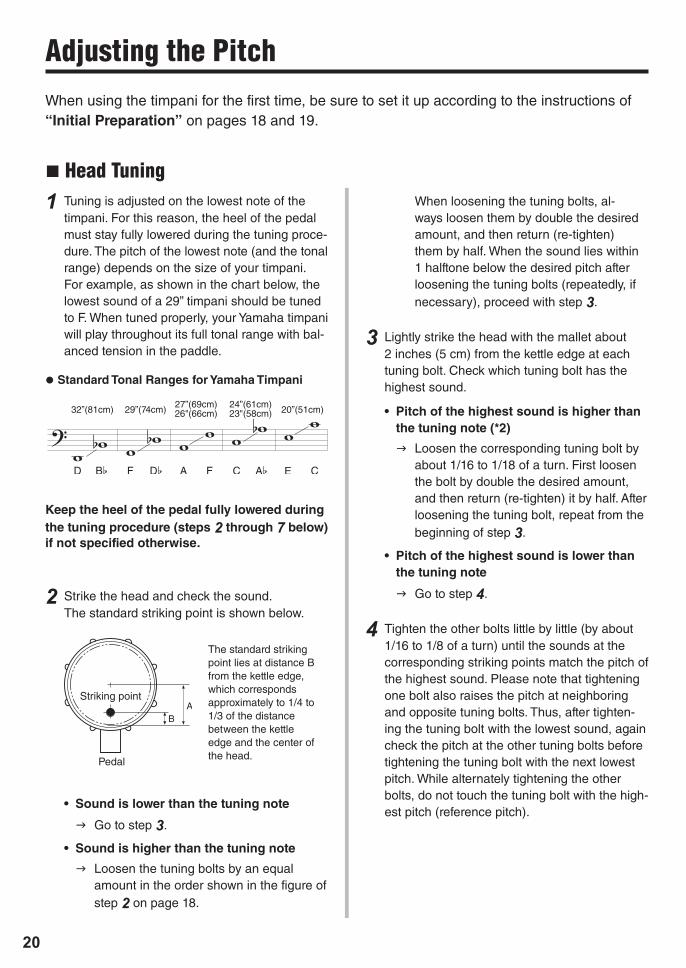
nHeadTuning1 Tuning is adjusted on the lowest note of the
timpani. For this reason, the heel of the pedal must stay fully lowered during the tuning proce-dure. The pitch of the lowest note (and the tonal range) depends on the size of your timpani. For example, as shown in the chart below, the lowest sound of a 29” timpani should be tuned to F. When tuned properly, your Yamaha timpani will play throughout its full tonal range with bal-anced tension in the paddle.
When loosening the tuning bolts, al-ways loosen them by double the desired amount, and then return (re-tighten) them by half. When the sound lies within 1 halftone below the desired pitch after loosening the tuning bolts (repeatedly, if necessary), proceed with step 3.
3 Lightly strike the head with the mallet about 2 inches (5 cm) from the kettle edge at each tuning bolt. Check which tuning bolt has the highest sound.
• Pitch of the highest sound is higher than the tuning note (*2)
gLoosen the corresponding tuning bolt by about 1/16 to 1/18 of a turn. First loosen the bolt by double the desired amount, and then return (re-tighten) it by half. After loosening the tuning bolt, repeat from the beginning of step 3.
• Pitch of the highest sound is lower than the tuning note
gGo to step 4.
4 Tighten the other bolts little by little (by about 1/16 to 1/8 of a turn) until the sounds at the corresponding striking points match the pitch of the highest sound. Please note that tightening one bolt also raises the pitch at neighboring and opposite tuning bolts. Thus, after tighten-ing the tuning bolt with the lowest sound, again check the pitch at the other tuning bolts before tightening the tuning bolt with the next lowest pitch. While alternately tightening the other bolts, do not touch the tuning bolt with the high-est pitch (reference pitch).
The standard strikingpoint lies at distance Bfrom the kettle edge,which correspondsapproximately to 1/4 to1/3 of the distancebetween the kettleedge and the center ofthe head.
l Standard Tonal Ranges for Yamaha Timpani
Keep the heel of the pedal fully lowered during the tuning procedure (steps 2 through 7 below) if not specified otherwise.
Striking point
Pedal
32”(81cm) 29”(74cm) 27”(69cm) 24”(61cm) 20”(51cm) 26"(66cm) 23"(58cm)
2 Strike the head and check the sound. The standard striking point is shown below.
AdjustingthePitch
• Sound is lower than the tuning note
gGo to step 3.
• Sound is higher than the tuning note
gLoosen the tuning bolts by an equal amount in the order shown in the figure of step 2 on page 18.
21
5 Loosen all over-tightened bolts according to the procedure described in step 3 (*2). When the pitch is approximately the same at each bolt, repeatedly depress the toe and heel of the pedal several times.
6 Repeat steps 3 through 5 until the pitch at each bolt is exactly the same.
7 Check the sound by striking the head as de-scribed in step 2.
• Sound is lower than the tuning note
gTune the instrument by tightening all tun-ing bolts by an equal amount (max. 1/16 of a turn).
• Sound is higher than the tuning note
gTune the instrument by loosening all tuning bolts by an equal amount (max. 1/16 of a turn) according to the procedure described in step 3 (*2).
8 Operate the pedal as described in step 5. If the pitch does not change, the instrument is tuned properly.
(If the pitch changes, repeat from step 7.)
The instrument is now tuned to the lowest note of its tonal range. Depress the toe of the pedal to change to a higher note.
9 After tuning, perform “Pedal Adjustment” and then “Tuning Indicator Adjustment”.
AdjustingthePitch
22
NoteDo not loosen the spring tension adjust-ment bolt by more than 3 rotations at a time, as the toe of the pedal tends to drop abruptly after a specific point.
Never place your fingers or feet into the spaces underneath the pedal, the base por-tion of the instrument, or between moving parts such as the casters. Serious injury can result if fingers or feet become pinched.
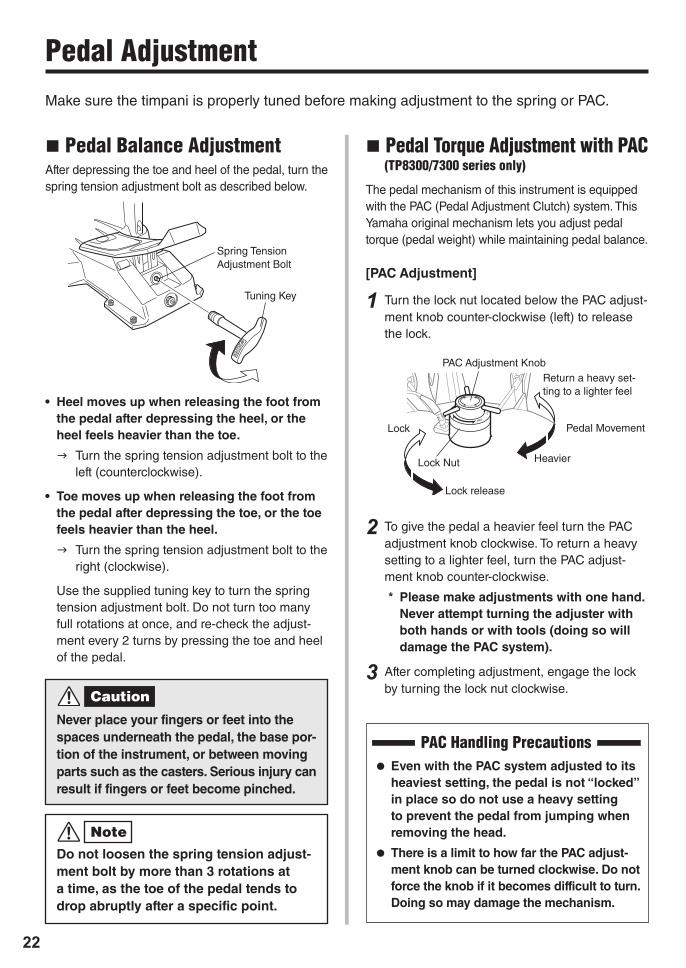
nPedalBalanceAdjustmentAfter depressing the toe and heel of the pedal, turn the spring tension adjustment bolt as described below.
• Heel moves up when releasing the foot from the pedal after depressing the heel, or the heel feels heavier than the toe.
gTurn the spring tension adjustment bolt to the left (counterclockwise).
• Toe moves up when releasing the foot from the pedal after depressing the toe, or the toe feels heavier than the heel.
gTurn the spring tension adjustment bolt to the right (clockwise).
Use the supplied tuning key to turn the spring tension adjustment bolt. Do not turn too many full rotations at once, and re-check the adjust-ment every 2 turns by pressing the toe and heel of the pedal.
nPedalTorqueAdjustmentwithPAC (TP8300/7300seriesonly)
The pedal mechanism of this instrument is equipped with the PAC (Pedal Adjustment Clutch) system. This Yamaha original mechanism lets you adjust pedal torque (pedal weight) while maintaining pedal balance.
[PAC Adjustment]
1 Turn the lock nut located below the PAC adjust-ment knob counter-clockwise (left) to release the lock.
2 To give the pedal a heavier feel turn the PAC adjustment knob clockwise. To return a heavy setting to a lighter feel, turn the PAC adjust-ment knob counter-clockwise.
* Please make adjustments with one hand. Never attempt turning the adjuster with both hands or with tools (doing so will damage the PAC system).
3 After completing adjustment, engage the lock by turning the lock nut clockwise.
PACHandlingPrecautionsl Even with the PAC system adjusted to its
heaviest setting, the pedal is not “locked” in place so do not use a heavy setting to prevent the pedal from jumping when removing the head.
l There is a limit to how far the PAC adjust-ment knob can be turned clockwise. Do not force the knob if it becomes difficult to turn. Doing so may damage the mechanism.
Spring Tension Adjustment Bolt
Tuning Key
PedalAdjustment
Caution
PAC Adjustment Knob
Pedal Movement
HeavierLock Nut
Return a heavy set-ting to a lighter feel
Lock release
Lock
Make sure the timpani is properly tuned before making adjustment to the spring or PAC.

23
The tuning indicator shows where to set the pedal for each note. After tuning the instrument, you must set each note on the indicator to its proper position.
1After you have tuned your timpani to the low-est note of its tonal range, make sure that the pointer is located within 2~3 mm from the pedal-side end of the indicator rail.
* If not, refer to “Adjusting the Pointer Position”.
2Slide the lowest note of the indicator (“C” in the case of a 23” timpani*) to the position where its center line coincides with the pointer.
* “Standard Tonal Ranges for Yamaha Tim-pani” on page 20.
3Tune the instrument to the next higher pitch (note) by moving the pedal, and then slide the corre-sponding note on the rail to the respective pointer position. Repeat for each remaining note.
nAdjustingthePointerPositionFirst loosen the pointer lock nut and then turn the adjuster as follows:
• Pointer is located beyond the lower rail end when the heel of the pedal is lowered fully (lowest note).
gTurn the adjuster to the left (counter clock-wise) until the pointer is aligned with the low-est note of the indicator.
• Pointer moves beyond the upper rail end before the toe of the pedal reaches the end of its stroke, or Pointer does not reach the lower rail end when the heel of the pedal is lowered fully (lowest sound)
gTurn the adjuster to the right (clockwise) to correct the pointer position as required.
lRelocatingtheTuningIndicator
Tuning Indicator Bolt
Tuning Indicator Bolt
Universal Style Attachment
German Style AttachmentThe timpani is shipped with a universal style tun-
ing indicator already attached however, the tun-ing indicator can be relocated for German style tuning.Using the supplied hex wrench, remove the two bolts holding the tuning indicator in place as shown in the diagram right, then slide the bolts through the holes on the tuning indicator from the opposite side. In either position, make sure that the note indicator bridge is easily viewable. Mounting Bracket
TuningIndicatorAdjustment
Note
AdjusterPointer Lock Nut
Adjuster Cover* Replace the
cover after adjusting.
Indicator Rail
Note
Pointer
24
Pedal
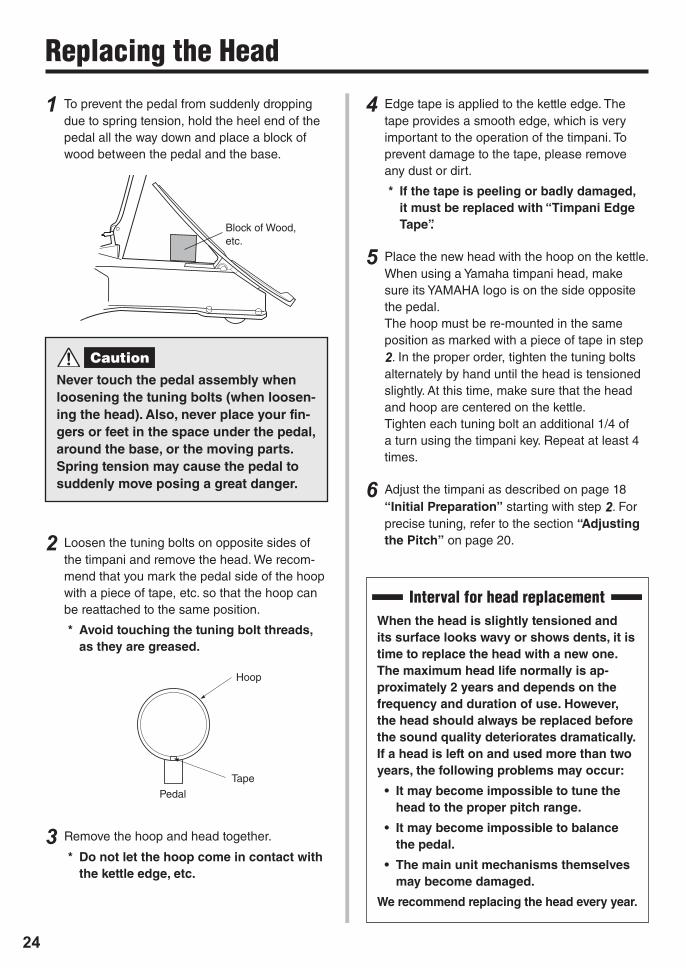
1To prevent the pedal from suddenly dropping due to spring tension, hold the heel end of the pedal all the way down and place a block of wood between the pedal and the base.
2 Loosen the tuning bolts on opposite sides of the timpani and remove the head. We recom-mend that you mark the pedal side of the hoop with a piece of tape, etc. so that the hoop can be reattached to the same position.
* Avoid touching the tuning bolt threads, as they are greased.
Never touch the pedal assembly when loosening the tuning bolts (when loosen-ing the head). Also, never place your fin-gers or feet in the space under the pedal, around the base, or the moving parts. Spring tension may cause the pedal to suddenly move posing a great danger.
3 Remove the hoop and head together.
* Do not let the hoop come in contact with the kettle edge, etc.
Hoop
Tape
4Edge tape is applied to the kettle edge. The tape provides a smooth edge, which is very important to the operation of the timpani. To prevent damage to the tape, please remove any dust or dirt.
* If the tape is peeling or badly damaged, it must be replaced with “Timpani Edge Tape”.
5Place the new head with the hoop on the kettle. When using a Yamaha timpani head, make sure its YAMAHA logo is on the side opposite the pedal.
The hoop must be re-mounted in the same position as marked with a piece of tape in step 2. In the proper order, tighten the tuning bolts alternately by hand until the head is tensioned slightly. At this time, make sure that the head and hoop are centered on the kettle.
Tighten each tuning bolt an additional 1/4 of a turn using the timpani key. Repeat at least 4 times.
6 Adjust the timpani as described on page 18 “Initial Preparation” starting with step 2. For precise tuning, refer to the section “Adjusting the Pitch” on page 20.
IntervalforheadreplacementWhen the head is slightly tensioned and its surface looks wavy or shows dents, it is time to replace the head with a new one. The maximum head life normally is ap-proximately 2 years and depends on the frequency and duration of use. However, the head should always be replaced before the sound quality deteriorates dramatically. If a head is left on and used more than two years, the following problems may occur:
• It may become impossible to tune the head to the proper pitch range.
• It may become impossible to balance the pedal.
• The main unit mechanisms themselves may become damaged.
We recommend replacing the head every year.
ReplacingtheHead
Caution
Block of Wood, etc.