Embed Size (px)
Citation preview
A generic Web Submission System Step-by Step Installation Guide
vorgelegt von Chantal Peeters
Juli 2011
Leiter der Arbeit Prof. Dr. Oscar Nierstrasz
Jorge Ressia
Abstract
- 1 -
Abstract
This Step-by-Step Installation Guide helps you to set up your computer for using and developing the web submission system if you are using MAC or Windows.
First you need to install PHP, a database, an IDE and a local Mail server.
And then you have to make some special settings, which are very important. So this part is also for those, who are familiar with the rest.
Contents
- 2 -
Contents
Abstract .......................................................................................................................................... 1
Contents ......................................................................................................................................... 2
1 Introduction ............................................................................................................................ 3
2 Installation on Windows ......................................................................................................... 4
2.1 The XAMPP Package ....................................................................................................... 4
2.2 MySQL Database ............................................................................................................ 6
2.3 Local Mail Account ......................................................................................................... 7
2.4 NetBeans IDE .................................................................................................................. 8
2.4.1 PHPUnit ...................................................................................................................... 8
2.4.2 XDebug ....................................................................................................................... 9
2.5 Special Settings ............................................................................................................. 10
3 Installation on MAC OS X ...................................................................................................... 11
3.1 MySQL Database .......................................................................................................... 11
3.2 Local Mail Account ....................................................................................................... 12
3.3 NetBeans IDE ................................................................................................................ 12
3.3.1 PEAR ......................................................................................................................... 12
3.3.2 PHPUnit .................................................................................................................... 13
3.3.3 XDebug ..................................................................................................................... 13
3.4 Special Settings ............................................................................................................. 14
4 Start the System .................................................................................................................... 15
4.1 Windows ....................................................................................................................... 15
4.2 MAC OS X ...................................................................................................................... 15
4.3 Bug ................................................................................................................................ 15
Introduction
- 3 -
1 Introduction
The project covers the following two folders:
- generic-system - additional-files
If you are unfamiliar with NetBeans, PHP or MySQL Database I would recommend following this Tutorial step by step. Otherwise it should be no problem to skim over the installation parts.
In order to use the project, you need a local Web environment. Therefore, your server should supports
- PHP 5 or more
and you need
- a MySQL Database - a local Mail server.
For taking a look at the code and developing or testing the code you need to install
- NetBeans IDE for PHP.
Installation on Windows
- 4 -
2 Installation on Windows
2.1 The XAMPP Package
With the XAMPP Package you can get all requirements at once.
1. Go to http://www.apachefriends.org/en/xampp-windows.html, scroll down to the Jump off point Download and click on XAMPP.
2. Download and execute the Installer.
3. Select your language and click OK.
4. Click next.
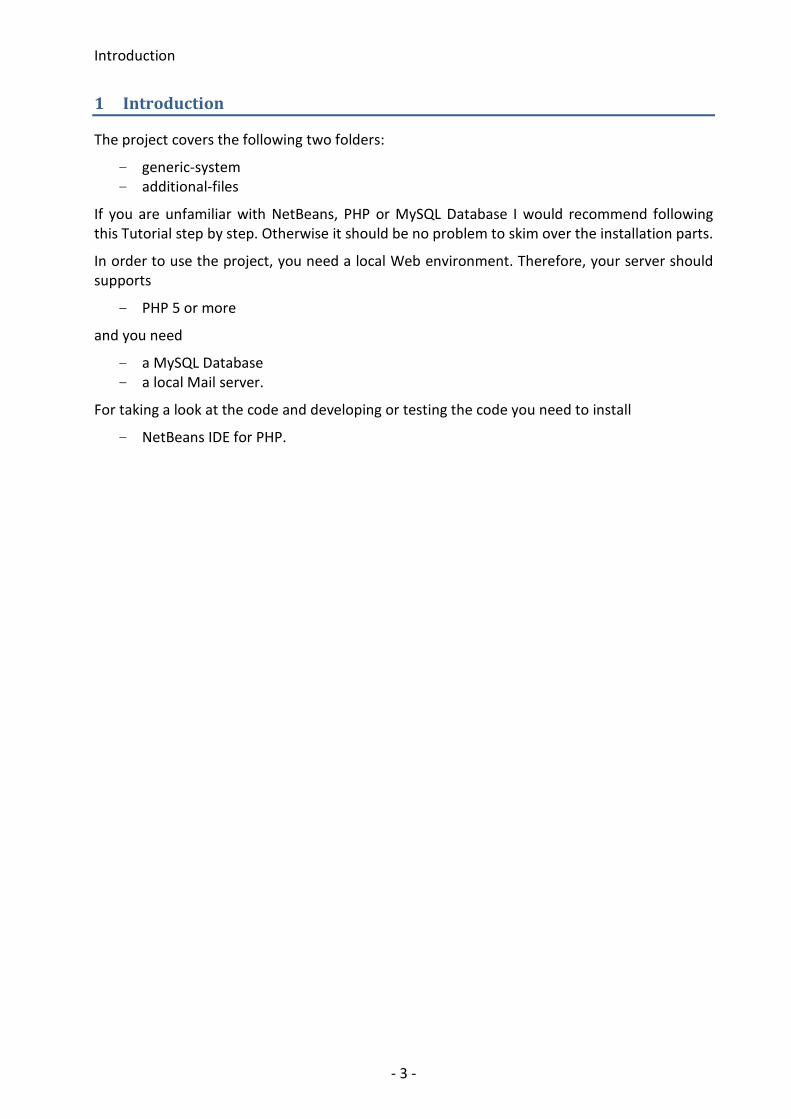
5. Enter the destination folder: C:\xampp
Installation on Windows
- 5 -
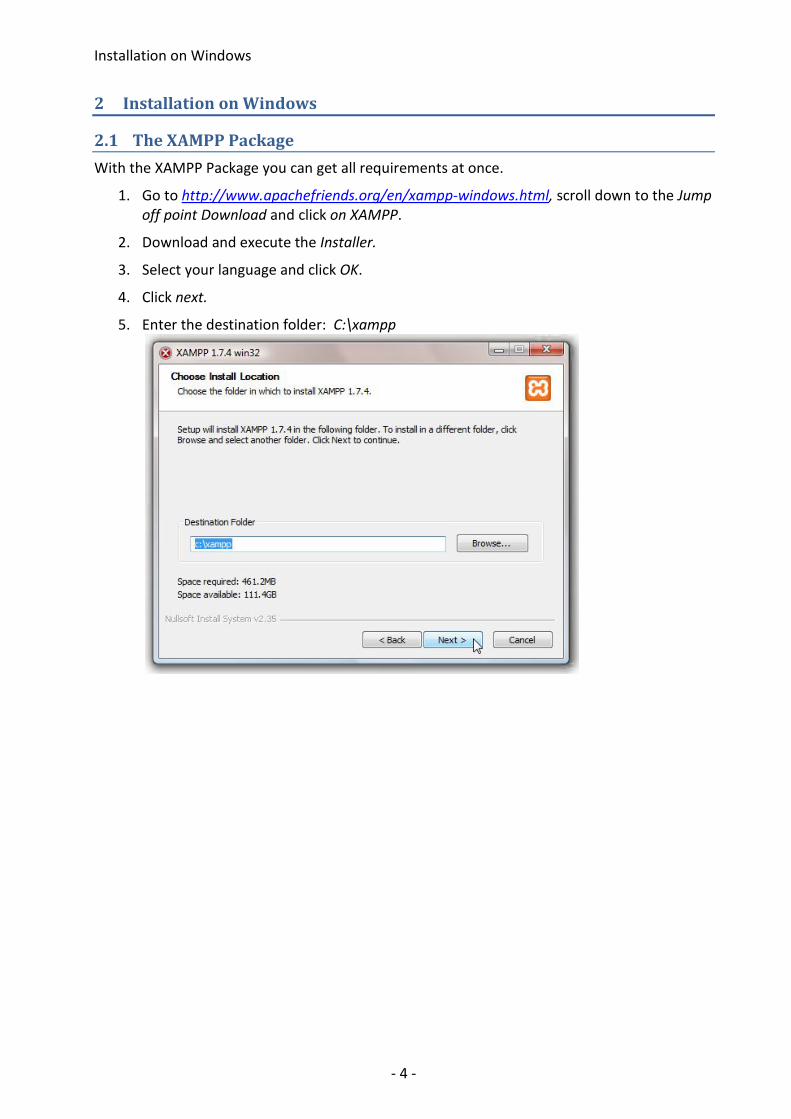
6. Ensure that all boxes of the SERVICE SECTION are unchecked. Click install.
7. Finish the Installation.
8. Start the XAMPP Control Panel.
Alternatively you can open the XAMPP Control Panel under Start > Programs > XAMPP.
Installation on Windows
- 6 -
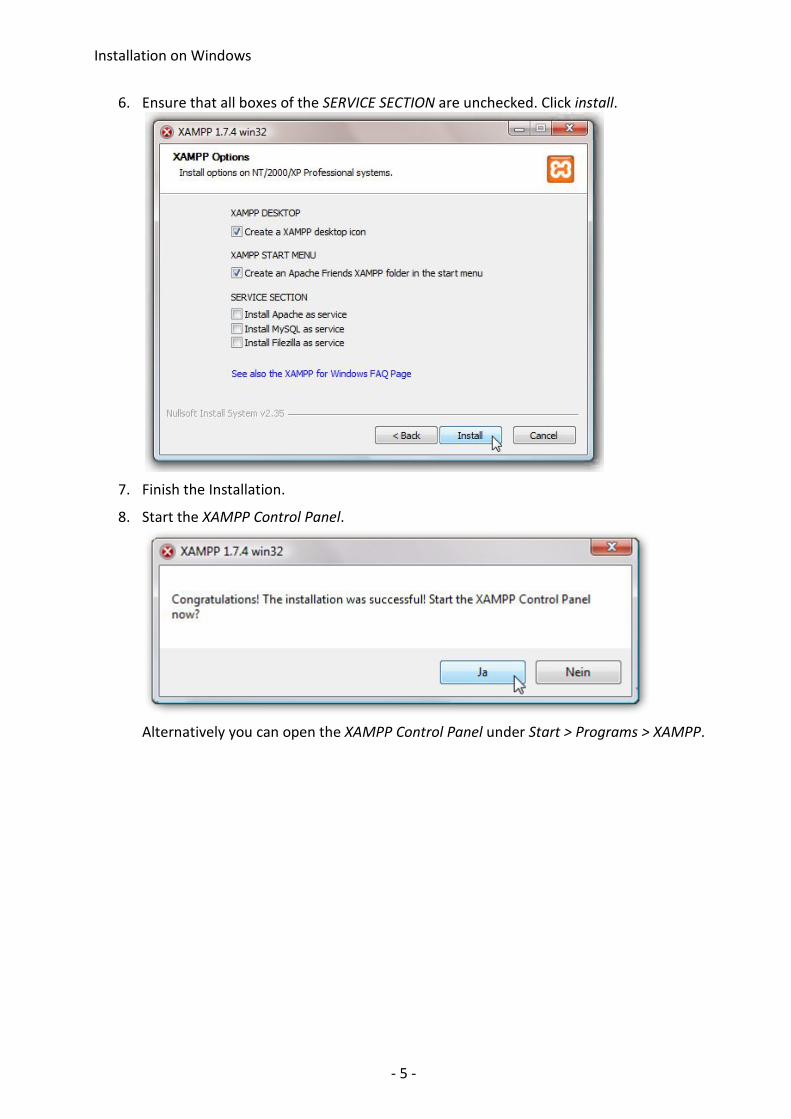
9. Start the Apache, MySQL and Mercury.
10. Copy the project folder generic system and the folder additional-files into C:\xampp\htdocs
2.2 MySQL Database
Open your browser and go to http://localhost/phpmyadmin. PhpMyAdmin is a nice software tool to handle the administration of MySQL over the World Wide Web.
1. First go to Privileges and check if there is already a user with the following settings: - User: root - Password: No (so it has no password)
If there is no user called root, add a user with this requirements. It is no problem, if you do not want to have an empty password. You only have to change it in the source code. This step will be explained in 2.5 Special Settings paragraph 2.
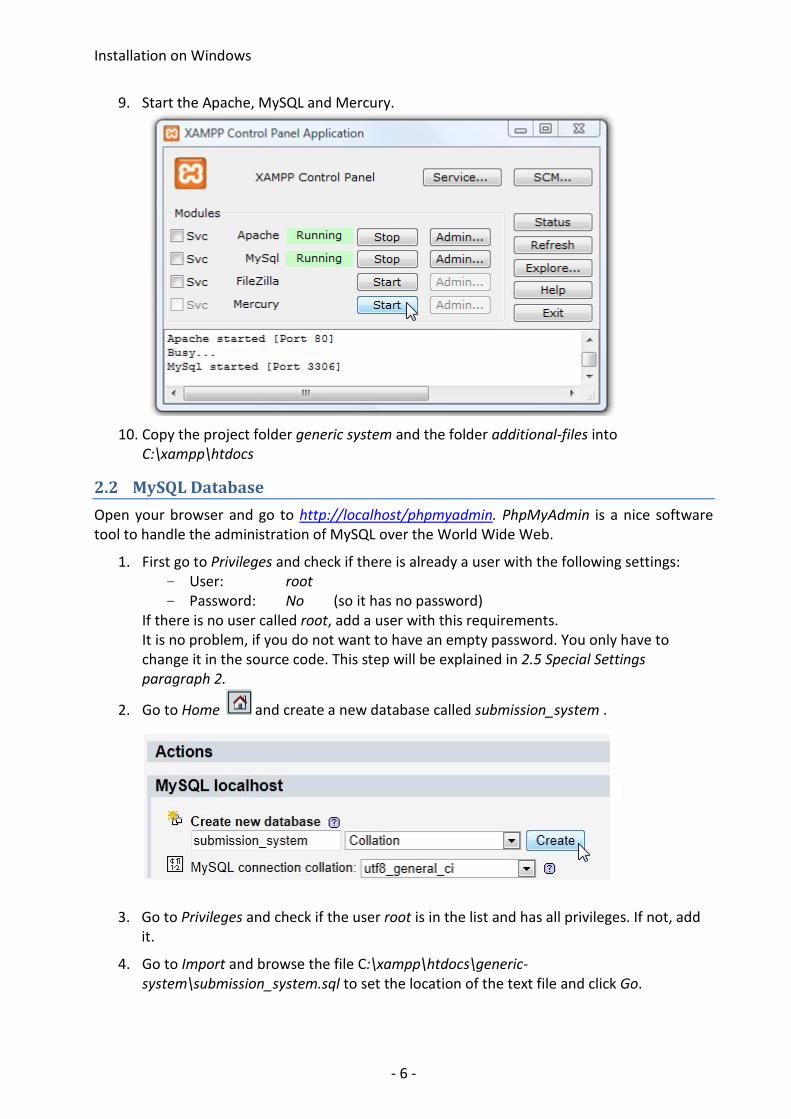
2. Go to Home and create a new database called submission_system .
3. Go to Privileges and check if the user root is in the list and has all privileges. If not, add it.
4. Go to Import and browse the file C:\xampp\htdocs\generic-system\submission_system.sql to set the location of the text file and click Go.
Installation on Windows
- 7 -
2.3 Local Mail Account
For using this system, it is very important to have the possibility to receive emails from a local mail address. The Mercury Mail server is integrated in the XAMPP package, which allows you sending e-mail to local addresses.
Now you have to create a new email account in your Windows Live Mail or another mail-program to receive these emails.
Here is the instruction for Windows Live Mail:
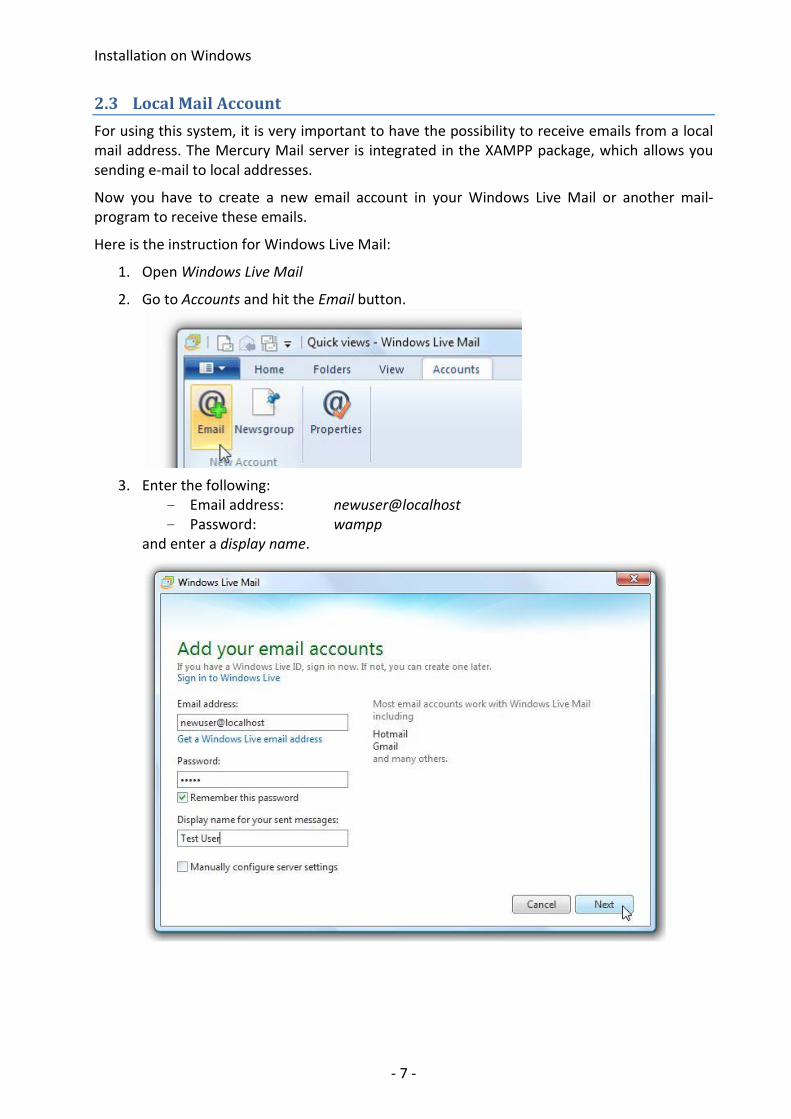
1. Open Windows Live Mail
2. Go to Accounts and hit the Email button.
3. Enter the following: - Email address: newuser@localhost - Password: wampp
and enter a display name.
Installation on Windows
- 8 -
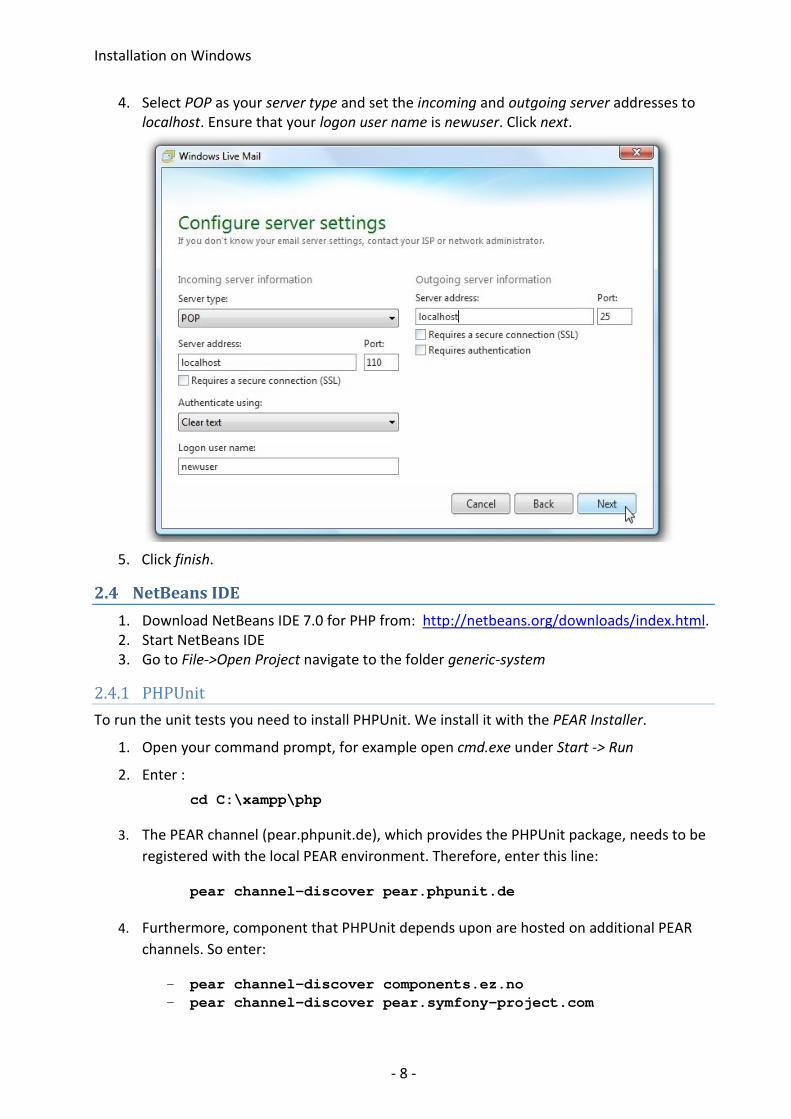
4. Select POP as your server type and set the incoming and outgoing server addresses to localhost. Ensure that your logon user name is newuser. Click next.
5. Click finish.
2.4 NetBeans IDE
1. Download NetBeans IDE 7.0 for PHP from: http://netbeans.org/downloads/index.html. 2. Start NetBeans IDE 3. Go to File->Open Project navigate to the folder generic-system
2.4.1 PHPUnit To run the unit tests you need to install PHPUnit. We install it with the PEAR Installer.
1. Open your command prompt, for example open cmd.exe under Start -> Run
2. Enter :
cd C:\xampp\php
3. The PEAR channel (pear.phpunit.de), which provides the PHPUnit package, needs to be registered with the local PEAR environment. Therefore, enter this line:
pear channel-discover pear.phpunit.de
4. Furthermore, component that PHPUnit depends upon are hosted on additional PEAR channels. So enter:
- pear channel-discover components.ez.no - pear channel-discover pear.symfony-project.com
Installation on Windows
- 9 -
5. Now the PEAR Installer is ready to be used to install packages from the PHPUnit channel. Enter:
pear install phpunit/PHPUnit
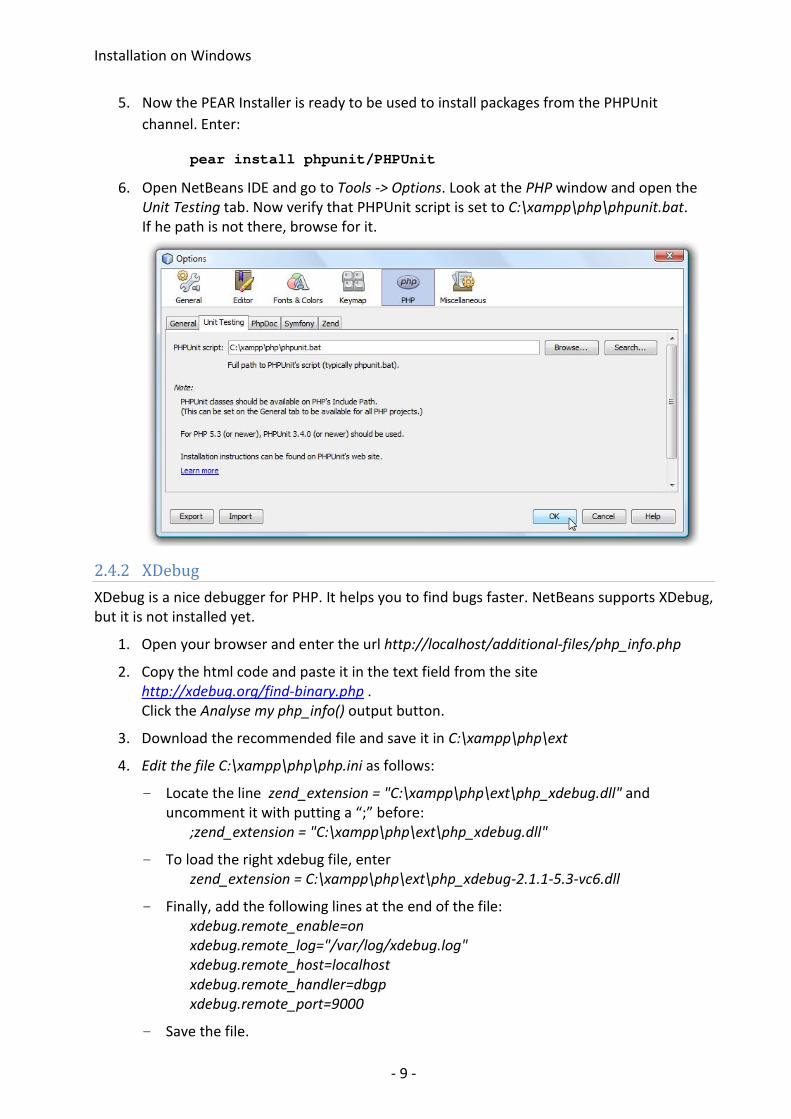
6. Open NetBeans IDE and go to Tools -> Options. Look at the PHP window and open the Unit Testing tab. Now verify that PHPUnit script is set to C:\xampp\php\phpunit.bat. If he path is not there, browse for it.
2.4.2 XDebug XDebug is a nice debugger for PHP. It helps you to find bugs faster. NetBeans supports XDebug, but it is not installed yet.
1. Open your browser and enter the url http://localhost/additional-files/php_info.php
2. Copy the html code and paste it in the text field from the site http://xdebug.org/find-binary.php . Click the Analyse my php_info() output button.
3. Download the recommended file and save it in C:\xampp\php\ext
4. Edit the file C:\xampp\php\php.ini as follows:
- Locate the line zend_extension = "C:\xampp\php\ext\php_xdebug.dll" and uncomment it with putting a “;” before: ;zend_extension = "C:\xampp\php\ext\php_xdebug.dll"
- To load the right xdebug file, enter zend_extension = C:\xampp\php\ext\php_xdebug-2.1.1-5.3-vc6.dll
- Finally, add the following lines at the end of the file: xdebug.remote_enable=on xdebug.remote_log="/var/log/xdebug.log" xdebug.remote_host=localhost xdebug.remote_handler=dbgp xdebug.remote_port=9000
- Save the file.
Installation on Windows
- 10 -
5. Open NetBeans IDE and go to Tools -> Options. Look at the PHP window and open the General tab.
- Verify that the PHP 5 Interpreter is set to C:\xampp\php\php.exe or browse for it.
- Set the Debugger Port to 9000 - Insert netbeans-xdebug as the Session ID
2.5 Special Settings
1. Go to C:\xampp\php\PEAR\fpdf and replace the file fpdf.php with the one of the project folder additional-files.
2. If your password from user root from the database is not empty, you have to update it in the project.
- Start NetBeans IDE
- Open the file generic-system /Source Files/DB/class.DB.php and change protected $_db_password = ""; to protected $_db_password = "your_password"; where your_password is your password from user root.
Installation on MAC OS X
- 11 -
3 Installation on MAC OS X
3.1 MySQL Database
Usually, the MySQL Database is already installed on your system.
1. To check if the MySQL installed on your computer and you have a version up to date, open your shell and try
- mysql - mysql –version
If the version of your MySQL is older than 5.5 or you have none, go to http://www.MySQL.com/downloads/MySQL/#downloads and download the newest version for MAC-OS X.
2. Add the following lines to /etc/php.ini ; copied and corrected from php.ini.default pdo_mysql.default_socket=/tmp/mysql.sock mysql.default_socket = /tmp/mysql.sock mysqli.default_socket = /tmp/mysql.sock
3. Open your browser and go to http://localhost/phpmyadmin.
4. Go to Privileges and check if there is already a user with the following settings: - User: root - Password: No (so it has no password)
If there is no user called root, add a user with this requirements. It is no problem, if you do not want to have an empty password. You only have to change it in the source code. This step will be explained in 3.4 Special Settings paragraph 3 .
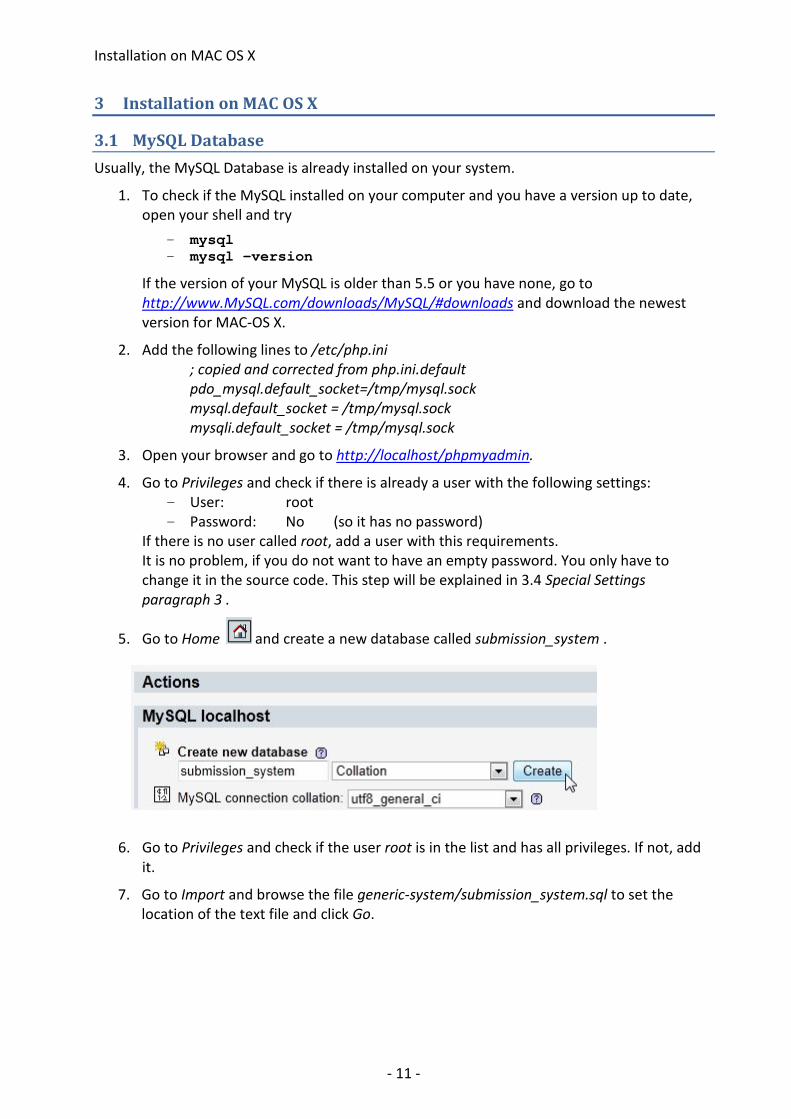
5. Go to Home and create a new database called submission_system .
6. Go to Privileges and check if the user root is in the list and has all privileges. If not, add it.
7. Go to Import and browse the file generic-system/submission_system.sql to set the location of the text file and click Go.
Installation on MAC OS X
- 12 -
3.2 Local Mail Account
MAC OS X provides a local Mail server called postfix so you are already able to send emails between local addresses. Use your email address [user]@localhost, where [user] should be replaced with your username.
3.3 NetBeans IDE
1. Download NetBeans IDE 7.0 for PHP from: http://netbeans.org/downloads/index.html.
2. Start NetBeans IDE
3. Go to File->Open Project navigate to the folder generic-system
3.3.1 PEAR You need PEAR to install PHPUnit.
1. MAC OS X provides PHP, but it may be disabled. To activate PHP, you have to load the PHP 5 module in the Apache configuration file. Therefore, open /etc/apache2/httpd.conf file and search for the line
#LoadModule php5_module
and uncomment it. That means, remove the # from the beginning of the line.
2. Open your Shell and restart apache with:
sudo apachectl restart
The Apache web server is started with the newly activated PHP 5 module.
3. Insert the following lines
- curl http://pear.php.net/go-pear.phar > go-pear.phar - sudo php go-pear.phar
4. Enter all to change install location to /usr/local/pear
5. Add /usr/local/pear/bin/pear to your (bash/tcsh) path
6. Verify that /etc/php.ini correctly specifies the include path “.:/usr/local/pear/share/pear”
7. Run
php -i | grep include_path
and check that all is ok.
8. To check that pear works, run
pear help
9. If necessary, set the proxy server for pear with the following command:
pear config-set http_proxy http://username:password@yourproxy:80
Installation on MAC OS X
- 13 -
3.3.2 PHPUnit To run the unit tests you need to install PHPUnit. We install it with the PEAR Installer.
1. Open your Terminal.
2. The PEAR channel (pear.phpunit.de), which provides the PHPUnit package, needs to be registered with the local PEAR environment. Therefore, enter the following line:
sudo pear channel-discover pear.phpunit.de
3. Run the following commands:
- sudo pear channel-discover components.ez.no - sudo pear channel-discover pear.symfony-project.com
4. Now the PEAR Installer is ready to be used to install packages from the PHPUnit channel. Enter:
sudo pear install phpunit/PHPUnit
5. You should now find PHPUnit installed here: /usr/local/pear/share/pear/PHPUnit There should also be an executable here: /usr/local/pear/bin/phpunit
6. Open NetBeans IDE and go to Tools -> Options. Look at the PHP window and open the Unit Testing Tab. Now verify that PHPUnit script is set to /usr/local/pear/bin/phpunit. If he path is not there, browse for it.
3.3.3 XDebug XDebug is a nice debugger for PHP. It helps you to find bugs faster. NetBeans supports XDebug, but it is not installed yet.
1. Open your Terminal and run
php –i
2. Copy the output and paste it in the text field from the site http://xdebug.org/find-binary.php Click the Analyse my php_info() output button.
3. Download the recommended file, for example xdebug-2.1.1.tgz
4. Unpack the downloaded file with
tar -xvzf xdebug-2.1.1.tgz
5. Enter the following commands:
- cd xdebug-2.1.1 - phpize - ./configure - Make - cp modules/xdebug.so /usr/lib/php/extensions/
no-debug-non-zts-20090626`
Installation on MAC OS X
- 14 -
6. Update the file /etc/php.ini with the correct path to xdebug. So add the following lines at the end of the file:
- zend_extension = /usr/lib/php/extensions/no-debug-non-zts-20090626/xdebug.so
- xdebug.remote_enable=on - xdebug.remote_log="/var/log/xdebug.log" - xdebug.remote_host=localhost - xdebug.remote_handler=dbgp - xdebug.remote_port=9000
7. Restart the Apache web server in the Terminal with the command:
sudo apachectl restart
8. Open NetBeans IDE and go to Tools -> Options. Look at the PHP window and open the General Tab.
- Verify that the PHP 5 Interpreter is set to your php.exe file or browse for it. - Set the Debugger Port to 9000 - Insert netbeans-xdebug as the Session ID
3.4 Special Settings
1. Go to the folder PEAR\fpdf and replace the file fpdf.php with the one of the project folder additional-files.
2. Update the file /etc/php.ini with the correct time zone:
date.timezone = "Europe/Berlin"
3. If your password from user root from the database is not empty, you have to update it in the project.
- Start NetBeans IDE
- Open the file generic-system /Source Files/DB/class.DB.php and change protected $_db_password = ""; to protected $_db_password = "your_password"; where your_password is your password from user root.
Start the System
- 15 -
4 Start the System
4.1 Windows
Open your favorite browser and go to: http://localhost/generic-system/View/index.php
The administrator is already registered. So use - user name: administrator - password: 000000
to log in.
4.2 MAC OS X
Open your browser and go to: http://localhost/~[user]/generic-system /View/index.php
The administrator is already registered. So use - user name: administrator - password: 000000
to log in.
4.3 Bug
There is still a bug in the system. If you use the system local on your MAC or on the web open the project in NetBeans and open the file Model/class.Mailer.php. Go to the method sendActivationMail(User $user) and change the variable $link.
- For local use:
$link = http://localhost/~[user]/generic-system /View/activation.php?username= ".$user->getUsername()."&code=".$user->getActivationCode()
Where [user] should be replaced with your user name.
- For web:
$link = [url of page]/View/activation.php?username=".$user->getUsername()."&code= ".$user->getActivationCode()
Where [url of page] should be replaced with the URL of the web page.