Embed Size (px)
Citation preview
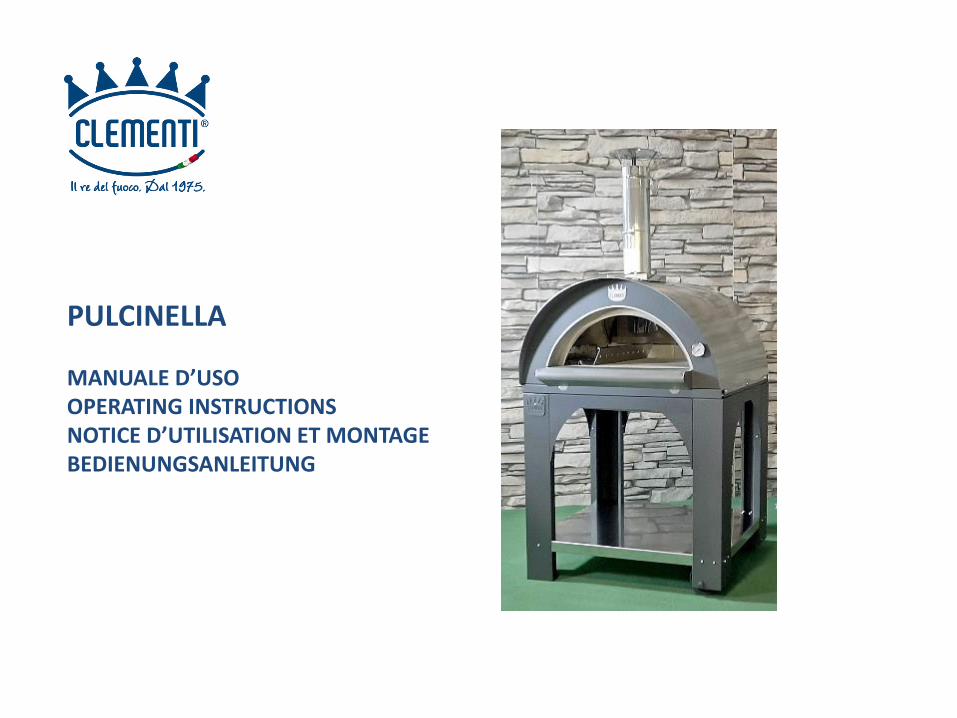
PULCINELLA MANUALE D’USO OPERATING INSTRUCTIONS NOTICE D’UTILISATION ET MONTAGE BEDIENUNGSANLEITUNG
AMO I FORNI CLEMENTI PERCHÉ SONO COME ME I LOVE THE CLEMENTI OVENS BECAUSE THEY ARE LIKE ME J’ADORE LES FOURS CLEMENTI PARCE QU’ILS SONT COMME MOI ICH LIEBE DEN BACKÖFEN CLEMENTI, DENN ER IST WIE ICH BIN
2
Congratulazioni per aver scelto un forno a legna CLEMENTI, u ’ Azienda con grande esperienza nel settore della cucina a legna. I nostri forni sono di alta qualità, costruiti con cura, precisione e materie prime selezionate, sono il risultato di lunghi anni di studio e ricerca. IMPORTANTE: per un uso corretto del forno, leggere attentamente le seguenti informazioni. Congratulations for your choice of a wood burning oven by CLEMENTI, a company with a great experience in the wood cooking sector. Our ovens are top quality articles; built with care, precision and selected materials, they are the result of long study and research. IMPORTANT: for a correct use of the oven, read carefully the following information. Félicitations pour avoir choisi un four à bois CLEMENTI, une entreprise avec une vaste expérience dans le secteur de la cuisson à bois. Nos fours sont de haute qualité, construits avec soin, précision et matières premières sélectionnées, ils sont le résultat d’a ées d'études et de recherche. IMPORTANT: pour une utilisation correcte du four, lire attentivement les informations suivantes. Herzlichen Glückwunsch, dass Sie den Holzbackofen CLEMENTI gewählt haben. Unsere Firma ein umfangreicher Erfahrung in der Holzofen –Sektor hat. Unsere Holzbackofen sind von hoher Qualität, gebaut mit Sorgfalt, Sie sind das Ergebnis der langjährigen Studien- und Forschungsmaterialien. WICHTIG: für den korrekten Gebrauch des Ofens, lesen Sie die folgenden Informationen.
3
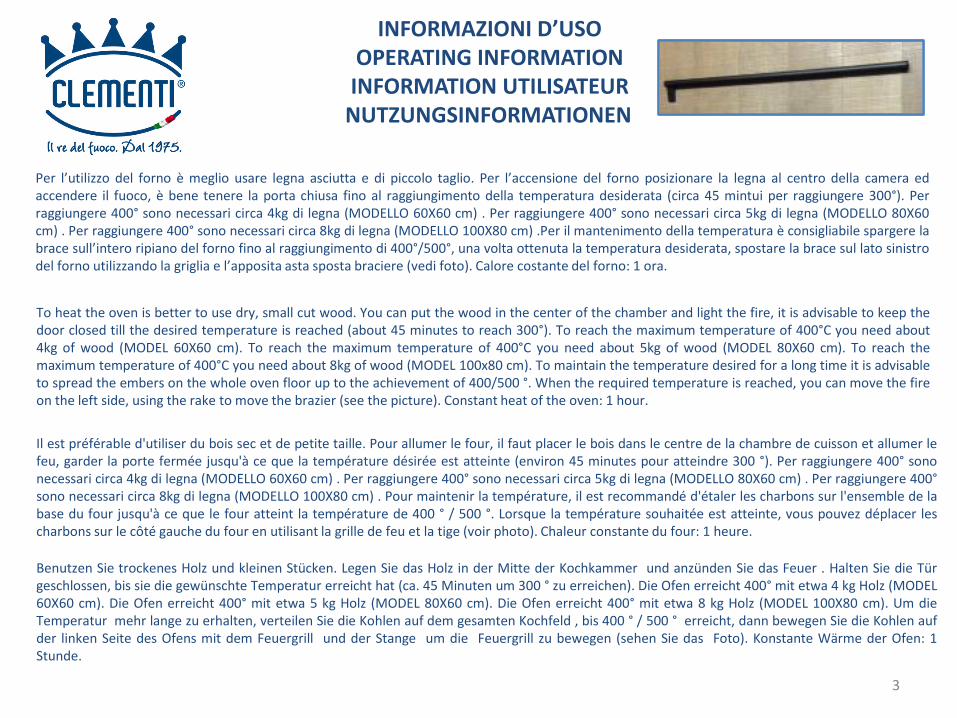
INFORMAZIONI D’USO OPERATING INFORMATION INFORMATION UTILISATEUR NUTZUNGSINFORMATIONEN Per l’utilizzo del forno è meglio usare legna asciutta e di piccolo taglio. Per l’acce sio e del forno posizionare la legna al centro della camera ed accendere il fuoco, è bene tenere la porta chiusa fino al raggiungimento della temperatura desiderata (circa 45 mintui per raggiungere 300°). Per raggiungere 400° sono necessari circa 4kg di legna (MODELLO 60X60 cm) . Per raggiungere 400° sono necessari circa 5kg di legna (MODELLO 80X60 cm) . Per raggiungere 400° sono necessari circa 8kg di legna (MODELLO 100X80 cm) .Per il mantenimento della temperatura è consigliabile spargere la brace sull’i tero ripiano del forno fino al raggiungimento di 400°/500°, una volta ottenuta la temperatura desiderata, spostare la brace sul lato sinistro del forno utilizzando la griglia e l’apposita asta sposta braciere (vedi foto). Calore costante del forno: 1 ora. To heat the oven is better to use dry, small cut wood. You can put the wood in the center of the chamber and light the fire, it is advisable to keep the door closed till the desired temperature is reached (about 45 minutes to reach 300°). To reach the maximum temperature of 400°C you need about 4kg of wood (MODEL 60X60 cm). To reach the maximum temperature of 400°C you need about 5kg of wood (MODEL 80X60 cm). To reach the maximum temperature of 400°C you need about 8kg of wood (MODEL 100x80 cm). To maintain the temperature desired for a long time it is advisable to spread the embers on the whole oven floor up to the achievement of 400/500 °. When the required temperature is reached, you can move the fire on the left side, using the rake to move the brazier (see the picture). Constant heat of the oven: 1 hour. Il est préférable d'utiliser du bois sec et de petite taille. Pour allumer le four, il faut placer le bois dans le centre de la chambre de cuisson et allumer le feu, garder la porte fermée jusqu'à ce que la température désirée est atteinte (environ 45 minutes pour atteindre 300 °). Per raggiungere 400° sono necessari circa 4kg di legna (MODELLO 60X60 cm) . Per raggiungere 400° sono necessari circa 5kg di legna (MODELLO 80X60 cm) . Per raggiungere 400° sono necessari circa 8kg di legna (MODELLO 100X80 cm) . Pour maintenir la température, il est recommandé d'étaler les charbons sur l'ensemble de la base du four jusqu'à ce que le four atteint la température de 400 ° / 500 °. Lorsque la température souhaitée est atteinte, vous pouvez déplacer les charbons sur le côté gauche du four en utilisant la grille de feu et la tige (voir photo). Chaleur constante du four: 1 heure. Benutzen Sie trockenes Holz und kleinen Stücken. Legen Sie das Holz in der Mitte der Kochkammer und anzünden Sie das Feuer . Halten Sie die Tür geschlossen, bis sie die gewünschte Temperatur erreicht hat (ca. 45 Minuten um 300 ° zu erreichen). Die Ofen erreicht 400° mit etwa 4 kg Holz (MODEL 60X60 cm). Die Ofen erreicht 400° mit etwa 5 kg Holz (MODEL 80X60 cm). Die Ofen erreicht 400° mit etwa 8 kg Holz (MODEL 100X80 cm). Um die Temperatur mehr lange zu erhalten, verteilen Sie die Kohlen auf dem gesamten Kochfeld , bis 400 ° / 500 ° erreicht, dann bewegen Sie die Kohlen auf der linken Seite des Ofens mit dem Feuergrill und der Stange um die Feuergrill zu bewegen (sehen Sie das Foto). Konstante Wärme der Ofen: 1 Stunde.
4
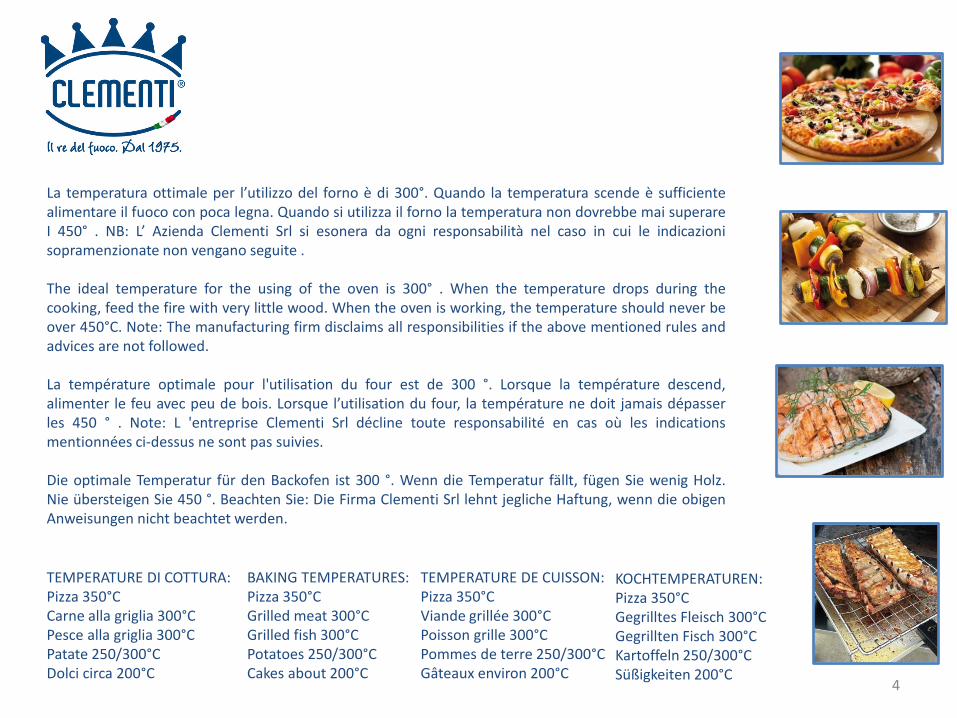
La temperatura ottimale per l’utilizzo del forno è di 300°. Quando la temperatura scende è sufficiente alimentare il fuoco con poca legna. Quando si utilizza il forno la temperatura non dovrebbe mai superare I 450° . NB: L’ Azienda Clementi Srl si esonera da ogni responsabilità nel caso in cui le indicazioni sopramenzionate non vengano seguite . The ideal temperature for the using of the oven is 300° . When the temperature drops during the cooking, feed the fire with very little wood. When the oven is working, the temperature should never be over 450°C. Note: The manufacturing firm disclaims all responsibilities if the above mentioned rules and advices are not followed. La température optimale pour l'utilisation du four est de 300 °. Lorsque la température descend, alimenter le feu avec peu de bois. Lorsque l’utilisation du four, la température ne doit jamais dépasser les 450 ° . Note: L 'entreprise Clementi Srl décline toute responsabilité en cas où les indications mentionnées ci-dessus ne sont pas suivies. Die optimale Temperatur für den Backofen ist 300 °. Wenn die Temperatur fällt, fügen Sie wenig Holz. Nie übersteigen Sie 450 °. Beachten Sie: Die Firma Clementi Srl lehnt jegliche Haftung, wenn die obigen Anweisungen nicht beachtet werden. TEMPERATURE DI COTTURA: Pizza 350°C Carne alla griglia 300°C Pesce alla griglia 300°C Patate 250/300°C Dolci circa 200°C
BAKING TEMPERATURES: Pizza 350°C Grilled meat 300°C Grilled fish 300°C Potatoes 250/300°C Cakes about 200°C
TEMPERATURE DE CUISSON: Pizza 350°C Viande grillée 300°C Poisson grille 300°C Pommes de terre 250/300°C Gâteaux environ 200°C
KOCHTEMPERATUREN: Pizza 350°C Gegrilltes Fleisch 300°C Gegrillten Fisch 300°C Kartoffeln 250/300°C Süßigkeiten 200°C
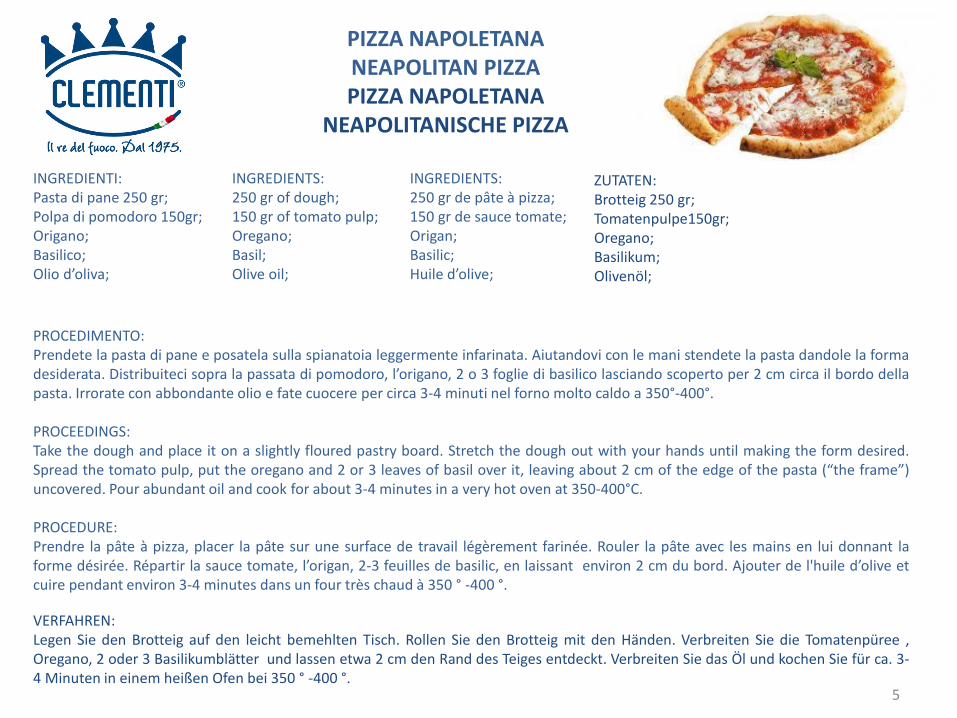
PIZZA NAPOLETANA NEAPOLITAN PIZZA PIZZA NAPOLETANA NEAPOLITANISCHE PIZZA INGREDIENTI: Pasta di pane 250 gr; Polpa di pomodoro 150gr; Origano; Basilico; Olio d’oliva; PROCEDIMENTO: Prendete la pasta di pane e posatela sulla spianatoia leggermente infarinata. Aiutandovi con le mani stendete la pasta dandole la forma desiderata. Distribuiteci sopra la passata di pomodoro, l’origa o, 2 o 3 foglie di basilico lasciando scoperto per 2 cm circa il bordo della pasta. Irrorate con abbondante olio e fate cuocere per circa 3-4 minuti nel forno molto caldo a 350°-400°. PROCEEDINGS: Take the dough and place it on a slightly floured pastry board. Stretch the dough out with your hands until making the form desired. Spread the tomato pulp, put the oregano and 2 or 3 leaves of basil over it, leaving about 2 cm of the edge of the pasta the fra e uncovered. Pour abundant oil and cook for about 3-4 minutes in a very hot oven at 350-400°C. PROCEDURE: Prendre la pâte à pizza, placer la pâte sur une surface de travail légèrement farinée. Rouler la pâte avec les mains en lui donnant la forme désirée. Répartir la sauce tomate, l’origa , 2-3 feuilles de basilic, en laissant environ 2 cm du bord. Ajouter de l'huile d’olive et cuire pendant environ 3-4 minutes dans un four très chaud à 350 ° -400 °.
INGREDIENTS: 250 gr de pâte à pizza; 150 gr de sauce tomate; Origan; Basilic; Huile d’olive;
5
INGREDIENTS: 250 gr of dough; 150 gr of tomato pulp; Oregano; Basil; Olive oil;
ZUTATEN: Brotteig 250 gr; Tomatenpulpe150gr; Oregano; Basilikum; Olivenöl;
VERFAHREN: Legen Sie den Brotteig auf den leicht bemehlten Tisch. Rollen Sie den Brotteig mit den Händen. Verbreiten Sie die Tomatenpüree , Oregano, 2 oder 3 Basilikumblätter und lassen etwa 2 cm den Rand des Teiges entdeckt. Verbreiten Sie das Öl und kochen Sie für ca. 3-4 Minuten in einem heißen Ofen bei 350 ° -400 °.
6
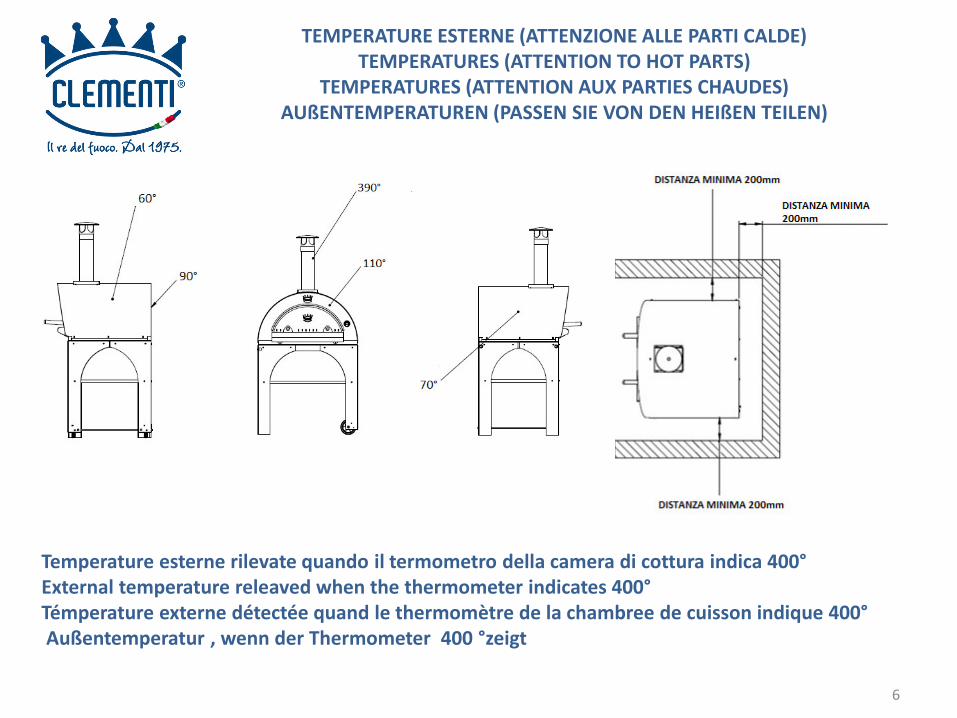
TEMPERATURE ESTERNE (ATTENZIONE ALLE PARTI CALDE) TEMPERATURES (ATTENTION TO HOT PARTS) TEMPERATURES (ATTENTION AUX PARTIES CHAUDES) AUßENTEMPERATUREN (PASSEN SIE VON DEN HEIßEN TEILEN)
Temperature esterne rilevate quando il termometro della camera di cottura indica 400° External temperature releaved when the thermometer indicates 400° Témperature externe détectée quand le thermomètre de la chambree de cuisson indique 400° Außentemperatur , wenn der Thermometer 400 °zeigt
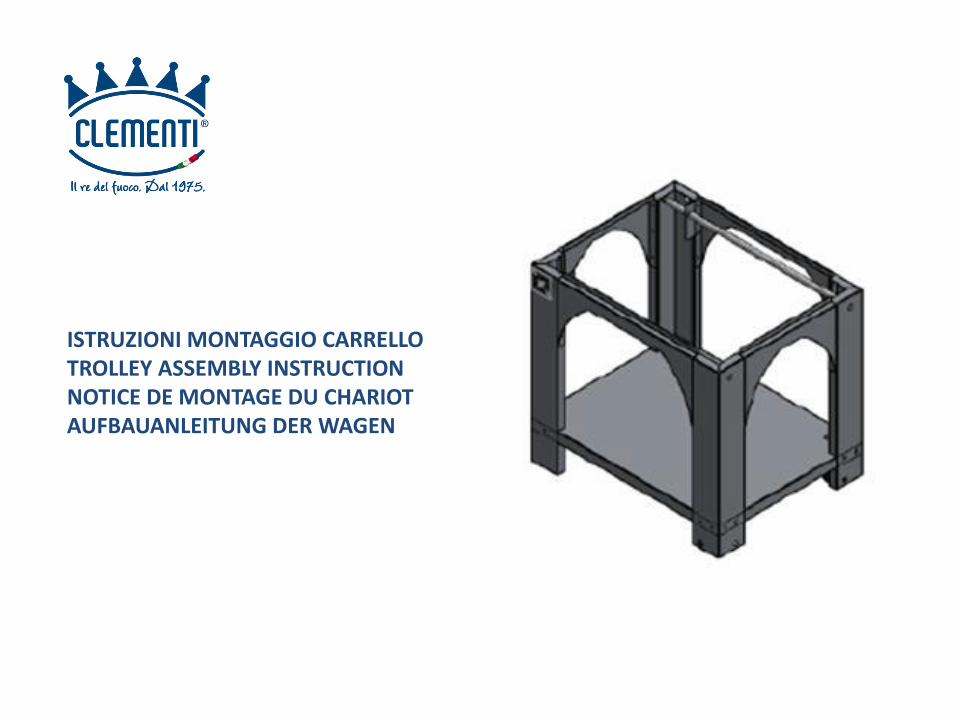
ISTRUZIONI MONTAGGIO CARRELLO TROLLEY ASSEMBLY INSTRUCTION NOTICE DE MONTAGE DU CHARIOT AUFBAUANLEITUNG DER WAGEN
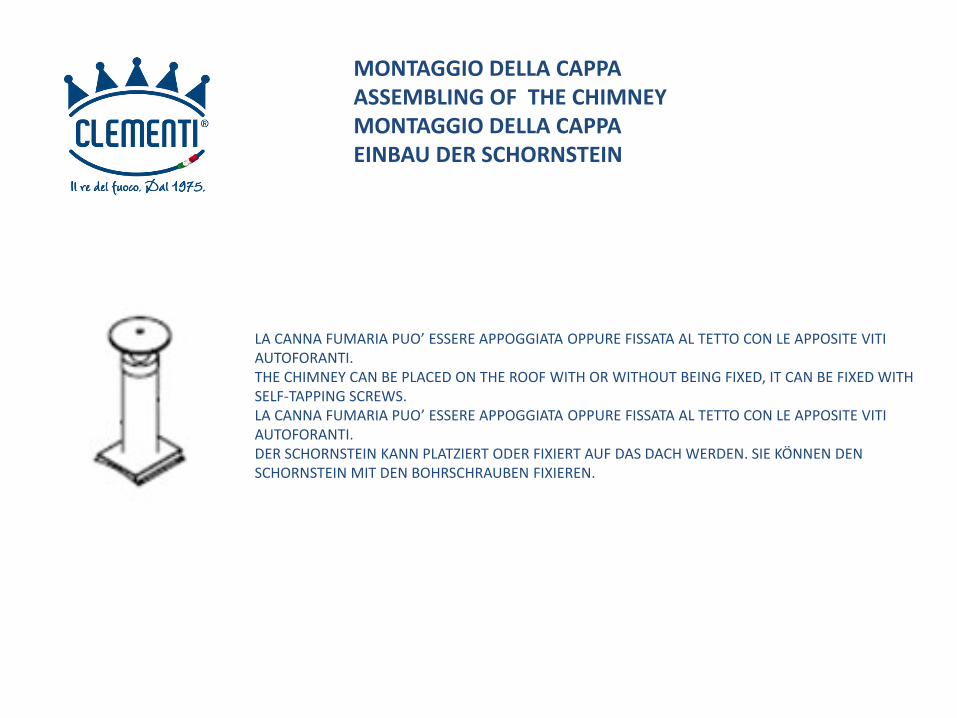
MONTAGGIO DELLA CAPPA ASSEMBLING OF THE CHIMNEY MONTAGGIO DELLA CAPPA EINBAU DER SCHORNSTEIN
LA CANNA FUMARIA PUO’ ESSERE APPOGGIATA OPPURE FISSATA AL TETTO CON LE APPOSITE VITI AUTOFORANTI. THE CHIMNEY CAN BE PLACED ON THE ROOF WITH OR WITHOUT BEING FIXED, IT CAN BE FIXED WITH SELF-TAPPING SCREWS. LA CANNA FUMARIA PUO’ ESSERE APPOGGIATA OPPURE FISSATA AL TETTO CON LE APPOSITE VITI AUTOFORANTI. DER SCHORNSTEIN KANN PLATZIERT ODER FIXIERT AUF DAS DACH WERDEN. SIE KÖNNEN DEN SCHORNSTEIN MIT DEN BOHRSCHRAUBEN FIXIEREN.
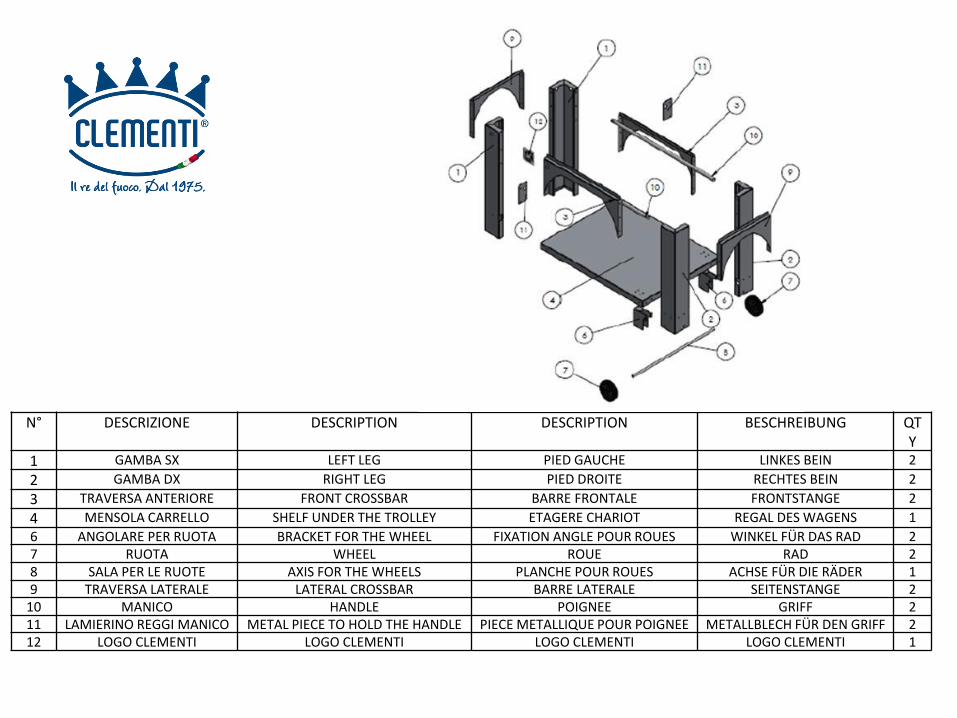
N° DESCRIZIONE DESCRIPTION DESCRIPTION BESCHREIBUNG QTY 1 GAMBA SX LEFT LEG PIED GAUCHE LINKES BEIN 2 2 GAMBA DX RIGHT LEG PIED DROITE RECHTES BEIN 2 3 TRAVERSA ANTERIORE FRONT CROSSBAR BARRE FRONTALE FRONTSTANGE 2 4 MENSOLA CARRELLO SHELF UNDER THE TROLLEY ETAGERE CHARIOT REGAL DES WAGENS 1 6 ANGOLARE PER RUOTA BRACKET FOR THE WHEEL FIXATION ANGLE POUR ROUES WINKEL FÜR DAS RAD 2 7 RUOTA WHEEL ROUE RAD 2 8 SALA PER LE RUOTE AXIS FOR THE WHEELS PLANCHE POUR ROUES ACHSE FÜR DIE RÄDER 1 9 TRAVERSA LATERALE LATERAL CROSSBAR BARRE LATERALE SEITENSTANGE 2 10 MANICO HANDLE POIGNEE GRIFF 2 11 LAMIERINO REGGI MANICO METAL PIECE TO HOLD THE HANDLE PIECE METALLIQUE POUR POIGNEE METALLBLECH FÜR DEN GRIFF 2 12 LOGO CLEMENTI LOGO CLEMENTI LOGO CLEMENTI LOGO CLEMENTI 1

Prendere i 2 componenti (codice 6) e fissarli con le viti in dotazione alla mensola (codice 4) facendo coincidere i fori. Take the 2 pieces (code 6) and fix them to the shelf (code 4) with the screws supplied by matching the holes. Prenez les deux composants (code 6) et fixez-les, avec les vis en dotation, à l’ tag re code 4 e faisant coïncider les trous. Nehmen Sie die 2 Stück (Code 6) und befestigen Sie mit die Schrauben an den Regal (Code 4) in Koinzidenz der Löcher.
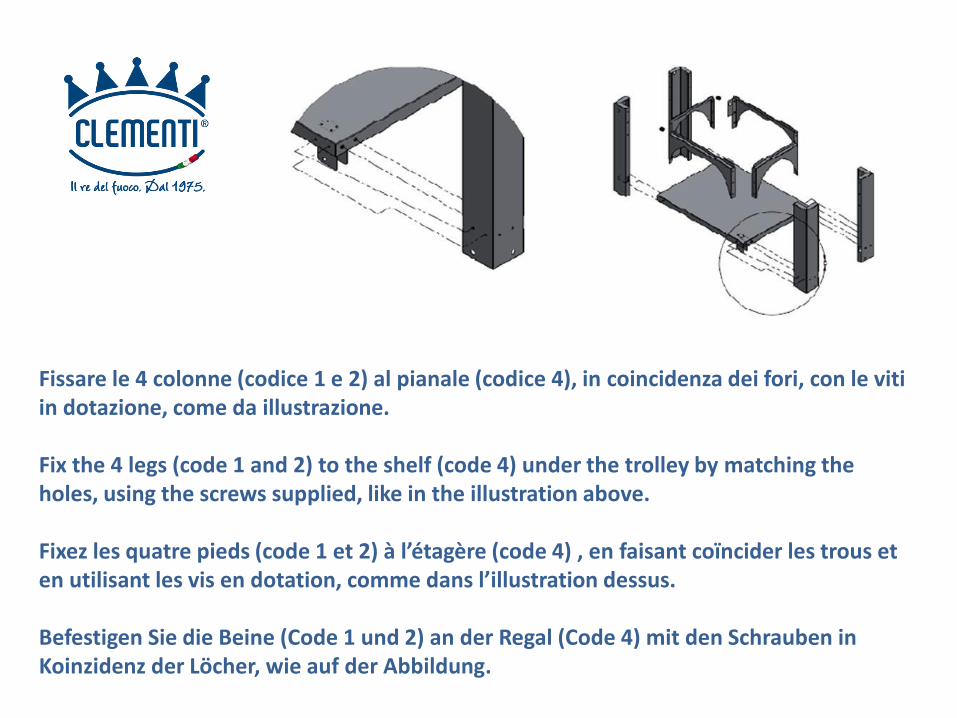
Fissare le 4 colonne (codice 1 e 2) al pianale (codice 4), in coincidenza dei fori, con le viti in dotazione, come da illustrazione. Fix the 4 legs (code 1 and 2) to the shelf (code 4) under the trolley by matching the holes, using the screws supplied, like in the illustration above. Fixez les quatre pieds code et à l’ tag re code 4 , e faisant coïncider les trous et en utilisant les vis en dotation, comme dans l’illustration dessus. Befestigen Sie die Beine (Code 1 und 2) an der Regal (Code 4) mit den Schrauben in Koinzidenz der Löcher, wie auf der Abbildung.
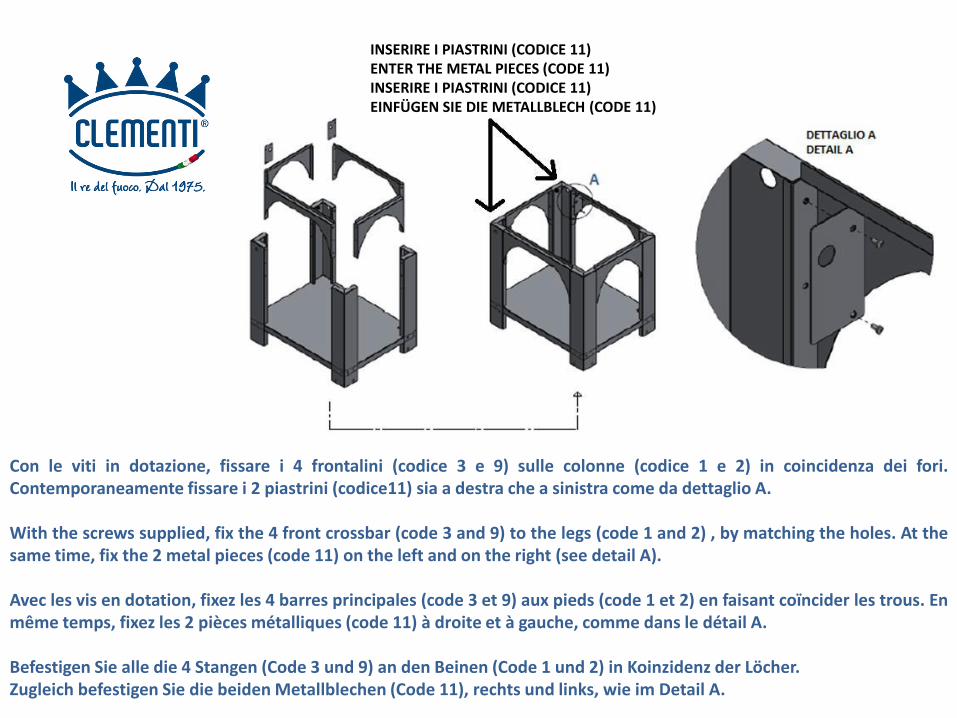
INSERIRE I PIASTRINI (CODICE 11) ENTER THE METAL PIECES (CODE 11) INSERIRE I PIASTRINI (CODICE 11) EINFÜGEN SIE DIE METALLBLECH (CODE 11)
Con le viti in dotazione, fissare i 4 frontalini (codice 3 e 9) sulle colonne (codice 1 e 2) in coincidenza dei fori. Contemporaneamente fissare i 2 piastrini (codice11) sia a destra che a sinistra come da dettaglio A. With the screws supplied, fix the 4 front crossbar (code 3 and 9) to the legs (code 1 and 2) , by matching the holes. At the same time, fix the 2 metal pieces (code 11) on the left and on the right (see detail A). Avec les vis en dotation, fixez les 4 barres principales (code 3 et 9) aux pieds (code 1 et 2) en faisant coïncider les trous. En même temps, fixez les 2 pièces métalliques (code 11) à droite et à gauche, comme dans le détail A. Befestigen Sie alle die 4 Stangen (Code 3 und 9) an den Beinen (Code 1 und 2) in Koinzidenz der Löcher. Zugleich befestigen Sie die beiden Metallblechen (Code 11), rechts und links, wie im Detail A.
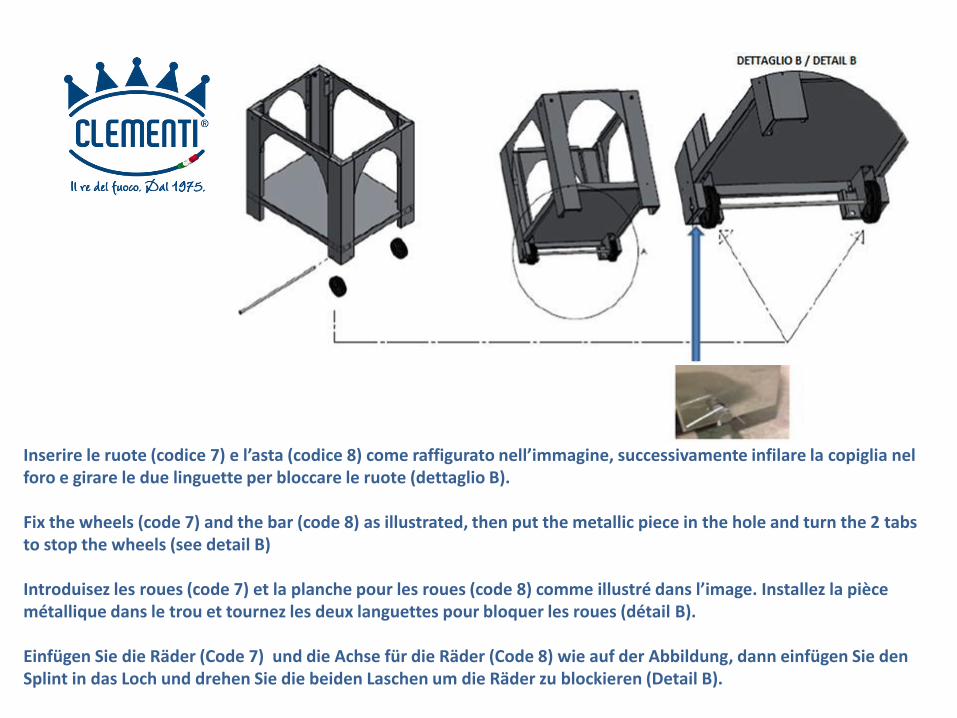
I serire le ruote codice e l’asta codice co e raffigurato ell’i agi e, successiva e te i filare la copiglia el foro e girare le due linguette per bloccare le ruote (dettaglio B). Fix the wheels (code 7) and the bar (code 8) as illustrated, then put the metallic piece in the hole and turn the 2 tabs to stop the wheels (see detail B) Introduisez les roues (code 7) et la planche pour les roues (code 8) comme illustré dans l’i age. I stallez la pièce métallique dans le trou et tournez les deux languettes pour bloquer les roues (détail B). Einfügen Sie die Räder (Code 7) und die Achse für die Räder (Code 8) wie auf der Abbildung, dann einfügen Sie den Splint in das Loch und drehen Sie die beiden Laschen um die Räder zu blockieren (Detail B).
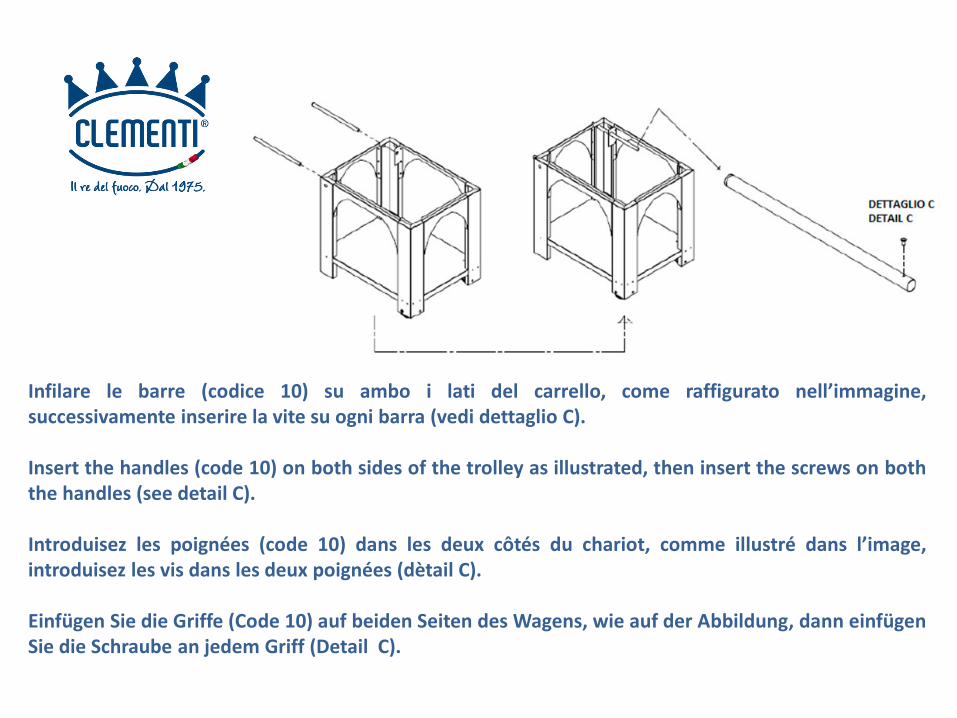
Infilare le barre (codice 10) su ambo i lati del carrello, come raffigurato ell’i agi e, successivamente inserire la vite su ogni barra (vedi dettaglio C). Insert the handles (code 10) on both sides of the trolley as illustrated, then insert the screws on both the handles (see detail C). Introduisez les poignées (code 10) dans les deux côtés du chariot, comme illustré dans l’i age, introduisez les vis dans les deux poignées (dètail C). Einfügen Sie die Griffe (Code 10) auf beiden Seiten des Wagens, wie auf der Abbildung, dann einfügen Sie die Schraube an jedem Griff (Detail C).
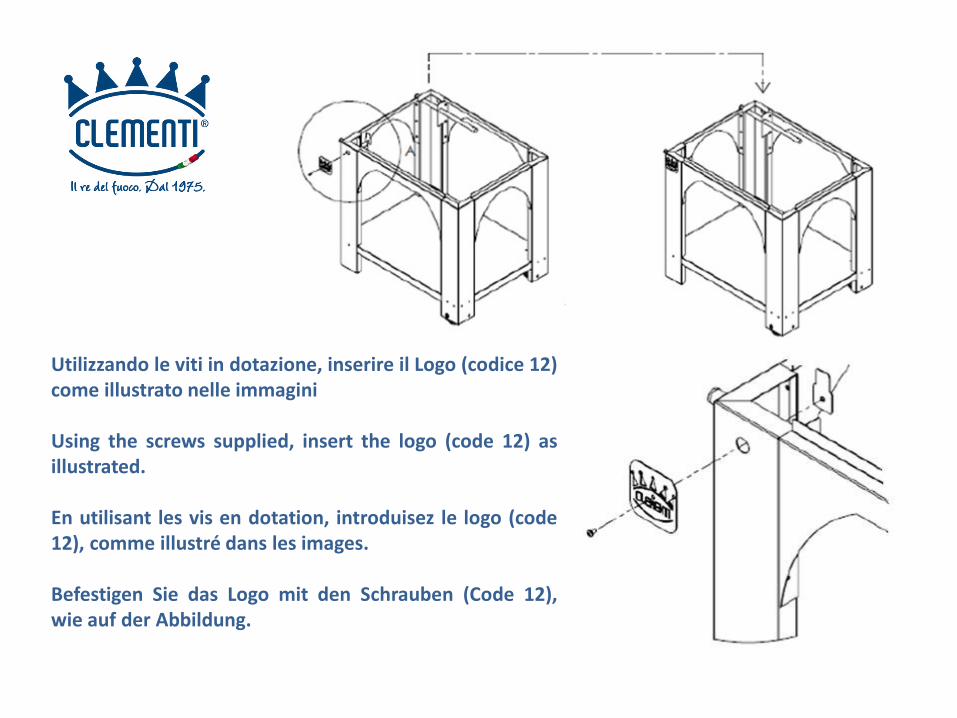
Utilizzando le viti in dotazione, inserire il Logo (codice 12) come illustrato nelle immagini Using the screws supplied, insert the logo (code 12) as illustrated. En utilisant les vis en dotation, introduisez le logo (code 12), comme illustré dans les images. Befestigen Sie das Logo mit den Schrauben (Code 12), wie auf der Abbildung.
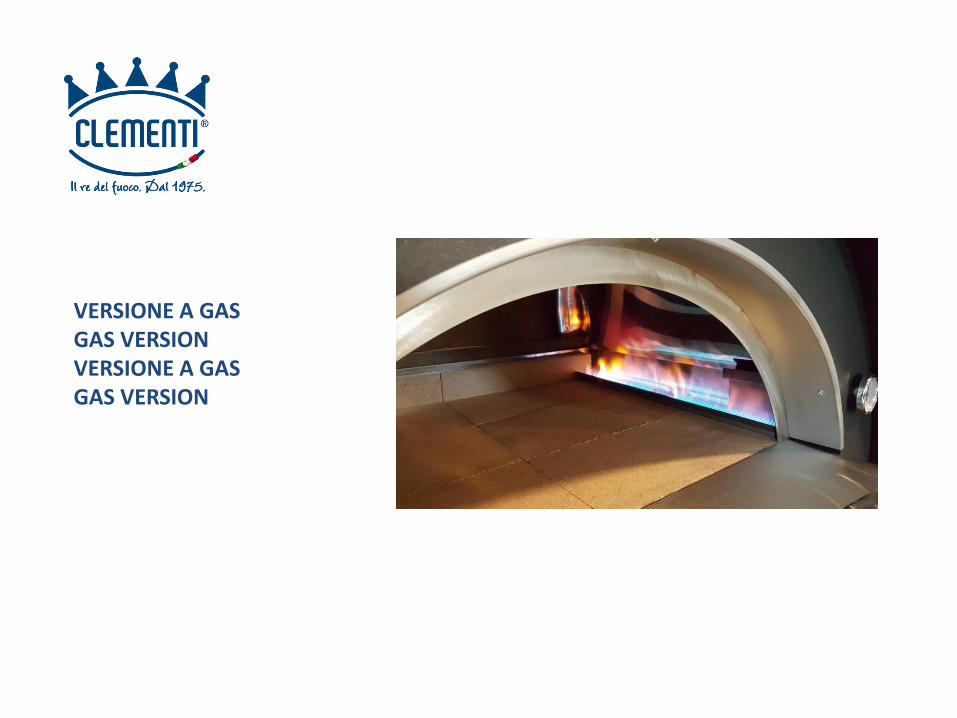
VERSIONE A GAS GAS VERSION VERSIONE A GAS GAS VERSION
Il forno a gas PULCINELLA 80x60 cm o 60x60 cm è composto da 1 bruciatore atmpsferico con valvola termoelettrica UL CSA, posizionata sul lato sinistro della camera di cottura (guardando il forno frontalmente) è un bruciatore Millberg e può sviluppare una potenza di 15kw. Il forno a gas PULCINELLA 100X80 cm (ma anche il PULCINELLA 80x60 nel caso in cui sia richiesto) è composto da 2 bruciatori atmosferici, uno a destra e uno a sinistra e sviluppa 30 kw. The gas burning PULCINELLA oven 80x60 cm or 60x60 cm is provided of 1 atmospheric burner with thermoelectric valve UL CSA, that is located on the left side of the cooking chamber (looking in front of the oven) it is a Millberg burner and it can develop a power of 15kw. The gas burning Pulcinella oven 100x80 cm (but also the PULCINELLA 80x60 cm if required) is provided of 2 atmospheric burners, one on the right and one on the left side and they can develop 30 kw. Il forno a gas PULCINELLA 80x60 cm o 60x60 cm è composto da 1 bruciatore atmpsferico con valvola termoelettrica UL CSA, posizionata sul lato sinistro della camera di cottura (guardando il forno frontalmente) è un bruciatore Millberg e può sviluppare una potenza di 15kw. Il forno a gas PULCINELLA 100X80 cm (ma anche il PULCINELLA 80x60 cm nel caso in cui sia richiesto) è composto da 2 bruciatori atmosferici, uno a destra e uno a sinistra e sviluppa 30 kw. Der Gasofen PULCINELLA 80x60 cm oder 60x60 cm besteht aus 1 atmosphärischem Brenner mit thermoelectric-Ventil UL CSA, der Brenner ist auf der linken Seite der Kochenkammer positioniert (wenn man sich den Ofen vor sehen). Es ist ein Brenner von Millberg und kann eine Leistung von 15 kw entwickeln. Der Gasofen PULCINELLA 100X80 cm (aber auch die PULCINELLA 80x60 cm, wenn es erforderlich ist) besteht aus 2 atmosphärischer Brenner, uno a destra e uno a sinistra , und kann eine Leistung von 30 kw entwickeln.
PULSANTE DI ACCENSIONE BUTTON FOR SWITCHING ON PULSANTE DI ACCENSIONE LEISTUNGTASTE
BRUCIATORE BURNER BRUCIATORE BRENNER UGELLO NOZZLE UGELLO DÜSE

NELLA SPERANZA CHE SIATE SODDISFATTI DEL VOSTRO ACQUISTO, NON CI RESTA CHE AUGURARVI…BUON APPETITO!!! HOPING THAT YOU ARE SATISFIED WITH YOUR PURCHASE OF OUR OVEN, WE CAN ONLY WISH YOU…ENJOY YOUR MEAL!!! DANS L’ESPOIR QUE VOUS ETES SATISFAIT DE VOTRE ACHAT, NOUS VOUS SOUHAITONS…BON APPETIT!!! IN DER HOFFNUNG, DASS SIE MIT IHREM KAUF ZUFRIEDEN SIND, WIR WUNSCHEN IHNEN...GUTEN APPETIT!!!