Embed Size (px)
Citation preview
1
BedienungsanleitungInstructions
Mode d’emploi
Wildkamera Wildlife Camera Caméra de gibier
MINOX DTC 700
2
Einleitung
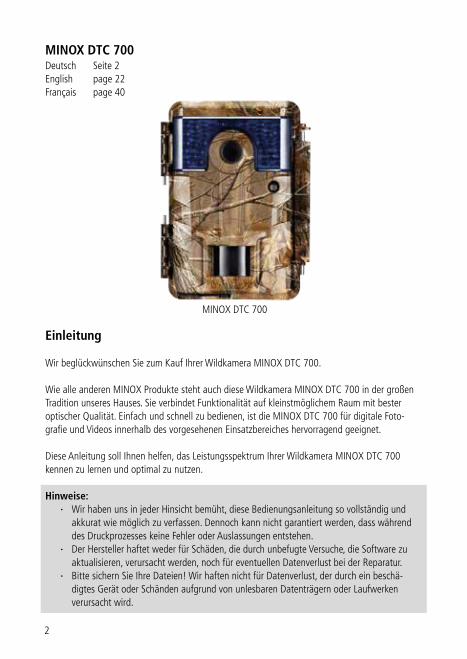
Wir beglückwünschen Sie zum Kauf Ihrer Wildkamera MINOX DTC 700.
Wie alle anderen MINOX Produkte steht auch diese Wildkamera MINOX DTC 700 in der großen Tradition unseres Hauses. Sie verbindet Funktionalität auf kleinstmöglichem Raum mit bester optischer Qualität. Einfach und schnell zu bedienen, ist die MINOX DTC 700 für digitale Fotografie und Videos innerhalb des vorgesehenen Einsatzbereiches hervorragend geeignet.
Diese Anleitung soll Ihnen helfen, das Leistungsspektrum Ihrer Wildkamera MINOX DTC 700 kennen zu lernen und optimal zu nutzen.
Hinweise: · Wir haben uns in jeder Hinsicht bemüht, diese Bedienungsanleitung so vollständig und
akkurat wie möglich zu verfassen. Dennoch kann nicht garantiert werden, dass während des Druckprozesses keine Fehler oder Auslassungen entstehen.
· Der Hersteller haftet weder für Schäden, die durch unbefugte Versuche, die Software zu aktualisieren, verursacht werden, noch für eventuellen Datenverlust bei der Reparatur.
· Bitte sichern Sie Ihre Dateien! Wir haften nicht für Datenverlust, der durch ein beschädigtes Gerät oder Schänden aufgrund von unlesbaren Datenträgern oder Laufwerken verursacht wird.
MINOX DTC 700
MINOX DTC 700Deutsch Seite 2English page 22Français page 40
3
Zur Verwendung von Wildkameras
Wild und Überwachungskameras erfassen mit ihrem InfrarotSensor plötzliche Änderungen der Umgebungstemperatur. Die Signale des hochempfindlichen InfrarotSensors (PIR = Passiver InfrarotSensor) schalten die Kamera ein und lösen Bild oder Videoaufnahmen aus. Nach diesem Grundprinzip arbeiten alle handelsüblichen Wild und Überwachungskameras. Um sichere Ergebnisse zu erzielen, sollten deshalb einige Grundregeln beachtet werden.
1) Auslösungen durch Wildtiere im Sommer/WinterGenerell ist eine Wildkameras im Winter, bei niedrigen Temperaturen, empfindlicher in der Auslösung als im Sommer. Da sich bei hohen Umgebungstemperaturen die Temperatur des Wildkörpers der der Umgebung angleicht, kann es im Sommer dazu kommen, dass die Wildkamera langsamere Auslösungen vornimmt. Aus diesem Grunde sollte die Sensorempfindlichkeit im Sommer auf hoch eingestellt werden, um auch geringe Temperaturunterschiede erkennen zu können.
2) SonneneinstrahlungDirekte Sonneneinstrahlung kann das Sensorfenster erhitzen und die im Sonnenlicht enthaltene IRStrahlung kann in manchen Fällen dazu führen, dass die Kamera langsamer auslöst. Deshalb empfiehlt es sich die Kamera grundsätzlich im Schatten zu installieren.
3) GegenlichtsituationenGenerell sollte die Kamera so montiert sein, dass es nicht zu Gegenlichtsituationen kommen kann. Bitte beachten Sie den Sonnenverlauf! Vor hellem Hintergrund (Himmel) ist es oft schwierig, das Wild eindeutig zu bestimmen.
4) IR-SensorDer IR empfindliche Bewegungssensor (PIR) ermittelt Temperaturunterschiede in einem Winkel von ca. 60 Grad. Der effektive Aufnahmewinkel des Objektivs ist deutlich kleiner und mit dem eines Weitwinkelobjektives von 35 mm (bezogen auf Kleinbild) zu vergleichen. Der PIR Winkel ist größer, um der Kamera bei heranwechselndem Wild einen entsprechenden Vorlauf zu ermöglichen, damit sich das Wildtier auch zur Auslösung in der Bildmitte befindet. Die Auslöseverzögerung liegt bei handelsüblichen Wildkameras unter 1 Sekunde. Somit kann es gelegentlich vorkommen, dass hochflüchtiges Wild nur teilweise erfasst werden kann oder langsames Wild mehrfach die Kamera auslöst. Sollten sich im Sensorbereich Zweige oder Büsche befinden, kann es auch bei stärkerem Wind zu Auslösungen kommen. Dann bitte den Standort verändern oder Zweige beschneiden. Insbesondere an Kirrungen können Vögel oder Mäuse die Kamera mehrfach auslösen. Sollte das WildkameraModell keine Einstellung der Sensorempfindlichkeit haben, erweitern Sie einfach die Distanz zur Kirrung.
5) Handhabung der SpeicherkarteDie Bilddaten werden auf einer SDSpeicherkarte gespeichert. In der Praxis hat es sich bewährt, eine weitere SDKarte anzuschaffen und die Karten im Revier von Zeit zu Zeit in der Kamera zu tauschen. Zuhause am Computermonitor können dann leichter die Aufnahmen begutachtet werden. Es sollten möglichst SDSpeicherkarten von Markenherstellern mit entsprechender Speichergeschwindigkeit (für Video) verwendet werden. Je nach Verwendung der SDKarte und des entsprechenden PC´s kann es vorkommen, dass unbemerkt noch weitere Dateien auf die Karte geschrieben werden. Die evtl. bei der Verwendung der SDKarte in anderen Geräten angelegten Unterverzeichnisse können die Speicherung von Videos und Bildern der DTC Wildkameras beeinträchtigen. In Einzelfällen kann dies dazu führen, dass insbesondere
4
im Videomodus die Kamera nicht die Datenspeicherung für die einzelne Szene abschließen kann. Sicherheitshalber empfehlen wir eine Formatierung der SDKarte auf Ihrem PC vor der Verwendung.
6) BatterieleistungFür die regelmäßige Anwendung von Wildkameras sind wiederaufladbare NiMHBatterien zu empfehlen. Unabhängig von der Kosteneinsparung haben diese Akkus den Vorteil, dass sie im Gegensatz zu herkömmlichen Alkalimangan Batterien auch bei niedrigen Außentemperaturen (unter 0° Celsius) Strom abgeben. Für die Kamerafunktion ist es wichtig, dass alle Akkus den gleichen Ladezustand haben! Bitte achten Sie auf gleichwertige Ladungen der Batterien. Viele Hersteller geben die Batterielebensdauer mit bis zu 6 oder 12 Monate an. Diese Angaben beziehen sich in der Regel auf 5 Aufnahmen am Tage und 5 in der Nacht (mit IRBlitz). Der größte Stromverbrauch in der Kamera ist der IRBlitz. Somit kann eine häufige Auslösung in der Nacht oder entsprechende Videoauslösungen die Batterieleistung teils deutlich reduzieren. Es kann deshalb auch sinnvoll sein, kurze Videosequenzen (5 oder 10 Sekunden) zu wählen.
7) SicherheitWildkameras wecken Begehrlichkeit. Aus diesem Grund lassen sich alle MINOX DTC Wildkameras an einem Baum o.ä. sichern, indem ein Stahlseil durch die dafür vorgesehenen Öffnungen und Ösen geführt und mit einem Schloss gesichert wird. Nutzen Sie auch den Passwortschutz. Diese Funktion erlaubt Ihnen, ein 4stelliges ZahlenPasswort einzugeben, um einem möglichen Diebstahl Ihrer DTC Wildkamera vorzubeugen. Ohne Eingabe des Passwortes ist die Funktion der Kamera nicht mehr gegeben.
5
Inhaltsverzeichnis
Einleitung Seite 2Zur Verwendung von Wildkameras Seite 3Lernen Sie Ihre Wildkamera MINOX DTC 700 kennen Seite 7Bedienelemente Seite 7Vorbereitung der Kamera Seite 7 Erklärung der Bedienelemente Seite 7 Einsetzen der Batterien Seite 8 Kontrolle des Batteriestatus Seite 8 Einsetzen der Speicherkarte Seite 8 Spracheinstellung Seite 9 Befestigung der Kamera Seite 9 Einstell- und Betriebsmodus Seite 9 Einstellmodus Seite 9 Betriebsmodus Seite 10Menüfunktionen und Einstellungen Seite 10 Manuelle Auslösung Seite 10 Kamera Seite 10 Video Seite 10 Tag und Nachtmodus Seite 10 Wiedergabe Foto/Video Seite 10 Löschen von Foto oder
VideoAufnahmen Seite 11 Abspielen von Videoaufnahmen Seite 11Hauptmenü Seite 11 Kameraeinstellungen Seite 11 Kameramodus Seite 11 Bildauflösung Seite 11 Serienbilder je Auslösung Seite 12 Videoauflösung Seite 12 Videolänge Seite 12 Videoton Seite 12 Auslöseverzögerung Seite 13 Auslösemodus Seite 13 Beleuchtung Seite 13 PIR Sensor: Einstellen der
Empfindlichkeit des IRSensors Seite 13 Einschaltdauer Seite 14 Zeitraffer Seite 14 Allgemeine Einstellungen Seite 15 Sprachauswahl Seite 15 Zeitstempel Seite 15 Datumsformat/Uhrzeit Seite 15 Temperatureinheit Seite 16 Stromversorgung Seite 16
Speicherkarte formatieren Seite 16 Passwort Seite 16 Eingabe des Passworts Seite 17 Deaktivieren des Passworts Seite 17 Standardeinstellung Seite 17 KameraInformationen Seite 17 Gespeicherte Dateien Seite 17 Speicherplatz Seite 17 Firmware Version Seite 17 Softwareaktualisierung Seite 17Anschließen der Kamera an einen Computer Seite 18 Anschluss über USBKabel Seite 18 Übertragen von Bildern und
Videos via SDKarte Seite 18MPEG-4 Visual Patent Portfolio License Seite 18Technische Daten Seite 19Gewährleistungsbestimmungen Seite 20
Lieferumfang Wildkamera MINOX DTC 700 Montagegurt USB Kabel SD Karte Bedienungsanleitung
Zubehör (optional erhältlich) Netzadapter (EUVersion), Bestellnr. 65016 Kabel für Anschluss an externe Batterie,
Bestellnr. 65017 SicherungsKit, Bestellnr. 65022
Weitere Informationen zum Zubehör für die DTC 700 finden Sie auf der MINOX Webseite:www.minox.com
Hinweis: Das Zubehör, das Sie erhalten haben, kann leicht vom oberen abweichen. Dieses Paket kann ohne eine vorherige Ankündigung verändert werden.
Hinweis: Nehmen Sie bitte immer eine Formatierung der SDKarte vor. Andere Dateien von anderen Medien können die Funktionsfähigkeit beeinträchtigen.
6
MINOX DTC 700
1 15
5
17
18
10
11
14
12 136
15
2
3/4
16
7
89
7
Lernen Sie Ihre Wildkamera MINOX DTC 700 kennen
Nehmen Sie sich bitte einen Moment Zeit, um diese Anweisungen und die Sicherheits und Wartungshinweise in dieser Bedienungsanleitung zu lesen.
Wir wünschen Ihnen viel Spaß!
6 Megapixel Auflösung Komfortabler 2“ Farbmonitor 32 leistungsstarke InfrarotLEDs mit Blackflash Hohe Auslösegeschwindigkeit unter 1 s Unsichtbarer IRBlitz mit über 15 m Reichweite Geringer Energieverbrauch (Standby über
12 Monate) Bis zu 5 Serienbilder / Videos bis 30 s Länge Videoauflösung: HD 1280 x 720 oder VGA
640 x 480 SDSpeicherkarte bis zu 32 GB einsetzbar Einfache, intuitive Bedienung,
6TastenBedienfeld LiveVorschau und Foto / Video Wiedergabe Passwortschutz
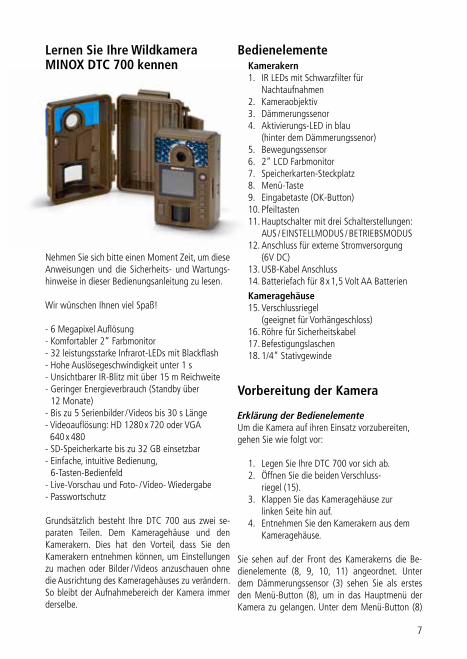
Grundsätzlich besteht Ihre DTC 700 aus zwei separaten Teilen. Dem Kameragehäuse und den Kamerakern. Dies hat den Vorteil, dass Sie den Kamerakern entnehmen können, um Einstellungen zu machen oder Bilder / Videos anzuschauen ohne die Ausrichtung des Kameragehäuses zu verändern. So bleibt der Aufnahmebereich der Kamera immer derselbe.
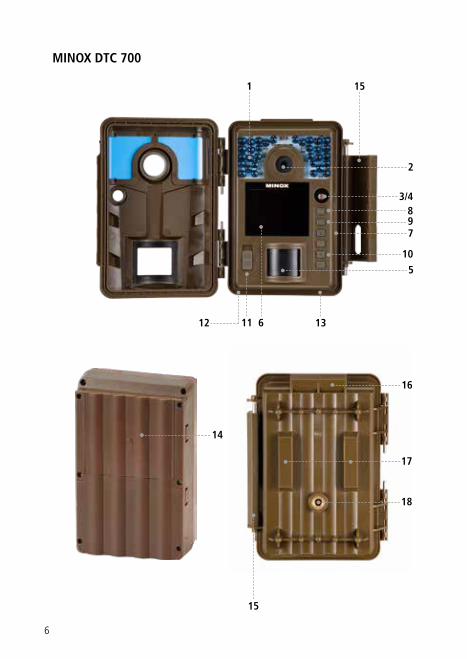
Bedienelemente Kamerakern 1. IR LEDs mit Schwarzfilter für
Nacht aufnahmen 2. Kameraobjektiv 3. Dämmerungssenor 4. AktivierungsLED in blau (hinter dem Dämmerungssenor) 5. Bewegungssensor 6. 2“ LCD Farbmonitor 7. SpeicherkartenSteckplatz 8. MenüTaste 9. Eingabetaste (OKButton) 10. Pfeiltasten 11. Hauptschalter mit drei Schalterstellungen:
AUS / EINSTELLMODUS / BETRIEBSMODUS 12. Anschluss für externe Stromversorgung
(6V DC) 13. USBKabel Anschluss 14. Batteriefach für 8 x 1,5 Volt AA Batterien
Kameragehäuse 15. Verschlussriegel (geeignet für Vorhängeschloss) 16. Röhre für Sicherheitskabel 17. Befestigungslaschen 18. 1/4“ Stativgewinde
Vorbereitung der Kamera
Erklärung der BedienelementeUm die Kamera auf ihren Einsatz vorzubereiten, gehen Sie wie folgt vor:
1. Legen Sie Ihre DTC 700 vor sich ab. 2. Öffnen Sie die beiden Verschluss
riegel (15). 3. Klappen Sie das Kameragehäuse zur
linken Seite hin auf. 4. Entnehmen Sie den Kamerakern aus dem
Kameragehäuse.
Sie sehen auf der Front des Kamerakerns die Bedienelemente (8, 9, 10, 11) angeordnet. Unter dem Dämmerungssensor (3) sehen Sie als erstes den MenüButton (8), um in das Hauptmenü der Kamera zu gelangen. Unter dem MenüButton (8)
8
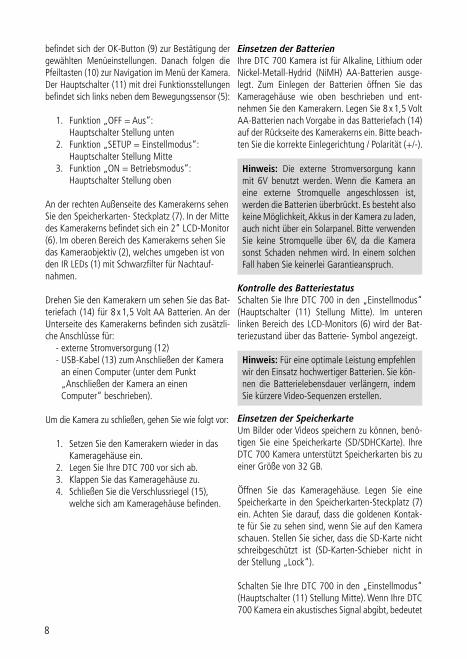
befindet sich der OKButton (9) zur Bestätigung der gewählten Menüeinstellungen. Danach folgen die Pfeiltasten (10) zur Navigation im Menü der Kamera. Der Hauptschalter (11) mit drei Funktionsstellungen befindet sich links neben dem Bewegungssensor (5):
1. Funktion „OFF = Aus“: Hauptschalter Stellung unten
2. Funktion „SETUP = Einstellmodus“: Hauptschalter Stellung Mitte
3. Funktion „ON = Betriebsmodus“: Hauptschalter Stellung oben
An der rechten Außenseite des Kamerakerns sehen Sie den Speicherkarten Steckplatz (7). In der Mitte des Kamerakerns befindet sich ein 2“ LCDMonitor (6). Im oberen Bereich des Kamerakerns sehen Sie das Kameraobjektiv (2), welches umgeben ist von den IR LEDs (1) mit Schwarzfilter für Nachtaufnahmen.
Drehen Sie den Kamerakern um sehen Sie das Batteriefach (14) für 8 x 1,5 Volt AA Batterien. An der Unterseite des Kamerakerns befinden sich zusätzliche Anschlüsse für: externe Stromversorgung (12) USBKabel (13) zum Anschließen der Kamera
an einen Computer (unter dem Punkt „Anschließen der Kamera an einen Computer“ beschrieben).
Um die Kamera zu schließen, gehen Sie wie folgt vor:
1. Setzen Sie den Kamerakern wieder in das Kameragehäuse ein.
2. Legen Sie Ihre DTC 700 vor sich ab. 3. Klappen Sie das Kameragehäuse zu. 4. Schließen Sie die Verschlussriegel (15),
welche sich am Kameragehäuse befinden.
Einsetzen der BatterienIhre DTC 700 Kamera ist für Alkaline, Lithium oder NickelMetallHydrid (NiMH) AABatterien ausgelegt. Zum Einlegen der Batterien öffnen Sie das Kameragehäuse wie oben beschrieben und entnehmen Sie den Kamerakern. Legen Sie 8 x 1,5 Volt AABatterien nach Vorgabe in das Batteriefach (14) auf der Rückseite des Kamerakerns ein. Bitte beachten Sie die korrekte Einlegerichtung / Polarität (+/).
Kontrolle des BatteriestatusSchalten Sie Ihre DTC 700 in den „Einstellmodus“ (Hauptschalter (11) Stellung Mitte). Im unteren linken Bereich des LCDMonitors (6) wird der Batteriezustand über das Batterie Symbol angezeigt.
Einsetzen der SpeicherkarteUm Bilder oder Videos speichern zu können, benötigen Sie eine Speicherkarte (SD/SDHCKarte). Ihre DTC 700 Kamera unterstützt Speicherkarten bis zu einer Größe von 32 GB.
Öffnen Sie das Kameragehäuse. Legen Sie eine Speicherkarte in den SpeicherkartenSteckplatz (7) ein. Achten Sie darauf, dass die goldenen Kontakte für Sie zu sehen sind, wenn Sie auf den Kamera schauen. Stellen Sie sicher, dass die SDKarte nicht schreibgeschützt ist (SDKartenSchieber nicht in der Stellung „Lock“).
Schalten Sie Ihre DTC 700 in den „Einstellmodus“ (Hauptschalter (11) Stellung Mitte). Wenn Ihre DTC 700 Kamera ein akustisches Signal abgibt, bedeutet
Hinweis: Die externe Stromversorgung kann mit 6V benutzt werden. Wenn die Kamera an eine externe Stromquelle angeschlossen ist, werden die Batterien überbrückt. Es besteht also keine Möglichkeit, Akkus in der Kamera zu laden, auch nicht über ein Solarpanel. Bitte verwenden Sie keine Stromquelle über 6V, da die Kamera sonst Schaden nehmen wird. In einem solchen Fall haben Sie keinerlei Garantieanspruch.
Hinweis: Für eine optimale Leistung empfehlen wir den Einsatz hochwertiger Batterien. Sie können die Batterielebensdauer verlängern, indem Sie kürzere VideoSequenzen erstellen.
9
das, dass entweder keine Speicherkarte eingelegt ist, diese nicht richtig eingesetzt wurde oder nicht kompatibel ist. Auf dem LCDMonitor erscheint eine rote Anzeige „Keine Karte“. Hören Sie kein akustisches Signal, können Sie mit den Kameraeinstellungen fortfahren.
SpracheinstellungDa die Wildkamera DTC 700 ab Werk mit einer englischsprachigen Menüführung voreingestellt ist, gehen Sie bitte wie folgt vor, um die für Sie richtige Sprache auszuwählen:
1. Bringen Sie den Hauptschalter (11) in die Schalterstellung „SETUP“ („Einstellmodus“).
2. Sie gelangen direkt in die „Manuelle Auslösung“ der Kamera.
3. Drücken Sie nun einmal den MenüButton (8). Sie gelangen in das „Hauptmenü“ der Kamera.
4. Drücken Sie nun einmal die nach rechts gerichtete Pfeiltaste (10), um den Reiter im „Hauptmenü“ zu wechseln.
5. Drücken Sie nun einmal die nach unten gerichtete Pfeiltaste (10).
6. Sie befinden sich nun im unterlegten Menüpunkt „Language“.
7. Drücken Sie den OK Button (9).8. Über die AbPfeiltaste (10) wählen Sie „Ger
man“ (unterlegt) aus.9. Drücken Sie den OK Button (9).10. Die Kamera springt zurück ins „Hauptmenü“.
Die Sprache ist nun auf „Deutsch“ eingestellt.
Befestigung der Kamera1. Montagegurt: Am Kameragehäuse befinden sich
an der Rückseite zwei Befestigungslaschen (17), mit deren Hilfe die Kamera befestigt werden kann. Der im Lieferumfang enthaltene Montagegurt wird durch die beiden Befestigungslaschen gezogen. Mit Hilfe des Befestigungsverschlusses am Montagegurt wird die Kamera fixiert.
2. Stativ: Am Außengehäuse der Kamera befindet sich an der Rückseite ein 1/4“ Stativgewinde (18), mit dessen Hilfe die Kamera auf einem Stativ befestigt werden kann.
Einstell- und Betriebsmodus
Ihre Kamera verfügt über zwei Moduseinstellungen:
1. EinstellmodusSchalten Sie Ihre DTC 700 Kamera in den „Einstellmodus“ (SETUP = Einstellmodus, Hauptschalter (11) Stellung Mitte). Sie gelangen direkt in die „Manuelle Auslösung“ der Kamera. Drücken Sie nun den MenüButton (8), um in das Hauptmenü der Kamera zu gelangen. Im Hauptmenü gibt es 2 Reiter, zwischen denen Sie durch Betätigen der rechten oder linken Pfeiltaste (10) wechseln können. Der aktuell ausgewählte Reiter wird grün unterlegt. Unter dem ersten Reiter, der mit einem „Kamerasymbol“ gekennzeichnet ist, können Sie alle Einstellungen, welche die Funktionsweise der Kamera betreffen, vornehmen. Im Folgenden wird dieser Reiter „Kameraeinstellungen“ genannt. Unter dem zweiten Reiter, welcher mit einem „Hammer und Maulschlüsselsymbol“ gekennzeichnet ist, können Sie alle anderen Einstellungen vornehmen. Im Folgenden wird dieser Reiter „Allgemeine Einstellungen“ genannt. In diesen Modi können Sie die Programmierung der Kamera, sowie alle Einstellungen der Anzeigen wie Datum, Uhrzeit, Temperatur etc., die später auf den Bildern oder Videoaufnahmen angezeigt werden sollen, vornehmen. Zu den einzelnen Menüpunkten in den Reitern gelangen Sie über die Auf/Ab Pfeiltasten (10). Um den Reiter zu wechseln, wenn ein Menüpunkt angewählt (unterlegt) ist, betätigen Sie die linke Pfeiltaste (10) einmal. Die Kamera springt zurück auf den
Hinweis: Falls die SDKarte für die Datenspeicherung in anderen Geräten verwendet wurde, formatieren Sie bitte die SDKarte an einem PC. Diese Formatierung entfernt alte Daten von der SDKarte und gewährleistet damit eine fehlerfreie Funktionsweise. Wenn die SDKarte nur in Ihrer DTC 700 verwendet wurde, kann die Formatierung in der DTC 700 erfolgen. Es wird empfohlen, die SD Karte nach dem Einlegen durch das Aufnehmen einiger Bilder auf Funktionsfähigkeit zu überprüfen.
10
übergeordneten Reiter. Nur dieser ist jetzt noch grün unterlegt. Nun können Sie mit der rechten/linken Pfeiltaste (10) zwischen den Reitern „Kameraeinstellungen“ und „Allgemeine Einstellungen“ wechseln und mit den Auf/Ab Pfeiltasten (10) den gewünschten Menüpunkt anwählen.
2. BetriebsmodusSchalten Sie Ihre DTC 700 Kamera in den „Betriebsmodus“ (ON = Betriebsmodus, Hauptschalter (11) Stellung oben). In diesem Modus übernimmt Ihre DTC 700 Kamera automatisch die neusten Einstellungen, die Sie zuvor im „Einstellmodus“ programmiert haben.
Menüfunktionen und Einstellungen
Manuelle AuslösungDiese Einstellung bietet Ihnen die Möglichkeit, Ihre DTC 700 wie eine normale Digitalkamera zu verwenden. Wie bei jeder üblichen Digitalkamera können Sie Bilder und Videos über die Monitoransicht betrachten und dabei aufnehmen. Die DTC 700 befindet sich, nachdem Sie sie in den „Einstellmodus“ (siehe Absatz Einstell und Betriebsmodus) versetzt haben, direkt in der „‚Manuellen Auslösung“. Sie können mit der linken (Video) und rechten (Foto) Pfeiltaste (10) zwischen „Foto“ und „Videomodus“ wechseln. Durch mehrmaliges Betätigen der jeweiligen Pfeiltaste können Sie die Bildauflösung des Fotos oder Videos verändern. Durch Betätigen der Menütaste (8) gelangen Sie in das „Hauptmenü“. Durch erneutes Betätigen der Menütaste gelangen Sie wieder zurück zur „Manuellen Auslösung“.
KameraIm LCD Monitor (6) wird folgendes angezeigt: Im linken oberen Bereich erscheint das KameraSymbol und die aktuelle Auflösung, im rechten oberen Bereich wird die Bildkapazität [0000/0000] ein
geblendet. Im linken unteren Bereich ist der Batterieladezustand zu sehen. Durch Drücken des OK Buttons (9) können Sie im Kameramodus manuell ein Foto aufnehmen.
VideoMöchten Sie in den „VideoModus“ wechseln, drücken Sie auf die linke Pfeiltaste (10). Im LCDMonitor (6) wird folgendes angezeigt: Im linken oberen Bereich erscheint das VideoSymbol und die aktuelle Auflösung, im rechten oberen Bereich wird die verbleibende Aufnahme Zeit in [00:00:00] eingeblendet. Im linken unteren Bereich ist der Batterieladezustand zu sehen. Durch Drücken des OK Buttons (10) starten Sie im „VideoModus“ die Videoaufnahme. Bei erneutem Drücken des OK Buttons (10) beenden Sie die Aufnahme.
Tag- und NachtmodusIn der „Manuellen Auslösung“ können Sie mithilfe der AufTaste (10) den „Tag oder Nachtmodus“ aktivieren. Bei Ihrer DTC 700 ist der „Tagmodus (Farbmodus)“ voreingestellt. Foto oder Videoaufnahmen werden farbig dargestellt. Um in den „NachtIRModus“ zu gelangen, drücken Sie auf die obere Pfeiltaste (10). Die Einstellung wechselt vom „Farbmodus am Tag“ auf den „NachtIR Modus“ und das im LCD Monitor (6) dargestellte Bild wechselt von einem Farbbild auf ein Schwarzweißbild.
Wiedergabe Foto / VideoDrücken Sie in der „Manuellen Auslösung“ die untere Pfeiltaste (10) oder wählen Sie „Wiedergabe Foto/Video“ im „Kameramodus“ Menüpunkt, welcher sich im „Hauptmenü“ unter dem ersten Reiter „Kameraeinstellungen“ befindet. Im LCDMonitor (6) werden die Bilder dargestellt. Das Aufnahmeformat (Foto / Video) wird im linken unteren Bereich des Bildes als Fotoapparat oder KameraSymbol dargestellt. Zusätzlich wird im rechten oberen Bereich des LCDMonitors (6) die Anzahl der Bilder und Videoaufnahmen angezeigt.
Hinweis: Die blaue AktivierungsLED (4) blinkt wenige Sekunden, bevor die Kamera betriebsbereit ist.
Hinweis: Im Betriebsmodus (Hauptschalter (11) Stellung unten) wählt die Kamera unter Zuhilfenahme des Dämmerungssensors (3) eigenständig den der Tageszeit entsprechend korrekten Modus aus.
11
Durch Drücken der linken oder rechten Pfeiltaste (10) können Sie sich die Bilder und Videos chronologisch vorwärts oder rückwärts anzeigen lassen. Durch Drücken des MenüButtons (8) gelangen Sie ins „Hauptmenü“, eine Wiederholung des Vorgangs bringt Sie zurück in die „Wiedergabe Foto / Video“. Zurück in die „Manuelle Auslösung“ gelangen Sie, indem Sie die untere Pfeiltaste (10) erneut betätigen.
Löschen von Foto- oder Video-AufnahmenDrücken Sie in der „Manuellen Auslösung“ die untere Pfeiltaste (10) oder wählen Sie „Wiedergabe Foto/ Video“ im „Kameramodus“ Menüpunkt, welcher sich im Reiter „Kameraeinstellungen“ im „Hauptmenü“ befindet. Wählen Sie die zu löschende Aufnahme aus. Durch Drücken der oberen Pfeiltaste (10) gelangen Sie in das Untermenü „Dateiverwaltung“. Hier können Sie mit den Auf und AbTasten (10) zwischen „1 Bild löschen“ und „Alle löschen“ auswählen. Bestätigen Sie mit OK (9). Wählen Sie „Ja“ aus und bestätigen mit OK (9), um das Bild (die Bilder) oder das Video (die Videos) zu löschen. Wenn Sie „Nein“ auswählen und bestätigen, gelangen Sie zurück in das Untermenü „Dateiverwaltung“. Mit der linken Pfeiltaste (10) gelangen Sie jeweils zurück in den übergeordneten Menüpunkt „Dateiverwaltung“ bzw. die „Manuellen Auslösung“. Durch Drücken des MenüButtons (8) gelangen Sie von überall im Menü direkt zurück in die „Wiedergabe Foto / Video“ ohne eine Datei zu löschen.
Abspielen von VideoaufnahmenDrücken Sie in der „Manuellen Auslösung“ die untere Pfeiltaste (10) oder wählen Sie „Wiedergabe Foto/Video“ im „Kameramodus“ Menüpunkt, welcher sich im „Hauptmenü“ unter dem ersten Reiter „Kameraeinstellungen“ befindet.
Bei VideoDateien sehen Sie im unteren linken Bereich des LCDMonitors (6) ein „Kamera Symbol“. Drücken Sie auf den OK Button (9), um das Video abzuspielen. Durch das Drücken der oberen Pfeiltaste (10) können Sie das Video anhalten. Es erscheint ein Standbild. Erneutes Betätigen der oberen Pfeiltaste (10) startet das Video wieder. Befindet sich ein Video gerade in der Wiedergabe können Sie
mit der rechten Pfeiltaste (10) vor und mit der linken Pfeiltaste (10) zurückspulen. Mehrmaliges Betätigen der Pfeiltasten erhöht die Spulgeschwindigkeit. Durch das Drücken der oberen Pfeiltaste (10) wird die Wiedergabe in Aufnahmegeschwindigkeit fortgesetzt.
Durch Drücken des MenüButtons (8) während des Abspielens gelangen Sie zurück in die „Wiedergabe Foto/Video“. Durch Drücken des MenüButtons (8) in der „Wiedergabe Foto / Video“ gelangen Sie ins Hauptmenü, eine Wiederholung des Vorgangs bringt Sie zurück in die „Wiedergabe Foto / Video“. Zurück in die „Manuelle Auslösung“ gelangen Sie, indem Sie die untere Pfeiltaste (10) erneut betätigen.
Hauptmenü
Kameraeinstellungen
KameramodusIhre DTC 700 können Sie so einstellen, dass diese nur Bilder oder nur Videos aufzeichnet. Wählen Sie im „Hauptmenü“, welches Sie durch das Betätigen des MenüButtons (8) aufrufen, den Menüpunkt „Kameramodus“ aus. Dieser befindet sich unter dem ersten Reiter „Kameraeinstellungen“. Durch Drücken des OK Buttons (9) oder der rechten Pfeiltaste (10) gelangen Sie ins Untermenü. Hier können Sie mit den Pfeiltasten Auf/Ab (10) das gewünschte Aufnahmeformat (Foto/Video) auswählen. Durch erneutes Drücken des OK Buttons (9) wird die Einstellung gespeichert. Durch Betätigen der linken Pfeiltaste (10) gelangen Sie zurück ins übergeordnete Menü ohne die Einstellungen zu ändern.
BildauflösungWählen Sie im „Hauptmenü“, welches Sie durch das Betätigen des MenüButtons (8) aufrufen, den Menüpunkt „Bildauflösung“ aus. Dieser befindet sich unter dem ersten Reiter „Kameraeinstellungen“. Durch das Drücken des OK Buttons (9) oder
Hinweis: Alternativ können Sie in der „Manuellen Auslösung“ durch Betätigen der rechten (Foto) oder linken (Video) Pfeiltaste (10) den Kameramodus auswählen.
12
der rechten Pfeiltaste (10) gelangen Sie in das Untermenü. In dieser Einstellung kann die FotoAuflösung über die Pfeiltasten Auf/Ab (10) mit 6 MP, 5 MP, 4 MP, 3 MP eingestellt werden. Durch Drücken des OK Buttons (9) wird die Einstellung gespeichert und Sie gelangen zurück zu dem Menüpunkt „Kameraeinstellungen“. Durch Betätigen der linken Pfeiltaste (10) gelangen Sie zurück ins übergeordnete Menü ohne die Einstellungen zu ändern.
Serienbilder je AuslösungMit dieser Funktion kann die Kamera bei jedem Auslösen bis zu fünf Serienbilder in schneller Folge aufnehmen. Wählen Sie im „Hauptmenü“, welches Sie durch das Betätigen des MenüButtons (8) aufrufen, den Menüpunkt „Serienbilder“ aus. Dieser befindet sich unter dem ersten Reiter „Kameraeinstellungen“. Durch das Drücken des OK Buttons (9) oder der rechten Pfeiltaste (10) gelangen Sie in das Untermenü. Im Untermenü können Sie nun die gewünschte Anzahl der Serienbilder je Auslösung durch Drücken der Pfeiltasten Auf/ Ab (10) einstellen. Durch Drücken des OK Buttons (9) wird die Einstellung gespeichert und Sie gelangen zurück zu dem Menüpunkt „Kameraeinstellungen“. Durch Betätigen der linken Pfeiltaste (10) gelangen Sie zurück ins übergeordnete Menü ohne die Einstellungen zu ändern.
VideoauflösungWählen Sie im „Hauptmenü“, welches Sie durch das Betätigen des MenüButtons (8) aufrufen, den Menüpunkt „Videoauflösung“ aus. Dieser befindet sich unter dem ersten Reiter „Kameraeinstellungen“. Durch das Drücken des OK Buttons (9) oder der rechten Pfeiltaste (10) gelangen Sie in das Untermenü. Sie können mit den Pfeiltasten Auf/Ab (10) zwischen der Videoauflösung in HD
(1280x720) und VGA (640x480) auswählen. Durch Drücken des OK Buttons (9) wird die Einstellung gespeichert und Sie gelangen zurück zu dem Menüpunkt „Kameraeinstellungen“. Durch Betätigen der linken Pfeiltaste (10) gelangen Sie zurück ins übergeordnete Menü ohne die Einstellungen zu ändern.
VideolängeWählen Sie im „Hauptmenü“, welches Sie durch das Betätigen des MenüButtons (8) aufrufen, den Menüpunkt „Videolänge“ aus. Dieser befindet sich unter dem ersten Reiter „Kameraeinstellungen“. Durch das Drücken des OK Buttons (9) oder der rechten Pfeiltaste (10) gelangen Sie in das Untermenü. Stellen Sie mit den Pfeiltasten Auf/Ab (10) die gewünschte Videolänge ein (530 Sek.) und drücken Sie den OK Button (9), um die Einstellung zu speichern. Die Kamera kehrt automatisch in den Menüpunkt „Kameraeinstellungen“ zurück. Durch Betätigen der linken Pfeiltaste (10) gelangen Sie zurück ins übergeordnete Menü ohne die Einstellungen zu ändern.
VideotonMit dieser Funktion können Sie festlegen, ob der Ton bei einer Videoaufnahme mit aufgezeichnet werden soll oder nicht. Wählen Sie im „Hauptmenü“, welches Sie durch das Betätigen des MenüButtons (8) aufrufen, den Menüpunkt „VideoTon“ aus. Dieser befindet sich unter dem ersten Reiter „Kameraeinstellungen“. Durch das Drücken des OK Buttons (9) oder der rechten Pfeiltaste (10) gelangen Sie in das Untermenü. Mit den Pfeiltasten (Auf/Ab) (10) können Sie nun bestimmen, ob der Ton aufgezeichnet wird oder nicht. Wählen sie „An“ für die Videoaufzeichnung mit Ton oder „Aus“’ für die Videoaufzeichnung ohne Ton. Durch Drücken des OK Buttons (9) wird die Einstellung gespeichert und Sie gelangen zurück zu dem Menüpunkt „Kameraeinstellung“. Durch Betätigen der linken Pfeiltaste (10) gelangen Sie zurück ins übergeordnete Menü ohne die Einstellungen zu ändern.
Hinweis: Alternativ können Sie in der „Manuellen Auslösung“ durch mehrmaliges Betätigen der rechten Pfeiltaste (10) die Bildauflösung des Fotos verändern.
Hinweis: Für die Auflösungen 5 MP, 3 MP ist das Bildformat 4:3, für die Auflösungen 6 MP, 4 MP ist das Bildformat 16:9.
Hinweis: Alternativ können Sie in der „Manuellen Auslösung“ durch mehrmaliges Betätigen der linken Pfeiltaste (10) die Videoauflösung auswählen.
13
AuslöseverzögerungMit dieser Funktion können Sie festlegen, wie lange der Zeitraum zwischen zwei Aufnahmen sein soll, in welchem Ihre Kamera nicht durch Bewegung angesprochen wird. Die möglichen Aufnahmeintervalle reichen von 1 Sekunden bis hin zu 60 Minuten. Wählen Sie im „Hauptmenü“, welches Sie durch das Betätigen des MenüButtons (8) aufrufen, den Menüpunkt „Auslöseverz.“ aus. Dieser befindet sich unter dem ersten Reiter „Kameraeinstellungen“. Durch das Drücken des OK Buttons (10) oder der rechten Pfeiltaste (10) gelangen Sie in das Untermenü. Im Untermenü können Sie das gewünschte Zeitintervall durch Betätigen der Pfeiltasten Auf/Ab (10) einstellen. Durch Drücken des OK Buttons (10) wird die Einstellung gespeichert und Sie gelangen zurück zu dem Menüpunkt „Kameraeinstellungen“. Durch Betätigen der linken Pfeiltaste (10) gelangen Sie zurück ins übergeordnete Menü ohne die Einstellungen zu ändern.
AuslösemodusMit dieser Funktion können Sie die Auslösegeschwindigkeit der DTC 700 festlegen. Die Kamera löst bei einer erkannten Bewegung im Batteriebetrieb in unter einer Sekunde aus. Hierfür muss Sie aus dem StandbyModus ‚erwachen’. Sollten Sie die Kamera mit einer externen Stromquelle betreiben, können Sie die DTC 700 so einstellen, dass sie nicht in den StandbyModus wechselt. Dies bedeutet, die Kamera braucht bei einer Bewegung nicht zu ‚erwachen’ und löst augenblicklich aus. Wählen Sie im „Hauptmenü“, welches Sie durch das Betätigen des MenüButtons (8) aufrufen, den Menüpunkt „AuslöseModus“ aus. Dieser befindet sich unter dem ersten Reiter „Kameraeinstellungen“. Durch das Drücken des OK Buttons (9) oder der rechten Pfeiltaste (10) gelangen Sie in das Untermenü. Im Untermenü können Sie mit den Pfeiltasten Auf/Ab (10) den gewünschten AuslöseModus einstellen. Wählen Sie ‚Normal’ für den Batteriebetrieb (< 1 Sek.) und ‚Strom’ für den Betrieb mit einer externen Stromquelle (augenblicklich). Durch Drücken des OK Buttons (9) wird die Einstellung gespeichert und Sie gelangen zurück zu dem Menüpunkt „Kameraeinstellungen“. Durch Betätigen der linken Pfeiltaste (10) gelangen Sie zurück ins übergeordnete Menü ohne die Einstellungen zu ändern.
BeleuchtungDie externe Beleuchtung ist für Ihre DTC 700 nicht verfügbar, bitte wählen Sie hier stets „Intern“. Sollten Sie dennoch „Extern“ wählen, ist der Blitz auch in der Dunkelheit deaktiviert und Sie werden in der Nacht nur schwarze Bilder erhalten.
PIR Sensor: Einstellen der Empfindlichkeit des IR-SensorsIhre MINOX DTC 700 verfügt über die Möglichkeit, die Empfindlichkeit des IRSensors in insgesamt drei Abstufungen – Niedrig, Normal und Hoch – einzustellen. Diese Funktion ist hilfreich, um z.B. das ungewollte Auslösen der Kamera durch Bewegungen nicht relevanter Objekte, wie z.B. Äste und Gräser, zu reduzieren. Um die IRSensor Empfindlichkeit Ihrer DTC 700 einzustellen, wählen Sie im „Hauptmenü“, welches Sie durch das Betätigen des MenüButtons (8) aufrufen, den Menüpunkt „PIR Sensor“ aus. Dieser befindet sich unter dem ersten Reiter „Kameraeinstellungen“. Durch das Drücken des OK Buttons (9) oder der rechten Pfeiltaste (10) gelangen Sie in das Untermenü. Hier können Sie zwischen den Einstellungen „Niedrig“, „Normal“ und „Hoch“ durch Drücken der Pfeiltasten Auf/Ab (10) wählen. Durch Drücken des OK Buttons (9) wird die Einstellung gespeichert und Sie gelangen zurück zu dem Menüpunkt „Kameraeinstellungen“. Durch Betätigen der linken Pfeiltaste (10) gelangen Sie zurück ins übergeordnete Menü ohne die Einstellungen zu ändern.
Hinweis: Bitte benutzen Sie den AuslöseModus „Strom“ nur, wenn die Kamera über ein Netzteil mit dem Stromnetz verbunden ist. Im Batteriebetrieb wird diese Einstellung die Batterien in kürzester Zeit aufbrauchen.
14
EinschaltdauerDiese Einstellung ermöglicht es Ihnen, die DTC 700 so zu programmieren, dass sie sich zu einer von Ihnen gewünschten Zeit an und ausschaltet. Während dieses Zeitintervalls macht die Kamera nur Aufnahmen, wenn der Bewegungssensor durch Aktivität angesprochen wird. Wählen Sie im „Hauptmenü“, welches Sie durch das Betätigen des Menü Buttons (8) aufrufen, den Menüpunkt „Einschaltdauer“ aus. Dieser befindet sich unter dem ersten Reiter „Kameraeinstellungen“. Durch das Drücken des OK Buttons (9) oder der rechten Pfeiltaste (10) gelangen Sie in das Untermenü. Im sich öffnenden Untermenü können Sie zwischen „Deaktivieren“ und „Aktivieren“ mit den Pfeiltasten Auf/Ab (10) auswählen. Bestätigen Sie Ihre Wahl mit OK (9). Wenn sie „Aktivieren“ gewählt haben, können Sie die Ein und Ausschaltzeit durch das Anwählen mit den Pfeiltasten Auf/Ab (10) und der Bestätigung mit OK (9), festlegen. Im sich öffnenden Fenster werden die einzelnen Einstellungen mit den Auf/Ab Pfeiltasten (10) vorgenommen. Um in das nächste Bearbeitungsfeld zu gelangen, benutzen Sie die linke bzw. rechte Pfeiltaste (10). Durch Drücken des OK Buttons (9) wird die Einstellung gespeichert. Die Kamera springt auto
matisch in das Ausgangsmenü zurück. Das Betätigen des MenüButtons (8) hat den gleichen Effekt wie das Speichern mit OK (9). Auch hier wird die letzte gemachte Einstellung übernommen und Sie gelangen zurück in das Ausgangsmenü „Aktivieren“, „Deaktivieren“. Im Untermenü „Aktivieren“ gelangen Sie ohne die Einstellungen zu ändern mit der linken Pfeiltaste (10) zurück. Wenn Sie „Deaktivieren“ auswählen und mit OK (9) bestätigen, ist die Kamera immer aktiv und Sie gelangen zurück ins Hauptmenü.
ZeitrafferDiese Einstellung gibt Ihnen die Möglichkeit, in einem festgelegten Zeitraum Fotos in einem vordefinierten Abstand zu einander aufzunehmen, ohne dass der Bewegungssensor angesprochen werden muss. Wählen Sie im „Hauptmenü“, welches Sie durch das Betätigen des MenüButtons (8) aufrufen, den Menüpunkt „Zeitraffer“ aus. Dieser befindet sich unter dem ersten Reiter „Kameraeinstellungen“. Durch das Drücken des OK Buttons (9) oder der rechten Pfeiltaste (10) gelangen Sie in das Untermenü. Im sich öffnenden Untermenü können Sie zwischen „Deaktivieren“ und „Aktivieren“ mit den Pfeiltasten Auf/Ab (10) auswählen. Bestätigen Sie Ihre Wahl mit OK (9). Wenn sie „Aktivieren“ gewählt haben, haben Sie die Möglichkeit „Einschaltzeit“, „Ausschaltzeit“, „Verzögerungsintervall“ und „VideoAusgang“ anzuwählen. Bestätigen Sie Ihre Wahl mit OK (9). Die Ein und Ausschaltzeit können Sie durch das Einstellen mit den Pfeiltasten Auf/Ab (10) und der Bestätigung mit OK (9) festlegen. Um in das nächste Bearbeitungsfeld zu gelangen, benutzen Sie die linke bzw. rechte Pfeiltaste (10). Durch Drücken des OK Buttons (9) wird die Einstellung gespeichert. Die Kamera springt automatisch in das Ausgangsmenü zurück. Das Betätigen des MenüButtons (8) hat den gleichen Effekt wie das Speichern mit OK (9). Auch hier wird die letzte gemachte Einstellung übernommen und Sie gelangen zurück in das Ausgangsmenü. Unter dem Menüpunkt „Verzögerungsintervall“ im Menü „Aktivieren“ legen Sie den Zeitraum zwischen den Aufnahmen fest. Diesen Zeitraum können Sie zwischen 10 Sek. und 12 Stunden einstellen. Durch Drücken des OK Buttons (9) wird die Einstellung gespeichert und die Kamera wechselt zurück ins übergeordnete
Hinweis: Die Erfassungsreichweite des IRSensors ist abhängig von äußeren Einflüssen, wie z.B. der Temperatur im Umfeld der Kamera. Zur groben Orientierung für die optimale Einstellung empfehlen wir, folgende Einstellungen des IRSensors vorzunehmen:
Hoch (hohe Empfindlichkeit) > im Allgemeinen im Sommer bzw. wenn die Umgebungstemperatur nahe der Körpertemperatur des erfassten Objekts liegt.
Normal (mittlere Empfindlichkeit) > im Allgemeinen im Frühjahr oder Herbst bzw. bei den zu diesen Jahreszeiten üblichen durchschnittlichen Temperaturen.
Niedrig (niedrige Empfindlichkeit) > im Allgemeinen im Winter bzw. bei den zu dieser Jahreszeit üblichen durchschnittlichen Temperaturen.

15
Menü. Durch Betätigen der linken Pfeiltaste (10) gelangen Sie zurück ins übergeordnete Menü ohne die Einstellungen zu ändern. Über die Funktion „VideoAusgang“ erstellt die DTC 700 ein Video der Zeitrafferaufnahmen. Wählen Sie im Menü „Zeitraffer“ den Menüpunkt „VideoAusgang“. Bestätigen Sie Ihre Wahl mit OK (9). Im sich öffnenden Untermenü können Sie zwischen „Deaktivieren“ und „Aktivieren“ mit den Pfeiltasten Auf/Ab (10) auswählen. Bestätigen Sie Ihre Wahl mit OK (9). Wenn sie „Aktivieren“ gewählt haben, können Sie im Folgenden die Geschwindigkeit des Videos mit den Pfeiltasten Auf/Ab (10) festzulegen. Je höher die FPS (Frames Per Second) gewählt werden, desto schneller wird das Video werden. Durch Drücken des OK Buttons (9), wird die Einstellung gespeichert. Durch Betätigen der linken Pfeiltaste (10) gelangen Sie zurück ins übergeordnete Menü ohne die Einstellungen zu ändern. Wenn Sie „Deaktivieren“ auswählen und mit OK (9) bestätigen, werden die Bilder nicht zu einem Video zusammen geschnitten.Wenn Sie im Menü „Zeitraffer“ „Deaktivieren“ wählen und dies mit OK (9) bestätigen, ist die Zeitrafferfunktion ausgeschaltet.
Allgemeine Einstellungen
SprachauswahlBitte gehen Sie wie folgt vor, um die Spracheinstellung Ihrer DTC 700 zu ändern:
1. Bringen Sie den Hauptschalter (11) in die Schalterstellung „ SETUP “ („Einstellmodus“).
2. Sie gelangen direkt in die „Manuelle Auslösung“ der Kamera.
3. Drücken Sie nun einmal den MenüButton (8). Sie gelangen in das „Hauptmenü“ der Kamera.
4. Drücken Sie einmal die nach rechts gerichtete
Pfeiltaste (10) um in den Reiter „Allgemeine Einstellungen“ zu wechseln.
5. Drücken Sie nun einmal die nach unten gerichtete Pfeiltaste (10).
6. Sie befinden sich im unterlegten Menüpunkt „Sprache“.
7. Drücken Sie den OK Button (9).8. Über die Auf und AbPfeiltasten (10) wählen
Sie die gewünschte Sprache (unterlegt) aus.9. Drücken Sie den OK Button (9). 10. Die Kamera hat die von Ihnen ausgewählte
Sprache nun gespeichert, und Sie befinden sich wieder im „Hauptmenü“. Durch Betätigen der linken Pfeiltaste (10) gelangen Sie zurück ins übergeordnete Menü ohne die Einstellungen zu ändern.
ZeitstempelDiese Einstellung ermöglicht Ihnen, bei jeder Aufnahme (Foto/Video) Angaben wie Datum, Uhrzeit und Temperatur als „Zeitstempel“ zu hinterlegen und anzuzeigen. Wählen Sie im „Hauptmenü“, welches Sie durch das Betätigen des MenüButtons (8) aufrufen, den Menüpunkt „Zeitstempel“ aus. Dieser befindet sich unter dem zweiten Reiter „Allgemeine Einstellungen“. Durch das Drücken des OK Buttons (9) oder der rechten Pfeiltaste (10) gelangen Sie in das Untermenü. In diesem Menüpunkt können Sie zwischen „An“ (Zeitstempel anzeigen) oder „Aus“ (Zeitstempel nicht anzeigen) wählen. Durch Drücken des OK Buttons (9) wird die Einstellung gespeichert und Sie gelangen zurück zu dem Menüpunkt „Allgemeine Einstellungen“. Durch Betätigen der linken Pfeiltaste (10) gelangen Sie zurück ins übergeordnete Menü ohne die Einstellungen zu ändern.
Datumsformat / Uhrzeit (Menüpunkt „Einstellung“)Diese Funktion ermöglicht Ihnen die Einstellung des Anzeigeformats von Datum und Uhrzeit. Wählen Sie im „Hauptmenü“, welches Sie durch das Betätigen des MenüButtons (8) aufrufen, den Menüpunkt „Einstellung“ aus. Dieser befindet sich unter dem zweiten Reiter „Allgemeine Einstellungen“. Durch das Drücken des OK Buttons (9) oder der rechten Pfeiltaste (10) gelangen Sie in das Untermenü. Hier können Sie die Einstellungen für Datum, Uhr
Hinweis: Die DTC 700 löst bei aktiviertem Zeitraffer auch weiterhin bei Bewegung aus.
Hinweis: Auch bei aktivierter Option „VideoAusgang“ werden alle Einzelbilder weiterhin auf der SDKarte gespeichert.
16
zeit, Datumsformat und Uhrzeitformat (12 oder 24 Stunden) mit Hilfe der Pfeiltasten Auf/Ab (10) festlegen. Über die linke und rechte Pfeiltaste (10) können Sie die Position ansteuern, welche Sie bearbeiten möchten. Durch Drücken des OK Buttons (9) wird die Einstellung gespeichert und Sie gelangen zurück zu dem Menüpunkt „Allgemeine Einstellungen“. Das Betätigen des MenüButtons (8) hat den gleichen Effekt wie das Speichern mit OK (9). Auch hier wird die letzte gemachte Einstellung übernommen und Sie gelangen zurück zu dem Menüpunkt „Allgemeine Einstellungen“.
TemperatureinheitDiese Funktion ermöglicht Ihnen die Einstellung der Temperatureinheit in Fahrenheit oder Celsius. Wählen Sie im „Hauptmenü“, welches Sie durch das Betätigen des MenüButtons (8) aufrufen, den Menüpunkt „Temperatureinheit“ aus. Dieser befindet sich unter dem zweiten Reiter „Allgemeine Einstellungen“. Durch das Drücken des OK Buttons (9) oder der rechten Pfeiltaste (10) gelangen Sie in das Untermenü. Im Untermenü können Sie die Einstellung in Fahrenheit oder Celsius durch Drücken der Pfeiltasten Auf/ Ab (10) festlegen. Durch Drücken des OK Buttons (9) wird die Einstellung gespeichert und Sie gelangen zurück zu dem Menüpunkt „Allgemeine Einstellungen“. Durch Betätigen der linken Pfeiltaste (10) gelangen Sie zurück ins übergeordnete Menü ohne die Einstellungen zu ändern.
StromversorgungIhre DTC 700 Wildkamera ist ein technisch hochwertiges Präzisionsgerät. Es wird empfohlen, hochwertige Alkaline, Lithium oder NiMHBatterien zu verwenden. Um den Batterietyp auszuwählen, wählen Sie im „Hauptmenü“, welches Sie durch das Betätigen des MenüButtons (8) aufrufen, den Menüpunkt „Stromversorgung“ aus. Dieser befindet sich unter dem zweiten Reiter „Allgemeine Einstellungen“. Durch das Drücken des OK Buttons (9) oder der rechten Pfeiltaste (10) gelangen Sie in das Untermenü. Wählen Sie nun Ihren Batterietyp
Lithium, Alkaline oder NiMHBatterie durch Drücken der Pfeiltasten Auf/Ab (10) aus. Des Weiteren haben Sie hier die Möglichkeit, eine externe Stromquelle auszuwählen. Hierfür wählen Sie 6V.
Durch Drücken des OK Buttons (9) wird die Einstellung gespeichert. Die Kamera springt automatisch in das Ausgangsmenü zurück. Durch Betätigen der linken Pfeiltaste (10) gelangen Sie zurück ins übergeordnete Menü ohne die Einstellungen zu ändern.
Speicherkarte formatierenDas Formatieren der Speicherkarte löscht alle Dateien, die sich auf der Speicherkarte befinden und bereitet die Speicherkarte für den Einsatz in der Kamera vor. Es wird empfohlen, die Speicherkarte vor jeder Benutzung zu formatieren. Wählen Sie im „Hauptmenü“, welches Sie durch das Betätigen des MenüButtons (8) aufrufen, den Menüpunkt „SDKarte formatieren“ aus. Dieser befindet sich unter dem zweiten Reiter „Allgemeine Einstellungen“. Durch das Drücken des OK Buttons (9) oder der rechten Pfeiltaste (10) gelangen Sie in das Untermenü. Wählen Sie nun „Ja“, wenn Sie die Speicherkarte formatieren möchten oder „Nein“, und die Speicherkarte wird nicht formatiert. Durch Drücken des OK Buttons (9) wird die Einstellung gespeichert. Die Kamera springt automatisch in das Ausgangsmenü zurück. Durch Betätigen der linken Pfeiltaste (10) gelangen Sie zurück ins übergeordnete Menü ohne eine Formatierung durchzuführen.
PasswortDiese Funktion erlaubt Ihnen, eine 4stellige Zahlenkombination einzugeben, um einem Missbrauch Ihrer DTC 700 Kamera vorzubeugen. Ohne Eingabe der Zahlenkombination gelangen Sie nicht mehr in das „SETUP“ (Hauptschalter (11) Stellung Mitte) der Kamera. Wählen Sie im „Hauptmenü“, welches Sie durch das Betätigen des MenüButtons (8) aufrufen, den Menüpunkt „Passwort“ aus. Dieser befindet sich unter dem zweiten Reiter „Allgemeine Einstellungen“. Durch das Drücken des OK Buttons (9) oder der rechten Pfeiltaste (10) gelangen Sie in das Untermenü. Im Untermenü können Sie Ihre
Hinweis: Mit der genauen Eingabe der Daten wird automatisch der MondphasenKalender aktiviert. Die Abbildung der Mondphase wird auf jeder Foto oder Videoaufnahme festgehalten.
Hinweis: Wählen Sie Alkaline beim Einsatz von LithiumBatterien aus.
17
Zahlenkombination unter „Passwort eingeben“ festlegen. Hiefür bestätigen Sie diesen Menüpunkt mit OK (9).
Eingabe des PasswortsGeben Sie die gewünschte Zahlenkombination (09) in jedem Feld mit den Pfeiltasten Auf/Ab (10) ein, mit den Pfeiltasten links/rechts (10) können Sie die einzelnen Felder der Zahlenkombination ansteuern. Haben Sie diese komplett eingegeben, drücken Sie auf den OK Button (9) zum Speichern. Das Betätigen des MenüButtons (8) hat den gleichen Effekt wie das Speichern mit OK (9). Auch hier wird das Passwort übernommen und Sie gelangen zurück zu dem Menüpunkt „Allgemeine Einstellungen“.
Deaktivieren des PasswortsWählen Sie im „Hauptmenü“, welches Sie durch das Betätigen des MenüButtons (8) aufrufen, den Menüpunkt „Passwort“ aus. Dieser befindet sich unter dem zweiten Reiter „Allgemeine Einstellungen“. Durch das Drücken des OK Buttons (9) oder der rechten Pfeiltaste (10) gelangen Sie in das Untermenü. Im Untermenü können Sie Ihre Zahlenkombination unter „Deaktivieren“ löschen. Navigieren Sie im Untermenü mit den Pfeiltasten Auf/ Ab (10) hin zu „Deaktivieren“. Drücken Sie auf den OK Button (9) zum Löschen Ihrer Zahlenkombination. Durch Betätigen der linken Pfeiltaste (10) gelangen Sie zurück ins übergeordnete Menü ohne das Passwort zu löschen.
StandardeinstellungMit dieser Einstellung können Sie Ihre DTC 700 auf Werkseinstellungen zurücksetzen. Wählen Sie im „Hauptmenü“, welches Sie durch das Betätigen des MenüButtons (8) aufrufen, den Menüpunkt „Standardeinstellung“ aus. Dieser befindet sich unter dem zweiten Reiter „Allgemeine Einstellungen“. Durch das Drücken des OK Buttons (9) oder der rechten Pfeiltaste (10) gelangen Sie in das Untermenü. Mit den Pfeiltasten Auf/Ab (10) können Sie nun „Ja“ oder „Nein“ anwählen und mit OK (9) bestätigen. Wählen Sie „Nein“, behalten Sie die aktuellen Einstellungen bei und die Kamera springt zurück in das übergeordnete Menü. Wenn Sie „Ja“ auswählen, wird Ihre DTC 700 auf Werkseinstellungen zurückgesetzt und springt in den zweiten Rei
ter „Allgemeine Einstellungen“ des „Hauptmenüs“ zurück.
Kamera-InformationenWählen Sie im „Hauptmenü“, welches Sie durch das Betätigen des MenüButtons (8) aufrufen, den Menüpunkt „KameraInfo“ aus. Dieser befindet sich unter dem zweiten Reiter „Allgemeine Einstellungen“. Durch das Drücken des OK Buttons (9) oder der rechten Pfeiltaste (10) gelangen Sie in das Untermenü. Im Untermenü können Sie mit Hilfe der Pfeiltasten Auf/Ab (10) zwischen folgenden Kamera Informationen auswählen: Gespeicherte Dateien, Speicherplatz, Firmware Version.
Gespeicherte DateienGehen Sie im Untermenü auf den Menüpunkt „Gespeicherte Dateien“ und drücken Sie auf den OK Button (9) oder auf die rechte Pfeiltaste (10). Im Folgenden bekommen Sie die aktuelle Anzahl der Foto und Videodateien angezeigt. Durch Bestätigen mit OK (9) oder der linken Pfeiltaste (10) gelangen Sie in das Ausgangsmenü zurück.
SpeicherplatzGehen Sie im Untermenü auf den Menüpunkt „Speicherplatz“ und drücken Sie auf den OK Button (9) oder auf die rechte Pfeiltaste (10). Im Folgenden bekommen Sie den „Belegten Speicher“ (Bel. Speicher) und den „Freien Speicher“ (Frei. Speicher) angezeigt. Durch Bestätigen mit OK (9) oder der linken Pfeiltaste (10) gelangen Sie in das Ausgangsmenü zurück.
Firmware VersionGehen Sie im Untermenü auf den Menüpunkt „Firmware Version“ und drücken Sie auf den OK Button (9) oder auf die rechte Pfeiltaste (10). Im Folgenden bekommen Sie die aktuelle Firmware Version angezeigt. Durch Bestätigen mit OK (9) oder der linken Pfeiltaste (10) gelangen Sie in das Ausgangsmenü zurück.
SoftwareaktualisierungSollte ein Softwareupdate für Ihre DTC 700 verfügbar sein, gehen Sie bitte wie folgt vor: Achten Sie darauf, dass Ihre DTC 700 ausgeschaltet ist (Funktion „OFF = Aus“: Hauptschalter (11) Stellung un
18
ten). Kopieren Sie am PC alle Dateien, welche für die Aktualisierung nötig sind, in das oberste Verzeichnis einer formatierten SDKarte. Legen Sie die SD Karte wie im Abschnitt „ Einsetzen der Speicherkarte“ beschrieben in Ihre DTC 700 ein. Schalten Sie Ihre Kamera in den „Einstellmodus“ (SETUP = Einstellmodus, Hauptschalter (11) Stellung Mitte). Wählen Sie im „Hauptmenü“, welches Sie durch das Betätigen des MenüButtons (8) aufrufen, den Menüpunkt „Aktualisieren“ aus. Dieser befindet sich unter dem zweiten Reiter „Allgemeine Einstellungen“. Durch das Drücken des OK Buttons (9) gelangen Sie in das Untermenü. Mit den Pfeiltasten Auf/Ab (10) können Sie nun „Ja“ oder „Nein“ anwählen und mit OK (10) bestätigen. Wählen Sie „Nein“, behalten Sie die aktuelle Softwareversion bei und die Kamera springt zurück in das übergeordnete Menü. Wenn Sie „Ja“ auswählen, wird Ihre DTC 700 den Aktualisierungsvorgang starten. Die Aktualisierung ist abgeschlossen wenn der Bildschirm Ihrer Kamera schwarz wird. Bitte versetzen Sie Ihre DTC 700 nun in die Funktion „OFF = Aus“: Hauptschalter (11) Stellung unten. Wenn Sie die Kamera das nächste Mal in den „Einstellmodus“ (SETUP = Einstellmodus, Hauptschalter (11) Stellung Mitte) versetzen, können Sie die neue Software nutzen. Durch Betätigen der linken Pfeiltaste (10) gelangen Sie zurück ins übergeordnete Menü ohne eine Aktualisierung durchzuführen.
Anschließen der Kamera an einen Computer
Zum Übertragen der Daten auf Ihren Computer gibt es zwei Wege: Entweder Sie entnehmen die SDKarte und lesen diese am Computer aus oder Sie verbinden die DTC 700 über das mitgelieferte USBKabel mit einem Computer.
Anschluss über USB-KabelStellen Sie immer sicher, dass die Kamera ausgeschaltet ist, bevor Sie diese mit Ihrem Computer verbinden. Schließen Sie die Kamera mit dem mitgelieferten USBKabel über den USBKabel Anschluss (13) an einen Computer an. Schalten Sie die Kamera ein. Die Kamera wird als Wechseldatenträger erkannt. Bilder oder VideoAufnahmen können direkt angesehen oder auf den PC übertragen werden.
Übertragen von Bildern und Videos via SD-KarteStellen Sie immer sicher, dass die Kamera ausgeschaltet ist, bevor Sie die SDKarte aus dem Kartensteckplatz (7) der Kamera entfernen, da der Speicher sonst beschädigt werden kann. Nehmen Sie die Speicherkarte aus dem Kartensteckplatz (7) der Kamera und stecken Sie sie in ein Speicherkartenlesegerät, das an Ihrem Computer angeschlossen ist. Manche Computer besitzen auch einen internen Steckplatz für SDKarten. In diesem Fall kann die SDKarte auch direkt an den Computer angeschlossen werden. Der Transfer der Bilder oder VideoAufnahmen auf den Computer kann beginnen.
MPEG-4 Visual Patent Portfolio License
Diese MINOX DTC 700 ist unter der MPEG4 Visual Patent Portfolio License für den persönlichen und nichtkommerziellen Gebrauch für folgende Funktionen lizenziert:
1. Codierung von Videodaten in Übereinstimmung mit dem MPEG4Standard und/oder
2. Decodierung von MPEG4Videodaten, die durch einen Anwender durch eine persönliche und nichtkommerzielle Aktivität verschlüsselt wurden und/oder von einem Videoanbieter erworben wurden, der durch eine Lizenz für die Bereitstellung von MPEG 4Videodaten berechtigt ist. Für andere Zwecke wird für den MPEG4Standard keine Lizenz gewährt und ist auch nicht stillschweigend eingeschlossen.
Weitere Informationen sind erhältlich von MPEG LA, L.L.C. unter www.mpegla.com
Hinweis: Bitte beachten Sie, dass dem oben beschriebenen Prozess genau Folge geleistet werden muss. Ein Abweichen oder Zuwiderhandeln kann zum Scheitern des Updatevorgangs führen. Dies macht Ihre Kamera möglicherweise unbrauchbar. In diesem Fall verlieren Sie jeglichen Garantieanspruch.
19
Technische Daten
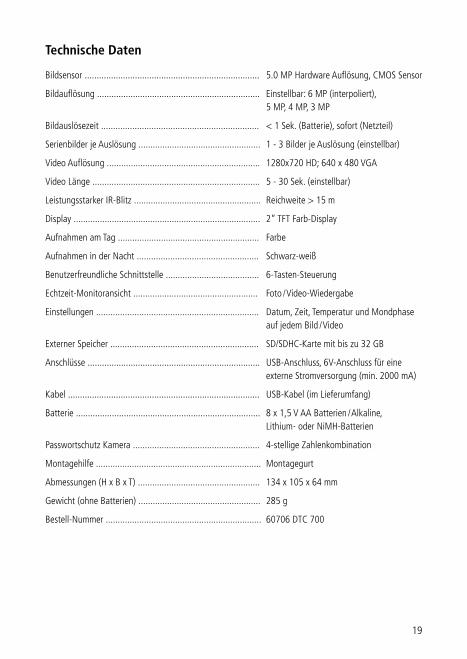
Bildsensor ......................................................................... 5.0 MP Hardware Auflösung, CMOS Sensor
Bildauflösung .................................................................... Einstellbar: 6 MP (interpoliert), 5 MP, 4 MP, 3 MP
Bildauslösezeit .................................................................. < 1 Sek. (Batterie), sofort (Netzteil)
Serienbilder je Auslösung ................................................... 1 3 Bilder je Auslösung (einstellbar)
Video Auflösung ................................................................ 1280x720 HD; 640 x 480 VGA
Video Länge ...................................................................... 5 30 Sek. (einstellbar)
Leistungsstarker IRBlitz ..................................................... Reichweite > 15 m
Display .............................................................................. 2“ TFT FarbDisplay
Aufnahmen am Tag ........................................................... Farbe
Aufnahmen in der Nacht ................................................... Schwarzweiß
Benutzerfreundliche Schnittstelle ....................................... 6TastenSteuerung
EchtzeitMonitoransicht .................................................... Foto / VideoWiedergabe
Einstellungen .................................................................... Datum, Zeit, Temperatur und Mondphase auf jedem Bild / Video
Externer Speicher .............................................................. SD/SDHCKarte mit bis zu 32 GB
Anschlüsse ........................................................................ USBAnschluss, 6VAnschluss für eine externe Stromversorgung (min. 2000 mA)
Kabel ................................................................................ USBKabel (im Lieferumfang)
Batterie ............................................................................. 8 x 1,5 V AA Batterien / Alkaline, Lithium oder NiMHBatterien
Passwortschutz Kamera ..................................................... 4stellige Zahlenkombination
Montagehilfe ..................................................................... Montagegurt
Abmessungen (H x B x T) ................................................... 134 x 105 x 64 mm
Gewicht (ohne Batterien) ................................................... 285 g
BestellNummer ................................................................. 60706 DTC 700
20
Mit dem Kauf dieser MINOX DTC 700 haben Sie ein Produkt erworben, das nach besonders strengen Qualitätsrichtlinien hergestellt und geprüft wurde. Die für dieses Produkt geltende gesetzliche Gewährleistung von 2 Jahren wird von uns ab dem Tag des Verkaufs durch einen autorisierten Händler unter folgenden Bedingungen übernommen:
1) In der Gewährleistungszeit werden Beanstandungen, die auf Fabrikationsfehlern beruhen, kostenlos und nach eigenem Ermessen durch Instandsetzung, Austausch defekter Teile oder Umtausch in ein gleichartiges einwandfreies Erzeugnis behoben. Weitergehende Ansprüche, gleich welcher Art und gleich aus welchem Rechtsgrund im Zusammenhang mit dieser Gewährleistung, sind ausgeschlossen.
2) Gewährleistungsansprüche entfallen, wenn der betreffende Mangel auf unsachgemäße Behandlung – wozu auch die Verwendung von Fremdzubehör zählen kann – zurückzuführen ist, ein Eingriff von nicht autorisierten Personen und Werkstätten durchgeführt oder die Fabrikationsnummer unkenntlich gemacht wurde.
Gewährleistungsbestimmungen
3) Gewährleistungsansprüche können nur bei Vorlage eines maschinengeschriebenen Kaufbelegs eines autorisierten Händlers geltend gemacht werden.
4) Bei Inanspruchnahme der Gewährleistung leiten Sie bitte die MINOX Kamera zusammen mit dem Original des maschinengeschriebenen Kaufbelegs und einer Schilderung der Beanstandung dem Kundendienst der MINOX GmbH oder einer Landesvertretung zu.
5) Touristen steht im Bedarfsfalle unter Vorlage des maschinengeschriebenen Kaufbelegs die Vertretung des jeweiligen Reiselandes gemäß den Regelungen zur Gewährleistung der MINOX GmbH zur Verfügung.
MINOX GmbHWalterZappStr. 4D35578 WetzlarTel.: +49 (0) 6441 / 9170Fax: +49 (0) 6441 / 917612EMail: [email protected]: www.minox.com

21
Notizen

22
Introduction
Congratulations on the purchase of your game camera MINOX DTC 700. Like all other MINOX products this MINOX DTC 700 game camera boasts the traditional values fostered by MINOX. It combines functionality in the smallest possible space with the best optical quality. Simple and fast operation make the MINOX DTC 700 ideal for digital photography and videos in the intended field of use. These instructions are to help you make the most of the full range of performance of your game camera MINOX DTC 700.
Note: · We have done our best to produce a complete and accurate manual. However, we cannot
ensure that there are no errors or omissions during the printing process. · We cannot take responsibility for any damages caused by unauthorized attempts to upgra
de software or for any data corruption while the product is being repaired. · Please Back Up Your Files! We cannot be held liable for the loss of data caused by dama
ged products or damage due to unreadable memories or drives.
MINOX DTC 700Deutsch Seite 2English page 22Français page 40
MINOX DTC 700
23
Information on the use of game and surveillance cameras
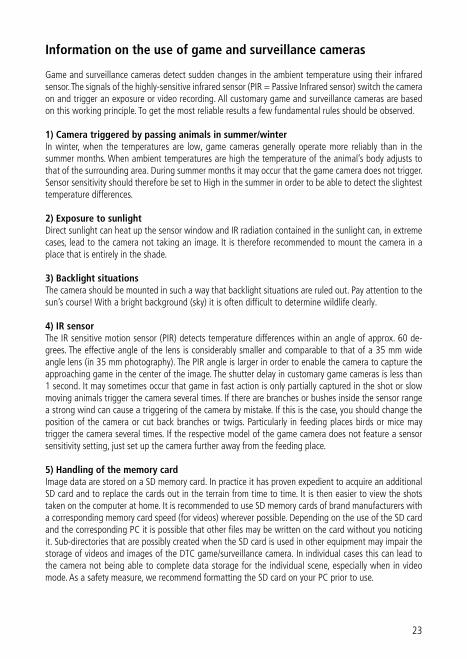
Game and surveillance cameras detect sudden changes in the ambient temperature using their infrared sensor. The signals of the highlysensitive infrared sensor (PIR = Passive Infrared sensor) switch the camera on and trigger an exposure or video recording. All customary game and surveillance cameras are based on this working principle. To get the most reliable results a few fundamental rules should be observed.
1) Camera triggered by passing animals in summer/winterIn winter, when the temperatures are low, game cameras generally operate more reliably than in the summer months. When ambient temperatures are high the temperature of the animal’s body adjusts to that of the surrounding area. During summer months it may occur that the game camera does not trigger. Sensor sensitivity should therefore be set to High in the summer in order to be able to detect the slightest temperature differences.
2) Exposure to sunlightDirect sunlight can heat up the sensor window and IR radiation contained in the sunlight can, in extreme cases, lead to the camera not taking an image. It is therefore recommended to mount the camera in a place that is entirely in the shade.
3) Backlight situationsThe camera should be mounted in such a way that backlight situations are ruled out. Pay attention to the sun’s course! With a bright background (sky) it is often difficult to determine wildlife clearly.
4) IR sensorThe IR sensitive motion sensor (PIR) detects temperature differences within an angle of approx. 60 degrees. The effective angle of the lens is considerably smaller and comparable to that of a 35 mm wide angle lens (in 35 mm photography). The PIR angle is larger in order to enable the camera to capture the approaching game in the center of the image. The shutter delay in customary game cameras is less than 1 second. It may sometimes occur that game in fast action is only partially captured in the shot or slow moving animals trigger the camera several times. If there are branches or bushes inside the sensor range a strong wind can cause a triggering of the camera by mistake. If this is the case, you should change the position of the camera or cut back branches or twigs. Particularly in feeding places birds or mice may trigger the camera several times. If the respective model of the game camera does not feature a sensor sensitivity setting, just set up the camera further away from the feeding place.
5) Handling of the memory cardImage data are stored on a SD memory card. In practice it has proven expedient to acquire an additional SD card and to replace the cards out in the terrain from time to time. It is then easier to view the shots taken on the computer at home. It is recommended to use SD memory cards of brand manufacturers with a corresponding memory card speed (for videos) wherever possible. Depending on the use of the SD card and the corresponding PC it is possible that other files may be written on the card without you noticing it. Subdirectories that are possibly created when the SD card is used in other equipment may impair the storage of videos and images of the DTC game/surveillance camera. In individual cases this can lead to the camera not being able to complete data storage for the individual scene, especially when in video mode. As a safety measure, we recommend formatting the SD card on your PC prior to use.
24
6) Battery capacityRechargeable NiMH batteries are recommended for regular use of game cameras. Apart from saving costs, these batteries have the advantage that, in contrast to conventional alkaline manganese batteries, they also deliver a current when outdoor temperatures are low (below 0° centigrade). To ensure correct functioning of the camera it is important that all batteries are charged at the same level!. Always check the uniform battery charge. Many manufacturers specify a battery life of up to 6 or 12 months. This information is usually based on 5 recordings during the day and 5 at night (with IR flash). The IR flash uses up the largest amount of power in the camera. Frequent triggering at night or corresponding video recordings can reduce the battery life considerably. It may therefore also be expedient to select short video sequences of 5 or 10 seconds.
7) SafetyGame cameras appeal to people. For this reason all MINOX DTC game cameras can be secured on a tree or such by threading a steel cable through the provided openings and eyes, that is then closed using a lock. You should also use password protection. This function allows you to enter a 4digit password to prevent your DTC game camera from being stolen. The camera only works when the password has been entered.
25
Content
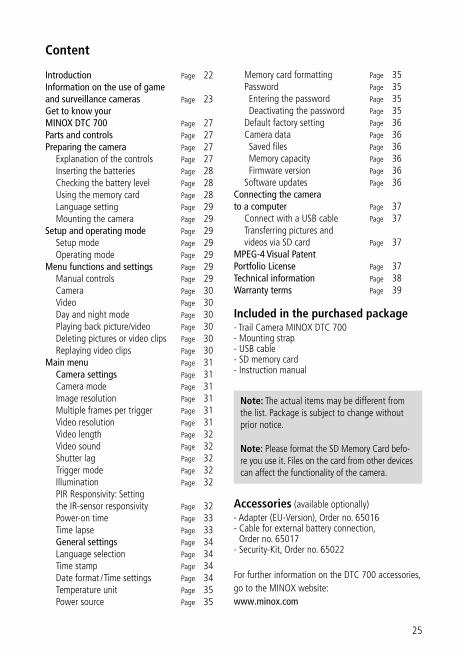
Introduction Page 22Information on the use of game and surveillance cameras Page 23Get to know your MINOX DTC 700 Page 27Parts and controls Page 27Preparing the camera Page 27 Explanation of the controls Page 27 Inserting the batteries Page 28 Checking the battery level Page 28 Using the memory card Page 28 Language setting Page 29 Mounting the camera Page 29 Setup and operating mode Page 29 Setup mode Page 29 Operating mode Page 29Menu functions and settings Page 29 Manual controls Page 29 Camera Page 30 Video Page 30 Day and night mode Page 30 Playing back picture/video Page 30 Deleting pictures or video clips Page 30 Replaying video clips Page 30Main menu Page 31 Camera settings Page 31 Camera mode Page 31 Image resolution Page 31 Multiple frames per trigger Page 31 Video resolution Page 31 Video length Page 32 Video sound Page 32 Shutter lag Page 32 Trigger mode Page 32 Illumination Page 32 PIR Responsivity: Setting
the IRsensor responsivity Page 32 Poweron time Page 33 Time lapse Page 33 General settings Page 34 Language selection Page 34 Time stamp Page 34 Date format / Time settings Page 34 Temperature unit Page 35 Power source Page 35
Memory card formatting Page 35 Password Page 35 Entering the password Page 35 Deactivating the password Page 35 Default factory setting Page 36 Camera data Page 36 Saved files Page 36 Memory capacity Page 36 Firmware version Page 36 Software updates Page 36 Connecting the camera to a computer Page 37 Connect with a USB cable Page 37 Transferring pictures and
videos via SD card Page 37MPEG-4 Visual Patent Portfolio License Page 37 Technical information Page 38 Warranty terms Page 39
Included in the purchased package Trail Camera MINOX DTC 700 Mounting strap USB cable SD memory card Instruction manual
Accessories (available optionally) Adapter (EUVersion), Order no. 65016 Cable for external battery connection,
Order no. 65017 SecurityKit, Order no. 65022
For further information on the DTC 700 accessories, go to the MINOX website:www.minox.com
Note: The actual items may be different from the list. Package is subject to change without prior notice.
Note: Please format the SD Memory Card before you use it. Files on the card from other devices can affect the functionality of the camera.

26
MINOX DTC 700
1 15
5
17
18
10
11
14
12 136
15
2
3/4
16
7
89
27
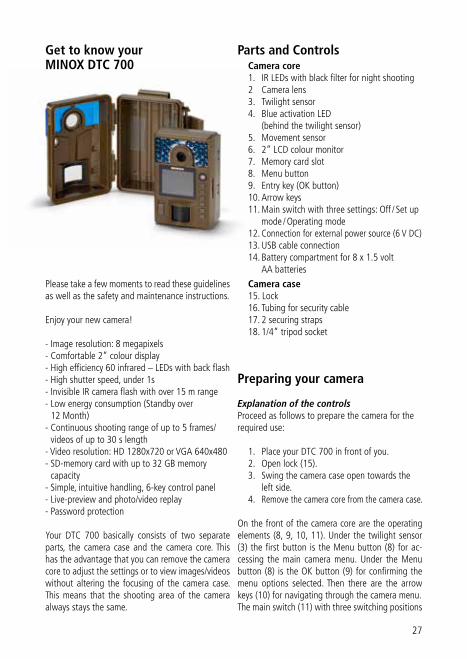
Get to know your MINOX DTC 700
Please take a few moments to read these guidelines as well as the safety and maintenance instructions.
Enjoy your new camera!
Image resolution: 8 megapixels Comfortable 2“ colour display High efficiency 60 infrared – LEDs with back flash High shutter speed, under 1s Invisible IR camera flash with over 15 m range Low energy consumption (Standby over
12 Month) Continuous shooting range of up to 5 frames/
videos of up to 30 s length Video resolution: HD 1280x720 or VGA 640x480 SDmemory card with up to 32 GB memory
capacity Simple, intuitive handling, 6key control panel Livepreview and photo/video replay Password protection
Your DTC 700 basically consists of two separate parts, the camera case and the camera core. This has the advantage that you can remove the camera core to adjust the settings or to view images/videos without altering the focusing of the camera case. This means that the shooting area of the camera always stays the same.
Parts and Controls Camera core 1. IR LEDs with black filter for night shooting 2 Camera lens 3. Twilight sensor 4. Blue activation LED (behind the twilight sensor) 5. Movement sensor 6. 2“ LCD colour monitor 7. Memory card slot 8. Menu button 9. Entry key (OK button) 10. Arrow keys 11. Main switch with three settings: Off / Set up
mode / Operating mode 12. Connection for external power source (6 V DC) 13. USB cable connection 14. Battery compartment for 8 x 1.5 volt
AA batteries
Camera case 15. Lock 16. Tubing for security cable 17. 2 securing straps 18. 1/4“ tripod socket
Preparing your camera
Explanation of the controlsProceed as follows to prepare the camera for the required use:
1. Place your DTC 700 in front of you. 2. Open lock (15). 3. Swing the camera case open towards the
left side. 4. Remove the camera core from the camera case.
On the front of the camera core are the operating elements (8, 9, 10, 11). Under the twilight sensor (3) the first button is the Menu button (8) for accessing the main camera menu. Under the Menu button (8) is the OK button (9) for confirming the menu options selected. Then there are the arrow keys (10) for navigating through the camera menu. The main switch (11) with three switching positions
28
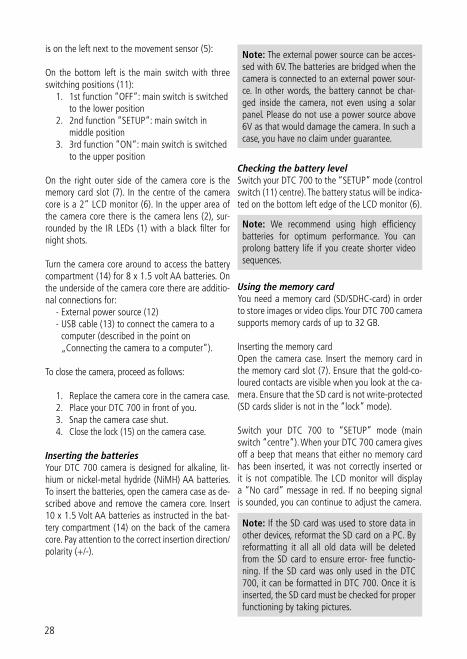
is on the left next to the movement sensor (5):
On the bottom left is the main switch with three switching positions (11): 1. 1st function “OFF“: main switch is switched
to the lower position 2. 2nd function “SETUP“: main switch in
middle position 3. 3rd function “ON“: main switch is switched
to the upper position
On the right outer side of the camera core is the memory card slot (7). In the centre of the camera core is a 2“ LCD monitor (6). In the upper area of the camera core there is the camera lens (2), surrounded by the IR LEDs (1) with a black filter for night shots.
Turn the camera core around to access the battery compartment (14) for 8 x 1.5 volt AA batteries. On the underside of the camera core there are additional connections for: External power source (12) USB cable (13) to connect the camera to a
computer (described in the point on „Connecting the camera to a computer”).
To close the camera, proceed as follows:
1. Replace the camera core in the camera case. 2. Place your DTC 700 in front of you. 3. Snap the camera case shut. 4. Close the lock (15) on the camera case.
Inserting the batteriesYour DTC 700 camera is designed for alkaline, lithium or nickelmetal hydride (NiMH) AA batteries. To insert the batteries, open the camera case as described above and remove the camera core. Insert 10 x 1.5 Volt AA batteries as instructed in the battery compartment (14) on the back of the camera core. Pay attention to the correct insertion direction/ polarity (+/).
Checking the battery levelSwitch your DTC 700 to the “SETUP” mode (control switch (11) centre). The battery status will be indicated on the bottom left edge of the LCD monitor (6).
Using the memory cardYou need a memory card (SD/SDHCcard) in order to store images or video clips. Your DTC 700 camera supports memory cards of up to 32 GB.
Inserting the memory card Open the camera case. Insert the memory card in the memory card slot (7). Ensure that the goldcoloured contacts are visible when you look at the camera. Ensure that the SD card is not writeprotected (SD cards slider is not in the “lock” mode).
Switch your DTC 700 to “SETUP” mode (main switch “centre”). When your DTC 700 camera gives off a beep that means that either no memory card has been inserted, it was not correctly inserted or it is not compatible. The LCD monitor will display a “No card” message in red. If no beeping signal is sounded, you can continue to adjust the camera.
Note: We recommend using high efficiency batteries for optimum performance. You can prolong battery life if you create shorter video sequences.
Note: The external power source can be accessed with 6V. The batteries are bridged when the camera is connected to an external power source. In other words, the battery cannot be charged inside the camera, not even using a solar panel. Please do not use a power source above 6V as that would damage the camera. In such a case, you have no claim under guarantee.
Note: If the SD card was used to store data in other devices, reformat the SD card on a PC. By reformatting it all all old data will be deleted from the SD card to ensure error free functioning. If the SD card was only used in the DTC 700, it can be formatted in DTC 700. Once it is inserted, the SD card must be checked for proper functioning by taking pictures.
29
Language settingSince the Trail Camera DTC 700 comes with default factory settings with an English menu, follow these steps to make the right language selection:
1. Bring the main switch (11) to the switch setting “SETUP” mode.
2. You will directly be brought to “manual activation” option in the camera.
3. Now press the menu key (8). You will be directed to the main menu of the camera.
4. Now press the the arrow key to the right (10) to change the tab in the “Main Menu”.
5. Then press the arrow key (10) facing downward.6. Now it shows the highlighted menu option
“Language”.7. Press the OK button (9).8. Using the down arrow key (10) select “German”
(highlighted).9. Press the OK button (9).10. The camera will return to the “Main Menu”. The
language has been set to “German”.
Mounting the camera1. Mounting strap: Two strap mounts (17) are
attached to the rear side of the camera core to mount the camera. The mounting strap included in the delivered package is passed through both mounts. The camera is fastened with the latch on the mounting strap.
2. Tripod: The external case of the camera has 1/4” tripod mount (18) at the backto fasten the camera to the tripod.
Setup and operating mode
You camera has two mode settings:
1. Setup modeSwitch your DTC 700 camera to the “SETUP” mode (SETUP = setup mode, main switch (11) centre). You will be directed to the “Manual Controls” of the camera. Press the menu button (8) to get to the main menu of the camera. You can alternate between 2 tabs in the main menu by activating
the right and left arrow keys (10). The tab currently selected is highlighted in green. Under the first tab displaying the “Camera icon” you can adjust the settings directly relevant to the functioning of the camera. These tabs will hereinafter be referred to as “camera settings”. The second tab showing the “Hammer and Wrench icon” allows you to adjust all the settings. This will hereinafter be referred to as “General Settings”. This mode allows you to program the camera and undertake all display settings such as date, time, temperature, etc. that are supposed to be displayed later on the pictures or video clips. Use the Up/Down arrow keys (10) to access the tabs for the individual menu options. To change the tabs once a menu option has been selected (highlighted), move the left arrow key (10) once. The camera will return to the previous selection menu. Only that option is now lit green. Now you can use the Right/ Left arrow key (10) to move between the tabs “Camera Settings” and “General Settings” in order to select the desired menu options with the Up/Down arrow keys (10).
2. Operation modeSwitch your DTC 700 camera to the “operation mode” (ON = operation mode, main on/ off switch (11) upper position). In this mode, your DTC 700 camera automatically accepts the new settings you previously programmed in the “SETUP” mode.
Menu functions and settings
Manual ControlsThis setting offers you the possibility of using your DTC 700 like a normal digital camera. As in any other normal digital camera, you can view the digital stills and video clips on the display monitor and accept them at the same time. Once your DTC 700 is in the “SETUP” mode (see the section on Setup and Operation mode), it is immediately in the “Manual Controls” mode. You can use the right (photo) and left (video) arrow keys (10) to move between the “photo” and “video” mode. You can change the image resolution of the picture by repe
Note: The blue activating LED (4) will blink for a few seconds before the camera is ready for use.
30
atedly activating the respective arrow key. Pressing the menu key (8) again will allow you to get to the “Manual Controls” mode.
CameraThe LCD monitor (6) displays the following information: The camera icon and the current screen resolution appear at the top left edge and the top right edge displays the image capacity (0000/0000). The battery level is shown at the bottom left edge. By pressing the OK button (9), you can manually take a picture in the camera mode.
VideoTo switch to the “video mode”, press the left arrow key (10). The LCD monitor (6) displays the following features: The video icon and the current screen resolution appear at the top left edge and the top right edge displays the remainder of the recording time in [00:00:00]. The lower left edge displays the battery level. By pressing the OK button (9), you can start recording in the “video mode”. By pressing the OK button (9) again, you stop recording.
Day and night modeIn the “Manual Control” mode, you can use the Upkey (10) to activatethe day or night mode. The default setting on your DTC 700 is the “day mode” (colour mode). Photos or video clips are displayed in colour. To switch to the “NightIR mode”, press the top arrow key (10). The setting changes from colour mode during the day to the Night IR mode and the image displayed on the LCD monitor (6) changes from colour image to a blackwhite image.
Playing back picture/videoIn the “Manual Control” mode, press the lower arrow key (10) or select “Playback Picture/ Video” in the selection menu for the “Camera mode”, which is located in the “Main Menu” under the first tab “Camera Settings”. The pictures are displayed on the LCD monitor (6). The picture format (photo/
video) is displayed at the bottom left edge of the image as the camera icon. In addition, the top right edge of the LCD monitor (6) shows the number of photos and video recordings. Press the left or right arrow key (10) to viewthe pictures and video clips in the chronological or reverse order. Press the menu button (8) to access “Main Menu”. By repeating that action, you will be able to return to “Replay photo/video”. You can return to the “Manual Controls” mode by again pressing the lower arrow key (10).
Delete the picture or video clipsPress the lower arrow key (10) in the “Manual Controls” mode or select “Playback photo/ video” option in the “Camera mode”, which is located under the “Camera settings” tab in the “Main Menu”.
Select the picture to be deleted.By pressing the upper arrow key (10), you access the lower menu option “File Management”. You can use the Up and Down keys (10)to choose between “1 Delete the picture” and “Delete all”. Confirm with OK (9). Select “Yes” and confirm with OK (9) to delete the picture (pictures) or the video (videos). If you select “No” and confirm, you will brought back to the submenu “File Management”. Using the left arrow key (10) you can return to the previous menu selection “File Management” or “Manual Control”. By pressing the menu button (8), you can directly return to replay photo/video option in the menu from anywhere without deleting the file.
Replaying video clipsPress the lower arrow key (10) in the “Manual Control” mode or select “Playback Photo/ Video” in the “Camera mode” menu option that is located in the “Main Menu” under the first tab “Camera Settings”. In case of video files, you can see a “camera icon” at the lower left edge of the LCD monitor (6). Press the OK button (9) to play the video. Pressing the Up arrow key (10) to stop the video. The image freezes. You can restart the video by again pressing the Up arrow key (10). In the playback mode, the video can be forwarded using the right arrow key (10) or rewound with the left arrow key (10). The playback speed can be adjusted by pressing the arrow keys several times. By pressing the Up arrow key (10), you
Note: In the operation mode (main switch (11) upper position), the camera uses the twilight sensor to automatically select the appropriate mode corresponding to the time of the day.
31
can continue to play the video clip at regular speed. By pressing the menu buttons (8) while playing the video clip, you can return to “Playback Picture/ Video”. By pressing the menu buttons (8) in the “Playback Picture/Video” mode, you can return to the main menu selection, by repeating the action, you return to “Playback Picture/ Video”. You can access the “Manual Control” mode by again pressing the lower arrow key (10).
Main Menu
Camera settings
Camera modeYou can set your DTC 700 to record either still images or video clips. Go to the “Main Menu” by pressing the menu button (8) and from the menu options select the “Camera mode”. It is located under the first tab “Camera Settings”. You can access the submenu options by pressing the OK button (9) or the right arrow key (10). Here you can select the desired recording format (Photo/Video) using the Up/Down arrow keys (10). You can save the setting by continuing to press the OK button. To return to the previous menu options without changing the settings, press the left arrow key (10).
Image resolutionGo to “Main Menu” by pressing the menu button (8) and select the menu option “Image Resolution”. This is located under the first tab “Camera Settings”. You can access the submenu by pressing the OK button (9) or the right arrow key (10). This setting allows you toset the image resolution at 6 MP, 5 MP, 4 MP, 3 MP by using the Up/Down arrow keys (10). Press the OK button (9), to save the setting and to return to the menu option “Camera Setting”. Press the left arrow key (10) to return to the previous set of menu options without changing the settings.
Multiple frames per triggerUsing this function, the camera can capture up to five frames per activation in quick succession. Go to the “Main Menu” by pressing the menu buttons (8) and select the menu option “Multiple frames”. This is located under the first tab “Camera Settings”. You can access the submenu options by pressing the OK button (9) or the right arrow key (10). The submenu offers the option of selecting the desired number of frames to be captured per trigger by pressing the Up/Down arrow keys (10).Press the OK button (9) to save the settings and to return to the menu option “Camera Settings”. Press the left arrow key (10) to return to the previous menu selection without changing the settings.
Video resolutionGo to “Main Menu” by pressing the menu button (8) and select the menu option “Video Resolution”. This is located under the first tab “Camera Settings”. You can access the submenu by pressing the OK button (9) or the right arrow key (10). You can choose between video resolution in HD (1280x720) and VGA (640x480) using the On/Off arrow keys (10). Press the OK button (9) to save the setting and to return to the menu selection “Camera Settings”. By pressing the left arrow key (10), you can return to the previous menu selection without changing the settings.
Note: Alternately, you can select the camera mode in the “Manual Control” mode by pressing the right (Photo) or left (Video) arrow key (10).
Note: Alternately, you can choose video resolution by continuously pressing the left arrow key (10) in the “Manual Control” mode.
Note: Alternately, you can change the image resolution of the pictures in the “Manual Control” mode by continuing to press the right arrow key (10).
Note: For resolutions measuring 5 MP, 3MP the picture format is 4:3; for resolutions 6MP, 4 MP the picture format is 16:9.
32
Video lengthGo to the “Main Menu” by pressing the menu button (8) and select the menu option “Video Length”. This is located under the first tab “Camera Settings”. You can access the submenu by pressing the OK button (9) or the right arrow key (10). Enter the desired video length (530s.) using the Up/Down arrow key (10) and press the OK button (9) to save the settings. The camera will automatically return to the menu option “Camera Settings”. You can return to the previous menu optionwithout changing the settings by pressing the left arrow key (10).
Video soundThis function allows you to decide whether to record the sound when shooting a video or not. Use the Menu button (8) to select the Menu item „Video sound“ from the Main Menu. This is under the first tab „Camera settings“. Press the OK button (9) or the right arrow key (10) to access the Submenu. With the Up/Down arrow keys (10) you can now select whether to record the sound or not. Select „On“ for video shooting with sound or „Off“ for video shooting without sound. Press the OK button (9) to save the setting; this returns you to the „Camera settings“ menu item. Use the left arrow key (10) to return to the higher menu without changing the settings.
Shutter lagThis function allows you to specify the length of the time between two pictures when your camera does not respond to movement. The options for programming the sequential shooting intervals extend from 1 second to 60 minutes.Go to “Main Menu” by pressing the menu button (8) and select the menu option “Shutter Lag”. This can be found under the tab “Camera Settings”. You can return to the submenu by pressing the OK button (9) or the right arrow key (10). In the submenu, choose the desired time interval using the On/ Off arrow keys (10). Press the OK button (9) to save the settingand to return to the menu option “Camera Settings”. By pressing the left arrow key (10), you can return to the previous menu selection without changing the settings.
Trigger modeThis function allows you to decide the trigger speed for the DTC 700. When movement is detected, the camera triggers in less than a second in battery operation. For this it has to ‚wake up‘ from the standby mode. If you are using the camera with an external power source, you can set the DTC 700 so that standby mode is never selected. This means that the camera does not need to ‚wake up‘ when there is movement and triggers instantaneously. Use the Menu button (8) to access the Main Menu and select „Trigger mode“. This is under the first „Camera settings“ tab. Press the OK button (9) or the right arrow key (10) to access the Submenu. In the Submenu you can set the required trigger mode with the Up/Down arrow keys (10). Select „Normal“ for battery operation (< 1 sec.) and „Power“ for operating with an external power source (instantaneous). Press the OK button (9) to save the setting and this will return you to the „Camera settings“ menu item. Use the left arrow key (10) to return to the higher menu without changing the settings.
IlluminationYour DTC 700 cannot access external illumination; please always select “Internal”. Should you nevertheless select “External”, the flash will remain deactivated even in the dark and you will get only black pictures at night.
PIR [Passive Infrared] Sensor: Setting the responsivity of the IR sensorYour MINOX DTC 700 allows you the possibility of adjusting the responsivity of the IR sensor at three levels – low, normal, and high. This function is effective, for instance, for reducing the possibility of an inadvertent activation of the camera through movements of nonrelevant objects, such as the branches and grass. In order to set the responsivity of the IR sensor to your DRC 700, please go to the “Main Menu” by pressing menu button (8)
Note: Please use the ‚Power‘ Trigger mode only when the camera is connected by a mains adaptor to the power supply system. In battery operation this setting will exhaust the batteries in a very short time.

33
and select the menu option “PIR sensor”. This is located under “Camera Settings”. You can access the submenu by pressing the OK button (9) or the right arrow key (10). Here you can choose between the “low”, “normal”, and “high” by pressing the Up/Down arrow keys (10). To save the settings press the OK button (9) and you will return to the menu option “Camera Settings”. You can return to the previous menu selection without changing the settings by pressing the left arrow key (10).
Power-on timeThis setting allows you to program your DTC 700 to enable it to switch on and off at intervals desired by you. During these time intervals, the camera takes pictures only if the movement sensor is activated through movement. Go to “Main Menu” by pressing the menu button (8) and select the menu option “Poweron time”. This is located under “Camera Settings”. Press the OK button (9) or the right arrow key (10) to access the submenu.As the submenu gradually opens, you can choose “deactivate” or “activate” using the Up/Down arrow keys. Confirm your choice with OK (9). Select “activate” to set the switchon and switchoff time with the Up/Down arrow keys (10) and press OK to confirm. Such a window requires individual settings to be undertaken using the Up/Down arrow keys (10). To continue to the next step, press the
left or right arrow key (10). Press the OK button (9) to save the settings. The camera will automatically return to the Start Menu. Pressing the Menu button (8) will have the same effect as saving by pressing the OK button (9). Even here, the last saved setting will be accepted and you will return to the Start Menu “Activate”, “Deactivate”. You can leave the submenu option “Activate” without changing the settings by using the left arrow key (10). When you select “Deactivate” and confirm using the OK button (9) your camera remains active and you will be returned to the main menu.
Time lapseThis setting allows you to take pictures at set periods at predetermined intervals without having to activate the movement sensor.Go to the “Main Menu” by pressing menu button (8) and select the menu option “Time lapse”. This is located under “Camera Settings”. You can access the submenu by pressing the OK button (9) or the right arrow key (10). As the submenu opens, select between “activate” and “deactivate” using the Up/Down arrow keys (10). Confirm your selection with OK (9). If you select “activate” you have the possibility of choosing “Switchon time”, “Switchoff time“, “Delayed interval” or „Video Output“. Confirm your selection with OK (9). The switch on and off time can be programmed using the Up/Down arrow keys (10) and confirmed with OK (9). To continue, use the left or right arrow key (10). In order to save the setting, press the OK button (9). The camera will automatically be returned to the Start Menu. Press the menu button (8) and you can have the same effect as saving with OK (9). Even here, the last saved setting will apply and you will be returned to the Start menu. Using the menu option “Delayed interval” under the option “Activate”, you can specify the time period between the pictures. This period can range between 10 seconds and 12 hours. By pressing the OK button (9), the setting will be saved and the camera will return to the previous menu selection by pressing the left arrow key (10) without changing the settings. The timelapse function remains inactive if you select “Deactivate” and confirm that selection with OK (9). The DTC 700 uses the „Video output“ function to create a video with timelapse shots. In the „Timelapse“ menu
Note: The detection range of the IR sensor depends on external factors, such as the temperature in the camera environment. For rough orientation to attain optimal setting, we recommend the following adjustments for the IR sensor:
High (high responsivity):generally in summer time or when the ambient air temperature is close to the body temperature of the detected object.
Normal (midlevel responsivity):generally at average spring or fall temperatures
Low (lowlevel responsivity):generally during winter or at average winter temperatures
34
select the menu item „Video output“. Confirm your selection with OK (9). In the Submenu, which opens, you can select „Deactivate“ or „Activate“ with the Up/Down arrow keys (10). Confirm your selection with OK (9). If you select „Activate“, you can set the speed of the video with the Up/Down arrow keys (10). The higher the FPS (frames per second) selected, the faster is the speed of the video. The setting is saved by pressing the OK button (9). Use the left arrow key to return to the higher menu without changing the settings. If you select „Deactivate“ and confirm with OK (9), the images will be not be produced as a video.Selecting „Deactivate“ in the „Time lapse“ menu and confirming this with OK (9) switches off the time lapse function.
General Settings
Language SelectionPlease proceed as follows to change the language settings on your DTC 700:
1. Bring the main switch (11) in the switch setting to the “SETUP” mode.
2. You will be immediately directed to “Manual Control” of the camera,
3. Now press the menu button (8). You will get to the “Main Menu” of the camera.
4. Then press the arrow key to the right (10) to change over to the “General Settings”
5. Now press the arrow key (10) pointing downwards.
6. You are now in the highlighted menu option “Language”.
7. Press the OK button (9).8. Using the Up and Down arrow keys (10), choo
se the language (highlighted) of your choice9. Press the OK button (9).
10. The camera will now have saved the language you select and you will again be led to the “Main Menu”. You will return to the previous menu selection by pressing the left arrow key (10) without affecting the settings.
Time StampThis setting allows you to archive and display details like date, time, and temperature as “time stamp”. Go to the “Main Menu”by pressing the menu button (8) and select the menu option “time stamp”. It is located under the second tab “General Settings”. You can access the submenu by pressing the OK button (9) or the right arrow key (10), Under this menu option you can choose between “On” (Display time stamp) or “Off” (Do not display the time stamp). Press the OK button (9) to save the setting and return to the menu option “General Settings”. You can access the previous menu option by pressing the left arrow key (10) without changing the settings.
Date format / Time(Menu option “Settings”)This function allows you to set up the display format for date and time. Go to “Main Menu” by pressing the menu button (8) and select the menu option “Settings”. It is located under the second tab “General Settings”. You can access the submenu by pressing the OK button (9) or the right arrow key (10). You can program the settings for date, time, date and time format (12 or 24 hours) using the Up/Down arrow key (10). Use the left and right arrow key (10) to access the option you would like to activate. Press the OK button (9) to save the settingand you will return to the menu option “General Settings”. Press the menu button (8) to have the same effect as saving with OK (9). Even here, the settings last saved will be accepted and you will be returned to the menu option “General Settings”. Note: Activate the moon phase calendar by entering precise information. The image of the moon phase will appear on every picture or video clip.
Note: DTC 700 will continue to respond to movement if the time lapse is activated.
Note: When the „Video output“ option is activated, all the individual images will continue to be saved to the SD card.
35
Temperature UnitThis function allows you to set either Fahrenheit or Celsius as the unit of temperature. Go to the “Main Menu” by pressing the menu button (8) and select the menu option Temperature Unit”. It is located under the second tab “General Settings”. You can access the submenu by pressing the OK button (9) or the right arrow key (10). Press the Up/Down arrow key (10) in the submenu to select either the Celsius or Fahrenheit option. Press the OK button (9) to save the settings to return to the menu option “General Settings”.You can return to the previous menu option without changing the settings by pressing the left arrow key (10).
Power sourceYour DTC 700 trail camera is a high precision device of premium technical quality. It is strongly recommended that you use premium quality alkaline, lithium or NiMH batteries. In order to select the battery type, go to the “Main Menu” by pressing the menu button (8) and select the menu option “Power source”. This is located under the second tab “General settings”. You can access the submenu by pressing the OK button (9) or the right arrow key (10). Now select your battery type by choosing between lithium, alkaline and NiMH batteries by pressing the Up/Down arrow key (10). In addition, you can select an external power source. For that, select 6V.
Formatting the memory cardFormatting the memory card will delete all data on the memory card and will prepare the memory card for use in the camera. It is recommended that you format the memory card before each use. Go to the “Main Menu” by pressing the menu button (8) and select the option “Format SD card”. This is located under the second tab “General Settings”. You can access the submenu by pressing the OK
button (9) or the right arrow key (10). Select “Yes” if you would like to format the SD card or “No” and the memory card will not be formatted. Press the OK button (9) to save the settings. The camera will automatically revert to the Start Menu. By pressing the left arrow key (10), you will be returned to the previous menu option and no formatting will be undertaken.
PasswordThis function allows you to enter a 4digit number combination in order to prevent the theft of your DTC 700 camera. You will not be able to access the “SETUP” option (Main Switch (11) centre) for the camera without entering the number combination. Go to the “Main Menu” by pressing the menu button (8) and select “Password”. This is located under the second tab “General Settings”. You can access the submenu by pressing the OK button (9) or the right arrow key (10). You can choose a number combination in the sub menu after selecting “Enter password”. For that, confirm this menu option with OK (9).
Entering the passwordEnter the desired number combination (09) in each field using the Up/Down arrow keys, and using the right/left arrow keys you can control the individual fields of the number combination. Once you enter the entire combination, press the OK button (9) to save. Pressing the menu button (8) has the same effect as saving with OK (9). Even here, the password is accepted and you return to the menu option “General Settings”.
Deactivating the passwordSelect the menu option “Password” in the “Main Menu”, which you can retrieve by pressing the menu button (8). This is located under the second tab “General Settings”. You can access the submenu by pressing the OK button (9) or the right arrow key (10). You can delete your number combination under “Deactivate” in the submenu. Use the Up/Down arrow keys (10) to navigate in the submenu. Press OK (9) to delete your number combination. You can return to the previous menu selection by pressing the left arrow key (10) without changing the password.
Note: Choose alkaline if using lithium batteries. Press the OK button (9) to save the settings. The camera will automatically return to the Start menu. You will return to the previous menu without any changes to the settings by pressing the left arrow key (10).
36
Default factory settingWith this, you can restore your DTC 700 settings to factory settings. Go to the “Main Menu” by pressing the menu button (8) and select the menu option “Default Settings”. This is located under the second tab “General Settings”. Press the OK button (9) or the right arrow button (10) to access the submenu. You can select “Yes” or “No” using the Up/Down arrow keys (10) and confirm with OK (9). Select “No” to retain the existing settings and the camera will return to the previous menu selection. If you choose “Yes”, your DTC 700 shall be restored to the factory settings and revert to the second tab “General Settings” in the “Main Menu”.
Camera dataGo to the “Main Menu” by pressing the menu button (8) and select the menu option “Camera info”. This is located under the second tab “General Settings”. You can access the submenu by pressing the OK button (9) or the right arrow key (10). In the submenu, you can use the Up/Down arrow key (10) and select from the following data stored in your camera; Saved files, memory space, firmware version.
Saved filesGo to the submenu on the menu option “Saved files” and press the OK button (9) or the right arrow key (10). After that, the actual number of photo and video files will be displayed. Confirm using the OK button (9) or the left arrow key (10) to return to the Start Menu.
Memory spaceGo to the menu option “Memory” in the submenu and press the OK button (9) or the right arrow key (10). Subsequently, “Used memory space” and “free memory space” will be indicated. Press the OK button (9) or the left arrow key (10) to confirm and return to the Start menu.
Firmware VersionGo to the menu option “Firmware Version” in the submenu and press the OK button (9) or the right arrow key (10). You will then be shown the current Firmware Version. Confirm with OK (9) or using the left arrow key (10) to return to the Start menu.
Software updatesIf an update is available for your DTC 700, please proceed as follows: Make sure your DTC 700 is switched off (“OFF” function: Main Switch (11), lower position). Copy all the files needed for updating directly onto a formatted SD card. Insert the SD card into your DTC 700 as 33 described in the section “Using the memory card”. Bring your camera into the “SETUP” mode (Main Switch (11), centre). Go to the Main Menu by pressing the menu button (8) and select the menu option “Updates”. This is located under the tab “General Settings”. Press the OK button (9) to access the submenu. Using the Up/Down arrow keys, you can select “Yes” or “No” and confirm with OK. Select “No” to retain the existing software version and the camera will return to the previous menu selection. If you select “Yes”, your DTC 700 will begin installing the updates. The update installation is completed once your camera screen turns black. Please switch your DTC 700 now to “OFF” function: Main Switch, lower position. When you switch on the camera the next time in the “SETUP” mode, Main Switch (11), centre, the new software is ready for use. Press the left arrow key (10) to return to the previous menu without installing the updates.
Note: Choose alkaline if using lithium batteries. Press the OK button (9) to save the settings. The camera will automatically return to the Start menu. You will return to the previous menu without any changes to the settings by pressing the left arrow key (10).
37
Connecting the camerato a Computer
There are two ways of transferring the data toyour computer: either you can take out the SDcard and read it on the computer or you canconnect the DTC 700 to your computer usinga USB cable included in the package.
Connect using the USB cableAlways ensure that the camera is switched off before you connect it to your computer. Connect your camera to the computer using the included USB cable via the USB cable slot (13). Switch on the camera. The camera will be recognized as a removable medium, pictures or video clips can be directly viewed or transferred to the PC.
Transferring pictures and videos via SD cardAlways ensure that the camera is switched off before the SD card is removed from the camera slot (7), else the memory could be damaged. Take the memory card from the slot (7) in the camera and insert it in the memory card reader connected to your computer. Some computers also have an internal slot for SD cards. In such a case, the SD card can be directly connected to your computer. The pictures or video clips can now begin to be transferred to the computer.
MPEG-4 Visual Patent Portfolio License
This MINOX DTC 700 is licensed under the MPEG4 Visual Patent Portfolio License for personal and noncommercial purposes to:1. encode video in compliance with the MPEG4
standard and/or.2. decode MPEG4 video that was encoded by a
consumer engaged in a personal and noncommercial activity and/or was obtained from a video provider licensed to provide MPEG4 video. For other purposes, no license is granted or implied for the MPEG4 standard.
Further information can be obtained from MPEG LA, LLC on http://www.mpegla.com
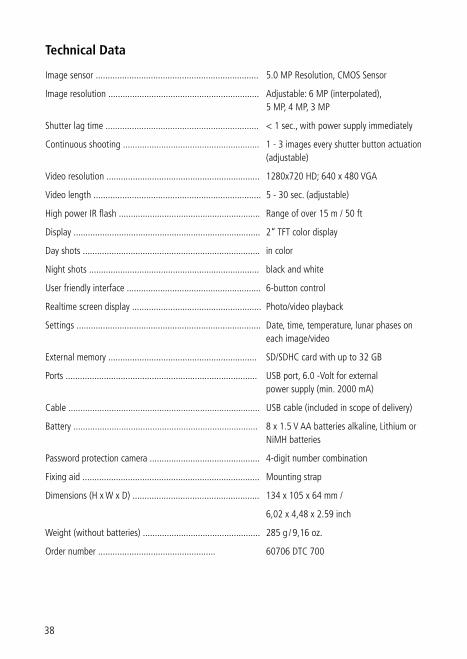
38
Technical Data
Image sensor .................................................................... 5.0 MP Resolution, CMOS Sensor
Image resolution ............................................................... Adjustable: 6 MP (interpolated), 5 MP, 4 MP, 3 MP
Shutter lag time ................................................................ < 1 sec., with power supply immediately
Continuous shooting ......................................................... 1 3 images every shutter button actuation (adjustable)
Video resolution ................................................................ 1280x720 HD; 640 x 480 VGA
Video length ...................................................................... 5 30 sec. (adjustable)
High power IR flash ........................................................... Range of over 15 m / 50 ft
Display .............................................................................. 2“ TFT color display
Day shots .......................................................................... in color
Night shots ....................................................................... black and white
User friendly interface ........................................................ 6button control
Realtime screen display ...................................................... Photo/video playback
Settings ............................................................................. Date, time, temperature, lunar phases on each image/video
External memory .............................................................. SD/SDHC card with up to 32 GB
Ports ................................................................................ USB port, 6.0 Volt for external power supply (min. 2000 mA)
Cable ................................................................................ USB cable (included in scope of delivery)
Battery ............................................................................. 8 x 1.5 V AA batteries alkaline, Lithium or NiMH batteries
Password protection camera .............................................. 4digit number combination
Fixing aid .......................................................................... Mounting strap
Dimensions (H x W x D) ..................................................... 134 x 105 x 64 mm /
6,02 x 4,48 x 2.59 inch
Weight (without batteries) ................................................. 285 g / 9,16 oz.
Order number ................................................. 60706 DTC 700
39
With the purchase of this MINOX DTC 700 you have acquired a product which has been manufactured and checked to special quality standards. The implied warranty of 2 years provided for this product commences on the date of purchase from an authorized dealer and is subject to the following conditions:
1) During the warranty period we shall deal with complaints based on faulty manufacture free of charge by repair, replacement of defective parts or replacement by an identical flawless product at our own discretion. Further claims, no matter what kind or what legal argument in connection with this warranty, shall not be accepted.
2) Claims under warranty are null and void if the defect has been caused by improper handling – which also can include the use of accessories made by other companies – if the product is serviced by unauthorized persons or workshops, or if the serial number has been obliterated.
Conditions of Warranty
3) Warranty claims can only be made by submission of the typewritten sales slip of an authorized dealer.
4) When submitting claims under warranty please return the MINOX camera together with the typewritten sales slip and a description of the complaint to the MINOX GmbH Customer Service or international MINOX Agency.
5) Tourists may, if required, make use of the Agency of the country in which they are traveling within the terms of the Warranty of MINOX GmbH by presenting the typewritten sales slip.
MINOX GmbHWalterZappStr. 4D35578 WetzlarTel.: +49 (0) 6441 / 9170Fax: +49 (0) 6441 / 917612EMail: [email protected]: www.minox.com

40
Introduction
Nous vous félicitons pour votre acquisition de la camera de gibier MINOX DTC 700. À l’instar des autres produits MINOX, cet appareil bénéficie de la qualité traditionnelle MINOX. Sous un volume des plus réduits, il allie la fonctionnalité à une qualité optique hors pair. Facile et rapide à utiliser, le MINOX DTC 700 est remarquablement adapté pour la photographie digitale et la vidéo et ce, dans le cadre des domaines d’applications qui sont les siens. Ce mode d’emploi vous aidera à exploiter optimalement l’éventail des performances que recèle votre MINOX DTC 700.
Remarque : · Nous nous sommes efforcés à tous les égards de rendre ce guide de l’utilisateur le plus
complet et le plus précis possible. Il est toutefois impossible de garantir qu’il n’y a pas eu d’erreurs ou d’omissions au cours du processus d’impression.
· Le fabricant décline toute responsabilitè pour les dommages résultant de tentatives illicites de mettre à jour le logiciel ainsi que pour les éventuelles pertes de données lors des rèparations.
· Veuillez sauvegarder vos données! Nous déclinons toute responsabilité pour les pertes de données dues à un appareil endommagé ou les dommages résultant de supports de données ou lecteurs illisibles.
MINOX DTC 700Deutsch Seite 2English page 22Français page 40
MINOX DTC 700
41
Dossier d’information sur l’utilisation des caméras de chasse
Grâce à leur capteur infrarouge, les caméras de chasse et de surveillance peuvent enregistrer de brusques changements dans les températures environnantes. Les signaux émis par un capteur infrarouge ultrasensible (PIR = Capteur infrarouge passif) activent la caméra et déclenchent la prise de vue photographique / vidéo. Pratiquement toutes les caméras de chasse ou de surveillance actuellement sur le marché fonctionnent suivant ce principe. Pour obtenir de bons résultats, il y a cependant quelques règles de base à observer.
1) Déclenchements par le gibier en été/hiverEn général, les caméras de chasse fonctionnent mieux en hiver, par basses températures. En été, il peut en effet arriver que la caméra de chasse ne se déclenche pas lorsque la température corporelle du gibier est proche de celle de l’environnement. C’est pour cette raison que, pendant la saison chaude, la sensibilité du capteur doit être programmée vers le haut afin qu’ainsi il puisse percevoir de minimes différences de températures.
2) Exposition au soleilIl peut arriver qu’une exposition directe au soleil provoque le déclenchement de la caméra et ce, en raison de la surchauffe au niveau de la fenêtre du capteur et du rayonnement infrarouge présent dans la lumière solaire. Il est donc fortement recommandé d’installer la caméra dans un endroit situé complètement à l’ombre.
3) Positionnement en contre-jourD’une façon générale, il faut veiller à éviter à la caméra un positionnement à contrejour. Dans cette perspective il faut aussi, bien sûr, tenir compte de la course du soleil ! D’autre part, lorsque l’arrièreplan (le ciel) est trop clair, il est souvent difficile de distinguer nettement le gibier.
4) Le capteur infrarougeLe capteur de mouvement IR (PIR) est sensible aux différences de températures dans un angle de 60 degrés environ. L’angle effectif d’appréhension de l’objectif est nettement inférieur puisqu’il est comparable à celui d’un grandangulaire de 35 mm (en photographie de petit format). L’angle PIR est plus grand afin de pouvoir couvrir le mouvement du gibier et assurer que ce dernier se trouve bien au centre de l’image lors du déclenchement. Comme la temporisation dans le déclenchement des caméras de chasse actuellement sur le marché est de moins d’une seconde, il peut occasionnellement arriver que le gibier très mobile ne soit qu’en partie appréhendé, ou que celui plus lent provoque plusieurs déclenchements. Par ailleurs, il peut aussi arriver qu’un vent fort agite la végétation à proximité du senseur et provoque ainsi des prises de vues fautives. Dans un tel cas, il faut changer d’endroit ou éliminer la végétation gênante. Il se peut aussi que des oiseaux ou des souris attirés par les appâts provoquent des déclenchements répétés de la caméra. Si le modèle de la caméra de chasse utilisée n’est pas équipé d’un réglage de la sensibilité du capteur, il est conseillé d’augmenter la distance jusqu’aux appâts.
5) Utilisation de la carte-mémoireLes prises de vues sont enregistrées par la caméra sur une cartemémoire SD. Il est conseillé de se munir de plusieurs cartes SD afin de pouvoir en changer de temps en temps. Ainsi pourrezvous plus facilement évaluer les images présentées sur l’écran de votre ordinateur. Dans la mesure du possible, il est préférable d’utiliser des cartes SD de fabricants réputés permettant aussi l’enregistrement d’images vidéo. En fonction du mode d’utilisation de la carte et de l’ordinateur il peut arriver que des informations supplémentaires soient subrepticement enregistrées sur la carte.

42
L’utilisation de répertoires présents sur la carte SD installé dans un autre appareil peut éventuellement influer sur des vidéos ou des images déjà enregistrées sur la caméra de chasse DTC. Au cas par cas, particulièrement en mode vidéo, il peut arriver aussi que la caméra ne puisse procéder à l’enregistrement de certaines scènes. Pour éviter de tells problèmes, avant utilisation, il est conseillé de formater la carte SD sur votre ordinateur.
6) Rendement de la pileL’emploi de piles rechargeables NiMH est recommandé lors de l’usage régulier d’une caméra de chasse. Outre un avantage économique par rapport aux piles alcalines au manganèse courantes, ces accus présentent l’avantage de fournir encore du courant lors de températures extérieures inférieures à 0° Celsius. Pour assurer un fonctionnement optimal de la caméra, il est important que l’énergie des piles utilisées soit au même niveau de charge ! Beaucoup de fabricants annoncent une durée de vie des piles allant de 6 à 12 mois. Le plus souvent, ces données sont basées sur 5 prises de vues dans la journée et autant la nuit (avec flash infrarouge). Mais comme ce dernier est à l’origine de la consommation de courant la plus importante, de fréquents déclenchements photos / vidéos nocturnes risquent de provoquer un épuisement plus rapide des piles utilisées. Il est donc préférable de procéder à des prises de vues vidéo en courtes séquences (10 secondes).
7) SécuritéComme une caméra de chasse peut éveiller la convoitise d’autrui, il est conseillé de fixer votre MINOX DTC à un arbre, etc. et ce, à l’aide d’un câble en acier passé au travers des ouvertures et oeillets prévus dans ce but, avant de sécuriser le tout avec un cadenas. Faites par ailleurs usage de la fonction « mot de passe » qui vous permet de générer un code d’entrée composé de 4 chiffres. Sans composer ce dernier, il sera impossible d’utiliser votre caméra.
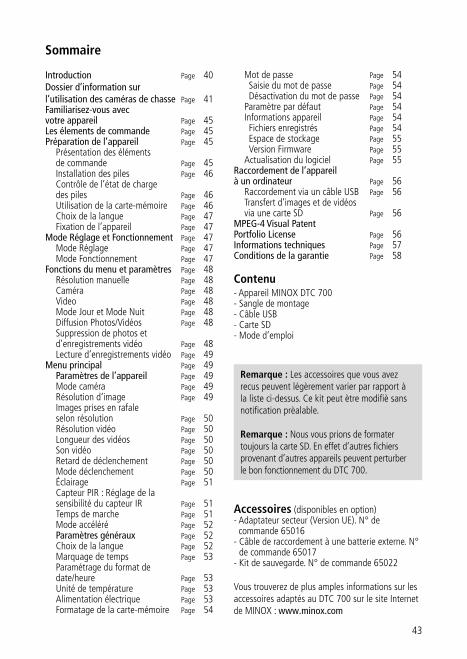
43
Sommaire
Introduction Page 40Dossier d’information sur l’utilisation des caméras de chasse Page 41Familiarisez-vous avec votre appareil Page 45Les élements de commande Page 45Préparation de l’appareil Page 45 Présentation des éléments de commande Page 45 Installation des piles Page 46 Contrôle de l’état de charge
des piles Page 46 Utilisation de la cartemémoire Page 46 Choix de la langue Page 47 Fixation de l’appareil Page 47Mode Réglage et Fonctionnement Page 47 Mode Réglage Page 47 Mode Fonctionnement Page 47Fonctions du menu et paramètres Page 48 Résolution manuelle Page 48 Caméra Page 48 Video Page 48 Mode Jour et Mode Nuit Page 48 Diffusion Photos/Vidéos Page 48 Suppression de photos et
d’enregistrements vidéo Page 48 Lecture d’enregistrements vidéo Page 49Menu principal Page 49 Paramètres de l’appareil Page 49 Mode caméra Page 49 Résolution d‘image Page 49 Images prises en rafale
selon résolution Page 50 Résolution vidéo Page 50 Longueur des vidéos Page 50 Son vidéo Page 50 Retard de déclenchement Page 50 Mode déclenchement Page 50 Éclairage Page 51 Capteur PIR : Réglage de la
sensibilité du capteur IR Page 51 Temps de marche Page 51 Mode accéléré Page 52 Paramètres généraux Page 52 Choix de la langue Page 52 Marquage de temps Page 53 Paramétrage du format de date/heure Page 53 Unité de température Page 53 Alimentation électrique Page 53 Formatage de la cartemémoire Page 54
Mot de passe Page 54 Saisie du mot de passe Page 54 Désactivation du mot de passe Page 54 Paramètre par défaut Page 54 Informations appareil Page 54 Fichiers enregistrés Page 54 Espace de stockage Page 55 Version Firmware Page 55 Actualisation du logiciel Page 55 Raccordement de l’appareil à un ordinateur Page 56 Raccordement via un câble USB Page 56 Transfert d’images et de vidéos
via une carte SD Page 56MPEG-4 Visual Patent Portfolio License Page 56 Informations techniques Page 57 Conditions de la garantie Page 58
Contenu Appareil MINOX DTC 700 Sangle de montage Câble USB Carte SD Mode d’emploi
Accessoires (disponibles en option) Adaptateur secteur (Version UE). N° de
commande 65016 Câble de raccordement à une batterie externe. N°
de commande 65017 Kit de sauvegarde. N° de commande 65022
Vous trouverez de plus amples informations sur les accessoires adaptés au DTC 700 sur le site Internet de MINOX : www.minox.com
Remarque : Les accessoires que vous avez recus peuvent légèrement varier par rapport à la liste cidessus. Ce kit peut ètre modifiè sans notification prèalable.
Remarque : Nous vous prions de formater toujours la carte SD. En effet d’autres fichiers provenant d’autres appareils peuvent perturber le bon fonctionnement du DTC 700.

44
MINOX DTC 700
1 15
5
17
18
10
11
14
12 136
15
2
3/4
16
7
89
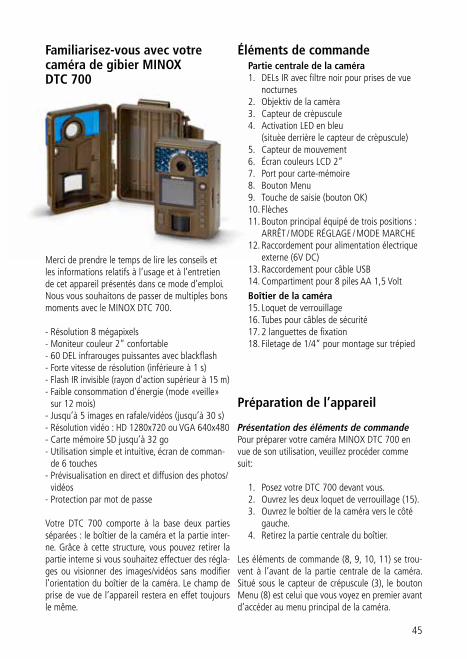
45
Familiarisez-vous avec votre caméra de gibier MINOX DTC 700
Merci de prendre le temps de lire les conseils et les informations relatifs à l’usage et à l’entretien de cet appareil présentés dans ce mode d’emploi. Nous vous souhaitons de passer de multiples bons moments avec le MINOX DTC 700.
Résolution 8 mégapixels Moniteur couleur 2“ confortable 60 DEL infrarouges puissantes avec blackflash Forte vitesse de résolution (inférieure à 1 s) Flash IR invisible (rayon d’action supérieur à 15 m) Faible consommation d’énergie (mode «veille»
sur 12 mois) Jusqu’à 5 images en rafale/vidéos (jusqu’à 30 s) Résolution vidéo : HD 1280x720 ou VGA 640x480 Carte mémoire SD jusqu’à 32 go Utilisation simple et intuitive, écran de comman
de 6 touches Prévisualisation en direct et diffusion des photos/
vidéos Protection par mot de passe
Votre DTC 700 comporte à la base deux parties séparées : le boîtier de la caméra et la partie interne. Grâce à cette structure, vous pouvez retirer la partie interne si vous souhaitez effectuer des réglages ou visionner des images/vidéos sans modifier l’orientation du boîtier de la caméra. Le champ de prise de vue de l’appareil restera en effet toujours le même.
Éléments de commande Partie centrale de la caméra 1. DELs IR avec filtre noir pour prises de vue
nocturnes 2. Objektiv de la camèra 3. Capteur de crèpuscule 4. Activation LED en bleu (situèe derrière le capteur de crèpuscule) 5. Capteur de mouvement 6. Écran couleurs LCD 2“ 7. Port pour cartemémoire 8. Bouton Menu 9. Touche de saisie (bouton OK) 10. Flèches 11. Bouton principal équipé de trois positions :
ARRÊT / MODE RÉGLAGE / MODE MARCHE 12. Raccordement pour alimentation électrique
externe (6V DC) 13. Raccordement pour câble USB 14. Compartiment pour 8 piles AA 1,5 Volt
Boîtier de la caméra 15. Loquet de verrouillage 16. Tubes pour câbles de sécurité 17. 2 languettes de fixation 18. Filetage de 1/4“ pour montage sur trépied
Préparation de l’appareil
Présentation des éléments de commandePour préparer votre caméra MINOX DTC 700 en vue de son utilisation, veuillez procéder comme suit:
1. Posez votre DTC 700 devant vous. 2. Ouvrez les deux loquet de verrouillage (15). 3. Ouvrez le boîtier de la caméra vers le côté
gauche. 4. Retirez la partie centrale du boîtier.
Les éléments de commande (8, 9, 10, 11) se trouvent à l’avant de la partie centrale de la caméra. Situé sous le capteur de crépuscule (3), le bouton Menu (8) est celui que vous voyez en premier avant d’accéder au menu principal de la caméra.
46
Le bouton OK (9) se trouve sous le bouton Menu (8) et sert à confirmer les paramètres choisis dans le menu. Les flèches (10) servent ensuite à naviguer dans le menu de la caméra. Le bouton principal (11) est équipé de trois positions et se situe à gauche, à côté du capteur de mouvement (5) :
1. À gauche = Fonction «OFF» (bouton principal (11) position en bas)
2. Au centre = Fonction «SETUP» (bouton principal (11) position milieu)
3. À droite = Fonction «ON» (bouton principal (11) position en haut)
La partie extérieure droite de la partie centrale de la caméra est équipé d’un port pour cartemémoire (7). Un écran LCD 2“ (6) se trouve au milieu de cette partie centrale. L’objectif de la caméra (2) se situe en haut de la partie centrale et est entouré des DELs IR (1) contenant un filtre noir destiné aux prises de vue nocturnes.
Tournez la partie centrale de la caméra pour avoir un aperçu du compartiment à piles (pour 8 piles AA 1,5 Volt). La partie inférieure de cette partie centrale est équipée de raccordements supplémentaires pour : une alimentation électrique externe (12) un câble USB (13) (afin de raccorder l’appareil
à un ordinateur) (voir «Raccordement de l’appareil à un ordinateur»).
Pour fermer la caméra, procédez de la manière suivante:
1. Réinsérez la partie centrale de la caméra dans le boîtier.
2. Posez votre DTC 700 devant vous. 3. Fermez le boîtier. 4. Fermez les loquet de verrouillage (15)
situées sur le boîtier.
Installation des pilesVotre caméra DTC 700 fonctionne avec des piles AA alcalines, lithium ou nickelmétalhybdride (NiMH). Pour les insérer, ouvrez le boîtier de caméra comme décrit cidessus et retirez la partie centrale. Inserez
8 piles AA 1,5 Volt selon les indications données dans le compartiment (14) (voir arrière de la partie centrale). Veuillez respecter le sens d’insertion/la polarité (+/).
Contrôle du niveau d’utilisation des pilesConnectez votre DTC 700 en «Mode Réglage» (Bouton principal (11) «Position milieu»). Le niveau de la batterie est affiché avec le symbole «Batterie» en bas à gauche du moniteur LCD (6).
Utilisation de la carte mémoireL’enregistrement d’images ou de vidéos nécessite l’utilisation d’une cartemémoire (carte SD/SDHC). Votre DTC 700 prend en charge les cartesmémoire allant jusqu’à 32 go.
Insertion de la carte-mémoireOuvrez le boîtier de l’appareil. Insérez une cartemémoire dans le port consacré (7). Veillez à ce que les contacts dorés soient visibles lorsque vous regardez l’appareil. Vérifiez que la carte SD n’est pas verrouillée; l’onglet de la carte SD ne doit pas être en position fermée («Lock»).
Mettez votre DTC 700 en «Mode Réglage» (bouton principal «Position centrale»). L’émission d’un signal sonore peut signifier que votre DTC ne contient aucune cartemémoire, qu’elle n’a pas été correctement utilisée ou qu’elle n’est pas compatible. Un signal rouge avec la mention «Aucune carte» apparaît alors sur le moniteur LCD. Vous pouvez
Remarque : L’alimentation électrique peut convenir à une tension de 6 V. Les piles sont montées quand l’appareil est raccordé à une source électrique externe. Il est donc impossible de charger les accumulateurs dans l’appareil et en mode panneau solaire. Pour ne pas endommager la caméra, ne jamais utiliser de source électrique de plus de 6V. La garantie de l’appareil ne couvre en aucun cas ce type de dommage.
Remarque : Pour que l’appareil fournisse des performances optimales, nous conseillons d’utiliser des piles de hautequalité. Vous pouvez rallonger la durée de vie des piles en réalisant des séquences vidéo plus courtes.
47
continuer à paramétrer votre appareil si vous n’entendez aucun signal sonore.
Choix de la langueLe DTC 700 est préréglé en sortie d’usine avec un menu en anglais, Veuillez suivre les instructions suivantes pour sélectionner la langue de votre choix :
1. Mettez le bouton principal (11) en position «SETUP» («Mode Réglage»).
2. Vous accédez directement à la «Résolution manuelle» de l’appareil.
3. Appuyez maintenant une fois sur le bouton Menu (8). Vous arrivez au «Menu principal» de l’appareil.
4. Pour passer à un autre onglet dans le «Menu principal», appuyez maintenant une fois sur la flèche allant vers la droite (10).
5. Appuyez maintenant une fois sur la flèche allant vers le bas (10).
6. Vous êtes maintenant dans l’option de menu «Language» situé dessous.
7. Appuyez sur OK (9).8. Sur la flèche Bas (10), sélectionnez «French»
(dessous).9. Appuyez OK (9).10. L’appareil repasse au «Menu principal». La lan
gue est maintenant paramétrée sur «Français».
Fixation de l’appareil1. Sangle de montage: Deux languettes de fixation
(17) se trouvent au dos du boîtier extérieur de l’appareil (17). Ces languettes permettent d’attacher l’appareil et de tirer la sangle de montage (fournie avec l’appareil). Ces fermetures situées sur la sangle de montage servent à fixer l’appareil.
2. Trépied: L’arrière du boîtier extérieur de l’appareil comporte un trépied muni d’un filetage de 1/4“ (18). Ce filetage permet de fixer l’appareil sur le trépied.
Mode Réglage et Fonctionnement
Votre appareil est équipé de deux réglages de mode :
1. Mode RéglageMettez votre DTC 700 en «mode Réglage» (SETUP = mode Réglage, bouton principal (11) Position milieu). Vous arrivez directement à la «Résolution manuelle» de l’appareil. Appuyez maintenant sur le bouton Menu (8) pour arriver au menu principal de l’appareil. Le menu principal compte 2 onglets que vous pouvez consulter an appuyant sur la flèche droite ou gauche (10). L’onglet sélectionné est en surbrillance (vert). Sous le premier onglet marqué par un symbole de caméra, vous pouvez faire tous les paramétrages de l’appareil. Cet onglet cidessous est intitulé «Paramètres Appareil». Vous pouvez faire les autres paramétrages sous le deuxième onglet (marqué par un symbole représentant un marteau et une clé à molette). Cet onglet cidessous est intitulé «Paramètres généraux». Les modes Réglage et Fonctionnement vous permettent de programmer votre appareil et de paramétrer notamment l’affichage de la date, de l’heure, de la température qui devra figurer par la suite sur les images ou les enregistrements vidéo. Pour accéder aux différentes options du menu situées dans les onglets, utilisez les flèches Haut/Bas (10). Appuyez une fois sur la flèche gauche (10) pour changer d’onglet [quand une option de menu est sélectionnée (surbrillance)]. L’appareil repasse à l’ongletparent. Seul cet onglet est alors encore en surbrillance (vert). Vous pouvez maintenant passer des onglets «Paramètres Appareil» et «Paramètres généraux» en utilisant la flèche droite/gauche (10) et choisir l’option de menu souhaitée avec les flèches Haut/Bas (10).
2. Mode FonctionnementMettez votre DTC 700 en «Mode Fonctionnement » (ON = mode Fonctionnement, bouton principal (11)
Remarque : Formatez la carte SD sur un PC si elle a été utilisée pour enregistrer des données dans d’autres appareils. Ce formatage supprimera les anciennes données de la carte et lui permettra de fonctionner parfaitement. Vous pouvez formater votre carte SD dans votre DTC 700 si elle est seulement utilisée dans votre appareil. Après insertion, il est conseillé de vérifier le fonctionnement de la carte SD en enregistrant quelques photos.
48
position en haut). Avec ce mode, votre DTC 700 reprend automatiquement les tout derniers paramètres que vous avez mis en mémoire auparavant en «Mode Fonctionnement ».
Fonctions du menu et paramètres
Résolution manuelleCe paramètre vous permet d’utiliser votre DTC 700 comme une caméra numérique normale. Comme sur n’importe quelle caméra, vous pouvez regarder photos et vidéos en utilisant l’aperçu disponible sur le moniteur et enregistrer. Le DTC 700 se trouve directement en «Résolution manuelle» une fois que vous êtes passé en «Mode Réglage» (voir section «Mode Réglage et Fonctionnement»). Vous pouvez passer entre les modes photos et vidéos en appuyant sur la flèche gauche (vidéo) et droite (photo). (10). En appuyant plusieurs fois sur la flèche correspondante, vous pouvez changer la résolution d’image de la photo ou de la vidéo. En appuyant sur la touche Menu (8), vous arrivez au «Menu principal». Appuyez à nouveau sur cette touche pour revenir en «Résolution manuelle».
CaméraLe moniteur LCD (6) affiche les éléments suivants : Le symbole de la caméra et la résolution en cours apparaissent en haut à gauche. La capacité de l’image [0000/0000] s’affiche elle en haut à droite et le niveau d’utilisation des piles, en bas à gauche. En appuyant sur le bouton OK (9), vous pouvez enregistrer manuellement une photo en Mode Caméra.
VidéoAppuyez sur la flèche gauche (10) pour passer en «Mode Vidéo». Les informations suivantes s’affichent sur le moniteur LCD (6) : le symbole vidéo et la résolution en cours apparaissent en bas à gauche. La durée d’enregistrement restante s’affiche en bas à droite [00:00:00] et le niveau d’utilisation de
la batterie, en bas à gauche. Pour démarrer l’enregistrement d’une vidéo en «Mode Vidéo», appuyez sur le bouton OK (9). Appuyez une nouvelle fois sur le bouton OK (9) pour terminer l’enregistrement.
Mode Jour et Mode NuitEn «Résolution manuelle», vous pouvez activer le «Mode Jour» ou le «Mode Nuit» avec la touche Haut (10). Votre DTC 700 est préréglé en «Mode jour (Mode Couleur)». Les prises de photos et les enregistrements vidéo apparaîtront alors en couleur. Appuyez sur la flèche supérieure (10) pour passer au «Mode NuitIR». Le réglage passe alors du «Mode couleur Jour» au «Mode NuitIR» et l’image affichée sur le moniteur LCD (6) passe d’une image en couleur à une image en noir et blanc.
Diffusion Photos / VidéosEn «Résolution manuelle», appuyez sur la flèche inférieure (10) ou choisissez «Diffusion Photos/Vidéos» en «Mode Caméra » (option de menu) situé dans le «menu principal» (sous le premier onglet intitulé «Paramètres Appareil»). Les images s’affichent sur le moniteur LCD (6). Le format d’enregistrement (photo/vidéos) est affiché en bas à gauche de l’image avec un symbole d’appareil photo ou de caméra. Le nombre de photos et d’enregistrements vidéo est aussi indiqué en haut à droite du moniteur LCD (6). En appuyant sur la flèche gauche ou la flèche droite (10), vous pouvez consulter les images et les vidéos de manière chronologique (en avant et en arrière). Avec le bouton Menu (8), vous arrivez au «Menu principal». En refaisant cette procédure, vous retournez à l’option de menu «Diffusion Photos/Vidéos». Pour revenir en «Résolution manuelle», appuyez à nouveau sur la flèche inférieure (10).
Suppression de photos et d’enregistrements vidéoEn «Résolution manuelle», appuyez sur la flèche du bas (10) ou choisissez «Diffusion Photos/Vidéos»
Remarque : La LED d’activation bleue (4) clignote quelques secondes avant que l’appareil soit prêt à fonctionner.
Remarque : En Mode Fonctionnement (bouton principal (11) position en bas), le capteur de crépuscule de l’appareil (3) sélectionne automatiquement le mode corrigé adapté au moment de la journée.
49
dans l’onglet «Mode caméra » situé dans l’onglet «Paramètres Appareil» (menu principal).
Sélectionnez l’élément à effacerEn appuyant sur la flèche du haut (10), vous arrivez au sousmenu «Gestion Fichiers». Avec les touches Haut et Bas (10), vous pouvez alors choisir entre «Supprimer 1 image» et «Tout supprimer». Confirmez en appuyant sur OK (9). Sélectionner «Oui» et confirmez en appuyant sur OK (9) afin de supprimer l’image (s) ou la vidéo(s). En sélectionnant et en appuyant sur «Non», vous revenez au sousmenu «Gestion Fichiers». Avec la flèche gauche (10), vous revenez au menuparent «Gestion Fichiers» et à «Résolution manuelle ». En appuyant sur le bouton Menu (8), vous repassez directement au menu à «Diffusion Photos/Vidéos» sans supprimer de fichier.
Lecture d’enregistrements vidéoDans «Résolution manuelle», appuyez sur la flèche du bas (10) ou choisissez «Diffusion Photos/Vidéos» dans «Mode Caméra» (menu) situé dans le «Menu principal» sous le premier onglet «Paramètres Appareil». Pour les fichiers vidéo, un symbole de caméra est affiché en bas à gauche du moniteur LCD (6). Appuyez sur le bouton OK (9) pour lire la vidéo. Vous pouvez arrêter la vidéo en appuyant sur la flèche du haut (10). L’image se fige à ce momentlà. Pour redémarrer la vidéo, appuyez à nouveau sur la flèche du haut (10). Si une vidéo est en cours de diffusion, vous pouvez avancer la lecture avec la flèche de droite (10) ou revenir en arrière avec la flèche de gauche (10). La vitesse de retour en arrière ou d’avancement augmente en appuyant plusieurs fois sur les flèches. La diffusion se poursuit à la vitesse d’enregistrement lorsque vous appuyez sur la flèche du haut (10). Pour revenir à «Diffusion Photos/Vidéos», appuyez sur le bouton Menu (8) pendant la lecture. Vous retournerez au menu principal si vous appuyez sur le bouton Menu (8) dans «Diffusion Photos/Vidéos». Appuyez une seconde fois sur ce bouton pour revenir à «Diffusion Photos/Vidéos». Pour revenir en «Résolution manuelle», appuyez à nouveau sur la flèche du bas (10).
Menu principal
Paramètres de l’appareil
Mode caméraVous pouvez régler votre DTC 700 de manière à ce qu’il garde en mémoire uniquement des photos ou des vidéos. Sélectionnez «Mode caméra » dans «Menu principal» [accessible en appuyant sur le bouton du Menu (8)]. Cet élément se trouve sous le premier onglet intitulé «Paramètres Appareil». Vous arrivez ensuite au sousmenu en appuyant sur le bouton OK (9) ou sur la flèche de droite (10). Vous pouvez alors sélectionner avec les flèches Haut/Bas (10) le format d’enregistrement (photo/vidéo). Le réglage est mis en mémoire lors que vous appuyez une nouvelle fois sur le bouton OK (9). Appuyez sur la flèche gauche (10) pour revenir au menuparent sans modifier les paramètres.
Résolution d’imageSélectionnez «Résolution Image» dans «Menu principal» [accessible en appuyant sur le bouton du Menu (8)]. Cet élément se trouve sous le premier onglet intitulé «Paramètres Appareil». Vous arrivez au sousmenu en appuyant sur le bouton OK (9) ou sur la flèche droite (10). Dans ce paramètre, la résolution photo peut être réglée en 6 MP, 5 MP, 4 MP, 3 MP avec les flèches Haut/Bas. Le réglage est mis en mémoire lors que vous appuyez sur le bouton OK (9). Vous revenez ensuite à l’élément de menu intitulé «Paramètre Appareil». Appuyez sur la flèche gauche (10) pour revenir au menuparent sans modifier les paramètres.
Remarque : Vous pouvez sinon sélectionner le Mode caméra sous «Résolution manuelle» en appuyant sur la flèche droite (photo) ou gauche (vidéo) (10).
Remarque : Vous pouvez sinon modifier la résolution de l’image (photo) sous «Résolution manuelle» en appuyant plusieurs fois sur la flèche droite (10).Remarque : Le format d’image 4:3 convient aux résolutions 5 MP, 3 MP. Le format d’image 16:9 correspond lui aux résolutions 6 MP, 4 MP.
50
Images prises en rafale selon résolutionCette fonction permet d’enregistrer à chaque résolution jusqu’à cinq images prises en rafales. Sélectionnez «Images en rafale» dans «Menu principal» [accessible en appuyant sur le bouton Menu (8)]. Cette option de menu se trouve sous le premier onglet intitulé «Paramètres Appareil». En appuyant sur le bouton OK (9) ou sur la flèche droite (10), vous ar rivez au sousmenu où vous pouvez paramétrer le nombre que vous souhaitez d’images à prendre en rafale selon la résolution. Pour paramétrer, appuyez sur les flèches Haut/Bas (10). Le réglage est mis en mémoire lors que vous appuyez sur le bouton OK (9). Vous revenez ensuite à l’option de menu intitulé «Paramètre Appareil». Appuyez sur la flèche gauche (10) pour revenir au menuparent sans modifier les paramètres.
Résolution vidéoSélectionnez «Résolution vidéo» dans «Menu principal» [accessible en appuyant sur le bouton Menu (8)]. Cet élément se trouve sous le premier onglet intitulé «Paramètres Caméra». En appuyant sur le bouton OK (9) ou sur la flèche droite (10), vous arrivez au sousmenu où vous pouvez choisir entre la résolution vidéo en HD (1280x720) et VGA (640x480) avec les flèches Haut/Bas (10). En appuyant sur le bouton OK (9), le réglage est mis en mémoire et vous revenez à «Paramètres caméra». Appuyez sur la flèche gauche (10) pour revenir au menuparent sans modifier les paramètres.
Longueur des vidéosSélectionnez «Longueur vidéos» dans «Menu principal» [accessible en appuyant sur le bouton Menu (8)]. Cet élément se trouve sous le premier onglet intitulé «Paramètres caméra». En appuyant sur le bouton OK (9) ou la flèche droite (10), vous arrivez au sousmenu. Réglez la longueur de la vidéo souhaitée (530 sec.) avec les flèches Haut/Bas (10) et appuyez sur le bouton OK (9) pour mettre ces paramètres en mémoire. L’appareil revient ensuite automatiquement à «Paramètre Caméra». En appuyant sur la flèche gauche (10), vous revenez au
menuparent sans modifier les paramètres.
Son vidéoCette fonction permet de faire une vidéo avec ou sans son. Sélectionnez l’élément de menu «Son vidéo» dans «Menu principal» [accessible en appuyant sur le bouton Menu (8)]. Cet élément se trouve sous le premier onglet intitulé «Paramètres caméra». En appuyant sur le bouton OK (9) ou la flèche droite (10), vous arrivez au sousmenu. Vous pouvez alors choisir d’enregistrer le son ou non avec les flèches Haut/Bas (10). Sélectionnez «Marche» pour faire une vidéo sonore ou «Arrêt» pour filmer sans le son. Appuyez sur le bouton OK (9) pour mettre le paramètre en mémoire et revenez à l’élément de menu «Paramètre Caméra». En appuyant sur la flèche gauche (10), vous revenez au menuparent sans modifier les paramètres.
Retard de déclenchementCette fonction permet de définir la longueur entre deux enregistrements d’images mobiles. Les intervalles d’enregistrement possibles vont de 1 seconde à 60 minutes. Sélectionnez «Ret. Déclenchement» dans «Menu principal» [accessible en appuyant sur le bouton Menu (8)]. Cet élément se trouve sous le premier onglet intitulé «Paramètres Caméra». En appuyant sur le bouton OK (9) ou la flèche droite (10), vous arrivez au sousmenu. Dans ce sousmenu, vous pouvez paramétrer l’intervalle souhaité en appuyant sur la flèche Haut/Bas (10). Appuyez sur le bouton OK (9) pour mettre le paramètre en mémoire et revenir à «Paramètre Caméra». En appuyant sur la flèche gauche (10), vous revenez au menuparent sans modifier les paramètres.
Mode déclenchementCette fonction permet de définir la vitesse de déclenchement du DTC 700. Lorsqu’un mouvement est détecté, la caméra se déclenche en moins d’une seconde (en fonctionnement sur piles). L’appareil sort donc de son mode «veille». En cas d’alimentation via une source électrique externe, le DTC 700 peut être paramétré de sorte qu’il ne puisse pas passer en mode «veille». La caméra n’aura donc pas besoin d’être «réveillée» et se déclenchera immédiatement. Sélectionnez l’élément de menu «Mode déclenchement» dans «Menu principal» [accessible
Remarque : Vous pouvez sinon sélectionner la résolution vidéo dans «Résolution manuelle» en appuyant plusieurs fois sur la flèche gauche (10).
51
en appuyant sur le bouton Menu (8)]. Cet élément se trouve sous le premier onglet intitulé «Paramètres Caméra». En appuyant sur le bouton OK (9) ou la flèche droite (10), vous arrivez au sousmenu. Dans ce sousmenu, vous pouvez paramétrer le mode de déclenchement souhaité en appuyant sur la flèche Haut/Bas (10). Choisissez «Normal» pour faire fonctionner l’appareil sur piles (< 1 sec.) et «Électricité » pour une alimentation sur une source électrique externe (immédiat). Appuyez sur le bouton OK (9) pour mettre ce paramètre en mémoire. Vous accédez ensuite à «Paramètres Caméra». En appuyant sur la flèche gauche (10), vous revenez au menuparent sans modifier les paramètres.
ÉclairageVotre DTC 700 n’est pas équipé d’un éclairage externe. Veuillez toujours sélectionner «Intern.». En sélectionnant «Extern», vous désactiverez toutefois le flash même dans l’obscurité et aurez la nuit uniquement des images de couleur noire.
Capteur PIR : Réglage de la sensibilité du capteur IRVotre MINOX DTC 700 peut régler la sensibilité du capteur IR en trois niveaux (faible, normal et élevé). Cette fonction est utile pour réduire la résolution non souhaitée liée à des mouvements d’objets superflus (p. ex. des branches et des herbes). Pour régler la sensibilité du capteur IR de votre DTC 700, sélectionnez «Capteur PIR» dans «Menu principal» [accessible en appuyant sur le bouton Menu (8)]. Cet élément se trouve sous le premier onglet intitulé «Paramètres Caméra». Vous accédez au sousmenu en appuyant sur le bouton OK (9) ou sur la flèche droite (10). Vous pouvez choisir alors entre les niveaux «Faible», «Normal» et «Élevé» en appuyant sur la flèche Haut/Bas (10). Appuyez sur le bouton OK (9) pour mettre le paramètre en mémoire et revenir à «Paramètre Caméra». En appuyant sur la flèche gauche (10), vous revenez au menuparent sans modifier les paramètres.
Temps de marcheCe paramètre vous permet de programmer le DTC 700 de façon à ce qu’il s’allume et s’éteigne pendant un laps de temps défini. Durant cet intervalle de temps, la caméra réalise seulement des enregistrements si l’activité active le capteur de mouvement. Choisissez «Temps de marche» dans «Menu principal» [accessible en appuyant sur le bouton Menu (8)]. Cet élément se trouve sous le premier onglet intitulé «Paramètres Caméra». En appuyant sur le bouton OK (9) ou sur la flèche de droite (10), vous arrivez au sousmenu. Dans le sousmenu qui s’ouvre, vous pouvez alors sélectionner «Désactiver» et «Activer» avec les flèches Haut/Bas (10). Confirmez votre choix avec OK (9). Si vous avez choisi «Activer», vous pouvez définir le temps de marche et d‘arrêt avec les flèches Haut/Bas (10) et en appuyant sur OK pour confirmer (10). Les différents réglages sont effectués avec les flèches Haut/ Bas (10) dans la fenêtre qui s’ouvre. Pour parvenir au champ de modification, utilisez la flèche de gauche et de droite (10). Le réglage est mis en mémoire en appuyant sur le bouton OK (9). L’appareil repasse ensuite automatiquement au menu de sortie. Vous pouvez appuyer sur le bouton Menu (8), mais aussi sur OK lorsque vous mettez en mémoire (10). Le réglage maintenant effectué
Remarque : Veuillez utilisez le Mode déclenchement «Électricité » seulement si la caméra est connectée au secteur via un bloc d’alimentation. En fonctionnement sur batterie, ce paramétrage épuisera les piles très rapidement.
Remarque : Le rayon de détection du capteur IR dépend des influences extérieures, comme la température de l’endroit où se trouve l’appareil. Nous conseillons de régler le capteur IR de la manière suivante pour une orientation sommaire (réglage optimal) :
Élevé (forte sensibilité) : Généralement en été, à savoir quand la température ambiante est proche de la température de l’objet concerné.
Normal (sensibilité moyenne) : Généralement au printemps ou en automne, à savoir aux températures moyennes habituelles observées à ces périodes de l’année.
Faible (faible sensibilité) : Généralement en hiver, à savoir aux températures moyennes habituelles observées à cette période de l’année.
52
est aussi repris à cet endroit. Revenez au menu de sortie «Activer», «Désactiver». En appuyant sur la flèche gauche (10), vous revenez au sousmenu «Activer» sans modifier les paramètres. La caméra restera active si vous sélectionnez «Désactiver» et confirmez en appuyant sur OK (9). Vous reviendrez ensuite au menu principal.
Mode accéléréCe paramètre vous permet d’enregistrer des photos précises dans un laps de temps prédéfini, sans que vous ayez à activer le capteur de mouvement. Sélectionnez «Mode accéléré» dans «Menu principal» [accessible en appuyant sur le bouton du Menu (8)]. Cet élément se trouve sous le premier onglet intitulé «Paramètres Caméra». En appuyant sur le bouton OK (9) ou sur la flèche de droite (10), vous arrivez au sousmenu. Dans le sousmenu qui s’ouvre, vous pouvez alors sélectionner «Désactiver » et «Activer» avec les flèches Haut/Bas (10). Confirmez votre choix en appuyant sur OK (9). Après avoir sélectionné «Activer», vous avez la possibilité de choisir la «durée d’activation», la «durée de désactivation», «l’intervalle de retard» et la «sortie vidéo». Confirmez votre choix en appuyant sur OK (9). Vous pouvez définir l’heure de mise en marche et d’arrêt avec les flèches Haut/Bas (10) et en confirmant avec OK (9). Pour parvenir au champ de modification suivant, utilisez la flèche de gauche et de droite (10). Le réglage est mis en mémoire si vous appuyez sur le bouton OK (9). L’appareil repasse automatiquement au menu de sortie. Sous l’élément de menu «Intervalle de retard» dans le menu «Activer», vous pouvez définir l’intervalle de temps entre les enregistrements (entre 10 sec. et 12 heures). Le réglage est mis en mémoire si vous appuyez sur le bouton OK (9). L’appareil revient alors au menuparent. En appuyant sur la flèche gauche (10), vous revenez au menuparent sans modifier les paramètres. La fonction «Mode accéléré» est inactive si vous choisissez «Désactiver» et que vous confirmez en appuyant sur OK (9). En fonction «Sortie vidéo», le DTC 700 réalise une vidéo en mode accéléré. Choisissez dans le menu «Mode accéléré» l’élément «Sortie vidéo». Confirmez votre choix en appuyant sur OK (9). Dans le sousmenu qui s’ouvre, vous pouvez choisir entre «Désactiver » et «Activer» en utilisant les flèches
Haut/Bas (10). Confirmez votre choix en appuyant sur OK (9). Après avoir choisi «Activer», vous pouvez déterminer la vitesse de la vidéo avec les flèches Haut/Bas (10). La vitesse de la vidéo augmente avec les niveaux de FPS (Frames Per Second) choisis. Le réglage est mis en mémoire en appuyant sur OK (9). En appuyant sur la flèche de gauche (10), vous revenez au menuparent sans modifier les paramètres. Les images ne seront pas montées ensemble dans une vidéo si vous sélectionnez «Désactiver» et confirmez en appuyant sur OK (9).La fonction «Mode accéléré» est désactivée si vous choisissez «Désactiver» dans le menu «Mode accéléré» et confirmez en appuyant sur OK (9).
Paramètres généraux
Choix de la langueProcédez de la manière suivante pour modifier la langue utilisée sur votre DTC 700 :
1. Mettez le bouton principal (11) en position «SETUP» («Mode Réglage»).
2. Vous arrivez directement à la «Résolution manuelle» de l’appareil.
3. Appuyez une fois sur le bouton Menu (8). Vous arrivez ensuite au «Menu principal» de l’appareil.
4. Appuyez une fois sur la flèche orientée vers la droite (10) pour passer à l’onglet «Paramètres généraux».
5. Appuyez une fois sur la flèche orientée vers le bas (10).
6. Vous êtes maintenant dans l’option de sousmenu «Langue».
7. Appuyez sur le bouton OK (9).8. Sélectionnez la langue souhaitée (cidessous)
avec les flèches Haut et Bas (10).9. Appuyez sur le bouton OK (9).10. L’appareil a maintenant mis en mémoire la lan
Remarque : Le DTC 700 se déclenche aussi en cas de mouvement lorsque le mode accéléré est activé.
Remarque : Les différentes images seront toutes enregistrées sur la carte SD même si l’option «Sortie vidéo» est activée.
53
gue que vous avez sélectionnée. Vous revenez à ce momentlà au «Menu principal». En appuyant sur la flèche de gauche (10), vous revenez au menu parent sans modifier les paramètres.
Marquage de tempsCe paramètre vous permet de mémoriser et d’afficher à chaque enregistrement (photo/vidéo) des informations comme la date, l’heure et la température (sous forme de «Marquage de temps»). Sélectionnez «Marquage de temps» dans «Menu principal » [accessible en appuyant sur le bouton Menu (8)]. Cet élément se trouve sous le deuxième onglet intitulé «Paramètres généraux ». En appuyant sur le bouton OK (9) ou sur la flèche de droite (10), vous arrivez au sousmenu. Vous pouvez alors choisir entre «Marche» (afficher le marquage de temps) ou «Arrêt» (ne pas afficher le marquage de temps). Le réglage est mis en mémoire si vous appuyez sur le bouton OK (9). Vous repassez ensuite à «Paramètres généraux». En appuyant sur la flèche de gauche (10), vous revenez au.
Paramétrage du format de date/heure (Option de menu «Paramètre»)Cette fonction permet de paramétrer le format d’affichage de la date et de l’heure. Sélectionnez «Paramètre» dans «Menu principal » [accessible en appuyant sur le bouton Menu (8)]. Cet élément se trouve sous le deuxième onglet intitulé «Paramètres généraux ». Vous arrivez au sousmenu en appuyant sur le bouton OK (9) ou sur la flèche de droite (10). Avec les flèches Haut/ Bas (10), vous pouvez alors paramétrer la date, l’heure, le format de la date et le format de l’heure (format 12 ou 24 heures). Avec la flèche de gauche et de droite (10), vous pouvez gérer la position que vous souhaitez modifier. Le réglage est mis en mémoire si vous appuyez sur le bouton OK (9). Vous pouvez appuyer sur le bouton Menu (8), mais aussi sur OK lorsque vous mettez en mémoire (10). Le réglage maintenant effectué est aussi repris à cet endroit. Vous revenez ensuite à «Paramètres généraux».
Unité de températureCette fonction permet de paramétrer l’unité de température de votre choix (Fahrenheit ou Celsius). Sélectionnez «Unité de température » dans «Menu principal» [accessible en appuyant sur le bouton Menu (8)]. Cet élément se trouve sous le deuxième onglet intitulé «Paramètres généraux». Vous arrivez au sousmenu en appuyant sur le bouton OK (9) ou sur la flèche droite (10). Dans le sousmenu, vous pouvez choisir entre Fahrenheit et Celsius en appuyant sur les flèches Haut/ Bas (10). Le réglage est mis en mémoire si vous appuyez sur le bouton OK (9). Vous revenez ensuite à «Paramètres généraux». En appuyant sur la flèche de gauche (10), vous revenez au menuparent sans modifier les paramètres.
Alimentation électriqueVotre DTC 700 est un appareil de précision de hautequalité technique. Il est donc conseillé d’utiliser des piles alcalines, au lithium ou NiMH de hautequalité. Pour choisir le type de pile, sélectionnez «Alimentation électrique » dans «Menu principal» [accessible en appuyant sur le bouton Menu (8)]. Cet élément se trouve sous le deuxième onglet intitulé «Paramètres généraux». Vous arrivez au sousmenu en appuyant sur le bouton OK (9) ou sur la flèche droite (10). Sélectionnez maintenant votre type de pile (lithium, alcaline ou NiMH) en appuyant sur la flèche Haut/Bas (10). Vous pouvez aussi sélectionner une source d’alimentation externe. Choisissez alors une tension de 6V.
Le réglage est mis en mémoire si vous appuyez sur le bouton OK (9). L’appareil repasse alors automatiquement au menu de sortie. En appuyant sur la flèche de gauche (10), vous revenez au menuparent sans modifier les paramètres.
Remarque : Le calendrier lunaire est automatiquement activé si vous saisissez les données avec précision. L’affichage du calendrier lunaire est gardé sur chaque enregistrement vidéo ou en mode photo.
Remarque : Sélectionnez alcaline si vous utilisez des piles au lithium.
54
Formatage de la carte-mémoireLe formatage de la cartemémoire efface l’ensemble des fichiers se trouvant sur la cartemémoire. La cartemémoire pourra être aussi utilisée dans l’appareil. Il est conseillé de formater la cartemémoire avant n’importe quelle utilisation. Sélectionnez «Formater carte SD» dans «Menu principal» [accessible en appuyant sur le bouton Menu (8)]. Cet élément se trouve sous le deuxième onglet intitulé «Paramètres généraux». En appuyant sur le bouton OK (9) ou sur la flèche droite (10), vous arrivez au sousmenu. Sélectionnez maintenant «Oui» pour formater la cartemémoire ou «Non» si vous ne voulez pas la formater. Le réglage est mis en mémoire en appuyant sur le bouton OK (9). L’appareil repasse automatiquement au menu de sortie. En appuyant sur la flèche de gauche (10), vous revenez au menuparent sans faire de formatage.
Mot de passeCette fonction vous permet de saisir une combinaison de 4 chiffres. Avec ce mot de passe, votre DTC 700 ne pourra pas être utilisé à des fins abusives. Si vous ne saisissez pas de combinaison de chiffres, vous ne pourrez plus arrivez à «SETUP» (Bouton principal (11) Position Milieu). Sélectionnez «Mot de passe» dans «Menu principal» [accessible en appuyant sur le bouton Menu (8)]. Cet élément se trouve sous le deuxième onglet intitulé «Paramètres généraux». En appuyant sur le bouton OK (9) ou la flèche droite (10), vous arrivez au sousmenu. Dans ce sousmenu, vous pouvez définir une combinaison de chiffres sous «Saisir Mot de passe». Confirmez en appuyant sur OK dans cette option de menu (10).
Saisie du mot de passeSaisissez la combinaison de chiffres souhaitée (09) dans chaque champ en utilisant les flèches Haut/Bas (10). Avec les flèches gauche/droite (10), vous pouvez diriger les différents champs de la combinaison de chiffres. Si vous avez entièrement saisi vos informations, appuyez sur le bouton OK (9) pour enregistrer. Vous pouvez appuyer sur le bouton Menu (10), mais enregistrer en appuyant sur OK (9). Le mot de passe est également repris à cet endroit et vous revenez ensuite à «Paramètres généraux».
Désactivation du mot de passeSélectionnez «Mot de passe» dans «Menu principal» [accessible en appuyant sur le bouton Menu (8)]. Cet élément se trouve sous le deuxième onglet intitulé «Paramètres généraux». En appuyant sur le bouton OK (9) ou la flèche de droite (10), vous arrivez au sousmenu. Dans ce sousmenu, vous pouvez supprimer votre combinaison de chiffres sous «Désactiver». Naviguez ensuite avec les flèches Haut/Bas (10) pour «Désactiver». Appuyez sur le bouton OK (9) pour effacer votre combinaison de chiffres. En appuyant sur la flèche gauche (10) vous revenez au menuparent sans effacer votre mot de passe.
Paramètre par défautCe paramètre vous permet de remettre votre DTC 700 aux paramètres d’usine. Sélectionnez «Paramètre par défaut» dans «Menu principal» [accessible en appuyant sur le bouton Menu (8)]. Cet élément se trouve sous le deuxième onglet intitulé «Paramètres généraux». En appuyant sur le bouton OK (9) ou la flèche droite (10), vous arrivez au sousmenu. Avec les flèches Haut/Bas (10), vous pouvez choisir maintenant «Oui» ou «Non». Confirmez ensuite en appuyant sur OK (9). Si vous appuyez sur «Non», vous conserverez les paramètres actuels et l’appareil reviendra au menuparent. Si vous appuyez sur «Oui», votre DTC 700 repassera aux réglages d’usine et au deuxième onglet intitulé Paramètres généraux» du «Menu principal».
Informations appareilSélectionnez «Informations appareil» dans «Menu principal» [accessible en appuyant sur le bouton Menu (8)]. Cet élément se trouve sous le deuxième onglet intitulé «Paramètres généraux». Vous arrivez au sousmenu en appuyant sur le bouton OK (9) ou la flèche droite (10). Dans le sousmenu, vous pouvez utiliser les flèches Haut/Bas (10) pour sélectionner les informations suivantes : fichiers enregistrés, espace de stockage, version firmware.
Fichiers enregistrésAllez dans le sousmenu sur l’option de menu «Fichiers enregistrés». Appuyez sur le bouton OK (9) ou sur la flèche droite (10). Vous obtiendrez alors le nombre actuel de fichiers vidéo et photo.
55
Pour revenir au menu de sortie, appuyez sur OK (9) ou sur la flèche gauche (10).
Espace de stockageAllez dans le sousmenu sur l’option de me nu «Espace de stockage». Appuyez sur le bouton OK (9) ou sur la flèche droite (10). Vous obtiendrez alors des informations sur «l’espace occupé» (Espace occ.) et «l’espace libre» (Espace libre). Pour revenir au menu de sortie, appuyez sur OK (9) ou sur la flèche gauche (10).
Version FirmwareAllez dans le sousmenu et dans l’option de menu «Version Firmware». Appuyez sur le bouton OK (9) ou sur la flèche droite (10). Vous obtiendrez alors la version Firmware en cours. Pour revenir au menu de sortie, appuyez sur OK (9) ou la flèche gauche (10).
Actualisation du logicielSi votre DTC 700 est équipé d’une mise à jour de logiciel, veuillez procéder de la manière suivante : Veillez à ce que votre DTC 700 soit éteint (Fonction «OFF = Arrêt» : Bouton principal (11) position en bas). Copiez sur un PC tous les fichiers nécessaires à l’actualisation dans le répertoireracine d’une carte SD formatée. Insérez la carte SD dans votre DTC 700 en suivant les instructions données dans la section «Insertion de la cartemémoire». Mettez votre appareil en «Mode Réglage“ (SETUP = Mode réglage, Bouton principal (11) Position Milieu). Sélectionnez «Actualiser» dans «Menu principal » [accessible en appuyant sur le bouton Menu (8). Cet élément se trouve sous le deuxième onglet «Paramètres généraux». En appuyant sur le bouton OK (9) vous arrivez au sousmenu. Avec les flèches Haut/Bas (10), vous pouvez maintenant choisir «Oui» ou «Non» et confirmer en appuyant sur OK (9). Si vous choisissez «Non», vous garderez la version de logiciel en cours et l’appareil reviendra au menuparent. Si vous sélectionnez «Oui», votre DTC 700 démarrera la procédure d’actualisation. L’actualisation est terminée lorsque l’écran de votre appareil devient noir. Veuillez mettre maintenant votre DTC 700 sur «OFF = Arrêt» : Bouton principal (11) position en bas». Vous pourrez utiliser le nouveau logiciel si, à la prochaine utilisation, vous mettez votre appareil en «Mode Réglage» (SETUP
= Mode Réglage, Bouton principal (11) Position Milieu). En appuyant sur la flèche de gauche (10), vous revenez au menuparent sans faire d’actualisation.
Remarque : Veillez à suivre les consignes données cidessous en respectant les différentes étapes. Le nonrespect de ces consignes peut entraîner un échec de la mise à jour, ce qui peut rendre votre appareil inutilisable. Vous ne pourrez alors plus bénéficier de votre garantie.
56
Raccordement de l’appareil à un ordinateur
Vous pouvez transférer des données sur votre ordinateur soit en enlevant la cartemémoire et en la lisant sur votre ordinateur, soit en connectant votre DTC 700 à un ordinateur via le câble USB fourni (13).
Raccordement via un câble USBAvant toute connexion à votre ordinateur, vérifiez que l’appareil est éteint. Raccordez l’appareil à un ordinateur en utilisant le câble USB fourni (13). Allumez votre DTC 700. L’appareil est alors reconnu comme lecteur amovible. Les enregistrements réalisés en mode vidéo et en mode photo peuvent être alors directement visibles ou transmis sur le PC.
Transfert d’images et de vidéos via une carte SDVérifiez que l’appareil est éteint avant d’enlever la carte SD de son logement (7). Vous risqueriez en effet d’endommager votre carte. Mettez la carte dans un lecteur de cartemémoire connecté à votre ordinateur. Certains ordinateurs possèdent aussi un logement interne destiné aux cartes SD. Dans ce cas, la cartemémoire peut être connectée directement à l’ordinateur. Vous pouvez alors commencer à transférer des images ou des vidéos sur votre ordinateur.
MPEG-4 Visual Patent Portfolio License
La MINOX DTC 700 est commercialisé sous la MPEG4 Visual Patent Portfolio License pour l’usage personnel et non commercial du consommateur et l’autorise à :
1. encoder des videos conformément à la norme MPEG4 et/ou à.
2. décoder des vidéos MPEG4 qui ont été encodées par un consommateur à des fins personnelles et non commerciales et/ou qui ont été obtenues auprès d’un fournisseur de vidéos autorisé par licence à fournir des vidéos MPEG4.
Aucune licence n’est accordée ou ne doit être utilisée implicitement à d’autres fins.Informations complémentaires peuvent être obtenues auprès de MPEG LA, LLC: http://www.mpegla.com
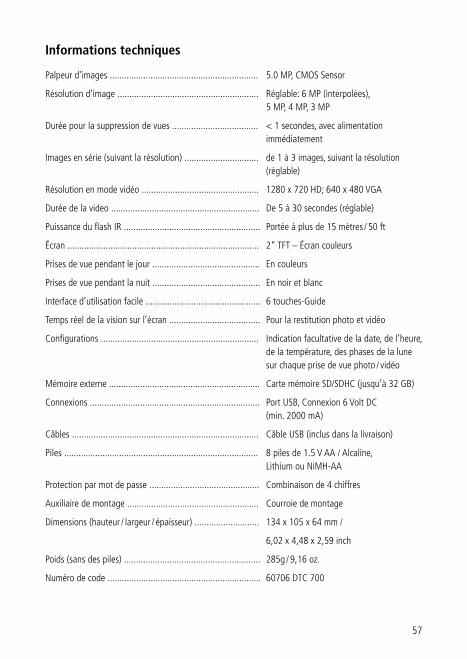
57
Informations techniques
Palpeur d’images .............................................................. 5.0 MP, CMOS Sensor
Résolution d’image ........................................................... Réglable: 6 MP (interpolées), 5 MP, 4 MP, 3 MP
Durée pour la suppression de vues .................................... < 1 secondes, avec alimentation immédiatement
Images en série (suivant la résolution) ............................... de 1 à 3 images, suivant la résolution (réglable)
Résolution en mode vidéo ................................................. 1280 x 720 HD; 640 x 480 VGA
Durée de la video .............................................................. De 5 à 30 secondes (réglable)
Puissance du flash IR ......................................................... Portée à plus de 15 mètres / 50 ft
Écran ................................................................................ 2“ TFT – Écran couleurs
Prises de vue pendant le jour ............................................. En couleurs
Prises de vue pendant la nuit ............................................. En noir et blanc
Interface d’utilisation facile ................................................ 6 touchesGuide
Temps réel de la vision sur l’écran ...................................... Pour la restitution photo et vidéo
Configurations .................................................................. Indication facultative de la date, de l’heure, de la température, des phases de la lune sur chaque prise de vue photo / vidéo
Mémoire externe ............................................................... Carte mémoire SD/SDHC (jusqu’à 32 GB)
Connexions ....................................................................... Port USB, Connexion 6 Volt DC (min. 2000 mA)
Câbles .............................................................................. Câble USB (inclus dans la livraison)
Piles ................................................................................. 8 piles de 1.5 V AA / Alcaline, Lithium ou NiMHAA
Protection par mot de passe .............................................. Combinaison de 4 chiffres
Auxiliaire de montage ....................................................... Courroie de montage
Dimensions (hauteur / largeur / épaisseur) ........................... 134 x 105 x 64 mm /
6,02 x 4,48 x 2,59 inch
Poids (sans des piles) ......................................................... 285g / 9,16 oz.
Numéro de code ................................................................ 60706 DTC 700

58
En achetant cette caméra MINOX, vous avez acquis un produit qui a été fabriqué et éprouvé suivant des norms de qualité particulièrement sévères. La garantie légale de 2 ans, en vigueur pour ce produit, est prise en charge par nos soins à compter du jour de la vente par un négociant agréé dans les conditions suivantes :
1) Il sera remédié, au cours de la période de garantie, aux réclamations qui se fondent sur des défauts de fabrication, gratuitement et, suivant notre proper appréciation, par le biais d’une remise en état, d’un changement des pièces défectueuses ou d’un échange contre un produit en parfait état et de même type. Les demandes qui dépasseraient ce cadre, quelle que soit leur nature et quel que soit leur motif juridique en rapport avec la présente prestation de garantie, sont exclues.
2) Les droits à la garantie sont supprimés si le défaut en question est imputable à une manipulation incorrecte – l’utilisation d’accessoires étrangers pouvant aussi en faire partie – si une intervention a été effectuée par des personnes et des ateliers non autorisés ou si le numéro de fabrication a été rendu méconnaissable.
Conditions de la garantie
3) Les droits à la garantie ne peuvent être invoqués que sur présentation d’un justificatif d’achat imprimé émanant d’un négociant autorisé.
4) En cas de recours à la garantie, veuillez faire parvenir la caméra MINOX, accompagnée de l’original du justificatif d’achat imprimé et d’un exposé de la réclamation, au service clients de la MINOX GmbH ou à une succursale régionale.
5) En cas de besoin, la succursale du pays de destination correspondant se tient à la disposition des touristes, conformément aux règles qui régissent la prestation de garantie de la MINOX GmbH, sur présentation du justificatif d’achat imprimé.
MINOX GmbHWalterZappStr. 4D35578 WetzlarTel.: +49 (0) 6441 / 9170Fax: +49 (0) 6441 / 917612EMail: [email protected]: www.minox.com

59
Notes
60
Änderungen in Konstruktion und Ausführung vorbehalten.Die Marke MINOX ist eine eingetragene Marke der MINOX GmbH, Wetzlar.
Design subject to alterations without notice.MINOX is a registered trademark of MINOX GmbH, Wetzlar.
Sous réserve de modifications.MINOX est une marque déposée par MINOX GmbH, Wetzlar.
MINOX GmbHWalterZappStr. 4D35578 WetzlarTel.: +49 (0) 6441 / 9170Fax: +49 (0) 6441 / 917612EMail: [email protected] 99564 09/15