Embed Size (px)
Citation preview
[0501/FUG/AGB-HW]
WARNING: PLEASE CAREFULLY READ THE CONSUMER INFORMATION AND PRECAUTIONS BOOKLET INCLUDEDWITH THIS PRODUCT BEFORE USING YOUR NINTENDO® HARDWARE SYSTEM, GAME PAK OR ACCESSORY. THISBOOKLET CONTAINS IMPORTANT SAFETY INFORMATION. PLEASE KEEP THIS BOOK FOR FUTURE REFERENCE.
HINWEIS: BITTE LIES DIE VERSCHIEDENEN BEDIENUNGSANLEITUNGEN UND VERBRAUCHERINFORMATIONEN,DIE SOWOHL DER NINTENDO® HARDWARE WIE AUCH JEDEM MODUL BEIGELEGT SIND, SEHR SORGFÄLTIGDURCH. DIESE ANLEITUNG ENTHÄLT WICHTIGE SICHERHEITSHINWEISE. HEBE DIR DIESES HEFT FÜR SPÄTERESNACHSCHLAGEN GUT AUF.
ATTENTION: VEUILLEZ LIRE ATTENTIVEMENT LA NOTICE “INFORMATIONS ET PRECAUTIONS D’EMPLOI” QUIACCOMPAGNE LE PRODUIT NINTENDO®, LA CARTOUCHE DE JEU OU LES ACCESSOIRES AVANT DE LES UTILISER.ELLE CONTIENT DES INFORMATIONS IMPORTANTES SUR LA SECURITE ET LES PRECAUTIONS D’EMPLOI. GARDEZENSUITE LE MANUEL POUR VOUS Y REFERER PLUS TARD.
This seal is your assurance thatNintendo has reviewed this productand that it has met our standards for excellence in workmanship,reliability and entertainment value. Always look for this seal when buying games and accessories to ensure complete compatibility with your NintendoProduct.
Ce sceau est votre assurance queNintendo a approuvé ce produit et qu’il est conforme aux normes d’excellence en matière de fabri-
cation, de fiabilité et surtout,de qualité. Recherchez ce sceau
lorsque vous achetez une consolede jeu, des cartouches ou des
accessoires pour assurer une totale compatibilité avec vos produits Nintendo.
TM AND ® ARE TRADEMARKS OF NINTENDO.TM ET ® SONT DES MARQUES DE NINTENDO.© 2001 NINTENDO.
Thank you for selecting the Nintendo® Game Boy Advance™ system.Merci d’avoir choisi le Nintendo® Game Boy Advance™.
English . . . . . . . . . . . . . . . . . . . . . . . . . . . . . . . . . 4
Deutsch . . . . . . . . . . . . . . . . . . . . . . . . . . . . . . . 18
Français . . . . . . . . . . . . . . . . . . . . . . . . . . . . . . . 46
CONTENTS/SOMMAIRE
AGB-EUR_A_8 26.09.2007 13:08 Uhr Seite 2
COPY
1 Consumer Information and Precautions
1. Consumer Information and Precautions . . . . . . . . . . . . . . . . . . . . . . . . . . . . . . . . . . . . . . . . . . . 5
2. Information . . . . . . . . . . . . . . . . . . . . . . . . . . . . . . . . . . . . . . . . . . . . . . . . . . . . . . . . . . . . . . . . . . . 6
3. List of Components . . . . . . . . . . . . . . . . . . . . . . . . . . . . . . . . . . . . . . . . . . . . . . . . . . . . . . . . . . . . 7
4. Description of Components . . . . . . . . . . . . . . . . . . . . . . . . . . . . . . . . . . . . . . . . . . . . . . . . . . . . . 8
5. Installing Batteries . . . . . . . . . . . . . . . . . . . . . . . . . . . . . . . . . . . . . . . . . . . . . . . . . . . . . . . . . . . . . 8
6. About Game Boy Advance Game Paks . . . . . . . . . . . . . . . . . . . . . . . . . . . . . . . . . . . . . . . . . . . . 9
7. Using the Game Boy Advance Video Game System
Starting a Game . . . . . . . . . . . . . . . . . . . . . . . . . . . . . . . . . . . . . . . . . . . . . . . . . . . . . . . . . . . 10
Removing Game Pak . . . . . . . . . . . . . . . . . . . . . . . . . . . . . . . . . . . . . . . . . . . . . . . . . . . . . . . 10
8. Changing the Screen Colours on Original Game Paks . . . . . . . . . . . . . . . . . . . . . . . . . . . . . . 10
9. Description of Accessories (When using Game Paks for the Game Boy Advance)
About Accessories . . . . . . . . . . . . . . . . . . . . . . . . . . . . . . . . . . . . . . . . . . . . . . . . . . . . . . . . . 11
Connecting a Game Boy Advance Game Link cable (AGB-005)
to your Game Boy Advance . . . . . . . . . . . . . . . . . . . . . . . . . . . . . . . . . . . . . . . . . . . . . . . . . . 11
Playing a Multi-Player Mode Game . . . . . . . . . . . . . . . . . . . . . . . . . . . . . . . . . . . . . . . . . . . 12
10. Description of Accessories
(When using a Game Pak designed for the Game Boy Series)
Supported Accessories . . . . . . . . . . . . . . . . . . . . . . . . . . . . . . . . . . . . . . . . . . . . . . . . . . . . . 13
Connecting an Accessory . . . . . . . . . . . . . . . . . . . . . . . . . . . . . . . . . . . . . . . . . . . . . . . . . . . 13
Playing Two-Player Mode Games . . . . . . . . . . . . . . . . . . . . . . . . . . . . . . . . . . . . . . . . . . . . . 14
11. AC-DC Adapter Set . . . . . . . . . . . . . . . . . . . . . . . . . . . . . . . . . . . . . . . . . . . . . . . . . . . . . . . . . . . . 15
12. Troubleshooting (Before seeking assistance) . . . . . . . . . . . . . . . . . . . . . . . . . . . . . . . . . . . . . . 16
Contents
4
READ THE FOLLOWING WARNINGS BEFORE YOU OR YOUR CHILD PLAY VIDEO GAMES
Some people (about 1 in 4000) may have seizures or blackouts triggered by light flashes, suchas while watching TV or playing video games, even if they have never had a seizure before.
Anyone who has had a seizure, loss of awareness, or other symptom linked to an epileptic con-dition should consult a doctor before playing a video game.
Parents should watch when their children play video games. STOP PLAYING IMMEDIATELYand consult a doctor if you or your child have any of the following symptoms: Convulsions,
Eye or muscle twitching, Loss of awareness, Altered vision, Involuntary movements,
Disorientation.
TO REDUCE THE LIKELIHOOD OF A SEIZURE WHEN PLAYING VIDEO GAMES:1. Sit or stand as far from the screen as possible.2. Play video games on the smallest available television screen.3. Do not play if you are tired or need sleep.4. Play in a well-lit room.5. Take a 10 to 15 minute break every hour.
Playing video games can make your muscles, joints or skin hurt after a few hours. Follow theseinstructions to avoid problems such as Tendonitis, Carpal Tunnel Syndrome or skin irritation:
• Take a 10 to 15 minute break every hour, even if you don’t think you need it.• If your hands, wrists or arms become tired or sore while playing,
stop and rest them for several hours before playing again.• If you continue to have sore hands, wrists or arms during or after play,
stop playing and see a doctor.
FAILURE TO FOLLOW THE FOLLOWING INSTRUCTIONS MAY CAUSE THE BATTERIES TO MAKE “POPPING” SOUNDS AND LEAK BATTERY ACID RESULTING IN PERSONAL INJURY AND DAMAGETO YOUR GAME BOY ADVANCE OR ACCESSORY. IF BATTERY LEAKAGE OCCURS, THOROUGHLYWASH THE AFFECTED SKIN AND CLOTHES. KEEP BATTERY ACID AWAY FROM YOUR EYES ANDMOUTH. CONTACT THE BATTERY MANUFACTURER FOR FURTHER INFORMATION.
1. For Game Boy Advance use only alkaline batteries. Do not use carbon zinc or any othernon-alkaline batteries.
2. Do not mix used and new batteries (replace all batteries at the same time).
▲! WARNING – BATTERY PRECAUTIONS
▲! WARNING – REPETITIVE MOTION INJURIES
▲! WARNING – SEIZURE
5
AGB-EUR_A_8 26.09.2007 13:08 Uhr Seite 4
COPY
2 Information
7
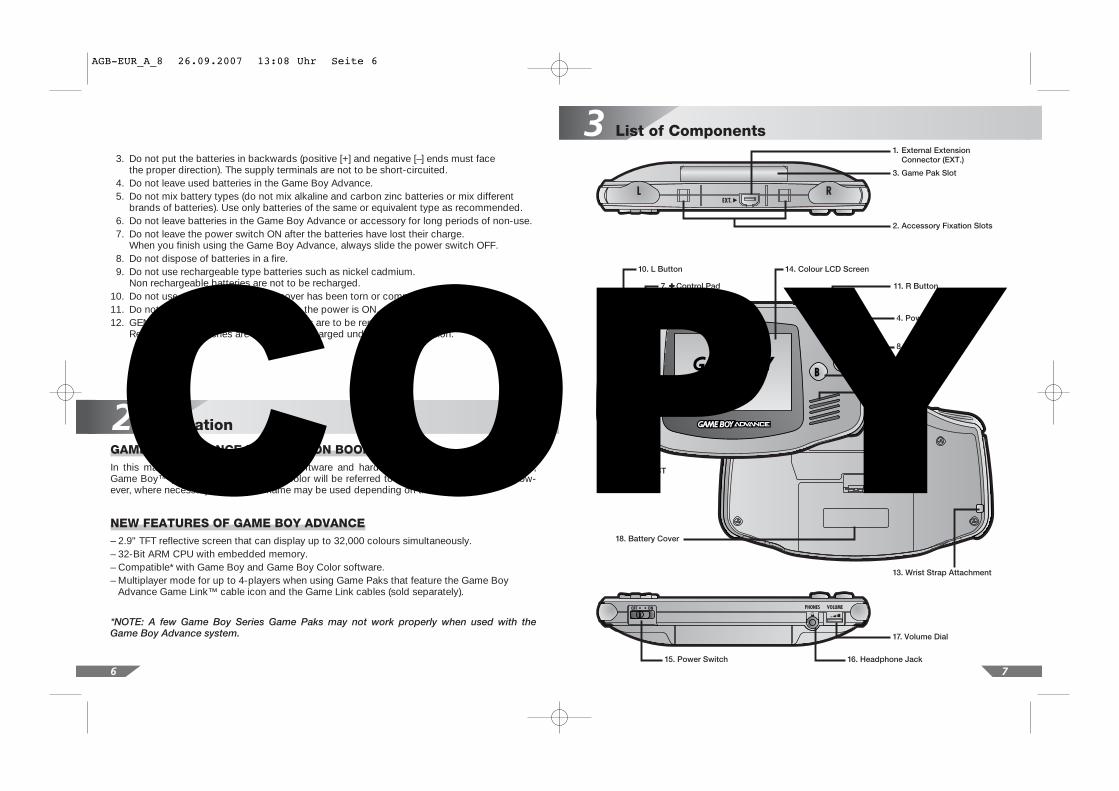
3 List of Components1. External Extension
Connector (EXT.)
3. Game Pak Slot
2. Accessory Fixation Slots
5. START
18. Battery Cover
15. Power Switch 16. Headphone Jack
17. Volume Dial
13. Wrist Strap Attachment
6. SELECT
11. R Button
9. B Button
8. A Button
4. Power Indicator LED
12. Speaker
10. L Button
7. ✚ Control Pad
14. Colour LCD Screen
3. Do not put the batteries in backwards (positive [+] and negative [–] ends must face the proper direction). The supply terminals are not to be short-circuited.
4. Do not leave used batteries in the Game Boy Advance. 5. Do not mix battery types (do not mix alkaline and carbon zinc batteries or mix different
brands of batteries). Use only batteries of the same or equivalent type as recommended.6. Do not leave batteries in the Game Boy Advance or accessory for long periods of non-use.7. Do not leave the power switch ON after the batteries have lost their charge.
When you finish using the Game Boy Advance, always slide the power switch OFF.8. Do not dispose of batteries in a fire.9. Do not use rechargeable type batteries such as nickel cadmium.
Non rechargeable batteries are not to be recharged.10. Do not use a battery if the plastic cover has been torn or compromised in anyway.11. Do not insert or remove batteries while the power is ON.12. GENERAL NOTE: Rechargeable batteries are to be removed before charging.
Rechargeable batteries are only to be recharged under adult supervision.
GAME BOY ADVANCE INSTRUCTION BOOKLETIn this manual, the previously released software and hardware of the Original Game Boy™,Game Boy™ pocket and Game Boy™ Color will be referred to as the Game Boy Series. How-ever, where necessary the specific name may be used depending on the context.
NEW FEATURES OF GAME BOY ADVANCE– 2.9" TFT reflective screen that can display up to 32,000 colours simultaneously.– 32-Bit ARM CPU with embedded memory.– Compatible* with Game Boy and Game Boy Color software.– Multiplayer mode for up to 4-players when using Game Paks that feature the Game Boy
Advance Game Link™ cable icon and the Game Link cables (sold separately).
*NOTE: A few Game Boy Series Game Paks may not work properly when used with theGame Boy Advance system.
6
AGB-EUR_A_8 26.09.2007 13:08 Uhr Seite 6
COPY
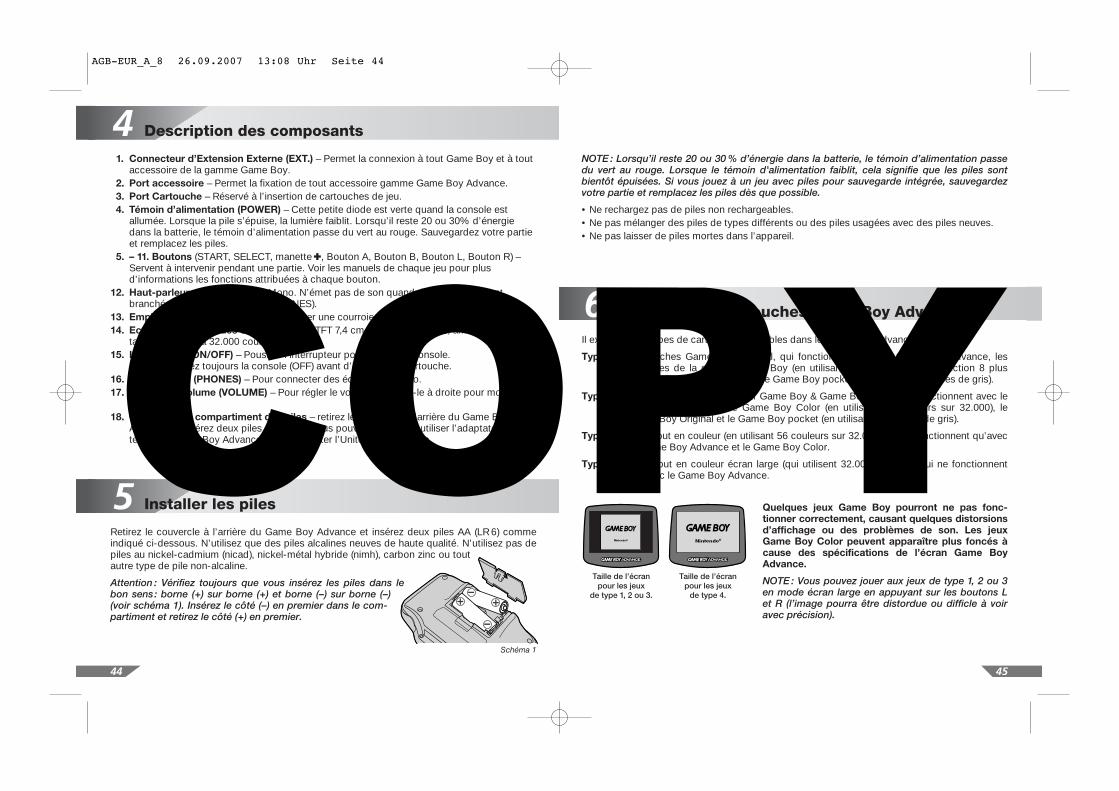
4 Description of Components
9
6 About Game Boy Advance Game Paks
5 Installing Batteries
1. External Extension Connector (EXT.) – This unit allows connection to any Game Boy andto Game Boy Series accessories.
2. Accessory Fixation Slots – For connecting Game Boy Advance dedicated accessories.3. Game Pak Slot – This easily accessible slot is designed for loading a Game Boy Game Pak.4. Power Indicator LED (POWER) – This tiny bulb lights green when the Game Boy Advance
is ON. For Alkaline batteries, the green light will change to red as the battery power reduces to 20 or 30 % and the LED will begin to fade when it is time to replace the batteries.
5. – 11. Operation Buttons (START, SELECT, ✚ Control Pad, A Button, B Button, L Button, R Button) – Used as the controls for playing games. See individual Game Pak instructionbooklets for specific button functions.
12. Speaker – Outputs mono sound. Will automatically turn off when headphones are pluggedinto Headphone Jack.
13. Wrist Strap Attachment – For attachment of a wrist strap.14. Colour LCD Screen – Highly reflective 2.9 inch Thin-Film Transistor (TFT) Colour Liquid
Crystal Display with up to 32,000 colours.15. Power Switch (OFF/ON) – Slide the switch to turn the power ON or OFF.
(NOTE: Always insert a Game Pak before turning power ON.)16. Headphone Jack (PHONES) – For connecting a pair of stereo headphones.17. Volume Dial (VOLUME) – Adjusts the volume right or left. Rotate to the right to increase
the volume or to the left to decrease.18. Battery Cover – Remove the cover on the back of the Game Boy Advance and insert two
AA (LR 6) batteries. Game Boy Advance AC-DC Adapter Set can also be used.
Remove the cover on the back of the Game Boy Advance and insert two AA (LR 6) batteries asshown. Always use two fresh, high quality alkaline batteries. Do not use rechargeable nickelcadmium (NiCad), nickel metal hydride (NiMH), carbon zinc or any other type ofnon-alkaline batteries.
Caution: When inserting the batteries, make sure that the
positive (+) and negative (–) ends are facing in the correct
directions. (See Illustration 1.) Always insert the negative end
first. When removing batteries, remove the positive end
first.
8
There are four types of Game Boy Game Paks that will work with the Game Boy Advance:
Type 1. Original Game Boy Game Paks, which will work with both the Game Boy Advanceand Game Boy Color units (using 4 – 10 colours, see Section 8) and with the originalGame Boy and Game Boy pocket systems (using 4 shades of gray).
Type 2. Dual mode Game Boy Game Paks that will work with both the Game Boy Advanceand Game Boy Color (using up to 56 colours out of a palette of 32,000) and with theoriginal Game Boy and Game Boy pocket systems (using 4 shades of gray).
Type 3. Full colour games (using up to 56 colors out of a palette of 32,000) that will workonly on Game Boy Color and Game Boy Advance.
Type 4. Special full colour (32,000 colours maximum) wide screen games that will work onlyon the Game Boy Advance.
A few older Game Boy games may not function
properly on the Game Boy Advance causing display
or sound problems. Game Boy Color games may
appear darker due to Game Boy Advance screen
specification.
NOTE: You can switch the screen size for Type 1, 2and 3 games to wide screen mode by pressing the L and R buttons. (This may make some of the imagesdistorted or hard to see.)
Game screen size for Type 1, 2 and 3
games
Game screen size forType 4 games only
Illustration 1
NOTE: When the battery life is down to between 20 % and 30 %, the Power Indicator LEDwill change colour from green to red. When the LED begins to grow dim, the battery life isalmost gone. If you are playing a game with a battery back-up, you should save your pro-gress and replace the batteries as soon as possible.
• Non-rechargeable batteries are not to be recharged. • Different types of batteries or new and used batteries are not to be mixed. • Exhausted batteries are to be removed from the toy.
AGB-EUR_A_8 26.09.2007 13:08 Uhr Seite 8
COPY

10
9 Description of Accessories (When using Game Paks for the Game Boy Advance)
• You cannot change the screen colour during the game.• Once you change the screen colour, you cannot change it while the power is turned ON.
If you want to change the screen colour, turn the power OFF and turn it ON again.• The screen colour can’t be changed when you’re using Game Paks for Game Boy Advance,
Game Boy Color, or dual mode Game Pak for Game Boy & Game Boy Color.• Some of the selected colour patterns may cause a problem displaying the screen clearly.
ABOUT ACCESSORIES You will enjoy a wider range of functions while using accessories designed for Game BoyAdvance (each sold separately). You will find icons on the Game Paks and in the InstructionBooklets indicating which accessories are supported.
NOTE: Please see the Instruction Booklets for how to use each accessory properly.
CONNECTING A GAME BOY ADVANCE GAME LINK CABLE (AGB-005) TO YOUR GAME BOY ADVANCEThe Game Boy Advance Game Link cable (AGB-005) can only be used with Game Paks designedfor Game Boy Advance when playing a Multi-Player game on the Game Boy Advance hardware.
Connect the Game Boy Advance Game Link cable with the External Extension Connector.
NOTE: Use of this cable with Game Boy Series Game Paks may cause loss of game infor-mation.
You can also use other accessories licensed by Nintendo that are connected to the Game PakSlot. Please see the individual accessory Instruction Booklet for details.
NOTE: When using Game Paks designed for Game Boy Advance, ONLY connect Game BoyAdvance accessories to the External Extension Connector. Otherwise the Game Boy Advanceunit or accessories might not function properly and thus cause a malfunction.
11
7
8 Changing Screen Colours on Original Game Paks
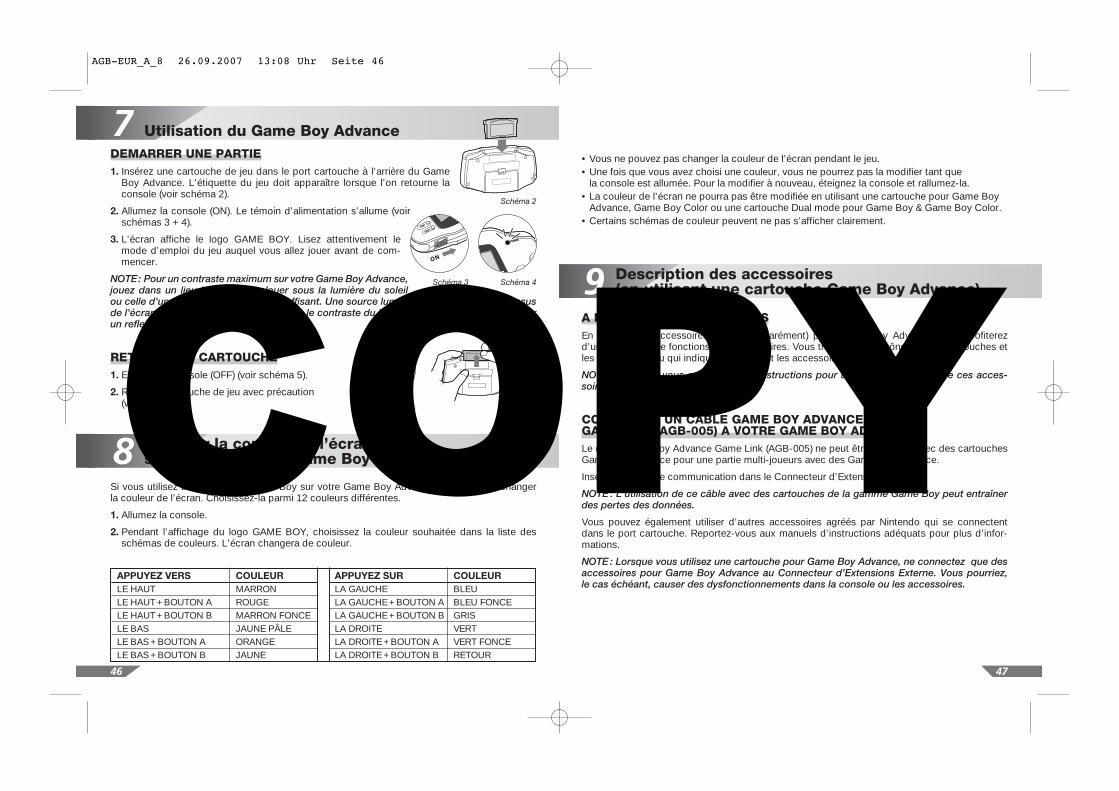
STARTING A GAME1. Insert a Game Pak into the Game Pak Slot in the back of the Game Boy
Advance. The label should face away from the Game Boy Advance wheninserting. (See illustration 2.)
2. Turn the power ON. The Power Indicator LED will light up. (Seeillustration 3 and 4.)
3. The screen displays the “GAME BOY” logo. Before starting thegame, always make sure you read the Game Pak InstructionBooklet for the game you are playing.
NOTE: To get maximum picture brightness on your Game BoyAdvance, be sure to play in a well-lit area. Natural sunlight neara window works well, as does playing near a lamp, etc. A light source that is above orbehind the player will maximize the brightness of the game. Try holding the Game BoyAdvance at different viewing angles for optimum screen reflection.
REMOVING GAME PAK1. Turn the power OFF (see illustration 5).
2. Cautiously take the Game Pak out of the GamePak Slot (see the illustration 6).
Illustration 2
ON
Illustration 3 Illustration 4
Illustration 6
OFF
Illustration 5
If you use a Game Pak designed for the Game Boy in Game Boy Advance, you can change thescreen colour. There are 12 different colour palettes to choose from.
1. Turn the power ON.
2. While the “GAME BOY” logo is displayed on the screen, enter the command by following thecolour palette list below. The screen colour will then change.
PRESS COLOUR
UP BROWNUP + A REDUP + B DARK BROWNDOWN PALE YELLOWDOWN + A ORANGEDOWN + B YELLOW
PRESS COLOUR
LEFT BLUELEFT + A DARK BLUELEFT + B GRAYRIGHT GREENRIGHT + A DARK GREENRIGHT + B REVERSE
Using the Game Boy Advance Video Game System
AGB-EUR_A_8 26.09.2007 13:08 Uhr Seite 10
COPY
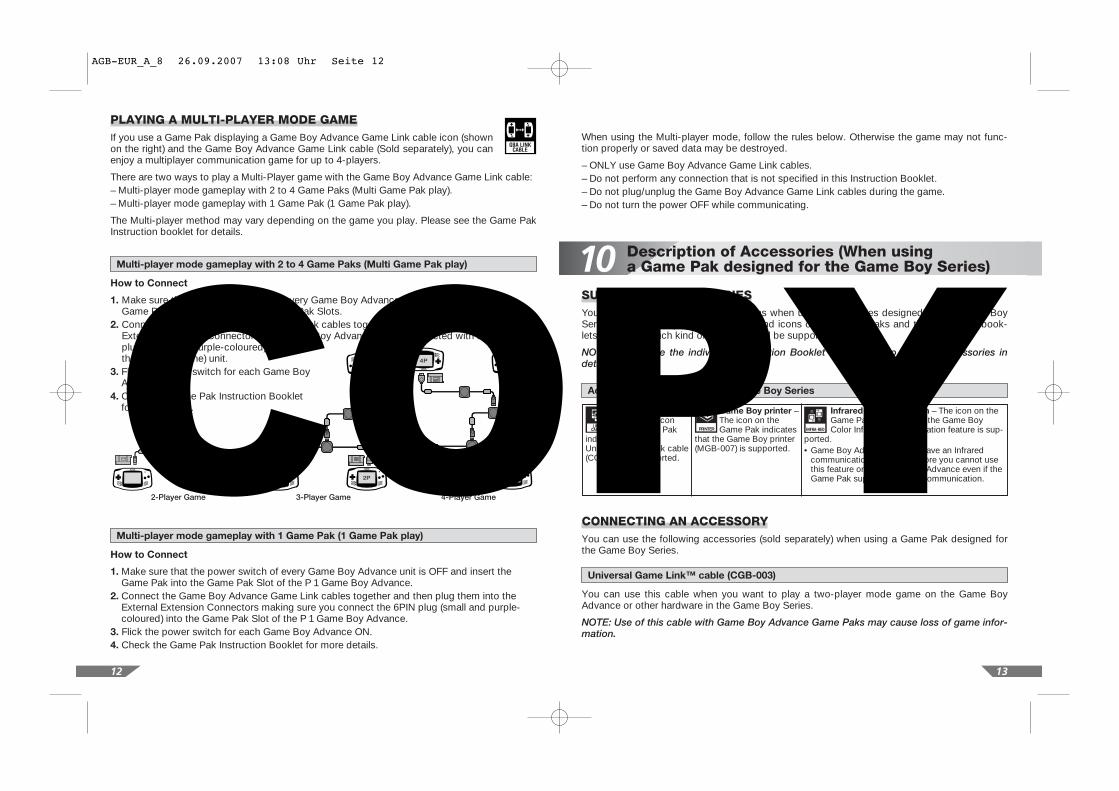
10 Description of Accessories (When using a Game Pak designed for the Game Boy Series)Multi-player mode gameplay with 2 to 4 Game Paks (Multi Game Pak play)
How to Connect
1. Make sure that the power switch on every Game Boy Advance hardware is OFF and theGame Paks are inserted into the Game Pak Slots.
2. Connect the Game Boy Advance Game Link cables together and then plug them into theExternal Extension Connectors. The Game Boy Advance that is connected with the 6PINplug (small and purple-coloured) should bethe P 1 (player one) unit.
3. Flick the power switch for each Game BoyAdvance ON.
4. Check the Game Pak Instruction Booklet for more details.
Multi-player mode gameplay with 1 Game Pak (1 Game Pak play)
How to Connect
1. Make sure that the power switch of every Game Boy Advance unit is OFF and insert theGame Pak into the Game Pak Slot of the P 1 Game Boy Advance.
2. Connect the Game Boy Advance Game Link cables together and then plug them into theExternal Extension Connectors making sure you connect the 6PIN plug (small and purple-coloured) into the Game Pak Slot of the P 1 Game Boy Advance.
3. Flick the power switch for each Game Boy Advance ON.4. Check the Game Pak Instruction Booklet for more details.
When using the Multi-player mode, follow the rules below. Otherwise the game may not func-tion properly or saved data may be destroyed.
– ONLY use Game Boy Advance Game Link cables.– Do not perform any connection that is not specified in this Instruction Booklet.– Do not plug/unplug the Game Boy Advance Game Link cables during the game.– Do not turn the power OFF while communicating.
3P4P
2P1P
3P
2P1P
2-Player Game 3-Player Game 4-Player Game
SUPPORTED ACCESSORIES You will enjoy a wider range of functions when using accessories designed for the Game BoySeries (each sold separately). You can find icons on the Game Paks and the instruction book-lets indicating which kind of accessory will be supported.
NOTE: Please see the individual Instruction Booklet to see how to use the accessories indetail.
Accessories for Game Pak for Game Boy Series
12
CONNECTING AN ACCESSORYYou can use the following accessories (sold separately) when using a Game Pak designed forthe Game Boy Series.
Universal Game Link™ cable (CGB-003)
You can use this cable when you want to play a two-player mode game on the Game BoyAdvance or other hardware in the Game Boy Series.
NOTE: Use of this cable with Game Boy Advance Game Paks may cause loss of game infor-mation.
Communicationcable – The icon on the Game Pak
indicates that the Universal Game Link cable(CGB-003) is supported.
Game Boy printer –The icon on theGame Pak indicates
that the Game Boy printer(MGB-007) is supported.
PRINTER
Infrared communication – The icon on theGame Pak indicates that the Game BoyColor Infrared communication feature is sup-
ported.• Game Boy Advance doesn’t have an Infrared
communication feature therefore you cannot usethis feature on the Game Boy Advance even if theGame Pak supports Infrared communication.
13
PLAYING A MULTI-PLAYER MODE GAMEIf you use a Game Pak displaying a Game Boy Advance Game Link cable icon (shownon the right) and the Game Boy Advance Game Link cable (Sold separately), you canenjoy a multiplayer communication game for up to 4-players.
There are two ways to play a Multi-Player game with the Game Boy Advance Game Link cable:– Multi-player mode gameplay with 2 to 4 Game Paks (Multi Game Pak play).– Multi-player mode gameplay with 1 Game Pak (1 Game Pak play).
The Multi-player method may vary depending on the game you play. Please see the Game PakInstruction booklet for details.
AGB-EUR_A_8 26.09.2007 13:08 Uhr Seite 12
COPY
11 AC-DC Adapter Set
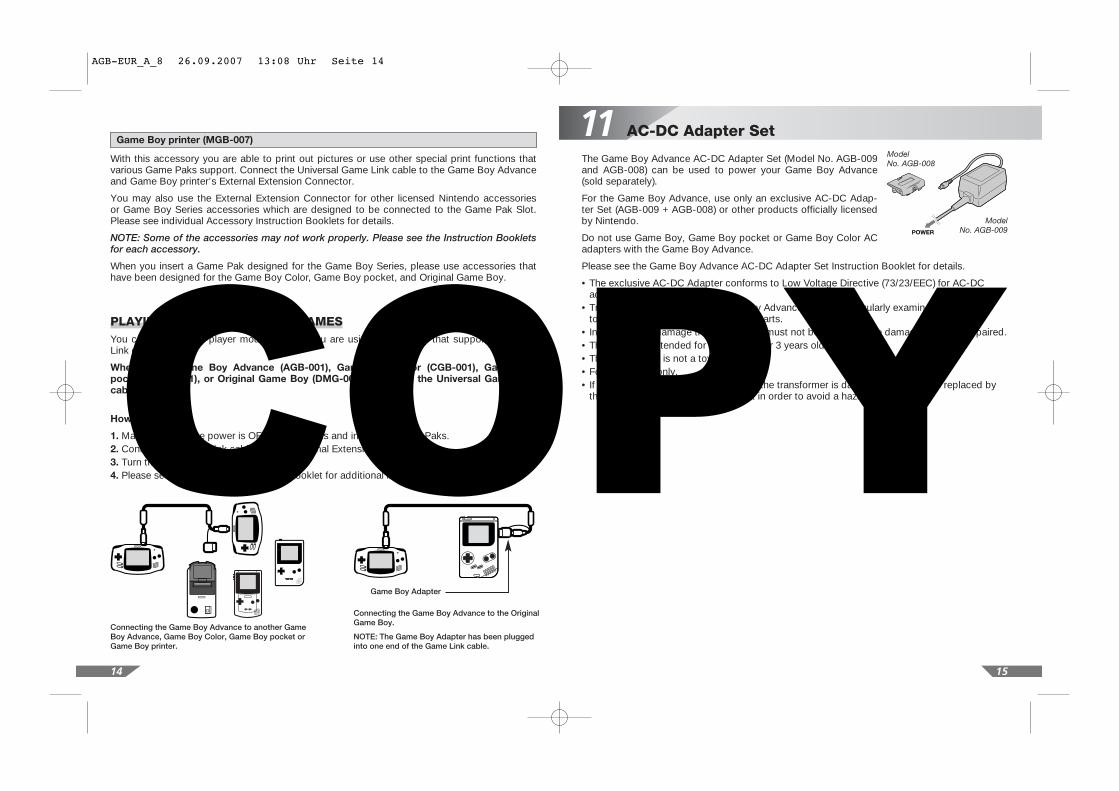
The Game Boy Advance AC-DC Adapter Set (Model No. AGB-009and AGB-008) can be used to power your Game Boy Advance(sold separately).
For the Game Boy Advance, use only an exclusive AC-DC Adap-ter Set (AGB-009 + AGB-008) or other products officially licensedby Nintendo.
Do not use Game Boy, Game Boy pocket or Game Boy Color ACadapters with the Game Boy Advance.
Please see the Game Boy Advance AC-DC Adapter Set Instruction Booklet for details.
• The exclusive AC-DC Adapter conforms to Low Voltage Directive (73/23/EEC) for AC-DCadapters.
• Transformers used with the Game Boy Advance should be regularly examined for damage to the cord, plug enclosure and other parts.
• In the event of damage the transformer must not be used until the damage has been repaired.• The toy is not intended for children under 3 years old.• The transformer is not a toy.• For indoor use only.• If the external flexible cable or cord of the transformer is damaged, it should be replaced by
the manufacturer or his service agent in order to avoid a hazard.
15
How to connect
1. Make sure that the power is OFF on both units and insert the Game Paks.2. Connect the Game Link cable to each External Extension Connector.3. Turn the power ON.4. Please see the Game Pak Instruction Booklet for additional information.
PLAYING TWO-PLAYER MODE GAMESYou can enjoy a two-player mode game, if you are using Game Paks that support the GameLink cable.
When using Game Boy Advance (AGB-001), Game Boy Color (CGB-001), Game Boy
pocket (MGB-001), or Original Game Boy (DMG-001), you need the Universal Game Link
cable (CGB-003).
Connecting the Game Boy Advance to another GameBoy Advance, Game Boy Color, Game Boy pocket orGame Boy printer.
Connecting the Game Boy Advance to the OriginalGame Boy.
NOTE: The Game Boy Adapter has been pluggedinto one end of the Game Link cable.
Game Boy Adapter
Model No. AGB-008
Model No. AGB-009
14
Game Boy printer (MGB-007)
With this accessory you are able to print out pictures or use other special print functions thatvarious Game Paks support. Connect the Universal Game Link cable to the Game Boy Advanceand Game Boy printer’s External Extension Connector.
You may also use the External Extension Connector for other licensed Nintendo accessories or Game Boy Series accessories which are designed to be connected to the Game Pak Slot.Please see individual Accessory Instruction Booklets for details.
NOTE: Some of the accessories may not work properly. Please see the Instruction Bookletsfor each accessory.
When you insert a Game Pak designed for the Game Boy Series, please use accessories thathave been designed for the Game Boy Color, Game Boy pocket, and Original Game Boy.
AGB-EUR_A_8 26.09.2007 13:08 Uhr Seite 14
COPY
16
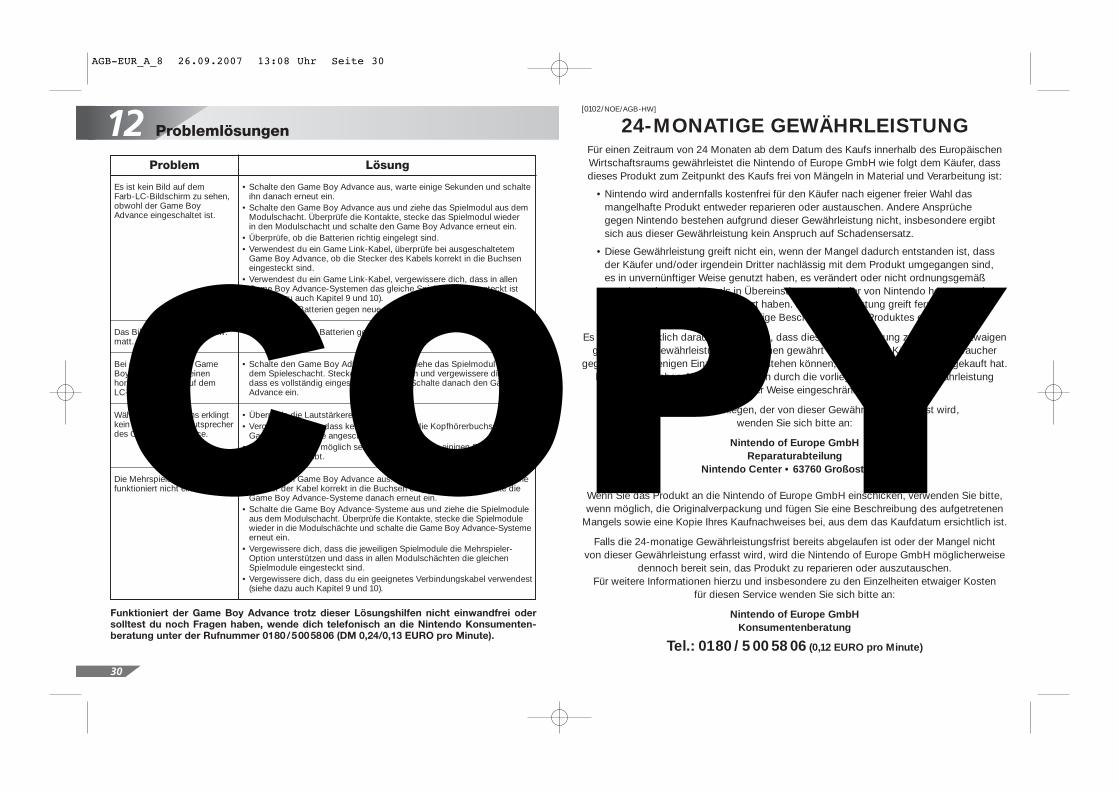
12 Troubleshooting (Before seeking assistance)
If your Game Boy Advance still does not operate correctly after trying the above reme-
dies, please call the Nintendo Service Center.
Problem
The screen stays blankeven though the power is ON.
The screen appears faint.
Horizontal lines appear when the power is ON.
No sound is heard from thespeaker during game play.
Multi-player game modesdon’t work.
Solution
• Turn the power OFF. Wait a few moments, then turn the power ON.• Turn the power OFF. Remove Game Pak and reinsert it,
then turn the power ON.• Check the placement of the batteries.• If using a Game Link cable, check connections with the power OFF,
then try again.• If using a Game Link cable, check that all Game Paks are the same.
(Review Sections 9 and 10.)• Replace the batteries with new fresh batteries.
• Replace the batteries with new fresh batteries.
• Turn OFF the power, remove the Game Pak and reinsert it, making sure it is fully inserted into the Game Pak Slot. Turn the power ON.
• Adjust the volume.• Make sure there are no headphones plugged into the Headphone Jack.• Some games may have no sound during parts of the game.
• Turn the power OFF. Check all of the Game Link Cable connections, then turn the power ON.
• Turn the power OFF. Remove all Game Paks and re-insert, then turn the power ON.
• Make sure Game Paks include the multi-player feature and that Game Paks are the same game.
• Make sure you are using the correct Game Link cable. (Review Sections 9 and 10.)
AGB-EUR_A_8 26.09.2007 13:08 Uhr Seite 16
COPY
1 Verbraucherinformationen und andere wichtige Hinweise
18
Inhalt
1. Verbraucherinformationen und andere wichtige Hinweise . . . . . . . . . . . . . . . . . . . . . . . . . . . 19
2. Information . . . . . . . . . . . . . . . . . . . . . . . . . . . . . . . . . . . . . . . . . . . . . . . . . . . . . . . . . . . . . . . . . . 20
3. Bestandteile des Game Boy Advance . . . . . . . . . . . . . . . . . . . . . . . . . . . . . . . . . . . . . . . . . . . . 21
4. Beschreibung der Bestandteile . . . . . . . . . . . . . . . . . . . . . . . . . . . . . . . . . . . . . . . . . . . . . . . . . 22
5. Einlegen der Batterien . . . . . . . . . . . . . . . . . . . . . . . . . . . . . . . . . . . . . . . . . . . . . . . . . . . . . . . . . 22
6. Unterscheidung von Modulen . . . . . . . . . . . . . . . . . . . . . . . . . . . . . . . . . . . . . . . . . . . . . . . . . . . 23
7. Verwendung des Game Boy Advance
Beginnen eines Spiels. . . . . . . . . . . . . . . . . . . . . . . . . . . . . . . . . . . . . . . . . . . . . . . . . . . . . . . 24
Entfernen des Moduls . . . . . . . . . . . . . . . . . . . . . . . . . . . . . . . . . . . . . . . . . . . . . . . . . . . . . . 24
8. Anpassen der Farbe . . . . . . . . . . . . . . . . . . . . . . . . . . . . . . . . . . . . . . . . . . . . . . . . . . . . . . . . . . . 24
9. Verwendung von Game Boy Advance-Modulen
Erläuterung zum Zubehör . . . . . . . . . . . . . . . . . . . . . . . . . . . . . . . . . . . . . . . . . . . . . . . . . . . . 25
Anschließen des Game Boy Advance Game Link-Kabels . . . . . . . . . . . . . . . . . . . . . . . . . . 25
Die Mehrspieler-Option . . . . . . . . . . . . . . . . . . . . . . . . . . . . . . . . . . . . . . . . . . . . . . . . . . . . . 26
10. Verwendung von Modulen der Game Boy-Serie
Unterstütztes Zubehör . . . . . . . . . . . . . . . . . . . . . . . . . . . . . . . . . . . . . . . . . . . . . . . . . . . . . . 27
Anschließen von Zubehör . . . . . . . . . . . . . . . . . . . . . . . . . . . . . . . . . . . . . . . . . . . . . . . . . . . . 27
2 Spieler-Option . . . . . . . . . . . . . . . . . . . . . . . . . . . . . . . . . . . . . . . . . . . . . . . . . . . . . . . . . . . . 28
11. Hinweise zum AC-DC-Adapterset . . . . . . . . . . . . . . . . . . . . . . . . . . . . . . . . . . . . . . . . . . . . . . . . 29
12. Problemlösungen . . . . . . . . . . . . . . . . . . . . . . . . . . . . . . . . . . . . . . . . . . . . . . . . . . . . . . . . . . . . . 30
HINWEIS AN ALLE ELTERN: BITTE DIESE WARNHINWEISE SORGFÄLTIG LESEN,
BEVOR SIE ODER IHR KIND ZU SPIELEN BEGINNEN!
Bei einem kleinen Prozentsatz (ca. 1 Person von 4000) der Bevölkerung können während desBetrachtens blinkender Lichter oder Muster, die in unserer Umgebung täglich vorkommen,epileptische Erscheinungen auftreten. Solche Reaktionen können auch auftreten, wenn diesePersonen bestimmte Fernsehbilder anschauen oder bestimmte Videospiele spielen. Auch beiSpielern, die bislang nicht mit epileptischen Symptomen auf Lichtreize reagiert haben, ist einebisher unentdeckte epileptische Veranlagung nicht ausgeschlossen.Befrage einen Arzt, bevor du ein Videospiel benutzt, wenn bei dir oder einem Mitglied deinerFamilie Epilepsie vorliegt.Wir empfehlen allen Eltern, ihre Kinder während des Spielens von Videospielen zu beobachten.Sollten bei ihrem Kind folgende Symptome auftreten, UNTERBRECHEN SIE AUGENBLICKLICHdas Spiel: verändertes Sehvermögen, Augen- und Muskelzuckungen, unwillkürliche Be-
wegungen, Desorientierung, Wahrnehmungsverlust der Umgebung, geistige Verwirrung,
Schwindelgefühle und/oder Krämpfe. Befragen Sie Ihren Arzt!
BEACHTE BEIM SPIELEN STETS FOLGENDE HINWEISE:1. Halte den größtmöglichen Abstand zum Bildschirm!2. Videospiele immer auf einem TV-Gerät mit möglichst kleinem Bildschirm spielen.3. Verzichte auf das Spielen, wenn du erschöpft bist oder Schlaf benötigst.4. Spiele stets in einem gut beleuchteten Raum.5. Achte darauf, pro Stunde etwa 10 bis 15 Minuten Pause zu machen.
Bei einigen Personen kann es nach längerer Spieldauer zu Ermüdungserscheinungen oder Un-behagen kommen. Beachte folgende Hinweise, um solche Erscheinungen zu vermeiden.• Unabhängig davon, wie du dich fühlst, solltest du in jedem Fall stündlich eine Pause
von 10 bis 15 Minuten einlegen. • Sollten deine Hände bzw. deine Arme ermüden oder fühlst du dich unwohl,
lege eine mehrstündige Erholungspause ein, bevor du weiterspielst. • Sollten die Beschwerden auch dann nicht abklingen, achte auf die Signale deines Körpers
und suche einen Arzt auf. Ansonsten könnten dauerhafte Schädigungen auftreten.
HALTE DICH BITTE AN DIESE ANWEISUNGEN, DA DIE BATTERIEN SONST ZERSTÖRT WERDEN KÖNNTEN,WAS DEN AUSTRITT VON BATTERIESÄURE ZUR FOLGE HAT. BATTERIESÄURE KANN VERÄTZUNGEN ANHAUT UND KLEIDUNG VERURSACHEN SOWIE DEN GAME BOY ADVANCE, DIE RUMBLE CARTRIDGE BZW.DAS ZUBEHÖR BESCHÄDIGEN UND UNBRAUCHBAR MACHEN. SOLLTE BATTERIESÄURE AUSTRETEN,WASCHE DIE DAMIT IN KONTAKT GEKOMMENEN HAUTPARTIEN UND KLEIDUNGSSTÜCKE GRÜNDLICH MIT KLAREM WASSER. BRINGE BATTERIESÄURE NIEMALS MIT AUGEN ODER MUND IN KONTAKT. (WEGENWEITERER INFORMATIONEN WENDE DICH BITTE AN DEN BATTERIEHERSTELLER!)
▲! WARNUNG – BATTERIEHINWEIS
▲! WARNUNG – ÜBERANSTRENGUNGS-HINWEIS
▲! WARNUNG – EPILEPSIEHINWEIS
19
AGB-EUR_A_8 26.09.2007 13:08 Uhr Seite 18
COPY
2 Information
1. Verwende für den Game Boy Advance ausschließlich Alkali-Batterien. Setze keine Zink-Kohle- oder sonstige, nicht-alkalische Batterien ein.
2. Verwende niemals verbrauchte und frische Batterien zur gleichen Zeit. Tausche immer denkompletten Satz aus.
3. Lege die Batterien nie entgegengesetzt der Anweisung ein (der Plus- und der Minus-Polmüssen in die korrekte Richtung zeigen!). Du darfst Batterien nicht kurzschließen.
4. Entferne verbrauchte Batterien aus deinem Game Boy Advance bzw. aus der Rumble Cartridge. 5. Setze niemals verschiedenartige Batterietypen ein, sondern immer nur solche mit gleicher
Zusammensetzung bzw. aus gleicher Herstellung.6. Wenn du deinen Game Boy Advance, Zubehör oder deine Rumble Cartridge über einen
längeren Zeitraum nicht benutzt, solltest du die Batterien entfernen.7. Sollten die Batterien leer sein, vergiss nicht, den Game Boy Advance auszuschalten.
Schalte den Game Boy Advance außerdem stets aus, wenn du nicht mehr spielst.8. Wirf die leeren Batterien niemals ins Feuer oder in den Hausmüll, sondern gib die Batterien
bei einer Sammelstelle ab. (Auskünfte über entsprechende Sammelstellen erteilt deine Stadtbzw. Gemeinde.)
9. Verwende keine aufladbaren Batterien, wie beispielsweise Nickel-Cadmium-Batterien. Versuche nicht, herkömmliche Batterien wieder aufzuladen.
10. Batterien, deren äußere Hülle in irgendeiner Weise beschädigt ist, darfst du unter keinenUmständen benutzen!
11. Lege keine Batterien ein bzw. entferne keine Batterien, während der Game Boy Advanceeingeschaltet ist.
12. ALLGEMEINE INFORMATION: Wiederaufladbare Batterien müssen vor dem Aufladen aus dem Game Boy Advance entfernt werden. Das Aufladen von Batterien darf nur unterAufsicht eines Erwachsenen erfolgen.
In dieser Bedienungsanleitung wird die bisher erschienene Hard- und Software für den OriginalGame Boy™, Game Boy™ pocket und Game Boy™ Color, ebenso wie die Geräte selbst, als der Game Boy-Serie zugehörig beziehungsweise als Game Boy-Serie bezeichnet. Je nachZusammenhang finden jedoch auch die jeweiligen Ursprungsbegriffe Verwendung.
HERAUSRAGENDE MERKMALE DES GAME BOY ADVANCE– Blickwinkel-unabhängiger TFT (Thin-Film Transistor) Farb-Flüssigkristall-Bildschirm
mit einer Darstellung von bis zu 32.000 Farben gleichzeitig und einer Bildschirmdiagonale von 2,9 Zoll (circa 7,4 cm).
– ARM 32-Bit-RISC-Prozessor mit integriertem Speicher.– Kompatibel* zum Game Boy und Game Boy Color.– Bis zu vier Spieler können mit entsprechend gekennzeichneten Game Boy Advance-Spielen
unter Verwendung des Game Boy Advance Game Link™-Kabels (separat erhältlich) miteinander spielen.
*HINWEIS: Es kann vorkommen, dass einige Spiele der Game Boy-Serie nichteinwandfrei mit dem Game Boy Advance funktionieren.20 21
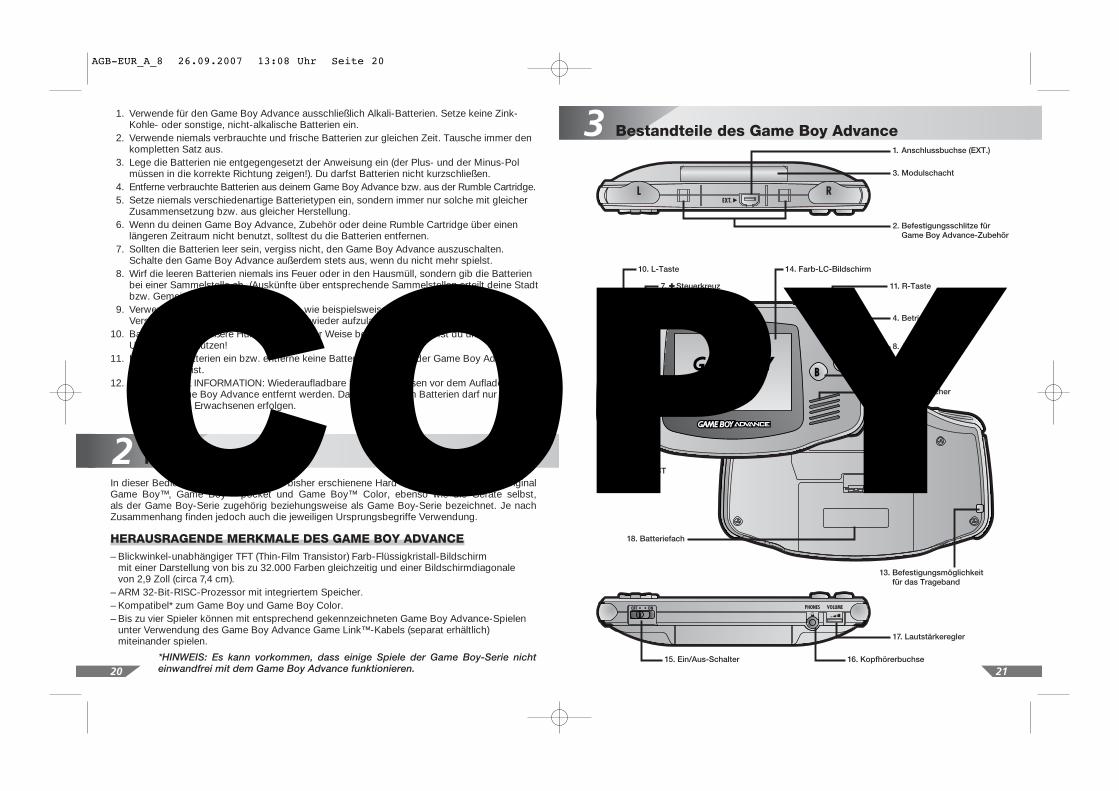
3 Bestandteile des Game Boy Advance1. Anschlussbuchse (EXT.)
3. Modulschacht
2. Befestigungsschlitze für Game Boy Advance-Zubehör
5. START
18. Batteriefach
15. Ein/Aus-Schalter 16. Kopfhörerbuchse
17. Lautstärkeregler
13. Befestigungsmöglichkeitfür das Trageband
6. SELECT
11. R-Taste
9. B-Knopf
8. A-Knopf
4. Betriebsanzeige
12. Lautsprecher
10. L-Taste
7. ✚ Steuerkreuz
14. Farb-LC-Bildschirm
AGB-EUR_A_8 26.09.2007 13:08 Uhr Seite 20
COPY
23
6 Unterscheidung von Modulen
Es gibt vier unterschiedliche Module, die in Verbindung mit einem Game Boy Advance verwen-det werden können:
Typ 1: Original Game Boy-Module unterstützen sowohl den Game Boy Advance und den GameBoy Color (unter Verwendung von vier bis zehn Farben, siehe dazu auch Kapitel 8) alsauch den herkömmlichen Game Boy und den Game Boy pocket (unter Verwendung vonvier Graustufen).
Typ 2: Duale Game Boy-Module unterstützen sowohl den Game Boy Advance und den GameBoy Color (unter Verwendung von bis zu 56 Farben aus einer Palette von bis zu 32.000darstellbaren Farben) sowie den Original Game Boy und den Game Boy pocket (unterVerwendung von vier Graustufen).
Typ 3: Vollfarb-Module unterstützen ausschließlich den Game Boy Advance und den GameBoy Color (unter Verwendung von bis zu 56 Farben aus einer Palette von bis zu 32.000darstellbaren Farben).
Typ 4: Game Boy Advance-Module mit Breitbild-Format unterstützen ausschließlich den GameBoy Advance (unter Verwendung von bis zu 32.000 Farben).
Aufgrund technischer Unterschiede kann es bei
einigen älteren Game Boy-Modulen zu Problemen
bei der Bild- und Tonwiedergabe kommen. Game
Boy Color-Spiele können aufgrund der Bildschirm-
eigenschaften des Game Boy Advance dunkler
erscheinen.
HINWEIS: Du kannst bei Modulen des Typs 1, 2 und 3die Bildschirmgröße verändern, indem du entwederdie L- oder die R-Taste drückst. (Durch das veränderteBildschirmformat kann es zu Problemen beim Erken-nen des Bildschirminhaltes kommen.)
Anzeigeformat bei Spielen des Typs
1, 2 und 3.
AusschließlichesAnzeigeformat bei
Spielen des Typs 4.
HINWEIS: Die Betriebsanzeige wechselt ihre Farbe von grün zu rot, sobald die verbleibendeEnergie der Batterien unter 20 – 30 % fällt. Wenn die Energie der Batterien nahezu erschöpft ist,wird die Betriebsanzeige schwächer. Wenn du ein Spiel mit Speicherfunktion spielst, solltestdu diese unverzüglich nutzen und danach die Batterien ersetzen.
• Du darfst nicht wiederaufladefähige Batterien nicht aufladen. • Verschiedene Batterietypen sowie gebrauchte und neue Batterien sollten nicht zusammen
verwendet werden! • Verbrauchte Batterien sollten unverzüglich aus dem Game Boy Advance entfernt werden.
4 Beschreibung der Bestandteile
5 Einlegen der Batterien
1. Anschlussbuchse (EXT.) – Sie ermöglicht die Verbindung zu einem weiteren Game Boy-System oder den Anschluss von Zubehör der Game Boy–Serie.
2. Befestigungsschlitze für Game Boy Advance-Zubehör – Diese Schlitze dienen der Befestigung von Game Boy Advance-Zubehör.
3. Modulschacht – Zum Einlegen der Spielmodule.4. Betriebsanzeige (POWER) – Sobald der Game Boy Advance eingeschaltet ist, leuchtet
diese Lampe grün auf. Bei Verwendung von Alkali-Batterien wechselt die Betriebsanzeigevon grün zu rot, sobald die verbleibende Energie der Batterien unter 20 – 30 % fällt. Wenndie Helligkeit der Betriebsanzeige nachlässt, solltest du umgehend die Batterien wechseln.
5. – 11. Steuerungselemente – Mit diesen Knöpfen bzw. Tasten führst du die Funktionen des Spiels aus. Lies bitte die entsprechende Spielanleitung, um dich über die jeweiligeTastenbelegung zu informieren.
12. Lautsprecher – Wiedergabe des Spiel-Sounds in Mono. Schaltet sich automatisch aus,wenn ein Kopfhörer in die Kopfhörerbuchse gesteckt wird.
13. Befestigungsmöglichkeit für das Trageband – An dieser Stelle kannst du ein Tragebandbefestigen.
14. Farb-LC-Bildschirm – Blickwinkel-unabhängiger TFT (Thin-Film Transistor) Farb-Flüssig-kristall-Bildschirm mit 2,9 Zoll (circa 7,4 cm) Diagonale und einer gleichzeitigen Darstellungvon bis zu 32.000 Farben.
15. Ein/Aus-Schalter – Zum Einschalten des Game Boy Advance nach rechts schieben.HINWEIS: Schalte den Game Boy Advance nur ein, wenn ein Spielmodul eingelegt ist.
16. Kopfhörerbuchse (PHONES) – Für den Anschluss eines Stereokopfhörers.17. Lautstärkeregler (VOLUME) – Drehe den Regler nach rechts, um die Lautstärke
zu reduzieren.18. Batteriefach – Entferne den Batteriefachdeckel und lege zwei AA (LR 6)-Batterien
korrekt in das Batteriefach. Alternativ dazu kannst du auch das Game Boy Advance-AC-DC-Adapterset verwenden.
Entferne den Batteriefachdeckel auf der Rückseite des Game Boy Advance und lege zwei AA(LR 6)-Batterien korrekt in das Batteriefach. Verwende am besten zwei neue Alkali-Batterien,um eine einwandfreie Funktion des Game Boy Advance zu garantieren. Du darfst keine wieder-aufladbaren Nickel-Cadmium-, Nickel-Eisen- oder Zink-Kohle-Batterien sowieandere nichtalkalische Batterien verwenden.
ACHTUNG: Achte beim Einlegen der Batterien darauf, dass derpositive (+) und der negative (–) Pol in die richtige Richtungzeigen. Beachte außerdem, dass du die Batterien mit demMinuspol (–) zuerst in das Batteriefach einlegst. Beim Ent-fernen sollte der Pluspol (+) zuerst vom Kontakt genommen
werden.Abbildung 122
AGB-EUR_A_8 26.09.2007 13:08 Uhr Seite 22
COPY
25
9 Verwendung von Game Boy Advance-Modulen
24
• Während eines Spiels lässt sich die Farbpalette nicht mehr ändern.• Nachdem eine bestimmte Farbpalette eingestellt worden ist, lässt sie sich nicht mehr wech-
seln. Schalte den Game Boy Advance aus, warte einige Sekunden und schalte ihn wieder ein,falls du eine andere Farbeinstellung wünschst, um eine andere Palette auswählen zu können.
• Bei Modulen für Game Boy Advance, Game Boy Color und dualen Modulen für Game BoyColor & Game Boy lässt sich die Farbpalette nicht verändern.
• Bei manchen der gewählten Farbpaletten kann es zu Schwierigkeiten bei der Erkennung derBildschirminhalte kommen.
ERLÄUTERUNG ZUM ZUBEHÖRMit dem Game Boy Advance-Zubehör (separat erhältlich) erschließt sich eine Vielzahl neuer Mög-lichkeiten. Eine entsprechende Kennzeichnung auf dem Spielmodul und in der Spielanleitungzeigt an, welches Zubehör unterstützt wird.
HINWEIS: Lies bitte die jeweilige Bedienungsanleitung genau durch, um das Zubehör ord-nungsgemäß in Betrieb nehmen zu können.
ANSCHLIESSEN DES GAME BOY ADVANCE GAME LINK-KABELS (AGB-005)Das Game Boy Advance Game Link-Kabel (AGB-005) ist ausschließlich zur Verwendung mitGame Boy Advance-Modulen geeignet. Dieses Kabel wird verwendet, wenn im Mehrspieler-Modus ausschließlich Game Boy Advance-Systeme zum Einsatz kommen. Verbinde dazu dieStecker des Kabels mit den Anschlussbuchsen.
HINWEIS: Bei Verwendung dieses Kabels in Verbindung mit Modulen der Game Boy-Seriekann es zu einem Datenverlust kommen.
Die Anschlussbuchse und der Modulschacht dienen auch der Verwendung von weiterem, vonNintendo lizenziertem Game Boy Advance-Zubehör. Lies bitte die Bedienungsanleitung desjeweiligen Zubehörs, um weitere Informationen zur jeweiligen Verwendung zu erhalten.
HINWEIS: Verwende in Verbindung mit einem Game Boy Advance-Modul an der Anschluss-buchse ausschließlich Game Boy Advance-Zubehör. Andernfalls kann es zu Fehlfunktionenbeim Game Boy Advance-System oder dem jeweiligen Zubehör kommen.
7
8 Anpassen der Farbe
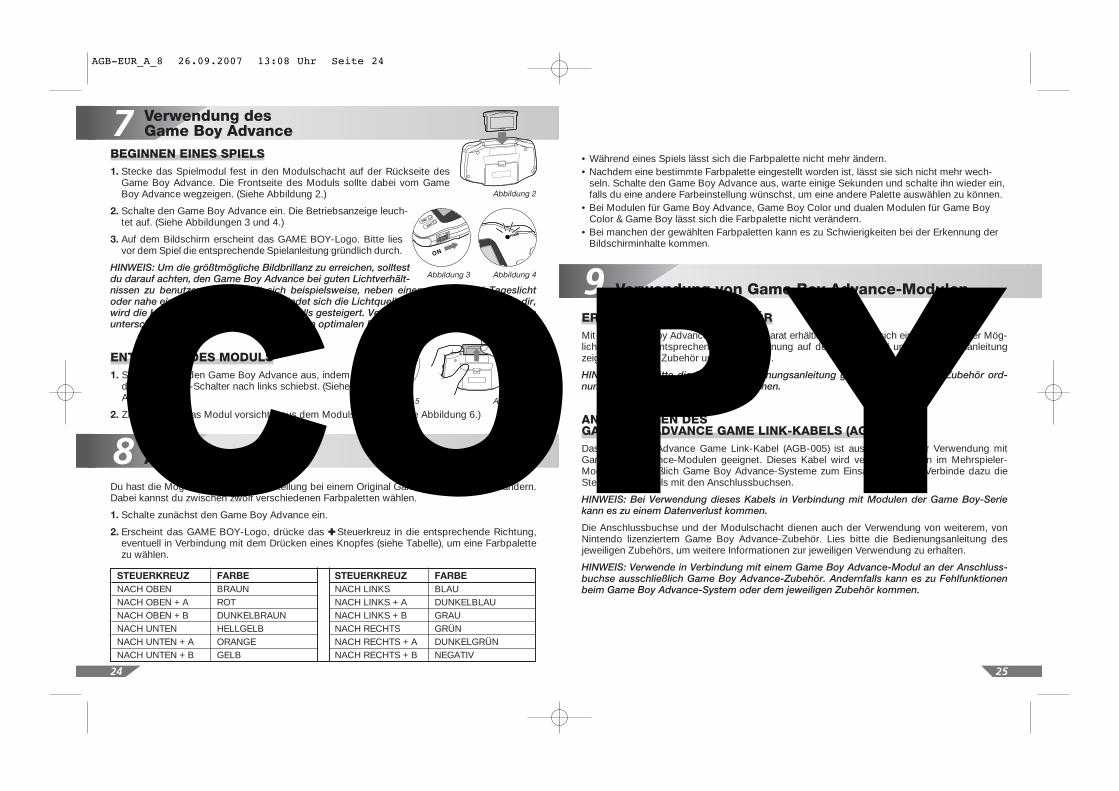
BEGINNEN EINES SPIELS1. Stecke das Spielmodul fest in den Modulschacht auf der Rückseite des
Game Boy Advance. Die Frontseite des Moduls sollte dabei vom GameBoy Advance wegzeigen. (Siehe Abbildung 2.)
2. Schalte den Game Boy Advance ein. Die Betriebsanzeige leuch-tet auf. (Siehe Abbildungen 3 und 4.)
3. Auf dem Bildschirm erscheint das GAME BOY-Logo. Bitte liesvor dem Spiel die entsprechende Spielanleitung gründlich durch.
HINWEIS: Um die größtmögliche Bildbrillanz zu erreichen, solltestdu darauf achten, den Game Boy Advance bei guten Lichtverhält-nissen zu benutzen. Es empfielt sich beispielsweise, neben einem Fenster bei Tageslichtoder nahe einer Lampe zu spielen. Befindet sich die Lichtquelle hinter oder oberhalb von dir,wird die Helligkeit des Bildschirms ebenfalls gesteigert. Versuche den Game Boy Advance inunterschiedlichen Winkeln zu halten, um den optimalen Blickwinkel zu finden.
ENTFERNEN DES MODULS1. Schalte zuerst den Game Boy Advance aus, indem
du den Ein/Aus-Schalter nach links schiebst. (SieheAbbildung 5.)
2. Ziehe danach das Modul vorsichtig aus dem Modulschacht. (Siehe Abbildung 6.)
Du hast die Möglichkeit, die Farbdarstellung bei einem Original Game Boy-Modul zu verändern.Dabei kannst du zwischen zwölf verschiedenen Farbpaletten wählen.
1. Schalte zunächst den Game Boy Advance ein.
2. Erscheint das GAME BOY-Logo, drücke das ✚ Steuerkreuz in die entsprechende Richtung,eventuell in Verbindung mit dem Drücken eines Knopfes (siehe Tabelle), um eine Farbpalettezu wählen.
STEUERKREUZ FARBE
NACH OBEN BRAUNNACH OBEN + A ROTNACH OBEN + B DUNKELBRAUNNACH UNTEN HELLGELBNACH UNTEN + A ORANGENACH UNTEN + B GELB
STEUERKREUZ FARBE
NACH LINKS BLAUNACH LINKS + A DUNKELBLAUNACH LINKS + B GRAUNACH RECHTS GRÜNNACH RECHTS + A DUNKELGRÜNNACH RECHTS + B NEGATIV
Verwendung des Game Boy Advance
Abbildung 2
ON
Abbildung 3 Abbildung 4
Abbildung 6
OFF
Abbildung 5
AGB-EUR_A_8 26.09.2007 13:08 Uhr Seite 24
COPY
27
10 Verwendung von Modulen der Game Boy-Serie
26
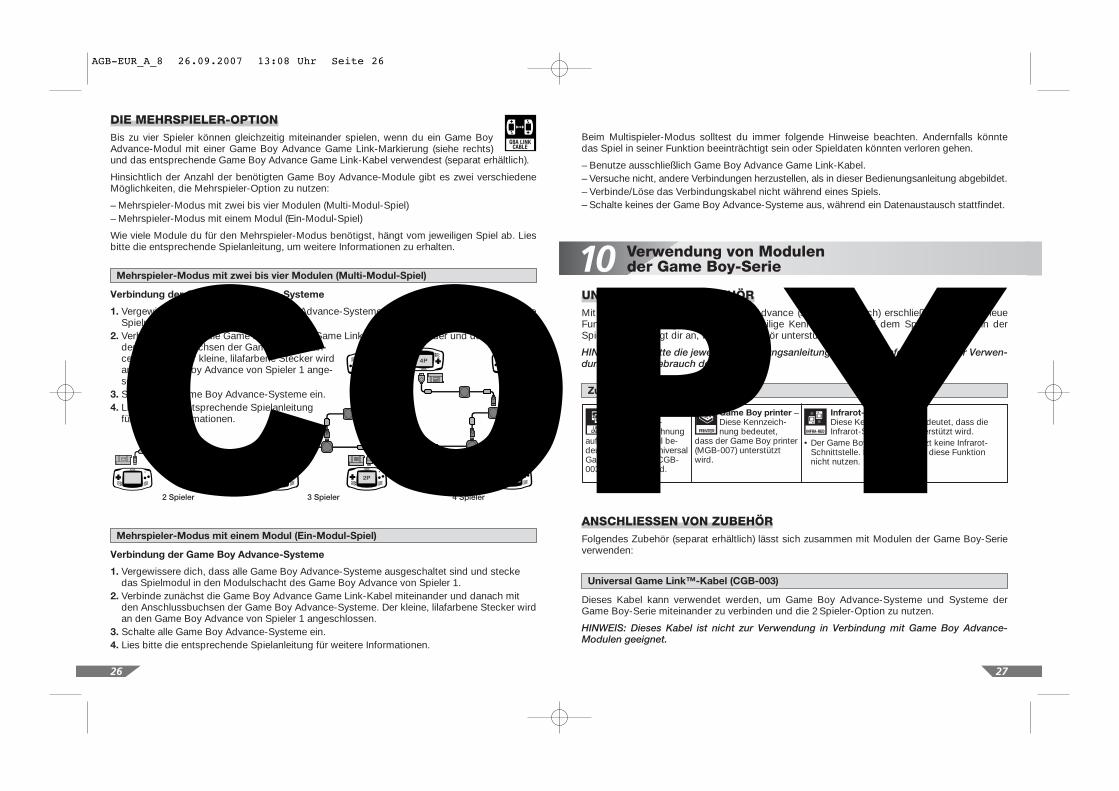
Mehrspieler-Modus mit zwei bis vier Modulen (Multi-Modul-Spiel)
Verbindung der Game Boy Advance-Systeme
1. Vergewissere dich, dass alle Game Boy Advance-Systeme ausgeschaltet sind und stecke dieSpielmodule in die Modulschächte.
2. Verbinde zunächst die Game Boy Advance Game Link-Kabel miteinander und danach mitden Anschlussbuchsen der Game Boy Advan-ce-Systeme. Der kleine, lilafarbene Stecker wirdan den Game Boy Advance von Spieler 1 ange-schlossen.
3. Schalte alle Game Boy Advance-Systeme ein.4. Lies bitte die entsprechende Spielanleitung
für weitere Informationen.
Mehrspieler-Modus mit einem Modul (Ein-Modul-Spiel)
Verbindung der Game Boy Advance-Systeme
1. Vergewissere dich, dass alle Game Boy Advance-Systeme ausgeschaltet sind und steckedas Spielmodul in den Modulschacht des Game Boy Advance von Spieler 1.
2. Verbinde zunächst die Game Boy Advance Game Link-Kabel miteinander und danach mitden Anschlussbuchsen der Game Boy Advance-Systeme. Der kleine, lilafarbene Stecker wirdan den Game Boy Advance von Spieler 1 angeschlossen.
3. Schalte alle Game Boy Advance-Systeme ein.4. Lies bitte die entsprechende Spielanleitung für weitere Informationen.
Beim Multispieler-Modus solltest du immer folgende Hinweise beachten. Andernfalls könntedas Spiel in seiner Funktion beeinträchtigt sein oder Spieldaten könnten verloren gehen.
– Benutze ausschließlich Game Boy Advance Game Link-Kabel.– Versuche nicht, andere Verbindungen herzustellen, als in dieser Bedienungsanleitung abgebildet.– Verbinde/Löse das Verbindungskabel nicht während eines Spiels.– Schalte keines der Game Boy Advance-Systeme aus, während ein Datenaustausch stattfindet.
3P4P
2P1P
3P
2P1P
2 Spieler 3 Spieler 4 Spieler
UNTERSTÜTZTES ZUBEHÖRMit dem Zubehör für den Game Boy Advance (separat erhältlich) erschließen sich viele neueFunktionen und Möglichkeiten. Die jeweilige Kennzeichnung auf dem Spielmodul und in derSpielanleitung zeigt dir an, welches Zubehör unterstützt wird.
HINWEIS: Lies bitte die jeweilige Bedienungsanleitung für weitere Informationen zur Verwen-dung und zum Gebrauch des Zubehörs.
Zubehör für die Game Boy-Serie
ANSCHLIESSEN VON ZUBEHÖRFolgendes Zubehör (separat erhältlich) lässt sich zusammen mit Modulen der Game Boy-Serieverwenden:
Universal Game Link™-Kabel (CGB-003)
Dieses Kabel kann verwendet werden, um Game Boy Advance-Systeme und Systeme derGame Boy-Serie miteinander zu verbinden und die 2 Spieler-Option zu nutzen.
HINWEIS: Dieses Kabel ist nicht zur Verwendung in Verbindung mit Game Boy Advance-Modulen geeignet.
Universal GameLink-Kabel – Die Kennzeichnung
auf dem Spielmodul be-deutet, dass das UniversalGame Link-Kabel (CGB-003) unterstützt wird.
Game Boy printer –Diese Kennzeich-nung bedeutet,
dass der Game Boy printer(MGB-007) unterstütztwird.
PRINTER
Infrarot-Schnittstelle – Diese Kennzeichnung bedeutet, dass dieInfrarot-Schnittstelle unterstützt wird.
• Der Game Boy Advance besitzt keine Infrarot-Schnittstelle. Daher kannst du diese Funktionnicht nutzen.
DIE MEHRSPIELER-OPTIONBis zu vier Spieler können gleichzeitig miteinander spielen, wenn du ein Game BoyAdvance-Modul mit einer Game Boy Advance Game Link-Markierung (siehe rechts)und das entsprechende Game Boy Advance Game Link-Kabel verwendest (separat erhältlich).
Hinsichtlich der Anzahl der benötigten Game Boy Advance-Module gibt es zwei verschiedeneMöglichkeiten, die Mehrspieler-Option zu nutzen:
– Mehrspieler-Modus mit zwei bis vier Modulen (Multi-Modul-Spiel)– Mehrspieler-Modus mit einem Modul (Ein-Modul-Spiel)
Wie viele Module du für den Mehrspieler-Modus benötigst, hängt vom jeweiligen Spiel ab. Liesbitte die entsprechende Spielanleitung, um weitere Informationen zu erhalten.
AGB-EUR_A_8 26.09.2007 13:08 Uhr Seite 26
COPY
28
Verbindung der Game Boy-Systeme
1. Vergewissere dich zunächst, dass alle Geräte ausgeschaltet sind und stecke die Spielmodulein den Modulschacht.
2. Verbinde das Universal Game Link-Kabel mit den beiden Anschlussbuchsen.3. Schalte danach alle Geräte ein.4. Lies die jeweiligen Gebrauchsanweisungen für weitere Informationen.
2 SPIELER-OPTIONDu kannst die 2 Spieler-Option nutzen, wenn die verwendeten Spielmodule ein Game Link-Kabel unterstützen.
Bei Verwendung eines Game Boy Advance (AGB-001), Game Boy Color (CGB-001), Game
Boy pocket (MGB-001) oder Original Game Boy (DMG-001) benötigst du ein Universal
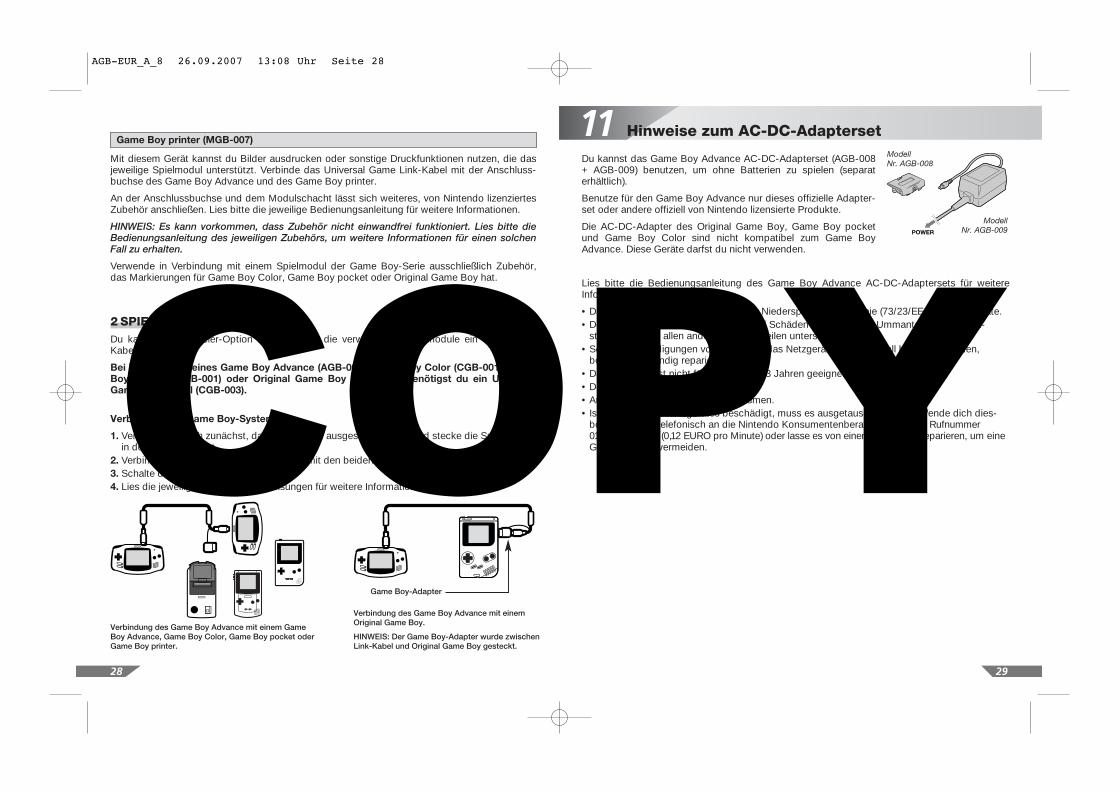
Game Link-Kabel (CGB-003).
Verbindung des Game Boy Advance mit einem GameBoy Advance, Game Boy Color, Game Boy pocket oderGame Boy printer.
Verbindung des Game Boy Advance mit einem Original Game Boy.
HINWEIS: Der Game Boy-Adapter wurde zwischenLink-Kabel und Original Game Boy gesteckt.
Game Boy-Adapter
Game Boy printer (MGB-007)
Mit diesem Gerät kannst du Bilder ausdrucken oder sonstige Druckfunktionen nutzen, die dasjeweilige Spielmodul unterstützt. Verbinde das Universal Game Link-Kabel mit der Anschluss-buchse des Game Boy Advance und des Game Boy printer.
An der Anschlussbuchse und dem Modulschacht lässt sich weiteres, von Nintendo lizenziertesZubehör anschließen. Lies bitte die jeweilige Bedienungsanleitung für weitere Informationen.
HINWEIS: Es kann vorkommen, dass Zubehör nicht einwandfrei funktioniert. Lies bitte dieBedienungsanleitung des jeweiligen Zubehörs, um weitere Informationen für einen solchenFall zu erhalten.
Verwende in Verbindung mit einem Spielmodul der Game Boy-Serie ausschließlich Zubehör,das Markierungen für Game Boy Color, Game Boy pocket oder Original Game Boy hat.
29
11 Hinweise zum AC-DC-Adapterset
Du kannst das Game Boy Advance AC-DC-Adapterset (AGB-008+ AGB-009) benutzen, um ohne Batterien zu spielen (separaterhältlich).
Benutze für den Game Boy Advance nur dieses offizielle Adapter-set oder andere offiziell von Nintendo lizensierte Produkte.
Die AC-DC-Adapter des Original Game Boy, Game Boy pocketund Game Boy Color sind nicht kompatibel zum Game BoyAdvance. Diese Geräte darfst du nicht verwenden.
Lies bitte die Bedienungsanleitung des Game Boy Advance AC-DC-Adaptersets für weitereInformationen.
• Das spezielle Netzgerät entspricht der Niederspannungsrichtlinie (73/23/EEC) für Netzgeräte.• Der Transformator muss regelmäßig auf Schäden am Kabel, der Ummantelung des Netz-
steckers und an allen anderen Bestandteilen untersucht werden. • Sollten Beschädigungen vorliegen, darf das Netzgerät auf keinen Fall betrieben werden,
bevor es vollständig repariert wurde.• Das Spielzeug ist nicht für Kinder unter 3 Jahren geeignet.• Der Transformator ist kein Spielzeug.• Ausschließlich zum Gebrauch in Räumen.• Ist ein Kabel des Netzgerätes beschädigt, muss es ausgetauscht werden. Wende dich dies-
bezüglich bitte telefonisch an die Nintendo Konsumentenberatung unter der Rufnummer0180/5 00 58 06 (0,12 EURO pro Minute) oder lasse es von einem Fachmann reparieren, um eineGefährdung zu vermeiden.
Modell Nr. AGB-008
Modell Nr. AGB-009
AGB-EUR_A_8 26.09.2007 13:08 Uhr Seite 28
COPY
30
12 Problemlösungen
Funktioniert der Game Boy Advance trotz dieser Lösungshilfen nicht einwandfrei oder
solltest du noch Fragen haben, wende dich telefonisch an die Nintendo Konsumenten-
beratung unter der Rufnummer 0180/5005806 (DM 0,24/0,13 EURO pro Minute).
Problem
Es ist kein Bild auf dem Farb-LC-Bildschirm zu sehen,obwohl der Game Boy Advance eingeschaltet ist.
Das Bild erscheint blass bzw.matt.
Bei eingeschaltetem GameBoy Advance erscheinen horizontale Linien auf dem LC-Bildschirm.
Während des Spielens erklingtkein Ton aus dem Lautsprecherdes Game Boy Advance.
Die Mehrspieler-Option funktioniert nicht einwandfrei.
Lösung
• Schalte den Game Boy Advance aus, warte einige Sekunden und schalteihn danach erneut ein.
• Schalte den Game Boy Advance aus und ziehe das Spielmodul aus demModulschacht. Überprüfe die Kontakte, stecke das Spielmodul wieder in den Modulschacht und schalte den Game Boy Advance erneut ein.
• Überprüfe, ob die Batterien richtig eingelegt sind.• Verwendest du ein Game Link-Kabel, überprüfe bei ausgeschaltetem
Game Boy Advance, ob die Stecker des Kabels korrekt in die Buchseneingesteckt sind.
• Verwendest du ein Game Link-Kabel, vergewissere dich, dass in allenGame Boy Advance-Systemen das gleiche Spielmodul eingesteckt ist(siehe dazu auch Kapitel 9 und 10).
• Tausche die Batterien gegen neue aus.
• Tausche die alten Batterien gegen neue aus.
• Schalte den Game Boy Advance aus und ziehe das Spielmodul aus dem Spieleschacht. Stecke es erneut hinein und vergewissere dich, dass es vollständig eingeschoben wurde. Schalte danach den Game BoyAdvance ein.
• Überprüfe die Lautstärkeregelung.• Vergewissere dich, dass kein Kopfhörer an die Kopfhörerbuchse des
Game Boy Advance angeschlossen ist.• Es kann durchaus möglich sein, dass das Spiel in einigen Sequenzen
keinen Ton ausgibt.
• Schalte den Game Boy Advance aus. Vergewissere dich, dass sämtlicheStecker der Kabel korrekt in die Buchsen eingesteckt sind. Schalte dieGame Boy Advance-Systeme danach erneut ein.
• Schalte die Game Boy Advance-Systeme aus und ziehe die Spielmoduleaus dem Modulschacht. Überprüfe die Kontakte, stecke die Spielmodulewieder in die Modulschächte und schalte die Game Boy Advance-Systemeerneut ein.
• Vergewissere dich, dass die jeweiligen Spielmodule die Mehrspieler-Option unterstützen und dass in allen Modulschächten die gleichenSpielmodule eingesteckt sind.
• Vergewissere dich, dass du ein geeignetes Verbindungskabel verwendest(siehe dazu auch Kapitel 9 und 10).
24-MONATIGE GEWÄHRLEISTUNGFür einen Zeitraum von 24 Monaten ab dem Datum des Kaufs innerhalb des EuropäischenWirtschaftsraums gewährleistet die Nintendo of Europe GmbH wie folgt dem Käufer, dassdieses Produkt zum Zeitpunkt des Kaufs frei von Mängeln in Material und Verarbeitung ist:
• Nintendo wird andernfalls kostenfrei für den Käufer nach eigener freier Wahl dasmangelhafte Produkt entweder reparieren oder austauschen. Andere Ansprüchegegen Nintendo bestehen aufgrund dieser Gewährleistung nicht, insbesondere ergibtsich aus dieser Gewährleistung kein Anspruch auf Schadensersatz.
• Diese Gewährleistung greift nicht ein, wenn der Mangel dadurch entstanden ist, dassder Käufer und/oder irgendein Dritter nachlässig mit dem Produkt umgegangen sind,es in unvernünftiger Weise genutzt haben, es verändert oder nicht ordnungsgemäßrepariert oder es anders als in Übereinstimmung mit der von Nintendo herausgegebe-nen Bedienungsanleitung genutzt haben. Die Gewährleistung greift ferner nicht ein,wenn der Mangel durch eine zufällige Beschädigung des Produktes entstanden ist.
Es wird ausdrücklich darauf hingewiesen, dass diese Gewährleistung zusätzlich zu etwaigengesetzlichen Gewährleistungsansprüchen gewährt wird, die dem Käufer als Verbraucher
gegenüber demjenigen Einzelhändler zustehen können, von dem er das Produkt gekauft hat.Diese gesetzlichen Ansprüche werden durch die vorliegende Nintendo-Gewährleistung
in keiner Weise eingeschränkt.
Sollte ein Mangel vorliegen, der von dieser Gewährleistung erfasst wird, wenden Sie sich bitte an:
Nintendo of Europe GmbH Reparaturabteilung
Nintendo Center • 63760 Großostheim
Wenn Sie das Produkt an die Nintendo of Europe GmbH einschicken, verwenden Sie bitte, wenn möglich, die Originalverpackung und fügen Sie eine Beschreibung des aufgetretenen
Mangels sowie eine Kopie Ihres Kaufnachweises bei, aus dem das Kaufdatum ersichtlich ist.
Falls die 24-monatige Gewährleistungsfrist bereits abgelaufen ist oder der Mangel nicht von dieser Gewährleistung erfasst wird, wird die Nintendo of Europe GmbH möglicherweise
dennoch bereit sein, das Produkt zu reparieren oder auszutauschen. Für weitere Informationen hierzu und insbesondere zu den Einzelheiten etwaiger Kosten
für diesen Service wenden Sie sich bitte an:
Nintendo of Europe GmbH Konsumentenberatung
Tel.: 0180 / 5 00 58 06 (0,12 EURO pro Minute)
[0102/NOE/AGB-HW]
AGB-EUR_A_8 26.09.2007 13:08 Uhr Seite 30
COPY
[0102/NOE/AGB-HW]
Kompetente Hilfe bei allen Fragen rund um Nintendo –die Profis von der Nintendo Hotline helfen weiter!
Bei Spielefragen:
0190-000000 (Live-Operator)
(Jeder Anruf kostet nur 1,51 EURO!) Die Spieleberatung erreicht ihr
von Montag bis Freitag jeweils von 13 bis 17 Uhr!
Bei allgemeinen Fragen zum Thema Nintendo:
0180-5005806 (Live-Operator)
(Bundesweit 0,12 EURO pro Minute!) Die Nintendo Konsumentenberatung
erreicht ihr von Montag bis Freitag jeweils von 13 bis 17 Uhr!
Das Magazin!Bereits seit über zehn Jahren begleitet das CLUB NINTENDO-
Magazin treue Nintendo-Fans ALLE ZWEI MONATE durch das
unendliche Videospiel-Universum! In jeder Ausgabe werden neue
Bereiche der virtuellen Welt erschlossen, neue Spiele vorgestellt
und brandheiße News präsentiert. Zudem erwarten euch Tipps,
Tricks, Verlosungen, Comics, Leserbriefe und vieles mehr!
KOSTENLOS bei eurem Nintendo-Händler!
Das Abo!Für nur 15,31 EURO kommt das Club Nintendo-Magazin ein Jahr lang
alle zwei Monate direkt zu euch nach Hause. Auf diese Weise entgeht
euch keines der begehrten Hefte! Und das Beste: Der Preis beinhaltet
zusätzlich die POWER PRÄMIE, ein exklusives Nintendo-Gimmick nur für Abonnenten!
MORE THAN WORDSMORE THAN WORDS
www.nintendo.dein das Adressfeld des Browsers eingeben und das
Portal zum Newscenter von Nintendo öffnen! Brand-
heiße News, ständig neue Spielevorstellungen und der
kostenlose Newsletter halten euch über alle Entwick-
lungen des Nintendo-Universums auf dem Laufenden!
www.pokemon.deund ihr betretet den virtuellen Pokémon-Erlebnispark!
Euch erwarten News, Online-Games, Verlosungen, Spiele-
vorstellungen, Sounds, Videos und natürlich jede Menge
Pokémon! Natürlich habt ihr auch hier die Möglichkeit,
einen kostenlosen Newsletter zu abonnieren!
Die Nintendo SpieleberaterDie Ratgeber direkt von den Nintendo-Spieleprofis!
Ob Pokémon, Donkey Kong 64 oder The Legend Of
Zelda – diese Bücher verraten euch wichtige Tipps und
Tricks zum Bestehen großartiger Abenteuer. Inklusive
detaillierter Levelmaps, genauer Lösungsbeschrei-
bungen und jeder Menge original Illustrationen.
SpecialsClub Nintendo Specials informieren euch über
jede neue Hardwareentwicklung und bieten euch
einen umfangreichen Einblick in das Software-
angebot von Nintendo. Brandheiße Infos direkt
aus erster Hand!
VIRTUAL VISIONSVIRTUAL VISIONSHOTLINEHOTLINE
PLAYER SUPPORTPLAYER SUPPORT
AGB-EUR_A_8 26.09.2007 13:08 Uhr Seite 32
COPY
C(S
TD)A
GB
-FR
G-1
NOTIZEN
Leiste einen Beitrag zum Umweltschutz:Verbrauchte Batterien und Akkumulatoren (Akkus) gehören nicht in den Hausmüll.Wirf verbrauchte Batterien und Akkus nur in einen Sondermüllbehälter bzw. gib diese bei einerSammelstelle ab.Über Standorte der Sondermüllbehälter bzw. Sammelstellen informiert dich deine Gemeinde.
AGB-EUR_A_8 26.09.2007 13:08 Uhr Seite 34
COPY

hallo
freund
e!
der of
fiziell
e nintend
o-club
bietet
dir me
gastarke vo
rteile!
salut l
es cop
ains! le
magazin
e
officie
lduclub
nintend
ot’off
re
des me
ga-avant
ages!
C(S
TD)A
GB
-FR
G-1
AGB-EUR_A_8 26.09.2007 13:08 Uhr Seite 36
COPY

NOTIZEN
hallo
freund
e!
der of
fiziell
e nintend
o-
club bi
etet dir
mega-
starke
vortei
le!
AGB-EUR_A_8 26.09.2007 13:08 Uhr Seite 38
COPY
1 Informations et precautions d’emploi
A LIRE AVANT TOUTE UTILISATION D’UN JEU VIDEO PAR VOUS MEME OU PAR VOTRE ENFANT.
I – Précautions à prendre dans tous les cas pour l’utilisation d’un jeu vidéo
• Evitez de jouer si vous êtes fatigué ou si vous manquez de sommeil.• Assurez-vous que vous jouez dans une pièce bien éclairée en modérant la luminosité
de votre écran.• Lorsque vous utilisez un jeu vidéo suspectible d’être connecté à un écran, jouez à bonne
distance de cet écran de télévision et aussi loin que le permet le cordon de raccordement.• En cours d’utilisation, faites des pauses de dix à quinze minutes toutes les heures.
II – Avertissement sur l’épilepsie
Certaines personnes sont susceptibles de faire des crises d’épilepsie comportant, le cas échéant,des pertes de conscience à la vue, notamment, de certains types de stimulations lumineusesfortes: succession rapide d’images ou répétition de figures géométriques simples, d’éclairs oud’explosions. Ces personnes s’exposent à des crises lorsqu’elles jouent à certains jeux vidéocomportant de telles stimulations, alors même qu’elles n’ont pas d’antécédent médical ou n’ontjamais été sujettes elles-mêmes à des crises d’épilepsie.Si vous-même ou un membre de votre famille avez déjà présenté des symptômes liés à l’épilepsie(crise ou perte de conscience) en présence de stimulations lumineuses, consultez votre médecinavant toute utilisation.Les parents se doivent également d’être particulièrement attentifs à leurs enfants lorsqu’ils jouent avec des jeux vidéo. Si vous-même ou votre enfant présentez un des symptômes suivants : vertige, trouble de la vision, contraction des yeux ou des muscles, trouble de l’orien-tation, mouvement involontaire ou convulsion, perte momentanée de conscience, il faut cesserimmediatement de jouer et consulter un médecin.
Jouer aux jeux vidéo pendant plusieurs heures peut fatiguer vos muscles, articulations oumême votre peau. Suivez les instructions suivantes pour éviter des problèmes de tendinite, lesyndrome Carpal Tunnel ou des irritations de l’épiderme. • Faites une pause de 10 à 15 minutes toutes les heures de jeu, même si vous sentez bien.• Si vos mains, poignets ou bras sont fatigués ou douloureux quand vous jouez,
reposez-vous plusieurs heures avant de recommencer à jouer.• Si la fatigue ou douleur persiste, consultez un médecin.
LE NON-RESPECT DES INSTRUCTIONS SUIVANTES PEUT ENDOMMAGER LES PILES (BRUITS DE “POP”,FUITE D’ACIDE DE BATTERIE), LA CONSOLE, LES ACCESSOIRES OU VOUS CAUSER DES DOMMAGESCORPORELS. SI UNE FUITE D’ACIDE SE PRODUIT, LAVEZ A GRANDE EAU LES VETEMENTS ET LA PEAU.ELOIGNEZ LES PILES DE VOTRE BOUCHE ET DE VOS YEUX. RENSEIGNEZ-VOUS AUPRES DU FABRI-CANT DES PILES POUR PLUS D’INFORMATIONS.
▲! AVERTISSEMENT – BATTERIES RECHARGEABLES
▲! AVERTISSEMENT – TRAUMATISMES DUS A DES MOUVEMENTS REPETES
▲! AVERTISSEMENT SUR L’EPILEPSIE
4140
Table des Matières
1. Informations et precautions d’emploi . . . . . . . . . . . . . . . . . . . . . . . . . . . . . . . . . . . . . . . . . . . . 41
2. Contenu . . . . . . . . . . . . . . . . . . . . . . . . . . . . . . . . . . . . . . . . . . . . . . . . . . . . . . . . . . . . . . . . . . . . 42
3. Liste des composants . . . . . . . . . . . . . . . . . . . . . . . . . . . . . . . . . . . . . . . . . . . . . . . . . . . . . . . . . 43
4. Description des composants . . . . . . . . . . . . . . . . . . . . . . . . . . . . . . . . . . . . . . . . . . . . . . . . . . . 44
5. Installer les piles . . . . . . . . . . . . . . . . . . . . . . . . . . . . . . . . . . . . . . . . . . . . . . . . . . . . . . . . . . . . . 44
6. A propos des cartouches Game Boy Advance . . . . . . . . . . . . . . . . . . . . . . . . . . . . . . . . . . . . . 45
7. Utilisation du Game Boy Advance
Démarrer une partie . . . . . . . . . . . . . . . . . . . . . . . . . . . . . . . . . . . . . . . . . . . . . . . . . . . . . . . . 46
Retirer une cartouche . . . . . . . . . . . . . . . . . . . . . . . . . . . . . . . . . . . . . . . . . . . . . . . . . . . . . . 46
8. Changer la couleur de l’écran sur les cartouches Game Boy Original . . . . . . . . . . . . . . . . . . 46
9. Description des accessoires (en utilisant une cartouche Game Boy Advance)
A propos des accessoires . . . . . . . . . . . . . . . . . . . . . . . . . . . . . . . . . . . . . . . . . . . . . . . . . . . 47
Connecter un câble Game Boy Advance Game Link (AGB-005)
à votre Game Boy Advance . . . . . . . . . . . . . . . . . . . . . . . . . . . . . . . . . . . . . . . . . . . . . . . . . . 47
Jouer un jeu en mode Multi-joueur . . . . . . . . . . . . . . . . . . . . . . . . . . . . . . . . . . . . . . . . . . . 48
10. Description des accessoires (en utilisant une cartouche de la gamme Game Boy)
Accessoires compatibles . . . . . . . . . . . . . . . . . . . . . . . . . . . . . . . . . . . . . . . . . . . . . . . . . . . 49
Connecter un accessoire . . . . . . . . . . . . . . . . . . . . . . . . . . . . . . . . . . . . . . . . . . . . . . . . . . . 49
Jouer en mode deux joueurs . . . . . . . . . . . . . . . . . . . . . . . . . . . . . . . . . . . . . . . . . . . . . . . . . 50
11. Ensemble transformateur CA-CC . . . . . . . . . . . . . . . . . . . . . . . . . . . . . . . . . . . . . . . . . . . . . . . 51
12. En cas de problèmes (avant d’appeler le service consommateurs) . . . . . . . . . . . . . . . . . . . . 52
AGB-EUR_A_8 26.09.2007 13:08 Uhr Seite 40
COPY
43
3 Liste des composants
42
2 Contenu
1. N’utilisez que de spiles alcalines. N’utilisez pas de piles au carbone zinc ou tout autre type de pile non-alcaline.
2. Ne mélangez pas piles neuves et usées (remplacez-les toutes en même temps).3. Ne mettez pas les piles à l’envers (borne [+] sur borne [+] et borne [–] sur borne [–]).
Ne court-circuitez pas les bornes d'alimentation.4. Ne laissez pas de piles usées dans le Game Boy Advance. 5. N’utilisez que des piles de même type (alcalines).6. Ne laissez pas de piles dans la console ni d’accessoires connectés pendant de longues
périodes.7. Ne laissez pas la console en position ON lorsque les piles ont perdu leur puissance.
Eteignez la console (OFF).8. Ne jetez pas les piles au feu.9. N’utilisez pas de piles rechargeables comme les piles au nickel-cadmium.
Ne rechargez pas les piles non-rechargeables.10. N’utilisez pas de piles endommagées.11. N’insérez/retirez pas les piles quand la console est allumée.12. NOTE GENERALE: Les piles rechargeables doivent être retirées avant d'être rechargées.
Les piles rechargeables doivent être rechargées sous la surveillance d'un adulte.
MANUEL D’INSTRUCTIONS DU GAME BOY ADVANCEDans ce manuel, on fera référence aux jeux ou consoles Original Game Boy™, Game Boy™pocket and Game Boy™ Color sous le nom gamme Game Boy. Cependant on pourra y faireréférence sous leur véritable dénomination, selon le contexte.
NOUVELLES CARACTERISTIQUES DU GAME BOY ADVANCE– Ecran TFT 7,4 cm, affichage simultané de jusqu’à 32.000 couleurs.– Mémoire 32-Bit ARM intégrée.– Compatible* Game Boy et Game Boy Color.– Mode de jeu 2 à 4 joueurs pour toute cartouche avec port de communication dédié Game Boy
Advance et câble de communication approprié (vendu séparément).
*NOTE: certains jeux de la gamme Game Boy ne fonctionneront pas correctement avec leGame Boy Advance.
1. Connecteur d’ExtensionExterne (EXT.)
3. Port cartouche
2. Port de fixation d’accessoire
5. START
18. Couvercle du compartiment des piles
15. Bouton d’alimentation 16. Prise écouteur
17. Bouton de volume
13. Emplacement pour courroie
6. SELECT
11. Bouton R
9. Bouton B
8. Bouton A
4. Témoin d’alimentation
12. Haut parleur
10. Bouton L
7. Manette ✚
14. Ecran couleur à cristaux liquides
AGB-EUR_A_8 26.09.2007 13:08 Uhr Seite 42
COPY
45
6 A propos des cartouches Game Boy Advance
44
4 Description des composants
5 Installer les piles
1. Connecteur d’Extension Externe (EXT.) – Permet la connexion à tout Game Boy et à toutaccessoire de la gamme Game Boy.
2. Port accessoire – Permet la fixation de tout accessoire gamme Game Boy Advance.3. Port Cartouche – Réservé à l’insertion de cartouches de jeu.4. Témoin d’alimentation (POWER) – Cette petite diode est verte quand la console est
allumée. Lorsque la pile s’épuise, la lumière faiblit. Lorsqu’il reste 20 ou 30% d’énergie dans la batterie, le témoin d’alimentation passe du vert au rouge. Sauvegardez votre partieet remplacez les piles.
5. – 11. Boutons (START, SELECT, manette ✚, Bouton A, Bouton B, Bouton L, Bouton R) – Servent à intervenir pendant une partie. Voir les manuels de chaque jeu pour plus d’informations les fonctions attribuées à chaque bouton.
12. Haut-parleur – Produit un son Mono. N’émet pas de son quand des écouteurs sont branchés dans la prise casque (PHONES).
13. Emplacement pour courroie – Pour fixer une courroie de poignet.14. Ecran cristaux liquides couleur – Ecran TFT 7,4 cm à cristaux liquides, affichant simul-
tanément jusqu’à 32.000 couleurs.15. Interrupteur (ON/OFF) – Poussez l’interrupteur pour allumer la console.
NOTE: Eteignez toujours la console (OFF) avant d’insérer une cartouche.16. Prise casque (PHONES) – Pour connecter des écouteurs Stéréo.17. Bouton du volume (VOLUME) – Pour régler le volume. Tournez-le à droite pour monter
le son.18. Couvercle du compartiment des piles – retirez le couvercle à l’arrière du Game Boy
Advance et insérez deux piles AA (LR 6). Vous pouvez également utiliser l’adaptateur sec-teur pour Game Boy Advance pour connecter l’Unité d’alimentation.
Retirez le couvercle à l’arrière du Game Boy Advance et insérez deux piles AA (LR 6) commeindiqué ci-dessous. N’utilisez que des piles alcalines neuves de haute qualité. N’utilisez pas depiles au nickel-cadmium (nicad), nickel-métal hybride (nimh), carbon zinc ou toutautre type de pile non-alcaline.
Attention : Vérifiez toujours que vous insérez les piles dans lebon sens: borne (+) sur borne (+) et borne (–) sur borne (–)(voir schéma 1). Insérez le côté (–) en premier dans le com-partiment et retirez le côté (+) en premier.
Il existe quatre types de cartouches utilisables dans le Game Boy Advance.
Type 1 : Cartouches Game Boy Original, qui fonctionnent avec le Game Boy Advance, lesconsoles de la gamme Game Boy (en utilisant 4 – 10 couleurs, voir section 8 plusbas), le Game Boy Original et le Game Boy pocket (en utilisant 4 nuances de gris).
Type 2 : Cartouches Dual mode pour Game Boy & Game Boy Color, qui fonctionnent avec leGame Boy Advance, le Game Boy Color (en utilisant 56 couleurs sur 32.000), leGame Boy Original et le Game Boy pocket (en utilisant 4 nuances de gris).
Type 3 : Jeux tout en couleur (en utilisant 56 couleurs sur 32.000) qui ne fonctionnent qu’avecle Game Boy Advance et le Game Boy Color.
Type 4 : Jeux tout en couleur écran large (qui utilisent 32.000 couleurs) qui ne fonctionnentqu’avec le Game Boy Advance.
Quelques jeux Game Boy pourront ne pas fonc-
tionner correctement, causant quelques distorsions
d’affichage ou des problèmes de son. Les jeux
Game Boy Color peuvent apparaître plus foncés à
cause des spécifications de l’écran Game Boy
Advance.
NOTE : Vous pouvez jouer aux jeux de type 1, 2 ou 3en mode écran large en appuyant sur les boutons Let R (l’image pourra être distordue ou difficle à voiravec précision).
Taille de l’écran pour les jeux
de type 1, 2 ou 3.
Taille de l’écran pour les jeux
de type 4.
Schéma 1
NOTE : Lorsqu’il reste 20 ou 30 % d’énergie dans la batterie, le témoin d’alimentation passedu vert au rouge. Lorsque le témoin d'alimentation faiblit, cela signifie que les piles sontbientôt épuisées. Si vous jouez à un jeu avec piles pour sauvegarde intégrée, sauvegardezvotre partie et remplacez les piles dès que possible.
• Ne rechargez pas de piles non rechargeables. • Ne pas mélanger des piles de types différents ou des piles usagées avec des piles neuves. • Ne pas laisser de piles mortes dans l’appareil.
AGB-EUR_A_8 26.09.2007 13:08 Uhr Seite 44
COPY
47
9 Description des accessoires (en utilisant une cartouche Game Boy Advance)
• Vous ne pouvez pas changer la couleur de l’écran pendant le jeu.• Une fois que vous avez choisi une couleur, vous ne pourrez pas la modifier tant que
la console est allumée. Pour la modifier à nouveau, éteignez la console et rallumez-la.• La couleur de l’écran ne pourra pas être modifiée en utilisant une cartouche pour Game Boy
Advance, Game Boy Color ou une cartouche Dual mode pour Game Boy & Game Boy Color.• Certains schémas de couleur peuvent ne pas s’afficher clairement.
A PROPOS DES ACCESSOIRES En utilisant les accessoires (vendus séparément) pour Game Boy Advance, vous profiterezd’une multitude de fonctions supplémentaires. Vous trouverez des icônes sur les cartouches etles manuels de jeu qui indiquent quels sont les accessoires compatibles.
NOTE : Reportez-vous aux manuels d’instructions pour une bonne utilisation de ces acces-soires.
CONNECTER UN CÂBLE GAME BOY ADVANCE GAME LINK (AGB-005) A VOTRE GAME BOY ADVANCELe câble Game Boy Advance Game Link (AGB-005) ne peut être utilisé qu’avec des cartouchesGame Boy Advance pour une partie multi-joueurs avec des Game Boy Advance.
Insérez le câble de communication dans le Connecteur d’Extension Externe.
NOTE : L’utilisation de ce câble avec des cartouches de la gamme Game Boy peut entraînerdes pertes des données.
Vous pouvez également utiliser d’autres accessoires agréés par Nintendo qui se connectentdans le port cartouche. Reportez-vous aux manuels d’instructions adéquats pour plus d’infor-mations.
NOTE : Lorsque vous utilisez une cartouche pour Game Boy Advance, ne connectez que desaccessoires pour Game Boy Advance au Connecteur d’Extensions Externe. Vous pourriez, le cas échéant, causer des dysfonctionnements dans la console ou les accessoires.
46
7
8 Changer la couleur de l’écran sur les cartouches Game Boy Original
DEMARRER UNE PARTIE1. Insérez une cartouche de jeu dans le port cartouche à l’arrière du Game
Boy Advance. L’étiquette du jeu doit apparaître lorsque l’on retourne laconsole (voir schéma 2).
2. Allumez la console (ON). Le témoin d’alimentation s’allume (voirschémas 3 + 4).
3. L’écran affiche le logo GAME BOY. Lisez attentivement lemode d’emploi du jeu auquel vous allez jouer avant de com-mencer.
NOTE: Pour un contraste maximum sur votre Game Boy Advance,jouez dans un lieu bien éclairé. Jouer sous la lumière du soleilou celle d'une lampe est amplement suffisant. Une source lumineuse directement au-dessusde l'écran ou derrière le joueur optimisera le contraste du jeu. Essayez plusieurs angles pourun reflet optimal.
RETIRER UNE CARTOUCHE1. Eteignez la console (OFF) (voir schéma 5).
2. Retirez la cartouche de jeu avec précaution (voir schéma 6).
Si vous utilisez une cartouche Game Boy sur votre Game Boy Advance, vous pouvez changerla couleur de l’écran. Choisissez-la parmi 12 couleurs différentes.
1. Allumez la console.
2. Pendant l’affichage du logo GAME BOY, choisissez la couleur souhaitée dans la liste desschémas de couleurs. L’écran changera de couleur.
APPUYEZ VERS COULEUR
LE HAUT MARRONLE HAUT + BOUTON A ROUGELE HAUT + BOUTON B MARRON FONCELE BAS JAUNE PÂLELE BAS + BOUTON A ORANGELE BAS + BOUTON B JAUNE
APPUYEZ SUR COULEUR
LA GAUCHE BLEULA GAUCHE + BOUTON A BLEU FONCELA GAUCHE + BOUTON B GRISLA DROITE VERTLA DROITE + BOUTON A VERT FONCELA DROITE + BOUTON B RETOUR
Utilisation du Game Boy Advance
Schéma 2
ON
Schéma 3 Schéma 4
Schéma 6
OFF
Schéma 5
AGB-EUR_A_8 26.09.2007 13:08 Uhr Seite 46
COPY
4948
Jeu multi-joueurs 2 à 4 cartouches (jeu multi-cartouches)
Comment effectuer les connections
1. Vérifiez que le Game Boy Advance est éteint (OFF) et insérez la cartouche dans le port cartouche.
2. Connecter les câbles Game Boy Advance Game Link, puis connectez le Connecteur d’Extension Externe. Le Game Boy Advanceconnecté à la (petite) fiche 6 broches (violette)sera la console du joueur 1.
3. Allumez les consoles (ON).4. Reportez-vous au manuel d’instructions
pour plus de détails.
Jeu multi-joueurs 1 cartouche (jeu une cartouche)
Comment effectuer les connections
1. Vérifiez que le Game Boy Advance est éteint (OFF) et insérez la cartouche dans le port cartouche du Game Boy Advance du joueur 1.
2. Insérez les câbles Game Boy Advance Game Link, puis insérez-les dans le Connecteur d’Extension Externe afin de connecter la fiche 6 broches (violette) au port cartouche duGame Boy Advance du joueur 1.
3. Allumez les consoles (ON).4. Reportez-vous au manuel d’instructions pour plus de détails.
JOUER UN JEU EN MODE MULTI-JOUEURSSi vous utilisez une cartouche portant l’icône “Câble Game Boy Advance Game Link”et si vous possédez ce câble (vendu séparément), vous pourrez créer un mini-réseaude 2 à 4 joueurs.
Il existe deux façons de jouer en communication avec un câble Game Boy Advance Game Link:
– Jeu multi-joueurs 2 à 4 cartouches (jeu multi-cartouches).– Jeu multi-joueurs 1 cartouche (jeu une cartouche).
Le mode multi-joueur varie selon le jeu auquel vous jouez. Reportez-vous aux manuels d’instructions pour plus de détails.
Partie 2 joueurs Partie 3 joueurs
3P4P
2P1P
Partie 4 joueurs
3P
2P1P
10 Description des accessoires (en utilisant une cartouche de la gamme Game Boy)
Quand vous utilisez le mode de jeu multi-joueurs, suivez les instructions ci-dessous. Le caséchéant, le jeu pourrait mal fonctionner ou les données sauvées pourraient être effacées.
– N’utilisez que des câbles de communication dédiés Game Boy Advance.– Ne faites pas de connections non-mentionnées dans le manuel d’instructions.– Ne branchez/débranchez pas de câbles pendant le jeu.– N’éteignez pas la console pendant les liaisons de communication.
ACCESSOIRES COMPATIBLES Vous profiterez de fonctions beaucoup plus nombreuses en utilisant les accessoires pour lagamme Game Boy (vendus séparément). Les manuels d’instructions et les emballages portentdes icônes qui indiquent quels types d’accessoires sont compatibles.
NOTE : Reportez-vous aux manuels d’instruction pour plus de détails.
Accessoires pour cartouches de la gamme Game Boy
CONNECTER UN ACCESSOIREVous pouvez utiliser les accessoires suivants (vendus séparément) quand vous jouez avec unecartouche de la gamme Game Boy.
Câble Universal Game Link™ (CGB-003)
Vous pouvez utilisez ce câble en mode deux joueurs sur Game Boy Advance et sur les conso-les de la gamme Game Boy (sauf Game Boy).
NOTE : L’utilisation de ce câble avec des cartouches Game Boy Advance peut entraîner despertes des données.
Câble de commu-nication – L’icônesur la cartouche in-
dique si le câble UniversalGame Link (CGB-003) estcompatible.
L’ImprimanteGame Boy – L’icône sur la car-
touche indique que le l’Imprimante Game Boy(MGB-007) est compa-tible.
Port de communication infra-rouge –L’icône sur la cartouche indique que le portde communication infra-rouge Game Boy
Color est compatible.• Le Game Boy Advance ne possède pas de port
infra-rouge. Vous ne pouvez utiliser aucune fonction relative au port infra-rouge avec unGame Boy Advance (même si la cartouche estcompatible avec le port infra-rouge).
PRINTER
AGB-EUR_A_8 26.09.2007 13:08 Uhr Seite 48
COPY

50
Comment effectuer les connections
1. Vérifiez que les consoles sont éteintes (OFF) et insérez la cartouche dans le port cartouchedu Game Boy Advance du joueur 1.
2. Connectez le câble Game Link à chaque Connecteur d’Extension Externe.3. Allumez la console (ON).4. Reportez-vous au manuel d’instructions pour plus de détails.
JOUER EN MODE DEUX JOUEURSVous pouvez jouer en mode deux joueurs si vous utilisez des cartouches compatibles avec lecâble Game Link.
Si vous utilisez le Game Boy Advance (AGB-001), le Game Boy Color (CGB-001), le Game
Boy pocket (MGB-001) ou le Game Boy Original (DMG-001), vous aurez besoin du câble
Universal Game Link (CGB-003).
Connecter le Game Boy Advance à un autre Game BoyAdvance, Game Boy Color, Game Boy pocket ou l’Imprimante Game Boy.
Connecter le Game Boy Advance au Game BoyOriginal.
NOTE: l’adaptateur Game Boy a été branché àune extrémité du câble Game Link.
Adaptateur Game Boy
L’Imprimante Game Boy (MGB-007)
Cette mini-imprimante vous permet d’imprimer des images ou d’utiliser d’autres fonctionsd’impressions proposées par les cartouches. Connectez le câble Universal Game Link pourconnecter le Game Boy Advance et le Connecteur d’Extension Externe de l’Imprimante GameBoy.
Vous pouvez également utiliser le Connecteur d’Extension Externe pour d’autres accessoiresNintendo ou d’autres accessoires pour la gamme Game Boy qui se connectent au port car-touche. Reportez-vous aux manuels d’instructions adéquats pour de plus amples informations.
NOTE : Certains des accessoires peuvent ne pas fonctionner. Consultez les manuels d’instruc-tions adéquats pour plus d’informations.
Lorsque vous insérez une cartouche pour gamme Game Boy, utilisez des accessoires portantles icônes suivantes Game Boy Color, Game Boy pocket et Game Boy Original.
51
11 Ensemble transformateur CA-CC
L’Ensemble transformateur CA-CC du Game Boy Advance(AGB-009 et AGB-008) sert à alimenter le Game Boy Advance(vendu séparément).
Pour le Game Boy Advance, utilisez uniquement l’Ensembletransformateur CA-CC (AGB-009 + AGB-008) ou d’autres pro-duits licenciés par Nintendo.
N’utilisez PAS d’autres consoles avec cet Ensemble transforma-teur CA-CC.
Reportez-vous à la notice de l’Ensemble transformateur CA-CC pour plus de précisions.
• Le transformateur CA-CC est conforme à la directive de basse tension (73/23/EEC) sur les transformateurs CA-CC.
• Les transformateurs utilisés avec le jouet doivent être régulièrement examinés (fiche, cordon et autres parties) pour détecter d’éventuels défauts.
• Si le transformateur est endommagé, ne pas l’utiliser avant réparation.• Ce jouet ne convient pas aux enfants de moins de 3 ans.• Le transformateur n’est pas un jouet.• A utiliser en intérieur seulement.• Si le cordon du transformateur est endommagé, faites-le remplacer par le fabricant ou tout
autre réparateur compétent afin d’éviter tout accident.
AGB-008
AGB-009
AGB-EUR_A_8 26.09.2007 13:08 Uhr Seite 50
COPY
52
12 En cas de problèmes (avant d’appeler le service consommateurs)
Si votre Game Boy Advance ne fonctionne toujours pas après avoir essayé les solutions
suivantes, appelez le service consommateurs Nintendo.
Problème
La console est allumée maisl’écran n’affiche rien.
L’écran apparaît faiblement.
Des lignes horizontalesapparaissent quand la console est allumée (ON).
Aucun son ne sort du haut-parleur pendant la partie.
Les modes multi-joueurs nefonctionnent pas.
Solution
• Eteignez la console (OFF) et attendez quelques secondes. Rallumez ensuite la console (ON).
• Eteignez la console (OFF), retirez la cartouche et réinsérez-la. Rallumez ensuite la console.
• Vérifiez les piles.• Si vous utilisez un câble Game Link, éteignez la console (OFF),
vérifiez les connexions et réessayez.• Si vous utilisez un câble Game Link, vérifiez que les deux cartouches de jeu
sont identiques (voir sections 9 et 10).• Remplacez les piles par des piles neuves.
• Remplacez les piles par des piles neuves.
• Eteignez la console (OFF) retirez la cartouche et réintroduisez-la bien. Rallumez la console (ON).
• Ajustez le volume.• Vérifiez qu’il n’y a pas d’écouteurs branchés dans la prise PHONES (casque).• Certains jeux ne possèdent pas de bande son pendant certains moments.
• Eteignez la console (OFF). Vérifiez toutes les connexions de câbles, puis rallumez la console (ON)
• Eteignez la console (OFF). Retirez toutes les cartouches de jeu et réintroduisez-les bien. Rallumez la console (ON).
• Vérifiez que les cartouches incluent une fonction multi-joueurs et qu’elles sontbien identiques.
• Vérifiez que les câbles de liaison sont les bons. Revoyez les sections 9 et 10pour plus de détails.
AGB-EUR_A_8 26.09.2007 13:08 Uhr Seite 52
COPY
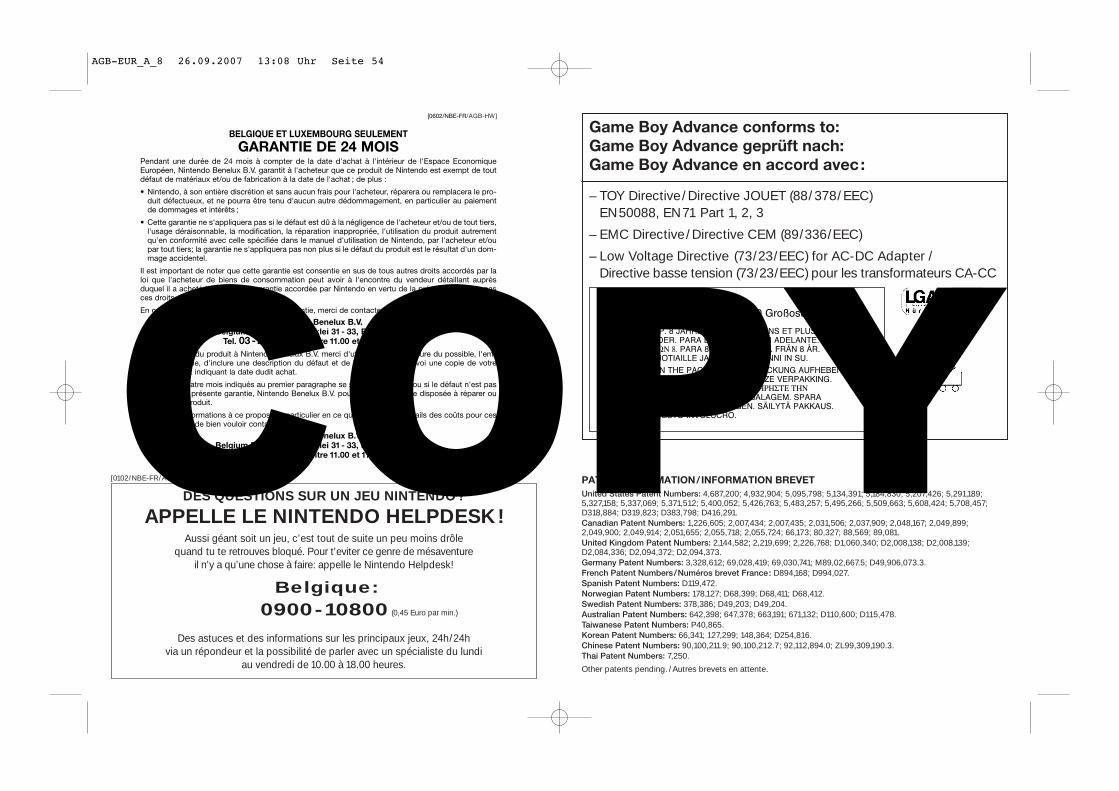
Game Boy Advance conforms to:
Game Boy Advance geprüft nach:
Game Boy Advance en accord avec:
– TOY Directive/Directive JOUET (88/378/EEC)EN50088, EN71 Part 1, 2, 3
– EMC Directive/Directive CEM (89/336/EEC)
– Low Voltage Directive (73/23/EEC) for AC-DC Adapter / Directive basse tension (73/23/EEC) pour les transformateurs CA-CC
PATENT INFORMATION/INFORMATION BREVET
United States Patent Numbers: 4,687,200; 4,932,904; 5,095,798; 5,134,391; 5,184,830; 5,207,426; 5,291,189;5,327,158; 5,337,069; 5,371,512; 5,400,052; 5,426,763; 5,483,257; 5,495,266; 5,509,663; 5,608,424; 5,708,457;D318,884; D319,823; D383,798; D416,291.Canadian Patent Numbers: 1,226,605; 2,007,434; 2,007,435; 2,031,506; 2,037,909; 2,048,167; 2,049,899;2,049,900; 2,049,914; 2,051,655; 2,055,718; 2,055,724; 66,173; 80,327; 88,569; 89,081.United Kingdom Patent Numbers: 2,144,582; 2,219,699; 2,226,768; D1,060,340; D2,008,138; D2,008,139;D2,084,336; D2,094,372; D2,094,373.Germany Patent Numbers: 3,328,612; 69,028,419; 69,030,741; M89,02,667.5; D49,906,073.3.French Patent Numbers/Numéros brevet France: D894,168; D994,027.Spanish Patent Numbers: D119,472.Norwegian Patent Numbers: 178,127; D68,399; D68,411; D68,412.Swedish Patent Numbers: 378,386; D49,203; D49,204.Australian Patent Numbers: 642,398; 647,378; 663,191; 671,132; D110,600; D115,478.Taiwanese Patent Numbers: P40,865.Korean Patent Numbers: 66,341; 127,299; 148,364; D254,816.Chinese Patent Numbers: 90,100,211.9; 90,100,212.7; 92,112,894.0; ZL99,309,190.3.Thai Patent Numbers: 7,250.
Other patents pending. /Autres brevets en attente.
DES QUESTIONS SUR UN JEU NINTENDO?
APPELLE LE NINTENDO HELPDESK!Aussi géant soit un jeu, c’est tout de suite un peu moins drôle
quand tu te retrouves bloqué. Pour t’eviter ce genre de mésaventure il n’y a qu’une chose à faire: appelle le Nintendo Helpdesk!
Belgique:0900-10800 (0,45 Euro par min.)
Des astuces et des informations sur les principaux jeux, 24h/24h via un répondeur et la possibilité de parler avec un spécialiste du lundi
au vendredi de 10.00 à 18.00 heures.
[0102/NBE-FR/AGB-HW]
AGB-EUR_A_8 26.09.2007 13:08 Uhr Seite 54
COPY
AGB-EUR(A)-8
INSTRUCTION BOOKLET
BEDIENUNGSANLEITUNG
MODE D’EMPLOI
AGB-EUR_A_8 26.09.2007 13:08 Uhr Seite 56
COPY