Embed Size (px)
Citation preview
1
MONTAGEANLEITUNGMOUNTING INSTRUCTIONS
INSTRUCTIONS DE MONTAGEINSTRUCCIONES DE MONTAJE
GUIDA AL MONTAGGIO
KAWASAKIZ900RS 2018-
(NTM)
© by MRA-Klement GmbH – 06/2018 4025066162802
MRA-Klement GmbH Siemensstr. 6 D-79331 Teningen Tel.: +49 7663 93890 Email: [email protected]
2
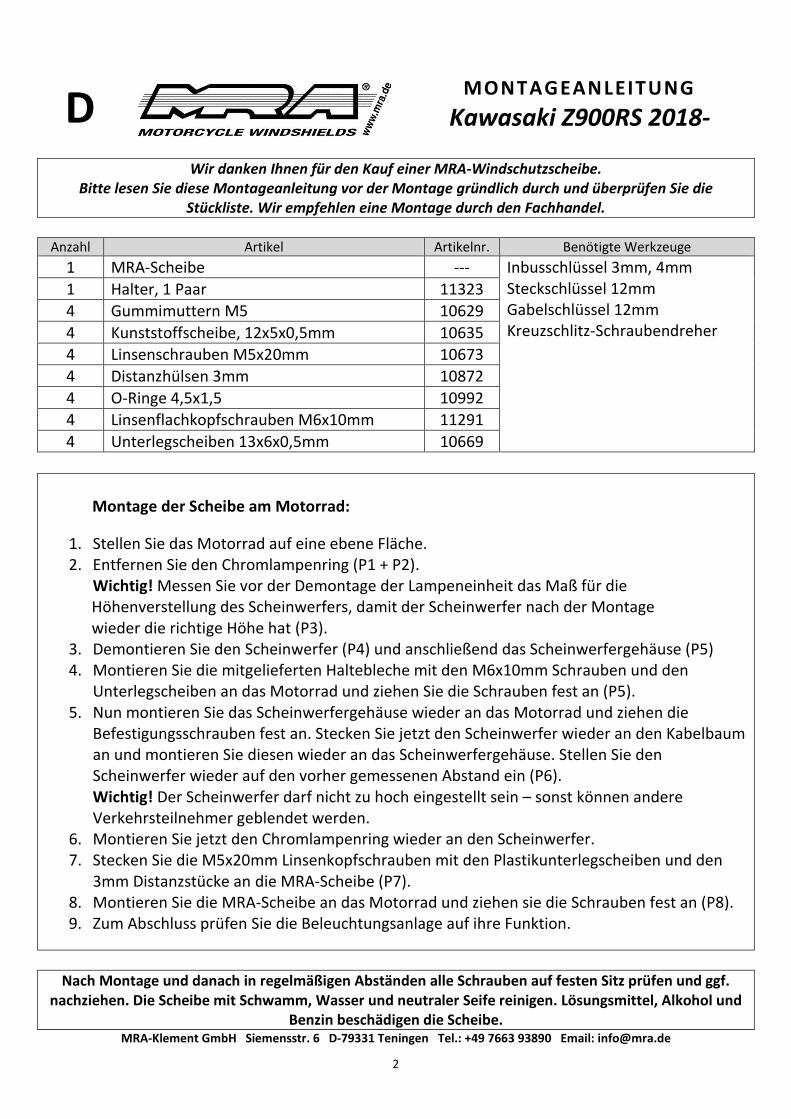
DMONTAGEANLEITUNG
Kawasaki Z900RS 2018-
Wir danken Ihnen für den Kauf einer MRA-Windschutzscheibe.Bitte lesen Sie diese Montageanleitung vor der Montage gründlich durch und überprüfen Sie die
Stückliste. Wir empfehlen eine Montage durch den Fachhandel.
Anzahl Artikel Artikelnr. Benötigte Werkzeuge
1 MRA-Scheibe --- Inbusschlüssel 3mm, 4mmSteckschlüssel 12mmGabelschlüssel 12mmKreuzschlitz-Schraubendreher
1 Halter, 1 Paar 11323
4 Gummimuttern M5 10629
4 Kunststoffscheibe, 12x5x0,5mm 10635
4 Linsenschrauben M5x20mm 10673
4 Distanzhülsen 3mm 10872
4 O-Ringe 4,5x1,5 10992
4 Linsenflachkopfschrauben M6x10mm 11291
4 Unterlegscheiben 13x6x0,5mm 10669
Montage der Scheibe am Motorrad:
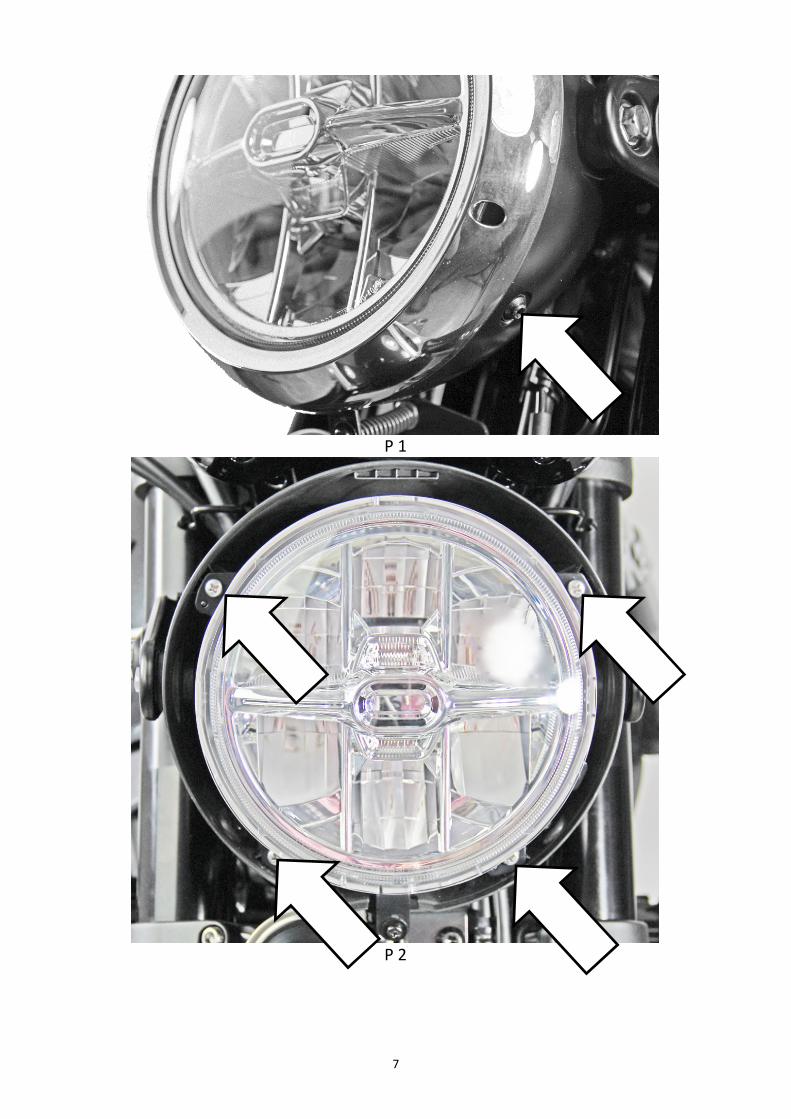
1. Stellen Sie das Motorrad auf eine ebene Fläche.2. Entfernen Sie den Chromlampenring (P1 + P2).
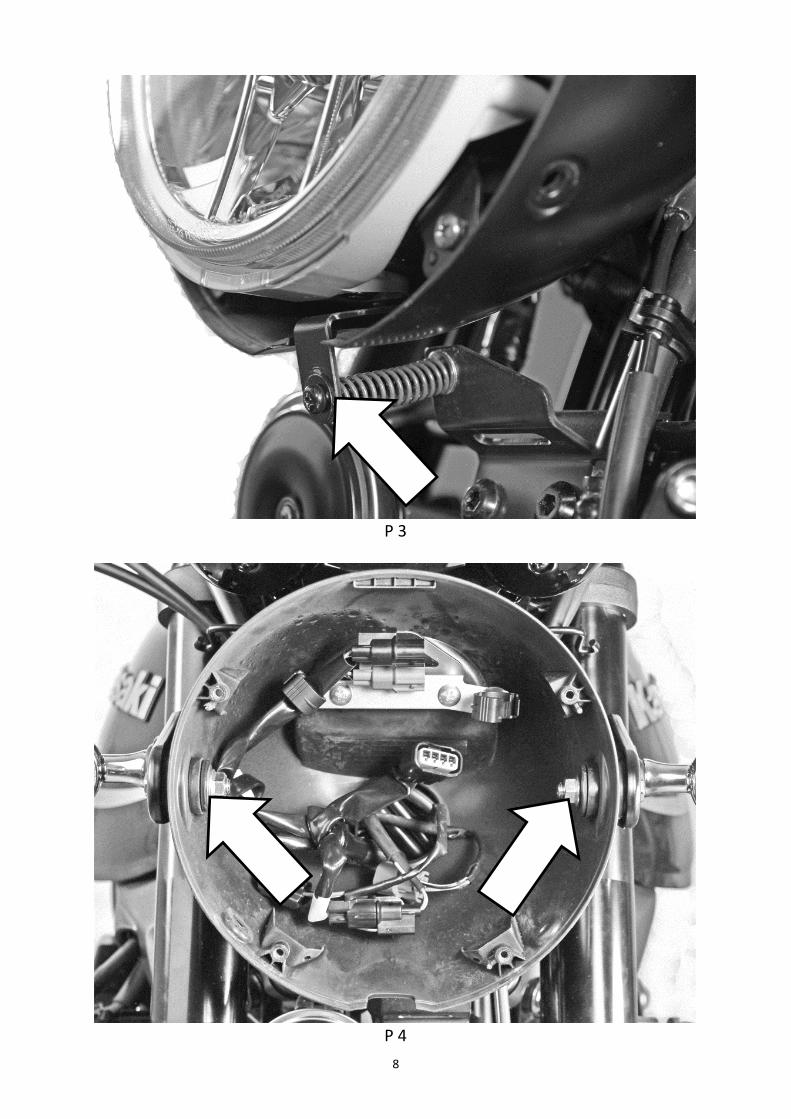
Wichtig! Messen Sie vor der Demontage der Lampeneinheit das Maß für dieHöhenverstellung des Scheinwerfers, damit der Scheinwerfer nach der Montagewieder die richtige Höhe hat (P3).
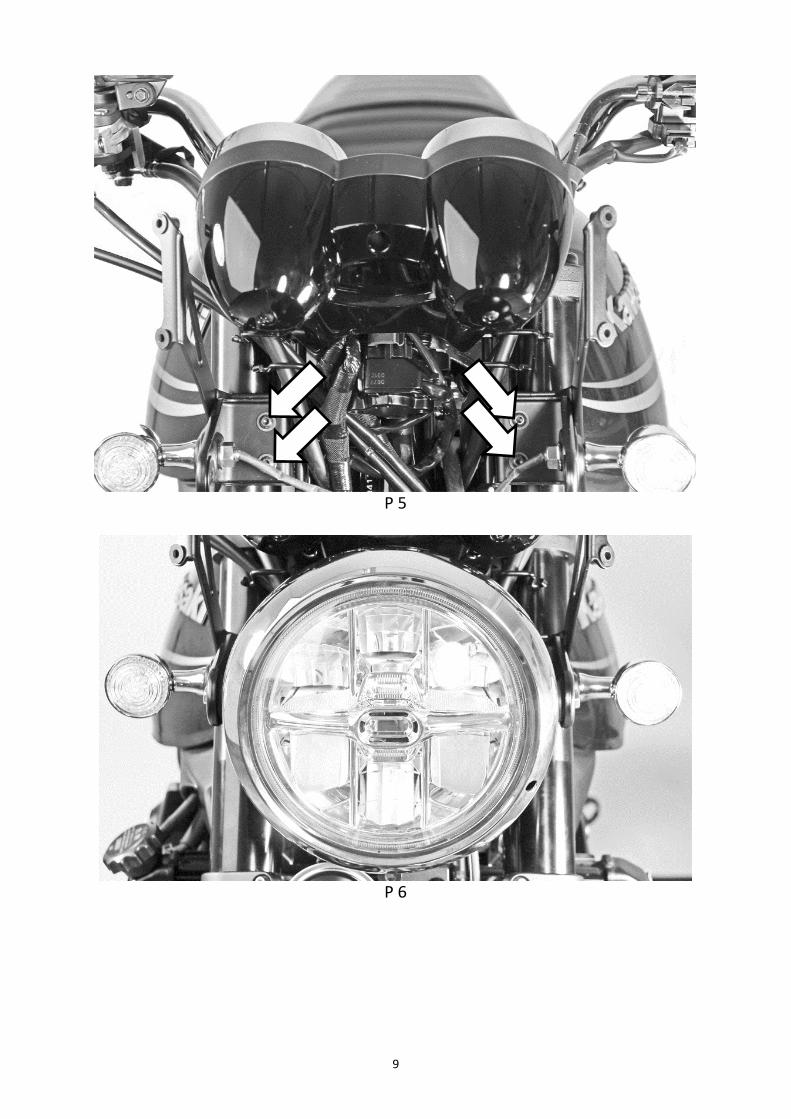
3. Demontieren Sie den Scheinwerfer (P4) und anschließend das Scheinwerfergehäuse (P5)4. Montieren Sie die mitgelieferten Haltebleche mit den M6x10mm Schrauben und den
Unterlegscheiben an das Motorrad und ziehen Sie die Schrauben fest an (P5).5. Nun montieren Sie das Scheinwerfergehäuse wieder an das Motorrad und ziehen die
Befestigungsschrauben fest an. Stecken Sie jetzt den Scheinwerfer wieder an den Kabelbauman und montieren Sie diesen wieder an das Scheinwerfergehäuse. Stellen Sie denScheinwerfer wieder auf den vorher gemessenen Abstand ein (P6).Wichtig! Der Scheinwerfer darf nicht zu hoch eingestellt sein – sonst können andereVerkehrsteilnehmer geblendet werden.
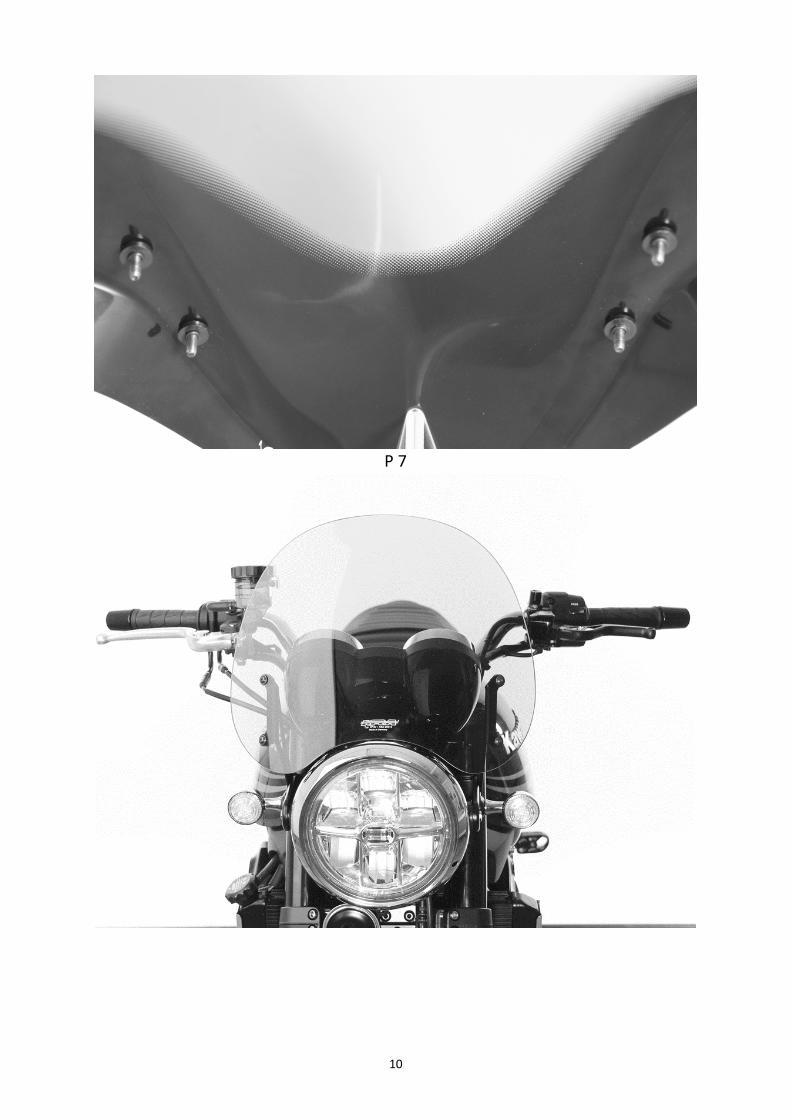
6. Montieren Sie jetzt den Chromlampenring wieder an den Scheinwerfer.7. Stecken Sie die M5x20mm Linsenkopfschrauben mit den Plastikunterlegscheiben und den
3mm Distanzstücke an die MRA-Scheibe (P7).8. Montieren Sie die MRA-Scheibe an das Motorrad und ziehen sie die Schrauben fest an (P8).9. Zum Abschluss prüfen Sie die Beleuchtungsanlage auf ihre Funktion.
Nach Montage und danach in regelmäßigen Abständen alle Schrauben auf festen Sitz prüfen und ggf.nachziehen. Die Scheibe mit Schwamm, Wasser und neutraler Seife reinigen. Lösungsmittel, Alkohol und
Benzin beschädigen die Scheibe.MRA-Klement GmbH Siemensstr. 6 D-79331 Teningen Tel.: +49 7663 93890 Email: [email protected]
3
GBMOUNTING INSTRUCTIONS
Kawasaki Z900RS 2018-
Thank you for buying a MRA Windshield.Read this manual carefully and check the parts list for completeness before you begin. We recommend
that you have your screen fitted by an authorised workshop.
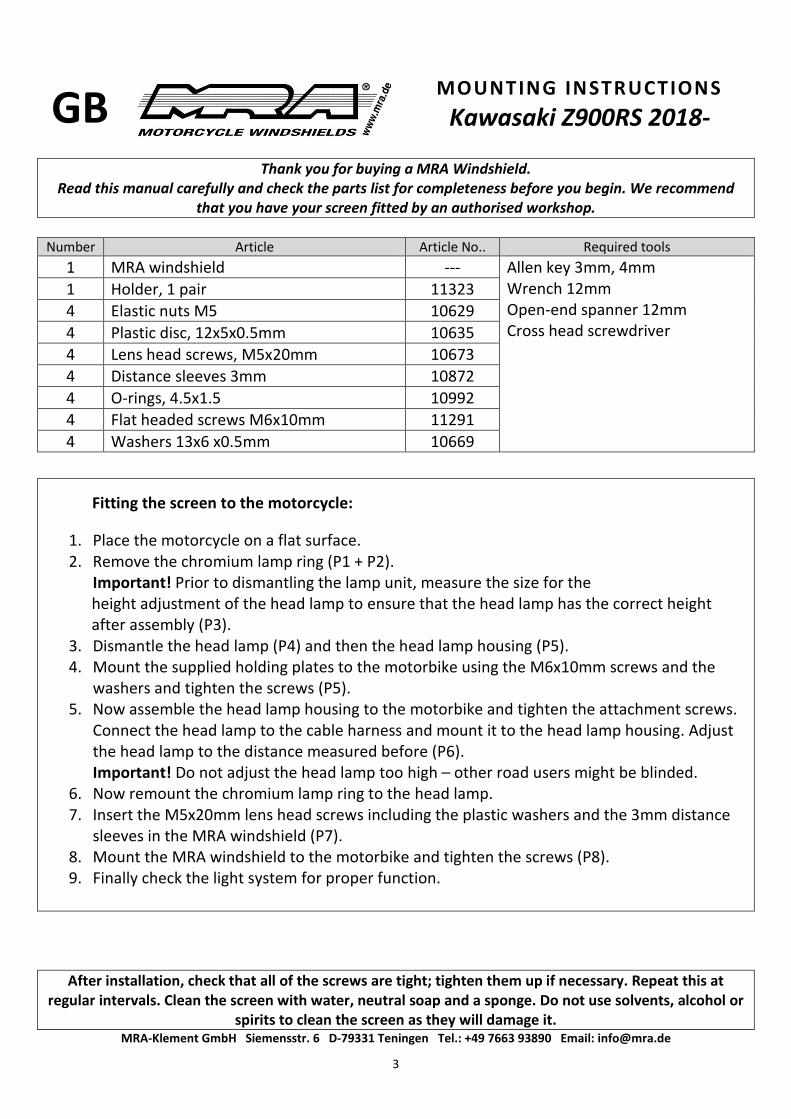
Number Article Article No.. Required tools
1 MRA windshield --- Allen key 3mm, 4mmWrench 12mmOpen-end spanner 12mmCross head screwdriver
1 Holder, 1 pair 11323
4 Elastic nuts M5 10629
4 Plastic disc, 12x5x0.5mm 10635
4 Lens head screws, M5x20mm 10673
4 Distance sleeves 3mm 10872
4 O-rings, 4.5x1.5 10992
4 Flat headed screws M6x10mm 11291
4 Washers 13x6 x0.5mm 10669
Fitting the screen to the motorcycle:
1. Place the motorcycle on a flat surface.2. Remove the chromium lamp ring (P1 + P2).
Important! Prior to dismantling the lamp unit, measure the size for theheight adjustment of the head lamp to ensure that the head lamp has the correct heightafter assembly (P3).
3. Dismantle the head lamp (P4) and then the head lamp housing (P5).4. Mount the supplied holding plates to the motorbike using the M6x10mm screws and the
washers and tighten the screws (P5).5. Now assemble the head lamp housing to the motorbike and tighten the attachment screws.
Connect the head lamp to the cable harness and mount it to the head lamp housing. Adjustthe head lamp to the distance measured before (P6).Important! Do not adjust the head lamp too high – other road users might be blinded.
6. Now remount the chromium lamp ring to the head lamp.7. Insert the M5x20mm lens head screws including the plastic washers and the 3mm distance
sleeves in the MRA windshield (P7).8. Mount the MRA windshield to the motorbike and tighten the screws (P8).9. Finally check the light system for proper function.
After installation, check that all of the screws are tight; tighten them up if necessary. Repeat this atregular intervals. Clean the screen with water, neutral soap and a sponge. Do not use solvents, alcohol or
spirits to clean the screen as they will damage it.MRA-Klement GmbH Siemensstr. 6 D-79331 Teningen Tel.: +49 7663 93890 Email: [email protected]
4
FINSTRUCTIONS DE MONTAGE
Kawasaki Z900RS 2018-
Merci d’avoir acheté un pare-brise MRA.Veuillez lire attentivement ces instructions de montage et vérifier la liste des pièces. Nous vous
recommandons de confier le montage à un revendeur spécialisé.
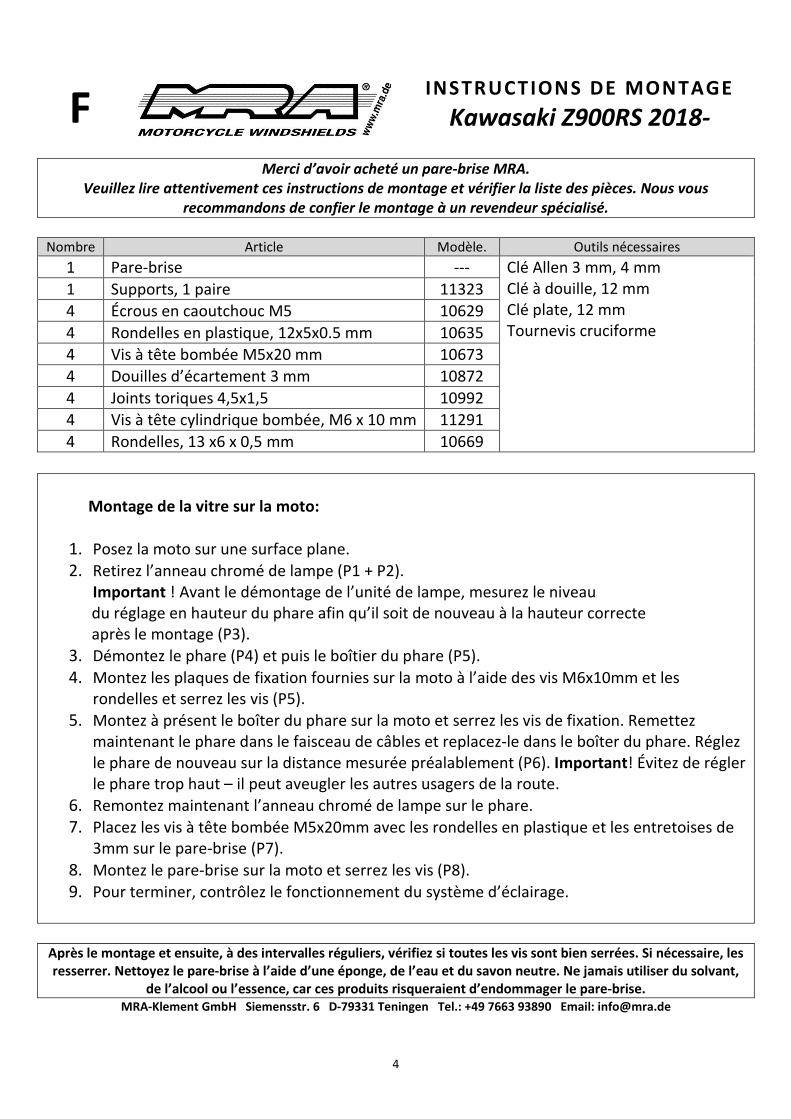
Nombre Article Modèle. Outils nécessaires
1 Pare-brise --- Clé Allen 3 mm, 4 mmClé à douille, 12 mmClé plate, 12 mmTournevis cruciforme
1 Supports, 1 paire 11323
4 Écrous en caoutchouc M5 10629
4 Rondelles en plastique, 12x5x0.5 mm 10635
4 Vis à tête bombée M5x20 mm 10673
4 Douilles d’écartement 3 mm 10872
4 Joints toriques 4,5x1,5 10992
4 Vis à tête cylindrique bombée, M6 x 10 mm 11291
4 Rondelles, 13 x6 x 0,5 mm 10669
Montage de la vitre sur la moto:
1. Posez la moto sur une surface plane.
2. Retirez l’anneau chromé de lampe (P1 + P2).Important ! Avant le démontage de l’unité de lampe, mesurez le niveaudu réglage en hauteur du phare afin qu’il soit de nouveau à la hauteur correcteaprès le montage (P3).
3. Démontez le phare (P4) et puis le boîtier du phare (P5).
4. Montez les plaques de fixation fournies sur la moto à l’aide des vis M6x10mm et lesrondelles et serrez les vis (P5).
5. Montez à présent le boîter du phare sur la moto et serrez les vis de fixation. Remettezmaintenant le phare dans le faisceau de câbles et replacez-le dans le boîter du phare. Réglezle phare de nouveau sur la distance mesurée préalablement (P6). Important! Évitez de réglerle phare trop haut – il peut aveugler les autres usagers de la route.
6. Remontez maintenant l’anneau chromé de lampe sur le phare.
7. Placez les vis à tête bombée M5x20mm avec les rondelles en plastique et les entretoises de3mm sur le pare-brise (P7).
8. Montez le pare-brise sur la moto et serrez les vis (P8).
9. Pour terminer, contrôlez le fonctionnement du système d’éclairage.
Après le montage et ensuite, à des intervalles réguliers, vérifiez si toutes les vis sont bien serrées. Si nécessaire, lesresserrer. Nettoyez le pare-brise à l’aide d’une éponge, de l’eau et du savon neutre. Ne jamais utiliser du solvant,
de l’alcool ou l’essence, car ces produits risqueraient d’endommager le pare-brise.MRA-Klement GmbH Siemensstr. 6 D-79331 Teningen Tel.: +49 7663 93890 Email: [email protected]
5
ITG U I D A A L M O N T A G G I O
Kawasaki Z900RS 2018-
Grazie per aver acquistato un cupolino MRA.Si prega di leggere attentamente la guida prima del montaggio e di verificare la distinta pezzi.
Consigliamo di rivolgersi a un rivenditore autorizzato per il montaggio.
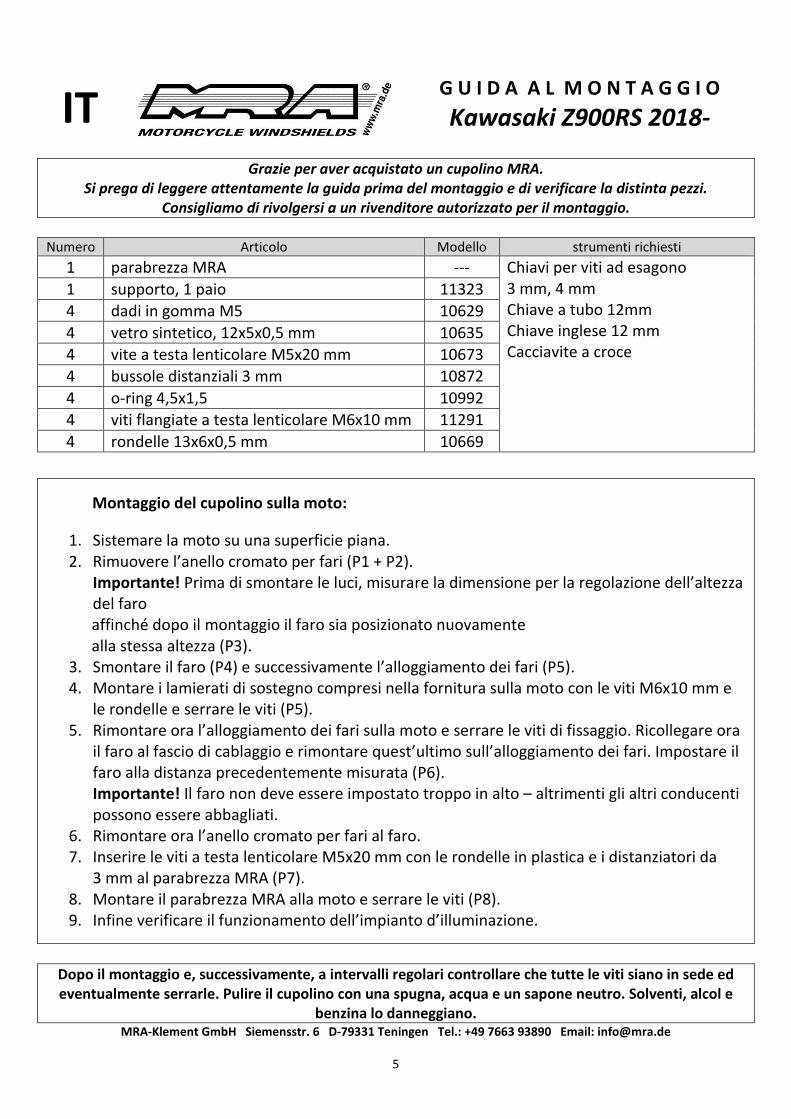
Numero Articolo Modello strumenti richiesti
1 parabrezza MRA --- Chiavi per viti ad esagono3 mm, 4 mmChiave a tubo 12mmChiave inglese 12 mmCacciavite a croce
1 supporto, 1 paio 11323
4 dadi in gomma M5 10629
4 vetro sintetico, 12x5x0,5 mm 10635
4 vite a testa lenticolare M5x20 mm 10673
4 bussole distanziali 3 mm 10872
4 o-ring 4,5x1,5 10992
4 viti flangiate a testa lenticolare M6x10 mm 11291
4 rondelle 13x6x0,5 mm 10669
Montaggio del cupolino sulla moto:
1. Sistemare la moto su una superficie piana.2. Rimuovere l’anello cromato per fari (P1 + P2).
Importante! Prima di smontare le luci, misurare la dimensione per la regolazione dell’altezzadel faroaffinché dopo il montaggio il faro sia posizionato nuovamentealla stessa altezza (P3).
3. Smontare il faro (P4) e successivamente l’alloggiamento dei fari (P5).4. Montare i lamierati di sostegno compresi nella fornitura sulla moto con le viti M6x10 mm e
le rondelle e serrare le viti (P5).5. Rimontare ora l’alloggiamento dei fari sulla moto e serrare le viti di fissaggio. Ricollegare ora
il faro al fascio di cablaggio e rimontare quest’ultimo sull’alloggiamento dei fari. Impostare ilfaro alla distanza precedentemente misurata (P6).Importante! Il faro non deve essere impostato troppo in alto – altrimenti gli altri conducentipossono essere abbagliati.
6. Rimontare ora l’anello cromato per fari al faro.7. Inserire le viti a testa lenticolare M5x20 mm con le rondelle in plastica e i distanziatori da
3 mm al parabrezza MRA (P7).8. Montare il parabrezza MRA alla moto e serrare le viti (P8).9. Infine verificare il funzionamento dell’impianto d’illuminazione.
Dopo il montaggio e, successivamente, a intervalli regolari controllare che tutte le viti siano in sede edeventualmente serrarle. Pulire il cupolino con una spugna, acqua e un sapone neutro. Solventi, alcol e
benzina lo danneggiano.MRA-Klement GmbH Siemensstr. 6 D-79331 Teningen Tel.: +49 7663 93890 Email: [email protected]
6
ESINSTRUCCIONES DE MONTAJE
Kawasaki Z900RS 2018-
Gracias por la compra de un parabrisas MRA.Antes de proceder al montaje, lea este manual y compruebe la lista de piezas. Recomendamos el montaje
a través de un comercio especializado.
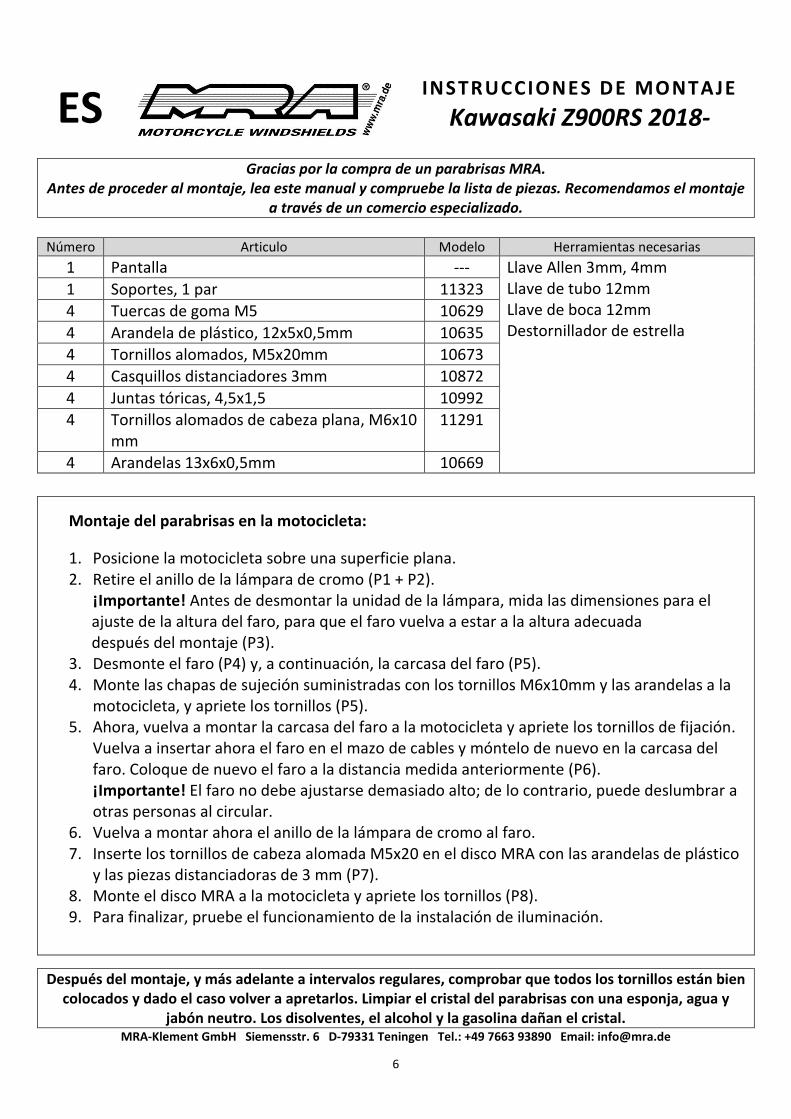
Número Articulo Modelo Herramientas necesarias
1 Pantalla --- Llave Allen 3mm, 4mmLlave de tubo 12mmLlave de boca 12mmDestornillador de estrella
1 Soportes, 1 par 11323
4 Tuercas de goma M5 10629
4 Arandela de plástico, 12x5x0,5mm 10635
4 Tornillos alomados, M5x20mm 10673
4 Casquillos distanciadores 3mm 10872
4 Juntas tóricas, 4,5x1,5 10992
4 Tornillos alomados de cabeza plana, M6x10mm
11291
4 Arandelas 13x6x0,5mm 10669
Montaje del parabrisas en la motocicleta:
1. Posicione la motocicleta sobre una superficie plana.2. Retire el anillo de la lámpara de cromo (P1 + P2).
¡Importante! Antes de desmontar la unidad de la lámpara, mida las dimensiones para elajuste de la altura del faro, para que el faro vuelva a estar a la altura adecuadadespués del montaje (P3).
3. Desmonte el faro (P4) y, a continuación, la carcasa del faro (P5).4. Monte las chapas de sujeción suministradas con los tornillos M6x10mm y las arandelas a la
motocicleta, y apriete los tornillos (P5).5. Ahora, vuelva a montar la carcasa del faro a la motocicleta y apriete los tornillos de fijación.
Vuelva a insertar ahora el faro en el mazo de cables y móntelo de nuevo en la carcasa delfaro. Coloque de nuevo el faro a la distancia medida anteriormente (P6).¡Importante! El faro no debe ajustarse demasiado alto; de lo contrario, puede deslumbrar aotras personas al circular.
6. Vuelva a montar ahora el anillo de la lámpara de cromo al faro.7. Inserte los tornillos de cabeza alomada M5x20 en el disco MRA con las arandelas de plástico
y las piezas distanciadoras de 3 mm (P7).8. Monte el disco MRA a la motocicleta y apriete los tornillos (P8).9. Para finalizar, pruebe el funcionamiento de la instalación de iluminación.
Después del montaje, y más adelante a intervalos regulares, comprobar que todos los tornillos están biencolocados y dado el caso volver a apretarlos. Limpiar el cristal del parabrisas con una esponja, agua y
jabón neutro. Los disolventes, el alcohol y la gasolina dañan el cristal.MRA-Klement GmbH Siemensstr. 6 D-79331 Teningen Tel.: +49 7663 93890 Email: [email protected]
7
P 1
P 2
8
P 3
P 4
9
P 5
P 6
10
P 7