Embed Size (px)
Citation preview
Portalkran ‚AW Lingen‘Gantry crane ‚AW Lingen‘Maßstab, Scale 1:220 (Z)
Art. 114111
2
Achtung! Bitte sorgfältig lesen!ARCHISTORIES Künstler-Bausätze enthalten viele Klein- und evtl. scharfkantige Einzelteile. Für die Montage benötigen Sie scharfe Werkzeuge wie Skalpell, Bastelmesser, Scheren, und Klebstoffe. Bitte beachten Sie, dass dieses Produkt und seine Verpackung daher nicht in die Hände von Kindern gehört und bewahren Sie es sowie für die Montage verwendetes Werkzeug unbedingt außer Reichweite von Kindern auf. Kleinteile und Verpackungsfolie könnten verschluckt oder eingeatmet werden.Das fertige Produkt ist als Schaustück für den festen Einbau in eine Modellanlage vorgesehen und kein Kinderspielzeug.
Aus rechtlichen Gründen weisen wir darauf hin, dass der Einbau elektrischer Beleuchtung auf eigenes Risiko erfolgt und ausschließlich von fachkundigen Personen durchzuführen ist. Dabei ist besonders darauf zu achten, dass keine Beleuchtungsmittel mit hoher Wärmeabstrahlung verwendet und die Anschlüsse fachgerecht durchgeführt werden. Vermeiden Sie die Entstehung von Hitzestaus in und an den Modellen. Da unsere Produkte aus brennbarem Material gefertigt sind und manche Bausätze über Innenraumaufteilungen verfügen, ist zu beachten, dass sich diese sich aufgrund des geringen Volumens schneller aufheizen können als herkömmliche Modelle. Lassen Sie beleuchtete Objekte nicht unbeaufsichtigt und prüfen Sie regelmäßig die Funktionsfähigkeit der elektrischen Installationen.Das von uns verwendete hochwertige Material zeichnet sich unter anderem durch hohe Feuchte- und UV-Stabilität aus. Bitte setzen Sie Ihre Modelle dennoch nicht unnötig dauerhaft direkter Sonneneinstrahlung oder starker Feuchtigkeit aus.Bei Verwendung von Klebstoffen, Farben und Lösungsmitteln bitte die Verarbeitungshinweise des Herstellers beachten und nicht trinken, oder rauchen. Von offenem Feuer fernhalten und nicht mit Haut, Augen oder Mund in Berührung bringen, Dämpfe nicht einatmen sowie Hände und Werkzeug nach der Arbeit gründlich reinigen.Erste Hilfe bei Augenkontakt: Auge sofort unter fließendem Wasser ausspülen und dabei offen halten. Bitte umgehend einen Arzt aufsuchen! Bitte bewahren Sie diese Informationen und die Produktverpackung gut auf.
Beachten Sie bitte unsere nachfolgenden Montagetipps. Weitere nützliche Informationen finden Sie unter http://www.archistories.com
Attention! Please read carefully!ARCHISTORIES artisan model kits contain many small pieces with potentially sharp edges. Glue and cutting tools, such as a scalpel, craft knife and scissors, are required for assembly. Please be aware that the product and its packaging should therefore be kept out of reach of children, as must the tools required for assembly. Small pieces and packaging foil could be swallowed or cause suffocation. The finished product is intended as a securely installed showpiece as part of a model display and not as a children‘s toy.
Due to legal reasons we advise you that the installation of electrical lighting is at your own risk and must only be carried out by a technically skilled person. Special care needs to be taken not to install lighting that emits too much heat, and to ensure that all connections are correct. Avoid the build up of heat anywhere on the model. Our products are constructed from combustible material and some sets contain interior divisions. It should be noted that because of the smaller volume these models heat up more quickly than ordinary ones. Do not leave lighting unattended and check all electrical installations regularly.The high-quality material that we use stands out on account of its high moisture and UV resistance. However, please do not unnecessarily expose the models to constant direct sunlight or excessive moisture.When using glues, paints and other chemicals follow the manufacturers instructions: do not drink or smoke, keep away from open fire, do not bring materials into contact with skin, eyes or mouth, do not inhale vapours. Wash hands and tools carefully after use.First aid in case of contact with eyes: immediately rinse open eyes with running water. Seek medical advice!Please keep this information leaflet in a safe place for future reference.
Please pay attention to our following tips on assembly. More useful information can be found at http://www.archistories.com

3
Danke, dass Sie diesem hochwertigen ARCHISTORIES Produkt vertrauen.
Bitte lesen Sie die folgenden Verarbeitungstipps aufmerksam durch, damit Sie lange viel Freude an Ihrem neuen Produkt haben. Weitere wertvolle Hinweise unter http://www.archistories.com
1. Achten Sie bitte vor der Verarbeitung auf fettfreie und saubere Hände, um Flecken auf dem Material zu vermeiden, denn diese sind kaum wieder zu entfernen.
2. Nehmen Sie sich Zeit und haben Sie Geduld. Dies gilt insbesondere für die kleinen Maßstäbe und die damit verbundene Kleinteiligkeit einiger Komponenten. Eine gute Pinzette ist unerlässlich.
3. Beachten Sie bitte die angegebene Reihenfolge. Dies ist konstruktiv notwendig und verhindert Beschädigungen und falsche Verarbeitung, die das Ergebnis beeinträchtigen könnten.
4. Trennen Sie die Bauteile erst vor der Verarbeitung aus den Trägerrahmen, um Verwechslungen und den Verlust kleinster Teile zu vermeiden.
5. Verwenden Sie nur normalen Holzleim auf Wasserbasis (außer wenn anders angegeben). Dies führt zu besten Ergebnissen und unsichtbaren Verklebungen. Sehr effektiv ist das Auftragen mit Einwegspritzen und abgestumpften Kanülen für feinste Klebespuren und das problemlose Erreichen von Engstellen. Der Einsatz schnelltrocknender Produkte kann nachteilig für nachträgliche Korrekturen sein.
6. Tragen Sie den Kleber bei Verzapfungen grundsätzlich an allen Kontaktflächen auf.
7. Verwenden Sie Klebstoffe sparsam und drücken Sie sie im Bereich der Fenster von innen nach außen fest, um Kleberaustritt auf transparente Bauteile zu verhindern.
8. Die beigefügte Transparentfolie für Fenster ist ausreichend. Verwenden Sie sie bitte dennoch sparsam. Zur Fixierung der beigelegten Folie empfehlen wir UHU Kraft transparent.
9. Stellenweise ist es hilfreich, den empfohlenen Holzleim mit Wasser leicht zu verdünnen und anschließend mit einem Haarpinsel aufzutragen.
10. Es empfiehlt sich, zum Kleben besonders kleiner und feiner Bauteile einen Tropfen Leim auf eine abwischbare Unterlage zu geben, diesen mit etwas Wasser zu verdünnen, die Bauteile mit einer Pinzette leicht einzutauchen und sofort an ihrem Platz zu fixieren.
11. Besonders beim Verarbeiten der Grundkonstruktion ist unabdingbar, auf absolut bündige Verzahnung der Zapfen zu achten. Dies können Sie durch das wechselseitige Aufdrücken der Verzapfungen auf einer glatten Arbeitsfläche erreichen. Dabei herausgedrückter Kleber muss entfernt werden, um eine ebene Oberfläche zu erhalten.
12. Beim Aufkleben großflächiger Komponenten beachten Sie bitte, das Bauteil besonders in allen Randbereichen und um die Fensteröffnungen mit Holzleim zu versehen. Die übrigen Flächen werden nur punktuell verklebt.
13. Nach Fertigstellung können produktionsbedingte Schmauchspuren an hellen Bauteilen mithilfe eines leicht befeuchteten Wattestäbchens problemlos entfernt werden. Diese Spuren sind wasserlöslich.
14. Eventuell vorhandene konstruktionsbedingte Nahtstellen an Gebäudeecken sind so angelegt, dass sie problemlos mit Regenfallrohren abgedeckt werden können. Passende Profile liegen bei oder sind optional im Modellbaufachhandel (z. B. Aero-naut) erhältlich.
15. Verglasen Sie die Türen stets separat. Dann können diese nach Fertigstellung vorsichtig geöffnet werden, ermöglichen die Darstellung von Szenen und beleben so den Gesamteindruck Ihrer Modellanlage.
Hilfreich bei der Montage sind:
• Holzleim (wir empfehlen Standardsorten von Ponal, UHU Coll etc.)• Kunststoffkleber nur für Fensterfolie und Metallteile (wir empfehlen UHU Kraft transparent)• Pinzetten (verschiedene Größen mit feinen Spitzen)• Mehrere Bastelklemmen zur gleichmäßigen Fixierung von größeren Bauteilen• Einwegspritze mit abgestumpften Kanülen zum gezielten und feinen Auftrag von Klebstoffen• Scharfes Bastelmesser zum sauberen Heraustrennen der Bauteile• Feine Feile zum Nachbehandeln der Bauteile (z. B. Nagelfeile) • Wattestäbchen, Haar- und Borstenpinsel verschiedener Größe• Für die Verarbeitung kleinster Teile empfiehlt sich eine Lupe• Feine scharfe Schere

4
Thank you for trusting in this high-quality ARCHISTORIES product.
Please take a moment to read the following construction tips so that you will be able to enjoy your new product for a long time to come. You will find further valuable information at http://www.archistories.com
1. Ensure that your hands are free from dirt and grease before commencing assembly in order to avoid making hard to remove spots and marks on the material.
2. Please take your time and be patient. This is especially important for the smaller scale models and their correspondingly sized components. A good pair of tweezers is indispensable.
3. Follow the instructions in the prescribed order. This is necessary for correct construction of the product and helps to avoid any damage or mistakes that could affect the end result.
4. Only separate the components from the support framework immediately prior to assembly. This reduces the risk of mistakes and the chance of losing small parts.
5. Use only standard water-based wood glue (unless otherwise stated). This leads to the best results and invisible joints. Use of a disposable syringe with a blunt cannula is very effective for application of the glue for good quality bonding and easing access to confined spaces. Fast-drying products can be a disadvantage as they may restrict subsequent adjustment.
6. Always apply the glue to all contact areas of the joints.
7. Employ the adhesive sparingly. In the vicinity of the windows press the materials down from the inside outwards in order to avoid soiling the transparent components.
8. Although there is sufficient transparent foil for the windows it is advisable to use it sparingly.
9. In some places it is helpful to water down the glue slightly and to apply it with a fine animal-hair brush.
10. When glueing particularly minute and delicate components it is advisable to put a drop of glue onto a wipeable surface. Dilute the glue with a little water, dip the components into it with tweezers and attach them to the required location.
11. During assembly of the basic construction it is particularly important to ensure an entirely flush finish of the interlocking joints. You can achieve this by pressing the joints on alternate sides onto a flat work surface. If glue should be squeezed out it must be removed in order to produce a planar surface.
12. When glueing on components with large surface areas please ensure all edges regions and the regions around the windows are coated with glue. The other areas need only be spotted.
13. Any traces of smoke resulting from the production process can be easily removed after completion by using a slightly moistened cotton bud.
14. Any potential seams at the corners of the model are created in such a way that they can be concealed by rainwater downpipes. Matching profiles are either attached or optionally available at a specialist model-making shop.
15. Always glaze the doors separately. This makes it possible to open them after completion in order to depict scenes and invigorate the overall impression of your model railway set.
The following items are helpful for assembly:
• Wood glue• Synthetic resin adhesive should only be used for window foil or metal components• Tweezers (different sizes with fine tips)• Several handicraft clamps for fixing larger components evenly• Disposable syringes with a blunt cannula for selective and accurate application of glue• Sharp handicraft knife for clean and precise separation of the components• Fine-grade file for subsequent treatment of the components (e.g. a nail file)• Cotton buds, animal-hair brushes and bristle brushes of different sizes• We recommend a magnifying glass for handling the smallest components• Fine sharp scissors
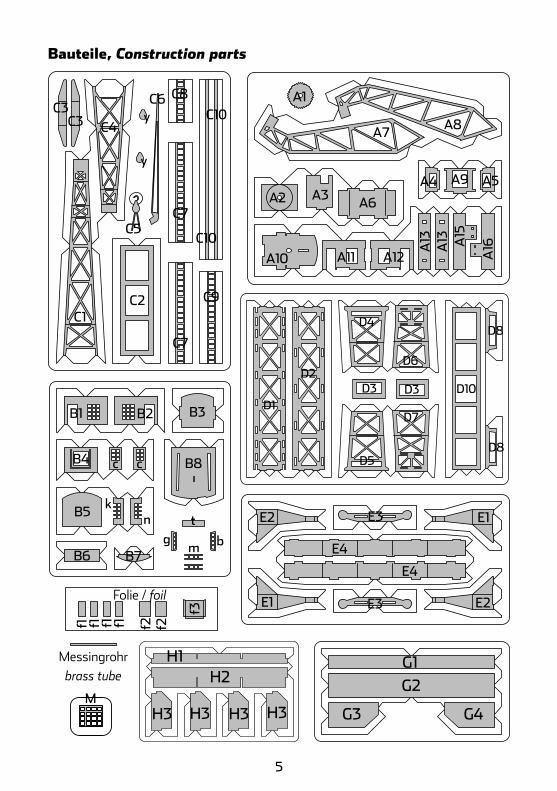
B1 B2 B3
B4
B5
B6 B7
c B8c
kn
bgm
t
C1C2
C3
C4
C5
C6
y
y
C7
C7
C8
C9
C10
C10C3
Bauteile, Construction parts
5
E1
E2
E3
E4
E4
G1
G2
G3 G4
Messingrohrbrass tube
H1H2
H3 H3 H3 H3
D1
D2D3 D3
D4
D5
D6
D7
D8
D8
D10
M
Folie / foil
f1 f1 f1 f1 f2 f2
f3
A1
A2
A10
A4A3
A5
A6
A7A8
A9
A11 A12
A13
A13 A15
A16
E3
E2
E1

Schritt 1, step 1
6
Schritt 2, step 2
Schritt 3, step 3
D1
E4
D2
D10
E4
G1
G2
G3
G4
H1
H2 H3
H3
H3
H3
7
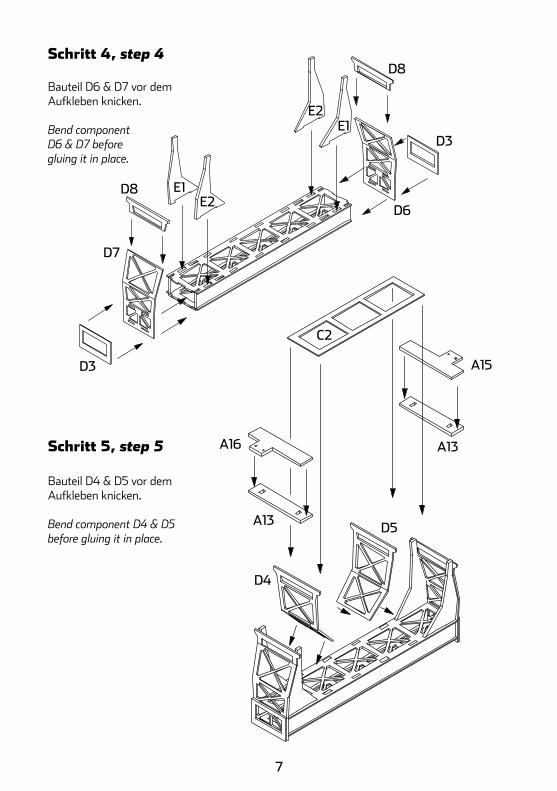
Schritt 4, step 4
Schritt 5, step 5
A13
A15
A16
C2
E1
E1E2
E2
D3
D3
D4
D5
D6
D7
D8
D8
A13
Bauteil D4 & D5 vor dem Aufkleben knicken.
Bend component D4 & D5 before gluing it in place.
Bauteil D6 & D7 vor dem Aufkleben knicken.
Bend component D6 & D7 before gluing it in place.
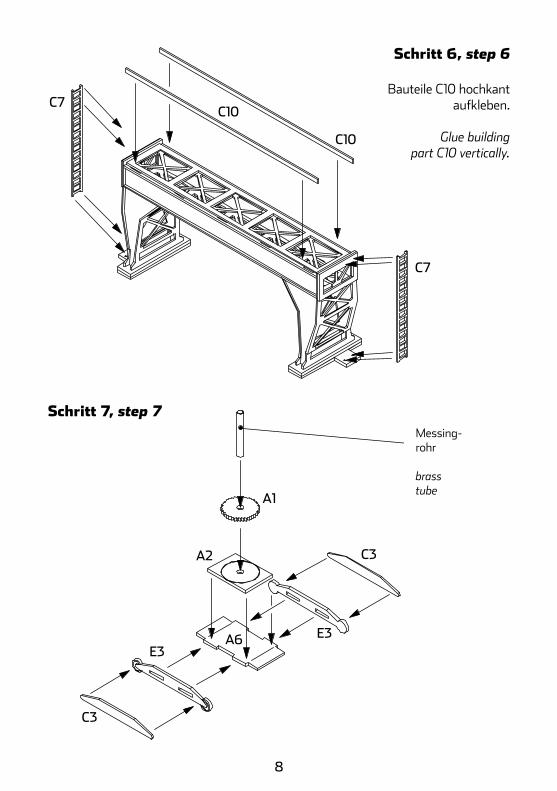
Bauteile C10 hochkant aufkleben.
Glue building part C10 vertically.
8
Schritt 6, step 6
Schritt 7, step 7
E3E3
C7
C7
C10
C10
C3
C3
Messing-rohr
brass tube
A1
A2
A6
9
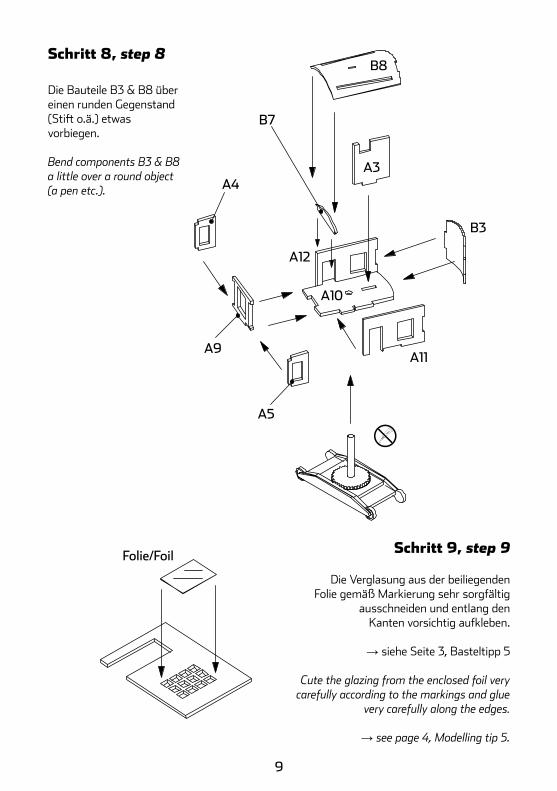
Schritt 8, step 8
Schritt 9, step 9
A10
A4A3
A5
A9A11
A12
B3
B8
B7
Die Verglasung aus der beiliegenden Folie gemäß Markierung sehr sorgfältig
ausschneiden und entlang den Kanten vorsichtig aufkleben.
→ siehe Seite 3, Basteltipp 5
Cute the glazing from the enclosed foil very carefully according to the markings and glue
very carefully along the edges.
→ see page 4, Modelling tip 5.
Kleber
Die Bauteile B3 & B8 über einen runden Gegenstand (Stift o.ä.) etwas vorbiegen.
Bend components B3 & B8 a little over a round object (a pen etc.).
Folie/Foil
C8
M
B1+f2
B2+f2
B4
B5
B6
c+f1
k+f1
n+f1b
g
m
tf3
c+f1
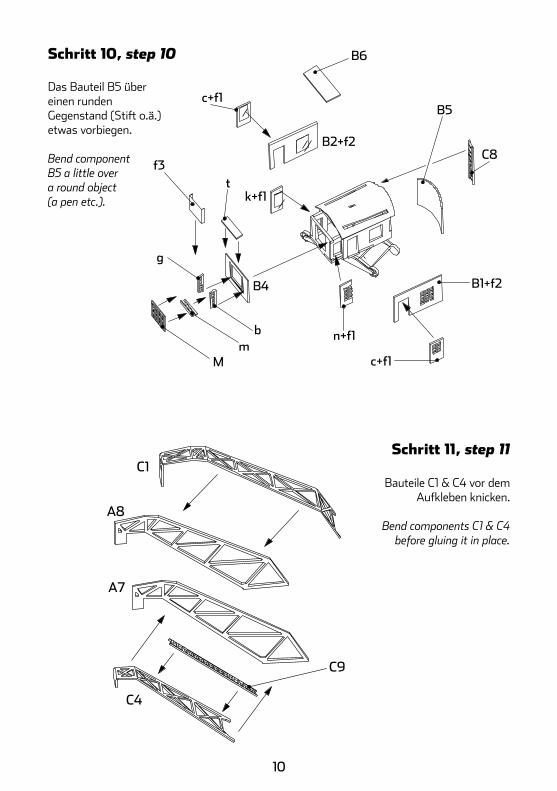
Das Bauteil B5 über einen runden Gegenstand (Stift o.ä.) etwas vorbiegen.
Bend component B5 a little over a round object (a pen etc.).
Schritt 10, step 10
10
Schritt 11, step 11C1
C4
C9
A7
A8
Bauteile C1 & C4 vor dem Aufkleben knicken.
Bend components C1 & C4 before gluing it in place.
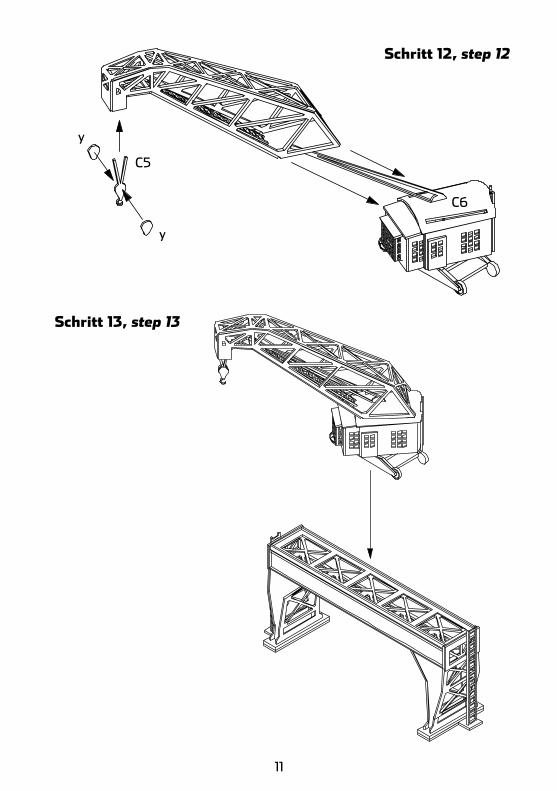
Schritt 12, step 12
11
Schritt 13, step 13
C5
C6
y
y

© ARCHISTORIES, All rights reservedÄnderungen, die der Weiterentwicklung des Produktes dienen, vorbehalten.
Made in Germany by ARCHISTORIES Vahrenwalder Str. 7
30165 Hannover
Dieses Produkt, seine Reste und Verpackung bestehen überwiegend aus unbedenklichem, natürlichem Material und können über das gewöhnliche Altpapier entsorgt werden. Bitte führen Sie Reste der Verglasungsfolie dem Restmüll und die Folienverpackung der Wiederverwertung zu. Vielen Dank!
This product, its packaging and remnants consist mainly of harmless, natural materials and can be disposed of as normal waste paper. Please recycle the remains of the glass sheet and the foil packaging waste. Thank you!