Embed Size (px)
Citation preview

Bedienungsanleitung Operating Instructions Mode d'emploi Instrucciones de uso
PreßluftgewehrLG 300 XT ALUTECLG 300 XT StandardLG 300 XT Junior
LG300XT
2
Wichtige Hinweise überden Umgang mit Waffen
Achtung!Gehen Sie davon aus, daß auchdie sicherste Waffe durch unsach-gemäßen Umgang für Sie undandere gefährlich werden kann.Machen Sie sich zuerst anhandder Bedienungsanleitung mit der Funktion und Handhabungder Waffe vertraut.Gehen Sie auch mit der unge-ladenen Waffe so um, als wennsie geladen wäre.Beachten Sie stets: KeinenFinger am Abzug, außer zurgewollten Schußabgabe.Halten Sie die Waffe immer so, daß Sie und Unbeteiligtenicht gefährdet sind.Wenden Sie bei der Bedienung,beim Zerlegen und beim Zusam-
menbau nie Gewalt an.Sicherheit ist nur gewährleistet,solange sich die Waffe in ein-wandfreiem Zustand befindet.Unsachgemäße Handhabungund mangelnde Pflege könnendie Funktion und Sicherheit derWaffe beeinträchtigen.Beachten Sie, daß die Waffe beiEinwirkungen von außen, z.B.Korrosion, Herunterfallen, usw.von einem Fachmann durchge-prüft werden muß.Unsachgemäße Eingriffe in denMechanismus, durch Gewalthervorgerufene Beschädigungenund Veränderungen durch Drit-te entbinden den Hersteller vonjeglichen Gewährleistungsan-sprüchen. Arbeiten an Waffendürfen nur von autorisiertenFachleuten vorgenommen wer-den.
Caution: Handling ofFirearms
Attention!Never forget that even the sa-fest weapon can be dangerousto you and others if not handledcorrectly.Before handing any weapon,first thoroughly familiarise your-self with its functions and hand-ling by carefully reading the in-structions.Always handle an unloaded wea-pon as if it were really loaded.Never forget to keep yourfinger off the trigger untilyou actually wish to fire ashot. Always handle the weapon in such a way thatneither you nor bystandersare endangered.Never use force when using,
stripping or assembling theweapon.Only weapons in perfect work-ing order are really safe. Incor-rect handling and poor mainte-nance will impair the function-ing and safety of the weapon.Always have your firearm in-spected by a qualified gunsmithif it has suffered from corrosion,being dropped or other externaldamage.Warranty Claims: the makers ofthe weapon are free of liabilityfor any claims resulting fromunauthorised tampering withthe mechanism, damage fromusing force, or modificationsmade by third parties. All workon weapons must be done byauthorized gunsmiths only.
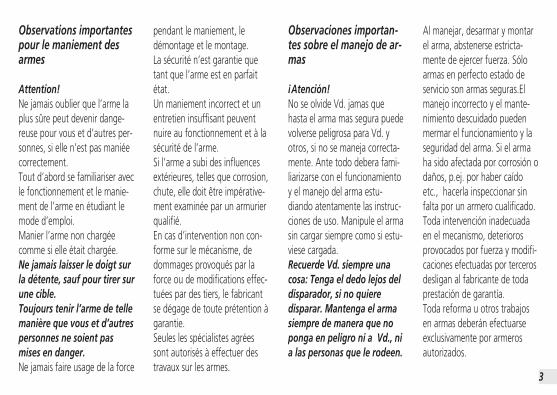
Observations importantespour le maniement desarmes
Attention!Ne jamais oublier que l’arme laplus sûre peut devenir dange-reuse pour vous et d’autres per-sonnes, si elle n’est pas maniéecorrectement.Tout d’abord se familiariser avecle fonctionnement et le manie-ment de l’arme en étudiant lemode d’emploi.Manier l’arme non chargéecomme si elle était chargée.Ne jamais laisser le doigt surla détente, sauf pour tirer surune cible.Toujours tenir l’arme de tellemanière que vous et d’autrespersonnes ne soient pasmises en danger.Ne jamais faire usage de la force
pendant le maniement, ledémontage et le montage.La sécurité n’est garantie quetant que l’arme est en parfaitétat.Un maniement incorrect et unentretien insuffisant peuventnuire au fonctionnement et à lasécurité de l’arme.Si l’arme a subi des influencesextérieures, telles que corrosion,chute, elle doit être impérative-ment examinée par un armurierqualifié.En cas d’intervention non con-forme sur le mécanisme, dedommages provoqués par laforce ou de modifications effec-tuées par des tiers, le fabricantse dégage de toute prétention àgarantie.Seules les spécialistes agréessont autorisés à effectuer destravaux sur les armes.
Observaciones importan-tes sobre el manejo de ar-mas
¡Atención!No se olvide Vd. jamas quehasta el arma mas segura puedevolverse peligrosa para Vd. yotros, si no se maneja correcta-mente. Ante todo debera fami-liarizarse con el funcionamientoy el manejo del arma estu-diando atentamente las instruc-ciones de uso. Manipule el armasin cargar siempre como si estu-viese cargada.Recuerde Vd. siempre unacosa: Tenga el dedo lejos deldisparador, si no quieredisparar. Mantenga el armasiempre de manera que noponga en peligro ni a Vd., nia las personas que le rodeen.
Al manejar, desarmar y montarel arma, abstenerse estricta-mente de ejercer fuerza. Sóloarmas en perfecto estado deservicio son armas seguras.Elmanejo incorrecto y el mante-nimiento descuidado puedenmermar el funcionamiento y laseguridad del arma. Si el armaha sido afectada por corrosión odaños, p.ej. por haber caídoetc., hacerla inspeccionar sinfalta por un armero cualificado.Toda intervención inadecuadaen el mecanismo, deteriorosprovocados por fuerza y modifi-caciones efectuadas por tercerosdesligan al fabricante de todaprestación de garantía.Toda reforma u otros trabajosen armas deberán efectuarseexclusivamente por armerosautorizados.
3
INHALT
Allgemeines 8
Spannen und Laden der Waffe 9
Sicherung bei geöffnetem Verschluß 9
Trainingsabzug 10
Auswechseln der Korne 11
Abzugeinstellung 12
Schaftbackeneinstellung LG 300 XT Standard 14
Schaftkappenverstellung LG 300 XT Standard 16
Riemenbügelhalter 17
Schafteinstellung LG 300 XT ALUTEC 18
Preßluftbehälter 20
Laufreinigung 25
Zubehör 26
Sonderzubehör 27
Technische Daten 28
CONTENTS
General 8
Cocking and loading the pistol 9
Safety when the breech is open 9
Dry-practice trigger 10
Changing the foresight elements 11
Setting the trigger 12
Adjusting the cheekpiece LG 300 XT Standard 14
Butt plate adjustment LG 300 XT Standard 16
Sling swivel 17
Adjusting the Stock LG 300 XT ALUTEC 18
Compressed air cylinder 21
Cleaning the barrel 25
Accessories 26
Optional accessories 27
Technical specifications 28
Seite
4
Page
5
TABLE DE MATIERES
Généralités 8
Armement et chargement de l’arme 9
Sécurité lorsque la culasse est ouverte 9
Détente d’entraînement 10
Changement de guidon 11
Réglage de la détente 12
Réglage du dos de la crosse LG 300 XT Standard 14
Réglage de la plaque de couche LG 300 XT Standard 16
Fixe-bretelle 17
Réglage de la crosse LG 300 XT ALUTEC 18
Cartouche d’air comprimé 22
Nettoyage du canon 25
Accessoires 26
Accessoires spéciaux 27
Caractéristiques techniques 28
Page
INDICE
Generalidades 8
Modo de armar y cargar el arma 9
Aseguramiento con el cierre abierto 9
Disparador de entrenamiento 10
Cambio de puntos de mira 11
Ajuste del disparador 12
Ajuste del lomo de la culata LG 300 XT Standard 14
Ajuste de la cantonera de la culata LG 300 XT Standard 16
Sujetador de correa 17
Ajuste de la culata LG 300 XT ALUTEC 18
Cartucho de gas comprimido 22
Limpieza del cañón 25
Accesorios 26
Accesorios especiales 27
Características técnicas 28
Página
6
7
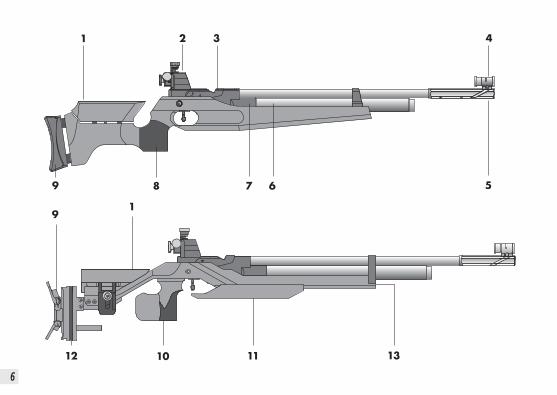
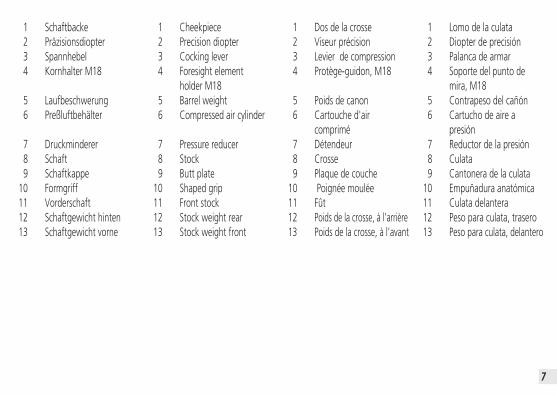
1 Schaftbacke2 Präzisionsdiopter3 Spannhebel4 Kornhalter M18
5 Laufbeschwerung6 Preßluftbehälter
7 Druckminderer8 Schaft9 Schaftkappe
10 Formgriff11 Vorderschaft12 Schaftgewicht hinten13 Schaftgewicht vorne
1 Cheekpiece2 Precision diopter3 Cocking lever4 Foresight element
holder M185 Barrel weight6 Compressed air cylinder
7 Pressure reducer8 Stock9 Butt plate
10 Shaped grip11 Front stock12 Stock weight rear13 Stock weight front
1 Dos de la crosse2 Viseur précision3 Levier de compression4 Protège-guidon, M18
5 Poids de canon6 Cartouche d'air
comprimé7 Détendeur8 Crosse9 Plaque de couche
10 Poignée moulée11 Fût12 Poids de la crosse, à l’arrière13 Poids de la crosse, à l’avant
1 Lomo de la culata2 Diopter de precisión3 Palanca de armar4 Soporte del punto de
mira, M185 Contrapeso del cañón6 Cartucho de aire a
presión7 Reductor de la presión8 Culata9 Cantonera de la culata
10 Empuñadura anatómica11 Culata delantera12 Peso para culata, trasero13 Peso para culata, delantero
8
Allgemeines
Das Gewehr ist ein Einzellader, bei dem als Antriebsmittel aus-schließlich Preßluft verwendetwird. Der abnehmbare Preß-luftbehälter ist horizontal an-gebracht.
General
The LG 300 XT is a single-shotrifle using compressed air froma detachable cylinder locatedbelow the barrel as its solepropellant source.
Généralités
Le carabine LG 300 XT est unearme à 1 coup, n’utilisantcomme élément propulsif quede l’air comprimé contenu dansune cartouche amovible, logéehorizontalement au-dessous ducanon.
Generalidades
El fusil es un arma de un sólotiro, utilizándose aire a presióncomo medio de propulsión ex-clusivo. El cartucho de aire apresión de quita y pon se en-cuentra fijado en posición hori-zontal.
Spannen und Laden derWaffe
Ladehebel bis zum Anschlagschwenken, dadurch öffnet sichder Verschluß und der Abzugwird gespannt. Diabolo in dieLademulde legen und den Ver-schluß schließen. Das Gewehr istgeladen und schußbereit.
Achtung!Halten Sie die Waffe immer so, daß Sie und Unbeteiligtenicht gefährdet sind.
Sicherung bei geöffnetemVerschluß
Bei geöffnetem Verschluß istdas Schlagstück gesperrt.
Armement et chargementde l’arme
Pivoter le levier de compressionjusqu’en butée. Cette opérationouvre la culasse et arme le dis-positif de détente. Placer uneballe diabolo dans la cavité duchargeur et refermer la culasse.L’arme est chargée et prête autir.
Attention!Toujours tenir l’arme de tellemanière que vous et d’autrespersonnes ne soient pasmises en danger.
Sécurité lorsque la culasseest ouverte
Le support-percuteur est bloquélorsque la culasse est ouverte.
Cocking and loading thepistol
Pull the cocking lever to its full-est extent, thereby opening thebreech and cocking the trigger.Insert a pellet into the groove,then lock the breech. The rifle is now loaded and ready to fire.
Attention!Always handle the weaponin such a way that neitheryou nor bystanders are en-dangered.
Safety when the breech isopen
When the breech is open, thefiring pin is blocked.
Modo de armar y sujetar elarma
Girar la palanca de armar hasta el tope, abriéndose entonces elcierre y quedando armado el dis-parador. Colocar la bola diàboloen la cavidad de cargar y cerrar elcierre. El fusil está ahora cargado ya punto de disparar.
¡Atención!Mantenga el arma siempre demanera que no ponga enpeligro ni a Vd., ni a laspersonas que le rodeen.
Aseguramiento con el cierreabierto
Estando el cierre abierto, la piezapercutora se encuentra bloqueada.
9
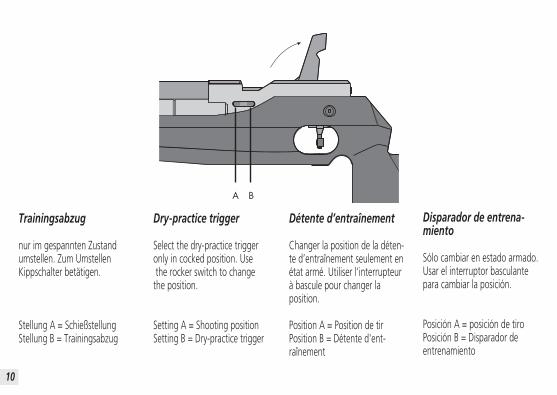
Trainingsabzug
nur im gespannten Zustand umstellen. Zum Umstellen Kippschalter betätigen.
Stellung A = SchießstellungStellung B = Trainingsabzug
Dry-practice trigger
Select the dry-practice triggeronly in cocked position. Usethe rocker switch to change the position.
Setting A = Shooting positionSetting B = Dry-practice trigger
Détente d’entraînement
Changer la position de la déten-te d’entraînement seulement enétat armé. Utiliser l'interrupteurà bascule pour changer la position.
Position A = Position de tirPosition B = Détente d'ent-raînement
Disparador de entrena-miento
Sólo cambiar en estado armado.Usar el interruptor basculantepara cambiar la posición.
Posición A = posición de tiroPosición B = Disparador de entrenamiento
10
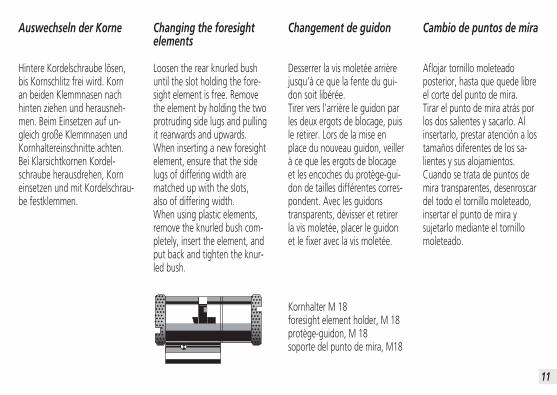
Auswechseln der Korne
Hintere Kordelschraube lösen,bis Kornschlitz frei wird. Kornan beiden Klemmnasen nachhinten ziehen und herausneh-men. Beim Einsetzen auf un-gleich große Klemmnasen undKornhaltereinschnitte achten.Bei Klarsichtkornen Kordel-schraube herausdrehen, Korneinsetzen und mit Kordelschrau-be festklemmen.
Changing the foresightelements
Loosen the rear knurled bushuntil the slot holding the fore-sight element is free. Removethe element by holding the twoprotruding side lugs and pullingit rearwards and upwards.When inserting a new foresightelement, ensure that the sidelugs of differing width arematched up with the slots, also of differing width.When using plastic elements,remove the knurled bush com-pletely, insert the element, andput back and tighten the knur-led bush.
Changement de guidon
Desserrer la vis moletée arrièrejusqu'à ce que la fente du gui-don soit libérée.Tirer vers l'arrière le guidon parles deux ergots de blocage, puisle retirer. Lors de la mise enplace du nouveau guidon, veillerà ce que les ergots de blocageet les encoches du protège-gui-don de tailles différentes corres-pondent. Avec les guidonstransparents, dévisser et retirerla vis moletée, placer le guidonet le fixer avec la vis moletée.
Cambio de puntos de mira
Aflojar tornillo moleteadoposterior, hasta que quede libreel corte del punto de mira.Tirar el punto de mira atrás porlos dos salientes y sacarlo. Alinsertarlo, prestar atención a los tamaños diferentes de los sa-lientes y sus alojamientos.Cuando se trata de puntos demira transparentes, desenroscardel todo el tornillo moleteado,insertar el punto de mira ysujetarlo mediante el tornillomoleteado.
Kornhalter M 18foresight element holder, M 18protège-guidon, M 18soporte del punto de mira, M18
11
12
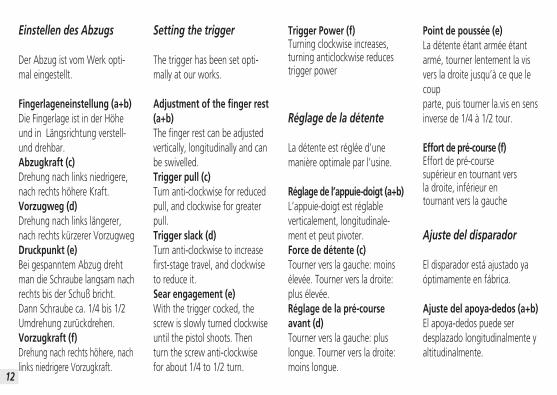
Einstellen des Abzugs
Der Abzug ist vom Werk opti-mal eingestellt.
Fingerlageneinstellung (a+b)Die Fingerlage ist in der Höheund in Längsrichtung verstell-und drehbar.Abzugkraft (c)Drehung nach links niedrigere,nach rechts höhere Kraft.Vorzugweg (d)Drehung nach links längerer,nach rechts kürzerer VorzugwegDruckpunkt (e)Bei gespanntem Abzug drehtman die Schraube langsam nachrechts bis der Schuß bricht.Dann Schraube ca. 1/4 bis 1/2Umdrehung zurückdrehen.Vorzugkraft (f)Drehung nach rechts höhere, nachlinks niedrigere Vorzugkraft.
Setting the trigger
The trigger has been set opti-mally at our works.
Adjustment of the finger rest(a+b)The finger rest can be adjustedvertically, longitudinally and canbe swivelled.Trigger pull (c)Turn anti-clockwise for reducedpull, and clockwise for greaterpull.Trigger slack (d)Turn anti-clockwise to increasefirst-stage travel, and clockwiseto reduce it.Sear engagement (e)With the trigger cocked, thescrew is slowly turned clockwiseuntil the pistol shoots. Thenturn the screw anti-clockwisefor about 1/4 to 1/2 turn.
Point de poussée (e)La détente étant armée étantarmé, tourner lentement la visvers la droite jusqu’à ce que lecoup parte, puis tourner la.vis en sensinverse de 1/4 à 1/2 tour.
Effort de pré-course (f)Effort de pré-course supérieur en tournant vers la droite, inférieur en tournant vers la gauche
Ajuste del disparador
El disparador está ajustado yaóptimamente en fábrica.
Ajuste del apoya-dedos (a+b)El apoya-dedos puede serdesplazado longitudinalmente yaltitudinalmente.
Trigger Power (f)Turning clockwise increases, turning anticlockwise reduces trigger power
Réglage de la détente
La détente est réglée d’unemanière optimale par l’usine.
Réglage de l’appuie-doigt (a+b)L’appuie-doigt est réglableverticalement, longitudinale-ment et peut pivoter.Force de détente (c)Tourner vers la gauche: moinsélevée. Tourner vers la droite:plus élevée.Réglage de la pré-courseavant (d)Tourner vers la gauche: pluslongue. Tourner vers la droite:moins longue.
13
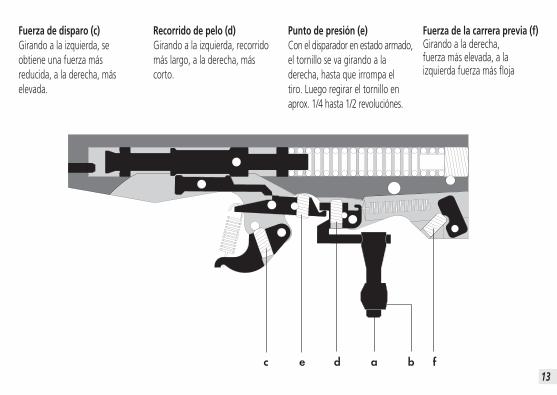
Fuerza de disparo (c)Girando a la izquierda, seobtiene una fuerza másreducida, a la derecha, más elevada.
Recorrido de pelo (d)Girando a la izquierda, recorridomás largo, a la derecha, máscorto.
Punto de presión (e)Con el disparador en estado armado,el tornillo se va girando a laderecha, hasta que irrompa el tiro. Luego regirar el tornillo enaprox. 1/4 hasta 1/2 revoluciónes.
Fuerza de la carrera previa (f)Girando a la derecha, fuerza más elevada, a la izquierda fuerza más floja
14
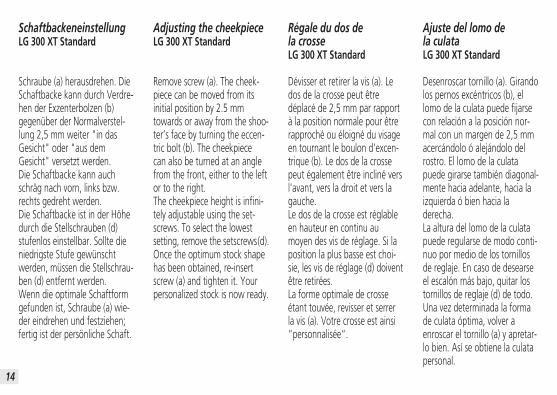
SchaftbackeneinstellungLG 300 XT Standard
Schraube (a) herausdrehen. DieSchaftbacke kann durch Verdre-hen der Exzenterbolzen (b)gegenüber der Normalverstel-lung 2,5 mm weiter "in dasGesicht" oder "aus demGesicht" versetzt werden. Die Schaftbacke kann auchschräg nach vorn, links bzw.rechts gedreht werden.Die Schaftbacke ist in der Höhedurch die Stellschrauben (d)stufenlos einstellbar. Sollte dieniedrigste Stufe gewünschtwerden, müssen die Stellschrau-ben (d) entfernt werden.Wenn die optimale Schaftformgefunden ist, Schraube (a) wie-der eindrehen und festziehen;fertig ist der persönliche Schaft.
Adjusting the cheekpieceLG 300 XT Standard
Remove screw (a). The cheek-piece can be moved from itsinitial position by 2.5 mmtowards or away from the shoo-ter’s face by turning the eccen-tric bolt (b). The cheekpiece can also be turned at an angle from the front, either to the leftor to the right.The cheekpiece height is infini-tely adjustable using the set-screws. To select the lowestsetting, remove the setscrews(d).Once the optimum stock shapehas been obtained, re-insertscrew (a) and tighten it. Yourpersonalized stock is now ready.
Régale du dos de la crosseLG 300 XT Standard
Dévisser et retirer la vis (a). Ledos de la crosse peut êtredéplacé de 2,5 mm par rapportà la position normale pour êtrerapproché ou éloigné du visageen tournant le boulon d'excen-trique (b). Le dos de la crossepeut également être incliné versl'avant, vers la droit et vers lagauche.Le dos de la crosse est réglableen hauteur en continu aumoyen des vis de réglage. Si laposition la plus basse est choi-sie, les vis de réglage (d) doiventêtre retirées.La forme optimale de crosseétant touvée, revisser et serrer la vis (a). Votre crosse est ainsi “personnalisée“.
Ajuste del lomo dela culataLG 300 XT Standard
Desenroscar tornillo (a). Girandolos pernos excéntricos (b), ellomo de la culata puede fijarsecon relación a la posición nor-mal con un margen de 2,5 mmacercándolo ó alejándolo delrostro. El lomo de la culatapuede girarse también diagonal-mente hacia adelante, hacia laizquierda ó bien hacia la derecha.La altura del lomo de la culatapuede regularse de modo conti-nuo por medio de los tornillosde reglaje. En caso de desearseel escalón más bajo, quitar lostornillos de reglaje (d) de todo.Una vez determinada la formade culata óptima, volver aenroscar el tornillo (a) y apretar-lo bien. Así se obtiene la culatapersonal.
15
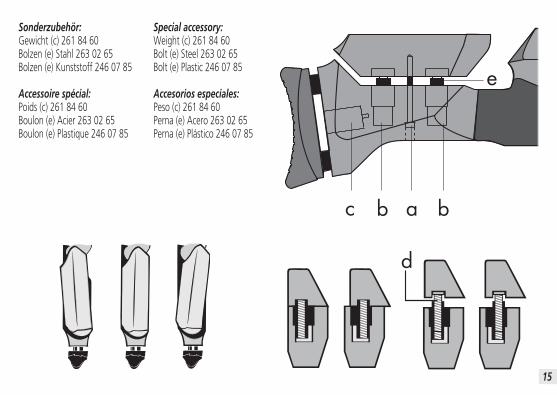
Sonderzubehör:Gewicht (c) 261 84 60Bolzen (e) Stahl 263 02 65Bolzen (e) Kunststoff 246 07 85
Accessoire spécial:Poids (c) 261 84 60Boulon (e) Acier 263 02 65Boulon (e) Plastique 246 07 85
Special accessory:Weight (c) 261 84 60Bolt (e) Steel 263 02 65Bolt (e) Plastic 246 07 85
Accesorios especiales:Peso (c) 261 84 60Perna (e) Acero 263 02 65Perna (e) Plástico 246 07 85
16
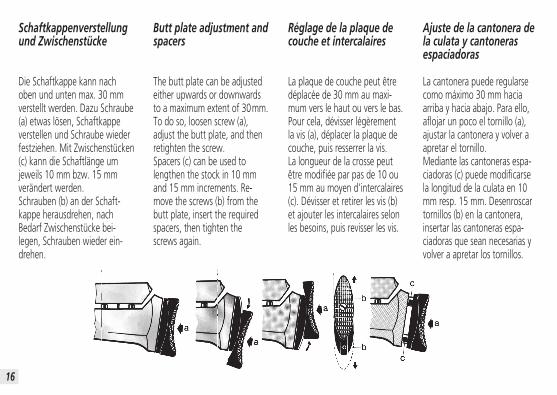
Schaftkappenverstellungund Zwischenstücke
Die Schaftkappe kann nachoben und unten max. 30 mmverstellt werden. Dazu Schraube(a) etwas lösen, Schaftkappeverstellen und Schraube wiederfestziehen. Mit Zwischenstücken(c) kann die Schaftlänge umjeweils 10 mm bzw. 15 mmverändert werden. Schrauben (b) an der Schaft-kappe herausdrehen, nachBedarf Zwischenstücke bei-legen, Schrauben wieder ein-drehen.
Butt plate adjustment andspacers
The butt plate can be adjustedeither upwards or downwardsto a maximum extent of 30mm.To do so, loosen screw (a),adjust the butt plate, and thenretighten the screw.Spacers (c) can be used tolengthen the stock in 10 mmand 15 mm increments. Re-move the screws (b) from thebutt plate, insert the requiredspacers, then tighten the screws again.
Réglage de la plaque decouche et intercalaires
La plaque de couche peut êtredéplacée de 30 mm au maxi-mum vers le haut ou vers le bas.Pour cela, dévisser légèrementla vis (a), déplacer la plaque decouche, puis resserrer la vis.La longueur de la crosse peutêtre modifiée par pas de 10 ou15 mm au moyen d'intercalaires(c). Dévisser et retirer les vis (b)et ajouter les intercalaires selonles besoins, puis revisser les vis.
Ajuste de la cantonera dela culata y cantonerasespaciadoras
La cantonera puede regularsecomo máximo 30 mm haciaarriba y hacia abajo. Para ello,aflojar un poco el tornillo (a),ajustar la cantonera y volver aapretar el tornillo.Mediante las cantoneras espa-ciadoras (c) puede modificarsela longitud de la culata en 10mm resp. 15 mm. Desenroscartornillos (b) en la cantonera,insertar las cantoneras espa-ciadoras que sean necesarias yvolver a apretar los tornillos.
17
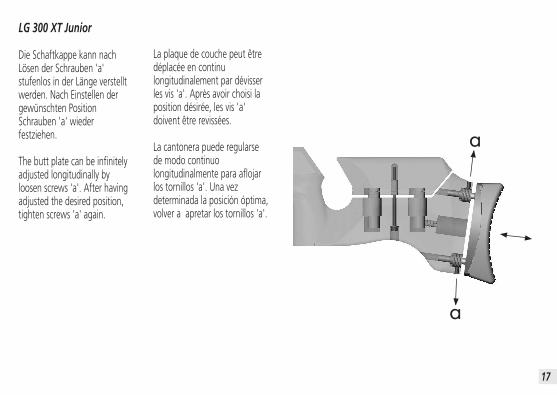
LG 300 XT Junior
Die Schaftkappe kann nachLösen der Schrauben 'a'stufenlos in der Länge verstelltwerden. Nach Einstellen dergewünschten PositionSchrauben 'a' wiederfestziehen.
The butt plate can be infinitelyadjusted longitudinally byloosen screws 'a'. After havingadjusted the desired position,tighten screws 'a' again.
La plaque de couche peut êtredéplacée en continulongitudinalement par dévisserles vis 'a'. Après avoir choisi laposition désirée, les vis 'a'doivent être revissées.
La cantonera puede regularsede modo continuolongitudinalmente para aflojarlos tornillos 'a'. Una vezdeterminada la posición óptima,volver a apretar los tornillos 'a'.
a
a
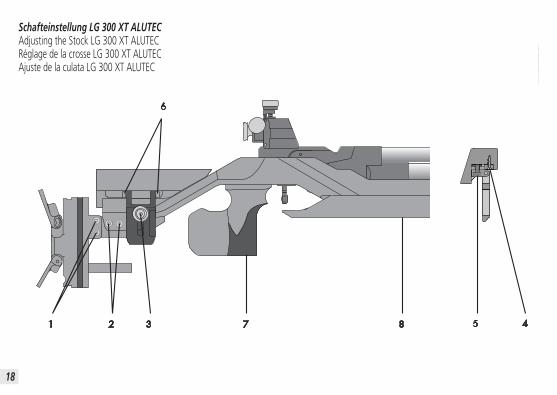
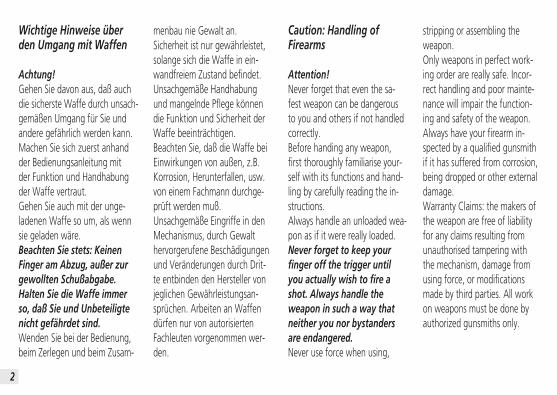
Schafteinstellung LG 300 XT ALUTECAdjusting the Stock LG 300 XT ALUTECRéglage de la crosse LG 300 XT ALUTECAjuste de la culata LG 300 XT ALUTEC
18
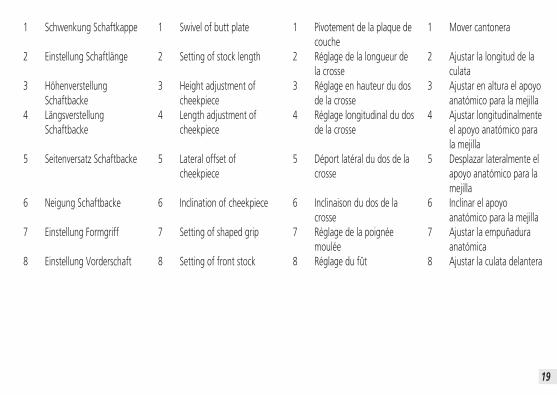
1 Schwenkung Schaftkappe
2 Einstellung Schaftlänge
3 Höhenverstellung Schaftbacke
4 Längsverstellung Schaftbacke
5 Seitenversatz Schaftbacke
6 Neigung Schaftbacke
7 Einstellung Formgriff
8 Einstellung Vorderschaft
1 Swivel of butt plate
2 Setting of stock length
3 Height adjustment of cheekpiece
4 Length adjustment of cheekpiece
5 Lateral offset of cheekpiece
6 Inclination of cheekpiece
7 Setting of shaped grip
8 Setting of front stock
1 Pivotement de la plaque de couche
2 Réglage de la longueur de la crosse
3 Réglage en hauteur du dos de la crosse
4 Réglage longitudinal du dos de la crosse
5 Déport latéral du dos de la crosse
6 Inclinaison du dos de la crosse
7 Réglage de la poignée moulée
8 Réglage du fût
1 Mover cantonera
2 Ajustar la longitud de la culata
3 Ajustar en altura el apoyo anatómico para la mejilla
4 Ajustar longitudinalmente el apoyo anatómico para la mejilla
5 Desplazar lateralmente el apoyo anatómico para la mejilla
6 Inclinar el apoyo anatómico para la mejilla
7 Ajustar la empuñadura anatómica
8 Ajustar la culata delantera
19
20
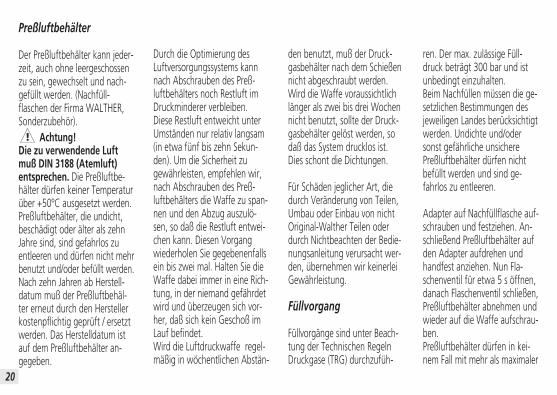
Preßluftbehälter
Der Preßluftbehälter kann jeder-zeit, auch ohne leergeschossenzu sein, gewechselt und nach-gefüllt werden. (Nachfüll-flaschen der Firma WALTHER,Sonderzubehör).
Achtung!Die zu verwendende Luftmuß DIN 3188 (Atemluft)entsprechen. Die Preßluftbe-hälter dürfen keiner Temperaturüber +50ºC ausgesetzt werden.Preßluftbehälter, die undicht,beschädigt oder älter als zehnJahre sind, sind gefahrlos zuentleeren und dürfen nicht mehrbenutzt und/oder befüllt werden.Nach zehn Jahren ab Herstell-datum muß der Preßluftbehäl-ter erneut durch den Herstellerkostenpflichtig geprüft / ersetztwerden. Das Herstelldatum istauf dem Preßluftbehälter an-gegeben.
!
Durch die Optimierung desLuftversorgungssystems kannnach Abschrauben des Preß-luftbehälters noch Restluft imDruckminderer verbleiben. Diese Restluft entweicht unterUmständen nur relativ langsam(in etwa fünf bis zehn Sekun-den). Um die Sicherheit zugewährleisten, empfehlen wir,nach Abschrauben des Preß-luftbehälters die Waffe zu span-nen und den Abzug auszulö-sen, so daß die Restluft entwei-chen kann. Diesen Vorgangwiederholen Sie gegebenenfallsein bis zwei mal. Halten Sie dieWaffe dabei immer in eine Rich-tung, in der niemand gefährdetwird und überzeugen sich vor-her, daß sich kein Geschoß imLauf befindet.Wird die Luftdruckwaffe regel-mäßig in wöchentlichen Abstän-
den benutzt, muß der Druck-gasbehälter nach dem Schießennicht abgeschraubt werden.Wird die Waffe voraussichtlichlänger als zwei bis drei Wochennicht benutzt, sollte der Druck-gasbehälter gelöst werden, sodaß das System drucklos ist.Dies schont die Dichtungen.
Für Schäden jeglicher Art, diedurch Veränderung von Teilen,Umbau oder Einbau von nichtOriginal-Walther Teilen oderdurch Nichtbeachten der Bedie-nungsanleitung verursacht wer-den, übernehmen wir keinerleiGewährleistung.
Füllvorgang
Füllvorgänge sind unter Beach-tung der Technischen RegelnDruckgase (TRG) durchzufüh-
ren. Der max. zulässige Füll-druck beträgt 300 bar und istunbedingt einzuhalten.Beim Nachfüllen müssen die ge-setzlichen Bestimmungen desjeweiligen Landes berücksichtigtwerden. Undichte und/odersonst gefährliche unsicherePreßluftbehälter dürfen nichtbefüllt werden und sind ge-fahrlos zu entleeren.
Adapter auf Nachfüllflasche auf-schrauben und festziehen. An-schließend Preßluftbehälter aufden Adapter aufdrehen undhandfest anziehen. Nun Fla-schenventil für etwa 5 s öffnen,danach Flaschenventil schließen, Preßluftbehälter abnehmen und wieder auf die Waffe aufschrau-ben.Preßluftbehälter dürfen in kei-nem Fall mit mehr als maximaler
21
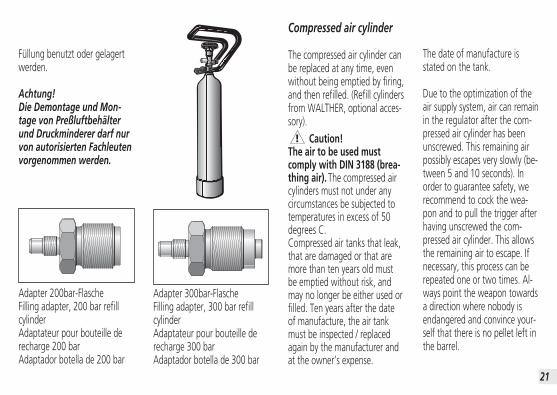
Compressed air cylinder
The compressed air cylinder canbe replaced at any time, evenwithout being emptied by firing,and then refilled. (Refill cylindersfrom WALTHER, optional acces-sory).
Caution!The air to be used mustcomply with DIN 3188 (brea-thing air). The compressed aircylinders must not under anycircumstances be subjected totemperatures in excess of 50degrees C.Compressed air tanks that leak,that are damaged or that aremore than ten years old mustbe emptied without risk, andmay no longer be either used orfilled. Ten years after the dateof manufacture, the air tankmust be inspected / replacedagain by the manufacturer and at the owner’s expense.
!
The date of manufacture isstated on the tank.
Due to the optimization of theair supply system, air can remainin the regulator after the com-pressed air cylinder has beenunscrewed. This remaining airpossibly escapes very slowly (be-tween 5 and 10 seconds). Inorder to guarantee safety, werecommend to cock the wea-pon and to pull the trigger afterhaving unscrewed the com-pressed air cylinder. This allowsthe remaining air to escape. Ifnecessary, this process can berepeated one or two times. Al-ways point the weapon towardsa direction where nobody isendangered and convince your-self that there is no pellet left inthe barrel.
Füllung benutzt oder gelagertwerden.
Achtung!Die Demontage und Mon-tage von Preßluftbehälterund Druckminderer darf nurvon autorisierten Fachleutenvorgenommen werden.
Adapter 300bar-FlascheFilling adapter, 300 bar refillcylinderAdaptateur pour bouteille derecharge 300 barAdaptador botella de 300 bar
Adapter 200bar-FlascheFilling adapter, 200 bar refillcylinderAdaptateur pour bouteille derecharge 200 barAdaptador botella de 200 bar
22
If the weapon is used regularly every week, the compressed aircylinder needn’t to be un-screwed after shooting. If youintend not to use the weaponfor more than two or threeweeks, you should unscrew thecylinder so that there is nopressure in the system. This willsave the seals.
No responsibility is accepted byus under the warranty for da-mage resulting from alterationsto parts, from conversions, orfrom installation of parts notmanufactured by the WALTHERcompany, or caused by non-compliance with the operatinginstructions.
Filling procedure
The technical regulations rela-ting to pressurized gas must becomplied with when filling thecompressed air cylinder. Themaximum permissible fillingpressure is 300 bars and mustbe strictly observed. When re-filling with compressed air, thestatutory regulations of the re-spective country must be ob-served. Leaking cylinders and/orcylinders which are otherwisedangerously unsafe should notbe filled and should be emptiedsafely.
Screw an adapter onto the refillcylinder and tighten it. Thenscrew the compressed air cylin-der onto the adapter and tight-en it to hand pressure. Nowopen the cylinder valve forabout 5 secs., then close this valve, remove the compressed
air cylinder, and screw it backonto the pistol.
Compressed air cylinders mustunder no circumstances bestored or used if they containmore than their maximumpermissible charge quantity.
Attention!The dismantling andinstallation of the com-pressed air cylinder and thepressure reducer must bedone by authorized gun-smiths only.
Cartouche d’air comprimé
La cartouche d’air comprimépeut être remplacée et rechar-gée à tout moment, même sansavoir être vidée par les tirs suc-cessifs (bouteilles de rechargede la societé WALTHER, acces-soire spécial).
Attention!L’air utilisé doit être conformeà la norme DIN 3188 (airinhalable). Les cartouches d’aircomprimé ne doivent pas êtreexposées à des températuressupérieures à +50 C.Les cartouches d’air compriméprésentant un défaut d’étan-chéité, endommagées ou datantde plus de dix ans doivent êtrevidées avec prudence et ne plusêtre utilisées et/ou rechargées.Après un délai de dix ans àcompter de la date de fabri-cation, la cartouche d’air com-primé doit être de nouveau
!
23
mise en danger.En cas l’arme est utiliséerégulièrement chaque semaine,il ne faut pas démonter la car-touche après de tirer. Si vousn’utilisez pas l’arme pour plusde deux ou trois semaines, nousvous recommandons de dévis-ser la cartouche pour soulagerle système. Cela protège lesjoints.
La garantie ne couvre aucundommage de quelque natureque ce soit, provoqué par desmodifications de pièces ou parle montage de pièces qui nesont pas des pièces d’origineWALTHER, ou par le non-res-pect du mode d’emploi.
Remplissage
Le remplissage doit être effec-tué conformément aux régle-ments techniques de sécuritérelatifs aux gaz comprimés. Lapression de remplissage maxi-male autorisée s’élêve à 300 baret doit impérativement être res-pectée. Lors du remplissage,respecter les dispositions légalesen vigueur dans le paysrespectif. Les cartouches d’aircomprimé présentant un dangerquelconque ne doivent pas être rechargées et doivent êtrevidangées en prenant toutes les mesures de sécurité nécessaires.
Visser à fond l’adaptateur sur labouteille de recharge, puis pla-cer la cartouche d’air comprimésur l’adaptateur et la visser à lamain. Ouvrir alors la vanne de labouteille pendant 5 s environ,puis la refermer. Retirer la car-
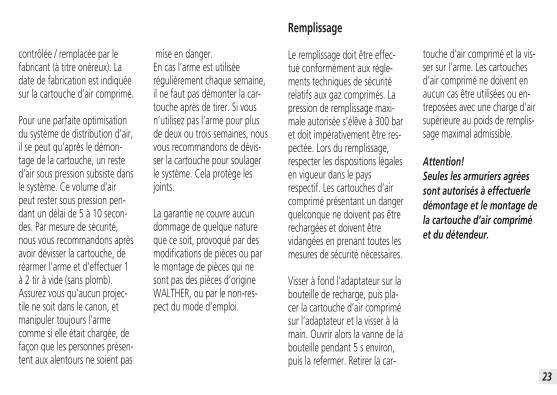
contrôlée / remplacée par lefabricant (à titre onéreux). Ladate de fabrication est indiquéesur la cartouche d’air comprimé.
Pour une parfaite optimisationdu système de distribution d’air,il se peut qu’après le démon-tage de la cartouche, un rested’air sous pression subsiste dansle système. Ce volume d’airpeut rester sous pression pen-dant un délai de 5 à 10 secon-des. Par mesure de sécurité,nous vous recommandons aprèsavoir dévisser la cartouche, deréarmer l’arme et d’effectuer 1à 2 tir à vide (sans plomb).Assurez vous qu’aucun projec-tile ne soit dans le canon, etmanipuler toujours l’armecomme si elle était chargée, defaçon que les personnes présen-tent aux alentours ne soient pas
touche d’air comprimé et la vis-ser sur l’arme. Les cartouchesd’air comprimé ne doivent enaucun cas être utilisées ou en-treposées avec une charge d’airsupérieure au poids de remplis-sage maximal admissible.
Attention!Seules les armuriers agréessont autorisés à effectuerledémontage et le montage dela cartouche d’air compriméet du détendeur.
24
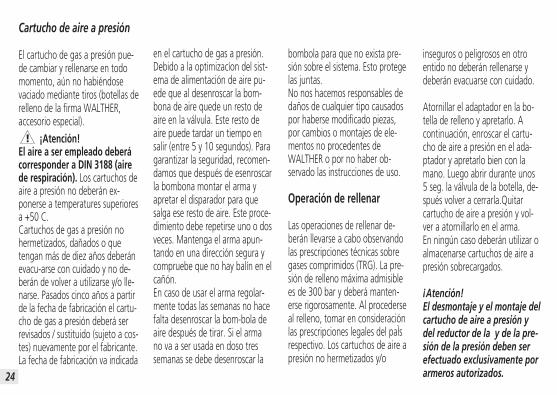
inseguros o peligrosos en otroentido no deberán rellenarse ydeberán evacuarse con cuidado.
Atornillar el adaptador en la bo-tella de relleno y apretarlo. Acontinuación, enroscar el cartu-cho de aire a presión en el ada-ptador y apretarlo bien con lamano. Luego abrir durante unos5 seg. la válvula de la botella, de-spués volver a cerrarla.Quitarcartucho de aire a presión y vol-ver a atornillarlo en el arma.En ningún caso deberán utilizar oalmacenarse cartuchos de aire apresión sobrecargados.
¡Atención!El desmontaje y el montaje delcartucho de aire a presión ydel reductor de la y de la pre-sión de la presión deben serefectuado exclusivamente porarmeros autorizados.
en el cartucho de gas a presión.Debido a la optimizacíon del sist-ema de alimentación de aire pu-ede que al desenroscar la bom-bona de aire quede un resto deaire en la válvula. Este resto deaire puede tardar un tiempo ensalir (entre 5 y 10 segundos). Paragarantizar la seguridad, recomen-damos que después de esenroscarla bombona montar el arma yapretar el disparador para quesalga ese resto de aire. Este proce-dimiento debe repetirse uno o dosveces. Mantenga el arma apun-tando en una dirección segura ycompruebe que no hay balín en elcañón.En caso de usar el arma regolar-mente todas las semanas no hacefalta desenroscar la bom-bola deaire después de tirar. Si el armano va a ser usada en doso tressemanas se debe desenroscar la
Cartucho de aire a presión
El cartucho de gas a presión pue-de cambiar y rellenarse en todomomento, aún no habiéndosevaciado mediante tiros (botellas derelleno de la firma WALTHER,accesorio especial).
¡Atención!El aire a ser empleado deberácorresponder a DIN 3188 (airede respiración). Los cartuchos deaire a presión no deberán ex-ponerse a temperatures superioresa +50 C.Cartuchos de gas a presión nohermetizados, dañados o quetengan más de diez años deberánevacu-arse con cuidado y no de-berán de volver a utilizarse y/o lle-narse. Pasados cinco años a partirde la fecha de fabricación el cartu-cho de gas a presión deberá serrevisados / sustituido (sujeto a cos-tes) nuevamente por el fabricante.La fecha de fabricación va indicada
!
bombola para que no exista pre-sión sobre el sistema. Esto protegelas juntas.No nos hacemos responsables dedaños de cualquier tipo causadospor haberse modificado piezas,por cambios o montajes de ele-mentos no procedentes deWALTHER o por no haber ob-servado las instrucciones de uso.
Operación de rellenar
Las operaciones de rellenar de-berán llevarse a cabo observandolas prescripciones técnicas sobregases comprimidos (TRG). La pre-sión de relleno máxima admisiblees de 300 bar y deberá manten-erse rigorosamente. Al procederseal relleno, tomar en consideraciónlas prescripciones legales del paÌsrespectivo. Los cartuchos de aire apresión no hermetizados y/o
25
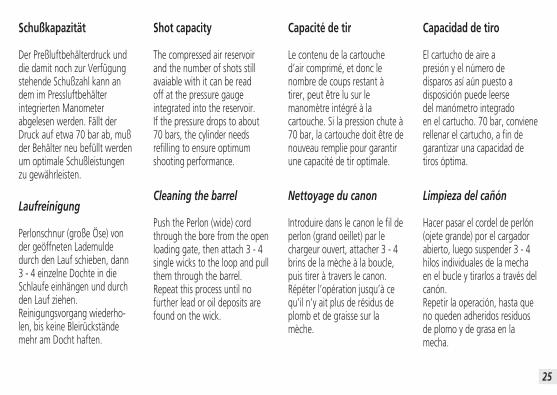
Laufreinigung
Perlonschnur (große Öse) vonder geöffneten Lademuldedurch den Lauf schieben, dann3 - 4 einzelne Dochte in dieSchlaufe einhängen und durchden Lauf ziehen.Reinigungsvorgang wiederho-len, bis keine Bleirückständemehr am Docht haften.
Nettoyage du canon
Introduire dans le canon le fil deperlon (grand oeillet) par lechargeur ouvert, attacher 3 - 4brins de la mèche à la boucle,puis tirer à travers le canon.Répéter l’opération jusqu’à cequ’il n’y ait plus de résidus deplomb et de graisse sur lamèche.
Cleaning the barrel
Push the Perlon (wide) cordthrough the bore from the openloading gate, then attach 3 - 4single wicks to the loop and pullthem through the barrel.Repeat this process until nofurther lead or oil deposits arefound on the wick.
Limpieza del cañón
Hacer pasar el cordel de perlón(ojete grande) por el cargadorabierto, luego suspender 3 - 4hilos individuales de la mechaen el bucle y tirarlos a través del canón.Repetir la operación, hasta queno queden adheridos residuosde plomo y de grasa en lamecha.
Schußkapazität
Der Preßluftbehälterdruck unddie damit noch zur Verfügungstehende Schußzahl kann andem im Pressluftbehälterintegrierten Manometerabgelesen werden. Fällt derDruck auf etwa 70 bar ab, mußder Behälter neu befüllt werdenum optimale Schußleistungenzu gewährleisten.
Shot capacity
The compressed air reservoir and the number of shots still avaiable with it can be read off at the pressure gauge integrated into the reservoir.If the pressure drops to about70 bars, the cylinder needsrefilling to ensure optimumshooting performance.
Capacité de tir
Le contenu de la cartouche d’air comprimé, et donc le nombre de coups restant à tirer, peut être lu sur le manomètre intégré à la cartouche. Si la pression chute à70 bar, la cartouche doit être denouveau remplie pour garantirune capacité de tir optimale.
Capacidad de tiro
El cartucho de aire a presión y el número de disparos así aún puesto a disposición puede leerse del manómetro integrado en el cartucho. 70 bar, convienerellenar el cartucho, a fin degarantizar una capacidad detiros óptima.
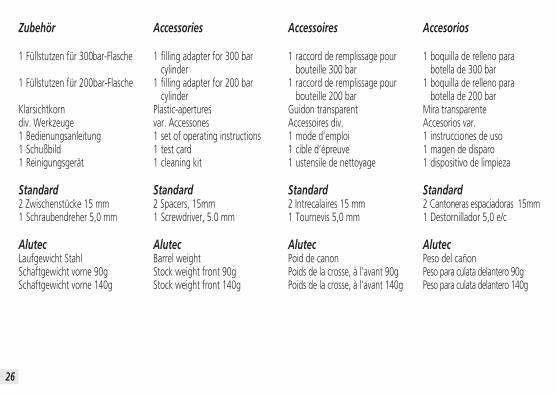
Zubehör
1 Füllstutzen für 300bar-Flasche
1 Füllstutzen für 200bar-Flasche
Klarsichtkorndiv. Werkzeuge1 Bedienungsanleitung1 Schußbild1 Reinigungsgerät
Standard2 Zwischenstücke 15 mm1 Schraubendreher 5,0 mm
AlutecLaufgewicht StahlSchaftgewicht vorne 90gSchaftgewicht vorne 140g
Accessories
1 filling adapter for 300 bar cylinder
1 filling adapter for 200 bar cylinder
Plastic-aperturesvar. Accessones1 set of operating instructions1 test card1 cleaning kit
Standard 2 Spacers, 15mm1 Screwdriver, 5.0 mm
AlutecBarrel weightStock weight front 90gStock weight front 140g
Accessoires
1 raccord de remplissage pour bouteille 300 bar
1 raccord de remplissage pour bouteille 200 bar
Guidon transparentAccessoires div.1 mode d’emploi1 cible d’épreuve1 ustensile de nettoyage
Standard 2 Intrecalaires 15 mm1 Tournevis 5,0 mm
AlutecPoid de canonPoids de la crosse, à l’avant 90gPoids de la crosse, à l’avant 140g
Accesorios
1 boquilla de relleno para botella de 300 bar
1 boquilla de relleno para botella de 200 bar
Mira transparente Accesorios var.1 instrucciones de uso1 magen de disparo1 dispositivo de limpieza
Standard 2 Cantoneras espaciadoras 15mm1 Destornillador 5,0 e/c
AlutecPeso del cañonPeso para culata delantero 90gPeso para culata delantero 140g
26
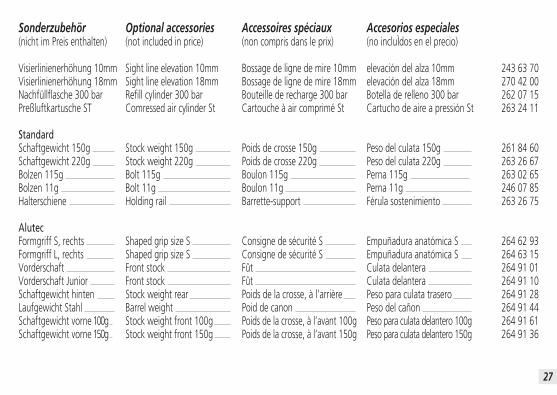
Accessoires spéciaux(non compris dans le prix)
Bossage de ligne de mire 10mmBossage de ligne de mire 18mmBouteille de recharge 300 barCartouche à air comprimé St
Poids de crosse 150gPoids de crosse 220gBoulon 115gBoulon 11gBarrette-support
Consigne de sécurité SConsigne de sécurité SFûtFûtPoids de la crosse, à l’arrièrePoid de canonPoids de la crosse, à l’avant 100gPoids de la crosse, à l’avant 150g
Sonderzubehör(nicht im Preis enthalten)
Visierlinienerhöhung 10mmVisierlinienerhöhung 18mmNachfüllflasche 300 barPreßluftkartusche ST
StandardSchaftgewicht 150gSchaftgewicht 220gBolzen 115gBolzen 11gHalterschiene
AlutecFormgriff S, rechtsFormgriff L, rechtsVorderschaftVorderschaft JuniorSchaftgewicht hintenLaufgewicht StahlSchaftgewicht vorne 100gSchaftgewicht vorne 150g
Optional accessories(not included in price)
Sight line elevation 10mmSight line elevation 18mmRefill cylinder 300 barComressed air cylinder St
Stock weight 150gStock weight 220gBolt 115gBolt 11gHolding rail
Shaped grip size SShaped grip size SFront stockFront stockStock weight rearBarrel weightStock weight front 100gStock weight front 150g
243 63 70270 42 00262 07 15263 24 11
261 84 60263 26 67263 02 65246 07 85263 26 75
264 62 93264 63 15264 91 01264 91 10264 91 28264 91 44264 91 61264 91 36
Accesorios especiales(no incluÌdos en el precio)
elevación del alza 10mmelevación del alza 18mmBotella de relleno 300 barCartucho de aire a pressión St
Peso del culata 150gPeso del culata 220gPerna 115gPerna 11gFérula sostenimiento
Empuñadura anatómica SEmpuñadura anatómica SCulata delanteraCulata delanteraPeso para culata traseroPeso del cañonPeso para culata delantero 100gPeso para culata delantero 150g
27
Caracteristicastécnicas
Calibre
Medidas(largo/alto/ancho)
Longitud de mira
Longitud de cañón
Peso total
Peso de disparoe
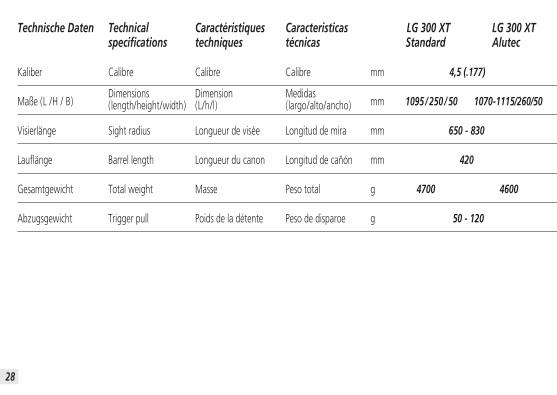
LG 300 XTAlutec
1070-1115/260/50
4600
Caractéristiquestechniques
Calibre
Dimension(L/h/l)
Longueur de visée
Longueur du canon
Masse
Poids de la détente
Technicalspecifications
Calibre
Dimensions(length/height/width)
Sight radius
Barrel length
Total weight
Trigger pull
Technische Daten
Kaliber
Maße (L /H / B)
Visierlänge
Lauflänge
Gesamtgewicht
Abzugsgewicht
LG 300 XTStandard
mm
mm 1095 / 250 / 50
mm 650 - 830
mm
g 4700
g
4,5 (.177)
420
50 - 120
28
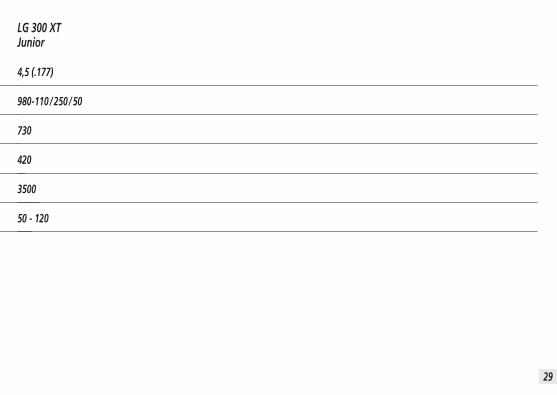
LG 300 XTJunior
4,5 (.177)
980-110 / 250 / 50
730
420
3500
50 - 120
29
Carl Walther GmbH SportwaffenPostfach 43 25D-89033 UlmTelefon 07 31-15 39-0Telefax 07 31-15 39 109
Tech
nisch
e Änd
erun
gen
vorb
ehalt
en.
Subje
ctsto
tech
nical
mod
ificat
ions.
Sous
rése
rve d
e mod
ificat
ions t
echn
iques
.
Rese
rvado
el d
erec
ho d
e int
rodu
cir m
odific
acion
es.
264
88 4
9.01
-06.
4,0.
21