Embed Size (px)
Citation preview
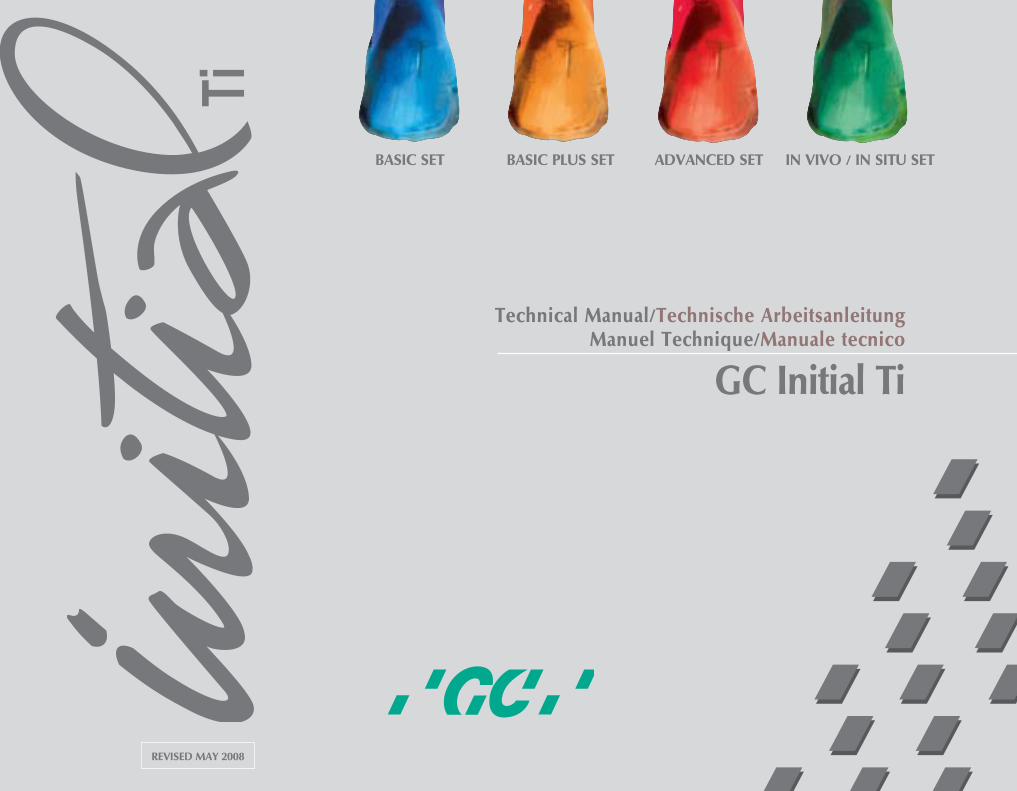
Technical Manual/Technische ArbeitsanleitungManuel Technique/Manuale tecnico
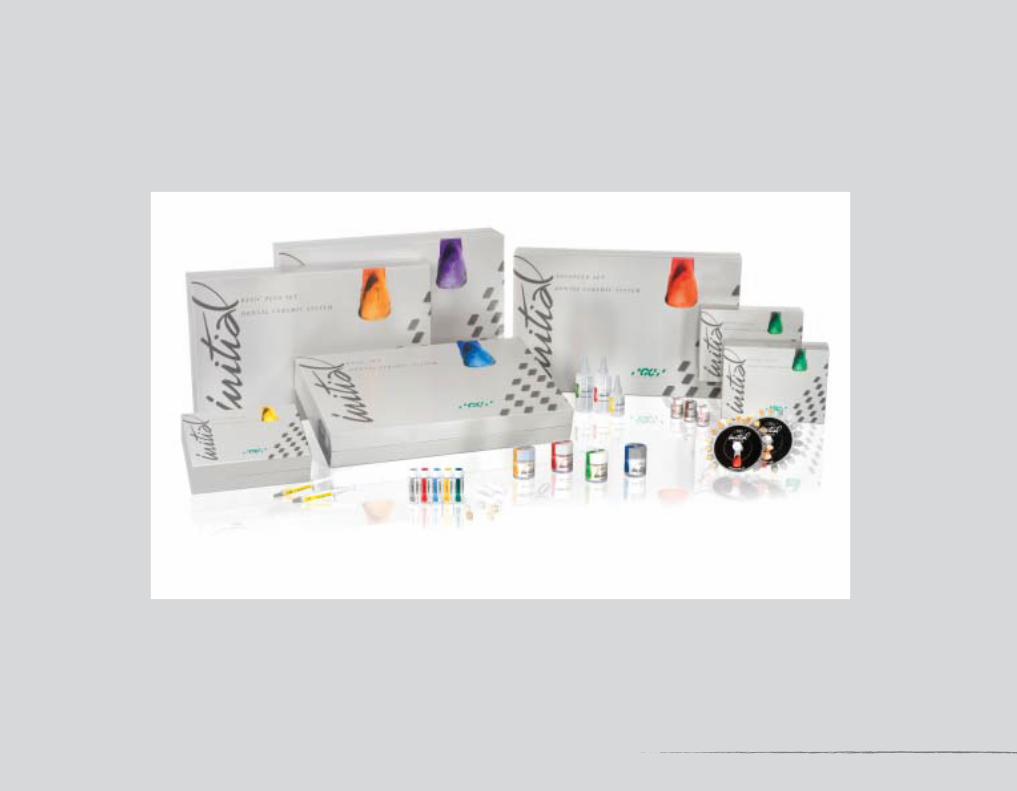
GC Initial Ti
TiBASIC SET BASIC PLUS SET ADVANCED SET IN VIVO / IN SITU SET
REVISED MAY 2008
2
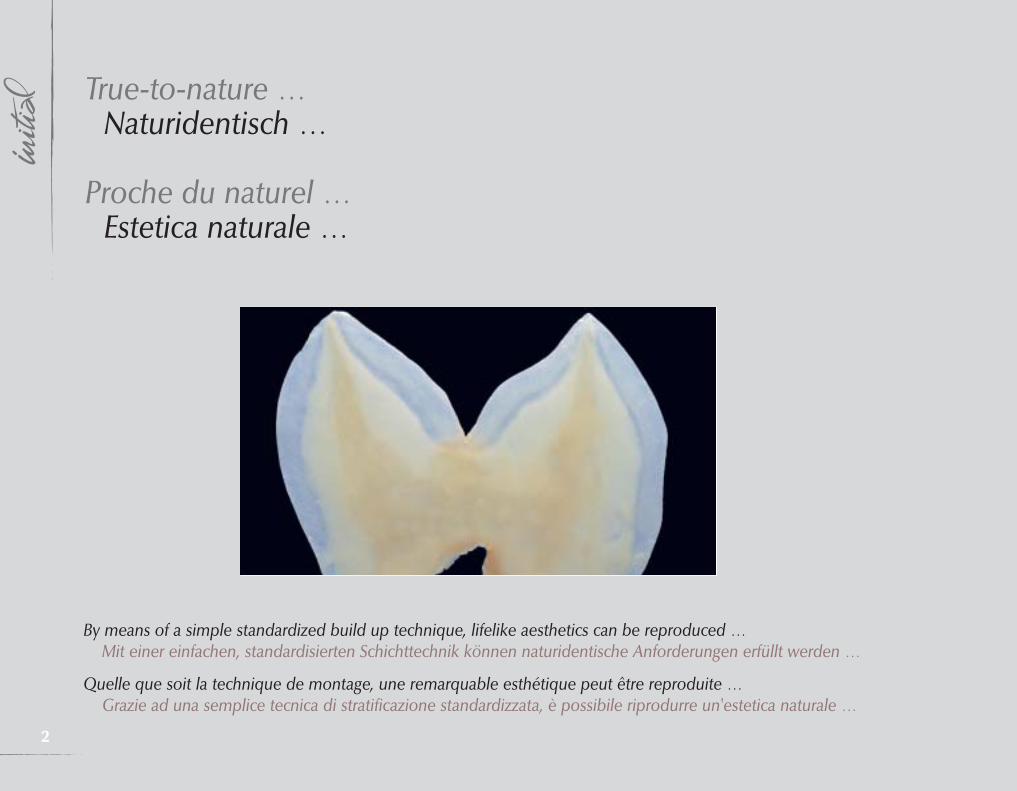
True-to-nature …Naturidentisch …
Proche du naturel …Estetica naturale …
By means of a simple standardized build up technique, lifelike aesthetics can be reproduced …Mit einer einfachen, standardisierten Schichttechnik können naturidentische Anforderungen erfüllt werden …
Quelle que soit la technique de montage, une remarquable esthétique peut être reproduite … Grazie ad una semplice tecnica di stratificazione standardizzata, è possibile riprodurre un'estetica naturale …
3
1 2
43
4
Technical ManualTechnische Arbeitsanleitung
GC Initial Ti
Ti
DG
B
Page
Colour chart / Farbtabelle 7
GC Initial Ti Bonder / GC Initial Ti Bonder 8
Standardized build up procedure / Standardisierte Schichttechnik
Anterior tooth / Frontzahn 9 – 13
Molar / Molar 15 – 19
Firing instructions / Brennanleitung 14 & 32
GC Initial – Colour combination charts / GC Initial – Farbzuordnungstabellen 20 – 22
Multi-chromatic build up procedure / Polychrome Schichttechnik 23 – 31
Physical properties & Shelf Life / Physikalische Eigenschaften & Haltbarkeitsdauer 33
Firing charts for various furnaces / Brenntabellen für diverse Ofentypen 34 – 35
Table of ContentsInhaltsverzeichnis
Photoshooting: Michael Brüsch - M.B. Dentaltechnik GmbH, Düsseldorf / Germany

7
Colour ChartFarbtabelle
Ti
Vita® is a registered trademark of VITA Zahnfabrik H. Rauter GmbH & Co. KG, Bad Säckingen, Germany.
Vita® ist ein eingetragenes Warenzeichen der VITA Zahnfabrik H. Rauter GmbH & Co. KG, Bad Säckingen, Deutschland.
8
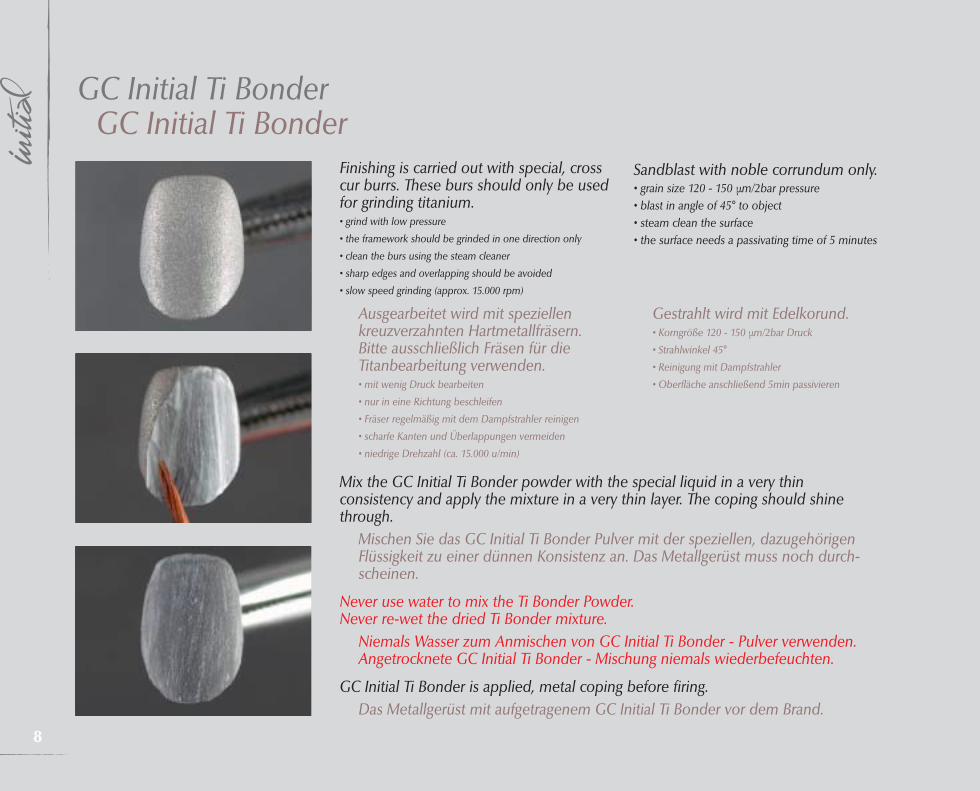
Mix the GC Initial Ti Bonder powder with the special liquid in a very thin consistency and apply the mixture in a very thin layer. The coping should shine through.
Mischen Sie das GC Initial Ti Bonder Pulver mit der speziellen, dazugehörigen Flüssigkeit zu einer dünnen Konsistenz an. Das Metallgerüst muss noch durch-scheinen.
Never use water to mix the Ti Bonder Powder. Never re-wet the dried Ti Bonder mixture.
Niemals Wasser zum Anmischen von GC Initial Ti Bonder - Pulver verwenden. Angetrocknete GC Initial Ti Bonder - Mischung niemals wiederbefeuchten.
GC Initial Ti Bonder is applied, metal coping before firing.Das Metallgerüst mit aufgetragenem GC Initial Ti Bonder vor dem Brand.
GC Initial Ti BonderGC Initial Ti Bonder
Finishing is carried out with special, cross cur burrs. These burs should only be used for grinding titanium. • grind with low pressure
• the framework should be grinded in one direction only
• clean the burs using the steam cleaner
• sharp edges and overlapping should be avoided
• slow speed grinding (approx. 15.000 rpm)
Sandblast with noble corrundum only.• grain size 120 - 150 µm/2bar pressure• blast in angle of 45° to object• steam clean the surface• the surface needs a passivating time of 5 minutes
Ausgearbeitet wird mit speziellen kreuzverzahnten Hartmetallfräsern. Bitte ausschließlich Fräsen für die Titanbearbeitung verwenden.• mit wenig Druck bearbeiten
• nur in eine Richtung beschleifen
• Fräser regelmäßig mit dem Dampfstrahler reinigen
• scharfe Kanten und Überlappungen vermeiden
• niedrige Drehzahl (ca. 15.000 u/min)
Gestrahlt wird mit Edelkorund.• Korngröße 120 - 150 µm/2bar Druck
• Strahlwinkel 45°
• Reinigung mit Dampfstrahler
• Oberfläche anschließend 5min passivieren
9
Standardized build up procedure Standardisierte Schichttechnik
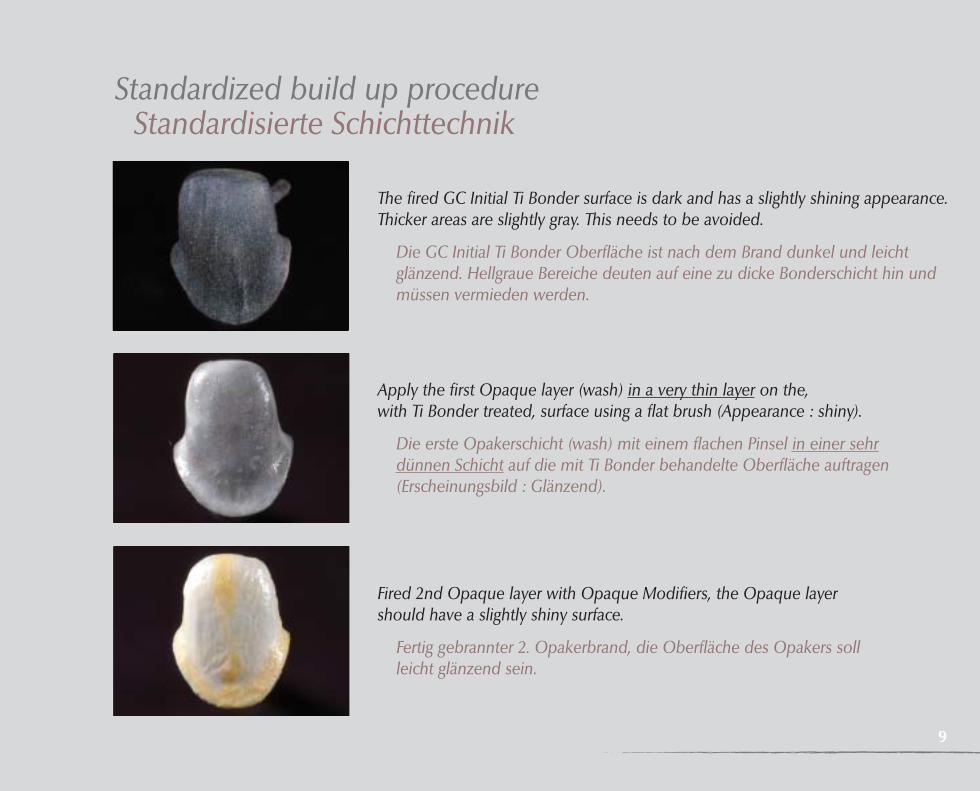
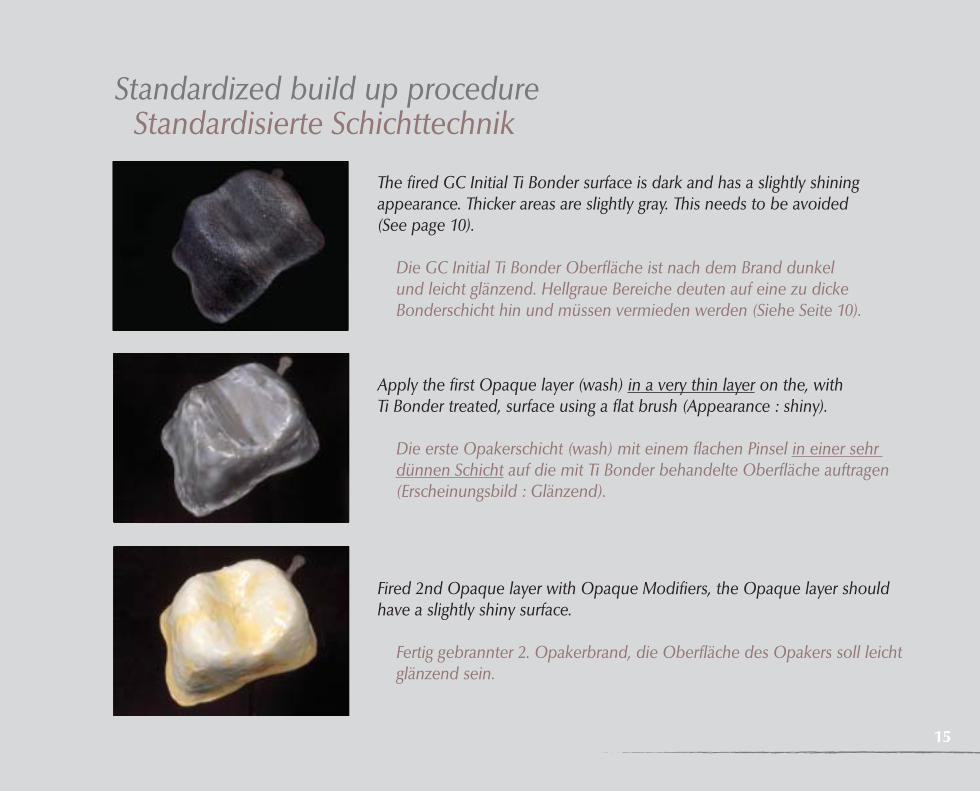
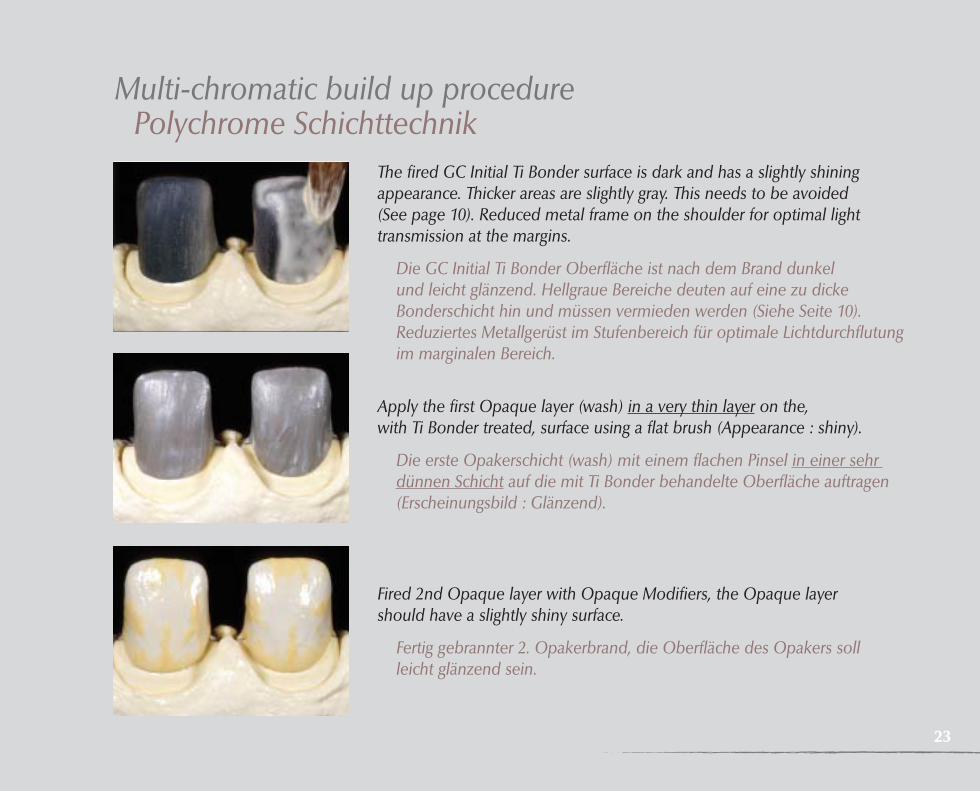
Apply the first Opaque layer (wash) in a very thin layer on the, with Ti Bonder treated, surface using a flat brush (Appearance : shiny).
Die erste Opakerschicht (wash) mit einem flachen Pinsel in einer sehrdünnen Schicht auf die mit Ti Bonder behandelte Oberfläche auftragen (Erscheinungsbild : Glänzend).
Fired 2nd Opaque layer with Opaque Modifiers, the Opaque layer should have a slightly shiny surface.
Fertig gebrannter 2. Opakerbrand, die Oberfläche des Opakers soll leicht glänzend sein.
The fired GC Initial Ti Bonder surface is dark and has a slightly shining appearance.Thicker areas are slightly gray. This needs to be avoided.
Die GC Initial Ti Bonder Oberfläche ist nach dem Brand dunkel und leicht glänzend. Hellgraue Bereiche deuten auf eine zu dicke Bonderschicht hin und müssen vermieden werden.
10
Standardized build up procedure Standardisierte Schichttechnik
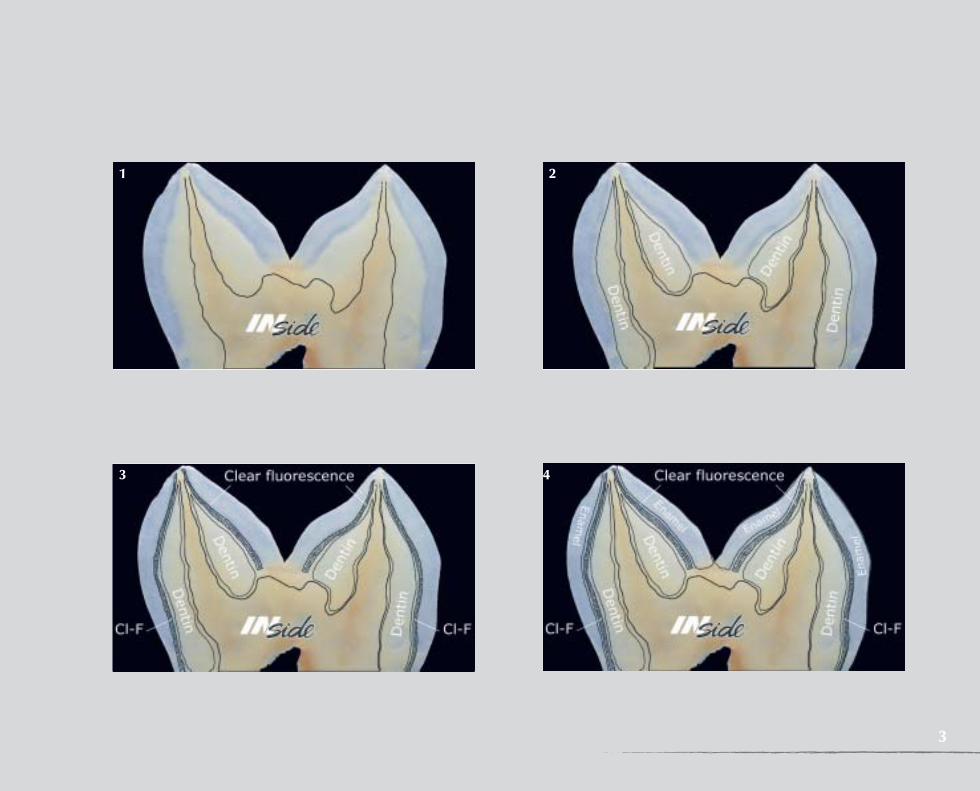
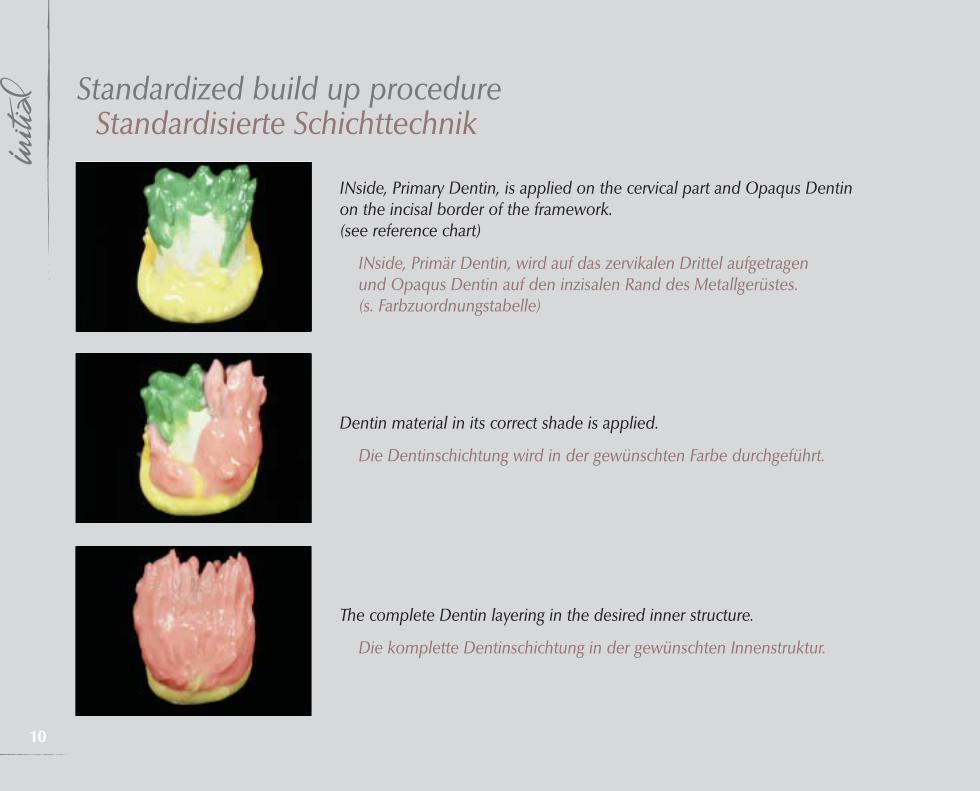
INside, Primary Dentin, is applied on the cervical part and Opaqus Dentin on the incisal border of the framework. (see reference chart)
INside, Primär Dentin, wird auf das zervikalen Drittel aufgetragen und Opaqus Dentin auf den inzisalen Rand des Metallgerüstes. (s. Farbzuordnungstabelle)
Dentin material in its correct shade is applied.
Die Dentinschichtung wird in der gewünschten Farbe durchgeführt.
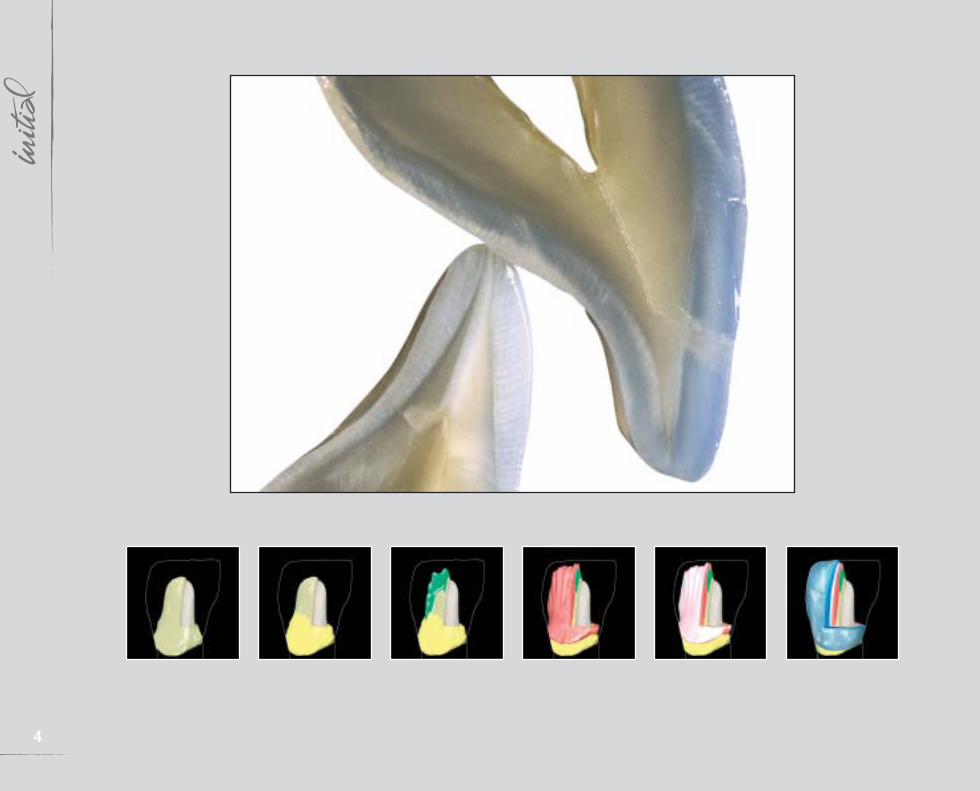
The complete Dentin layering in the desired inner structure.
Die komplette Dentinschichtung in der gewünschten Innenstruktur.
11
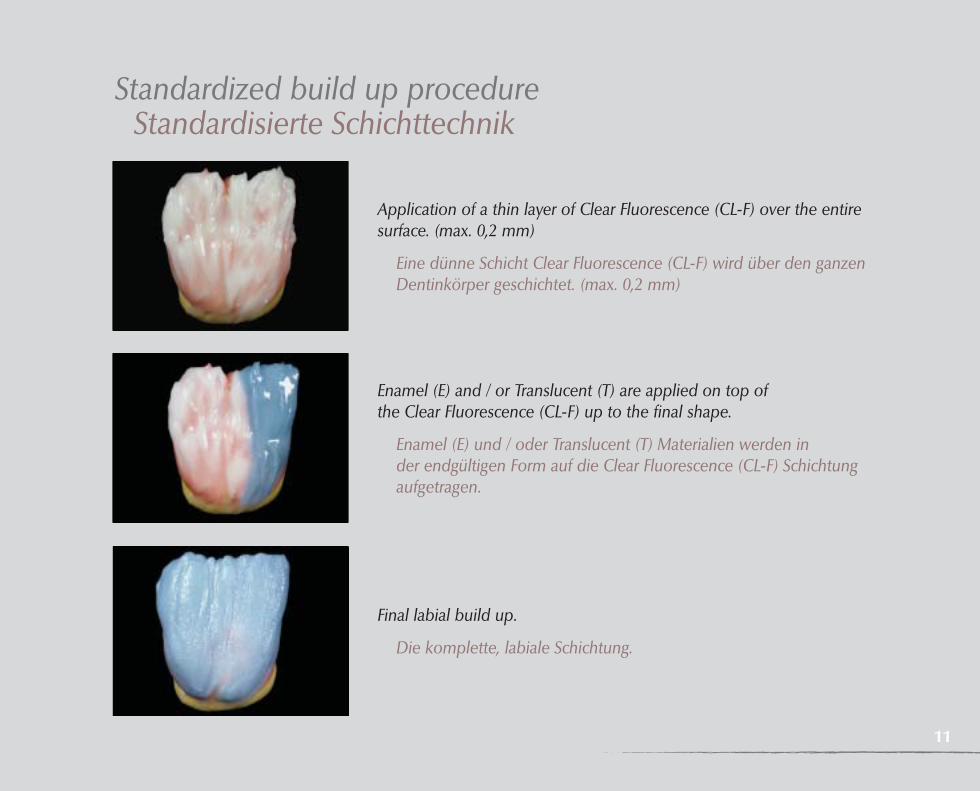
Enamel (E) and / or Translucent (T) are applied on top of the Clear Fluorescence (CL-F) up to the final shape.
Enamel (E) und / oder Translucent (T) Materialien werden in der endgültigen Form auf die Clear Fluorescence (CL-F) Schichtung aufgetragen.
Final labial build up.
Die komplette, labiale Schichtung.
Standardized build up procedure Standardisierte Schichttechnik
Application of a thin layer of Clear Fluorescence (CL-F) over the entire surface. (max. 0,2 mm)
Eine dünne Schicht Clear Fluorescence (CL-F) wird über den ganzen Dentinkörper geschichtet. (max. 0,2 mm)
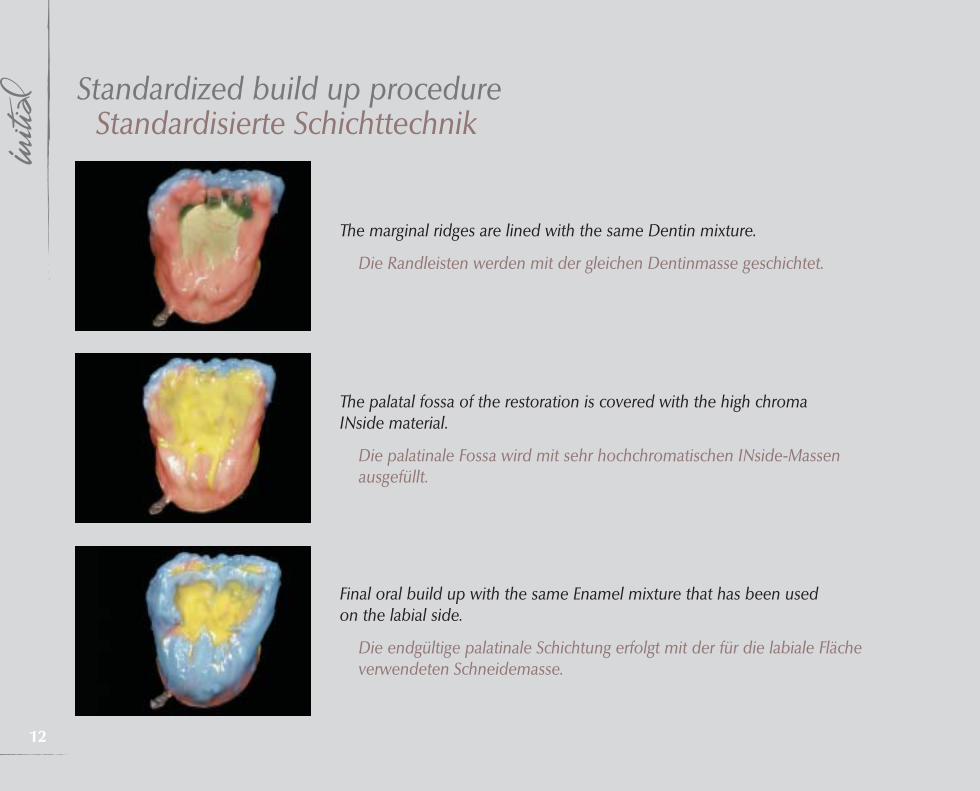
The marginal ridges are lined with the same Dentin mixture.
Die Randleisten werden mit der gleichen Dentinmasse geschichtet.
The palatal fossa of the restoration is covered with the high chroma INside material.
Die palatinale Fossa wird mit sehr hochchromatischen INside-Massen ausgefüllt.
Standardized build up procedure Standardisierte Schichttechnik
Final oral build up with the same Enamel mixture that has been used on the labial side.
Die endgültige palatinale Schichtung erfolgt mit der für die labiale Fläche verwendeten Schneidemasse.
12
13
Standardized build up procedure Standardisierte Schichttechnik
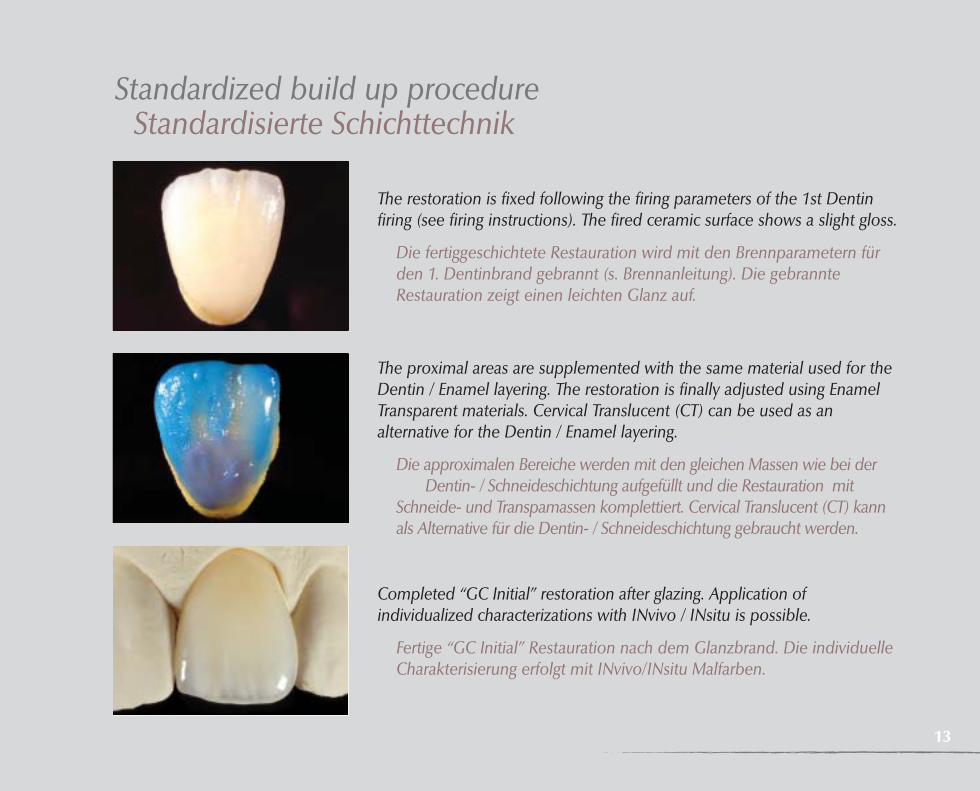
The restoration is fixed following the firing parameters of the 1st Dentin firing (see firing instructions). The fired ceramic surface shows a slight gloss.
Die fertiggeschichtete Restauration wird mit den Brennparametern für den 1. Dentinbrand gebrannt (s. Brennanleitung). Die gebrannte Restauration zeigt einen leichten Glanz auf.
The proximal areas are supplemented with the same material used for the Dentin / Enamel layering. The restoration is finally adjusted using Enamel Transparent materials. Cervical Translucent (CT) can be used as an alternative for the Dentin / Enamel layering.
Die approximalen Bereiche werden mit den gleichen Massen wie bei der Dentin- / Schneideschichtung aufgefüllt und die Restauration mit Schneide- und Transpamassen komplettiert. Cervical Translucent (CT) kann als Alternative für die Dentin- / Schneideschichtung gebraucht werden.
Completed “GC Initial” restoration after glazing. Application of individualized characterizations with INvivo / INsitu is possible.
Fertige “GC Initial” Restauration nach dem Glanzbrand. Die individuelle Charakterisierung erfolgt mit INvivo/INsitu Malfarben.

14
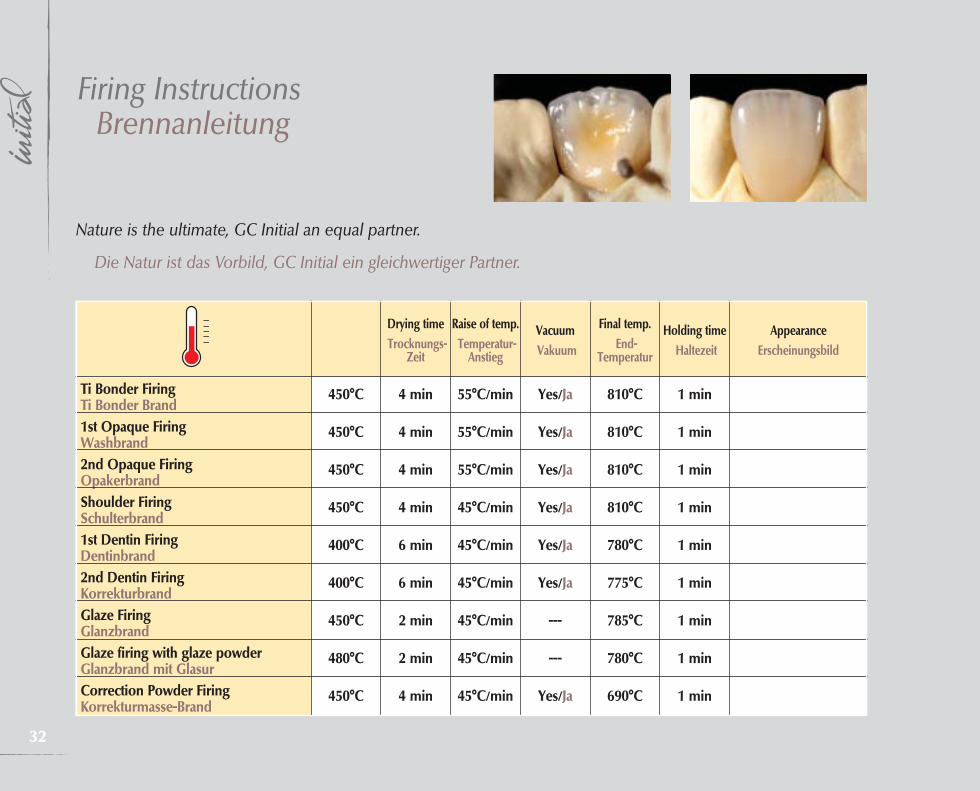
Firing InstructionsBrennanleitung
55°C/min
55°C/min
55°C/min
45°C/min
45°C/min
45°C/min
45°C/min
45°C/min
45°C/min
Slightly shiningLeicht glänzend
ShiningGlänzend
Slightly shiningLeicht glänzendSlightly shiningLeicht glänzendSlightly shiningLeicht glänzendSlightly shiningLeicht glänzend
ShiningGlänzendShining
GlänzendShining
Glänzend
Ti Bonder FiringTi Bonder Brand1st Opaque FiringWashbrand2nd Opaque FiringOpakerbrandShoulder FiringSchulterbrand1st Dentin FiringDentinbrand 2nd Dentin FiringKorrekturbrand Glaze FiringGlanzbrandGlaze firing with glaze powderGlanzbrand mit GlasurCorrection Powder FiringKorrekturmasse-Brand
Preheating temp. Start-
Temperatur
Drying time Trocknungs-
Zeit
Raise of temp. Temperatur-
Anstieg
Vacuum Vakuum
Final temp. End-
Temperatur
Holding time Haltezeit
AppearanceErscheinungsbild
450°C
450°C
450°C
450°C
400°C
400°C
450°C
480°C
450°C
4 min
4 min
4 min
4 min
6 min
6 min
2 min
2 min
4 min
Yes/Ja
Yes/Ja
Yes/Ja
Yes/Ja
Yes/Ja
Yes/Ja
---
---
Yes/Ja
810°C
810°C
810°C
810°C
780°C
775°C
785°C
780°C
690°C
1 min
1 min
1 min
1 min
1 min
1 min
1 min
1 min
1 min
15
Standardized build up procedure Standardisierte Schichttechnik
Fired 2nd Opaque layer with Opaque Modifiers, the Opaque layer should have a slightly shiny surface.
Fertig gebrannter 2. Opakerbrand, die Oberfläche des Opakers soll leicht glänzend sein.
Apply the first Opaque layer (wash) in a very thin layer on the, with Ti Bonder treated, surface using a flat brush (Appearance : shiny).
Die erste Opakerschicht (wash) mit einem flachen Pinsel in einer sehr dünnen Schicht auf die mit Ti Bonder behandelte Oberfläche auftragen (Erscheinungsbild : Glänzend).
The fired GC Initial Ti Bonder surface is dark and has a slightly shining appearance. Thicker areas are slightly gray. This needs to be avoided (See page 10).
Die GC Initial Ti Bonder Oberfläche ist nach dem Brand dunkel und leicht glänzend. Hellgraue Bereiche deuten auf eine zu dicke Bonderschicht hin und müssen vermieden werden (Siehe Seite 10).
16
Standardized build up procedure Standardisierte Schichttechnik
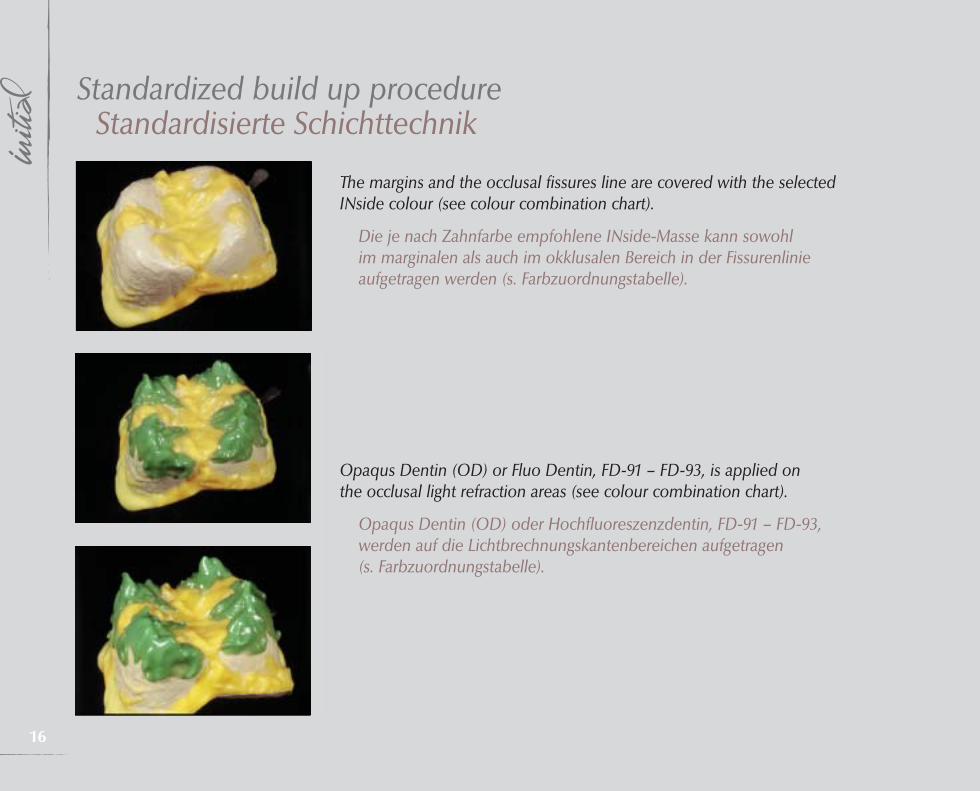
The margins and the occlusal fissures line are covered with the selected INside colour (see colour combination chart).
Die je nach Zahnfarbe empfohlene INside-Masse kann sowohl im marginalen als auch im okklusalen Bereich in der Fissurenlinie aufgetragen werden (s. Farbzuordnungstabelle).
Opaqus Dentin (OD) or Fluo Dentin, FD-91 – FD-93, is applied on the occlusal light refraction areas (see colour combination chart).
Opaqus Dentin (OD) oder Hochfluoreszenzdentin, FD-91 – FD-93, werden auf die Lichtbrechnungskantenbereichen aufgetragen (s. Farbzuordnungstabelle).
17
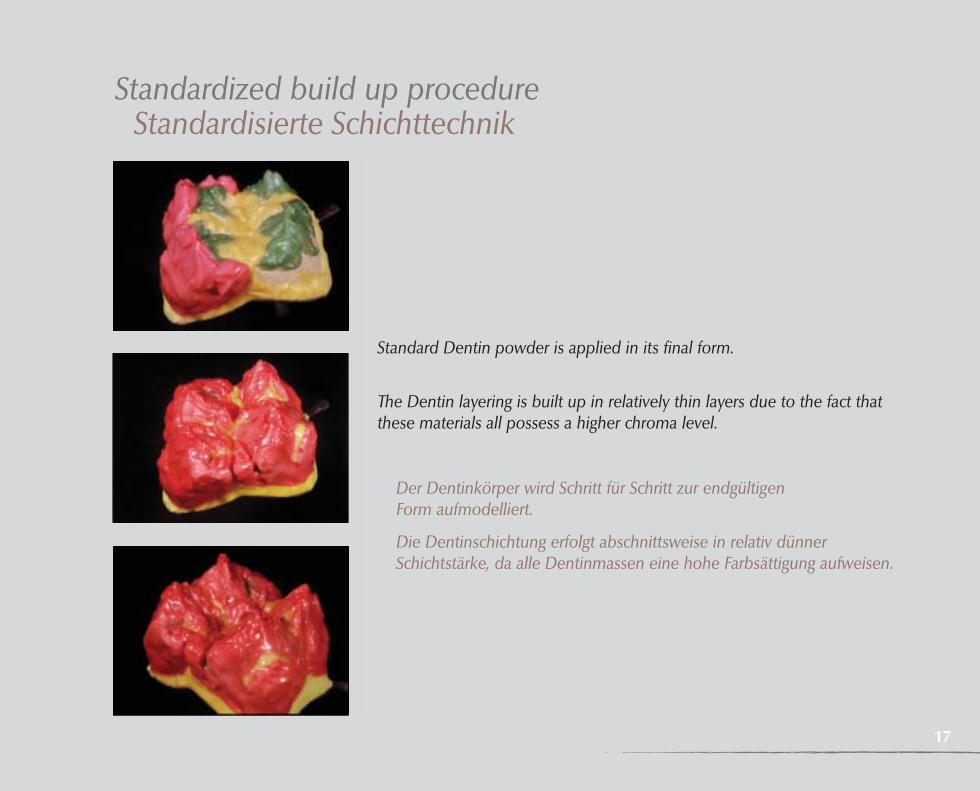
Standard Dentin powder is applied in its final form.
The Dentin layering is built up in relatively thin layers due to the fact that these materials all possess a higher chroma level.
Der Dentinkörper wird Schritt für Schritt zur endgültigen Form aufmodelliert.
Die Dentinschichtung erfolgt abschnittsweise in relativ dünner Schichtstärke, da alle Dentinmassen eine hohe Farbsättigung aufweisen.
Standardized build up procedure Standardisierte Schichttechnik
Standardized build up procedure Standardisierte Schichttechnik
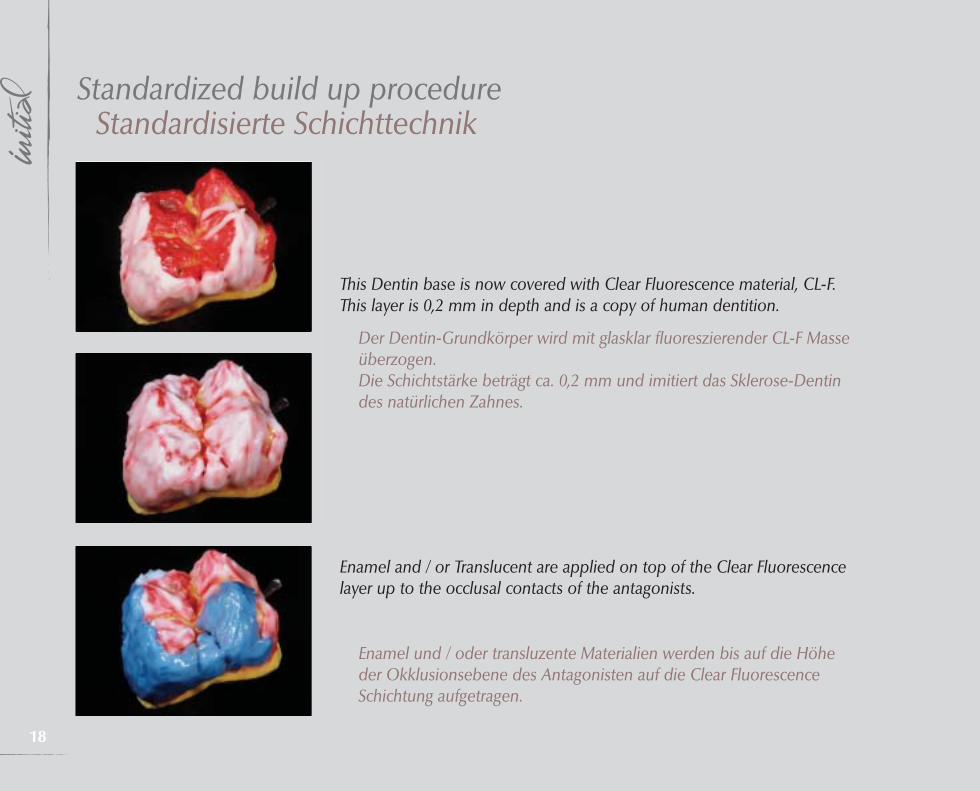
This Dentin base is now covered with Clear Fluorescence material, CL-F.This layer is 0,2 mm in depth and is a copy of human dentition.
Der Dentin-Grundkörper wird mit glasklar fluoreszierender CL-F Masse überzogen.Die Schichtstärke beträgt ca. 0,2 mm und imitiert das Sklerose-Dentin des natürlichen Zahnes.
Enamel and / or Translucent are applied on top of the Clear Fluorescence layer up to the occlusal contacts of the antagonists.
Enamel und / oder transluzente Materialien werden bis auf die Höhe der Okklusionsebene des Antagonisten auf die Clear Fluorescence Schichtung aufgetragen.
18
19
Standardized build up procedure Standardisierte Schichttechnik
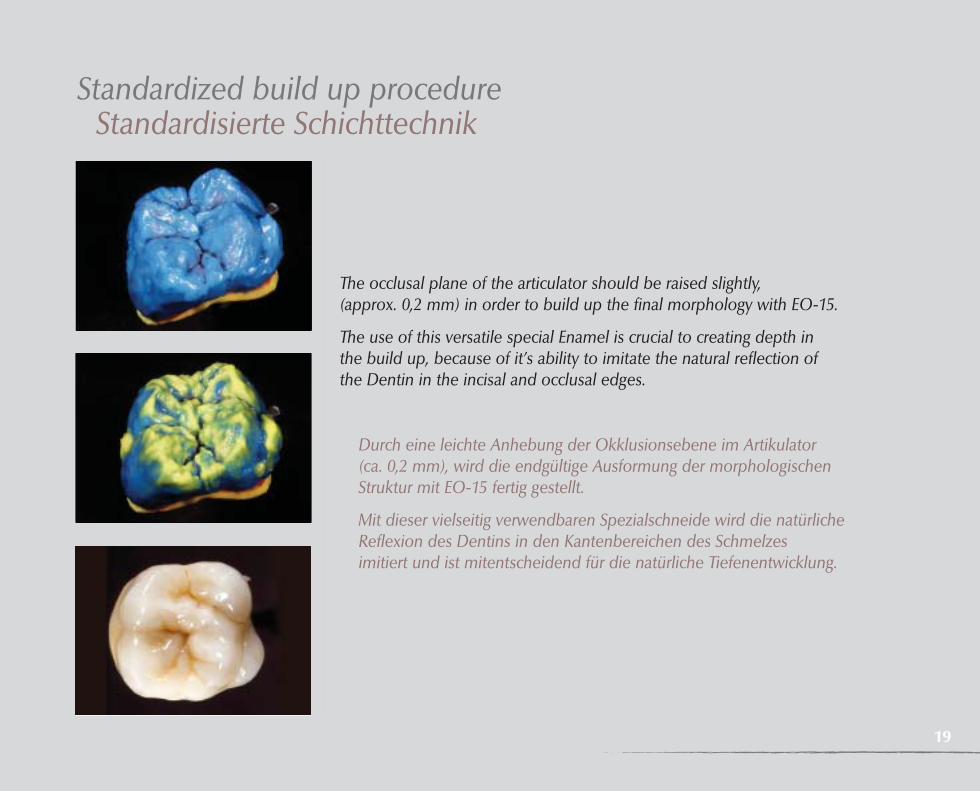
The occlusal plane of the articulator should be raised slightly, (approx. 0,2 mm) in order to build up the final morphology with EO-15.
The use of this versatile special Enamel is crucial to creating depth in the build up, because of it’s ability to imitate the natural reflection of the Dentin in the incisal and occlusal edges.
Durch eine leichte Anhebung der Okklusionsebene im Artikulator (ca. 0,2 mm), wird die endgültige Ausformung der morphologischen Struktur mit EO-15 fertig gestellt.
Mit dieser vielseitig verwendbaren Spezialschneide wird die natürliche Reflexion des Dentins in den Kantenbereichen des Schmelzes imitiert und ist mitentscheidend für die natürliche Tiefenentwicklung.
20
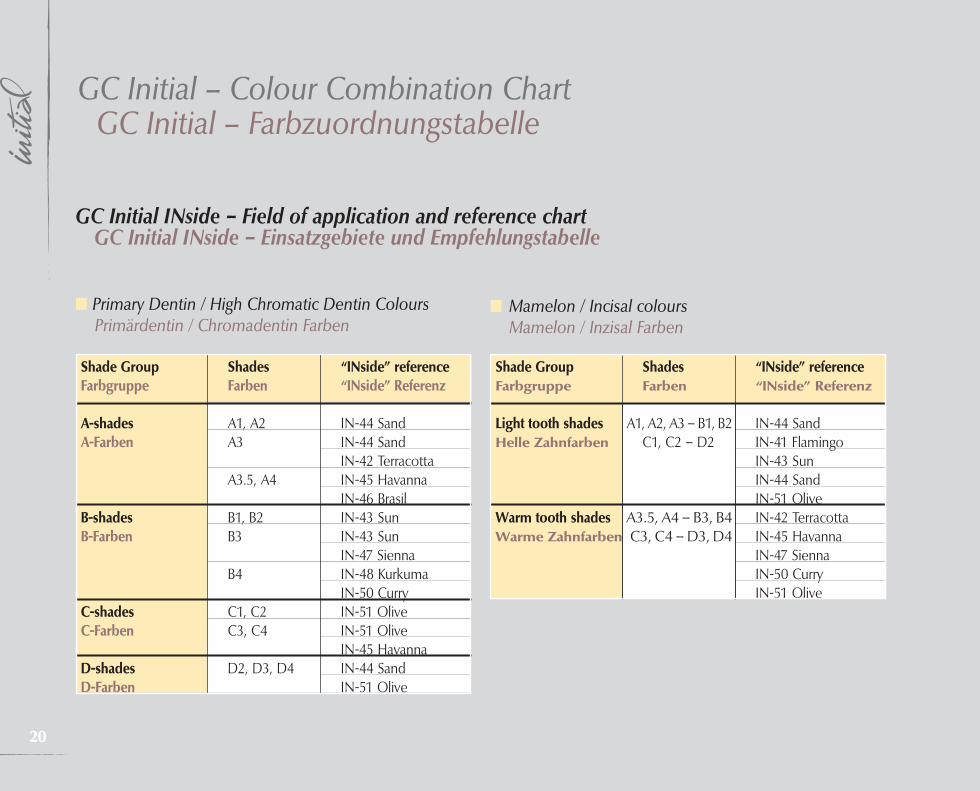
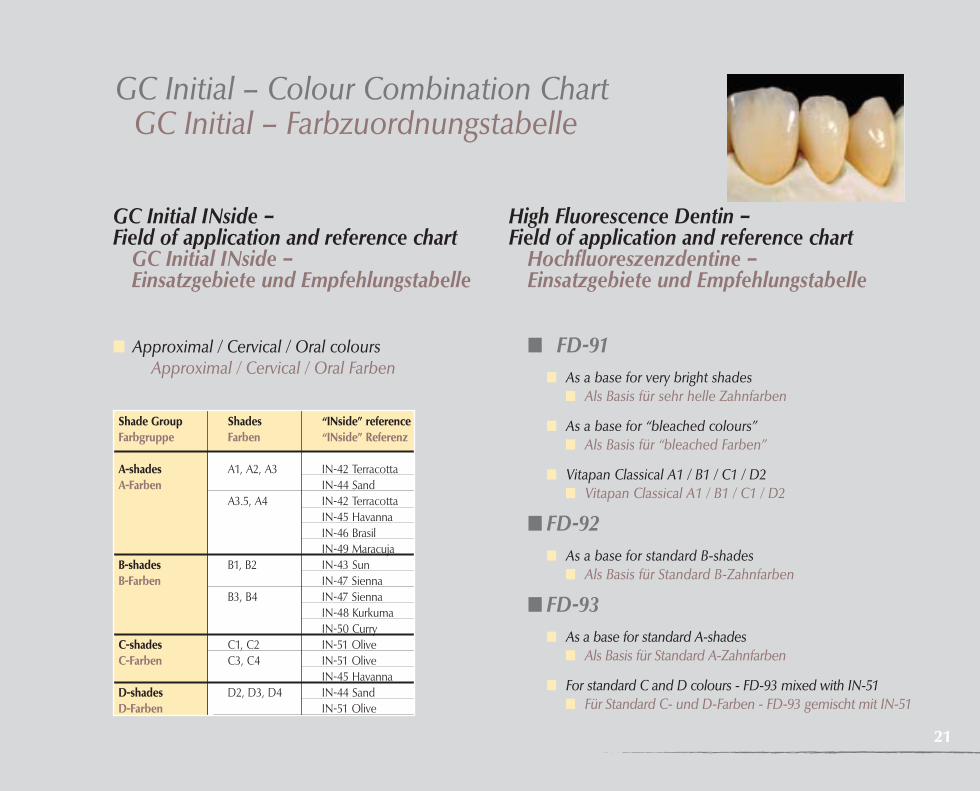
Shade Group Shades “INside” referenceFarbgruppe Farben “INside” Referenz
A-shades A1, A2 IN-44 SandA-Farben A3 IN-44 Sand IN-42 Terracotta A3.5, A4 IN-45 Havanna IN-46 BrasilB-shades B1, B2 IN-43 SunB-Farben B3 IN-43 Sun IN-47 Sienna B4 IN-48 Kurkuma IN-50 CurryC-shades C1, C2 IN-51 OliveC-Farben C3, C4 IN-51 Olive IN-45 HavannaD-shades D2, D3, D4 IN-44 SandD-Farben IN-51 Olive
■ Mamelon / Incisal coloursMamelon / Inzisal Farben
GC Initial INside – Field of application and reference chart GC Initial INside – Einsatzgebiete und Empfehlungstabelle
■ Primary Dentin / High Chromatic Dentin ColoursPrimärdentin / Chromadentin Farben
GC Initial – Colour Combination ChartGC Initial – Farbzuordnungstabelle
Shade Group Shades “INside” referenceFarbgruppe Farben “INside” Referenz
Light tooth shades A1, A2, A3 – B1, B2 IN-44 SandHelle Zahnfarben C1, C2 – D2 IN-41 Flamingo IN-43 Sun IN-44 Sand IN-51 OliveWarm tooth shades A3.5, A4 – B3, B4 IN-42 TerracottaWarme Zahnfarben C3, C4 – D3, D4 IN-45 Havanna IN-47 Sienna IN-50 Curry IN-51 Olive
21
GC Initial – Colour Combination ChartGC Initial – Farbzuordnungstabelle
High Fluorescence Dentin – Field of application and reference chart
Hochfluoreszenzdentine – Einsatzgebiete und Empfehlungstabelle
■ FD-91■ As a base for very bright shades
■ Als Basis für sehr helle Zahnfarben
■ As a base for “bleached colours”■ Als Basis für “bleached Farben”
■ Vitapan Classical A1 / B1 / C1 / D2■ Vitapan Classical A1 / B1 / C1 / D2
■ FD-92■ As a base for standard B-shades
■ Als Basis für Standard B-Zahnfarben
■ FD-93■ As a base for standard A-shades
■ Als Basis für Standard A-Zahnfarben
■ For standard C and D colours - FD-93 mixed with IN-51■ Für Standard C- und D-Farben - FD-93 gemischt mit IN-51
Shade Group Shades “INside” referenceFarbgruppe Farben “INside” Referenz
A-shades A1, A2, A3 IN-42 TerracottaA-Farben IN-44 Sand A3.5, A4 IN-42 Terracotta IN-45 Havanna IN-46 Brasil IN-49 MaracujaB-shades B1, B2 IN-43 SunB-Farben IN-47 Sienna B3, B4 IN-47 Sienna IN-48 Kurkuma IN-50 CurryC-shades C1, C2 IN-51 OliveC-Farben C3, C4 IN-51 Olive IN-45 HavannaD-shades D2, D3, D4 IN-44 SandD-Farben IN-51 Olive
GC Initial INside – Field of application and reference chart GC Initial INside –
Einsatzgebiete und Empfehlungstabelle
■ Approximal / Cervical / Oral coloursApproximal / Cervical / Oral Farben
22
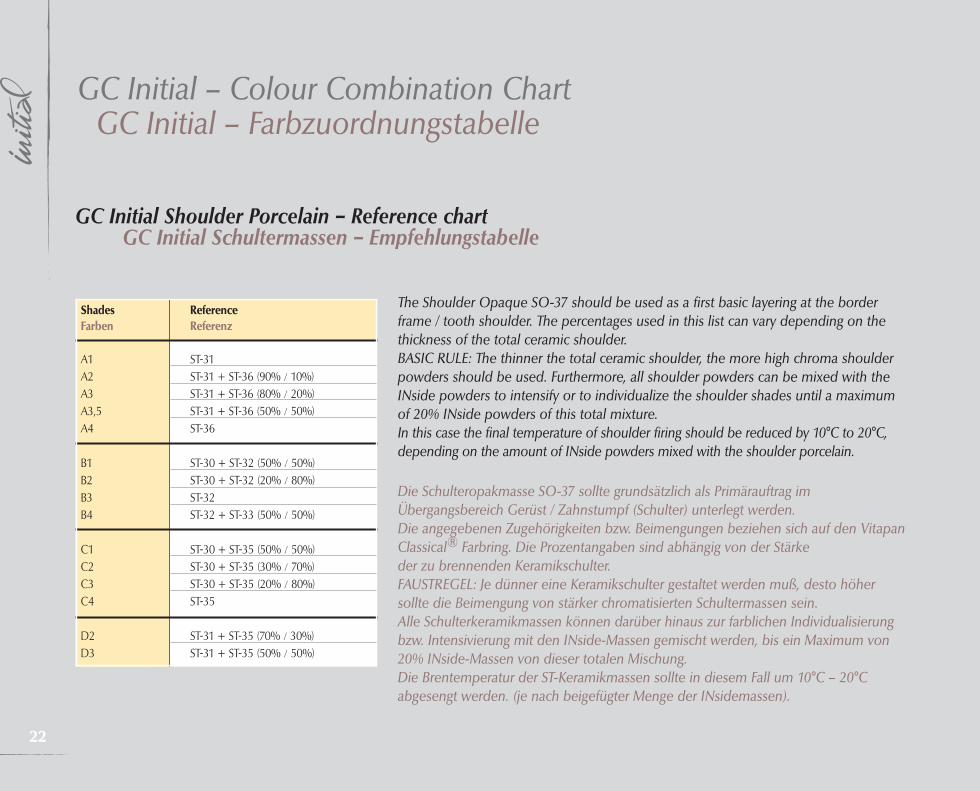
GC Initial Shoulder Porcelain – Reference chart GC Initial Schultermassen – Empfehlungstabelle
The Shoulder Opaque SO-37 should be used as a first basic layering at the border frame / tooth shoulder. The percentages used in this list can vary depending on the thickness of the total ceramic shoulder.BASIC RULE: The thinner the total ceramic shoulder, the more high chroma shoulder powders should be used. Furthermore, all shoulder powders can be mixed with the INside powders to intensify or to individualize the shoulder shades until a maximum of 20% INside powders of this total mixture.In this case the final temperature of shoulder firing should be reduced by 10°C to 20°C, depending on the amount of INside powders mixed with the shoulder porcelain.
Die Schulteropakmasse SO-37 sollte grundsätzlich als Primärauftrag im Übergangsbereich Gerüst / Zahnstumpf (Schulter) unterlegt werden. Die angegebenen Zugehörigkeiten bzw. Beimengungen beziehen sich auf den Vitapan Classical® Farbring. Die Prozentangaben sind abhängig von der Stärke der zu brennenden Keramikschulter.FAUSTREGEL: Je dünner eine Keramikschulter gestaltet werden muß, desto höher sollte die Beimengung von stärker chromatisierten Schultermassen sein.Alle Schulterkeramikmassen können darüber hinaus zur farblichen Individualisierung bzw. Intensivierung mit den INside-Massen gemischt werden, bis ein Maximum von 20% INside-Massen von dieser totalen Mischung.Die Brentemperatur der ST-Keramikmassen sollte in diesem Fall um 10°C – 20°C abgesengt werden. (je nach beigefügter Menge der INsidemassen).
GC Initial – Colour Combination ChartGC Initial – Farbzuordnungstabelle
Shades ReferenceFarben Referenz
A1 ST-31A2 ST-31 + ST-36 (90% / 10%)A3 ST-31 + ST-36 (80% / 20%)A3,5 ST-31 + ST-36 (50% / 50%)A4 ST-36
B1 ST-30 + ST-32 (50% / 50%)B2 ST-30 + ST-32 (20% / 80%)B3 ST-32B4 ST-32 + ST-33 (50% / 50%)
C1 ST-30 + ST-35 (50% / 50%)C2 ST-30 + ST-35 (30% / 70%)C3 ST-30 + ST-35 (20% / 80%)C4 ST-35
D2 ST-31 + ST-35 (70% / 30%)D3 ST-31 + ST-35 (50% / 50%)
23
The fired GC Initial Ti Bonder surface is dark and has a slightly shining appearance. Thicker areas are slightly gray. This needs to be avoided (See page 10). Reduced metal frame on the shoulder for optimal light transmission at the margins.
Die GC Initial Ti Bonder Oberfläche ist nach dem Brand dunkel und leicht glänzend. Hellgraue Bereiche deuten auf eine zu dicke Bonderschicht hin und müssen vermieden werden (Siehe Seite 10). Reduziertes Metallgerüst im Stufenbereich für optimale Lichtdurchflutung im marginalen Bereich.
Apply the first Opaque layer (wash) in a very thin layer on the, with Ti Bonder treated, surface using a flat brush (Appearance : shiny).
Die erste Opakerschicht (wash) mit einem flachen Pinsel in einer sehr dünnen Schicht auf die mit Ti Bonder behandelte Oberfläche auftragen (Erscheinungsbild : Glänzend).
Multi-chromatic build up procedurePolychrome Schichttechnik
Fired 2nd Opaque layer with Opaque Modifiers, the Opaque layer should have a slightly shiny surface.
Fertig gebrannter 2. Opakerbrand, die Oberfläche des Opakers soll leicht glänzend sein.
24
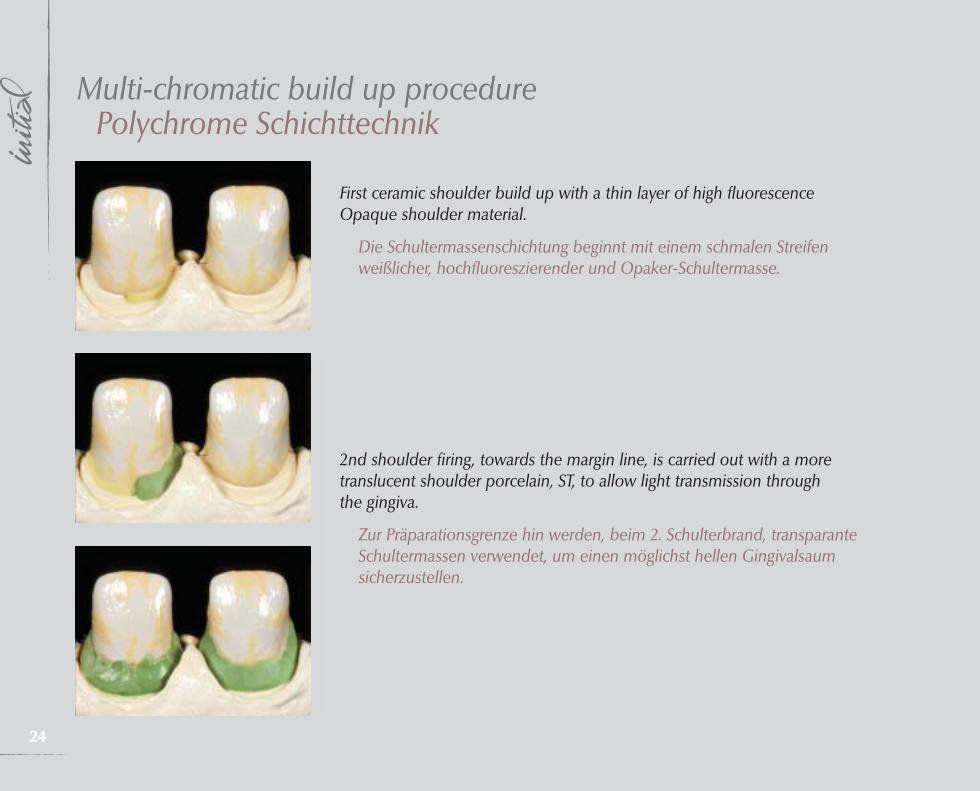
First ceramic shoulder build up with a thin layer of high fluorescence Opaque shoulder material.
Die Schultermassenschichtung beginnt mit einem schmalen Streifen weißlicher, hochfluoreszierender und Opaker-Schultermasse.
2nd shoulder firing, towards the margin line, is carried out with a more translucent shoulder porcelain, ST, to allow light transmission through the gingiva.
Zur Präparationsgrenze hin werden, beim 2. Schulterbrand, transparante Schultermassen verwendet, um einen möglichst hellen Gingivalsaum sicherzustellen.
Multi-chromatic build up procedurePolychrome Schichttechnik
25
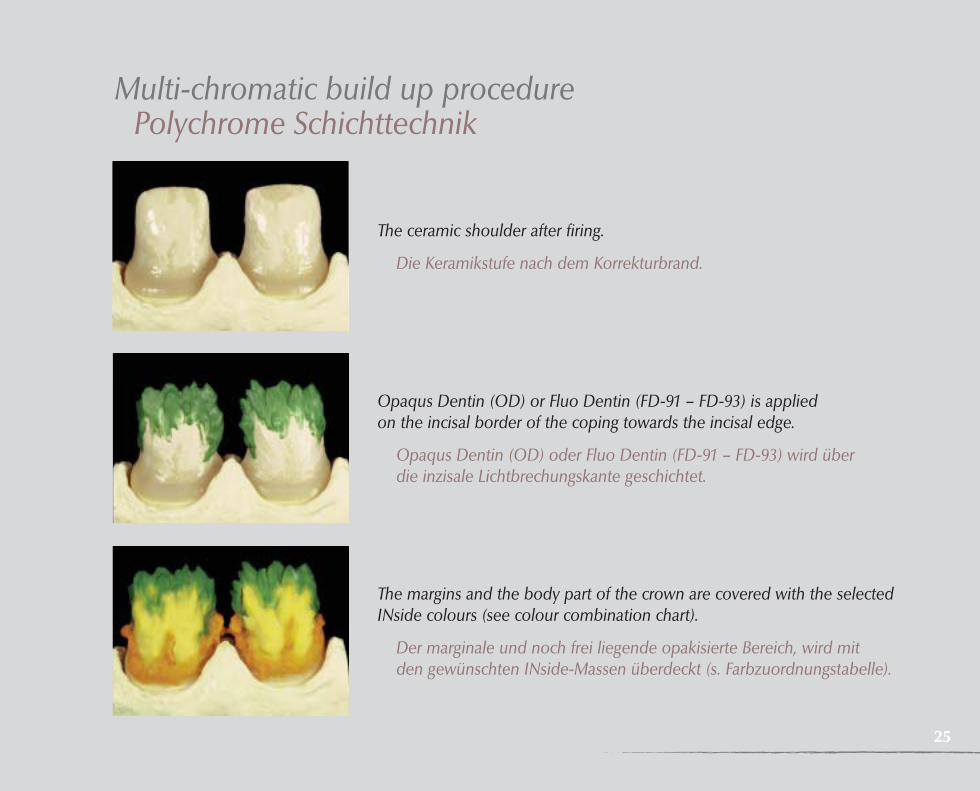
The margins and the body part of the crown are covered with the selected INside colours (see colour combination chart).
Der marginale und noch frei liegende opakisierte Bereich, wird mit den gewünschten INside-Massen überdeckt (s. Farbzuordnungstabelle).
Multi-chromatic build up procedure Polychrome Schichttechnik
The ceramic shoulder after firing.
Die Keramikstufe nach dem Korrekturbrand.
Opaqus Dentin (OD) or Fluo Dentin (FD-91 – FD-93) is applied on the incisal border of the coping towards the incisal edge.
Opaqus Dentin (OD) oder Fluo Dentin (FD-91 – FD-93) wird über die inzisale Lichtbrechungskante geschichtet.

26
Dentin is applied in its final form. This way of working allows a true-to-nature build up procedure of the Transpa / Enamel layering.
Der Dentinkörper wird in die endgültige Form gebracht. Diese Vorgehensweise erlaubt einen nahezu naturidentischen Aufbau der Transpa- / Schneideschichtung.
Multi-chromatic build up procedure Polychrome Schichttechnik
Standard Dentin powder is mixed with 10% of INside powder (see colour combination chart) and very thinly applied (about 50% of the usual thickness).
Die standard Dentine werden durch eine 10% Beimischung der zugehörigen INside-Massen (s. Farbzuordnungstabelle) sehr hochchromatisch ausgelegt in einer, sehr flachen Schichtungsweise. Die Schichtstärke beträgt hier 50% weniger als gewohnt.
27
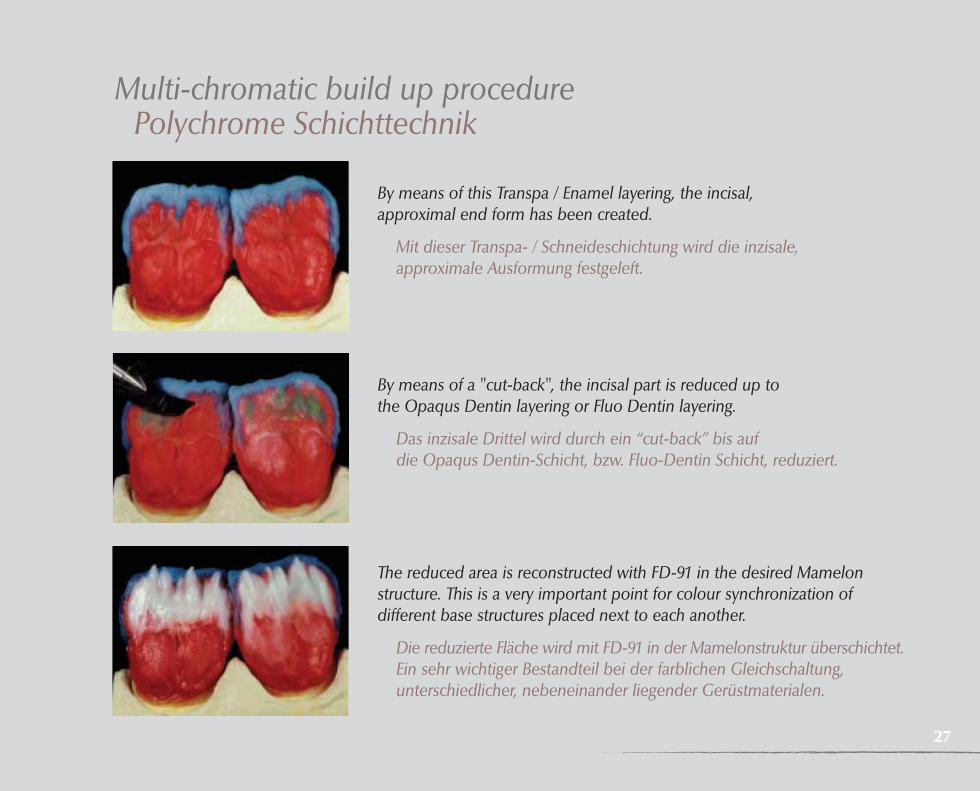
By means of this Transpa / Enamel layering, the incisal, approximal end form has been created.
Mit dieser Transpa- / Schneideschichtung wird die inzisale, approximale Ausformung festgeleft.
By means of a "cut-back", the incisal part is reduced up to the Opaqus Dentin layering or Fluo Dentin layering.
Das inzisale Drittel wird durch ein “cut-back” bis auf die Opaqus Dentin-Schicht, bzw. Fluo-Dentin Schicht, reduziert.
The reduced area is reconstructed with FD-91 in the desired Mamelon structure. This is a very important point for colour synchronization of different base structures placed next to each another.
Die reduzierte Fläche wird mit FD-91 in der Mamelonstruktur überschichtet. Ein sehr wichtiger Bestandteil bei der farblichen Gleichschaltung, unterschiedlicher, nebeneinander liegender Gerüstmaterialen.
Multi-chromatic build up procedure Polychrome Schichttechnik
28
Multi-chromatic build up procedure Polychrome Schichttechnik
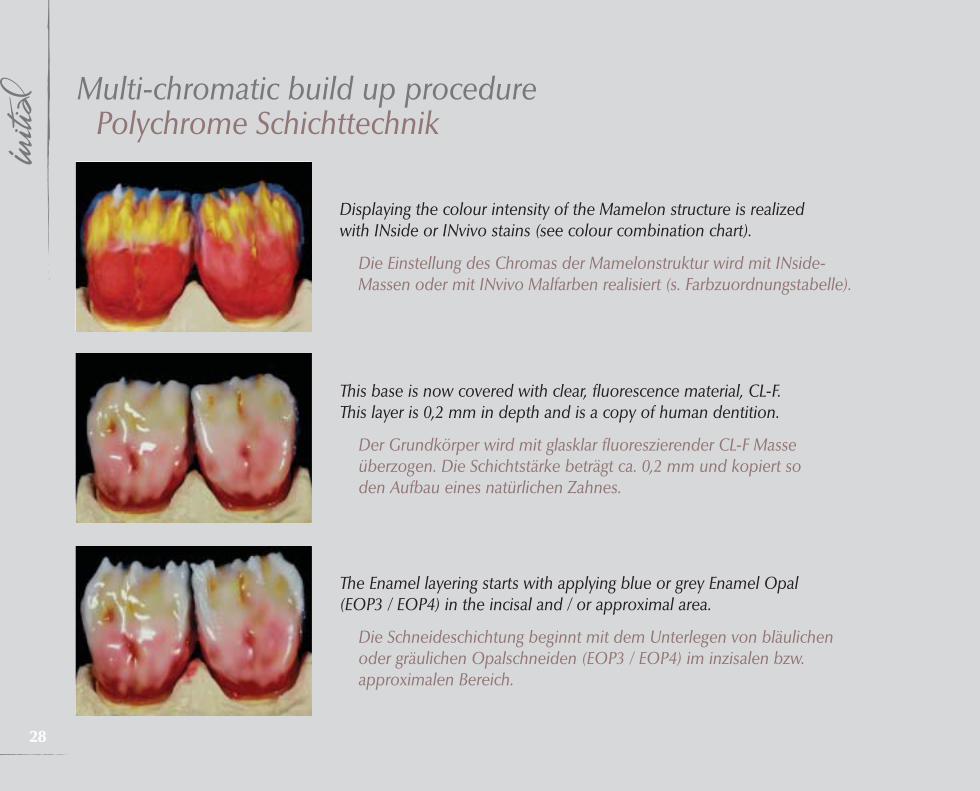
Displaying the colour intensity of the Mamelon structure is realized with INside or INvivo stains (see colour combination chart).
Die Einstellung des Chromas der Mamelonstruktur wird mit INside-Massen oder mit INvivo Malfarben realisiert (s. Farbzuordnungstabelle).
This base is now covered with clear, fluorescence material, CL-F. This layer is 0,2 mm in depth and is a copy of human dentition.
Der Grundkörper wird mit glasklar fluoreszierender CL-F Masse überzogen. Die Schichtstärke beträgt ca. 0,2 mm und kopiert soden Aufbau eines natürlichen Zahnes.
The Enamel layering starts with applying blue or grey Enamel Opal (EOP3 / EOP4) in the incisal and / or approximal area.
Die Schneideschichtung beginnt mit dem Unterlegen von bläulichen oder gräulichen Opalschneiden (EOP3 / EOP4) im inzisalen bzw. approximalen Bereich.
29
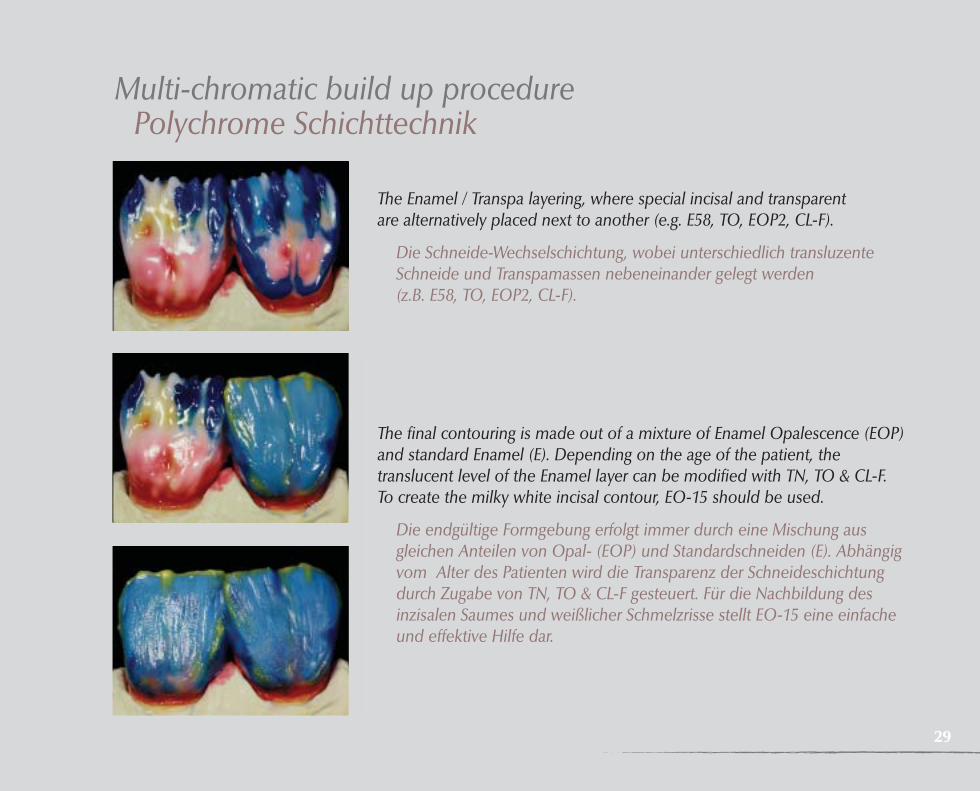
The Enamel / Transpa layering, where special incisal and transparent are alternatively placed next to another (e.g. E58, TO, EOP2, CL-F).
Die Schneide-Wechselschichtung, wobei unterschiedlich transluzente Schneide und Transpamassen nebeneinander gelegt werden (z.B. E58, TO, EOP2, CL-F).
The final contouring is made out of a mixture of Enamel Opalescence (EOP)and standard Enamel (E). Depending on the age of the patient, the translucent level of the Enamel layer can be modified with TN, TO & CL-F. To create the milky white incisal contour, EO-15 should be used.
Die endgültige Formgebung erfolgt immer durch eine Mischung aus gleichen Anteilen von Opal- (EOP) und Standardschneiden (E). Abhängig vom Alter des Patienten wird die Transparenz der Schneideschichtung durch Zugabe von TN, TO & CL-F gesteuert. Für die Nachbildung des inzisalen Saumes und weißlicher Schmelzrisse stellt EO-15 eine einfache und effektive Hilfe dar.
Multi-chromatic build up procedurePolychrome Schichttechnik
30
Multi-chromatic build up procedure Polychrome Schichttechnik
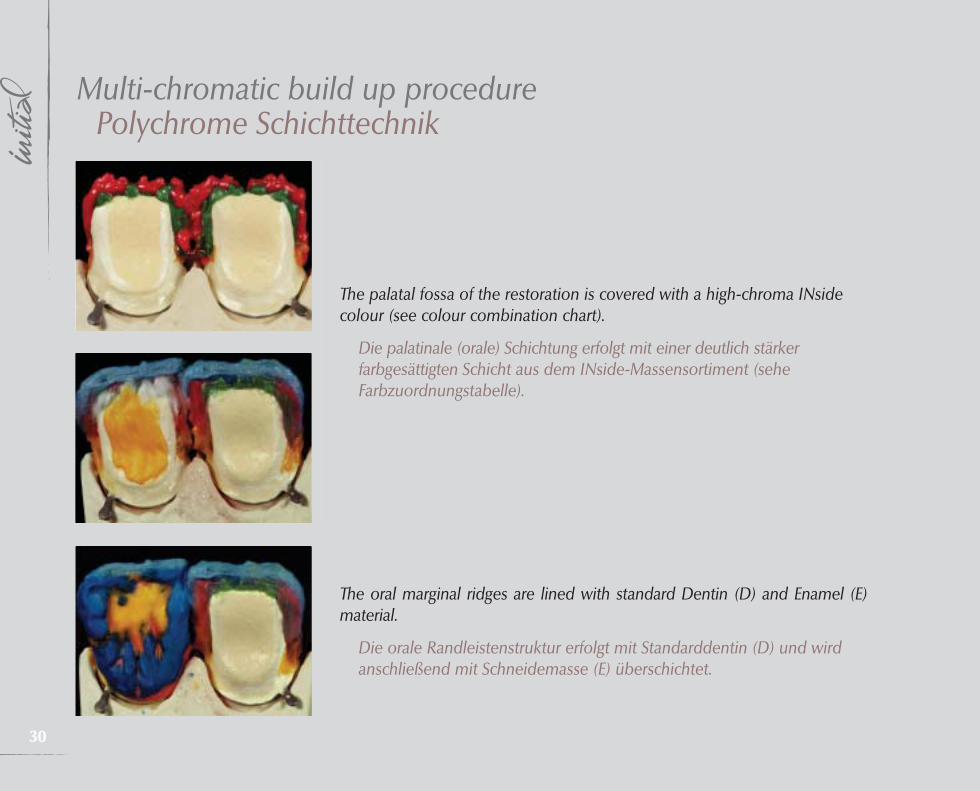
The palatal fossa of the restoration is covered with a high-chroma INside colour (see colour combination chart).
Die palatinale (orale) Schichtung erfolgt mit einer deutlich stärker farbgesättigten Schicht aus dem INside-Massensortiment (sehe Farbzuordnungstabelle).
The oral marginal ridges are lined with standard Dentin (D) and Enamel (E) material.
Die orale Randleistenstruktur erfolgt mit Standarddentin (D) und wird anschließend mit Schneidemasse (E) überschichtet.

31
The result of an always returning layering system.
Das Ergebnis einer sich immer wiederholenden Schichtsystematik.
Multi-chromatic build up procedure Polychrome Schichttechnik
The final functional contouring of the oral side is done with Enamel Occlusal (EO-15).
Die abschließende funktionelle Formgebung der oralen Strukturerfolgt mit EO-15.
32
Nature is the ultimate, GC Initial an equal partner.
Die Natur ist das Vorbild, GC Initial ein gleichwertiger Partner.
Firing InstructionsBrennanleitung
55°C/min
55°C/min
55°C/min
45°C/min
45°C/min
45°C/min
45°C/min
45°C/min
45°C/min
Ti Bonder FiringTi Bonder Brand1st Opaque FiringWashbrand2nd Opaque FiringOpakerbrandShoulder FiringSchulterbrand1st Dentin FiringDentinbrand 2nd Dentin FiringKorrekturbrand Glaze FiringGlanzbrandGlaze firing with glaze powderGlanzbrand mit GlasurCorrection Powder FiringKorrekturmasse-Brand
Drying time Trocknungs-
Zeit
Raise of temp. Temperatur-
Anstieg
Vacuum Vakuum
Final temp. End-
Temperatur
Holding time Haltezeit
AppearanceErscheinungsbild
450°C
450°C
450°C
450°C
400°C
400°C
450°C
480°C
450°C
4 min
4 min
4 min
4 min
6 min
6 min
2 min
2 min
4 min
Yes/Ja
Yes/Ja
Yes/Ja
Yes/Ja
Yes/Ja
Yes/Ja
---
---
Yes/Ja
810°C
810°C
810°C
810°C
780°C
775°C
785°C
780°C
690°C
1 min
1 min
1 min
1 min
1 min
1 min
1 min
1 min
1 min
33
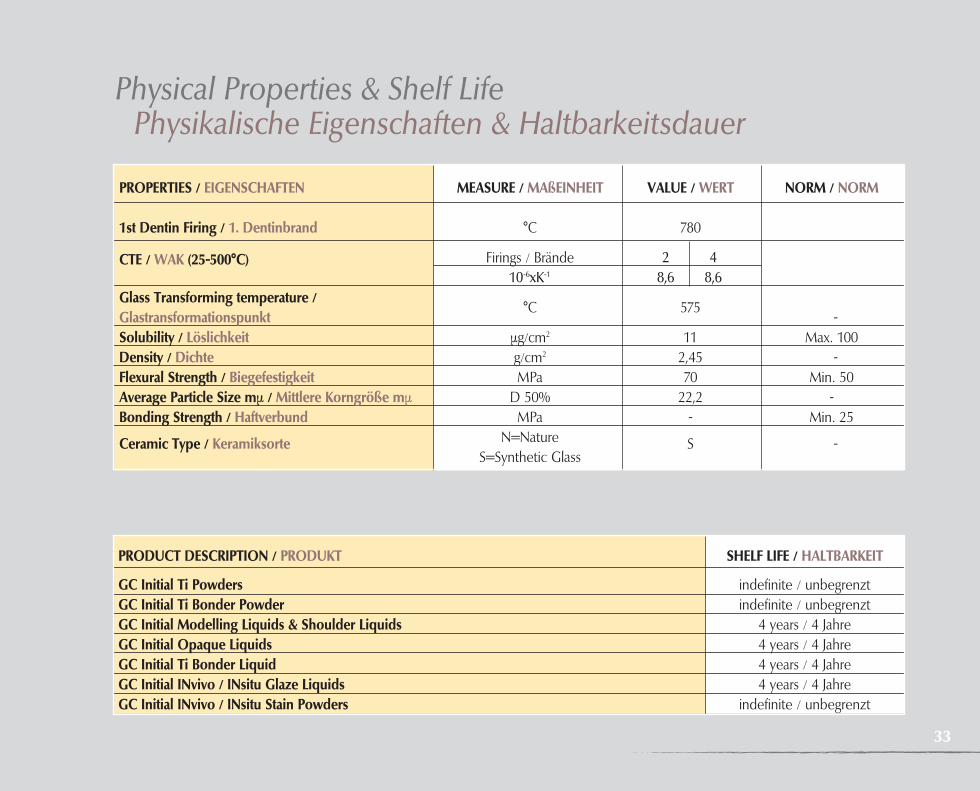
Physical Properties & Shelf LifePhysikalische Eigenschaften & Haltbarkeitsdauer
PRODUCT DESCRIPTION / PRODUKT SHELF LIFE / HALTBARKEIT
GC Initial Ti Powders indefinite / unbegrenzt GC Initial Ti Bonder Powder indefinite / unbegrenzt GC Initial Modelling Liquids & Shoulder Liquids 4 years / 4 JahreGC Initial Opaque Liquids 4 years / 4 Jahre GC Initial Ti Bonder Liquid 4 years / 4 Jahre GC Initial INvivo / INsitu Glaze Liquids 4 years / 4 JahreGC Initial INvivo / INsitu Stain Powders indefinite / unbegrenzt
PROPERTIES / EIGENSCHAFTEN MEASURE / MAßEINHEIT VALUE / WERT NORM / NORM
1st Dentin Firing / 1. Dentinbrand °C 780
CTE / WAK (25-500°C) Firings / Brände 2 4 10-6xK-1 8,6 8,6 Glass Transforming temperature / Glastransformationspunkt
°C 575 -
Solubility / Löslichkeit µg/cm2 11 Max. 100 Density / Dichte g/cm2 2,45 - Flexural Strength / Biegefestigkeit MPa 70 Min. 50 Average Particle Size mµ / Mittlere Korngröße mµ D 50% 22,2 - Bonding Strength / Haftverbund MPa - Min. 25
Ceramic Type / Keramiksorte N=Nature S - S=Synthetic Glass
Firing charts for various furnaces Brenntabellen für diverse Ofentypen
KLEMA FIRE / KLEMA PRESS
34
Bon- 1st Opaq. 2nd Opaq. 1st & 2nd 1st Dentin 2nd Dentin Glaze Glaze firing Correction der Firing Firing Schoulder Firing Firing Firing Firing glaze powder Powder Washbrand Opaker- 1. & 2. 1. Dentin- 2. Dentin- Glanz- Glanzbrand Korrektur- brand Schulterbrand brand brand brand Glasur masse
Low Temp. / Bereitschaftst. °C 450 450 450 450 400 400 450 480 450
Up Time / Verschlusszeit min 4 4 4 4 6 6 2 2 4
Preaheat Time / Trockenzeit min 1 1 1 1 1 1 1 1 1
Heat Rate / Anstiegsgeschw. °C / min 55 55 55 45 45 45 45 45 45
Vacuum Start / Vakuumstart °C 450 450 450 450 400 400 450
Vacuum End / Vakuumende °C 810 810 810 810 780 775 690
Vacuum Delay / Vakuumverzög. min
Vacuum Level / Vakuumgrenze mmHg 730 730 730 730 730 730 730
High Temperature / Brenntemperatur °C 810 810 810 810 780 775 785 780 690
Temperature Delay / Verzögerung min 1 1 1 1 1 1 1 1 1
Final Temperature / Endtemperatur °C
Final Delay / Endverzögerung min
Cooling Time / Kühlphase min
3535
Firing charts for various furnaces Brenntabellen für diverse Ofentypen
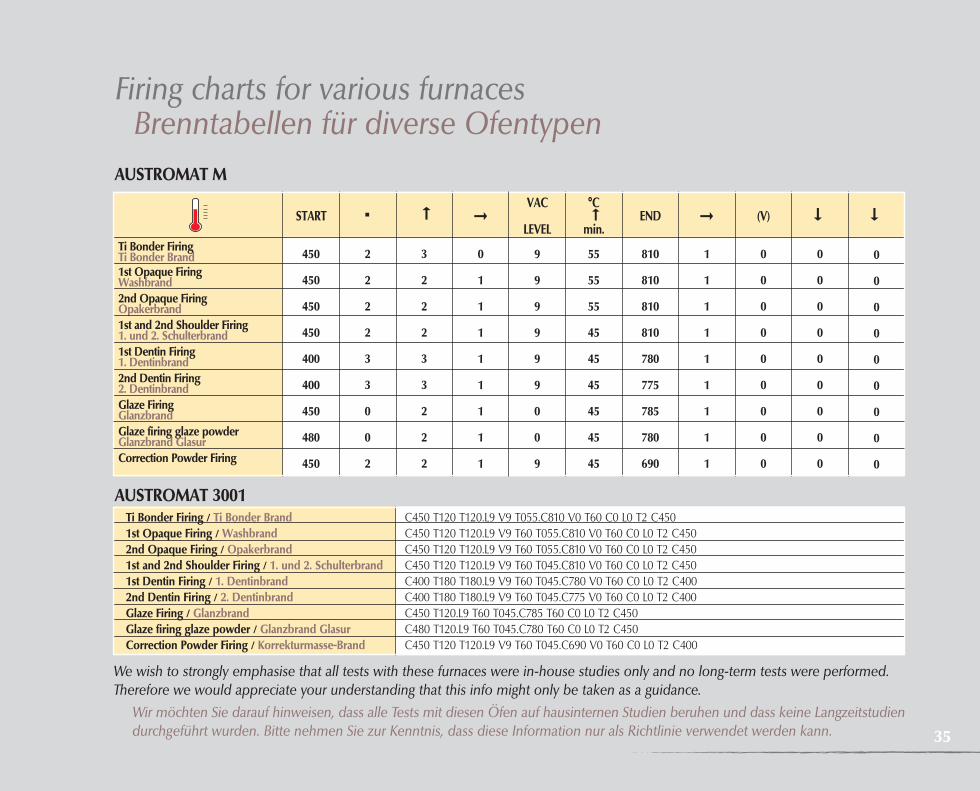
AUSTROMAT M
We wish to strongly emphasise that all tests with these furnaces were in-house studies only and no long-term tests were performed. Therefore we would appreciate your understanding that this info might only be taken as a guidance.
Wir möchten Sie darauf hinweisen, dass alle Tests mit diesen Öfen auf hausinternen Studien beruhen und dass keine Langzeitstudien durchgeführt wurden. Bitte nehmen Sie zur Kenntnis, dass diese Information nur als Richtlinie verwendet werden kann.
Ti Bonder Firing / Ti Bonder Brand C450 T120 T120.L9 V9 T055.C810 V0 T60 C0 L0 T2 C4501st Opaque Firing / Washbrand C450 T120 T120.L9 V9 T60 T055.C810 V0 T60 C0 L0 T2 C4502nd Opaque Firing / Opakerbrand C450 T120 T120.L9 V9 T60 T055.C810 V0 T60 C0 L0 T2 C450 1st and 2nd Shoulder Firing / 1. und 2. Schulterbrand C450 T120 T120.L9 V9 T60 T045.C810 V0 T60 C0 L0 T2 C450 1st Dentin Firing / 1. Dentinbrand C400 T180 T180.L9 V9 T60 T045.C780 V0 T60 C0 L0 T2 C400 2nd Dentin Firing / 2. Dentinbrand C400 T180 T180.L9 V9 T60 T045.C775 V0 T60 C0 L0 T2 C400 Glaze Firing / Glanzbrand C450 T120.L9 T60 T045.C785 T60 C0 L0 T2 C450 Glaze firing glaze powder / Glanzbrand Glasur C480 T120.L9 T60 T045.C780 T60 C0 L0 T2 C450 Correction Powder Firing / Korrekturmasse-Brand C450 T120 T120.L9 V9 T60 T045.C690 V0 T60 C0 L0 T2 C400
AUSTROMAT 3001
Ti Bonder FiringTi Bonder Brand1st Opaque FiringWashbrand 2nd Opaque FiringOpakerbrand 1st and 2nd Shoulder Firing1. und 2. Schulterbrand1st Dentin Firing1. Dentinbrand2nd Dentin Firing2. DentinbrandGlaze FiringGlanzbrandGlaze firing glaze powderGlanzbrand GlasurCorrection Powder Firing
START
450
450
450
450
400
400
450
480
450
2
2
2
2
3
3
0
0
2
0
1
1
1
1
1
1
1
1
VAC
LEVEL
9
9
9
9
9
9
0
0
9
°C
min.
55
55
55
45
45
45
45
45
45
END
810
810
810
810
780
775
785
780
690
1
1
1
1
1
1
1
1
1
(V)
0
0
0
0
0
0
0
0
0
0
0
0
0
0
0
0
0
0
3
2
2
2
3
3
2
2
2
➞ ➞➞ ➞
➞ ➞
0
0
0
0
0
0
0
0
0

36
Titel EngelsTitel Duits
36
Manuel TechniqueManuale tecnico
GC Initial Ti
Ti
IF
Page
Tableau des teintes / Tabella di combinazione delle masse 7
GC Initial Ti Bonder / GC Initial Ti Bonder 8
Procédure classique de montage / Procedura di stratificazione standard
Dent antérieure / Dente anteriore 9 – 13
Molaire / Molare 15 – 19
Cuisson / Istruzioni per la cottura 14 & 32
GC Initial – Tableau de combinaison des teintes /
GC Initial – Schemi delle combinazioni cromatiche 20 – 22
Procédure de montage multi chromatique / Procedura di stratificazione policromatica 23 – 31
Propriétés physiques & Péremption / Proprietà fisiche & Scadenza 33
Tableau de cuisson selon différents fours à céramiques / Grafici per la cottura nei diversi forni 34 – 35
Table des matièresIndice
Photoshooting: Michael Brüsch - M.B. Dentaltechnik GmbH, Düsseldorf / Allemagne / Germania
7
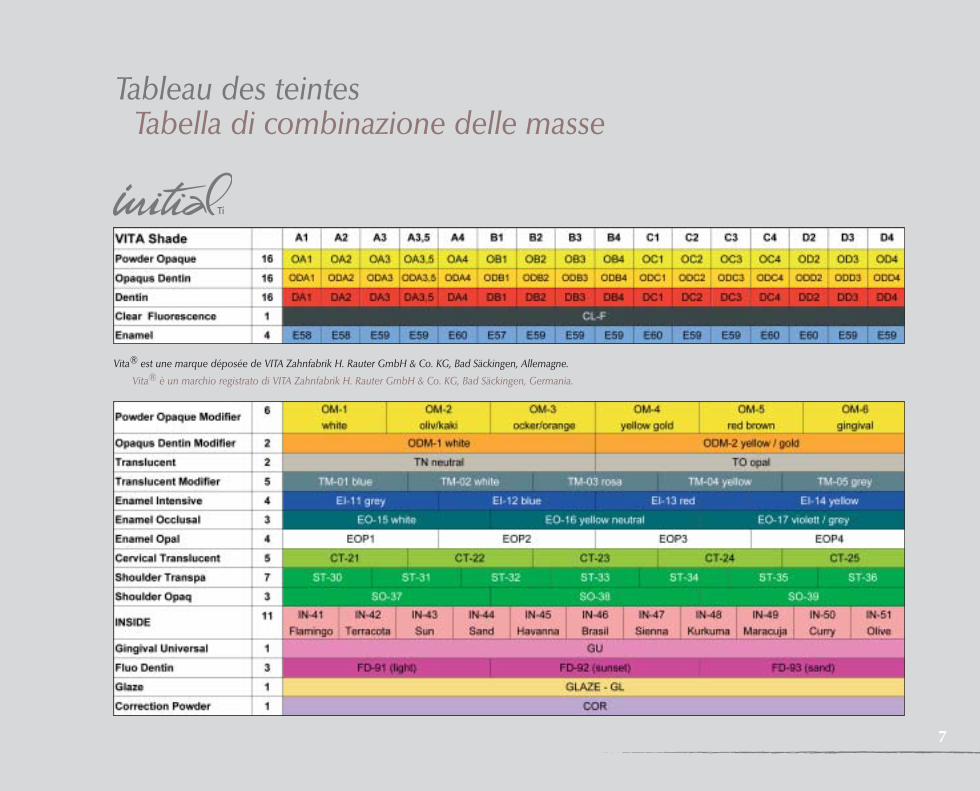
Tableau des teintesTabella di combinazione delle masse
Ti
Vita® est une marque déposée de VITA Zahnfabrik H. Rauter GmbH & Co. KG, Bad Säckingen, Allemagne.
Vita® è un marchio registrato di VITA Zahnfabrik H. Rauter GmbH & Co. KG, Bad Säckingen, Germania.
8
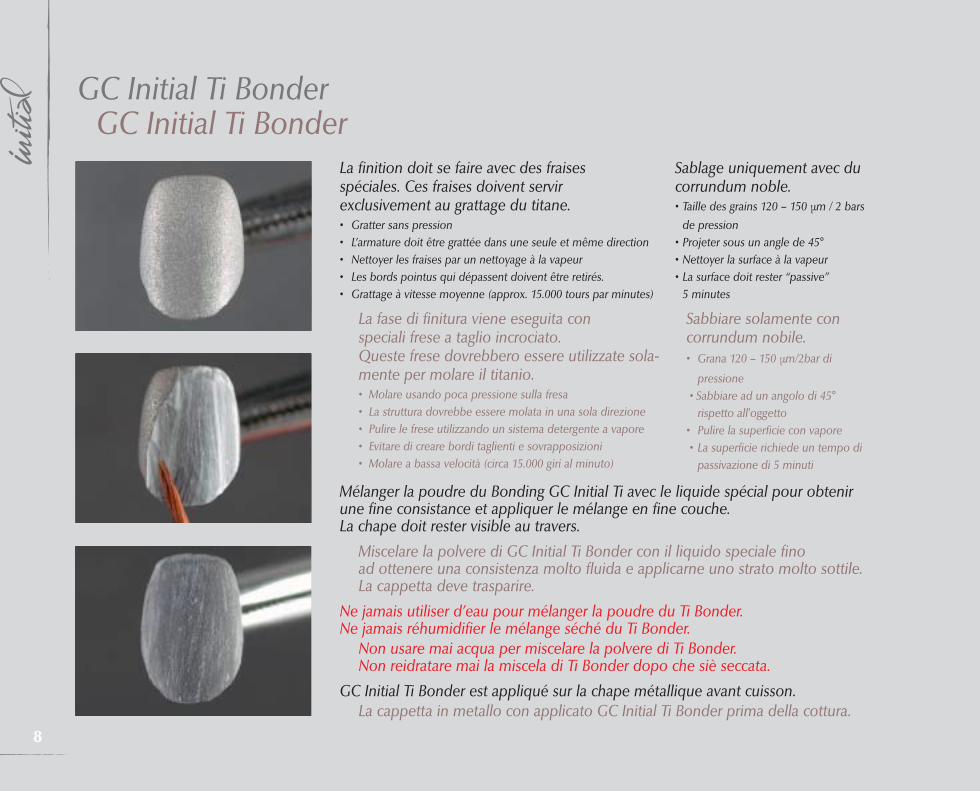
Mélanger la poudre du Bonding GC Initial Ti avec le liquide spécial pour obtenir une fine consistance et appliquer le mélange en fine couche. La chape doit rester visible au travers.
Miscelare la polvere di GC Initial Ti Bonder con il liquido speciale fino ad ottenere una consistenza molto fluida e applicarne uno strato molto sottile. La cappetta deve trasparire.
Ne jamais utiliser d’eau pour mélanger la poudre du Ti Bonder.Ne jamais réhumidifier le mélange séché du Ti Bonder.
Non usare mai acqua per miscelare la polvere di Ti Bonder.Non reidratare mai la miscela di Ti Bonder dopo che siè seccata.
GC Initial Ti Bonder est appliqué sur la chape métallique avant cuisson. La cappetta in metallo con applicato GC Initial Ti Bonder prima della cottura.
GC Initial Ti BonderGC Initial Ti Bonder
La fase di finitura viene eseguita con speciali frese a taglio incrociato. Queste frese dovrebbero essere utilizzate sola-mente per molare il titanio.• Molare usando poca pressione sulla fresa• La struttura dovrebbe essere molata in una sola direzione• Pulire le frese utilizzando un sistema detergente a vapore• Evitare di creare bordi taglienti e sovrapposizioni• Molare a bassa velocità (circa 15.000 giri al minuto)
Sabbiare solamente con corrundum nobile.• Grana 120 – 150 µm/2bar di
pressione • Sabbiare ad un angolo di 45° rispetto all'oggetto• Pulire la superficie con vapore • La superficie richiede un tempo di passivazione di 5 minuti
La finition doit se faire avec des fraises spéciales. Ces fraises doivent servir exclusivement au grattage du titane. • Gratter sans pression• L’armature doit être grattée dans une seule et même direction • Nettoyer les fraises par un nettoyage à la vapeur • Les bords pointus qui dépassent doivent être retirés. • Grattage à vitesse moyenne (approx. 15.000 tours par minutes)
Sablage uniquement avec du corrundum noble.• Taille des grains 120 – 150 µm / 2 bars
de pression• Projeter sous un angle de 45° • Nettoyer la surface à la vapeur• La surface doit rester “passive”
5 minutes
9
Procédure classique de montage Procedura di stratificazione standardizzata
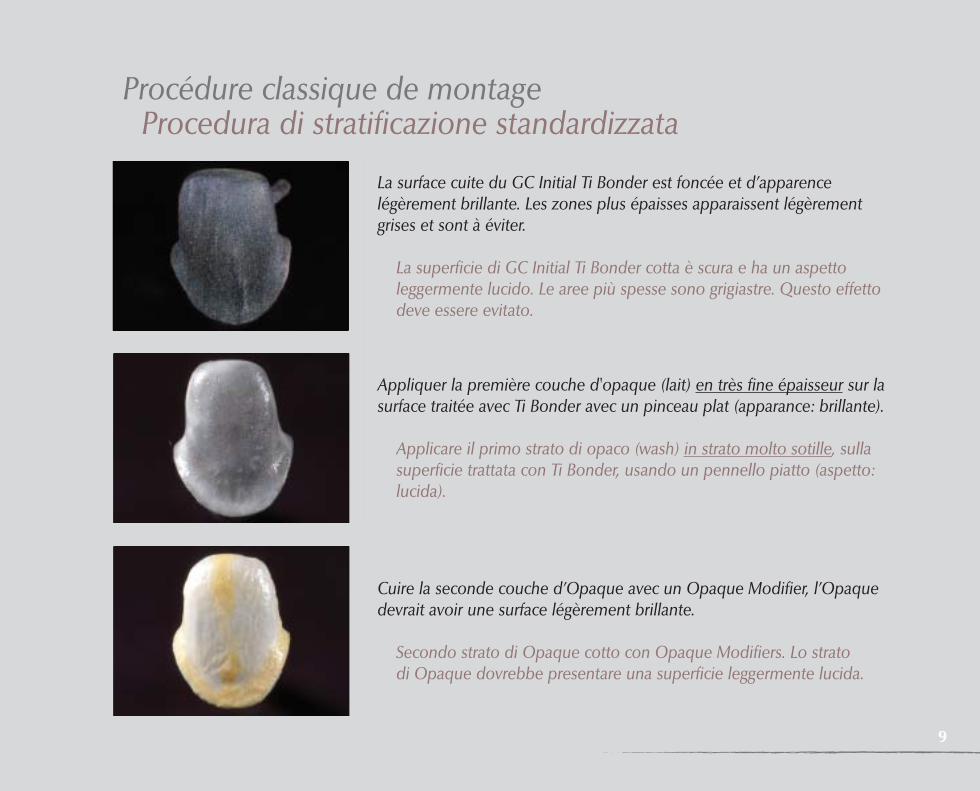
Appliquer la première couche d'opaque (lait) en très fine épaisseur sur la surface traitée avec Ti Bonder avec un pinceau plat (apparance: brillante).
Applicare il primo strato di opaco (wash) in strato molto sotille, sulla superficie trattata con Ti Bonder, usando un pennello piatto (aspetto: lucida).
Cuire la seconde couche d’Opaque avec un Opaque Modifier, l’Opaque devrait avoir une surface légèrement brillante.
Secondo strato di Opaque cotto con Opaque Modifiers. Lo strato di Opaque dovrebbe presentare una superficie leggermente lucida.
La surface cuite du GC Initial Ti Bonder est foncée et d’apparence légèrement brillante. Les zones plus épaisses apparaissent légèrement grises et sont à éviter.
La superficie di GC Initial Ti Bonder cotta è scura e ha un aspetto leggermente lucido. Le aree più spesse sono grigiastre. Questo effetto deve essere evitato.
10
Procédure classique de montage Procedura di stratificazione standardizzata
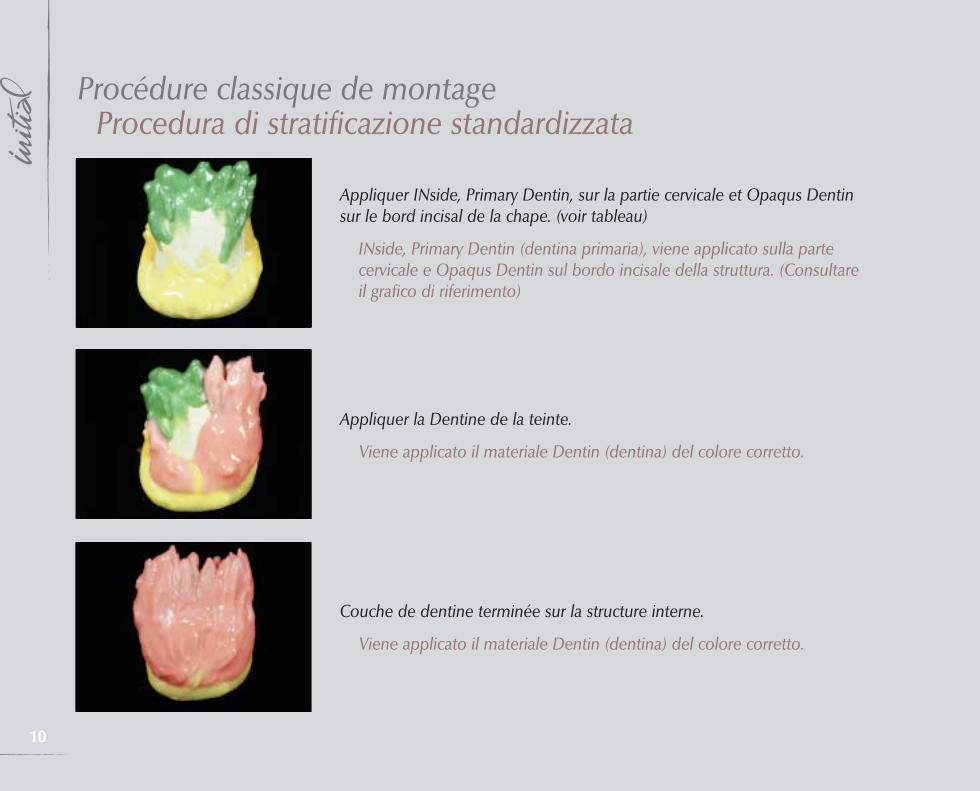
Appliquer INside, Primary Dentin, sur la partie cervicale et Opaqus Dentin sur le bord incisal de la chape. (voir tableau)
INside, Primary Dentin (dentina primaria), viene applicato sulla parte cervicale e Opaqus Dentin sul bordo incisale della struttura. (Consultare il grafico di riferimento)
Appliquer la Dentine de la teinte.
Viene applicato il materiale Dentin (dentina) del colore corretto.
Couche de dentine terminée sur la structure interne.
Viene applicato il materiale Dentin (dentina) del colore corretto.
11
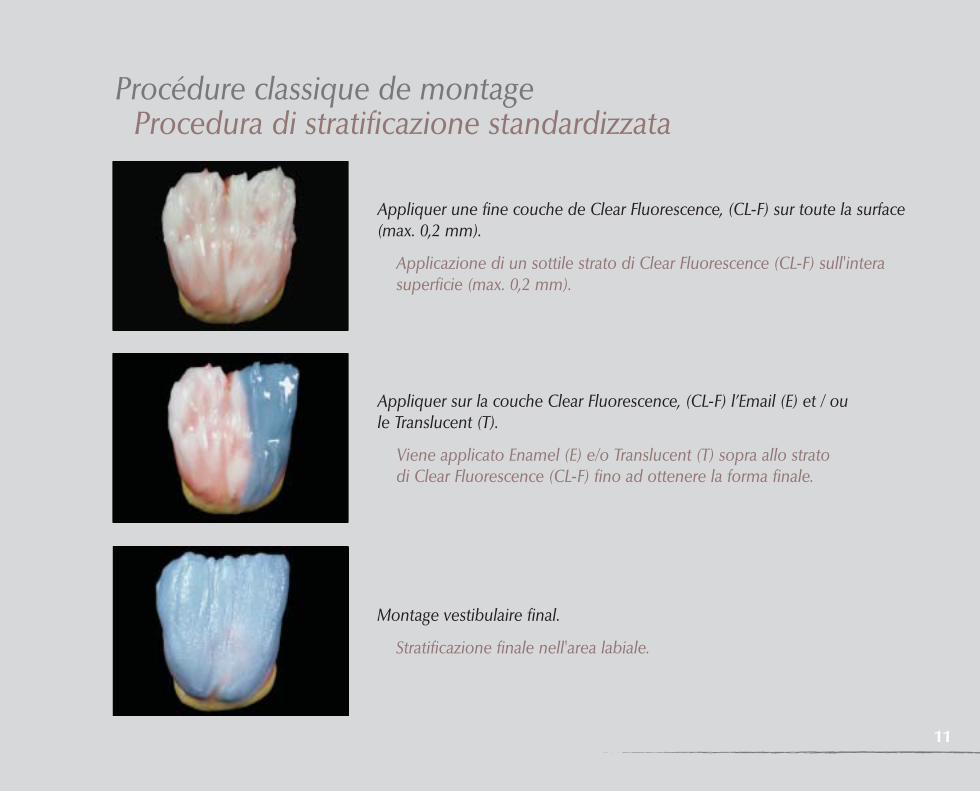
Appliquer sur la couche Clear Fluorescence, (CL-F) l’Email (E) et / ou le Translucent (T).
Viene applicato Enamel (E) e/o Translucent (T) sopra allo strato di Clear Fluorescence (CL-F) fino ad ottenere la forma finale.
Montage vestibulaire final.
Stratificazione finale nell'area labiale.
Procédure classique de montageProcedura di stratificazione standardizzata
Appliquer une fine couche de Clear Fluorescence, (CL-F) sur toute la surface (max. 0,2 mm).
Applicazione di un sottile strato di Clear Fluorescence (CL-F) sull'intera superficie (max. 0,2 mm).

12
Procédure classique de montageProcedura di stratificazione standardizzata
Les crêtes marginales sont réalisées avec le même mélange Dentine.
I bordi marginali vengono rivestiti con la stessa miscela di Dentin.
La fosse palatine de la restauration est recouverte avec un matériau INside à haut degré de saturation.
La fossa palatale del restauro viene ricoperta con il materiale INside ad elevato croma.
Le montage final se fait avec le même mélange d’Email que celui qui a été utilisé sur la face vestibulaire.
Stratificazione palatale finale con la stessa miscela di Enamel utilizzata sul versante labiale.
13
Procédure classique de montageProcedura di stratificazione standardizzata
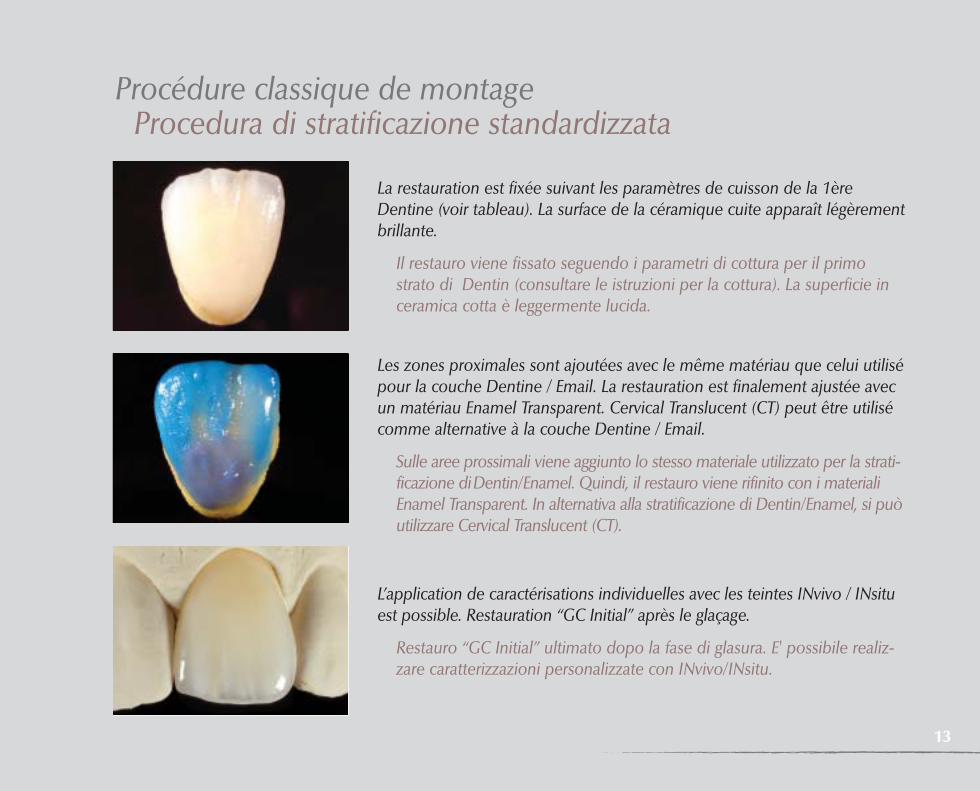
La restauration est fixée suivant les paramètres de cuisson de la 1ère Dentine (voir tableau). La surface de la céramique cuite apparaît légèrement brillante.
Il restauro viene fissato seguendo i parametri di cottura per il primo strato di Dentin (consultare le istruzioni per la cottura). La superficie in ceramica cotta è leggermente lucida.
Les zones proximales sont ajoutées avec le même matériau que celui utilisé pour la couche Dentine / Email. La restauration est finalement ajustée avec un matériau Enamel Transparent. Cervical Translucent (CT) peut être utilisé comme alternative à la couche Dentine / Email.
Sulle aree prossimali viene aggiunto lo stesso materiale utilizzato per la strati-ficazione di Dentin/Enamel. Quindi, il restauro viene rifinito con i materiali Enamel Transparent. In alternativa alla stratificazione di Dentin/Enamel, si può utilizzare Cervical Translucent (CT).
L’application de caractérisations individuelles avec les teintes INvivo / INsitu est possible. Restauration “GC Initial” après le glaçage.
Restauro “GC Initial” ultimato dopo la fase di glasura. E' possibile realiz-zare caratterizzazioni personalizzate con INvivo/INsitu.
14
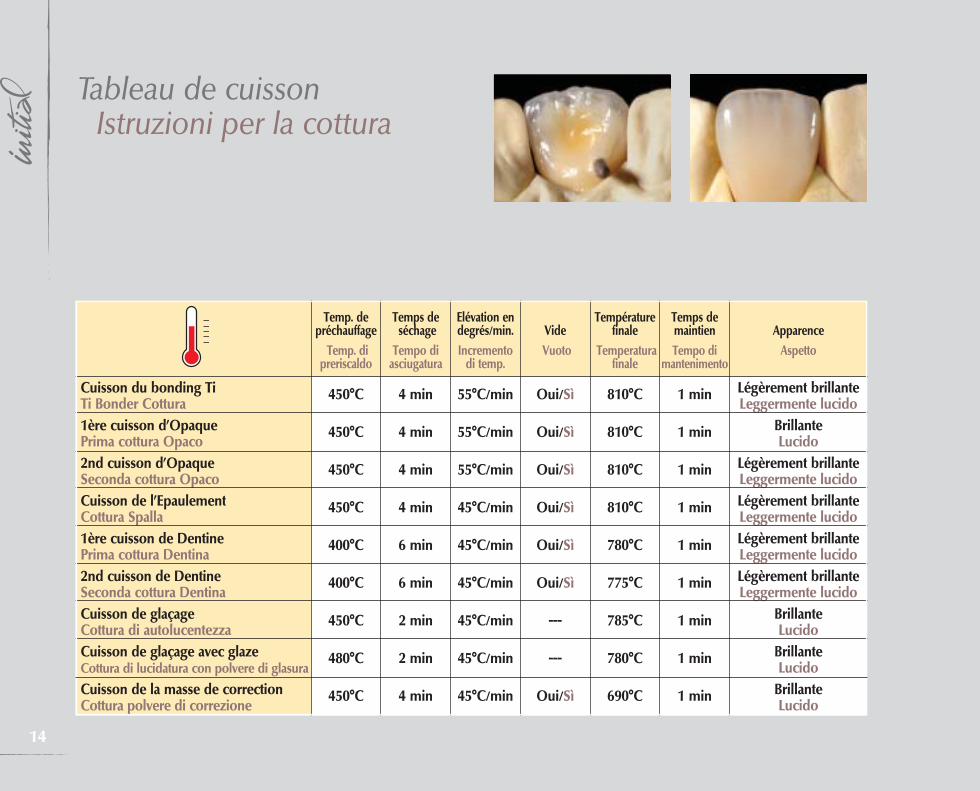
Tableau de cuissonIstruzioni per la cottura
55°C/min
55°C/min
55°C/min
45°C/min
45°C/min
45°C/min
45°C/min
45°C/min
45°C/min
Légèrement brillanteLeggermente lucido
BrillanteLucido
Légèrement brillanteLeggermente lucidoLégèrement brillanteLeggermente lucidoLégèrement brillanteLeggermente lucidoLégèrement brillanteLeggermente lucido
BrillanteLucido
BrillanteLucido
BrillanteLucido
Cuisson du bonding TiTi Bonder Cottura1ère cuisson d’Opaque Prima cottura Opaco2nd cuisson d’OpaqueSeconda cottura Opaco Cuisson de l’EpaulementCottura Spalla 1ère cuisson de DentinePrima cottura Dentina2nd cuisson de DentineSeconda cottura Dentina Cuisson de glaçageCottura di autolucentezzaCuisson de glaçage avec glazeCottura di lucidatura con polvere di glasura
Cuisson de la masse de correctionCottura polvere di correzione
Temp. depréchauffage
Temp. di preriscaldo
Temps de séchageTempo di
asciugatura
Elévation endegrés/min.Incremento
di temp.
Vide Vuoto
Températurefinale
Temperatura finale
Temps demaintien Tempo di
mantenimento
ApparenceAspetto
450°C
450°C
450°C
450°C
400°C
400°C
450°C
480°C
450°C
4 min
4 min
4 min
4 min
6 min
6 min
2 min
2 min
4 min
Oui/Sì
Oui/Sì
Oui/Sì
Oui/Sì
Oui/Sì
Oui/Sì
---
---
Oui/Sì
810°C
810°C
810°C
810°C
780°C
775°C
785°C
780°C
690°C
1 min
1 min
1 min
1 min
1 min
1 min
1 min
1 min
1 min
15
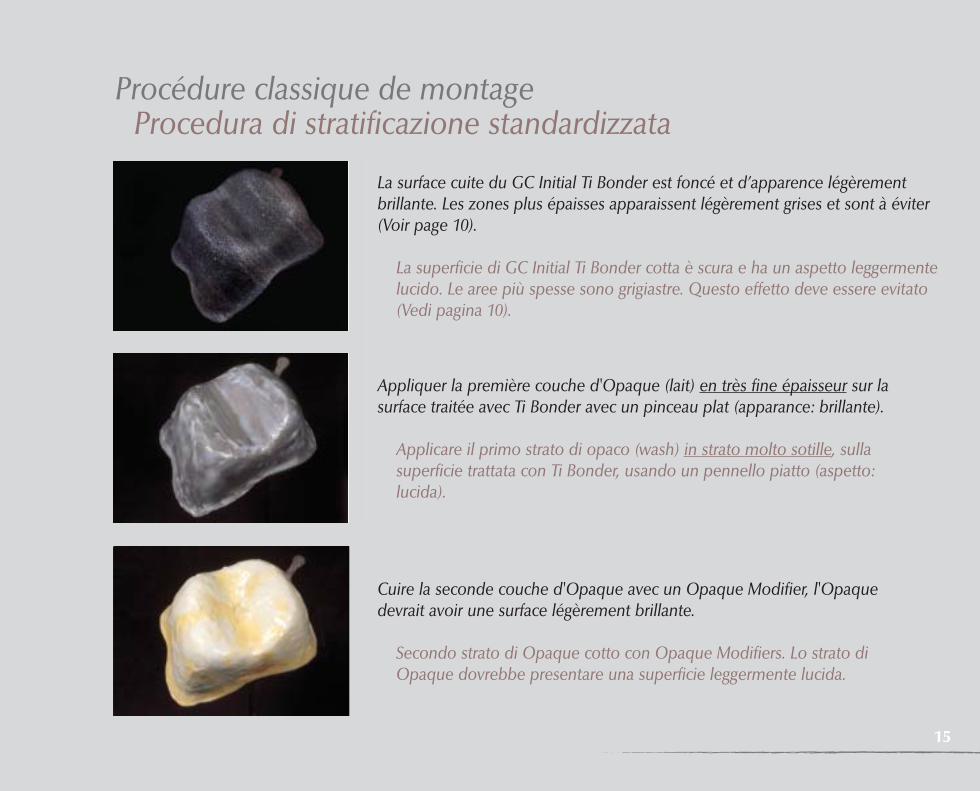
Procédure classique de montage Procedura di stratificazione standardizzata
Appliquer la première couche d'Opaque (lait) en très fine épaisseur sur la surface traitée avec Ti Bonder avec un pinceau plat (apparance: brillante).
Applicare il primo strato di opaco (wash) in strato molto sotille, sulla superficie trattata con Ti Bonder, usando un pennello piatto (aspetto: lucida).
Cuire la seconde couche d'Opaque avec un Opaque Modifier, l'Opaque devrait avoir une surface légèrement brillante.
Secondo strato di Opaque cotto con Opaque Modifiers. Lo strato di Opaque dovrebbe presentare una superficie leggermente lucida.
La surface cuite du GC Initial Ti Bonder est foncé et d’apparence légèrement brillante. Les zones plus épaisses apparaissent légèrement grises et sont à éviter (Voir page 10).
La superficie di GC Initial Ti Bonder cotta è scura e ha un aspetto leggermente lucido. Le aree più spesse sono grigiastre. Questo effetto deve essere evitato (Vedi pagina 10).
16
Procédure classique de montage Procedura di stratificazione standardizzata
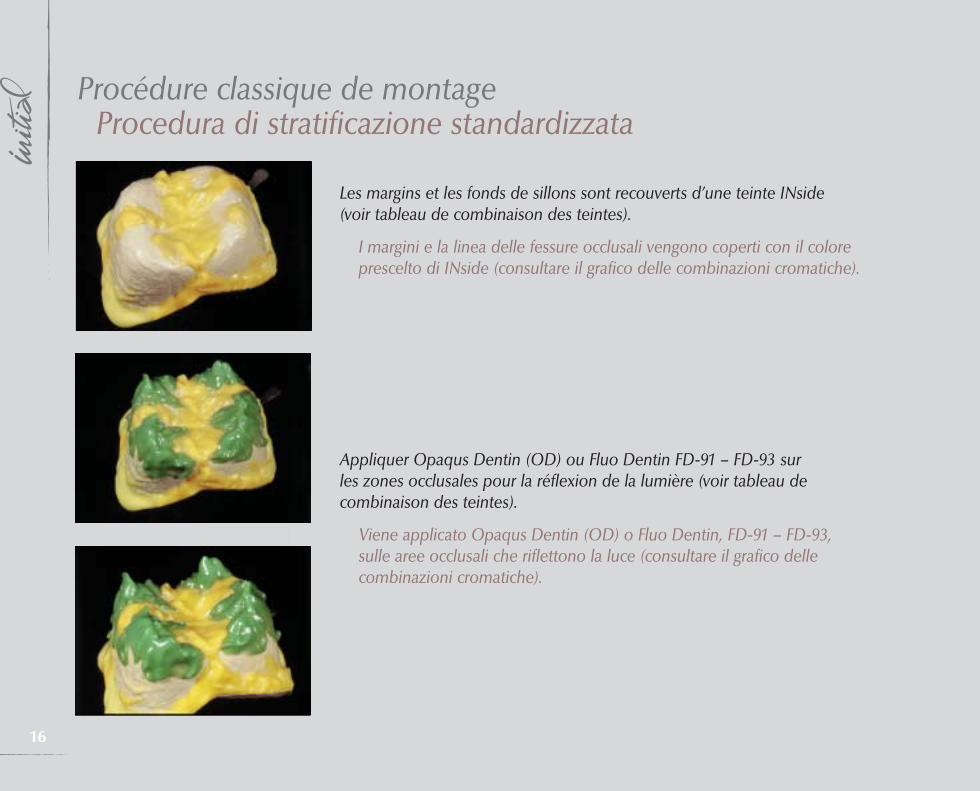
Les margins et les fonds de sillons sont recouverts d’une teinte INside (voir tableau de combinaison des teintes).
I margini e la linea delle fessure occlusali vengono coperti con il colore prescelto di INside (consultare il grafico delle combinazioni cromatiche).
Appliquer Opaqus Dentin (OD) ou Fluo Dentin FD-91 – FD-93 sur les zones occlusales pour la réflexion de la lumière (voir tableau de combinaison des teintes).
Viene applicato Opaqus Dentin (OD) o Fluo Dentin, FD-91 – FD-93, sulle aree occlusali che riflettono la luce (consultare il grafico delle combinazioni cromatiche).

17
La poudre Dentine Standard est montée dans sa forme finale.
Cette couche de Dentine est montée en fines épaisseurs, car ces matériaux possèdent un haut niveau de saturation.
Viene applicata della normale polvere di Dentin nella forma finale.
La stratificazione di Dentin viene eseguita con strati relativamente sottili in quanto tutti questi materiali possiedono un livello di croma superiore.
Procédure classique de montage Procedura di stratificazione standardizzata

18
Procédure classique de montage Procedura di stratificazione standardizzata
Cette base de Dentine est ensuite recouverte de Clear Fluorescence CL-F.Cette couche de 0,2 mm de profondeur reproduit la dent naturelle.
Questa base di Dentin viene ora coperta con il materiale Clear Fluorescence, CL-F.Questo strato ha una profondità di 0,2 mm ed è una riproduzione della dentizione umana.
Appliquer Enamel et / ou Translucent sur la couche de Clear Fluorescence pour réaliser les contacts occlusaux avec l’antagoniste.
Enamel e/o Translucent vengono applicati sopra lo strato di Clear Fluorescence fino ai contatti occlusali degli antagonisti.

19
Procédure classique de montage Procedura di stratificazione standardizzata
Le plan occlusal sur articulateur doit être effectué en retrait (approx. 0,2 mm) afin de réaliser en EO-15, la morphologie finale.
L’utilisation de cet Email spécial est déterminante pour créer la profondeur du fait de sa capacité à imiter la réflexion naturelle de la Dentine (bord incisal et occlusal).
Il piano occlusale dell'articolatore dovrebbe essere sollevato leggermente (circa 0,2 mm) per stratificare la morfologia finale con EO-15.
L'uso di questo speciale smalto versatile (Enamel) è fondamentale per creare profondità nella stratificazione in quanto è in grado di imitare la riflessione naturale della Dentina sui bordi incisali e occlusali.
20
GC Initial – Tableau de combinaison des teintes GC Initial – Schema delle combinazioni cromatiche
GC Initial INside – Champ d’application et référencesGC Initial INside – Campo di applicazione e schema di riferimento
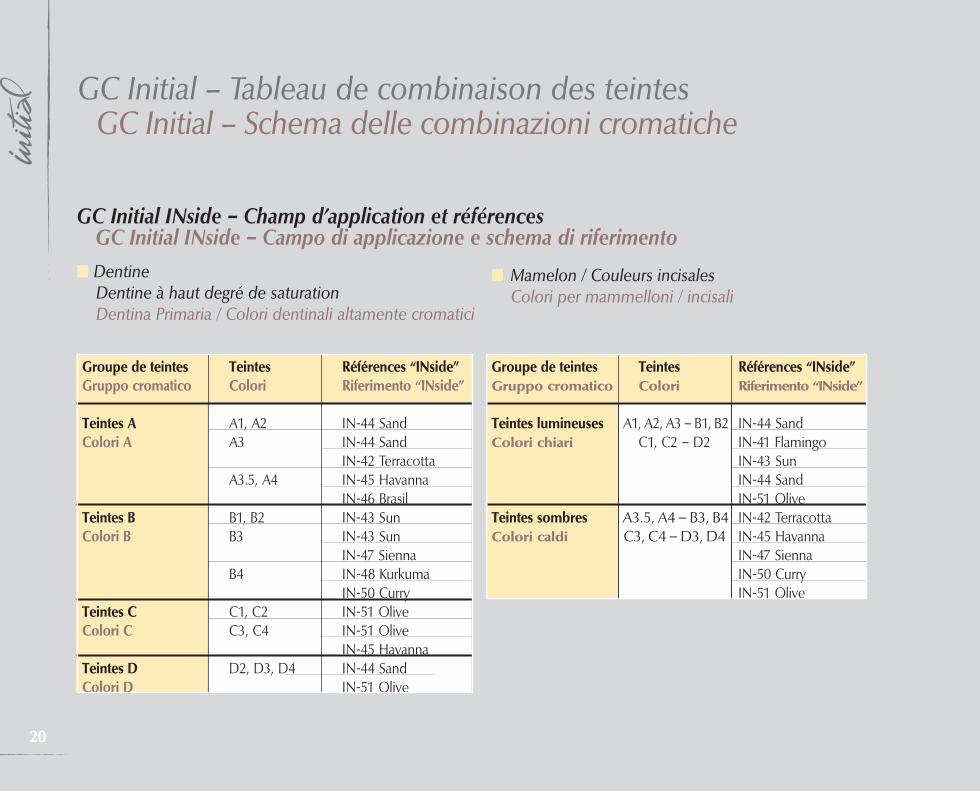
■ Dentine Dentine à haut degré de saturation
Dentina Primaria / Colori dentinali altamente cromatici
Groupe de teintes Teintes Références “INside”Gruppo cromatico Colori Riferimento “INside”
Teintes A A1, A2 IN-44 SandColori A A3 IN-44 Sand IN-42 Terracotta A3.5, A4 IN-45 Havanna IN-46 BrasilTeintes B B1, B2 IN-43 SunColori B B3 IN-43 Sun IN-47 Sienna B4 IN-48 Kurkuma IN-50 CurryTeintes C C1, C2 IN-51 OliveColori C C3, C4 IN-51 Olive IN-45 HavannaTeintes D D2, D3, D4 IN-44 SandColori D IN-51 Olive
■ Mamelon / Couleurs incisalesColori per mammelloni / incisali
Groupe de teintes Teintes Références “INside”Gruppo cromatico Colori Riferimento “INside”
Teintes lumineuses A1, A2, A3 – B1, B2 IN-44 SandColori chiari C1, C2 – D2 IN-41 Flamingo IN-43 Sun IN-44 Sand IN-51 OliveTeintes sombres A3.5, A4 – B3, B4 IN-42 TerracottaColori caldi C3, C4 – D3, D4 IN-45 Havanna IN-47 Sienna IN-50 Curry IN-51 Olive
21
GC Initial – Tableau de combinaison des teintesGC Initial – Schemi delle combinazioni cromatiche
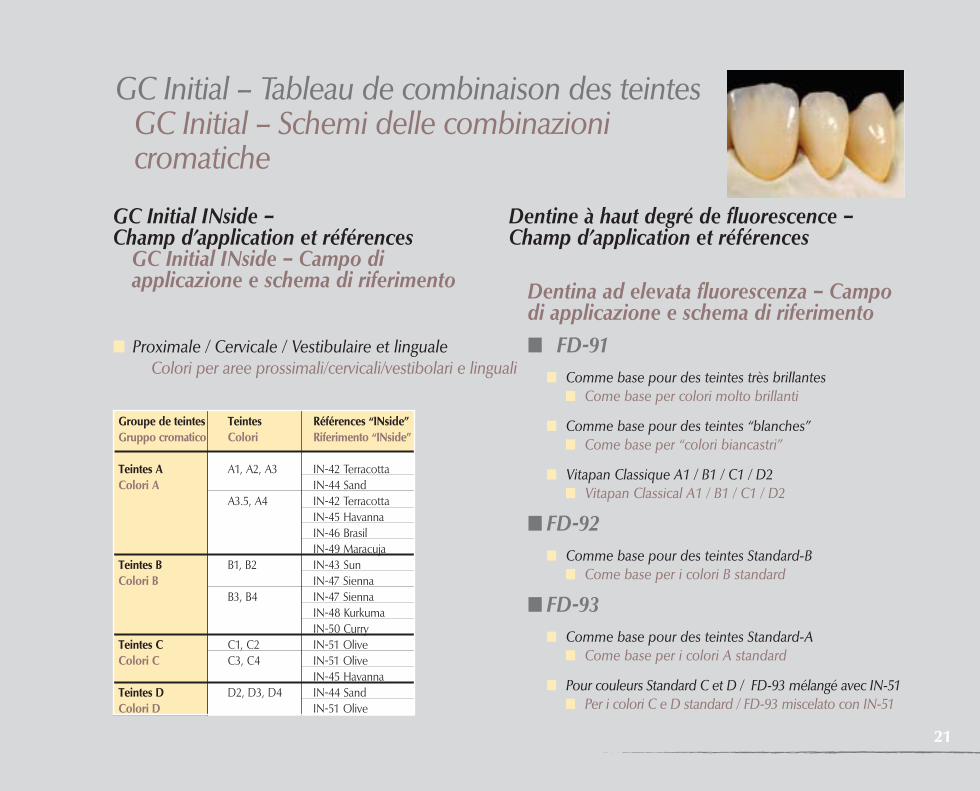
Dentine à haut degré de fluorescence – Champ d’application et références
Dentina ad elevata fluorescenza – Campo di applicazione e schema di riferimento■ FD-91
■ Comme base pour des teintes très brillantes■ Come base per colori molto brillanti
■ Comme base pour des teintes “blanches”■ Come base per “colori biancastri”
■ Vitapan Classique A1 / B1 / C1 / D2■ Vitapan Classical A1 / B1 / C1 / D2
■ FD-92■ Comme base pour des teintes Standard-B
■ Come base per i colori B standard
■ FD-93■ Comme base pour des teintes Standard-A
■ Come base per i colori A standard
■ Pour couleurs Standard C et D / FD-93 mélangé avec IN-51■ Per i colori C e D standard / FD-93 miscelato con IN-51
Groupe de teintes Teintes Références “INside”Gruppo cromatico Colori Riferimento “INside”
Teintes A A1, A2, A3 IN-42 TerracottaColori A IN-44 Sand A3.5, A4 IN-42 Terracotta IN-45 Havanna IN-46 Brasil IN-49 MaracujaTeintes B B1, B2 IN-43 SunColori B IN-47 Sienna B3, B4 IN-47 Sienna IN-48 Kurkuma IN-50 CurryTeintes C C1, C2 IN-51 OliveColori C C3, C4 IN-51 Olive IN-45 HavannaTeintes D D2, D3, D4 IN-44 SandColori D IN-51 Olive
GC Initial INside – Champ d’application et références GC Initial INside – Campo di
applicazione e schema di riferimento
■ Proximale / Cervicale / Vestibulaire et lingualeColori per aree prossimali/cervicali/vestibolari e linguali
22
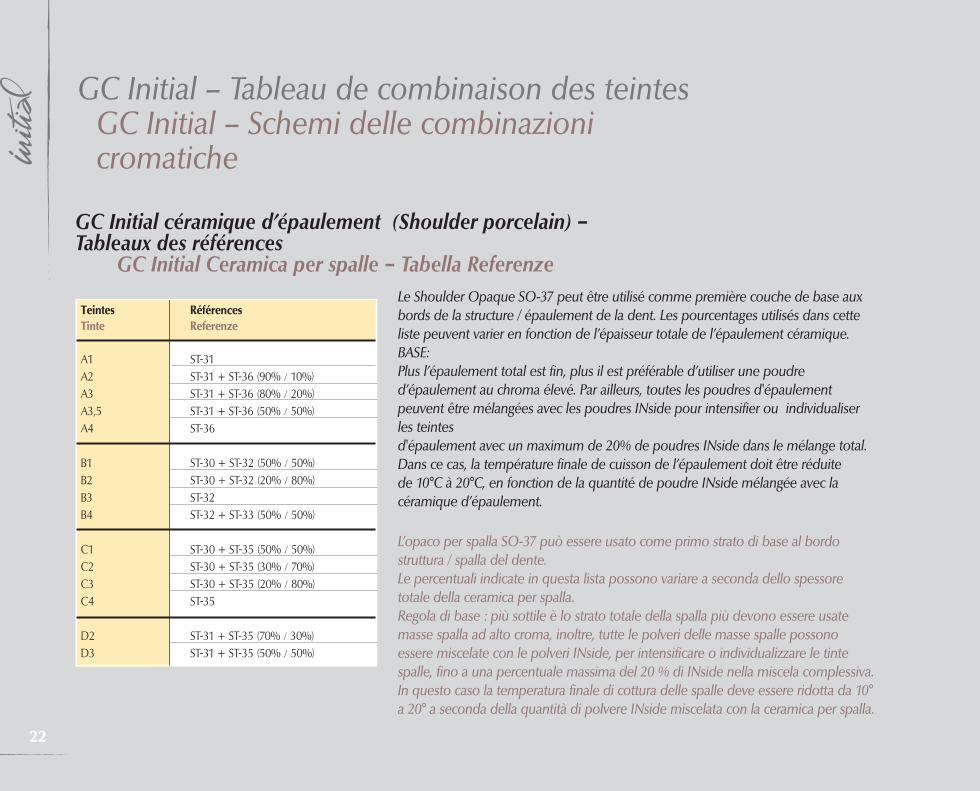
GC Initial céramique d’épaulement (Shoulder porcelain) – Tableaux des références
GC Initial Ceramica per spalle – Tabella ReferenzeLe Shoulder Opaque SO-37 peut être utilisé comme première couche de base aux bords de la structure / épaulement de la dent. Les pourcentages utilisés dans cette liste peuvent varier en fonction de l’épaisseur totale de l’épaulement céramique. BASE: Plus l’épaulement total est fin, plus il est préférable d’utiliser une poudre d’épaulement au chroma élevé. Par ailleurs, toutes les poudres d'épaulement peuvent être mélangées avec les poudres INside pour intensifier ou individualiser les teintes d'épaulement avec un maximum de 20% de poudres INside dans le mélange total. Dans ce cas, la température finale de cuisson de l’épaulement doit être réduite de 10°C à 20°C, en fonction de la quantité de poudre INside mélangée avec la céramique d’épaulement.
L’opaco per spalla SO-37 può essere usato come primo strato di base al bordo struttura / spalla del dente.Le percentuali indicate in questa lista possono variare a seconda dello spessore totale della ceramica per spalla.Regola di base : più sottile è lo strato totale della spalla più devono essere usate masse spalla ad alto croma, inoltre, tutte le polveri delle masse spalle possono essere miscelate con le polveri INside, per intensificare o individualizzare le tinte spalle, fino a una percentuale massima del 20 % di INside nella miscela complessiva. In questo caso la temperatura finale di cottura delle spalle deve essere ridotta da 10° a 20° a seconda della quantità di polvere INside miscelata con la ceramica per spalla.
GC Initial – Tableau de combinaison des teintesGC Initial – Schemi delle combinazioni cromatiche
Teintes RéférencesTinte Referenze
A1 ST-31A2 ST-31 + ST-36 (90% / 10%)A3 ST-31 + ST-36 (80% / 20%)A3,5 ST-31 + ST-36 (50% / 50%)A4 ST-36
B1 ST-30 + ST-32 (50% / 50%)B2 ST-30 + ST-32 (20% / 80%)B3 ST-32B4 ST-32 + ST-33 (50% / 50%)
C1 ST-30 + ST-35 (50% / 50%)C2 ST-30 + ST-35 (30% / 70%)C3 ST-30 + ST-35 (20% / 80%)C4 ST-35
D2 ST-31 + ST-35 (70% / 30%)D3 ST-31 + ST-35 (50% / 50%)
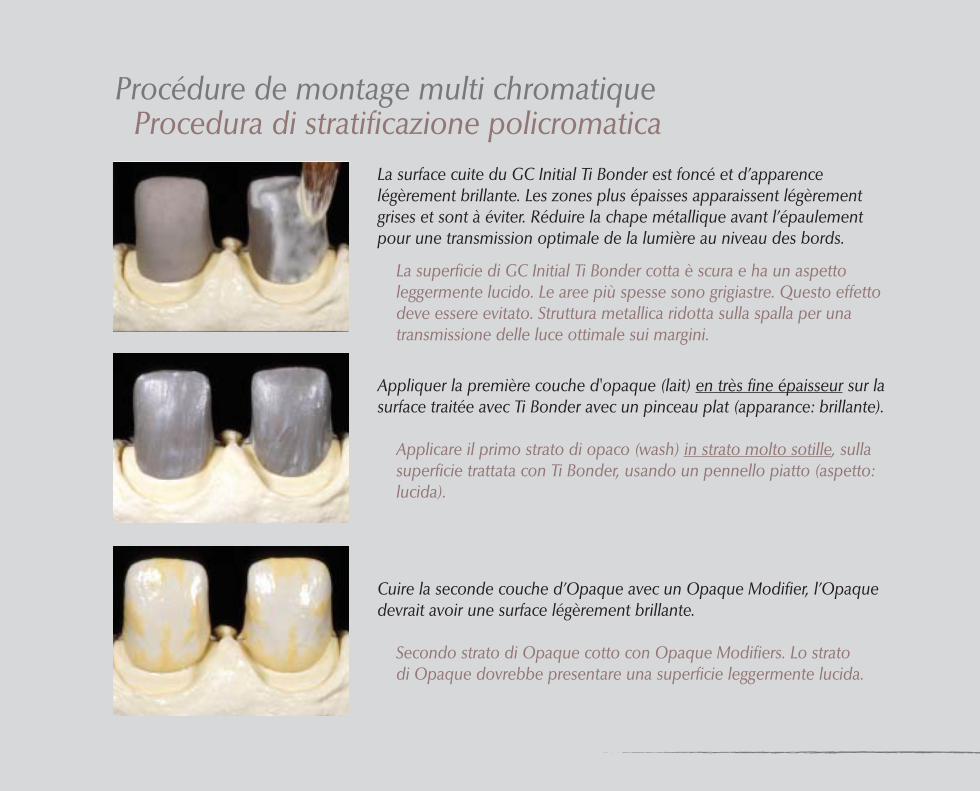
La surface cuite du GC Initial Ti Bonder est foncé et d’apparence légèrement brillante. Les zones plus épaisses apparaissent légèrement grises et sont à éviter. Réduire la chape métallique avant l’épaulement pour une transmission optimale de la lumière au niveau des bords.
La superficie di GC Initial Ti Bonder cotta è scura e ha un aspetto leggermente lucido. Le aree più spesse sono grigiastre. Questo effetto deve essere evitato. Struttura metallica ridotta sulla spalla per una transmissione delle luce ottimale sui margini.
Appliquer la première couche d'opaque (lait) en très fine épaisseur sur la surface traitée avec Ti Bonder avec un pinceau plat (apparance: brillante).
Applicare il primo strato di opaco (wash) in strato molto sotille, sulla superficie trattata con Ti Bonder, usando un pennello piatto (aspetto: lucida).
Procédure de montage multi chromatiqueProcedura di stratificazione policromatica
Cuire la seconde couche d’Opaque avec un Opaque Modifier, l’Opaque devrait avoir une surface légèrement brillante.
Secondo strato di Opaque cotto con Opaque Modifiers. Lo strato di Opaque dovrebbe presentare una superficie leggermente lucida.
24
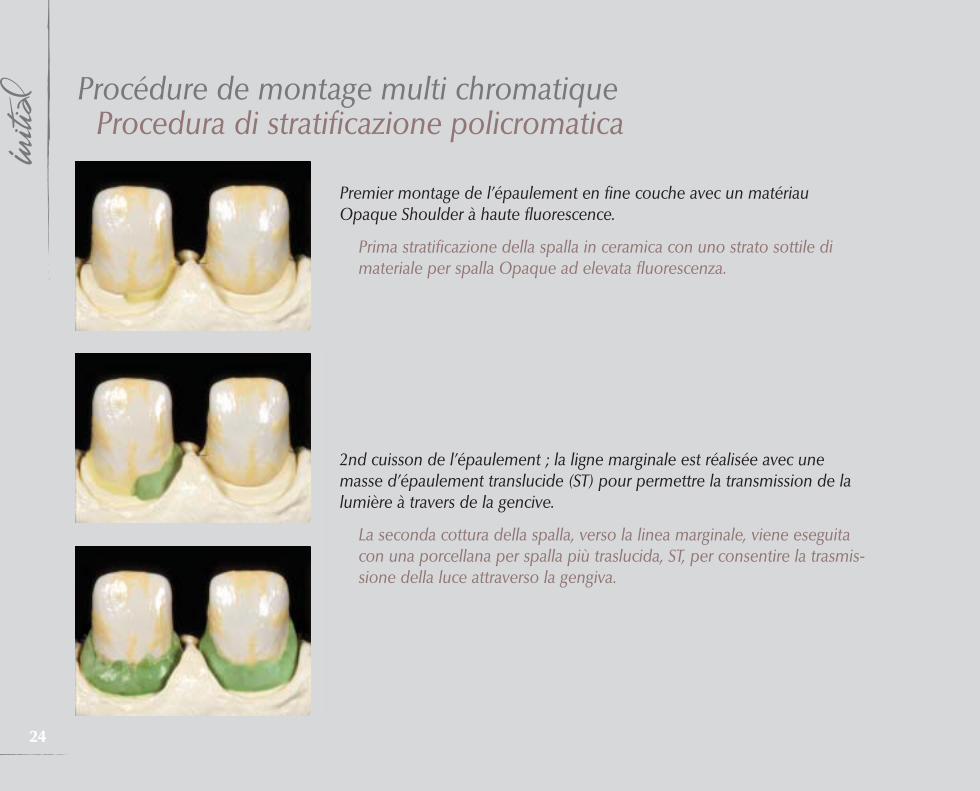
Premier montage de l’épaulement en fine couche avec un matériau Opaque Shoulder à haute fluorescence.
Prima stratificazione della spalla in ceramica con uno strato sottile di materiale per spalla Opaque ad elevata fluorescenza.
2nd cuisson de l’épaulement ; la ligne marginale est réalisée avec une masse d’épaulement translucide (ST) pour permettre la transmission de la lumière à travers de la gencive.
La seconda cottura della spalla, verso la linea marginale, viene eseguita con una porcellana per spalla più traslucida, ST, per consentire la trasmis-sione della luce attraverso la gengiva.
Procédure de montage multi chromatiqueProcedura di stratificazione policromatica
Recouvrir les bords et la partie centrale de la couronne avec les teintes INside (voir tableau de combinaison des teintes).
I margini e il corpo della corona vengono coperti con i colori prescelti di INside (consultare lo schema delle combinazioni cromatiche).
Procédure de montage multi chromatique Procedura di stratificazione policromatica
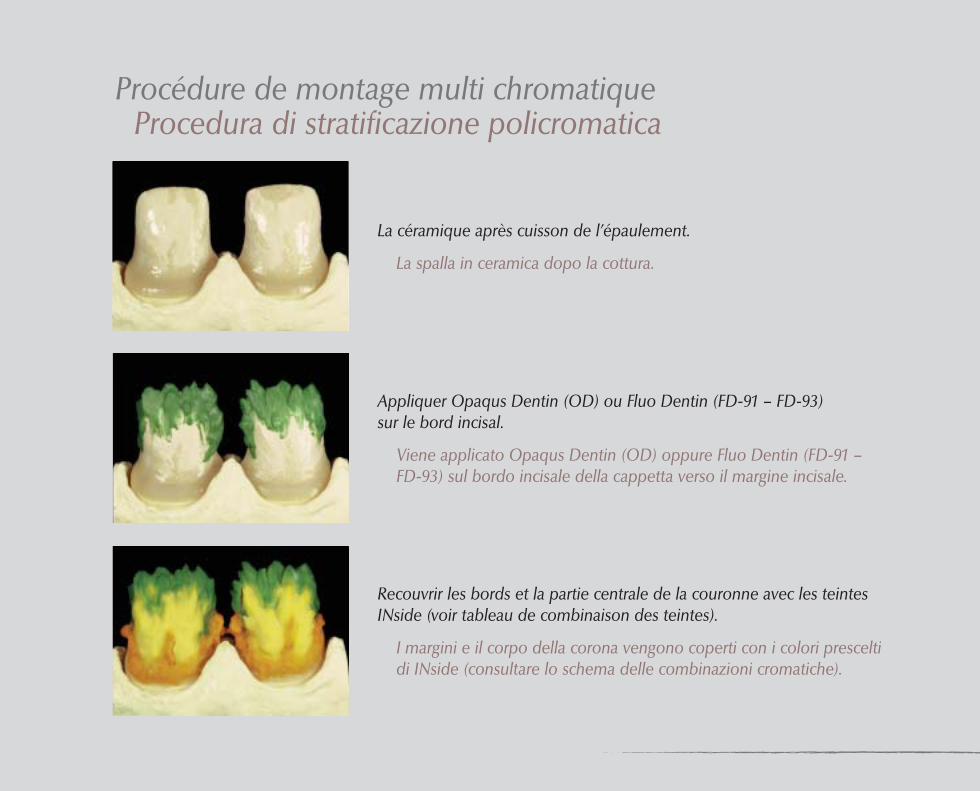
La céramique après cuisson de l’épaulement.
La spalla in ceramica dopo la cottura.
Appliquer Opaqus Dentin (OD) ou Fluo Dentin (FD-91 – FD-93) sur le bord incisal.
Viene applicato Opaqus Dentin (OD) oppure Fluo Dentin (FD-91 – FD-93) sul bordo incisale della cappetta verso il margine incisale.
26
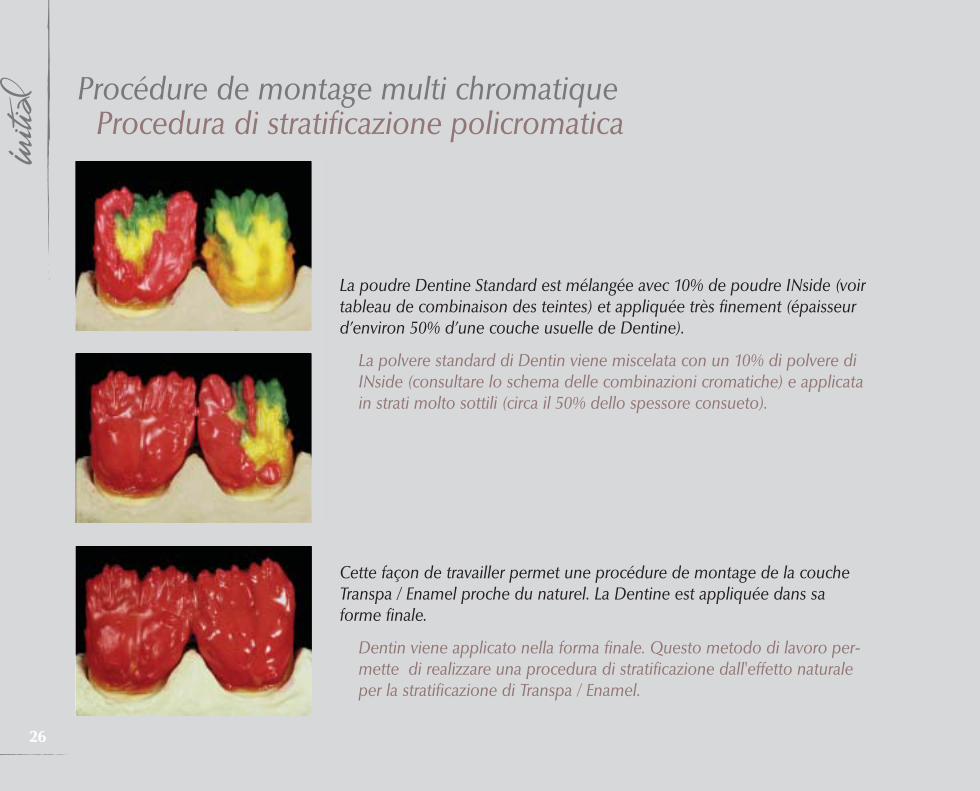
Cette façon de travailler permet une procédure de montage de la couche Transpa / Enamel proche du naturel. La Dentine est appliquée dans sa forme finale.
Dentin viene applicato nella forma finale. Questo metodo di lavoro per-mette di realizzare una procedura di stratificazione dall'effetto naturale per la stratificazione di Transpa / Enamel.
Procédure de montage multi chromatiqueProcedura di stratificazione policromatica
La poudre Dentine Standard est mélangée avec 10% de poudre INside (voir tableau de combinaison des teintes) et appliquée très finement (épaisseur d’environ 50% d’une couche usuelle de Dentine).
La polvere standard di Dentin viene miscelata con un 10% di polvere di INside (consultare lo schema delle combinazioni cromatiche) e applicata in strati molto sottili (circa il 50% dello spessore consueto).
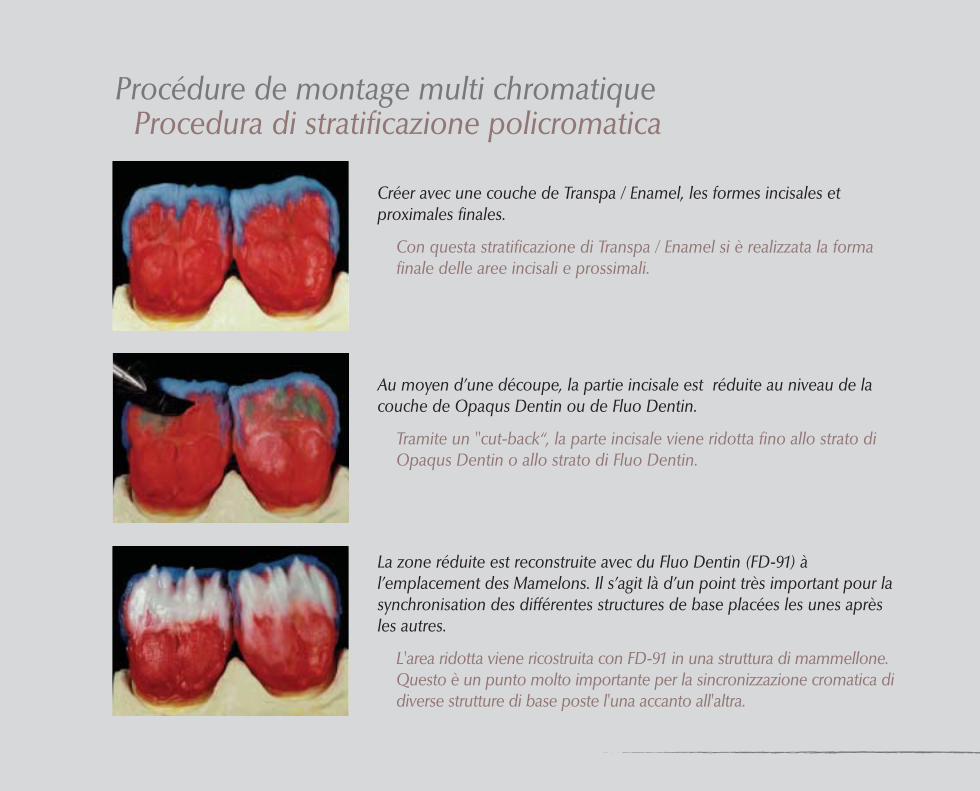
Créer avec une couche de Transpa / Enamel, les formes incisales et proximales finales.
Con questa stratificazione di Transpa / Enamel si è realizzata la forma finale delle aree incisali e prossimali.
Au moyen d’une découpe, la partie incisale est réduite au niveau de la couche de Opaqus Dentin ou de Fluo Dentin.
Tramite un "cut-back“, la parte incisale viene ridotta fino allo strato di Opaqus Dentin o allo strato di Fluo Dentin.
La zone réduite est reconstruite avec du Fluo Dentin (FD-91) à l’emplacement des Mamelons. Il s’agit là d’un point très important pour la synchronisation des différentes structures de base placées les unes après les autres.
L'area ridotta viene ricostruita con FD-91 in una struttura di mammellone. Questo è un punto molto importante per la sincronizzazione cromatica di diverse strutture di base poste l'una accanto all'altra.
Procédure de montage multi chromatique Procedura di stratificazione policromatica
28
Procédure de montage multi chromatiqueProcedura di stratificazione policromatica
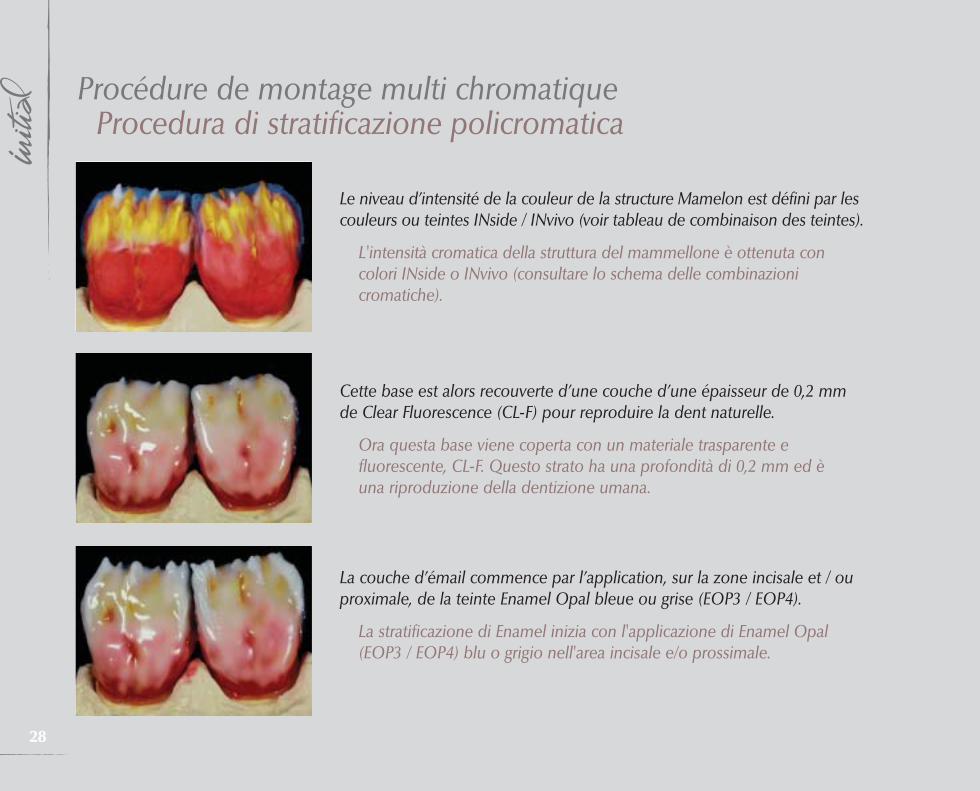
Le niveau d’intensité de la couleur de la structure Mamelon est défini par les couleurs ou teintes INside / INvivo (voir tableau de combinaison des teintes).
L'intensità cromatica della struttura del mammellone è ottenuta con colori INside o INvivo (consultare lo schema delle combinazioni cromatiche).
Cette base est alors recouverte d’une couche d’une épaisseur de 0,2 mm de Clear Fluorescence (CL-F) pour reproduire la dent naturelle.
Ora questa base viene coperta con un materiale trasparente e fluorescente, CL-F. Questo strato ha una profondità di 0,2 mm ed è una riproduzione della dentizione umana.
La couche d’émail commence par l’application, sur la zone incisale et / ou proximale, de la teinte Enamel Opal bleue ou grise (EOP3 / EOP4).
La stratificazione di Enamel inizia con l'applicazione di Enamel Opal (EOP3 / EOP4) blu o grigio nell'area incisale e/o prossimale.

La couche Enamel / Transpa est constituée de teintes spéciales incisales et transparentes placées alternativement les unes à coté des autres. (ex : E58, TO, EOP2, CL-F).
Stratificazione di Enamel / Transpa, dove il materiale speciale per incisali e il materiale speciale trasparente vengono posti alternativamente l'uno accanto all'altro (ad esempio E58, TO, EOP2, CL-F).
Le contourage final est un mélange de Enamel Opalescence (EOP) et Enamel standard (E). Le niveau de translucidité de la couche d’émail peut être modifié, en fonction de l’âge du patient, avec TN, TO & CL-F. Pour créer un aspect blanc laiteux au niveau incisal, l’EO- 15 peut être utilisé.
La definizione finale dei contorni viene realizzata con una miscela di Enamel Opalescence (EOP) e di Enamel (E) standard. A seconda dell'età del paziente, è possibile modificare il livello di traslucenza dello strato di Enamel utilizzando TN, TO e CL-F. Per creare un contorno incisale bianco latte si usa EO-15.
Procédure de montage multi chromatiqueProcedura di stratificazione policromatica
30
Procédure de montage multi chromatiqueProcedura di stratificazione policromatica
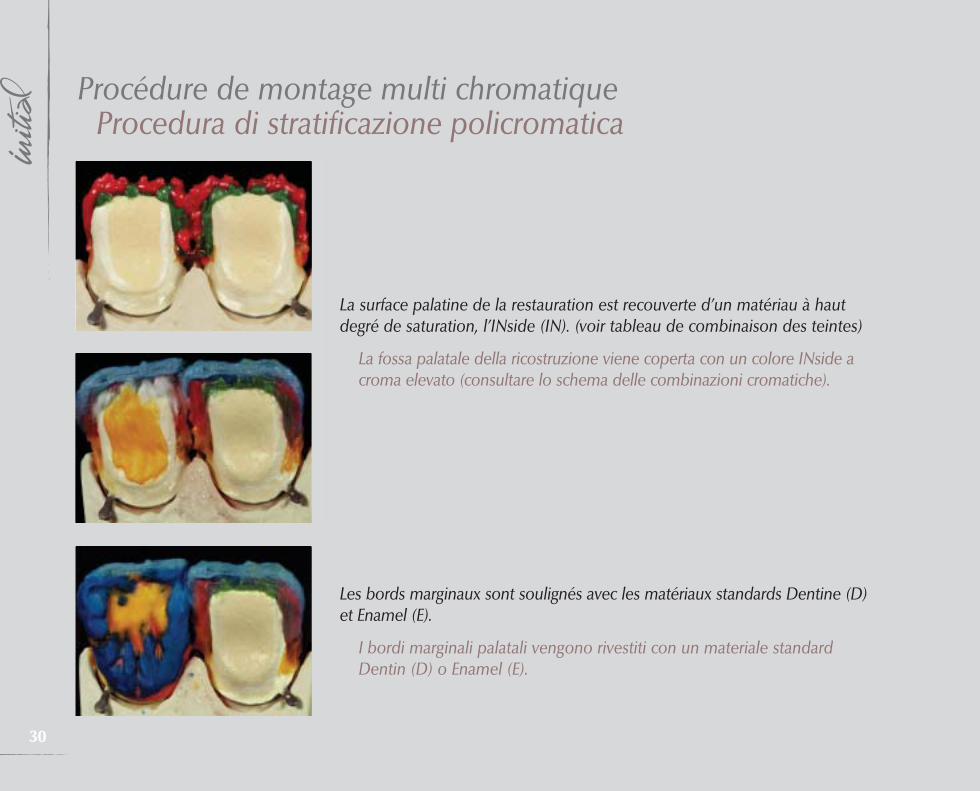
La surface palatine de la restauration est recouverte d’un matériau à haut degré de saturation, l’INside (IN). (voir tableau de combinaison des teintes)
La fossa palatale della ricostruzione viene coperta con un colore INside a croma elevato (consultare lo schema delle combinazioni cromatiche).
Les bords marginaux sont soulignés avec les matériaux standards Dentine (D) et Enamel (E).
I bordi marginali palatali vengono rivestiti con un materiale standard Dentin (D) o Enamel (E).
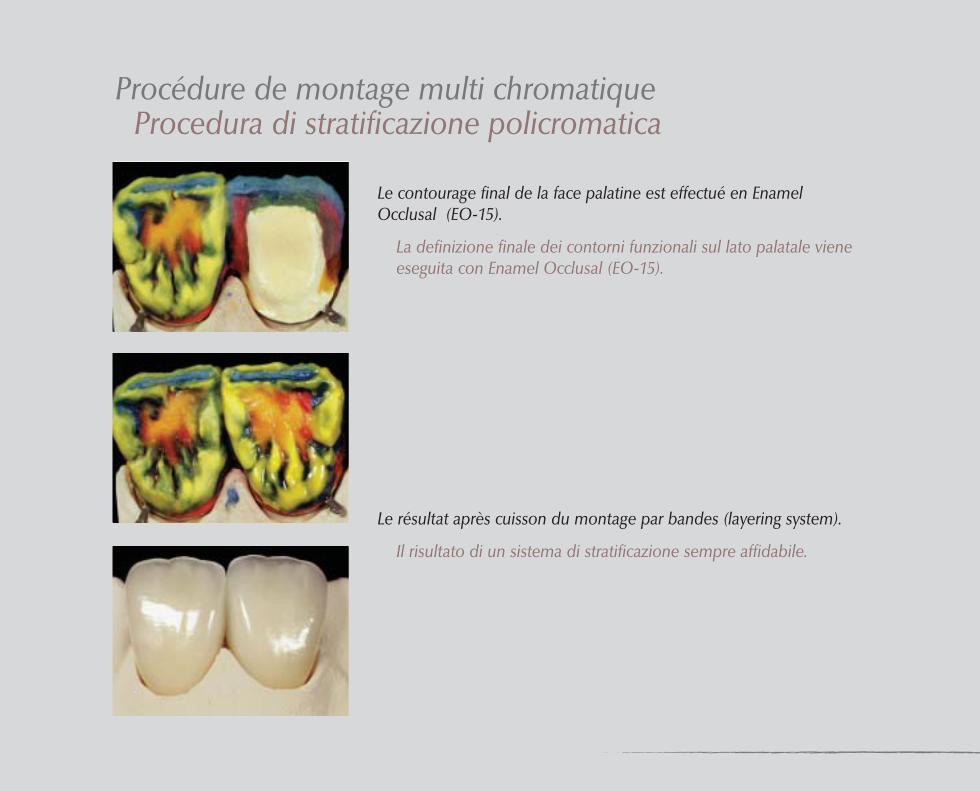
Le résultat après cuisson du montage par bandes (layering system).
Il risultato di un sistema di stratificazione sempre affidabile.
Procédure de montage multi chromatique Procedura di stratificazione policromatica
Le contourage final de la face palatine est effectué en Enamel Occlusal (EO-15).
La definizione finale dei contorni funzionali sul lato palatale viene eseguita con Enamel Occlusal (EO-15).
32
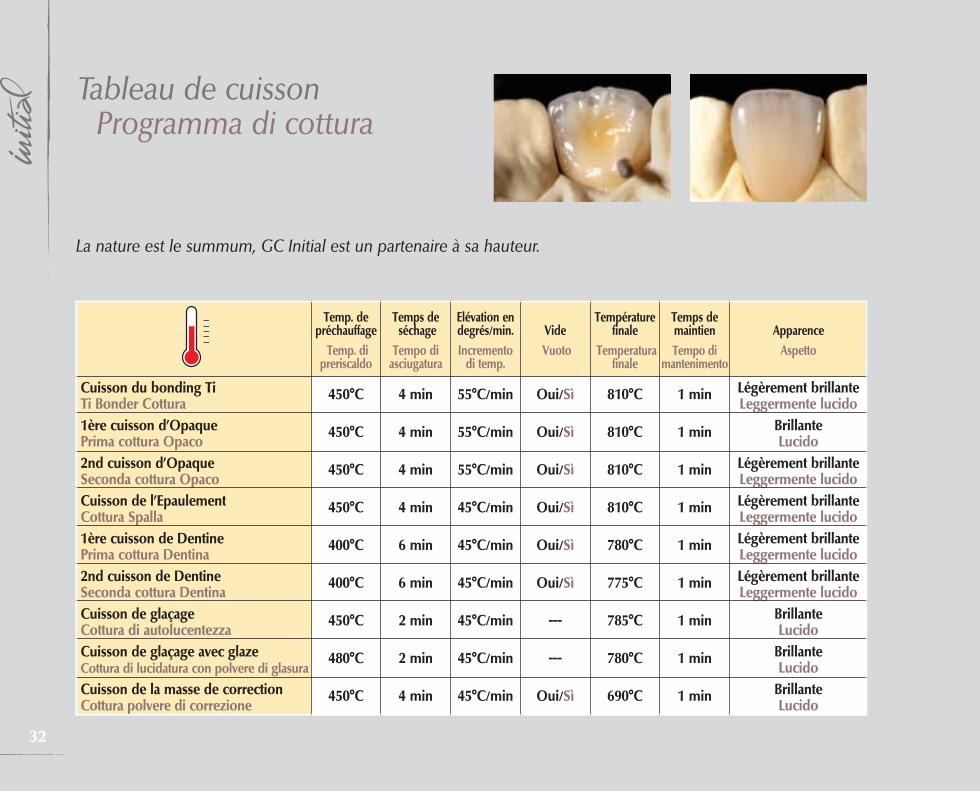
La nature est le summum, GC Initial est un partenaire à sa hauteur.
Tableau de cuissonProgramma di cottura
55°C/min
55°C/min
55°C/min
45°C/min
45°C/min
45°C/min
45°C/min
45°C/min
45°C/min
Légèrement brillanteLeggermente lucido
BrillanteLucido
Légèrement brillanteLeggermente lucidoLégèrement brillanteLeggermente lucidoLégèrement brillanteLeggermente lucidoLégèrement brillanteLeggermente lucido
BrillanteLucido
BrillanteLucido
BrillanteLucido
Cuisson du bonding TiTi Bonder Cottura1ère cuisson d’Opaque Prima cottura Opaco2nd cuisson d’OpaqueSeconda cottura Opaco Cuisson de l’EpaulementCottura Spalla 1ère cuisson de DentinePrima cottura Dentina2nd cuisson de DentineSeconda cottura Dentina Cuisson de glaçageCottura di autolucentezzaCuisson de glaçage avec glazeCottura di lucidatura con polvere di glasura
Cuisson de la masse de correctionCottura polvere di correzione
Temp. depréchauffage
Temp. di preriscaldo
Temps de séchageTempo di
asciugatura
Elévation endegrés/min.Incremento
di temp.
Vide Vuoto
Températurefinale
Temperatura finale
Temps demaintien Tempo di
mantenimento
ApparenceAspetto
450°C
450°C
450°C
450°C
400°C
400°C
450°C
480°C
450°C
4 min
4 min
4 min
4 min
6 min
6 min
2 min
2 min
4 min
Oui/Sì
Oui/Sì
Oui/Sì
Oui/Sì
Oui/Sì
Oui/Sì
---
---
Oui/Sì
810°C
810°C
810°C
810°C
780°C
775°C
785°C
780°C
690°C
1 min
1 min
1 min
1 min
1 min
1 min
1 min
1 min
1 min
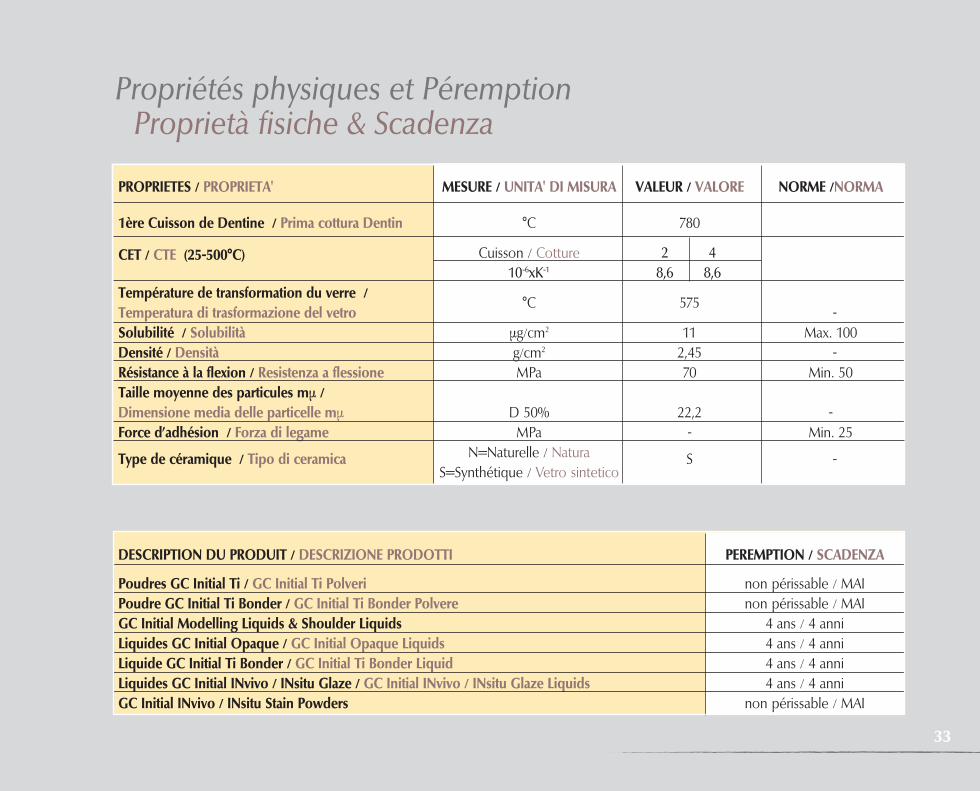
Propriétés physiques et PéremptionProprietà fisiche & Scadenza
DESCRIPTION DU PRODUIT / DESCRIZIONE PRODOTTI PEREMPTION / SCADENZA
Poudres GC Initial Ti / GC Initial Ti Polveri non périssable / MAI Poudre GC Initial Ti Bonder / GC Initial Ti Bonder Polvere non périssable / MAI GC Initial Modelling Liquids & Shoulder Liquids 4 ans / 4 anniLiquides GC Initial Opaque / GC Initial Opaque Liquids 4 ans / 4 anni Liquide GC Initial Ti Bonder / GC Initial Ti Bonder Liquid 4 ans / 4 anni Liquides GC Initial INvivo / INsitu Glaze / GC Initial INvivo / INsitu Glaze Liquids 4 ans / 4 anniGC Initial INvivo / INsitu Stain Powders non périssable / MAI
33
PROPRIETES / PROPRIETA' MESURE / UNITA' DI MISURA VALEUR / VALORE NORME /NORMA
1ère Cuisson de Dentine / Prima cottura Dentin °C 780
CET / CTE (25-500°C) Cuisson / Cotture 2 4 10-6xK-1 8,6 8,6 Température de transformation du verre / Temperatura di trasformazione del vetro
°C 575 -
Solubilité / Solubilità µg/cm2 11 Max. 100 Densité / Densità g/cm2 2,45 - Résistance à la flexion / Resistenza a flessione MPa 70 Min. 50 Taille moyenne des particules mµ / Dimensione media delle particelle mµ D 50% 22,2 - Force d’adhésion / Forza di legame MPa - Min. 25
Type de céramique / Tipo di ceramica N=Naturelle / Natura S - S=Synthétique / Vetro sintetico
Tableau de cuisson selon différents fours à céramiques Grafici per la cottura nei diversi forni
KLEMA FIRE / KLEMA PRESS
Bon- 1ère Cuisson 2nd Cuisson 1ère/2nd Cuisson 1ère Cuisson 2nd Cuisson Glaçage Glaçage Cuisson de der d’Opaque d’Opaque de l’épaulement Dentine Dentine avec Glaze la masse de 1° Cottura 2° Cottura 1° e 2° Cottura 1° Cottura 2° Cottura Cottura di Cottura di correction Opaco Opaco Spalla Dentina Dentina autolucentezza lucidatura con Massa di polvere di glasura correzione
Temp. de préchauffage / Temp. partenza °C 450 450 450 450 400 400 450 480 450
Temps de séchage / Asciugatura min 4 4 4 4 6 6 2 2 4
Temps de préchauffage / Preriscaldo min 1 1 1 1 1 1 1 1 1
Vitesse montée / Salita °C / min 55 55 55 45 45 45 45 45 45
Départ du vide / Inizio vuoto °C 450 450 450 450 400 400 450
Fin du vide / Fine vuoto °C 810 810 810 810 780 775 690
Maintien du vide / Staz. in vuoto min
Niveau de vide / Livello vuoto mmHg 730 730 730 730 730 730 730
Température haute / Temperatura finale °C 810 810 810 810 780 775 785 780 69
Temps de maintien de la T.H. / Tempo staz. finale min 1 1 1 1 1 1 1 1 1
Température Finale/ Temperatura finale °C
Temps de maintien de la T.F. / Tempo stazionamento min
Temps de refroidissement / Tempo raffreddamento min
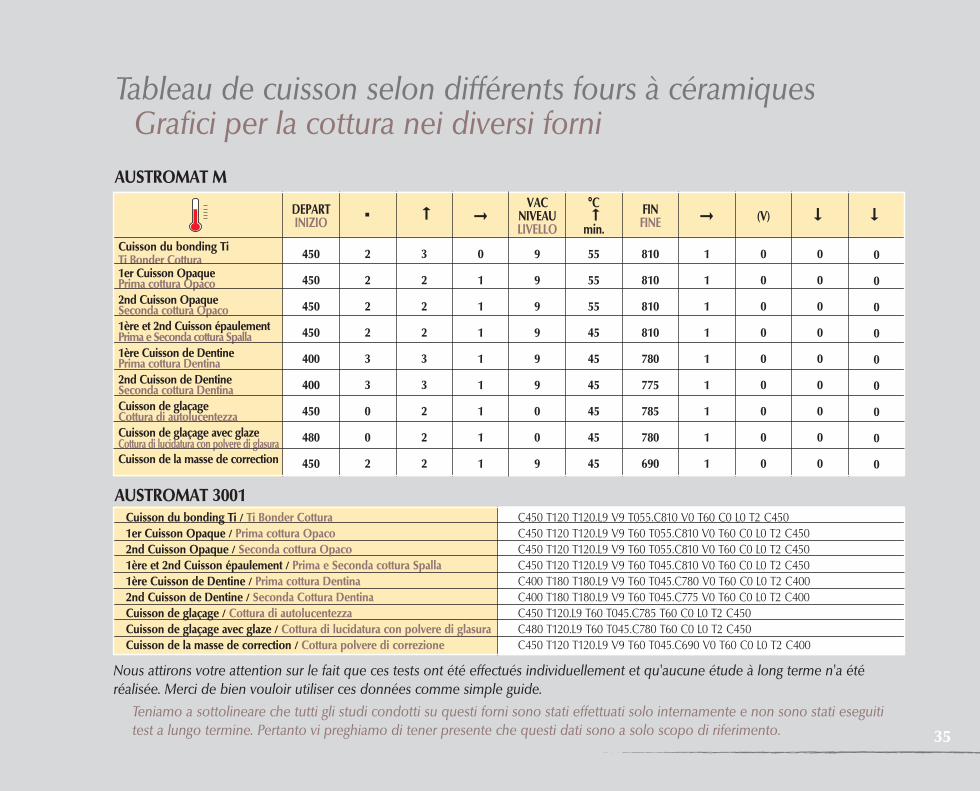
35
Tableau de cuisson selon différents fours à céramiquesGrafici per la cottura nei diversi forni
AUSTROMAT M
Nous attirons votre attention sur le fait que ces tests ont été effectués individuellement et qu'aucune étude à long terme n'a été réalisée. Merci de bien vouloir utiliser ces données comme simple guide.
Teniamo a sottolineare che tutti gli studi condotti su questi forni sono stati effettuati solo internamente e non sono stati eseguiti test a lungo termine. Pertanto vi preghiamo di tener presente che questi dati sono a solo scopo di riferimento.
Cuisson du bonding Ti / Ti Bonder Cottura C450 T120 T120.L9 V9 T055.C810 V0 T60 C0 L0 T2 C4501er Cuisson Opaque / Prima cottura Opaco C450 T120 T120.L9 V9 T60 T055.C810 V0 T60 C0 L0 T2 C450 2nd Cuisson Opaque / Seconda cottura Opaco C450 T120 T120.L9 V9 T60 T055.C810 V0 T60 C0 L0 T2 C450 1ère et 2nd Cuisson épaulement / Prima e Seconda cottura Spalla C450 T120 T120.L9 V9 T60 T045.C810 V0 T60 C0 L0 T2 C450 1ère Cuisson de Dentine / Prima cottura Dentina C400 T180 T180.L9 V9 T60 T045.C780 V0 T60 C0 L0 T2 C400 2nd Cuisson de Dentine / Seconda Cottura Dentina C400 T180 T180.L9 V9 T60 T045.C775 V0 T60 C0 L0 T2 C400 Cuisson de glaçage / Cottura di autolucentezza C450 T120.L9 T60 T045.C785 T60 C0 L0 T2 C450 Cuisson de glaçage avec glaze / Cottura di lucidatura con polvere di glasura C480 T120.L9 T60 T045.C780 T60 C0 L0 T2 C450 Cuisson de la masse de correction / Cottura polvere di correzione C450 T120 T120.L9 V9 T60 T045.C690 V0 T60 C0 L0 T2 C400
AUSTROMAT 3001
Cuisson du bonding TiTi Bonder Cottura1er Cuisson OpaquePrima cottura Opaco 2nd Cuisson OpaqueSeconda cottura Opaco1ère et 2nd Cuisson épaulementPrima e Seconda cottura Spalla1ère Cuisson de DentinePrima cottura Dentina2nd Cuisson de DentineSeconda cottura Dentina Cuisson de glaçageCottura di autolucentezzaCuisson de glaçage avec glaze Cottura di lucidatura con polvere di glasura Cuisson de la masse de correction
DEPARTINIZIO
450
450
450
450
400
400
450
480
450
2
2
2
2
3
3
0
0
2
0
1
1
1
1
1
1
1
1
VACNIVEAULIVELLO
9
9
9
9
9
9
0
0
9
°C
min.
55
55
55
45
45
45
45
45
45
FINFINE
810
810
810
810
780
775
785
780
690
1
1
1
1
1
1
1
1
1
(V)
0
0
0
0
0
0
0
0
0
0
0
0
0
0
0
0
0
0
3
2
2
2
3
3
2
2
2
➞ ➞➞ ➞
➞ ➞
0
0
0
0
0
0
0
0
0
z L
MA
Ti G
B/D
E &
FR
/IT
7 29
05/
08
GC EUROPE N.V.
Head Office
Interleuvenlaan 13
B - 3001 Leuven
Tel. +32.16.39.80.50
Fax. +32.16.40.02.14
www.gceurope.com
GC AMERICA INC.
3737 West 127th Street
USA - Alsip, ILL. 60803
Tel. +1.708.597.0900
Fax. +1.708.3771.5103
www.gcamerica.com
GC GERMANY GmbH
Paul-Gerhardt-Allee 50
D - 81245 München
Tel. +49.89.89.66.74.0
Fax. +49.89.89.66.74.29
www.germany.gceurope.com
GC ITALIA S.r.l.
Via Calabria 1
I - 20098 San Giuliano Milanese
Tel. +39.02.98.28.20.68
Fax. +39.02.98.28.21.00
www.italy.gceurope.com
GC UNITED KINGDOM Ltd. 22-23, Coopers Court Newport Pagnell UK - Bucks. MK16 8JS Tel. +44.1908.218.999 Fax. +44.1908.218.900 [email protected] www.uk.gceurope.com
GC FRANCE s.a.s. 9 bis, Avenue du Bouton d’Or – BP 166 F - 94384 Bonneuil sur Marne Cedex Tel. +33.1.49.80.37.91 Fax. +33.1.49.80.37.90 [email protected] www.france.gceurope.com
GC EUROPE N.V.Iberic BranchEdificio Codesa 2Playa de las Americas, 2, 1°, Of. 4ES - 28230 Las Rozas, MadridTel. +34.916.364.340Fax. [email protected]
GC AUSTRIA GmbH Tallak 124 A - 8103 Rein bei Graz Tel. +43.3124.54020 Fax. +43.3124.54020.40 [email protected] www.austria.gceurope.com
GC BENELUX N.V. Edisonbaan 12 NL - 3439 MN Nieuwegein Tel. +31.30.630.85.00 Fax. +31.30.605.59.86 [email protected] www.benelux.gceurope.com
GC EUROPE N.V. East European Office Cazmanska 8 HR - 10000 Zagreb Tel. +385.1.46.78.474 Fax. +385.1.46.78.473 [email protected] www.eeo.gceurope.com GC NORDIC ABFinnish Branch Vanha Hommaksentie 11B FIN - 02430 Masala Tel. & Fax. +358.9.221.82.59 [email protected] www.finland.gceurope.com GC NORDIC ABDanish BranchTvaerdiget 22DK - 2730 HerlevTel. +45.44.53.53.82Fax. [email protected]
GC NORDIC AB Kungsporten 4 A S - 427 50 Billdal Tel. +46.31.939553 Fax. +46.31.914246 [email protected] www.nordic.gceurope.com GC EUROPE N.V. Swiss Office Wilerstrasse 3 CH - 9545 Wängi Tel. +41.52.366.46.46 Fax. +41.52.366.46.26 [email protected] www.switzerland.gceurope.com
^
http://www.gcinitial.gceurope.com/